


STEREO CASSETTE DECK
CT/KXF-W SERIES
CT-203 KXF-W4010
CT-2050 KXF-W6010
INSTRUCTION MANUAL
KENWOOD CORPORATION
This manual contains instructions for four models. M odel availability and features (functions) may differ depending on country and sales area.
SI DICHIARA CHE :
gli apparecchi Sintonizzatori per casa Kenw ood modelli KT-2080, KT-3080 rispondono alle prescrizioni dell'art. 2 comma 1 del D.M . 28 agosto 1995, n. 548.
Fatto a M ilano il 15 febbraio 1996
Kenw ood Electronics Italia S.p.A. - via G. Sirtori, 7/ 9 - 20129 M ilano
B60-3706-00 HZ ( K, P, T, M, X, Y ) ID 99/3 2 1 98/12 11 10 9 8 7 6 5 4 3
Downloaded from: http://www.usersmanualguide.com/
|
Introduction |
|
|
|
Before applying pow er |
CT-2 0 5 0 / 2 0 3 / KXF-W 6 0 1 0 / W 4 0 1 0 (En/ M ) |
|
2 |
Cauti on : Read thi s secti on careful l y to ensure safe operati on. |
||
|
|
||
|
|
|
|
Units are designed for operation as follow s. |
|
U.S.A. and Canada ................................................................ |
AC 120 V onl y |
Austral i a .................................................................................. |
AC 240 V onl y |
Europe and U.K. ..................................................................... |
AC 230 V onl y |
* Other countri es ............................ |
AC 110120 / 220240 V sw i tchabl e |
Safety precautions |
Cauti on : Read thi s secti on careful l y to ensure safe operati on. |
|
WARNING : TO PREVENT FIRE OR ELECTRIC SHOCK, DO NOT EXPOSE THIS APPLIANCE TO RAIN OR M OISTURE.
CAUTION
RISK OF ELECTRIC SHOCK
DO NOT OPEN
CAUTION: TO REDUCE THE RISK OF ELECTRIC SHOCK, DO NOT REM OVE COVER (OR BACK). NO USER-SERVICEABLE PARTS INSIDE. REFER SERVICING TO QUALIFIED SERVICE PERSONNEL.
THE LIGHTNING FLASH WITH ARROWHEAD SYM BOL, WITHIN AN EQUILATERAL TRIANGLE, IS INTENDED TO ALERT THE USER TO THE PRESENCE OF UNINSULATED “ DANGEROUS VOLTAGE” WITHIN THE PRODUCT’S ENCLOSURE THAT M AY BE OF SUFFICIENT M AGNITUDE TO CONSTITUTE A RISK OF ELECTRIC SHOCK TO PERSONS.
THE EXCLAM ATION POINT WITHIN AN EQUILATERAL TRIANGLE IS INTENDED TO ALERT THE USER TO THE PRESENCE OF IM PORTANT OPERATING AND M AINTENANCE (SERVICING) INSTRUCTIONS IN THE LITERATURE ACCOM PANYING THE APPLIANCE.
Downloaded from: http://www.usersmanualguide.com/
Special features
Dolby HX pro and Auto-Bias function
DPSS function
CCRS function
Dubbing function
Introduction
CT-2 0 5 0 / 2 0 3 / KXF-W 6 0 1 0 / W 4 0 1 0 (En/ M )
3
¶The Dolby HX pro headroom extension and auto-bias function provide a recording w ith superior high-frequency characterisitics.
¶Simple operations allow you to use the follow ing convenient functions. 1 Skip Play 2 Rew ind & Play 3 Single-tune repeated playback
4 Dash & Play (DPSS: Direct program Search System)
¶This function automatically stes the optimum recording level of the disc to be recorded, making it easy to record a CD.
(CCRS: Computer-Controlled CD Recording System)
¶ With an easy operation, the tape loaded in deck A can be dubbed onto the tape in deck B. making it easy to record a CD.
Unpacking
Unpack the unit carefully and make sure that all accessories are put aside so they w ill not be lost.
Examine the unit for any possibility of shipping damage. If your unit is damaged or fails to operate, notify your dealer immediately. If your unit w as shipped to you directly, notify the shipping company w ithout delay. Only the consignee (the person or company receiving the unit) can file a claim against the carrier for shipping damage.
We recommend that you retain the original carton and packing materials for use should you transport or ship the unit in the future.
Keep this manual handy for future reference.
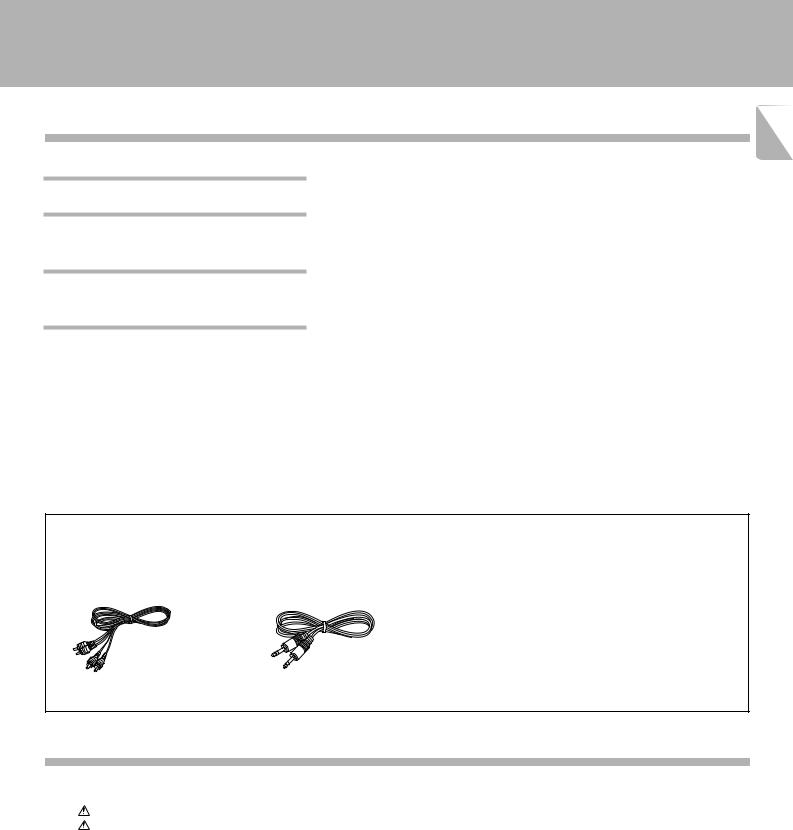
Accessories
Check that the follow ing accessories are present.
Audio cord ........................ |
(2) |
System control cord ............ |
(1) |
Contents
Caution: Read the pages marked  carefully to ensure safe operation.
Introduction .................................................................. |
2 |
Before applying pow er ....................................................... |
2 |
Safety precautions .............................................................. |
2 |
Special features ................................................................... |
3 |
Important items ........................................................... |
4 |
M aintenance ........................................................................ |
4 |
Reference ............................................................................. |
4 |
System connections .................................................... |
6 |
Controls and indicators ............................................... |
8 |
Preparation for playback (recording) ....................... |
10 |
Playback (recording) preparation .................................... |
10 |
Listening to cassette tapes ....................................... |
11 |
Normal playback ............................................................... |
11 |
Relay playback ................................................................... |
12 |
Convenient music search (DPSS) ............................. |
14 |
Skip play operation ........................................................... |
14 |
Rew ind & Play operation .................................................. |
15 |
Single-tune repeated playback operation ....................... |
15 |
Dash & Play operation ...................................................... |
15 |
How to record (CT-203/ KXF-W4010; Deck B only) .. 16
Normal recording .............................................................. |
16 |
Relay recording (CT-2050/ KXF-W6010 only) ........... |
19 |
Relay recording .................................................................. |
19 |
Tape dubbing operation (Deck A \ Deck B) ................ |
20 |
Tape dubbing ..................................................................... |
20 |
Convenient CD recording (CT-203/ KXF-W4010; Deck |
|
B only) ......................................................................... |
21 |
CD synchro recording ....................................................... |
21 |
Recording of CD playback (CCRS)(Deck B only) ............. |
22 |
Timer operations........................................................ |
23 |
Timer playback of tape ...................................................... |
23 |
Timer recording of tuner broadcast(CT-203/ KXF-W4010; |
|
Deck B only) ....................................................................... |
24 |
In case of difficulty ..................................................... |
25 |
Glossary ...................................................................... |
27 |
Specifications ............................................................. |
28 |
Downloaded from: http://www.usersmanualguide.com/
Important items
4 M aintenance
Cleaning
Unplug this appliance from the w all outlet before cleaning. Do not use volatile solvents such as alcohol, paint thinner, gasoline, or benzine, etc. to clean the cabinet. Use a clean dry cloth.
CT-2 0 5 0 / 2 0 3 / KXF-W 6 0 1 0 / W 4 0 1 0 (En/ M )
Caution against contact revitalizer
Do not use contact cleaners because it could cause a malfunction. Be specially careful against contact cleaners containing oil, for they may deform the plastic componente.
Cleaning the head section
Cotton sw ab
Capstan
Head
Pinch roller
Tape guides
Cleaning the heads and peripheral components
For maintaining the best condition of the deck and for longer service life, alw ays keep the head (recording/playback/erase), capstan and pinch roller clean. To clean them, perform the follow ing:
1.Open the cassette holder.
2.Using a cotton sw ab dipped in alcohol, clean the head (recording/playback/erase), capstan and pinch roller carefully.
Demagnetizing the head
When the recording/playback head is magnetized, the sound quality w ill be deteriorated. In such a case, demagnetize the head using a commercially available demagnetizer (head eraser).
There are precisely aligned parts around the heads, including the tape guides.
Note When cleaning, pay special attention so as not to apply shock to them.
Reference
Caution on condensation
Condensation (of dew )may occur inside the unit w hen there is agreat difference in temperature betw een this unit and the outside.
This unit may not function properly if condensation occurs. In this case, leave the unit for afew hours w ith the pow er left ON, and restart the operation after the condensation has dried up.
Be specially cautions against condensation in a follow ing circumstance:
When this unit is carried from a place to another across a large difference in temperature, w hen the humidity in the room w here this unit in installed increases, etc.
Dolby noise reduction and HX Pro headroom extension manufactured under license from Dolby Laboratories Licensing Corporation. HX Pro originated by Bang & Olufsen.
“ DOLBY” , the double-D symbol and “ HX PRO” are trademarks of Dolby Laboratories Licensing Corporation.
WARNING NOTICE:
IN M OST CASES IT IS AN INFRINGM ENT OF COPYRIGHT TO M AKE COPIES OF TAPES OR DISCS WITHOUT THE PERM ISSION OF THE COPYRIGHT OWNERS. ANYONE WISHING TO COPY COM M ERCIALLY AVAILABLE TAPES OR DISCS SHOULD CONTACT THE M ECHANICAL COPYRIGHT PROTECTION SOCIETY LIM ITED OR THE PERFORM ING RIGHTS SOCIETY LIM ITED.
Downloaded from: http://www.usersmanualguide.com/
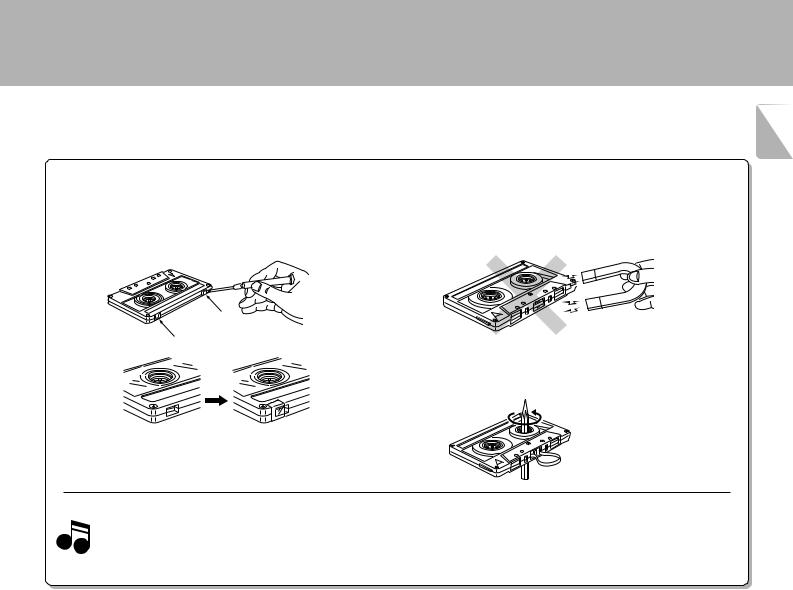
Handling the cassette tape
Notes on cassette tape
Safety tab (accidental erasure prevention tab)
After an important recording has been finished, break the safety tab, to prevent the recorded contents from being erased or recorded on accidentally.
For A side
For B side
To re-record |
Apply tape only to the position |
|
w here the tab has been removed. |
Important items
CT-2 0 5 0 / 2 0 3 / KXF-W 6 0 1 0 / W 4 0 1 0 (En/ M )
5
To store cassette tapes
Do not store the tapes in a place w hich is subject to direct sunlight, or near equipment that generates heat. Keep the cassette tapes aw ay from any magnetic field.
N
S
When there is slack in the tape
In such a case, insert a pencil into the reel hole and w ind the reel hub to remove the slack.
1.Longer tape than 110 minutes cassette tape
Since longer tape than 110 minutes cassette tape is very thin, the tape could adhere to the pinch roller or be easily cut.
Notes |
It is recommended that these tapes not be used w ith this |
|
unit to prevent possible damage. |
2.Endless tapes
Do not use an endless tape, as this could damage the mechanism of the unit.
Downloaded from: http://www.usersmanualguide.com/
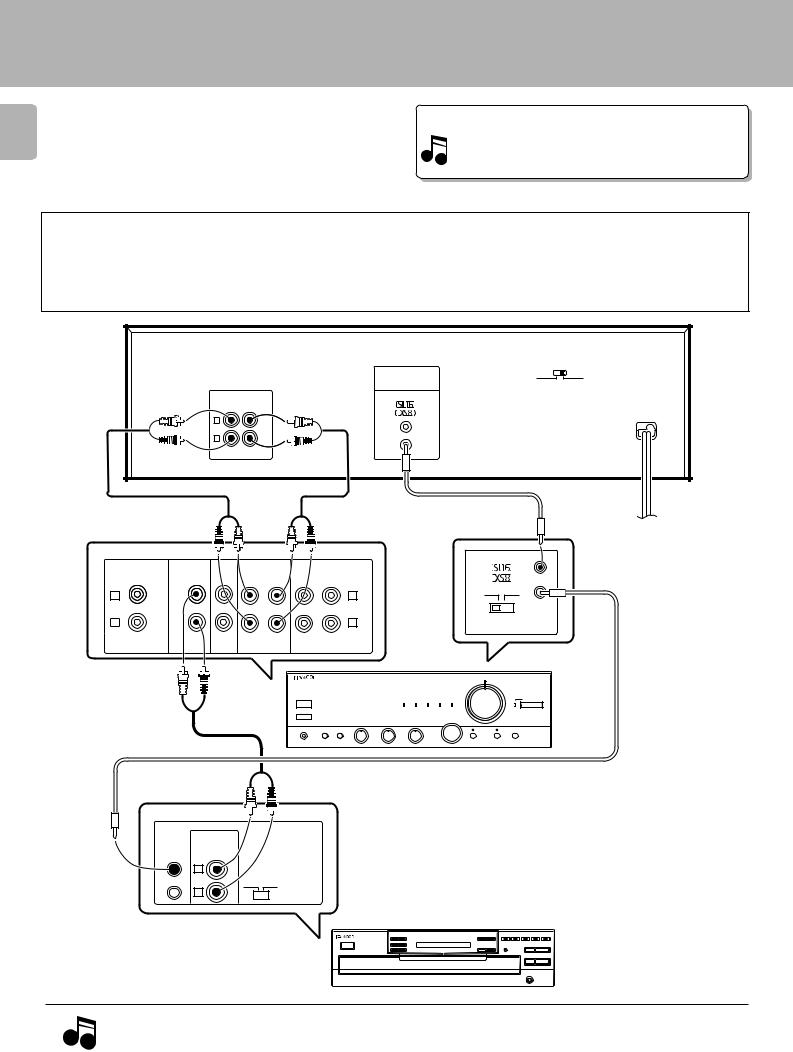
System connections
M ake connections as show n below . When connecting the related system components, refer also to the instruction
6 manuals of the related components.
Caution: Do not plug in the pow er lead until all connections are completed.
CT-2 0 5 0 / 2 0 3 / KXF-W 6 0 1 0 / W 4 0 1 0 (En/ M )
M alfunction of microcomputer
If operation is not possible or erroneous display appears even though all connections have been made properly, reset the microcomputer referring to “ In case of difficulty” . ∞
Except for U.S.A., Canada
Caution regarding placement
To maintain proper ventilation, be sure to leave a space around the unit (from the largest outer dimensions including projections) equal to, or greater than, show n below .
Left and right panels: 10 cm, rear panel: 10 cm
|
AC110- |
AC220- |
|
120V~ |
240V~ |
|
SYSTEM CONTROL |
|
REC |
PLAY |
|
L |
|
|
R |
|
|
LINEIN |
LINEOUT |
|
Audio cords
System control cord
To w all AC outlet
|
|
|
|
|
|
SYSTEM CONTROL |
|
PHONO |
CD |
TUNER |
TAPE |
|
MD |
|
|
|
|
|
REC |
PLAY |
REC |
PLAY |
|
L |
|
|
|
|
|
SL 16 |
XS 8 |
|
|
|
|
|
L |
|
|
R |
|
|
|
|
|
R |
|
Amplifier
Audio cord
System control cord
* The connected component model is variable dependent on areas.
SYSTEM |
LINE OUTPUT |
|
CONTROL |
||
VARIABLE |
||
|
||
|
L |
|
|
SL1 6 XS 8 |
|
|
R |
CD player
|
1. Connect all cords firmly. If connections are loose, there could be loss of sound or noise produced. |
Notes |
2. When plugging and unplugging connection cords, be sure to first remove the pow er cord from the AC outlet. Plugging/unplugging |
connection cords w ithout removal of the pow er cord can cause malfunctions or damage to the unit. |
Downloaded from: http://www.usersmanualguide.com/
System connections
CT-2 0 5 0 / 2 0 3 / KXF-W 6 0 1 0 / W 4 0 1 0 (En/ M )
7
ABOUT THE SYSTEM CONTROL CONNECTIONS
Connecting system control cords after connecting a KENWOOD audio component system lets you take advantage of convenient system control operations.
There are tw o KENWOOD system control modes. M ake connections according to the groups of terminal symbols show n below.
[XS8] M ode : lets you combine F, f and ƒ terminals [SL16] M ode : for 
 terminals only
This unit is compatible w ith both [XS8] and [SL16] modes. It comes from the factory set to the [SL16] mode. To sw itch to the [XS8] mode, follow the instructions in “SWITCHING FROM [SL16] TO [XS8]” below.
1. [SL16] equipment cannot be combined w ith [XR], [XS], and [XS8] equipment for system operations. If your equipment consists of this kind
Notes
of combination, please do not connect any system control cords. Even w ithout system control cords, normal operations can be carried out w ithout affecting performance.
2.If your amplifier or receiver does not have asystem control terminal, do not connect any system control cords to the system control terminals on the other components.
3.Do not connect system control cords to any components other than those specified by KENWOOD. It may cause a malfunction and damage your equipment.
4.Be sure the system control plugs are inserted all the w ay in to the system control terminals.
ABOUT THE SYSTEM CONTROL OPERATIONS
Remote Control
Lets you operate this unit w ith the system remote supplied w ith the amplifier or receiver.
Automatic Operation (except [XR] equipment)
Automatically sw itches the input selector on the amplifier or receiver w hen you start playback from this unit.
Synchronized Recording (except [XR] equipment)
Lets you synchronize recording w ith the start of playback w hen recording from CD, M D, LD, or analog discs. Also, the simple CCRS operation lets you make great recordings from CD.
SW ITCHING FROM [SL16] TO [XS8]
You can easily change the system control mode w ith the follow ing operation. Do this operation after completing all connections.
Sw itching to [XS8]: Hold dow n the 1 (rew ind) key on Deck B and sw itch the POWER key from OFF to ON. |
8 |
Sw itching back to [SL16]: Hold dow n the ¡ (fast forw ard) key on Deck B and sw itch the POWER key from OFF to ON. 8
÷ This operation w ill not affect items stored in the memory.
Downloaded from: http://www.usersmanualguide.com/

Controls and indicators
8
Operation indicators (Deck A) |
Peak level indicators |
||
2, 3 Transportdirection |
|||
|
indicators |
REV.M ODE indicators |
|
¶ |
Recording indicator (CT-2050/ |
||
(Dolby NR reference level) |
|||
|
KXF-W6010 only) |
||
8Pause indicator (CT-2050/
KXF-W6010 only) |
|
RELAY indicator |
CCRS indicator |
|
|
|
|
|
|
|
|
CT-2 0 5 0 / 2 0 3 / KXF-W 6 0 1 0 / W 4 0 1 0 (En/ M )
Operation indicators (Deck B) 2, 3 Transportdirection
indicators
¶ Recording indicator
8Pause indicator
M PX FILTER indicator
BAL. BIAS LEVEL indicators (CT-203/KXF-W4010; BAL. LEVEL only)
Deck A COUNTER |
DOLBY NR |
Deck B COUNTER |
indicators |
indicators |
indicators |
|
|
|
|
DUBBING indicators |
|
|
|
|
AUTO BIAS |
|
|
|
|
|
|
|
|
|
|
|
indicator |
|
|
||
|
|
|
|
NORM AL |
|
|
|
|
|
|
|
|
|
|
|
|
HIGH |
|
Display |
|
|
|
|
|
|
|
|
|
|
|
|
|
|
|
|
|
||
CT-2050/KXF-W 6010 |
1 |
|
|
2 |
|
|
|
|
|
3 |
4 |
|
|
|
|
|
|
|
|
|
|
|
|
|
|
|
|
|
|
0 |
|
|
|
|
|
0 |
|
|
|
STEREO DOUBLE CASSETTE DECK KXF-W6010 |
|
|
|
|
|
|
|
|
|||
|
AUTO REVERSE |
|
|
|
|
|
|
|
|
AUTO REVERSE |
||
|
|
|
|
RESET A DOLBY NR REV.MODE RELAY REC NORM.DUBB. HIGH DUBB. MPX FILTER |
CCRS |
AUTO BIAS RESET B |
|
|
||||
TAPE A |
|
|
|
2 |
7 |
3 |
2 |
7 |
|
3 |
|
TAPE B |
|
|
|
|
|
|
|
|
|
|
|
||
|
|
|
|
POWER |
PHONES |
|
|
|
|
|
|
|
8PAUSE |
¶REC/ARM |
1 |
¡ |
-ON –OFF |
TIMER |
|
|
1 |
¡ |
8PAUSE ¶REC/ARM |
||
|
|
|
|
|
||||||||
|
|
|
|
|
|
|
REC OFF PLAY |
|
|
|
|
|
|
|
|
|
|
|
|
MODE |
|
REC LEVEL/BAL. |
|
|
|
|
|
|
|
|
|
|
|
|
|
|
|
|
|
|
|
|
|
|
|
|
|
|
/BIAS |
|
|
|
|
|
|
|
|
|
|
|
∞ |
∞ |
|
|
|
|
|
|
|
|
|
|
|
MIN/L |
MAX/R |
|
|
|
|
5 |
6 |
7 |
|
8 9 |
|
|
|
|
0 |
|
! @ # $ % ^ & * ( ) ¡ ™ |
||||||||||||
8PAUSE ¶REC/ARM |
|
|
|
|
|
|
|
|
|
|
REC LEVEL/BAL. |
|
|
|
|
|
|
|
|
|
|
|
|
|
/BIAS |
RESET A DOLBY NR REV.MODE RELAY REC NORM.DUBB. HIGH DUBB. MPX FILTER CCRS AUTO BIAS RESET B |
∞ |
∞ |
|
MIN/L |
MAX/R |
& |
# $ % ( * ) ¡ £ |
||
NORMAL |
HIGH |
|
|
DUBBING DUBBING |
|
REC LEVEL/BAL. |
|
|
RESET A DOLBY NR REV. MODE CCRS MPX FILTER AUTO BIAS RESET B |
∞ |
∞ |
|
|
MIN/L |
MAX/R |
|
1 |
|
|
2 |
|
|
|
|
|
|
3 |
|
4 |
|
|
|
|
|
0 |
|
|
|
|
|
|
0 |
|
|
|
|
STEREO DOUBLE CASSETTE DECK KXF-W4010 |
|
|
|
|
|
|
|
|
|
|
|
||
AUTO REVERSE |
|
|
|
|
|
|
|
|
|
AUTO REVERSE |
||||
|
|
|
|
RESET A |
DOLBY NR |
REV. MODE |
CCRS |
MPX FILTER |
AUTO BIAS |
RESET B |
|
|
|
|
TAPE A |
|
|
|
2 |
|
7 |
3 |
|
2 |
7 |
3 |
|
|
TAPE B |
|
|
|
|
|
|
|
|
|
|
|
|
|
||
NORMAL |
HIGH |
|
|
POWER |
|
PHONES |
|
|
|
|
|
|
|
|
1 |
¡ |
-ON –OFF |
|
TIMER |
|
1 |
¡ |
8PAUSE |
¶REC/ARM |
|||||
DUBBING |
DUBBING |
|
|
|
|
|
||||||||
|
|
|
|
|
|
|
|
REC OFF PLAY |
|
|
|
|
|
|
|
|
|
|
|
|
|
|
|
MODE |
REC LEVEL/BAL. |
|
|
|
|
|
|
|
|
|
|
|
|
|
|
|
|
|
|
|
|
|
|
|
|
|
|
|
|
|
∞ |
∞ |
|
|
|
|
|
|
|
|
|
|
|
|
|
MIN/L |
MAX/R |
|
|
|
CT-203/KXF-W 4010 |
|
5 |
6 |
|
7 |
8 9 |
|
0 |
|
|
||||
|
|
|
|
|
|
|||||||||
Downloaded from: http://www.usersmanualguide.com/

1Deck A
This deck is used exclusively for playback. (CT-203/KXF-W4010 only)
This deck is capable of both playback and recording. (CT-2050/KXF-W6010 only)
2 |
Deck A eject (0) key |
0 |
|
|
Press to open the cassette holder of |
||
|
deck A. |
|
|
3 |
Deck B eject (0) key |
0 |
|
|
Press to open the cassette holder of |
||
|
deck B. |
|
|
4 |
Deck B |
|
|
|
This deck is capable of both playback |
||
|
and recording. |
|
|
5 |
Deck A operation keys |
0~! |
|
|
1 : Rew ind key (for fast w inding of |
||
|
|
tape tow ard the left reel seen |
|
|
|
from you) |
|
|
¡ : Fast Forw ard key (for fast w ind- |
||
|
|
ing of tape tow ard the right reel |
|
|
|
seen from you) |
|
|
2, 3 : Play keys |
|
|
|
7 |
: Stop key (Stop) |
|
6 |
POWER sw itch |
0 |
|
|
Press to turn this unit ON and OFF. |
||
7 |
PHONES jack |
! |
|
|
Connect stereo headphones (optional) |
||
|
here. |
|
|
8 |
TIM ER sw itch |
£ |
|
This sw itch is used in setting of timer playback and timer recording.
9 M ODE key |
^ |
Press t o change t he recording level,balance,or bias settings.
0 Deck B operation keys 0~!
2, 3 : Play keys
7: Stop key (Stop)
1: Rew ind key (for fast w inding of tape tow ard the left reel seen
from you)
¡: Fast Forw ard key (for fast w inding of tape tow ard the right reel
seen from you) |
|
PAUSE (8) key |
! |
:Press to let tape transport pause |
|
temporarily. |
|
REC/ ARM (¶) key |
^ |
:Press in stop mode to start recording or press in record mode to let the recording pause after leaving a non-recorded blank of
4seconds.
!Deck A PAUSE (8) key (CT-2050/
KXF-W6010 only) |
! |
Press to let tape transport pause temporarily.
@ Deck A REC/ ARM (¶) key (CT-2050/
KXF-W6010 only) ^
Press in stop mode to start recording or press in record mode to let the recording pause after leaving a non-recorded blank of 4 seconds.
# RESET A key |
! |
Press to reset the tape counter of deck |
|
A to “0000” . |
|
$ DOLBY NR key |
0 |
Press to sw itch the Dolby Noise Reduction mode to B = C = OFF. This makes it possible to use the Dolby NR effect in recording and playback.
Controls and indicators
CT-2 0 5 0 / 2 0 3 / KXF-W 6 0 1 0 / W 4 0 1 0 (En/ M )
9
% REV. M ODE key |
0 |
Press to change the tape transport direction.
^ RELAY RECkey (CT-2050/ KXF-W6010 only) (
Press to perform continuous recording from deck A to deck B.
& DUBB. keys (NORM ./HIGH) (CT-2050/
KXF-W6010 only) ) DUBBING keys (NORM AL/HIGH) (CT-
203/ KXF-W4010 only) )
Press to start tape dubbing.
NORM ./ NORM AL
|
: Dubbing at t he norm al |
|
|
speed. |
|
HIGH |
: Dubbing at a high speed. |
|
* M PX FILTER key |
& |
|
Press to reduce beat noise w hen recording FM broadcasts.
( CCRS key |
™ |
Press to start recording after automatic setting of the optimum CD recording level and optimum tape recording bias.
) AUTO BIAS key |
^ |
When this key is pressed, the bias level appropriate for the tape is set automatically for recording.
¡RESET B key
Press to reset the tape counter of deck B to “0000” .
™REC LEVEL/ BAL./ BIAS knob (CT-
2050/ KXF-W6010 only) ^
Adjust this before recording.
£ REC LEVEL/ BAL. knob (CT-203/ KXF-
W4010 only) |
^ |
Adjust this before recording. |
|
Downloaded from: http://www.usersmanualguide.com/
 Loading...