


DRV-N520
Dashboard camera
INSTRUCTION MANUAL
For your records
Record the serial number, found on the back of the unit, in the spaces designated on the warranty card, and in the space provided below. Refer to the model and serial numbers whenever you call upon your Kenwood dealer for information or service on the product. Model DRV-N520
Serial number
US Residents Only
Register Online
Register your Kenwood product at www.Kenwoodusa.com
© 2017 JVC KENWOOD Corporation |
B5A-2036-00 (W) |

Contents
Precautions and notices................... |
3 |
Precautions for Use............................. |
4 |
Accessories............................................ |
6 |
Names and Functions of Parts........ |
7 |
How to Install........................................ |
8 |
LED Indications.................................. |
12 |
Initial settings..................................... |
12 |
Basic Operation.................................. |
13 |
Display the Dashboard camera |
|
screen.................................................... |
14 |
Using the Driving Support |
|
function................................................ |
16 |
Recording............................................. |
19 |
Protecting or Deleting Files........... |
26 |
Various Settings................................. |
28 |
Updating the system....................... |
31 |
Using the PC Application............... |
31 |
Formatting an SD Card.................... |
35 |
Troubleshooting................................ |
36 |
Specifications..................................... |
40 |
Disclaimer
•Please note that JVC KENWOOD shall not be responsible for any damages suffered by the customer or a third party as a result of incorrectly using this product, a failure during use of this product, or other trouble, or due to the use of this product, unless such liability is acknowledged by law.
Copyrights
•Recorded video, image, and audio content cannot be used for other than personal enjoyment without the consent of the copyright holder as specified in the Copyright Act.
•Please note that the recording of an event such as a show, performance, or exhibition may be restricted even when doing so for personal enjoyment.
2

Precautions and notices
•Warning! Do not operate the device while driving. Using this product does not change the requirement for a driver to take full responsibility for his or her behavior. This responsibility includes observing all traffic rules and
regulations in order to avoid accidents, personal injury or property damage.
•For your own safety, do not operate the controls of the product while driving.
•A window mount is needed when using the recorder in a car. Make sure that you place the recorder in an appropriate place, so as not to obstruct the driver’s view or deployment of airbags.
•Make sure that no object is blocking the camera lens and no reflective material is placed near the lens. Please keep the lens clean.
•If the car’s windscreen is tinted with a coating, it may impact the recording quality.
•Connect the charger to a proper power source. The voltage requirements are found on the product case and/or packaging.
•Do not use the charger if the cord becomes damaged.
•Do not attempt to service the unit. There are no serviceable parts inside. Replace the unit if it is damaged or exposed to excess moisture.
Caring for your device
•Taking good care of your device will ensure trouble-free operation and reduce the risk of damage.
•Keep your device away from excessive moisture and extreme temperatures.
•Avoid exposing your device to direct sunlight or strong ultraviolet light for extended periods of time.
•Do not place anything on top of your device or drop objects on your device.
•Do not drop your device or subject it to severe shock.
•Do not subject your device to sudden and severe temperature changes. This could cause moisture condensation inside the unit, which could damage your device. In the event of moisture condensation, allow the device to dry out completely before use.
•Never clean your device with it powered on. Use a soft, lint-free cloth to wipe the camera lens and the exterior of your device.
•Do not use paper towels to clean the camera lens.
•Never attempt to disassemble, repair or make any modifications to your device. Disassembly, modification or any attempt at repair could cause damage to your device and even bodily injury or property damage and will void any warranty.
•Do not store or carry flammable liquids, gases or explosive materials in the same compartment as your device, its parts or accessories.
•To discourage theft, do not leave the device and accessories in plain view in an unattended vehicle.
•Overheating may damage the device.
3

FCC WARNING
This equipment may generate or use radio frequency energy. Changes or modifications to this equipment may cause harmful interference unless the modifications are expressly approved in the instruction manual. The user could lose the authority to operate this
equipment if an unauthorized change or modification is made.
FCC NOTE
This equipment has been tested and found to comply with the limits for a Class B digital device, pursuant to Part 15 of the FCC Rules. These limits are designed to provide reasonable protection against harmful interference in a residential installation.
This equipment may cause harmful interference to radio communications, if it is not installed and used in accordance with the instructions. However, there
is no guarantee that interference will not occur in a particular installation. If this equipment does cause harmful interference to radio or television reception, which can be determined by turning the equipment off and on,
the user is encouraged to try to correct the interference by one or more of the following measures:
•Reorient or relocate the receiving antenna.
•Increase the separation between the equipment and receiver.
•Connect the equipment into an outlet on a circuit different from that to which the receiver is connected.
•Consult the dealer or an experienced radio/TV technician for help.
Precautions for Use
Precautions for Installation
•Install the device in a position where it will not block the front view of the driver (position where hidden by the rear-view mirror).
•Install the device so that it is within the wiping range of the wiper.
•Install the device in a position where it will not interfere with the movement of the rear-view mirror.
•Take care not to install the device over the vehicle inspection sticker or other sticker.
•Take care not to install the device where it will interfere with driving or airbag operation.
•When installing the device in a vehicle equipped with a driving support system, check the instruction manual of the vehicle and then select an installation location that will not interfere with the driving support system.
•If the device is installed incorrectly, event recording or parking recording may not work correctly. Refer to "How to Install" for the loosening of fixing knob, installation orientation, installation angle, and other information and then install the device correctly.(P.8)
•Do not install the device near an electrical component. Doing so may cause flickering and noise.
•Use a commercially available cleaning cloth or the like to wipe off all dirt and grease on the mounting surface and then fix the mount base in place. If the device is re-affixed or mounted using, for example, general-purpose doublesided tape, the adhesion strength may weaken and cause the device to fall.
•After mounting the device, leave it for 24 hours before use to enable the mounting strength of the mount
4

bracket to improve. Failing to do so may result in the adhesion of the mount bracket becoming weak and the device falling.
•Fix the cord in place with tape or the like so that it does not interfere with driving.
Precautions for Use
•Do not block the camera lens, get dirt on it, or place a reflective object near it.
•When LED traffic lights are recorded, video in which they appear to
be flickering or flashing may be recorded. JVC KENWOOD assumes no responsibility with regard to the distinguishing or recording of traffic lights.
•If coating is used on the windshield of the vehicle, recording quality may be affected.
•There is no guarantee that the device can record video in all conditions.
Cleaning the Device
•When the device is dirty, wipe it with a dry silicone cloth or other soft cloth. If the device is very dirty, remove the dirt with a cloth with neutral cleaner on it and then wipe off the cleaner. Wiping the device with a hard cloth or using a volatile substance such as
thinner or alcohol may cause scratches, deformation, deterioration, or other damage.
•When the lens is dirty, gently wipe it with a soft cloth dampened with water. Rubbing the lens strongly with a dry cloth may cause scratches.
If You Notice a Problem with the Device
•If you notice a problem with the device, first refer to "Troubleshooting"(P.36) and check whether there is a way to resolve the problem.
•If you are unable to find a way to resolve
the problem, contact your dealer or nearest JVC KENWOOD service center.
SD Cards
• Cards supported by this device
Standard |
microSDHC |
Capacity |
8 GB to 32 GB |
Speed class |
Class 6 or higher |
File system |
FAT32 |
•Up to the Class 10 speed class is supported.
Precautions for using SD cards
•When using a commercially available SD card, also check the instructions supplied with the SD card.
•Be sure to format (initialize) an SD card with the device before use.
•SD cards have a product lifespan, such as the number of times that writing can be performed. It is recommended to replace the SD card with a new one regularly depending on the usage conditions.
•When inserting and removing an SD card, confirm the orientation, do not bend it, and do not apply a strong force or impact to it.
•Do not directly touch the contact part with a hand or metal. The stored data may be damaged or lost due to static electricity.
•Be sure to back up (copy) the required files in the SD card to a PC or other device. The saved data may be lost due to the usage conditions of the SD card. Please note that JVC KENWOOD cannot compensate for any damages arising from the loss of saved files.
5
Requests Regarding Disposal or Transferring Ownership of an SD Card
•Using the SD card format and deletion functions of this device or formatting with a function of a PC just changes the file management information and does not completely delete the data in an SD card. We recommend either physically destroying the actual SD card or using commercially available PC data deletion software or the like to completely delete the data in the SD card before disposal or transfer of ownership. Manage
the data in SD cards at your own responsibility.
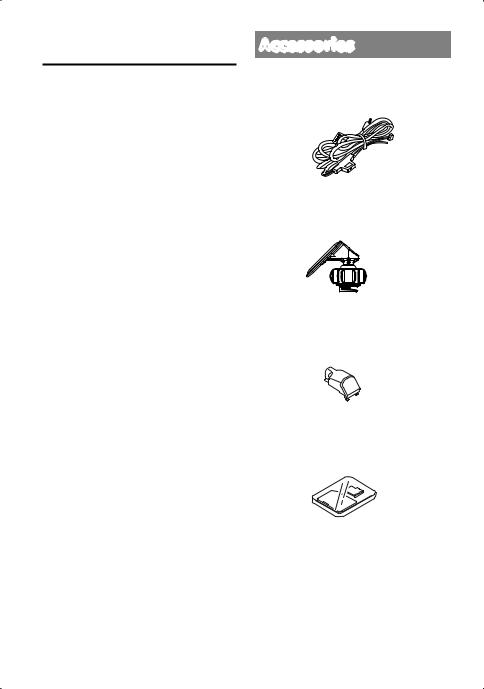
Accessories
1Power cord x1
2Mount bracket x1
3Cable holder x1
4microSDHC card (8GB) x1
6
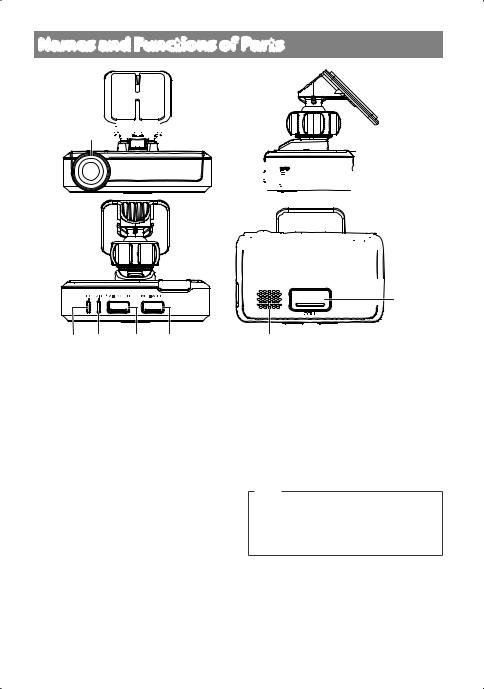
Names and Functions of Parts


1Camera lens
2REC LED
Lights (blue) while recording is in progress.
3MIC LED
Lights (green) when audio recording is turned on.
4


 button
–– Audio recording toggles between enabled and disable states each time this button is pressed.
–– Hold down this button to turn on or off the power of the device.
5


 button
–– Take a photo.
–– The automatic still image capture function turns on automatically when this button is pressed and held . The automatic still image capture function turns off when the button is pressed and held while the function is turned on.


6microSD card slot
Insert an SD card for recording.
7Microphone
Records audio.
8REC button
Start manual recording.
9Speaker
Outputs voice guidance, warning sounds, and file playback audio.
Note
•When a recorded file is played on navigation, the audio is output from the speaker of this device, not from the navigation speaker.
7
How to Install
Installation Procedure
Check that the vehicle is parked on a level surface.
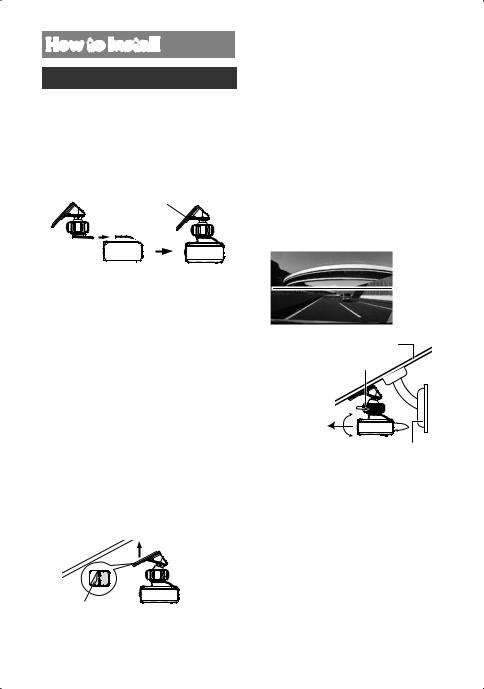
1. Attach the device to the mount bracket (accessory 2).
Insert the mount bracket into the bracket attachment part of the device and attach it to the device.
Mount bracket 2
Camera lens 


 side
side 

2. Determine where to mount the device.
Determine the mounting position in reference to "Recommended installation position".
3. Clean the mounting surface and then affix the device to the windshield.
Use a commercially available cleaning cloth or the like to wipe off all dirt and grease on the mounting surface. Peel off the release paper of the doublesided tape on the mount bracket
and push the bracket against the windscreen to affix it in place. Leave the device for 24 hours before use to enable the mounting strength of the mount bracket to improve.
Release paper
4. Perform the cord wiring work.
Refer to "How to Wire" and then perform the wiring work.(P.10)
5. Adjust the installation angle of the device and then fix the device in place.
Turn the angle adjustment knob clockwise before adjustment. Adjust the sky portion and the road portion to 50:50 as shown in the picture below. After adjusting the installation angle, turn the angle adjustment knob of the adjustment bracket counterclockwise to fix the device in place.
■■Adjustment example
Windshield
Angle adjustment knob
Rear-view mirror
6. Adjusting the Settings to Match the Vehicle
•Settings are required to use the driving support function.(P.16) The driving support function will not work without configuring these settings properly.
•Configure the Dashboard camera on the receiver on which the device is connected. For connection information, refer to the instructions supplied with that receiver.
8
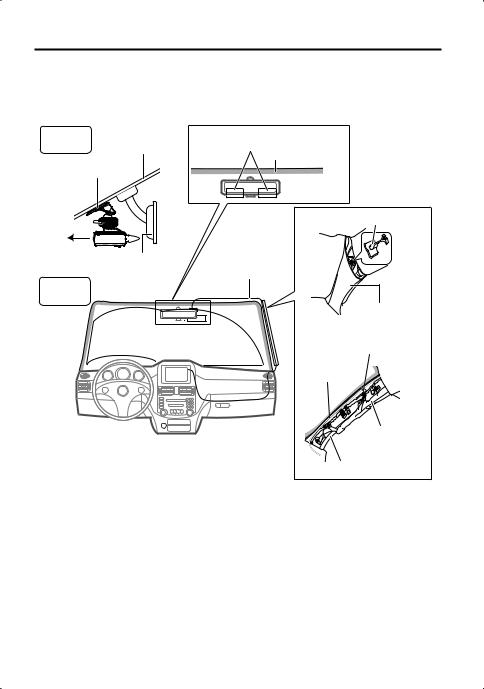
Recommended installation position
•Install the device in a position where it will not block the front view of the driver (position where hidden by the rear-view mirror).
•Install the device so that it is within the wiping range of the wiper.
•Mounting the device to the center of the windshield behind the rear-view mirror will facilitate optimal video recording.
Outside |
Windshield |
Example of Mounting |
|
vehicle |
|||
|
Ceramic part |
||
|
|
||
Double-sided tape |
|
||
Clip
Rear-view mirror
Power cord1
Inside vehicle
*Fix the power cord in place with commercially available soft tape or the like.
Front pillar cover
Soft tape*
Power cord1
Airbag
Front pillar
 CAUTION
When passing the power cord through the front pillar or another part, observe the following points when performing the wiring work.
•Wire the power cord farther forward or farther rearward than the airbag so that it does not interfere with the airbag.
•In the case of a vehicle in which the front pillar cover is fixed in place with special clips or the like, the clips may need to be replaced after you remove the front pillar cover. For how to remove the front pillar cover, the availability of replacement parts, and other information, contact the vehicle dealer.
•Fix the power cord in place with commercially available soft tape or the like so that it does not interfere with driving.
9
How to Wire
 CAUTION
To prevent a short circuit, remove the key from the ignition and disconnect the
¤terminal of the battery.
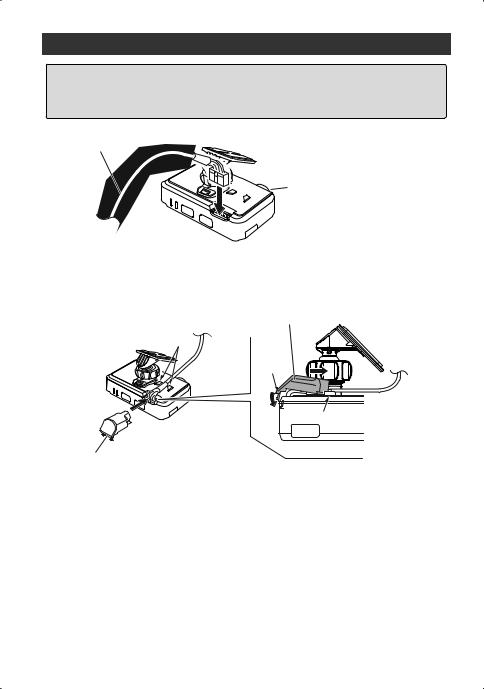
1.Connect the power cord (accessory 1) to the Dashboard camera.
Power cord 1
Camera lens
2. Mount the cable holder (accessory 3) in position by inserting it into the slot in the Dashboard camera and also inserting its claw into the connector of the Dashboard camera.
Cable holder3
Slot
Claw
Slot |
Cable holder3
3. Make connections
•Settings are required to connect the Dashboard camera. Refer to the instructions supplied the receiver.
–– For the model having a video input connector with a DASH CAM tag, connect the video output to the Front view camera/Dashboard camera input connector (yellow).
–– For the model that does not have a video input connector with a DASH CAM tag, connect the optionally available CA-C3AV to the AV-IN input port of the receiver, and then connect the video output to the video input connector (yellow) of the CA-C3AV.
10

Connect the Dashboard camera and power cord.
|
|
Power cord(3.5 m) |
|
Dashboard camera |
(Accessory1) |
|
|
|
GPS NAVIGATION SYSTEM/ MONITOR WITH RECEIVER |
|
|
CA-C3AV (Optional |
Video input (Yellow) |
|
Accessory) |
|
|
|
|
Video output |
AV-IN /Dashboard |
Front view camera/ Dashboard |
camera input |
camera video input (Yellow) |
|
Dashboard |
|
camera |
|
interface |
Dashboard |
|
camera interface |
Interface |
|
Ignition key switch |
Accessory |
Accessory cord (Red) |
||
|
Fuse |
Connect to a power supply that can be |
||
|
power supply |
|||
|
|
|
turned on and off with the switch. |
|
|
|
|
Fuse(2A) |
|
|
|
Battery cord (Yellow) |
||
|
|
Connect to a power supply with a voltage always |
||
Main fuse |
|
applied regardless of whether or not the engine key is |
||
|
on or off at a point after the power has passed through |
|||
|
|
|||
|
|
the main fuse. |
||
|
|
Ground cord(Black) |
||
Battery |
|
Connect to a metal part of the vehicle (part of the |
||
GND |
chassis with an electrical connection to the negative |
|||
|
||||
side of the power supply).
11
LED Indications
|
|
|
|
|
|
|
|
|
|
|
|
|
|
|
|
|
|
|
|
|
|
|
|
|
|
|
|
|
|
|
|
|
|
|
|
|
|
|
|
|
|
|
|
|
|
|
|
|
|
|
|
|
|
|
|
|
|
|
|
|
|
|
|
MIC LED(Green) |
|||||||||||
|
|
|
|
|
|
|||||||||||||
|
|
REC LED(Blue) |
|
|
|
|
|
|
|
|
|
|
|
|||||
|
|
|
|
|
|
|
|
|
|
|
|
|
|
|
|
|
|
|
|
|
|
|
|
|
|
|
|
|
|
|
LED |
||||||
|
|
|
|
State |
REC |
|
|
MIC |
||||||||||
|
|
|
|
|
|
|
|
(Blue) |
(Green) |
|||||||||
|
|
|
|
|
|
|
|
|
|
|
|
|
|
|
|
|||
|
starts continuous |
On |
- |
|
||||||||||||||
|
recording |
|
||||||||||||||||
|
|
|
|
|
|
|
|
|
|
|
|
|||||||
|
stops continuous |
Off |
- |
|
||||||||||||||
|
recording |
|
||||||||||||||||
|
|
|
|
|
|
|
|
|
|
|
|
|||||||
|
starts manual recording |
On |
- |
|
||||||||||||||
|
starts event recording |
On |
- |
|
||||||||||||||
|
starts parking recording |
On |
- |
|
||||||||||||||
|
stops parking recording |
Off |
- |
|
||||||||||||||
|
Audio recording is |
- |
|
|
|
|
On |
|||||||||||
|
enabled. |
|
|
|
|
|||||||||||||
|
|
|
|
|
|
|
|
|
|
|
|
|||||||
|
Audio recording is |
- |
|
|
|
Off |
||||||||||||
|
disabled. |
|
|
|
||||||||||||||
|
|
|
|
|
|
|
|
|
|
|
|
|||||||
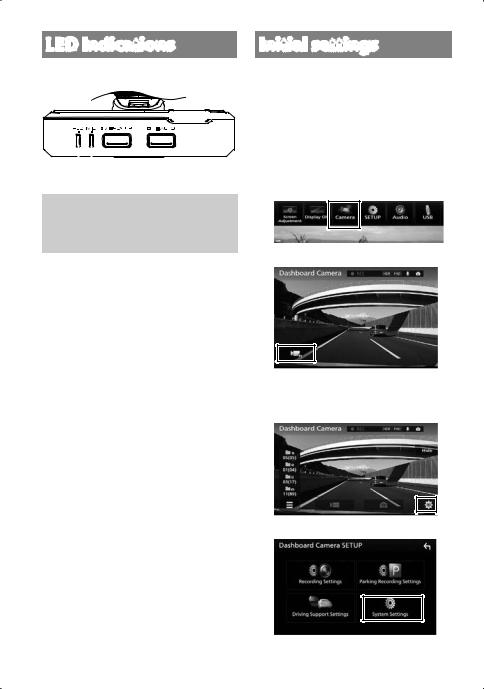
Initial settings
• Set the time zone before use. If you use the driving support function, complete the setting as described on page 16
as well.
• Configure the Dashboard camera in advance using the receiver to which the Dashboard camera is to be connected.
1. Press the [MENU] button on the monitor panel.
2. Touch [Camera].
3. Touch  .
.
Displays the operating buttons on the
screen.
4. Touch  .
.
5. Touch [System Settings].
12
6. Set the following items.
Item |
Explanation |
Time Zone |
Select the Time Zone. |
|
UTC-12:00 to UTC+14:00 |
|
UTC+0:00* |
Daylight |
OFF*/+1 hr./+30 min |
Saving Time |
Set daylight saving time. |
Time Format |
12-Hour/24-Hour* |
Date Format |
Month/Day/Year / |
|
Day/Month/Year* / |
|
Year/Month/Day |
Notification |
0/1/2*/3 |
Volume |
|
|
|
Select Units |
km /h, MPH* |
|
|
* Factory default settings
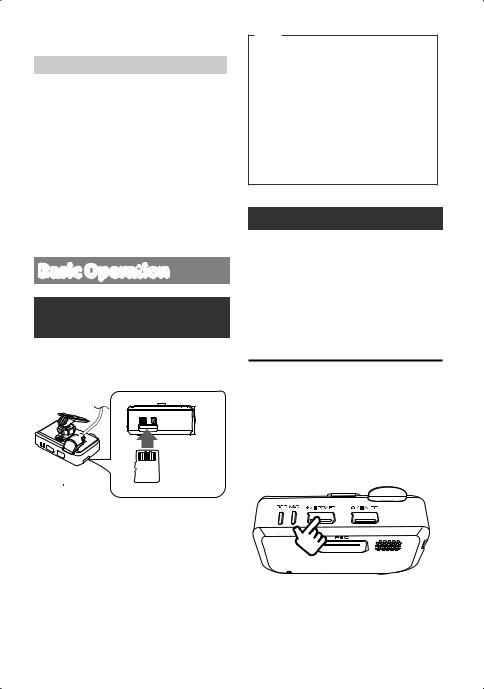
Basic Operation
Inserting and Removing
an SD Card
Turn off the power of the device and then insert an SD card into the SD card slot until you hear a clicking sound.
To remove the SD card, turn off the power of the device and then press the SD card so that it pops up and remove the SD card by pulling it out.
Note
•Make sure that the device is powered off (LED off) before mounting or demounting an SD card.
•Have only the data recorded by this device stored on an SD card.
•This device will not be functional without an SD card mounted in position.
•Be sure to format an SD card with the device.
Turning the Power On/Off
Turning on the accessories power (ACC) switch or starting the engine of the vehicle turns on the power of the device and starts continuous recording. When the device is connected using the power code(P.10) turning off the accessories power (ACC) turns off the power of the device and switches to parking recording mode.
To Turn the Power On/Off Manually
When the accessories power (ACC) is on, the power of the device can be turned on or off manually.
•Hold down the [POWER] button for at least 1 second while the device is on to turn off the power.
•Hold down the [POWER] button for at least 1 second while the device is off to turn on the power.
13
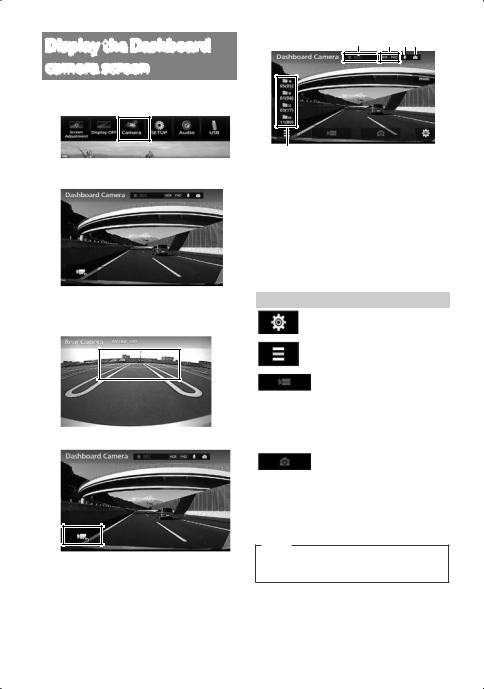
Display the Dashboard camera screen
1. Press the [MENU] button.
2. Touc [Camera].
Display the Dashboard camera screen.
While the rear camera view is displayed, a touch screen is displayed in the upper center of the Dashboard camera screen.
3. Touch  .
.
Displays the operating buttons on the screen.
1 2 34
5
1Recording mode/Remaining manual recording or event recording time
2HDR recording/Resolution
3Audio recording ON  /OFF
/OFF 
Automatic still image capture mode ON  / OFF
/ OFF 
5Number of recording files (number of files that can be recorded)
Button |
Explanation |
|
Configures the Dashboard |
|
camera.(P.28) |
|
|
|
Displays a recorded file list. |
|
|
|
• Start manual recording. |
|
(P.21) |
|
• Touch while manual |
|
recording is in progress |
|
to extend the duration of |
|
manual recording. |
|
• Take a photo.(P.22) |
|
• Press and hold to turn ON |
|
the automatic still image |
|
capture function. |
[Hide] |
Hides the operating buttons |
|
on the screen. |
Note
•The operating buttons will clear after a certain period of time.
14

Turn off the Dashboard camera screen
1. Touch the lower center of the screen
15
 Loading...