


ASSEMBLY INSTRUCTIONS
for :
PRO-II VAN
Parts: 40870 & 40880
®
11_1.1
(916) 638-8703
• 11261- G Trade Center Drive • Rancho Cordova, CA 95742 •
(800) 343-7486
ASSEMBLY INSTRUCTIONS
Read all instructions carefully and
follow each step in proper sequence
for ease and speed in assembling
your KARGO-MASTER RACK. See below
for nuts and bolts diagram.
P
O
L
PRO-II Van
40870 & 40880
P
O
O
G
P
O
H
P
O
G
O
G
A
3
R
4
I
U
S
M
i
l
i
c
o
n
e
P
O
L
1
U
X
H
Q
R
2
G
X
U
U
A
B
C
I
5
CAUTION!
REQUIRED TOOLS
NOT INCLUDED
• RATCHET WRENCH WITH
5/16", 3/8" & 1/2" SOCKETS or
OPEN END WRENCHES
• ADJUSTABLE END WRENCH
• Too much weight will greatly reduce the stability of your
vehicle. Kargo Master makes no representation or
warranty as to the amount of weight that your vehicle
can safely carry. For guidance, we recommend that you
consult the vehicle manufacture. In no event should the
weight of cargo loaded on a Kargo Master rack exceed
the maximum gross axle weight rating ("GAWR") or the
gross vehicle weight rating ("GVWR") as specified by the
vehicle manufacture.
• Secure all payloads properly for safe transportation.
© 2011 KargoMaster-Pro2-VAN:11_1.1

(4 ea.)
X
3/8" x 4" Hex Bolt
G
(4 ea.)
1/2" x 2 1/2"
Button Head Bolt
VAN
HARDWARE KIT
P
1/2" x 1"
Hex Bolt
(8 ea.)
A
1/4" x 1 1/2"
Hex Bolt
(4 ea.)
(4 ea.)
Q
5/16" x 3/4"
Carriage Bolt
O
(8 ea.)
1/2" Lock Washer
R
M
(4 ea.)
5/16" Lock Nut
L
(4 ea.)
5/16" SAE Flat Washer
U
(8 ea.)
3/8" SAE Flat Washer
H
(8 ea.)
1/2" SAE Flat Washer
(4 ea.)
3/8" Lock Nut
1/2" Jam Nut
(2 ea.)
Sleeve
I
(4 ea.)
(2 ea.)
Bushing
(2 ea.)
Nylon Washer
B
(4 ea.)
1/4"
Lock Washer
©2011 KARGO MASTER -- -VAN :11_1.1
C
(4 ea.)
1/4"
SAE Flat Washer
(4 ea.) Mounting Bracket Spacers

V- Series 11_1.1
GOOP APPLICATION
Apply a healthy air tight bead of goop
around every swaged joint as shown, to
prevent moisture from leaking into and out
of the joint. If this is not done properly, the
inside surface of the tubes can rust and
rusty water can leak out. Maintain this
joint seal throughout the life of your rack.
STEP 1
#1 = Cover entire swedge joints with GOOP and
join FRONT and REAR side channels together.
Be sure the connecting plates overlap and bolt
together with bolts Q, washers L and lock nuts M.
Swaged joint & holes
Smooth goop at swaged joint & holes
M
L
GOOP
GOOP
P
O
O
G
STEP 2
03
#1= Slide FRONT SIDE BEAMS into front "U" CROSS BAR
05
04
#2= Slide REAR SIDE BEAMS into rear "U" CROSS BAR
06
#3 = BOLT TOGETHER TOP (small tube) & SIDE RAIL (large tube),
as shown, using bolt G & nut I.
The allen wrench is included in the package.
Q
A
G
B
G
03
O
O
P
A
I

STEP 3
G
I
G
O
O
P
G
O
O
P
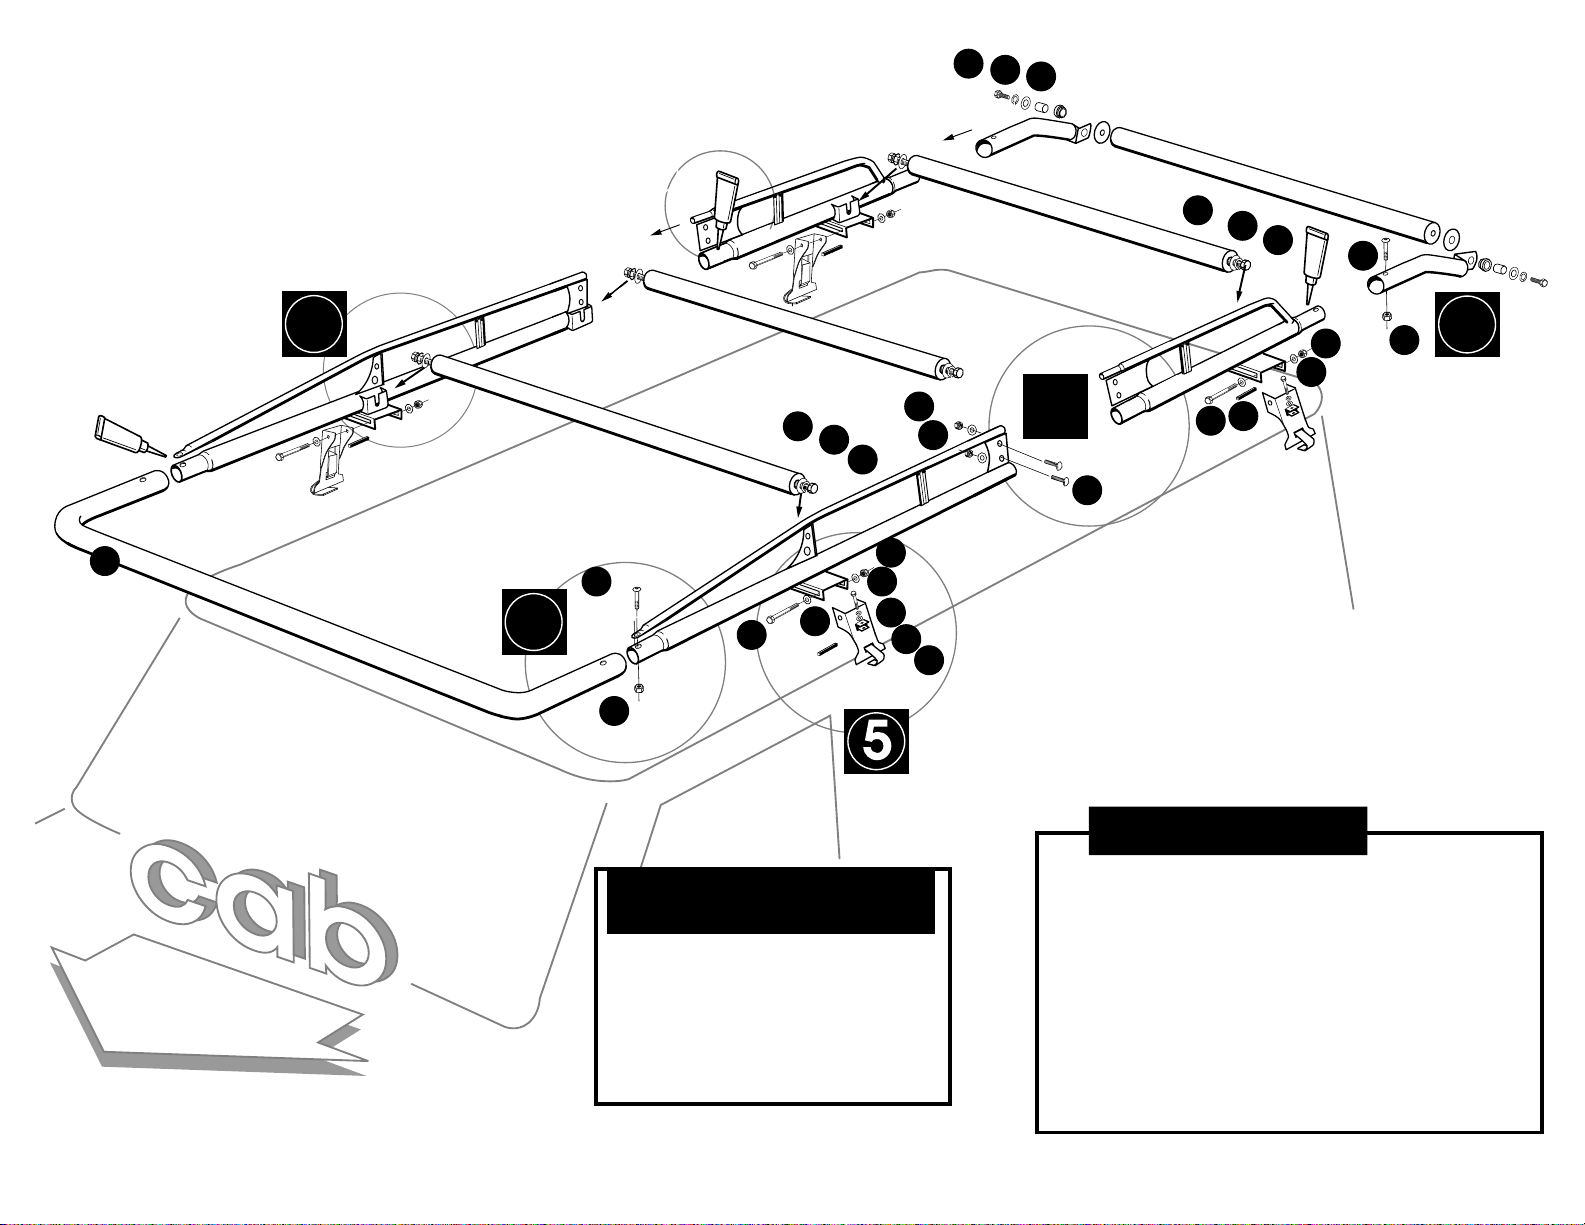
Support Arm
Side Beam
Rear Roller Bar
Nylon Washer
#1= At each end of the 3 shorter CROSS BARS, start BOLTS & WASHERS
Slide BOLTS & WASHERS into SLOTTED BRACKETS on frame
and snug with an open end 3/4" wrench (as shown)
P
O
V- Series 11_1.1
44
//
P
O
H
33
C
P
O
H
H
STEP 4
#1= Apply GOOP on joints, then slide each support arm onto
side beams and secure with bolt G and nut I.
#2= Attach longer rear roller bar to support arms by positioning the
nylon washer inbetween, then insert bushing, sleeve and secure
with bolt P, lock washer O & flat washer L.
Nylon Washer
Bushing
Sleeve
L
O
P

V- Series 11_1.1
O
V
E
R
T
U
R
N
F
O
R
C
E
GUTTER STRAP
LBS.
LBS.
100" = X3 lbs.
@
35" =
@
x1 lbs.
© 2011 KargoMaster-Pro2-VAN:11_1.1

DON'T OVERLOAD YOUR VEHICLE!
O
V
E
R
T
U
R
N
F
O
R
C
E
LBS.
LBS.
@
@
ALWAYS KEEP HEAVY LOADS CENTERED AND AS LOW AS POSSIBLE.
YOUR VANS G.V.W. MAY BE MUCH HIGHER THAN KARGO-MASTER'S
LOAD RATING BUT IT IS IMPORTANT TO NOTE THE EFFECTS OF
HEAVY WEIGHT ON ROLL CENTER.
100" = X3 lbs.
35" =
x1 lbs.
®
®
For TECHNICAL SUPPORT Call:
1-800-343-7486
HOURS: Monday- Friday 8:00 A.M. to 4:30 P.M. (PACIFIC )
11_1.1
 Loading...