

Page 1
For TECHNICAL SUPPORT Call:
1-800-343-7486
Monday- Friday 8:00 A.M. to 4:30 P.M. ( PACIFIC )
®
ASSEMBLY & MOUNTING for
CONGO CAGE
HARDWARE KIT #
50331
50301
11
503
RED
03
04
LOCKTITE
Q
N
5031150311
front mountfront mount
I
platesplates
07
07
05
F
H
H
H
F
06
F
F
01
R
G
F
E
G
G
D
F
M
J
K
02
RED
LOCKTITE
M
L
M
01b
P
R
Detail for CONGO CAGE
C
B
R
E
D
L
O
C
K
T
I
T
E
A
IMPORTANT:
When installing rear leg into
rear U ba
r, ensure that
hinge barrel is BEHIND the
leg as shown.
JEEP
06
02
Rear Leg Hinge Joint
Hinge Barrel BEHIND Leg.
JEEP
Page 2
®
For TECHNICAL SUPPORT Call:
1-800-343-7486
Monday- Friday 8:00 A.M. to 4:30 P.M. ( PACIFIC )
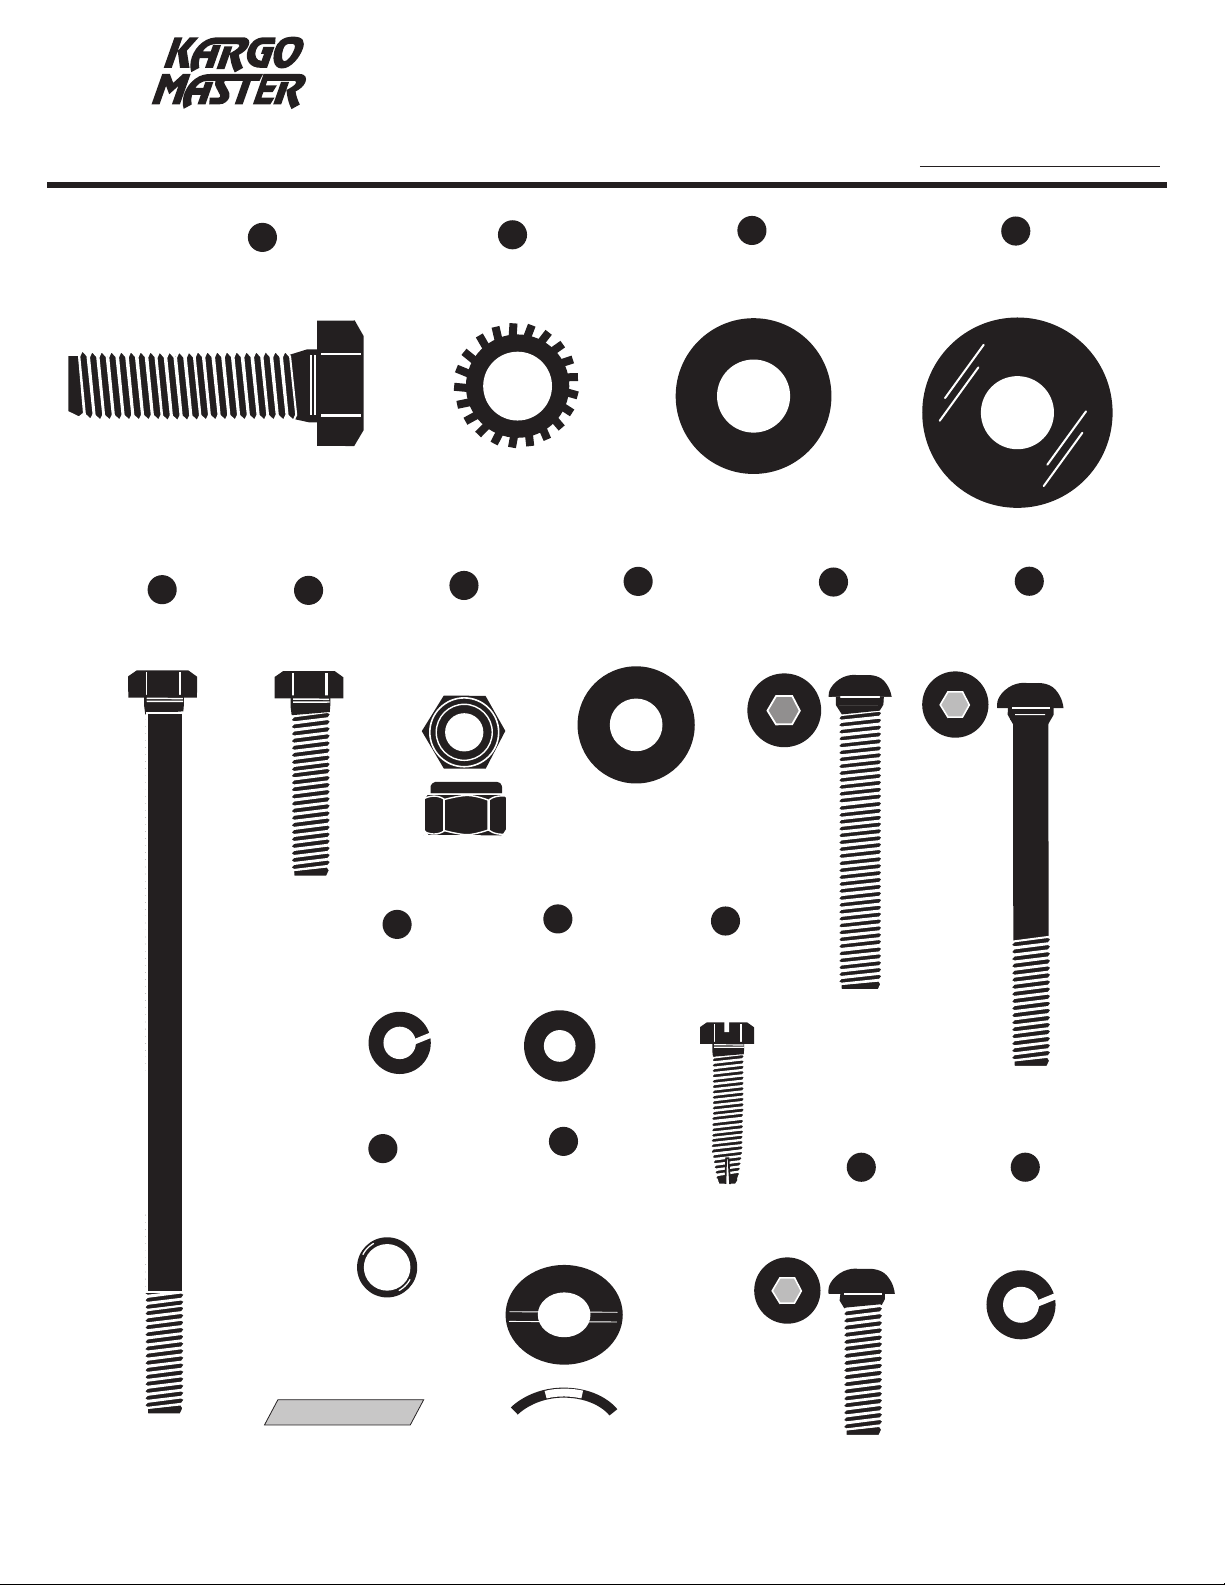
HARDWARE KIT FOR
CONGO CAGE
ASSEMB
LY
HARDWARE KIT #
50331
50301
11
503
D
(2 ea.)
5/16" x 5"
Hex Bolt
A
(2 ea.)
1/2" x 1 3/4"
Cap Screw
(2 ea.)
5/16" x 1 1/4"
Hex Bolt
(2 ea.)
1/2"
SAE Flat
C
Washer
H
(4 ea.)
5/16" x 2"
Button Head Bolt
B
(2 ea.)
1/2"
Lock Washer
E
F
(12 ea.)
5/16"
NyLoc Nut
G
(10 ea.)
5/16"
Washer
Flat
R
(4 ea.)
Rubber
1/2"
Washer
I
(4 ea.)
5/16" x 2 1/4"
Button Head Bolt
K
(6 ea.)
1/4"
Lock Washer
N
(4 ea.)
O Ring
5/16"
Shown Actual Size
Shown Actual Size
(6 ea.)
1/4"
SAE Flat
(4 ea.)
5/16"
Contoured
Flat
L
Washer
Q
Washer
J
(6 ea.)
1/4" x 20 x 1"
Thread Cutting
Screw
M
(10 ea.)
5/16" -18 x 1"
Button Head Bolt
(2 ea.)
5/16"
Lock
P
Washer
Page 3
®
For TECHNICAL SUPPORT Call:
Monday- Friday 8:00 A.M. to 4:30 P.M. ( PACIFIC )
SEE PAGE 1
#1=
#2=
1-800-343-7486
HARDWARE KIT #
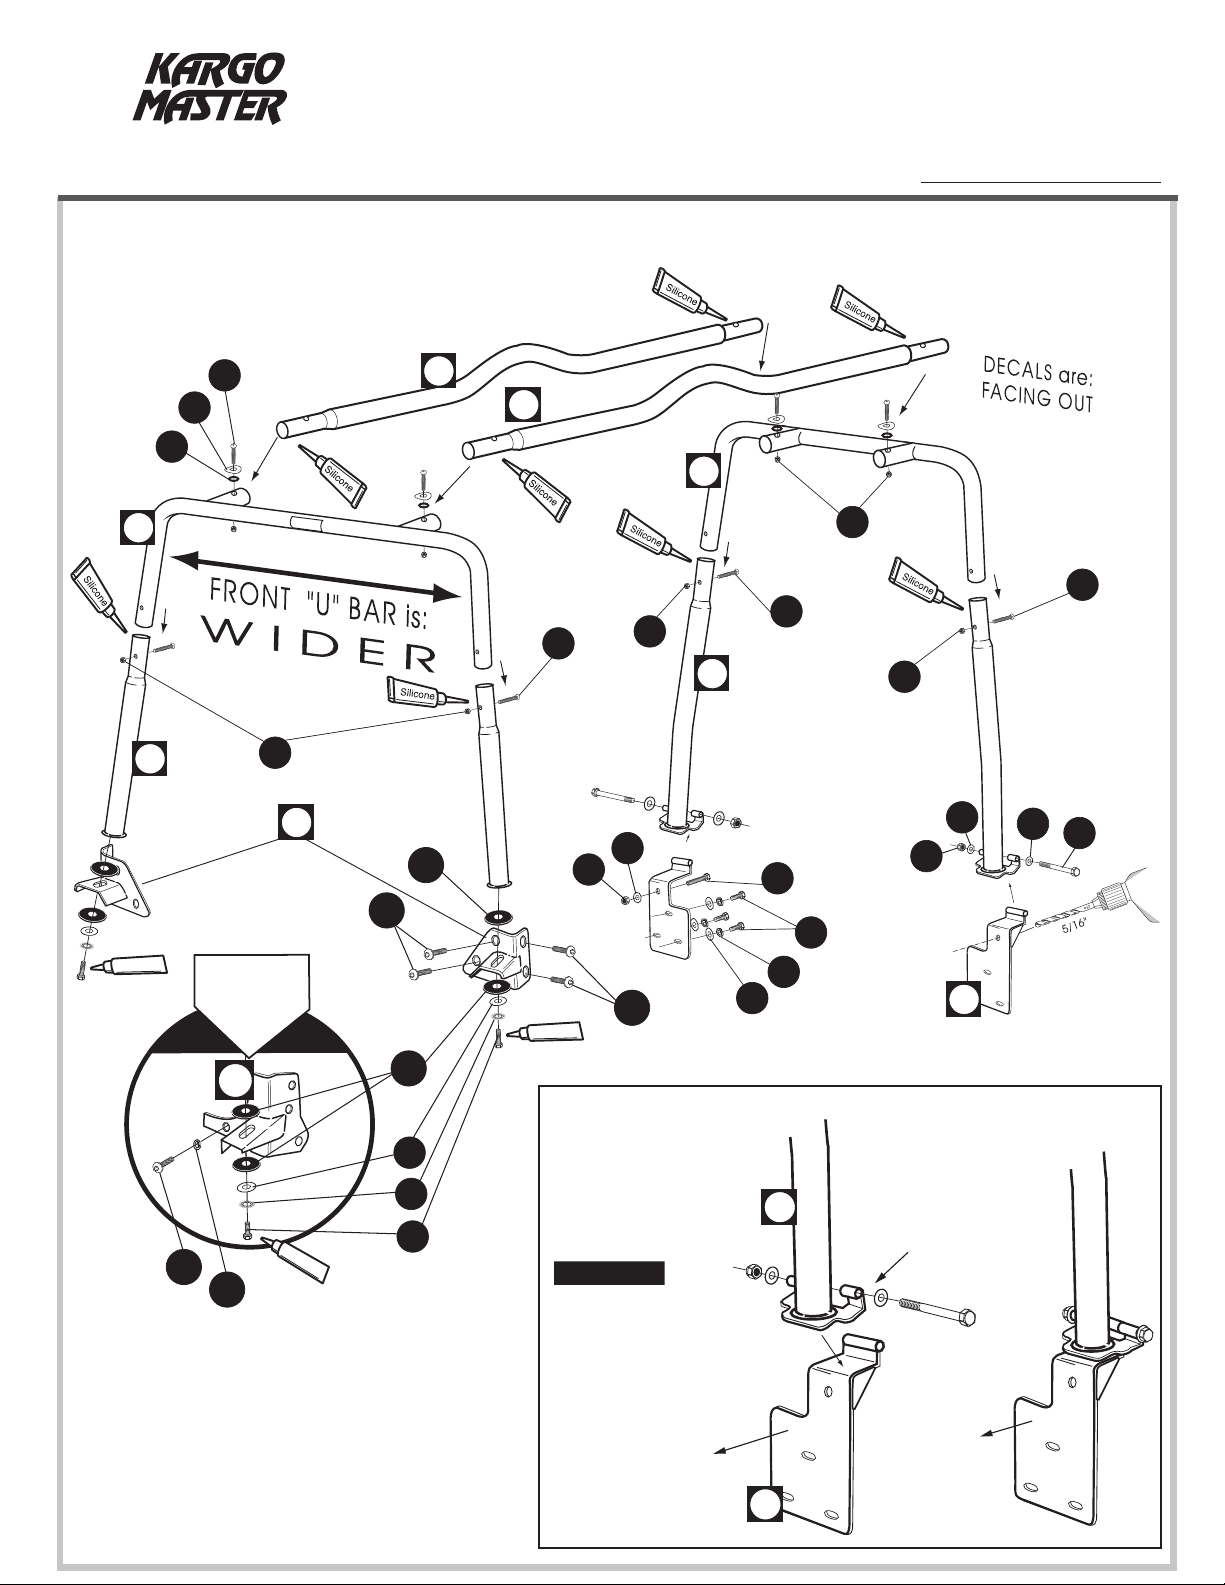
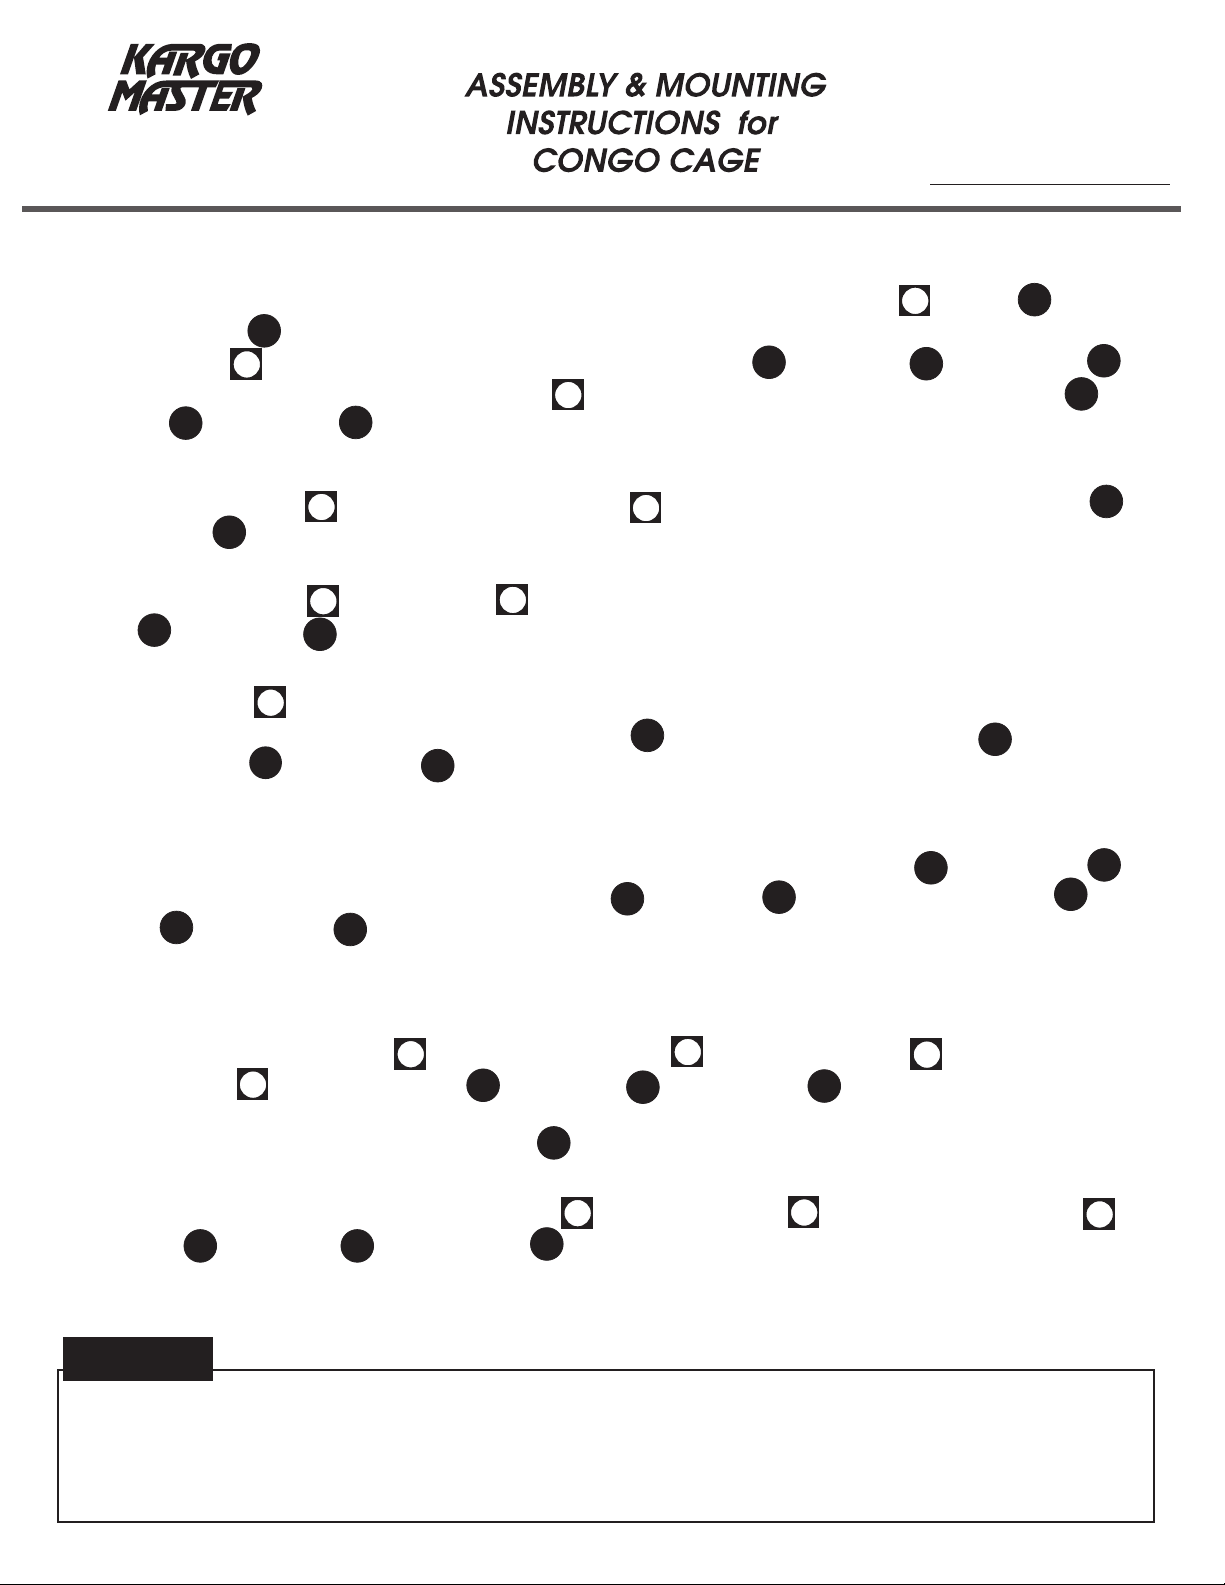
Remove existing bolts from the upper half of the windshield hinge plates. Put a small bead of silicone inside and around the
countersunk bolt holes in the existing windshield hinge plates. Attach front LEG MOUNT PLATES with bolts , and
with l
ock washers , as shown. Attach the rear LEG MOUNT PLATES, by removing the tail lights and sliding the rear LEG
MOUNT P
Next, at the upper hole of the rear LEG MOUNT PLATES , drill a 5/16" hole through vehicle body. Secure with bolts , flat
washers , and nyloc nuts .
Assemble the cage on the ground. Cover entire swaged joint surfaces with silicone sealant (see page 5).
Assemble FRONT 'U' BAR ( it's the wider one) to FRONT LEGS (they are the shorter ones) with button head bolts
and nyloc nut . IMPORTANT: Orient bolts so that nut is in front of leg (hood side) and bolt head is behind leg (cab side).
LATES in behind tail lights and secure with thread cutting screws , lock washers and flat washers .
G
P
02
02
J
F
03
04
F
01
M
K
50331
50301
50311
L
E
H
HF
Q
06
Q
B
R
I
,
N
A
C
08
09
K
Now attach REAR 'U' BAR to the REAR LEGS , (see the detail drawing for the Rear Leg Hinge Joint), with button head
#3=
bolts and nyloc nuts . Cover entire swaged joint surfaces with silicone sealant (see page 5). .
H
#4=
Find CROSS TUBES . Cover entire swaged joint surfaces with silicone sealant (see page 5). Insert the CROSS TUBES
into the cups on the FRONT and REAR U BARS. Secure with bolt then (on top side only) place O-rings and
contoured washer , with lock nuts , (on the bottom side).
TIGHTEN UP ALL BO
AT'S IT for the cage part. Lift the cage up onto the LEG MOUNT PLATES and secure with hex bolts , rubber washers
TH
attached detail: Front Leg Shock Absorbers), lock washers , flat washers . for the front, and hinge bolts , flat
(see
washers , and nyloc nuts for the rear.
PAGE 4 TO ATTACH BASKET RACK.
SEE
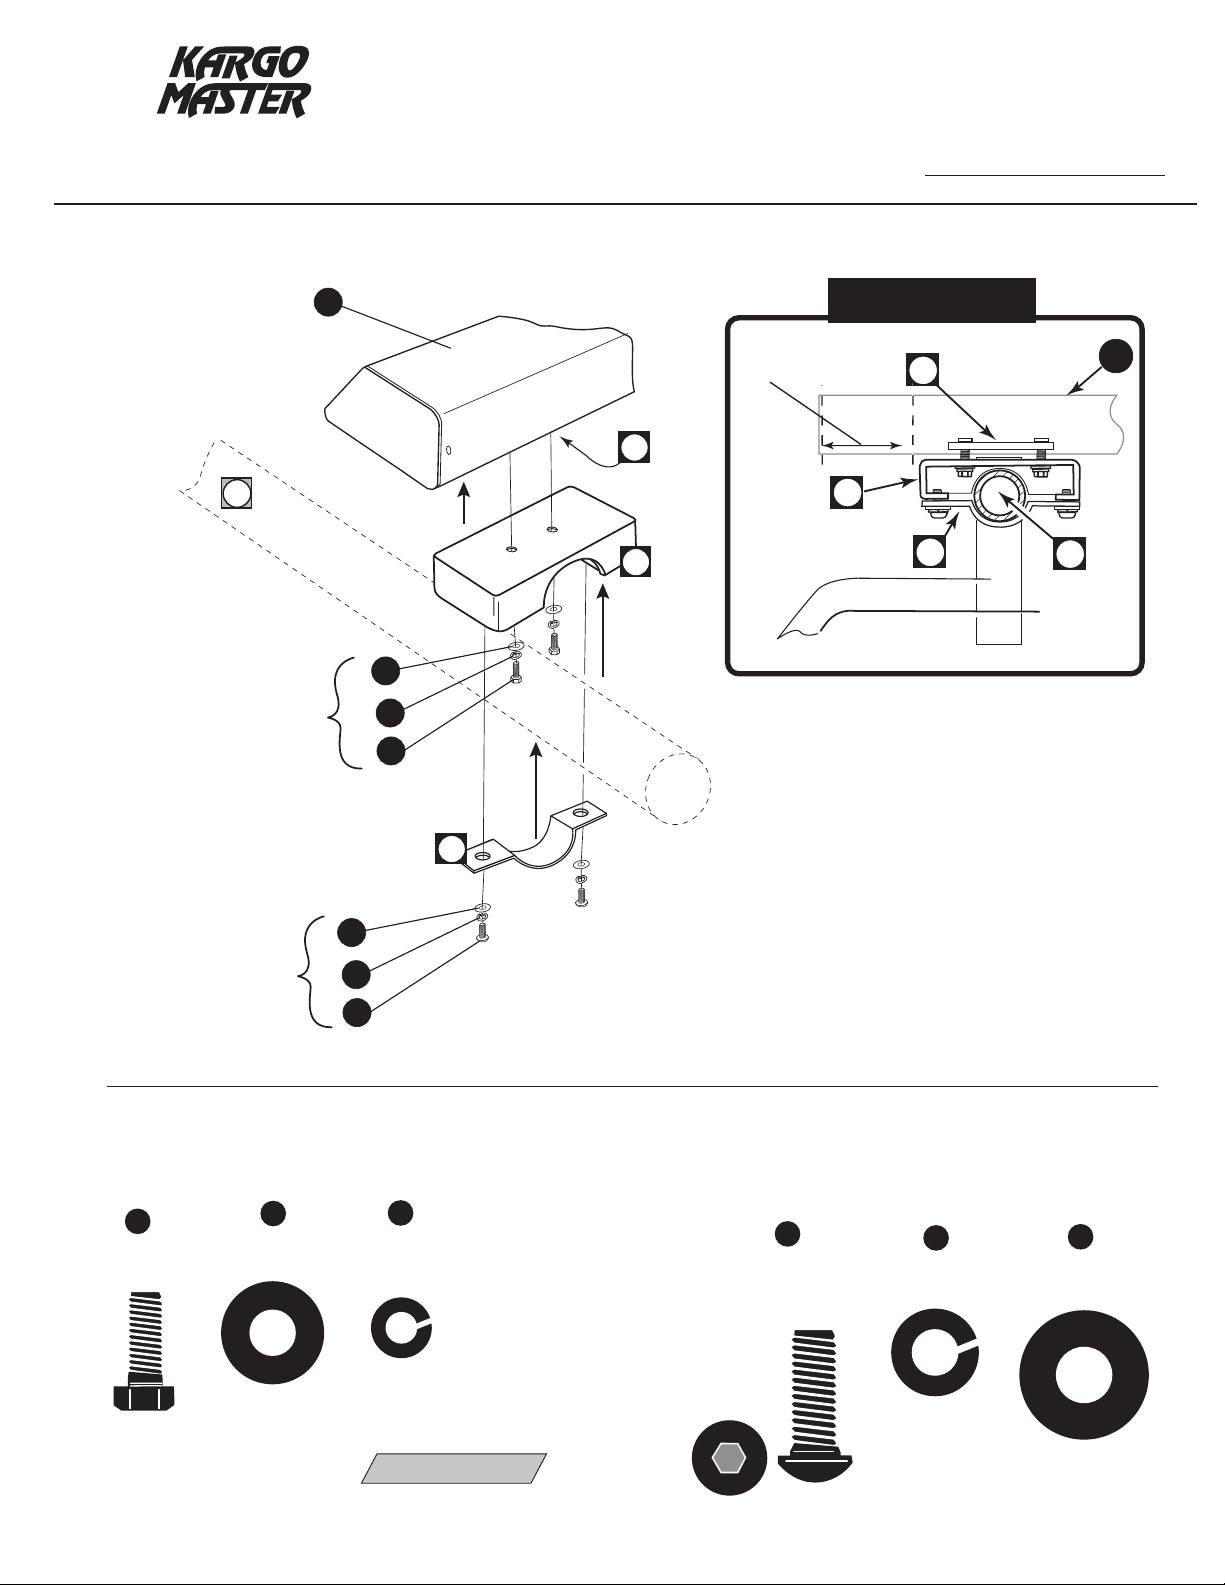
Align bolt holes of MOUNT PLATES with holes of CLAMP PLATES (inside rack cross beams ), and loosely attach
#5=
MOUNT P
to desired location front to back and confirm position of rack side to side with equal distance from all end caps to
mou
G
LATES with button head bolts , lock washers , and flat washers see DIAGRAM#1a. Position rack
nting plates. After rack is centered, tighten bolts .
10
07
Q
LTS.
05
F
F
F
10
R
D
#6=
With rack in it's final spot, attach MOUNT CLAMP STRAP , around CROSS TUBES and secure into MOUNT PLATE ,
with bolts , lock washers , and flat washers . Tighten all bolts.
T
U
11
V
07
THAT'S IT! YOUR INSTALLATION IS COMPLETE.
NOTE:
“Any time an overhead rack is mounted on a vehicle, there will be some incremental wind noise. In the vast majority
of cases, the additional noise is subtle and not objectionable. Sometimes, for reasons we cannot explain, customers
complain that the wind noise is intolerable. For these customers, we offer this Optional Wind Deflector. Be sure to
specify the Wind Deflector part number that is appropriated for your Congo Cage.
#60141 for CJ Congo Cage #50301 and TJ Congo Cages #50311 & #50331.
10
Page 4
For TECHNICAL SUPPORT Call:
1-800-343-7486
Monday- Friday 8:00 A.M. to 4:30 P.M. ( PACIFIC )
®
ASSEMBLY & MOUNTING for
FARI RACK on CONGO CAGE
SA
HARDWARE KIT #
Page 4
50561
07
C
O
N
"Attach, Position
and Sucu
these
bolts FIRST"
re
D
same distance
each b
K
K
MKM
MKM
08
Mount
G
O
C
A
G
E
C
r
o
s
s
T
u
b
e
10
Mount Clamp Strap
DIAGRAM #1a
Clamp Plate
racket
Plate
(inside)
10
CONGO CAGE 'U' Bars
08
11
Rack
Cross Beam
07
Cross Tube
D
K
Q
R
11
"Finish with
these
R
(8 ea.)
5/16" x 3/4"
Hex Bolt
bolts."
(8 ea.)
5/16"
Flat Washer
SAE
M
N
O
HARDWARE KIT FOR
K
Q
(8 ea.)
5/16"
Lock Washer
Shown Actual Size
Shown Actual Size
CONGO CAGE
MOUNT
O
(8 ea.)
3/8" x 1"
Button Head
N
(8 ea.)
3/8"
Lock Washer
M
(8 ea.)
SAE
3/8"
Flat Washer
Page 5
®
For TECHNICAL SUPPORT Call:
1-800-343-7486
Monday- Friday 8:00 A.M. to 4:30 P.M. ( PACIFIC )
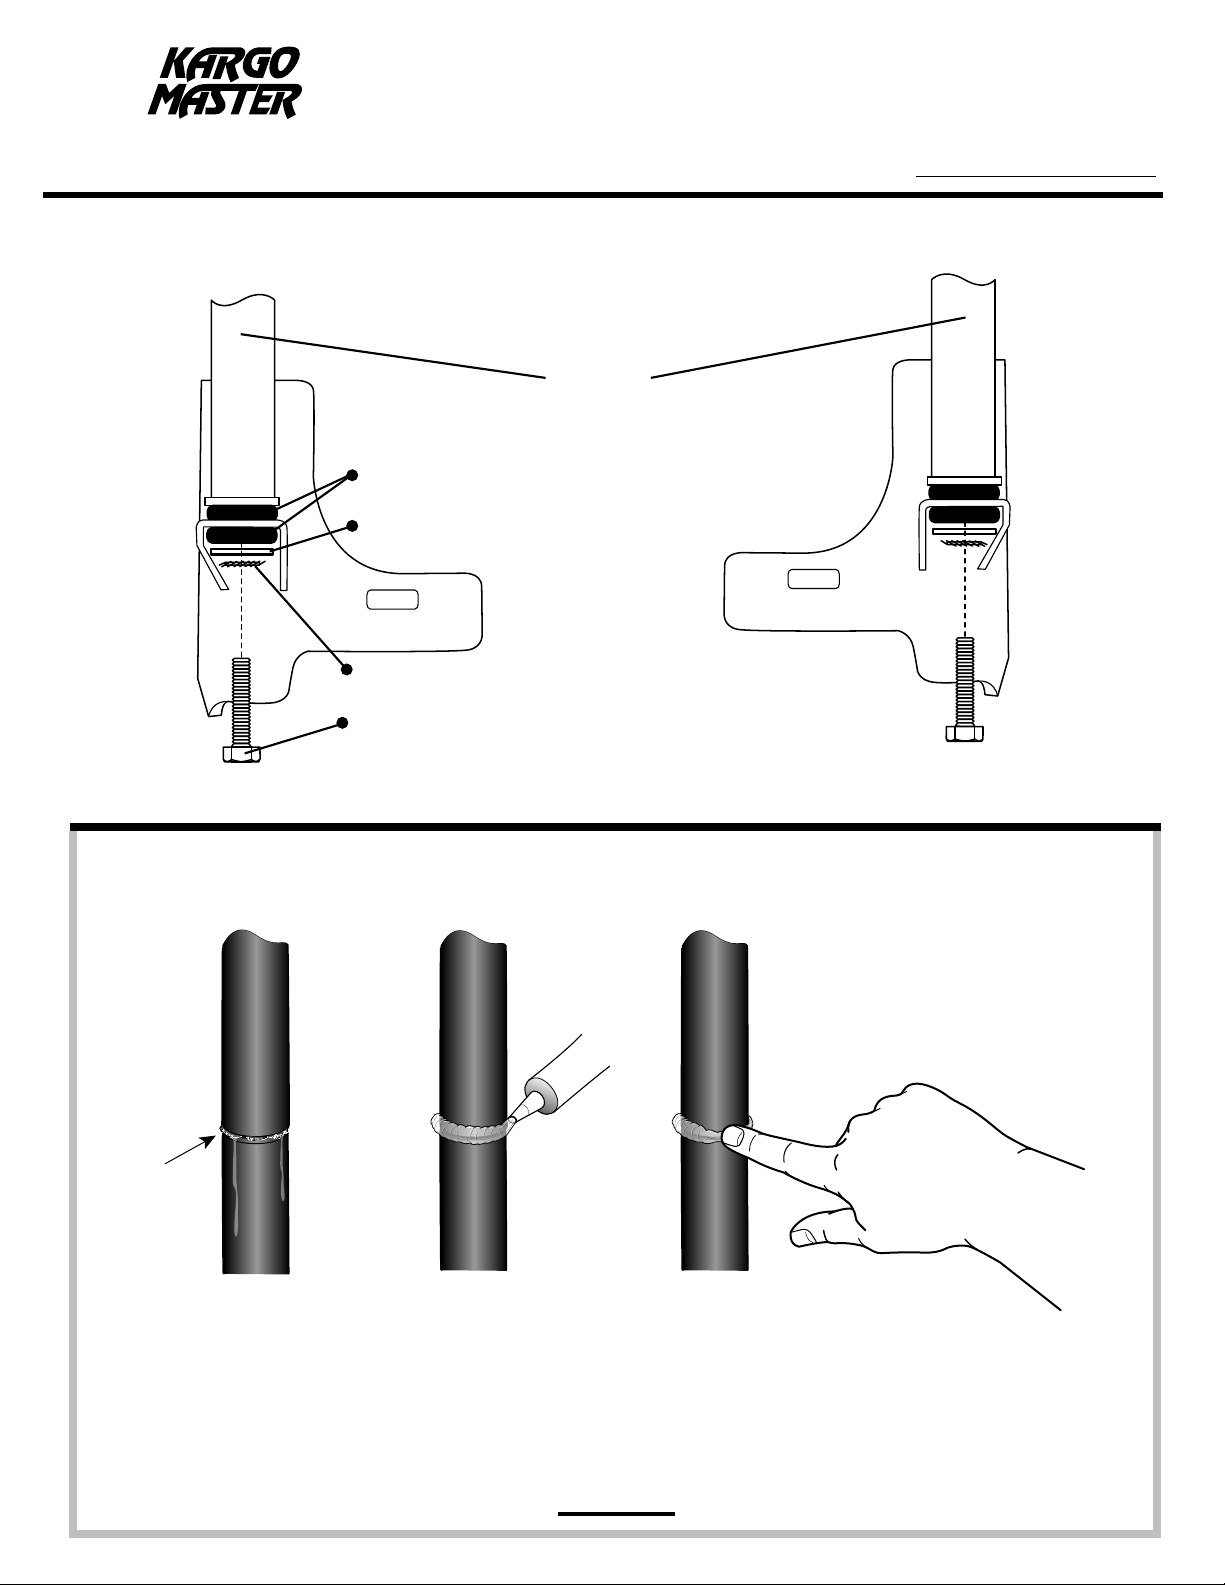
DETAIL: Front Leg Shock Absorbers
HARDWARE KIT FOR
CONGO CAGE
ASSEMB
FRONT LEGS
LY
HARDWARE KIT #
50331
50301
503
11
(WITHOUT SEALANT)
RUBBER
FLAT WASHER
EXTERNA
CA
WASHERS
(DRIVERS SIDE)
L TOOTH LOCK WASHER
P SCREW
( TIGHTEN DOWN TO COMPRESS RUBBER TO 1/8” )
DETAIL: Seal swage joints:
Rusty Joint
SILICONE
SEALANT
Apply a healthy air tight bead of silicone around every swaged joint to prevent
moisture from leaking into and out of the joint. If this is
inside surface of the tubes can rust and rusty water can
not done properly, the
leak out. Maintain this
joint seal throughout the life of your rack.
Tighten down all nuts & bolts and THAT'S IT! You are now ready to use your rack.
Page 6
For TECHNICAL SUPPORT Call:
1-800-343-7486
Monday- Friday 8:00 A.M. to 4:30 P.M. ( PACIFIC )
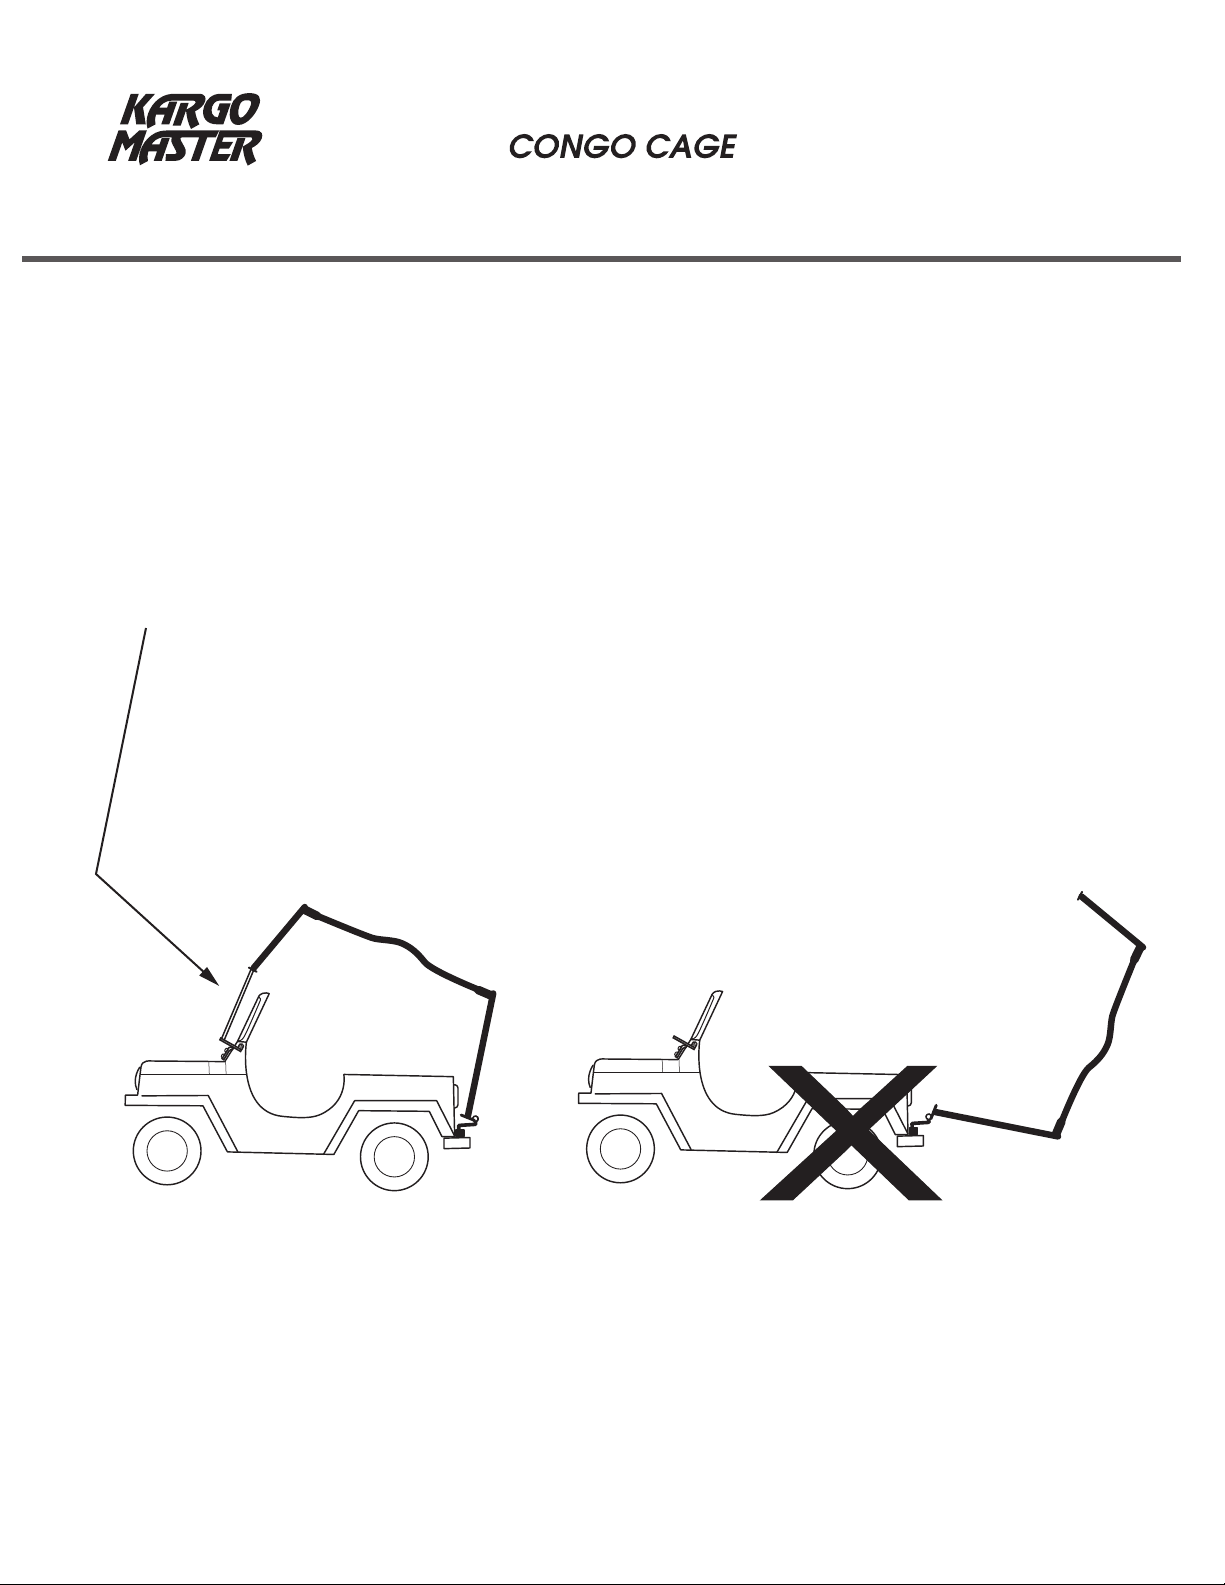
NOTE: When raising Congo Cage to install or remove top, DO NOT rotate the Cage
completely back as this will spring the rear hinge and/or damage the body of your
jeep. Rotate only to the extent necessary.
Hold the Congo Cage in the raised position by inserting the two support rods
(provided) into the hole of the front bracket and the hole in the bottom of the front leg.
®
Page 6
SUPPORT RODS PROVIDED
YES
NO
 Loading...