

Page 1

®
For TECHNICAL SUPPORT Call:
Monday- Friday 8:00 A.M. to 4:30 P.M. ( PACIFIC )
1-800-343-7486
ASSEMBLY & MOUNTING for
JK CONGO CAGE
07
M
HARDWARE KIT #
50341
50351
N
D
04
M
U
U
V
V
05
03
G
G
G
D
D
06
L
G
REAR “U” BAR is:
G
D
P
L
L P
L
G
T
F
K
J
H
N
T
A
C
B
N
S
A
N
B
C
RED LOCKTITE
S
K
J
E
I
NOTE:
“Any time an overhead rack is mounted on a vehicle, there will be some incremental wind noise. In the vast majority
of cases, the additional noise is subtle and not objectionable. Sometimes, for reasons we cannot explain, customers
complain that the wind noise is intolerable. For these customers, we offer this Optional Wind Deflector. Be sure to
specify the Wind Deflector part number that is appropriated for your Congo Cage.
#60151 for JK Congo Cage #50341 & #50351 .”
Page 2
®
For TECHNICAL SUPPORT Call:
1-800-343-7486
Monday- Friday 8:00 A.M. to 4:30 P.M. ( PACIFIC )
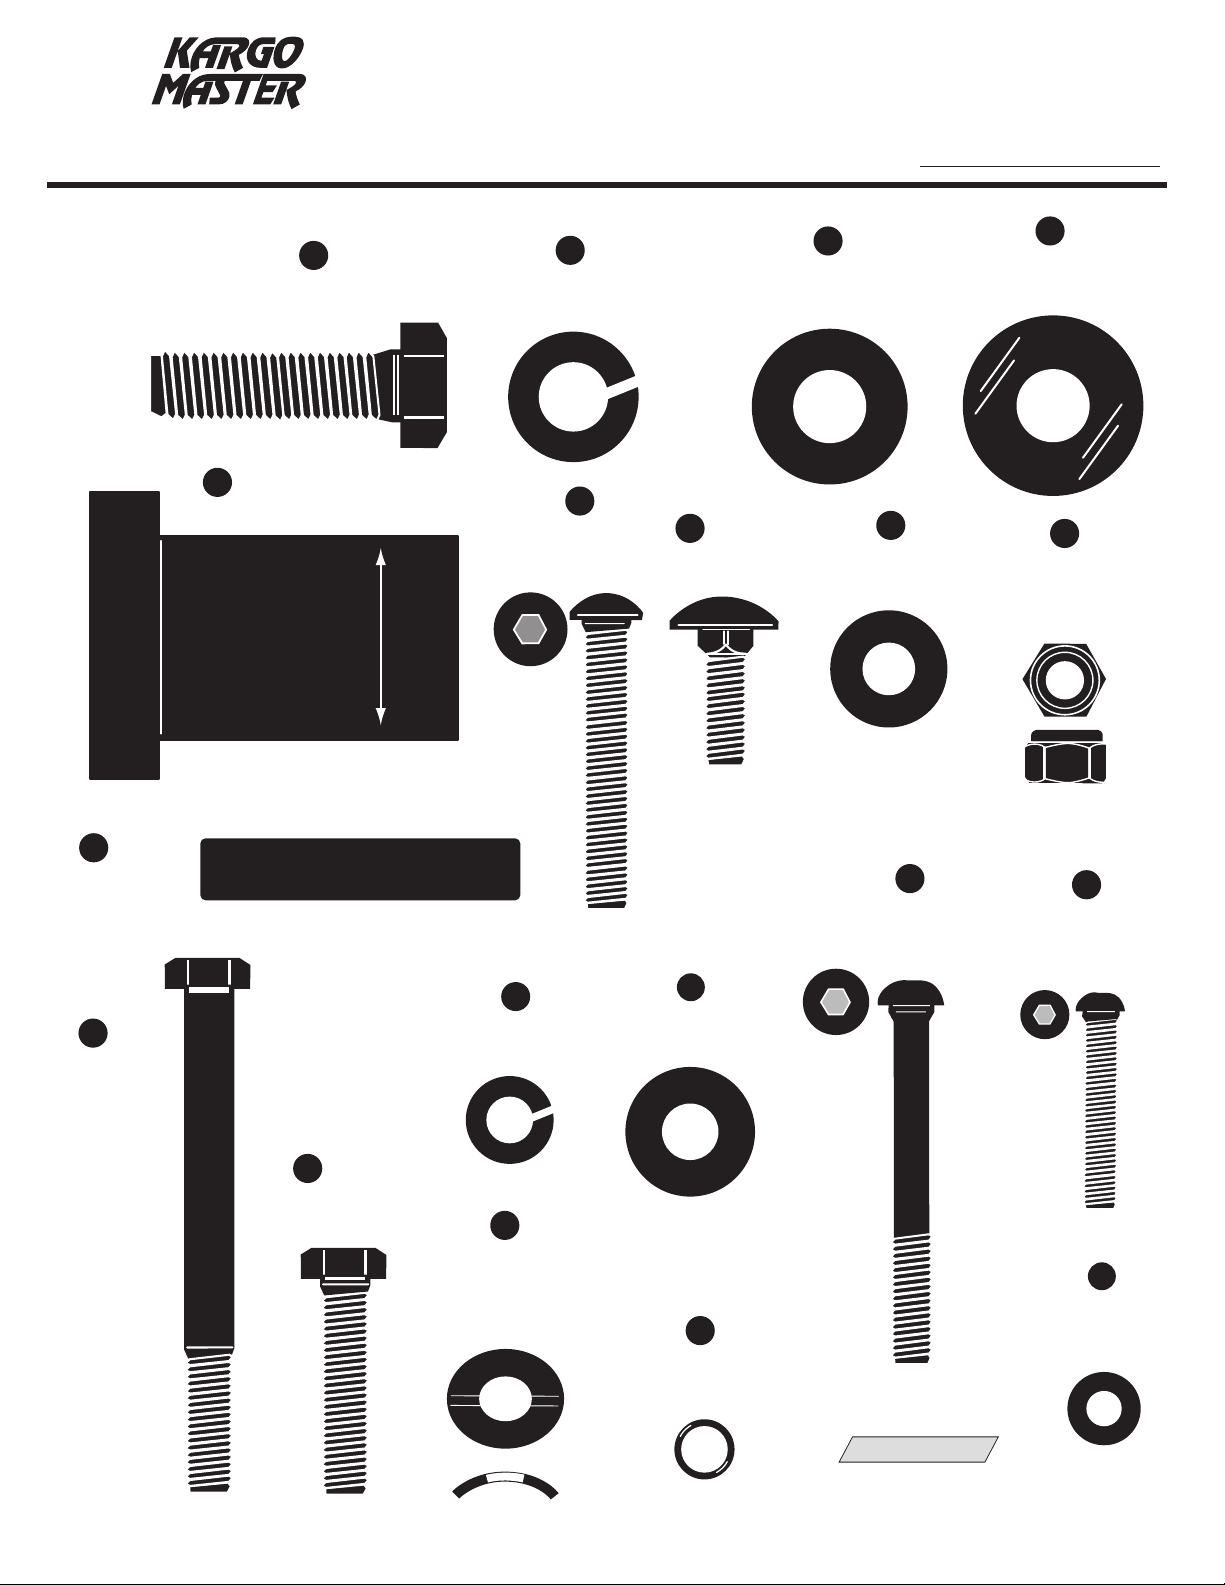
HARDWARE KIT FOR
JK CONGO CAGE
ASSEMBLY
HARDWARE KIT #
50341
50351
(2 ea.)
1/2" x 1 3/4"
Hex Bolt
(4 ea.)
L
Rubber Bushing
A
1.46”
B
(2 ea.)
1/2"
Lock Washer
D
(4 ea.)
5/16" x 2"
Button Head Bolt
(4 ea.)
E
5/16" x 1"
Carriage Bolt
C
(2 ea.)
1/2"
SAE Flat Washer
(4 ea.)
Flat Washer
F
5/16"
N
(4 ea.)
1/2"
Rubber Washer
G
(12 ea.)
5/16"
NyLock Nut
(2 ea.)
P
1/2" x2 1/2"
Bushing Spacer
(2 ea.)
H
3/8" x 3 1/2"
Hex Bolt
(4 ea.)
I
3/8" x 1 1/2"
Hex Bolt
J
(6 ea.)
3/8"
Lock Washer
U
(4 ea.)
5/16"
Contoured
Washer
Flat
K
(6 ea.)
3/8"
SAE Flat Washer
V
(4 ea.)
O Ring
5/16"
M
(4 ea.)
5/16" x 2 1/4"
Button Head Bolt
S
(6 ea.)
8mm x 35mm
Button Head
Bolt
T
(6 ea.)
8mm
Thick Flat Washer
Shown Actual Size
Page 3
®
ASSEMBLY & MOUNTING
Page 3
For TECHNICAL SUPPORT Call:
1-800-343-7486
Monday- Friday 8:00 A.M. to 4:30 P.M. ( PACIFIC )
INSTRUCTIONS for
JK CONGO CAGE
HARDWARE KIT #
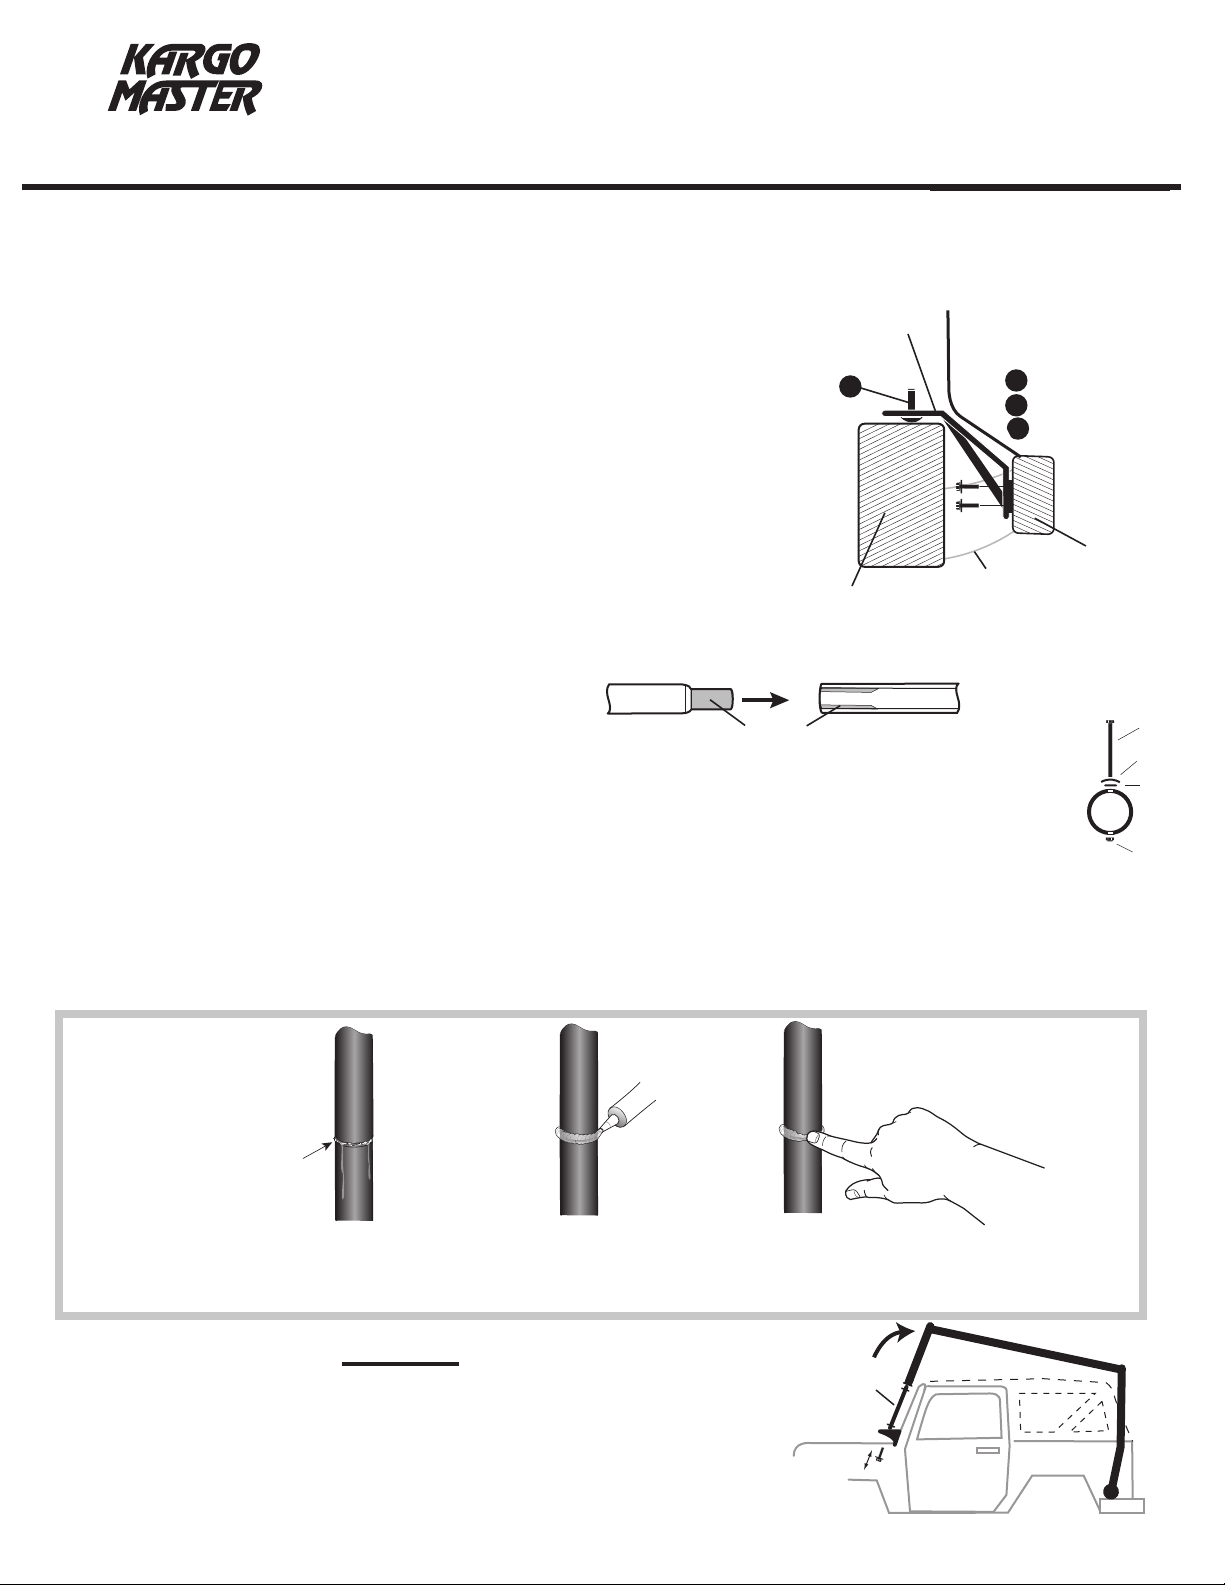
Remove existing bolts from the upper half of the windshield hinge plates. Put a small bead of
#1=
silicone inside and around the countersunk bolt holes in the existing windshield hinge plates
and place the thick washers T, (between the jeep and the bracket), then attach front leg
mount plates with bolts S.
Under the Jeep, on either side, there is a bracket that attaches the rear
#2=
bumper to the chassis. Remove existing bolts. Place the Congo Cage rear
mounting bracket over the existing bumper bracket. Insert bolts
I with lock
washers J and flat washers K through the Congo Cage bracket and the
Jeep bumper bracket, into the threaded holes in the chassis. Attach loosely.
Put bolts E up through the foot of mounting bracket (between the
#3=
bracket and the bumper). Tighten down the bolts at the chassis.
Place U-bracket onto mounting bracket (threads towards jeep), and
#4=
attach with flat washers F and lock nuts G. Tighten down securely.
Before inserting male swage into female swage, apply to both inside (female) and outside (male) of each
#5=
swaged joint a coat of silicone (provided).
Male Swage
With bolts D and lock nuts G snug only the front legs 04 to the front U-bar 03 (narrow). Then attach rear
#6=
Swage Joint
Silicone
legs to rear U-bar 05 (widest) with bolts D and lock nuts G (leg with the joggle goes on driver side).
Next, using bolts M, contoured flat washer U, and O-ring V (as shown), top side only of the cross bars 07 ,
#7=
with lock nut G on bottom side.
#8=
Insert a rubber bushing L into one side of each barrel at the bottom of the rear legs and insert bushing spacer
P into rubber bushing, then insert remaining bushing. Lift rack onto jeep and secure loosely front legs to front
mounting brackets with bolts A, lock washers B, and flat washers C, rubber washers N (one above and one
below the mounting bracket). Next attach loosely the rear legs with bolts H, lock washers J and flat washers
K Tighten down all nuts & bolts and apply bead of silicone around all swage joints as shown below.
REAR
MOUNTING
BRACKET
E
BUMPER
I
JEEP BODY
BUMPER
MOUNTING BRACKET
Female Swage
BOLTS,
LOCK WASHERS,
J
FLAT WASHERS
K
50341
50351
JEEP
CHASSIS
M
U
V
G
(WITHOUT SEALANT)
SILICONE
SEALANT
Rusty Joint
Apply a healthy air tight bead of silicone around every swaged joint to prevent moisture from leaking into and
out of the joint. If this is not done properly, the inside surface of the tubes can rust and rusty water can leak out.
Maintain this joint seal throughout the life of your rack.
THAT'S IT! You are now ready to use your rack.
NOTE:
To remove and replace the soft top to the jeep, remove the front
mount bolts and lift the front of the rack and prop it up with the
prop rod while you work on the roof. On completion, lower rack
back into postion and re-bolt.
SEE PAGE 4 TO ATTACH BASKET RACK.
PROP ROD
 Loading...