

Page 1

Intel® Client System Setup Utility
Legal Information
Using the Client System Setup Utility
Using the Phonebook
Configuring Resources
Controlling Boot Options
Managing Passwords and Security Options
Using the System Event Log
Using the Sensor Data Records
Using the FRU Inventory
User’s Guide
Version 0.8
Part Number: 754458-002
Page 2

Intel Client System Setup Utility Version 0.8
Legal Information
Intel Corporation (Intel) makes no warranty of any kind with regard t o this mat eri al, including, but not limited to, the implied
warranties of merchantability and fitness for a part ic ul ar purpose.
Intel assumes no responsibility for any errors that may appear in t his doc ument .
Intel makes no commitment to update nor to keep current the information cont ai ned in this doc ument.
No part of this document may be copied or reproduced in any form or by any means without prior written consent of Intel.
®
An Intel
installation, it accurately stores, di spl ays, processes, provides, and/or receives date data from, into, and between the
twentieth and twenty-first centuries, i ncl uding leap year calculations, provided that all other technology used in combination
with said product properly exchanges date data with it.
Nothing in this document constitutes a guarantee, warrant y, or license, express or implied.
Intel disclaims all liability for all s uch guaranties, warranties, and licenses, including but not limit ed to: fitness for particular
purpose; merchantability; not infringem ent of i ntellectual property or other rights of any third party or of Intel; indemnity; and
all others.
The reader is advised that third parties may have intellectual property rights that may be relevant t o this docum ent and the
technologies discussed herein, and is advised to seek the advice of competent legal couns el, without obligation to Intel.
The Intel
deviate from published specifications. Currently charac terized errata are available on request.
†
product, when used in accordance with its associated documentation, is "Year 2000 Capable" when, upon
®
Server Control product may contain design defects or errors known as errata that may cause t he product to
Third-party brands and names are owned by their respective companies.
Copyright 1999, Intel Corporation.
2
Page 3

Intel Client System Setup Utility Version 0.8
Using the Client System Setup Utility
Remote System Setup
System functions for managed servers can be setup remotely, using the Client System Setup
Utility. The Server System Setup Utility runs on the server console and provides all of the
necessary setup functions. The Client System Setup Utility provides the tools to do the same
functions remotely:
• Assign resources to devices and add-in boards before loading the OS,
• Specify boot device order and system security options,
• View and clear the system event log (SEL),
• View the system field replaceable unit records (FRUs) and sensor data records (SDRs),
• Troubleshoot the server when the OS is not operational,
• View the server system-level I/O devices,
• Save and restore the system configuration.
• The tools are implemented as plug-in Active-X controls called add-ins. The specific
functions provided will vary with individual platforms.
3
Page 4

Intel Client System Setup Utility Version 0.8
When to Run the Client System Setup Utility
Use the Client SSU when you need to do any of these tasks remotely:
• Add and remove boards affecting the assignment of resources (ports, memory, IRQs, DMA)
• Modify the server’s boot device order or security settings
• Change the server's configuration settings
• Save the server configuration
• View or clear the SEL
• View FRU information
• View the SDR information
To determine a system configuration, the Client SSU uses the following information from the
server system:
• The baseboard CFG file
• Configuration registers
• CMOS and non-volatile storage
The Client SSU stores configuration values in flash memory in the server. These values take effect
when you boot the server.
4
Page 5

Intel Client System Setup Utility Version 0.8
The BIOS checks the values against the actual hardware configuration; if the values do not agree,
the BIOS generates an error message. You must then run the Client SSU to specify the correct
configuration before the server boot s.
The Client SSU always includes a checksum with the configuration data, so the BIOS can detect
any potential data corruption before the actual hardware configuration occurs.
5
Page 6

Intel Client System Setup Utility Version 0.8
Using the Phonebook
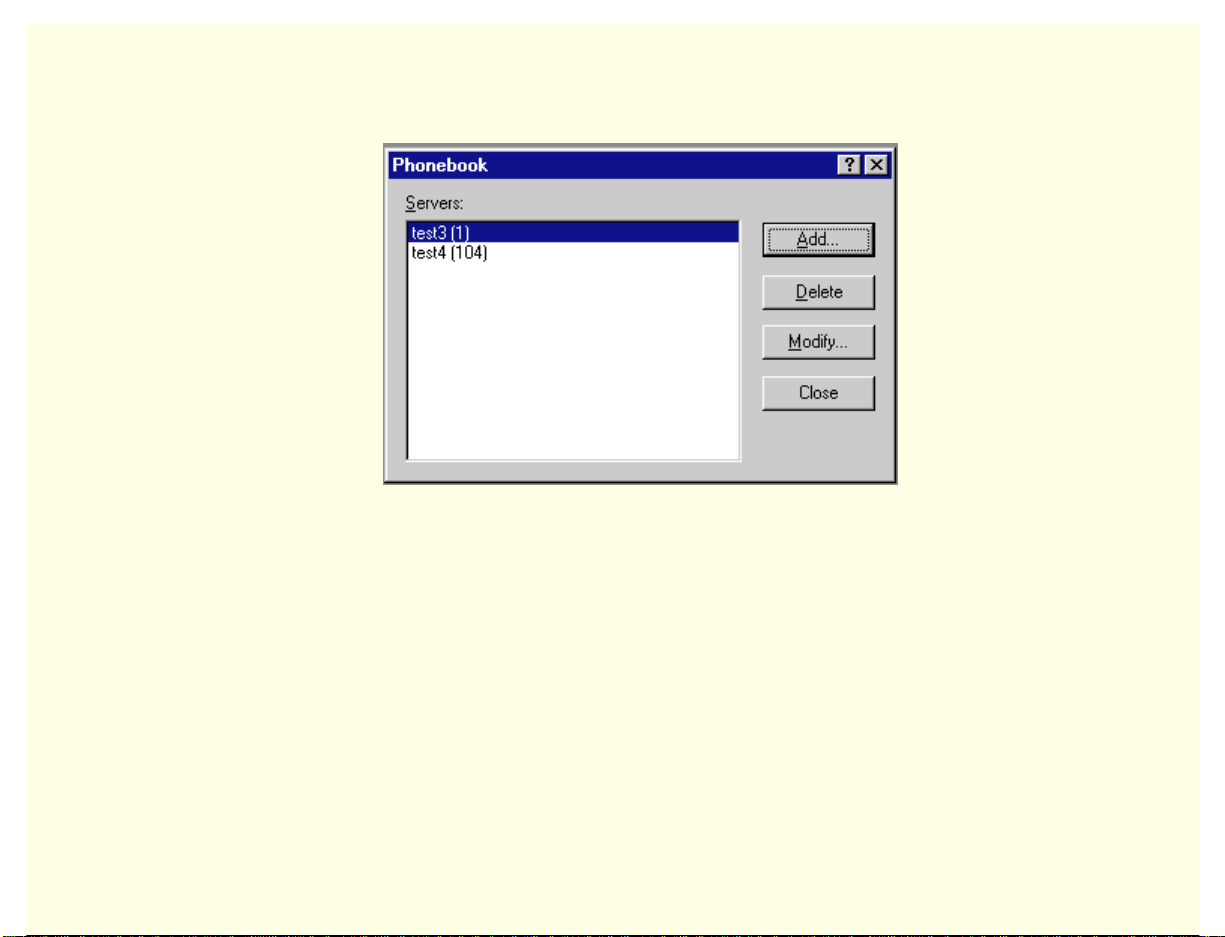
The Phonebook Dialog
The Client SSU includes a phonebook—which is shared with other ISC components—to organize
dialing information needed to establish connections with supported platforms. Use the phonebook
when the Client SSU is run outside of an enterprise management console, or when the Client SSU
is unable to make a server connection when started within an enterprise management console. The
dialog box used to maintain existing or edit new phonebook entries is shown in the following
figure.
You can open the phonebook from the Main Menu, using the
choosing Server>Phonebook.
6
icon on the toolbar, or by
Page 7
Intel Client System Setup Utility Version 0.8
Phonebook Dialog
Options available in the dialog are:
• Servers: Displays a list of server names and associated phone numbers previously stored in
the phonebook.
• Add: Opens the Add/Modify dialog, which you can use to add a new server to the
phonebook.
• Modify: Edits an existing entry. Before selecting this option, you must first select an existing
entry from the Servers list and modify the existing phone number. Click <OK> to store this
entry in the phonebook.
7
Page 8
Intel Client System Setup Utility Version 0.8
• Delete: Deletes an entry from the phonebook. You must first select an existing server from
the Server box before selecting this option. Click <OK> to delete the entry.
• Close: Exits the dialog with no action taken.
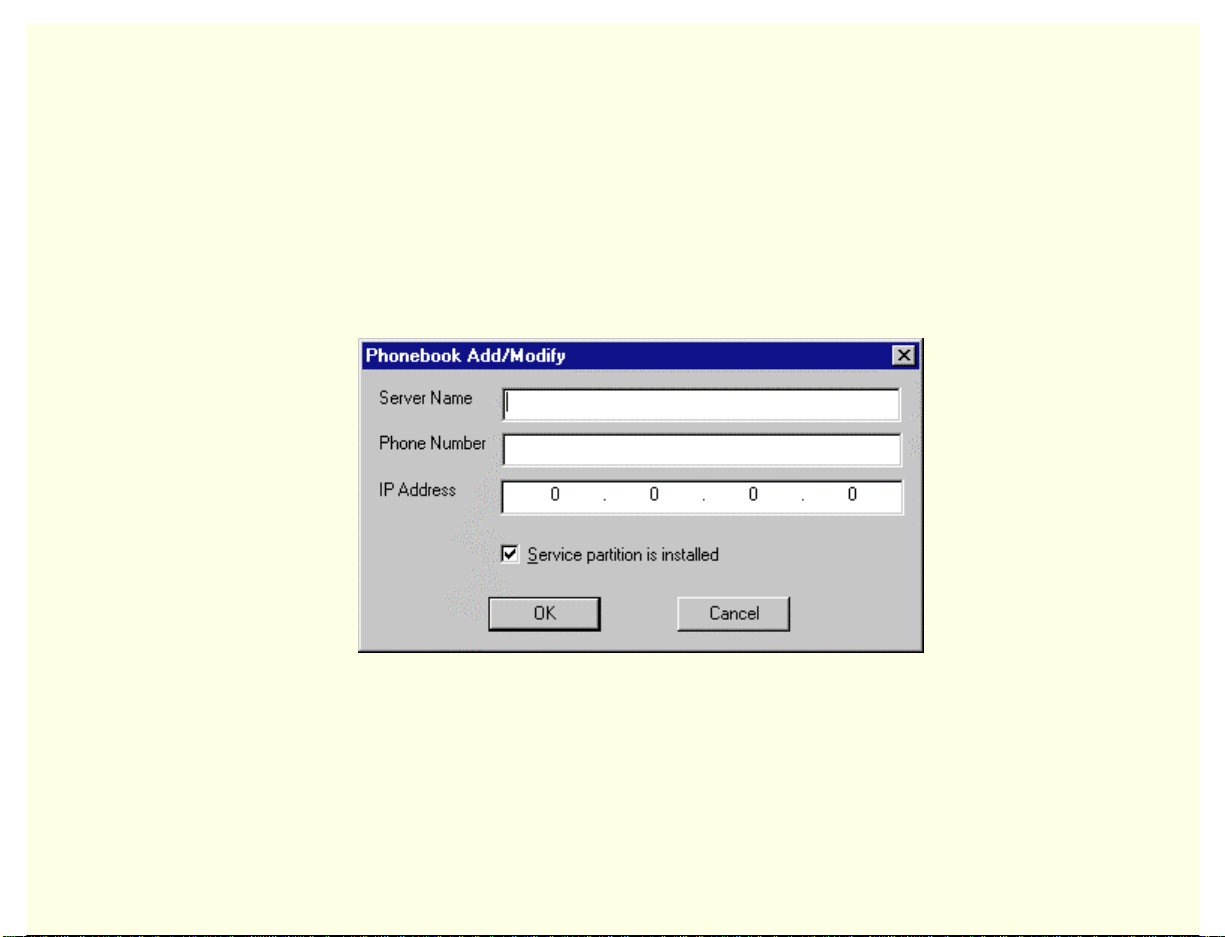
Phonebook Add/Modify Dialog
The Client SSU includes a Phonebook Add/Modify dialog.
Phonebook Add/Modify Dialog
8
Page 9

Intel Client System Setup Utility Version 0.8
Server Name
The Server Name area allows you to specify the name of the server associated with a phonebook
entry. Any change of the Server Name takes effect once the OK button is selected.
Phone Number
The Phone Number area allows you to specify the phone number associated with a phonebook
entry. Like the Server Name edit control, any change of the Phone Number takes effect once the
OK button is selected.
IP Address
The IP Address area allows you to specify the IP address of the selected server.
Service Partition
Use the Service Partition checkbox to specify whether the selected server has a service partition. A
fully-populated service partition is required on the server for the Client SSU to establish a
connection.
OK Button
The OK button updates the phonebook based on the information contained in various dialogs.
9
Page 10
Intel Client System Setup Utility Version 0.8
Cancel Button
The Cancel button discards any changes to the phonebook entry, closes the phonebook, and returns
to the Main Window.
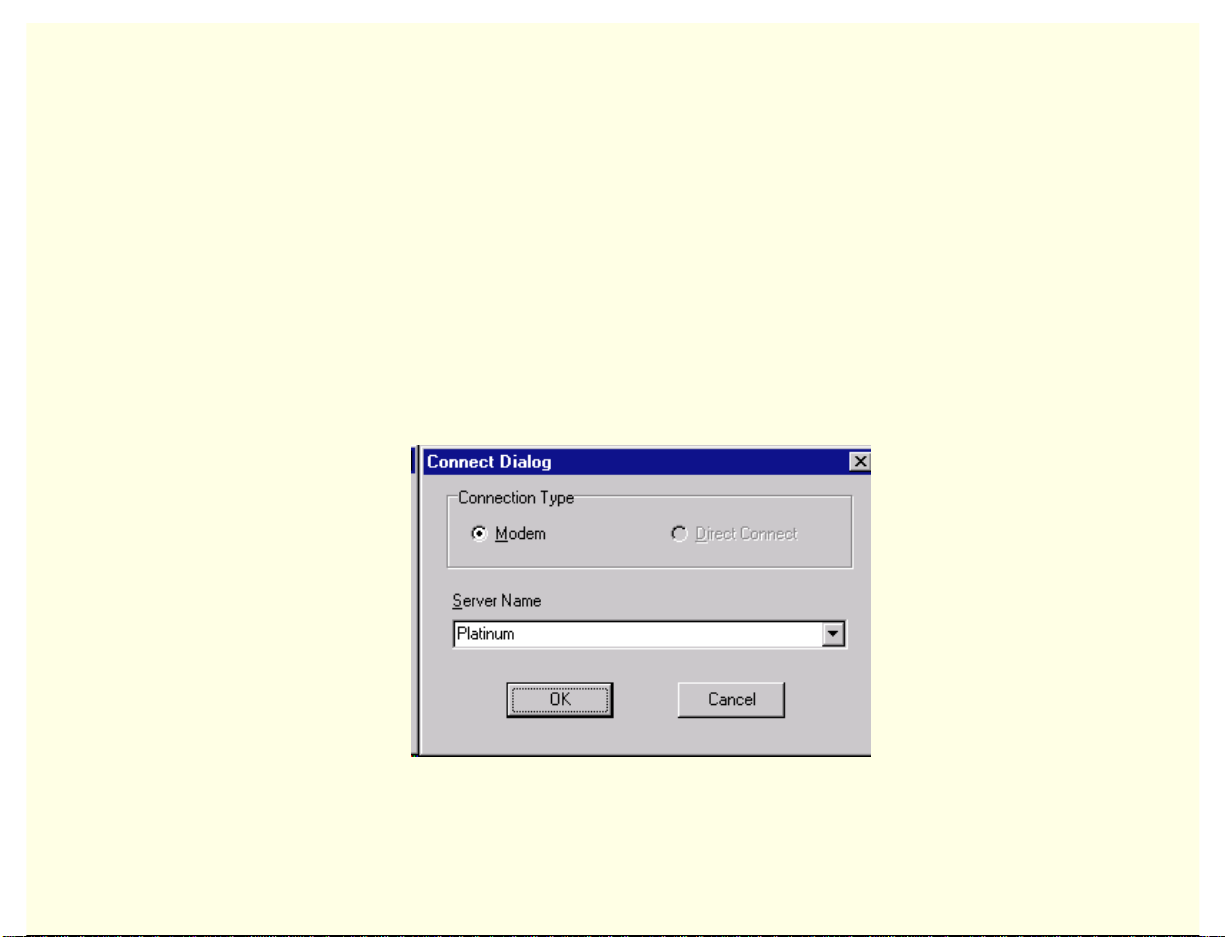
Connect Dialog
The Client SSU also includes a Connect dialog, which is used to establish the connection between
the Client SSU and the SSU Server in those cases where the phone number has not been passed to
the Client SSU on the command line or when the Client SSU was unable to make a server
connection with the phone number provided. The dialog box used to establish a connection is
shown in the Connect Dialog.
Connect Dialog
10
Page 11

Intel Client System Setup Utility Version 0.8
Modem
The Modem button selects the connection type for the server specified in the Server Name edit
control.
Direct Connect
The Direct Connect button is not used.
Server Name
The Server Name area provides an alphabetized list of server platforms that the Client SSU may
attempt to connect to. The list is based upon information maintained in the phonebook.
OK Button
The OK button attempts to establish a connection with the specified server platform. When
selected, the OK button prompts for an EMP password and if successful reboots the server to the
service partition and attempts to establish the connection with the server SSU. If the connection
cannot be established an error message displays and the server system should be rebooted to its
primary operating system using the DPC. While the connection is being established the Client
SSU displays connection information on the status bar.
Cancel
The Cancel button closes the connection dialog and returns to the Main Window.
11
Page 12

Intel Client System Setup Utility Version 0.8
Using the EMP Password Dialog
The Emergency Management Port Password dialog opens when you click the OK button in the
Connect dialog. Enter the password that will allow you to use the EMP Port on the selected server.
12
Page 13

Intel Client System Setup Utility Version 0.8
Configuring Resources
The Resource Configuration Add-in (RCA) provides two major functions:
• Modifying the contents of the system by adding and removing devices
• Modifying the resources used by devices
The Resource Configuration Add-in (RCA) provides the resource conflict detection and resolution
services. Its purpose is to help create a working configuration after adding or removing hardware
from the system. Only a single instance of the RCA may be used at one time.
RCA Main Window
The RCA presents a main window that supports several features, which are described in the
following sections.
13
Page 14

Intel Client System Setup Utility Version 0.8
Resource Configuration Main Window
Devices
It may be necessary to modify the resources of a device to accommodate certain operating systems,
applications, and drivers. It may also be necessary to modify resources to resolve a conflict. To
modify the resources associated with a device, highlight the device in the Devices list box and
double-click on the entry.
14
Page 15

Intel Client System Setup Utility Version 0.8
Save to System Button
The Save to System option writes the current configuration to non-volatile storage on the server
system. The stored configuration information is used by the server’s BIOS to configure the
platform during power-up.
Although the RCA can be started multiple times during a Client SSU session, it is recommended
that the managed server be rebooted once the ‘Save To System’ operation is performed.
Configuration changes to PCI devices will not be recognized during subsequent RCA uses unless
the managed server is rebooted.
Close Button
The Close option exits the RCA. Although no configuration information is automatically written to
non-volatile storage with this selection, you will be prompted to save any outstanding changes
before exiting.
Device Window
It may be necessary to modify the resources of a device to accommodate certain operating systems,
applications, and drivers. The Device Window provides several features to aid in this process.
15
Page 16

Intel Client System Setup Utility Version 0.8
Device Window
16
Page 17

Intel Client System Setup Utility Version 0.8
Function
Use the Function tree to select a device function so that the configuration choices and resources
associated with the function may be updated. Selecting a new function updates the Choice box and
the DMA, IRQ, Memory, and Ports list boxes as required. Some functions may not contain choices
or resources and are simply used for grouping or organizational purposes.
Choice
The Choice area shows a list of configuration choices associated with the current function. Change
choices by selecting the desired option. Selecting a new choice may update the DMA, IRQ,
Memory, and Ports list boxes.
DMA
Use the DMA list box to change an existing setting of a DMA resource associated with the current
choice. DMA resources can be changed by double-clicking the desired entry and updating the
DMA entry in the Change DMA window. If a DMA resource is not required for the current
choice, N/A is displayed as the only item in the DMA list box.
IRQ
Use the IRQ list box to change an existing setting of a IRQ resource associated with the current
choice. Change the resource by double-clicking the desired entry and updating the IRQ entry in the
Change IRQ window. If an IRQ resource is not required for the current choice, N/A is displayed as
the only item in the IRQ list box.
17
Page 18

Intel Client System Setup Utility Version 0.8
Memory
Use the Memory list box to change an existing setting of a memory resource associated with the
current choice. Change settings by double-clicking the desired entry and updating the memory
entry in the Change Memory window. If a memory resource is not required for the current choice,
N/A is displayed as the only item in the Memory list box.
Ports
Use the Ports list box to change an existing setting of a port resources associated with the current
choice. Change the setting by double-clicking the desired entry and updating the port entry in the
Change Port window. If a port resource is not required for the current choice, N/A is displayed as
the only item in the Port list box.
OK
The OK button commits any resource changes made to the device to the internal resource database.
Updated information is not stored in non-volatile storage on the server system until the Save to
System button is selected on the RCA main window.
Cancel
The Cancel button discards any changes made to the device and returns to the RCA main window.
Note that after the RCA conflict detection and resolution algorithm is run, it is not possible to
cancel changes to the selected device.
18
Page 19

Intel Client System Setup Utility Version 0.8
Resources Button
Click the Resources button to start the Resource Usage window.
System Resource Usage Window
Viewing system resources is useful for setup and debugging system configurations. The System
Resource Window provides several features to pres ent th is information.
19
Page 20

Intel Client System Setup Utility Version 0.8
System Resource Usage Window
20
Page 21

Intel Client System Setup Utility Version 0.8
Resource
The Resource List box shows a complete listing of the specified resources currently used in the
system, except for any relocatable expansion ROM images. Because they are fully relocatable by
the system BIOS, Relocatable expansion ROM images are not included. The address ranges
occupied by these expansion ROM images should not be considered in the conflict detection and
resolution algorithm provided in the RCA.
IRQ
The IRQ button updates the Resource list box to include only IRQ resources.
DMA
The DMA button updates the Resource list box to include only DMA resources.
Ports
The Ports button updates the Resource list box to include only port resources.
Memory
The Memory button updates the Resource list box to include only memory resources.
21
Page 22

Intel Client System Setup Utility Version 0.8
All
The All button updates the Resource list box to include all system resources: IRQs, DMAs, ports,
and memory resources.
Dump to File
The Dump to File button writes the system resource use information to the specified plain text file.
The system resource use information file may be stored on either the client or server system.
Close
The Close button exits the System Resource Usage window.
22
Page 23

Intel Client System Setup Utility Version 0.8
Controlling Boot Options
The Multiboot Add-in (MBA) provides a means for selecting Initial Program Load (IPL) devices.
Using the MBA, you can identify all IPL devices in the system and organize their boot order. On
power-up, the managed server’s BIOS will sequentially attempt to boot from each device. Only a
single instance of the MBA may be used at one time.
Multiboot Main Window
23
Page 24

Intel Client System Setup Utility Version 0.8
MBA Main Window
The MBA main window is described in the following sections.
Boot Device Priority
The Boot Device Priority list box contains the IPL devices in the system in descending boot
priority.
Hard Drives
The Hard Drives list box contains the list of Boot Connection Vector (BCV) devices in descending
priority. Typically, the BCV device list contains hard disks installed in the system. The Hard
Drives list shows the order in which the drives will be tried when trying to boot from a hard drive.
Move Up / Move Down
The Move Up/Move Down buttons allow you to move the selected IPL or BCV device in the Boot
Device Priority or Hard Drives list box respectively.
Save to System Button
The Save to System button writes the updated boot priority information to non-volatile storage on
the server system.
24
Page 25

Intel Client System Setup Utility Version 0.8
Cancel Button
The Cancel button exits the Multiboot Add-in. Configuration information is not written to nonvolatile storage on the server system with this selection, but you will be prompted to save any
outstanding changes before exiting.
25
Page 26

Intel Client System Setup Utility Version 0.8
Managing Passwords and Security Options
The Password Add-in (PWA) provides security and password support options. Within the PWA,
you can either set or modify the current server system BIOS User or Administrator passwords or
update any of the various security options available. Only a single instance of the PWA may be
used at a time.
PWA Main Window
The PWA presents a main window with three sections relating to the Administrative Password,
User Password, and the Security Options, which are described in the following sections.
26
Page 27

Intel Client System Setup Utility Version 0.8
Password Main Window
27
Page 28

Intel Client System Setup Utility Version 0.8
Administrator Password Status
The administrator password status control displays either Set or Not Set, depending on the current
status of the BIOS administrative password on the server system.
Change/Clear Admin Password
The Change/Clear Admin Password button allows you to set or change the administrator password
on the server system used by both the SSU and the system BIOS. All changes to the admin
password take place immediately and do not require the Save to System button to be pressed.
User Password Status
The User Password Status control displays either Set or Not Set, depending on the current status of
the BIOS user password on the server system.
Change/Clear User Password
The Change/Clear User Password button allows you to set or change the user password on the
server system that is used by both the SSU and the system BIOS. All changes to the user password
take place immediately and do not require the Save to System button to be pressed. A change to
the user password is immediately reflec ted in the user passw ord contro l.
28
Page 29

Intel Client System Setup Utility Version 0.8
Hot Key
The Hot Key box provides a list of valid key combinations that can be used to put a system in
secure mode. This option is only available when the user password is set—otherwise the option is
grayed out. The Hot Key selection is saved to the platform via the Save To System button.
(Support for this option may vary between platforms.)
Lock Out Timer
The Lock Out Timer box provides a list of valid secure mode timer values that may be selected. If
no keyboard or mouse activity is detected for the specified interval, the server will change to
Secure Mode. The option is available only when the user password is set, otherwise it is grayed
out. The Lock Out Timer option is saved to the platform via the Save to System button.
(Support for this option may vary between platforms.)
Secure Boot Mode
The Secure Boot Mode box allows you to enable or disable secure boot mode. The option is
available only when the user password is set, otherwise it is grayed out. The Secure Boot Mode
option is saved to the platform via the Save to System button.
(Support for this option may vary between platforms.)
29
Page 30

Intel Client System Setup Utility Version 0.8
Video Blanking
The Video Blanking box allows you to enable or disable the server system’s video screen when the
secure mode is active. The option is available only when the user password is set, otherwise it is
grayed out. The Video Blanking option is saved to the platform via the Save to System button.
(Support for this option may vary between platforms.)
Floppy Write Protect
The Floppy Write Protect box allows you to enable or disable writing to the floppy diskette drive
when secure mode is active. The option is available only when the user password is set, otherwise
it is grayed out. The Floppy Write Protect option is saved to the platform via the Save to System
button.
(Support for this option may vary between platforms.)
Front Panel Lock Out
The Front Panel Lock Out box allows you to enable or disable the reset and power buttons when
secure mode is active. The option is available only when the user password is set, otherwise it is
grayed out. The Front Panel Lock Out option is saved to the platform via the Save to System
button.
(Support for this option may vary between platforms.)
30
Page 31

Intel Client System Setup Utility Version 0.8
Save to System
The Save to System button writes the updated security options to non-volatile storage on the server
system. Note that the Save To System button does not update either the administrator or user
password, because they are updated immediately following a change.
Cancel Button
The Cancel button exits the PWA. No configuration information is automatically written to nonvolatile storage with this selection, but you will be prompted to save any outstanding changes
before exiting.
31
Page 32

Intel Client System Setup Utility Version 0.8
Using the System Event Log
The System Event Log (SEL) contains a sequential record of events that have occurred in the
remote server.
The contents of the SEL will help you to determine the cause of server system failures.
The SEL viewer allows you to
• Examine SEL records via the Baseboard Management Controller (BMC)
• Examine SEL records by sensor or event type
• Save SEL records to a file on the local or remote system
• Clear SEL records from the nonvolatile storage area on the server system
Click the SEL icon
menu on the toolbar.
in the Client SSU toolbar to start the SEL Manager. This also places a SEL
32
Page 33

Intel Client System Setup Utility Version 0.8
For each entry, the SEL viewer displays:
• A record identifier
• Time stamp information
• A generator identifier
• The sensor type
• The sensor number
• An event description
Use the online help to find information about specific controls and features of the SEL Manager.
You can sort the columns in the SEL Manager by clicking the column heading.
33
Page 34

Intel Client System Setup Utility Version 0.8
Using the Sensor Data Recor ds
The Sensor Data Records (SDR) contain the information recorded from each of the configured
sensors in the managed server. Record data is displayed in hexadecimal or binary form.
The contents of the SDR file will help you to determine the cause of server system failures.
Using the SDR tool, you can
• Examine Sensor Data Records
• Examine SDRs by Record type
• Save SDRs to a file on the local or remote system
Click the SDR icon
placed on the toolbar, which provides access to SDR Manager properties.
Information is displayed when a specific sensor type is selected in the SDR information tree.
Use the online help to find information about specific controls and features of the SDR Manager.
in the Client SSU toolbar to start the SDR Manager. An SDR menu is
34
Page 35

Intel Client System Setup Utility Version 0.8
SDR Manager Window
35
Page 36

Intel Client System Setup Utility Version 0.8
Using the FRU Inventory
The Field Replaceable Unit (FRU) invento ry records cont ain in formation about the components
that comprise the remote server. The information, based on the Intelligent Peripheral Management
Interface (IPMI) specification, includes such things as part numbers, serial numbers,
manufacturer’s names, version numbers, and asset tag numbers.
The contents of the FRU inventory files will help you to identify components that may be of
interest while troubleshooting a system failure. Using the FRU, you can
• Examine individual FRU inventory areas
• Save FRU inventory information to a file on the local or remote system
Click the FRU icon
exists, you’ll see a status message to tell you that the FRU inventory records are loading. If no
server is connected, then you'll see a connect dialog.
Starting the FRU Manager adds an FRU menu to the toolbar, which you can use to see the FRU
properties or reload the FRU Manager.
The FRU Manager displays a hierarchical tree of FRU components, and detailed inventory
information for each selected unit. Highlight a component in the tree with the mouse to see its
associated inventory information.
in the Client SSU toolbar to start the FRU Manager. If a server connection
36
Page 37

Intel Client System Setup Utility Version 0.8
The FRU Manager does not display all of the FRU information defined in the IPMI specification.
It displays selected information from the chassis, board, and product areas that will be helpful in
identifying the components of a managed server.
Use the online help to find information about specific controls and features of the FRU Manager.
37
 Loading...