


Infinity Primus 150 Owners manual

Owner’s Guide
Primus 140
Primus 150
Primus 160
PRIMUS SPEAKER SYSTEMS

INFINITY PRIMUS™SERIES
The Primus series of loudspeakers continues Infinity’s longstanding
commitment to accurate sound reproduction.Our proprietary Metal
Matrix Diaphragm (MMD
™
) drivers,precision dividing networks,and
rigid,well-braced enclosures combine to deliver uncompromised
performance in any stereo or multichannel home theater system.
In addition,Primus series speakers are magnetically shielded for safe
placement adjacent to a television.
UNPACKING THE SPEAKERS
If you suspect damage from transit,report it immediately to your dealer.
Keep the shipping carton and packing materials for future use.
PLACEMENT
Stereo
Before deciding where to place your Primus speakers,survey your room
and think about placement,keeping the following points in mind, using
Figure 1 as a guide:
•For best results,place the speakers 6'–8' apar t.
•Position each speaker so that the tweeter is approximately at ear level.
• Generally,bass output will increase as the speaker is moved closer to a
wall or corner.
• Refer to “Home Theater”below if you also plan to use the speakers for
home theater reproduction.
Figure 1.Experiment with speaker placement to obtain the best
bass level and stereo imaging in your room.
Home Theater
For front-channel use,place one speaker on the left and another on the
right,along either side of the television monitor.Since the speakers are
magnetically shielded,you can place them without worrying about the
field distorting the TV picture.
Forrear-channel use,place Primus bookshelf speakers on bookshelves or
stands alongside the listening position.Final placement depends on room
acoustics,availability of space,and your listening preference (Figures 2
and 3).
The center channel speaker should be placed on top of or directly below
the television and aimed toward the listening area.
NOTE:An Infinity powered subwoofer will add impact and realism to both
music and film soundtracks.Contact your Infinity dealer for recommendations on subwoofer models for your application.
Figure 2.This overhead view shows a typical home theater plan.
Figure 3.This figure shows an alternate layout,which may be
more suitable for some rooms.
Couch
Left
Front
Channel
Left
Surround
Channel
Right
Surround
Channel
Right
Front
Channel
Center
Channel
Infinity Subwoofer
(optional)
Couch
Left
Front
Channel
Left
Surround
Channel
Right
Surround
Channel
Right
Front
Channel
Center
Channel
Infinity Subwoofer
(optional)
Listening Position
Left
Channel
Right
Channel
2
PRIMUS SPEAKER SYSTEMS
3
PRIMUS SPEAKER SYSTEMS
+–
Receiver or
Amplifier
(rear view)
Speaker (rear view)
– +
(one channel shown)
REDBLACK
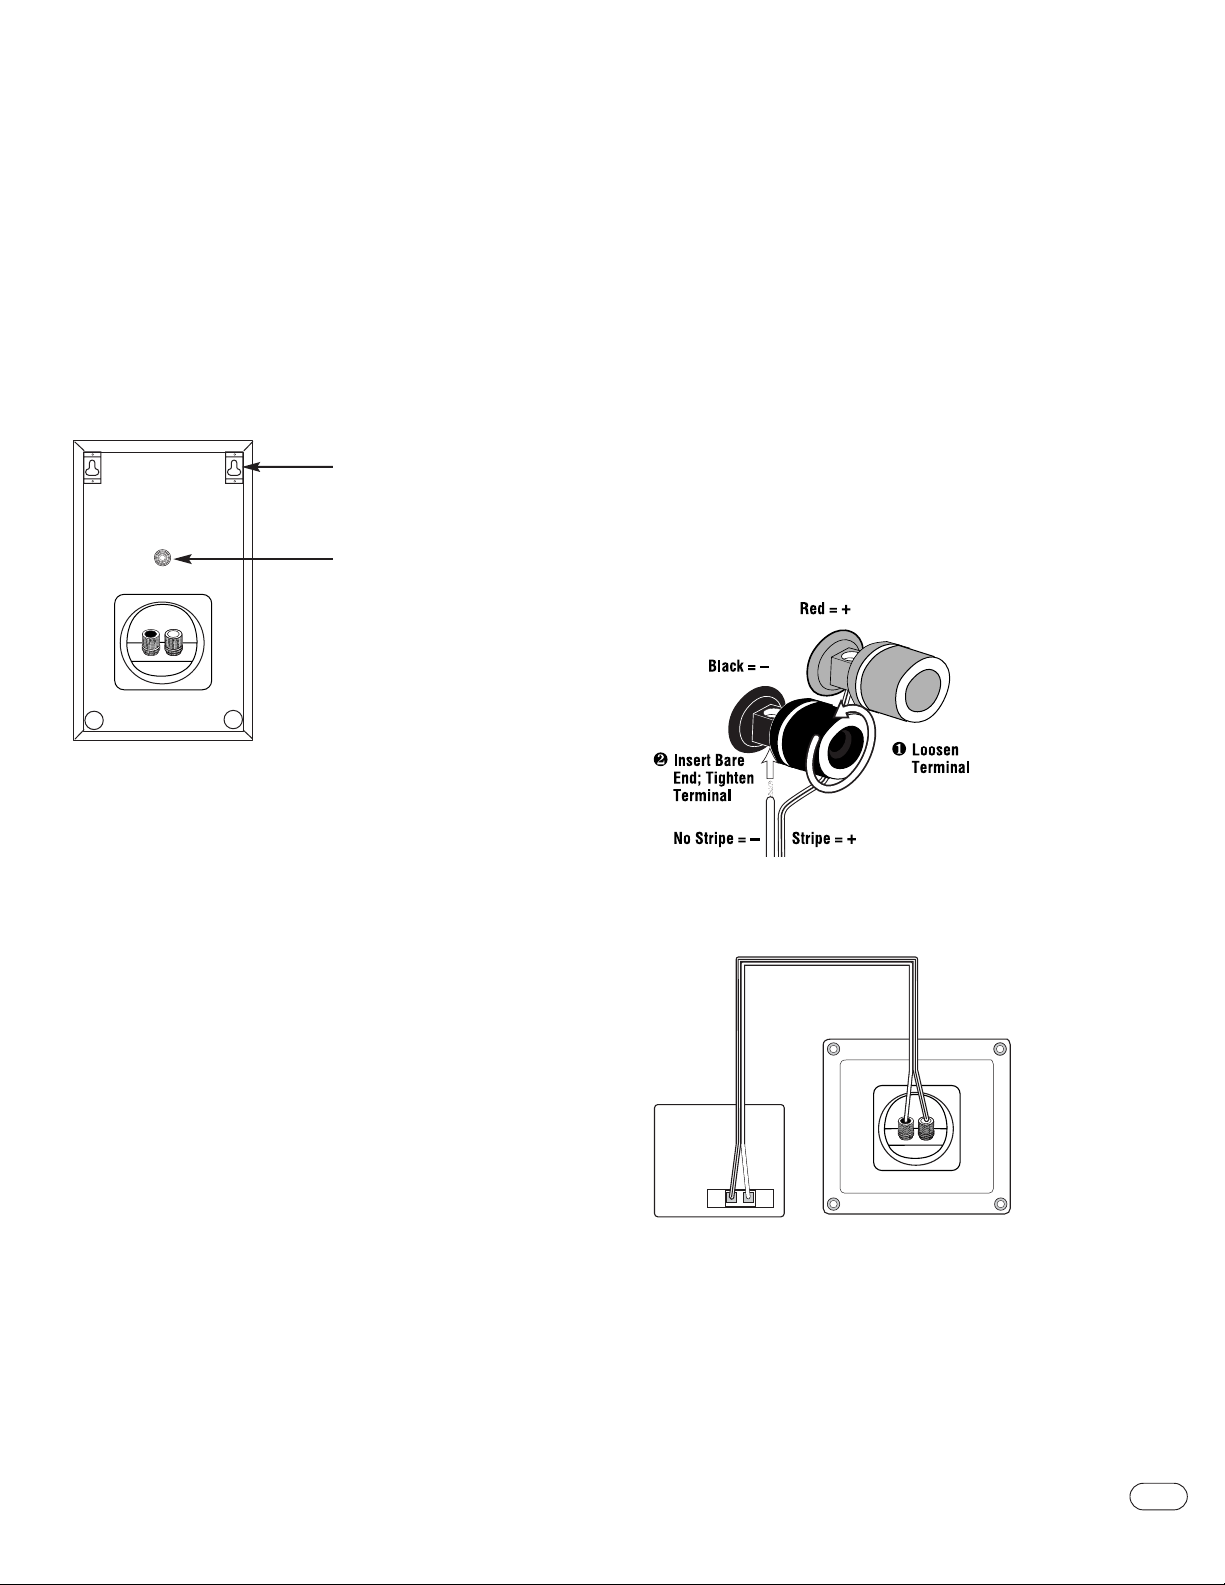
Figure 5.This example shows how to connect bare wires to the terminals.
FIGURE 4.
Step 1.
Mark the positions on the wall where you would like to place the mounting
screws.
Step 2.
Fasten two 1-1/2,"#10 wood screws to the wall using the markings
placed in Step 1 as your guide.Leave an 11/16" space between the wall
and screwhead.If a wall stud is not available,use an appropriate anchor.
Step 3.
Place the speaker on the wall by aligning the keyholes on the back of the
speaker to the screwheads on the wall.Once positioned properly,the
speaker should slide down slightly and become secure.
The Primus 140 also allows the use of third-party wall brackets using the
1/4"-20 threaded insert located beneath the keyhole mount.Consult the
wall-bracket manufacturer for selection of proper bracket.ker on the wall
by aligning the keyhole on the back of the speaker to the screwhead on
the wall.Once positioned properly,the speaker should slide down slightly
and become secure.
– +
Keyhole mounts
1/4"-20 Threaded insert
(Primus 140 only)
Figure 6. Wiring diagram shows polarity connections for one
channel of a stereo or home theater system.
WIRING THE SYSTEM
IMPORTANT:Make sure all equipment is turned off before making any
connections.
For speaker connections,use a minimum #16-gauge speaker wire with
polarity coding.The side of the wire with a ridge or other coding is
usually considered positive polarity (i.e.,+).
NOTE: If desired,consult your local Infinity dealer about speaker wire and
connection options.
The speakers have coded terminals that accept a variety of wire connectors.The most common connection is shown in Figure 5.
To ensure proper polarity,connect each
+ terminal on the back of the
amplifier or receiver to the respective
+ (red) terminal on each speaker,
as shown in Figure 6.Connect the –(black) terminals in a similar way.
See the owner’s guides that were included with your amplifier,receiver
and television to confirm connection procedures.
IMPORTANT:Do not reverse polarities (i.e.,+ to –or –to +) when
making connections.Doing so will cause poor imaging and diminished
bass response
.
WALL-MOUNTINGTHE PRIMUS 140 AND
PRIMUS 150
The Primus 140 and Primus 150 are designed to mount directly to a
wall.Each satellite speaker has two keyholes on the back. Each speaker
will require (2) 1-1/2,"#10 wood screws fastened to a wall stud.If a
wall stud is unavailable,install an anchor appropriate for a 1-1/2,"#10
screw.
NOTE:The customer is responsible for the correct selection and use of
mounting hardware (available through hardware stores) that will ensure
the proper and safe wall-mounting of the speakers.
 Loading...