

USERS MANUAL
INFINITYTM USB UNLIMITED
UK . DE . F R . D K


UK USERS MANUAL 4
DE BENUT ZERHANDBUCH 24
FR MANUE L UTILISATEUR 44
DK BRUGER MANUAL 64

Users manual
INFI N I TYTM US B UNL I MITE D
4
Introduction
With the Infi nity USB Unlimited you can quickly and easily
program most of the different smartcards available today.
Infi nity USB Unlimited supports PIC-based cards like Gold and
Silvercard, AVR-based cards like Funcard and the latest phoenixbased high-security cards like TitaniumCard, MII, KnotCard
and BasicCard directly in the software. Support for future and
even more advanced access- and security-cards will be added
through new software updates.
With the two integrated smartcard connectors you have the
possibility of using both regular smartcards and small form
factor smartcards like SIM/GSM cards. The accompanying SIM
editor makes backing up or editing your SIM card easy.
For information, software updates and support, visit:
www.infi nityusb.com

5
UK . EN GLI SH
Package contains / Table of contents
Package contains
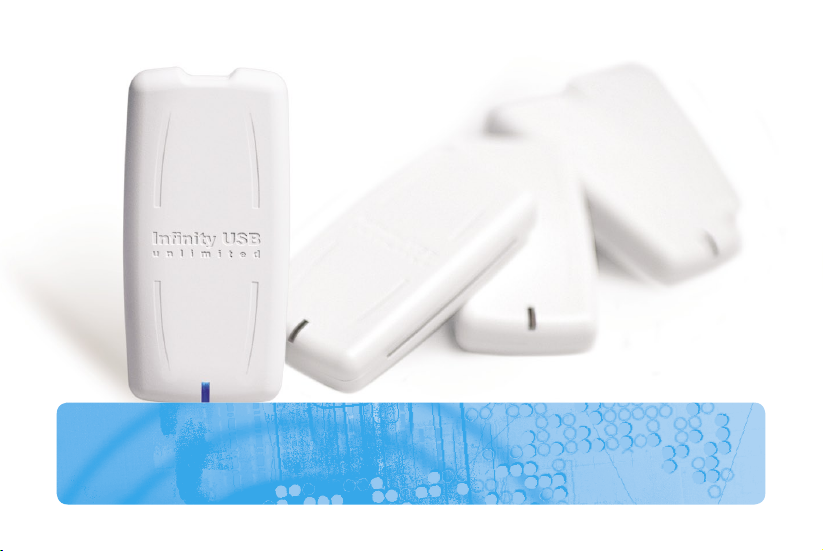
�• Infi nity USB Unlimited
�• USB2.0 compatible cable
�• Printed manual in multiple languages
�• Driver and software CD
Table of contents
6. Hardware installation
7. Driver installation
8. Windows XP
10. Windows 2000
12. Windows 98/ME
14. Software installation / Quickstart guide
16. Advanced software usage
16. General
17. Detect
18. Fuses / LED states
19. Settings
22. Troubleshooting
23. Product information

6
INFI N I TYTM US B UNL I MITE D
Hardware installation
Hardware installation
Infi nity USB Unlimited is a USB based smartcard programmer
consisting of a mini-USB connector, a standard smartcard
connector, a small form factor connector and an RGB (multi
colored) light emitting diode (LED).
To install your Infi nity USB Unlimited connect the USB cable to
a free USB port in your PC or USB hub. Afterwards connect the
mini-USB connector to the Infi nity USB Unlimited hardware.
When you have connected Infi nity USB Unlimited, Windows will
start the ‘Found new hardware wizard’.

7
Driver installation
Driver installation
When you connect your Infi nity USB Unlimited for the fi rst
time the LED will fl ash red, this means that the hardware is
connected but the driver has not yet been installed. Windows
will now ask you for a driver, and in the next section you will
fi nd a guide on how to install the driver for your particular
operating system.
If the LED still fl ashes red when the driver installation is done
please read the troubleshooting-section on page 22 to solve
the problem
UK . EN GLI SH

INFI N I TYTM US B UNL I MITE D
8
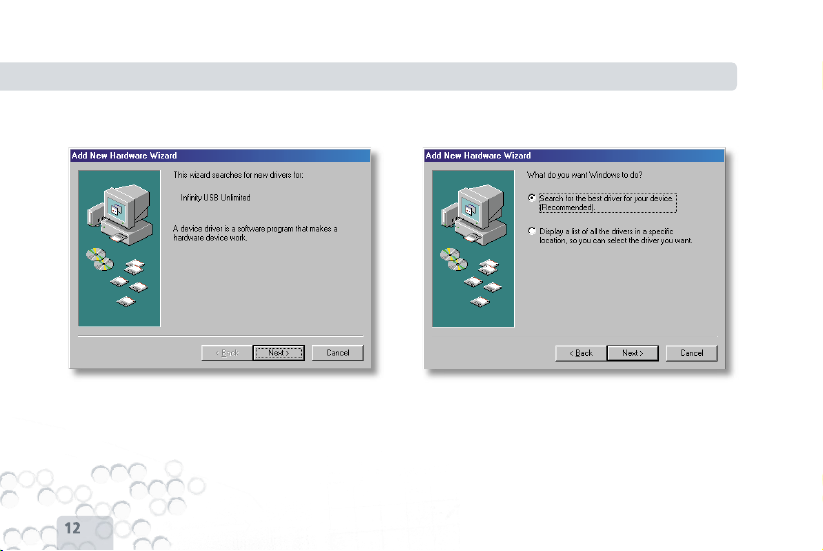
Windows XP
1. The found new hardware wizard starts. Select ‘Install from a
list or specifi c location’. Click next.
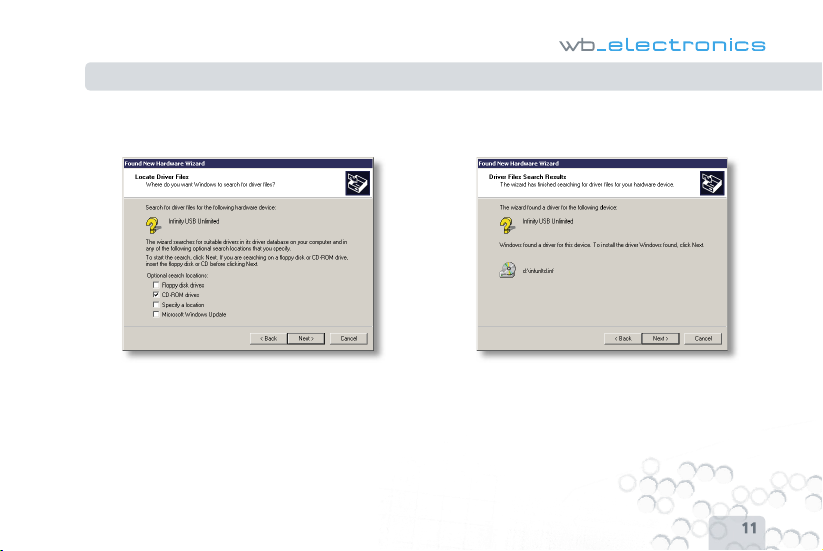
2. Select ‘Search for the best driver in these locations’ and
‘Search removable media’. Insert the driver CD. Click next.
Driver installation > Windows XP
9
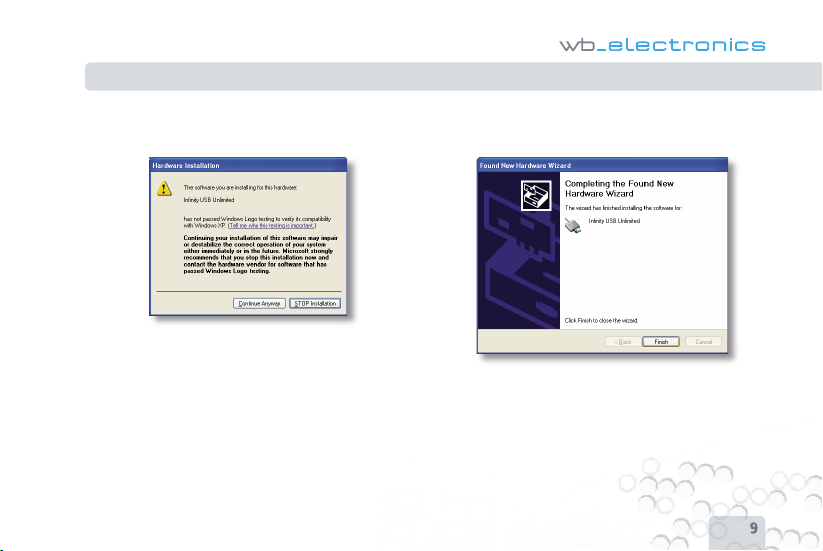
3. Click Continue anyway.
4. The driver has now been installed. Click fi nish.
Driver installation > Windows XP
UK . EN GLI SH
INFI N I TYTM US B UNL I MITE D
10
Windows 2000
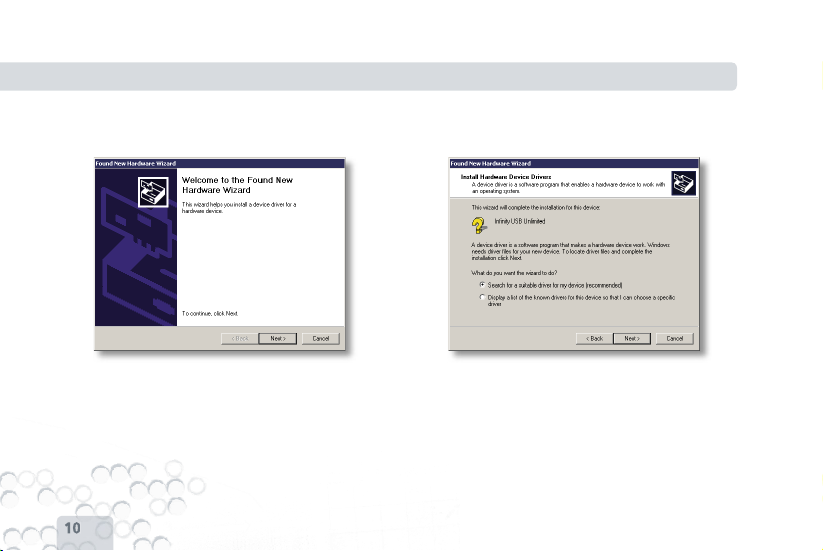
1. The found new hardware wizard starts. Click next. 2. Select ‘Search for a suitable driver’. Click next.
Driver installation > Windows 2000
11
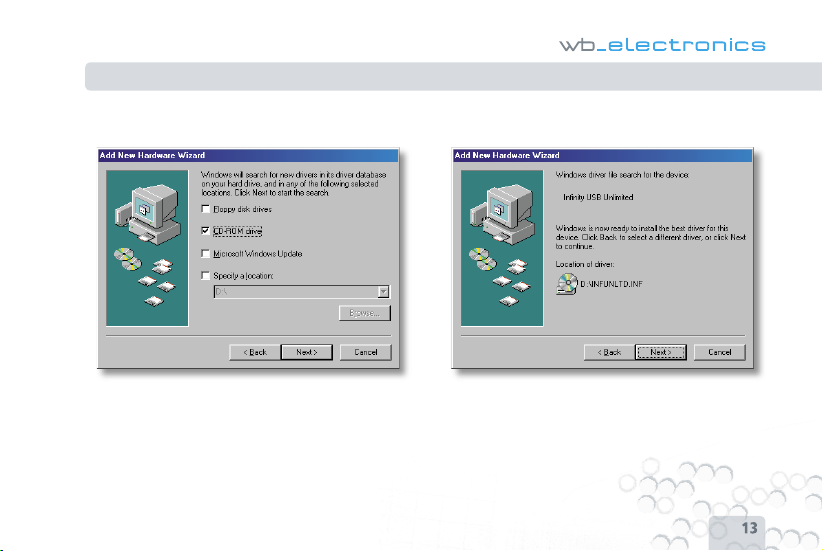
3. Select ‘CD-ROM drives’ and insert the driver CD. Click next. 4. The driver has now been installed. Click fi nish.
Driver installation > Windows 2000
UK . EN GLI SH
INFI N I TYTM US B UNL I MITE D
12
Windows 98/ME
1. The found new hardware wizard starts. Click next. 2. Select ‘Search for the best driver’. Click next.
Driver installation > Windows 98/ME
13
3. Select CD-rom drive and insert the driver CD. Click next. 4. The driver has been found on the CD-ROM. Click next. The
driver has now been installed. Click Finish.
Driver installation > Windows 98/ME
UK . EN GLI SH
INFI N I TYTM US B UNL I MITE D
14
Software installation
To install the necessary software for the Infi nity USB Unlimited
insert the accompanying CD in your CD-ROM drive, the installation will automatically begin.
If the installation does not begin automatically, you have to run
setup.exe on the CD-ROM.
During setup you have to choose an installation folder, or just
use the default folder. You will have the option of creating a
shortcut on your desktop or in the quick launch bar. Use these
shortcuts to start the software when installation is done.
Quickstart guide
Start the Infi nity USB Unlimited software by using the shortcuts
created during installation.
First time the software is started you have to select a language.
The language can be changed in the menu
‘Options > Language’.
Programming a card requires 3 simple steps.
Software installation / Quickstart guide

15
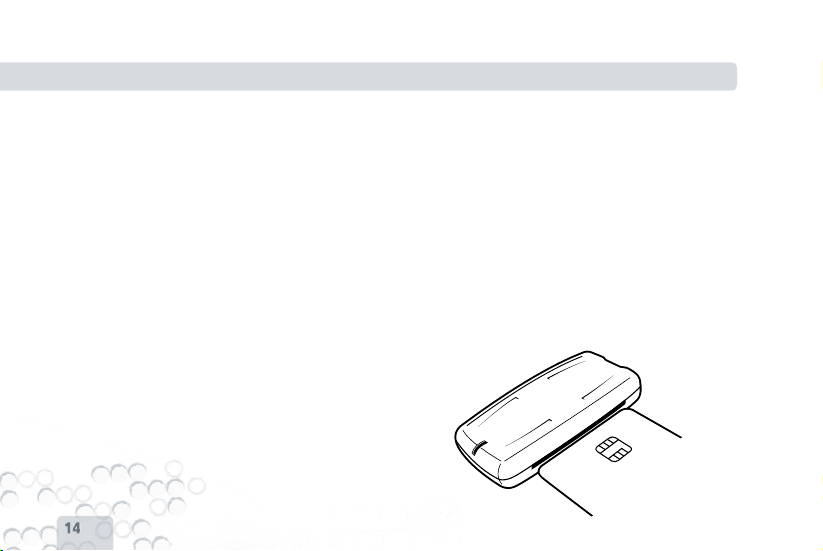
1. Insert your smartcard with the contacts facing upwards like
illustrated.
The software will show that a card has been inserted and will
try to detect the card. When the card has been detected it is
automatically selected on the list. Make sure the correct card
has been selected before proceeding.
2. Load one or more data fi les
Different smartcards have different memory areas, most have a
fl ash-area, an internal EEprom and an external EEprom. Usually
one fi le for each area needs to be loaded depending on the
application usage.
3. Click the big ‘Write’ button
This begins programming of all the loaded fi les. If you wish to
program only one particular memory area, push the arrow part
of the ‘Write’-button and select the area.
Quickstart guide
UK . EN GLI SH
INFI N I TYTM US B UNL I MITE D
16
Advanced software usage
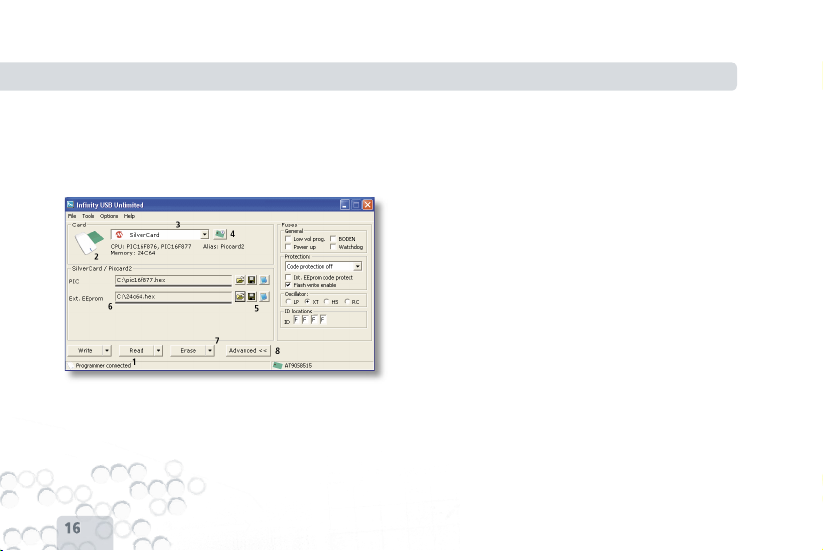
General
1. The left part of the statusbar indicates if Infi nity USB Unlimited is connected.
2. When a card is inserted in one of the 2 smartcard connectors,
the icon in the upper left corner will change, initial details about
the card will be shown in the lower right corner.
3. The cardtype can manually be selected from the list. The list
will be limited and only display the cards that contains the
CPU/OS detected.
The CPU, memory, OS of the card will be listed underneath.
4. If you click the ‘Detect’ icon a detection window will appear.
If you right click the icon you will have the option of directly
detecting and selecting the card.
5. Open, save and show data fi les.
6. Shows which fi les are opened or read from a smartcard. The
small bar underneath each fi lename shows which areas of the
fi le contains data. If you want to remove a fi le or previously
read data, mark the fi lename and press DEL on your keyboard.
Advanced software usage > General
17
7. Use the Write, Read or Erase buttons to execute an action
on the card. If the left part of the buttons are used all tasks
are performed automatically but if the drop-down menus on
the right side are used, single tasks can be selected. If one of
these actions are selected, a status window is opened showing
detailed information about current and fi nished tasks, aswell as
the estimated time remaining for the current operation.
If an error occurs during programming of a card, the button
‘Show errors’ can be used to display detailed information about
where the error occured.
8. The ‘Advanced’ button opens or closes advanced options for
the currently selected card.
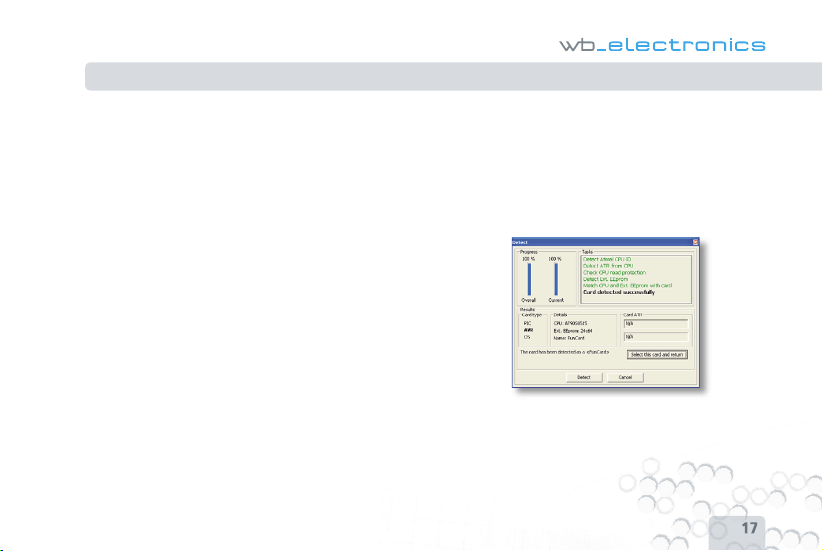
Detect
The detect window makes it possible to identify exactly which
card is currently used. This form of detection might erase
parts of the card so it should not be used on cards containing
important data.
Push the detect button to begin. When detection is done you
will have the option to return to the main window with the
correct card selected, this is done by pushing the button ‘Select
this card and return’.
Advanced software usage > Detect
UK . EN GLI SH

INFI N I TYTM US B UNL I MITE D
18
Fuses
Fuses are advanced settings which are programmed into the
CPU. Fuses are often used to protect the CPU from being
read after it has been programmed, and to select which oscillatortype is used.
Certain cards have many different fuses and it is necessary to
read the datasheet for the CPU to gain further knowledge of
these.
For all cards, fuses default to the optimal settings for most uses.
For more information about fuses, visit:
www.microchip.com
www.atmel.com
LED states
Hardware not initialized.
Hardware initialized, software started, smartcard
or simcard not inserted.
Hardware initialized, software started, smartcard
or simcard inserted.
Hardware initialized, software started,
programming.
Hardware initialized, software started, card in
both slots.
Hardware initialized, software started,
programming errors.
Hardware initialized, software started, other
errors.
Userdefi ned - Hardware initialized, software
closed.
Advanced software usage > Fuses / LED states

19
Settings
Settings for Infi nity USB Unlimited are accessed from the menu
‘Options > General’ and are divided into 3 tabs: General,
Advanced and Startup.
General
‘Autoload last opened fi les’
Automatically loads the last opened fi les, when the application
starts.
‘Remember directory on fi le load’
Remembers which folder you last opened fi les from.
‘Use embedded Int. EEprom in fl ash-fi le’
Some hex fi les contain data for both the fl ash and int. EEprom,
this is normal for PIC-based smartcards but has to be enabled
for AVR-based smartcards, by checking the checkbox.
‘Auto close status window when programming is successful’
When programming a smartcard a status window is displayed
with information. If this option is enabled the status window
automatically closes when programming is fi nished.
‘Beep when done’
Generates a standard Windows sound when programming is
fi nished.
‘Supress general warnings’
If enabled most minor warnings are not displayed.
‘Disable verify of ext. EEprom’
Normally data is automatically verifi ed when programming a
card, this option makes it possible to disable verifi cation of ext.
EEprom. This could increase speed during this type of programming, but errors would not be discovered.
Advanced software usage > Settings
UK . EN GLI SH

INFI N I TYTM US B UNL I MITE D
20
‘Restore CPU-memory after ext. EEprom activity’
When the ext. EEprom is accessed the CPU on the card is
overwritten with a bootloader. This makes the previous data
on the CPU invalid. If you enable this option the data on the
CPU will be read out before it is erased, and restored when ext.
EEprom activity is done. If the CPU is protected from read-out, a
warning is issued and you can choose to continue without the
possibility to restore the CPU contents.
‘Erase ext. EEprom before programming’
The software optimizes the data so as little data as needed
is written to the card. Normally an ext. EEprom is not erased
before programming because new data can overwrite it without
prior erase. Some applications expects that an ext. EEprom contains the value 0xFF at empty locations. If this option is enabled
all unused locations will be fi lled with 0xFF.
Advanced
‘Autodetect CPU on card when card inserted’
When a card is inserted the software will try to detect the CPU
on the card automatically.
‘Limit card selection based on detected CPU’
Multiple cards can contain the same kind of CPU, with this
option cards that do not contain the detected CPU are removed
from the list. This will make selecting the relevant card simpler.
‘Autodetect CPU before write/read/erase’
Verifi es that the CPU on the card matches the CPU on the
selected card, before writing, reading or erasing a card.
‘Automatic full detection, when card is inserted’
If needed the application will prompt you to completely detect
the card that is inserted. Should only be used if you are unsure
which card you are using.
Advanced software usage > Settings

21
Startup
‘Check for new software updates’
Checks for a new software version by connecting to our webserver. If you are using the latest software version you will not
be further notifi ed, but if there is a new version available on the
server, you will have the option of downloading and installing it.
Further information
For further information and support visit:
www.infi nityusb.com/support
Support is available on the forum at:
www.infi nityusb.com/forum
Advanced software usage > Settings / Further information
UK . EN GLI SH

INFI N I TYTM US B UNL I MITE D
22
Troubleshooting
[Question 1]: I have connected the Infi nity USB Unlimited but
the LED is fl ashing red.
[Answer 1]: If the Infi nity USB Unlimited is fl ashing red when
connected, it means the driver is not installed correctly. If the
driver has been attempted installed before, try connecting the
Infi nity USB Unlimited directly to another USB port on the PC,
and try another USB cable.
[Question 2]: When I insert a card in my Infi nity USB Unlimited
the error ‘No CPU could be detected on the inserted card’ is
displayed.
[Answer 2]: This error could be caused by dirty contacts on the
card, make sure they are clean or clean them with a lint free rag
and isopropyl alcohol.
Make sure the card is facing the right way, contacts facing up
for regular smartcards and contacts facing down for SIM/GSM
smartcards. The error could also indicate that the card you are
trying to use cannot be used with the Infi nity USB Unlimited.
[Question 3]: When I program a card the error ‘Could not verify
location’ is displayed.
[Answer 3]: This error typically arises when older or worn out
cards have errors at certain memory locations. Also make
sure the contacts are clean. If you keep receiving this error try
another card.
Troubleshooting

23
Product information
Product warranty
The limited 2 years warranty covers production defects from
date of purchase.
Disclaimer
Do not use this product for any other purpose than the
intended. Under no circumstances including negligence, shall
WB Electronics ApS be liable to you for any incidental, indirect,
speciel or consequential damages (including property damage)
arising from the use or misuse of this product.
Intellectual rights
The software is exclusively for use with WB Electronics ApS
products. The software must not be altered or modifi ed in any
way.
Copyright © 2002-2005 - WB Electronics ApS
Produkt specifi cations
Dimensions 42*86*16mm
Weight 32g
Temperatur range 0° - 45° Celcius
Relative humidity 15% - 95%
Placement Do not place in direct sunlight.
System requirements
Windows 98SE, Windows ME, Windows 2000, Windows XP
Min. Pentium class CPU
Min. 1MB free harddisk space
Min. 32MB free memory
Min. 1 free USB 1.1 or 2.0 port
Product information
UK . EN GLI SH

Benutzerhandbuch
INFI N I TYTM US B UNL I MITE D
24
Einleitung
Mit dem Infi nity USB Unlimited kann man die unterschiedlichsten heute verfügbaren Smartcards einfach und leicht programmieren.
Die Infi nity USB Unlimited Software unterstützt PIC basierende
Karten wie Gold- und Silvercard, AVR basierende Karten wie
Funcard und die neuesten Phönix basierenden Hochsicherheitskarten wie die Titanium-, MII, Knot- und Basiccard.
Unterstützung für zukünftige und weiterentwickelte Zugangsund Sicherheits-Karten werden durch neue Software-Updates
hinzugefügt.
Auf Grund der zwei integrierten Smartcard-Schächte hat man
die Möglichkeit sowohl die üblichen Smartcards als auch kleine
Smartcards wie SIM/GSM Karten zu verwenden. Der beigelegte
SIM-Editor macht es leicht die SIM-Karte zu editieren oder die
Daten zu sichern.
Für Informationen, Software-Updates und Unterstützung
besuche:
www.infi nityusb.com

25
DE . DE UTS CH
Paket beinhaltet / Inhaltsverzeichnis
Das Paket enthält
�• Infi nity USB Unlimited
�• USB2.0 kompatibles Kabel
�• Handbuch in mehreren Sprachen
�• Treiber und Software CD
Inhaltsverzeichnis
26. Hardware Installation
27. Treiber Installation
28. Windows XP
30. Windows 2000
32. Windows 98/ME
34. Software Installation /
Schnelleinführung
36. Erweiterte Software Bedienung
36. Allgemein
37. Erkennen
38. Sicherungen / LED Stati
39. Einstellungen
42. Fehlerbehebung
43. Produkt Informationen

26
INFI N I TYTM US B UNL I MITE D
Hardware Installation
Hardware Installation
Infi nity USB Unlimited ist ein USB basierender Smartcard
Programmer bestehend aus einem Mini-USB Stecker, einem
Standard-Smartcard Schacht, einem kleinen Formfaktorschacht
und einer RGB (mehrfärbig) lichtemittierenden Diode (LED).
Um den Infi nity USB Unlimited zu installieren verbinde ihn mit
einem freien USB-Port oder mit dem USB-Hub.
Schliesse danach den Mini-USB Stecker an den Infi nity USB
Unlimited.
Wenn der Infi nity USB Unlimited angeschlossen ist, startet
Windows den ‘Hardware Assistenten’.

27
Treiber Installation
Treiber Installation
Wenn der Infi nity USB Unlimited das erste mal angesteckt wird,
leuchtet die LED rot, das bedeutet, dass das Gerät angesteckt
ist, der Treiber aber noch nicht installiert wurde. Windows
fragt danach nach dem Treiber, im nächsten Abschnitt ist eine
Anleitung zu fi nden, wie der Treiber für das entsprechende
Betriebssystem installiert werden muss.
Wenn die LED weiterhin rot blinkt, nachdem die Treiber-Installation abgeschlossen ist, bitte den Abschnitt Fehlersuche auf Seite
42 lesen um das Problem zu beheben.
DE . DE UTS CH

INFI N I TYTM US B UNL I MITE D
28
Windows XP
1. Der ‘Neue Hardware gefunden - Assistent’ startet. Wähle
‘Installiere von der Liste oder speziellen Pfad’. Klicke ‘Weiter’.
2. Wähle ‘Suche nach dem Treiber in diesem Pfad’ und ‘Suche
nach Wechseldatenträger’. Lege die Treiber-CD ein. Klicke
‘Weiter’
Treiber Installation > Windows XP

29
3. Klicke ‘Weiter’.
4. Der Treiber wurder erfolgreich installiert. Klicke ‘Beenden’.
Treiber Installation > Windows XP
DE . DE UTS CH

INFI N I TYTM US B UNL I MITE D
30
Windows 2000
1. Der Hardware-Assistent startet. Klicke ‘Weiter’. 2. Wähle ‘Suche nach passendem Treiber’. Klicke ‘Weiter’.
Treiber Installation > Windows 2000

31
3. Wähle ‘CD-Laufwerk’ und lege die Treiber-CD ein. Klicke
‘Weiter’.
4. Der Treiber wurde nun installiert. Klicke ‘Beenden’.
Treiber Installation > Windows 2000
DE . DE UTS CH

INFI N I TYTM US B UNL I MITE D
32
Windows 98/ME
1. Der Hardware-Assistent startet. Klicke ‘Weiter’. 2. Wähle ‘Suche nach passendem Treiber’. Klicke ‘Weiter’.
Treiber Installation > Windows 98/ME

33
3. Wähle ‘CD-Laufwerk’ und lege die Treiber-CD ein. Klicke
‘Weiter’.
4. Der Treiber wurde auf dem CD-Laufwerk gefunden. Klicke
‘Weiter’. Der Treiber wurde erfolgreich installiert. Klicke
‘Beenden’.
Treiber Installation > Windows 98/ME
DE . DE UTS CH

INFI N I TYTM US B UNL I MITE D
34
Software Installation
Um die notwendige Software für den Infi nity USB Unlimited zu
installieren lege die mitgelieferte CD in das CD-ROM Laufwerk,
die Installation startet danach automatisch.
Sollte die Installation nicht automatisch starten, so starte das
setup.exe von der CD-ROM.
Während dem Setup muss ein Verzeichnis für die Installation
angegeben werden, oder verwende einfach das vorgegebene
Verzeichnis. Es gibt die Möglichkeit eine Verknüpfung am Desktop oder in der Schnellstartleiste zu erstellen. Verwende diese
Verknüpfung um die Software nach der Installation zu starten.
Schnelleinführung
Starte Infi nity USB Unlimited mittels einer der Verknüpfungen,
die bei der Installation angelegt wurden.
Wenn die Software das erste Mal gestartet wird, muss zuerst
die Sprache ausgewählt werden. Die Sprache kann im Menü
‘Optionen > Sprache’ geändert werden.
Eine Karte zu programmieren bedarf 3 einfacher Schritte.
Software Installation / Schnelleinführung

35
1. Stecke die Smartcard mit den Kontakten nach oben wie
veranschaulicht in den Programmer.
Die Software zeigt, dass eine Karte gesteckt wurde und wird
versuchen diese zu erkennen. Wenn die Karte erkannt wurde,
wird diese automatisch aus der Liste ausgewählt. Stelle fest, ob
die richtige Karte ausgewählt wurde, bevor mit dem Programmieren begonnen wird.
2. Lade eine oder mehrere Daten-Dateien.
Einige Smartcards haben unterschiedliche Datenbereiche, die
meisten haben einen Flash, einen internen EEPROM und einen
externen EEPROM. Normalerweise wird für jeden Bereich eine
Datei geladen abhängig vomvon der Anwendung.
3. Drücke den grossen ‘Schreiben’ Knopf.
Dadurch beginnt das Programmieren aller geladenen Dateien.
Wenn nur ein Teil des Bereiches programmiert werden soll,
drücke den mit einem Pfeil gekennzeichneten Teil des ‘Schreiben’-Knopfes und wähle den gewünschten Bereich aus.
Schnelleinführung
DE . DE UTS CH

INFI N I TYTM US B UNL I MITE D
36
Erweiterter Software Gebrauch
Allgemein
1. Der linke Teil der Statusleiste zeigt, ob der Infi nity USB
Unlimited angeschlossen ist.
2. Wenn eine Karte in einem der beiden Smartcard-Schächte
gesteckt wird, ändert sich das Symbol in der linken oberen Ecke,
weitere Details über die Smatrcard werden im unteren rechten
Bereich angezeigt.
3. Der Kartentyp kann manuell aus der Liste ausgewählt
werden. Die Liste ist begrenzt und zeigt nur die Karten an,
welche die ermittelten CPU/OS enthalten. Der Speicher und das
OS der Karte wird darunterliegend angezeigt.
4. Wenn das ‘Erkennen’-Symbol gedrückt wird, wird ein ‘Erkennen’-Fenster eingeblendet. Wenn das Symbol mittels rechtsKlick gedrückt wird, hat man die Möglichkeit, die Karte direkt zu
erkennen und auszuwählen.
5. Lade, speichere und zeige Daten-Dateien.
6. Zeigt welche Dateien geöffnet und welche von der Smartcard
gelesen wurden. Die kleine Leiste unter jedem Dateinamen zeigt
an, welcher Bereich Daten beinhaltet. Soll eine zuvor geladene
Erweiterter Software Gebrauch > Allgemein

37
oder eingelesene Datei gelöscht werden, markiere den Dateinamen und drücke ‘Entf’ auf der Tastatur.
7. Verwende den ‘Schreiben’, ‘Lesen’ oder ‘Löschen’ Knopf
um eine Aktion auf der Karte auszulösen. Wird der linke Teil
der Knöpfe gedrückt so werden alle Aufgaben ausgeführt,
wenn der nach unten klappende Teil gedrückt wird, können
einzelne Aktionen ausgelöst werden. Wird eine dieser Aktionen
gewählt, öffnet sich ein Status-Fenster, welches laufende und
abgeschlossene Aufgaben anzeigt, als auch die geschätze Zeit
für die laufenden Aufgaben. Sollte ein Fehler während dem
Programmieren einer Karte auftreten, so kann der Knopf ‘Zeige
Fehler’ verwendet werden um detailierte Informationen zum
aufgetretenen Fehler zu erhalten.
8. Der ‘Erweitert’ Knopf öffnet oder schliesst die erweiterten
Optionen für die selektierte Karte.
Erkennen
Das Erkennen-Fenster ermöglicht es die verwendete Karte exakt
zu identifi zieren. Diese Art der Identifi zierung löscht möglicherweise Daten von der Karte, deshalb sollte diese Funktion nicht
verwendet werden falls wichtige Daten auf der Karte stehen.
Drücke den ‘Erkennen’ Knopf um zu starten. Wenn die
Erkennung fertig ist hat man die Möglichkeit mit der richtig
ausgewählten Karte zum Hauptfenster zurückzukehren indem
der Knopf ‘Wähle diese Karte’ gedrückt wird.
Erweiterter Software Gebrauch > Erkennen
DE . DE UTS CH

INFI N I TYTM US B UNL I MITE D
38
Sicherung
Sicherungen sind erweiterte Einstellungen welche in der CPU
programmiert werden. Sicherungen werden hauptsächlich
verwendet um die CPU vor dem Auslesen zu schützen nachdem
sie beschrieben wurde, und um den Oscillatortyp einzustellen.
Bestimmte Karten haben viele unterschiedliche Sicherungen und
es ist notwendig das Datenblatt der CPU zu lesen um weiteres
Wissen von diesen zu gewinnen.
Für alle Karten sind die Sicherungen auf die optimalen Einstellungen der häufi gsten Anwendungen vorkonfi guriert.
Für weitere Informationen betreffend Sicherungen besuche:
www.microchip.com
www.atmel.com
LED Stati
Hardware ist nicht initialisiert.
Hardware initialisiert, Software gestartet, Smart
card oder SIM-Karte nicht gesteckt.
Hardware initialisiert, Software gestartet, Smart
card oder SIM gesteckt.
Hardware initialisiert, Software gestartet,
programmiert.
Hardware initialisiert, Software gestartet, Karten
in beiden Schächten gesteckt.
Hardware initialisiert, Software gestartet, Fehler
beim Programmieren.
Hardware initialisiert, Software gestartet, andere
Fehler.
Benutzerdefi niert - Hardware initialisiert, Software
beendet.
Erweiterter Software Gebrauch > Sicherungen / LED Stati

39
Einstellungen
Einstellungen für Infi nity USB Unlimited können vom Menü
‘Optionen > Allgemein’ vorgenommen werden und sind in 3
Schritte aufgeteilt:
Allgemein, Erweitert und Start.
Allgemein
‘Zuletzt geöffnete Datei automatisch laden’
Ladet die zuletzt göffnete Datei automatisch beim Starten der
Anwendung.
‘Verzeichnis beim Laden der Datei merken’
Merkt sich welches Verzeichnis zuletzt geöffnet wurde.
‘Verwende den in der Flash-Datei integrierten int. EEprom’
Einige Hex-Dateien beinhalten sowohl Daten für den Flash als
auch für den int. EEprom, das ist normal bei PIC-basierenden
Smartcards, sollte aber bei AVR-basierenden Smartcards durch
Setzen dieser Option ermöglicht werden.
‘Statusfenster bei erfolgreicher Programmierung automatisch
schliessen’
Wird eine Smartcard programmiert so wird ein Status-Fenster mit Informationen angezeigt. Ist diese Option gesetzt
so verschwindet das Status-Fenster automatisch wenn das
Programmieren beendet ist.
‘Akustisches Signal bei Ende’
Generiert einen Standard-Windows-Beep wenn das Programmieren beendet ist.
‘Allgemeine Warnung unterdrücken’
Ist diese Option gesetzt werden kleinere Warnungen nicht
angezeigt.
Erweiterter Software Gebrauch > Einstellungen
DE . DE UTS CH

INFI N I TYTM US B UNL I MITE D
40
‘Überprüfung vom ext. EEprom abschalten’
Normalerweise werde die Daten automatisch verifi ziert wenn
eine Karte programmiert wird. Diese Option ermöglicht es die
Verifi zierung des ext. EEprom auszuschalten. Dies kann die Geschwindigkeit während dieser Art der Programmierung erhöhen,
aber Störungen würden nicht erkannt werden.
‘Wiederherstellung des CPU-Speichers nach ext. EEprom
Aktivität’
Wird auf den ext. EEprom zugegriffen so wird die CPU auf der
Karte mit einem Bootloader überschrieben. Dies macht die
Daten auf der CPU ungültig. Wird diese Option gesetzt, werden
die Daten der CPU vorher ausgelesen bevor sie gelöscht werden
und wieder hergestellt wenn die Tätigkeit für den ext. EEprom
beendet ist. Ist die CPU vor einem Auslesen geschützt, so wird
eine Warnung angezeigt und es beseteht die Möglichkeit die
Inhalte der CPU wiederherzustellen.
‘Lösche ext. EEprom vor dem Programmieren’
Die Software optimiert die Daten, so dass so wenig wie möglich
auf die Karte geschrieben wird. Normalerweise wird der ext.
EEprom vor dem Programmieren nicht gelöscht, da neue Daten
auch ohne einem vorherigen Löschen einfach überschrieben
werden können. Einige Anwendungen erwarten, dass ein 0xFF
an den leeren Positionen im ext. EEprom steht. Wird diese
Option gesetzt so werden alle nicht benutzten Positionen mit
0xFF aufgefüllt.
Erweitert
‘Karten-CPU beim Einschieben der Karte automatisch erkennen’
Wird eine Karte gesteckt so versucht die Software die CPU
automatisch zu erkennen.
‘Kartenauswahl anhand der erkannten CPU einschränken’
Mehrere Karten können den gleichen CPU-Typ beinhalten. Mit
dieser Option werden jene Karten welche eine nicht erkannte
Erweiterter Software Gebrauch > Einstellungen

41
CPU beinhaltet von der Liste entfernt. Dies erleichtert das
Auswählen der relevanten Karte.
‘CPU vor Schreiben / Lesen / Löschen automatisch erkennen’
Verifi ziert ob die CPU der Karte mit der CPU der selektierten
Karte übereinstimmt, bevor mit dem Schreiben, Lesen oder
Löschen begonnen wird.
‘Automatische Erkennung, wenn die Karte eingeschoben ist’
Ist diese Option gesetzt, so wird man aufgefordert die Karte die
gesteckt wurde vollständig zu erkennen. Dies sollte nur gewählt
werden, wenn man sich unsicher ist um welchen Kartentyp es
sich handelt.
Programmstart
‘Suche nach neuen Softwareupdates’
Kontrolliert ob eine neue Software auf unserem Webserver
ist. Wenn Sie bereits die letzte Version installiert haben, gibt
es keine weiteren Meldungen. Sollte aber eine neue Version
verfügbar sein, kann man diese optional sofort laden und
installieren.
Weitere Informationen
Für weitere Informationen und Support besuche:
www.infi nityusb.com/support
Support fi ndet man im Forum unter:
www.infi nityusb.com/forum
Erweiterter Software Gebrauch > Einstellungen / Weitere Informationen
DE . DE UTS CH

INFI N I TYTM US B UNL I MITE D
42
Fehlersuche und -Behebung
[Frage 1]: Ich habe den Infi nity USB Unlimited angeschlossen,
aber die LEDs blinken rot.
[Antwort 1]: Wenn der Infi nity USB Unlimited rot blinkt, bedeutet dies, dass der Treiber nicht korrekt installiert wurde. Wurde
der Treiber bereits installiert, versuche einen anderen USB Port
am PC oder ein anderes USB Kabel.
[Frage 2]: Bei gesteckter Smartcard bringt der Infi nity USB die
Fehlermeldung ‘Die CPU auf der Smartcard konnte nicht erkannt
werden’.
[Antwort 2]: Dieser Fehler kann durch schlechte Kontakte auf
der Smartcard verursacht werden. Säubere die Kontakte mit
einem fusselfreien Tuch und etwas Alkohol.
Überprüfe ob die Smartcard richtig gesteckt ist. Kontakte oben
für Smartcards, Kontakte unten für SIM/GSM Karten. Der Fehler
kann auch bedeuten, dass die gesteckte Karte generell nicht mit
dem Infi nity USB Unlimited kompatibel ist.
[Frage 3]: Beim Schreiben einer Karte wird der Fehler ‘Speicherort konnte nicht geprüft werden’ angezeigt.
[Antwort 3]: Dies ist ein typischer Fehler bei älteren Karten die
ihre Lebensdauer erreicht haben. Überprüfe ob die Kontakte
der Karte sauber sind. Wenn der Fehler sich wiederholt, tausche
die Karte aus.
Fehlerbehebung

43
Produkt Information
Produkt Garantie
Die auf 2 Jahre begrenzte Garantie umfasst Produktionsfehler
ab dem Datum des Erwerbs.
Disclaimer
Benutzen Sie dieses Produkt nicht für irgendeinen anderen
Zweck als vorgesehen. WB Electronics haftet unter keinen Umständen für direkte oder indirekte Folgeschäden (einschliesslich
Eigenbeschädigung) weder bei bestimmungsgemässer oder
nicht bestimmungsgemässer Anwendung (einschliesslich
Nachlässigkeit) dieses Produkts.
Eigene Rechte
Die Software ist ausschliesslich für Gebrauch mit WB Electronics
Produkten bestimmt. Die Software darf in keiner Hinsicht
verändert oder geändert werden.
Produkt Spezifi kationen
Abmessungen 42*86*16mm
Gewicht 32g
Temperatur Arbeitsbereich 0° - 45° Celcius
Relative Luftfeuchtigkeit 15% - 95%
Vor direkter Sonneneinstrahlung schützen.
System Vorsaussetzungen
Windows 98SE, Windows ME, Windows 2000, Windows XP
Min. Pentium CPU
Min. 1MB freier Festplattenplatz
Min. 32MB freier Hauptspeicher
Min. 1 freier USB 1.1 or 2.0 Port
Copyright© 2002-2005 - WB Electronics
Produkt Information
DE . DE UTS CH

Manuel utilisateur
INFI N I TYTM US B UNL I MITE D
44
Introduction
Avec l’Infi nity USB Unlimited vous pourrez rapidement et
facilement programmer la majeure partie des différentes cartes
disponibles aujourd’hui.
Le logiciel de l’Infi nity USB Unlimited supporte directement les
cartes à base de PIC comme la GoldCard et la Silvercard, les
cartes à base d’ AVR comme Funcard, et les dernières cartes
Phoenix de haute-sécurité comme la TitaniumCard, la MII, la
KnotCard et la BasicCard. Il supporte les futures cartes et bien
plus d’accès avançés, et les cartes sécurisées seront ajoutées
par de nouvelles mises à jour du logiciel.
Avec les deux connecteurs smartcard intégrés vous aurez la
possibilité d’employer des cartes standards et des petites cartes
comme les SIM/GSM.
L’éditeur de SIM qui l’accompagne sauvegardera ou éditera
votre carte SIM facilement.
Pour les informations, mises à jour de logiciel et support, visitez:
www.infi nityusb.com

45
FR . FR ANÇ AI S
Contenu du paquet / Table des matières
Le paquet contient
�• L’Infi nity USB Unlimited
�• Un câble USB2.0 compatible
�• Un Manuel imprimé en plusieurs langues
�• Un Pilote (driver) et le logiciel sur CD
Table des matières
46. Installation du matériel
47. Installation du driver
48. Windows XP
50. Windows 2000
52. Windows 98/ME
54. Installation du logiciel / Guide de démarrage rapide
56. Utilisation avançée du logiciel
56. Généralités
57. Détecter
58. Protections / LED
59. Confi guration
62. Dépannage
63. Information sur le produit

46
INFI N I TYTM US B UNL I MITE D
Installation du matériel
Installation du matériel
L’Infi nity USB Unlimited est un programmateur de smartcard
USB se composant d’un connecteur Mini-USB, d’un connecteur
standard de carte, d’un petit connecteur de carte SIM et d’une
diode (LED) RVB (multi color).
Pour installer votre Infi nity USB Unlimited relier le câble USB à
un port USB libre de votre PC ou un hub USB. Brancher après le
connecteur Mini-USB au programmateur.
Quand vous avez relié l’Infi nity USB Unlimited, Windows vous
indiquera ‘Nouveau matériel détecté’.

47
Installation du driver
Installation du pilote (driver)
Quand vous reliez votre Infi nity USB Unlimited pour la première
fois la LED clignotera rouge, cela signifi e que le matériel est
relié mais le driver n’a pas encore été installé. Windows vous
demandera le driver, et vous trouverez dans la prochaine
section un guide d’installation du driver pour votre système
d’exploitation.
Si la LED clignote toujours rouge quand l’installation du driver
est faite, consultez la section dépannage sur la page 62 pour
résoudre le problème.
FR . FR ANÇ AI S

INFI N I TYTM US B UNL I MITE D
48
Windows XP
1. La procédure d’installation d’un nouveau matériel démarre.
Choisir ‘Installer à partir d’une liste ou d’un emplacement
spécifi é’. Cliquer sur Suivant.
2. Choisir ‘Rechercher le meilleur pilote dans ces emplacements’
et ‘Rechercher dans les médias amovibles’. Insérer le CD du
driver. Cliquer sur Suivant.
Installation du driver > Windows XP

49
3. Cliquer de toute façon sur Suivant.
4. Le driver est maintenant installé. Cliquer sur Terminer.
Installation du driver > Windows XP
FR . FR ANÇ AI S

INFI N I TYTM US B UNL I MITE D
50
Windows 2000
1. La procédure d’installation d’un nouveau matériel démarre.
Cliquer sur Suivant.
2. Choisir ‘Rechercher le driver approprié’. Cliquer sur Suivant.
Installation du driver > Windows 2000

51
3. Choisir ‘Lecteurs de Cd-ROM’ et insérer le CD du driver.
Cliquer sur Suivant.
4. Le driver est maintenant installé. Cliquer sur Terminer.
Installation du driver > Windows 2000
FR . FR ANÇ AI S

INFI N I TYTM US B UNL I MITE D
52
Windows 98/ME
1. La procédure d’installation d’un nouveau matériel démarre.
Cliquer sur Suivant.
2. Choisir ‘Rechercher le meilleur driver’. Cliquer sur Suivant.
Installation du driver > Windows 98/ME

53
3. Choisir ‘Lecteurs de CD-ROM’ et insérer le CD du driver.
Cliquer sur Suivant.
4. Le driver a été trouvé sur le CD-ROM. Cliquer sur Suivant. Le
driver est maintenant installé. Cliquer sur Terminer.
Installation du driver > Windows 98/ME
FR . FR ANÇ AI S

INFI N I TYTM US B UNL I MITE D
54
Installation du logiciel
Pour installer le logiciel nécessaire, inserez le CD accompagnant votre Infi nity USB Unlimited, l’installation démarrera
automatiquement.
Si l’installation ne démarre pas automatiquement, vous devez
lancer le Setup.exe présent sur le CD-ROM.
Pendant l’installation vous devez choisir un répertoire
d’installation, ou utiliser le répertoire par défaut. Vous aurez
l’option de créer un raccourci sur votre bureau ou dans la barre
de lancement rapide. Utilisez ces raccourcis pour démarrer le
logiciel quand l’installation est terminée.
Guide de Démarrage Rapide
Démarrer le logiciel de l’Infi nity USB Unlimited en utilisant les
raccourcis créés pendant l’installation.
Lors du premier démarrage du logiciel vous devez choisir une
langue. La langue peut être changée dans le menu
‘Options > Langue ‘.
La programmation d’une carte demande 3 étapes simples.
Installation du logiciel / Guide de démarrage rapide

55
1. Insérer votre carte avec le coté des contacts vers le haut
comme illustré.
Le logiciel indique qu’une carte a été insérée et essaie de
détecter le type de carte. Quand la carte a été détectée elle est
automatiquement choisie dans la liste. S’assurer que la carte
correcte a été choisie avant de procéder à la suite.
2. Charger un ou plusieurs fi chiers de données
Les différents types de cartes ont des zones de mémoire
différentes, certaines ont une memoire fl ash, une EEprom
interne et une EEprom externe. Habituellement un fi chier pour
chaque zone mémoire doit être chargé selon l’utilisation ou
l’application.
3. Cliquer sur le gros bouton ‘Ecrire’
La programmation de tous les fi chiers chargés commence. Si
vous souhaitez programmer seulement une zone de mémoire
particulière, cliquer sur la petite fl èche du bouton ‘Ecrire’ et
choisir le secteur à programmer.
Guide de démarrage rapide
FR . FR ANÇ AI S

INFI N I TYTM US B UNL I MITE D
56
Utilisation avançée du logiciel
Généralités
1. La partie gauche de la barre d’état indique si l’Infi nity USB
Unlimited est connecté.
2. Quand une carte est insérée dans un des 2 lecteurs de carte,
l’icône dans le coin supérieur gauche change, le détail de la
carte est indiqué dans le coin inférieur droite.
3. Le type de carte peut être choisi manuellement dans la
liste. La liste sera limitée et indiquera seulement les cartes qui
contiennent l’UCT/OS détecté.
L’UCT, la mémoire, l’OS de la carte seront listés dessous.
4. Si vous cliquez sur l’icône ‘Détecter’ une fenêtre de détection
apparaît. Si vous faites un click droit sur l’icône vous aurez
l’option de détecter et de choisir directement la carte.
5. Ouvrir, sauvegarder et montrer les fi chiers de données.
6. Montre quels fi chiers sont ouverts ou lus de la carte. La petite
barre sous chaque nom de fi chier montre quels secteurs du
fi chier contient des données. Pour fermer un fi chier ou enlever
des données précédemment lues, marquer le nom du fi chier et
appuyer sur la touche DEL de votre clavier.
Utilisation avançée du logiciel > Généralités

57
7. Utiliser les boutons Ecrire, Lire ou Effacer pour exécuter une
action sur la carte. Si la partie gauche des boutons est utilisée,
toutes les tâches sont accomplies automatiquement mais si les
menus à droite des boutons sont utilisés, des tâches simples
peuvent être choisies. Si une de ces actions est choisie, une
fenêtre de statut est ouverte montrant des informations détaillées sur les tâches courantes et terminées, ainsi que le temps
estimé restant pour l’opération courante.
Si une erreur se produit pendant la programmation d’une carte,
le bouton ‘Montrer les erreurs’ peut être utilisé pour indiquer
l’information détaillée au moment où l’erreur s’est produite.
8. Le bouton ‘Avancé’ ouvre ou ferme des options avançées
pour la carte sélectionnée.
Détecter
La fenêtre de détection permet d’identifi er exactement quelle
carte est actuellement utilisée.Cette forme de détection peut effacer certaines parties de la carte et elle ne doit pas être utilisée
sur les cartes contenant des données importantes.
Cliquer sur le bouton Détecter pour commencer. Quand la
détection est faite, vous avez l’option de retourner à la fenêtre
principale avec la bonne carte sélectionnée, ceci se fait en
Cliquant sur le bouton ‘Choisir cette carte et retourner’.
Utilisation avançée du logiciel > Détection
FR . FR ANÇ AI S

INFI N I TYTM US B UNL I MITE D
58
Protections (Fuses)
Les protections sont des confi gurations avancées qui sont programmées dans l’UCT. Les protections sont souvent employées
pour protéger l’UCT contre la lecture après la programmation,
et pour choisir quel type d’oscillateur est utilisé.
Certaines cartes ont plusieurs protections et il est nécessaire de
lire la fi che technique de l’UCT pour une meilleure connaissance
de ces dernières.
Pour toutes les cartes, les protections sont par défaut pour une
confi guration optimale pour la plupart des usages.
Pour plus d’informations sur les protections, visiter :
www.microchip.com
www.atmel.com
États de la LED
Matériel non initialisé.
Matériel initialisé, logiciel démarré, carte ou SIM
non insérée.
Matériel initialisé, logiciel démarré, carte ou SIM
insérée.
Matériel initialisé, logiciel démarré, programma-
tion en cours.
Matériel initialisé, logiciel démarré, carte détectée
dans les deux lecteurs.
Matériel initialisé, logiciel démarré, erreurs de
programmation.
Matériel initialisé, logiciel démarré, autres erreurs.
Mode Utilisateur - Matériel initialisé, logiciel
arrêté.
Utilisation avançée du logiciel > Protections / LED

59
Confi gurations
Les confi gurations pour l’Infi nity USB Unlimited sont accessibles
dans le menu ‘Options > Généralités ‘ et sont en 3 parties :
Généralités, Avancé et Démarrage.
Généralités
‘Charger automatiquement les derniers fi chiers ouverts’
Charge automatiquement les derniers fi chiers ouverts, quand
l’application démarre.
‘Se rappeler du répertoire des fi chiers ‘
Se rappelle dans quel répertoire vous avez ouvert les derniers
fi chiers.
‘Utiliser l’EEprom interne du fi chier Flash ‘
Certains fi chiers hex contiennent en même temps des données
pour la mémoire fl ash et l’EEprom interne, ceci est normal pour
les cartes à base de PIC mais doit être activé pour des cartes à
base d’AVR.
‘Ferme automatiquement la fenêtre d’état quand la programmation est réussie ‘
Pendant la programmation d’une carte, une fenêtre
d’informations apparaît. Si cette option est validée la fenêtre
d’informations se ferme automatiquement quand la programmation est terminée.
‘Signal sonore de fi n’
Produit un son standard de Windows quand la programmation
est fi nie.
‘Supprime les alarmes générales’
Si activé, la plupart des alarmes mineures ne sont pas signalées.
‘Désactiver vérifi cation de l’EEprom externe’
Normalement les données sont automatiquement vérifi ées en
Utilisation avançée du logiciel > Confi guration
FR . FR ANÇ AI S

INFI N I TYTM US B UNL I MITE D
60
programmant une carte, cette option permet de désactiver la
vérifi cation de l’EEprom externe. Ceci peut augmenter la vitesse
pendant ce type de programmation, mais les erreurs ne sont
pas signalées.
‘Restaurer le contenu de l’UCT après un accès à l’EEprom
externe’
Quand on accède à l’EEprom externe, on réécrit dans l’UCT de
la carte, un fi chier de chargement (bootloader). Ceci fait que les
données précédentes sont invalides dans l’UCT. Si vous activez
cette option les données dans l’UCT seront sauvées avant
qu’elles ne soient effacées, et seront reconstituées après l’accès
à l’EEprom externe. Si l’UCT est protégée contre la lecture, un
avertissement est affi ché et vous pouvez choisir de continuer
sans possibilité de reconstituer le contenu de l’UCT.
‘Effacer l’EEprom externe avant la programmation’
Le logiciel optimise les données pour que juste celles néces-
saires soient écrites dans la carte. Normalement une EEprom
externe n’est pas effacée avant la programmation parce que des
nouvelles données peuvent être ajoutées sans effacement préalable. Certaines applications exigent qu’une EEprom externe
contienne la valeur 0xFF aux endroits vides. Si cette option est
validée tous les endroits inutilisés seront remplis de 0xFF.
Avançé
‘Détecter automatiquement l’UCT quand la carte est insérée’
Quand une carte est insérée le logiciel essaie de détecter l’UCT
automatiquement.
‘Limiter le choix de cartes basées sur l’UCT détectée’
De multiples cartes peuvent contenir le même genre d’UCT, avec
cette option les cartes qui ne contiennent pas l’UCT détectée
sont enlevées de la liste. Ceci rendra le choix de la carte appropriée plus simple.
Utilisation avançée du logiciel > Confi guration

61
‘Détecter automatiquement l’UCT avant Ecriture/Lecture/Effacement’
Vérifi e que l’UCT de la carte insérée correspond à l’UCT de la
carte choisie avant d’écrire, lire ou effacer la carte.
‘Détection complète automatique, quand la carte est insérée’
Si nécessaire l’application détectera complètement la carte qui
est insérée. Utiliser seulement si vous n’êtes pas certain de la
carte utilisée.
Démarrage
‘Vérifi er les nouvelles mises à jour du logiciel’
Vérifi e si une nouvelle version du logiciel existe, en se connectant à notre webserver. Si vous utilisez la dernière version du
logiciel vous n’aurez pas d’ annonce, mais s’il y a une nouvelle
version disponible sur le serveur, vous aurez l’option de la
télécharger et de l’installer.
Autres informations
Pour de plus amples informations et un support, visiter :
www.infi nityusb.com/support
Le support est disponible sur le forum :
www.infi nityusb.com/forum
Utilisation avançée de logiciel > Confi guration / Autres informations
FR . FR ANÇ AI S

INFI N I TYTM US B UNL I MITE D
62
Dépannage
[Question 1] : J’ai relié l’Infi nity USB Unlimited mais la LED
clignote rouge.
[Réponse 1] : Si l’Infi nity USB Unlimited clignote rouge une fois
relié, cela signifi e que le driver n’est pas installé correctement.
Si le driver a été installé avant, essayez de relier l’Infi nity USB
Unlimited directement à un autre port USB sur le PC, ou essayez
un autre câble USB.
[Question 2] : Quand j’insère une carte dans mon Infi nity USB
Unlimited l’erreur ‘aucune UCT ne peut être détectée sur la
carte insérée’ est indiquée.
[Réponse 2] : Cette erreur peut être provoquée par les contacts
sales sur la carte, s’assurer qu’ils sont propres ou nettoyez les
avec de l’alcool isopropyle et un chiffon non pelucheux.
S’assurer que la carte est insérée dans le bon sens, contacts vers
le haut pour des cartes standards et contacts vers le bas pour
des cartes SIM/GSM. L’erreur peut également indiquer que la
carte que vous essayez ne peut pas être utilisée avec l’Infi nity
USB Unlimited.
[Question 3] : Quand je programme une carte, l’erreur ‘ne peut
pas vérifi er l’emplacement’ est indiquée.
[Réponse 3] : Cette erreur surgit typiquement quand une carte
est vieille ou hors service avec des erreurs à certains endroits de
la mémoire. S’assurer en outre que les contacts sont propres. Si
vous continuez à voir cette erreur, essayez une autre carte.
Dépannage

63
Information sur le produit
Garantie du produit
La garantie est limitée à 2 ans et couvre les défauts de fabrication à partir de la date d’achat.
Avertissement
N’employer ce produit pour aucun autre but que celui prévu.
Dans aucunes circonstances comprenant de la négligence,
WB Electronics ApS ne sera responsable pour quelqu’accident
fortuit, indirect, spécial ou les dommages consécutifs (dégats
matériels y compris) résultant de l’utilisation ou de l’abus de
ce produit.
Droits intellectuels
Le logiciel sert exclusivement avec les produits de WB Electronics ApS. Le logiciel ne doit pas être changé ou modifi é de
quelque façon. Copyright © 2002-2005 - WB Electronics ApS.
Caractéristiques du Produit
Dimensions 42*86*16mm
Poids 32g
Température d’utilisation 0° - 45° Celcius
Humidité relative 15% - 95%
Ne pas exposer à la lumière directe du soleil.
Conditions requises du système
Windows 98SE, Windows ME, Windows 2000, Windows XP
Min. CPU classe Pentium
Min. 1MB libre d’espace disque
Min. 32MB libre de mémoire
Min. 1 port libre USB 1.1 ou USB 2.0
Information sur le produit
FR . FR ANÇ AI S

Brugermanual
INFI N I TYTM US B UNL I MITE D
64
Indledning
Med Infi nity USB Unlimited kan du nemt og hurtigt programmere en stor del af de forskellige smartcards der eksisterer idag.
Infi nity USB Unlimited understøtter PIC-baserede kort som Gold
og Silvercard, AVR-baserede kort som FunCard og de nyeste
phoenix-baserede høj-sikkerheds kort som TitaniumCard, MII,
KnotCard og BasicCard direkte i den medfølgende software.
Fremtidige og endnu mere avancerede adgangs-, og sikkerhedskort vil blive understøttet via nye software opdateringer.
Med de 2 integrerede smartcard konnektorer har du mulighed
for både at anvende regulære smartcards samt small form factor kort såsom SIM/GSM kort. Den medfølgende SIM editor gør
det nemt at tage backup eller redigere dit SIM kort.
For information, software opdateringer og support, besøg:
www.infi nityusb.com

65
DK . DA NS K
Pakken indeholder / Indholdsfortegnelse
Pakken indeholder
�• Infi nity USB Unlimited
�• USB2.0 kompatibelt kabel
�• Trykt manual på fl ere sprog
�• Driver og software CD
Indholdsfortegnelse
66. Hardware installation
67. Driver installation
68. Windows XP
70. Windows 2000
72. Windows 98/ME
74. Software installation / Quickstart guide
76. Avanceret software brug
76. Generelt
77. Detekt
78. Fuses / LED tilstande
79. Indstillinger
82. Fejlsøgning
83. Produkt information

66
INFI N I TYTM US B UNL I MITE D
Hardware installation
Hardware installation
Infi nity USB Unlimited er en USB baseret smart card programmer der består af et mini-usb stik, en standard smartcard
konnektor, en small form factor smartcard konnektor samt en
RGB (multi farve) lysdiode (LED).
For at installere din Infi nity USB Unlimited skal du tilslutte USB
kablet til en ledig USB port i PC’en eller i en USB hub. Tilslut herefter mini USB stikket til USB porten på Infi nity USB Unlimited.
Når du har tilsluttet Infi nity USB Unlimited, vil Windows starte
”Guiden tilføj ny hardware”.

67
DK . DA NS K
Driver installation
Driver installation
Når du tilslutter din Infi nity USB Unlimited for første gang vil
lysdioden blinke rødt, dette betyder at hardwaren er tilsluttet
men at driveren ikke er installeret endnu. Windows vil nu bede
om en driver, og herunder kan du fi nde en guide til at installere
driveren til netop dit operativ system.
Hvis lysdioden stadig blinker rødt når du er færdig med
installationen læs da fejlsøgnings-sektionen på side 82 for at
afhjælpe problemet.

INFI N I TYTM US B UNL I MITE D
68
Windows XP
1. Guiden tilføj ny hardware begynder. Vælg ’Installere fra en
liste eller en bestemt placering’. Tryk Næste.
2. Vælg ’Søg efter den bedste driver’ / CDROM. Tryk Næste.
Driver installation > Windows XP

69
DK . DA NS K
3. Tryk Fortsæt alligevel.
4. Driveren er nu installeret. Tryk Afslut.
Driver installation > Windows XP

INFI N I TYTM US B UNL I MITE D
70
Windows 2000
1. Guiden tilføj ny hardware begynder. Tryk Næste. 2. Vælg ’Søg efter den bedste driver’. Tryk Næste.
Driver installation > Windows 2000

71
DK . DA NS K
3. Vælg CD-ROM drev. Indsæt driver CD-ROM. Tryk næste. 4. Driveren er nu installeret. Tryk Afslut.
Driver installation > Windows 2000

INFI N I TYTM US B UNL I MITE D
Windows 98/ME
1. Guiden tilføj ny hardware begynder. Tryk næste. 2. Vælg ’Søg efter den bedste driver’. Tryk Næste.
Driver installation > Windows 98/ME

73
DK . DA NS K
3. Vælg CD-ROM drev. Indsæt driver CD-ROM. Tryk næste. 4. Driveren er fundet på CD-ROM. Tryk Næste.
Driveren er nu installeret. Tryk Afslut.
Driver installation > Windows 98/ME

INFI N I TYTM US B UNL I MITE D
74
Software installation
For at installere den nødvendige software til Infi nity USB
Unlimited skal du sætte den medfølgende CD i dit CDROM drev,
og installationen vil herefter automatisk starte.
Starter installationen ikke automatisk skal du manuelt køre
programmet setup.exe på CD’en.
Under installationen skal du vælge en installations mappe, eller
blot benytte den foruddefi nerede mappe. Du får muligheden
for at lave en genvej til Infi nity USB Unlimited på dit skrivebord
eller i quick launch bjælken. Benyt disse genveje til at starte
softwaren når installationen er færdig.
Quickstart guide
Start Infi nity USB Unlimited softwaren ved at benytte en af de
genveje der er lavet under installationen.
Første gang softwaren starter skal du vælge et sprog. Sproget
kan senere ændres i menuen ”Indstillinger > Sprog”
For at programmere et kort kræves 3 simple trin.
Software installation / Quickstart guide

75
DK . DA NS K
1. Isæt dit smartcard med kontaktfl aden opad som vist på
illustrationen.
Softwaren vil nu vise at der er isat et kort og forsøge at
genkende det isatte kort. Når kortet er genkendt vælges det
automatisk på kortlisten. Kontroller at det rette kort er valgt
inden du fortsætter.
2. Indlæs en eller fl ere data fi ler
Forskellige smartcards har forskellige hukommelses-områder, de
fl este har et fl ash område og et internt hukommelses-område i
CPU’en samt en ekstern EEprom. Der skal som regel indlæses
en fi l til hvert af disse områder, afhængig af anvendelsestypen.
3. Tryk på den store ”Skriv” knap
Dette påbegynder programmering af alle de indlæste fi ler. Ønsker du kun at programmere et enkelt område tryk da på pil-ned
delen af “Skriv”-knappen, og vælg det ønskede område.
Quickstart guide

INFI N I TYTM US B UNL I MITE D
76
Avanceret software brug
Generelt
1. Den venstre del af statusbjælken viser om Infi nity USB
Unlimited er tilsluttet.
2. Når et kort isættes en af de 2 smartcard konnektorer, vil
ikonet i øverste venstre hjørne ændres, umiddelbare detaljer om
kortet vil blive vist i nederste højre hjørne.
3. Korttypen kan vælges manuelt i listen, under listen vises hvad
det valgte kort indeholder (CPU, hukommelse, OS osv). Listen
vil være begrænset til kun at vise de kort der inderholder den
CPU/OS der er detekteret.
4. Trykkes der på ”Detekt” ikonet vil detekt vinduet åbnes.
Højreklikkes der på ikonet får man mulighed for direkte detekt
og valg af kort.
5. Åben, gem og vis data fi ler
6. Viser hvilke fi ler der er åbne eller udlæst fra et smartcard.
Den smalle bjælke under fi lnavnet viser hvilke områder af fi len
der indeholder data. Dette er nyttigt for at få et hurtigt overblik
over hvor mange data fi len indeholder. For at lukke en fi l eller
fjerne indlæst data, markeres fi lnavnet og der trykkes på DEL
Avanceret software brug > Generelt

77
DK . DA NS K
på tastaturet.
7. Benyt Skriv, Læs eller Slet knapperne til at udføre den
ønskede handling på kortet. Benyttes venstre del af de store
knapper udføres alle opgaver automatisk, benyttes rullemenuen
i højre side gives der mulighed for at vælge enkelte opgaver
at udføre.
Benyttes Skriv, Læs eller Slet åbnes et statusvindue der viser
detaljerede informationer om aktuelle og udførte operationer
samt den forventede tid opgaven tager.
Hvis der opstår en fejl under programmering af kortet kan
knappen ”Vis fejl” benyttes til at få detaljerede oplysninger om
hvor fejlen er opstået.
8. Avanceret knappen åbner og lukker for yderligere indstillinger
for det pågældende kort.
Detekt
Detekt vinduet gør det muligt at få identifi ceret præcist hvilket
kort der benyttes. Denne form for detektion sletter muligvis
enkelte områder af kortet så detekt skal ikke benyttes på kort
der indeholder data.
Tryk på detekt for at starte. Når detekt er færdig er det muligt
at vende tilbage til hovedvinduet med det korrekte kort valgt,
dette gøres ved at trykke på knappen ’Vælg dette kort og
returner’.
Avanceret software brug > Detekt

INFI N I TYTM US B UNL I MITE D
78
Fuses
Fuses er avancerede indstillinger der gør det muligt at programmere CPU’en med bestemte indstillinger. Fuses anvendes oftest
til at beskytte CPU’en mod udlæsning efter den er programmeret, samt vælge hvilken oscillatortype der benyttes.
Visse kort har mange forskellige fuses og det er her nødvendigt
at læse databladet for den pågældende CPU hvis man ønsker
yderligere kendskab til disse.
For alle kort gælder det at fuses som standard i softwaren er sat
op så de vil virke optimalt for langt de fl estes brug.
For mere information om fuses besøg:
www.microchip.com
www.atmel.com
LED tilstande
Hardware ikke initialiseret.
Hardware initialiseret, software startet, smartcard
og simcard ikke isat.
Hardware initialiseret, software startet, smartcard
eller simcard isat.
Hardware initialiseret, software startet,
programmerer
Hardware initialiseret, software startet, kort i
begge slots
Hardware initialiseret, software startet
programmeringsfejl
Hardware initialiseret, software startet anden fejl
Brugerdefi neret - Hardware initialiseret, software
lukket
Avanceret software brug > Fuses / LED tilstande

79
DK . DA NS K
Indstillinger
Indstillingerne for Infi nity USB Unlimited tilgåes i menuen
’Indstillinger > Generelt’ og er opdelt i 3 faneblade: Generelt,
Avanceret og Opstart.
Generelt
‘Åben de tidligere valgte fi ler’
Indlæser automatisk de sidste fi ler der har været anvendt, når
programmet starter.
‘Husk mappe ved åbning af fi ler’
Husker hvilken mappe du sidst har åbnet fi ler fra.
‘Brug data fra fl ash-fi l til int. EEprom’
Nogle hex fi ler indeholder data til både fl ash og int. EEprom,
dette er normalt for PIC baserede smartcards men skal tilvælges
her for AVR baserede smartcards.
‘Luk status vinduet ved endt successfuld programmering’
Når du programmerer et smartcard vises et statusvindue med
information, denne valgmulighed gør at vinduet automatisk
lukkes når programmering afsluttes.
‘Afspil lyd efter endt programmering’
Afspiller en standard Windows lyd når programmering afsluttes.
‘Ingen verifi cering af ekst. EEprom’
Normalt verifi ceres alle data der programmeres automatisk,
men med denne valgmulighed er det muligt at slå verifi cering
af ekst. EEprom fra. Dette kan forøge hastigheden under denne
type programmering, men eventuelle fejl opdages ikke.
Avanceret software brug > Indstillinger

INFI N I TYTM US B UNL I MITE D
80
‘Gendan CPU-hukommelse efter ekst. EEprom aktivitet’
Når ekstern EEprom tilgåes overskrives CPU’en på kortet med
en bootloader. Dette gør at de data der ligger i CPU’en går
tabt. Hvis du slår denne valgmulighed til vil programmet udlæse
dataene fra CPU’en før denne slettes og gendanne CPU’en når
ekst. EEprom aktivitet er færdig. Hvis CPU’en er beskyttet mod
udlæsning vil du modtage en advarsel så du kan vælge om du
vil fortsætte selvom du ikke kan gendanne CPU indholdet.
‘Slet ekst. EEprom før programmering’
Programmet optimerer dataene så der ikke skrives fl ere data til
kortet end nødvendigt. Normalt sletter man ikke ekst. EEprom
da denne kan overskrives med nye data uden forudgående
sletning. Nogle programmer forventer dog at ekst. EEprom
indeholder værdien 0xFF på ubrugte lokationer. Benyttes denne
valgmulighed vil programmet fylde alle ubrugte pladser med
0xFF.
Avanceret
‘Identifi cer CPU på kortet når kort isættes’
Når du isætter et kort kan programmet automatisk identifi cere
CPU’en på det kort du har isat.
‘Begræns kortliste ved identifi ceret CPU’
Flere kort kan indeholde den samme slags CPU, med denne
valgmulighed fjernes de kort fra listen som ikke indeholder
den type CPU som er detekteret. På denne måde er der kun
relevante kort at vælge imellem.
‘Identifi cer CPU før en handling udføres’
Verifi cerer at den CPU der fi ndes på kortet matcher det kort der
er valgt før kortet skrives ellers læses.
‘Automatisk komplet identifi kation af kort ved isættelse’
Hvis nødvendigt vil programmet spørge om du ønsker at lave en
komplet identifi kation af det isatte kort.
Avanceret software brug > Indstillinger

81
DK . DA NS K
Bør kun anvendes hvis du er usikker på hvilket kort du anvender.
Opstart
‘Check for nye software opdateringer’
Kontrollerer om der fi ndes en ny software version ved at
forbinde til vores webserver. Hvis du benytter den nyeste version
vil der ikke ske yderligere, men er der en ny version tilgængelig
på webserveren vil du få mulighed for at downloade denne.
Yderligere information
For mere information og support besøg:
www.infi nityusb.com/support
Support håndteres på forummet på:
www.infi nityusb.com/forum
Avanceret software brug > Indstillinger / Yderligere information

INFI N I TYTM US B UNL I MITE D
82
Fejlsøgning
[Spørgsmål 1]: Jeg har tilsluttet Infi nity USB Unlimited men den
blinker rødt?
[Svar 1]: Hvis Infi nity USB Unlimited blinker rødt når den
tilsluttes, betyder det at driveren ikke er installeret korrekt. Har
driveren været forsøgt installeret, prøv da at tilslutte Infi nity
USB Unlimited direkte til en anden USB port i PC’en, og forsøg
med et andet USB kabel.
[Spørgsmål 2]: Når jeg sætter et kort i min Infi nity USB
Unlimited vises fejlen ”Der kunne ikke identifi ceres en CPU på
det isatte kort”.
[Svar 2]: Denne fejl kan være forårsaget af beskidte kontaktfl ader på kortet, kontroller at de er rene eller rens dem med en
fnugfri klud og isopropyl alkohol.
Vær også sikker på at kortet vender korrekt, med kontakt fl aden
op ad for standard størrelses smartcards, og ned for SIM/GSM
kort. Det kan også skyldes du har isat et kort som ikke kan
anvendes i Infi nity USB Unlimited.
[Spørgsmål 3]: Når jeg programmerer et kort vises fejlen ”Kunne
ikke verifi cere lokation”
[Svar 3]: Denne fejl opstår typisk når ældre eller slidte kort har
fejl på enkelte lokationer, kontroller også at kontaktfl aden på
kortet er ren. Opstår fejlen igen prøv da med et andet kort.
Fejlsøgning

83
DK . DA NS K
Produkt information
Produkt garanti
Garanti mod fabrikationsfejl på produktet gælder 2 år fra
købsdato.
Ansvarsfraskrivelse
Dette produkt må ikke bruges til andre formål end de oprindeligt tiltænkte. Under ingen omstændigheder inklusive mislighold
kan WB Electronics ApS drages til ansvar for hændelser, direkte
eller indirekte, specielle eller afl edte skader (inkl. materielle
skader), ved brug eller misbrug af dette produkt.
Produktrettigheder
Den medfølgende software er udelukkende til brug sammen
med produkter fra og produceret af WB Electronics ApS. Produktet må ikke ændres eller modifi ceres på nogen måde.
Copyright © 2002-2005 - WB Electronics ApS
Produkt specifi kationer
Dimensioner 42*86*16mm
Vægt 32g
Temperaturområde 0° - 45° Celcius
Relativ luftfugtighed 15% - 95%
Placering Bør ikke placeres i direkte sollys.
Systemkrav
Windows 98SE, Windows ME, Windows 2000, Windows XP
Pentium class CPU
Min. 1MB fri harddiskplads
Min. 32MB fri hukommelse
Min. 1 ledig USB 1.1 or 2.0 port
Produkt information

Copyright © 2002-2005 WB Electronics
(“Infinity” is a trademark of WB Electronics)
www.infinityusb.com
 Loading...