

Page 1

PRIMUS™HCS
Owner’s Guide
Page 2

PRIMUS™HCS OWNER’S GUIDE
Table of Contents
3 Important safety precautions
4 Introduction
4 Unpacking the System
4 Planning Your System
5 Placement
5 Wall-Mounting the Satellites
6 Center and Satellite Speaker Connections
7 Subwoofer Controls
8 Subwoofer Connections
9 Operation
9 Maintenance and Service
10 Specifications
2
PRIMUS HCS
Page 3

Declaration of Conformity
CAUTION
RISK OF ELECTRIC SHOCK
DO NOT OPEN
CAUTION: To prevent electric shock,
do not remove the grounding plug
on the power cord, or use any plug
or extension cord that does not have
a grounding plug provided.
Make certain that the
AC outlet is properly grounded.
Do not use an adapter plug
with this product.
The lightning flash with arrowhead symbol
within an equilateral triangle is intended to
alert the user to the presence of
uninsulated “dangerous voltage” within the
product’s enclosure that may be of
sufficient magnitude to constitute a risk of
electric shock to persons.
The exclamation point within an
equilateral triangle is intended to alert the
user to the presence of important
operating and maintenance (servicing)
instructions in the literature accompanying
the appliance.
Declaration of Conformity
We, Harman Consumer International
2, route de Tours
72500 Chateau-du-Loir
France
declare in own responsibility that the products described in
this owner’s manual are in compliance with technical
standards:
EN 50081-1:1992
EN 50082-1:1997
Robin Marshall
Harman Consumer International
Chateau-du-Loir, France 2/03
read first! Important Safety Precautions!
1. Read Instructions. All the safety and operating
instructions should be read before the product is
operated.
2. Retain Instructions. The safety and operating
instructions should be retained for future reference.
3. Heed Warnings. All warnings on the product and in
the operating instructions should be adhered to.
4. Follow Instructions. All operating and use
instructions should be followed.
5.Water and Moisture. The product should not be
used near water – for example, near a bathtub,
washbowl, kitchen sink, laundry tub, in a wet
basement, or near a swimming pool, and the like.
6.Accessories. Do not place this product on an
unstable cart, stand,tripod, bracket, or table.The
product may fall, causing serious injury to a child or
adult, and serious damage to the product. Use only
with a cart, stand,tripod, bracket, or table recommended by the manufacturer, or sold with the product.
Any mounting of the product should follow the
manufacturer’s instructions, and should use a
mounting accessory recommended by the
manufacturer.
7.Wall or Ceiling Mounting. The product should be
mounted on a wall or ceiling only when and as
recommended by the manufacturer.
8.Ventilation. Slots and openings in the cabinet are
provided for ventilation and to ensure reliable
operation of the product and to protect it from
overheating, and these openings must not be blocked
or covered.The openings should never be blocked by
placing the product on a bed, sofa, rug, or other
similar surface.This product should not be placed in
a built-in installation such as a bookcase or rack
unless proper ventilation is provided or the
manufacturer’s instructions have been adhered to.
9. Heat. The product should be situated away from
heat sources such as radiators, heat registers, stoves,
or other products that produce heat. If placed near an
amplifier, check with the manufacturer for applicability.
10. Power Sources. This product should be operated
only from the type of power source indicated on the
marking label. If you are not sure of the type of power
supply to your home, consult your product dealer
or local power company. For products intended to
operate from battery power, or other sources, refer
to the operating instructions.
11. Grounding or Polarization. This product
equipped with a polarized alternating
may be
-current line plug
(a plug having one blade wider than the other).This
plug will fit into the power outlet only one way.This is
a safety feature.If you are unable to insert the plug
fully into the outlet, try reversing the plug. If the plug
should still fail to fit, contact your electrician to
replace your obsolete outlet. Do not defeat the safety
purpose of the polarized plug.
12. Power-Cord Protection. Power-supply cords
should be routed so that they are not likely to be
walked on or pinched by items placed upon or
against them, paying particular attention to cords at
plugs, convenience receptacles, and the point where
they exit from the product.
13. Cleaning. Unplug this product from the wall outlet
before cleaning. Do not use liquid cleaners or aerosol
cleaners. Use a damp cloth for cleaning.
14. Nonuse Periods. The power cord of the product
should be unplugged from the outlet when left unused
for long periods of time.
15. Lightning. For added protection for this product
during a lightning storm, or when it is left unattended
and unused for long periods of time, unplug it from
the wall outlet and disconnect the antenna or cable
system.This will prevent damage to the product due to
lightning and power-line surges.
16. Overloading. Do not overload wall outlets,
extension cords, or integral convenience receptacles,
as this can result in a risk of fire or electric shock.
17. Object and Liquid Entry. Never push objects of
any kind into this product through openings,as they
may touch dangerous voltage points or short-out
We, Harman Consumer International
2, route de Tours
72500 Chateau-du-Loir
France
declare in own responsibility that the product described in
this owner’s manual is in compliance with technical
standards:
EN 60065:1998
EN 55013/A14:1999
EN 55020/A14:1999
EN 61000-3-2/A14:1999
EN 61000-3-3/1.1995
Robin Marshall
Harman Consumer International
Chateau-du-Loir, France 2/03
parts that could result in a fire or electric shock.
Never spill liquid of any kind on the product.
18. Damage Requiring Service. Unplug this product
from the wall outlet and refer servicing to qualified
service personnel under the following conditions:
a. The power-supply cord or the plug has been
damaged; or
b. Objects have fallen, or liquid has been spilled into,
the product; or
c. The product has been exposed to rain or water; or
d. The product does not operate normally when
following the operating instructions.Adjust only
those controls that are covered by the operating
instructions, as an improper adjustment of other
controls may result in damage and will often require
extensive work by a qualified technician to restore the
product to its normal operation; or
e. The product has been dropped, or the enclosure
damaged; or
f. The product does not appear to operate normally
or exhibits a marked change in performance.
19.Attachments. Do not use attachments not
recommended by the product manufacturer,as they
may cause hazards.
20. Replacement Parts. When replacement parts are
required, be sure the service technician has used
replacement parts specified by the manufacturer or
that have the same characteristics as the original
part. Unauthorized substitutions may result in fire,
electric shock or other hazards.
21. Safety Check. Upon completion of any service or
repairs to this product,ask the service technician to
perform safety checks to determine that the product
is in proper operating condition.
22. Servicing. Do not attempt to service this product
yourself,as opening or removing covers may expose
you to dangerous voltage or other hazards. Refer all
servicing to qualified service personnel.
PRIMUS HCS
3
Page 4

I
NTRODUCTION
P
LANNINGYOURSYSTEM
Infinity Primus™Series
The Primus Series of loudspeakers continues Infinity’s
longstanding commitment to accurate sound reproduction. Our
proprietary Metal Matrix Diaphragm
™
(MMD™) drivers, precision
dividing networks and rigid, well-braced enclosures combine to
deliver uncompromised performance in any stereo or multichannel
home theater system. In addition, Primus Series speakers, except
for the powered subwoofers, are magnetically shielded for safe
placement adjacent to a television.
Unpacking the System
Carefully unpack the system. If you suspect damage from transit,
report it immediately to your dealer and/or delivery service. Keep
the shipping carton and packing materials for future use. Open
the package and verify the following contents:
(1) Powered Sub
Before deciding where to best place your speakers, survey your room and
study Figures 1 and 2.
Subwoofer
Left
Surround
Channel
Front
Channel
Left
Center
Channel
Couch
Right
Front
Channel
Right
Surround
Channel
Figure 1. In this overhead view of a typical installation, satellite speakers
are used to reproduce sound for the front and surround channels.The
center channel reproduces sound and dialogue.The powered subwoofer
provides bass for effects and music.
Left
Front
Channel
Subwoofer
Right
Front
Channel
Center
Channel
Right
Surround
Channel
(4) Satellite Speakers
(20) Rubber Feet
••••••••••
••••••••••
(1) Center
Couch
Left
Surround
Channel
Figure 2.This figure shows an alternative layout which may be more
suitable for some rooms.
4
PRIMUS HCS
Page 5
P
— +
LACEMENT
WALL-MOUNTING THE SATELLITES
NOTE: The satellite speakers can be placed directly on a shelf,
or mounted on a wall using optional wall brackets.
Left and Right Front Channels
For left and right front channels, place one satellite to the left
and another to the right of the television, as shown in Figure 1.
Since the speakers are magnetically shielded, you can place
them very close to the TV without worrying about the magnetic
field distorting the picture.
Center Channel
For the center channel, place the speaker directly on top of,
or below, your television. Use a shelf if the television does not
provide a stable platform.
Surround Channels
For left and right surround channels, place one speaker on the
left and another on the right, to the side of or slightly behind the
listening area.The surround speakers should be mounted at a
height of between 1.2 and 2 meters.
Subwoofer
Since the installation of a subwoofer can be somewhat more
complicated than installing full-range speakers, it is essential
that you read this section very carefully prior to connecting the
subwoofer to your system. Should you have questions relating to
installation, it is advisable to call either your dealer or Infinity’s
Customer Service Department for advice.
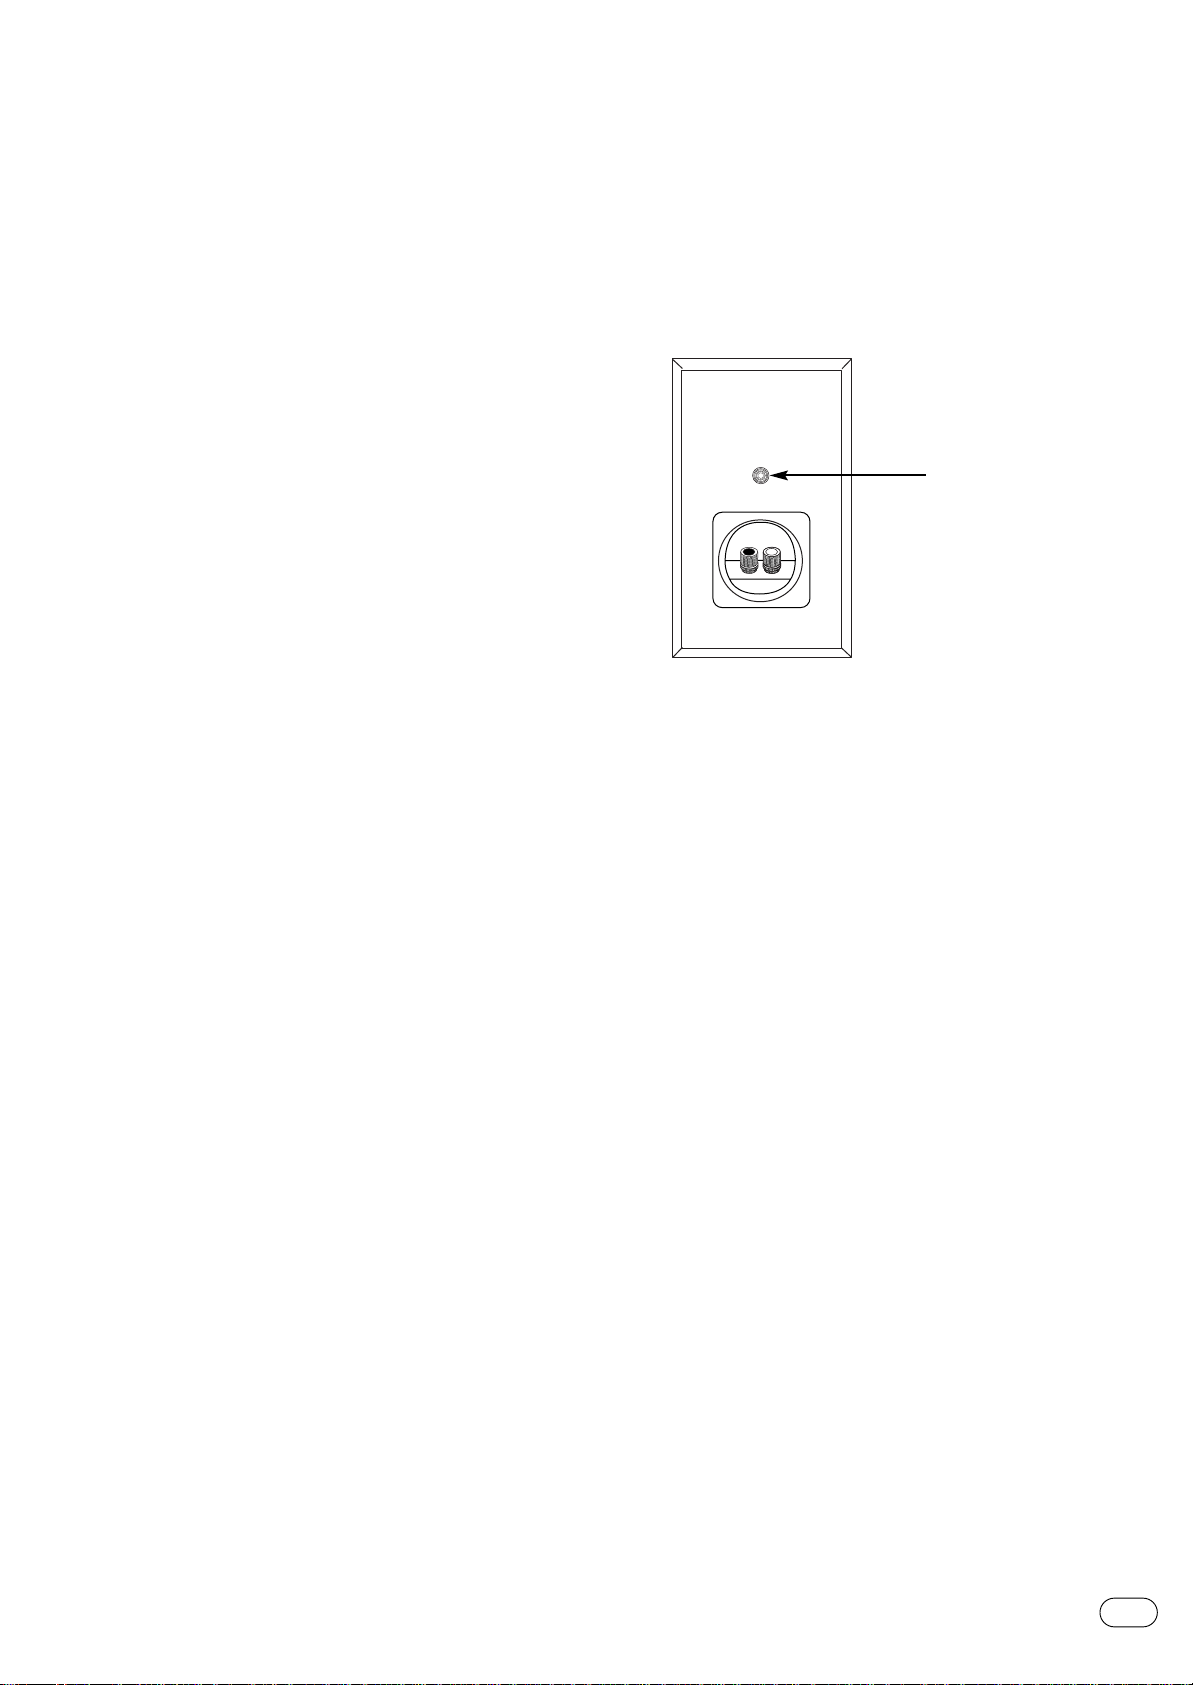
The Primus HCS allows the use of optional wall brackets (UNI-WB)
using the threaded insert located above the terminal panel (refer
to figure 3)..ker on the wall by aligning the keyhole on the back
of the speaker to the screwhead on the wall. Once positioned
properly, the speaker should slide down slightly and become
secure.
Figure 3.
Threaded
insert
The performance of the subwoofer is directly related to its
placement in the listening room and how you align the subwoofer
with the satellite speakers. Setting the volume of the subwoofer
in relation to the left and right speakers is also of critical
importance because it is essential that the subwoofer integrate
smoothly with the entire system. Setting the subwoofer’s volume
level too high will result in an overpowering, boomy bass. Setting
the volume level too low will negate the benefits of the subwoofer.
Here are several additional facts on installation that may prove
useful. It is generally believed that low frequencies (below
125Hz) are nondirectional and, therefore, placement of a
subwoofer within any listening room is not critical.While in
theory it is true that the larger wavelengths of extremely low
frequencies are basically nondirectional, the fact is that, when
installing a subwoofer within the limited confines of a room,
reflections, standing waves and absorptions generated within the
room will strongly influence the performance of any subwoofer
system. As a result, specific location of the subwoofer becomes
important, and we strongly recommend that you experiment with
placement before choosing a final location. Placement will
depend upon your room (for example, whether or not your room
permits placement of the subwoofer near either satellite) and
the amount and quality of bass required.
PRIMUS HCS
5
Page 6
C
— +
— +
ENTER ANDSATELLITESPEAKERCONNECTIONS
Turn Off All Power
After placing the speakers, you are ready to connect your
system. First, turn off all audio-system power.Use high-quality
speaker wire with polarity coding to make your connections.
The side of the wire with a ridge or other coding is usually
considered positive polarity (i.e., +). Also, consult the owner’s
manuals that were included with your amplifier or receiver to
confirm connection procedures.
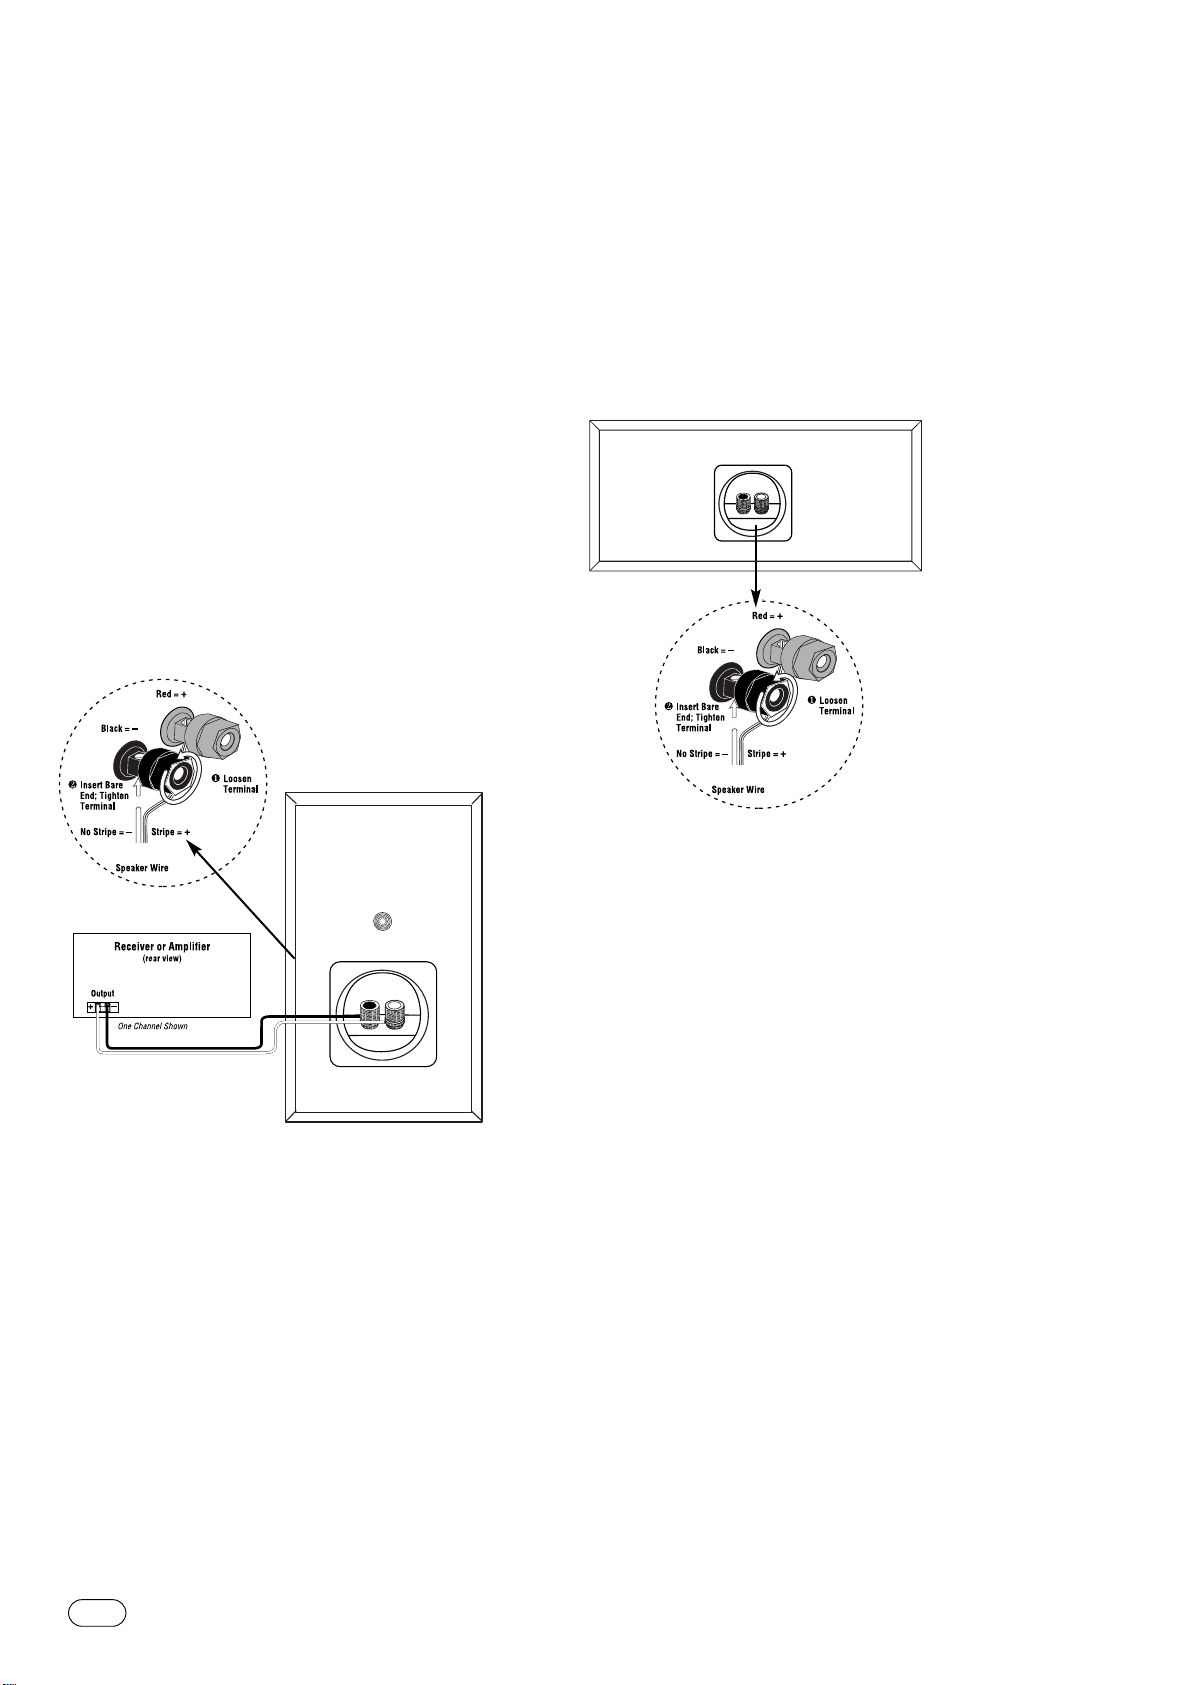
Satellites
Observe polarities when making speaker connections, as shown
in Figure 4. Connect each + terminal on the back of the
amplifier or receiver to the respective + (red) terminal on each
speaker. Connect the – (black) terminals in the same way.
Important!
Do not reverse polarities (i.e., + to – or – to +) when making
connections. Doing so will cause poor imaging and diminished
bass response. Be certain that positive and negative wire
strands are completely isolated to avoid short circuits that may
damage your equipment.
Center Channel
Observe polarities when making speaker connections, as shown
in Figure 5. Connect each + terminal on the back of the
amplifier or receiver to the respective + (red) terminal on the
speaker. Connect the – (black) terminals in the same way.
Important!
Do not reverse polarities (i.e., + to – or – to +) when making
connections. Be certain that positive and negative wire strands
are completely isolated to avoid short circuits that may damage
your equipment.
Figure 4. Wiring diagram shows polarity connections
for one channel of a home theater system.
Figure 5.The satellites and center channel speaker feature
terminals that can be connected in several different ways:
e.g., spade terminals and direct wiring (as shown here).
6
PRIMUS HCS
Page 7
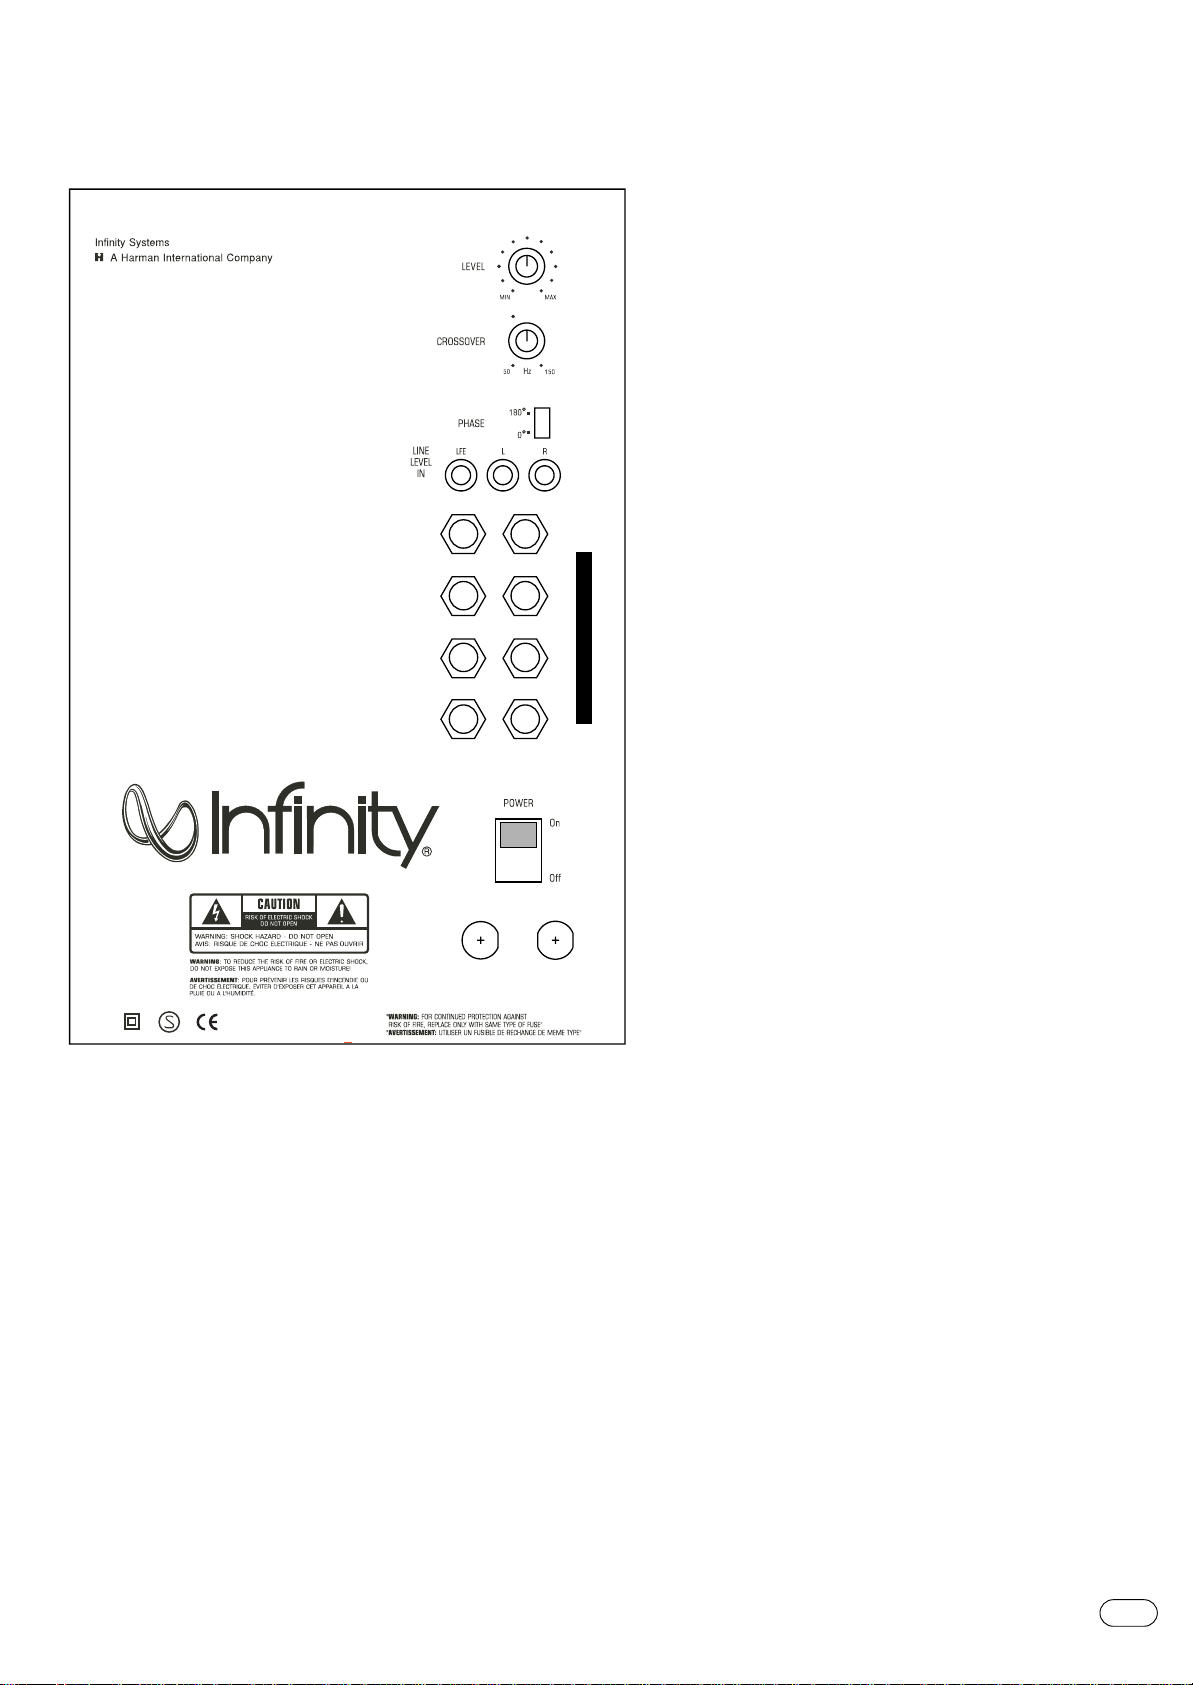
SUBWOOFER CONTROLS
Rear Panel
¢
OUT IN
+ +
R R
– –
∞
§
+ +
L L
– –
OUT IN
FUSE
T 1.25A L 250V
TYPE
¶
•
AC~
220V-240V,
50Hz-60Hz
220 Watts
¡
™
£
H
I
G
H
L
E
V
E
L
¡
Subwoofer Level Control
™
Crossover Adjustment
£
Phase Switch
¢
Direct (LFE) Input
∞
Line-Level Inputs
§
High-Level Outputs
¶
High-Level Inputs
•
Power Switch
A Few Suggestions
We recommend that you do not operate your speakers or
subwoofer with the bass, treble and loudness controls set to
full boost.This will place undue strain on your electronics and
speakers and could damage them.
The volume control setting on your processor/preamp or
receiver is not a specific indication of the overall loudness level
of the speakers.The only important consideration is the loudness
level at which the system can be played, regardless of where the
volume control is set.
Always turn down the volume control setting on your processor/
preamp or receiver when changing a cassette or CD, or
switching inputs to AM or FM operation. Excessively loud
transients (clicks or popping sounds) can damage the satellite
speakers and possibly the subwoofer.
Important!
Whenever changing cables, pulling plugs, etc.,ALWAYS TURN
OFF ALL EQUIPMENT, including the subwoofer.
PRIMUS HCS
7
Page 8
SUBWOOFER OR
LFE OUTPUT
+ +
OUT IN
+ +
OUT IN
RECEIVER/PROCESSOR
L R
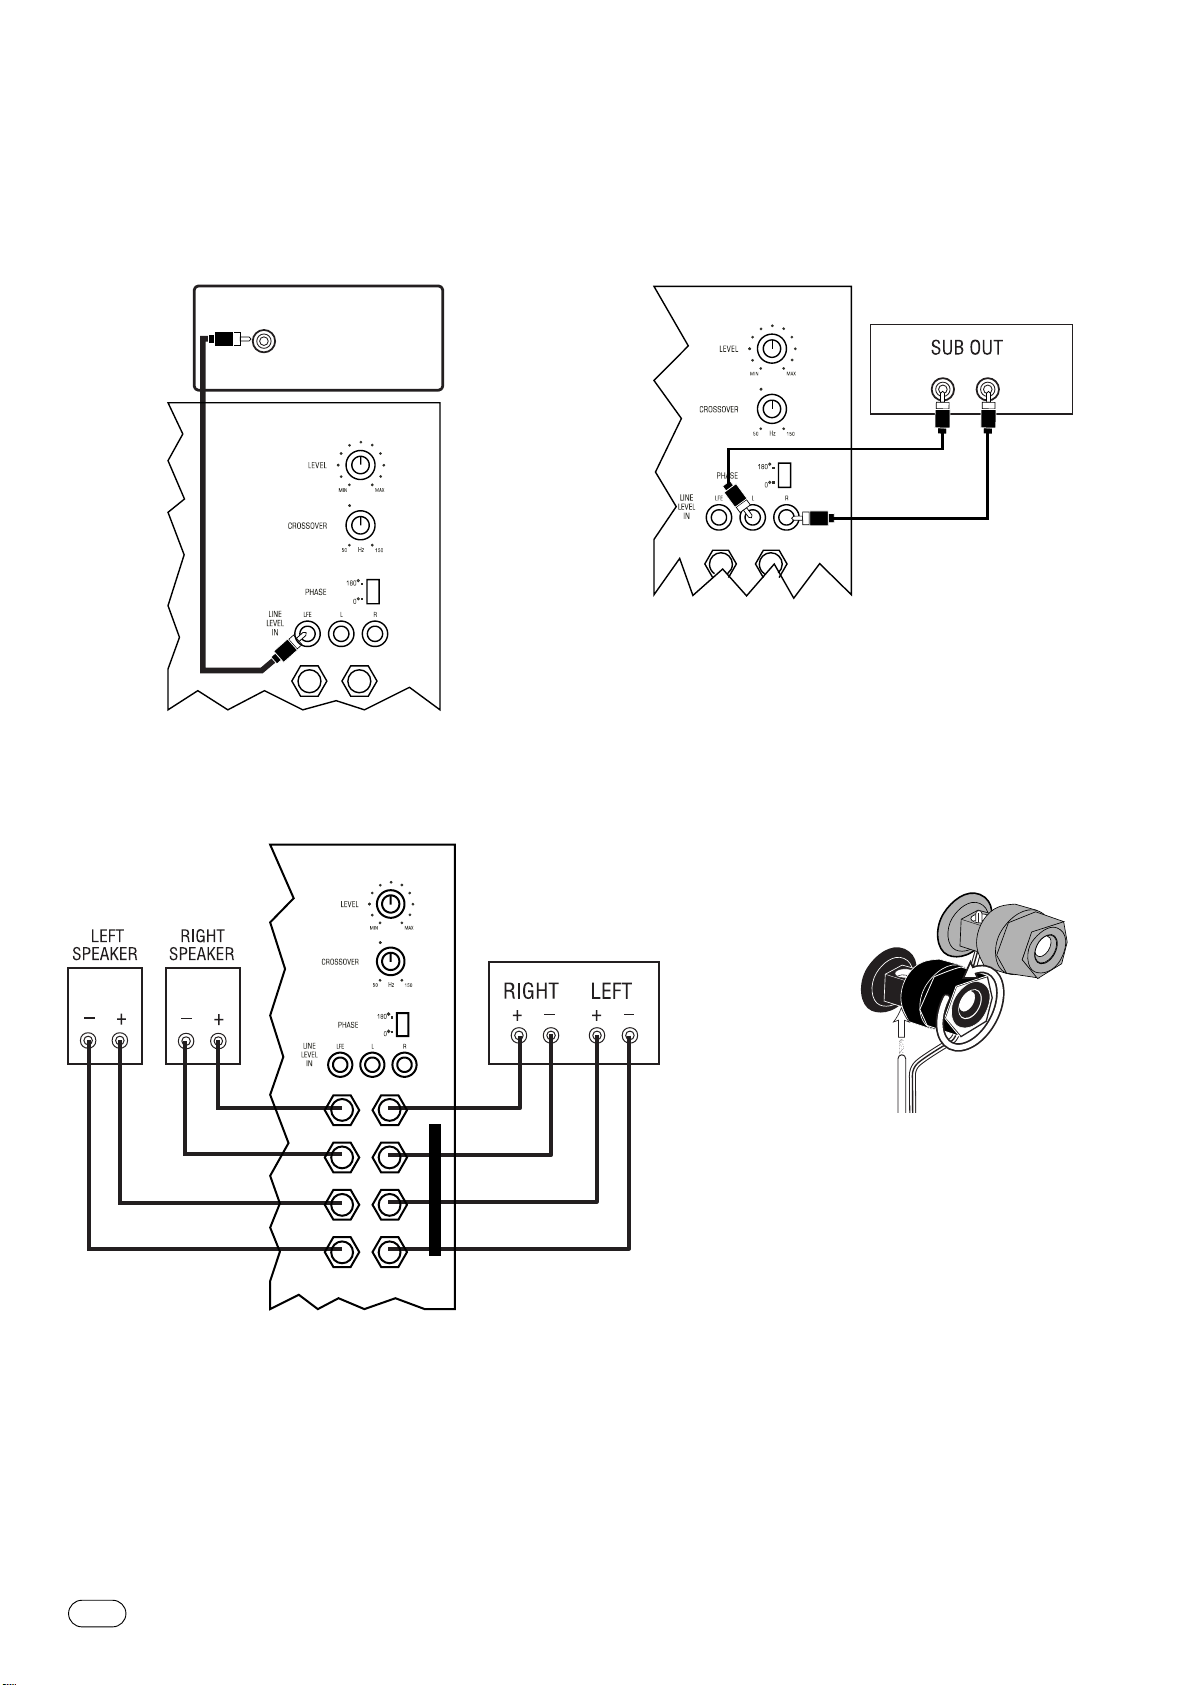
SUBWOOFER CONNECTIONS
RECEIVER/AMPLIFIER
Front Speaker Output
H
I
G
H
L
E
V
E
L
+ +
R R
L L
– –
– –
+ +
OUT IN
OUT IN
LOOSEN TERMINALS
INSERT BARE END;
TIGHTEN TERMINALS
1.
2.
BLACK =
–
NO STRIPE = –STRIPE =
+
RED =
+
CHOOSE THE SUBWOOFER CONNECTION THAT IS MOST SUITABLE FOR YOUR RECEIVER/PROCESSOR
If you have a Dolby* Digital or DTS®receiver/processor with a
low-frequency-effects (LFE) or subwoofer output:
If your receiver/processor does not have subwoofer outputs for
the left and right channels or an LFE output:
If your receiver/processor does not contain a Dolby Digital or DTS
processor but has a subwoofer output:
Connect speaker wire from your receiver/amplifier to your
speakers and subwoofer using two sets of speaker wire.
8
PRIMUS HCS
This figure shows how to connect bare wires
to the terminals.
Page 9

O
PERATION
Surround Modes (Using LFE or line level inputs
to subwoofer)
When using the Primus HCS in a Dolby Digital or DTS home
theater system, make sure all speakers are set to “Small”. When
using the Primus HCS in a Dolby Pro Logic* home theater system
make sure the receiver’s center channel mode is set to “Small”.
Some Dolby Digital-equipped receivers/processors offer different
setup options for each source or surround mode, e.g., CD-stereo,
videotape, Dolby, Pro Logic. In each case,follow your equipment’s
instructions to ensure that the subwoofer output is turned on and
that the speakers are set to “Small”in each mode.
Surround Modes (Using high level inputs to
subwoofer)
When using the Primus HCS in a Dolby Digital or DTS home
theater system, make sure all speakers are set to “Large” in your
receiver set-up menu.When using the Primus HCS in a Dolby Pro
Logic* home theater system make sure the receiver’s center
channel mode is set to “Large”.
Some Dolby Digital-equipped receivers/processors offer different
setup options for each source or surround mode, e.g., CD-stereo,
videotape, Dolby, Pro Logic. In each case,follow your equipment’s
instructions to ensure that the speakers are set to “Large” in
each mode.
Power On
Plug your subwoofer’s AC cord into a wall outlet. Do not use the
outlets on the back of the receiver.
Initially set the Subwoofer Level Control ¡to the“MIN”position.
Turn on the subwoofer by pressing the Power Switch •on the
rear panel.
Turn on your entire audio system and start a CD or movie soundtrack at a moderate level.
Important Note: The Primus Subwoofer includes an Auto-On/AutoOff circuit. During periods of normal use, the power switch should
always be left on. It should only be turned off during extended
periods of nonoperation, e.g., when you are away on vacation.
Adjust Gain
Turn the Subwoofer Level Control ¡up about half way.If no
sound emanates from the subwoofer, check the AC-line cord and
input cables.Are the connectors on the cables making proper
contact? Is the AC plug connected to a “live”receptacle? Has the
Power Switch •been pressed to the “On” position? Once you
have confirmed that the subwoofer is active, proceed by playing a
CD, record or cassette. Use a selection that has ample bass
information.
Set the overall volume control of the receiver/processor to a
comfortable level.Adjust the Subwoofer Level Control ¡until
you obtain a pleasing blend of bass. Bass response should not
overpower the room but rather be adjusted so there is a
harmonious blend across the entire musical range. Many
users have a tendency to set the subwoofer volume too loud,
adhering to the belief that a subwoofer is there to produce lots
of bass.This is not entirely true. A subwoofer is designed to
extend the response of the entire system so the bass can be felt
as well as heard. However, overall balance must be maintained or
the music will not sound natural.An experienced listener will set
the volume of the subwoofer so its impact on bass response is
always there but never obtrusive.
Crossover Adjustment
NOTE: This control will have no effect if the LFE Input ¢ is
used. If you have a Dolby Digital or DTS receiver/processor, the
Low-Pass Frequency is set by the receiver/processor. Consult
your owner’s manual to learn how to view or change this setting.
The Crossover control ™ determines the highest frequency at
which the subwoofer reproduces sounds. For the Primus HCS, it is
recommended that this control be set at 120Hz.
Phase Control
The Phase Switch £ determines whether the subwoofer
speaker’s piston-like action moves in and out with the main
speakers, 0˚, or opposite the main speakers, 180˚. Proper phase
adjustment depends on several variables such as room size,
subwoofer placement and listener position.Adjust the phase
switch to maximize bass output at the listening position.
Final Positioning
After correctly connecting the Primus HCS system and verifying
that both the subwoofer and all satellite speakers are playing, it
is time to optimize the system for your particular listening room.
Earlier, you placed the subwoofer in its general location. Finding
the exact location for optimum performance sometimes only
involves moving the speakers up to a few inches in any direction.
We urge you, therefore, to experiment with placement, if possible,
until your speakers deliver their full potential.
M
AINTENANCE ANDSERVICE
The speaker and subwoofer enclosures may be cleaned using a
soft cloth to remove fingerprints or to wipe off dust.
The grilles may be gently vacuumed. Stains may be removed with
an aerosol cleaner, following its instructions.Do not use any
solvents on the grille.
All wiring connections should be inspected and cleaned or
remade periodically.The frequency of maintenance depends on
the metals involved in the connections, atmospheric conditions,
and other factors, but once per year is the minimum.
If a problem occurs, make sure that all connections are properly
made and clean. If a problem exists in one loudspeaker, reverse
the connection wires to the left and right system. If the problem
remains in the same speaker, then the fault is with the loudspeaker. If the problem appears in the opposite speaker, the
cause is in another component or cable. In the event that your
Primus HCS ever needs service, contact your local Infinity dealer
or distributor.
PRIMUS HCS
9
Page 10

S
PECIFICATIONS
Primus HCS
HCS Sat HCS Center
Frequency Range: 100Hz – 20,000Hz (±3dB) 100Hz – 20,000Hz (±3dB)
Recommended
Amplifier Power Range: 15 – 100 watts 15 – 100 watts
Sensitivity: 86dB 87dB
(2.83V @ 1 meter)
Nominal Impedance: 8Ω 8Ω
Crossover Frequency: 3000Hz, 24dB/Octave 3000Hz, 24dB/Octave
Midrange Driver(s): 100mm (4") MMD.™ Dual 100mm (4") MMD.™
magnetically shielded magnetically shielded
High-Frequency Driver: 19mm (3/4") MMD, 19mm (3/4") MMD,
magnetically shielded magnetically shielded
Dimensions (H x W x D): 245mm x 150mm x 173mm 150mm x 363mm x 173mm
(9-5/8" x 5-15/16" x 6-13/16") (5-15/16" x 14-1/4" x 6-13/16")
Weight: 3.2kg (7 lb) 4.5kg (10 lb)
HCS Subwoofer
Frequency Range: 35Hz – 150Hz (±3dB)
Amplifier Output: 100 watts RMS
Low-Frequency Driver: 8Ω
Crossover Frequency: 50Hz – 150Hz, 24dB/Octave, continuously variable
Dimensions (H x W x D): 425mm x 270mm x 397mm
(16-3/4" x 10-5/8" x 15-5/8")
Weight: 15kg (33 lb)
Infinity continually strives to update and improve existing products,as well as create new ones.The specifications and construction details in this and related Infinity
publications are therefore subject to change without notice.
10
PRIMUS HCS
Page 11

N
OTES
:
Page 12

© 2003 Harman International Industries, Incorporated
Infinity Systems, 250 Crossways Park Drive, Woodbury, NY 11797 USA 800.553.3332 (USA only)
*Trademark of Dolby Laboratories. DTS is a registered trademark of Digital Theater Systems, Inc.Infinity is a registered trademark, and MMD is a trademark, of Harman International Industries,Incorporated.
www.infinitysystems.com
 Loading...