


#61-846 & 61-848
HeatSeeker® 160 and HeatSeeker® 320
Dual View Thermal Imaging Camera
Instruction Manual
Safety Warning:
The equipment described in this document uses a Class 2 laser. Under no account should anyone look directly into the laser beam or the laser beam exit aperture, irreversible damage to the eye may occur. The laser should not be operated when there are personnel in the imager’s field of view.
Caution – use of controls or adjustments or performance of procedures other than those specified in this document may result in hazardous laser radiation exposure.
© 2011 No part of this publication may be reproduced without prior permission in writing from IDEAL. Whilst IDEAL will endeavor to ensure that any data contained in this product information is correct, IDEAL does not warrant its accuracy or accept liability for any reliance on it. IDEAL reserves the right to change the specification of the products and descriptions in this publication without notice. Prior to ordering products please check with IDEAL for current specification details. All brands and product names are acknowledged and may be trademarks or registered trademarks of their respective holders.
ND-7521-3UK |
Page 1 of 27 |

#61-846 & 61-848
Contents |
Page |
1. |
CONTENTS OF THE CASE ................................................................................... |
3 |
2. MAIN CONTROLS ................................................................................................... |
4 |
|
2.1. BACK .................................................................................................................. |
4 |
|
2.2. FRONT ................................................................................................................ |
4 |
|
2.3. FUNCTION KEYS ..................................................................................................... |
4 |
|
3. GETTING STARTED ................................................................................................. |
5 |
|
3.1. |
SWITCHING THE CAMERA ON/OFF ............................................................................. |
5 |
3.2. |
CHARGING THE BATTERY ....................................................................................... |
5 |
3.3. |
CHANGING THE BATTERY ....................................................................................... |
5 |
3.4 |
FOCUSING ........................................................................................................ |
6 |
3.5. |
SAVING AN IMAGE ............................................................................................... |
6 |
3.6. |
TEMPERATURE MEASUREMENT.................................................................................. |
6 |
4. |
FUNCTION BUTTONS.......................................................................................... |
7 |
4.1. |
MOVING THE CURSOR ........................................................................................... |
7 |
4.2. |
IMAGE ALIGNMENT .............................................................................................. |
8 |
4.3. |
TURNING THE VISIBLE IMAGE OFF AND ON ................................................................... |
9 |
4.4. |
THERMAL AND VISIBLE IMAGE BLENDING ..................................................................... |
9 |
4.5. |
MANUAL CONTROL.............................................................................................. |
12 |
4.6. |
LIGHT ............................................................................................................ |
12 |
4.7. |
IMAGE FREEZE .................................................................................................. |
12 |
4.8. |
MENU ............................................................................................................ |
12 |
5. |
MENU STRUCTURE. .......................................................................................... |
13 |
5.1. |
INFRARED SETTINGS ......................................................................................... |
14 |
5.2. |
MEASUREMENT OPTIONS ..................................................................................... |
15 |
5.3. |
CAMERA SETTINGS ........................................................................................... |
17 |
5.4. |
AUDIO SETTINGS............................................................................................. |
18 |
5.5. |
IMAGE BROWSER ............................................................................................. |
19 |
5.6. |
DATE & TIME SETTINGS ..................................................................................... |
19 |
5.7. |
LANGUAGE SELECTION ...................................................................................... |
20 |
5.8. |
DISPLAY SETTINGS .......................................................................................... |
20 |
6. ADDING CAPTIONS WHEN SAVING IMAGES ......................................................... |
21 |
|
6.1. VOICE MESSAGE .................................................................................................... |
21 |
|
6.2. TEXT CAPTIONS ..................................................................................................... |
22 |
|
APPENDIX................................................................................................................ |
23 |
|
A1. EMISSIVITY TABLES ................................................................................................. |
23 |
|
A2. FULL ICON LIST. .................................................................................................... |
24 |
|
A3. TECHNICAL SPECIFICATION......................................................................................... |
25 |
|
ND-7521-3UK |
Page 2 of 27 |
|
#61-846 & 61-848
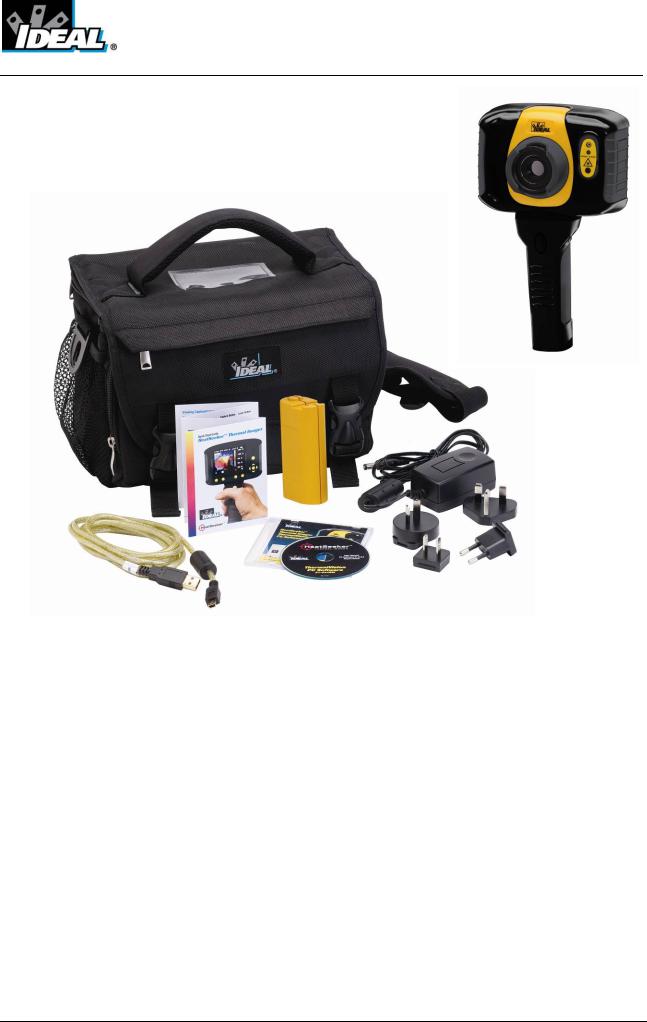
1. Contents of the Case
♦Carrying Case.
♦Camera.
♦USB PSU and International Adaptors.
♦CD – 61-846 Instruction Manual and ThermalVision™ 160 Software and Software Instruction Manual
♦USB Cable (Camera to PC).
♦Quick Start Guide.
ND-7521-3UK |
Page 3 of 27 |
#61-846 & 61-848
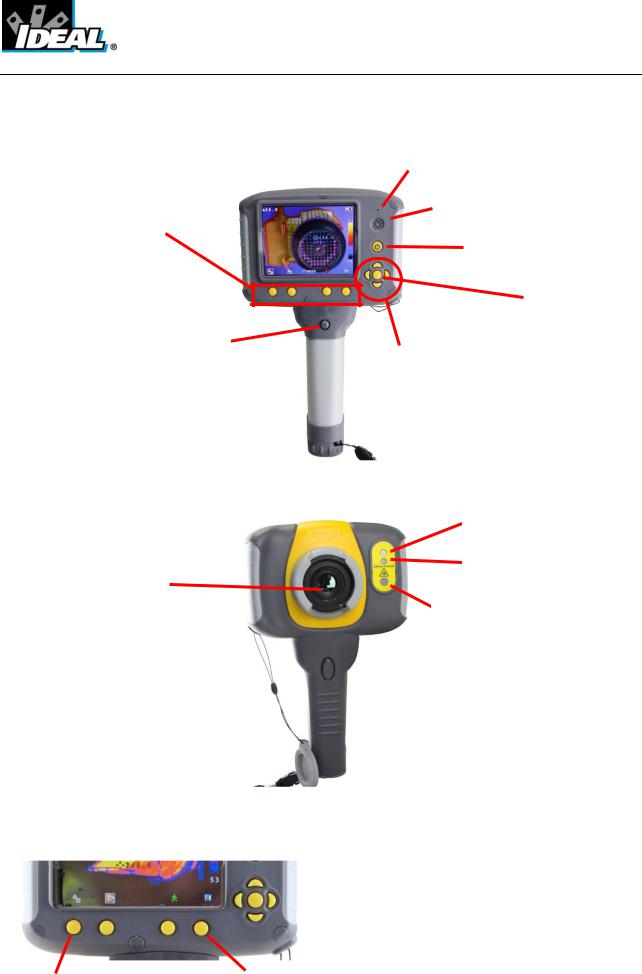
2. Main Controls
2.1. Back
Microphone
Speaker
Function Keys 1 to 4
Power Button
Centre Navigation
Key
Laser button
4 Navigation Keys
2.2. Front
Laser
Light
Infrared lens
Visible camera
Capture Button 
2.3. Function Keys
The Function Key functions are indicated by the icons or text displayed on the screen above them. These functions vary according to the operating options chosen by the user.
|
|
|
|
|
|
|
|
|
|
|
|
|
|
|
|
|
|
|
|
|
|
Function |
|
Function |
|
Function |
|
Function |
|
|||
Key 1 |
|
Key 2 |
|
Key 3 |
|
Key 4 |
|
|||
|
|
|
|
|
|
|
|
|
|
|
|
|
|
|
|
|
|
|
|
|
|
|
|
|
|
|
|
|
|
|
|
|
|
ND-7521-3UK |
|
|
|
|
|
Page 4 of 27 |
|||
#61-846 & 61-848
3. Getting started
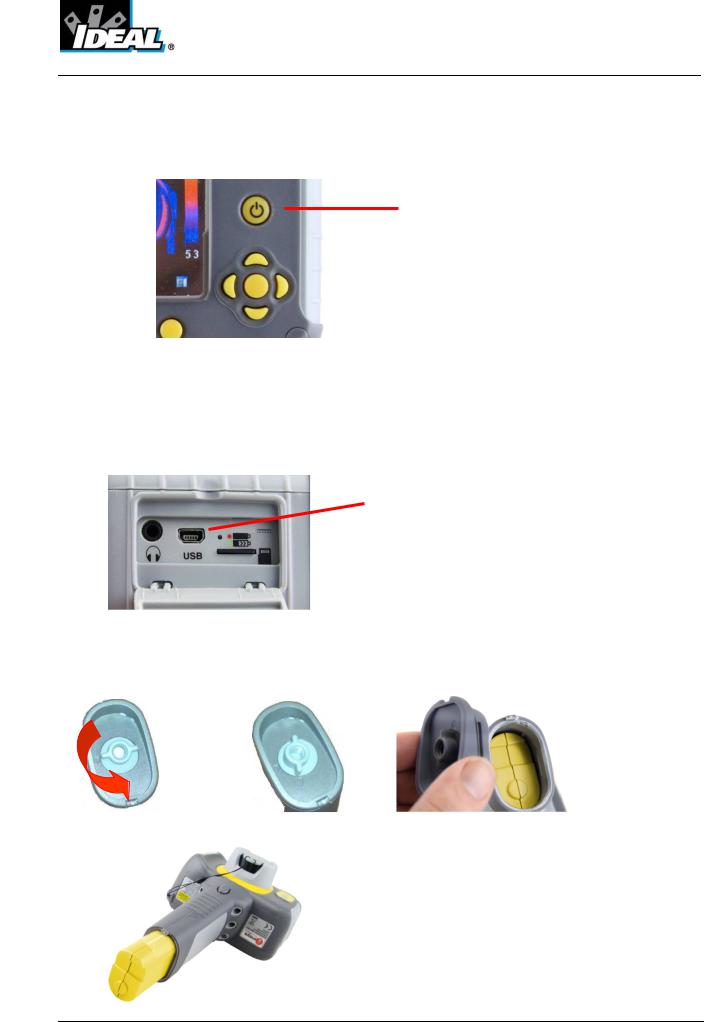
3.1. Switching the camera on/off
Press the on/off button and hold it for two seconds to switch the camera on.
Press and hold for three seconds to switch the camera off.
After switching on, it will take up to 30 seconds for the infrared image to appear. The image will periodically freeze for one or two seconds while the camera re-calibrates itself. This is normal operation, and the time between these calibrations will increase as the operating temperature of the camera stabilises.
3.2. Charging the battery
The camera’s battery is charged via the USB port. A fully charged battery will last approximately 5 hours. A green LED indicates charging which turns to red when the battery is charged.
Note: When the camera is connected to a PC via the USB cable it switches off and the SD card as an external memory.
3 |
the battery |
lock on the battery cover and remove the cover
Remove battery.
Insert new battery, ensuring the terminal pads are towards the front of the camera.
Replace and lock the cover
ND-7521-3UK |
Page 5 of 27 |
#61-846 & 61-848
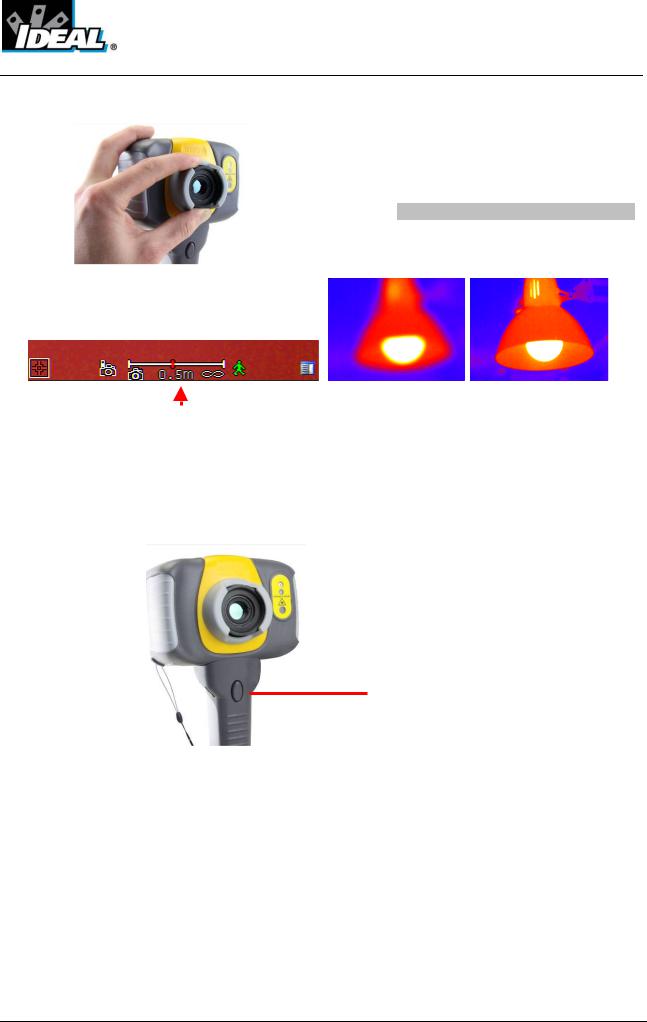
3.4Focusing
Gently rotate the lens clockwise and counter-clockwise to focus the image.
♦ Remember to remove the lens cap.
|
ar |
Out of Focus |
Focused |
When focusing a |
appears on the screen to assist in focusing the image. It |
||
indicates the approximate distance in metres (in feet when °F is selected) of a focused target from the
3.5. Saving an image
Save image button
To save a live or frozen image, press the Save button once. If Caption Mode or Voice Annotation has been turned on, a text caption or voice annotation can be attached to the image (see section 6).
3.6. Temperature measurement
One of the key functions of a thermal imager is obtaining temperature information about the scene. The IDEAL 61-846EU has a variety of measurement options to provide maximum flexibility.
The display of temperature values and related items depends on the combination of the measurement and display options selected. Temperature readings are displayed at the top of the display. In the default mode, a single reading in °C indicates the temperature at the centre point of the cursor. The other reading at the top of the display is the reflected temperature setting (see section 5.1.). The temperature range within the scene is indicated by a scale on the right hand side of the display.
ND-7521-3UK |
Page 6 of 27 |

#61-846 & 61-848
4.Function buttons
Function |
Function |
Function |
Function |
Key1 |
Key2 |
Key3 |
Key4 |
Pressing any of the Function Key buttons reveals the icons which indicate the functions of these buttons. A box around the icon for Function Key1 or Function Key2 indicates that this option is selected and this defines the operation of the navigation buttons. With the default settings, the key functions are as follows:
Function Key 1 toggles between Align Image and Cursor.
Function Key 2 cycles through Visible on/off, Auto/Manual, and Light on/off. Function Key 3 toggles between Live and Freeze.
Function Key 4 opens the menu.
See appendix A2 for a full list of Function Key button functions.
4.1.Moving the cursor
4.1.1.Press Function Key 1  to toggle to the Cursor icon
  . The emissivity value will be displayed at the top of the screen.
4.1.2.Use the left/right and up/down navigation buttons to move the cursor to the desired position.
ND-7521-3UK |
Page 7 of 27 |
#61-846 & 61-848
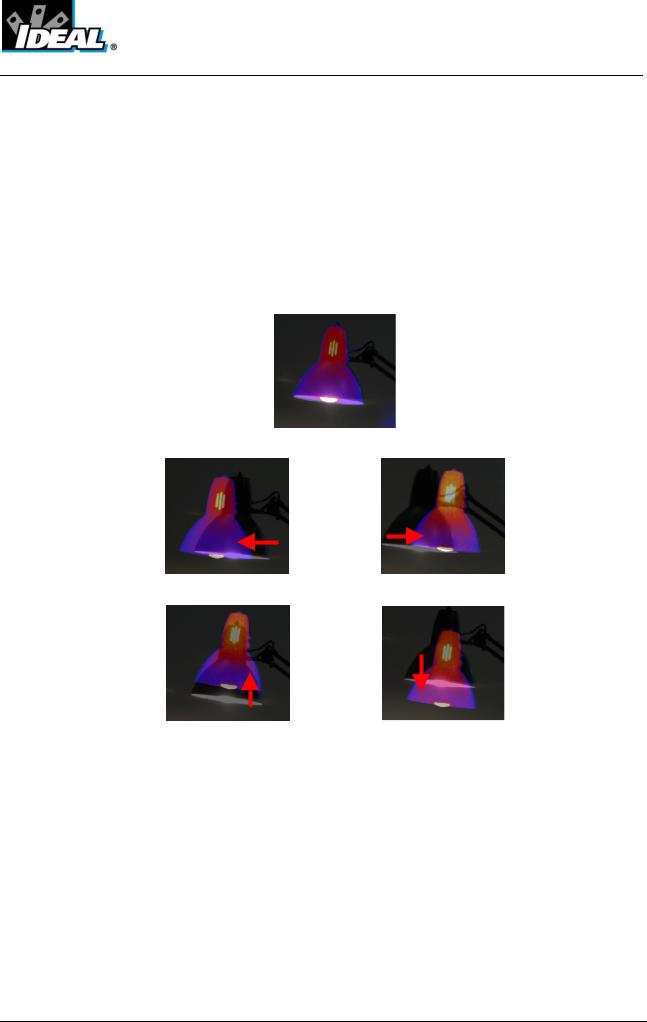
4.2. Image alignment
As the visible and thermal cameras are not co-axial the visible and thermal image may need to be aligned. This is usually required when moving to view objects at different distances.
4.2.1.Press Function Key 1 to toggle to the alignment icon
  .
.
4.2.2.Use the up/down and left/right navigation buttons  to align the thermal and visible images.
Note The visible image is moved during alignment.
Examples of alignment.
Fully Aligned
Four pre-programmed |
are included. |
are at 0.5 |
metre, 1 metre, |
2 metres and 4 metres |
the alignment option selected by |
function key 1, |
|
pressing the centre |
once aligns |
metres. Pressing the centre |
|
navigation button repeatedly allows you to cycle |
to 4 metres, 0.5 metre and 1 |
||
metre. |
|
|
|
Note: These values appear in Feet if °F is selected.
ND-7521-3UK |
Page 8 of 27 |
#61-846 & 61-848
4.3.Turning the visible image off and on
4.3.1.Press Function Key 2  to toggle to the Visible On icon
  .
.
4.3.2.Press the centre navigation button  to toggle to Visible Off
  .
.
4.3.3.Press the centre navigation button  again to toggle to Visible On
  .
.
4.4.Thermal and visible image blending
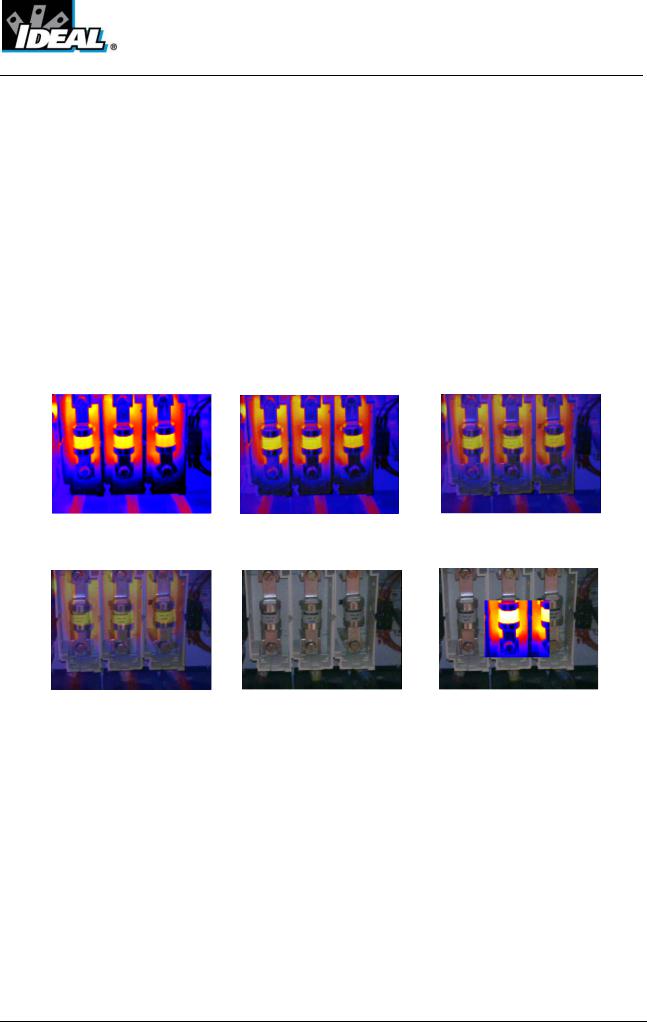
The camera can show a thermal image, a visible image of the scene, a mixed blend of both visible and thermal, a thermal picture in the visible picture (PiP) and a blended version of the thermal image in the PiP.
100% thermal |
25% visible 75% thermal 50% visible 50% thermal |
75% visible 25% thermal |
100% visible |
Picture in Picture |
ND-7521-3UK |
Page 9 of 27 |
 Loading...