


See Warranty on page 8 for important information about commercial use of this product.
Operating Instructions |
HDS580, HDS590, HDS890 |
|
|
Please read and save these instructions. Read carefully before attempting to assemble, install, operate or maintain the product described. Protect yourself and others by observing all safety information. Failure to comply with instructions could result in personal injury and/or property damage! Retain instructions for future reference.
Gravity Feed Spray Gun
Description
Air operated spray guns are designed to perform a variety of painting, coating, and finishing applications using the power of compressed air.
Unpacking
After unpacking the unit, inspect carefully for any damage that may have occurred during transit. Make sure to tighten fittings, bolts, etc., before putting unit into service.
Do not operate tool if damaged during shipping, handling or use.
Damage could result in bursting and cause injury or property damage.
Safety Guidelines
This manual contains information that is very important to know and understand. This information is provided for SAFETY and to PREVENT EQUIPMENT PROBLEMS. To help
recognize this information, observe the following symbols.
Danger indicates an imminently
hazardous situation which, if not avoided, WILL result in death or serious injury.
Warning indicates a potentially
hazardous situation which, if not avoided, COULD result in death or serious injury.
Caution indicates a potentially
hazardous situation which, if not avoided, MAY result in minor or moderate injury.
Notice indicates important
information, that if not followed, may cause damage to equipment.
NOTE: Information that requires special attention.
Important Safety Instructions
INSTRUCTIONS PERTAINING TO A RISK OF FIRE, ELECTRIC SHOCK, OR INJURY TO PERSONS
When using tools, basic precautions
should always be followed, including the following:
California proposition 65
This product or its power cord may contain chemicals known to
the State of California to cause cancer and birth defects or other reproductive harm. Wash hands after handling.
You can create
dust when you cut, sand, drill or grind materials
such as wood, paint,
metal, concrete, cement, or other masonry. This dust often contains chemicals known to cause cancer, birth defects, or other reproductive harm. Wear protective gear.
General
a.To reduce the risks of electric shock, fire, and injury to persons, read all the instructions before using the tool.
b.Be thoroughly familiar with the controls and the proper use of the equipment. Follow all instructions. Contact your Campbell Hausfeld representative if you have any questions.
c.Only persons well acquainted with these rules of safe operation should be allowed to use the unit.
Locate model and date code on tool and record below:
Model No.: _____________________
Date Code: _____________________
Retain these numbers for future reference.
Read and understand tool
labels and manual. Failure to follow warnings, dangers, and cautions could result in DEATH or SERIOUS INJURY.
d.Follow all local electrical and safety codes as well as the United States National Electrical Codes (NEC) and Occupational Safety and Health Act (OSHA).
|
REMINDER: Keep your dated proof of purchase for warranty purposes! |
|
Attach it to this manual or file it for safekeeping. |
|
|
© 2011 |
IN710101AV 8/11 |
|
Operating Instructions
Important Safety Instructions |
c. Do not attach the hose or tool to |
Tool Use and Care |
||||||||||||||||||||
(Continued) |
|
your body. Attach the hose to the |
a. Use clamps or another practical way |
|||||||||||||||||||
Work Area |
|
structure to reduce the risk of loss of |
|
to secure and support the workpiece |
||||||||||||||||||
|
balance if the hose shifts. |
|
|
|
|
|
||||||||||||||||
|
|
|
|
|
|
to a stable platform. Holding the |
||||||||||||||||
|
|
|
|
Never |
|
|
|
|
|
|
|
|||||||||||
|
|
|
|
|
|
|
|
Use a |
|
|
|
|
|
|
|
work by hand or against the body is |
||||||
|
|
|
|
|
|
|
|
|
|
|||||||||||||
|
|
|
|
spray |
|
|
|
|
|
|
|
|
|
|
|
|||||||
|
|
|
|
|
|
|
|
|
|
|
|
|||||||||||
|
|
|
|
|
|
|
|
face |
|
|
|
|
|
|
|
unstable and is able to lead to loss |
||||||
closer than 25 feet to the |
|
|
|
|
|
|
|
|
|
|
|
|||||||||||
|
mask/respirator and |
|
|
|
|
|
|
|
||||||||||||||
compressor! If possible, |
|
|
|
|
|
|
|
|
of control. |
|||||||||||||
|
protective clothing when |
|
|
|
|
|
|
|
||||||||||||||
locate compressor in |
|
|
|
|
|
|
|
|
|
|
|
|
|
|||||||||
|
|
|
|
|
|
|
|
|
|
|
|
|
|
|
|
|
||||||
|
spraying. Always spray in |
|
|
|
|
b. Store the tool when it is idle out |
||||||||||||||||
separate room. Never spray into |
|
|
|
|
||||||||||||||||||
a well ventilated area to prevent |
|
of reach of children and other |
||||||||||||||||||||
the compressor, compressor |
|
|||||||||||||||||||||
health and fire hazards. Refer to |
|
|||||||||||||||||||||
controls or the motor. |
|
untrained persons. A tool is |
||||||||||||||||||||
Material Safety Data Sheets (MSDS) |
|
|||||||||||||||||||||
|
|
|
|
Do not |
|
|
dangerous in the hands of untrained |
|||||||||||||||
|
|
|
|
|
of spray material for details. |
|
|
|
|
|
||||||||||||
|
|
|
|
|
|
|
|
|
|
|||||||||||||
|
|
|
|
spray |
|
|
|
|
Always |
|
|
|
|
|
|
|
users. |
|||||
flammable materials in |
|
|
|
|
|
|
|
|
|
|
|
|
|
|
|
|
||||||
vicinity of open flame |
|
|
|
|
wear eye |
|
|
|
|
|
|
|
|
|
|
Do not |
|
|||||
|
protection. |
|
|
|
|
|
|
|
|
|
|
|
||||||||||
|
|
|
|
|
|
|
|
|
|
|
||||||||||||
or near ignition sources. |
|
|
|
|
|
|
|
|
|
|
|
|
||||||||||
|
|
|
|
|
|
|
|
|
||||||||||||||
|
|
|
|
|
|
|
|
|
|
|
use pressure that exceeds |
|
||||||||||
Motors, electrical equipment and |
|
|
|
|
|
|
|
|
|
|
|
|||||||||||
|
|
|
|
|
|
|
|
|
|
operating pressure of the |
|
|||||||||||
controls can cause electrical arcs |
|
|
|
Never |
|
|
|
|
|
|
|
|||||||||||
|
|
|
|
|
|
|
|
|
spray gun or any of the |
|
||||||||||||
that will ignite a flammable gas |
|
|
|
use |
|
|
|
|
|
parts (hoses, fittings, etc.) in the |
||||||||||||
|
|
|
|
|
|
|
||||||||||||||||
or vapor. Never store flammable |
oxygen, corbon dioxide, |
|
O CO2 |
painting system. |
||||||||||||||||||
liquids or gases in the vicinity of |
combustible gases or |
|
|
|
|
|
|
|
|
|
Over pressurizing |
|||||||||||
the compressor. |
any bottled gas as an |
|
|
|
|
|
|
|
|
|
the spray gun is |
|||||||||||
|
|
|
|
Do not smoke or |
air source for the spray gun. Such |
|
|
|
|
|||||||||||||
|
|
|
|
able to result in bursting, abnormal |
||||||||||||||||||
|
|
|
|
|||||||||||||||||||
|
|
|
|
eat when spraying |
gases are capable of explosion and |
|||||||||||||||||
|
|
|
|
operation, breakage of the spray |
||||||||||||||||||
paint, insecticides, or other |
serious injury to persons. |
|
|
|
|
|||||||||||||||||
|
|
|
|
gun or serious injury to persons. |
||||||||||||||||||
flammable substances. |
|
|
|
Do not misuse this |
||||||||||||||||||
|
|
|
|
|
|
|
Always verify |
|||||||||||||||
|
|
|
|
Keep hose away |
|
|
|
product. Excessive |
|
|
|
|
prior to using |
|||||||||
|
|
|
|
from sharp |
exposure to vibration, work in |
the spray gun that the air source |
||||||||||||||||
objects. Bursting air hoses may |
awkward positions, and repetitive |
|||||||||||||||||||||
has been adjusted to the rated air |
||||||||||||||||||||||
cause injury. Examine air hoses |
work motions can cause injury |
|||||||||||||||||||||
pressure or within the rated air- |
||||||||||||||||||||||
regularly and replace if damaged. |
to hands and arms. Stop using |
|
|
|
|
|||||||||||||||||
|
|
|
|
pressure range. |
||||||||||||||||||
|
|
|
|
Always work in a |
any tool if discomfort, numbness, |
|||||||||||||||||
|
|
|
|
|
|
|
|
Check for |
||||||||||||||
|
|
|
|
tingling or pain occur, and consult a |
|
|
|
|
||||||||||||||
|
|
|
|
clean |
|
|
|
|
||||||||||||||
|
|
|
|
physician. |
|
|
|
|
|
|
|
|
misalignment |
|||||||||
environment. To avoid injury and |
|
|
|
|
|
|
|
|
||||||||||||||
|
|
|
Never aim or |
|
|
|
|
or binding of moving parts, |
||||||||||||||
damage to the workpiece, do not |
|
|
|
|
|
|
|
breakage of parts, and any other |
||||||||||||||
aim the spray gun at any dust or |
|
|
|
spray at yourself |
||||||||||||||||||
|
|
|
condition that affects the spray |
|||||||||||||||||||
|
|
|
||||||||||||||||||||
debris. |
or anyone else or serious injury |
|||||||||||||||||||||
gun’s operation. If damaged, have |
||||||||||||||||||||||
|
|
|
|
|
|
could occur. |
|
|
|
|
||||||||||||
|
|
|
|
Keep visitors |
|
|
|
|
the spray gun serviced before |
|||||||||||||
|
|
|
|
|
|
|
Do not spray |
|
|
|
|
|||||||||||
|
|
|
|
away and NEVER |
|
|
|
|
|
|
|
using. Many accidents are caused |
||||||||||
allow children or pets in the work |
|
|
|
acids, corrosive |
by poorly maintained spray guns. |
|||||||||||||||||
|
|
|
||||||||||||||||||||
|
|
|
||||||||||||||||||||
area. |
materials, toxic chemicals, |
|
|
|
|
There is a risk of bursting if the |
||||||||||||||||
Personal Safety |
fertilizers or pesticides. Using these |
spray gun is damaged. |
||||||||||||||||||||
materials could result in death or |
|
|
|
|
Avoid |
|||||||||||||||||
|
|
|
|
|
|
serious injury. |
|
|
|
|
|
|
|
|
||||||||
a. Stay alert. Watch what you are |
|
|
|
|
|
|
|
|
unintentional |
|||||||||||||
|
|
|
When spraying |
|
|
|
|
|||||||||||||||
|
|
|
|
|
|
|
||||||||||||||||
doing and use common sense |
|
|
|
starting. Be sure the trigger is |
||||||||||||||||||
|
|
|
||||||||||||||||||||
|
|
|
||||||||||||||||||||
when operating the tool. Do not |
|
|
|
and cleaning, |
off before connecting to the air |
|||||||||||||||||
always follow the instructions and |
supply. Do not carry the spray gun |
|||||||||||||||||||||
use the tool while tired or under |
||||||||||||||||||||||
safety precautions provided by the |
with your finger on the trigger or |
|||||||||||||||||||||
the influence of drugs, alcohol, |
||||||||||||||||||||||
material manufacturer (Refer to |
connect the spray gun to the air |
|||||||||||||||||||||
or medication. A moment of |
MSDS). |
|
|
|
|
supply with the trigger on. |
||||||||||||||||
inattention while operating the |
|
|
|
Do |
|
|
|
|
|
|
|
|
|
Disconnect the |
||||||||
tool increases the risk of injury to |
|
|
|
not |
|
|
|
|
|
|
|
|
|
spray gun from |
||||||||
|
|
|
|
|
|
|
||||||||||||||||
|
|
|
|
|
|
|
|
|
|
|
||||||||||||
|
|
|
|
|
|
|
||||||||||||||||
persons. |
overreach. Keep proper |
|
|
|
|
|
the air source before, changing |
|||||||||||||||
b. Dress properly. Do not wear loose |
footing and balance at |
|
|
|
|
|
accessories, cleaning, servicing |
|||||||||||||||
all times. Proper footing |
|
|
|
|
|
or storing the spray gun. Such |
||||||||||||||||
|
|
|
|
|
||||||||||||||||||
clothing or jewelry. Contain long |
and balance enables better control |
preventive safety measures reduce |
||||||||||||||||||||
hair. Keep hair, clothing, and |
of the spray gun in unexpected |
the risk of starting the spray gun |
||||||||||||||||||||
gloves away from moving parts. |
situations. |
|
|
|
|
unintentionally. |
||||||||||||||||
|
|
|
|
|
|
|
|
|
|
|
|
|
|
Failure to install |
||||||||
Loose clothes, jewelry, or long |
|
|
|
|
|
|
|
|
|
|
|
|
|
|
||||||||
|
|
|
|
|
|
|
|
|
|
|
|
|
|
|||||||||
|
|
|
|
|
|
|
|
|
|
|
|
|
|
|||||||||
hair increases the risk of injury to |
|
|
|
|
|
|
|
|
|
|
|
|
|
|
appropriate |
|||||||
|
|
|
|
|
|
|
|
|
|
|
|
|
|
|||||||||
|
|
|
|
|
|
|
|
|
|
water/oil removal equipment may |
||||||||||||
persons as a result of being caught |
|
|
|
|
|
|
|
|
|
|
||||||||||||
|
|
|
|
|
|
|
|
|
|
result in damage to machinery or |
||||||||||||
in moving parts. |
|
|
|
|
|
|
|
|
|
|
||||||||||||
|
|
|
|
|
|
|
|
|
|
workpiece. |
||||||||||||
|
|
|
|
|
|
|
|
|
|
|
|
|
|
|
|
|
|
|
|
Always use a |
||
|
|
|
|
|
|
|
|
|
|
|
|
|
|
|
|
|
|
|
|
|||
|
|
|
|
|
|
|
|
|
|
|
|
|
|
|
|
|
|
|
|
|||
|
|
|
|
|
|
|
|
|
|
|
|
|
|
|
|
|
|
|
|
pressure regulator |
||
|
|
|
|
|
|
|
|
|
|
|
|
|
|
|
|
|
|
|
|
|||
|
|
|
|
|
|
|
|
|
|
|
|
|
|
|
|
on the air supply to the spray gun. |
||||||
2
HDS580, HDS590, HDS890
Important Safety Instructions (Continued)
Service
a.Tool service must be performed only by qualified repair personnel.
b.When servicing a tool, use only identical replacement parts. Use only authorized parts.
Do not make any modifications to
the tool without first obtaining written approval from Campbell Hausfeld. Do not use the tool if any shields or guards are removed or altered. Do not use the tool as a hammer. Personal injury or tool damage may occur.
Introduction
The spray gun is a vital link in any finishing application. In addition to operating the spray gun properly, techniques of surface preparation and paint preparation must be understood. These instructions will explain the differences among various spray technologies and serve as a guide in the proper operation and techniques of spray painting. Refer to the Replacement Parts Manual for model specific information.
Spray Gun Terms
Atomization – Conversion of bulk liquid to spray droplets (mist).
Bleeder/Non-Bleeder – Indicates whether air flows through the gun continuously or as the trigger is pulled.
Bleeder – In this mode, air passes continuously through the gun whether spraying or not. This mode is generally used when the air is supplied by a continuously running compressor that does not have a tank.
Non-Bleeder – In this mode, air flows only when the trigger is pulled. This type of operation is used with a compressor equipped with a tank or with a large factory air system.
Feed – Method used to bring paint into the gun for spraying.
Fluid Control Knob – Used to control the amount of paint being mixed with air.
Gravity Feed – Method of paint feed similar to the siphon feed method. However, the cup is inverted to create a positive fluid pressure at the nozzle.
Mix – The mixing of paint and air when spraying.
External Mix – Process where the air and paint are mixed just after leaving the nozzle. This type of mix should be used for fast drying paints and when a high quality finish is needed.
Internal Mix – Process where the air and paint are mixed inside the air cap just before being sprayed. This method is best for heavy bodied, slow drying paints and can only be used with the pressure feed method. Do not use fast drying paints with internal mix. The paint will dry inside and quickly clog the air cap.
Paint Tank – An auxiliary pressurized paint reservoir that allows continuous spraying of large amounts of paint without stopping for refills as with a canister. It also allows using the spray gun at any angle without causing paint to drip.
Pattern Control Knob – Used to form the proper pattern (size and shape) of paint as it is sprayed from the gun to the workpiece.
Pressure Feed – Method of paint feed where a canister or paint tank is pressurized to force paint to the gun. Either internal or external mix air caps are used with this method. Pressure feed is generally used for spraying heavy bodied paints or for large size projects.
Siphon Feed – Method of paint feed where atmospheric pressure creates a partial vacuum to siphon paint to the gun. Only external mix air caps are used with this method. Siphon feed is used with light bodied paints.
Viscosity – A measurement of the resistance to the flow of liquids.
Conventional vs. HVLP
Conventional spray guns use a much higher air cap pressure to atomize paint than HVLP spray guns. This results in more overspray and a lower transfer efficiency.
HVLP, electrostatic and airless processes are currently the only compliant spray methods that meet the strict 65% transfer efficiency criteria required by some air quality management districts. This enhanced transfer efficiency results in a significant material savings compared to conventional spraying. Check local, state and national regulations that may be in effect before performing any spraying operations.
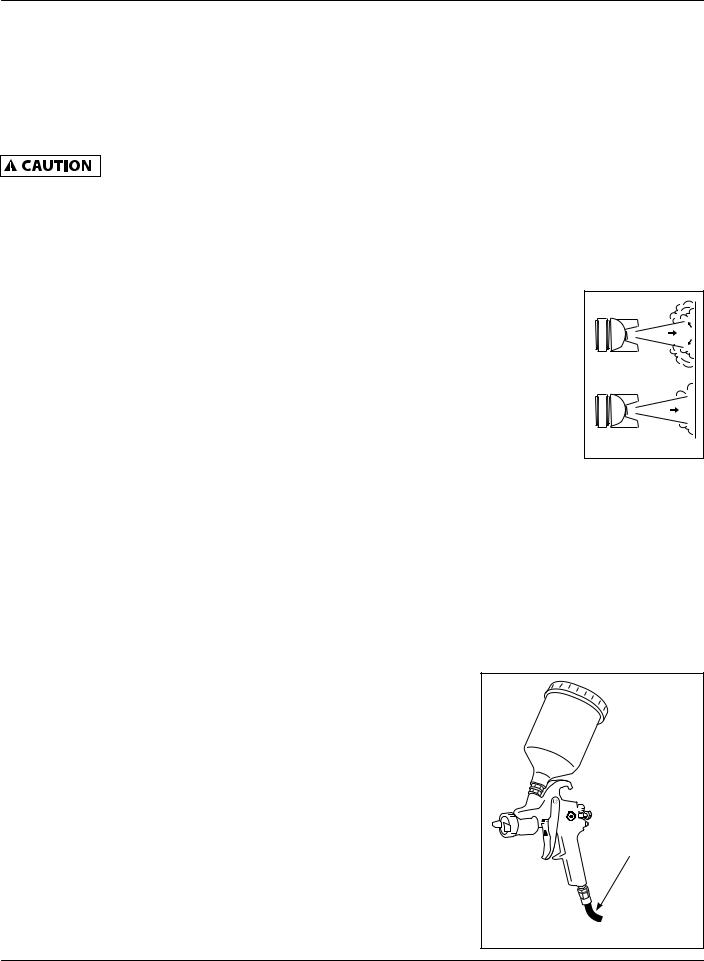
HVLP spraying is a growing trend in the finishing industry due to its environmental friendliness. By
definition, dynamic air pressures in the air cap must be 10 psi or less to qualify as HVLP. A soft, low velocity pattern is produced which
increases control and reduces bounceback and overspray (See Figure 1). For these reasons, HVLP is also well suited for spraying parts with recessed
areas.
Spray Gun Setup
The pressure for atomization is controlled at the air source. The amount of fluid is adjusted by the fluid control knob, the paint viscosity and the air pressure.
The gravity feed cup screws onto the top of the gun body creating a positive fluid pressure in the nozzle (See Figure 2).
Filtered,
Regulated
Air Source
Figure 2 - Gravity Feed Cup Set-up
3

Operating Instructions |
|
|
|
|
|
|
||
Preparation |
|
|
Adjust air pressure with the trigger |
4. Trigger a short burst while turning |
||||
1. Thoroughly mix and thin paint |
|
pulled and air control knob (if |
fluid control knob counterclockwise. |
|||||
|
applicable) fully open. If reduced air |
Observe the spray pattern on the |
||||||
in accordance with the paint |
|
|||||||
|
pressure is desired for some areas of |
target and adjust the fluid control |
||||||
manufacturer’s instructions. Most |
||||||||
the spray job, use the air compressor |
knob until the desired pattern |
|||||||
materials will spray readily if thinned |
||||||||
regulator or air control knob to reduce |
(atomization) is obtained (See |
|||||||
properly. |
|
|
||||||
|
|
pressure as necessary (See Figure 4). |
Figure 7). |
|
||||
2. Strain material through cheese cloth |
|
|||||||
|
|
If the spray is too fine (excessive |
||||||
or a paint strainer. |
|
|
|
|
||||
|
|
|
|
overspray), caused by too much air for |
||||
3. Fill the canister about 3/4 full and |
|
|
||||||
Air Control |
|
|
|
|
||||
start the air compressor. |
|
Knob |
|
|
|
|
||
4. Set up a piece of cardboard or other |
|
|
|
|
|
|||
scrap material to use as a target and |
Increase |
Decrease |
|
|
|
|||
adjust for best spray pattern. |
|
|
|
|
||||
|
Air Flow |
Air Flow |
|
|
|
|||
5. Test the consistency of the material |
Figure 4 - Air Adjustment on Spray Gun |
Paint too |
Correct |
Paint too |
||||
by making a few strokes on a |
|
|||||||
|
2. Set pattern size to desired shape. For |
|||||||
cardboard target. If material |
|
fine |
|
coarse |
||||
|
full pattern, open pattern control |
|
|
|
||||
still appears too thick, add a |
|
|
|
|
||||
|
knob by turning counterclockwise. |
Figure 7 - Pattern Consistency |
||||||
small amount of thinner. THIN |
|
|||||||
|
For a round pattern, turn pattern |
(Atomization) |
|
|||||
WITH CARE!! Do not exceed |
|
|
||||||
|
|
|
|
|||||
|
control knob clockwise (See |
the amount of paint being sprayed, |
||||||
paint manufactuer’s thinning |
|
|||||||
|
Figure 6). |
|
reduce the air pressure or open the fluid |
|||||
recommendations. |
|
|
|
|||||
|
|
|
|
control to spray more material. |
||||
|
|
|
Pattern control |
|
||||
Fan direction |
|
|
|
If the spray is too coarse (spitting globs), |
||||
The direction of the fan (horizontal or |
knob |
|
||||||
|
reduce the amount of material with the |
|||||||
|
|
|||||||
vertical) can be changed by loosening |
|
|
fluid control knob or thin the paint. |
|||||
the lock ring and turning the air cap 90 |
|
|
5. The fluid control knob can be used |
|||||
degrees (See Figure 3). Hand tighten |
|
|
||||||
|
|
to finely adjust pattern consistency. |
||||||
lock ring after adjustment. |
|
|
|
|||||
|
|
|
Before spraying the workpiece, practice |
|||||
|
|
|
|
Fluid Control |
||||
Air Cap |
|
|
|
a few minutes on a cardboard target to |
||||
|
|
|
Knob |
|||||
|
|
|
|
ensure the pattern size and consistency |
||||
|
Horizontal Fan |
|
|
|||||
|
|
|
Figure 6 - Pattern Size |
|
are set correctly. |
|
||
|
|
|
|
|
|
|
||
|
|
|
3. Turn fluid control knob fully |
|
|
|
||
Lock Ring |
Vertical Fan |
|
clockwise until closed (See Figure 6). |
|
|
|
||
|
|
|
|
|
|
|
||
|
|
|
|
|
|
Vent Hole |
|
|
Figure 3 |
|
|
|
|
|
Cup |
|
|
|
|
|
|
|
|
|
||
Pattern Adjustment |
|
|
|
|
|
|
||
1. Adjust air pressure |
|
40 psi |
|
|
|
|
|
|
to the spray gun |
|
Min. |
|
Air Cap |
|
Pattern Control |
||
|
|
|
|
|||||
according to the |
|
60 psi |
|
|
|
Knob (location |
||
recommendations |
|
Max. |
|
|
|
depends on model) |
||
|
|
|
|
|
|
|
||
supplied with the spray material. |
|
|
|
Fluid Control Knob |
||||
This air pressure usually falls |
|
|
|
|
||||
|
|
|
|
|
|
|||
between 40 - 60 psi. |
|
Fluid Tip (Nozzle) |
|
|
Air Valve |
|
||
Do not exceed |
Fluid Packing Nut |
|
|
|||||
spray gun |
|
Trigger |
|
Packing Nut |
|
|||
maximum pressure. |
|
|
|
1/4 inch NPS Air |
||||
|
|
|
|
|
||||
|
|
|
|
|
|
|||
|
|
|
|
|
|
Inlet Fitting |
|
|
|
|
|
Figure 5 - Gravity Feed Spray Gun |
|
|
|
||
4
Water/Oil in compressed Air
All compressor pumps discharge some condensed water, oil or contaminates with the compressed air.
Important: This condensation will cause “fish eyes” to appear in the paint job. Install appropriate water/oil removal equipment and
controls as necessary for the intended application. Locate filter as close to spray gun as possible.
Failure to install appropriate
water/oil removal equipment may result in damage to machinery or workpiece.
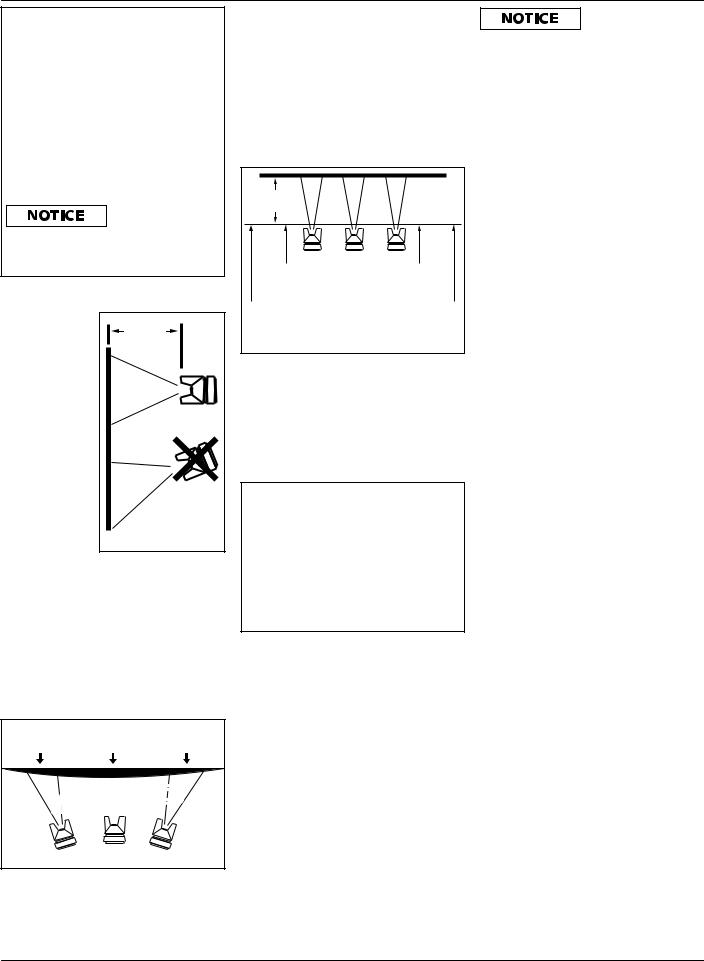
Operation
1.Begin
spraying. 6 - 9 Always keep inches
the gun at
right angles to the work (See
Figure 8).
2. Keep the
nozzle about 6 to 9 inches
from the work surface throughout the stroke and always
keep the gun in motion while spraying. Stopping gun movement in mid-stroke will cause a build up of paint and result in runs. Do not fan the gun from side to side while painting. This will cause a build-up of paint in the center of the stroke and an insufficient coating at each end (See Figure 9).
Thin |
Heavy |
Thin |
coat |
coat |
coat |
INCORRECT
Figure 9
HDS580, HDS590, HDS890
3.Trigger the gun properly. Start the gun moving at the beginning of the stroke BEFORE SQUEEZING THE TRIGGER and release the trigger BEFORE STOPPING GUN MOVEMENT at the end of the stroke. This procedure will feather (blend) each stroke with the
next without showing overlap or unevenness (See Figure 10).
6 - 9 |
|
inches |
|
Pull |
Release |
Trigger |
Trigger |
Start |
End |
Stroke |
Stroke |
Figure 10 |
|
4.The amount of paint being applied can be varied by the speed of the stroke, distance from the surface and adjustment of the fluid control knob.
5.Overlap strokes just enough to obtain an even coat (See Figure 11).
Figure 11
NOTE: Two thin coats of paint will yield better results and have less chance of runs than one heavy layer.
6.Use a piece of cardboard as a shield to catch overspray at the edges of the work to protect other surfaces. Use masking tape to cover other areas if needed.
User - Maintenance Instructions
Daily clean-up
Local codes may require specific cleaning methods and equipment. Follow local codes and paint manufacturer’s recommendations for the use and disposal of spray materials and solvent.
Clean spray gun immediately after
use. Paint and other materials dry quickly in the small passages rendering gun useless due to the difficulty of removing hardened
paint from the passages inside the gun.
NOTE: In the instructions below, the use of the word “solvent” refers to the specific solvent for the material used (example: lacquer thinner for lacquer, etc.).
1.Remove and empty the canister; then rinse with a solvent recommended for the paint or other material used.
2.Refill canister with clean solvent and attach to the gun. Spray solvent through the gun while shaking
the gun vigorously. Wipe the gun exterior with a solvent soaked rag. Repeat until the gun is clean.
3.Remove the air cap and soak in solvent until clean. Use a small brush for stubborn stains if necessary. Toothpicks or small brushes may be used to clean air passages; however,
NEVER USE METAL OBJECTS TO CLEAN PRECISELY DRILLED
PASSAGES. DAMAGED PASSAGES WILL CAUSE IMPROPER SPRAYING.
4.Clean gaskets with a solvent soaked rag. To prevent equipment damage,
Do not immerse gaskets or spray gun body in solvents.
5.After using water to clean out water based paints or materials, spray mineral spirits through the gun to prevent corrosion.
6.Use a non-silicone oil on all moving parts when reassembling. Use Vaseline® or light grease on all threaded connections prior to storage.
7.Clean and flush gun thoroughly to neutralize any contaminants corrosive to the spray gun.
Periodic clean-up
Due to improper cleaning and paint it may be necessary to inspect and clean the internal parts and the gun body.
1.Examine openings in air cap and fluid tip. If clogged, remove any o-rings and soak the air cap or fluid tip in solvent.
5
Operating Instructions
User - Maintenance |
4. Check and replace any damaged |
Tool Repair |
|
Instructions (Continued) |
o-rings and seals. O-rings and seals |
Only qualified personnel should repair |
|
2. A brush or toothpick or something |
can be wiped clean but not soaked |
the tool and they should use genuine |
|
in solvent. |
|||
Campbell Hausfeld replacement parts |
|||
similar may be used to dislodge the |
|||
|
|||
5. Unscrew packing nuts and replace |
and accessories, or parts and accessories |
||
dried paint from holes and passages. |
|||
the packing ONLY if a leak will not |
which perform equivalently. |
||
NEVER USE METAL OBJECTS |
|||
stop when the nut is tightened (See |
|
||
TO CLEAN PRECISELY DRILLED |
Storage |
||
Figure 5). Do not over-tighten a |
|||
PASSAGES. DAMAGED PASSAGES |
1. When not using spray gun, |
||
packing nut because this will restrict |
|||
WILL CAUSE IMPROPER |
|||
turn the fluid adjustment knob |
|||
movement of the needle. |
|||
SPRAYING. |
|||
counterclockwise to open which |
|||
|
|||
3. Remove and check the fluid needle |
6. Re-assemble in reverse order of |
||
will reduce spring tension on needle |
|||
above and use a non-silicone oil on |
|||
for excessive wear at the tip and |
fluid tip. |
||
moving parts. Apply Vaseline® or |
|||
straightness. |
|||
light grease on threaded joints and |
2. Spray gun must be well cleaned |
||
IMPORTANT: If the needle tip is worn |
|||
and lightly lubricated. |
|||
hose connections. |
|||
more on one side than the other, either |
|
||
Technical Service |
|
||
the needle is bent or the gun body |
|
||
has been dropped or knocked out-of- |
Please call our Tool Hotline at 1-800- |
|
|
line. There are no adjustments that |
543-6400 with any questions regarding |
|
|
can be made to a bent gun body. Test |
the operation or repair of this tool or |
|
|
the needle by rolling on a flat surface. |
for additional copies of this manual. |
|
|
Replace if necessary. |
|
|
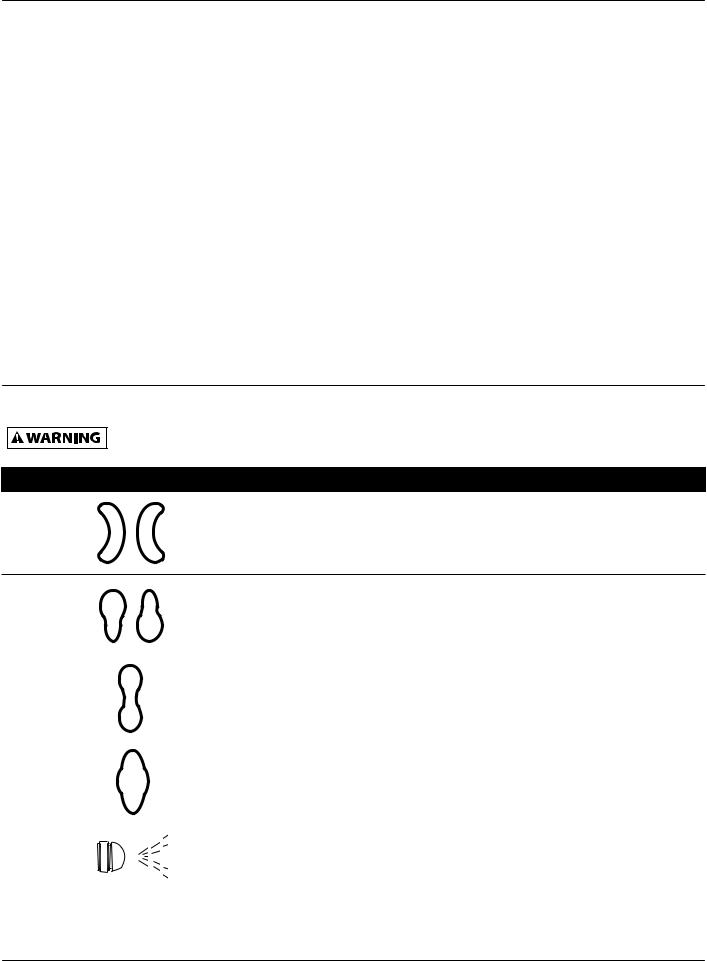
Troubleshooting Chart
Stop using tool immediately if any of the following problems occur. Serious personal injury could occur. Any repairs or replacements must be done by a Qualified Service Person or
Authorized Service Center.
Symptom |
Possible Cause(s) |
Corrective Action |
Right or left heavy spray pattern
1. |
Holes in left or right side of the air cap |
1. |
Clean. Use only non-metallic pick |
|
are plugged |
|
|
2. |
Dirt on left or right side of fluid tip |
2. |
Clean |
Top or |
|
|
|
|
|
|
|
1. Dried material at top or bottom of fluid |
1. |
Clean |
||
bottom |
|
|
|
|
|
|
|
|
tip |
|
|
|
heavy spray |
2. |
Loose air cap or dirty seat |
2. |
Clean and tighten |
||||||||
pattern |
||||||||||||
3. |
Air cap plugged |
3. |
Clean. Use only non-metallic pick |
|||||||||
|
||||||||||||
|
|
|
|
|
|
|
|
|
|
|
||
Split spray |
|
|
|
|
|
|
|
1. Fan pattern open too far |
1. |
Partially close the pattern adjustment |
||
pattern |
2. |
Fluid turned in too far |
2. |
Increase fluid |
||||||||
|
||||||||||||
|
3. |
Atomization air too high |
3. |
Reduce atomization air pressure |
||||||||
|
|
|
|
|
|
|
|
|
|
|
||
Center |
|
|
|
|
|
|
|
1. Fan adjustment partially closed |
1. |
Open fan pattern adjustment |
||
heavy spray |
2. |
Material too thick |
2. |
Thin to proper viscosity |
||||||||
pattern |
||||||||||||
3. |
Atomization pressure too low |
3. |
Increase atomization pressure |
|||||||||
|
||||||||||||
|
|
|
|
|
|
|
|
|
|
|
||
Sputtering |
|
|
|
|
|
|
|
1. Material level too low |
1. |
Refill |
||
spray |
|
|
|
|
|
|
|
2. |
Container tipped too far |
2. |
Hold more upright |
|
|
3. |
Loose fluid inlet connection |
3. |
Tighten |
||||||||
|
4. |
Loose or damaged fluid tip/seat |
4. |
Adjust or replace |
||||||||
|
5. |
Dry or loose fluid needle packing nut |
5. |
Lubricate and or tighten |
||||||||
|
6. |
Air vent clogged |
6. |
Clear vent hole |
||||||||
6

HDS580, HDS590, HDS890
Troubleshooting Chart (Continued)
Stop using tool immediately if any of the following problems occur. Serious personal injury could occur. Any repairs or replacements must be done by a Qualified Service Person or
Authorized Service Center.
Symptom |
Possible Cause(s) |
Corrective Action |
||
Fluid leaking from packing |
1. Packing nut loose |
1. |
Tighten, but do not restrict needle |
|
nut |
2. |
Packing worn or dry |
2. |
Replace or lubricate (non-silicone oil) |
|
||||
|
|
|
|
|
Air leaking from air cap |
1. Sticking air valve stem |
1. |
Lubricate |
|
without pulling trigger |
2. |
Contaminate on air valve or seat |
2. |
Clean |
|
||||
|
3. |
Worn or damaged air valve or seat |
3. |
Replace |
|
4. |
Broken air valve spring |
4. |
Replace |
|
5. |
Bent valve stem |
5. |
Replace |
|
|
|
|
|
Fluid leaking from fluid tip |
1. Packing nut too tight |
1. |
Adjust |
|
of pressure feed spray gun |
2. |
Fluid tip worn or damaged |
2. |
Replace tip and/or needle |
|
||||
|
3. |
Foreign matter on tip |
3. |
Clean |
|
4. |
Fluid needle spring broken |
4. |
Replace |
|
|
|
|
|
Excessive overspray |
1. Too high atomization pressure |
1. |
Reduce pressure |
|
|
2. |
Too far from work surface |
2. |
Adjust to proper distance |
|
3. |
Improper stroking (arcing, gun motion |
3. |
Move at moderate pace, parallel to surface |
|
|
too fast) |
|
|
|
|
|
|
|
Will not spray |
1. No pressure at gun |
1. |
Check air lines |
|
|
2. |
Fluid control not open enough |
2. |
Open fluid control |
|
3. |
Fluid too heavy |
3. |
Thin fluid or change to pressure feed system |
Notes
7

Operating Instructions
Limited Warranty - Husky Gravity Feed Spray Guns by Campbell Hausfeld
1.DURATION: From the date of purchase by the original purchaser as follows: Two years.
2.WHO GIVES THIS WARRANTY (WARRANTOR): Campbell Hausfeld / Scott Fetzer Company, 100 Production Drive, Harrison, Ohio, 45030, Telephone: (800) 543-6400
3.WHO RECEIVES THIS WARRANTY (PURCHASER): The original purchaser (other than for purposes of resale) of the Campbell Hausfeld product.
4.WHAT PRODUCTS ARE COVERED BY THIS WARRANTY: This Campbell Hausfeld spray gun, models HDS580, HDS590, HDS890.
5.WHAT IS COVERED UNDER THIS WARRANTY: Substantial defects in material and workmanship which occur within the duration of the warranty period with the exceptions below.
6.WHAT IS NOT COVERED UNDER THIS WARRANTY:
A.Implied warranties, including those of merchantability and FITNESS FOR A PARTICULAR PURPOSE ARE LIMITED FROM THE DATE OF ORIGINAL PURCHASE AS STATED IN THE DURATION. If this product is used for commercial, industrial or rental purposes, the warranty will apply for ninety (90) days from the date of purchase. Some States do not allow limitation on how long an implied warranty lasts, so the above limitations may not apply to you.
B.ANY INCIDENTAL, INDIRECT, OR CONSEQUENTIAL LOSS, DAMAGE, OR EXPENSE THAT MAY RESULT FROM ANY DEFECT, FAILURE, OR MALFUNCTION OF THE CAMPBELL HAUSFELD PRODUCT. Some States do not allow the exclusion or limitation of incidental or consequential damages, so the above limitation or exclusion may not apply to you.
C.Any failure that results from an accident, purchaser’s abuse, neglect or failure to operate products in accordance with instructions provided in the owner’s manual(s) supplied with product. Accident, purchaser’s abuse, neglect or failure to operate products in accordance with instructions shall also include the removal or alteration of any safety devices. If such safety devices are removed or altered, this warranty is void.
D.Normal adjustments which are explained in the owner’s manual(s) provided with the product.
E.Items or service that are normally required to maintain the product, e.g. o-rings, springs, gaskets, packings or seals, fluid nozzles, needles, filter elements, or any other expendable part not specifically listed. These items will only be covered for ninety (90) days from date of original purchase. Underlined items are warranted for defects in material and workmanship only.
7.RESPONSIBILITIES OF WARRANTOR UNDER THIS WARRANTY: Repair or replace, at Warrantor’s option, products or components which are defective, have malfunctioned and/or failed to conform within the duration of the specific warranty period.
8.RESPONSIBILITIES OF PURCHASER UNDER THIS WARRANTY:
A.Provide dated proof of purchase and maintenance records.
B.Call Campbell Hausfeld (800-543-6400) to obtain your warranty service options. Freight costs must be borne by the purchaser.
C.Use reasonable care in the operation and maintenance of the products as described in the owner’s manual(s).
9.WHEN WARRANTOR WILL PERFORM REPAIR OR REPLACEMENT UNDER THIS WARRANTY: Repair or replacement will be scheduled and serviced according to the normal work flow at the servicing location, and depending on the availability of replacement parts.
This Limited Warranty applies in the United States, Canada and Mexico only and gives you specific legal rights. You may also have other rights which vary from state to state or country to country.
8
 Loading...