


HP Pavilion a110uk, Pavilion a115uk, Pavilion a118uk, Pavilion a120uk, Pavilion a145uk Quick Start Manual
...Quick Start Guide

The information in this document is subject to change without notice.
Hewlett-Packard® Company makes no warranty of any kind with regard to this material, including, but not limited to, the implied warranties of merchantability and fitness for a particular purpose.
HP shall not be liable for errors contained herein or for incidental or consequential damages in connection with the furnishing, performance, or use of this material.
HP assumes no responsibility for the use or reliability of its software on equipment that is not furnished by HP.
This document contains proprietary information that is protected by copyright. All rights are reserved. No part of this document may be photocopied, reproduced, or translated to another language without the prior written consent of HP.
Hewlett-Packard Company
P.O. Box 4010
Cupertino, CA 95015-4010
USA
© 2000, 2003 Hewlett-Packard Company. All rights reserved.
Hewlett-Packard is a registered trademark of Hewlett-Packard Company in the United States of America and other countries/regions.
This product incorporates copyright protection technology that is protected by method claims of certain U.S. patents and other intellectual property rights owned by Macrovision Corporation
and other rights owners. Use of this copyright protection technology must be authorised by Macrovision Corporation, and is intended for home and other limited viewing uses only unless otherwise authorised by Macrovision Corporation. Reverse engineering
or disassembly is prohibited. Apparatus Claims of U.S. Patent Nos. 4,631,603, 4,577,216, 4,819,098, and 4,907,093 licensed for limited viewing uses only.
Other brand or product names are trademarks of their respective holders.

Contents
Start Here........................................... |
vii |
Introducing the Quick Start Guide ......... |
1 |
Safety Information ................................................. |
1 |
Using the Quick Start Guide................................... |
3 |
Finding Additional Information ............................... |
4 |
Setting Up the PC.................................. |
5 |
Turning On the PC for the First Time ........................ |
5 |
Registering with HP ............................................... |
6 |
Making Recovery CDs ........................................... |
7 |
Getting Help......................................................... |
7 |
Protecting the PC................................................... |
7 |
Working in Comfort .............................................. |
8 |
Contents
Using the PC....................................... |
11 |
Introducing the Basics.......................................... |
11 |
Windows operating system .............................. |
11 |
Start menu ..................................................... |
11 |
Help and Support ........................................... |
11 |
Using the Mouse................................................. |
12 |
The scroll feature ............................................ |
13 |
To use the autoscroll feature ............................. |
13 |
To use the panning feature ............................... |
13 |
Using the Keyboard ............................................ |
14 |
Introduction .................................................... |
14 |
Keyboard features .......................................... |
14 |
Buttons .......................................................... |
22 |
Button configuration ........................................ |
26 |
Using the Monitor ............................................... |
27 |
Modifying monitor display properties ................ |
27 |
Quick Start Guide |
iii |

Using Speakers .................................................. |
28 |
|
|
Using multi-channel audio speakers................... |
28 |
|
To connect your multi-channel speaker system |
|
|
to the PC........................................................ |
29 |
|
To configure multi-channel audio output for |
|
|
speakers configuration .................................... |
29 |
|
To configure multi-channel audio output |
|
|
for the DVD player .......................................... |
30 |
|
To use the microphone |
|
|
with multi-channel audio .................................. |
30 |
|
Adjusting speaker volume ................................ |
31 |
Using a Microphone ........................................... |
32 |
|
|
Adjusting microphone volume .......................... |
33 |
Using a Television ............................................... |
34 |
|
|
Cables you may need ..................................... |
34 |
|
Connecting to a TV set .................................... |
34 |
|
Viewing the PC image on TV............................ |
35 |
|
Disabling the TV option ................................... |
36 |
|
Disconnecting the TV ....................................... |
37 |
Turning Off the PC .............................................. |
37 |
|
Putting the PC into Standby and |
|
|
Hibernation Mode .............................................. |
38 |
|
|
Standby mode ................................................ |
38 |
iv |
HP Pavilion home PC |
|
Hibernation mode........................................... |
39 |
Automatic standby or hibernation mode ............ |
40 |
Setting Up and Using the Internet....... |
43 |
Introducing the Internet........................................ |
43 |
What is the Internet? ....................................... |
43 |
What is an ISP?.............................................. |
44 |
What is the World Wide Web?........................ |
44 |
What is a URL? .............................................. |
45 |
What is an e-mail address? ............................. |
45 |
How do I search the Internet?........................... |
46 |
Setting Up the Modem ........................................ |
47 |
Upgrading to V.92 ......................................... |
49 |
Setting Up the Network Interface Adapter ............. |
49 |
Setting Up Your Internet Account .......................... |
51 |
Signing up with an ISP using |
|
Easy Internet Sign-up....................................... |
52 |
Connecting to the Internet.................................... |
52 |
Using ISP-provided browser ............................. |
53 |
Using any browser.......................................... |
53 |
Visiting the Hewlett-Packard Web Site ................... |
54 |
Viewing online manuals .................................. |
55 |

Sending and Receiving E-Mail .............................. |
56 |
If the ISP provides the browser.......................... |
57 |
If using Outlook Express................................... |
57 |
Doing Common Tasks ......................... |
59 |
Understanding Your Drives ................................... |
59 |
Using the Diskette (Floppy) Drive........................... |
60 |
Using the 6-In-1 Memory Card Reader .................. |
60 |
Special note about the Safely Remove |
|
Hardware Utility ............................................. |
61 |
To use the 6-In-1 memory card reader................ |
61 |
Inserting a CD or DVD......................................... |
63 |
Removing a CD or DVD ....................................... |
65 |
Handling CDs..................................................... |
65 |
Playing Music CDs .............................................. |
66 |
Using MusicMatch Jukebox .............................. |
66 |
Using Windows Media Player .......................... |
67 |
Creating a CD by Using the CD-RW Drive ............. |
68 |
Creating a CD by Using RecordNow .................... |
69 |
Creating a music CD ....................................... |
69 |
Creating a data CD ........................................ |
71 |
...........................................Playing DVD Movies |
71 |
Contents |
|
Playing a DVD |
72 |
||
|
|||
Viewing Help information ................................ |
73 |
|
|
Understanding DVD terminology....................... |
73 |
|
|
Using the WinDVD control panel ...................... |
73 |
|
|
Using country/region codes............................. |
74 |
|
|
|
|||
Creating a DVD by Using the |
|
|
|
DVD+RW/+R Drive............................................. |
76 |
|
|
Using the Combo Drive ....................................... |
76 |
|
|
Playing Video CDs .............................................. |
77 |
|
|
Playing dual-language Video CDs..................... |
77 |
|
|
Using HP Pavilion PC Tools .................................. |
79 |
|
Getting HP Updates for the PC ............ |
81 |
Informing You of Changes.................................... |
81 |
Using HP Centre to Receive Messages from HP ...... |
81 |
To start HP Centre ........................................... |
81 |
To turn off the HP Centre Service....................... |
82 |
Re-enabling the HP Centre Service .................... |
82 |
Quick Start Guide |
v |

Resolving Problems............................ |
83 |
Troubleshooting .................................................. |
83 |
Using Application Recovery |
|
and System Recovery......................... |
91 |
System Restore ................................................... |
91 |
Application Recovery .......................................... |
92 |
System Recovery................................................. |
93 |
System Recovery Using Recovery CDs ................... |
95 |
Using HP Recovery CD Creator ........................ |
95 |
Starting system recovery using recovery CDs ..... |
96 |
Freeing Up Space on Your Hard Disk Drive |
......... 100 |
To display hard disk space ............................ |
100 |
Increasing available hard disk space .............. |
101 |
Uninstalling programs ................................... |
101 |
Removing desktop icons ................................ |
101 |
Using the Disk Cleanup utility......................... |
102 |
Reinstalling programs.................................... |
102 |
Index .............................................. |
103 |
vi |
HP Pavilion home PC |
Start Here
Welcome
Thank you for becoming a member of the HP Pavilion home PC family. This “Start Here” section is an overview of some of the added software features and tools available on your HP Pavilion. The rest of this Quick Start Guide gives you information on how to use your computer. With this guide, you can use your computer with confidence.
Note: The screens on your computer may not match the screens pictured on these pages.
Start Here
Quick Start Guide |
vii |
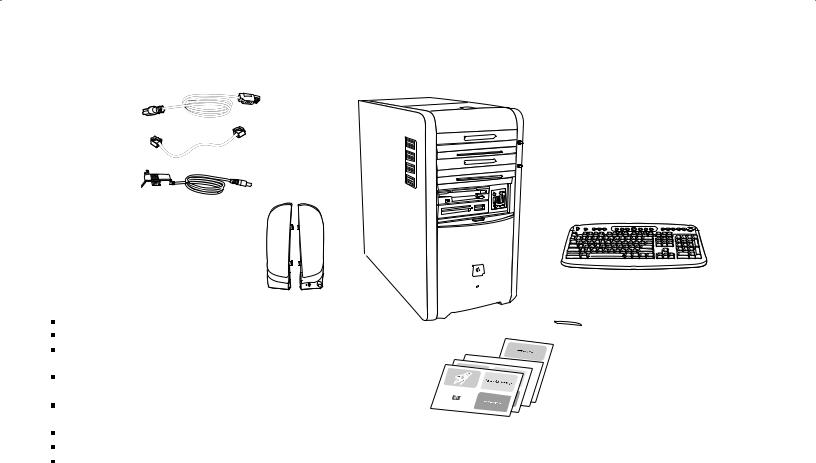
Inventory Checklist
Power cord
Modem cable
Transformer  (powered speakers, select models only)
Speakers (select models only)
The documentation includes:
Setup poster
This Quick Start Guide
Support Guide, containing support,
warranty, license, regulatory, and safety information
Upgrading and Servicing the PC guide (select models installed on PC, or in print)
Read first, addenda, or other documents if applicable
DVD Writer guide (select models)
Microsoft Windows XP Home Edition Start Here guide
My HP Pavilion home PC brochure (select models)
viii HP Pavilion home PC
PC
Keyboard
 Mouse
Mouse
Documentation
Note: Your contents may vary.
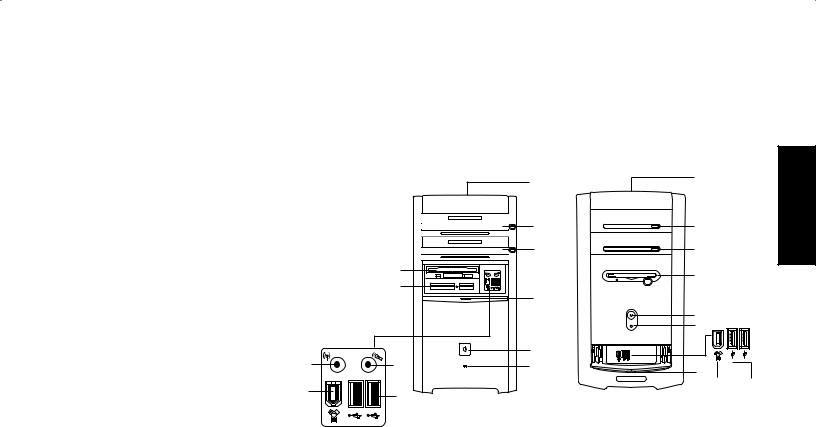
PC Front
Your PC may look different from the ones shown here. Component, connector location, type, and number vary by model.
A — CD storage (select models) B — CD-ROM or CD-RW drive
C — DVD-ROM or DVD+RW/+R drive D — Diskette (floppy) drive
E— 6-In-1 Memory card reader (select models)
F — FireWire®
G — USB 2.0 (two shown) H — Audio Line In
I — Microphone
K — On button/indicator
M — Hard disk activity indicator
N — Door opened to show connectors
H
F
|
A |
A |
Here |
|
|
||
|
|
|
|
|
B |
B |
Start |
|
|
||
|
C |
C |
|
D |
|
D |
|
|
|
|
|
E |
|
|
|
|
N |
|
|
|
|
K |
|
|
|
M |
|
|
K |
|
|
I |
M |
N |
|
|
|
|
|
|
|
F |
G |
G
Quick Start Guide |
ix |

Multi-Storage Bay
Some PCs have a multi-storage bay (select models only) on the top of the PC chassis. You can use it to store
ten CDs/DVDs, to store memory A cards, or as a place for peripherals,
such as a digital camera docking station. The bay design allows you to place a device, and thread the USB or FireWire data cable and the power cord for the device, underneath the top cover to the connectors at the back of the PC.
B
To store CDs, open the top cover (figure A) and gently lift the two sections to form the spindle (figure B). You can store 10 CDs/DVDs.
Your PC may look different from the one shown here. Component, connector location, type, and number vary by model.
x |
HP Pavilion home PC |
Multi-Storage Bay — Peripheral Placement
To use the multi-storage bay for a
peripheral device, do the following:
C
1 Open the bay cover. Hold the cover on each side near the hinges, then lift the cover and slide it toward the back of the chassis (figure C). Gently lift it off.
2 Thread the cables through the |
|
cable tunnel opening at the back |
|
of the bay (figure D). Connect |
|
data and power cables to the |
D |
peripheral device, and place |
|
the peripheral in the bay. |
|
3 Connect the data cable to the USB or FireWire connector on the back of the PC. Plug the power cord into a power outlet.
Your PC may look different from the one shown here. Component, connector location, type, and number vary by model.
Start Here
Quick Start Guide |
xi |

Multi-Storage Bay — Peripheral Placement (Continued)
To use the chassis top to set a |
|
|
peripheral device, do the following: |
E |
G |
|
||
1 Remove the bay cover (see step 1 |
|
|
on previous page). |
|
|
2 Grasp the tab and pull it out |
|
|
toward the front of the chassis |
|
|
(figure E). Put the tab in its |
|
|
storage area in the bay near |
|
|
the spindle (figure F). |
|
|
3 Thread the data and power |
|
F |
|
|
|
cables for the device through the |
|
|
cable tunnel opening at the back |
|
|
of the bay. Place the cables in the |
|
|
tab opening, and replace the bay |
|
|
cover. Close the cover. |
|
|
4 Connect the cables to the device, |
|
|
and place it on the top of the |
|
|
chassis (figure G). At the back of |
|
|
the PC, connect the data cable to |
|
|
the USB or FireWire connector |
|
|
on the back of the PC. Plug the |
|
|
power cord into a power outlet. |
|
|
xii |
HP Pavilion home PC |

PC Back
Connect your keyboard, mouse, monitor, and modem as described in the setup poster. Turn on the computer for the first time, and finish the registration process. Then, add a printer or other device, or install any software programs that came on CDs or DVDs included in the computer box (select models only).
Your computer may look different from the one shown here. Component, connector location, type, and number vary by model.
PS/2 keyboard
PS/2 mouse Serial
Parallel
Audio Out
Audio In
Microphone
USB 2.0
Monitor
Telephone
SERIAL
OUT
IN
ETHERNET


SERIAL
Start Here
Joystick
Speaker out
Ethernet
TV out
Modem
Quick Start Guide xiii
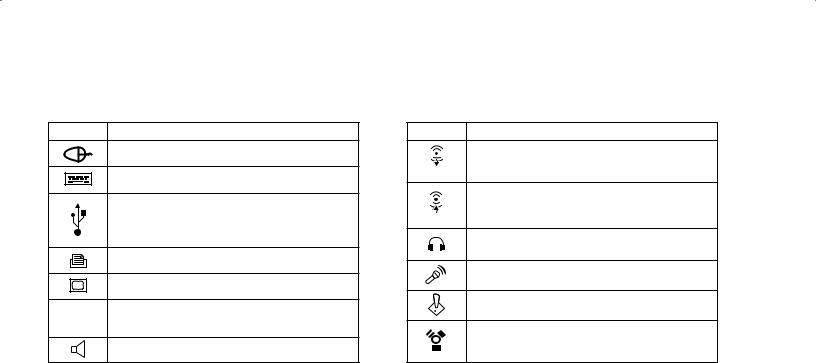
PC Connector Symbols
Symbols in this table identify connectors.
Symbol Description
Mouse (PS/2)
Keyboard (PS/2)
Universal Serial Bus (USB) for mouse, keyboard, digital camera, or other device with a USB connector
Printer (parallel)
|
Monitor |
|
serial |
Serial port for digital camera or other |
|
serial device |
||
|
||
|
Speaker |
Many peripherals and external devices are Plug and Play. Plug and Play describes the ability to add or remove components without any special procedures such as resetting jumpers and testing for conflicts. When you add a Plug and Play peripheral, the PC recognizes it and obtains the best driver for the device.
xiv |
HP Pavilion home PC |
Symbol Description
Audio Line Out (powered speakers)
OUT
Audio Line In
IN
Headphones
Microphone
Joystick/MIDI
FireWire for video cameras or other devices with very fast transfer rates
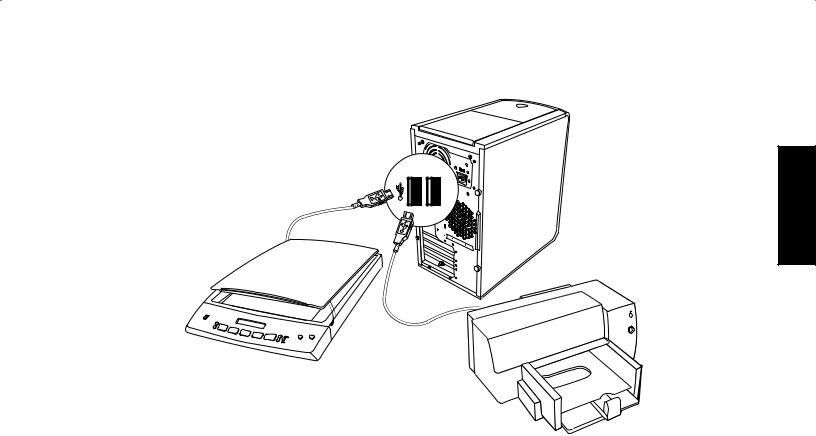
PC Back Connections
Your PC may look
different from the one shown here. External components shown in the following figure are not included with the PC. Back connector location, type, and number vary by model.
Note: Before using your components, you may need to install the software that came with the component.
Start Here
HP Products Work Better Together
HP computers include pre-loaded software for select HP All-In-One, camera, scanner, and printer peripheral products. Pre-loaded software simplifies and speeds product setup for HP peripherals. Simply connect the HP peripheral product, turn it on, and your HP PC automatically configures it so it is ready to use.
Quick Start Guide xv
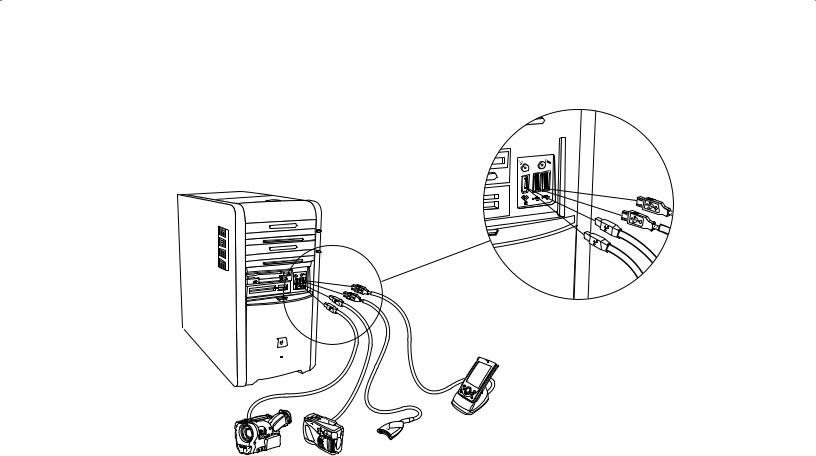
PC Front Connections
Your PC may look different from the one shown here. External components shown in the following figure are not included with the PC. Front connector location, type, and number
vary by model.
Note: Before using your components, you may need to install the software that came with the component.
xvi |
HP Pavilion home PC |
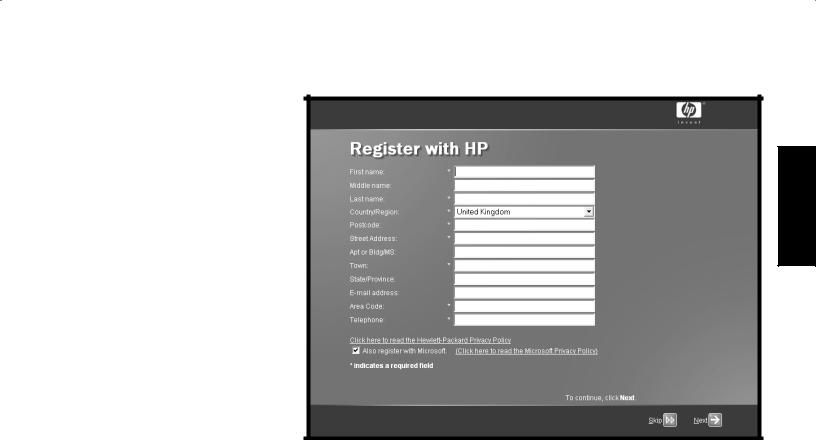
Register with HP
Register your HP Pavilion home PC with Hewlett-Packard so that HP can assist you with your technical support needs.
Start Here
Quick Start Guide xvii
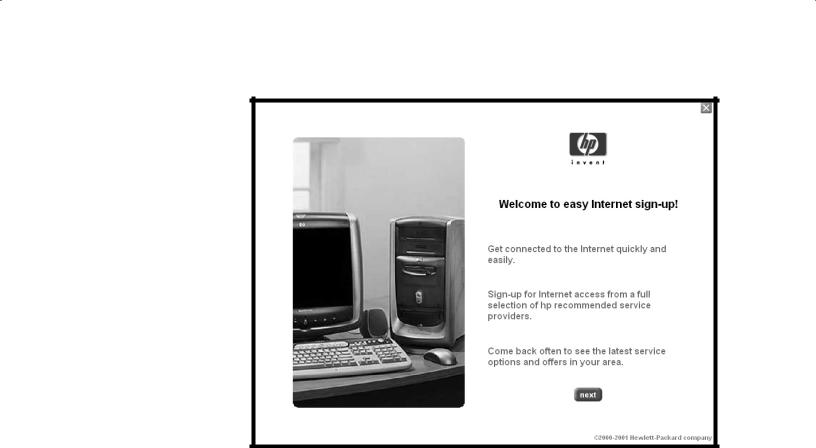
Internet
Click Start, choose
All Programs, and then click easy Internet sign-up for a simple step-by-step wizard to guide you through setup for the Internet and e-mail.
For information about modem setup, the Internet, and e-mail, see the related sections inside this guide. You can also find helpful information by clicking
Start, Help and Support, and then My HP Pavilion PC
(select models only).
xviii HP Pavilion home PC
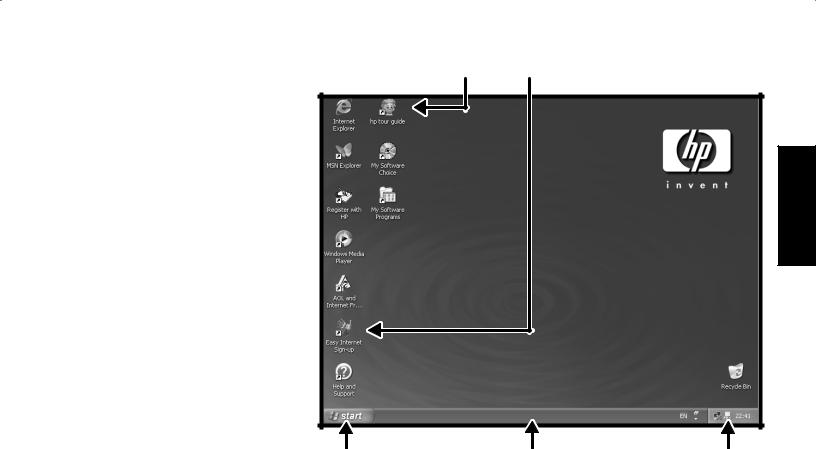
HP Desktop |
HP Tour Guide |
Easy Internet Sign-up |
|
The HP desktop has shortcut icons that make it easy to find the things you need. Click the icon to find out more information about that program.
Note: The screen on your computer may not match the screen pictured here.
Help and Support 
Start Here
Start button |
Taskbar |
System tray |
|
|
Quick Start Guide xix |
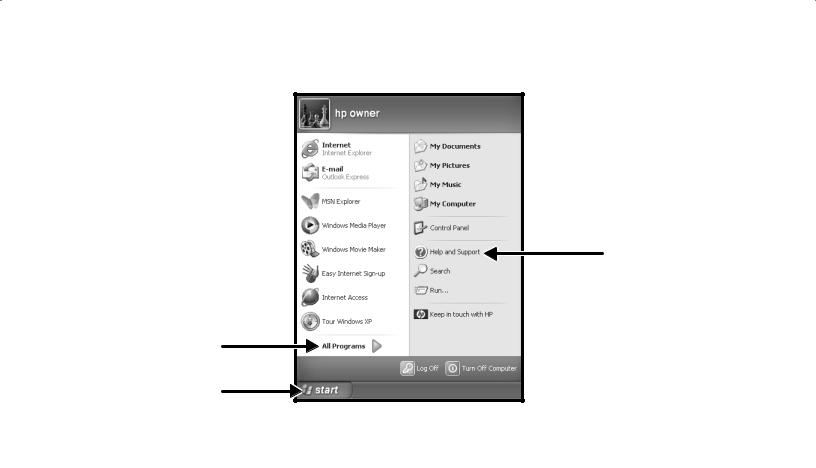
Start Menu |
|
Click the Start button to |
|
view the Start menu, the entry |
|
point to everything on your |
|
PC. Look at the following |
|
pages to learn about important |
|
software programs and tools |
|
available to you. |
|
Choose All Programs and |
|
then choose Hewlett-Packard |
|
to find HP-specific software (select |
Help and Support |
models only). |
All Programs
Start button
Note: The screen on your PC may not match the screen pictured here.
xx HP Pavilion home PC
Help and Support
Click Start and then
Help and Support to learn about your PC and get your questions answered.
HP Pavilion information  and support
(select models)
Help and support news
Start Here
Quick Start Guide xxi

My HP Pavilion PC
Click Start, Help and Support, and then
My HP Pavilion PC for detailed instructions and information about your PC (select models only).
Learn how to use your HP Pavilion home PC
xxii HP Pavilion home PC

All Programs
Click Start and then choose All Programs to find all the software programs on your PC.
Choose Hewlett-Packard, and then choose
hp pavilion pc tools to find HP drivers and the HP Tour Guide (select models only).
Hewlett-Packard |
|
|
|
hp pavilion |
|
|
|
||
|
|
|
|
pc tools |
All Programs 
Start button 
Note: The screen on your PC may not match the screen pictured here.
Quick Start Guide xxiii
Start Here

HP Tour Guide
Click Start, choose
All Programs, Hewlett-Packard, click hp pavilion pc tools, and then click hp tour guide.
Or
Click the icon on the desktop (select models).
Let the HP Tour Guide show you the desktop and the basics of the Internet and e-mail.
xxiv HP Pavilion home PC

Your HP Pavilion home PC Support Guide
You can get help over the telephone from HP.
See the Support Guide included with the computer documentation for the terms of your HP Pavilion warranty coverage, for license information, and for support telephone numbers and addresses.
The Support Guide contains operating specifications for the PC, along with regulatory and safety information.
hp pavilion home pc
support guide
!where to get help !warranty and license information
!declaration of conformity !operating specifications !regulatory and safety information
Note: Your document contents may vary.
Start Here
Quick Start Guide xxv

HP Web Sites
Type these Web site addresses into the Address box of your Internet browser, and then press the Enter key on your keyboard to find helpful information from HP online.
http://www.hp.com
This main Web site has
the latest information about your HP Pavilion home PC and all your HP products. Receive technical support, download software updates, and find out about
HP’s home and business services. http://www.hp.com/
cposupport/loc/regional.html
Use this worldwide Web site for all your technical support needs.
xxvi HP Pavilion home PC

Microsoft Windows XP Operating System
For questions about the Microsoft® Windows® XP operating system, refer to:
 Help and Support, for onscreen help and troubleshooting — click Start and then
Help and Support.
 Microsoft Windows XP Home Edition Start Here guide, included with the computer documentation.
Start Here
Quick Start Guide xxvii

Recovery System and Hard Drive Space
HP Pavilion home PCs with Windows XP feature a recovery partition included on the hard drive, along with a recovery CD creator program. This program allows you to make your own recovery CDs. The recovery process, either application or operating system, offers the following advantages:
"Selective: Ensures that the recovery data is matched to the particular PC model. You can easily recover only the application or system software you need.
"Non-destructive: Recovers only the software you need; preserves user data and files.
System recovery using recovery CDs has two options:
"Standard Recovery: This is a non-destructive recovery, which recovers factory-shipped programs, drivers, and the operating system without affecting data files.
"Full System Recovery: This recovery erases hard disk drive data, reformats the drive, creates a new disk
partition, and then installs the operating system. You must reinstall any software that was not installed on the computer at the factory.
Instructions for using system recovery and application recovery, and creating your recovery CDs, are in this guide: refer to “Using Application Recovery and System Recovery.” To view the space used by the recovery partition on the hard drive, or to delete undesired software titles, refer to “Freeing Up Space on Your Hard Disk Drive.”
xxviii HP Pavilion home PC

Introducing the Quick Start Guide
Safety Information
This product has not been evaluated for connection to an “IT” power system (an AC distribution system with no direct connection to earth, according to IEC 60950).
AC Power Safety Warning
Warning: Install the PC near an AC outlet. The AC power cord is your
HP Pavilion PC’s main AC disconnecting device and must be easily accessible at all times. For your safety, the power cord provided with your system has a grounded plug. Always use the power cord with a properly grounded wall outlet to avoid the risk of electrical shock.
Warning: To reduce the possibility of an electric shock from the telephone
network, plug your PC into the AC outlet before connecting it to the telephone line. Also, disconnect the telephone line before unplugging your PC from the AC power outlet.
Warning: Your system is provided with a voltage select switch for use in a 115 or 230 VAC power system. The voltage select switch has been pre-set to the correct voltage setting for use in the particular country/region where it was initially sold. Changing the voltage
select switch to the incorrect position can damage your PC and void any implied warranty.
Introduction
Quick Start Guide |
1 |

Warning: Always disconnect the modem cord from the telephone system before installing or removing your PC cover.
Warning: Do not operate the PC with the cover removed.
Warning: The power supply is not user-serviceable. To prevent damage to the power supply, have a qualified person repair or replace it. All other components are user-serviceable.
Warning: Electrostatic discharge (ESD) can damage disk drives, add-in cards, and other components. If an ESD station is not available, wear a wrist strap attached to a metal part of the PC. Place cards on a conductive foam pad or inside the card wrapper, if possible, but never on the card wrapper.
2 |
HP Pavilion home PC |
 Loading...