

Page 1
HP LaserJet P3010 Series – Manage and maintain
Load paper and print media
How do I? Steps to perform
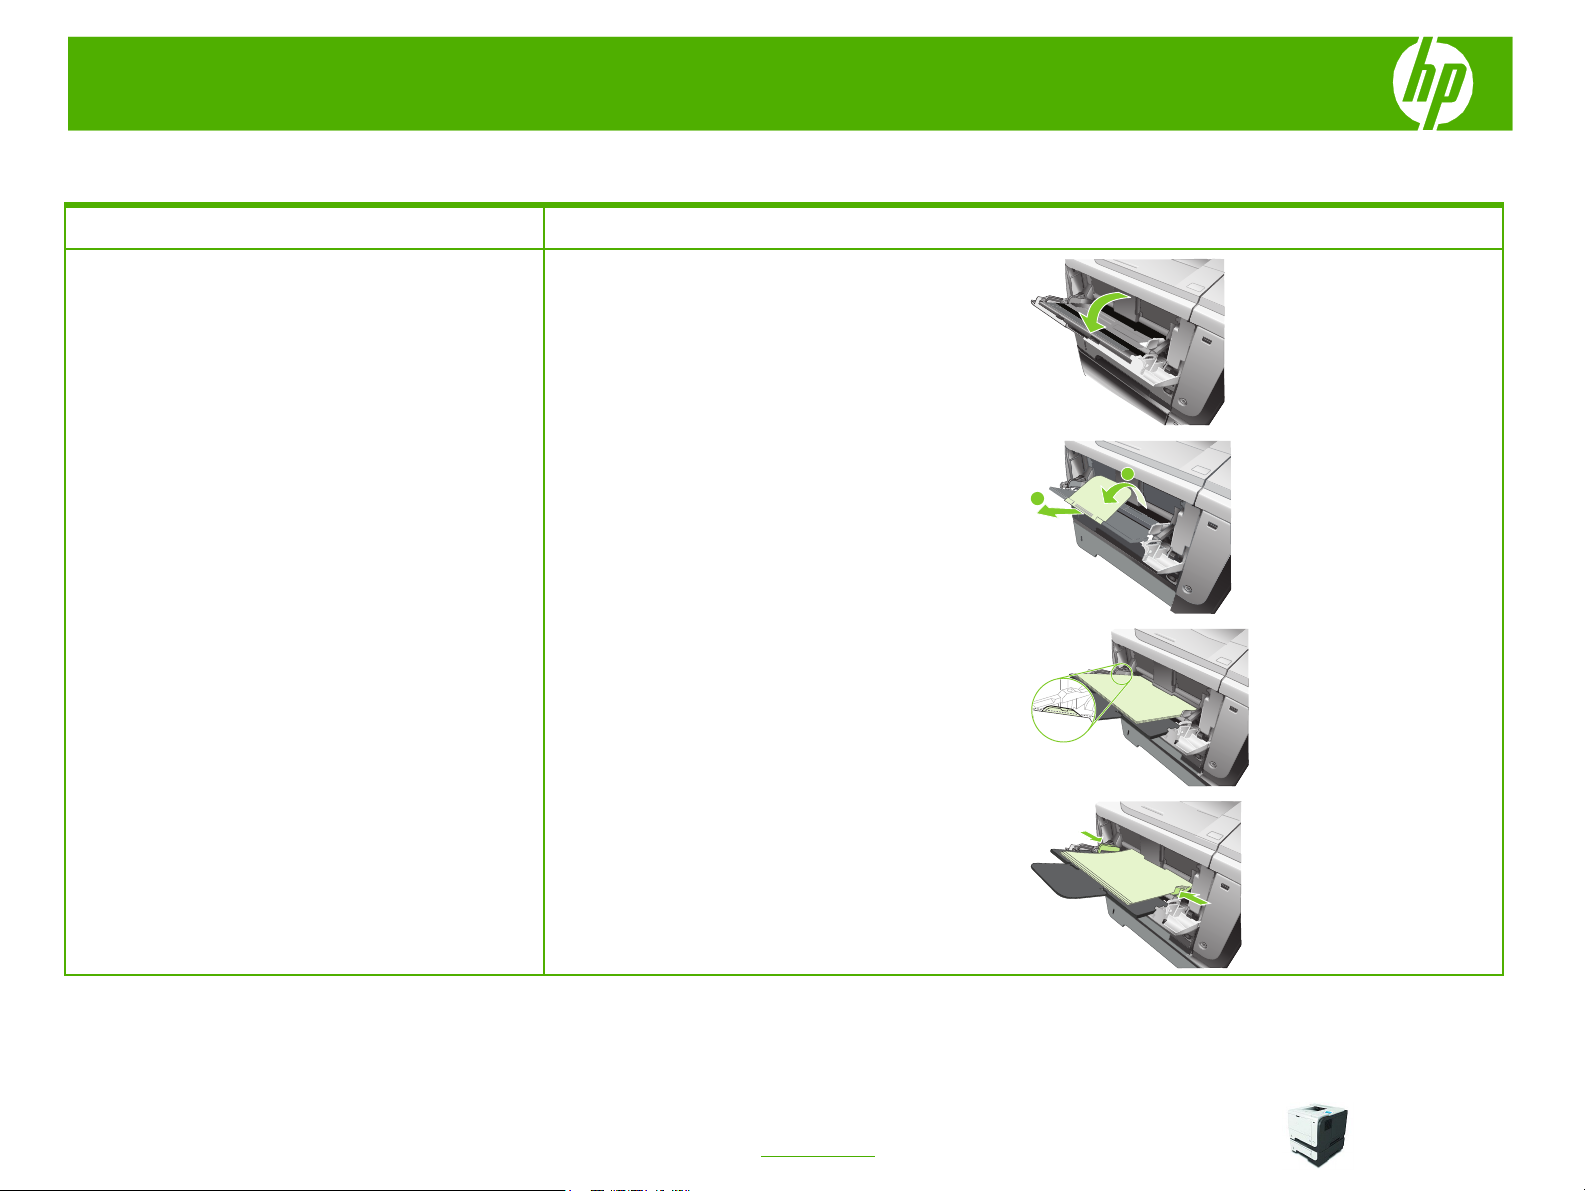
1 Open Tray 1.
Load Tray 1
2 Pull out the tray extension.
A
3 Load the paper into the tray. Make sure that the paper
fits under the tabs and below the maximumheight
indicators.
B
4 Adjust the side guides so that they lightly touch the
paper stack but do not bend the paper.
1
© 2009 Copyright Hewlett-Packard
Development Company, L.P.
www.hp.com
Page 2
HP LaserJet P3010 Series – Manage and maintain
How do I? Steps to perform
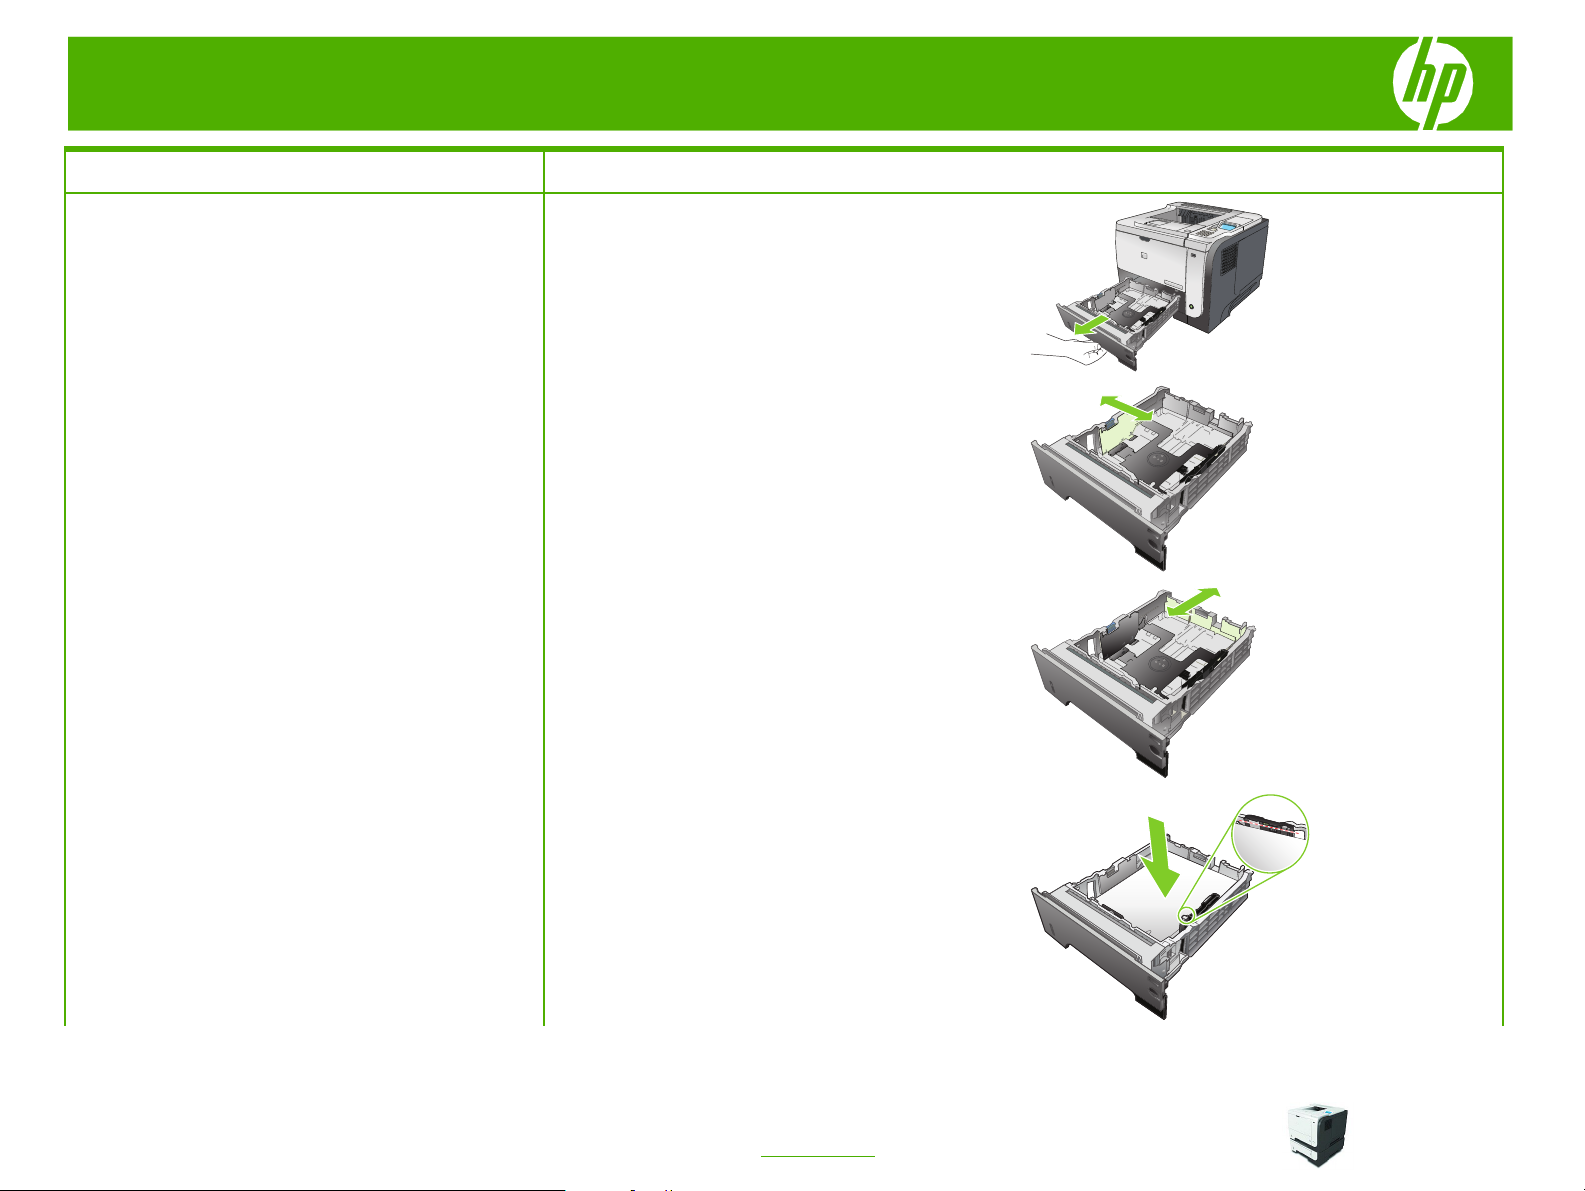
1 Pull the tray out and lift up slightly to remove it
Load Tray 2 or an optional 500-sheet tray
2 Pinch the release that is located on the left guide and
3 Pinch the release that is located on the rear paper
completely from the product.
slide the side guides to the correct paper size.
guide and slide it to the correct paper size.
1
4 Load the paper into the tray. Make sure that the stack
is flat at all four corners and that the top of the stack is
below the maximum-height indicators.
2
© 2009 Copyright Hewlett-Packard
Development Company, L.P.
www.hp.com
Page 3
HP LaserJet P3010 Series – Manage and maintain
How do I? Steps to perform
For A6-size paper, stack the paper no higher than the
bottom height indicator.
5 Slide the tray completely into the product.
1
2
2
2
© 2009 Copyright Hewlett-Packard
Development Company, L.P.
3
www.hp.com
Page 4
HP LaserJet P3010 Series – Manage and maintain
2
1
3
2
1
3
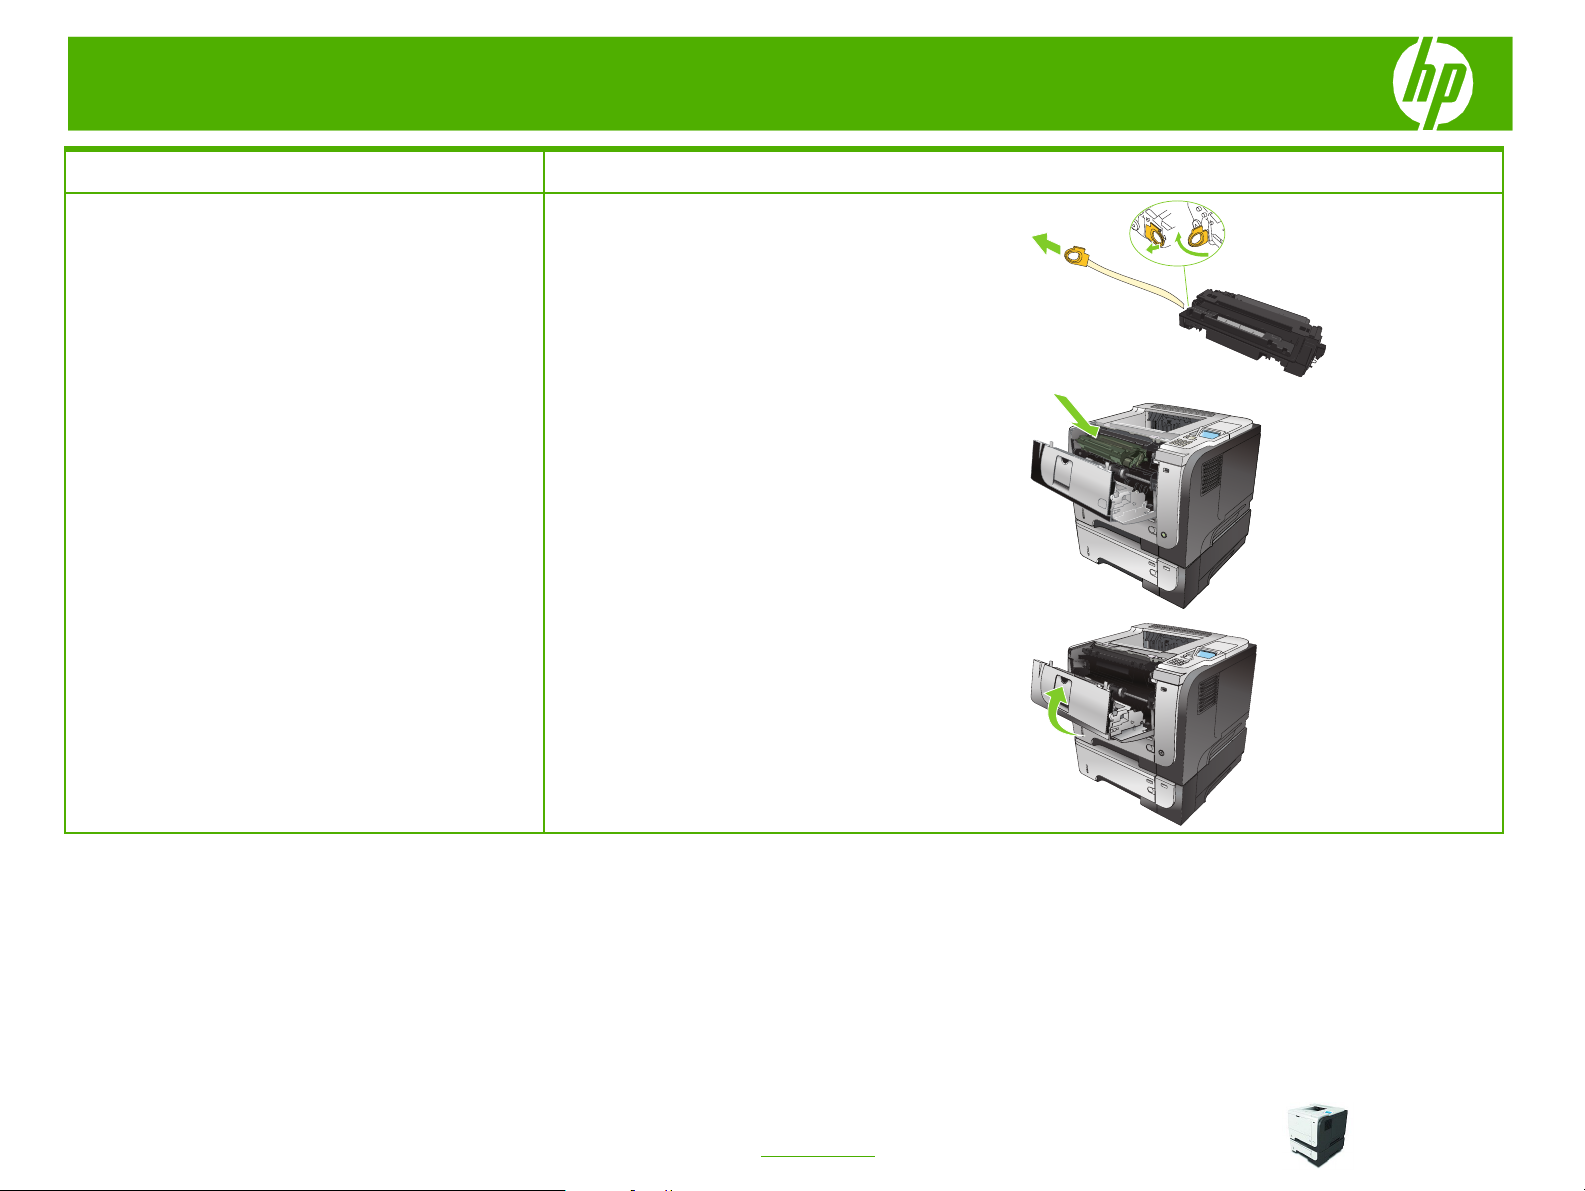
Change the print cartridge
How do I? Steps to perform
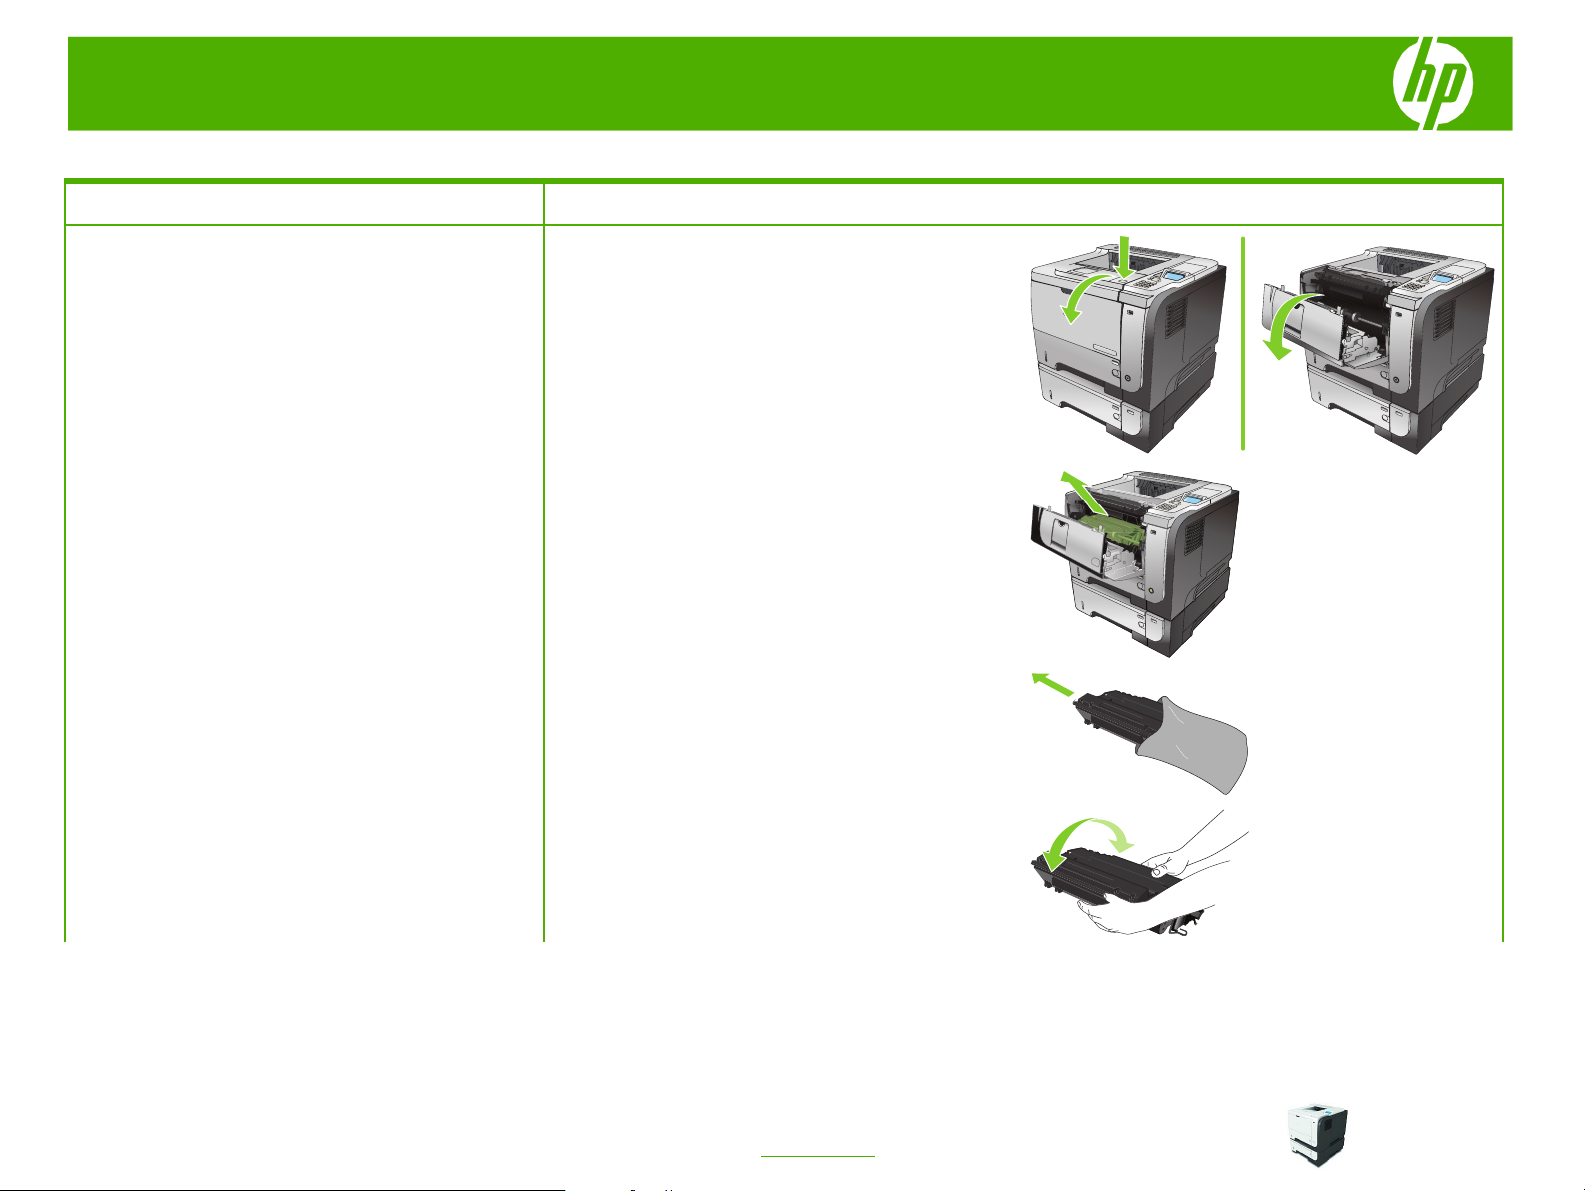
1 Press the top-cover release button, and open the top
Change the print cartridge
cover.
2 Remove the used print cartridge from the product.
3 Remove the new print cartridge from the bag. Place
the used print cartridge in the bag for recycling.
4 Grasp the front and back of the print cartridge, and
distribute the toner by gently rocking the print cartridge
five or six times.
CAUTION:
Do not touch the shutter or the surface of
the roller.
1
2
3
1
2
3
2
3
© 2009 Copyright Hewlett-Packard
Development Company, L.P.
4
www.hp.com
Page 5
HP LaserJet P3010 Series – Manage and maintain
2
1
3
How do I? Steps to perform
5 Remove the shipping tape from the new print
cartridge. Discard the tape according to local
regulations.
6 Align the print cartridge with the tracks inside the
product, and insert the print cartridge until it is firmly
seated.
7 Close the top cover. After a short time, the control
panel should display Ready.
1
2
3
1
© 2009 Copyright Hewlett-Packard
Development Company, L.P.
2
3
5
www.hp.com
Page 6
HP LaserJet P3010 Series – Manage and maintain
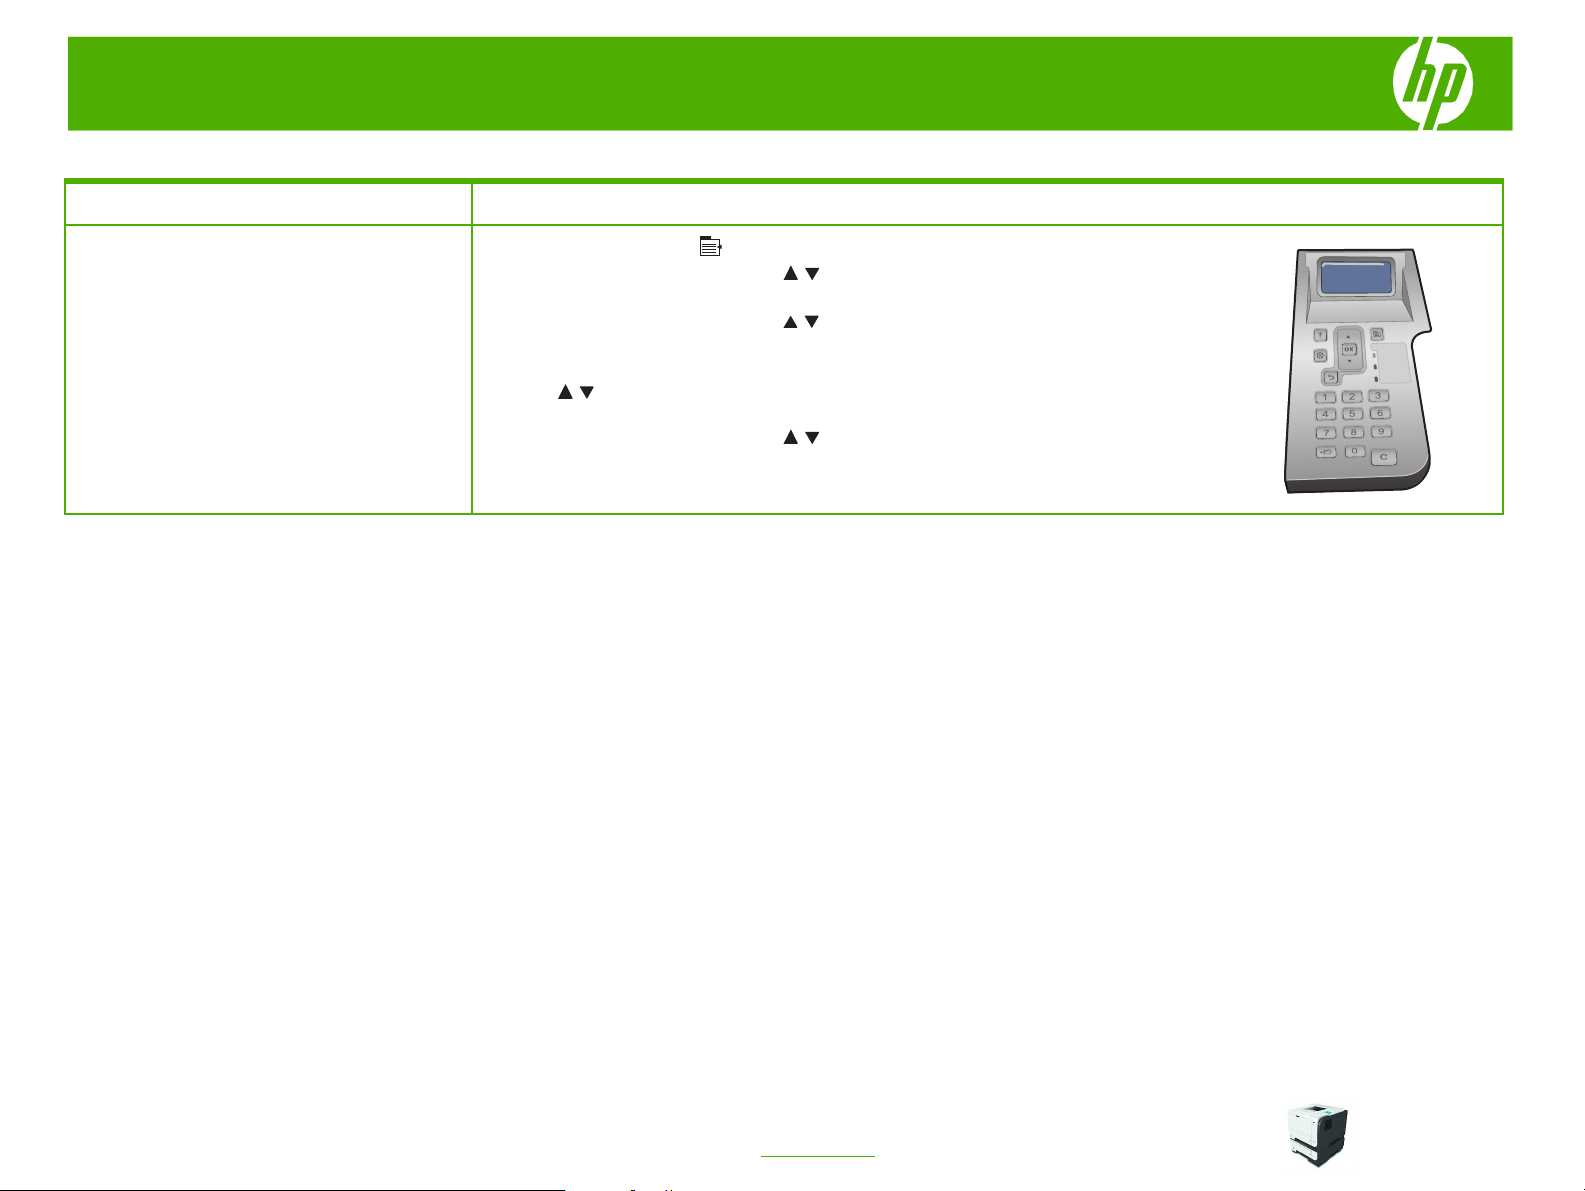
Clean the paper path from the product control panel
How do I? Steps to perform
Create and use the cleaning page
1 Press the
2 Press the up arrow or down arrow
and then press the OK button.
3 Press the up arrow or down arrow
then press the OK button.
4 If the product does not have automatic two-sided printing, press the up arrow or down
arrow
button. If the product has automatic two-sided printing, go to step 5.
5 Press the up arrow or down arrow / to highlight the PROCESS CLEANING PAGE
option, and then press the OK button. The cleaning process takes several minutes.
6 Discard the printed page. The task is complete.
Menu
/ to highlight the CREATE CLEANING PAGE option, and then press the OK
button .
/ to highlight the CONFIGURE DEVICE menu,
/ to highlight the PRINT QUALITY menu, and
© 2009 Copyright Hewlett-Packard
Development Company, L.P.
6
www.hp.com
Page 7

HP LaserJet P3010 Series – Manage and maintain
Clear jams
How do I? Steps to perform
1 Slowly pull the jammed paper or other print media out
Clear jams from Tray 1
of the product. If part of the paper has already been
pulled into the product, see
.
cover
OK
2 Press the
button to clear the message.
Clear jams from the top
OK
© 2009 Copyright Hewlett-Packard
Development Company, L.P.
7
www.hp.com
Page 8

HP LaserJet P3010 Series – Manage and maintain
2
1
3
2
1
3
How do I? Steps to perform
1 Remove the tray from the product.
Clear jams from Tray 2 or an optional 500sheet tray
2 Remove any damaged paper from the tray, and then
reinsert the tray.
3 Press the top-cover-release button, and open the top
cover.
1
4 Remove the print cartridge.
© 2009 Copyright Hewlett-Packard
Development Company, L.P.
www.hp.com
8
1
2
3
1
2
3
2
3
Page 9

HP LaserJet P3010 Series – Manage and maintain
2
1
3
How do I? Steps to perform
5 Lift the metal plate, and remove any jammed paper.
6 Reinsert the print cartridge.
7 Close the top cover.
1
2
3
1
© 2009 Copyright Hewlett-Packard
Development Company, L.P.
2
3
9
www.hp.com
Page 10

HP LaserJet P3010 Series – Manage and maintain
2
1
3
2
1
3
How do I? Steps to perform
1 Press the top-cover-release button, and open the top
Clear jams from the top cover
cover.
2 Remove the print cartridge.
3 Lift the metal plate, and remove any jammed paper.
1
2
3
2
3
1
2
3
© 2009 Copyright Hewlett-Packard
Development Company, L.P.
10
www.hp.com
Page 11

HP LaserJet P3010 Series – Manage and maintain
2
1
3
How do I? Steps to perform
4 Reinsert the print cartridge.
5 Close the top cover.
1
2
3
1
2
3
© 2009 Copyright Hewlett-Packard
Development Company, L.P.
11
www.hp.com
Page 12

HP LaserJet P3010 Series – Manage and maintain
2
1
3
2
1
3
How do I? Steps to perform
1 Open the rear door, and push down so it is fully
Clear jams from the rear door and the fuser
area
opened to a 90° angle.
:
The rear door has two positions. It opens to a
NOTE
45° angle for the rear output bin and to a 90° angle for
clearing jams.
2 Remove any jammed paper.
3 Press the top-cover-release button, and open the top
cover.
© 2009 Copyright Hewlett-Packard
Development Company, L.P.
4 Close the rear door.
12
www.hp.com
1
2
3
1
2
3
Page 13

HP LaserJet P3010 Series – Manage and maintain
2
1
3
How do I? Steps to perform
5 Remove the print cartridge.
6 Lift the metal plate, and remove any jammed paper.
7 Reinsert the print cartridge.
2
3
1
8 Close the top cover.
© 2009 Copyright Hewlett-Packard
Development Company, L.P.
2
3
1
2
3
13
www.hp.com
Page 14

HP LaserJet P3010 Series – Manage and maintain
How do I? Steps to perform
1 Remove Tray 2 completely from the product.
Clear jams from the duplexer
2 Push the green button to release the duplex pan.
3 Remove any jammed paper.
1
1
4 Close the duplex pan.
© 2009 Copyright Hewlett-Packard
Development Company, L.P.
14
www.hp.com
Page 15

HP LaserJet P3010 Series – Manage and maintain
How do I? Steps to perform
5 Reinsert Tray 2.
6 Open the rear door, and push down so it is fully
opened to a 90° angle.
NOTE: The rear door has two positions. It opens to a
45° angle for the rear output bin and to a 90° angle for
clearing jams.
7 Remove any jammed paper.
1
2
2
2
© 2009 Copyright Hewlett-Packard
Development Company, L.P.
15
www.hp.com
Page 16

HP LaserJet P3010 Series – Manage and maintain
2
1
3
2
1
3
How do I? Steps to perform
8 Press the top-cover-release button, and open the top
cover.
9 Close the rear door.
10 Remove the print cartridge.
1
2
3
1
2
3
2
3
11 Lift the metal plate, and remove any jammed paper.
© 2009 Copyright Hewlett-Packard
Development Company, L.P.
16
www.hp.com
Page 17

HP LaserJet P3010 Series – Manage and maintain
2
1
3
How do I? Steps to perform
12 Reinsert the print cartridge.
13 Close the top cover.
1
2
3
1
2
3
© 2009 Copyright Hewlett-Packard
Development Company, L.P.
17
www.hp.com
 Loading...