

Page 1

LaserJet MFP M72625, M72630 Series Printer
User Guide
support.hp.com
Page 2

Page 3

HP LaserJet MFP M72625, M72630 Series
Printer
User Guide
Page 4

Copyright and License
Trademark Credits
© Copyright 2018 HP Development Company,
L.P.
Reproduction, adaptation, or translation without
prior written permission is prohibited, except as
allowed under the copyright laws.
The information contained herein is subject to
change without notice.
The only warranties for HP products and
services are set forth in the express warranty
statements accompanying such products and
services. Nothing herein should be construed as
constituting an additional warranty. HP shall not
be liable for technical or editorial errors or
omissions contained herein.
Edition 2, 1/2019
Adobe®, Adobe Photoshop®, Acrobat®, and
P
ostScript® are trademarks of Adobe Systems
Inc
orporated.
Apple and the Apple logo are trademarks of
Apple Inc., registered in the U.S. and other
countries.
macOS is a trademark of Apple Inc., registered in
the U.S. and other countries.
Google™ is a trademark of Google Inc.
Microsoft®, Windows®, Windows® XP, and
Windows Vista® are U.S. registered trademarks
of Microsoft Corporation.
UNIX® is a registered trademark of The Open
Gr
oup.
Page 5

Table of contents
1 Introduction ............................................................................................................................................................................................... 1
Useful to know .......................................................................................................................................................................... 2
About this user’s guide ............................................................................................................................................................ 3
Conventions .......................................................................................................................................................... 3
Printer overview ........................................................................................................................................................................ 4
Front view 1 .......................................................................................................................................................... 4
Front view 2 .......................................................................................................................................................... 5
Rear view ............................................................................................................................................................... 7
Printer specications ............................................................................................................................................................... 8
Technical specications ...................................................................................................................................... 8
Supported operating systems ......................................................................................................................... 10
Mobile printing solutions .................................................................................................................................. 11
Printer dimensions ............................................................................................................................................ 12
Power consumption, electrical specications, and acoustic emissions ................................................... 12
Operating-environment range ........................................................................................................................ 12
Control panel overview ......................................................................................................................................................... 13
Connecting a network cable ................................................................................................................................................. 14
Turning on the printer ........................................................................................................................................................... 15
Understanding the LEDs ....................................................................................................................................................... 17
Understanding the status LED ........................................................................................................................ 17
Power LED .......................................................................................................................................................... 18
Display screen and useful buttons ...................................................................................................................................... 19
Display screen .................................................................................................................................................... 19
Counter button ................................................................................................................................................... 19
Eco button .......................................................................................................................................................... 20
Job Status button .............................................................................................................................................. 20
Interrupt button ................................................................................................................................................. 22
Understanding the pop-up keyboard ................................................................................................................................. 22
Printer hardware setup and software installation ............................................................................................................ 22
2 Using a Network-Connected Printer .................................................................................................................................................... 23
Network environment ........................................................................................................................................................... 24
ENWW iii
Page 6

Accessing network setup ...................................................................................................................................................... 25
Network settings (TCP/IP) ..................................................................................................................................................... 25
Ethernet .............................................................................................................................................................. 25
TCP/IP Protocol .................................................................................................................................................. 25
Installing driver over the network ....................................................................................................................................... 27
Windows .............................................................................................................................................................. 27
macOS ................................................................................................................................................................. 28
Linux .................................................................................................................................................................... 29
WebUI (embedded web server) ........................................................................................................................................... 30
What is WebUI? .................................................................................................................................................. 30
Required web browser ...................................................................................................................................... 30
Connecting to WebUI ......................................................................................................................................... 30
Logging into WebUI ........................................................................................................................................... 31
Information tab .................................................................................................................................................. 31
Address book tab ............................................................................................................................................... 32
Settings tab ........................................................................................................................................................ 32
Security tab ......................................................................................................................................................... 32
Maintenance tab ................................................................................................................................................ 34
Additional network-connected tasks ............................................................................................................. 34
Additional network-connected tasks .................................................................................................................................. 35
3 Media and tray ........................................................................................................................................................................................ 36
Loading originals .................................................................................................................................................................... 37
Scanner glass ..................................................................................................................................................... 37
Document feeder .............................................................................................................................................. 38
Selecting print media ............................................................................................................................................................. 41
Guidelines to select print media ...................................................................................................................... 41
Loading paper in the tray ...................................................................................................................................................... 42
Tray overview ..................................................................................................................................................... 42
Standard tray / optional dual cassette feeder .............................................................................................. 42
Tray 1 (MP) .......................................................................................................................................................... 49
Media sizes automatically detected ............................................................................................................... 52
Printing on special media ...................................................................................................................................................... 54
Envelope ............................................................................................................................................................. 54
Labels .................................................................................................................................................................. 55
Card stock/ Custom-sized paper .................................................................................................................... 57
Letterhead/Pre-printed paper ........................................................................................................................ 57
Additional information for printing on special media .................................................................................. 57
Tray Settings ........................................................................................................................................................................... 58
Setting the paper size ....................................................................................................................................... 58
Setting the paper type ...................................................................................................................................... 58
iv ENWW
Page 7

Setting the tray conrmation message ......................................................................................................... 58
Auto tray switch ................................................................................................................................................. 59
Auto continue ..................................................................................................................................................... 59
Paper substitution ............................................................................................................................................. 59
Tray protection ................................................................................................................................................... 59
Tray priority setting ........................................................................................................................................... 59
4 Printing ..................................................................................................................................................................................................... 60
Printer driver features ........................................................................................................................................................... 61
Basic printing .......................................................................................................................................................................... 62
Canceling a print job .......................................................................................................................................... 62
macOS printing ....................................................................................................................................................................... 63
Printing a document .......................................................................................................................................... 63
Changing printer settings ................................................................................................................................. 63
Printing multiple pages on one sheet ............................................................................................................ 63
Printing on both sides of the paper ................................................................................................................ 64
Using help ........................................................................................................................................................... 64
Additional print tasks ............................................................................................................................................................. 65
5 Copying ..................................................................................................................................................................................................... 66
Understanding the copy screen ........................................................................................................................................... 67
Basic tab .............................................................................................................................................................. 67
Advanced tab ...................................................................................................................................................... 67
Image tab ............................................................................................................................................................ 67
Basic copying .......................................................................................................................................................................... 68
Copying originals of dierent sizes ................................................................................................................ 68
Quick copying .......................................................................................................................................................................... 70
Using special copy features .................................................................................................................................................. 72
Additional copy tasks ............................................................................................................................................................. 78
6 Scanning .................................................................................................................................................................................................. 79
Understanding the scan methods ....................................................................................................................................... 80
Scanning and sending through email ................................................................................................................................. 81
Understanding the Scan to Email screen ...................................................................................................... 81
Setting up an email account ............................................................................................................................ 82
Scanning and sending an email ...................................................................................................................... 83
Resending to the last email address .............................................................................................................. 83
Printing an email conrmation report ............................................................................................................ 84
Scanning and sending via SMB/FTP .................................................................................................................................... 85
Understanding the Scan to Server screen ..................................................................................................... 85
ENWW v
Page 8

Setting up an FTP/SMB server ......................................................................................................................... 86
Scanning and sending to an SMB/FTP server ............................................................................................... 87
Resending to the last server address ............................................................................................................ 87
Scanning and sending to your computer ........................................................................................................................... 89
For a network or USB connected printer ....................................................................................................... 89
Scanning and sending to USB/shared folder ..................................................................................................................... 90
Understanding the USB /shared folder screen ............................................................................................. 90
Scanning to a USB /shared folder ................................................................................................................... 91
macOS scanning ..................................................................................................................................................................... 92
Scanning with network ..................................................................................................................................... 92
Additional scan tasks ............................................................................................................................................................. 93
7 Menu Overview and Advanced Features ............................................................................................................................................. 94
Menu overview ....................................................................................................................................................................... 95
Printer setup ......................................................................................................................................................................... 100
Log-in ................................................................................................................................................................ 100
Printer Details .................................................................................................................................................. 100
General Settings .............................................................................................................................................. 101
Security ............................................................................................................................................................. 103
Printer hardware setup .................................................................................................................................. 105
8 Supplies and accessories .................................................................................................................................................................... 106
Ordering supplies and accessories ................................................................................................................................... 107
Available supplies ................................................................................................................................................................ 107
Available accessories .......................................................................................................................................................... 108
Storing the toner cartridge ................................................................................................................................................. 110
Handling instructions ..................................................................................................................................... 110
Toner cartridge usage .................................................................................................................................... 110
Estimated cartridge life .................................................................................................................................. 110
Redistributing toner ............................................................................................................................................................ 111
Replacing the toner cartridge ............................................................................................................................................ 112
Replacing the toner collection unit ................................................................................................................................... 113
Checking the supplies life ................................................................................................................................................... 114
From the printer .............................................................................................................................................. 114
Cleaning the printer ............................................................................................................................................................. 115
Cleaning the outside or display screen ........................................................................................................ 115
Cleaning the inside .......................................................................................................................................... 115
Cleaning the imaging unit area ..................................................................................................................... 116
Cleaning the toner collection unit area ........................................................................................................ 117
Cleaning the scan unit .................................................................................................................................... 117
Cleaning the chargers of imaging unit ......................................................................................................... 118
vi ENWW
Page 9

Tips for storing the printer, supplies, and paper ............................................................................................................ 120
Printer ............................................................................................................................................................... 120
Toner cartridge/ Imaging unit ....................................................................................................................... 120
Paper ................................................................................................................................................................. 120
Tips for moving the printer ................................................................................................................................................ 121
9 Troubleshooting ................................................................................................................................................................................... 122
Tips for avoiding paper jams .............................................................................................................................................. 123
Clearing paper jams ............................................................................................................................................................. 124
Jam in Tray 2 .................................................................................................................................................... 124
Jam in optional trays ...................................................................................................................................... 125
Jam in Tray 1 (MP) ........................................................................................................................................... 127
Jam inside the printer ..................................................................................................................................... 127
Jam in the fuser area ...................................................................................................................................... 127
Jam in the exit area ......................................................................................................................................... 128
Jam in the duplex unit area ........................................................................................................................... 129
Clearing original document jams .................................................................................................................. 130
Original paper jam in exit area of scanner .................................................................................................. 131
Jam in the optional inner nisher area ........................................................................................................ 132
Understanding display messages ..................................................................................................................................... 135
Paper Jam-related messages ....................................................................................................................... 135
Toner-related messages ................................................................................................................................ 136
Tray-related messages .................................................................................................................................. 137
Network-related messages ........................................................................................................................... 137
Misc. messages ................................................................................................................................................ 139
Paper feeding problems ..................................................................................................................................................... 143
Power and cable connecting problems ............................................................................................................................ 144
Solving other problems ...................................................................................................................................................... 145
Display screen problem ................................................................................................................................. 145
Paper feeding problems ................................................................................................................................ 145
Printing problems ........................................................................................................................................... 146
Printing quality problems .............................................................................................................................. 148
Copying problems ........................................................................................................................................... 153
Scanning problems ......................................................................................................................................... 154
Additional troubleshooting tasks ................................................................................................................. 155
Appendix A Revision History .................................................................................................................................................................. 156
Revision History ................................................................................................................................................................... 157
ENWW vii
Page 10

Appendix B Glossary ............................................................................................................................................................................... 158
Glossary of terms ................................................................................................................................................................ 159
viii ENWW
Page 11

1 Introduction
●
Useful to know
●
About this user’s guide
●
Printer overview
●
Printer specications
●
Control panel overview
●
Connecting a network cable
●
Turning on the printer
●
Understanding the LEDs
●
Display screen and useful buttons
●
Understanding the pop-up keyboard
●
Printer hardware setup and software installation
For more information:
The following information is correct at the time of publication. For current information, see support.hp.com.
HP's all-inclusive help for the printer includes the following information:
● Install and congure
● Learn and use
● Solve problems
● Download software and rmware updates
● Join support forums
● Find warranty and regulatory information
ENWW 1
Page 12

Useful to know
Where can I purchase accessories or supplies?
● Order supplies and paper: www.hp.com/go/suresupply
● Order genuine HP parts or accessories: www.hp.com/buy/parts
● Order through service or support providers: Contact an HP-authorized service or support provider.
The status LED ashes or remains constantly on.
● Turn the product o and on again.
● Check the meanings of LED indications in this manual and troubleshoot accordingly (see "Understanding
the LEDs")
A paper jam has occurred.
● Open and close the cover (see "Front view 1").
● Check the instructions on removing jammed paper in this manual and troubleshoot accordingly (see
"Clearing paper jams”)
Printouts are blurry.
● The toner level might be low or uneven. Shake the toner cartridge (see "Redistributing toner").
● Try a dierent print resolution setting (see "Opening printing preferences”)
● Replace the toner cartridge (see "Replacing the toner cartridge").
Where can I download the printer’s driver?
● You can get help, support application, printer drivers manuals, and order information from support.hp.com
2 Chapter 1 Introduction ENWW
Page 13

About this user’s guide
This user’s guide provides information for your basic understanding of the printer as well as detailed steps to
explain printer usage.
● Do not discard this manual and keep it for future reference.
● If you have a problem using the printer, refer to the troubleshooting chapter.
● Terms used in this user’s guide are explained in the glossary chapter.
●
All illustrations in this user’s guide may dier from your printer depending on its options or model you
purchased.
● The screenshots/some menus in this user’s guide may dier from your printer depending on the printer’s
rmware/driver version.
● The procedures in this user’s guide are mainly based on Windows 7.
Conventions
Some terms in this guide are used interchangeably, as below:
● Document is synonymous with original.
● Paper is synonymous with media, or print media.
ENWW About this user’s guide 3
Page 14
Printer overview
●
Front view 1
●
Front view 2
●
Rear view
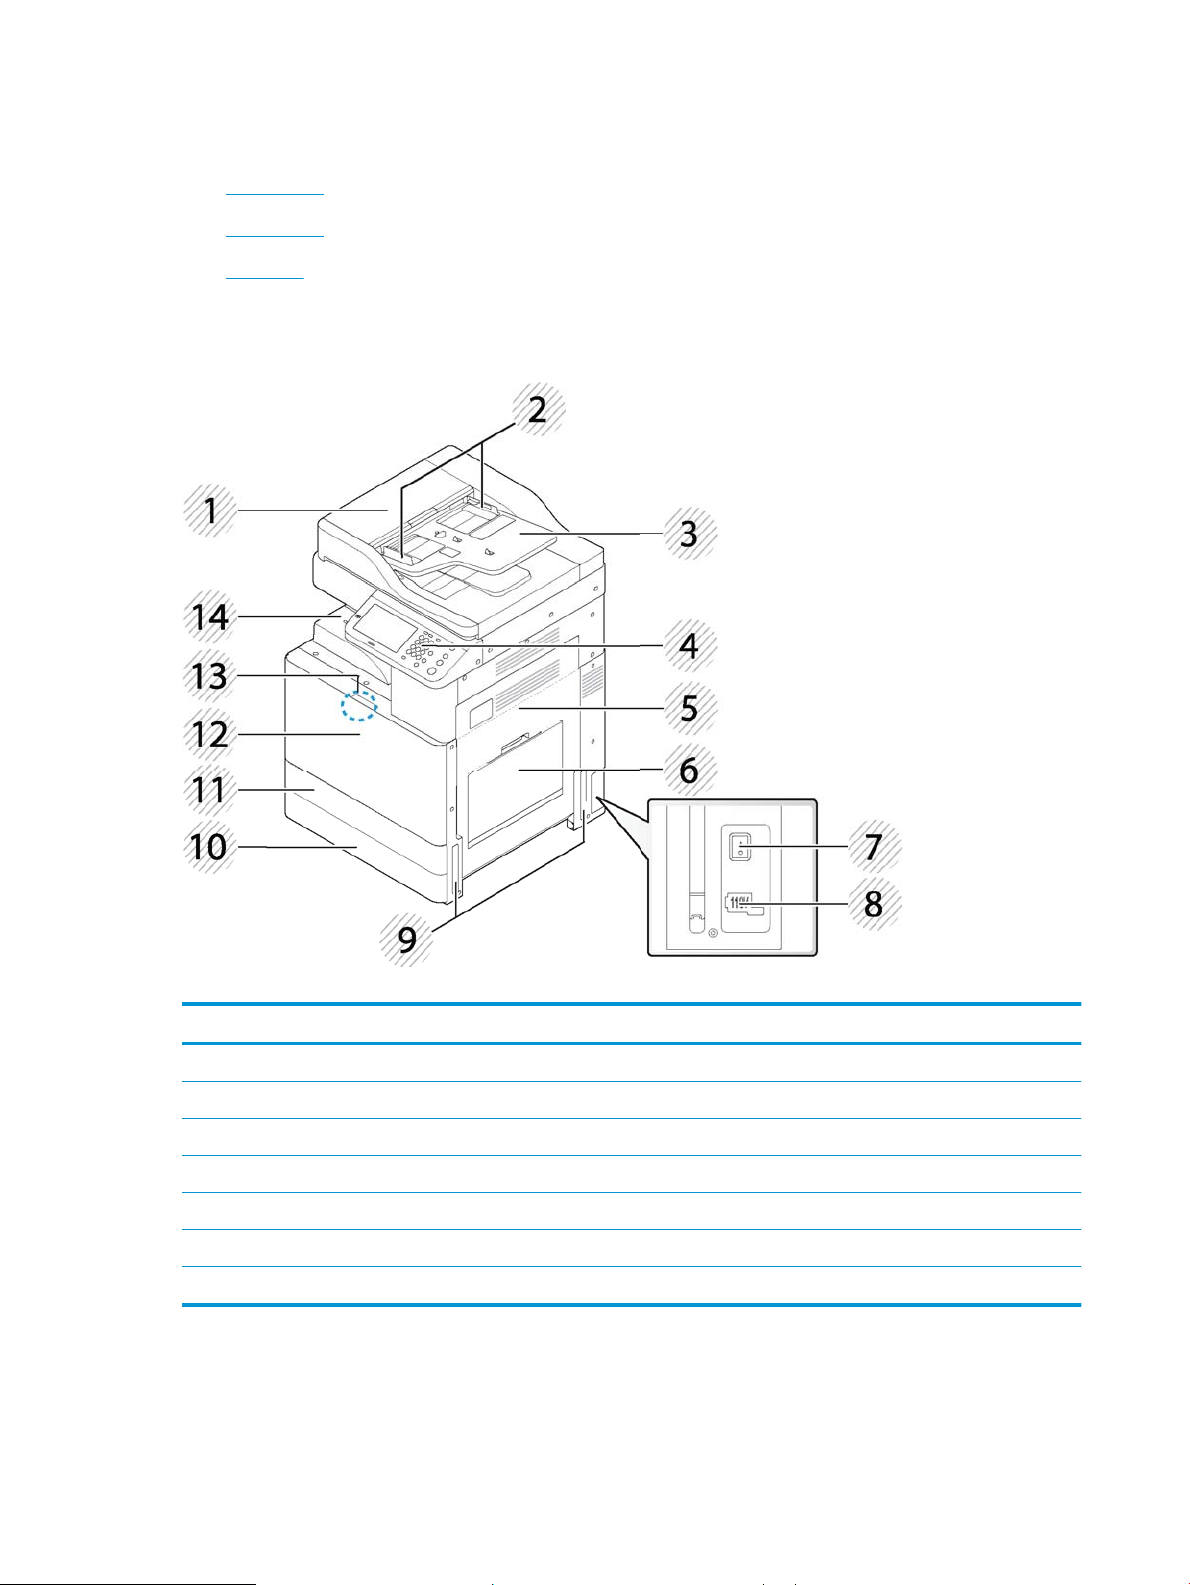
Front view 1
Figure 1-1 Front view 1
Table 1-1 Front view 1
Callout Description Callout Description
1 Document feeder cover 8 Power receptacle
2 Document feeder width guides 9 Handles
3 Document input tray 10 Standard tray (Tray 3)
4 Control panel 11 Standard tray (Tray 2)
5 Side door 12 Front door
6 Tray 1 (MP) 13 Front door handle
7 Power-switch 14 Paper output tray
4 Chapter 1 Introduction ENWW
Page 15
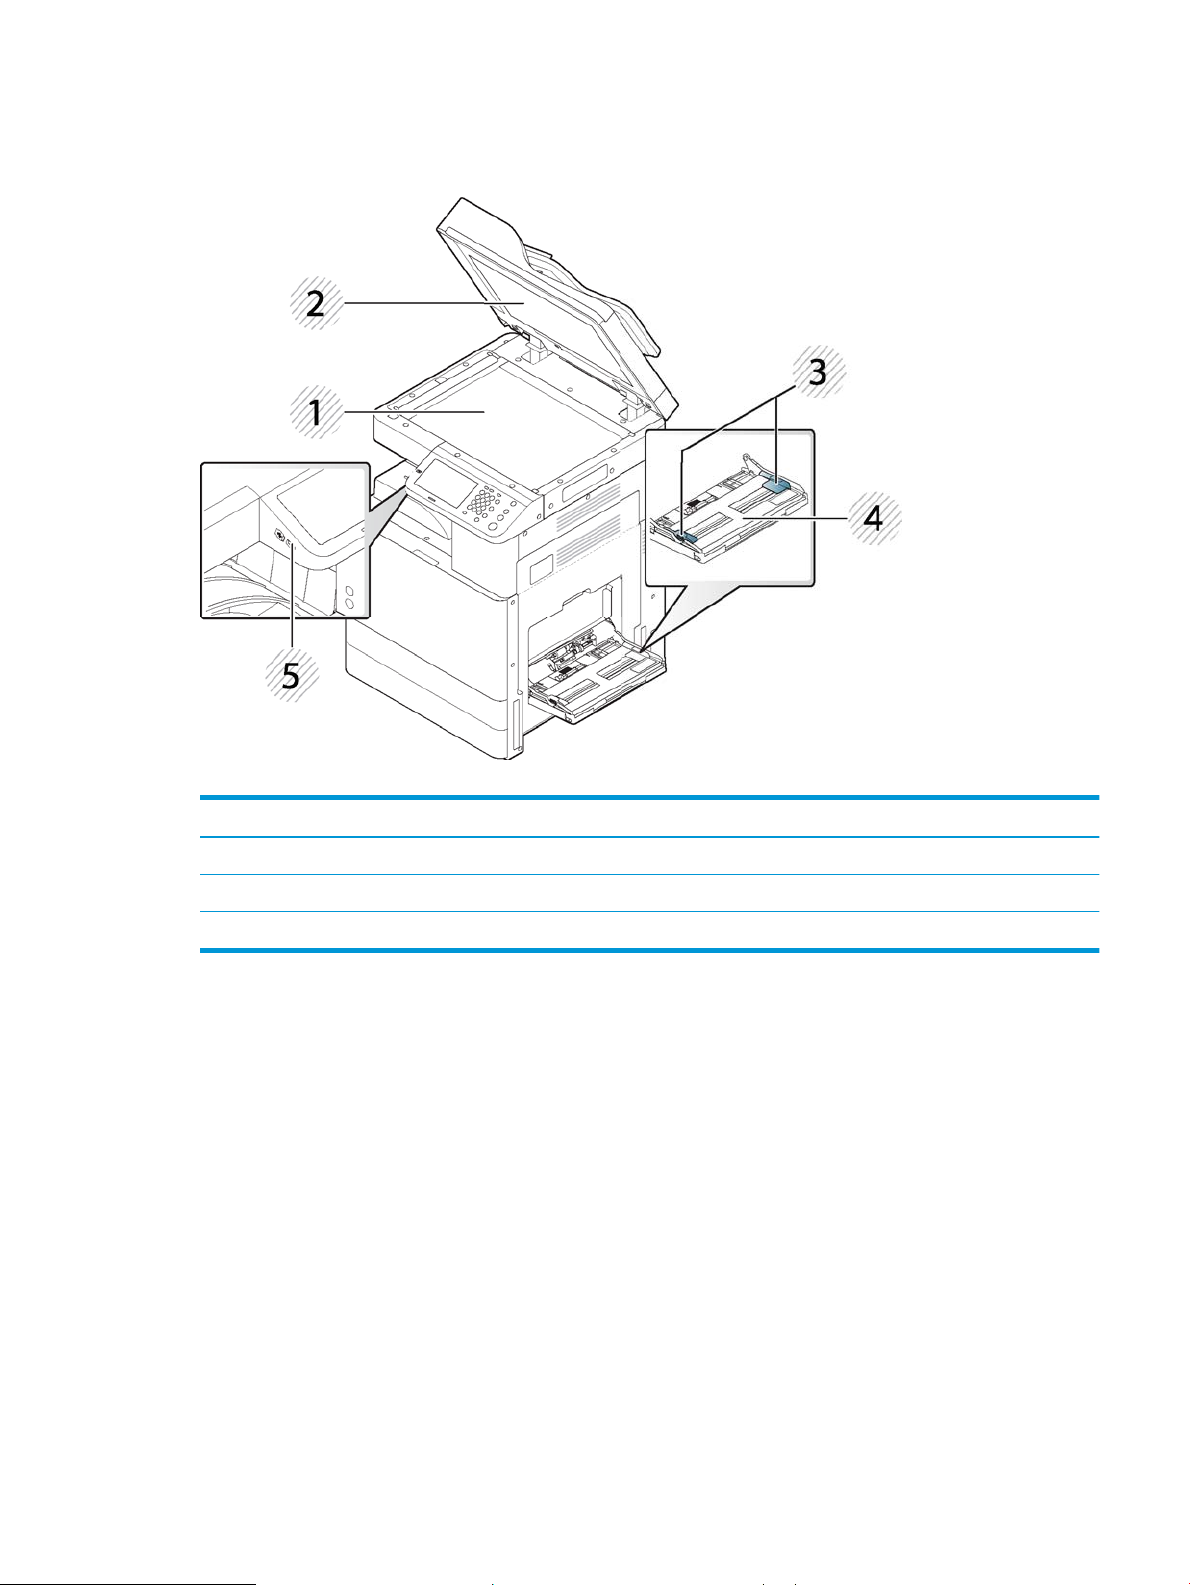
Front view 2
Figure 1-2 Front view 2
Table 1-2 Front view 2
Callout Description Callout Description
1 Scanner glass 4 Tray 1 (MP)
2 White sheet 5 USB memory port
3 Tray 1 (MP) paper width guides
ENWW Printer overview 5
Page 16

Figure 1-3 Inner view
Table 1-3 Inner view
Callout Description
1 Toner collection unit
2 Toner cartridge
3 Imaging unit
NOTE: If you want to see the imaging unit, you need to remove the toner collection unit.
6 Chapter 1 Introduction ENWW
Page 17
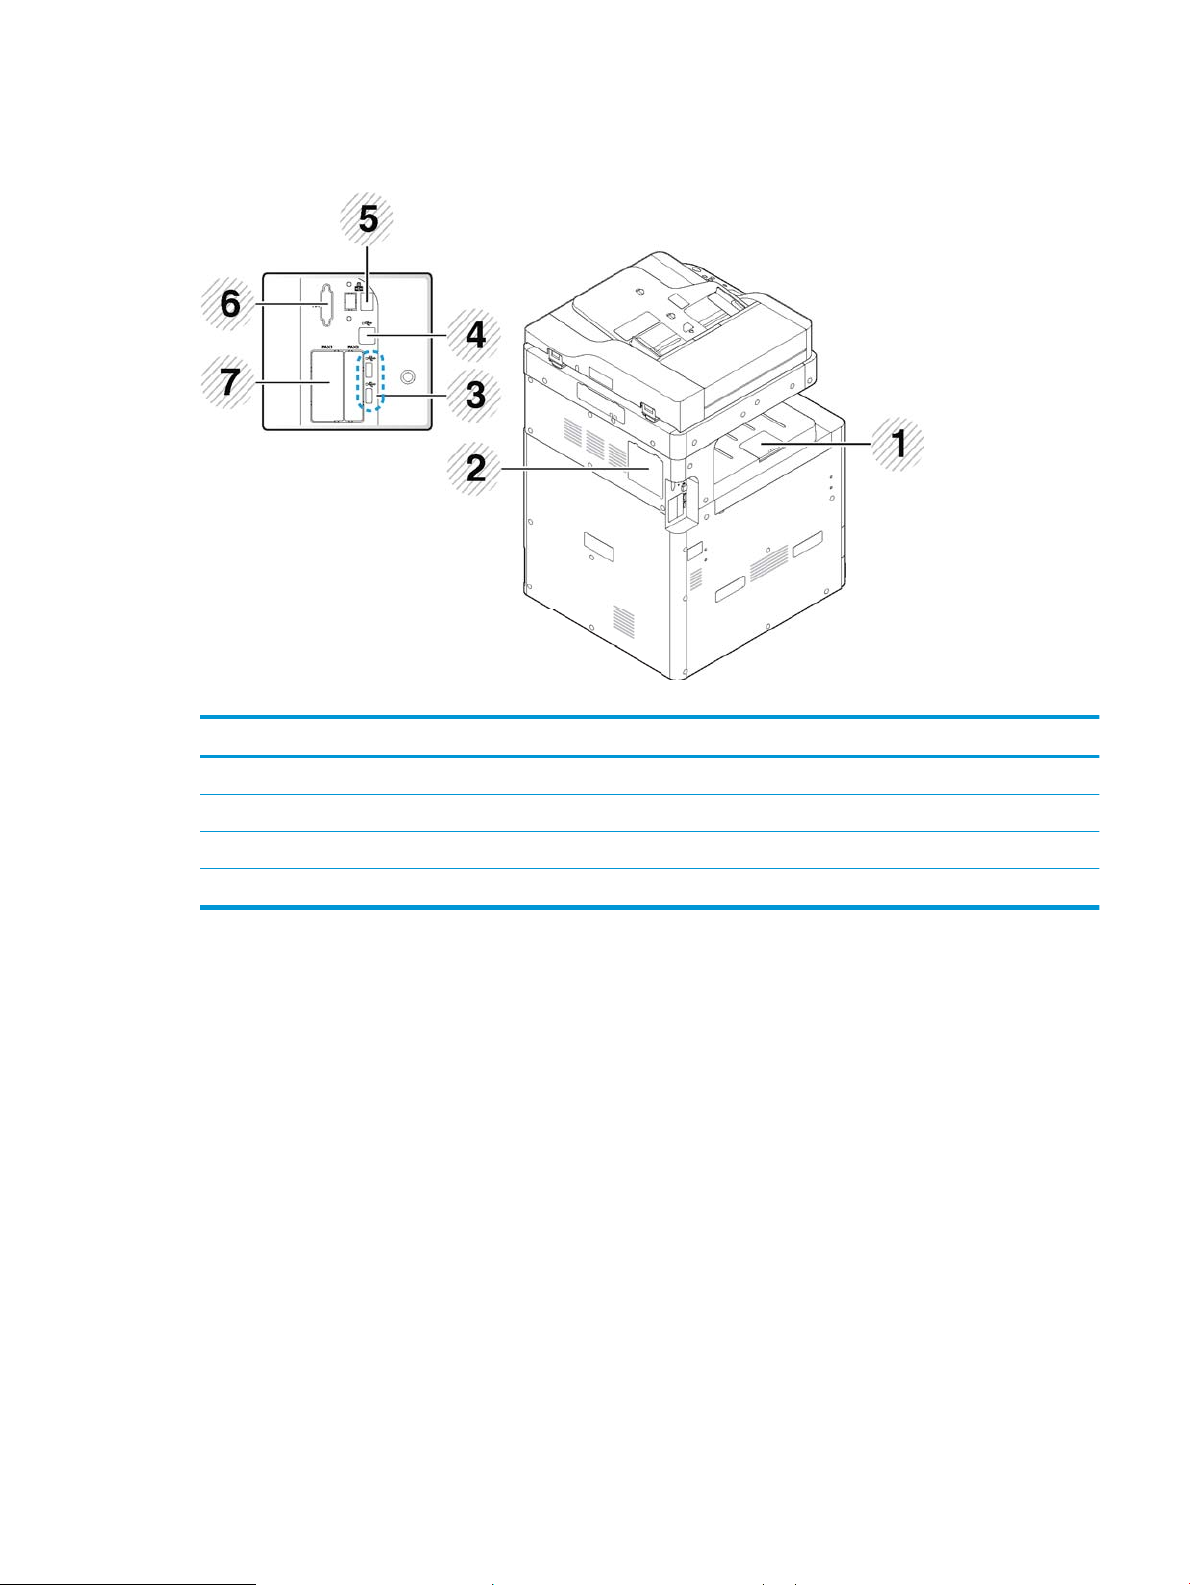
Rear view
Figure 1-4 Rear view
Table 1-4 Rear view
Callout Description Callout Description
1 Output support tray 5 Network port
2
Control board cover
3 USB memory port 7
1
6
Cover for optional FDI kit
Cover for optional Fax port
4 USB port
1
Open this cover to install the optional device.
1
1
ENWW Printer overview 7
Page 18
Printer specications
IMPORTANT: The following specications are correct at the time of publication, but they are subject to change.
For current information, see support.hp.com.
●
Technical specications
●
Supported operating systems
●
Mobile printing solutions
●
Printer dimensions
●
Power consumption, electrical specications, and acoustic emissions
●
Operating-environment range
Technical specications
Table 1-5 HP LaserJet MFP M72625dn, HP LaserJet MFP M72630dn
HP LaserJet MFP M72625dn
Model number
Product number
Paper handling ● Tray 1 (MP) (100-sheet capacity)
● Tray 2 (520-sheet capacity)
● Tray 3 (520-sheet capacity)
● HP LaserJet 2 x 520-sheet paper
feeder
● 500-sheet output capacity
● HP LaserJet Printer cabinet Optional Optional
● HP LaserJet Inner nisher
accessory
● HP LaserJet 2/4 hole punch
accessory
● HP LaserJet 2/3 hole punch
accessory
● HP LaserJet Swedish hole punch Optional Optional
● HP Job Separator Optional Optional
(25 ppm)
2ZN49A
Optional Optional
Optional Optional
Optional Optional
Optional Optional
HP LaserJet MFP M72630dn
(30 ppm)
2ZN50A
● Automatic duplex printing
Connectivity ● 10/100/1000 Ethernet LAN
connection with IPv4 and IPv6
● Hi-Speed USB 2.0 printer to PC
connections
8 Chapter 1 Introduction ENWW
Page 19
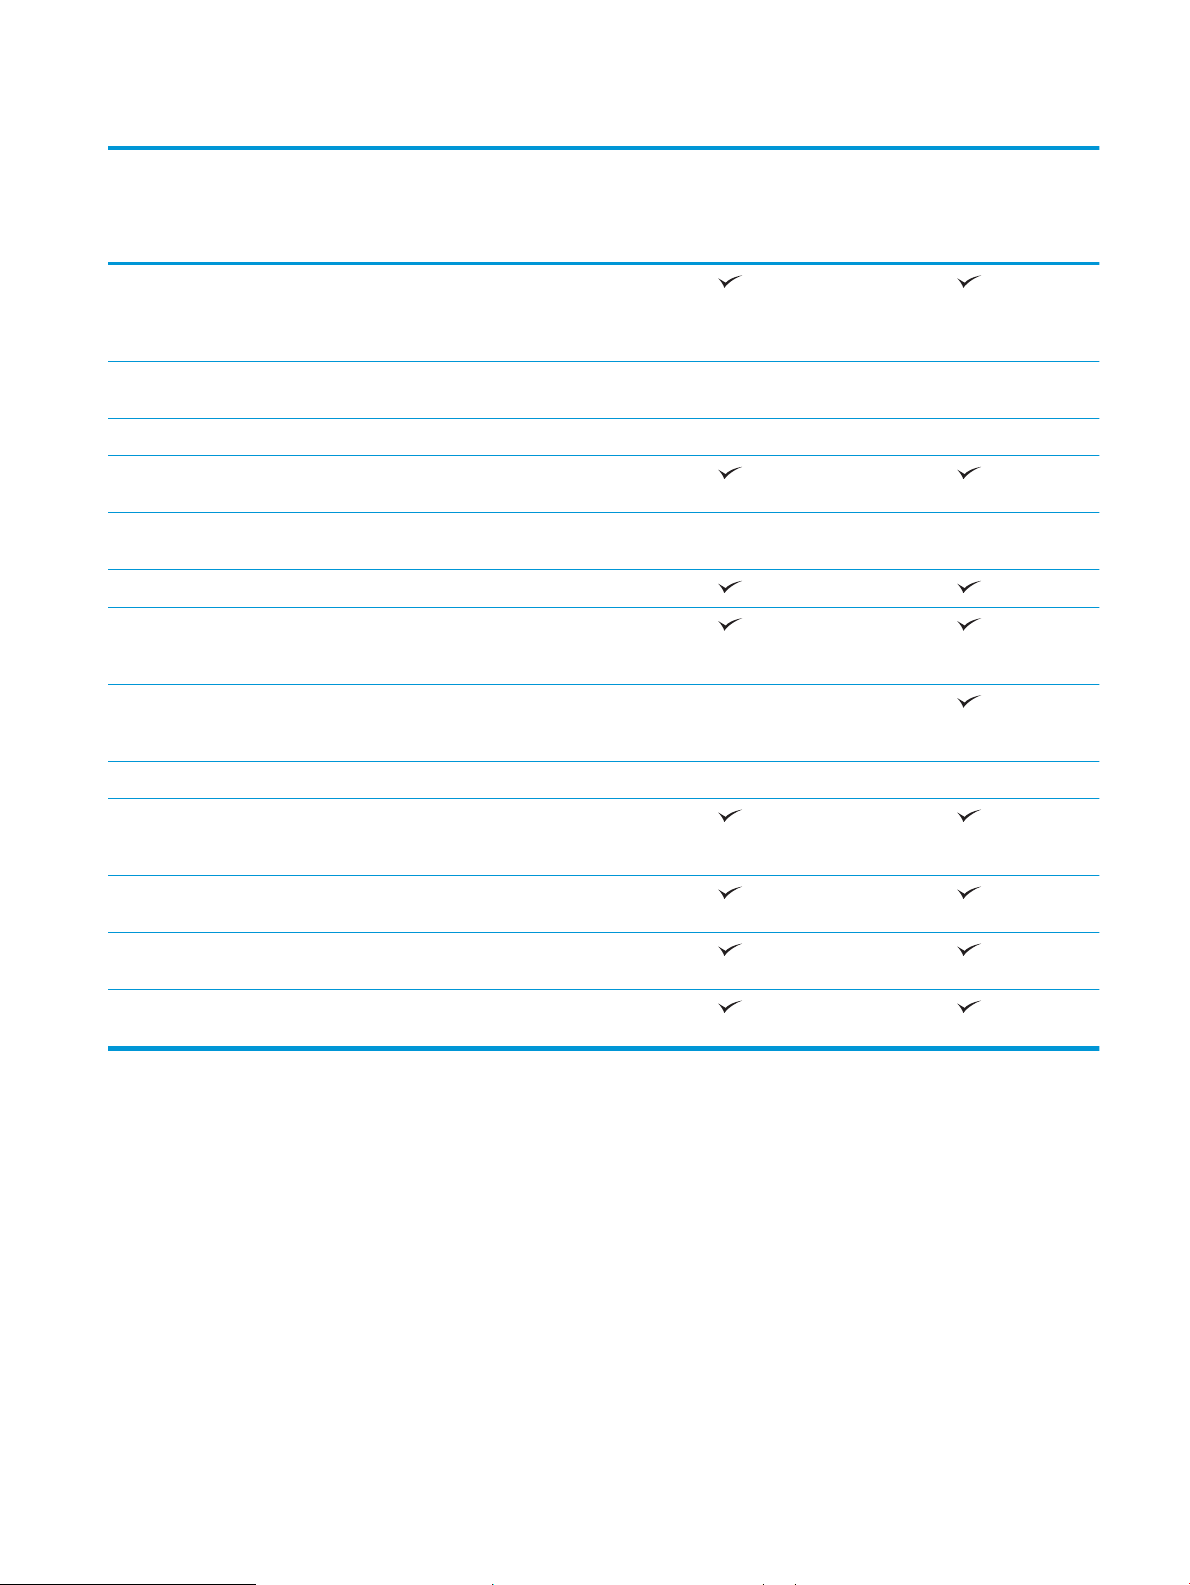
Table 1-5 HP LaserJet MFP M72625dn, HP LaserJet MFP M72630dn (continued)
HP LaserJet MFP M72625dn
Model number
Product number
● Easy-access USB port for
printing without a computer and
upgrading the rmware (located
near the control panel)
● IEEE 802.1 1b/g/n (NFC active
type)
● Foreign Device Interface (FDI) Kit Optional Optional
Memory ● 1.5 GB base memory (standard/
maximum)
Mass Storage ● 320 GB HP Secure High-
Performance Hard Disk
Control-panel display ● 7 inch touchscreen control panel
Print ● Prints 25 pages per minute
(ppm) on A4 and on letter-size
paper
● Prints 30 pages per minute
(ppm) on A4 and on letter-size
paper
(25 ppm)
2ZN49A
Optional Optional
Optional Optional
Not supported
HP LaserJet MFP M72630dn
(30 ppm)
2ZN50A
Fax ● Analog fax kit Optional Optional
Copy and Scan ● Scans 45 images per minute
(ipm) (mono) on A4 and lettersize paper
● Copy up to 25 cpm on A4 and
letter size paper
● Automatic document feeder
(ADF) (multiple pass duplex)
● 100-sheet document feeder
output
ENWW Printer specications 9
Page 20

Supported operating systems
The following information applies to the Printer-Specic Windows PCL 6 and HP print drivers for macOS and to
the software installer.
Windows: The HP Software Installer is provided with in-box software CD or can be downloaded from the printer
support website (support.hp.com.) The PCL 6 drivers on the software CD and the website support the operating
systems listed in the table below.
macOS: macOS computers are supported with this printer. Use the in-box mac software CD, or go to the printer
support website (support.hp.com) for assistance in downloading the macOS software for the printer.
Linux: For information and print drivers for Linux, go to www.hp.com/go/linuxprinting.
Table 1-6 Supported operating systems and print drivers
Operating system Print driver installed (from the software on
the web)
Windows® XP SP3, 32-bit
Windows Vista®, 32-bit
Windows Server 2003 SP2, 32-bit An HP PCL 6 printer-specic print driver is
Windows 7 SP1, 32-bit and 64-bit An HP PCL 6 printer-specic print driver is
Windows 8, 32-bit and 64-bit An HP PCL 6 printer-specic print driver is
An HP PCL 6 printer-specic print driver is
installed for this operating system as part of
the software installation.
An HP PCL 6 printer-specic print driver is
installed for this operating system as part of
the software installation.
available for download from the printersupport website. Download the driver, and
then use the Microsoft Add Printer tool to
install it.
installed for this operating system as part of
the software installation.
installed for this operating system as part of
the software installation.
Notes
Microsoft retired mainstream support for
Windows XP in April 2009. HP will continue
to provide best eort support for the
discontinued XP operating system. Some
features and page sizes in the print driver
are not supported.
Microsoft retired mainstream support for
Windows Vista in April 2012. HP will
continue to provide best eort support for
the discontinued Vista operating system.
Some features and page sizes in the print
driver are not supported.
Microsoft retired mainstream support for
Windows Server 2003 in July 2010. HP will
continue to provide best eort support for
the discontinued Server 2003 operating
system. Some features and page sizes in
the print driver are not supported.
Windows 8 RT support is provided through
Microsoft IN OS Version 4, 32- bit driver.
Windows 8.1, 32-bit and 64-bit An HP PCL 6 printer-specic print driver is
installed for this operating system as part of
the software installation.
Windows 10, 32-bit and 64-bit An HP PCL 6 printer-specic print driver is
installed for this operating system as part of
the software installation.
Windows Server 2008 SP2, 32-bit and 64
bit
An HP PCL 6 printer-specic print driver is
available for download from the printersupport website. Download the driver, and
then use the Microsoft Add Printer tool to
install it.
Windows 8.1 RT support is provided through
Microsoft IN OS Version 4, 32- bit driver.
Microsoft retired mainstream support for
Windows Server 2008 in January 2015. HP
will continue to provide best eort support
for the discontinued Server 2008 operating
system. Some features and page sizes in
the print driver are not supported.
10 Chapter 1 Introduction ENWW
Page 21

Table 1-6 Supported operating systems and print drivers (continued)
Operating system Print driver installed (from the software on
the web)
Windows Server 2008 R2, SP 1, 64-bit An HP PCL 6 printer-specic print driver is
available for download from the printersupport website. Download the driver, and
then use the Microsoft Add Printer tool to
install it.
Windows Server 2012, 64-bit An HP PCL 6 printer-specic print driver is
available for download from the printersupport website. Download the driver, and
then use the Microsoft Add Printer tool to
install it.
Windows Server 2012 R2, 64-bit An HP PCL 6 printer-specic print driver is
available for download from the printersupport website. Download the driver, and
then use the Microsoft Add Printer tool to
install it.
OS X 10.10 Yosemite, OS X 10.11 El Capitan,
macOS, 10.12 Sierra, and 10.13 High Sierra
To install from included CD or go to
support.hp.com http://123.hp.com/LaserJet
follow the steps provided to the install
printer software and print driver.
Notes
NOTE: Supported operating systems can change. For a current list of supported operating systems, go to
support.hp.com for HP's all-inclusive help for the printer.
NOTE: For details on client and server operating systems and for HP UPD driver support for this printer, go to
www.hp.com/go/upd. Under Additional information, click the links.
Table 1-7 Minimum system requirements
Windows macOS
● An Internet connection
● Dedicated USB 1.1 or 2.0 connection or a network connection
● 2 GB of available hard-disk space
Mobile printing solutions
HP oers multiple mobile and ePrint solutions to enable easy printing to an HP printer from a laptop, tablet,
smartphone, or other mobile device. To see the full list and to determine the best choice, go to www.hp.com/go/
LaserJetMobilePrinting.
NOTE: Update the printer rmware to ensure all mobile printing and ePrint capabilities are supported.
● Internet connection
● 1 GB of available hard-disk space
ENWW Printer specications 11
Page 22
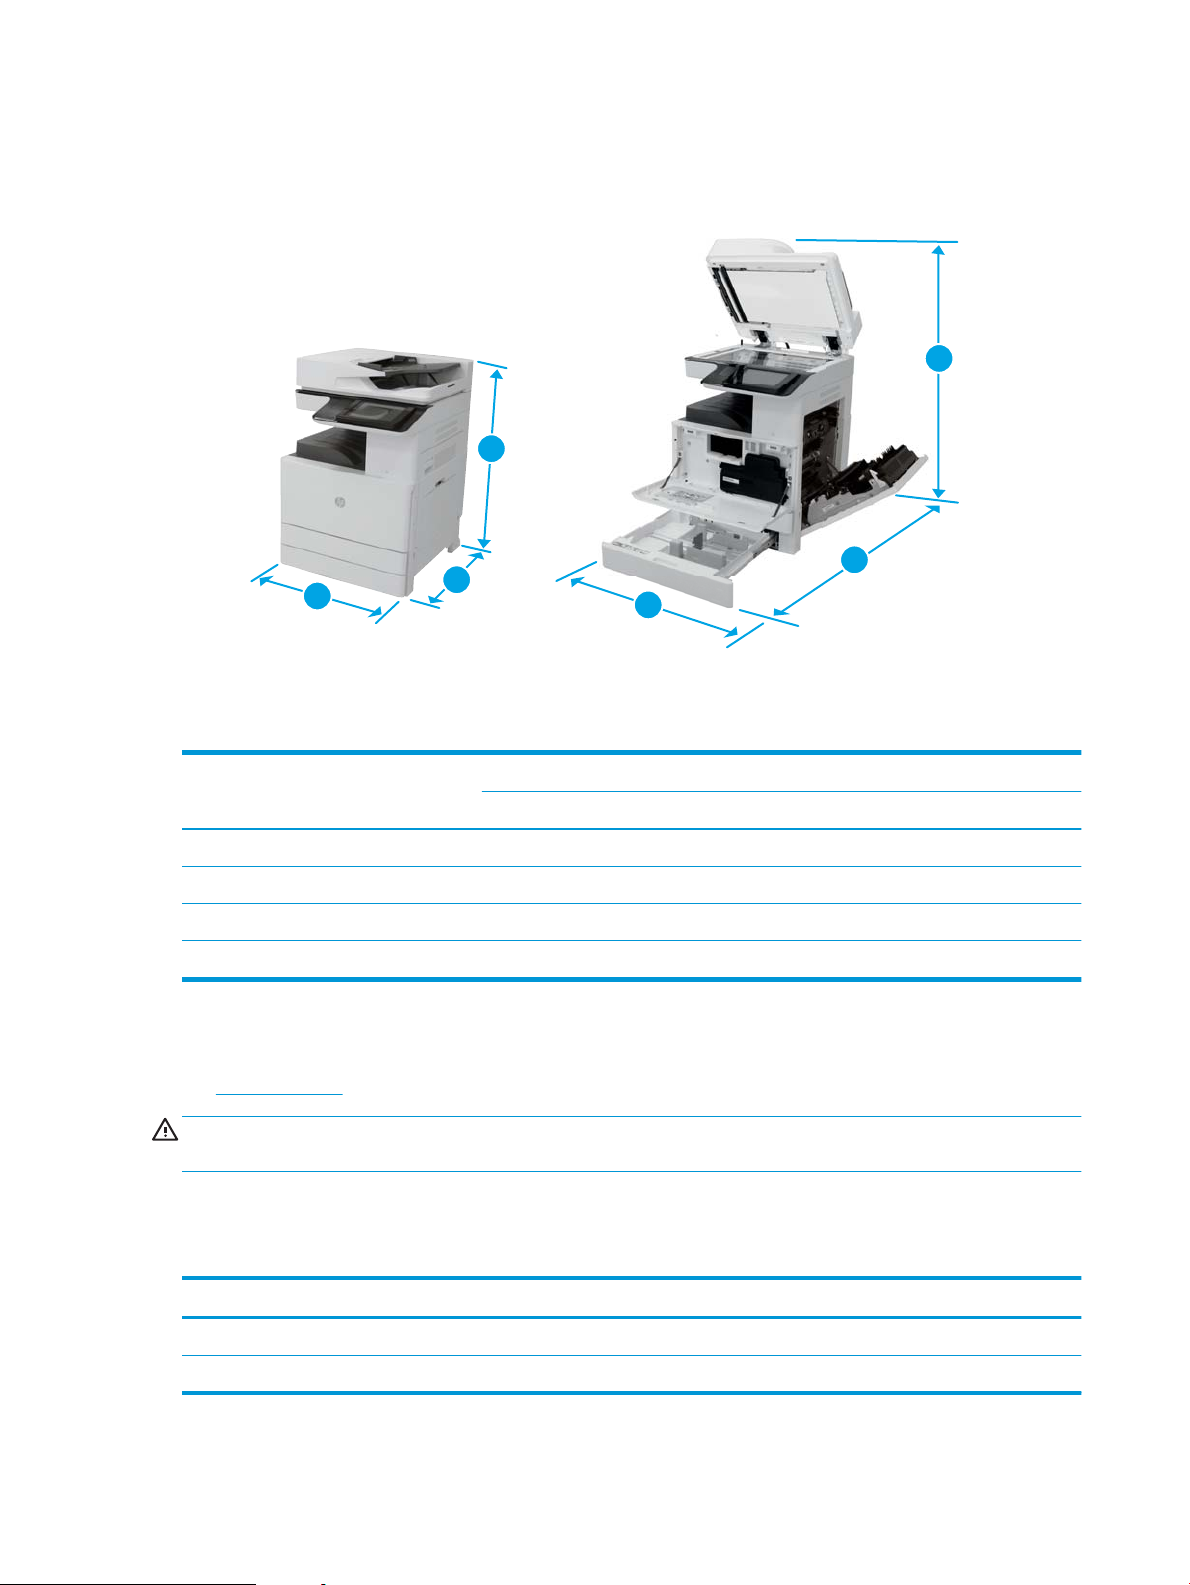
Printer dimensions
2
1
3
2
3
1
Figure 1-5 Printer dimensions
Table 1-8 Printer dimensions
M72625dn/M72630dn
Printer fully closed Printer fully opened
1. Height 820 mm (32.3 in) 1220 mm (48.03 in)
2. Depth 620 mm (24.41 in) 1115 mm (43.8 in)
3. Width 566 mm (22.28 in) 1010 mm (39.7 in)
Weight 59.0 kg (130.1 lb.) 59.0 kg (130.1 lb.)
Power consumption, electrical specications, and acoustic emissions
See support.hp.com for current information.
CAUTION: Power requirements are based on the country/region where the printer is sold. Do not convert
oper
ating voltages. This will damage the printer and void the printer warranty.
Operating-environment range
Table 1-9 Operating-environment specications
En
vironment Recommended Allowed
Temperature 10° to 30°C (50° to 86°F) 10° to 30°C (50° to 86°F)
Relative humidity 20% to 80% relative humidity (RH) 20% to 80% (RH)
12 Chapter 1 Introduction ENWW
Page 23
Control panel overview
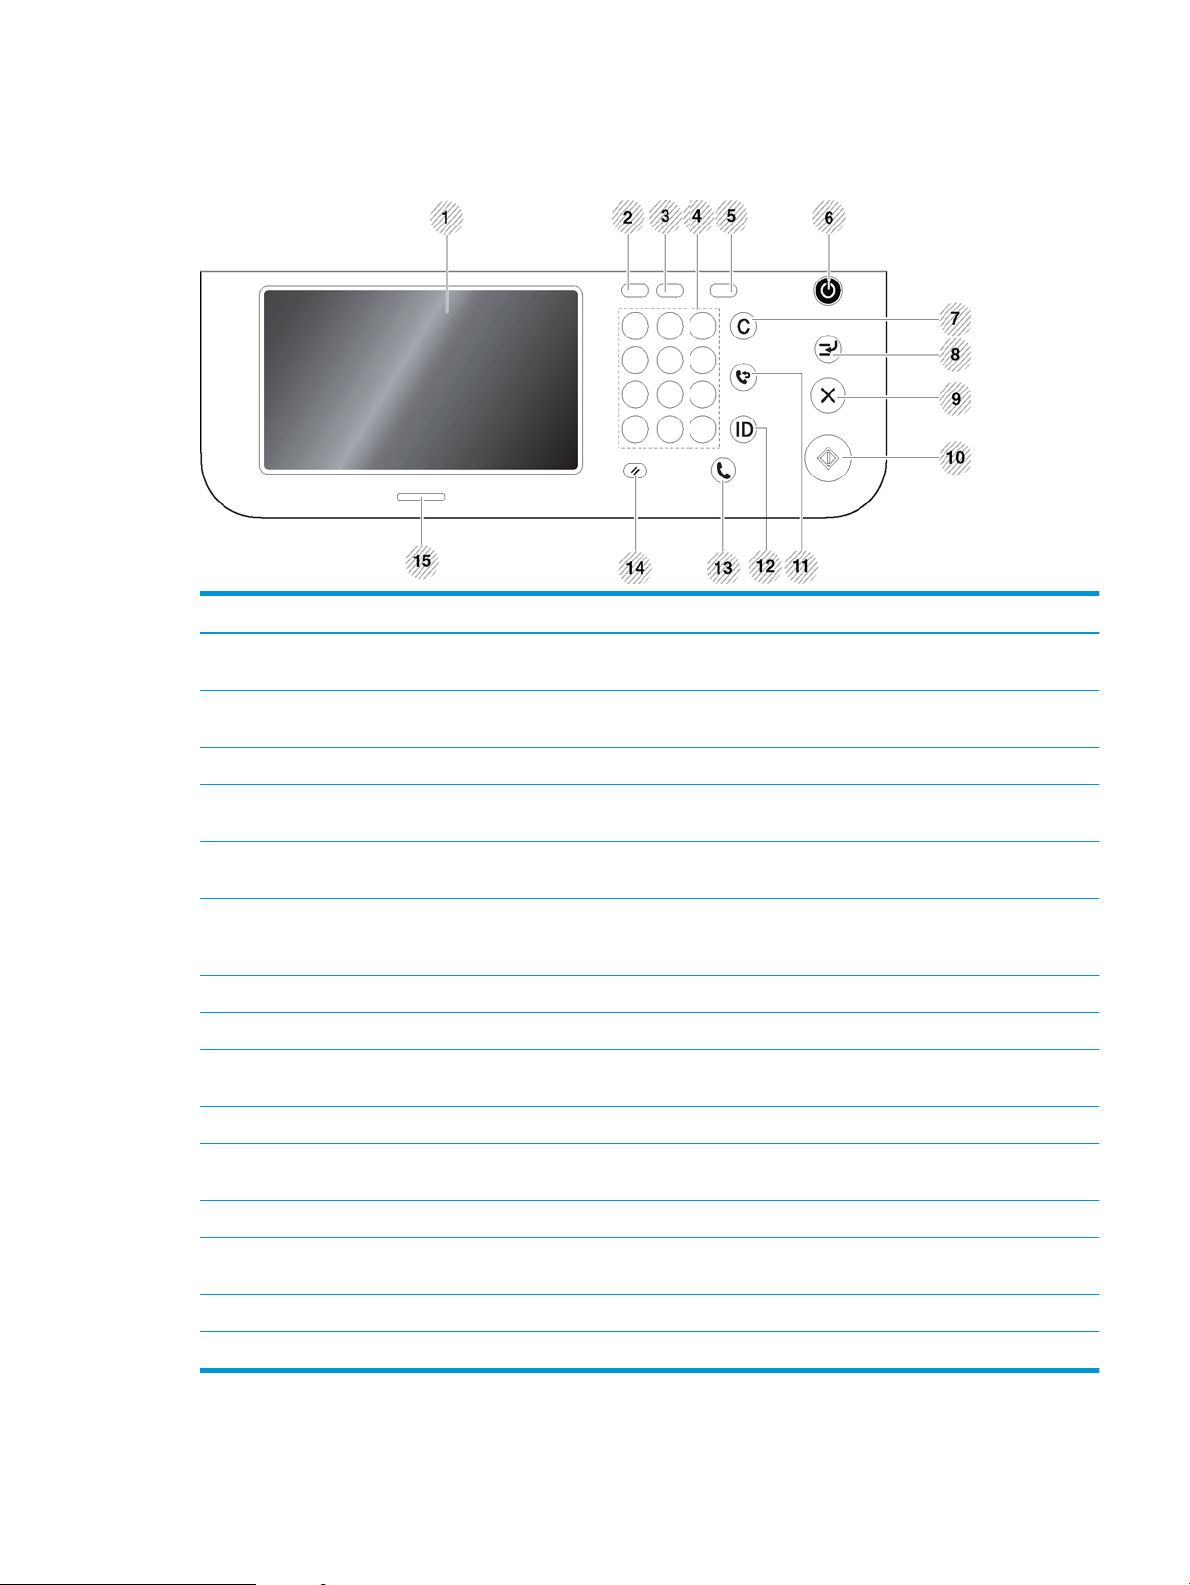
Figure 1-6 Control panel overview
Callout Item Description
1 Touch screen Shows the current printer status and prompts during an operation. You can set menus
2 Job Status Shows the jobs currently running, queued jobs, completed jobs, current error code or
easily using the display screen.
secured jobs.
3 Counter Shows the amount of paper used (see “Counter button”)
4 Numeric keypad Dials numbers and enters alphanumeric characters. You can also enter the number value
for document copies or other options.
5 Eco Turn on Eco mode. Turn on the Eco mode to reduce toner consumption and paper usage
when pc-printing and copying only (see "Eco button").
6 Power/Wakeup Turns the power on or o. When the blue LED is on, the printer is powered on and you can
use it. To turn the printer o, press and hole this button for at least 3 seconds. Press Yes
when the conrmation window appears.
7 Clear Deletes characters in the edit area.
8 Interrupt Stops a print or copy job in operation for urgent copying.
9 Stop Stops an operation at any time. The pop-up window appears on the screen showing the
current job that the user can stop or resume.
10 Start Starts a job.
11 Redial/Pause Redials the recently sent fax number or received caller ID in ready mode, or inserts a pause
(-) into a fax number in edit mode.
12 Logout Allows user to log out.
13 On Hook Dial When you press this button, you can hear a dial tone. Then enter a fax number. It is similar
to making a call using a speaker phone.
14 Reset Resets the current printer setup.
15 Status LED Shows the status of your printer (see "Understanding the LEDs").
ENWW Control panel overview 13
Page 24

IMPORTANT: When you use the display screen, use your nger only. The screen may be damaged with anything
else.
Connecting a network cable
This printer has a built-in network interface card. You can connect your printer to a network using a network
cable.
Figure 1-7 Connecting a network cable
14 Chapter 1 Introduction ENWW
Page 25
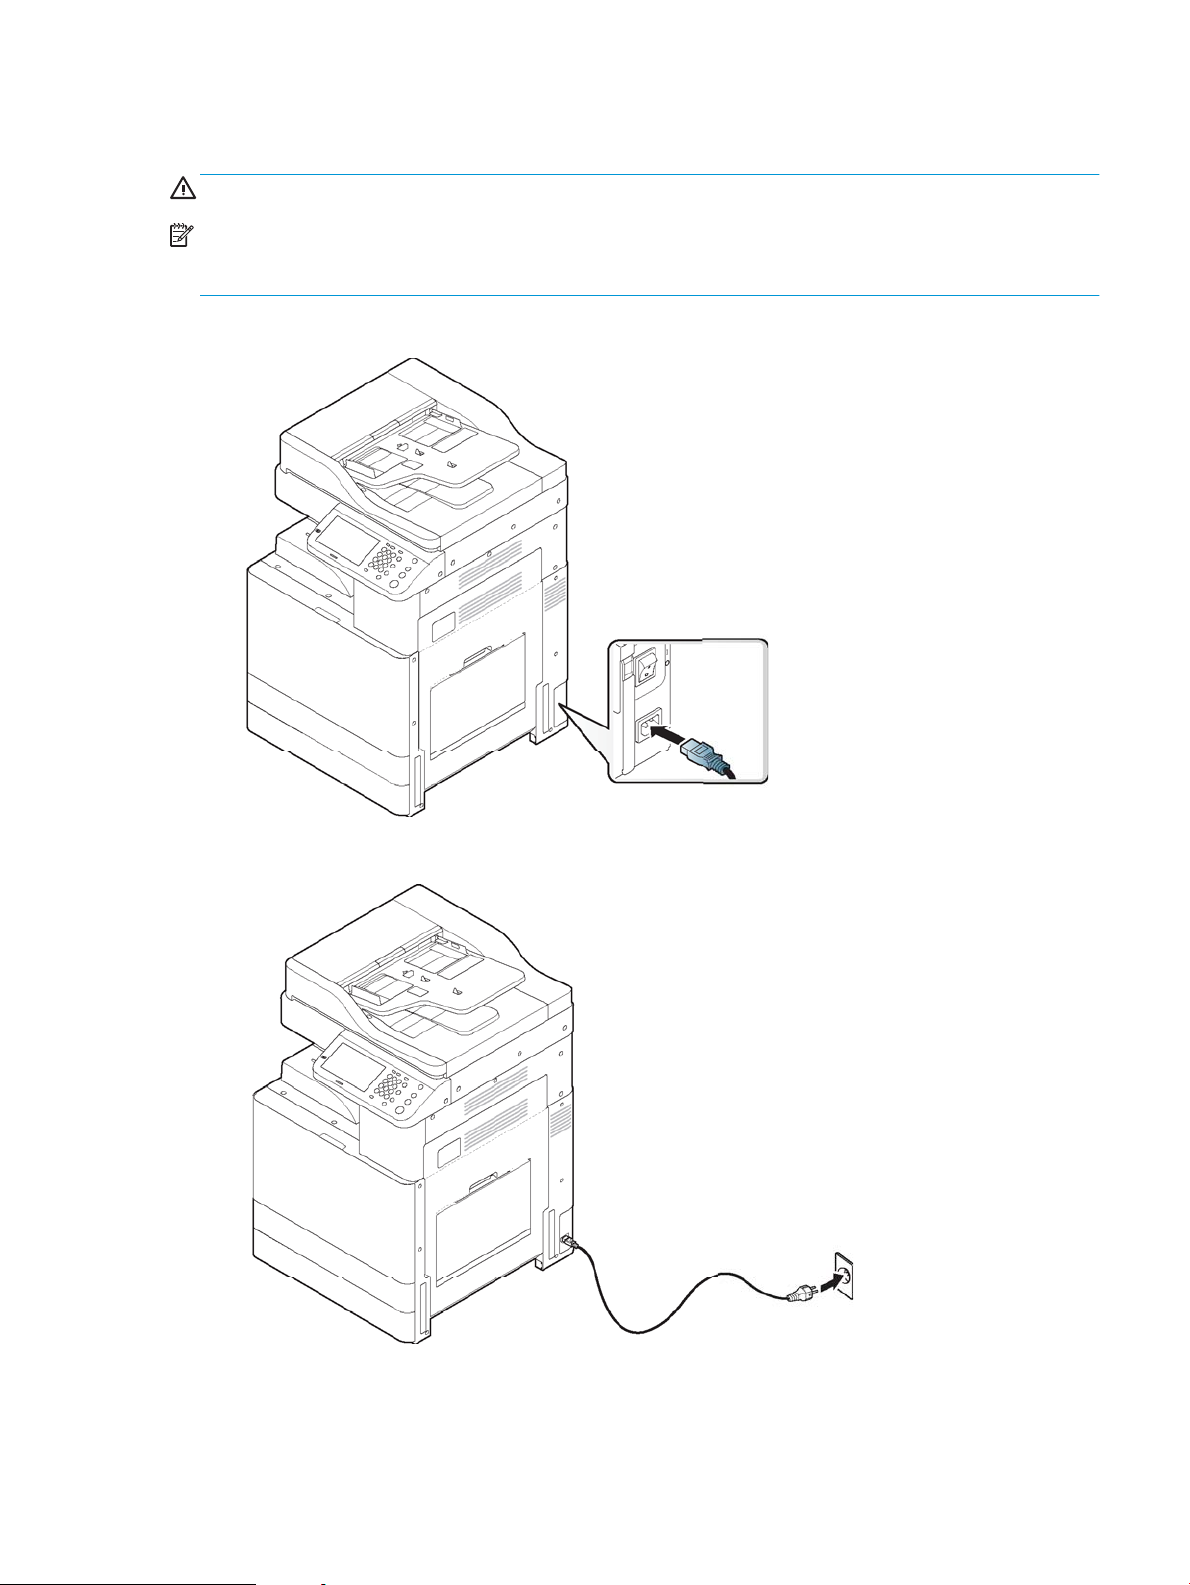
Turning on the printer
CAUTION: To prevent damage to the printer, use only the power cord that is provided with the printer.
NOTE: Make sure that the power source is adequate for the printer voltage rating. The voltage rating is on the
printer label. The printer uses either 110-127 Vac or 220-240 Vac and 50/60 Hz. A label with the printer voltage
rating is located on the back of the printer.
1. Plug the power cord into the power receptacle.
2. Plug the other end into a properly grounded AC outlet.
ENWW Turning on the printer 15
Page 26
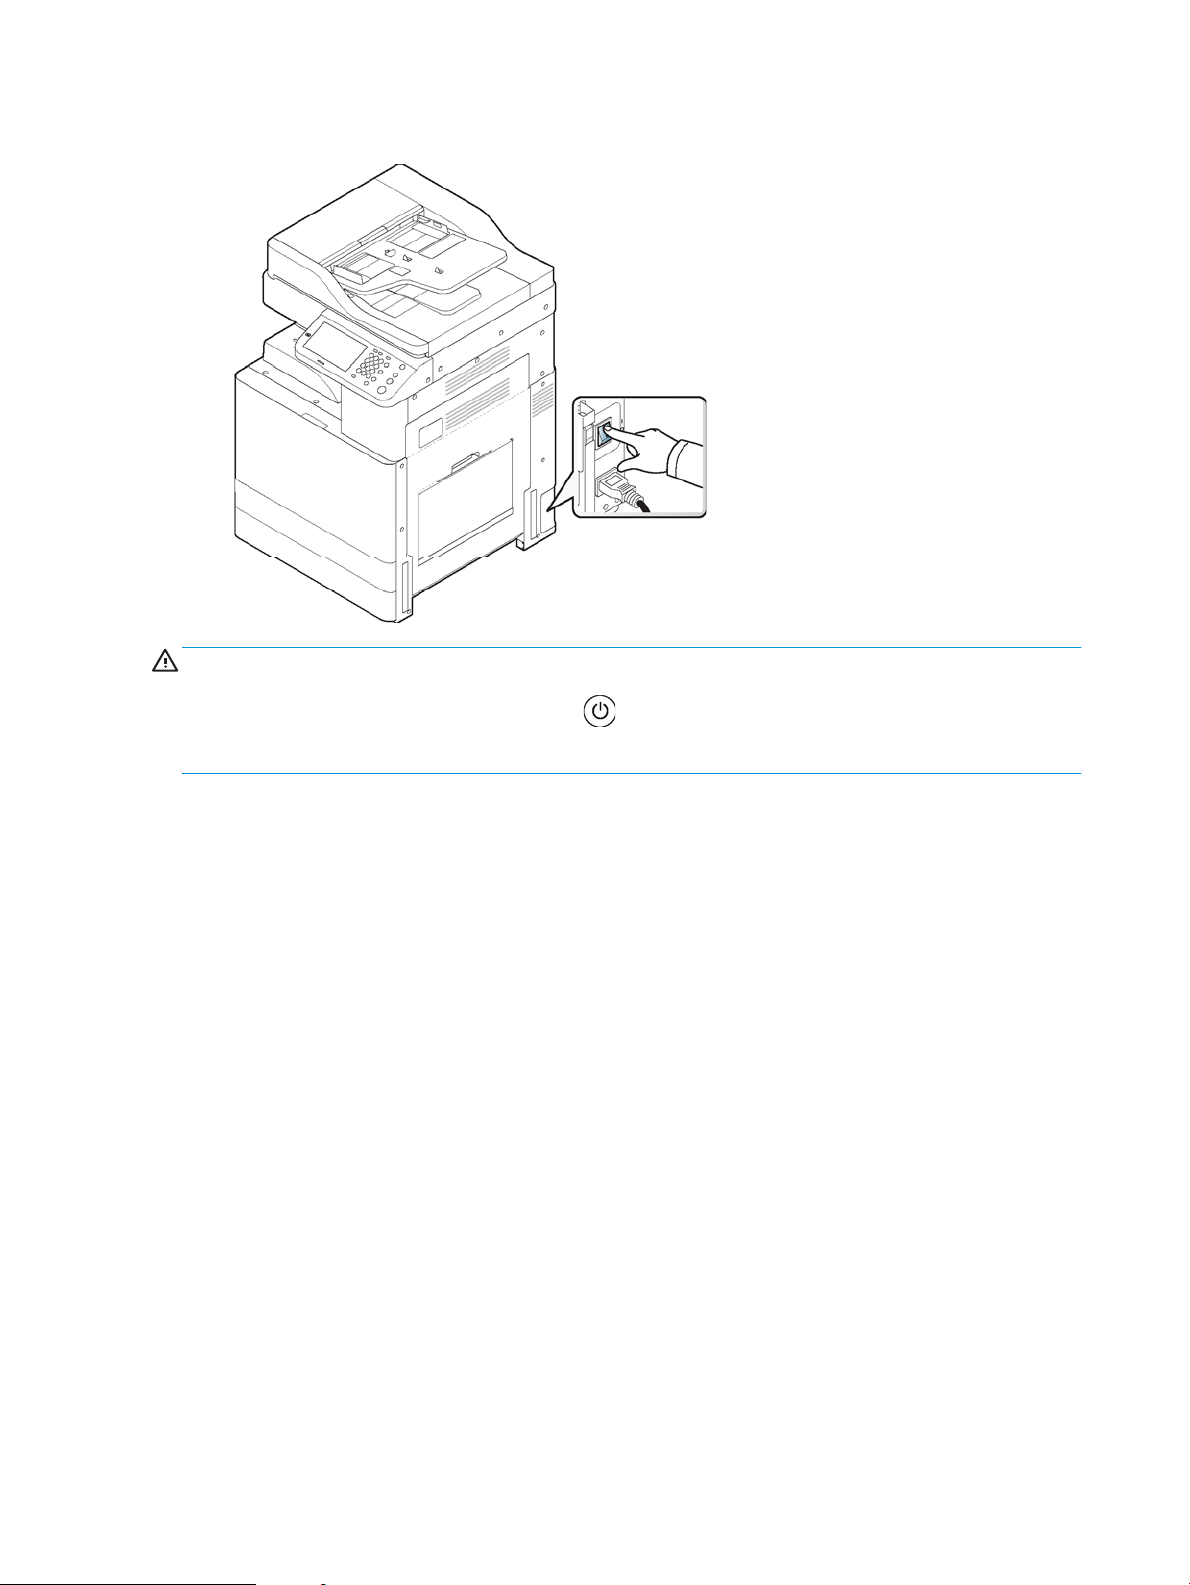
3. Turn on the main power switch.
CAUTION:
● You can also turn the printer on pressing the (Power/Wakeup).
● Some parts inside of the printer may be hot when power is on, or after printing.
16 Chapter 1 Introduction ENWW
Page 27

Understanding the LEDs
The color of the status LED indicates the printer's current status.
NOTE:
● Some LEDs may not be available depending on model or country/region (see "Control panel overview").
● To resolve the error, look at the error message and its instructions from the troubleshooting chapter (see
"Troubleshooting").
● If the problem persists, call a service representative.
●
Understanding the status LED
●
Power LED
Understanding the status LED
Table 1-10 Understanding the status LED
Status Description
O ● The printer is o-line.
Blue On The printer is on-line and can be used.
● The printer is in power save mode.
Blinking Fax The printer is sending or receiving faxes.
Copy The printer is copying documents.
Scan The printer is scanning documents.
Print ● When the status LED slowly blinks, the printer is
receiving data from the computer.
● When the status LED blinks rapidly, the printer is
printing data.
ENWW Understanding the LEDs 17
Page 28

Table 1-10 Understanding the status LED (continued)
Status Description
Orange On ● A toner cartridge has almost reached its estimated cartridge life. It is recommended
Blinking ● A minor error has occurred and the printer is waiting for the error to be cleared.
to replace the toner cartridge.
● A paper jam has occurred (see "Clearing paper jams").
● The door is opened. Close the door.
● There is no paper in the tray. Load paper in the tray (see "Loading paper in the tray").
● The printer has stopped due to a major error. Check the display message (see
"Understanding display messages").
● Imaging unit has almost reached its estimated cartridge life. It is recommended to
replace the toner cartridge.
● The toner collection unit is not installed in the printer or it is full (see "Replacing the
toner collection unit").
Check the display message (see "Understanding display messages"). When the
problem is cleared, the printer resumes its original task.
● The toner cartridge life or imaging unit is near the end of its life. Order a new toner
cartridge or imaging unit. You can temporarily improve print quality by redistributing
the toner.
NOTE: Check the message on the display screen. Follow the instructions in the message or refer to the
troubleshooting chapter (see "Understanding display messages"). If the problem persists, call for service.
Power LED
The color of the status LED indicates the printer's current status.
Table
Status Description
O The printer is o-line.
Blue On ● The printer is on-line and can be used.
NOTE: Check the message on the display screen. Follow the instructions in the message or refer to the
troubleshooting chapter (see "Understanding display messages"). If the problem persists, call for service.
1-11 Power LED
● The printer is in power save mode. When data is received, or any screen is pressed, it
switches to on-line automatically.
18 Chapter 1 Introduction ENWW
Page 29

Display screen and useful buttons
●
Display screen
●
Counter button
●
Eco button
●
Job Status button
●
Interrupt button
Display screen
The display screen on the control panel allows user-friendly operation of the printer. Once you press the home
icon ( ) on the screen, it shows the display screen. The display screen image in this user’s guide may dier from
your printer depending on its option or model.
NOTE:
● To switch to the next display screen, press the right arrow or drag your nger across the display screen.
● Depending on the authentication setting, the printer’s users have to enter an ID and a password. In this
case, the printer can only be used by an authorized user who has registered an ID and a password on the
printer. Contact the printer’s administrator.
● Copy: Enters the Copy menu (see "Copying").
● Stored Document: Enters the Stored Document menu (see "Understanding the Stored Document screen").
● Shared Folder: Enters the Shared Folder menu (see "Understanding the Shared Folder screen").
● Scan to Email: Enters the Scan to Email menu (see "Scanning and sending through email").
● Scan to Server: Enters the Scan to Server menu (see "Scanning and sending via SMB/FTP").
● Scan to PC: Enters the Scan to PC menu (see "Scanning and sending to your computer").
● Scan to Shared Folder: Enters the Scan to Shared Folder menu (see "Scanning and sending to USB /shared
folder").
● Quick Copy: Enters the Quick Copy menu (see "Quick copying").
● USB: Enters the USB menu. When a USB memory device is inserted into the USB memory port on your
printer, USB is activated on the display screen (see "Understanding the USB screen").
● Scan to USB: Enters the Scan to USB menu. When a USB memory device is inserted into the USB memory
port on your printer, Scan to USB is activated on the display screen (see "Scanning to a USB memory
device").
● Machine Setup: You can browse current printer settings or change printer values (see "Printer setup").
NOTE: Some menus are only congured by an administrator or an authorized user who has an ID and
password registered on the printer by an administrator. When the printer requests, enter the ID and password.
Counter button
When you press the Counter button on the control panel, you can see the number of impressions.
ENWW Display screen and useful buttons 19
Page 30
When you select Device, you can see the number of impressions by device. An impression typically refers to a
single side of a sheet and not a one-sided print.
● Total Usage: Displays the total number of impressions.
● Send Usage: Displays the number of images sent via email, server, etc.
● Large Page: Displays the total number of impressions with large size paper.
● Fax Send Usage (PSTN): Displays the number of sent faxes.
When you select User, you can see the number of usage, limit, and remaining usage by each user.
Eco button
The eco feature allows you to save print resources and leads you to eco-friendly printing. When you press the
Eco button, the printer turns eco mode on or o. If the eco mode is on, you can see the eco image ( ) on
some features. Some options in the features are not available to use in the eco mode.
NOTE:
● Only administrators have permission for Eco Settings in Machine Setup (see "Eco Settings").
● If the printer requests a password for eco mode, you need to enter the password. Contact your
administrator.
● The Eco button is activated only for Copy, Quick Copy menus.
Table 1-12 Eco button
Status Description
O The printer is not in Eco mode.
Green On The printer is in Eco mode.
Job Status button
When you press the Job Status button, the screen lists the currently running, queued, and completed jobs.
Current Job
Displays the list of jobs in progress and pending.
Pressing the job name shows more detailed information.
● No.: Gives the order of jobs.
● Job Type: Displays type of the job, such as print, copy, fax, etc.
● Job Name: Displays the name of the job.
● User: Displays the name of the job owner.
● Status: Displays the current status of each job.
● Delete: Removes a selected job from the list.
20 Chapter 1 Introduction ENWW
Page 31

Completed Job
Displays the list of completed jobs.
Pressing the job name shows more detailed information.
● No.: Gives the order of jobs.
● Job Type: Displays type of the job, such as print, copy, fax, etc.
● Job Name: Displays the name of the job.
●
● Status: Displays the status of each completed job.
Secured Job
Displays the list of secured jobs the user has set in the printer driver (see "Print Mode"). You need to enter the ID
and Password set in the printer driver.
● No.: Gives the order of jobs.
● Job Type: Displays type of the job.
● Job Name: Displays the name of the job.
● User: Displays the name of the job owner.
User: Displays the name of the job owner.
Active Notice
● Detail: Displays detailed information of the selected job. You can also change the number of copies by
pressing Change Settings.
● Edit: Changes the Job Name of the selected job.
● Delete: Removes the selected job from the list.
● Print: Prints the selected job from the list.
● Close: Closes the job status window.
Displays any error messages and codes that have occurred.
● Time: Display the time of messages.
● Type: Displays type of the job.
● Machine Status Message: Displays the error messages for the current errors in the printer.
● Error Code: Displays the error message's code.
ENWW Display screen and useful buttons 21
Page 32

Interrupt button
When you press the Interrupt button, the printer goes into interrupt mode, which means it stops the current
printing job for an urgent copy job. When the urgent copy job is completed, the previous printing job continues.
Table 1-13 Interrupt button
Status Description
O The printer is not in interrupt printing mode.
Blue On The printer is in interrupt printing mode.
Understanding the pop-up keyboard
You can enter alphabet characters, numbers, or special symbols using the popup keyboard on the display
screen. This keyboard is the same as a normal keyboard for easy usability.
Touch the input area where you need to enter characters, then the keyboard pops up on the screen. The
keyboard is the default showing the lowercase letters.
Printer hardware setup and software installation
For basic setup instructions, see the Hardware Installation Guide that came with the printer. For additional
instructions, go to HP support on the Web.
Go to support.hp.com for HP's all-inclusive help for the printer. Find the following support:
● Install and congure
● Learn and use
● Solve problems
● Download software and rmware updates
● Join support forums
● Find warranty and regulatory information
22 Chapter 1 Introduction ENWW
Page 33

2 Using a Network-Connected Printer
●
Network environment
●
Accessing network setup
●
Network settings (TCP/IP)
●
Installing driver over the network
●
WebUI (embedded web server)
●
Additional network-connected tasks
ENWW 23
Page 34

Network environment
You can use network after connecting network cable to a corresponding port on your printer.
You need to set up the network protocols on the printer to use it as your network printer. You can set up the basic
network settings through the printer's control panel.
The following table shows the network environments supported by the printer:
Table 2-1 Network environment
Items Specications
Network interface ● Ethernet 10/100/1000 Base-TX Wired Lan
● 802.11b/g/n Wireless LAN
Network operating system ● Windows® XP Service Pack 3, Windows Server® 2003,
● Windows Vista®, Windows® 7/8, Windows® 8.1, Windows® 10, Windows Server® 2008 R2, Windows®
● Various Linux OS
● macOS 10.6 -10.13
● 32-bit and 64-bit operating systems
Network protocols ● TCP/IPv4
a
Server 2012, Windows® Server 2016
Wireless security
a
Optional device
● DHCP, BOOTP
● DNS, WINS, Bonjour, SLP, UPnP
● Standard TCP/IP Printing (RAW), LPR, IPP, WSD
● SNMPv 1/2/3, HTTP, IPSec
● TCP/IPv6 (DHCP, DNS, RAW, LPR, SNMPv 1/2/3, HTTP, IPSec)
a
● Authentication: Open System, Shared Key, WPA/WPA2-Personal/Enterprise
● Encryption: WEP64, WEP128, TKIP, AES
24 Chapter 2 Using a Network-Connected Printer ENWW
Page 35

Accessing network setup
1. Make sure that the ethernet cable is connected to your printer.
2. Press Machine Setup > Network Settings from the display screen.
3. Select the option you want. If the option is available for only the administrator, the following screen
appears.
Enter the ID, Password, and Domain using the pop-up keyboard which appears when you press each eld.
NOTE:
● Enter the ID and password you rst set when you turned on the printer: Initial Settings (see "Initial
Settings").
● You can also use the Recent Users button to nd the recently used ID and Domain List button to nd
the domain from the list stored in the printer.
● When you log-in, you can see the ID of the logged in user on the display.
4. Press OK.
Network settings (TCP/IP)
When you connect your printer to a network, you must rst congure the TCP/IP settings for the printer. The
settings shown below are the basic settings required for using your printer as a network printer. You can set
TCP/IP, DNS server, TCP/IPv6, Ethernet, and IP address allocation methods.
●
Ethernet
●
TCP/IP Protocol
Ethernet
You can set ethernet settings.
Press Machine Setup > Network Settings > TCP/IP > Ethernet from the display screen.
NOTE: You can also use this feature from the WebUI. Open the Web browser from your networked computer
and type the IP address of your printer (see "Settings tab").
● Ethernet: You can enable/disable ethernet port.
● Speed Rate: Choose the speed rate of ethernet.
● MAC Address: Shows the MAC address of the printer.
TCP/IP Protocol
You can set IPv4 settings.
Press Machine Setup > Network Settings > TCP/IP > TCP/IPv4 from the display screen.
NOTE: You can also use this feature from the WebUI. Open the Web browser from your networked computer
and type the IP address of your printer (see "Settings tab").
ENWW Accessing network setup 25
Page 36

IP Setting
You can choose the method for allocating IP addresses.
● Static: Select to enter IP address/Subnet Mask/Gateway Address manually.
● BOOTP: IP address/Subnet Mask/Gateway Address are automatically allocated by the BOOTP Server.
● DHCP: IP address/Subnet Mask/Gateway Address are automatically allocated by the DHCP Server.
DNS Conguration
You can congure the DNS server.
● Host Name: Enter the host name. You can enter up to 63 characters. Default name is “"NPI"{last 6 digits of
● Domain Name: Enter the domain name. You can enter up to 128 characters.
● Primary DNS Server: Enter the address of the DNS server you want to use primarily.
● Secondary DNS Server: Enter the address of the DNS server you want to use as an alternative.
● Dynamic DNS Registration: If you want to use, check the checkbox(es) of dynamic DNS registration. If this
MAC address}”.
option is checked, the printer registers its host name and domain name to congured DNS servers
dynamically. Also, if this option is checked and DHCP is selected, DHCP FQDN options are automatically
disabled.
WINS (Windows Internet Name Service)
You can congure the WINS server. WINS is used in the Windows operating system.
Display IP address
You can set the printer to display the IP address on the Notication Bar. If you select this option, the IP
address will show on the Notication Bar.
26 Chapter 2 Using a Network-Connected Printer ENWW
Page 37

Installing driver over the network
You must install the printer driver software for printing. The software includes drivers, applications, and other
support programs.
Make sure that the network setup for your printer is completed. All applications should be closed on your
computer before beginning installation.
●
Windows
●
macOS
●
Linux
Windows
1. Make sure that the printer is connected to the network and powered on. Also, your printer’s IP address
should have been set.
2. Insert the supplied software CD into your CD-ROM drive.
If the installation window does not appear, select Start > All programs > Accessories > Run.
X:\Setup.exe replacing “X” with the letter, which represents your CD-ROM drive and select OK.
● For Windows 8
If the installation window does not appear, from Charms, select Search > Apps and search for Run.
Type in X:\Setup.exe, replacing “X” with the letter that represents your CD-ROM drive and select OK.
If “Tap to choose what happens with this disc.” pop-up window appears, select the window and select
Run Setup.exe.
● For Windows 10 / Windows Server 2016
If the installation window does not appear, from task bar, type in X:\Setup.exe in Search input area,
replacing “X” with the letter that represents your CD-ROM drive and press the Enter key.
3. Review and accept the installation agreements in the installation window, and then select Next.
4. Select Network Connection on the Printer Connection Type screen. Then, select Next.
5. Follow the instructions in the installation window.
ENWW Installing driver over the network 27
Page 38

In Windows 8.1, 10
The V4 class driver is automatically installed from the operating system when your computer is connected to the
network.
1. Make sure that the printer is connected to the network and powered on. Also, your printer’s IP address
2. From Charms, select Settings > Change PC settings > Devices.
. Click Add a printer or scanner.
3
4. Click the model name or host name you wish to use.
should have been set.
NOTE: For Windows 10 / Windows Server 2016
From task bar, type in Devices and Printers in Search input area. Press the Enter key.
Or
From the Start ( ) icon, select Settings > Devices > Printers and Scanners.
Discovered machines will be shown on the screen.
NOTE: You can print a Network Conguration Report from the printer’s control panel that will show the
current printer’s host name.
macOS
5. The driver is automatically installed from the Windows Update.
1. Make sure that the printer is connected to your computer and powered on.
NOTE: If your MAC does not have an optical drive, go to support.hp.com for driver installation.
2. Insert the supplied software CD into your CD-ROM drive.
3. Select the CD-ROM volume that appears on Finder.
4. Double-click the Install Software icon.
5. Read the license agreement and check installation agreement button.
6. Click Next.
7. Select Network on the Printer Connection Type.
8. Click Next.
9. Follow the instructions in the installation window.
28 Chapter 2 Using a Network-Connected Printer ENWW
Page 39

Linux
You need to download Linux software packages from the HP Linux Imaging and Printing (HPLIP) website to
install the printer software.
1. Make sure that the printer is connected to your network and powered on. Also, your printer’s IP address
should have been set.
2. Copy Unied Linux Driver package to your system.
3. Open Terminal program and go to the folder that you copied the package to.
4. Extract the package.
5. Move to uld folder.
6. Execute ” ./install.sh“ command (If you are not logged in as root, execute the command with “sudo” as
“sudo ./install.sh”).
7. Proceed with installation.
8. When installation nished, launch Printing utility (Go to System > Administration > Printing or execute
“system-cong-printer“ command in Terminal program).
9. Click Add button.
10. Select AppSocket/HP JetDirect and enter your printer’s IP address.
11. Click Forward button and add it to your system.
ENWW Installing driver over the network 29
Page 40

WebUI (embedded web server)
This section gives you step-by-step instructions for setting up the network environment using WebUI.
NOTE:
● Internet Explorer® 8.0 or higher is the minimum requirement for WebUI.
● Some menus may not appear on the display screen depending on the settings or models. If so, it is not
applicable to your printer.
What is WebUI?
If you have connected your printer to a network and set up TCP/IP network parameters correctly, you can
manage the printer via WebUI. Use WebUI to:
● View the printer’s device information and check its current status.
● Change TCP/IP parameters and set up other network parameters.
● Change the printer preference.
● Set the email notications advising of the printer’s status.
● Get support for using the printer.
● Upgrade printer software.
Required web browser
You need one of the following web browsers to use WebUI:
● Internet Explorer® 8.0 or higher
● Chrome 27.0 or higher
● FireFox 21.0 or higher
● Safari 5.9.1 or higher
Connecting to WebUI
IPv4 supported web browser
1. Start a web browser that supports IPv4 addressing as a URL.
NOTE: You can get the printer’s IP address from the printer report (see" Other settings").
2. Your printer’s WebUI website opens.
30 Chapter 2 Using a Network-Connected Printer ENWW
Page 41

IPv6 supported web browser
1. Start a web browser that supports IPv6 addressing as a URL.
2. Select one of the IPv6 addresses (Stateless Address, Stateful Address, Manual Address) from Network
Conguration Report.
NOTE: You can get the printer’s IP address from the printer report (see" Other settings").
3. Enter the IPv6 addresses (e.g., http://[3e:10:88:194:213:77:fe82:75b]).
IMPORTANT: The address must be enclosed in '[ ]' brackets.
4. Your printer’s WebUI website opens.
Logging into WebUI
Before conguring options in WebUI, you need to log-in as an administrator. You can still use WebUI without
logging in, but you will not have access to or view the Settings tab and the Security tab.
1. Click Login on the upper right of the WebUI website.
A log-in page appears.
2. Type in the ID and Password.
Use the same login ID, Password as when logging in from the printer (see "Log-in").
NOTE: If you want to change the password, see "Security tab".
Information tab
This tab gives you general information about your printer. You can check things, such as the printer’s status,
supplies’ status, count information, network information, and more. You can also print reports, such as
conguration page.
● Active Alerts: You can check the current alerts in the printer. Use this information to troubleshoot printer
errors.
● Supplies: You can check the supplies’ information. For toner cartridge, supplies’ status is displayed with a
visual graph showing you the amount of each supply left. Page counts are also available which can help
you predict when to change the supplies. This feature is also available from the printer.
● Usage Counters: You can check the billing information and usage counter of the printer. This feature is also
available from the printer.
● Current Settings: Shows the current settings of the printer and network.
– Machine Information: Shows the current printer settings.
– Network Information: Shows the current network settings. Use this page as a reference and change
the necessary settings needed for using the network.
● Security Information: Shows the current security settings of the printer and network.
● Print Information: You can print all the reports provided by your printer. You can use these reports to help
you maintain your printer. This feature is also available in the printer (see "Other settings").
ENWW WebUI (embedded web server) 31
Page 42

Address book tab
You can manage the address book. This feature is also available from the printer (see "Setting up an address
book from the control panel").
● Individual: You can manage individual entries in the address book.
● Group: You can manage group address books.
Settings tab
Settings tab has sub menus, Machine Settings and Network Settings. You cannot view or access this tab if you do
not log-in as an administrator (see "Logging into WebUI”).
● Machine Settings: You can set printer settings.
– System: You can set printer related settings.
– Printer: You can set print related settings such as darkness or adjust the background. This feature is
– Copy: You can set copy related settings such as darkness or adjusting the background.
– Fax: You can set fax related settings such as fax number or redial times. This feature is also available
– Scan: You can set scan related settings. This feature is also available from the printer (see
also available from the printer.
from the printer (see "Understanding the fax screen" on page 175).
"Understanding the Scan to Email screen" on page 146).
● Network Settings: You can set up the network environment to use your printer as a network printer. You
Security tab
– Email Notication: When an error occurs or the consumables are running out, the printer sends a
notication to the administrator via email. You can set whether to use this feature or not. You can also
select which alerts to receive and when.
can also set the settings from the printer. Refer to the network setup chapter (see "Network Settings").
– General: You can set general printer information to use in the network and set ethernet settings. This
feature is also available from the printer.
– TCP/IPv4, TCP/IPv6, Raw TCP/IP, LPR/LPD, IPP, Telnet, WSD, SLP, UPNP, mDNS, CIFS (Shared Folder),
SNMPv1/v2, SNMPv3, FTP Print Server: You can set protocol settings.
– Outgoing Mail Server (SMTP): You can set server settings for outgoing emails. If this setting is not
congured, you cannot use scan to email feature. Outgoing emails will be sent through SMTP server
you set here.
– HTTP: You can allow or block users from accessing the WebUI.
– Proxy: You can set proxy settings and enable authentication.
– Restore Default: Clicking the Clear button under the Restore Default section will clear security and
network congurations. Restoring the settings will take eect after the system is rebooted.
The security tab has System Security, Network Security, User Access Control and System Log. You cannot access
this tab if you do not log-in as an administrator (see "Logging into WebUI).
● System Security: From the WebUI, select the Security tab > System Security.
32 Chapter 2 Using a Network-Connected Printer ENWW
Page 43

– System Administrator: Enter the system administrator’s information. The printer sends email
notication to the email address set here. This feature is also available from the printer.
– Feature Management: Species the services, PC application security, physical ports, and network
protocol features to use. Select the features to use, and then click Apply.
– Information Hiding: Species which information to hide. Select the amount of information that you
want to hide, and then click Apply.
– Restart Device: You can reboot your printer. Click the Restart Now button to reboot.
● Network Security: From the WebUI, select the Security tab > Network Security.
– Digital Certicate: You can manage digital certicates. A digital certicate is an electronic certicate
that veries the secure association between communication nodes. You need to add the certicate for
SSL communication.
– Secure Connection: You can enable or disable secure connection to use more enhanced secure
network channel. For secure communication, using the Secure Connection feature is recommended.
– SNMPv3: You can set SNMPv3.
– IP Security: You can set IP security settings.
– IP/MAC Filtering: You can set ltering options for IP and MAC addresses. If the administrator does not
add a ltering rule for IPv4, IPv6, and MAC addresses, nothing is ltered. If the administrator has
added a ltering rule, ltering will be applied to the entered IPv4, IPv6, and MAC addresses.
○ IPv4 Filtering: You can enable/disable IPv4 ltering as well as manage ltering rules.
○ IPv6 Filtering: You can enable/disable IPv6 ltering as well as manage ltering rules.
○ MAC Filtering: You can enable/disable Mac ltering as well as manage ltering rules.
– 802.1x(Ethernet): You can enable/disable 802.1x Security as well as manage ltering rules.
– External Authentication Server: Set the servers for authentication.
● User Access Control: You can restrict users from accessing the printer or application. You can also give
specic permission for user to only use certain feature of the printer. For example, you can allow user A to
only use print feature. In this case, user A will not be able to scan, copy or fax with the printer.
– Authentication: You can choose the authentication method for user authentication. Select a mode and
click on the Options button.
– Authorization (Giving rights): You can give permissions to a user to only use certain features of the
printer.
○ Authority Management: You can give dierent rights to dierent users. For example, you can
allow user A to use all the printer’s functions while giving user B only the right to print.
○ External User Authority: Set the authority for external server users.
ENWW WebUI (embedded web server) 33
Page 44

– Accounting: You can manage accounts.
– User prole: You can store user information on the printer’s hard drive. You can use this feature to
● System Log: You can keep logs of events that have happened in the printer. The administrator can record
and manage the printer usage information by keeping the system log les. The system log les are stored
on the printer’s mass storage device (hard disk), and when it is full, it will erase old data. Export and save
the important audit data separately using the exporting feature.
– Log conguration: You can enable or disable keeping logs. You can also backup log les by periods
– Log Viewer: You can view, delete, and search log les.
Maintenance tab
This tab allows you to maintain your printer by upgrading rmware, managing applications, and setting contact
information for sending emails. You can also connect to the HP website or download manuals and drivers by
selecting the Link menu.
● Firmware Upgrade: You can check the rmware version used in the printer. Check the version and update it
if necessary.
● Application Management: You can add or delete applications/license. If you add an application, you need to
activate the license of the installed application. Some applications may not have a license.
manage the users using the printer. You can also group the users and manage them as a group. You
can make a maximum of 500 individual users and 200 user groups.
and transfer to a repository server.
● Contact Information: You can view contact information.
● Link: You can view links to useful websites where you can:
– view product information and get support (HP website).
– download manuals and drivers.
– order consumable supplies.
– register your printer on-line.
● License Management: License Management provides settings managing the licenses for installed
applications.
● Cloning: The printer prints multiple original images on a single page. The number of images is
automatically determined by the original image and the paper size. You can enable or disable the clone
menu.
● Wi-Fi Interface: You can enable or disable the Wi-Fi menu.
Additional network-connected tasks
For more information go to support.hp.com
Instructions are available for performing specic scan task, such as the following:
● Wireless network setup (optional accessory required)
34 Chapter 2 Using a Network-Connected Printer ENWW
Page 45

Additional network-connected tasks
Go to support.hp.com. Instructions are available for performing specic copy tasks, such as the following:
● Setting IP address
ENWW Additional network-connected tasks 35
Page 46

3 Media and tray
●
Loading originals
●
Selecting print media
●
Loading paper in the tray
●
Printing on special media
●
Tray Settings
36 Chapter 3 Media and tray ENWW
Page 47

Loading originals
You can use the scanner glass or the Document Feeder to load an original for copying, scanning, and sending a
fax.
●
Scanner glass
●
Document feeder
Scanner glass
Make sure that no originals are in the document feeder. If an original is detected in the document feeder, the
printer gives it priority over the original on the scanner glass. To get the best scan quality, especially for colored
or gray-scaled images, use the scanner glass.
Preparing originals
Do not load paper smaller than 25 x 25 mm (1.0 x 1.0 inch) or larger than 297 x 432 mm (11.7 x 17 inches).
Make sure any glue, ink, or correction uid on the paper is completely dry before loading.
1. Open the document feeder.
ENWW Loading originals 37
Page 48

2. Place the original face down on the scanner glass and align it with the registration guide at the top left
corner of the glass.
3. Close the document feeder.
NOTE:
● Leaving the document feeder open while copying may aect copy quality and toner consumption.
● Dust on the scanner glass may cause black spots on the printout. Always keep it clean.
● If you are copying a page from a book or magazine, lift the document feeder until its hinges are
IMPORTANT:
● Be careful not to break the scanner glass, it may cause injury.
● Do not put hands on the scanner glass while closing the document feeder. The document feeder may
● Do not look at the light inside of the scanner while copying or scanning. It is harmful to eyes.
Document feeder
● Do not load paper smaller than 140 x 140 mm (5.5 x 5.5 inches) or larger than 297 x 432 mm (11.7 x 17
inches).
● The document feeder can automatically detect A5 LEF, Letters or A4 SEF, Legal SEF, A3 SEF.
– Do not attempt to load the following types of paper, in order to prevent paper jams, low print quality,
caught by the stopper and then close the lid. If the book or magazine is thicker than 30 mm (1 inch),
start copying with the lid open.
fall on your hands and cause injury.
and printer damage.
○ Carbon paper or carbon-backed paper
○ Coated paper
○ Onion skin or thin paper
○ Wrinkled or creased paper
38 Chapter 3 Media and tray ENWW
Page 49

● Remove all staples and paper clips before loading.
●
● Do not load originals that include dierent sizes or weights of paper.
● Do not load booklets, pamphlets, transparencies, or documents with other unusual characteristics.
Preparing originals
Using the document feeder, you can load up to 100 sheets of paper (80 g/m2, 20 lb. bond) for one job.
1. Flex or fan the edge of the paper stack to separate the pages before loading originals.
2. Load the originals face up into the document feeder. Make sure that the bottom of the original stack
○ Curled or rolled paper
○ Torn paper
Make sure any glue, ink, or correction uid on the paper is completely dry before loading.
matches the paper size marked on the document input tray.
NOTE: Do not overload the tray: it may cause original jams. Make sure that the paper is below the
maximum paper capacity indicator inside the tray.
1 Paper capacity indicator
ENWW Loading originals 39
Page 50

3. Adjust the document width guides to the paper size.
NOTE: Dust on the document feeder glass may cause black lines on the printout. Always keep the glass
clean.
40 Chapter 3 Media and tray ENWW
Page 51

Selecting print media
You can print on a variety of print media, such as plain paper, envelopes and labels. Always use print media that
meet the guidelines for use with your printer.
●
Guidelines to select print media
Guidelines to select print media
Print media that does not meet the guidelines outlined in this user’s guide may cause the following problems:
● Poor print quality
● Increased paper jams
● Premature wear on the printer
Properties, such as weight, composition, grain, and moisture content, are important factors that aect the
printer’s performance and the output quality. When you choose print materials, consider the following:
● The type, size, and weight of the print media for your printer are described in print media specications
(see "Print media specications").
● Desired outcome: The print media you choose should be appropriate for your project.
● Brightness: Some print media are whiter than others and produce sharper, more vibrant images.
● Surface smoothness: The smoothness of the print media aects how crisp the printing looks on the paper.
NOTE: Some print media may meet all of the guidelines in this user’s guide and still not produce satisfactory
results. This may be the result of the sheets characteristics, improper handling, unacceptable temperature and
humidity levels, or other variables over which cannot be controlled.
Before purchasing large quantities of print media, ensure that it meets the requirements specied in this user’s
guide.
CAUTION: Using print media that does not meet these specications may cause problems or require repairs.
Such repairs are not covered by HP’s warranty or service agreements.
The amount of paper put into the tray may dier according to media type used (see "Print media specications").
Make sure not to use the inkjet photo paper with this printer. It could cause damage to the printer.
Use designated print media (see "Print media specications").
WARNING! The use of inammable media or foreign materials left in the printer may lead to overheating of the
unit and equipment damage.
The amount of paper put into the tray may dier according to media type used (see "Print media specications").
ENWW Selecting print media 41
Page 52

Loading paper in the tray
●
Tray overview
●
Standard tray / optional dual cassette feeder
●
Tray 1 (MP)
●
Media sizes automatically detected
Tray overview
To change the size, you need to adjust the paper guides.
1 Locking switch
2 Paper capacity indicator
3 Paper length guide
4 Paper width guide
IMPORTANT: If you do not adjust the guide, it may cause paper registration, image skew, or jamming of the
paper.
Standard tray / optional dual cassette feeder
Load the print media you use for the majority of your print jobs into the standard tray. The standard tray can
hold a maximum of 1,040 sheets of plain paper.
You can purchase an optional dual cassette feeder and attach it below the standard tray to load an additional
1,040 sheets of plain paper.
42 Chapter 3 Media and tray ENWW
Page 53

NOTE: Standard tray contains two trays. (Tray 2, Tray 3)
Optional dual cassette feeder contains two trays. (Tray 4, Tray 5)
The process to load paper in Tray 2, Tray 3, Tray 4, and Tray 5 is the same.
Do not extend more than one paper tray at a time.
Do not use paper tray as a step.
All trays must be closed while relocating/moving product.
Keep hands out of paper tray/drawers when closing.
Close keyboard tray when not in use.
IMPORTANT: Using photographic paper or coated paper may cause problems that require repairs. Such repairs
are not covered by the warranty or service agreements.
1. Pull on the right side of the tray to pull out.
ENWW Loading paper in the tray 43
Page 54

2. Squeeze the paper length guide, and pull it to the end of the tray.
1 Paper length guide
3. Squeeze the paper width guide, and pull it to the end of the tray.
1 Paper width guide
44 Chapter 3 Media and tray ENWW
Page 55

4. Flex and fan the edge of the paper stack to separate the pages before loading papers.
ENWW Loading paper in the tray 45
Page 56

5. Load paper with the print side facing up.
NOTE: Do not overload the tray: it may cause paper jams. Make sure that the paper is below the
maximum paper capacity indicator inside the tray.
1 Paper capacity indicator
46 Chapter 3 Media and tray ENWW
Page 57

6. Adjust the paper length guide to the desired paper length.
ENWW Loading paper in the tray 47
Page 58

7. After loading paper into the tray, pinch the paper width guide and move it toward the stack of paper until it
lightly touches the side of the stack. Do not press the guide too tightly to the edge of the paper: the guide
may bend the paper.
NOTE: Do not push the paper guide too far causing the media to warp.
If you do not adjust the paper width guide, it may cause paper jams.
48 Chapter 3 Media and tray ENWW
Page 59

8. Fix the paper length guide using the locking switch. Release the locking switch to load a dierent sized
paper.
9. Insert the tray back into the printer.
Tray 1 (MP)
Tray 1 (MP) can hold special sizes and types of print material, such as postcards, note cards, and envelopes. It is
useful for single page printing on colored paper.
1 Locking switch
When you print a document, set the paper type and size for the tray.
For information about setting the paper type and size on the control panel (see "Tray Settings").
NOTE:
● If you experience problems with paper feeding, check whether the paper meets the media
specications (see "Print media specications"). Then, try placing one sheet at a time in Tray 1 (MP)
(see "Tray 1 (MP)").
● The standard tray and optional dual cassette feeder can automatically detect various-sized paper
(see "Media sizes automatically detected").
Check if the paper size and type in the tray are detected or not. If you want to set the paper size and
type or if the printer cannot detect them, you can set the size and type directly in the conrmation
window.
ENWW Loading paper in the tray 49
Page 60

Tips on using Tray 1 (MP)
● Load only one type, size, and weight of print media at a time in the Tray 1 (MP).
● To prevent paper jams, do not add paper while printing when there is still paper in Tray 1 (MP). This also
applies to other types of print media.
● Print media should be loaded face down with the top edge going into Tray 1 (MP) rst and be placed in the
center of the tray.
● Always load only the specied print media to avoid paper jams and print quality problems (see "Print media
specications").
● Flatten any curl on postcards, envelopes, and labels before loading them into Tray 1 (MP).
1. Open Tray 1 (MP) and pull out the extension if necessary.
2. Flex or fan the edge of the paper stack to separate the pages before loading originals.
50 Chapter 3 Media and tray ENWW
Page 61

3. Load the paper with the side to be printed on facing down.
NOTE: Do not overload the tray: it may cause paper jams. Make sure that the paper is below the
maximum paper capacity indicator inside the tray.
1 Paper capacity indicator
ENWW Loading paper in the tray 51
Page 62

4. Squeeze Tray 1 (MP) paper width guides and adjust them to the width of the paper. Do not force too much,
otherwise the paper will bend resulting in a paper jam or skew.
5
. When you print a document, set the paper type and size for the Tray 1 (MP) (see "Media sizes automatically
detected").
For information about setting the paper type and size on the control panel (see "Tray Settings").
Media sizes automatically detected
This printer can automatically detect various sized-paper. Refer to the table below.
The paper sizes auto-detected are determined by the printer's default paper size. If A4, metric paper sizes are
auto detected, if Letter, imperial sizes are auto detected.
Table 3-8 Media sizes automatically detected
Sizea (Plain)
Letter SEF
Letter LEF
11x17
Legal SEF Auto-detected in trays 2 -4
Executive SEF
Executive LEF
Statement SEF
b
c
Standard tray 2, 3 Optional dual cassette feeder Duplex printing
NOTE: (Tray 3 only)
A3 SEF
NOTE: (Tray 3 only)
A4 SEF
52 Chapter 3 Media and tray ENWW
Page 63

Table 3-8 Media sizes automatically detected (continued)
Sizea (Plain)
Standard tray 2, 3 Optional dual cassette feeder Duplex printing
A4 LEF
A5 SEF
A5 LEF
B4 SEF
JIS B5 SEF
JIS B5 LEF
A6 SEF
Ocio 8.5 x 13 SEF
Ocio 216 x 340
mm SEF
8K 270 x 390 mm
SEF
16K 195 x 270 mm
SEF
16K 195 x 270 mm
LEF
a
This printer can detect paper of similar sizes as the listed paper sizes.
b
SEF meaning is Short Edge Feed.
c
LEF meaning is Long Edge Feed.
ENWW Loading paper in the tray 53
Page 64

Printing on special media
NOTE: The media types are shown in the Printing Preferences. This paper type option allows you to set the
type of paper to be loaded in the tray. This setting appears in the list so that you can select it. This will let you get
the best quality printout. If not, the desired print quality may not be achieved.
●
Envelope
●
Labels
●
Card stock/ Custom-sized paper
●
Letterhead/Pre-printed paper
●
Additional information for printing on special media
Envelope
Successful printing on envelopes depends upon the quality of the envelopes.
To print an envelope, place it with the ap side up.
● When selecting envelopes, consider the following factors:
– Weight: The weight of the envelope paper should not exceed 90 g/m2 (16 lb.) otherwise, a jam may
occur.
– Construction: Prior to printing, envelopes should lie at with less than 6 mm (0.25 inches) curl, and
should not contain air.
– Condition: Envelopes should not be wrinkled, nicked, or damaged.
– Temperature: Use envelopes that are compatible with the heat and pressure of the printer during
operation.
● Use only well-constructed envelopes with sharp and well-creased folds.
● Do not use stamped envelopes.
54 Chapter 3 Media and tray ENWW
Page 65

● Do not use envelopes with clasps, snaps, windows, coated lining, self-adhesive seals, or other synthetic
materials.
● Do not use damaged or poorly made envelopes.
● Be sure the seam at both ends of the envelope extends all the way to the corner of the envelope.
1 Acceptable
2 Unacceptable
● Envelopes with a peel-o adhesive strip or with more than one ap that folds over to seal must use
adhesives compatible with the printer’s fusing temperature of about 170°C (338 °F) for 0.1 second. The
extra aps and strips might cause wrinkling, creasing, or jams, and may even damage the fuser.
● For the best print quality, position margins no closer than 15 mm (0.6 inches) from the edges of the
envelope.
● Avoid printing over the area where the envelope’s seams meet.
Labels
Load the paper with the side to be printed on facing down.
To avoid damaging the printer, use only labels designed for use in laser printers.
ENWW Printing on special media 55
Page 66

When selecting labels, consider the following factors:
● Adhesives: The adhesive material should be stable at your printer’s fusing temperature of about 170°C
(338 °F) for 0.1 second.
● Arrangement: Only use labels with no exposed backing between them. Labels can peel o sheets that have
spaces between the labels, causing serious jams.
– Curl: Prior to printing, labels must lie at with no more than 13 mm (0.5 inches) of curl in any
direction.
– Condition: Do not use labels with wrinkles, bubbles, or other indications of separation.
● Make sure that there is no exposed adhesive material between labels. Exposed areas can cause labels to
peel o during printing, which can cause paper jams. Exposed adhesive can also cause damage to printer
components.
● Do not run a sheet of labels through the printer more than once. The adhesive backing is designed for only
a single pass through the printer.
● Do not use labels that are separating from the backing sheet or are wrinkled, bubbled, or damaged.
● Do not load paper that does not have space between labels running the same direction as the paper is
being fed. Otherwise, it could cause paper jams.
56 Chapter 3 Media and tray ENWW
Page 67

Card stock/ Custom-sized paper
● Do not print on media smaller than 98 mm (3.8 inches) wide or 148 mm (5.8 inches) long.
● In the software application, set margins to at least 6.4 mm (0.25 inches) away from the edges of the
material.
Letterhead/Pre-printed paper
Table
3-10 Letterhead / Pre-printed paper
Tray Single-sided Double-sided
Standard tray/Optional dual
cassette feeder
Tray 1 (MP) Face down Face up
● Preprinted paper must be printed with heat-resistant ink that will not melt, vaporize, or release hazardous
emissions when subjected to the printer’s fusing temperature of about 170°C (338 °F) for 0.1 second.
● Preprinted paper ink must be non-ammable and should not adversely aect printer rollers.
● Forms should be sealed in a moisture-proof wrapping to prevent changes during storage.
● Before you load preprinted paper, verify that the ink on the paper is dry. During the fusing process, wet ink
can come o preprinted paper, reducing print quality.
Face up Face down
Additional information for printing on special media
Go to support.hp.com. Instructions are available for performing specic scan tasks, such as the following:
● Special media types and what each tray will support
ENWW Printing on special media 57
Page 68

Tray Settings
After loading paper in the paper tray, set the paper size and type using the display screen. For computer printing,
select the paper size and type in the application program you use on your computer (see "Opening printing
preferences").
NOTE: The paper setting in the printer and driver should match to print without a paper mismatch error.
● You change the paper setting set in the printer using WebUI.
If your printer is connected to the network, you can set the printer’s setting WebUI.
● You can set it using Machine Setup > Tray Settings > Settings > select the tray you want > Paper Size or
Paper Type on the control panel.
●
Setting the paper size
●
Setting the paper type
●
Setting the tray conrmation message
●
Auto tray switch
●
Auto continue
●
Paper substitution
●
Tray protection
●
Tray priority setting
Setting the paper size
1. Press Machine Setup > Tray Settings > Settings > select the tray you want from the display screen.
2. Press Paper Size and select the paper size.
NOTE: If there is no required size paper or you need to use custom size paper, press the Custom Size
button to set the paper size. You can also set and save the custom size using Custom Size. You can select
the custom size whenever you need it.
3. Press (Back) to save the selection.
Setting the paper type
1. Press Machine Setup > Tray Settings > Settings > select the tray you want from the display screen.
2. Press Paper Type and select the paper type.
3. Press (Back) to save the selection.
Setting the tray conrmation message
When you load paper into a tray, you can set the conrmation message to appear automatically; or not at all.
This printer can detect some paper sizes and types automatically. If you want to set the paper size and type, or
the printer cannot detect them, you can set the size and type directly in the conrmation window.
58 Chapter 3 Media and tray ENWW
Page 69

1. Press Machine Setup > Tray Settings > Settings > select the tray you want from the display screen.
2. Press the button in Tray Conrmation Message to activate this function.
Auto tray switch
This is the option to set if the printer is to continue printing or not when any tray becomes empty. For example,
both tray 1 and tray 2 are lled with the same size paper, the printer automatically prints from tray 2 after the
tray 1 runs out of paper.
1. Press Machine Setup > Tray Settings > Settings > Auto Tray Switch.
2. Press the button on the right to activate this function.
Auto continue
This option allows you to continue printing when the paper size you have set is mismatched with the paper in the
tray. When this option is activated, the printer continues printing using similar or large size paper. If this option is
inactivated, the printer waits until the required size paper is loaded in the tray.
1. Press Machine Setup > Tray Settings > Settings > Auto Continue.
2. Choose one of the options.
Paper substitution
When the requested paper for a print job is not available in the tray, this feature allows you to substitute similar
paper size. For example, if the requested ledger sized paper is not available in the tray, this printer substitutes
A3 for the requested paper.
NOTE: When the paper is substituted, some image loss may occur.
1. Press Machine Setup > Tray Settings > Settings > Paper Substitution.
2. Press the button on the right to activate this function.
Tray protection
When you choose this option, the selected tray will be protected. This will be used to prevent like paper from
being fed if Auto Switching is “ON”.
1. Press Machine Setup > Tray Settings > Settings > Tray Protection.
2. Choose tray and press the button to activate this function.
Tray priority setting
When you do not select the tray for printing, the tray selected as in the Tray Priority Setting will be used in order.
If the tray does not have the paper on which you want to print, the printer automatically prints from the trays in
the priority order set.
1. Press Machine Setup > Tray Settings > Settings > Tray Priority Setting.
2. Press a tray, and give priority in the order for printing job using up and down arrows.
ENWW Tray Settings 59
Page 70

4 Printing
●
Printer driver features
●
Basic printing
●
macOS printing
●
Additional print tasks
60 Chapter 4 Printing ENWW
Page 71

Printer driver features
NOTE: The procedures in the chapter are based on the print drivers provided on the CD received with your
printer.
Check the operating systems that are compatible with your printer (see "System requirements").
Your printer drivers support the following standard features:
● Paper orientation, size, source, and media type selection
●
Number of copies
You can also use various special printing features. The following table shows a general overview of features
supported by your printer drivers:
NOTE: Some models or operating system may not support the certain feature(s) in the following table.
Feature
Printer quality option
Poster printing
Multiple pages per sheet
Booklet printing
Fit to page printing
Reduce and enlarge printing
Dierent source for rst page
Cover page options
Raster compression
Output options
Watermark
Overlay
PCL/PSab/XPSbc
Windows macOS Linux
(PCL only)
(PCL only)
bc
b
PS
Double-sided printing (duplex)
a
The PostScript driver is recommended for best print image quality from PostScript-based applications such as Acrobat Reader®, Adobe
Illustrator®, Adobe Photoshop®, etc.
b
Download the software from the HPI website and install it: (hp.com > nd your product > Support or Downloads). Before installing, check
whether your computer’s OS support the software.
c
XPS printer driver can be installed only on Windows Vista OS or higher.
ENWW Printer driver features 61
Page 72

Basic printing
NOTE:
● macOS printing (see "macOS printing").
● Linux printing (see "Linux printing").
The following Printing Preferences window is for Notepad in Windows 7. Your Printing Preferences window may
dier, depending on your operating system or the application you are using.
1. Open the document you want to print.
2. Select Print from the File menu.
3. Select your printer from the Select Printer list.
The basic print settings including the number of copies and print range are selected within the Print
window.
NOTE: To take advantage of the printer features provided by your printer driver, click Properties or
Preferences in the application’s Print window to change the print setting (see "Opening printing
preferences").
4. To start the print job, click OK or Print in the Print window.
Canceling a print job
If the print job is waiting in the print queue or print spooler, cancel the job as follows:
● You can access this window by simply double-clicking the printer icon ( ) in the Windows task bar.
● You can also cancel the current job by pressing (Stop) button on the control panel.
62 Chapter 4 Printing ENWW
Page 73

macOS printing
NOTE: Some features may not be available depending on models or options. It means that the features are not
supported.
●
Printing a document
●
Changing printer settings
●
Printing multiple pages on one sheet
●
Printing on both sides of the paper
●
Using help
Printing a document
When you print with macOS, you need to check the printer driver settings in each application you use. Follow the
steps below to print from macOS:
1. Open the document to print.
2. Open the File menu and click Page Setup (Document Setup in some applications).
3. Choose your paper size, orientation, scaling, other options, and make sure that your printer is selected.
Click OK.
4. Open the File menu and click Print.
5. Choose the number of copies and indicate which pages to print.
6. Click Print.
Changing printer settings
You can use advanced printing features when using your printer.
Open an application and select Print from the File menu. The printer name, which appears in the printer
properties window, may dier depending on the printer in use.
Printing multiple pages on one sheet
You can print more than one page on a single sheet of paper. This feature provides a cost-eective way to print
draft copies.
1. Open an application, and select Print from the File menu.
2. Select Layout from the drop-down list under Orientation. In the Pages per Sheet drop-down list, select the
number of pages you want to print on one sheet of paper.
3. Select the other options to use.
4. Click Print.
The printer prints the selected number of pages to print on one sheet of paper.
ENWW macOS printing 63
Page 74

Printing on both sides of the paper
NOTE: Some features may not be available depending on models or options. It means that the features are not
supported
Before printing in the duplex mode, decide on which edge you will be binding your nished document. The
binding options are, as follows:
● Long-Edge Binding: This option is the conventional layout used in book binding.
● Short-Edge Binding: This option is the type often used with calendars.
1. From your macOS application, select Print from the File menu.
2. Select Layout from the drop-down list under Orientation.
3. Select a binding orientation from the Two-Sided option.
4. Select the other options to use.
5. Click Print and the printer prints on both sides of the paper.
IMPORTANT: If you print more than 2 copies, the rst copy and the second copy might print on the same sheet
of paper. Avoid printing on both sides of paper when you are printing more than 1 copy.
Using help
Click the question mark on the bottom-left corner of the window and click on the topic you want to know about.
A pop-up window appears with information about that option's feature, which is provided from the driver.
64 Chapter 4 Printing ENWW
Page 75

Additional print tasks
Go to support.hp.com.
Instructions are available for performing specic print tasks, such as the following:
● Create and use printing shortcuts or presets
● Select the paper size, or use a custom paper size
● Select the page orientation
● Create a booklet
● Scale a document to t a specic paper size
● Print the rst or last pages of the document on dierent paper
● Print watermarks on a document
ENWW Additional print tasks 65
Page 76

5 Copying
●
Understanding the copy screen
●
Basic copying
●
Quick copying
●
Using special copy features
●
Additional copy tasks
66 Chapter 5 Copying ENWW
Page 77

Understanding the copy screen
When you press Copy from the display screen, the Copy screen appears which has several tabs and lots of
copying options. All the options are grouped by features so that you can congure your selections easily.
If a dierent screen is displayed, press (Home) to go to the home display screen.
●
Basic tab
●
Advanced tab
●
Image tab
Basic tab
● Copies: Enters the number of copies.
● Paper Source: Selects the paper source tray.
● Reduce/Enlarge: Reduces or enlarges the size of a copied image.
● Duplex: Sets the printer to print copies on both sides of the paper.
● Output: Sets the printer’s various output options.
● Darkness: Adjusts the brightness level to make a copy for easier reading, when the original contains faint
markings and dark images.
● Programs: Allows you to save the current settings for future use.
Advanced tab
● Original Size: Selects the actual paper size of the originals.
● Original Orientation: Selects the orientation of the originals.
● N-Up: Prints 2 or more original images, reduced to t onto one sheet of paper.
● ID Copy: Prints 2-sided originals on one sheet of paper. This feature is helpful for copying a small-sized
● Book Copy: Allows you to copy the left or/and right pages of book on separate output paper.
● Booklet: Allows you to create booklets.
● Watermark: Allows you to print a watermark on printouts.
● Stamp: Allows you to print with some information such as date and time.
● Build Job: After the scanning is nished, the Scan More Pages window appears to ask if you want to scan
Image tab
item, such as a business card.
another page. If you select Yes, then you can scan another page in the current job. If you select No, then
the scanning process is completed and the remainder of the job is performed.
● Original Type: Improves the copy quality by selecting the original’s type for the current copy job.
● Adjust Background: Prints an image with a lighter background.
ENWW Understanding the copy screen 67
Page 78

● Erase Backside Image: Prevents copying the original’s image shown through on the backside.
● Erase Edge: Allows you to erase spots, drill holes, fold creases and staple marks along any of the four
edges of a document.
Basic copying
This is the normal and usual procedure for copying your originals.
1. Press Copy from the display screen.
2. Place the originals face up in the document feeder or place a single original face down on the scanner glass
and close the document feeder (see "Loading originals").
NOTE: Ensure all documents are centered in the input tray. Adjust paper guides to align with the edges of
the paper.
3. Adjust the settings for each copy such as Paper Source, Reduce/ Enlarge, Duplex and more in the Basic tab.
4. Set the copy features in the Advanced or Image tabs, if necessary.
5. Enter the number of copies using the numeric keypad on the control panel, if necessary.
6. Press (Start) from the control panel to begin copying.
NOTE:
● To cancel the current copy job, press (Stop) on the control panel.
● You can delete current and pending jobs using Job Status on the control panel. Select the job you
want to cancel and press Delete (see "Job Status button").
Copying originals of dierent sizes
This feature allows you to copy originals of dierent sizes at once.
NOTE: If you want to copy dierent sized originals at once, select Mixed Size under the Original Size option.
Otherwise, it could cause original-document jams.
1. Press Copy from the display screen.
68 Chapter 5 Copying ENWW
Page 79

2. Place the dierent sized originals face up in the document feeder. Align and gently push them to the center
side of the document feeder width guide.
NOTE: Ensure all documents are centered in the input tray. Adjust paper guides to align with the edges of
the paper.
3. Press the Advanced tab > Original Size > Mixed Size from the display screen.
ENWW Basic copying 69
Page 80

NOTE:
● Mixed Size is activated when the originals are placed in the document feeder.
● When using the Mixed Size option, we recommend that you use the following combinations for
copying dierent sized originals. Using combinations that are not recommended may cause originaldocument jams. Depending on the default paper size (A4 or Letter), the combinations are as follows:
If A4 is the default paper size,
– A3 and A4 LEF
– B4 JIS and B5 LEF
– A4 SEF and A5 LEF
– Letter LEF and 11x17
If Letter is the default paper size,
– A3 and A4 LEF
– B4 JIS and B5 LEF
– 11x17 and Letter LEF
– Legal, Letter SEF and Statement LEF
4. Adjust the settings for each copy such as Paper Source, Duplex and more in the Basic tab.
5. Set the copy features in the Advanced or Image tab, if necessary.
6. Enter the number of copies using the numeric keypad on the control panel, if necessary.
7. Press (Start) from the control panel to begin copying.
Quick copying
The Quick Copy menu allows you to quickly set copy options without having to move to a lower level menu or
another tab. But, this menu does not provide all copy options. If you need to use other copy options, use the
copy options in the Copy menu.
1. Press Quick Copy from the display screen.
70 Chapter 5 Copying ENWW
Page 81

2. Place the originals face up in the document feeder or place a single original face down on the scanner glass
and close the document feeder.
NOTE: Ensure all documents are centered in the input tray. Adjust paper guides to align with the edges of
the paper.
3. Adjust the settings for each copy such as Reduce/Enlarge, Duplex/NUp, Output, Paper Source, etc.
NOTE: You can set the default Quick Copy options from Machine Setup > Application Settings > Copy
Settings from the display screen. Set the most frequently used settings.
4. Enter the number of copies using the numeric keypad on the control panel, if necessary.
5. Press (Start) from the control panel to begin copying.
ENWW Quick copying 71
Page 82

Using special copy features
On the Basic, Advanced, or Image tab of the Copy screen, you can select specic copy features.
NOTE: Some menus may not appear in the display depending on options or models.
To change the menu options:
1. Press Copy from the display screen.
2. Place the originals face up in the document feeder or place a single original face down on the scanner glass
and close the document feeder (see "Loading originals").
3. If you want to customize the copy settings including reduce/enlarge, darkness, original type, and more
from the display screen.
4. Press the Basic, Advanced, or Image tab from the display screen.
5. Select the appropriate option.
Item Description
Paper Source Paper Source sets the tray containing the paper to be used for printing. The printer prints the
Reduce/Enlarge Reduces or enlarges the size of a copied image.
scanned image on the paper in the selected tray. You can see the icons that show paper
sizes and the remaining amount of paper in each tray.
NOTE: If the printer is set to Eco mode, reduce and enlarge features are not available.
Output You can select the options for how you want the outputs to be arranged.
● Sort: Select how to sort the output.
– Collated: The outputs are in sets to match the sequence of originals.
– Uncollated: The outputs are sorted into stacks of individual pages.
● Rotate: Stacks the printouts in crisscrossed sets.
72 Chapter 5 Copying ENWW
Page 83

NOTE:
– This feature is available only when the nisher is not installed.
– This feature is available only with Letter- and A4-sized print media.
– Before using this feature, you have to load the paper in the trays with SEF (Short
edge feed) and LEF (Long edge feed). For example, direction of paper feeding in
tray 1 is SEF, and direction of paper feeding in tray 2 is LEF.
– This feature is available only when the optional nisher is installed.
– Some features are available only when the optional nisher is installed.
● Output Tray: This option allows you to specify the tray where to output the printed
documents.
● Staple: Specify the number of staples to use when binding the document (either 1 or 2
staples).
● Punch: Specify the number of holes to punch in the document (either two or three
holes). Some punch kits may oer a 4 Hole option instead of the 3 Hole option.
Darkness You can adjust the degree of darkness. This feature allows dark images to be printed into
lighter images, or light images into darker images.
Duplex You can set the printer to print copies on both sides of paper.
● 1 -> 1 Sided: Scans one side of an original and prints it on one side of the paper.
● 1 -> 2 Sided
● 2 -> 1 Sided
● 2 -> 2 Sided
NOTE: If an original is placed on the scanner glass and you press 1 -> 2 Sided, 2 -> 1 Sided
or 2 -> 2 Sided, the message Do you want to scan another page? appears after the rst page
is copied. Load another original and press Yes. When you nish, press No on this window.
Original Size Copies can be produced after specifying the document scanning size if the document size
cannot be detected automatically or if you wish to specify a certain document size.
ENWW Using special copy features 73
Page 84

Original Orientation When copying double-sided documents or making double-sided copies or combined copies,
specify the document orientation; otherwise, the copies may not be printed in the correct
page order or correct front and back page arrangement.
● Upright Images: Select this setting for an original document loaded with the top toward
the back of the printer.
● Sideways Images: Select this setting for an original document loaded into the
document feeder with the top of the original document toward the left side of the
printer or an original document placed on the scanner glass with the top of the original
document toward the right side of the printer.
Original Type The original type setting is used to improve copy quality by selecting document types for
current copy jobs.
● Text: Use for originals containing mostly text.
● Text/Photo: Use for originals containing text mixed with photographs.
● Photo: Use when the originals are photographs.
● Copied Original: Use for copied documents.
● Map: Use for maps.
● Light Original: Use for light documents.
N-Up Reduces the size of the original images and prints 2 or 32 pages onto one sheet of paper.
● O: Copies an original onto one sheet of paper.
● 2UP - 32UP: Copies corresponding numbers of separate originals to one page.
NOTE: Depending on original document size, output paper size, and the reduced rate of
image, some options may be inactivated.
74 Chapter 5 Copying ENWW
Page 85

Booklet The printer automatically prints on one or both sides of the paper, which are then folded to
produce a booklet with all the pages in the correct sequence.
The printer will also reduce and correctly adjust the position of each image to t on the
selected paper.
● O: Disables this feature.
● 1 Sided Original: Copies from one side of the original to one page of a booklet.
● 2 Sided Original Book: Copies each side of an original to one page of a booklet.
● 2 Sided Original Calendar: Copies each side of an original to one page of a booklet. The
second side of each original is rotated 180 degrees so the text will be upright in the
booklet.
Book Copy This feature allows you to copy an entire book. If the book is too thick, lift the cover until its
hinges are caught by the stopper and then close the cover. If the book is thicker than 30 mm,
start copying with the cover open.
● O: Disables this feature.
● Left Page: Prints only the left page of the book.
● Right Page: Prints only the right page of the book.
● Both Pages (From Left): Prints both facing pages from the left page.
● Both Pages (From Right): Prints both facing pages from the right page.
NOTE: This copy feature is available only when you place originals on the scanner glass.
Adjust Background Prints an image without its background. This copy feature removes the background color
and can be helpful when copying an original containing color in the background, such as a
newspaper or a catalog.
● O: Disables this feature.
● Auto: Optimizes the background.
● Enhance: The higher the number is, the more vivid the background.
● Erase: The higher the number is, the lighter the background.
ENWW Using special copy features 75
Page 86

Erase Edge Allows you to erase spots, drill holes, fold creases and staple marks along any of the four
edges of a document.
● O: Disables this feature.
● Border Erase: Erases the certain amount of the edge of the printout.
● Hole Punch Erase: Erases the marks of bookbinding holes.
Stamp You can apply the stamp feature.
● IP Address: This option allows you to print an IP Address on the printouts.
● ID: This option allows you to print a user ID on the printouts.
● Device information: This option allows you to print a device information on the
printouts.
● Comment: This option allows you to print your comment on the printouts.
● Date & Time: This option allows you to print time and date stamps on the printouts.
● Page Number: This option allows you to print page number on the printouts.
Watermark The watermark option allows you to print text over an existing document. For example, you
use it when you want to have large gray letters reading “DRAFT” or “CONFIDENTIAL” printed
diagonally across the rst page or all pages of a document.
ID Copy This feature is helpful for copying a small-sized item such as business cards (see "ID card
copying")
76 Chapter 5 Copying ENWW
Page 87

Erase Backside Image When the original is thin and backside images show through, you can use this feature to
remove the backside images.
Build Job After the scanning is nished, the Scan More Pages window appears to ask if you want to
scan another page. If you select Yes, then you can scan another page in the current job. If
you select No, then the scanning process is completed and the remainder of the job is
performed.
ENWW Using special copy features 77
Page 88

Additional copy tasks
Go to support.hp.com. Instructions are available for performing specic copy tasks, such as the following:
● Copy or scan pages from books or other bound documents
● Copy mixed-size documents
● Copy or scan both sides of an identication card
● Copy or scan a document into a booklet format
78 Chapter 5 Copying ENWW
Page 89

6 Scanning
Scanning with your printer lets you turn pictures and text into digital les that can be stored on your computer.
●
Understanding the scan methods
●
Scanning and sending through email
●
Scanning and sending via SMB/FTP
●
Scanning and sending to your computer
●
Scanning and sending to USB/shared folder
●
macOS scanning
●
Additional scan tasks
NOTE: The maximum resolution that can be achieved depends upon various factors, including computer speed,
available disk space, memory, the size of the image being scanned, and bit depth settings. Thus, depending on
your system and what you are scanning, you may not be able to scan at certain resolutions, especially using
enhanced resolution.
ENWW 79
Page 90

Understanding the scan methods
To use the scanning feature, press Scan to Email, Scan to USB, Scan to Server, Scan to PC, or Scan to Shared
Folder on the display screen.
If a dierent screen is displayed, press ( ) to go to the home display screen.
● Scan to Email: Scans and sends scanned output to the destination by e-mail (see "Scanning and sending
through email").
● Scan to Server: Scans and sends scanned output to the destination with SMB or FTP (see "Scanning and
sending via SMB/FTP").
● Scan to PC: Scans and sends scanned output to a computer (see "Scanning and sending to your computer").
● Scan to Shared Folder: Scans and stores scanned output in the shared folder (see "Scanning and sending to
USB /shared folder").
NOTE: This option is available when the mass storage device (hard disk) installed.
● Scan to USB: Scans and stores scanned output onto a USB memory device (see "Scanning to a USB memory
device").
NOTE: If you want to use this feature, you need to insert a USB memory device into the USB memory port
on your printer.
80 Chapter 6 Scanning ENWW
Page 91

Scanning and sending through email
You can scan originals and send the scanned image to several destinations from the printer by email.
NOTE: To scan and send an image as an email attachment, you need to set up network parameters, SMTP
settings and Scan to Email settings using the control panel (see "Setting up an email account").
●
Understanding the Scan to Email screen
●
Setting up an email account
●
Scanning and sending an email
●
Resending to the last email address
●
Printing an email conrmation report
Understanding the Scan to Email screen
Press Scan to Email in the display screen.
Basic tab
● Send To Me: Press the Advanced tab > Email Settings, then type the sender’s email address. Click the
checkbox on the right to send to yourself.
● Input Address: Tap the screen to add recipient’s email addresses.
● File Name: Makes the le name for the le to be sent.
● File Format: Select the le format before you proceed with the scanning job.
● Resolution: Selects scanning resolution value.
● Darkness: Adjusts the degree of darkness of scanned output.
● Address Book (Favorite ( ), All, ABC, 123/!@#, Server): Inputs the recipient's address by pressing
● Recent: Shows the latest email addresses used. Also, you can choose email addresses instead of pressing
● Programs: Allows you to save the current settings for future use (see "Using a programs setting").
Advanced tab
● Original Size: Selects the size of originals.
● Original Orientation: Selects the orientation of the originals.
● Email Settings: Enter the information including From, Subject, and Message.
stored addresses. You can save frequently used email addresses using the control panel (see "Setting up
an address book from the control panel").
the pop-up keyboard (see "Resending to the last email address").
● Duplex: For originals that are scanned on both sides.
● Build Job: After the scanning is nished, the Scan More Pages window appears to ask if you want to scan
another page. If you select Yes, then you can scan another page in the current job. If you select No, then
the scanning process is completed and the remainder of the job is performed.
ENWW Scanning and sending through email 81
Page 92

Image tab
You can move to the next or previous page using the up/down arrows located at the bottom left.
● Original Type: Selects whether the original is text, photo, etc.
● Adjust Background: Erase the background to some extent by adjusting density or brightness.
● Erase Backside Image: Prevents scanning the other side’s image shown through the original paper.
● Scan to Edge: Scans the document all the way to the edge of the paper.
Output tab
● Quality: Adjusts the display quality of the scanned output.
● File Format: Selects the le format for the le to be sent.
Setting up an email account
1. Check whether or not the network cable is connected to the printer. If not, connect the printer with a
standard network cable.
2. Start a web browser such as Internet Explorer, Safari, or Firefox and enter your printer’s new IP address in
the browser window.
3. Click Login on the upper right of the WebUI website.
4. Type in the ID and Password.
Use the same login ID, Password as when logging in from the printer (see "Log-in").
NOTE: If you want to change the password, see the "Security tab” section.
5. Select Settings > Network Settings and Outgoing Mail Server (SMTP).
6. Enter the IP address in dotted decimal notation or as a host name.
7. Select a Secure Email Connection with SSL/TLS option.
NOTE: Based on the option you select, you must enter the port number in step 8.
● None: Port 25 is used by default.
● SSL: Port 465 is used by default.
● TLS: Port 587 is used by default.
8. Enter the server port number, from 1 to 65535.
9. Check the box next to SMTP Requires Authentication to require authentication.
10. Enter the SMTP server login name and password.
11. Press Apply.
82 Chapter 6 Scanning ENWW
Page 93

NOTE:
● If the authentication method of SMTP server is POP3 before SMTP, put a check mark of SMTP
Requires POP Before SMTP Authentication.
● Enter the IP address and port number.
Scanning and sending an email
You can scan originals and send the scanned image to several destinations from the printer by email.
NOTE: To scan and send an image as an email attachment, you need to set up network parameters, SMTP
settings and Scan to Email settings using the control panel (see "Setting up an email account").
1. Place the originals face up in the document feeder or place a single original face down on the scanner glass
and close the document feeder (see "Loading originals").
2. Press Scan to Email from the display screen.
3. Set the scan features in the Advanced, Image, or Output tabs.
4. Press the Basic tab.
5. Enter the login name and password that you congured.
6. Enter the sender’s and recipient’s email address.
NOTE:
● Add to Address: Allows you to add an email address in the Recent results to the Address Book.
● Delete: Allows you to delete an email address in the Recent results. Press the email address you want
to delete. Then press Delete.
7. Set the scan quality by Duplex and Resolution.
8. Press the (Start) button to scan and send the le.
9. The printer begins scanning and then sends the email.
NOTE:
● To cancel the current scan job, press the (Stop) button on the control panel. Or you can delete
current and pending jobs using Job Status on the control panel. Select the job you want to cancel and
press Delete (see "Job Status button").
● While the printer is sending a scanned data, you cannot use the printer to copy or to send a fax.
Resending to the last email address
To resend to the last used email address:
1. Place the originals face up in the document feeder or place a single original face down on the scanner glass
and close the document feeder (see "Loading originals").
2. Press Scan to Email from the display screen.
ENWW Scanning and sending through email 83
Page 94

3. Set the scan features in the Advanced, Image, or Output tabs.
4. Press the Basic tab.
5. Press To’s input area and Recent.
6. Press the email address which you want to re-send. Then press OK.
NOTE:
● Add to Address: Allows you to add an email address in the Recent results to the Address Book.
● Delete: Allows you to delete an email address in the Recent results. Press the email address you want
to delete. Then press Delete.
7. Set the scan quality by Duplex and Resolution.
8. Press the (Start) button to scan and send the le.
If an original is placed on the scanner glass, the printer shows the window asking if you want to place
another page. Load another original and press Yes. When you nish, press No on this window.
Printing an email conrmation report
You can set the printer to print a report whether an email transmission is successfully completed or not.
NOTE: If a report contains characters or fonts that the printer does not support, Unknown could be printed
instead of the characters/fonts in the report.
1. Press Machine Setup > Application Settings > Scan to Email Settings from the display screen.
2. Press the appropriate option in Print Conrmation Report.
● Always: Always prints a conrmation report whether an email transmission is successfully completed
or not.
● Never: Never prints a conrmation report.
● On Errors Only: Prints a conrmation report only when an email transmission is not successful.
3. Press (Back) to go back to the previous screen.
84 Chapter 6 Scanning ENWW
Page 95

Scanning and sending via SMB/FTP
If you install a mass storage device (hard disk), you can send scanned images to up to ten dierent destinations
via SMB or FTP. Without a mass storage device, you can only send scanned images to a single destination via
SMB or FTP.
NOTE: To scan and send an image to a server, you need to set up network parameters using the control panel
(see "Setting up an FTP/SMB server").
●
Understanding the Scan to Server screen
●
Setting up an FTP/SMB server
●
Scanning and sending to an SMB/FTP server
●
Resending to the last server address
Understanding the Scan to Server screen
Press Scan to Server in the display screen.
Basic tab
● File Name: Makes the le name for the le to be sent.
● File Format: Select the le format before you proceed with the scanning job.
● Recent: Shows the latest email addresses used. Also, you can choose email addresses instead of pressing
● Resolution: Selects scanning resolution value.
● Darkness: Adjusts the degree of darkness of scanned output.
● Address Book (Favorite ( ), All, ABC, 123/!@#): Inputs the recipient's address by pressing stored
● Programs: Allows you to save the current settings for future use (see "Using a programs setting").
Advanced tab
● Original Size: Selects the size of originals.
●
● Duplex: For originals that are scanned on both sides.
● Build Job: After the scanning is nished, the Scan More Pages window appears to ask if you want to scan
the pop-up keyboard (see "Resending to the last email address").
addresses. You can save frequently used email addresses using the control panel (see "Setting up an
address book from the control panel").
Original Orientation: Selects the orientation of the originals.
another page. If you select Yes, then you can scan another page in the current job. If you select No, then
the scanning process is completed and the remainder of the job is performed.
ENWW Scanning and sending via SMB/FTP 85
Page 96

Image tab
You can move to the next or previous page using the up/down arrows located at the bottom left.
● Original Type: Selects whether the original is text, photo, etc.
● Adjust Background: Erase the background to some extent by adjusting density or brightness.
● Erase Backside Image: Prevents scanning the other side’s image shown through the original paper.
● Scan to Edge: Scans the document all the way to the edge of the paper.
Output tab
● Quality: Adjusts the display quality of the scanned output.
● File Format: Selects the le format of the scanned output.
Setting up an FTP/SMB server
1. Check whether or not the network cable is connected to the printer. If not, connect the printer with a
standard network cable.
2. Start a web browser such as Internet Explorer, Safari, or Firefox and enter your printer’s new IP address in
the browser window.
3. Click Login on the upper right of the WebUI website.
4. Type in the ID and Password.
Use the same login ID, Password as when logging in from the printer (see "Log-in").
NOTE: If you want to change the password, see the "Security tab" section.
5. Select Address Book > Individual > Add.
6. Check the box next to Add FTP or Add SMB.
7. Enter the IP address in dotted decimal notation or as a host name.
8. Enter the server port number, from 1 to 65535.
9. Check the box next to Anonymous, then the server permits the access of unauthorized people.
10. Enter the login name and password.
11. Enter the domain name if your server is joined to the certain domain, otherwise just enter your computer
name which is registered to the SMB server.
12. Enter the path for saving the scanned image.
86 Chapter 6 Scanning ENWW
Page 97

NOTE:
● The folder to save the scanned image must be on the root.
● The folder properties need to be setup as a share.
● Your user name should have the rights to read and write the folder.
13. Press Apply.
Scanning and sending to an SMB/FTP server
You can select destinations using SMB, or FTP servers.
NOTE: To scan and send an image to a server, you need to set up network parameters using the control panel
(see "Setting up an FTP/SMB server").
1. Place the originals face up in the document feeder or place a single original face down on the scanner glass
and close the document feeder (see "Loading originals").
2. Press Scan to Server from the display screen.
3. Set the scan features in the Advanced, Image, or Output tabs (see "Changing the scan feature settings").
4. Press the Basic tab.
5. Press the server name input area, you can enter a recipient’s server address manually. You cannot enter an
address in the second eld before entering an address in the rst eld.
You can also use Address Book to enter the addresses easily (see "Setting up an Address Book").
6. Set the scan quality by Duplex and Resolution.
7. Press (Start) on the control panel.
The printer begins scanning and then sends the scanned image to the specied server.
If an original is placed on the scanner glass, the printer shows the window asking if you want to place
another page. Load another original and press Yes. When you nish, press No on this window.
NOTE:
● To cancel the current scan job, press (Stop) on the control panel. Or you can delete current and
pending jobs using Job Status on the control panel. Select the job you want to cancel and press
Delete (see "Job Status button").
● While the printer is sending a scanned data, you cannot use the printer to copy or to send a fax.
Resending to the last server address
To resend a le to the server address last sent to:
1. Place the originals face up in the document feeder or place a single original face down on the scanner glass
and close the document feeder (see "Loading originals").
2. Press Scan to Server from the display screen.
ENWW Scanning and sending via SMB/FTP 87
Page 98

3. Set the scan features in the Advanced, Image, or Output tabs.
4. Press the Basic tab.
5. Press Recent.
6. Press the server address to which you want to resend. Then press OK.
NOTE:
● Add to Address: Allows you to add a server address in the Recent results to the Address Book.
● Delete: Allows you to delete a server address in the Recent results. Press the server address you want
to delete. Then press Delete.
7. Set the scan quality by Duplex and Resolution.
8. Press the (Start) button to scan and send the le.
If an original is placed on the scanner glass, the printer shows the window asking if you want to place
another page. Load another original and press Yes. When you nish, press No on this window.
88 Chapter 6 Scanning ENWW
Page 99

Scanning and sending to your computer
This option allows you to scan an image on the printer and send it out to your network-connected computer.
●
For a network or USB connected printer
For a network or USB connected printer
Make sure the scanner driver is installed on your computer.
1. Make sure that your printer and the computer are connected to a network USB.
NOTE: This feature is enabled by default if HP MFP Scan To PC Setup is selected during installation. To
enable/disable this feature later launch HP MFP Scan to PC Setup > select the corresponding device.
2. Place the originals face up in the document feeder or place a single original face down on the scanner glass
and close the document feeder (see "Loading originals").
3. Press Scan to PC from the display screen.
4. Select “Local” if connected over USB or your computer name and press OK. If the printer requests a
password, enter the password using the numeric keypad on the control panel.
5. Press the application program you want and press Select.
The default setting is My Documents.
6. Set the scan quality with Resolution in the Basic tab.
7. Set the size of original in the Advanced tab. If you are not sure of the original size, select Auto.
8. Set the le format in which the image is to be saved in the Output tab.
NOTE: File Format activates only when you select the application program as My Documents.
9. Press (Start) from the control panel to begin scanning.
NOTE: The scanned image is saved in the computer’s My Documents > Scan folder.
ENWW Scanning and sending to your computer 89
Page 100

Scanning and sending to USB/shared folder
You can scan a document and save the scanned image onto USB memory device/ shared folder. When you scan a
document, the printer uses the default settings, such as for resolution. You can also customize your own scan
settings (see "Changing the scan feature settings").
●
Understanding the USB /shared folder screen
●
Scanning to a USB /shared folder
Understanding the USB /shared folder screen
Press Scan to USB or Scan to Shared Folder in the display screen.
NOTE: This option is available when the USB inserted or mass storage device (hard disk) installed.
Basic tab
● File Name: Makes a le name to store the scan data.
● File Format: Select the le format before you proceed with the scanning job.
● Resolution: Selects the scanning resolution value.
● Darkness: Adjusts the degree of darkness of scanned output.
Advanced tab
● Duplex: For originals that are scanned on both sides.
● Original Size: Selects the size of originals.
● Original Orientation: Selects the orientation of the originals.
● Build Job: After the scanning is nished, the Scan More Pages window appears to ask if you want to scan
Image tab
You can move to the next or previous pages using the up/down arrows located at the bottom left.
● Original Type: Selects whether the original is text, photo, etc.
● Adjust Background: Erase the background to some extent by adjusting density or brightness.
● Erase Backside Image: Prevents scanning the other side’s image shown through the original paper.
● Scan to Edge: Scans the document all the way to the edge of the paper.
Output tab
● Quality: Adjusts the display quality of the scanned output.
another page. If you select Yes, then you can scan another page in the current job. If you select No, then
the scanning process is completed and the remainder of the job is performed.
● File Format: Selects the le format of the scan output.
● Filing Policy: Automatically renames or overwrites when the USB memory device has a le with same
name.
90 Chapter 6 Scanning ENWW
 Loading...