

Page 1

HP LaserJet MFP M433a, M436n, M436dn,
M436nda
User Guide
Page 2

Copyright and License
Trademark Credits
© Copyright 2018 HP Development Company,
L.P.
Reproduction, adaptation, or translation without
prior written permission is prohibited, except as
allowed under the copyright laws.
The information contained herein is subject to
change without notice.
The only warranties for HP products and
services are set forth in the express warranty
statements accompanying such products and
services. Nothing herein should be construed as
constituting an additional warranty. HP shall not
be liable for technical or editorial errors or
omissions contained herein.
Edition 5, 4/2018
Adobe®, Adobe Photoshop®, Acrobat®, and
PostScript
®
are trademarks of Adobe Systems
Incorporated.
Microsoft®, Windows®, Windows® XP, and
Windows Vista® are U.S. registered trademarks
of Microsoft Corporation.
Page 3

Table of contents
1 Introduction ............................................................................................................................................................................................... 1
Features by model .................................................................................................................................................................... 2
About this user’s guide ............................................................................................................................................................ 3
Safety information ................................................................................................................................................................... 4
Machine overview ..................................................................................................................................................................... 8
Components ......................................................................................................................................................... 8
Front view .............................................................................................................................................................. 9
Rear view ............................................................................................................................................................ 10
Control panel overview ......................................................................................................................................................... 11
2 Menu Overview ....................................................................................................................................................................................... 13
Accessing the menus ............................................................................................................................................................. 14
Menu overview ........................................................................................................................................................................ 15
Copy feature menu ............................................................................................................................................ 15
Copy Setup Menu ............................................................................................................................................... 16
Print Setup Menu ............................................................................................................................................... 17
System Setup Menu .......................................................................................................................................... 18
Network Menu .................................................................................................................................................... 20
Scan Menu .......................................................................................................................................................... 21
3 Media and Tray ........................................................................................................................................................................................ 23
Tray overview ......................................................................................................................................................................... 24
Loading paper in the tray ...................................................................................................................................................... 25
Introduction ........................................................................................................................................................ 25
Preparing paper ................................................................................................................................................. 25
Tray 2 / optional tray ........................................................................................................................................ 26
Multi-purpose Tray 1 ........................................................................................................................................ 28
Printing on special media ...................................................................................................................................................... 30
Card stock/Custom-sized paper ...................................................................................................................... 30
Preprinted paper ................................................................................................................................................ 31
Setting the paper size and type ........................................................................................................................................... 32
ENWW iii
Page 4

Loading the original ............................................................................................................................................................... 33
Introduction ........................................................................................................................................................ 33
Preparing originals ............................................................................................................................................ 33
Loading originals ............................................................................................................................................... 34
On the scanner glass .................................................................................................................... 34
In the document feeder ............................................................................................................... 36
Print media specications ..................................................................................................................................................... 37
4 Printer installation .................................................................................................................................................................................. 39
Printer hardware setup and software installation ............................................................................................................ 40
Software installation instructions ....................................................................................................................................... 41
5 Printing ..................................................................................................................................................................................................... 43
Print setup on the control panel .......................................................................................................................................... 44
6 Copying ..................................................................................................................................................................................................... 45
Copy features on the control panel ..................................................................................................................................... 46
Copy feature ....................................................................................................................................................... 46
Copy Setup .......................................................................................................................................................... 49
Basic copying .......................................................................................................................................................................... 49
Changing the settings for each copy ................................................................................................................................... 50
Darkness ............................................................................................................................................................. 50
Original Type ....................................................................................................................................................... 50
Reduced or enlarged copy ................................................................................................................................ 51
ID card copying ....................................................................................................................................................................... 52
7 Scanning .................................................................................................................................................................................................. 55
Scanning from the machine ................................................................................................................................................. 56
Introduction ........................................................................................................................................................ 56
Scan feature ....................................................................................................................................................... 56
Basic scanning .................................................................................................................................................... 57
Scanning from a computer ................................................................................................................................................... 58
Introduction ........................................................................................................................................................ 58
Scan to PC ........................................................................................................................................................... 58
Scanning from the HP Scan Software ............................................................................................................ 59
Scanning from image editing program .......................................................................................................... 59
Scanning using the WIA driver ......................................................................................................................... 60
Scanning via WSD .............................................................................................................................................. 60
Installing a WSD Printer Driver .................................................................................................... 61
Scanning using the WSD feature ................................................................................................ 61
iv ENWW
Page 5

8 System and Other Settings ................................................................................................................................................................... 63
Machine setup ......................................................................................................................................................................... 64
Paper setup ............................................................................................................................................................................. 66
Report ...................................................................................................................................................................................... 66
Maintenance ............................................................................................................................................................................ 67
Network setup ........................................................................................................................................................................ 68
Accessing settings using the Embedded Web Server (EWS) ........................................................................................... 69
9 Maintenance ............................................................................................................................................................................................ 71
Ordering supplies and accessories ...................................................................................................................................... 72
Available consumables .......................................................................................................................................................... 72
Available accessories ............................................................................................................................................................. 73
Available maintenance parts ................................................................................................................................................ 73
Storing the consumables ...................................................................................................................................................... 74
Imaging unit handling instructions ................................................................................................................. 74
Toner cartridge usage ....................................................................................................................................... 74
Estimated toner cartridge life .......................................................................................................................... 75
Redistributing toner ............................................................................................................................................................... 75
Toner cartridge installation ................................................................................................................................................... 78
Imaging unit installation ....................................................................................................................................................... 81
Monitoring the supplies life .................................................................................................................................................. 88
Setting the toner low alert .................................................................................................................................................... 88
Cleaning the machine ............................................................................................................................................................ 89
Cleaning the outside ......................................................................................................................................... 89
Cleaning the inside ............................................................................................................................................ 89
Cleaning the roller ............................................................................................................................................. 90
Cleaning the scan unit ....................................................................................................................................... 94
Update the rmware .............................................................................................................................................................. 95
Step one: Download the rmware from HP.com .......................................................................................... 95
Step two: Update the rmware ....................................................................................................................... 95
10 Useful Settings ..................................................................................................................................................................................... 99
Machine’s basic settings ..................................................................................................................................................... 100
Altitude adjustment ............................................................................................................................................................. 101
11 Troubleshooting ................................................................................................................................................................................. 103
Paper feeding problems ..................................................................................................................................................... 104
Clearing jams ........................................................................................................................................................................ 105
Introduction ...................................................................................................................................................... 105
Tray 2 ................................................................................................................................................................ 105
ENWW v
Page 6

In optional Tray 3 ............................................................................................................................................ 107
In Multi-purpose Tray 1 .................................................................................................................................. 110
Inside the printer ............................................................................................................................................. 111
In the exit area ................................................................................................................................................. 113
In the duplex unit area .................................................................................................................................... 115
Clearing original document jams .................................................................................................................. 117
Original paper jam in front of scanner .................................................................................... 117
Original paper jam inside of scanner ....................................................................................... 119
Original paper jam in exit area of scanner .............................................................................. 122
Original paper jam in scanner duplex path ............................................................................. 124
Understanding the status LED ........................................................................................................................................... 126
Understanding display messages ..................................................................................................................................... 127
Paper Jam-related messages ....................................................................................................................... 127
Toner-related messages ................................................................................................................................ 128
Tray-related messages .................................................................................................................................. 129
Network-related messages ........................................................................................................................... 129
Misc. messages ................................................................................................................................................ 130
Power and cable connecting problems ............................................................................................................................ 131
Printing problems ................................................................................................................................................................ 132
Printing quality problems ................................................................................................................................................... 134
Copying problems ................................................................................................................................................................ 139
Scanning problems .............................................................................................................................................................. 140
Operating system problems .............................................................................................................................................. 141
Appendix A Appendix .............................................................................................................................................................................. 143
Specications ....................................................................................................................................................................... 144
General specications .................................................................................................................................... 144
System requirements ..................................................................................................................................... 144
Network environment .................................................................................................................................... 145
HP limited warranty statement ......................................................................................................................................... 146
UK, Ireland, and Malta ..................................................................................................................................... 148
Austria, Belgium, Germany, and Luxemburg .............................................................................................. 148
Belgium, France, and Luxemburg ................................................................................................................. 149
Italy .................................................................................................................................................................... 150
Spain .................................................................................................................................................................. 150
Denmark ........................................................................................................................................................... 151
Norway .............................................................................................................................................................. 151
Sweden ............................................................................................................................................................. 151
Portugal ............................................................................................................................................................ 151
Greece and Cyprus .......................................................................................................................................... 152
Hungary ............................................................................................................................................................ 152
vi ENWW
Page 7

Czech Republic ................................................................................................................................................. 152
Slovakia ............................................................................................................................................................. 153
Poland ............................................................................................................................................................... 153
Bulgaria ............................................................................................................................................................. 153
Romania ............................................................................................................................................................ 154
Belgium and the Netherlands ....................................................................................................................... 154
Finland .............................................................................................................................................................. 154
Slovenia ............................................................................................................................................................ 155
Croatia ............................................................................................................................................................... 155
Latvia ................................................................................................................................................................. 155
Lithuania ........................................................................................................................................................... 155
Estonia .............................................................................................................................................................. 156
Russia ................................................................................................................................................................ 156
End User License Agreement ............................................................................................................................................. 157
HP's Premium Protection Warranty: LaserJet toner cartridge limited warranty statement .................................... 161
HP policy on non-HP supplies ........................................................................................................................................... 162
HP anticounterfeit Web site ............................................................................................................................................... 163
Data stored on the toner cartridge ................................................................................................................................... 164
Long life consumable and maintenance kit limited warranty statement ................................................................... 165
Customer support ................................................................................................................................................................ 166
Declaration of conformity ................................................................................................................................................... 167
Environmental product stewardship program ................................................................................................................ 169
Protecting the environment .......................................................................................................................... 169
Disposal of waste equipment by users (EU and India) .............................................................................. 169
Electronic hardware recycling ....................................................................................................................... 169
Restriction on Hazardous Substances statement (India) ......................................................................... 169
SEPA Ecolabel User Information (China) ...................................................................................................... 169
The regulation of the implementation on China energy label for printer, fax, and copier .................. 170
Substances Table (China) ............................................................................................................................... 170
Material restrictions ........................................................................................................................................ 170
Battery information ........................................................................................................................................ 171
Substances Table (Taiwan) ............................................................................................................................ 172
Material Safety Data Sheet (MSDS) .............................................................................................................. 173
For more information ..................................................................................................................................... 174
Regulatory information ...................................................................................................................................................... 175
Warning ............................................................................................................................................................. 175
Eurasian Conformity (Belarus, Kazakhstan, Russia) ................................................................................. 176
Laser safety statement .................................................................................................................................. 176
EMC statement (China) ................................................................................................................................... 177
Nordic Statements (Denmark, Finland, Norway, Sweden) ........................................................................ 177
Laser statement for Finland .......................................................................................................................... 177
ENWW vii
Page 8

Glossary ..................................................................................................................................................................................................... 179
viii ENWW
Page 9

1 Introduction
This chapter provides information you need to know before using the machine.
●
Features by model
●
About this user’s guide
●
Safety information
●
Machine overview
●
Control panel overview
ENWW 1
Page 10

Features by model
NOTE: Some features and optional goods may not be available depending on model or country/region. Some
models may not be available depending on the country/region.
Table 1-1 Variety features
Features M436n
W7U01A
Hi-Speed USB 2.0
Network Interface
Ethernet 10/100 Base TX
wired LAN
Eco printing
Duplex (2-sided) printing
(automatic)
Duplex (2-sided) printing
(manual)
Multi-purpose Tray 1 (MP
Tray 1)
Tray 2
Optional Second Cassette
Feeder (Tray 3)
Automatic Document
Feeder (ADF) (optional
for M436n/M436dn)
Scan
a
M436dn
2KY38A
M436nda
W7U02A
M433a
1VR14A
Copy
a
Available for Windows OS and Linux OS only.
Table
1-2 Software
Software Windows XP, Vista, Server 2003
M436n/dn/nda, M433a
PCL6 printer driver
Printer Manager
Scan application
Windows Software Installer/Uninstaller
Status Monitor
Scanning Software
Scan to PC Setup
a
You can download the software from the website and install it: (www.hp.com/support/ljM436MFP, www.hp.com/support/ljM433MFP >
drivers, software & rmware). Before installing, check whether your computer’s OS supports the software.
Windows 7, 8, 8.1, 10
M436n/dn/nda, M433a
2 Chapter 1 Introduction ENWW
Page 11

About this user’s guide
This user's guide provides information for your basic understanding of the machine as well as detailed steps to
explain machine usage.
● Read the safety information before using the machine.
● If you have a problem using the machine, refer to the troubleshooting chapter.
● Terms used in this user’s guide are explained in the glossary chapter.
●
All illustrations in this user’s guide may dier from your machine depending on its options or model you
purchased.
● The screenshots in this user’s guide may dier from your machine depending on the machine’s rmware/
driver version.
● The procedures in this user’s guide are mainly based on Windows 7.
● Document is synonymous with original.
● Paper is synonymous with media, or print media.
ENWW About this user’s guide 3
Page 12

Safety information
These warnings and precautions are included to prevent injury to you and others, and to prevent any potential
damage to your machine. Be sure to read and understand all of these instructions before using the machine.
After reading this section, keep it in a safe place for future reference.
Table 1-3 Important safety symbols
Warning Hazards or unsafe practices that may result in severe
Caution Hazards or unsafe practices that may result in minor
Do not attempt.
Table 1-4 Operating environment
Warning
Do not use if the power cord is damaged or if the electrical outlet is not grounded.
personal injury or death.
personal injury or property damage.
Caution
Equipment damage could occur.
Do not place anything on top of the machine (water, small metal or heavy objects, candles, lit cigarettes, etc.).
Equipment damage could occur.
● If the machine gets overheated, it releases smoke, makes strange noises, or generates an odd odor,
immediately turn o the power and unplug the machine.
● The user should be able to access the power outlet in case of emergencies that might require the user to pull
the plug out.
Equipment damage could occur.
Do not bend, step on, or place heavy objects on the power cord.
Stepping on or allowing the power cord to be crushed by a heavy object could result in equipment damage.
Do not remove the plug by pulling on the cord; do not handle the plug with wet hands.
Equipment damage could occur.
Be careful, the paper output area may be hot.
4 Chapter 1 Introduction ENWW
Page 13
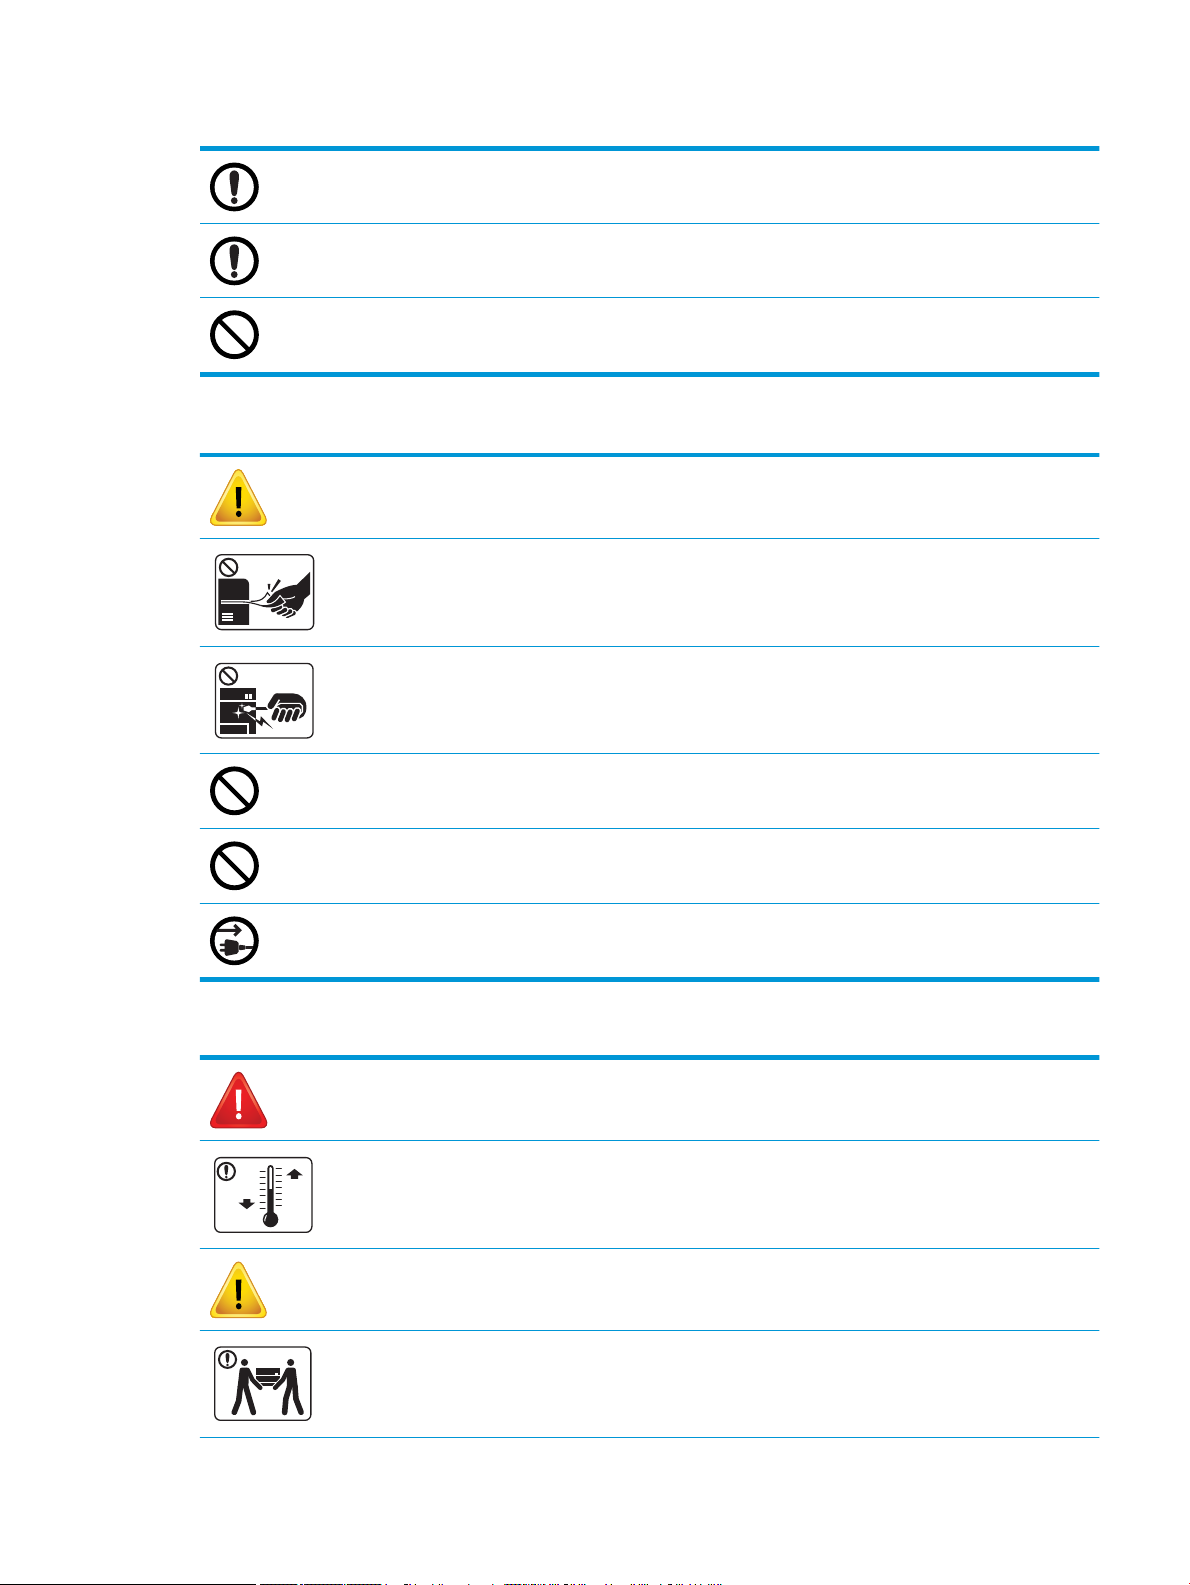
Table 1-4 Operating environment (continued)
If the machine has been dropped, or if the cabinet appears damaged, unplug the machine from all interface
connections and request assistance from qualied service personnel.
If the machine does not operate properly after these instructions have been followed, unplug the machine from all
interface connections and request assistance from qualied service personnel.
If the plug does not easily enter the electrical outlet, do not attempt to force it in.
Call an electrician to change the electrical outlet.
Table 1-5 Operating method
Caution
Do not forcefully pull the paper out during printing.
Equipment damage could occur.
When removing jammed paper, do not use tweezers or sharp metal objects.
Equipment damage could occur.
Do not allow too many papers to stack up in the paper output tray.
This may cause paper jams.
Do not block or push objects into the ventilation opening.
Equipment damage could occur.
To switch o the power supply, remove the power cord from the electrical outlet.
Table 1-6 Installation/Moving
Warning
Place the machine in the environment where it meets the operating temperature and humidity specication.
Caution
Before moving the machine, turn the power o and disconnect all cords. If you have a medical condition that
prevents you from lifting, do not lift the machine. Ask for help, and always use the appropriate amount of people to
lift the device safely.
ENWW Safety information 5
Page 14
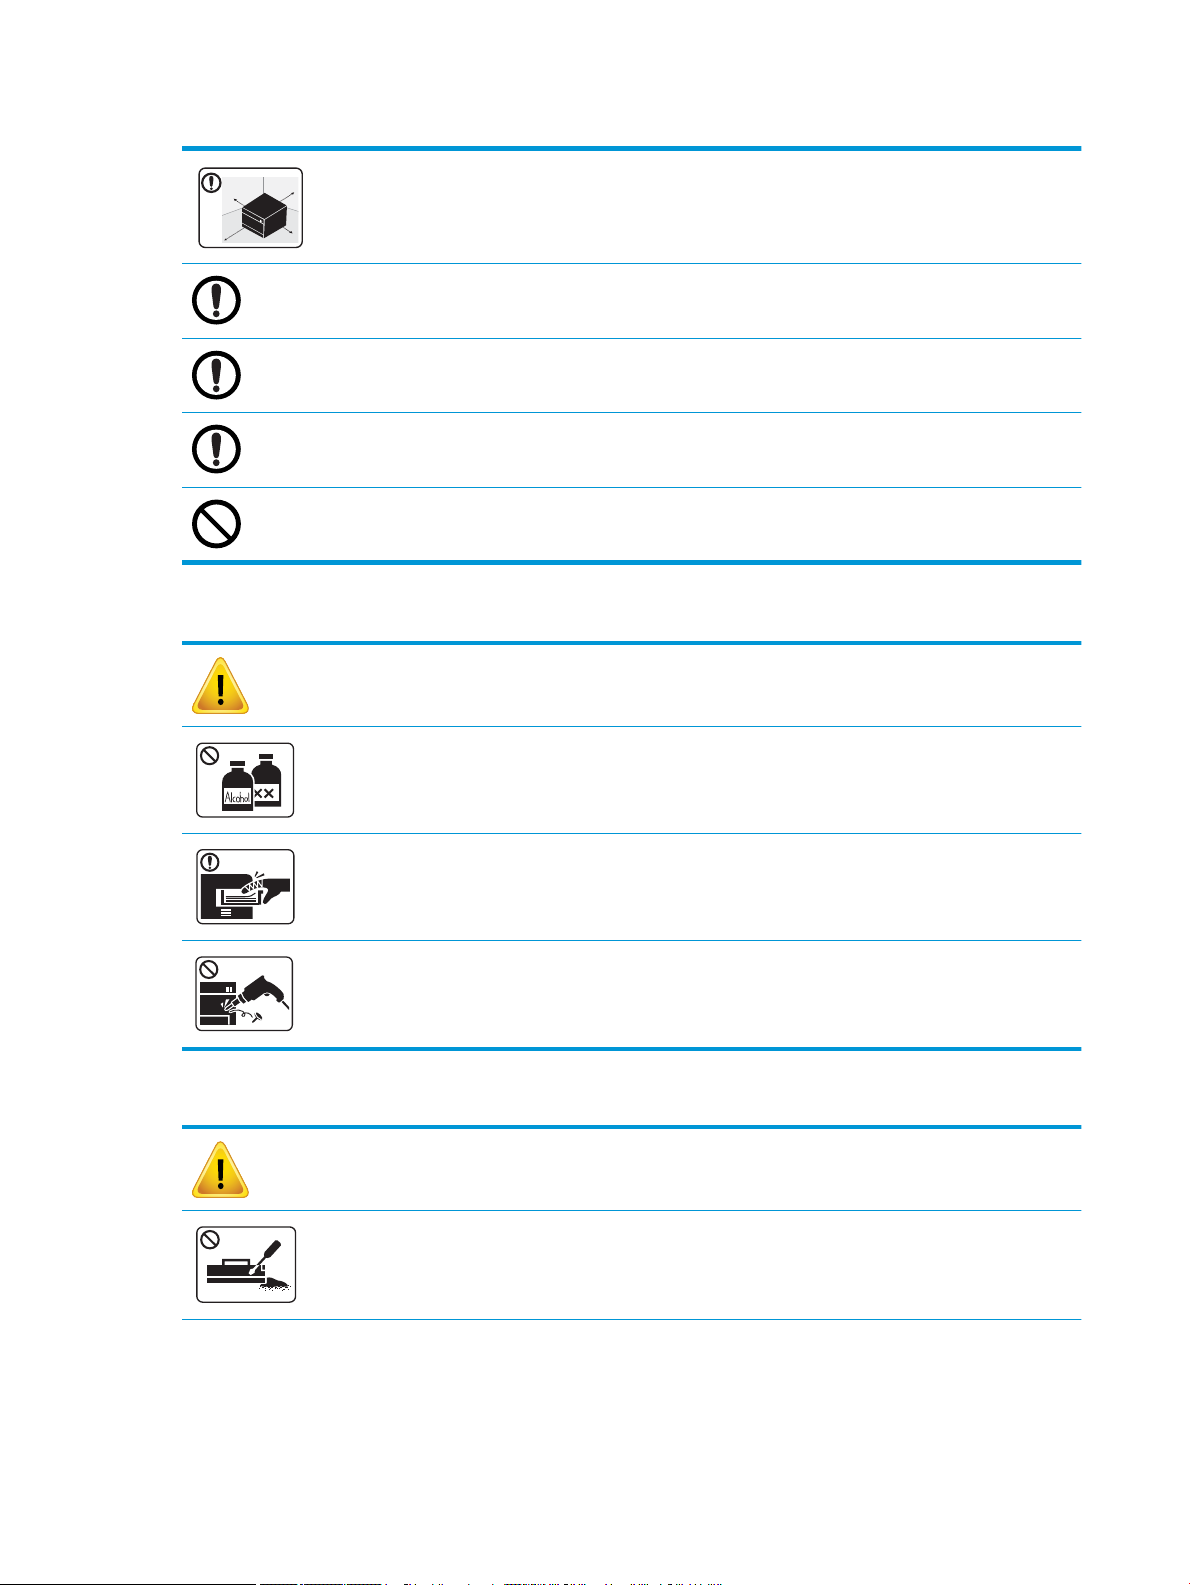
Table 1-6 Installation/Moving (continued)
Choose a at surface with enough space for ventilation to place the machine. Also consider the space required to
open the cover and trays.
Do not place the machine on an unstable surface.
The machine could fall, causing injury or machine damage.
Make sure you plug the power cord into a grounded electrical outlet.
Use the power cord supplied with your machine for safe operation.
Connect the power cord directly to the power outlet. Do not use extension cords or power strips.
Do not put a cover over the machine or place it in an airtight location, such as a closet.
Table 1-7 Maintenance / Checking
Caution
Unplug this product from the wall outlet before cleaning the inside of the machine. Do not clean the machine with
benzene, paint thinner or alcohol; do not spray water directly into the machine.
When you are working inside the machine replacing consumables or cleaning the inside, do not operate the machine.
Do not disassemble, repair or rebuild the machine by yourself.
It can damage the machine. Call a certied technician when the machine needs repairing.
Table 1-8 Supply usage
Caution
Do not disassemble the toner cartridge.
6 Chapter 1 Introduction ENWW
Page 15

Table 1-8 Supply usage (continued)
Using recycled consumables, such as toner, can cause damage to the machine.
When toner gets on your clothing, do not use hot water to wash it.
Use cold water.
ENWW Safety information 7
Page 16
Machine overview
This illustration may dier from your machine depending on your model. There are various types of machine.
Some features and optional goods may not be available depending on model or country/region.
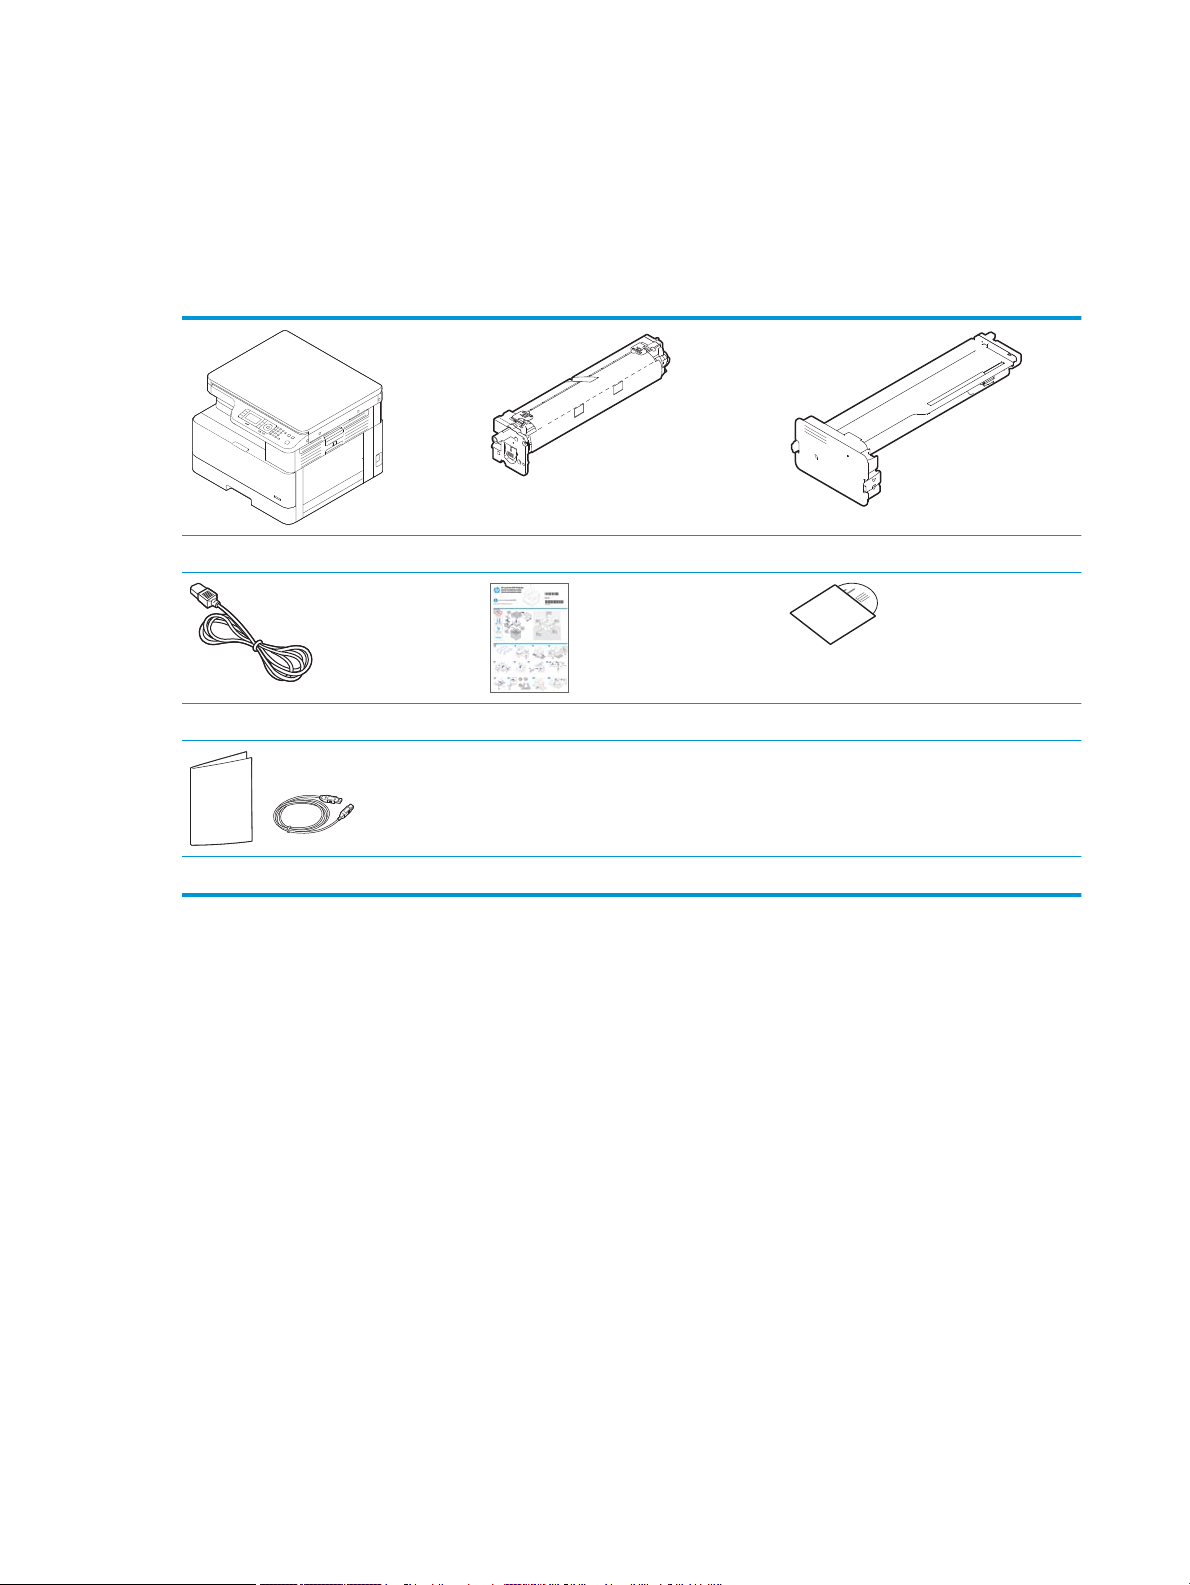
Components
Machine Imaging unit
Power cord Quick installation guide
Misc. accessories
a
Miscellaneous accessories included with your machine may vary by country/region of purchase and specic model.
b
Depending on the printer model, there might be more than one software CD.
a
Toner cartridge
Software CDs
a
b
8 Chapter 1 Introduction ENWW
Page 17
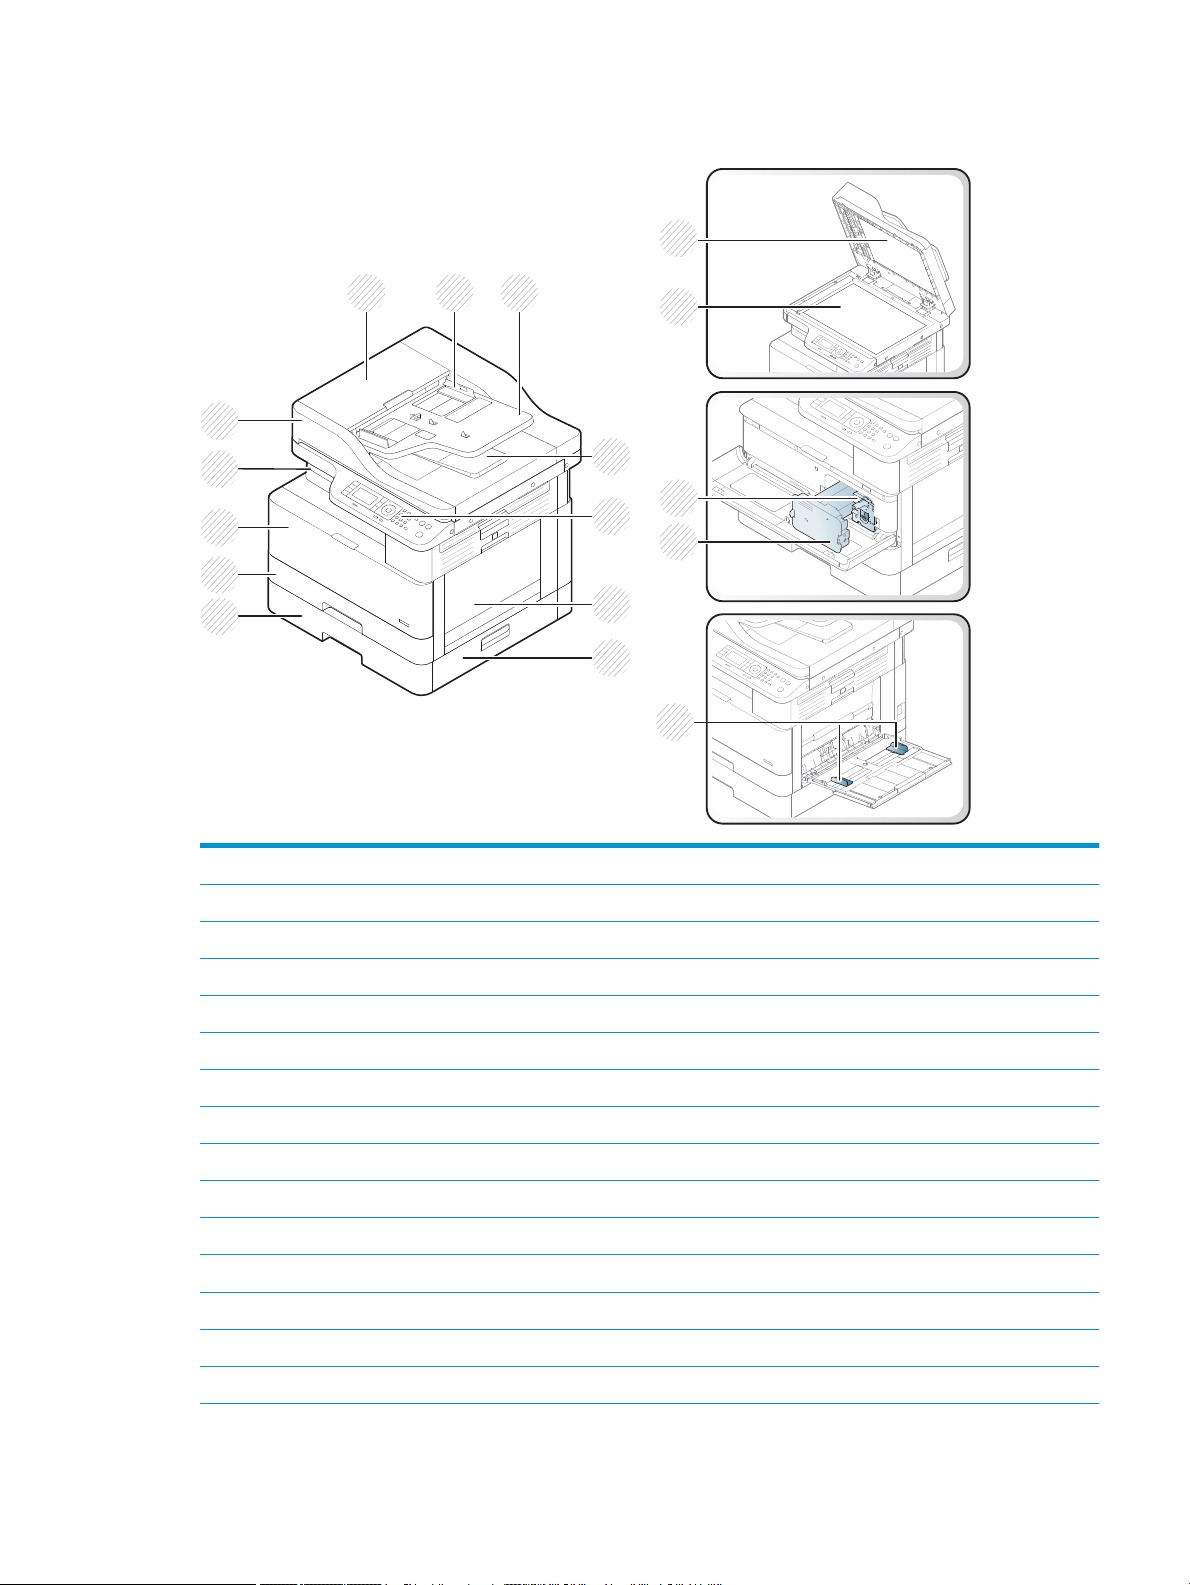
Front view
1
15
16
2 3
5
6
4
7
8
12
9
10
11
17
14
13
1
2
3
4
5 Control panel
6 Multi-purpose tray
7
8
9 Tray 2
10 Front cover
11 Output tray
12
13 Scanner lid
14 Scanner glass
15 Imaging unit
Automatic document feeder cover
Automatic document feeder width guide
Automatic document feeder input tray
Automatic document feeder output tray
Tray 3 jam cover
Second Cassette Feeder (Tray 3)
Automatic document feeder
a
a
a
a
a
a
a
ENWW Machine overview 9
Page 18
a
3
1
2
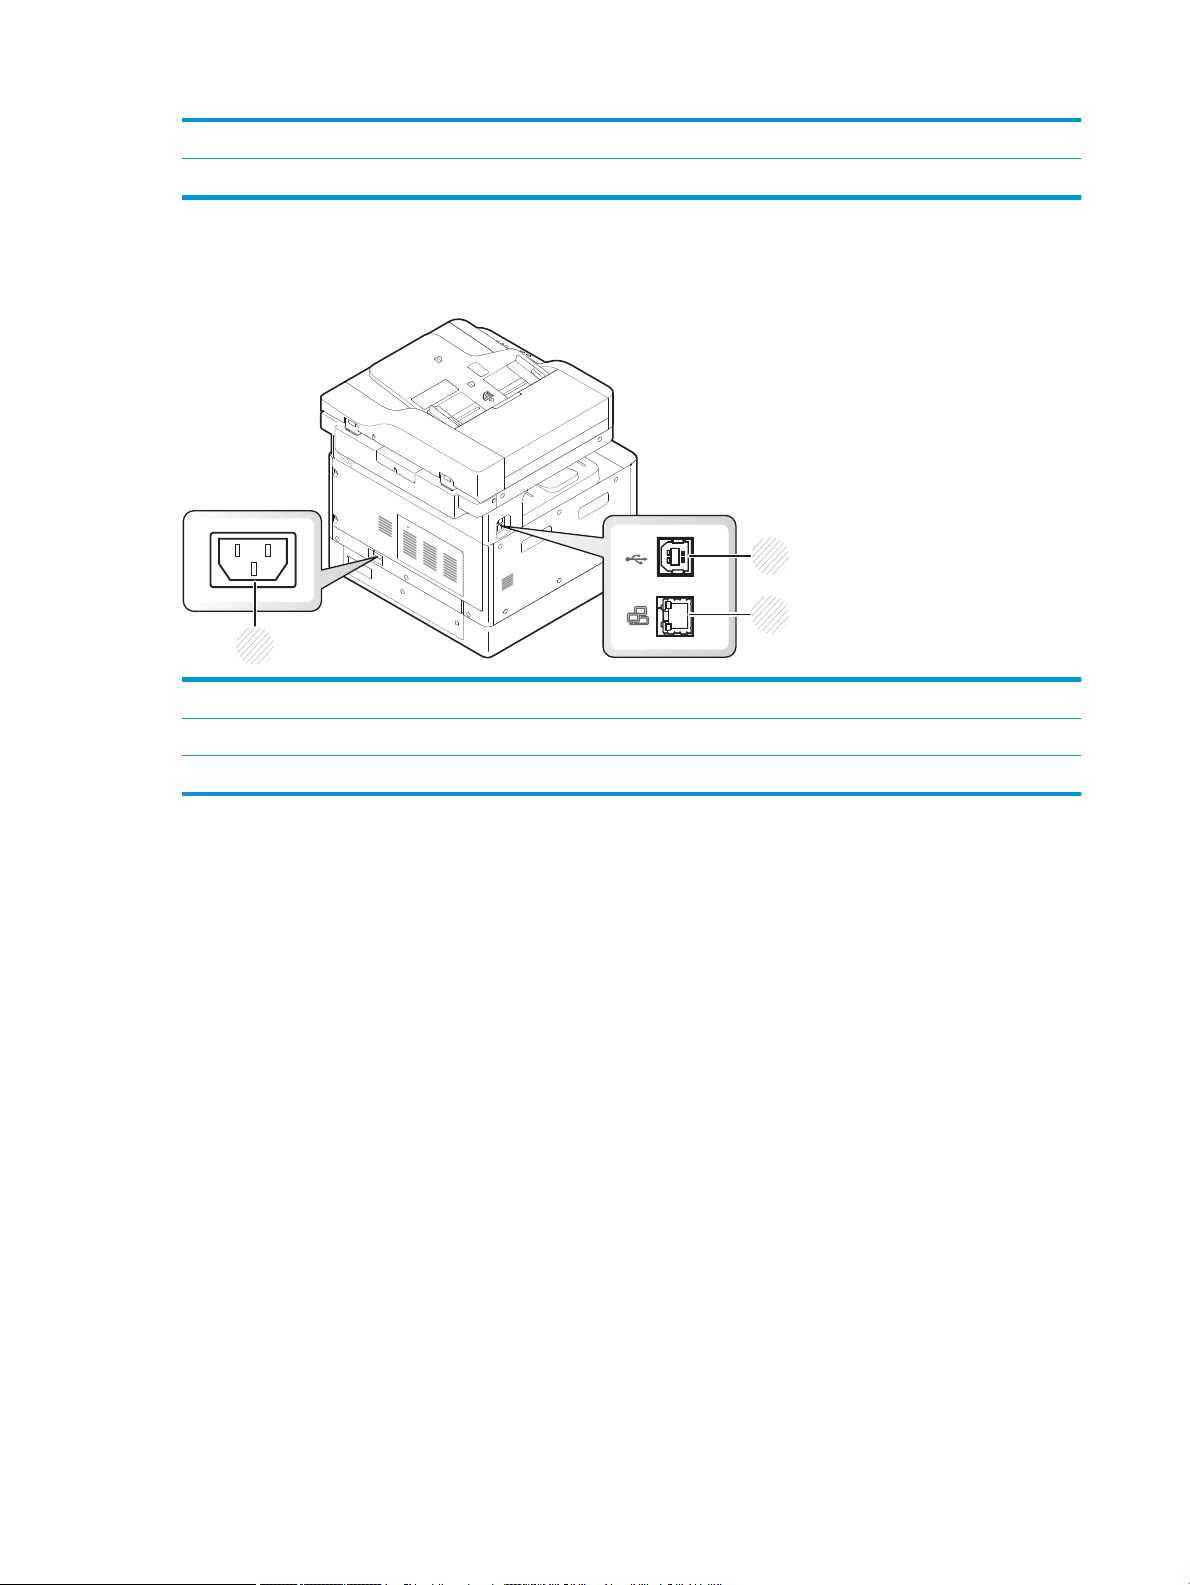
Rear view
16 Toner cartridge
17 Paper width guides on a multipurpose tray
This is an optional feature.
1 Power receptacle
2 USB 2.0, Type B port
3 Network port (not available on the M433a model)
10 Chapter 1 Introduction ENWW
Page 19
Control panel overview
8 9 1076
2
1
3 5
12 11
18
17
16 15
14
13
4
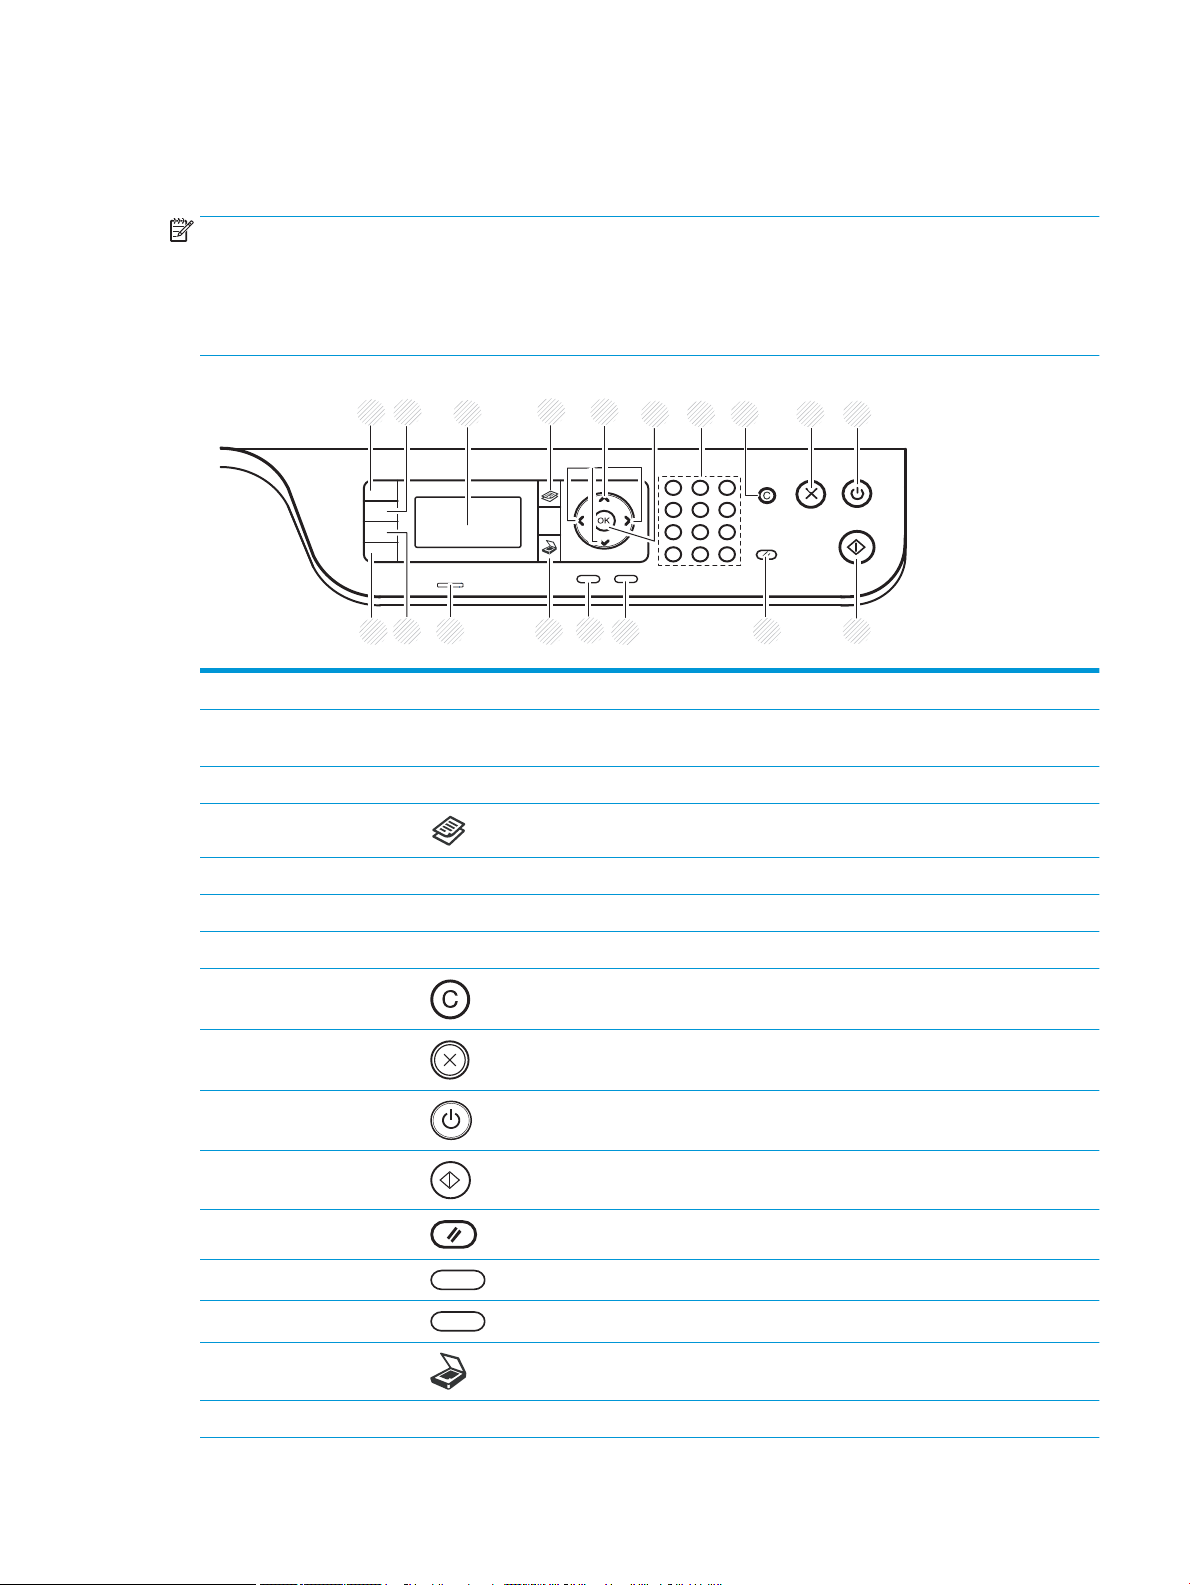
The following gure and table describe the location and provide a brief description of the control panel elements.
NOTE: This control panel may dier from your machine depending on its model. There are various types of
control panels.
Some features and optional goods may not be available depending on model or country/region.
Some buttons may not work depending on the mode (copy or scan).
1 ID Copy Allows you to copy both sides of an ID card like a driver’s license on a single side of paper.
2 Reduce/Enlarge You can reduce or enlarge the size of a copied image from 25% to 400% when you copy
original documents from the scanner glass.
3 Display screen Shows the current status and prompts during an operation.
4 Copy Switches to Copy mode.
5 Arrows Scroll through the options available in the selected menu, and increase or decrease values.
6 OK Conrms the selection on the screen.
7 Numeric keypad Enter the number of copies.
8 Clear Reset the number of copies.
9 Stop Stops current operation.
10 Power / Wake Up Turns the power on or o, or wakes up the machine from the power save mode. If you need
to turn the machine o, press this button for more than three seconds.
11 Start Begins a copying job.
12 Reset Reset the copy settings to default values.
13 Back Sends you back to the upper menu level.
14 Menu Enters Menu mode and scrolls through the available menus.
15 Scan Switches to Scan mode.
16 Status LED Indicates the status of your machine.
ENWW Control panel overview 11
Page 20

17 Paper Select Select the tray you want from the display screen.
18 Darkness Adjusts the brightness level to make a copy for easier reading, when the original contains
faint markings and dark images.
12 Chapter 1 Introduction ENWW
Page 21

2 Menu Overview
This chapter provides information about the overall menu structure.
●
Accessing the menus
●
Menu overview
ENWW 13
Page 22

Accessing the menus
Some menus may not appear on the display depending on the options selected, the product model, or your
country/region of residence. If so, it is not applicable to your machine.
1. Select the Copy or Scan button on the control panel depending on the feature to be used.
2. Select the Menu button on the left to enter Menu mode.
3. Press the arrows until the needed menu item appears and press OK.
4. If the setting item has sub menus, repeat step 3.
5. Press OK to save the selection.
6. Select Back to return to the previous menu item.
7. Press the Stop button to return to the ready mode.
Menu features are also accessible remotely from the Embedded Web Server (EWS).on network-connected
printers.
14 Chapter 2 Menu Overview ENWW
Page 23

Menu overview
Copy feature menu
Table 2-1 Copy Feature
Menu Sub-menu
Reduce/Enlarge
a
25%
NOTE: The most commonly used
reductions/enlargements are:
● 70% (A3 -> A4)
● 141% (A4 -> A3)
b
Duplex
50% (A3 -> A5)
61% (A3 -> B5)
70% (A3 -> A4), B4(JIS) -> B5, A4 -> A5)
81% (B4(JIS) -> A4, B5-A5)
86% (A3-B4(JIS), A4 -> B5)
100%
AutoFit
115% (B4(JIS) -> A3)
122% (A4 -> B4(JIS))
141% (A4 -> A3), A5 -> A4)
150%
200 (A5 -> A3)
400%
Custom (25 – 400%)
1->1 Sided
1->2 Sided, Book
1->2 Sided, Calendar
2->1 Sided, Book
2->1 Sided, Calendar
2->2 Sided, Book->Book
2->2 Sided, Calendar->Calendar
2->2 Sided, Book->Calendar
2->2 Sided, Calendar->Book
Darkness -5 -> +5
Original Type Text
Text/Photo
Photo
Map
Image Rotation
b
On/O
ENWW Menu overview 15
Page 24

Table 2-1 Copy Feature (continued)
Menu Sub-menu
Collation On/O
Layout Normal
ID Copy
N-Up
Book Copy
Adjust Background O
Auto
Enhance Lev.1
Enhance Lev.2
Erase Lev.1- Erase Lev.4
a
Reduce/Enlarge means specically to print a specic paper size onto another specic paper size. The % and specic sizes listed are based
on the default paper size.
b
Some menus may not appear on the display depending on options or models. If so, it is not applicable to your machine.
Table 2-2 Reduce/Enlarge percentages for other media sizes
Media Reduce/enlarge setting percentage
A3->A5 50%
A3->B5 61%
A3->A4 70%
B4->B5/A5 70%
B4->A4/B5/A5 81%
A3/B4/A4->B5 86%
A5->A3 200%
B4->A3 115%
A4->B4 122%
A4->A3 141%
A5->A4 141%
A5->A3 200%
Copy Setup Menu
2-3 Copy Setup Menu
Table
Menu Sub-menu
Change Default
a
Copies
16 Chapter 2 Menu Overview ENWW
Page 25

Table 2-3 Copy Setup Menu (continued)
Menu Sub-menu
Auto Tray On/O
a
This menu selection allows you to change the default copy selections for the Copy Feature menu, except for Layout and Background.
Print Setup Menu
Table 2-4 Print Setup
Menu Sub-menu Sub-menu
Orientation Portrait
Duplex O
Copies 1-999
Resolution Standard
Landscape
Long Edge
Short Edge
High Resolution
Clear Text O
Minimum
Normal
Maximum
Auto CR LF
LF+CR
Skip Blank Pages On/O
Emulation Setup
PCL Typeface PCL 1 - 58
Symbol Set
Lines 5 - 128
Pitch 0.44 - 99.99
Wide A4 On/O
Courier Regular
Dark
ENWW Menu overview 17
Page 26

System Setup Menu
Table 2-5 System Setup
Menu Sub-menu Sub-menu Sub-menu Sub-menu
Machine Setup Date & Time
Clock Mode 12 hours
24 hours
Language English
Chinese
Power Save 1 - 60 minute(s)
Wakeup Event On/O
Auto Power O O
On (5 - 240 minutes)
System Timeout O
On (10 - 600
seconds)
Job Timeout O
On (15 - 300
seconds)
Altitude Adjustment Normal
High 1 - 4
Humidity Normal
High 1 - 3
Auto Continue O
After 0 sec
After 30 sec
Auto Tray Switch On/O
Paper Substitution On/O
Tray Protection Tray 1 O
Tray 2 O
On
On
Tray 3 (a) O
On
Eco Settings Default Mode On/O
Select Template Default Eco
Custom Eco
18 Chapter 2 Menu Overview ENWW
Page 27

Table 2-5 System Setup (continued)
Menu Sub-menu Sub-menu Sub-menu Sub-menu
Paper Setup Paper Size MP Tray 1
Tray 2
a
Tray 3
Default Paper Size A4
Paper Type MP Tray 1
Tray 2
a,
Tray 3
Paper Select Copy Tray 1
Print Auto
Letter
Tray 2
Tray 3
a
Tray 1
Tray 2
Tray 3
a
Margin Common Margin Simplex Margin Top Margin -20 - +20 mm
Left Margin
Duplex Margin Side 1 Top Margin -20 - +20 mm
Side 1 Left Margin -20 - +20 mm
Side 2 Top Margin -20 - +20 mm
Side 2 Left Margin -20 - +20 mm
Tray Conrmation Tray 1 O
On
Tray 2 O
On
Tray 3 (a) O
On
Report Conguration
Demo Page
Network
Conguration
Supplies Information
Usage Counter
PCL Font
ENWW Menu overview 19
Page 28

Table 2-5 System Setup (continued)
Menu Sub-menu Sub-menu Sub-menu Sub-menu
Maintenance Supplies Life Supplies Information
Total
ADF Scan
Platen Scan
Developer
Fuser
Transfer Roller
Tray 1 Roller
Tray 1 Friction Pad
Tray 2 Roller
Tray 2 Friction Pad
Tray 3 Roller(a)
a
Some menus may not appear on the display depending on options or models. If so, it is not applicable to your machine.
Network Menu
Table
2-6 Network
Menu Sub-menu
TCP/IP (IPv4) DHCP
Tray 3 Friction
Pad(a)
ADF Roller
ADF Rubber Pad
Image Mgr. Custom Color Default Reset?
Toner Low Alert On/O
OPC Unit Low Alert On/O
Serial Number
Paper Stacking On/O
Print Density -10 - +10
BOOTP
Static
TCP/IP (IPv6) IPv6 Protocol
DHCPv6 Cong
Ethernet Ethernet Port
Ethernet Speed
20 Chapter 2 Menu Overview ENWW
Page 29

Table 2-6 Network (continued)
Menu Sub-menu
Protocol Management HTTP
Network Conguration
Clear Settings
Scan Menu
Select Scan > Scan To PC on the control panel.
Table 2-7 Scan Menu
Menu Sub-menu
HTTPS
WINS
SNMPv1/v2
UPnP(SSDP)
mDNS
Scan to PC Local or network PC
File Format
Color Mode
Resolution
Original Size
Duplex
ENWW Menu overview 21
Page 30

22 Chapter 2 Menu Overview ENWW
Page 31

3 Media and Tray
This chapter provides information on how to load print media into your machine.
●
Tray overview
●
Loading paper in the tray
●
Printing on special media
●
Setting the paper size and type
●
Loading the original
●
Print media specications
ENWW 23
Page 32

Tray overview
3
1
2
4
To change the size, you need to adjust the paper guides.
1 Paper length guide
2 Paper width guide
3 Paper bottom plate
4 Tray extend lever
24 Chapter 3 Media and Tray ENWW
Page 33

Loading paper in the tray
Introduction
The following topics describe how to prepare and load paper in Tray 2, optional Tray 3, and Multi-purpose Tray 1.
●
Preparing paper
●
Tray 2 / optional tray
●
Multi-purpose Tray 1
Preparing paper
● Use only print media that meets the specications required by the machine.
● If you use print media that does not meet the specications outlined in this user guide, the following
problems may occur:
– Low printing quality, paper jams, excessive wear on the machine
● The weight, material, surface condition, and moisture content of the print media may aect the
performance and printing quality of the machine.
● Some print media may not produce the desired result even if it meets the specications outlined in this
user guide.
This may occur due to mishandling of the print media, unsuitable temperature or humidity, or other
uncontrollable factors.
● Using print media that does not meet the specications outlined in this user guide may result in machine
malfunctions that require repairs.
Such repairs are not covered by the warranty agreement.
● Do not use inkjet photo print media with this machine. Doing so may damage the machine.
● Do not use creased, torn, or damp print media.
WARNING! The use of inammable media or foreign materials left in the printer may lead to overheating of the
unit and, in rare cases may cause a re.
ENWW Loading paper in the tray 25
Page 34

Tray 2 / optional tray
1
3
2
1. Pull out the paper tray.
2. Squeeze and slide the paper width guide and paper
length lever to locate them in the correct paper
size slot marked at the bottom of the tray to adjust
to the size.
3. Flex or fan the edge of the paper stack to separate
the pages before loading papers.
26 Chapter 3 Media and Tray ENWW
Page 35

4. After inserting paper into the tray, squeeze and
3
2
1
slide the paper width guides and paper length
guide.
● Do not push the paper width guide too far
causing the media to warp.
● If you do not adjust the paper width guide, it
may cause paper jams.
● Do not use a paper with a leading-edge curl, it
may cause a paper jam or the paper can be
wrinkled.
5. Insert the tray back into the machine.
6. When you print a document, set the paper type
and size for Tray 2/optional tray.
CAUTION: To avoid paper jams, always press
down the Tray 2/optional tray feed plate when
reloading paper.
ENWW Loading paper in the tray 27
Page 36

Multi-purpose Tray 1
The multi-purpose tray can hold special sizes and types of print material, such as postcards and note cards.
1. Hold the handle of multi-purpose tray and pull it
down to open and pull out the multi-purpose tray
paper extension.
2. Load the paper.
28 Chapter 3 Media and Tray ENWW
Page 37

3. Squeeze the multi-purpose tray paper width
guides and adjust them to the width of the paper.
Do not force them too much, or the paper will bent
resulting in a paper jam or skew.
4. When you print a document, set the paper type
and size for the multipurpose tray.
CAUTION: To avoid paper jams, always press
down the Tray 1 feed plate when reloading paper.
ENWW Loading paper in the tray 29
Page 38

Printing on special media
The paper setting in the machine and driver should match to print without a paper mismatch error.
Or if your machine supports a display screen, you can set it using the Menu button on the control panel.
Then, set the paper type from the Printing preferences window > Paper tab > Paper Type.
NOTE:
● When using special media, we recommend you feed one sheet at a time.
● Illustrations on this user’s guide may dier from your machine depending on its options or models. Check
your machine type.
Card stock/Custom-sized paper
In the software application, set the margins to at least 6.4 mm (0.25 inches) away from the edges of the
material.
30 Chapter 3 Media and Tray ENWW
Page 39

Preprinted paper
When loading preprinted paper, the printed side should be facing up with an uncurled edge at the front. If you
experience problems with paper feeding, turn the paper around. Note that print quality is not guaranteed.
● Must be printed with heat-resistant ink that will not melt, vaporize, or release hazardous emissions when
subjected to the machine’s fusing temperature for 0.1 second (about 170°C (338°F)).
● Preprinted paper ink must be non-ammable and should not adversely aect machine rollers.
● Before you load preprinted paper, verify that the ink on the paper is dry. During the fusing process, wet ink
can come o preprinted paper, reducing print quality.
ENWW Printing on special media 31
Page 40

Setting the paper size and type
The paper setting in the machine and driver should match to print without a paper mismatch error.
From the print driver or application, set the paper type from the Print Options window > Properties > Paper tab >
Type.
NOTE: It may be necessary to press OK to navigate to lower-level menus for some models.
After loading paper in the paper tray, set the paper size and type using the control panel buttons.
1. Select Menu > System Setup > Paper Setup > Paper Size or Paper Type on the control panel.
2. Select the tray and the option you want.
3. Press OK to save the selection.
4. Click the Back button to the right of the Menu button to return to the Paper Setup screen. Then
select the paper type if desired.
5. Press the Stop button to return to ready mode.
NOTE: If you want to use special-sized paper such as billing paper, select the Paper tab > Size > Edit... and set
Custom Paper Size Settings in the Printing Preferences.
32 Chapter 3 Media and Tray ENWW
Page 41

Loading the original
Introduction
The following topics describe how to prepare originals for copying and how to load originals on the scanner glass
or in the document feeder.
●
Preparing originals
●
Loading originals
Preparing originals
● Do not load documents that are smaller than 125 x 101.6mm (4.92 x 4 inches) or larger than 297 x 432
mm (11.7 x 17 inches).
● Do not load documents printed on the following types of paper to avoid paper jams, low printing quality,
and machine malfunctions:
– Carbon-paper or carbon-backed paper
– Coated paper
– Tracing paper or thin paper
– Wrinkled or creased paper
– Curled or rolled paper
– Torn paper
● Remove all staples and paper clips from the document before loading it.
● Make sure that any glue, ink, or correction uid on the document is completely dry before loading it.
● Do not load original documents that include dierent sizes or weights of paper.
● Do not load booklets, pamphlets, transparencies, or documents with other unusual characteristics.
ENWW Loading the original 33
Page 42

Loading originals
You can use the scanner glass or the document feeder to load an original for copying and scanning.
NOTE: Illustrations on this user’s guide may dier from your machine depending on its options or models.
Check your machine type.
On the scanner glass
Using the scanner glass, you can copy or scan originals. You can get the best scan quality, especially for colored
or gray-scaled images. Make sure that no originals are in the document feeder. If an original is detected in the
document feeder, the machine gives it priority over the original on the scanner glass.
1. Lift and open the scanner lid.
34 Chapter 3 Media and Tray ENWW
Page 43

2. Place the original face down on the scanner glass.
Align it with the registration guide at the top left
corner of the glass.
3. Close the scanner lid.
NOTE:
● Leaving the scanner lid open while copying
may aect copy quality and toner
consumption.
● Dust on the scanner glass may cause black
spots on the printout. Always keep it clean.
● If you are copying a page from a book or
magazine, lift the scanner lid until its hinges
are caught by the stopper and then close the
lid. If the book or magazine is thicker than 30
mm, start copying with the scanner lid open.
CAUTION:
● Be careful not to break the scanner glass. You
may get hurt.
● Do not look into the light from inside of the
scanner while copying or scanning. It is
harmful to eyes.
ENWW Loading the original 35
Page 44

In the document feeder
Using the automatic document feeder (ADF), you can load up to 100 sheets of paper (80 g/m2, 21 lbs bond) for
one job.
1. Flex or fan the edge of the paper stack to separate
the pages before loading originals.
2. Load the original face up into the document feeder
input tray. Make sure that the bottom of the
original stack matches the paper size marked on
the document input tray.
3. Adjust the document feeder width guides to the
paper size.
NOTE: Dust on the document feeder glass may cause black lines on the printout. Always keep the glass clean.
36 Chapter 3 Media and Tray ENWW
Page 45

Print media specications
The following table describes the attributes of the print media supported by the printer. Attributes include media
type, size, dimensions, weight, and tray capacity for the specied media.
Type Size Dimensions
Plain paper Letter 216 x 279 mm (8.5 x 11
inches)
11 x 17 279 x 432 mm (11 x 17
inches)
Legal 216 x 356 mm (8.5 x 14
inches)
Ocio 216 x 330 mm (8.5 x 13
inches)
Ocio 216x340 216 x 340 mm (8.5 x
13.39 inches)
B4 257 x 364 mm (10.1 x
14.3 inches)
B5 182 x 257 mm (7.16 x
10.11 inches)
Executive 184 x 267 mm (7.25 x
10.5 inches)
8K 270 x 390 mm (10.75 x
15.5 inches)
Print media weight/Capacity
Tray 2 / Tray 3 Multi-purpose Tray 1
71 to 85 g/m2 (19 to 22.5
lbs bond)
● 250 sheets of 80
g/m2 (21 lbs bond)
a
71 to 85 g/m2 (19 to 22.5
lbs bond)
● 100 sheets of 80
g/m2 (21 lbs bond)
16K 195 x 270 mm (7.76 x
A3 297 x 420 mm (11.7 x
A4 210 x 297 mm (8.26 x
A5 148 x 210 mm (5.82 x
Statement 140 x 216 mm (5.5 x 8.5
PostCard 152 x 102 mm (6 x 4
Mid-weight 96-110g Refer to the Plain paper
section
b
Heavy 110 to 130g
Light 60-74g Refer to the Plain paper
Refer to the Plain paper
section
section
10.75 inches)
16.5 inches)
11.69 inches)
8.26 inches)
inches)
inches)
Refer to the Plain paper
section
Refer to the Plain paper
section
Refer to the Plain paper
section
Not available in Tray 2/
Tray 3.
Not available in Tray 2/
Tray 3.
96 to 110 g/m2 (26 to 29
lbs bond)
Not available in Tray 2/
Tray 3.
60 to 74 g/m2 (16 to 20
lbs bond)
96 to 110 g/m2 (26 to 29
lbs bond)
111 to 163 g/m2 (30 to
43.5 lbs bond)
60 to 74 g/m2 (16 to 20
lbs bond)
ENWW Print media specications 37
Page 46

Type Size Dimensions
Print media weight/Capacity
a
Tray 2 / Tray 3 Multi-purpose Tray 1
HP LaserJet 90g, Colored
paper, Pre-Printed paper,
Refer to the Plain paper
section
Refer to the Plain paper
section
75 to 90 g/m2 (20 to
24lbs bond)
75 to 90 g/m2 (20 to
24lbs bond)
LetterHead paper, PrePunched paper
Recycled paper Refer to the Plain paper
section
Bond paper
b
Refer to the Plain paper
section
Intermediate 85-95g Refer to the Plain paper
section
Card stock
b
Refer to the Plain paper
section
d
Minimum size (custom)c,
● Multi-purpose Tray
Refer to the Plain paper
section
Refer to the Plain paper
section
Refer to the Plain paper
section
Refer to the Plain paper
section
60 to 90 g/m2 (16 to
24lbs bond)
Not available in Tray 2/
Tray 3.
85 to 95 g/m2 (23 to
26lbs bond)
Not available in Tray 2/
Tray 3.
60 to 90 g/m2 (16 to
24lbs bond)
105 to 120 g/m2 (28 to
32lbs bond)
85 to 95 g/m2 (23 to
26lbs bond)
105 to 163 g/m2 (28 to
43 lbs bond)
● Multi-purpose Tray 1: 60 to 163 g/m2 (16 to 43.5 lbs bond)
1: 125 x 101.6 mm
(4.92 x 4 inches)
● Tray 2/ Tray 3: 60 to 110 g/m2 (16 to 29.3 lbs bond)
● Tray 2/ Tray 3: 148
x 182 mm (5.83 x
7.17 inches)
Maximum size (custom) 297 x 432 mm (11.69 x
17.01 inches)
a
Maximum capacity may dier depending on media weight, thickness, and environmental conditions.
b
The printer does not support duplexing for Heavy weight paper, Bond paper, and Card stock paper types.
c
The paper types available in Multi-purpose Tray 1: Plain, Mid-weight 96-110g, heavy 110 to 130g, light 60-74g, HP Laser Jet 90g,
Colored, Preprinted, Recycled, Bond, Intermediate 85-95g, LetterHead, Prepunched, Cardstock
d
The paper types available in Tray 2: Plain, Mid-weight 96-110g, light 60-74g, HP Laser Jet 90g, Colored, Preprinted, Recycled,
Intermediate 85-95g, LetterHead, Prepunched
38 Chapter 3 Media and Tray ENWW
Page 47

4 Printer installation
ENWW 39
Page 48

Printer hardware setup and software installation
For basic setup instructions, see the Quick Installation Guide that came with the printer. For additional
instructions, go to HP support on the Web.
Go to www.hp.com/support/ljM436MFP, www.hp.com/support/ljM433MFP for HP's all-inclusive help for the
printer. Find the following support:
● Install and congure
● Learn and use
● Solve problems
● Download software and rmware updates
● Join support forums
● Find warranty and regulatory information
40 Chapter 4 Printer installation ENWW
Page 49

Software installation instructions
The full software install is available for the following operating systems:
● Windows XP 32–bit and 64–bit
● Windows Vista 32–bit and 64–bit
● Windows 7 32–bit and 64–bit
● Windows 8 32–bit and 64–bit
● Windows 8.1 32–bit and 64–bit
● Windows 10 32–bit and 64–bit
Server operating system platforms support the installation of the HP LaserJet MFP M433a, M436n, M436dn,
M436nda print driver only using the Add Printer Wizard.
Other supported HP LaserJet MFP M433a, M436n, M436dn, M436nda print drivers available for download on hp.com:
● HP UPD PCL6
● HP PCL6 V4 driver (for Windows 8.1 and Windows 10)
Install the software
1. Insert the software installer CD into the CD/DVD drive of the PC.
NOTE: If no CD/DVD drive is available, download the HP LaserJet MFP M433a, M436n, M436dn, M436nda
full software solution from www.hp.com/support/ljM436MFP, www.hp.com/support/ljM433MFP.
2. The software installer should run automatically after inserting the CD. If the software installer does not
start automatically, browse the software installer CD and double-click on the le named “setup.exe”.
3. Follow the on screen instructions to install and congure the HP LaserJet MFP M433a, M436n, M436dn,
M436nda product software.
ENWW Software installation instructions 41
Page 50

42 Chapter 4 Printer installation ENWW
Page 51

5 Printing
This chapter explains common printing tasks.
●
Print setup on the control panel
NOTE: Supported optional devices and features may dier according to your model.
For additional print driver information, go to www.hp.com/support/ljM436MFP, www.hp.com/support/
ljM433MFP
ENWW 43
Page 52

Print setup on the control panel
The following information describes the printer setup functions available from the control panel. These functions
control the appearance of the printed pages.
NOTE: Some menus may not appear in the display depending on options or models. If so, it is not applicable to
your machine.
To change the menu options:
● Press Menu > Print Setup on the control panel.
Item Description
Orientation Selects the direction in which information is printed on a page.
● Portrait
● Landscape
Duplex You can set the machine to print on both sides of paper.
NOTE: Depending on model, this may be manual or automatic duplexing.
Copies You can enter the number of prints using the number keypad.
Resolution Sets the resolution option. The higher the setting, the sharper printed characters and graphics.
Clear Text Prints text darker than on a normal document.
Auto CR Allows you to append the required carriage return to each line feed, which is useful for DOS users.
Skip Blank Pages The printer detects the printing data from computer whether a page is empty or not. You can set to print or
skip the blank page.
Emulation Set up font information to be used when sending PCL5 directly to the device.
44 Chapter 5 Printing ENWW
Page 53

6 Copying
This chapter explains common copying tasks.
●
Copy features on the control panel
●
Basic copying
●
Changing the settings for each copy
●
ID card copying
ENWW 45
Page 54

Copy features on the control panel
Copy feature
The following topics describe how to use the Copy and Copy Setup features on the control panel. These features
control the appearance of the generated copies.
NOTE: Some menus may not appear in the display depending on options or models. If so, it is not applicable to
your machine.
To change the menu options:
● Press Copy > Menu > Copy Feature on the control panel.
Or Menu > Copy Feature on the control panel.
Table 6-1 Copy feature
Item Description
Reduce/Enlarge Reduces or enlarges the size of a copied image.
NOTE: If the machine is set to Eco mode, reduce and enlarge features are not available.
46 Chapter 6 Copying ENWW
Page 55

Table 6-1 Copy feature (continued)
Item Description
Duplex
NOTE: Available only on
models equipped with an
automatic duplexer.
You can set the machine to print copies on both sides of paper.
● 1 ->1 Sided: Scans one side of an original and prints it on one side of the paper.
● 1->2 Sided, Book
● 1->2 Sided, Calendar
● 2->1 Sided, Book
● 2->1 Sided, Calendar
● 2->2 Sided, Book ->Book
● 2->2 Sided, Calendar->Calendar
● 2->2 Sided, Book->Calendar
● 2->2 Sided, Calendar->Book
ENWW Copy features on the control panel 47
Page 56

Table 6-1 Copy feature (continued)
Item Description
Darkness Adjusts the brightness level to make a copy that is easier to read, when the original contains faint markings
Original Type Improves the copy quality by selecting the document type for the current copy job.
Image Rotation Allows you to rotate the image in the originals.
Collation Set the machine to sort the copy job. For example, if you make 2 copies of a 3 page original, one complete 3
Layout Adjusts the layout format such as ID Copy, N-Up, etc.
and dark images.
page document will print followed by a second complete document.
● On: Prints output in sets to match the sequence of originals.
● O: Prints output sorted into stacks of individual pages.
Adjust Background Prints an image without its background. This copy feature removes the background color and can be helpful
when copying an original containing color in the background, such as a newspaper or a catalog.
● O: Does not use this feature.
● Auto: Optimizes the background.
● Enhance Lev.1~2: The higher the number is, the more vivid the background is.
● Erase Lev.1~4: The higher the number is, the lighter the background is.
48 Chapter 6 Copying ENWW
Page 57

Copy Setup
NOTE: Some menus may not appear in the display depending on options or models. If so, it is not applicable to
your machine.
To change the menu options:
● Press Copy > Menu > Copy Setup on the control panel.
Or Menu > Copy Setup on the control panel.
Table 6-2 Copy Setup
Item Description
Change Default The copy options can be set to those most frequently used.
Auto Tray This is the option to set if the machine is to continue printing or not when any tray becomes empty.
Basic copying
1. Select Copy > Menu > Copy Feature on the control panel.
Or select Menu > Copy Feature on the control panel.
2. Place a single document face down on the document glass, or load the documents face up into the
document feeder.
3. If you want to customize the copy settings including Reduce/Enlarge, Darkness, Original Type and more by
using the control panel buttons.
4. Enter the number of copies using the arrow or number keypad, if necessary.
5. Press Start .
NOTE:
will stop.
If you need to cancel the copying job during the operation, press the Stop button and the copying
ENWW Basic copying 49
Page 58

Changing the settings for each copy
Your machine provides default settings for copying so that you can quickly and easily make a copy.
NOTE:
● If you press the Stop button twice while setting the copy options, all of the options you have set for
the current copy job will be canceled and returned to their default status. Or, they will automatically return
to their default status after the machine completes the copy in progress.
● Accessing menus may dier from model to model.
● It may be necessary to press OK to navigate to lower-level menus for some models.
Darkness
If you have an original containing faint marking and dark images, you can adjust the brightness to make a copy
that is easier to read.
1. Select Copy > Menu > Copy Feature > Darkness on the control panel.
Or press Darkness on the control panel.
2. Select the option you want and press OK.
3. Press the Stop button to return to ready mode.
Original Type
The original setting is used to improve the copy quality by selecting the document for the current copy job.
1. Select Copy > Menu > Copy Feature > Original Type on the control panel.
2. Select the option you want and press OK.
3. Press the Stop button to return to ready mode.
For example, the +5 being the lightest, and the -5 being the darkest.
Or select Menu > Copy Feature >Original Type on the control panel.
● Text: Use for originals containing mostly text.
● Text/Photo: Use for originals with mixed text and photographs.
NOTE: If texts in the printout is blurry, select Text to get the clear texts.
● Photo: Use when the originals are photographs.
● Map: Use when the originals are map.
50 Chapter 6 Copying ENWW
Page 59

Reduced or enlarged copy
You can reduce or enlarge the size of a copied image from 25% to 400% from the document feeder or scanner
glass.
NOTE:
● This feature may not be available depending on model or optional goods.
● If the machine set to Eco mode, reduce and enlarge features are not available.
To select from the predened copy sizes
1. Select Copy > Menu > Copy Feature > Reduce/Enlarge on the control panel.
Or select Menu > Copy Feature > Reduce/Enlarge on the control panel.
2. Select the option you want and press OK.
3. Press the Stop button to return to ready mode.
To scale the copy by directly entering the scale rate
1. Select Copy > Menu > > Copy Feature > Reduce/Enlarge > Custom on the control panel.
Or select Menu > Copy Feature > Reduce/Enlarge > Custom on the control panel.
2. Enter the copy size you want using the numeric keypad.
3. Press OK to save the selection.
4. Press the Stop button to return to ready mode.
NOTE: When you make a reduced copy, black lines may appear at the bottom of your copy.
ENWW Changing the settings for each copy 51
Page 60

ID card copying
Your machine can print 2-sided originals on one sheet.
The machine prints one side of the original on the upper half of the paper and the other side on the lower half
without reducing the size of the original. This feature is helpful for copying a small-sized item such as business
card.
NOTE:
● The original must be placed on the scanner glass to use this feature.
● If the machine set to Eco mode, this feature is not available.
Depending on the model, the operating procedure may dier.
1. Press ID Copy on the control panel.
Or select (Menu) > Copy Feature > Layout > ID Copy on the control panel.
2. Place the front side of an original facing down on the scanner glass where arrows indicate as shown. Then,
close the scanner lid.
NOTE: To get a better image, close the scanner lid and lightly press the scanner lid.
3. Place Front Side Press [Start] appears on the display.
4. Press Start .
Your machine begins scanning the front side and shows Place Rear Side Press [Start].
52 Chapter 6 Copying ENWW
Page 61

5. Turn the original over and place it on the scanner glass where arrows indicate as shown. Then, close the
scanner lid.
6. Press the Start button.
NOTE:
● If you do not press the (Start) button, only the front side will be copied.
● If the original is larger than the printable area, some portions may not be printed.
ENWW ID card copying 53
Page 62

54 Chapter 6 Copying ENWW
Page 63

7 Scanning
This chapter explains the normal and usual procedure for scanning originals.
●
Scanning from the machine
●
Scanning from a computer
ENWW 55
Page 64

Scanning from the machine
Introduction
The following topics describe how to set up the Scan To PC menu options from the control panel and then scan a
document.
●
Scan feature
●
Basic scanning
Scan feature
NOTE: Some menus may not appear in the display depending on options or models. If so, it is not applicable to
your machine.
NOTE: In order for the Scan To button to function, you must install the HP Scan Software on the PC.
To change the menu options:
● Press Scan > Scan To PC on the control panel.
NOTE: Not available on the M433a model.
Item Description
Scan to PC Selects the scan destination to a network-connected computer that has the scan software installed and the
Scan To feature has been congured.
Network PC Sets scan destination to a network-connected computer. You scan the originals and save the scanned image
to a directory such as My Documents.
File Format Sets the le format in which the image is to be saved. If you select JPEG, TIFF or PDF, you can select to scan
multiple pages. Depending on the selected scan type, this option may not appear.
● Multi-Page PDF: Scans originals in PDF, but several originals are scanned as one le.
● Single-Page PDF: Scans the originals in PDF, and several originals are scanned as an each individual
PDF le.
● Multi-Page TIFF: Scans originals in TIFF (Tagged Image File Format), but several originals are scanned
as one le.
● Single-Page TIFF: Scans the originals in TIFF (Tagged Image File Format), and several originals are
scanned as an each individual TIFF le.
● JPEG: Scans original in JPEG format.
NOTE: The le format JPEG cannot be selected in the File Format option, if Mono has been selected for
Color Mode.
Color Mode You can select the color options of scan outputs.
● Color: Uses color to display an image. 24 bits per pixel, 8 bits for each RGB, is used for 1 pixel.
● Gray: Uses the black gradation to display an image. 8 bits per pixel.
Resolution Sets the image resolution.
56 Chapter 7 Scanning ENWW
Page 65

Item Description
Original Size Sets the image size.
Duplex Selects if the machine scans one side of the paper (1 Sided), both sides of the paper (2 Sided), or both sides
Basic scanning
This is the normal and usual procedure for scanning originals.
NOTE:
● Accessing menus may dier from model to model.
● It may be necessary to press OK to navigate to lower-level menus for some models.
1. Place a single document face down on the document glass, or load the documents face up into the
document feeder.
of the paper (2 Sided Rotated).
● 1 Sided: For originals that are printed on one side only.
● 2 Sided, Book: For originals that are printed on both sides.
● 2 Sided, Calendar: For originals that are printed on both sides, but the back is rotated 180 degrees.
NOTE: If an original is placed on the scanner glass, the machine shows the window asking to place another
page. Load another original and press Yes. When you nish, select No for this option.
2. Select Scan > Scan To PC on the control panel.
NOTE: If you do not see Scan To PC on the control panel, use the down arrow to show more Scan To
destination options.
NOTE: If you see Not Available message, check the port.
Switch to advanced mode > Scan To PC Settings.
NOTE: The printer's full software, which includes HP Scan, must be installed for the Scan To PC button
push to function properly from the printer's control panel.
3. Select the scan destination you want and press OK.
Default setting is My Documents.
4. Select the option you want and press OK.
5. Scanning begins.
NOTE: Scanned image is saved in computer’s C:\Users\users name\My Documents\Scan. The saved folder may
dier, depending on your operating system or the application you are using.
ENWW Scanning from the machine 57
Page 66

Scanning from a computer
Introduction
The following topics describe several methods for scanning a document from the scanner to a computer.
NOTE: The maximum resolution that can be achieved depends upon various factors, including computer speed,
available disk space, memory, the size of the image being scanned, and bit depth settings. Thus, depending on
your system and what you are scanning, you may not be able to scan at certain resolutions, especially using
enhanced dpi.
●
Scan to PC
●
Scanning from the HP Scan Software
●
Scanning from image editing program
●
Scanning using the WIA driver
●
Scanning via WSD
Scan to PC
The M436 full software installation includes the HP Scan Application. The HP Scan Application enables the Scan
To button on the printer's control panel.
NOTE: Not available on the M433a model.
The HP Scan Application includes the Scan to PC Setup utility for conguring the scan settings used when
scanning is done using the Scan To button on the printer's control panel.
Congure scan settings using the Scan to PC Setup utility
1. Open the Scan to PC Setup utility:
a. Select the Windows icon in the left-bottom corner of the screen.
b. Select All Programs.
c. Select the HP or HP Printers folder.
d. Select the HP LaserJet MFP M436 folder.
e. Select the HP M436 Scan to PC Setup application.
2. Select your printer from the list in the Scan to PC Setup utility, and then click the Properties button. The
following settings are available:
● Prole Name–This is the name that displays on the printer's control panel to identify and select the
prole.
● Scan Settings
Color Mode
Resolution
58 Chapter 7 Scanning ENWW
Page 67

Scan to PC
Original Size
Duplex
● Save Settings
Save Location
File Format
Action After Saving
3. Click the OK button to save the settings.
1. Place a single document face down on the document glass, or load the documents face up into the
document feeder.
2. Touch Scan to PC on the control panel.
NOTE: Not available on the M433a model.
3. Select your registered computer ID, and enter the Password if necessary.
4. Select the option you want and then touch OK.
5. Scanning begins.
NOTE: Scanned images are saved in C:\Users\users name\My Documents. The saved folder
may dier, depending on your operating system or the application you are using.
Scanning from the HP Scan Software
The full software solution from the product CD, or available at hp.com, includes a TWAIN compliant scan
application.
1. Open the HP Scan Application:
a. Click the Start button.
b. Click All Programs.
c. Click HP.
d. Click HP M436/M433 Scan.
2. Use the Quick Scan, Advanced Scan or Conguration features to scan documents or to adjust scan settings.
Scanning from image editing program
You can scan and import documents in the image editing software such as Adobe Photoshop, if the software is
TWAIN-compliant. Follow the steps below to scan with TWAIN-compliant software:
1. Make sure that the machine is connected to your computer and powered on.
2. Place a single document face down on the document glass, or load the documents face up into the
document feeder.
ENWW Scanning from a computer 59
Page 68

3. Open an application, such as Adobe Photoshop.
4. Click File > Import, and select the scanner device.
5. Set the scan options.
6. Scan and save your scanned image.
Scanning using the WIA driver
Your machine supports the Windows Image Acquisition (WIA) driver for scanning images. WIA is one of the
standard components provided by Microsoft Windows 7 and works with digital cameras and scanners. Unlike the
TWAIN driver, the WIA driver allows you to scan and easily adjust images without using additional software:
1. Make sure that the machine is connected to your computer and powered on.
2. Place a single document face down on the document glass, or load the documents face up into the
document feeder.
3. Open a WIA-compliant application, for example Microsoft Paint, and then do the following:
● Select File
● Select From Scanner or Camera.
● Select M436/M433 Scan.
4. From the WIA Scan screen select Flatbed or Document Feeder as the Paper Source.
NOTE: When using the document feeder as the paper source the File Type and Page Size must be
congured in the Settings menu.
5. Click the Scan button.
Scanning via WSD
Scans the originals and saves the scanned data on a connected computer if the computer supports the WSD
(Web Service for Device) feature. To use the WSD feature, you need to install the WSD printer driver on your
computer. For Windows 7, you can install the WSD driver by Control Panel > Devices and Printers > Add a printer.
Click Add a network printer from the wizard.
NOTE: Not available on the M433a model.
IMPORTANT: To use the WSD feature the computer must have Network Discovery and File and Print Sharing
enabled.
NOTE:
● Device Discovery and File and Print Sharing must be enabled on the computer for WSD to work.
● The machine that does not support the network interface, it will not be able to use this feature.
● The WSD feature works only with Windows Vista® or later version that are the WSD-compliant computer.
● The following installation steps are based on Windows 7 computer.
60 Chapter 7 Scanning ENWW
Page 69

Installing a WSD Printer Driver
1. Select Start > Control Panel > Devices and Printers > Add a printer.
2. Click Add a network, wireless or Bluetooth printer from the wizard.
3. In the printers list, select the one you want to use, and then click Next.
NOTE:
● The IP address for WSD printer is http://IP address/ws/ (example: http:// 111.111.111.111/ws/).
● If no WSD printer is displayed in the list, click The printer that I want isn't listed > Add a printer using a
TCP/IP address or hostname and select Web Services Device from Device type. Then enter the
printer's IP address.
4. Follow the instructions in the installation window.
Scanning using the WSD feature
1. Make sure that the machine is connected to your computer and powered on.
2. Place a single document face down on the document glass, or load the documents face up into the
document feeder.
3. Select Scan > Scan To WSD on the control panel.
NOTE: If you see Not Available message, check the port connection. Or check the printer driver for WSD is
correctly installed.
4. Select your computer name from Destination List.
5. Select the option you want and press OK.
6. Scanning begins.
ENWW Scanning from a computer 61
Page 70

62 Chapter 7 Scanning ENWW
Page 71

8 System and Other Settings
●
Machine setup
●
Paper setup
●
Report
●
Maintenance
●
Network setup
●
Accessing settings using the Embedded Web Server (EWS)
ENWW 63
Page 72

Machine setup
NOTE: Some menus may not appear in the display depending on options or models. If so, it is not applicable to
your machine.
To change the menu options:
● Press Menu > System Setup > Machine Setup on the control panel.
Item Description
Date & Time Sets the date and time.
Clock Mode Selects the format for displaying time between 12 hr. and 24 hr.
Language Sets the language of the text that appears on the control panel display.
Power Save Sets how long the machine waits before going to power save mode.
Wakeup Event When this option is "On", you can wake up the machine from the power saving mode with the following
When the machine does not receive data for an extended period of time, power consumption is
automatically lowered.
actions:
● loading paper in a tray
● opening or closing the front cover
● pulling a tray out or pushing a tray in
Auto Power O Turns power o automatically when the machine has been in power save mode for the length of time set in
Auto Power O > On > Timeout.
NOTE:
● To turn the machine on again, Press the (Power / Wake Up) button on the control panel.
● If you run the printer driver or HP Scan Application, the time automatically extends.
● While the machine is connected to the network or working on a print job, Auto Power O feature
doesn't work.
System Timeout Sets the time that the machine remembers previously used copy settings. After the timeout, the machine
restores the default copy settings.
Job Timeout Sets the length of time the printer waits before printing the last page of a print job that does not end with a
command to print the page.
Altitude Adjustment Optimize print quality according to the machine’s altitude.
Humidity Optimizes print quality according to the humidity in the environment.
Auto Continue Determine whether or not the machine continues printing when it detects the paper does not match the
paper settings.
● 0 Sec: This option allows you to continue printing when the paper size you have set is mismatched
with the paper in the tray.
● 30 Sec: If a paper mismatch occurs, an error message will display. The machine waits for about 30
second, then automatically clears the message and continue printing.
● O: If a paper mismatch occurs, the machine waits until you insert the correct paper.
64 Chapter 8 System and Other Settings ENWW
Page 73

Item Description
Auto Tray Switch Determine whether or not the machine continues printing when it detects the paper does not match. For
example, if both Tray 2 and Tray 3 are lled with the same size paper, the machine automatically prints
from Tray 3 after the Tray 2 runs out of paper.
NOTE: This option does not appear if you selected Auto for Paper Source from printer driver.
Paper Substitution Automatically substitutes the printer driver’s paper size to prevent the paper mismatch between Letter and
A4. For example, if you have A4 paper in the tray but you set the paper size to Letter in the printer driver,
the machine prints on A4 paper and vice versa.
Tray Protection Decides to use or not use the Auto Tray Switch feature.
If you set Tray 2 to On, for example, then Tray 2 is excluded during tray switching.
NOTE: This setting works for copy or print jobs.
Eco Settings Allows you to save print resources and enables ecofriendly printing.
● Default Mode: Select whether to turn the Eco mode on or o.
● Select Template: Selects the eco template set from the EWS.
ENWW Machine setup 65
Page 74

Paper setup
NOTE: Some menus may not appear in the display depending on options or models. If so, it is not applicable to
your machine.
To change the menu options:
● Press Menu > System Setup > Paper Setup on the control panel.
Item Description
Paper Size Choose the paper size for each tray. It must match the size of paper that is in the tray.
Paper Type Choose the type of the paper for each tray.
Paper Select Select the default paper tray for Copy and Print.
Margin Sets the default margins for all printing.
Tray Conrmation If tray conrmation is set, the conrmation message appears automatically when you load paper into an
Report
empty tray. The machine detects some paper sizes and types automatically. You can conrm or change the
detected size/type from the conrmation window.
NOTE: Some menus may not appear in the display depending on options or models. If so, it is not applicable to
your machine.
To change the menu options:
● Press Menu > System Setup > Report on the control panel.
Item Description
Conguration Prints a report on the machine's overall conguration.
Demo Page Prints the demo page to check whether your machine is printing properly or not.
Network Conguration Prints information on your machine’s network connection and conguration.
Supplies Information Prints supplies’ information.
Usage Counter Prints a usage page. The usage page contains the total number of pages printed.
PCL Font Prints the PCL font list.
66 Chapter 8 System and Other Settings ENWW
Page 75

Maintenance
NOTE: Some menus may not appear in the display depending on options or models. If so, it is not applicable to
your machine.
To change the menu options:
● Press Menu > System Setup > Maintenance on the control panel.
Item Description
Supplies Life Shows the supply life indicators
Image Mar. Allows you to adjust the color setting such as color registration, color density, etc.
Toner Low Alert Turn on/o Toner Low Alert
OPC Unit Low Alert Turn on/o OPC Unit Low Alert.
Serial Number Shows the machine’s serial number. When you call for service or register as a user on the website, you can
Paper Stacking If you use a machine in a humid area, or you are using the damp print media caused by a high humidity, the
nd this.
printouts on the output tray may be curled and may not be stacked properly. In this case, you can set the
machine to use this function to let printouts stack rmly. But, using this function will make the print speed
slow.
ENWW Maintenance 67
Page 76

Network setup
NOTE: Some menus may not appear in the display depending on options or models. If so, it is not applicable to
your machine.
To change the menu options:
● Press Menu > Network on the control panel.
Option Description
TCP/IP (IPv4) Selects the appropriate protocol and congure parameters to use the network
TCP/IP (IPv6) Selects this option to use the network environment through IPv6.
Ethernet Congure the network transmission speed or port.
Protocol Management HTTP You can set whether to use Web Service or not.
HTTPS Turn on secure communication over the network.
environment.
NOTE: There are lots of parameters to be set. If you are not sure, leave as is, or consult
the network administrator.
NOTE: Turn the power o and on after you change this option.
NOTE: Turn the power o and on after you change this option to O.
WINS You can congure the WINS server. WINS (Windows Internet Name Service) is used in the
Windows operating system.
SNMP V1/V2 You can set SNMP (Simple Network Management Protocol). Administrator’s can use SNMP
to monitor and manage machines on the network.
UPnP(SSDP) You can set UPNP protocol.
NOTE: Turn the power o and on after you change this option to O.
MDNS You can set mDNS (Multicast Domain Name System) settings.
Network Conguration This list shows information on your machine’s network connection and conguration.
Clear Settings Reverts the network settings to the default values.
NOTE: Turn the power o and on after you change this option.
68 Chapter 8 System and Other Settings ENWW
Page 77

Accessing settings using the Embedded Web Server (EWS)
Network-connected MFPs have an Embedded Web Server available to view and modify printer settings.
NOTE: Not available on the M433a model.
Use the following steps to open the EWS:
1. Print a conguration page to obtain your printer's IP address or host name.
2. Open a Web browser, and in the address line, type the IP address or host name exactly as it displays on the
conguration page. Press the Enter key on the computer keyboard. The EWS opens.
If the Web browser displays a There is a problem with this website’s security certicate message when
attempting to open the EWS, click Continue to this website (not recommended).
NOTE: Choosing Continue to this website (not recommended) will not harm the computer while
navigating within the EWS for the HP printer.
Modify settings in the EWS
The EWS displays printer settings in a “Read-only” view by default. Users must log in to the EWS to change any
settings. Use the following steps to log into the EWS:
1. Click Sign In in the upper-right of the EWS page.
2. Type admin for both the Username and Password.
ENWW Accessing settings using the Embedded Web Server (EWS) 69
Page 78

70 Chapter 8 System and Other Settings ENWW
Page 79

9 Maintenance
This chapter provides information about purchasing supplies, accessories, and maintenance parts available for
your machine.
●
Ordering supplies and accessories
●
Available consumables
●
Available accessories
●
Available maintenance parts
●
Storing the consumables
●
Redistributing toner
●
Toner cartridge installation
●
Imaging unit installation
●
Monitoring the supplies life
●
Setting the toner low alert
●
Cleaning the machine
●
Update the rmware
ENWW 71
Page 80

Ordering supplies and accessories
NOTE: Available accessories may dier from country/region to country/region. Contact your sales
representatives to obtain the list of available supplies and maintenance parts.
Available consumables
When supplies reach the end of their life span, you can order the following supplies for your machine:
Type Description Part number
Toner cartridge Standard-capacity replacement black toner cartridge CF256A
High-capacity replacement black toner cartridge
Imaging unit Replacement imaging drum CF257A
a
Not available on the M433a model.
NOTE: Depending on the options, percentage of image area and job mode used, the toner cartridge’s lifespan
may dier.
WARNING! When purchasing new toner cartridges or other supplies, these must be purchased in the same
country/region as the machine you are using. Otherwise, new toner cartridges or other supplies will be
incompatible with your machine due to dierent congurations of toner cartridges and other supplies according
to the specic country/region conditions.
a
CF256X
CAUTION: HP does not recommend using non-genuine HP toner cartridge such as relled or remanufactured
toner. HP cannot guarantee non-genuine HP toner cartridge's quality. Service or repair required as a result of
using non-genuine HP toner cartridges will not be covered under the machine’s warranty.
72 Chapter 9 Maintenance ENWW
Page 81

Available accessories
You can purchase accessories to enhance your machine's performance and capacity. These accessories must be
installed by a qualied HP authorized service provider, dealer, or the retailer where you bought the machine.
NOTE: Some features and optional goods may not be available depending on model or country/region.
Accessory Function
Optional tray
ADFa,
a
M436n Only
b
Plain paper 80 g/m2 (20 lbs bond).
c
Not available on the M433a model.
c
c
If you are experiencing frequent paper supply problems, you can attach an additional 250b sheet tray.
Automatic Document Feeder.
Available maintenance parts
To purchase maintenance parts, contact the source where you bought the machine. Replacing maintenance parts
can be performed only by an authorized service provider, dealer, or the retailer where you bought the machine.
The warranty does not cover the replacement of any maintenance parts once it has reached its “Average yield”.
Maintenance parts are replaced at specic intervals to avoid print quality and paper feed problems resulting from
worn parts, see table below. The purpose of which is to maintain your machine in top working condition. The
maintenance parts below should be replaced when the life span of each item has been met.
Parts
Transfer roller Approx. 100,000 pages
Fuser unit Approx. 100,000 pages
MP Tray 1 pick up roller Approx. 100,000 pages
Tray 2 pick up roller Approx. 100,000 pages
Tray 3 pick up roller Approx. 100,000 pages
MP Tray 1 Friction Pad Approx. 50,000 pages
Tray 2 friction pad Approx. 50,000 pages
Tray 3 friction pad Approx. 50,000 pages
Document feeder (ADF) Roller Approx. 100,000 pages
Document feeder (ADF) Rubber Approx. 50,000 pages
a
It will be aected by the operating system used, computing performance, application software, connecting method, media, media size,
and job complexity.
Average yield
a
ENWW Available accessories 73
Page 82

Storing the consumables
Consumables contain components that are sensitive to light, temperature, and humidity. HP suggests users
follow these recommendations to ensure optimal performance, highest quality, and longest life from your new
HP consumables.
Store the consumables in the same environment in which the printer will be used. This should be in controlled
temperature and humidity conditions. The consumables should remain in their original and unopened package
until installation.
If the consumables are removed from the printer, follow the instructions below to store the imaging unit
properly.
● Store the cartridge inside the protective bag from the original package.
● Store lying at (not standing on end) with the same side facing up as if it were installed in the machine.
● Do not store consumables in any of the following conditions:
– Temperature greater than 40°C (104°F).
– Humidity range less than 20% or greater than 80%.
– An environment with extreme changes in humidity or temperature.
– Direct sunlight or room light.
– Dusty places.
– A car for a long period of time.
– An environment where corrosive gases are present.
– An environment with salty air.
Imaging unit handling instructions
● Opening the imaging unit package prior to use dramatically shortens its useful shelf and operating life. Do
not store on the oor.
● If original packaging is not available, cover the top opening of the imaging unit with paper and store in a
dark cabinet.
● Do not touch the surface of the photoconductive drum in the imaging unit.
● Do not expose the imaging unit to unnecessary vibrations or shock.
● Never manually rotate the drum, especially in the reverse direction; this can cause internal damage and
toner spillage.
Toner cartridge usage
HP cannot recommend the use of non-HP toner cartridges, either new or remanufactured.
NOTE: For HP printer products, the use of a non-HP toner cartridge or a relled toner cartridge does not aect
either the warranty to the customer or any HP support contract with the customer. However, if product failure or
damage is attributable to the use of a non-HP toner cartridge or relled toner cartridge, HP will charge its
standard time and materials charges to service the product for the particular failure or damage.
74 Chapter 9 Maintenance ENWW
Page 83

Estimated toner cartridge life
Print cartridge life is approximate, based on average A4 /Letter-size page count with ISO coverage. Declared
cartridge yield value in accordance with ISO/IEC 19798. Actual yields vary considerably based on images printed
and other factors. For more information, go to http://www.hp.com/go/learnaboutsupplies.
Redistributing toner
When the toner cartridge is near the end of its life:
● White streaks or light printing occurs and/or density varies from side to side.
● The Status LED blinks red. The toner-related message saying that the toner is low may appear on the
display.
● The computer’s Printing Status program window appears on the computer telling you which cartridge is low
on toner.
If this happens, you can temporarily improve print quality by redistributing the remaining toner in the cartridge. In
some cases, white streaks or light printing will still occur even after you have redistributed the toner.
NOTE: Illustrations on this user’s guide may dier from your machine depending on its options or models.
Check your machine type.
CAUTION: If toner gets on your clothing, wipe it o with a dry cloth and wash clothing in cold water. Hot water
sets toner into fabric.
1.
ENWW Redistributing toner 75
Page 84

2.
3.
4.
76 Chapter 9 Maintenance ENWW
Page 85

5.
ENWW Redistributing toner 77
Page 86

Toner cartridge installation
1. Remove toner cartridge from shipping bag.
TIP: Keep the orange plug in place. It is required for toner cartridge replacement.
2. Hold the toner cartridge as shown and rotate the toner cartridge end to end to redistribute toner in
cartridge.
78 Chapter 9 Maintenance ENWW
Page 87

3. Pull the red or orange pull tab and remove it completely.
ENWW Toner cartridge installation 79
Page 88

4. Align toner cartridge with the opening and push until toner cartridge locks into place. An audible click will
indicate the cartridge is locked into place.
5. Close front door and right door.
80 Chapter 9 Maintenance ENWW
Page 89

Imaging unit installation
CAUTION: Leave front and right door open until all installation steps are complete.
1. Remove imaging unit from shipping bag and place it on a clean at surface.
2. Loosen shipping tape from the bottom and both sides.
ENWW Imaging unit installation 81
Page 90

3. Remove orange shipping locks from imaging unit.
82 Chapter 9 Maintenance ENWW
Page 91

4. Remove remaining shipping tape and pull protective sheet from imaging unit.
CAUTION: Do not touch exposed drum roller surface.
NOTE: Do not expose the imaging unit to light for more than a few minutes.
ENWW Imaging unit installation 83
Page 92

5. Remove orange plug on back of imaging unit
CAUTION: Once the plug is removed, the imaging unit must remain level. Contents may spill out if the
imaging unit is tipped.
6. With right and front doors fully open, carefully lift imaging unit into position, so the bottom of imaging unit
aligns with the raised alignment rails inside printer cabinet as shown.
CAUTION: Do not touch exposed drum roller surface.
84 Chapter 9 Maintenance ENWW
Page 93

7. Install imaging unit and ensure it is fully seated.
NOTE: If imaging unit binds or does not slide easily into cabinet, verify the right door is fully open, realign
imaging unit, and install.
ENWW Imaging unit installation 85
Page 94

8. Connect the electrical cable as shown and route cable into holder as shown.
CAUTION: Make sure the connector is fully seated in the socket.
86 Chapter 9 Maintenance ENWW
Page 95

9. Install two screws as shown.
10. Ensure electrical connector is plugged in and fully seated. Ensure the two screws are securely installed.
ENWW Imaging unit installation 87
Page 96

Monitoring the supplies life
If you experience frequent paper jams or printing problems, check the number of pages the machine has printed
or scanned. Replace the corresponding parts, if necessary.
NOTE:
● Some menus may not appear in the display depending on options or models. If so, it is not applicable to
your machine.
● It may be necessary to press OK to navigate to lower-level menus for some models.
1. Select Menu > System Setup > Maintenance > Supplies Life on the control panel.
2. Select the option you want and press OK.
3. Press the Stop button to return to ready mode.
Setting the toner low alert
If the amount of toner in the cartridge is low, a message or LED informing the user to change the toner cartridge
appears. You can set the option for whether or not this message or LED appears.
NOTE: It may be necessary to press OK to navigate to lower-level menus for some models.
1. Select Menu > System Setup > Maintenance > Toner Low Alert on the control panel.
2. Select the option you want.
3. Press OK to save the selection.
88 Chapter 9 Maintenance ENWW
Page 97

Cleaning the machine
If printing quality problems occur or if you use your machine in a dusty environment, you need to clean your
machine regularly to keep it in the best printing condition and use your machine longer.
CAUTION:
● Cleaning the cabinet of the machine with cleaning materials containing large amounts of alcohol, solvents,
or other strong substances can discolor or distort the cabinet.
● If your machine or the surrounding area is contaminated with toner, we recommend you use a cloth or
tissue dampened with water to clean it. If you use a vacuum cleaner, toner blows in the air and might be
harmful to you.
Cleaning the outside
Clean the machine cabinet with a soft, lint-free cloth. Dampen the cloth slightly with water, but be careful not to
let any water drip onto or into the machine.
Cleaning the inside
During the printing process, paper, toner, and dust particles can accumulate inside the machine. This buildup can
cause print quality problems, such as toner specks or smearing. Cleaning the inside of the machine clears and
reduces these problems.
CAUTION:
● To prevent damage to the toner cartridge, do not expose it to light for more than a few minutes. Cover it
with a piece of paper, if necessary.
● Do not touch the green area of the toner cartridge. Use the handle on the cartridge to avoid touching this
area.
● Use a dry lint free cloth when cleaning the inside of the machine, be careful not to damage the transfer
roller or any other inside parts. Do not use solvents such as benzene or thinner. Printing quality problems
can occur and cause damage to the machine.
NOTE:
● Use a dry lint-free cloth to clean the machine.
● Turn the machine o and unplug the power cord. Wait for the machine to cool down.
● Illustrations on this user’s guide may dier from your machine depending on its options or models. Check
your machine type.
ENWW Cleaning the machine 89
Page 98

Cleaning the roller
NOTE:
● Turn the machine o and unplug the power cord. Wait for the machine to cool down.
● Illustrations on this user’s guide may dier from your machine depending on its options or models. Check
your machine type.
1.
2.
90 Chapter 9 Maintenance ENWW
Page 99

3.
4.
5.
ENWW Cleaning the machine 91
Page 100

M436nda models only
1.
2.
3.
92 Chapter 9 Maintenance ENWW
 Loading...