

Page 1
HP Color LaserJet CM1312 MFP Series
Getting Started Guide
Read me First
入门指南
请先阅读
Panduan Persiapan
Baca Dulu saya
시작 설명서
먼저 읽어 보십시오.
คู่มือการเริ่มต้นใช้งาน
อ่านข้อมูลนี้ก่อน
入門指南
請先閱讀
ZHTW
EN
KO
ID
ZHCN
TH
Terdaftar di Deperindag Provinsi DKI Jakarta No :
0089/1.824.51
Page 2

Copyright and License
© 2008 Copyright Hewlett-Packard Development Company, L.P.
Reproduction, adaptation or translation without prior written
permission is prohibited, except as allowed under the copyright
laws.
The information contained herein is subject to change without
notice.
版权与许可
© 2008 版权所有 Hewlett-Packard Development
Company, L.P.
除非版权法/著作权法允许,否则,在事先未经书面
许可的情况下,严禁复制、改编或翻译。
此处包含的信息如有更改,恕不另行通知。
The only warranties for HP products and services are set forth in
the express warranty statements accompanying such products
and services. Nothing herein should be construed as constituting
an additional warranty. HP shall not be liable for technical or
editorial errors or omissions contained herein.
Part number: CC431-90905
Edition 1, 4/2008
FCC Regulations
This equipment has been tested and found to comply with the
limits for a Class B digital device, pursuant to Part 15 of the FCC
rules. These limits are designed to provide reasonable protection
against harmful interference in a residential installation. This
equipment generates, uses, and can radiate radio-frequency
energy. If this equipment is not installed and used in accordance
with the instructions, it may cause harmful interference to
radio communications. However, there is no guarantee that
interference will not occur in a particular installation. If this
equipment does cause harmful interference to radio or television
reception, which can be determined by turning the equipment
off and on, correct the interference by one or more of the
following measures:
• Reorient or relocate the receiving antenna.
HP 产品和服务的保修仅以随该产品和服务提供的
明确保修声明为准。此处内容不代表任何额外保
修。HP 公司对此处任何技术性或编辑性的错误或遗
漏概不负责。
部件号:CC431-90905
第 1 版,2008 年 4 月
FCC 规则
本设备经测试,确认符合 FCC 规则第 15 部分有
关 B 级数字设备的限制规定。在住宅区安装时,这
些限制为防止有害干扰提供了合理保护。本设备可
以产生、利用并发射无线射频能量。如果不按说明
中的要求安装和使用本设备,有可能对无线电通信
产生有害干扰。但也不能保证在特定的安装中不会
产生干扰。如果本设备确实对无线电或电视接收造
成干扰(可以通过开关设备来确定),可通过以下
一种或多种措施排除干扰:
• 重新调整接收天线的方向或位置。
• Increase separation between equipment and receiver.
• Connect equipment to an outlet on a circuit different from
that to which the receiver is located.
• Consult your dealer or an experienced radio/TV technician.
Any changes or modifications to the product that are not
expressly approved by HP could void the user’s authority to
operate this equipment. Use of a shielded interface cable is
required to comply with the Class B limits of Part 15 of FCC
rules. For more regulatory information, see the electronic
user guide. Hewlett-Packard shall not be liable for any direct,
indirect, incidental, consequential, or other damage alleged in
connection with the furnishing or use of this information.
Trademark Credits
Windows® is a U.S. registered trademark of Microsoft
Corporation.
• 增加设备和接收器之间的距离。
•
将设备连接到与接收器所用电路不同的电源插座上。
• 咨询代理商或经验丰富的无线电/电视技术人员。
未经 HP 明确批准而对产品进行任何更改或修改都
将导致用户不能操作此设备。使用屏蔽的接口电缆
时必须遵循 FCC 规则第 15 部分中的 B 类限制。
有关更多管制信息,请参阅电子版《用户指南》。
对于由本信息的提供或使用所引起的任何直接、间
接、偶然、继发性或其它损失,Hewlett-Packard
概不负责。
商标说明
Windows® 是 Microsoft Corporation 在美国的注
册商标。
Page 3
EN
In-box documentation and CD contents
ZHCN
ID
KO
TH
ZHTW
EN
随附文档和 CD 内容
Dokumentasi dalam kemasan dan isi CD
제품과 함께 제공되는 설명서 및 CD 내용물
เอกสารและแผ่นซีดีที่ให้มาในกล่อง
包裝盒說明文件及 CD 內容
Getting Started Guide
Windows CD/ Macintosh CD
• User Guide
• Quick Reference Guide
• Software Drivers
• Installer
Readiris CD
HP Support Flyer
TH
คู่มือการเริ่มต้นใช้งาน
Windows CD/ Macintosh CD
• คู่มือผู้ใช้
• คู่มืออ้างอิงอย่างรวดเร็ว
• ไดรเวอร์ซอฟต์แวร์
• โปรแกรมติดตั้ง
Readiris CD
HP Support Flyer
ZHCN
ID
KO
入门指南
Windows CD/ Macintosh CD
• 用户指南
• 快速参考指南
• 软件驱动程序
• 安装程序
Readiris CD
HP 支持说明
Panduan Persiapan
CD Windows/ CD Macintosh
• Melihat Panduan Pengguna
• Panduan Referensi Cepat
• Driver Perangkat Lunak
• Penginstal
CD Readiris
Brosur Dukungan HP
시작 설명서
Windows CD/Macintosh CD
• 사용 설명서
• 빠른 참조 설명서
• 소프트웨어 드라이버
• 설치 프로그램
Readiris CD
HP 지원 안내서
ZHTW
入門指南
Windows CD/ Macintosh CD
• 使用指南
• 快速參考指南
• 軟體驅動程式
• 安裝程式
Readiris CD
HP 支援傳單
1
Page 4
1
2
Prepare the site
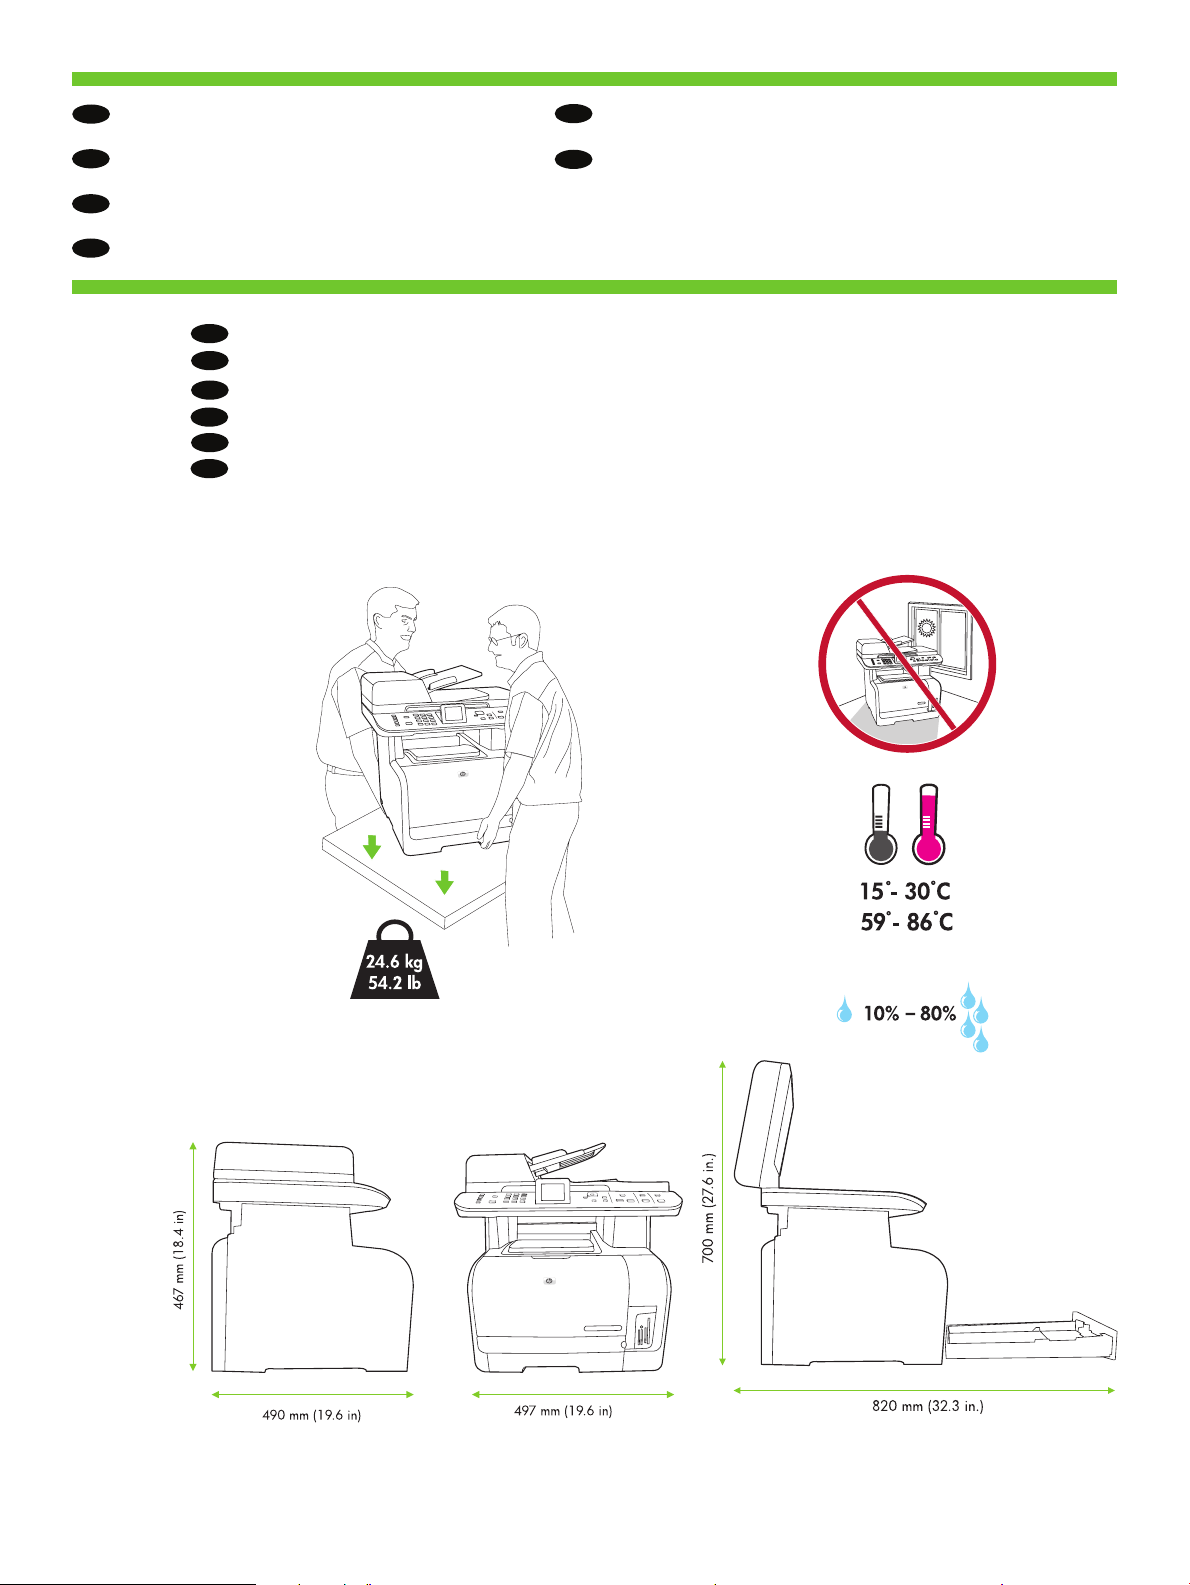
Select a sturdy, well-ventilated, dust free area to position the product.
选择一处通风良好并且免受灰尘侵扰的固定场所安放本产品。
准备场所
Pilih tempat yang kokoh, berventilasi baik dan bebas debu untuk meletakkan produk.
Menyiapkan situs
제품을 설치하기 위해 안정감 있고 환기가 잘 되며 먼지가 없는 장소를 선택하십시오.
설치 공간 확보
เลือกวางเครื่องพิมพ์ไว้ในบริเวณที่แข็งแรง มีการระบายอากาศที่ดีและปราศจากฝุ่น
เตรียมสถานที่ติดตั้ง
請選擇一個堅固、通風良好且無塵的區域來放置本產品。
準備現場
ZHTW
ZHTW
EN
TH
ZHCN
ID
KO
EN
TH
ZHCN
ID
KO
Page 5
EN
Setup the Product
TH
ติดตั้งเครื่องพิมพ์
ZHCN
ID
KO
2
安装产品
Mengatur Produk.
제품 설치
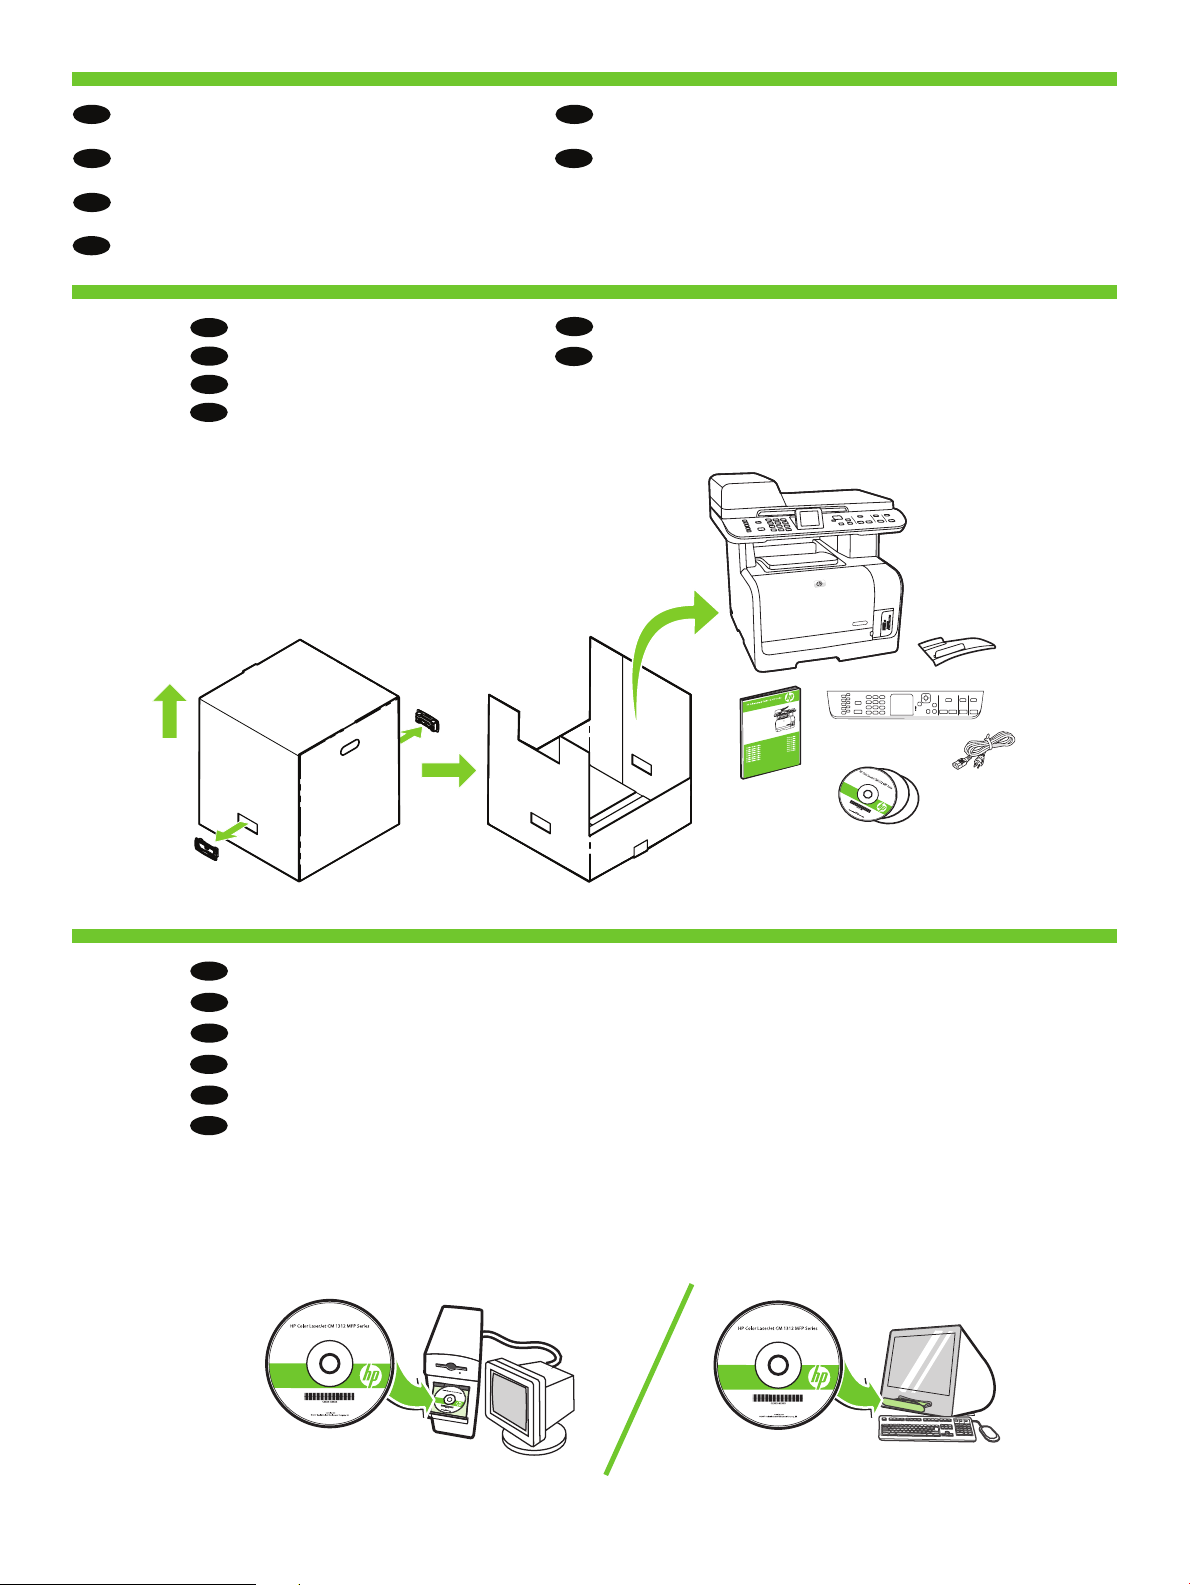
Unpack the product.
EN
ZHCN
打开产品包装。
Buka kemasan produk.
ID
제품을 개봉하십시오.
KO
ZHTW
TH
ZHTW
安裝產品
นำเครื่องออกจากกล่องบรรจุ
拆開產品的包裝。
3
Insert the CD. Follow the setup instructions on the screen or in this guide.
EN
ZHCN
插入 CD。按照本指南或屏幕上的安装说明进行操作。
Masukkan CD. Ikuti petunjuk pengaturan di layar atau dalam panduan ini.
ID
CD를 넣습니다. 이 설명서 또는 화면의 설치 지침을 따르십시오.
KO
ใส่แผ่นซีดี ทำตามคำแนะนำการติดตั้งบนหน้าจอหรือในคู่มือฉบับนี้
TH
ZHTW
插入 CD。依照螢幕上的設定指示或本指南操作。
3
Page 6
4
5
EN
ZHCN
ID
KO
TH
ZHTW
EN
ZHCN
ID
KO
TH
ZHTW
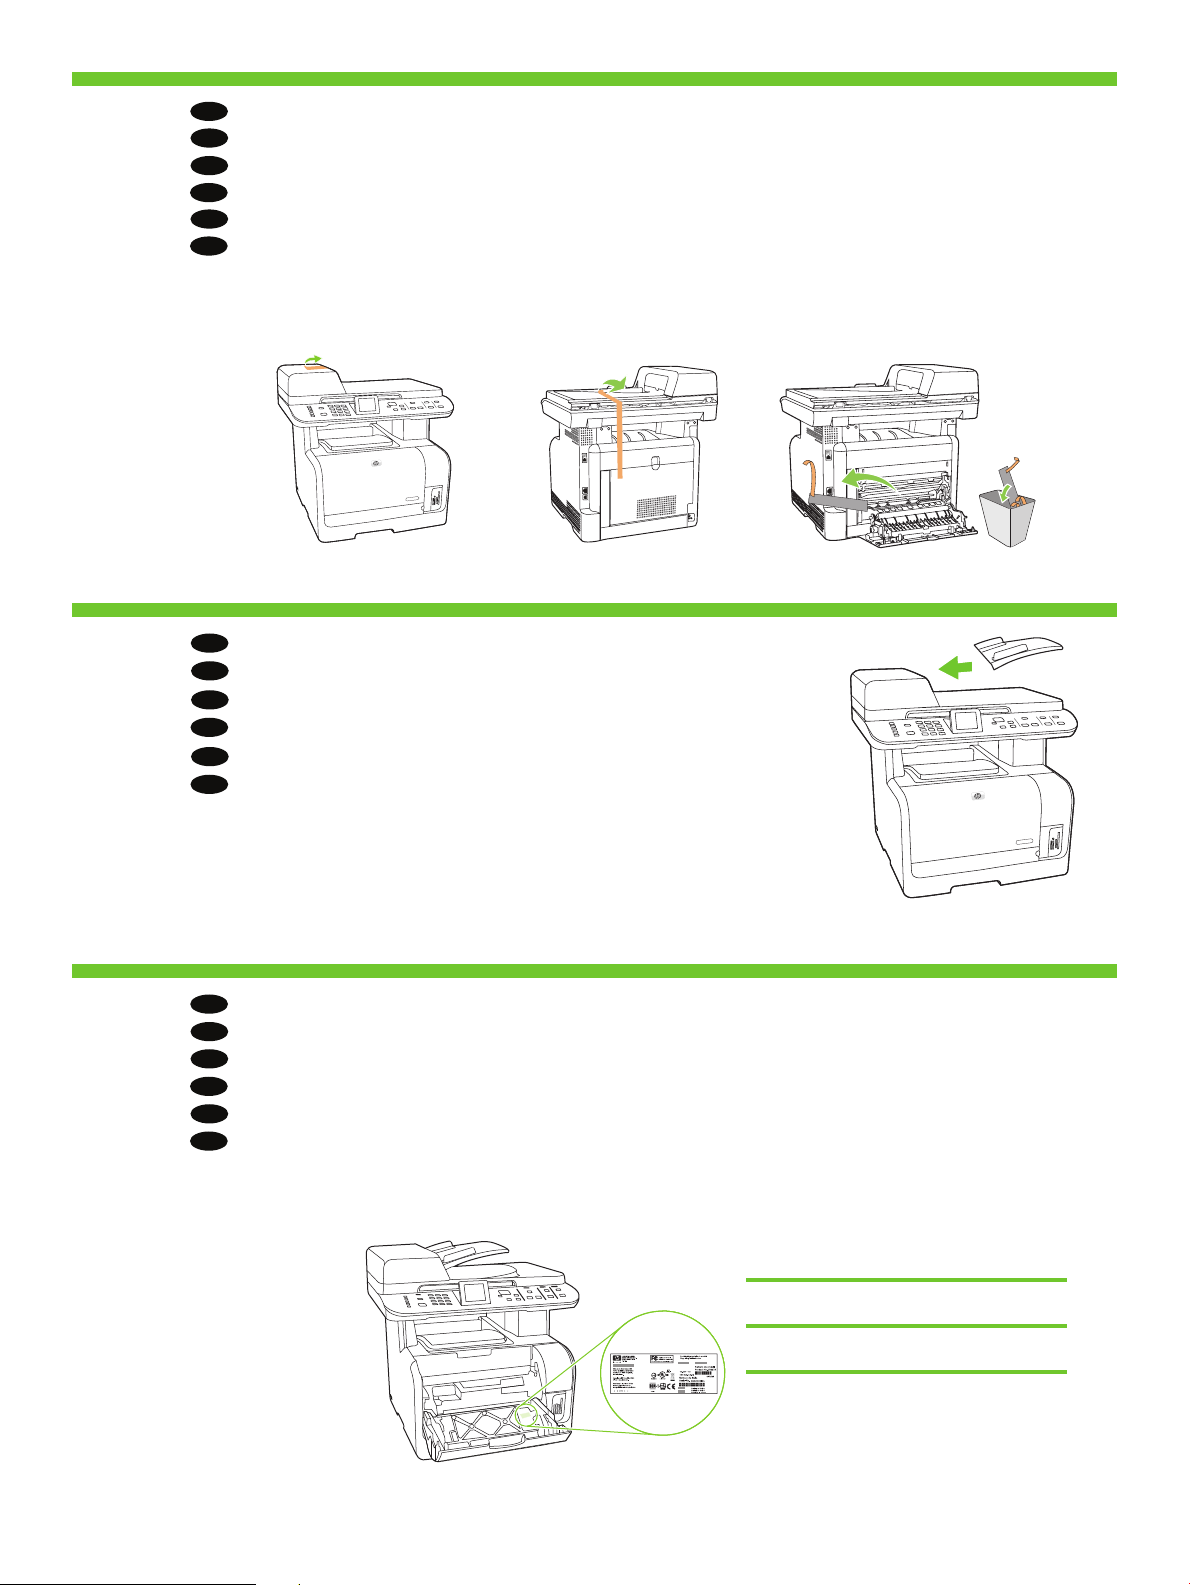
Remove all orange shipping tape from the product.
从产品上撕下所有橙色装运带。
Lepaskan semua pita kemasan pengiriman warna oranye dari produk.
제품의 오렌지색 포장재를 모두 제거합니다.
ลอกเทปสีส้มทั้งหมดที่มาพร้อมกับกล่องบรรจุออก
將產品上所有的橘色包裝封條移除。
Install accessories.
安装附件。
Menginstal aksesori.
부속품을 설치합니다.
ติดตั้งอุปกรณ์เสริม
安裝配件。
6
Record your Serial and Product number for product registration.
EN
ZHCN
记下用于产品注册的序列号和产品编号。
Catat nomor Seri dan Produk untuk pendaftaran produk.
ID
제품 등록을 위한 일련 번호 및 제품 번호를 기록해 둡니다.
KO
จดบันทึกหมายเลขเครื่องและหมายเลขผลิตภัณฑ์ของคุณสำหรับการลงทะเบียนผลิตภัณฑ์
TH
將產品序號及產品編號記錄下來以供產品註冊。
ZHTW
Model # CM1312 MFP Series
Product #
Serial #
4
Page 7
7
8
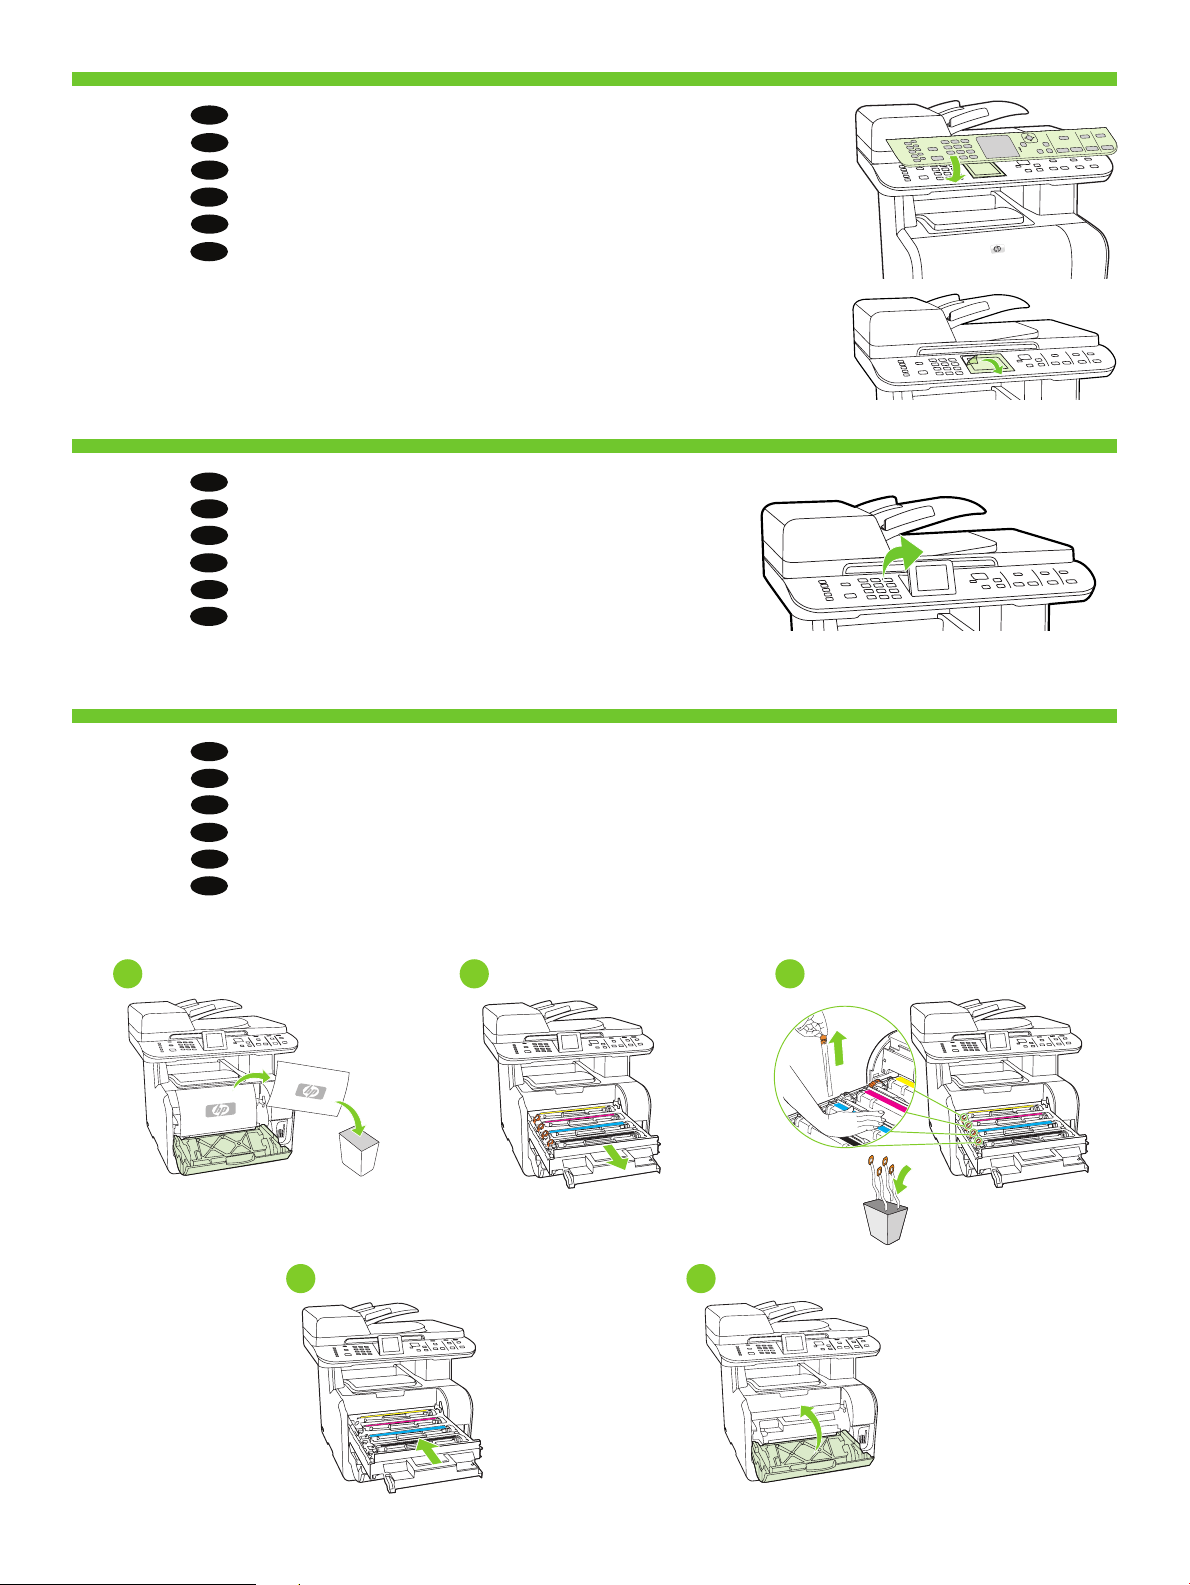
Attach the control panel faceplate. Remove the clear cover.
EN
ZHCN
连接控制面板。取下保护膜。
Pasangkan pelat muka panel kontrol. Lepaskan penutup bening.
ID
제어판 전면 덮개를 씌운 다음 보호용 필름을 떼어 냅니다.
KO
ใส่แผ่นปิดแผงควบคุม ลอกแผ่นปิดหน้าจอออก
TH
裝上控制面板。將透明膠片撕開。
ZHTW
Rotate the display.
EN
ZHCN
转动显示屏。
Putar layar.
ID
디스플레이를 들어 올립니다.
KO
ปรับตำแหน่งหน้าจอ
TH
ZHTW
旋轉顯示幕。
9
Prepare the print cartridges.
EN
ZHCN
准备打印墨盒。
ID
Siapkan kartrid cetak.
인쇄 카트리지의 밀봉 테이프를 떼어냅니다.
KO
เตรียมตลับหมึกพิมพ์
TH
準備碳粉匣。
ZHTW
1
4
2
5
3
5
Page 8
10
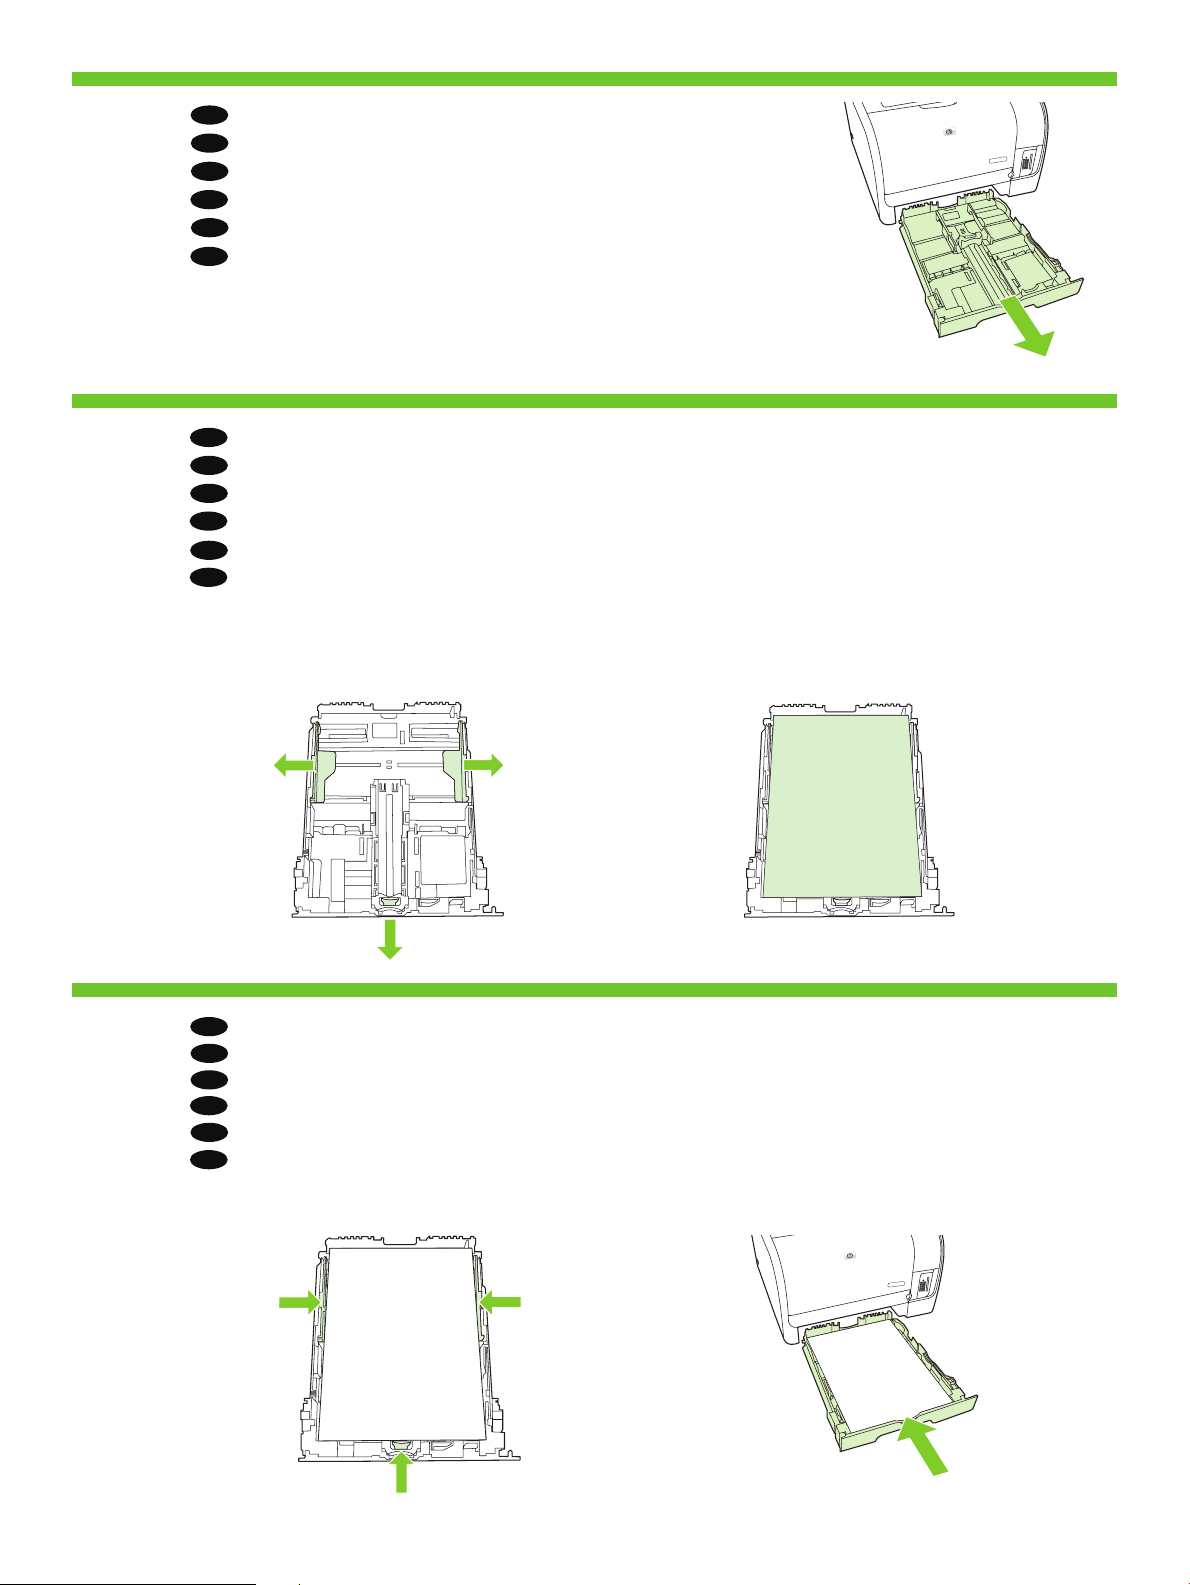
Open the paper tray.
EN
ZHCN
打开纸盘。
Buka baki kertas.
ID
용지함을 엽니다.
KO
เปิดถาดกระดาษ
TH
開啟紙匣。
ZHTW
11
EN
ZHCN
ID
KO
TH
ZHTW
Adjust the paper tray guides and load paper.
调整纸盘导槽并放入纸张。
Sesuaikan pemandu baki kertas kemudian muatkan kertas.
용지함 조정대를 조정한 다음 용지를 넣습니다.
ปรับตัวกั้นกระดาษและใส่กระดาษ
調整紙匣導板並裝入紙張。
12
EN
ZHCN
ID
KO
TH
ZHTW
Adjust the paper guides against the paper and reinsert tray.
根据纸张大小调整纸张导槽,然后重新插入纸盘。
Sesuaikan pemandu kertas pada kertas kemudian masukkan kembali bakinya.
용지에 맞게 용지 조정대를 조정하고 용지함을 다시 삽입합니다.
ปรับตัวกั้นกระดาษให้ชิดกับกระดาษ และใส่ถาดกลับเข้าที่
依紙張大小調整紙張導板,然後重新插入紙匣。
6
Page 9

13
14
7
Connect the power cord.
Note: Do not connect the USB cable until prompted by the software.
Connect the phone cord.
连接电源线。
注意:在软件提示之前请勿连接 USB 电缆。
连接电话线。
Hubungkan kabel daya.
Catatan: Jangan menghubungkan kabel USB sampai diperintahkan oleh
perangkat lunak.
Hubungkan kabel telepon.
전원 코드를 연결합니다.
참고: 소프트웨어에서 지시하기 전에는 USB 케이블을 연결하지 마십시오.
전화 코드를 연결합니다.
เชื่อมต่อสายไฟ
หมายเหตุ: ห้ามเชื่อมต่อสายเคเบิล USB จนกว่าซอฟต์แวร์จะแสดงข้อความ
เชื่อมต่อสายโทรศัพท์
連接電源線。
注意:未出現軟體提示前,請不要連結 USB 纜線。
連接電話線。
ZHTW
ZHTW
ZHTW
EN
TH
ZHCN
ID
KO
EN
TH
ZHCN
ID
KO
EN
TH
ZHCN
ID
KO
Page 10

15
16
Turn on the product.
EN
ZHCN
打开本产品的电源。
Nyalakan produk.
ID
제품의 전원을 켭니다.
KO
เปิดเครื่อง
TH
開啟本產品電源。
ZHTW
Set the language and the location on the control panel.
EN
ZHCN
在控制面板上设置语言和位置。
ID
Atur bahasa dan lokasi pada panel kontrol.
제어판에서 언어 및 지역을 선택합니다.
KO
ตั้งค่า ภาษา และ ที่ตั้ง บนแผงควบคุม
TH
ZHTW
在控制面板上設定語言和位置。
8
Page 11

17
EN
ZHCN
ID
KO
TH
ZHTW
Connect the network cable. Verify a network light is illuminated on the network port.
连接网络电缆。检查网络端口上的网络指示灯是否亮起。
Hubungkan kabel jaringan. Pastikan lampu jaringan menyala pada port jaringan.
네트워크 케이블을 연결합니다. 네트워크 포트에서 네트워크 표시등이 켜졌는지 확인합니다.
เชื่อมต่อสายเคเบิลเครือข่าย ตรวจสอบไฟแสดงเครือข่ายที่พอร์ตเครือข่ายว่าสว่างอยู่หรือไม่
連接網路纜線。確認網路連接埠上的網路指示燈是否亮起。
EN
ZHCN
ID
KO
Test the setup
测试安装
Lakukan tes pada pengaturan
설치 테스트
TH
ZHTW
ทดสอบการตั้งค่า
測試設定
9
Page 12

18
EN
ZHCN
ID
KO
TH
ZHTW
Optional: Insert a memory card into the reader and view photos on the display.
可选:将存储卡插入读卡器并在显示屏上查看照片。
Opsional: Masukkan kartu memori ke dalam pembaca kemudian lihat foto di layar.
옵션: 판독기에 메모리 카드를 삽입하고 디스플레이에서 사진을 확인합니다.
ทำหรือไม่ก็ได้: ใส่การ์ดหน่วยความจำลงในช่องอ่านการ์ด และดูภาพที่ปรากฏบนหน้าจอ
選擇性:將記憶卡插入讀卡機並在顯示幕上檢視相片。
19
EN
Print a Configuration Report, Press Setup, select Reports, press OK, select Configuration Report, press OK to
test printing.
ZHCN
打印一份配置报告:按设置,选择报告,按 OK,选择配置报告,按 OK 以测试打印。
ID
Mencetak Configuration Report (Laporan Konfigurasi), Tekan Setup (Pengaturan), pilih Reports (Laporan),
tekan OK, pilih Configuration Report (Laporan Konfigurasi), tekan OK untuk menguji pencetakan.
구성 보고서를 인쇄합니다. 설정을 눌러 보고서를 선택하고 OK를 누른 다음 구성 보고서를 선택하고 OK를
KO
누르면 테스트 페이지가 인쇄됩니다.
พิมพ์ รายงานคอนฟิเกอเรชัน กด การตั้งค่า เลือก รายงาน กด OK เลือก รายงานคอนฟิเกอเรชัน กด OK
TH
เพื่อทดสอบการพิมพ์
ZHTW
列印組態報告,按「設定」,選擇「報告」,按「OK」,選擇「組態報告」,按「OK」以測試列印。
10
Page 13

20
Place the Configuration Report in the ADF and press Start Copy Black to test the ADF.
EN
ZHCN
将配置报告放入 ADF,然后按开始复印黑色来测试 ADF。
ID
Taruh Laporan Konfigurasi dalam ADF kemudian tekan Start Copy Black (Mulai Salin Hitam) untuk menguji ADF.
ADF에 구성 보고서를 올려 놓고 복사 시작에서 흑백 버튼을 눌러 ADF를 테스트합니다.
KO
วาง รายงานคอนฟิเกอเรชัน ลงใน ADF และกด เริ่มถ่ายเอกสารสีดำ เพื่อทดสอบ ADF
TH
ZHTW
將組態報告放入 ADF ,然後按「開始影印黑色」按鈕來測試 ADF。
21
EN
ZHCN
ID
KO
TH
ZHTW
Place the Configuration Report on the flatbed scanner and press Start Copy Color to test the Color copy.
将配置报告放在平板扫描仪上,然后按开始复印彩色来测试彩色复印。
Taruh Laporan Konfigurasi pada pemindai alas rata kemudian tekan Start Copy Color (Mulai Salin Warna)
untuk menguji salinan yang Berwarna.
평판 스캐너에 구성 보고서를 올려 놓고 복사 시작에서 컬러 버튼을 눌러 컬러 복사를 테스트합니다.
วาง รายงานคอนฟิเกอเรชัน บนเครื่องสแกนแบบแท่นวางและกด เริ่มถ่ายเอกสารสี เพื่อทดสอบการถ่ายเอกสารสี
將組態報告放在平台掃描器上,然後按「開始影印彩色」按鈕來測試彩色影印。
11
Page 14

EN
Install the software
TH
ติดตั้งซอฟต์แวร์
ZHCN
ID
KO
安装软件
Menginstal perangkat lunak
소프트웨어 설치
ZHTW
安裝軟體
EN
ZHCN
ID
KO
TH
ZHTW
EN
ZHCN
ID
KO
TH
ZHTW
Go to step 22 for USB installation.
USB 安装请转至步骤 22。
Maju ke langkah 22 untuk penginstalan USB.
USB를 설치하려면 22단계로 이동하십시오.
ไปยังขั้นตอนที่ 22 สำหรับการติดตั้ง USB
USB安裝請前往步驟22。
Go to step 25 for Network installation.
网络安装请转至步骤 25。
Maju ke langkah 25 untuk penginstalan Jaringan.
네트워크를 설치하려면 25단계로 이동하십시오.
ไปยังขั้นตอนที่ 25 สำหรับการติดตั้งเครือข่าย
網路安裝請前往步驟25。
12
EN
ZHCN
ID
KO
TH
ZHTW
Go to step 28 for standalone fax setup.
独立传真机设置请转至步骤 28。
Maju ke langkah 28 untuk penginstalan faks yang
berdiri sendiri (standalone).
독립형 팩스를 설치하려면 28단계로 이동하십시오.
ไปยังขั้นตอนที่ 28 สำหรับการตั้งค่าแฟกซ์
獨立傳真設定請前往步驟28。
Page 15

22
EN
ZHCN
ID
KO
Install the software from the CD. Follow the onscreen instructions.
EN
ZHCN
从 CD 安装软件。按照屏幕上的说明进行操作。
Menginstal perangkat lunak dari CD. Ikuti petunjuk di layar.
ID
CD에서 소프트웨어를 설치합니다. 화면의 지침을 따릅니다.
KO
ติดตั้งซอฟต์แวร์จากแผ่นซีดี ทำตามคำแนะนำบนหน้าจอ
TH
ZHTW
從 CD 安裝軟體。依照螢幕上的指示操作。
USB installation
USB 安装
Penginstalan USB
USB 설치
TH
ZHTW
การติดตั้ง USB
USB 安裝
23
EN
ID
KO
ZHTW
KO
Connect the USB cable when prompted by the software.
ZHCN
当软件提示时,连接 USB 电缆。
Hubungkan kabel USB saat diperintahkan oleh perangkat lunak.
소프트웨어에서 USB 케이블을 연결하라는 메시지가 나타나면 USB 케이블을 연결하십시오.
เชื่อมต่อสายเคเบิล USB เมื่อซอฟต์แวร์แสดงข้อความให้เริ่มทำ
TH
軟體出現提示時,連接 USB 纜線。
Note: If installation does not continue, make sure that you are using a USB 2.0 certified cable.
EN
ZHCN
注意:如果安装无法继续,请确认您使用的是符合 USB 2.0 认证的电缆。
ID
Catatan: Jika penginstalan tidak berlanjut, periksa dan pastikan bahwa Anda memang menggunakan kabel
USB 2.0 bersertifikat.
참고: 설치가 계속되지 않는 경우 USB 2.0 인증 케이블을 사용하고 있는지 확인합니다.
หมายเหตุ: หากการติดตั้งไม่ดำเนินการต่อ ตรวจดูให้แน่ใจว่าคุณกำลังใช้สายเคเบิล USB 2.0 ที่ผ่านการรับรอง
TH
ZHTW
注意:如果安裝無法繼續,請確定您使用的是符合 USB 2.0 認證的纜線。
13
Page 16

24
USB installation is complete. Print a test page.
EN
ZHCN
USB 安装已完成。打印一份测试页。
Penginstalan USB selesai. Cetak halaman uji.
ID
USB 설치가 완료되었습니다. 테스트 페이지를 인쇄합니다.
KO
การติดตั้ง USB เสร็จสมบูรณ์ พิมพ์หน้าทดสอบ
TH
ZHTW
USB 安裝已完成。列印測試頁。
EN
ZHCN
ID
KO
TH
ZHTW
Go to step 29.
转至步骤 29。
Maju ke langkah 29.
29단계로 이동하십시오.
ไปยังขั้นตอนที่ 29
請前往步驟29。
14
Page 17

25
EN
Network installation
ZHCN
网络安装
Penginstalan Jaringan
ID
네트워크 설치
KO
Find the IP address on the Configuration report.
EN
ZHCN
在配置报告中找到 IP 地址。
Temukan alamat IP pada laporan Konfigurasi.
ID
KO
구성 보고서에서 IP 주소를 확인합니다.
ดู IP แอดเดรสที่รายงานคอนฟิเกอเรชัน
TH
ZHTW
找尋組態報告上的 IP 位址。
Note: You might need to assign an IP address depending on type of network installed. See your system
EN
การติดตั้งเครือข่าย
TH
網路安裝
ZHTW
administrator.
ZHCN
注意:您可能需要分配 IP 地址,具体取决于安装所处的网络类型。请向系统管理员咨
询。
Catatan: Mungkin Anda harus menentukan alamat IP, tergantung jenis jaringan yang sudah diinstal. Tanyakan
ID
kepada administrator sistem Anda.
참고: 설치한 네트워크의 유형에 따라 IP 주소를 할당해야 할 수도 있습니다. 시스템 관리자를
KO
참조하십시오.
หมายเหตุ: คุณอาจต้องระบุ IP แอดเดรส ซึ่งขึ้นอยู่กับประเภทเครือข่ายที่ติดตั้งไว้ ให้ติดต่อผู้ดูแลระบบของคุณ
TH
ZHTW
注意:依據網路安裝的類型,您可能需要指定一個 IP 位址。請洽詢系統管理員。
15
Page 18

26
27
Install the software from the CD. Follow the onscreen instructions.
EN
ZHCN
从 CD 安装软件。按照屏幕上的说明进行操作。
Menginstal perangkat lunak dari CD. Ikuti petunjuk di layar.
ID
CD에서 소프트웨어를 설치합니다. 화면의 지침을 따릅니다.
KO
ติดตั้งซอฟต์แวร์จากแผ่นซีดี ทำตามคำแนะนำบนหน้าจอ
TH
ZHTW
從 CD 安裝軟體。依照螢幕上的指示操作。
Network installation is complete. Print a test page.
EN
网络安装已完成。打印一份测试页。
ZHCN
Penginstalan Jaringan selesai. Cetak halaman uji.
ID
네트워크 설치가 완료되었습니다. 테스트 페이지를 인쇄합니다.
KO
การติดตั้งเครือข่ายเสร็จสมบูรณ์ พิมพ์หน้าทดสอบ
TH
網路安裝已完成。列印測試頁。
ZHTW
16
Page 19

28
Fax Setup
EN
ZHCN
传真设置
Pengaturan Faks
ID
KO
팩스 설정
If you completed the software installation, your fax system has been setup. If you did not complete the software
EN
installation, on the control panel press Setup, use the arrows to select Fax Setup, press OK, then select Fax
Setup Utility and press OK. Follow the instructions on the screen to complete the setup.
ZHCN
如果您已完成软件的安装,则传真系统设置成功。如果尚未完成软件的安装,请在控制面
TH
ZHTW
การตั้งค่าแฟกซ์
傳真設定
板上按设置,使用箭头选择传真设置,按 OK,然后选择传真设置实用程序并按 OK。按
照屏幕上的说明完成设置。
Jika Anda sudah menyelesaikan penginstalan perangkat lunak, berarti sistem faks sudah diatur. Jika Anda
ID
tidak menyelesaikan penginstalan perangkat lunak, pada panel kontrol tekan Setup (Pengaturan), gunakan
panah untuk memilih Fax Setup (Pengaturan Faks), tekan OK, kemudian pilih Fax Setup Utility (Utilitas
Pengaturan Faks) lalu tekan OK. Ikuti petunjuk di layar untuk menyelesaikan pengaturan.
소프트웨어 설치를 마치면 팩스 시스템이 설정됩니다. 소프트웨어 설치를 마치지 않은 경우 제어판에서
KO
설정을 누르고 화살표 버튼을 사용하여 팩스 설정을 선택하고 OK를 누른 다음 팩스 설정 유틸리티를
선택하고 OK를 누릅니다. 화면의 지침에 따라 설정을 완료합니다.
หากคุณเสร็จสิ้นการติดตั้งซอฟต์แวร์ ระบบแฟกซ์ของคุณก็ได้รับการตั้งค่าด้วย หากคุณยังไม่เสร็จสิ้นการติดตั้ง
TH
ซอฟต์แวร์ ให้กด การตั้งค่า บนแผงควบคุม ใช้ปุ่ม ลูกศร เพื่อเลือก การตั้งค่าแฟกซ์ กด OK เลือก
ยูทิลิตีการตั้งค่าแฟกซ์ และกด OK ทำตามคำแนะนำบนหน้าจอเพื่อตั้งค่าจนเสร็จเรียบร้อย
ZHTW
如果您已完成軟體安裝,則傳真系統設定成功。如果尚未完成軟體的安裝,請在控制面板上按「設定」,使
用箭頭指示選擇「傳真設定」,按「OK」,然後選擇「傳真設定公用程式」並按「OK」。依照螢幕上的指示
完成設定。
17
Page 20

EN
Product documentation
TH
เอกสารของเครื่องพิมพ์
ZHCN
ID
KO
29
产品文档
Dokumentasi Produk
제품 설명서
The electronic User Guide and other documentation is on the CD that came with the product or in the HP
EN
Program folder on your computer. This information is also available at www.hp.com/support/cm1312series
ZHCN
产品随附的 CD 上有电子版《用户指南》和其它文档,您也可以从计算机上的 HP
Program
ID
Panduan Pengguna elektronik dan dokumentasi lainnya ada dalam CD yang disertakan dengan produk atau di
dalam folder Program HP pada komputer Anda. Informasi ini juga tersedia di www.hp.com/support/cm1312series
전자 사용 설명서와 기타 설명서는 제품과 함께 제공된 CD에 있거나 사용자 컴퓨터의 HP 프로그램 폴더에
KO
있습니다. 이 정보는 www.hp.com/support/cm1312series 에서도 볼 수 있습니다.
ZHTW
• Detailed user instructions
• Solve problems information
產品說明文件
• Important safety notices
• Regulatory information
文件夹中找到它们。也可从 www.hp.com/support/cm1312series 获取这些信息
• 详细用户说明
• 解决问题的信息
• Rincian petunjuk untuk pengguna
• Informasi tentang penyelesaian masalah
• 重要安全通告
• 管制信息
•
Pemberitahuan penting tentang keselamatan
• Informasi kepengaturan
• 세부 사용자 지침
• 문제 해결 정보
คู่มือผู้ใช้แบบอิเล็กทรอนิกส์และเอกสารอื่นๆ จะอยู่ในแผ่นซีดีที่มาพร้อมกับเครื่องพิมพ์ หรือในโฟลเดอร์ HP Program
TH
ในคอมพิวเตอร์ของคุณ ข้อมูลนี้ยังมีอยู่ใน www.hp.com/support/cm1312series
• คำแนะนำผู้ใช้โดยละเอียด
• ข้อมูลการแก้ไขปัญหา
ZHTW
這份電子《使用指南》及其他說明文件在產品隨附的 CD 中,或在您電腦中的 HP 程式資料夾內。您也可從
www.hp.com/support/cm1312series 取得這份資訊
• 詳細的使用說明
• 解決問題資訊
• 중요 안전 정보
• 규격 정보
• คำประกาศด้านความปลอดภัยที่สำคัญ
• ข้อมูลเกี่ยวกับข้อบังคับ
• 重要安全注意提示
• 法規資訊
18
Page 21

EN
Solve problems
TH
การแก้ไขปัญหา
ZHCN
ID
KO
EN
ZHCN
解决问题
ZHTW
解決問題
Menyelesaikan masalah
문제 해결
Print a Menu Map; Press Setup, select Reports, then select Menu structure and press OK. Use the Menu map as a quick
reference to using the control panel to change settings, such as Fax Ring volume, Fax Distinctive ring, photo and copy
settings.
Find more information in the electronic User Guide:
• Print help in the Print Tasks chapter.
• Make copies and adjust copy settings in the Copy chapter.
• Setup Scan destinations in the Scan chapter.
• Fax settings in the Fax chapter.
打印菜单图;按设置,选择报告,然后选择菜单结构并按 OK。以菜单图为快速参考,使用控制
面板更改设置,例如:传真响铃音量、传真特殊响铃、照片和复印设置等。
有关更多信息,请参阅电子板《用户指南》:
• 有关打印帮助的信息,请参阅“打印任务”一章。
• 有关进行复印和调整复印设置的信息,请参阅“复印”一章。
• 有关设置扫描目标位置的信息,请参阅“扫描”一章。
• 有关传真设置的信息,请参阅“传真”一章。
ID
KO
TH
Mencetak Peta Menu; Tekan Setup (Pengaturan), pilih Reports (Laporan), kemudian pilih Menu structure (Struktur
menu) lalu tekan OK. Gunakan peta Menu sebagai referensi cepat dalam menggunakan panel kontrol untuk mengubah
pengaturan, seperti pengaturan volume Dering Faks, dering Fax Berbeda, foto dan salin.
Temukan informasi lainnya dalam Panduan Pengguna elektronik:
• Bantuan cetak dalam bab Print Tasks (Tugas Cetak).
• Membuat salinan dan menyesuaikan pengaturan salin dalam bab Copy (Salin).
• Mengatur tujuan Pemindaian dalam bab Scan (Pindai).
• Pengaturan Faks dalam bab Fax (Faks).
메뉴 맵을 인쇄합니다. 설정을 눌러 보고서를 선택하고 메뉴 구조를 선택한 다음 OK를 누릅니다. 메뉴 맵은 팩스
벨소리 볼륨, 팩스 벨소리 구별, 사진 및 복사 설정 등의 설정 변경을 위한 제어판 사용 방법에 대한 빠른 참조로
사용합니다.
자세한 내용은 전자 사용 설명서의 다음 장을 참조하십시오.
• 인쇄 작업 장의 인쇄 도움말
• 복사 장의 복사하기 및 복사 조정 설정
• 스캔 장의 스캔 대상 설정
• 팩스 장의 팩스 설정
พิมพ์แผนผังเมนู กด ตั้งค่า เลือก รายงาน และเลือก โครงสร้างเมนู และกด OK ใช้แผนผังเมนูเพื่อการอ้างอิงอย่างรวดเร็ว
ในการใช้แผงควบคุมเพื่อเปลี่ยนการตั้งค่า เช่น ความดังเสียงกริ่งของแฟกซ์ เสียงกริ่งเฉพาะของแฟกซ์ และการตั้งค่าภาพถ่าย
และการทำสำเนา
ค้นหาข้อมูลเพิ่มเติมได้ในคู่มือผู้ใช้:
• พิมพ์วิธีใช้ในบทงานพิมพ์
• ทำสำเนาและปรับการตั้งค่าการทำสำเนาในบทการทำสำเนา
• ตั้งค่าปลายทางการสแกนในบทการสแกน
• การตั้งค่าแฟกซ์ในบทแฟกซ์
19
Page 22

ZHTW
列印功能表地圖;按「設定」,選擇「報告」,接著選擇「功能表結構」然後按「OK」。以「功能表」地圖作為快速
參考,使用控制面版來變更設定,例如:傳真鈴聲音量、傳真特殊鈴聲、相片及影印設定。
更多電子《使用指南》的其他資訊:
• 列印說明請參閱《列印工作》章節。
• 影印及調整影印設定請參閱《影印》章節。
• 設定掃描目的地請參閱《掃描》章節。
• 傳真設定請參閱《傳真》章節。
20
Page 23

21
Page 24

© 2008 Hewlett-Packard Development Company, L.P.
www.hp.com
*CC431-90905*
*CC431-90905*
CC431-90905
 Loading...