

Page 1

Start
Memulai
hp color LaserJet 9500n
hp color LaserJet 9500hdn
Page 2
Copyright and License
© Copyright Hewlett-Packard Company 2003
All Rights Reserved. Reproduction, adaptation, or translation without prior
written permission is prohibited, except as allowed under the copyright
laws.
The information contained in this document is subject to change without
notice.
Part number: C8546-90962
Edition 1, 4/2003
Trademark Credits
Windows® is a U.S. registered trademark of Microsoft Corporation.
For regulatory information, see the HP Color LaserJet User Guide
(in the front-door pocket of the printer).
1
Page 3
1 2
1
2
Remove the printer from its packaging. Warning! The printer is heavy.
Two people are required to roll the printer off of the pallet safely. See the
illustrations on the box lid for information about removing the printer from
its packaging.
Keluarkan printer dari dalam kemasannya. Peringatan! Printer ini cukup
berat. Diperlukan dua orang untuk menggeser printer dari landasannya
dengan aman. Lihat ilustrasi pada tutup kotak untuk informasi tentang
mengeluarkan printer dari kemasannya.
Remove the packing materials. 1) Remove the orange tape from the
outside of the front doors and from tray 1 on the right side of the printer.
2) Open the front doors and remove the styrofoam packing material.
3) Remove the protective film from the printer control panel.
English
Lepaskan bahan-bahan pembungkusnya. 1) Lepaskan pita perekat
oranye dari sisi luar pintu depan dan dari baki 1 di sisi kanan printer.
2) Buka pintu depan dan lepaskan bahan pembungkus dari styrofoam.
3) Lepaskan lapisan film pelindung dari panel kontrol printer.
Bahasa Indonesia
2
Page 4
hp color LaserJet 9500hdn
3
1
2
3
4
5
hp color LaserJet 9500n
Both HP color LaserJet 9500 series printers come with tray 1, tray 2, and
tray 3. The HP color LaserJet 9500hdn also includes tray 4. Open each
tray and remove the orange tape from the top, inside edge of the tray and
the orange plastic spacers inside the tray. Note: For more information
about tray locations, see page 7.
English
Kedua seri printer warna HP color LaserJet 9500 dilengkapi dengan baki
1, baki 2 dan baki 3. HP color LaserJet 9500hdn juga dilengkapi dengan
baki 4. Buka setiap baki dan lepaskan pita perekat oranye di sisi dalam
atas baki dan pembatas plastik oranye di dalam baki. Catatan: Untuk
informasi lebih lanjut tentang lokasi baki, bacalah hal. 7.
Bahasa Indonesia
6
Check the contents of the box. The box contains: 1) the printer 2) the
user guide (to be placed in the pocket inside the front door) 3) the softw are
CD-ROM, which includes the user reference guide 4) this start guide and
other documentation 5) the HP Paper Sample Guide 6) the control-panel
overlay (Parts 5 and 6 might be already installed.)
Periksa isi kotak. Kotak berisi: 1) printer 2) panduan pengguna
(ditempatkan di dalam kantong pada pintu depan) 3) CD-ROM piranti
lunak, yang berisi panduan referensi pengguna 4) panduan awal ini dan
dokumentasi lainnya 5) Pemandu Contoh Kertas HP 6) lapisan penutup
panel-kontrol (komponen 5 dan 6 mungkin sudah terpasang.)
3
Page 5
8
7
8
9
4
355 mm
(14.0 inches)
682 mm
(26.9 inches)
465 mm
(18.3 inches)
(30.2 inches)
767 mm
10
11
12
7) four print cartridges — yellow (Y), magenta (M), cyan (C), and black (K)
8) four image drums — yellow (Y), magenta (M), cyan (C), and black (K)
9) the toner collection bottle 10) the image transfer cleaner 11) the power
cord 12) the left bin. Note: A parallel cable and a network cable are not
included.
(17.9 inches)
455 mm
hp color LaserJet 9500n
887 mm (34.9 inches)
Prepare the location. Place the printer on a sturdy, level surface. Allow
space around the printer so that the air vents on the left side, right side,
and back of the printer are not blocked. Note: The dimensions of the
HP color LaserJet 9500n are shown above (in top and front views).
7) empat cartridge tinta — kuning (Y), magenta (M), cyan (C), dan hitam
(K) 8) empat drum gambar — kuning (Y), magenta (M), cyan (C), dan
hitam (K) 9) botol pengumpul toner 10) pembersih tranfer gambar
11) kabel listrik 12) nampan kiri. Catatan: Kabel paralel dan kabel
jaringan tidak termasuk.
Persiapkan lokasinya. Tempatkan printer di atas permukaan yang kokoh
dan rata. Berikan ruang di sekitar printer sehingga aliran udara di sisi kiri,
kanan dan belakang printer tidak terhalang. Catatan: Dimensi dari
HP LaserJet 9500n warna ditunjukkan di atas (tampak atas dan depan).
4
Page 6
355 mm
(14.0 inches)
hp color LaserJet 9500hdn
682 mm
(26.9 inches)
465 mm
(18.3 inches)
(30.2 inches)
767 mm
(17.9 inches)
455 mm
1212 mm (47.8 inches)
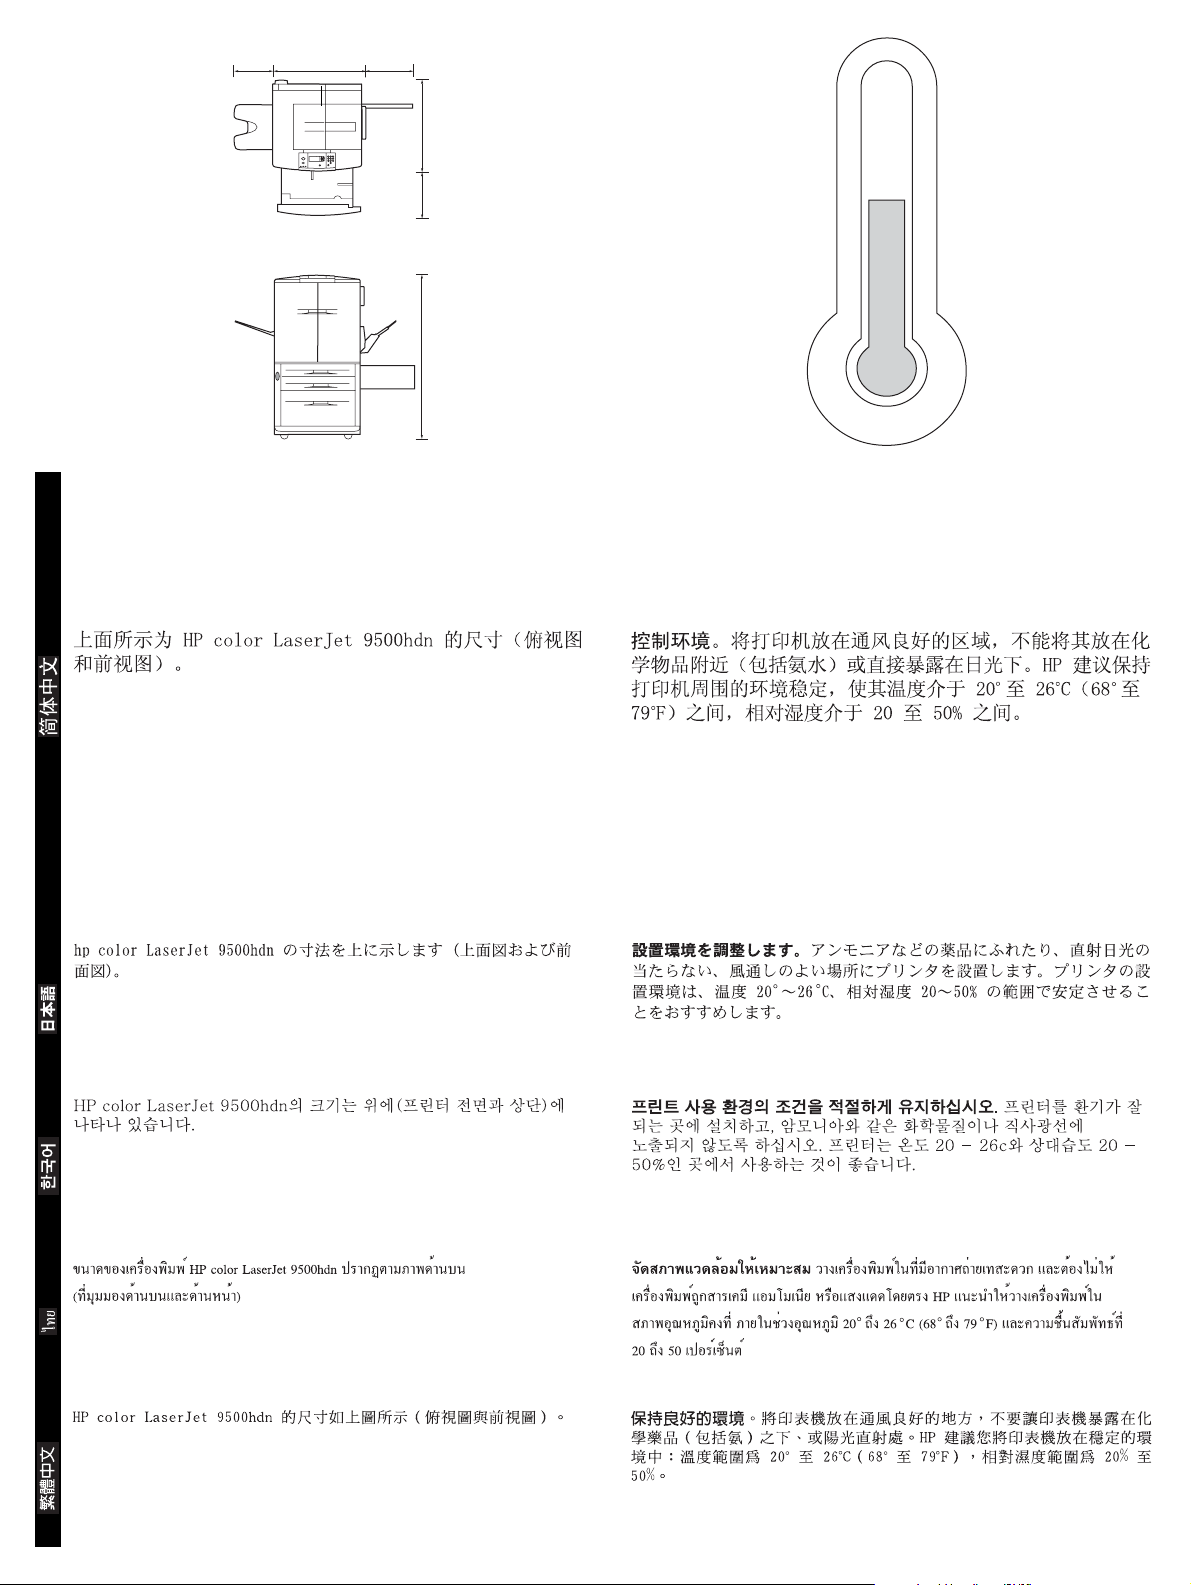
The dimensions of the HP color LaserJet 9500hdn is shown above (in top
and front views).
English
Dimensi dari HP color LaserJet 9500hdn ditunjukkan di atas (tampak atas
dan tampak depan).
Bahasa Indonesia
Regulate the environment. Place the printer in a well-ventilated area that
does not expose the printer to chemicals, including ammonia, or direct
sunlight. HP recommends that the printer’s environment remain stable,
within a temperature range of 20° to 26° C (68° to 79° F) and a relative
humidity range of 20 to 50 percent.
Pengendalian lingkungan. T empatkan printer di tempat berventilasi baik
dan jangan sampai printer terkena bahan kimia, termasuk amoniak, atau
sinar matahari langsung. HP menganjurkan agar lingkungan printer dijaga
supaya tetap stabil, dalam kisaran suhu 20° s/d 26°C (68° s/d 79°F) dan
kisaran kelembaban relatif 20 s/d 50 persen.
5
Page 7
5
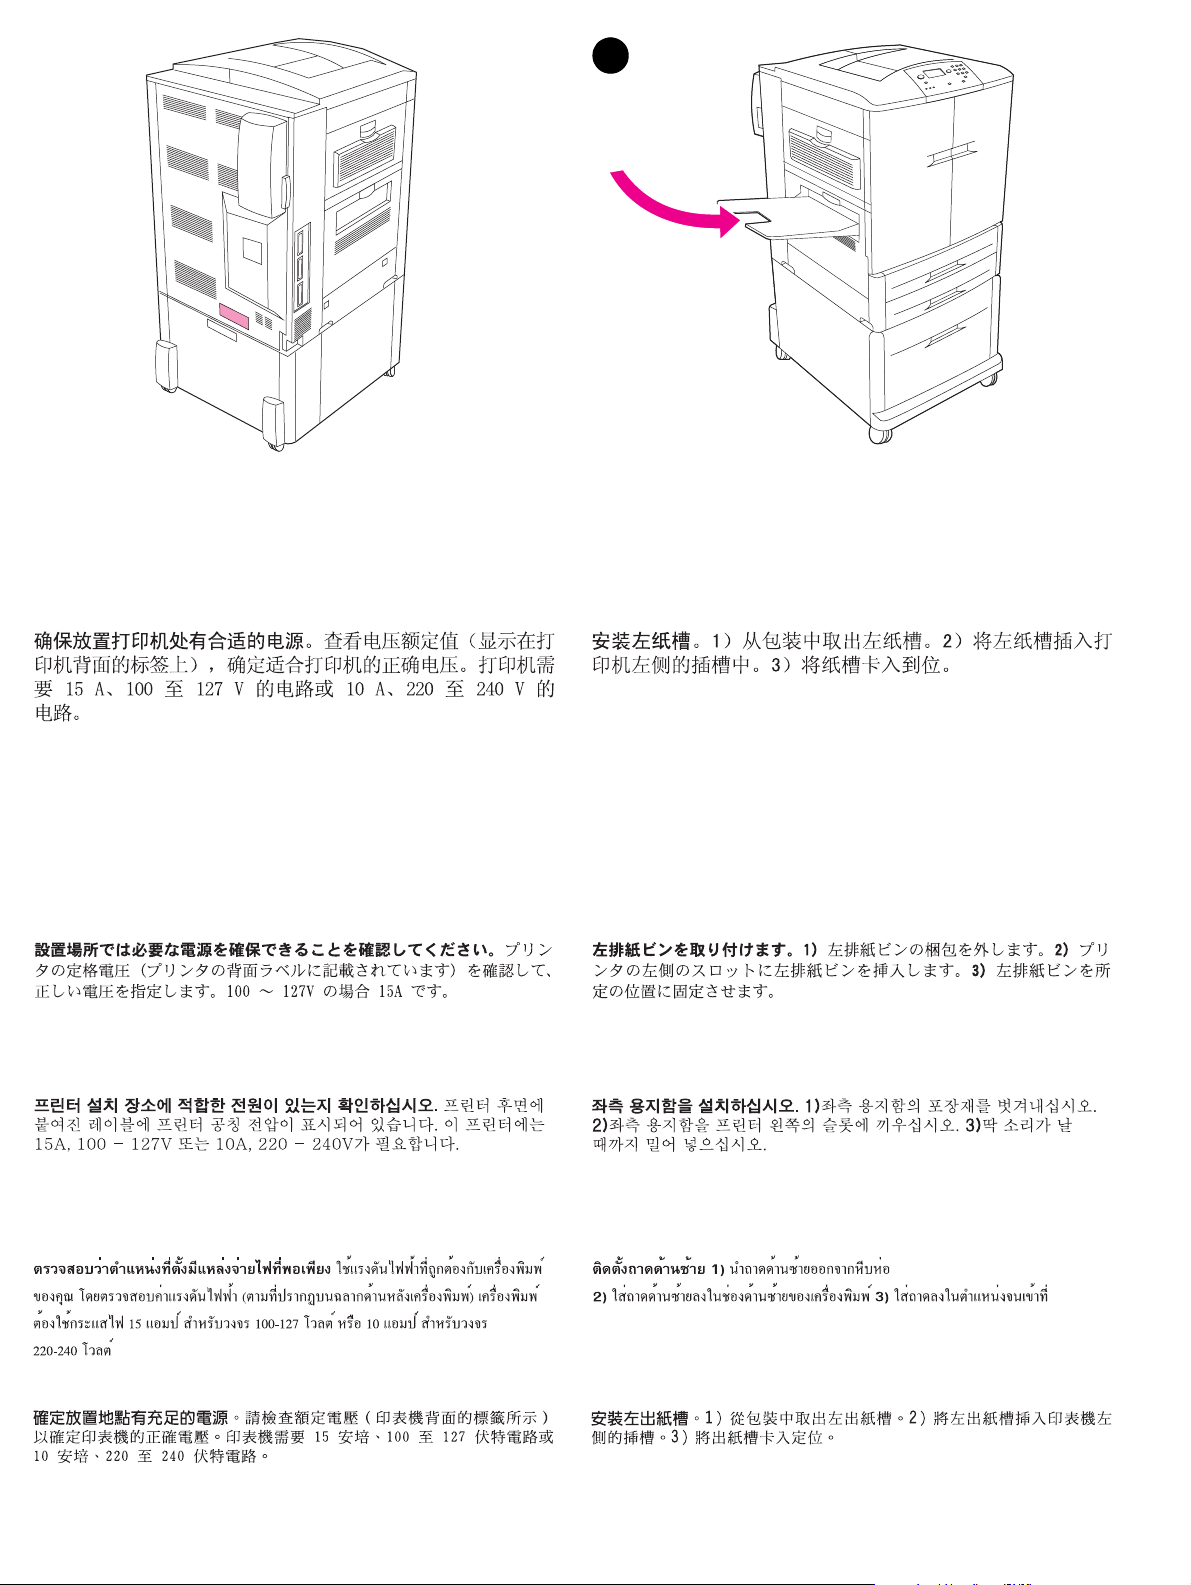
Make sure that the location has an adequate power source.
Determine the correct voltage for your printer by checking the voltage
rating (shown on a label on the back of the printer). The printer requires
either a 15-amp, 100- to 127-volt circuit or a 10-amp, 220- to 240-volt
circuit.
Pastikan bahwa di lokasi tersebut tersedia cukup daya listrik.
Tentukan tegangan yang benar untuk printer Anda dengan memeriksa
kelas tegangan (tertulis pada label di bagian belakang printer). Printer
memerlukan daya listrik 15-amp, 100- s/d 127-volt atau 10-amp, 220- s/d
240-volt.
Install the left bin. 1) Remove the left bin from its packaging. 2) Insert the
left bin in the slot on the left side of the printer. 3) Snap the bin into place.
Pasang nampan kiri. 1) Keluarkan nampan kiri dari kemasannya.
2) Masukkan nampan kiri ke dalam selot di sebelah kiri printer. 3) Dorong
sampai terkunci.
6
Page 8
6
1
2
3
4
5
8
9
10
6
7
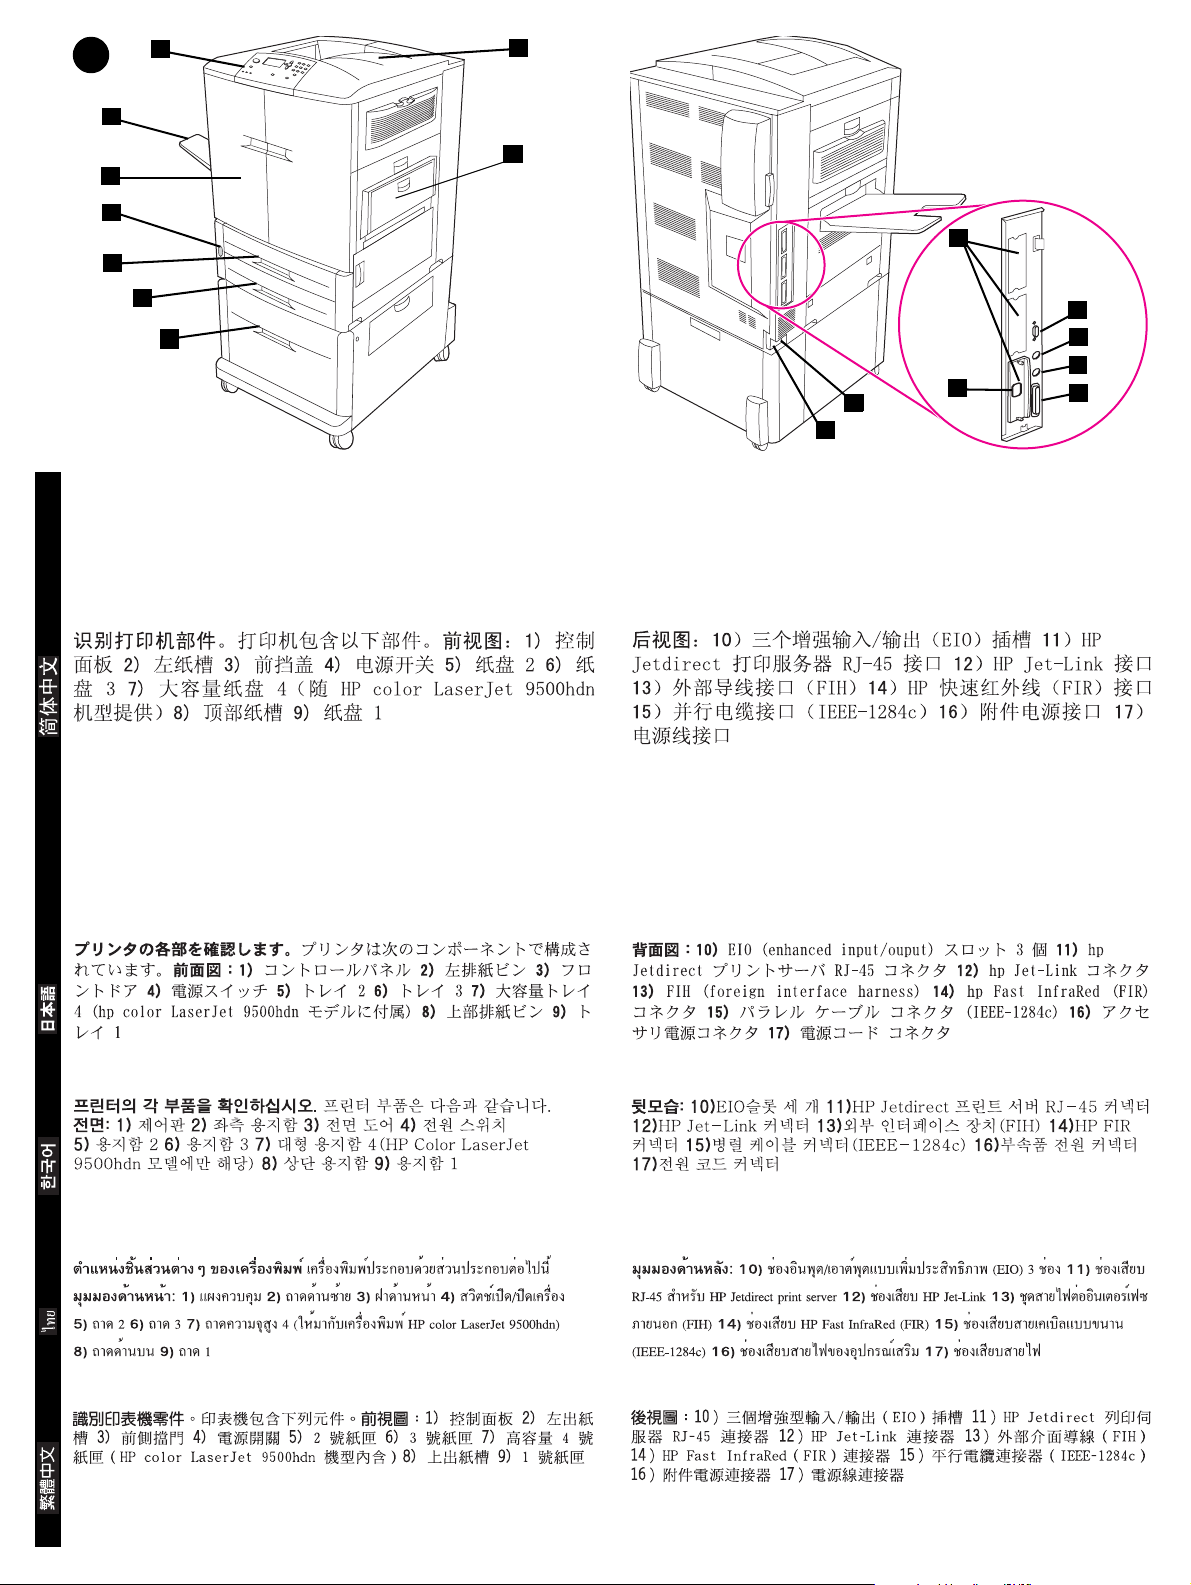
Identify the printer parts. The printer contains the following components.
Front view: 1) the control panel 2) the left bin 3) the front doors 4) the
power switch 5) tray2 6) tray 3 7) high-capacity tray 4 (included with the
HP color LaserJet 9500hdn model) 8) the top bin 9) tray 1
English
Mengenali komponen printer. Printer terdiri dari sejumlah komponen
berikut. Tampak depan: 1) panel kontrol 2) baki kiri 3) pintu depan
4) saklar daya 5) baki 2 6) baki 3 7) baki 4 kapasitas-tinggi (disertakan
pada model HP color LaserJet 9500hdn) 8) baki atas 9) baki 1
12
13
14
16
17
Back view: 10) three enhanced input/ouput (EIO) slots 11) the
HP Jetdirect print server RJ-45 connector 12) the HP Jet-Link connector
13) the foreign interface harness (FIH) 14) the HP Fast InfraRed (FIR)
connector 15) the parallel cable connector (IEEE-1284c) 16) the
accessory power connector 17) the power cord connector
Tampak belakang: 10) tiga selot enhanced input/ouput (EIO)
11) konektor RJ-45 HP Jetdirect print server 12) konektor Jet-Link HP
13) foreign interface harness (FIH) 14) konektor infra merah HP Fast
InfraRed (FIR) 15) konektor kabel paralel (IEEE-1284c) 16) konektor
daya listrik aksesori 17) konektor kabel listrik
11
15
Bahasa Indonesia
7
Page 9
7
8
1
2
3
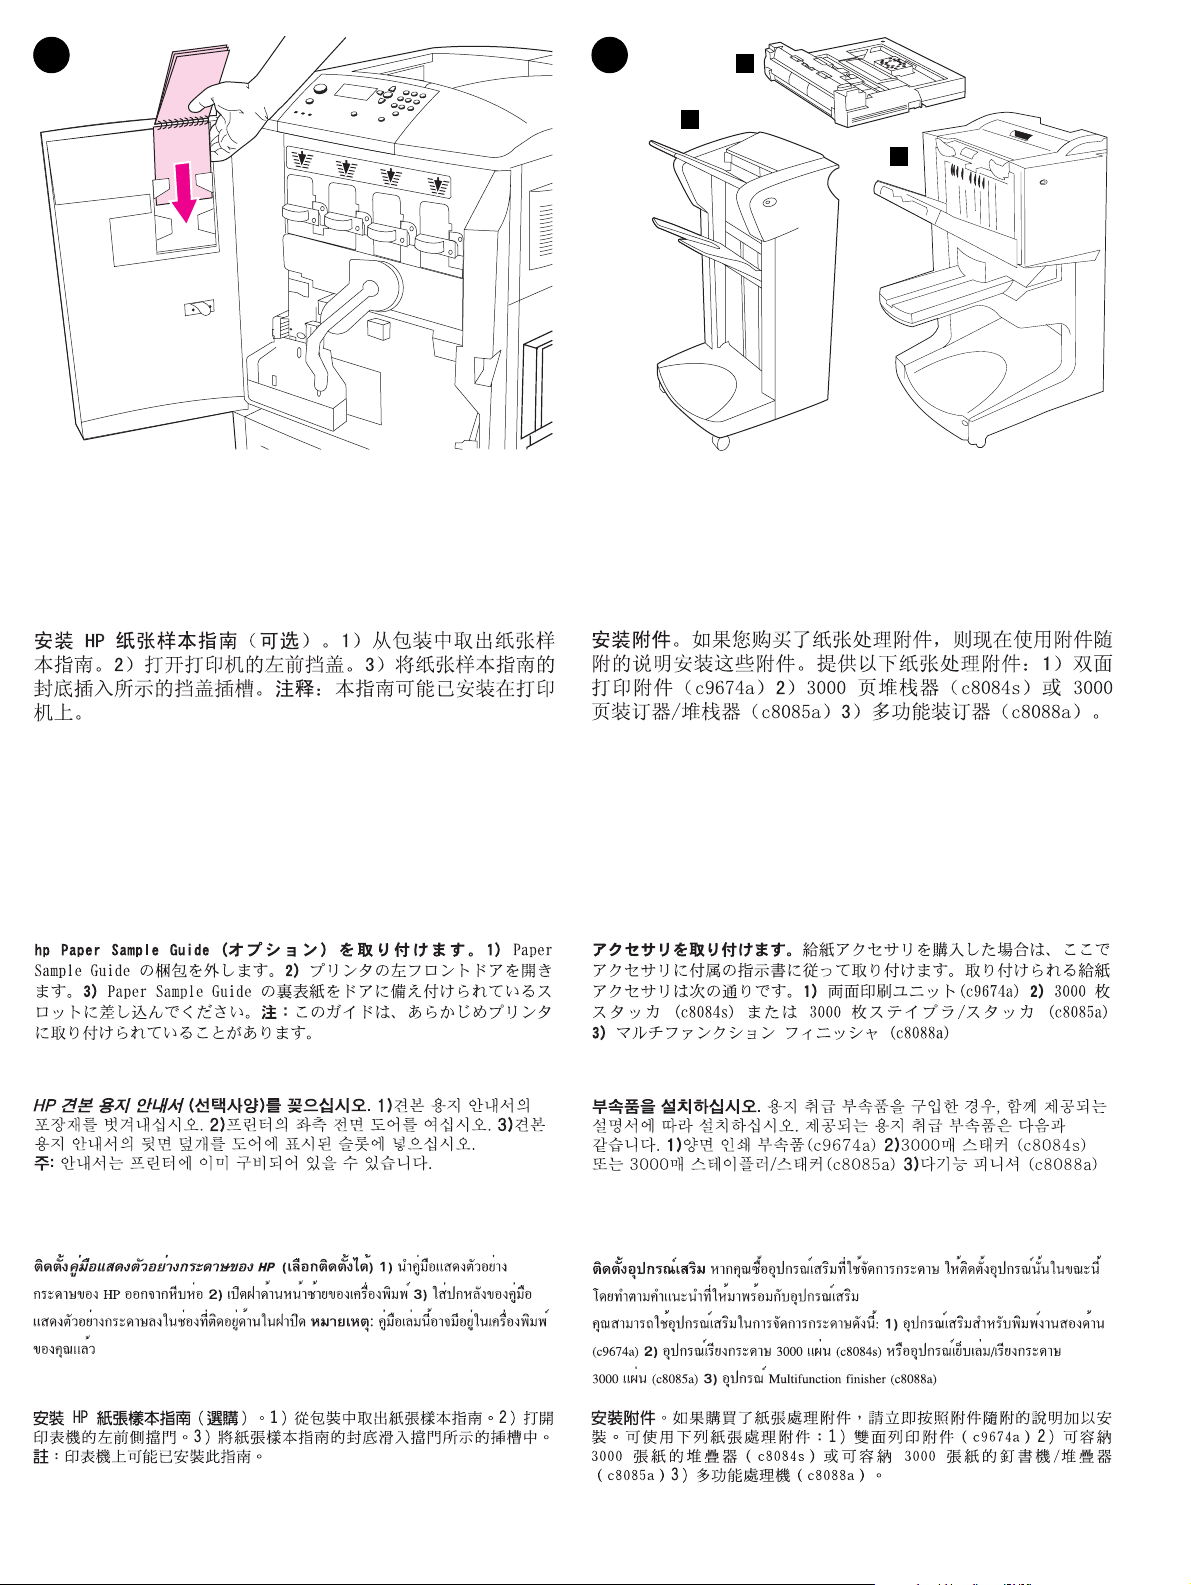
Install the HP Paper Sample Guide (optional). 1) Remove the paper
sample guide from its packaging. 2) Open the left-front door of the printer.
3) Slide the back cover of the paper sample guide into the slot indicated on
the door. Note: This guide might already be installed on your printer.
Menginstalasi Pemandu Contoh Kertas HP (opsional). 1) Lepaskan
pemandu contoh kertas dari kemasannya. 2) Buka pintu depan-kiri printer.
3) Geser penutup belakang dari pemandu contoh kertas ke dalam selot
yang ditunjukkan pada pintu. Catatan: Pemandu ini mungkin sudah
terpasang pada printer Anda.
Install accessories. If you purchased paper-handling accessories, install
them now using the instructions that are included with the accessories.
The following paper-handling accessories are available: 1)the duplex
printing accessory (c9674a) 2) the 3000-sheet stacker (c8084s) or the
3000-sheet stapler/stacker (c8085a) 3) the multifunction finisher (c8088a).
Menginstalasi aksesori. Jika Anda membeli aksesori
penanganan-kertas, lakukan instalasi sekarang dengan mengikuti
petunjuk yang menyertai aksesori tersebut. Tersedia aksesori
penanganan-kertas berikut ini: 1) aksesori pencetakan dupleks (c9674a)
2) penumpuk 3000-lembar (c8084s) atau penjilid/penumpuk 3000-lembar
(c8085a) 3) pengolahan akhir multi fungsi (c8088a).
8
Page 10

9
Install the four print cartridges. Note: Before you begin, you might want
to remove your jewelry, which can snag on parts inside the printer.
1) Open the front doors of the printer. 2) Look for the blue lever that
corresponds to the yellow print cartridge, and turn the lever to the right.
English
Menginstalasi keempat catridge tinta. Catatan: Sebelum mulai, Anda
mungkin perlu melepaskan perhiasan Anda, supaya tidak tersangkut
komponen di dalam printer. 1) Buka pintu depan printer. 2) Carilah tuas
biru yang berkaitan dengan cartridge cetak kuning, dan putar tuas
tersebut ke kanan.
Bahasa Indonesia
3) Remove the yellow cartridge from its packaging. Note: If toner gets on
your clothes or your hands, wash them with cold water.
3) Keluarkan cartridge kuning dari dalam kemasannya. Catatan: Jika
pakaian atau tangan Anda terkena toner, basuh dengan air dingin.
9
Page 11

4) Align the arrow label on the top of the cartridge with the arrow label
above the empty slot. Slide the cartridge into the printer until it clicks.
Note: If the cartridge does not fit, make sure that you are installing the
correct color cartridge in the correct slot.
5) Turn the blue lever to the left until it clicks into place. 6) Repeat this
process to install the other three print cartridges.
4) Atur label panah pada bagian atas cartridge tepat pada label panah di
atas selot yang kosong. Geser cartridge ke dalam printer sampai terkunci.
Catatan: Jika cartridge tidak masuk dengan pas, pastikan Anda
memasang cartridge warna yang benar ke dalam selot yang benar.
5) Putar tuas biru ke kiri sampai terkunci di tempatnya. 6) Ulangi proses ini
untuk ketiga cartridge cetak lainnya.
10
Page 12

10
3
2
4
Install the image transfer cleaner. 1) Remove the image transfer cleaner
from its packaging. Note: Make sure that the large, green lever is in the
upright position. 2) Align the guide on the top of the image transfer cleaner
with the notch in the printer.
English
Menginstalasi pembersih transfer gambar. 1) Keluarkan pembersih
transfer gambar dari kemasannya. Catatan: Pastikan bahwa tuas hijau,
besar berada dalam posisi tegak. 2) Atur pemandu pada bagian atas
pembersih transfer gambar tepat pada lekukan di dalam printer.
Bahasa Indonesia
3) Using the blue handle, firmly insert the transfer cleaner into the printer
until it clicks to a stop. 4) Rotate the blue transfer cleaner handle up and
firmly push it to the right until it snaps into place. Note: If the handle does
not snap into place, make sure that the transfer cleaner is pushed all the
way in.
3) Menggunakan tangkai biru, masukkan dengan kuat pembersih transfer
gambar ke dalam printer sampai berhenti. 4) Putar tangkai biru pembersih
transfer gambar ke atas dan tekan kuat ke kanan sampai terkunci.
Catatan: Jika tangkainya tidak terkunci, pastikan pembersih transfer
sudah didorong sepenuhnya ke dalam.
11
Page 13

11
12
2
Install the toner collection bottle. 1) Remove the toner collection bottle
from its packaging. 2) Slide the toner collection bottle down and snap it
into place against the printer. Note: If the bottle does not snap into place,
make sure the blue transfer cleaner handle and the green lever are in the
upright position.
Menginstalasi botol pengumpul toner. 1) Keluarkan botol pengumpul
toner dari dalam kemasannya. 2) Geser botol pengumpul toner ke bawah
dan dorong sampai terkunci pada printer. Catatan: Jika botol tidak
terkunci di tempatnya, pastikan tangkai biru dan tuas hijau pembersih
transfer berada dalam posisi tegak.
Install the four image drums. 1) Swing the large, green lever down.
Menginstalasi keempat drum gambar. 1) Ayunkan tuas besar, hijau ke
bawah.
12
Page 14

2) Rotate the blue dial up until it clicks and the image-drum door
unlatches. Open the image-drum door completely.
English
3) Remove the yellow image drum from its packaging. Note: Do not
remove the protective cov er on the underside of the drum unit until step 6.
Do not touch the green component inside the drum cartridge. If toner gets
on your clothes or your hands, wash them with cold water.
2) Putar penunjuk biru sampai terkunci dan pintu drum gambar terbuka.
Buka sepenuhnya pintu drum-gambar.
Bahasa Indonesia
3) Keluarkan drum gambar kuning dari dalam kemasannya. Catatan:
Jangan melepaskan lapisan pelindung pada bagian bawah unit drum
sebelum langkah 6. Jangan menyentuh komponen hijau di dalam
cartridge drum. Jika pakaian atau tangan Anda terkena toner, basuh
dengan air dingin.
13
Page 15

4) Place the drum on a level surface. Pull the orange ring on the end of the
drum all the way out to remove the seal from inside the drum. Pull the
orange handle on the top of the drum to remove the protective sheet, the
silica gel pack, and the orange tape and discard them. Pull the two orange
rings on the side of the drum. Note: Do not shake the drum.
5) Make sure that the four blue levers above the image-drum door are in
the horizontal position. Align the yellow drum with the correct slot,
arrow-end first. Rest the end of the drum flat on the image-drum door.
Note: The four blue levers must be in the horizontal position so that the
image drums can be installed.
4) Tempatkan drum di atas permukaan yang rata. Tarik keluar cincin
oranye pada ujung drum untuk melepaskan segel dari dalam drum. Tarik
tangkai oranye pada bagian atas drum untuk melepaskan lembaran
pelindung, paket silica gel, dan pita perekat oranye untuk dibuang. Tarik
kedua cincin oranye di samping drum. Catatan: Jangan mengguncang
drum.
5) Pastikan bahwa keempat tuas biru di atas pintu drum-gambar berada
dalam posisi horisontal. Atur drum kuning tepat pada selot yang sesuai,
ujung panah terlebih dahulu. Letakkan dasar drum rata pada pintu
drum-gambar. Catatan: Keempat tuas biru harus berada dalam posisi
horisontal sehingga drum gambar bisa dipasang.
14
Page 16

6) Hold the gray protective cover in place with one hand and use the palm
of your other hand to slide the drum firmly and completely into the printer.
Note: If the drum does not fit into the slot, make sure that you are
installing the correct color drum in the correct slot, and that you have the
drum aligned correctly.
English
7) Repeat this process to install the remaining three image drums. Close
the image-drum door, pressing the tabs at the top of the door until they
click into place.
6) Pegang lapisan pelindung abu-abu di tempatnya dengan satu tangan
dan gunakan telapak tangan yang lain untuk menggeser drum dengan
kuat ke dalam printer sepenuhnya. Catatan: Jika drum tidak masuk
dengan pas pada selot, pastikan Anda menginstalasi drum warna yang
benar dalam selot yang benar, dan bahwa drum sudah Anda atur dengan
tepat.
Bahasa Indonesia
7) Ulangi proses ini untuk menginstalasi ketiga drum gambar yang tersisa.
Tutup pintu drum-gambar, tekan tab pada bagian atas pintu sampai
terkunci di tempatnya.
15
Page 17

13
8
9
8) Rotate the blue dial downward until it stops. 9) Swing the large, green
lever up. 10) Close the front doors.
8) Putar penunjuk biru ke bawah sampai berhenti. Ayunkan tuas besar,
hijau ke atas. 10) Tutup pintu depan.
Load media in trays 2 and 3. 1) Pull the tray open until it stops. 2) Load
the media so that the side to be printed faces down, and the top edge is
toward the rear of the tray. Do not load more media than the maximum
that is indicated by the media-fill triangles at the back of the tray. Note: It
is usually not necessary to fan the media before loading it.
Isikan media ke dalam baki 2 dan 3. 1) Tarik keluar baki sampai
berhenti. 2) Isikan media dengan sisi yang akan dicetak menghadap ke
bawah, dan sisi atas ke arah belakang baki. Jangan mengisikan media
melebihi tinggi maksimal yang ditunjukkan oleh segitiga pengisian-media
di belakang baki. Catatan: Biasanya media tidak perlu dikipaskan
sebelum diisikan.
16
Page 18

3
4
5
3) Move the left media guide to match the media size that is being loaded.
4) Move the front media guide to match the media size that is being
loaded.
English
3) Geser pemandu kiri media tepat sesuai dengan media yang diisikan.
4) Geser pemandu depan media tepat sesuai dengan media yang
diisikan.
Bahasa Indonesia
5) Set the custom/standard switch to STANDARD. Note: See the user
reference guide on the CD-ROM for information about loading
custom-sized media and configuring input trays. 6) Slide the tray back into
the printer. Note: See the user guide (in the front-door pocket) for
instructions for loading trays 1 and 4.
5) Atur saklar custom/standard ke STANDARD. Catatan: Baca panduan
referensi Pengguna pada CD-ROM untuk informasi tentang pengisian
media ukuran-khusus dan konfigurasi baki input. 6) Dorong kembali baki
ke dalam printer. Catatan: Baca panduan pengguna (di dalam kantong
pintu depan) untuk petunjuk pemasangan baki 1 dan 4.
17
Page 19

14
15
1
2
1
4 5 632
Change the control-panel overlay (optional). If necessary, replace the
installed overlay with the one that is included in the printer box. 1) Insert a
small, pointed object into the notch above the overlay, and then lift up.
2) Align the new overlay with the holes on the control panel, rotate the
overlay into position, and then snap it into place.
Mengganti penutup panel-kontrol (opsional). Bila perlu, ganti penutup
yang terpasang dengan yang tersedia di dalam kotak printer. 1) Masukkan
benda kecil dan lancip ke dalam tekukan di atas penutup, lalu angkat.
2) Atur letak penutup baru sesuai dengan lubang pada panel kontrol,
putar penutup ke posisinya, lalu tekan sampai terkunci.
Understand the control panel. 1) P
display 3) B
menus) 6) numeric keypad
Memahami panel kontrol. 1) tombol I
3) tombol K
menu) 6) papan tombol angka
ACK button 4) UP button 5) SELECT button (used to enter the
EMBALI 4) tombol KE ATAS 5) tombol PILIH (untuk masuk ke
AUSE/RESUME button 2) graphical
STIRAHAT/LANJUT 2) tampilan grafis
18
Page 20

1 2
7
3
8 9 10
11 12 13
7) CANCEL JOB button, 8) green Ready light 9) green Data light 10) amber
Attention light 11) H
ELP button 12) DOWN button 13) CLEAR button. See the
user guide (in the front-door pocket) f or more information about the control
panel.
English
7) tombol BATALKAN PEKERJAN, 8) lampu Siaga hijau 9) lampu Data hijau
10) lampu Perhatian kuning gading 11) tombol B
BAWAH 13) tombol HAPUS. Baca panduan pengguna (di dalam kantong
ANTUAN 12) tombol KE
pintu depan) untuk informasi lebih lanjut tentang panel kontrol.
Bahasa Indonesia
Understand the supplies status indicators. The graphical display on
the printer control panel shows the status of the following consumables:
1) the yellow, magenta, cyan, and black print cartridges, 2) the yellow,
magenta, cyan, and black image drums 3) the image cleaning kit.
Memahami indikator status suplai. Tampilan grafis pada panel kontrol
printer menunjukkan status ketersediaan dari suplai berikut ini:
1) cartridge cetak kuning, magenta, cyan, dan hitam, 2) drum gambar
kuning, magenta, cyan, dan hitam 3) kit pembersih gambar.
19
Page 21

16
1
2
Connect the power cable and turn on the printer. 1) Plug the power
cable into the power connector on the left side of the printer, and then plug
the other end of the power cable into an ac outlet. 2) Press the power
switch on the front of the printer to turn the printer on. Note: The printer
makes a noticeable pop sound when it turns on. This sound is normal.
Sambungkan kabel listrik lalu aktifkan printer. 1) Tancapkan kabel
listrik ke konektor listrik di samping kiri printer, lalu tancapkan ujung kabel
listrik yang lain ke stop kontak ac. 2) Tekan tombol daya di bagian depan
printer untuk mengaktifkan printer. Catatan: Printer mengeluarkan bunyi
pop yang cukup keras sewaktu diaktifkan. Itu suara yang normal.
Change the control panel language (optional). To change the control
panel graphical display to present messages in your language, follow
these instructions: 1) When the LANGUAGE = message appears, use
(UP button) or (DOWN button) to scroll to your language on the
graphical display, and then press (S
Mengganti bahasa panel kontrol (opsional). Untuk mengganti tampilan
grafis panel kontrol untuk menampilkan pesan dalam bahasa Anda, ikuti
petunjuk berikut ini: 1) Jika pesan LANGUAGE = muncul, gunakan
(tombol KE ATAS) atau (tombol KE BAWAH) untuk memilih bahasa Anda
pada tampilan grafis, lalu tekan (P
ELECT). (continued)
ILIH). (berlanjut)
20
Page 22

The printer continues turning on. Note: These instructions are to be used
the first time the printer is turned on. See the user reference guide on the
CD-ROM for information about changing the control panel language after
the printer has been turned on for the first time.
English
When the printer reaches the Ready state, the green Ready light turns on,
the READY message appears on the control-panel graphical display, and
the supplies status indicators show that all supplies are new. Note: The
READY message might alternate with other messages. If the printer does
not reach the Ready state, see the user reference guide on the CD-ROM.
Printer terus dihidupkan. Catatan: Petunjuk ini hanya untuk digunakan
sewaktu printer pertama kali dihidupkan. Bacalah panduan referensi
pengguna pada CD-ROM untuk informasi penggantian bahasa panel
kontrol setelah printer dihidupkan untuk pertama kalinya.
Bahasa Indonesia
Setelah printer mencapai status Siaga, lampu Siaga hijau menyala, pesan
SIAGA muncul pada tampilan grafis panel kontrol, dan indikator status
suplai menandakan bahwa semuanya penuh. Catatan: Pesan SIAGA bisa
digantikan oleh pesan yang lain. Jika printer tidak mencapai status Siaga,
bacalah panduan referensi pengguna pada CD-ROM.
21
Page 23

17
Print a demo page to verify that the printer is working. 1) Press
(SELECT) to enter the menus. 2) Use (UP button) or (DOWN button)
to scroll to INFORMATION, and then press (S
button) or (D
(S
ELECT).
OWN button) to scroll to PRINT DEMO, and then press
ELECT). 3) Use (UP
Note: If the page does not print, check the control panel for error
messages and follow the instructions on the graphical display to clear any
errors. Press (H
ELP button) to get additional help or see the user
reference guide on the CD-ROM for troubleshooting information.
Cetak halaman demo untuk memastikan printer bekerja. 1) Tekan
(PILIH) untuk masuk ke menu. 2) Gunakan (tombol KE ATAS) atau
(tombol K
3) Gunakan
memilih PRINT DEMO, lalu tekan (P
E BAWAH) untuk memilih INFORMATION, lalu tekan (PILIH).
(tombol KE ATAS) atau (tombol KE BAWAH) untuk
ILIH).
Catatan: Jika tidak ada halaman yang tercetak, periksa apakah ada
pesan kesalahan pada panel kontrol dan ikuti petunjuk pada tampilan
grafis untuk menghapus kesalahan yang ada. Tekan (tombol
B
ANTUAN) untuk bantuan lebih lanjut atau bacalah panduan referensi
pengguna pada CD-ROM untuk informasi pemecahan masalah.
22
Page 24

18
19
1
2
Connect the printer interface cable. 1) If your HP color LaserJet 9500
series printer connects to a single computer, connect a parallel cable to
the parallel cable connector on the back of the printer. 2) If your printer
connects to a network, connect a network cable to the HP Jetdirect print
server RJ-45 connector on the back of the printer.
English
Menyambungkan kabel antarmuka printer. 1) Jika printer warna
HP LaserJet 9500 series disambungkan hanya ke satu printer,
sambungkan kabel paralel ke konektor kabel paralel di bagian belakang
printer. 2) Jika printer Anda disambungkan ke jaringan, sambungkan
kabel jaringan ke konektor RJ-45 print server HP Jetdirect di bagian
belakang printer.
Bahasa Indonesia
Install the printing software. Procedures for software installation vary
according to the operating system and the network environment. Insert
the CD-ROM into the CD-ROM drive. When the installation wizard starts,
follow the instructions. See the user reference guide on the CD-R OM if the
installation wizard does not start or for detailed installation information.
Menginstalasi piranti lunak pencetakan. Prosedur instalasi piranti lunak
bervariasi tergantung dari sistem operasi dan jaringan yang digunakan.
Masukkan CD-ROM ke dalam drive CD-ROM. Setelah wizard instalasi
dijalankan, ikuti petunjuk di dalamnya. Bacalah panduan referensi
pengguna pada CD-ROM jika wizard instalasi tidak bekerja atau untuk
informasi lebih detil untuk instalasi.
23
Page 25

20
Test the software installation. Print a test page from the printer driver to
test the software installation. On computers running Windows®, follow
these instructions to gain access to the printer driver. 1) From your
computer desktop, click Start. 2) Select Settings, and then click Printers
(In Windows XP, click Printers and Faxes).
Menguji instalasi piranti lunak. Cetak halaman uji coba dari driver
printer untuk menguji instalasi piranti lunak. Pada komputer berbasis
Windows®, ikuti petunjuk berikut untuk mengakses driver printer. 1) Dari
desktop komputer Anda, klik Start. 2) Pilih Settings, lalu klik pada
Printers (Pada Windows XP, klik pada Printers and Faxes).
3) Right-click the HP color LaserJet 9500 series printer icon, and then
click Properties. 4) On the General tab, click Print Test Page. If the test
page prints, the printer software is correctly installed. If the test page does
not print, the software installation has failed and you must reinstall the
software.
3) Klik-kanan pada ikon HP color LaserJet 9500 series, lalu klik pada
Properties. 4) Pada tab General, klik pada Print Test Page. Jika
halaman uji coba tercetak, piranti lunak printer sudah terinstalasi dengan
baik. Jika halaman uji coba tidak tercetak, instalasi piranti lunak Anda
gagal dan Anda harus menginstalasi ulang.
24
Page 26

Note: If the software reinstallation fails, see the Readme on the CD-ROM,
see the support flyer than came in the printer box, or visit
http://www.hp.com/support/callcenters. Click
country/region to see a list of the customer care centers in your area.
English
next to your
Congratulations! Your printer is ready to use. See the user reference
guide on the CD-ROM for instructions for configuring the printer and any
accessories you might have purchased and for more information about the
functions available in the HP color LaserJet 9500 series printer.
Catatan: Jika instalasi ulang gagal, baca Readme pada CD-ROM, baca
flyer pendukung yang disertakan dalam kotak printer, atau kunjungi
http://www.hp.com/support/callcenters. Klik
negara/kawasan Anda untuk melihat daftar pusat layanan pelanggan di
daerah Anda.
Bahasa Indonesia
di samping
Selamat! Printer Anda siap untuk digunakan. Baca panduan referensi
pengguna pada CD-ROM untuk petunjuk konfigurasi printer dan semua
aksesori yang mungkin telah Anda beli dan untuk informasi lebih lanjut
tentang fungsi-fungsi yang tersedia pada printer warna HP LaserJet 9500
series.
25
Page 27

26
Page 28

copyright © 2003
Hewlett-Packard Company
http://www.hp.com
*C8546-90962*
*C8546-90962*
C8546-90962
 Loading...