

Page 1
user guide
color LaserJet 9500mfphp
Page 2

Page 3

HP Color LaserJet 9500mfp
user guide
Page 4

Copyright and License
© 2004 Copyright Hewlett-Packard Development Co mpany,
LP
Reproduction, adaptation or translati on wit hout prior written
permission is prohibited, except as allowed under the
copyright laws.
Part Number: C8549-90902
Edition 1, 10/2004
The information contained herein is subject to change
without notice.
The only warranties for HP products and services are set
forth in the express warranty statements accompanying
such products and services. Nothing herein should be
construed as constituting an additional warranty. HP shall
not be liable for technical or editorial errors or omissions
contained herein.
Trademark Credits
Acrobat®, Adobe®, and PostScript® are trademarks of
Adobe Systems Incorporated.
HP-UX® Release 10.20 and later and HP-UX Release
11.00 and later (in both 32- and 64-bit configurations) on all
HP 9000 computers are Open Group UNIX 95 branded
products.
Microsoft®, MS-DOS®, Windows®, and Windows NT® are
U.S. registered trademarks of Microsoft Corporation.
PANTONE®* is Pantone, Inc.’s check-standard trademark
for color.
TrueType™ is a U.S. trademark of Apple Computer, Inc.
UNIX® is a registered trademark of The Open Group.
NERGY STAR® is a U.S. registered service mark of the U.S.
E
Environmental Protection Agency.
Page 5

EN
3
Page 6

http://www.hp.com/go/clj9500mfp
4 Chapter –
Rev. 1.0
Page 7

MFP basics
MFP components . . . . . . . . . . . . . . . . . . . . . . . . . . . . . . . . . . . . . . . . . . . . . . . . . . . . . . . . . . . . . . . . . . . . 1
Control panel. . . . . . . . . . . . . . . . . . . . . . . . . . . . . . . . . . . . . . . . . . . . . . . . . . . . . . . . . . . . . . . . . . . . 4
Setting the MFP defaults. . . . . . . . . . . . . . . . . . . . . . . . . . . . . . . . . . . . . . . . . . . . . . . . . . . . . . . . . . . . . . . 9
Setting the MFP device defaults . . . . . . . . . . . . . . . . . . . . . . . . . . . . . . . . . . . . . . . . . . . . . . . . . . . . . 9
Loading input trays . . . . . . . . . . . . . . . . . . . . . . . . . . . . . . . . . . . . . . . . . . . . . . . . . . . . . . . . . . . . . . . . . . 10
Loading tray 2 and tray 3 . . . . . . . . . . . . . . . . . . . . . . . . . . . . . .
Changing and setting the media size and type for a tray . . . . . . . . . . . . . . . . . . . . . . . . . . . . . . . . . 27
. . . . . . . . . . . . . . . . . . . . . . . . . . . 15
Copying
Copy-screen layout . . . . . . . . . . . . . . . . . . . . . . . . . . . . . . . . . . . . . . . . . . . . . . . . . . . . . . . . . . . . . . . . . . 32
Copying instructions . . . . . . . . . . . . . . . . . . . . . . . . . . . . . . . . . . . . . . . . . . . . . . . . . . . . . . . . . . . . . . . . . 35
Copying by using the default settings (one-touch copying). . . . . . . . . . . . . . . . . . . . . . . . . . . . . . . . 36
Copying by using user-defined settings . . . . . . . . . . . . . . . . . . . . . . . . . . . . . . . . . . . . . . . . . . . . . . 37
Copying from the scanner glass . . . . . . . . . . . . . . . . . . . . . . . . . . . . . . . . . . . . . . . . . . . . . . . . . . . . 42
Copying by using the ADF . . . . . . . . . . . . . . . . . . . . . . . . . . . . . . . . . . . . . . . . . . . . . . . . . . . . . . . . 42
Copying books . . . . . . . . . . . . . . . . . . . . . . . . . . . . . . . . . . . . . . . . . . . . . . . . . . . . . . . . . . . . . . . . . 43
Creating a job to be copied later . . . . . . . . . . . . . . . . . . . . . . . . . . . . . . . . . . . . . . . . . . . . . . . . . . . . 44
Color copies or black and white copies. . . . . . . . . . . . . . . . . . . . . . . . . . . . . . . . . . . . . . . . . . . . . . . 44
Reduce or enlarge . . . . . . . . . . . . . . . . . . . . . . . . . . . . . . . . . . . . . . . . . . . . . . . . . . . . . . . . . . . . . . 45
Adjust the lightness/darkness . . . . . . . . . . . . . . . . . . . . . . . . . . . . . . . . . . . . . . . . . . . . . . . . . . . . . . 45
ENWW
5
Page 8

http://www.hp.com/go/clj9500mfp
Enhance the document . . . . . . . . . . . . . . . . . . . . . . . . . . . . . . . . . . . . . . . . . . . . . . . . . . . . . . . . . . . 45
Setting copy defaults. . . . . . . . . . . . . . . . . . . . . . . . . . . . . . . . . . . . . . . . . . . . . . . . . . . . . . . . . . . . . . . . . 47
Digital sending and e-mail
Sending documents. . . . . . . . . . . . . . . . . . . . . . . . . . . . . . . . . . . . . . . . . . . . . . . . . . . . . . . . . . . . . . . . . . 51
Sending letter-size originals by using the scanner glass or ADF . . . . . . . . . . . . . . . . . . . . . . . . . . . 51
Changing the settings . . . . . . . . . . . . . . . . . . . . . . . . . . . . . . . . . . . . . . . . . . . . . . . . . . . . . . . . . . . 52
Sending a document to multiple recipients . . . . . . . . . . . . . . . . . . . . . . . . . . . . . . . . . . . . . . . . . . . . 53
Using the auto-complete function . . . . . . . . . . . . . . . . . . . . . . . . . . . . . . . . . . . . . . . . . . . . . . . . . . . 54
Using the address book. . . . . . . . . . . . . . . . . . . . . . . . . . . . . . . . . . . . . . . . . . . . . . . . . . . . . . . . . . . . . . . 55
Creating a recipient list . . . . . . . . . . . . . . . . . . . . . . . . . . . . . . . . . . . . . . . . . . . . . . . . . . . . . . . . . . . 56
Faxing
Connecting the fax to a phone line . . . . . . . . . . . . . . . . . . . . . . . . . . . . . . . . . . . . . . . . . . . . . . . . . . . . . . 60
Verifying the fax operation. . . . . . . . . . . . . . . . . . . . . . . . . . . . . . . . . . . . . . . . . . . . . . . . . . . . . . . . . . . . . 61
Establishing the required fax settings . . . . . . . . . . . . . . . . . . . . . . . . . . . . . . . . . . . . . . . . . . . . . . . . . . . . 62
Using the Fax Settings menu . . . . . . . . . . . . . . . . . . . . . . . . . . . . . . . . . . . . . . . . . . . . . . . . . . . . . . 63
Setting or verifying the date and time . . . . . . . . . . . . . . . . . . . . . . . . . . . . . . . . . . . . . . . . . . . . . . . . 64
Setting or verifying the location. . . . . . . . . . . . . . . . . . . . . . . . . .
Setting or verifying the fax header . . . . . . . . . . . . . . . . . . . . . . . . . . . . . . . . . . . . . . . . . . . . . . . . . . 65
Fax feature screen . . . . . . . . . . . . . . . . . . . . . . . . . . . . . . . . . . . . . . . . . . . . . . . . . . . . . . . . . . . . . . . . . . 67
Status message bar . . . . . . . . . . . . . . . . . . . . . . . . . . . . . . . . . . . . . . . . . . . . . . . . . . . . . . . . . . . . . 67
6 Contents
. . . . . . . . . . . . . . . . . . . . . . . . . . . 64
Rev. 1.0
Page 9

Sending faxes . . . . . . . . . . . . . . . . . . . . . . . . . . . . . . . . . . . . . . . . . . . . . . . . . . . . . . . . . . . . . . . . . . . . . . 68
Sending a fax by typing the number manually . . . . . . . . . . . . . . . . . . . . . . . . . . . . . . . . . . . . . . . . . 69
Sending a fax by using speed dial . . . . . . . . . . . . . . . . . . . . . . . . . . . . . . . . . . . . . . . . . . . . . . . . . . 70
Sending a fax by using phone book numbers. . . . . . . . . . . . . . . . . . . . . . . . . . . . . . . . . . . . . . . . . . 71
Canceling a fax . . . . . . . . . . . . . . . . . . . . . . . . . . . . . . . . . . . . . . . . . . . . . . . . . . . . . . . . . . . . . . . . . . . . . 73
Canceling the current fax transmission. . . . . . . . . . . . . . . . . . . . . . . . . . . . . . . . . . . . . . . . . . . . . . . 73
Canceling all pending faxes . . . . . . . . . . . . . . . . . . . . . . . . . . . . . . . . . . . . . . . . . . . . . . . . . . . . . . . 74
Speed dial . . . . . . . . . . . . . . . . . . . . . . . . . . . . . . . . . . . . . . . . . . . . . . . . . . . . . . . . . . . . . . . . . . . . . . . . . 74
Changing the sharpness setting . . . . . . . . . . . . . . . . . . . . . . . . . . . . . . . . . . . . . . . . . . . . . . . . . . . . . . . . 76
Changing the background setting . . . . . . . . . . . . . . . . . . . . . . . . . . . . . . . . . . . . . . . . . . . . . . . . . . . . . . . 77
Changing the light/dark setting . . . . . . . . . . . . . . . . . . . . . . . . . . . . . . . . . . . . . . . . . . . . . . . . . . . . . . . . . 78
Receiving faxes. . . . . . . . . . . . . . . . . . . . . . . . . . . . . . . . . . . . . . . . . . . . . . . . . . . . . . . . . . . . . . . . . . . . . 78
Establishing optional fax settings . . . . . . . . . . . . . . . . . . . . . . . . . . . . . . . . . . . . . . . . . . . . . . . . . . . . . . . 79
Setting the modem volume . . . . . . . . . . . . . . . . . . . . . . . . . . . . . . . . . . . . . . . . . . . . . . . . . . . . . . . . 80
Setting the ringer volume . . . . . . . . . . . . . . . . . . . . . . . . . . . . . . . . . . . . . . . . . . . . . . . . . . . . . . . . . 81
Setting outgoing fax resolution . . . . . . . . . . . . . . . . . . . . . . . . . . . . . . . . . . . . . . . . . . . . . . . . . . . . . 81
Setting dialing and detection options. . . . . . . . . . . . . . . . . . . . . . . . . . . . . . . . . . . . . . . . . . . . . . . . . . . . . 83
Setting a dialing prefix. . . . . . . . . . . . . . . . . . . . . . . . . . . . . . . . . . . . . . . . . . . . . . . . . . . . . . . . . . . . 83
Setting the redial-on-busy feature. . . . . . . . . . . . . . . . . . . . . . . . . . . . . . . . . . . . . . . . . . . . . . . . . . . 84
Setting the paper tray . . . . . . . . . . . . . . . . . . . . . . . . . . . . . . . . . . . . . . . . . . . . . . . . . . . . . . . . . . . . . . . . 85
Setting the destination bin. . . . . . . . . . . . . . . . . . . . . . . . . . . . . . . . . . . . . . . . . . . . . . . . . . . . . . . . . . . . . 86
ENWW
7
Page 10

http://www.hp.com/go/clj9500mfp
Troubleshooting fax. . . . . . . . . . . . . . . . . . . . . . . . . . . . . . . . . . . . . . . . . . . . . . . . . . . . . . . . . . . . . . 87
What type of phone line are you using? . . . . . . . . . . . . . . . . . . . . . . . . . . . . . . . . . . . . . . . . . . . . . . 87
Are you using a phone-line splitter? . . . . . . . . . . . . . . . . . . . . . . . . . . . . . . . . . . . . . . . . . . . . . . . . . 88
Are you using a surge-protection device?. . . . . . . . . . . . . . . . . . . . . . . . . . . . . . . . . . . . . . . . . . . . . 88
Are you using a phone company voice-messaging service or an answering machine? . . . . . . . . . . 89
Checking fax status. . . . . . . . . . . . . . . . . . . . . . . . . . . . . . . . . . . . . . . . . . . . . . . . . . . . . . . . . . . . . . . . . . 89
Fax feature is not operating. . . . . . . . . . . . . . . . . . . . . . . . . . . . . . . . . . . . . . . . . . . . . . . . . . . . . . . . . . . . 91
General fax problems . . . . . . . . . . . . . . . . . . . . . . . . . . . . . . . . . . . . . . . . . . . . . . . . . . . . . . . . . . . . . . . . 93
Receiving fax problems. . . . . . . . . . . . . . . . . . . . . . . . . . . . . . . . . . . .
Sending fax problems . . . . . . . . . . . . . . . . . . . . . . . . . . . . . . . . . . . . .
Error codes . . . . . . . . . . . . . . . . . . . . . . . . . . . . . . . . . . . . . . . . . . . . .
. . . . . . . . . . . . . . . . . . . . . . . . . . . 96
. . . . . . . . . . . . . . . . . . . . . . . . . . 100
. . . . . . . . . . . . . . . . . . . . . . . . . . 103
Fax product specifications. . . . . . . . . . . . . . . . . . . . . . . . . . . . . . . . . . . . . . . . . . . . . . . . . . . . . . . . . . . . 107
Printing
Customizing tray 1 operation. . . . . . . . . . . . . . . . . . . . . . . . . . . . . . . . . . . . . . . . . . . . . . . . . . . . . . . . . . 109
Printing from tray 1 when the loaded paper is requested . . . . . . . . . . . . . . . . . . . . . . . . . . . . . . . . 109
Manually feeding paper from tray 1. . . . . . . . . . . . . . . . . . . . . . . . . . . . . . . . . . . . . . . . . . . . . . . . . 110
Using the job-storage features . . . . . . . . . . . . . . . . . . . . . . . . . . . . . . . . . . . . . . . . . . . . . . . . . . . . . . . . 111
Private jobs . . . . . . . . . . . . . . . . . . . . . . . . . . . . . . . . . . . . . . . . . . . . . . . . . . . . . . . . . . . . . . . . . . . 112
Stored jobs . . . . . . . . . . . . . . . . . . . . . . . . . . . . . . . . . . . . . . . . . . . . . . . . . . . . . . . . . . . . . . . . . . . 113
QuickCopy jobs. . . . . . . . . . . . . . . . . . . . . . . . . . . . . . . . . . . . . . . . . . . . . . . . . . . . . . . . . . . . . . . . 115
8 Contents
Rev. 1.0
Page 11

Proof and hold jobs . . . . . . . . . . . . . . . . . . . . . . . . . . . . . . . . . . . . . . . . . . . . . . . . . . . . . . . . . . . . . 117
Control panel menus
Retrieve job menu. . . . . . . . . . . . . . . . . . . . . . . . . . . . . . . . . . . . . . . . . . . . . . . . . . . . . . . . . . . . . . . . . . 123
Information menu . . . . . . . . . . . . . . . . . . . . . . . . . . . . . . . . . . . . . . . . . . . . . . . . . . . . . . . . . . . . . . . . . . 125
Paper handling menu . . . . . . . . . . . . . . . . . . . . . . . . . . . . . . . . . . . . . . . . . . . . . . . . . . . . . . . . . . . . . . . 127
Configure device menu . . . . . . . . . . . . . . . . . . . . . . . . . . . . . . . . . . . . . . . . . . . . . . . . . . . . . . . . . . . . . . 131
Originals submenu . . . . . . . . . . . . . . . . . . . . . . . . . . . . . . . . . . . . . . . . . . . . . . . . . . . . . . . . . . . . . 131
Copying submenu . . . . . . . . . . . . . . . . . . . . . . . . . . . . . . . . . . . .
Enhancement submenu . . . . . . . . . . . . . . . . . . . . . . . . . . . . . . . . . . . . . . . . . . . . . . . . . . . . . . . . . 137
Sending submenu . . . . . . . . . . . . . . . . . . . . . . . . . . . . . . . . . . . . . . . . . . . . . . . . . . . . . . . . . . . . . . 138
Printing submenu . . . . . . . . . . . . . . . . . . . . . . . . . . . . . . . . . . . . . . . . . . . . . . . . . . . . . . . . . . . . . . 141
Print quality submenu . . . . . . . . . . . . . . . . . . . . . . . . . . . . . . . . . . . . . . . . . . . . . . . . . . . . . . . . . . . 147
System setup submenu. . . . . . . . . . . . . . . . . . . . . . . . . . . . . . . . . . . . . . . . . . . . . . . . . . . . . . . . . . 150
. . . . . . . . . . . . . . . . . . . . . . . . . . 134
Selecting and using media
Selecting high-quality media . . . . . . . . . . . . . . . . . . . . . . . . . . . . . . . . . . . . . . . . . . . . . . . . . . . . . . 159
Using non-HP-brand media. . . . . . . . . . . . . . . . . . . . . . . . . . . . . . . . . . . . . . . . . . . . . . . . . . . . . . . 160
Ordering supported media . . . . . . . . . . . . . . . . . . . . . . . . . . . . . . . . . . . . . . . . . . . . . . . . . . . . . . . 160
Setting media size and type . . . . . . . . . . . . . . . . . . . . . . . . . . . . . . . . . . . . . . . . . . . . . . . . . . . . . . 161
Supported types of media . . . . . . . . . . . . . . . . . . . . . . . . . . . . . . . . . . . . . . . . . . . . . . . . . . . . . . . . 164
Media-related copy-quality and print-quality issues . . . . . . . . . . . . . . . . . . . . . . . . . . . . . . . . . . . . 180
ENWW
9
Page 12

http://www.hp.com/go/clj9500mfp
Managing and maintaining
Managing supplies . . . . . . . . . . . . . . . . . . . . . . . . . . . . . . . . . . . . . . . . . . . . . . . . . . . . . . . . . . . . . . . . . 187
Checking supplies levels. . . . . . . . . . . . . . . . . . . . . . . . . . . . . . . . . . . . . . . . . . . . . . . . . . . . . . . . . 187
Ordering supplies . . . . . . . . . . . . . . . . . . . . . . . . . . . . . . . . . . . . . . . . . . . . . . . . . . . . . . . . . . . . . . 188
Storing supplies. . . . . . . . . . . . . . . . . . . . . . . . . . . . . . . . . . . . . . . . . . . . . . . . . . . . . . . . . . . . . . . . 189
Replacing and recycling the supplies . . . . . . . . . . . . . . . . . . . . . . . . . . . . . . . . . . . . . . . . . . . . . . . 191
Using the image drums . . . . . . . . . . . . . . . . . . . . . . . . . . . . . . . .
Replacing the image drums . . . . . . . . . . . . . . . . . . . . . . . . . . . .
. . . . . . . . . . . . . . . . . . . . . . . . . . 196
. . . . . . . . . . . . . . . . . . . . . . . . . . 197
Image transfer kit . . . . . . . . . . . . . . . . . . . . . . . . . . . . . . . . . . . . . . . . . . . . . . . . . . . . . . . . . . . . . . 202
Image cleaning kit . . . . . . . . . . . . . . . . . . . . . . . . . . . . . . . . . . . . . . . . . . . . . . . . . . . . . . . . . . . . . . 213
Image fuser kit. . . . . . . . . . . . . . . . . . . . . . . . . . . . . . . . . . . . . . . . . . . . . . . . . . . . . . . . . . . . . . . . . 219
Cleaning procedures. . . . . . . . . . . . . . . . . . . . . . . . . . . . . . . . . . . . . . . . . . . . . . . . . . . . . . . . . . . . . . . . 224
Cleaning the ADF . . . . . . . . . . . . . . . . . . . . . . . . . . . . . . . . . . . . . . . . . . . . . . . . . . . . . . . . . . . . . . 224
Cleaning the post charger. . . . . . . . . . . . . . . . . . . . . . . . . . . . . . . . . . . . . . . . . . . . . . . . . . . . . . . . 231
Cleaning the fuser input . . . . . . . . . . . . . . . . . . . . . . . . . . . . . . . . . . . . . . . . . . . . . . . . . . . . . . . . . 234
Relocating the MFP. . . . . . . . . . . . . . . . . . . . . . . . . . . . . . . . . . . . . . . . . . . . . . . . . . . . . . . . . . . . . . . . . 237
Problem solving
Clearing jams . . . . . . . . . . . . . . . . . . . . . . . . . . . . . . . . . . . . . . . . . . . . . . . . . . . . . . . . . . . . . . . . . . . . . 239
Jam clearing locations. . . . . . . . . . . . . . . . . . . . . . . . . . . . . . . . . . . . . . . . . . . . . . . . . . . . . . . . . . . 240
Clearing jams from the input-tray areas . . . . . . . . . . . . . . . . . . . . . . . . . . . . . . . . . . . . . . . . . . . . . 242
10 Contents
Rev. 1.0
Page 13

Clearing jams from the duplexer . . . . . . . . . . . . . . . . . . . . . . . . . . . . . . . . . . . . . . . . . . . . . . . . . . . 258
Clearing jams from the output areas. . . . . . . . . . . . . . . . . . . . . . . . . . . . . . . . . . . . . . . . . . . . . . . . 261
Solving repeated jams. . . . . . . . . . . . . . . . . . . . . . . . . . . . . . . . . . . . . . . . . . . . . . . . . . . . . . . . . . . 275
Understanding MFP messages. . . . . . . . . . . . . . . . . . . . . . . . . . . . . . . . . . . . . . . . . . . . . . . . . . . . . . . . 277
Using the MFP help system . . . . . . . . . . . . . . . . . . . . . . . . . . . . . . . . . . . . . . . . . . . . . . . . . . . . . . 277
If a message persists . . . . . . . . . . . . . . . . . . . . . . . . . . . . . . . . . . . . . . . . . . . . . . . . . . . . . . . . . . . 278
Solving output-quality problems . . . . . . . . . . . . . . . . . . . . . . . . . . . . . . . . . . . . . . . . . . . . . . . . . . . . . . . 279
Output-quality troubleshooting procedures . . . . . . . . . . . . . . . . . . . . . . . . . . . . . . . . . . . . . . . . . . . 281
Solving persistent output-quality problems . . . . . . . . . . . . . . . . .
Print Quality Troubleshooting Pages . . . . . . . . . . . . . . . . . . . . .
Solving MFP problems . . . . . . . . . . . . . . . . . . . . . . . . . . . . . . . . . . . .
. . . . . . . . . . . . . . . . . . . . . . . . . . 282
. . . . . . . . . . . . . . . . . . . . . . . . . . 288
. . . . . . . . . . . . . . . . . . . . . . . . . . 290
MFP hardware issues . . . . . . . . . . . . . . . . . . . . . . . . . . . . . . . . . . . . . . . . . . . . . . . . . . . . . . . . . . . 290
Media-handling issues . . . . . . . . . . . . . . . . . . . . . . . . . . . . . . . . . . . . . . . . . . . . . . . . . . . . . . . . . . 293
MFP-output issues . . . . . . . . . . . . . . . . . . . . . . . . . . . . . . . . . . . . . . . . . . . . . . . . . . . . . . . . . . . . . 298
Duplexer issues. . . . . . . . . . . . . . . . . . . . . . . . . . . . . . . . . . . . . . . . . . . . . . . . . . . . . . . . . . . . . . . . 303
Service and support
Warranty information. . . . . . . . . . . . . . . . . . . . . . . . . . . . . . . . . . . . . . . . . . . . . . . . . . . . . . . . . . . . . . . . 305
Service during and after the warranty period . . . . . . . . . . . . . . . . . . . . . . . . . . . . . . . . . . . . . . . . . 305
Extended warranty . . . . . . . . . . . . . . . . . . . . . . . . . . . . . . . . . . . . . . . . . . . . . . . . . . . . . . . . . . . . . 305
Spare parts and supplies availability. . . . . . . . . . . . . . . . . . . . . . . . . . . . . . . . . . . . . . . . . . . . . . . . 306
ENWW
11
Page 14

http://www.hp.com/go/clj9500mfp
Color print cartridge/image drum warranty . . . . . . . . . . . . . . . . . . . . . . . . . . . . . . . . . . . . . . . . . . . 306
HP software license terms . . . . . . . . . . . . . . . . . . . . . . . . . . . . . . . . . . . . . . . . . . . . . . . . . . . . . . . 308
Customer support options worldwide . . . . . . . . . . . . . . . . . . . . . . . . . . . . . . . . . . . . . . . . . . . . . . . . . . . 310
Information from the MFP . . . . . . . . . . . . . . . . . . . . . . . . . . . . . . . . . . . . . . . . . . . . . . . . . . . . . . . . 310
Customer support and MFP repair assistance . . . . . . . . . . . . . . . . . . . . . . . . . . . . . . . . . . . . . . . . 311
Specifications and regulatory information
Physical specifications . . . . . . . . . . . . . . . . . . . . . . . . . . . . . . . . . . . . . . . . . . . . . . . . . . . . . . . . . . . . . . 313
Power requirements and circuit capacity. . . . . . . . . . . . . . . . . . . . . . . . . . . . . . . . . . . . . . . . . . . . . . . . . 316
Power consumption. . . . . . . . . . . . . . . . . . . . . . . . . . . . . . . . . . . . . . . . . . . . . . . . . . . . . . . . . . . . . . . . . 317
Acoustical specifications¹ . . . . . . . . . . . . . . . . . . . . . . . . . . . . . . . . . . . . . . . . . . . . . . . . . . . . . . . . . . . . 319
Operating and storage environment . . . . . . . . . . . . . . . . . . . . . . . . . . . . . . . . . . . . . . . . . . . . . . . . . . . . 320
Environmental product stewardship program . . . . . . . . . . . . . . . . . . . . . . . . . . . . . . . . . . . . . . . . . . . . . 321
Protecting the environment . . . . . . . . . . . . . . . . . . . . . . . . . . . . . . . . . . . . . . . . . . . . . . . . . . . . . . . 321
FCC statement . . . . . . . . . . . . . . . . . . . . . . . . . . . . . . . . . . . . . . . . . . . . . . . . . . . . . . . . . . . . . . . . . . . . 326
Regulatory statements . . . . . . . . . . . . . . . . . . . . . . . . . . . . . . . . . . . . . . . . . . . . . . . . . . . . . . . . . . . . . . 327
Declaration of Conformity . . . . . . . . . . . . . . . . . . . . . . . . . . . . . . . . . . . . . . . . . . . . . . . . . . . . . . . . 327
EU Statement for Telecom Operation. . . . . . . . . . . . . . . . . . . . . . . . . . . . . . . . . . . . . . . . . . . . . . . 330
Canadian DOC Regulations . . . . . . . . . . . . . . . . . . . . . . . . . . . . . . . . . . . . . . . . . . . . . . . . . . . . . . 330
VCCI Statement (Japan). . . . . . . . . . . . . . . . . . . . . . . . . . . . . . . . . . . . . . . . . . . . . . . . . . . . . . . . . 331
Korean EMI Statement . . . . . . . . . . . . . . . . . . . . . . . . . . . . . . . . . . . . . . . . . . . . . . . . . . . . . . . . . . 332
12 Contents
Rev. 1.0
Page 15

Laser Statement for Finland . . . . . . . . . . . . . . . . . . . . . . . . . . . . . . . . . . . . . . . . . . . . . . . . . . . . . . 332
Taiwan Class A Statement . . . . . . . . . . . . . . . . . . . . . . . . . . . . . . . . . . . . . . . . . . . . . . . . . . . . . . . 334
Taiwan Battery Statement. . . . . . . . . . . . . . . . . . . . . . . . . . . . . . . . . . . . . . . . . . . . . . . . . . . . . . . . 335
Product Information Sheet . . . . . . . . . . . . . . . . . . . . . . . . . . . . . . . . . . . . . . . . . . . . . . . . . . . . . . . 335
ENWW
13
Page 16

http://www.hp.com/go/clj9500mfp
14 Contents
Rev. 1.0
Page 17
MFP basics
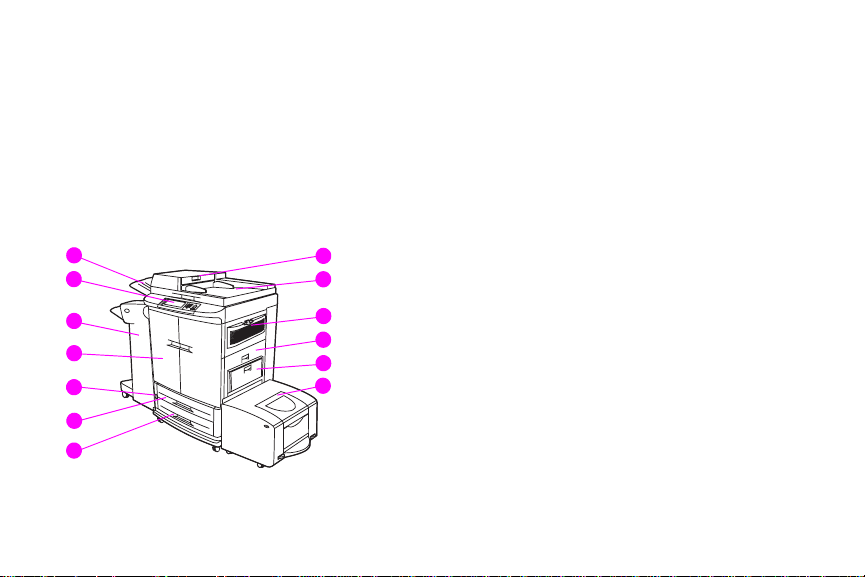
MFP components
The following figures show the components of the HPColor LaserJet 9500mfp.
1
1
2
3
4
5
6
7
ENWW
8
9
10
11
12
12
13
MFP components 1
Page 18

http://www.hp.com/go/clj9500mfp
1 the ADF (automatic document feeder) output bin
2 the control panel (including the touch-screen
graphical display)
3 the finishing device
(3,000-sheet stapler/stacker, 3,000-sheet
stacker, multifunction finisher, or 8-bin mailbox)
2 Chapter 1 – MFP basics
4 the front doors
5 the power switch
6 tray 2
7 tray 3
8 the ADF feeder
9 the ADF
10 the ozone fan and filter
11 the right door
12 tray 1
13 the 2,000-sheet side input
tray (tray 4)
Rev. 1.0
Page 19
1
1
2
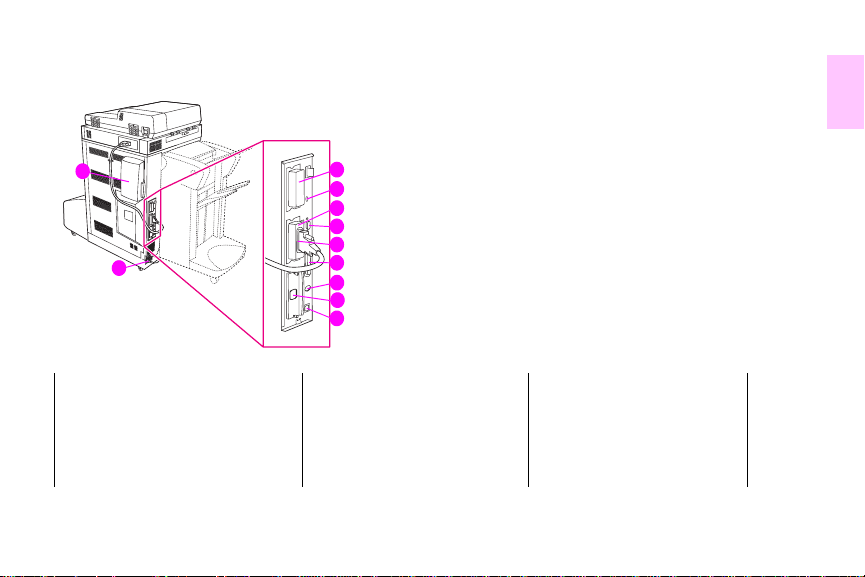
1 the air filter
2 the power-cord connector
3 the copy connect card
(enhanced input/output [EIO])
4 the disk-drive security lock
ENWW
3
4
5
6
7
8
9
10
11
5 the RJ11 connector (to the
external fax line)
6 the HP JetLink connector
7 the hard disk (EIO)
8 the parallel port
9 the FIH (foreign interface
harness) connector
10 the ethernet network card
(EIO)
11 the USB por t
MFP components 3
Page 20
http://www.hp.com/go/clj9500mfp
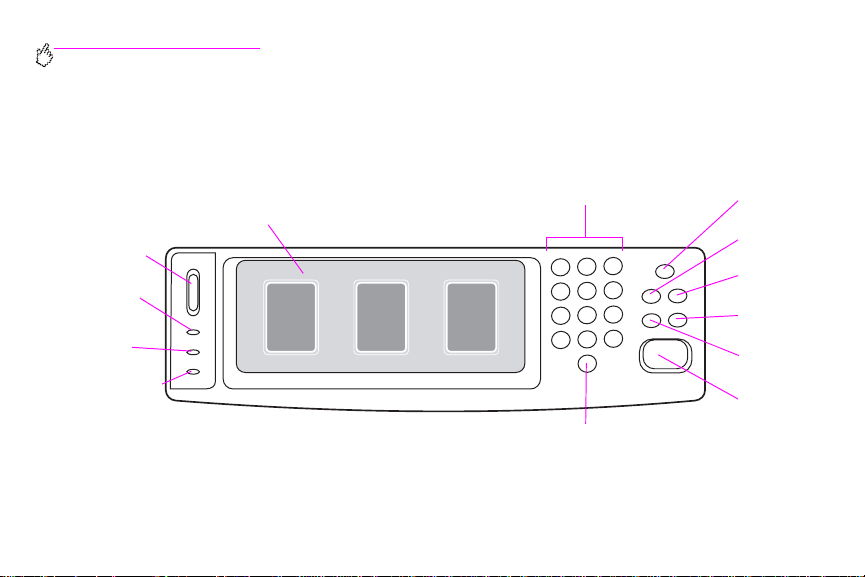
Control panel
The control panel includes a touch-screen graphical display, three job-control buttons, a numeric ke ypad, and three lightemitting diode (LED) indicator lights.
Touch-screen
graphical display
Display
contrast
adjustment
Ready light
(green)
Data light
(green)
Attention light
(orange)
4 Chapter 1 – MFP basics
Numeric keypad
CLEAR
button (C)
SLEEP
button
MENU
button
S
TATUS
button
S
TOP
button
RESET
button
START
button
Rev. 1.0
Page 21

Features and buttons Function
ISPLAY CONTRAST ADJUSTMENT Use this to adjust the amount of back light on the control-panel display.
D
OUCH-SCREEN GRAPHICAL DISPLAY This touch-screen display provides the user with text and graphical information
T
LEEP Use this to set the MFP to Sleep Mode.
S
ENU Use this to open the MFP Information, Configuration, and other menus.
M
TATUS This button shows the current jobs and their progress, and also shows the status of
S
about the configuration and status of the MFP. The touch screen allows you to
control all of the MFP functions and features.
the trays and supplies.
ESET Use this button to resets the job settings to user-defined default values.
R
TOP Use this button to cancel the active job.
S
TART Use this button to begin a copy job, start digital sending, or continue a job that has
S
been interrupted.
C This is the Clear button which resets the number of copies to one.
1
ENWW
MFP components 5
Page 22
http://www.hp.com/go/clj9500mfp
Features and buttons Function
UMERIC KEYPAD Use the keypad to type numeric values for the number of copies that are required
N
and to specify other numeric values.
Interpreting control-panel lights
Use the following table to int erpret the control-panel lights.
Light State Indication
Ready
(green)
Off The MFP is off, offline, or has experienced an error.
On The MFP is ready to print.
Blinking The MFP is going offline.
6 Chapter 1 – MFP basics
Rev. 1.0
Page 23
Light State Indication
Data
(green)
Attention
(orange)
Off The MFP has no data to print.
On The MFP has data to print, but is not ready or is offline.
Blinking The MFP is processing or is printing the data.
Off The MFP is functioning without error.
On The MFP has experienced a critical error. Note the error message, and then turn
the MFP off and on again.
Blinking Action is required. See the control-panel display.
1
ENWW
MFP components 7
Page 24
http://www.hp.com/go/clj9500mfp
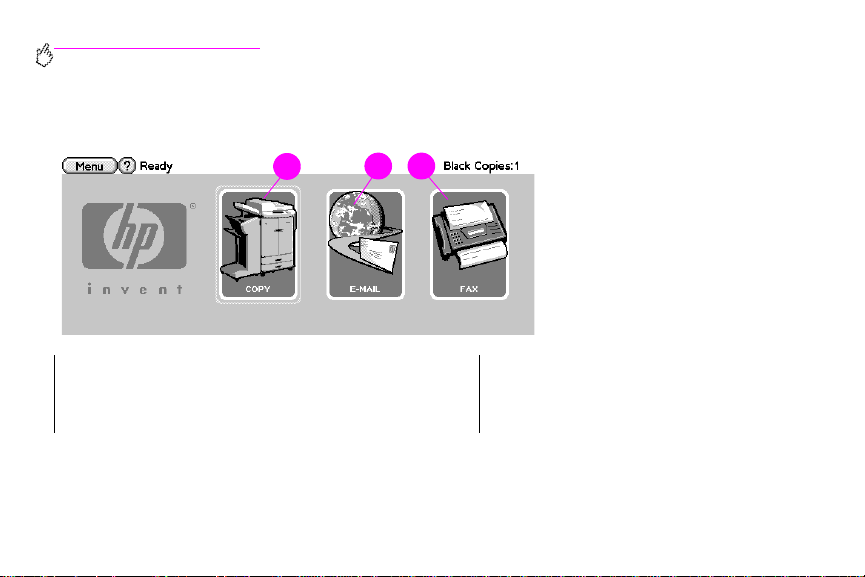
Control-panel home screen
Use the following control-panel elements to gain access to MFP features.
213
1 touch this to use the copy screen
2 touch this to use the e-mail screen
3 touch this to use the fax screen
8 Chapter 1 – MFP basics
Rev. 1.0
Page 25

Setting the MFP defaults
Certain printing features and hardware (such as the duplex-printing accessory or a finishing device) must be configured
through the printing-system software.
Setting the MFP device defaults
You can create default MFP device settings for several printing, copying, faxing, e-mail, and network features.
To set device defaults at the control panel
1 Press the MENU button.
2 Scroll to and touch C
3 Scroll to and touch the configuration item that you want. These items include the following:
• copying
• enhancement
• sending
• printing
• system setup
ONFIGURE DEVICE.
1
ENWW
Setting the MFP defaults 9
Page 26

http://www.hp.com/go/clj9500mfp
Loading input trays
This section contains information about loading standard- and custom-size media into tray 1, tray2, tray 3, and the 2,000sheet side input tray (tray 4).
Caution To avoid a jam, never add or remove paper from tray1 or open tray 2, tray 3, or the 2,000-sheet side input
10 Chapter 1 – MFP basics
tray (tray 4) while printing or copying from that tray.
To avoid damaging the MFP, print labels and enve lopes only from tray 1. Send labels and envelopes to the
face-up bin. Print on only one side of labels and envelopes.
Rev. 1.0
Page 27
1
2
3
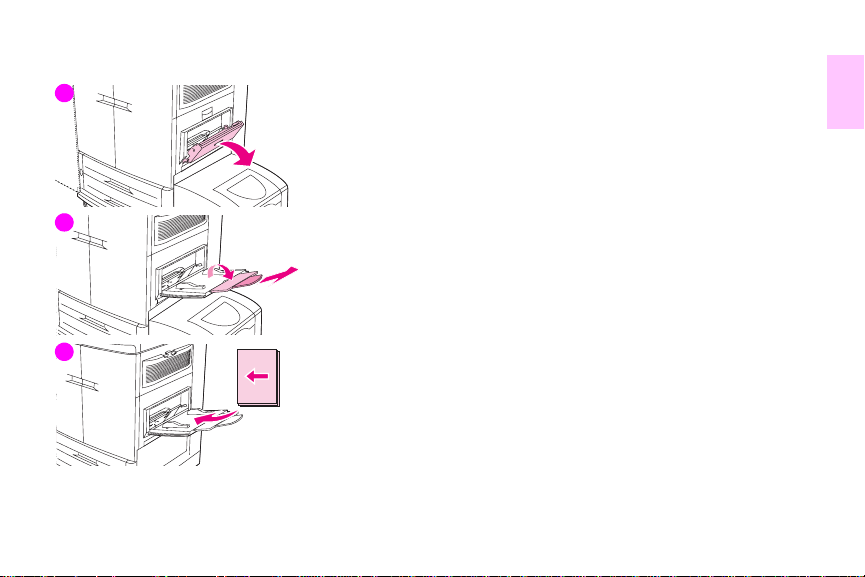
To load media in tray 1
Tray 1 is a multipurpose tray that holds a stack of media up to 5mm (0.2 inch)
in height, which equals approximately 100 sheets of 75 g/m² (20-lb paper), 10
envelopes, or 20 transparencies. If media is loaded in tr ay1, the MFP default
is to print media from tray 1 first.
Tray 1 provides a convenient way to print envelopes, transparencies, customsize paper, or other types of media without having to unload the oth er trays. It
can also be used as a convenient additional input tray.
Use this procedure to load media in tray 1.
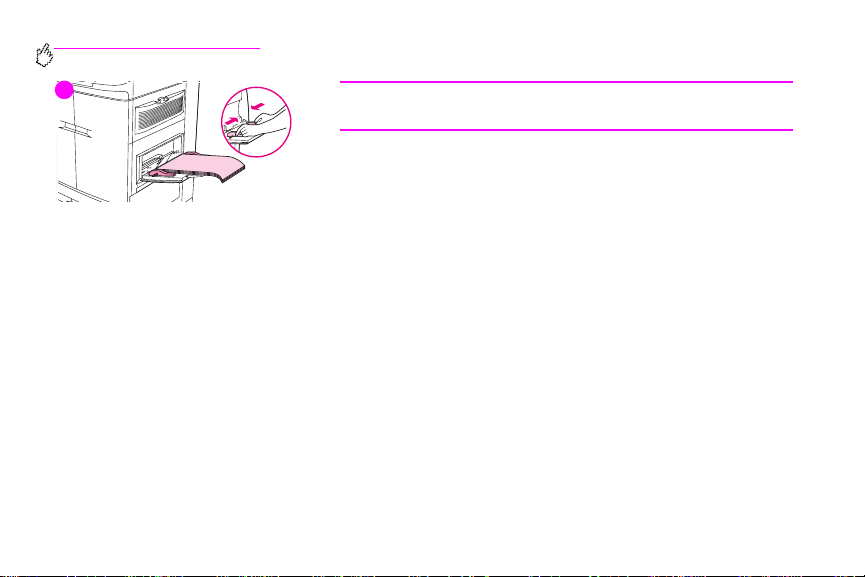
1 Open tray 1.
2 Pull the first tray extension out until it stops. If you are printing on large
media, also extend the second tray extension out until it stops.
3 Load (orient) media according to size and finishing opti ons. F or single-sided
printing on preprinted paper, load the side to be printed on face up. For
double-sided printing (duplexing) on prep rinted paper, load the first side to
be printed on face down.
1
ENWW
Loading input trays 11
Page 28
http://www.hp.com/go/clj9500mfp
4
12 Chapter 1 – MFP basics
Note
To avoid jams, print sheets of labels one at a time.
4 Adjust the paper guides so they lightly touch the paper stack, but do not
bend the paper. Mak e sure the paper fits under th e tabs on the paper guides
and not above the load level indicators.
5 Look at the control-panel display within a few seconds of loading the paper.
(Remove and reload the media if the time has already elapsed.)
6 If the control panel does not display the message TRAY 1 <TYPE> <SIZE>,
then the tray is ready to use.
7 If the control panel displays TRAY 1 <TYPE> <SIZE>, touch O
size and type configuration. The size menu is displayed.
8 Touch A
9 Touch A
10 If the control panel displays TRAY 1 ANY SIZE ANY TYPE, then the tray is
11 Touch E
NY SIZE. The control panel displays SETTING SAVED.
NY TYPE. The control panel displays SETTING SAVED.
ready for occasional one-time use for a variety of paper.
XIT to accept the size and type settings.
K to change the
Rev. 1.0
Page 29

To load tray 1 when the same paper is used for
multiple jobs
Use the following procedure if tray 1 is loaded continually with the same type of
paper, and the paper is not usually removed from tray 1 between print jobs.
The following procedures can also increase the MFP performance when
printing from tray 1.
CAUTION
To avoid a jam, never add or remove paper from a tray while printing from
that tray.
1
ENWW
1 Touch M
2 Touch P
3 Touch T
4 Touch the correct paper size. The control panel displays SETTING SAVED.
5 Touch T
ENU.
APER HANDLING.
RAY 1 SIZE.
Note
If you select CUSTOM as the paper size, also select the unit of measure (the
X and Y dimensions).
RAY 1 TYPE.
Loading input trays 13
Page 30
http://www.hp.com/go/clj9500mfp
8
9
10
14 Chapter 1 – MFP basics
6 Touch the correct paper type. The control panel displays SETTING SAVED.
7 Touch E
XIT to exit the menus.
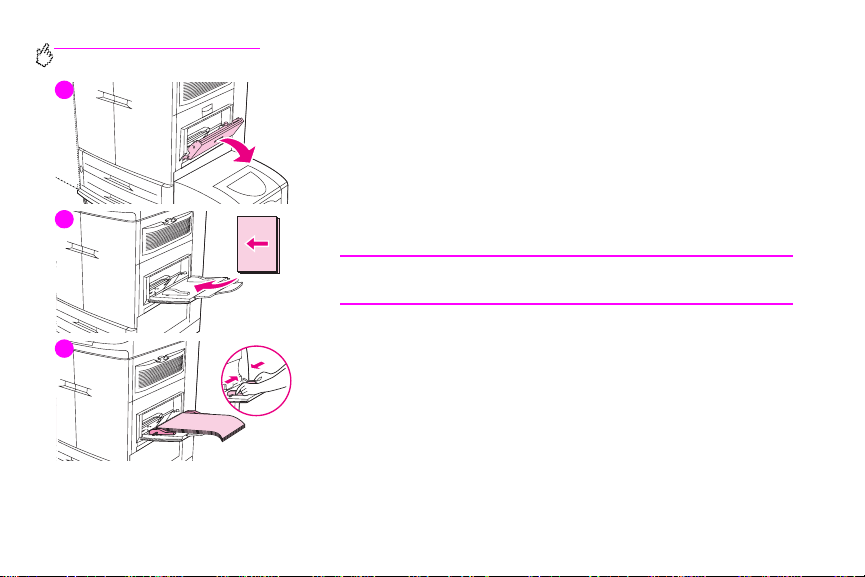
8 Open tray 1.
9 Pull the first tray extension out until it stops. If you are printing on large
media, also extend the second tray extension out until it stops.
10 Load (orient) media according to size and finishing options. For single-sided
printing on preprinted paper, load the side to be printed on face up. For
double-sided printing (duplexing) on preprinted paper, load the first side to
be printed on face down.
CAUTION
To avoid jams, print sheets of labels one sheet at a time.
11 Adjust the paper guides so they lightly touch the paper stack, but do not
bend the paper. Make sure the paper fits under the tabs on the guides and
not above the load level indicators.
12 Look at the control-panel display within a few second s of loadi ng the paper.
The tray configuration is displayed. (Remove and reload the media if the
time has already elapsed.)
13 Touch E
XIT to exit the menus. The tray is ready to use.
Rev. 1.0
Page 31

1
Loading tray 2 and tray 3
Tray 2 and tray 3 hold up to 500 sheets of standard media.
1
To load detectable standard-size media i n tray 2
and tray 3
Use this procedure to load detectable standard-size media in the tray. The
2
following are the detectable sizes, which are marked inside the tray:
• A4, Letter, A3, Legal, Executive, 11 x 17, B4, B5, A4-R, and Letter-R
CAUTION
To avoid a jam, never add or remove media from a tray while printing from
that tray.
3
ENWW
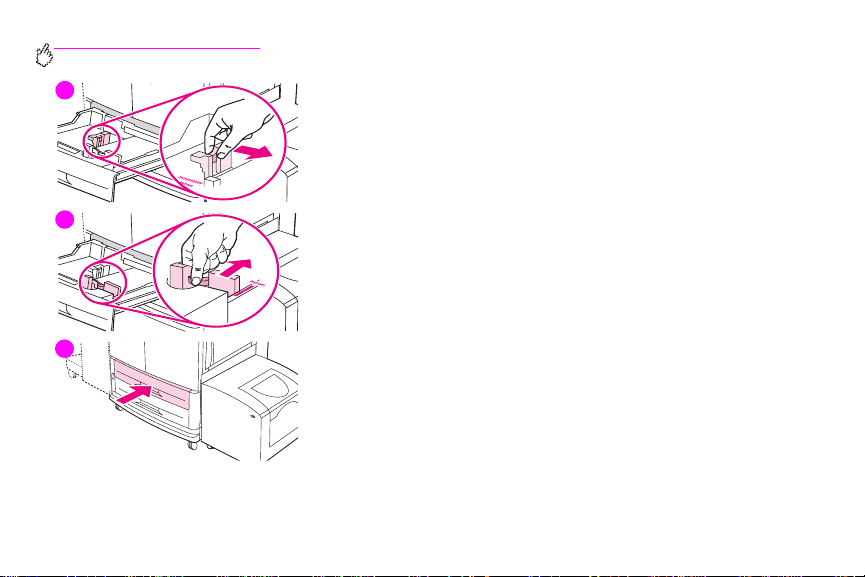
1 Pull the tray open until it stops.
2 Adjust the left (Y) media guide by pressing the tab on the guide and set the
guide to the correct media size.
3 Adjust the front (X) media guide by pressing the tab on the guide and set
the guide to the correct media size.
Loading input trays 15
Page 32

http://www.hp.com/go/clj9500mfp
4
5
6
16 Chapter 1 – MFP basics
4 Load (orient) the media according to size.
CAUTION
Do not load more media than the maximum that is indicated by the media-fill
triangles at the back of the tray.
5 Set the custom/standard switch to Standard.
6 Slide the tray into the MFP.
7 Look at the control panel within a few seconds of closing the tray. (Open
and close the tray if the time has already elapsed.) The control panel
displays the tray size and type configuration. Do one of the following.
• If the size and type settings are correct, touch EXIT to accept the settings.
• If the size and type settings are not correct, touch OK. The TRAY N
SIZE=*<SIZE> menu is displayed.
8 To change the size setting, touch the correct paper size. The message
SETTING SAVED is displayed for a moment, and then the tray type menu is
displayed.
Rev. 1.0
Page 33

Note
Depending on the size that you selected, the MFP might prompt you to
move the Custom/Standard switch in the tray to another position. The MFP
might also prompt you to move the paper guides. Follow t he in struct ions o n
the control panel, close the tray, and then repeat this procedure starting
with step 7.
9 To change the type setting, touch the correct paper type. The message
SETTING SAVED is displayed for a moment, and then the size and type
settings are displayed.
Note
If you are using media that is lighter or heavier than 75 g/m² to 105 g/m² (20
to 28 lb), or if you are using coated media or transparencies, set th e media
type for the tray.
1
ENWW
10 If the size and type settings are correct, touch E
The tray is ready to use.
XIT to accept the settings.
Loading input trays 17
Page 34

http://www.hp.com/go/clj9500mfp
1
4
5
18 Chapter 1 – MFP basics
To load undetectable standard-size media in tray 2
and tray 3
Use this procedure to load undetectable standard-size media in the tray. The
following are the undetectable sizes, which are marked insid e the tray:
• 8K, 16K, A5, Statement, Executive, and 8.5 x 13 (216 x 330 mm)
CAUTION
To avoid a jam, never add or remove media from a tray while printing from
that tray.
1 Pull the tray open until it stops.
2 Press the tab on the front (X) paper guide and slide the guide all the way
out.
3 Press the tab on the left (Y) paper guide and slide the guide all the way out.
4 Load (orient) the media according to size.
5 Adjust the left (Y) media guide by pressing the tab on the guide and slide
the guide until it gently touches the paper.
Rev. 1.0
Page 35

6
7
6 Adjust the front (X) media guide by pressing tab on the guide and slide the
guide until it gently touches the paper.
7 Set the Custom/Standard switch to Custom.
8 Slide the tray into the MFP.
9 Look at the control panel within a few seconds of closing the tray. (Open
and close the tray if the time has already elapsed.) The control panel
displays the tray size and type configuration. Do one of the following:
• If the size and type settings are correct, touch EXIT to accept the settings.
1
• If the size and type settings are not correct, touch OK. The TRAY N
SIZE=*<SIZE> menu is displayed.
10 To change the size setting, touch the correct paper size. The message
SETTING SAVED is displayed for a moment, and then the tray type menu is
displayed.
8
Note
Depending on the size that you selected, the MFP might prompt you to
move the Custom/Standard switch in the tray to another position. The MFP
might also prompt you to move the paper guides. Follow t he in struct ions o n
the control panel, close the tray, and then repeat this procedure starting
with step 9.
ENWW
Loading input trays 19
Page 36

http://www.hp.com/go/clj9500mfp
11 To change the type setting, touch the correct paper type. The message
SETTING SAVED is displayed for a moment, and then the size and type
settings are displayed.
Note
If you are using media that is lighter or heavier than 75 g/m² to 105 g/m² (20
to 28 lb), or if you are using coated media or transparencies, set th e media
type for the tray.
20 Chapter 1 – MFP basics
12 If the size and type settings are correct, touch E
The tray is ready to use.
XIT to accept the settings.
Rev. 1.0
Page 37

1
4
5
To load custom media in tray 2 and tray 3
Use this procedure to load custom-size media in the tray.
CAUTION
To avoid a jam, never add or remove media from a tray while printing from
that tray.
1 Pull the tray open until it stops.
2 Press the tab on the front (X) paper guide and slide the guide all the way
out.
3 Press the tab on the left (Y) paper guide and slide the guide all the way out.
4 Load (orient) the media according to size.
5 Set the Custom/Standard switch to Custom.
1
ENWW
Loading input trays 21
Page 38
http://www.hp.com/go/clj9500mfp
6
7
8
22 Chapter 1 – MFP basics
6 Adjust the left (Y) media guide by pressing the tab on the guide and slide
the guide until it gently touches the paper.
7 Adjust the front (X) media guide by pressing tab on the guide and slide the
guide until it gently touches the paper.
8 Note the orientation of the paper, as well as the value of the X dimension
and the Y dimension. The X and Y dimensions are marked in the tray. You
will need this information for a later step.
9 Slide the tray into the MFP.
10 Look at the control panel within a few seconds of closing the tray. (Open
and close the tray if the time has already elapsed.) The control panel
displays the tray size and type configuration. Do one of the following:
• If the size and type settings are correct, touch EXIT to accept the settings.
The tray is ready to use. (You do not need to complete the rest of this
procedure unless you want to configure the exact custom dimension. See
the following note for more information.)
• To change the size setting, touch OK. The TRAY N SIZE=*<SIZE> menu is
displayed.
Rev. 1.0
Page 39

Note
If the size displayed on the control panel is CUSTOM, then the tray size is set
to ANY CUSTOM. The tray will match any custom-size print job, even if the
print-job dimensions are different from the dimensions of the paper that is
loaded in the tray. If you prefer, you can sp ecify the exact dimensi ons of the
custom-size paper that is loaded in the tray. When you specify exact
dimensions, the dimensions are displayed as the size, rather than CUSTOM.
1
ENWW
11 Touch C
USTOM. The Unit of Measure menu is displayed.
Note
The MFP might prompt you to move the Custom/Standard switch in the tray
to another position. The MFP might also prompt you to move the paper
guides. Follow the instructions on the control panel, close the tray, and then
repeat this procedure starting with step 10.
12 Touch the unit of measure (M
measurement on the tray guide, select M
ILLIMETERS or INCHES). (If you are using the
ILLIMETERS.)
13 Use the numeric keypad to select the X (front to back) dimension.
14 Touch O
K.
15 Use the numeric keypad to select the Y (left to right) dimension.
16 Touch O
K. The control panel displays SETTING SAVED for a moment. The
tray size in dimensions is then displayed.
Loading input trays 23
Page 40

http://www.hp.com/go/clj9500mfp
17 To change the type setting, touch the correct paper type. The message
SETTING SAVED is displayed for a moment, and then the size and type
settings are displayed.
Note
If you are using media that is lighter or heavier than 75 g/m² to 105 g/m² (20
to 28 lb), or if you are using coated media or transparencies, set th e media
type for the tray.
24 Chapter 1 – MFP basics
18 Touch E
XIT to accept the settings. The tray is ready to use.
Rev. 1.0
Page 41

1
To load the 2,000-sheet side input tray (tray 4)
The 2,000-sheet side input tray (tray4) holds up to 2,000 sheets of media.
The 2,000-sheet side input tray (tray 4) only supports A4- or letter-size media. If
you are using media that is lighter or heavier than 75 g/m
lb), or if you are using coated media, set the media type for the tray.
2
to 105 g/m2 (20 to 28
1
2
ENWW
CAUTION
To avoid a jam, never add or remove media from the tray whil e printing from
that tray.
Use this procedure to load media in the 2,000-sheet side input tray (tray 4).
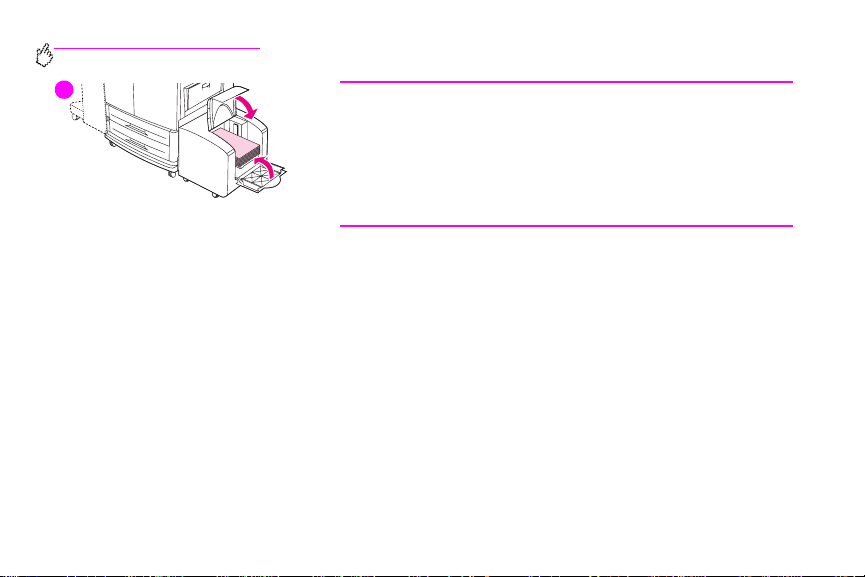
1 Open the top door, and then open the bottom door.
2 Load the media so that the side to be printed on faces up and the long edge
is toward the MFP (short edge toward the MFP is you are
Do not load more media than the maximum that is indicated by the media-fill
triangles at the back of the 2,000-sheet side input tray (tray 4).
making booklets).
Loading input trays 25
Page 42
http://www.hp.com/go/clj9500mfp
3
26 Chapter 1 – MFP basics
Note
The number of sheets that can be loaded might vary depending on the type
of media. Use the media-fill triangles to determine h ow much media to load.
Make sure that the corners of the media are not folded.
The 2,000-sheet side input tray (tray4) supports letter, A4, A4-R, and letter-
R media.
3 Close the bottom door, and then close the top door.
4 The control-panel display prompts you to select the size and type of the
media that you want to use.
5 Scroll to the size that you want and select it.
6 Scroll to the type you want and select it.
Rev. 1.0
Page 43

Changing and setting the media size and type for a tray
You can configure the MFP input trays by type and size. You can load different media in the input trays and then request
media by type or size.
1
Note If you have used previous HP LaserJet printers or MFPs, you might be accustomed to configuring tray 1 to
The following instructions are used to configure the trays at the MFP control panel. You can also configure the trays from
your computer by using the embedded Web server.
first mode or cassette mode. To duplicate the settings for first mode, configure tra y1 for Size = ANYSIZE and
Type = ANY. T o duplicate the settings f or cassette mod e, set either the size or type f or tra y1 to a setting other
than ANY.
To set or change media size for tray 1
1 Press the MENU button.
2 Touch P
3 Touch T
4 Touch the paper size that is loaded.
5 Touch O
ENWW
APER HANDLING.
RAY 1 SIZE.
K to exit the menus.
Loading input trays 27
Page 44

http://www.hp.com/go/clj9500mfp
To set a standard size for tray 2, tray 3, and the 2,000-sheet side input tray
(tray 4)
The MFP automatically detects the size that is loaded, so you do not need to set the size manually.
To set or change a custom size for tray 2 and tray 3
1 Make sure that the switch inside the tray that you want to configure is in the Custom position.
2 A message on the control panel prompts you to specify the paper size.
3 Touch the appropriate unit of measure (M
the tray guides are in millimeters.)
4 Use the numeric keypad to specify the tray X (front-to-back) dimension.
5 Use the numeric keypad to specify the tray Y (left-to-right) dimension.
6 Touch
EXIT to exit the menus.
ILLIMETERS or INCHES). (The default is MILLIMETERS because the marks on
28 Chapter 1 – MFP basics
Rev. 1.0
Page 45

To set or change a media type for any tray
1 Determine the correct media-type selection for your media.
2 Press the M
3 Touch P
4 Touch T
5 Touch the appropriate type setting for the media that you are using.
Note The default media type is plain.
ENU button.
APER HANDLING.
RAY X TYPE.
1
6 Touch E
ENWW
XIT to exit the menu.
Loading input trays 29
Page 46

http://www.hp.com/go/clj9500mfp
30 Chapter 1 – MFP basics
Rev. 1.0
Page 47

Copying
This MFP functions as a standalone, walk-up color or blac k-and-white copier—y ou do not ha ve to ha v e software installed or
have your computer turned on to make copies. You can easily adjust copy settings at the control panel. Originals can be
copied using either the ADF or the scanner glass. The MFP can process copying, printing, and digital-sending jobs
simultaneously.
This chapter provides information about how to make b lac k-and-whit e or color copies and h ow to change copy settings. It is
helpful to review the section about control-pane l oper ation before using the MFP copying functions. See “Control panel” on
page 4 in chapter 1.
2
ENWW
31
Page 48

http://www.hp.com/go/clj9500mfp
Copy-screen layout
The following figure and table provide information about features and buttons on the copy screen.
32 Chapter 2 – Copying
Rev. 1.0
Page 49
Features and buttons Function
Provides access to “What is this?” Help or “Show me How.”
(Help)
EADY Indicates that the MFP is ready to copy. (Additional status messages might appear on this line .)
R
ESCRIBE ORIGINAL Allows you to select size , type , orientation, image content, and additi onal f eatures of th e original
D
copy.
OLOR COPIES Allows you to select color copies.
C
LACK COPIES Allows you to select black and white copies.
B
Reduce/Enlarge Reduces or enlarges the size of the copy.
Light/Dark Increases or decreases the brightness of the copy.
2
ENWW
Copy-screen layout 33
Page 50

http://www.hp.com/go/clj9500mfp
Features and buttons Function
C
OPY SETTINGS Displays settings that describe the output features of the document, such as paper size,
TART Starts copying the document.
S
ACK Moves back one screen on the control-panel display.
B
ANCEL Each lower-level screen (any screen below the main screen) on the touch screen includes a
C
K Each lower-level screen on the touch screen includes an OK option. Touching OK accepts any
O
simplex/duplex, and stapling.
ANCEL option. Touching CANCEL negates any changes that you made, and takes you back to
C
the previous screen.
changes that you made, and takes you to the next screen.
34 Chapter 2 – Copying
Rev. 1.0
Page 51

Copying instructions
For standard-size media , the size of the original is automatically detected when the document is placed on the scanner
glass or in the ADF, and the appropriate size of media is used for the copy. You can override the auto-detect feature by
specifying the required input (
Note Use the scanner glass to copy small, lightweigh t (l ess than 46g/m
such as receipts, newspaper clippings, photographs, or old, delicate, valuable, or worn documents. The
scanner glass is also used to copy books, magazines, and manuals.
Use the ADF to make as many as 999 copies of a document. The A DF can be load ed wit h up to 50sheets
of ledger/A3 media or 100 sheets of letter/A4 media (depending on the thickness of the pages).
This section provides instructions for the following cop ying tasks:
• Copying by using the default settings (one-touch copying)
• Copying by using user-defined settings
• Copying from the scanner glass
• Copying by using the ADF
• Copying books
• Creating a job to be copied later
DESCRIBE ORIGINAL) and output (COPY SETTINGS) at the control panel.
2
, or 12 lb), or irregularly sized originals,
2
ENWW
Copying instructions 35
Page 52

http://www.hp.com/go/clj9500mfp
Copying by using the default settings (one-touch copying)
The following are the default settings for copying:
• One copy
• Letter- or A4-size original and letter-size copy
Note The MFP automatically detects the original size and makes a same-size cop y . The f actory default paper-size
setting is Letter or A4 only if no media size is detected.
• Black and white (color copied can be selected)
• Page Orientation: Portrait
• Number of Sides: One
• Page Content: Mixed (mi xed text and graphics)
• Job Mode: Off
• Heavy Paper: Off
36 Chapter 2 – Copying
Rev. 1.0
Page 53

To make color copies by using the default settings
1 Place the document face-down on the scanner glass or in the ADF.
2 Touch C
3 Select color copies.
4 Touch S
OPY.
TART.
To make black and white copies by using the default settings
1 Place the document face-down on the scanner glass or in the ADF.
2 Touch C
3 Select black copies.
4 Touch S
OPY.
TART.
Copying by using user-defined settings
Using the following steps, you can change the settings for your copies.
To make copies by using settings other than the default settings
1 Place the original face-down on the scanner glass or in the ADF.
2 Touch the copy icon on the control panel. The copy screen appear s on the graphical display.
ENWW
2
Copying instructions 37
Page 54

http://www.hp.com/go/clj9500mfp
3 Touch C
4 Make any necessary adjustments to the contrast and the reduction or enlargement by using the L
5 Touch D
Note If you select Mixed on the Page Content tab, you can use the Advanced tab to select the emphasis for te xt
OLOR or BLACK & WHITE copies.
and the R
your selections, touch O
EDUCE/ENLARGE option in the image-modification section of the graphical display.
ESCRIBE ORIGINAL to view your options. You can select BASIC options or ADVANCED options. After you make
K.
or photo, or for text or glossy photo.
IGHT/DARK bar
Basic tab What to select
IZE Select Book or the media size of your original.
S
P
AGE ORIENTATION Select Portrait or Landscape.
UMBER OF SIDES Select 1-sided or 2-sided.
N
AGE CONTENT Select Text, Photo, Glossy Photo, or Mixed.
P
Advanced tab What to select
EAVY PAPER Select Heavy Paper if your original is heavy paper and you are using
H
the ADF.
OB MODE If you are combining multiple flatbed scans into a single job, select
J
38 Chapter 2 – Copying
Job Mode.
Rev. 1.0
Page 55

Description of use
Text Optimize for the best text quality.
Photo Optimize for printed or half-tone original graphics.
Glossy photo Optimize for glossy photograph s and for continuous tone photographic originals.
Mixed Optimize for mixed text and graphics.
Advanced (button) An adjustment to optimize more toward text or graphics in mixed mode.
6 Touch COPY SETTINGS to view your options. You can touch the Advanced tab to see more options.
2
ENWW
Copying instructions 39
Page 56

http://www.hp.com/go/clj9500mfp
Basic tab What to select
S
IZE Select Auto (media size is matched to original size), or the copy size
N
UMBER OF SIDES Select 1-sided or 2-sided.
ACK SIDE ORIENTATION Select Normal or Flip (applies when 2-sided copying is selected).
B
AGES PER SHEET Select 1, 2, 4, or Booklet.
P
that you want. Be sure that you have loaded the correct media size in
the tray.
If 4 pages per sheet is selected, “Z” or “N”ordering is tailored to the
page orientation, and the option to put a border around each smaller
page appears.
“Z” ordering
ORDERS Select Border or No Border when y ou are printing multiple pa ges per
B
sheet.
“N” ordering
40 Chapter 2 – Copying
Rev. 1.0
Page 57

TAPLE Stapling options depend on your finishing de vice and the media size
S
that you selected. For the 3,000-sheet stapler/stacker, the selections
are None, Corner, 1, 2, 3, or 6. For the multifunction finisher, the
selections are None, 1, 2, or Booklet.
Advanced tab What to select
OLLATION Select Collated or Uncollated.
C
UTPUT BIN Select the output destination for your finishing device.
O
OB STORAGE Select On to indicate that the copy job should be stored on the MFP
J
NHANCE Increases or reduces sharpness, and removes background.
E
CALE TO FIT Select On to slightly reduce the image so that it fits in the printable
S
rather than printed. Select Off to copy the job normally. See “ Creating
a job to be copied later” on page 44 for more information.
area.
7 When you are finished, touch OK to return to the main copy screen.
Note The page icon in the COPY section of the graphical display shows a representative image of the copy.
8 Using the numeric keypad, specify the number of copies, and then pre ss S
ENWW
TART.
Copying instructions 41
2
Page 58

http://www.hp.com/go/clj9500mfp
Copying from the scanner glass
Use the scanner glass to copy small, light weight (l ess tha n 46g/m² or 12 lb), or irregularly sized originals, such as receipts,
newspaper clippings, photographs, or old or worn documents. The scanner glass is also used to copy books, magazines,
and manuals.
1 Place the document face-do w n on the scanner glass.
2 Make any image modifications, and choose any copy settings, if necessary. See “Copying by using user-defined
settings” on page 37 for the available settings.
3 If you are making only one copy, press S
the number of copies (up to 999), and then press S
TART. If you are making multiple copies, use the numeric keypad to select
TART to begin copying.
Copying by using the ADF
Using the ADF, you can make as many as 999 copies of a document that has as many as 100pages (depending on the
thickness of the pages).
1 Load the document face-down into the ADF. The MFP can automatically detect several standard paper sizes.
2 Make any image modifications, and select any copy settings if necessary. See “Copying by using user-defined
settings” on page 37 for the available settings.
If you are making only one copy, press S
required number of copies, and then press S
TART. If you are making multiple copies, use the numeric keypad to specify the
TART.
42 Chapter 2 – Copying
Rev. 1.0
Page 59

Copying books
You can use the scanner glass to copy books.
1 Place the book face-down on the scanner glass.
2 Align the book. The book is correctly aligned if the book binding is in line with the book icon at the top of the scan ner
glass.
3 Touch C
4 Touch D
5 Select Book as the size.
6 Touch O
OPY.
ESCRIBE ORIGINAL.
K.
2
Note You can skip a page by touching the Sk ip Page button above the page icon. Touch the button once to skip
7 Touch C
8 Select any output settings that you w ant. Select the paper size that is the closest match to the actual size of the
9 Touch O
10 Using the numeric keypad, specify the number of copies you want.
11 Press S
ENWW
the left page and twice to skip the right page. Press the button three times to cancel page skipping. If you
don’t skip a page using the Skip Page button, left side and right side pages will be copied.
OPY SETTINGS.
book that you are copying.
K.
TART.
Copying instructions 43
Page 60

http://www.hp.com/go/clj9500mfp
Creating a job to be copied later
Turning on the stored job setting indicates that you want the copy job to be stored on the MFP hard disk, and that you will
print the job later.
1 Select your basic copy settings (see “Copying by using user-defined settings” on page 37).
2 Touch the Advanced tab.
3 For the Stored Jobs option, select On.
A pop-up dialog box appears, asking for the User Name, Job Name, and Person al I de ntificat ion Number (PIN), if required.
The keyboard appears when you select User Name and Job Name. The PIN is a four-digit number that can be typed by
using the numeric keypad.
4 Type the User Name.
5 Type the Job Name.
6 Type the PIN if you want to control access to the stored copy job.
7 Touch O
8 Press S
K.
TART.
Color copies or black and white copies
At the home screen, touch COPY and then touch the circle below COLOR copies or BLACK & WHITE copies to select the
appropriate type of copies. If C
display. If B
44 Chapter 2 – Copying
LACK & WHITE is selected, BLACK COPIES: appears in the upper-right corner of the control-panel display.
OLOR is selected, COLOR COPIES: appears in the upper-right corner of the control-panel
Rev. 1.0
Page 61

Reduce or enlarge
The MFP has an autoscaling feature. If the original paper size differs from the copy paper size, the MFP can autodetect a
size mismatch between the original page size and the copy page size. The scanned image of the original page is reduced
or enlarged automatically to match the copy paper size. You can override autoscaling by using the reduce and enlarge
feature.
The MFP can reduce copies to as little as 25% of the original size and enlarge copies to as much as 400% of the original
size (200% when using the ADF).
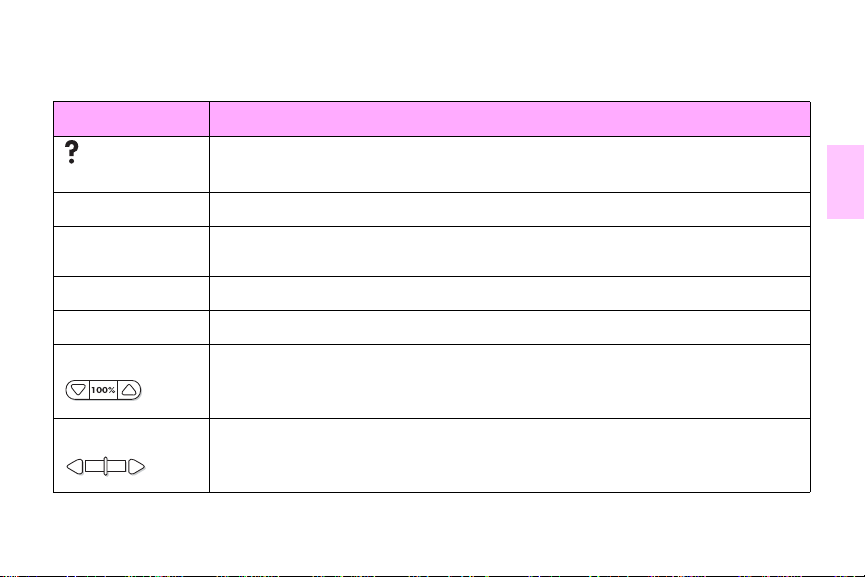
To reduce or enlarge your copies, touch the arrows on the REDUCE/ENLARGE bu tton until you reach the size that you want.
The scale percentage box in the cent er of the REDUCE/ENLARGE bu tton indicates the percentage of reduction or enlargement.
You can also touch 100% to display the keypad to type the number that you want. Touch O
K to save the changes.
Adjust the lightness/darkness
You can adjust the lightness and the darkness of the copied output by touching the arrows on the Light/Dark bar in the
default copy screen.
Enhance the document
T ouch the Copy Settings tab and then touch t he Ad v anced tab t o gain access to the e mbedded en hancement screen t hat
allows you to adjust the le v el of bac kground re mov al from the copie d image, and increase or decrease the sh arpness of the
copied image.
2
ENWW
Copying instructions 45
Page 62

http://www.hp.com/go/clj9500mfp
Background Removal
If you are copying a document that is printed on colored paper or the original is thin and makes the backside image show
through, you can enhance your copy quality by removing the background. Adjust the amount of background removal by
touching the arrows on the Background Removal Control. The slider moves to the lighter or darker area of the
Background Removal Control bar for increased or decreased background removal.
Sharpness
The Sharpness Control specifies the sharpness setting that the scanner uses when the MFP scans your original.
Sharpness enhances the edges of the original so that faint or fine text and graphics are reproduced more sharply. Adjust
the amount of sharpness by touching the arrows on the Sharpness Control bar.
46 Chapter 2 – Copying
Rev. 1.0
Page 63

Setting copy defaults
The defaults for several copy settings can be controlled by the administrator. To set or change the following copy defaults,
perform the following steps:
1 Touch M
2 Touch C
3 Touch C
4 Select the copy setting that you want to change.
Copy setting Description
COLOR MODE Sets the MFP to default to color or black and white copies.
NUMBER OF SIDES The copy can have one side (simplex) or two sides (duplex) printed on each page.
COLLATE If collate is OFF, each page is copied separately. If collate is ON, the document is collated.
COPIES I ndicates the number of copies that will be produced.
STAPLE SUBMENU Appears if a stapling finishing device is at tached.
ENU.
ONFIGURE DEVICE.
OPYING.
2
ENWW
Setting copy defaults 47
Page 64

http://www.hp.com/go/clj9500mfp
Copy setting Description
SHARPNESS Indicates th e sharpness of the image when it is copied.
BACKGROUND REMOVAL Indicates how much background is removed when an imag
e is copied.
48 Chapter 2 – Copying
Rev. 1.0
Page 65

Digital sending and e-mail
To configure the embeded Send to e-mail feature, you must either know the Internet Protocol (IP) address or hostname of
the Simple Mail Transfer Protocol (SMTP) server on y our net work, or use the Find Servers men u opti on to attempt to l ocate
the server. The MFP uses SMTP to send e-mail messages with attachments containing the image that is scanned at the
MFP.
Optionally, you can configure the MFP to use the Lightweight Directory Access Protocol (LDAP) to connect to a directory
server so that you can easily address an e-mail that will be sent from the MFP. Directory servers contain recipient names
(for example, “John Smith”), and associated e-mail addresses (jsmith@hp.com).
When the MFP is configured to use LDAP, users simply type the first few characters of a recipient’s name. The MFP
searches the directory server for names that match and uses the closest matching name. In most environments, the
Embedded Web Server must be used to correctly configure LDAP.
3
Note If you do not know the IP address or hostname of the SMTP or LDAP servers on your network, ask your
1 Touch M
2 Touch C
3 Touch S
4 Touch E-
ENWW
network or e-mail administrator for this information.
ENU.
ONFIGURE DEVICE.
ENDING.
MAIL.
49
Page 66

http://www.hp.com/go/clj9500mfp
5 You can touch F
successful, go to step 8. Otherwise, go to step 6.
6 Touch S
touch L
7 Touch O
8 Touch T
IND SEND GATEWAYS to let the MFP search the local network for LDAP and SMTP servers. If this is
MTP GATEWAY and then enter t he IP ad dress or hostname o f the SMTP serv er. If a LDAP server is av ailab le ,
DAP GATEWAY and then enter the IP address or hostname of the LDAP server.
K.
EST SEND GATEWAYS to test the configuration.
The MFP offers color-scanning and digital-sending capabilities. Using the control panel, you can scan black-and-white or
color documents and send them to an e-mail address as an e-mail attachment. To use digital sending, the MFP must be
connected to a local area network (LAN). The MFP connects directl y to your LAN by using the Jetdirect ethernet card. This
chapter addresses both scanning and sending, because they are fully integrated functions.
Digital sending offers the following benefits:
• Sends documents to multiple e-mail addresses, saving t i me and delivery costs.
• Delivers files in black-and-white or in color. Files can be sent in different file formats that the recipient can
manipulate.
• Provides verification that e-mail was delivered correctly.
With digital sending, documents are scanned into the MFP memory and sent to an e-mail address or multiple addresses as
an e-mail attachment. Digital documents can be sent in several graphics formats, such as PDF, JPEG, and TIFF (see
“Changing the settings” on page 52), enabling recip i ents to manipulate the document file in various programs to meet their
specific needs. Documents arrive in near-original quality, and then can be printed, stored, or forwarded.
The HP Digital Sender Module software offers the additi onal benefits of authenticating the user for security purposes and
scanning to a folder.
50 Chapter 3 – Digital sending and e-mail
Rev. 1.0
Page 67

Sending documents
The MFP scans at a 600 pixels-per-inch (ppi) resolution . The MFP sca ns both black-and-white and color originals. You can
place originals either on the scanner glass or in the ADF. The scanner glass accommodates all sizes of media, including
irregular-size documents, books, stapled documents, previously folded documents, and photographs.
You can use the default settings or change the scanning preference and file formats. The following are the default settings:
• Color
• .PDF file (requires the recipient to have an Adobe® Acrobat® viewer to view the e-mail attachment)
Sending letter-size originals by using the scanner glass or ADF
Use the following instructions to scan and send letter-size originals by using the MFP default settings.
1 Place the document face-down on the scanner glass.
Complete the following steps on the touch screen of the graphical display:
2 Touch S
The Send Options options replaces the Copy Settings options. The Reduce/Enlarge selection disappears because that
option does not apply to sending.
3 If requested, type your name and password.
4 Touch E-
END OPTIONS.
MAIL.
3
ENWW
Sending documents 51
Page 68

http://www.hp.com/go/clj9500mfp
5 Touch F
ROM: and, using the pop-up keyboard, type your e-mail address.
Note Touch to delete any incorrect keystrokes.
6 Touch T
7 Touch CC: and then type the e-mail address of any cop y recipients , if necessary. If you want to send a blind copy to
8 Touch S
9 Change any appropriate settings (see “Changing the settings” on page52) by touching S
10 Press S
The PROCESSING DIGITAL SEND JOB message appears on the control-panel status bar.
O: and then type the recipient e-mail address.
an e-mail address, touch BCC: and type the address of the recipient.
UBJECT: and then type the subject of your e-mail.
ETTINGS. Touch OK.
TART.
Changing the settings
Before you send a document, you can change the following settings:
• Scan Preferences: Select Black and White or Color.
• File Type: Select PDF, TIFF, MTIFF, or JPG. Files can be transmitted to an e-mail address in any of these file
formats:
• PDF: The .PDF file format is the default setting, and it offers th e best ov erall te xt and graphics q uality. However,
the recipient must have an Adobe Acrobat vie we r installed in order to read .P DF files. This file f ormat produces
one e-mail attachment that contains all of the scanned pages.
52 Chapter 3 – Digital sending and e-mail
Rev. 1.0
Page 69

• JPG: Although a .JPG file does not have the same quality as a PDF, the recipient can view a JPG file easily
using an Internet browser. This file format produces one e-mail attachment for each scanned page. The
recipient can manipulate the .JPG files and import them into various prog rams.
• TIFF: A .TIFF is a standard file format that interfaces well with many computer programs and can be
manipulated by the recipient. This file format produces one
e-mail attachment for each scanned page.
• MTIFF: A .MTIFF is a multipage TIFF that saves multiple scanned pages into a single e-mail attachment.
Note The .MTIFF and .PDF files might be divided into multiple e-mail attachment s if the network limits the file siz e
of e-mail attachments.
Sending a document to multiple recipients
Use the following instructions to send a document to more than one recipient.
1 Place a document face-down on the scanner glass or in t he ADF.
2 Touch S
3 Touch E-
4 Touch F
5 Touch T
6 To check the recipient list, touch the down arrow in the To: text line.
ENWW
END OPTIONS.
MAIL.
ROM: and, using the pop-up keyboard, type your e-mail address.
O: and then type the e-mail address of the first recipient. After typing the first e-mail address, touch ENTER
on the keyboard screen to insert a semicolon, and then continue typing e-mail addresses.
Sending documents 53
3
Page 70

http://www.hp.com/go/clj9500mfp
7 Touch CC: and then type the e-mail address of any copy recipients , if necessary. If you want to send a blind copy to
an e-mail address, touch BCC: and type the address of the recipient.
8 Touch S
9 Touch O
10 Press S
UBJECT: and then type the subject of your e-mail.
K.
TART.
Using the auto-complete function
When you open the To, CC, or From screens in t he Send to E-mail feature, the auto-complete function is invoke d. As you
type the required address or name at the keyboard screen, the MFP automatically searches the address book list and
brings the first matching address into the text line of the keyboard screen. You can then select that name by touching
NTER, or continue typing the name unti l auto-complete finds the correct entry. If y ou type a character that does not match
E
any entry in the list, the auto-complete text is removed from the display to show that you are typing an address that is not in
the address book.
54 Chapter 3 – Digital sending and e-mail
Rev. 1.0
Page 71

Using the address book
The private address book and the local address book store frequently-used e-mail addresses. These books can be sh ared
between MFPs that use the same server to access the HP MFP Digital Sending software.
Note Addresses can be added or deleted to the private and local address books , but the user must be authenticated
The address book is activated by selecting the address book icon in the display dialog box. When the All or Local button
are selected, an Edit button appears. Use the Edit button to add or delete items in the address books. When the Edit
button is selected, Address Book - Add and Address Book - Delete appear on the control-panel display.
The Back button returns you to the previous screen.
You can send to a list of recipients by using the MFP address book feature. See your system administrator for information
about configuring address lists.
ENWW
in order to add addresses to their private a ddress book. If aut hentication is not complete, t he addresses are
added to the local address book.
Using the address book 55
3
Page 72

http://www.hp.com/go/clj9500mfp
Creating a recipient list
Complete these steps on the touch screen of the graphical display:
1 Touch E-
2 Touch T
3 Type the first letter of the name.
Note The MFP starts at the beginning of the address list unless you type in the first letter of the name.
4 Touch to gain access to the address book.
5 Navigate in the address book using the scroll bar.
6 Highlight the name to select a recipient, and then touch the A
You can also select a distribution list by to uching the A
OCAL button. Highlight the appropriate names, and then touch the ADD button to add the name to your list of recipients.
L
You can remove a recipient from your list by scrolling to highlight the recipient, and then touching the R
7 The names in the recipient list are placed into the text line of the keyboard screen. If you want to, you can add a
8 Touch OK on the keyboard screen.
9 Finish typing CC: and S
10 Press S
MAIL.
O: to gain access to the keyboard screen.
DD button.
LL or LOCAL button, or add a recipient from a local list by t ouching the
recipient that is not in the address book by typing the e-mail address on th e keyboard.
UBJECT: on the Send To E-mail screen, if necessary. You can check the list of recipients by
touching the down arrow in the T
TART.
O: text line.
EMOVE button.
56 Chapter 3 – Digital sending and e-mail
Rev. 1.0
Page 73

Faxing
4
Note In some countries/regions, the HP LaserJet MFP Analog Fax Accessory 300 is standard on the HP Color
When configuring the required fax settings for location, some countries/regions are supported but do not have an entry in
the Location setting list. These additional countries/regions can be supported by selecting another alternate country/region
from the Location settings list. The following table lists additional supported countries/regions and the acceptable alternate
country/region to select to support that country/region.
Country/region support
To select this country/region Select this country/region from the location setting list
Estonia Norway, Sweden, or Russian Federation
Iceland Denmark, Norway, or Sweden
ENWW
LaserJet 9500mfp. The HPLaserJet MFP Analog Fax Accessory 300 requires telecommunication
certification by country/region. Check with your sales representativ e or at
www.hp.com/clj9500mfp/fax/countries-regions for a list of the certified countries/regions that offer fax as a
standard capability.
57
Page 74

http://www.hp.com/go/clj9500mfp
Country/region support
To select this country/region Select this country/region from the location setting list
Latvia Norway, Sweden, or Russian Federation
Liechtenstein Austria or Switzerland
Lithuania Norway, Sweden, or Russian Federation
Morocco Spain
Slovenia Hungary or Poland
The MFP can function as a standalone analog fax machine. The information in this chapter helps you complete the
following tasks:
• Perform initial setup configur ation
• Send faxes
• Configure fax settings
• Perform advanced fax features
• Use fax logs and reports
• Troubleshoot problems
58 Chapter 4 – Faxing
Rev. 1.0
Page 75

Note Although the MFP also supports LAN faxing through the HP MFP Digital Sending Software Configuration
Utility, that utility is available as an option and is not discussed in this chapter. For information about LAN
faxing, see the HP MFP Digital Sending Software User Guide or the HP MFP Digital Sending Software
Support Guide.
4
ENWW
59
Page 76

http://www.hp.com/go/clj9500mfp
Connecting the fax to a phone line
When connecting the fax to a phone line, make sure that the phone l ine f or the fa x is a dedicated line that is not used b y any
other devices. This line should be an analog line, because the fax will not function correctly when it is connected to some
digital PBX systems. If you are unsure about what type of line you have, contact your tele com provider.
Note Use the phone cord that comes with the fax to make sure that the fax functions correctly.
Follow these instructions to connect the fax to a phone jack.
1 Locate the phone cord that is included with the fax kit. Plug one end of the cord into the fax phone jack. The fax
phone jack is located on the back of the MFP on the formatter plate, next to the other connectors . Make sure that
the cord is plugged into the fax phone jack completely and securely.
60 Chapter 4 – Faxing
Rev. 1.0
Page 77
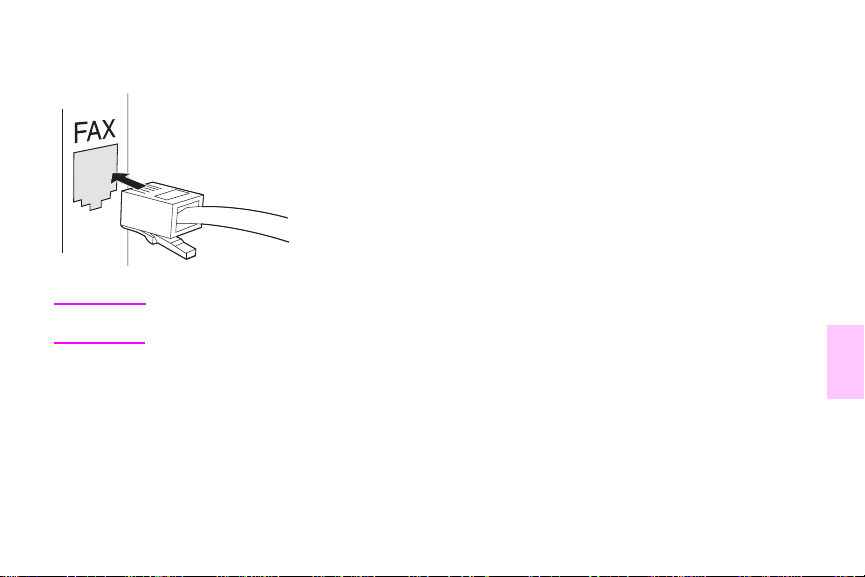
2 Plug the other end of the phone cord completely into the phone jack on the wall to finish the installation.
Note The fax function for the HPColor LaserJet 9500mfp will not function until the required items are entered into
the appropriate menus on the control panel. See “Establishing the required fax settings” on page 62.
Verifying the fax operation
Verify that the MFP fax is functioning by checking the MFP control-panel display. The f ax option should appear on the
screen. Howev er , until th e required settings ar e established, t he option is gr a y and the te xt “Not Confi gured” appears across
it. To use the analog fax, see “Establishing the required fax settings” on page 62.
ENWW
Verifying the fax operation 61
4
Page 78

http://www.hp.com/go/clj9500mfp
Establishing the required fax settings
After the fax is installed, you must establish these settings before you can use the fax:
• Date and time
• Location (country/region)
• Fax header (phone number and company name)
This information is used in the fax header that is printed on all outgoing faxes.
Note In the U.S. and man y other coun tries/regio ns , setting th e date, time, location, phone number and company
name is a legal requirement.
Because the fax reads some of these settings from the MFP, a value might already be set. Verify the value that appears to
make sure that the information is correct.
62 Chapter 4 – Faxing
Rev. 1.0
Page 79

Using the Fax Settings menu
Use the Fax Settings menu to establish th e required fax settings. Press the MENU button on th e MFP co ntrol p anel to open
the Fax Settings menu.
Note If you have the HPMFP Digital Sending Software installed and the LAN fax is enabled, the fax settings do
The following figure shows the control-pan el wi th the fax option visible.
Touch-screen graphical display
ENWW
not appear on the menu because the settings are only used to configure the analog fax. Only one type of
fax can be enabled at a time, and only th e controls for that fax appear on the control-panel display. If you
want to use analog fax when the LAN f ax is enabled, use the HP MFP Digital Sending Softwar e Configuration
Utility to disable the LAN fax.
Fax option
MENU BUTTON
START BUTTON
Establishing the required fax settings 63
4
Page 80

http://www.hp.com/go/clj9500mfp
Setting or verifying the date and time
The date and time setting for the fax is the same value as the MFP date and time setting. If you are turning on the MFP for
the first time, you will be prompted for this information.
To verify or change the date and time settings
1 Press the MENU button.
2 Scroll to and touch F
3 Scroll to and touch F
4 Scroll to and touch D
5 Select the date and time formats, and then type the date and time.
AX.
AX SETUP REQUIRED.
ATE/TIME.
Setting or verifying the location
The location setting identifies the country/region where the MFP is located. This setting selects the date/time format and
the minimum and maximum rings-to-answer range for the country/region. Because this setting is a legal requirement in
some countries/regions, it must be set befo re the f ax can oper ate . If y ou are turning on the MFP f o r the first time , y ou will be
prompted for this information.
64 Chapter 4 – Faxing
Rev. 1.0
Page 81

To verify or change the location
1 Press the MENU button.
2 Scroll to and touch F
3 Scroll to and touch F
4 Scroll to and touch F
5 Scroll to and touch L
6 Scroll through the list until your country/region appears, and then touch the country/region to select it.
AX.
AX SETUP REQUIRED.
AX HEADER.
OCATION.
Setting or verifying the fax header
The fax header setting is used to set a p hone n umber and comp an y name that appear i n the fax header. This inf ormation is
required and must be set.
To verify or change the phone number and the company name
1 Press the MENU button.
2 Scroll to and touch F
3 Scroll to and touch F
4 Scroll to and touch F
5 Scroll to and touch P
ENWW
AX.
AX SETUP REQUIRED.
AX HEADER.
HONE NUMBER.
Establishing the required fax settings 65
4
Page 82

http://www.hp.com/go/clj9500mfp
6 Type a phone number and then touch O
7 Touch C
OMPANY NAME.
8 Type the company name, and then touch O
If the fax option appears on the control-panel display and the message “Not Configured” does not appear, you have
completed the setup and can use the fax feat ure.
66 Chapter 4 – Faxing
K.
K.
Rev. 1.0
Page 83

Fax feature screen
Use the Fax feature screen to send faxes. Press the Fax option that appears on the MFP control-panel display to open this
screen.
Note The Phone Book option appears only if you set the feature in the HP MFP Digital Sending Software
Configuration Utility.
Status message bar
While the MFP is sending and receiving faxes, status information such as Ready, Receiving call, and Page sent appears in
the status bar at the top of some touch-screens.
ENWW
Fax feature screen 67
4
Page 84

http://www.hp.com/go/clj9500mfp
Sending faxes
Use one of three basic methods to specify numbers to send a fax:
• Type the number manually
• Specify the number by using speed dial
• Specify the number by using the phone book (available only if the HP MFP Digital Sending Software Configuration
Utility is installed and the phone book has been populated)
Note For online information about sending a fax, touch ? on the screen to open the Help menu, and then touch
When using the numeric keypad to type a phon e number , include any pauses o r other numbe rs such as area codes , access
codes for numbers outside a PBX syst em ( usually a 9 or 0), or a l ong-d istan ce prefix. A t w o-second pause can be i ncluded
by typing a comma (,). If the fax prefix settin g is set to automatically include the dialing prefix, you do not need to type it.
Note Faxes that fail because the number was busy or the receiving fax did not answer, for example, are deleted
SEND A FAX under the list of help topics .
from memory.
Sending a fax by typing the number manually
Use the following procedure to send a fax by typing the number.
68 Chapter 4 – Faxing
Rev. 1.0
Page 85

1 Place the document in the ADF or on the scanner glass.
2 On the control-panel display, touch the F
3 Touch S
ETTINGS. Verify that the Describe Original settings are appropriate for your original. The following settings
are available:
AX option. You might be prompted to type a user name and password.
• page size (such as letter or A4)
• 1-sided or 2-sided printing
• page content (text, mixed text and graphics, or graphics and photos)
• orientation (portrait or landscape)
If the settings do not match, complete the following steps:
a Touch D
ESCRIBE ORIGINAL to open the Original Setting screen.
b Make any changes that are required to describe your original.
Note You can also change how you are notified about the status of a fax (that is, if the fax was sent or if an error
occurred that prevented it from being sent), by touching the F
settings, and then making any appropriate changes . This setting ch anges the notification only f or the current
fax.
c When all of the settings are complete, touch O
K to return to the Fax screen.
ENWW
AX SETTINGS option to view the notification
Sending faxes 69
4
Page 86

http://www.hp.com/go/clj9500mfp
4 Type a phone number by using the keyboard that appears on the control-panel display.
Note If a two-second pause is needed, type a comma (,) after a prefix number (such as a “9” or “0”) to allow the
5 To specify additional phone numbers, touch N
internal phone system time to reach an outside line before the remainder of the number is dialed.
EXT NUMBER.
Note To remove a number from the list, scroll to and highlight the number and then touch REMOVE.
6 Touch S
Note When a fax is sent, it is first copied into memory. After the entire docume nt is stored, the fax is sent and is
TART to send the fax. (You can touch START on the touch-screen or press the START button on the control
panel.)
then deleted from memory.
Sending a fax by using speed dial
Use the following procedure to send a fax by using speed dia
Note Before sending a fax by using speed dial, you must create a speed dial. To create a single speed dial or a
speed-dial group, see “To create a speed dial” on page 74.
70 Chapter 4 – Faxing
l.
Rev. 1.0
Page 87

1 Follow steps 1 through 3 in the procedure “Sending a fax by typing the number manually” on page 69.
2 Scroll to and touch S
3 Touch the check box in front of the speed dial name that you want to send the fax to.
4 Touch O
5 Touch S
K. The speed dial name should be listed on the Fax Recipient screen.
TART to send the fax. (You can touch START on the touch-screen or press the START button on the control
panel.)
PEED DIAL.
Sending a fax by using phone book numbers
The fax phone book f eature i s only available when the MFP is configured to use the HPMFP Digital Sending Configuration
Utility.
If the MFP has not been configured for use with this sof tware , the Phone Book butt on will not appear . To configure the MFP
for use with the HPMFP Digital Sending Configuration software, see the HP MFP Digital Sending Software User Guide or
the HP MFP Digital Sending Software Support Guide.
Also, when Auth entication is t urned on in the HPMFP Digital Sending Configuration Utility, pe rsonal fax numbers from your
Microsoft Exchange contact list appear in the phone book.
4
Note You cannot add to or delete fax numbers from the phone book on this device. Fax numbers can only be
ENWW
added or deleted using the Address Book Manager (ABM) on the Digital Send Server or by changing your
contact list.
Sending faxes 71
Page 88

http://www.hp.com/go/clj9500mfp
If you have the HPMFP Digital Sending Configuration Utility installed on your MFP you can use the following procedure to
send a fax by using the phone book.
1 Follow steps 1 through 3 in the procedure “Sending a fax by typing the number manually” on page 69.
2 Scroll to and touch P
3 Scroll to and highlight a name or a number in the list, and then touch A
window. You can add as many names and numbers as you want to.
4 Touch D
5 Touch O
6 Touch S
ETAILS to view the fax number or list of f ax number s f or the sele cted phone-boo k entry. The PERSONAL option
shows only the entries from the user's contact list in the phone book. The ALL option provides a merged list of the
public fax entries and the personal entries from the contact list.
K to return to the Fax screen. The list of fax names appears in the Recipients window.
TART to send the fax. (You can touch START on the touch-screen or press the START button on the control
panel.)
HONE BOOK.
DD to include the name or number in the
72 Chapter 4 – Faxing
Rev. 1.0
Page 89

Canceling a fax
Canceling the current fax transmission
The Cancel Current Transmiss ion menu appears only if an outgoing fax call is in progress.
Note The cancel operation can require up to 30 seconds to complete.
1 Press the M
2 Touch F
3 Scroll to and touch C
Note While a fax or faxes are being deleted, a “Canceling fax” message appears in the status bar.
ENWW
ENU button.
AX.
ANCEL CURRENT TRANSMISSION.
Canceling a fax 73
4
Page 90

http://www.hp.com/go/clj9500mfp
Canceling all pending faxes
This feature deletes all of the outgoing faxes that are stored in memory. However, if a fax is in the process of being
transmitted, that fax is no t deleted.
Note If any outgoing faxes are waiting in memory, they are also deleted.
1 Press the M
2 Touch F
3 Scroll to and touch
ENU button.
AX.
CANCEL ALL PENDING TRANSMISSIONS.
Speed dial
Use speed dial to assign a speed dial name to a single number or a group of numbers. You can send a fax to that number
or numbers by selecting the speed dial name.
To create a speed dial
1 Touch the FAX option.
2 Touch S
74 Chapter 4 – Faxing
PEED DIAL.
Rev. 1.0
Page 91

3 Touch the Edit tab.
4 Touch the N
5 Type a number by using the control-panel keyboard. If you want to specify more than one number, touch
EXT NUMBER and then specify another number. Repeat this step to define all of the numbers for the speed dial.
N
6 Touch N
EW SPEED DIAL option.
AME.
7 Type a name for the speed dial using the control-panel keyboard.
8 Touch O
K.
Note After you have created a speed dial group, you cannot add or delete individual numbers from it.
To delete a speed dial
1 Touch the FAX option.
2 Touch S
3 Touch the Edit tab.
4 Touch the D
5 T ouch the che ck bo x in front of the speed dial that y ou wan t to delete. You might need to scroll up or down to find the
6 Touch D
7 Touch Y
8 Touch O
ENWW
PEED DIAL.
ELETE SPEED DIAL option.
speed dial name. You can delete more than one speed-dial groups by placing a check mark in front of other na mes .
ELETE.
ES.
K.
Speed dial 75
4
Page 92

http://www.hp.com/go/clj9500mfp
Changing the sharpness setting
Use the Sharpness setting to specify the resolution that the scanner uses when the MFP scans your original. Sharpness
enhances the edges of the original so that faint or fine text and graphics are reproduced more sharply.
Note Increasing sharpness increases resolution, which also increases the transmission time.
To change the sharpness setting
1 Touch the FAX option.
2 Touch S
3 Touch the F
4 On the Enhance tab, touch the left arrow to decrease the sharpness or touch the right arrow to increase the
5 Touch O
ETTINGS.
AX SETTINGS option.
sharpness of the image.
K.
76 Chapter 4 – Faxing
Rev. 1.0
Page 93

Changing the background setting
If you are faxing a document that is printed on colored paper, you can enhance your fax copy quality by removing the
background that might cause your fax copy to streak or blur.
To change the background setting
1 Touch the FAX option.
2 Touch S
3 Touch the F
4 On the Enhance tab, touch the left arrow to increase the appearance of background or touch the right arrow to
5 Touch O
ETTINGS.
AX SETTINGS option.
decrease the background.
K.
4
ENWW
Changing the background setting 77
Page 94

http://www.hp.com/go/clj9500mfp
Changing the light/dark setting
The light/dark setting adjusts how light or dark the transmitted image will appear on the recipient’s fax machine.
To change the light/dark setting
1 Touch the FAX option.
2 Touch S
3 Touch the Light arrow to lighten the image or touch the Dark arrow to darken the image .
4 Touch O
ETTINGS.
K.
Receiving faxes
When the fax receives incoming faxes, it stores them in memory before printing. After the entire fax is stored, it is printed
and then deleted from memory. However, if the schedule printing of faxes is set (turned on), then all of the incoming faxes
are stored in memory and none are printed. When the schedule printing of faxes has been set and is then turned off, all of
the stored faxes are printed.
78 Chapter 4 – Faxing
Rev. 1.0
Page 95

You can change the fax receive default settings to modify the way a fax is received:
• Select the number of rings-to-answer
• Print date, time, and page number on faxes (stamp)
• Select input paper tray and destination bin
• Forward faxes to another number
• Block faxes from certain numbers
• Schedule printing of faxes
Note You cannot cancel incoming faxes.
Establishing optional fax settings
Use the following procedures when you want to establish fax settings in addition to those that are required for fax
functionality.
4
Note Depending on the capabilities of and settings that you hav e establ ished f or y our f ax method, some of these
ENWW
options might not be availabl e or configurable.
Establishing optional fax settings 79
Page 96

http://www.hp.com/go/clj9500mfp
The following bulleted fax settings are not described in this manual but are described in the User Reference Guide on the
CD-ROM:
• Setting error correction mode
• Setting JBIG compression mode
• Setting the overlay header
• Setting dialing mode
• Setting redial interval
• Setting dial-tone detection
• Stamp received faxes
• Setting the fit-to-page option
Setting the modem volume
Use the following procedure to set the modem volume.
To set the modem volume
1 Press the MENU button.
2 Touch F
3 Scroll to and touch F
4 Scroll to and touch M
5 Scroll to and touch O
AX.
AX SETUP OPTIONAL.
ODEM VOLUME.
FF, MEDIUM (default), or LOUD.
80 Chapter 4 – Faxing
Rev. 1.0
Page 97

Setting the ringer volume
Use the following procedure to set the ringer volume for the local fax.
To set the ringer volume
1 Press the MENU button.
2 Touch F
3 Scroll to and touch F
4 Scroll to and touch R
5 Scroll to and touch O
AX.
AX SETUP OPTIONAL.
INGER VOLUME.
FF, MEDIUM (default), or LOUD.
Setting outgoing fax resolution
Use this setting to establish the resolution f or outgoing fax transmissions. The sending f ax determines the maximum
resolution that the receiving f ax supp orts, and then use s a resolut ion that is defined b y a combination of this set ting and t he
information about the receiving fax.
Note If the fax is wider than 8.5 inches, the fax will automatically select fine or standard resolution in order to
ENWW
reduce the transmission time.
Establishing optional fax settings 81
4
Page 98

http://www.hp.com/go/clj9500mfp
To set the outgoing fax resolution
1 Press the MENU button.
2 Touch F
3 Scroll to and touch F
4 Scroll to and touch D
5 Touch S
Note The higher the resolution, the longer the transmission time that is required.
AX.
AX SEND.
EFAULT RESOLUTION.
TANDARD (200 x 100 dpi), FINE (200 x 200 dpi; default) , or SUPERFINE (300x 300 dpi) to select the
resolution.
82 Chapter 4 – Faxing
Rev. 1.0
Page 99

Setting dialing and detection options
Use the following procedures to set a dialing prefix, redial options, or tone detection.
Setting a dialing prefix
Use the dialing prefix setting to specify a prefix number (such as a “9” to gain access to an outside line) that is automatically
added to all phone numbers when they are dialed.
To set a dialing prefix
Note You might need a pause between the prefix and the phone num ber. To insert a two second pause, type a
1 Press the M
2 Touch F
3 Scroll to and touch F
4 Scroll to and touch D
ENWW
comma (,).
ENU button.
AX.
AX SEND.
IAL PREFIX.
Setting dialing and detection options 83
4
Page 100

http://www.hp.com/go/clj9500mfp
5 Touch O
6 Type the prefix number(s), and then touch O
FF (default) to turn off dialing prefix, or touch CUSTOM to see the keyboard on the control-panel displa y and
type a prefix.
K.
Setting the redial-on-busy feature
The redial-on-busy setting specifies the number of times (0 through 9) that the fax redials a number when it is busy. The
interval between retries is established in the redial interval setting.
To set redial-on-busy
1 Press the MENU button.
2 Touch F
3 Scroll to and touch F
4 Scroll to and touch R
5 Scroll to and touch the number of redial attempts (the default is 3), and then touch O
84 Chapter 4 – Faxing
AX.
AX SEND.
EDIAL ON BUSY.
K.
Rev. 1.0
 Loading...