

Page 1
hphpLaserJet 9055 mfp
LaserJet 9065 mfp
system
administrator
guide
Page 2

Page 3

hp LaserJet 9055mf p/9065mfp
system administrator guide
Page 4

Copyright Information
© 2003 Copyright Hewlett-Packard
Development Company, LP
Reproduction, adaptation or translation
without prior written permission is prohibited,
except as allowed under the copyright laws.
The information contained herein is subject to
change without notice.
The only warranties for HP products and
services are set forth in the express warranty
statements accompanying such products and
services. Nothing herein should be construed
as constituting an additional warranty. HP
shall not be liable for technical or editorial
errors or omissions contained herein.
Part number: Q3631-90911
Edition 1, 11/2003
T rademark Credits
Energy Star® is a U.S. registered mark.
All other products mentioned herein may be
trademarks of their respective companies.
Page 5

Contents
1 Introduction
Key operator functions . . . . . . . . . . . . . . . . . . . . . . . . . . . . . . . . . . . . . . . . . . . . . . .2
MFP service, repairs, and supplies . . . . . . . . . . . . . . . . . . . . . . . . . . . . . . . . . . . . .2
Help mode. . . . . . . . . . . . . . . . . . . . . . . . . . . . . . . . . . . . . . . . . . . . . . . . . . . . . . . . . 2
Product overview . . . . . . . . . . . . . . . . . . . . . . . . . . . . . . . . . . . . . . . . . . . . . . . . . . . 2
Features . . . . . . . . . . . . . . . . . . . . . . . . . . . . . . . . . . . . . . . . . . . . . . . . . . . . . . . . . .2
MFP features. . . . . . . . . . . . . . . . . . . . . . . . . . . . . . . . . . . . . . . . . . . . . . . . . . .2
2 Safety information
User instructions . . . . . . . . . . . . . . . . . . . . . . . . . . . . . . . . . . . . . . . . . . . . . . . . . . .6
MFP safety labels . . . . . . . . . . . . . . . . . . . . . . . . . . . . . . . . . . . . . . . . . . . . . . . . . . . 6
Environmental Product Stewardship Program . . . . . . . . . . . . . . . . . . . . . . . . . . . . .9
Protecting the environment . . . . . . . . . . . . . . . . . . . . . . . . . . . . . . . . . . . . . . . .9
Declaration of Conformity . . . . . . . . . . . . . . . . . . . . . . . . . . . . . . . . . . . . . . . . . . . .11
Electrical specifications . . . . . . . . . . . . . . . . . . . . . . . . . . . . . . . . . . . . . . . . . . . . .12
Acoustic emissions . . . . . . . . . . . . . . . . . . . . . . . . . . . . . . . . . . . . . . . . . . . . . . . . . 12
Regulations. . . . . . . . . . . . . . . . . . . . . . . . . . . . . . . . . . . . . . . . . . . . . . . . . . . . . . . 13
Installation and power requirements . . . . . . . . . . . . . . . . . . . . . . . . . . . . . . .14
Handling and care . . . . . . . . . . . . . . . . . . . . . . . . . . . . . . . . . . . . . . . . . . . . . .15
Routine safety . . . . . . . . . . . . . . . . . . . . . . . . . . . . . . . . . . . . . . . . . . . . . . . . .16
3 MFP configuration
External MFP . . . . . . . . . . . . . . . . . . . . . . . . . . . . . . . . . . . . . . . . . . . . . . . . . . . . .20
External MFP callouts . . . . . . . . . . . . . . . . . . . . . . . . . . . . . . . . . . . . . . . . . . . 20
Internal MFP . . . . . . . . . . . . . . . . . . . . . . . . . . . . . . . . . . . . . . . . . . . . . . . . . . . . . . 22
Internal MFP callouts. . . . . . . . . . . . . . . . . . . . . . . . . . . . . . . . . . . . . . . . . . . .22
Optional equipment . . . . . . . . . . . . . . . . . . . . . . . . . . . . . . . . . . . . . . . . . . . . . . . .23
Optional equipment details . . . . . . . . . . . . . . . . . . . . . . . . . . . . . . . . . . . . . . . . . . .24
Site requirements . . . . . . . . . . . . . . . . . . . . . . . . . . . . . . . . . . . . . . . . . . . . . . . . . .28
MFP Weight. . . . . . . . . . . . . . . . . . . . . . . . . . . . . . . . . . . . . . . . . . . . . . . . . . .29
Control panel layout . . . . . . . . . . . . . . . . . . . . . . . . . . . . . . . . . . . . . . . . . . . . . . . .30
Touchscreen . . . . . . . . . . . . . . . . . . . . . . . . . . . . . . . . . . . . . . . . . . . . . . . . . .31
Main screen. . . . . . . . . . . . . . . . . . . . . . . . . . . . . . . . . . . . . . . . . . . . . . . . . . .32
4 Paper information
Paper size conversion chart . . . . . . . . . . . . . . . . . . . . . . . . . . . . . . . . . . . . . . . . . .36
Positioning originals on the scanner glass . . . . . . . . . . . . . . . . . . . . . . . . . . . . . . .3 6
Specifications. . . . . . . . . . . . . . . . . . . . . . . . . . . . . . . . . . . . . . . . . . . . . . . . . . 37
Using the automatic document feeder (ADF) . . . . . . . . . . . . . . . . . . . . . . . . . . . . 37
Specifications in 1`1, 1`2, 2`2, 2`1 copying. . . . . . . . . . . . . . . . . . . . . . . . . .37
Using mixed original mode* . . . . . . . . . . . . . . . . . . . . . . . . . . . . . . . . . . . . . . . . . .37
Unsuitable ADF originals. . . . . . . . . . . . . . . . . . . . . . . . . . . . . . . . . . . . . . . . .38
Positioning originals . . . . . . . . . . . . . . . . . . . . . . . . . . . . . . . . . . . . . . . . . . . .38
Positioning mixed originals . . . . . . . . . . . . . . . . . . . . . . . . . . . . . . . . . . . . . . .38
Paper in MFP trays . . . . . . . . . . . . . . . . . . . . . . . . . . . . . . . . . . . . . . . . . . . . . . . .39
Paper in Q3637A high capacity input (optional) . . . . . . . . . . . . . . . . . . . . . . . . . . . 40
Paper in Q3638A high capacity input (optional) . . . . . . . . . . . . . . . . . . . . . . . . . . . 40
Paper in automatic duplex unit . . . . . . . . . . . . . . . . . . . . . . . . . . . . . . . . . . . . . . . .41
Paper in Tray 1 . . . . . . . . . . . . . . . . . . . . . . . . . . . . . . . . . . . . . . . . . . . . . . . . . . . . 41
ENWW iii
Page 6

Paper in Q3633A stapler/stacker and Q3634A multi-function finisher (optional) .41
Q3633A stapler/stacker and Q3634A multi-function finisher
primary (main) tray . . . . . . . . . . . . . . . . . . . . . . . . . . . . . . . . . . . . . . . . . .42
Q3633A stapler/stacker and Q3634A multi-function finisher secondary tray. .42
Q3634A multi-function finisher booklet tray. . . . . . . . . . . . . . . . . . . . . . . . . . . 43
Paper in Q3636A post inserter (optional) . . . . . . . . . . . . . . . . . . . . . . . . . . . . . . . .44
Paper in punch kits . . . . . . . . . . . . . . . . . . . . . . . . . . . . . . . . . . . . . . . . . . . . . . . . . 44
Paper in Q3689A punch kit (optional) . . . . . . . . . . . . . . . . . . . . . . . . . . . . . . . 44
Paper in Q3635A punch kit (optional) . . . . . . . . . . . . . . . . . . . . . . . . . . . . . . . 45
Paper in Q3690A punch kit (optional) . . . . . . . . . . . . . . . . . . . . . . . . . . . . . . . 45
Paper in Q3691A punch kit (optional) . . . . . . . . . . . . . . . . . . . . . . . . . . . . . . . 45
Paper weight compatibility chart . . . . . . . . . . . . . . . . . . . . . . . . . . . . . . . . . . . . . .47
5 MFP management
Power management . . . . . . . . . . . . . . . . . . . . . . . . . . . . . . . . . . . . . . . . . . . . . . . .50
Sleep mode . . . . . . . . . . . . . . . . . . . . . . . . . . . . . . . . . . . . . . . . . . . . . . . . . . .50
Auto low power (Sleep 1) . . . . . . . . . . . . . . . . . . . . . . . . . . . . . . . . . . . . . . . . 50
Auto shut off (Sleep 2 ) . . . . . . . . . . . . . . . . . . . . . . . . . . . . . . . . . . . . . . . . . .50
Manual shut off . . . . . . . . . . . . . . . . . . . . . . . . . . . . . . . . . . . . . . . . . . . . . . . .50
Access management . . . . . . . . . . . . . . . . . . . . . . . . . . . . . . . . . . . . . . . . . . . . . . . 51
Usage management . . . . . . . . . . . . . . . . . . . . . . . . . . . . . . . . . . . . . . . . . . . . . . . .52
6 Basic operations
The main screen. . . . . . . . . . . . . . . . . . . . . . . . . . . . . . . . . . . . . . . . . . . . . . . . . . .54
Recalling previous job settings . . . . . . . . . . . . . . . . . . . . . . . . . . . . . . . . . . . . . . . .55
Duplex mode . . . . . . . . . . . . . . . . . . . . . . . . . . . . . . . . . . . . . . . . . . . . . . . . . . . . .56
Using Tray 1 . . . . . . . . . . . . . . . . . . . . . . . . . . . . . . . . . . . . . . . . . . . . . . . . . . . . . . 57
Contrast. . . . . . . . . . . . . . . . . . . . . . . . . . . . . . . . . . . . . . . . . . . . . . . . . . . . . . . . . .57
Automatic exposure. . . . . . . . . . . . . . . . . . . . . . . . . . . . . . . . . . . . . . . . . . . . .57
Manual mode (lighter, normal, darker). . . . . . . . . . . . . . . . . . . . . . . . . . . . . . . 58
Density shift. . . . . . . . . . . . . . . . . . . . . . . . . . . . . . . . . . . . . . . . . . . . . . . . . . .58
Lens mode . . . . . . . . . . . . . . . . . . . . . . . . . . . . . . . . . . . . . . . . . . . . . . . . . . . . . . .58
Automatic paper select . . . . . . . . . . . . . . . . . . . . . . . . . . . . . . . . . . . . . . . . . .58
Automatic scale . . . . . . . . . . . . . . . . . . . . . . . . . . . . . . . . . . . . . . . . . . . . . . . .59
Paper size. . . . . . . . . . . . . . . . . . . . . . . . . . . . . . . . . . . . . . . . . . . . . . . . . . . . . . . . 62
Binding mode . . . . . . . . . . . . . . . . . . . . . . . . . . . . . . . . . . . . . . . . . . . . . . . . . . . . .64
Reserve. . . . . . . . . . . . . . . . . . . . . . . . . . . . . . . . . . . . . . . . . . . . . . . . . . . . . . . . . . 65
Store mode . . . . . . . . . . . . . . . . . . . . . . . . . . . . . . . . . . . . . . . . . . . . . . . . . . . . . . . 67
Interrupt mode . . . . . . . . . . . . . . . . . . . . . . . . . . . . . . . . . . . . . . . . . . . . . . . . . . . .68
Rotation. . . . . . . . . . . . . . . . . . . . . . . . . . . . . . . . . . . . . . . . . . . . . . . . . . . . . . . . . . 69
Rotation and auto paper select . . . . . . . . . . . . . . . . . . . . . . . . . . . . . . . . . . . .70
Rotation and auto scale . . . . . . . . . . . . . . . . . . . . . . . . . . . . . . . . . . . . . . . . . .70
To release automatic rotation . . . . . . . . . . . . . . . . . . . . . . . . . . . . . . . . . . . . .70
To resume automatic rotation . . . . . . . . . . . . . . . . . . . . . . . . . . . . . . . . . . . . .70
Check and proof copy. . . . . . . . . . . . . . . . . . . . . . . . . . . . . . . . . . . . . . . . . . . . . . .70
Change/release settings . . . . . . . . . . . . . . . . . . . . . . . . . . . . . . . . . . . . . . . . .71
Help mode . . . . . . . . . . . . . . . . . . . . . . . . . . . . . . . . . . . . . . . . . . . . . . . . . . . . . . .71
7 Finisher modes
Q3633A stapler/stacker and Q3634A multi-function finisher specifications . . . . . .74
Finisher type . . . . . . . . . . . . . . . . . . . . . . . . . . . . . . . . . . . . . . . . . . . . . . . . . .74
Primary tray . . . . . . . . . . . . . . . . . . . . . . . . . . . . . . . . . . . . . . . . . . . . . . . . . . .74
Secondary tray . . . . . . . . . . . . . . . . . . . . . . . . . . . . . . . . . . . . . . . . . . . . . . . . 75
Booklet tray (multi-function finisher only) . . . . . . . . . . . . . . . . . . . . . . . . . . . .75
Post inserter. . . . . . . . . . . . . . . . . . . . . . . . . . . . . . . . . . . . . . . . . . . . . . . . . . . 75
Punch kit . . . . . . . . . . . . . . . . . . . . . . . . . . . . . . . . . . . . . . . . . . . . . . . . . . . . . 75
iv ENWW
Page 7

Non-sort mode using primary tray . . . . . . . . . . . . . . . . . . . . . . . . . . . . . . . . . . . . .76
Sort mode using primary tray . . . . . . . . . . . . . . . . . . . . . . . . . . . . . . . . . . . . . . . . .77
Staple-sort mode using primary tray . . . . . . . . . . . . . . . . . . . . . . . . . . . . . . . . . . .77
Group mode using primary tray . . . . . . . . . . . . . . . . . . . . . . . . . . . . . . . . . . . . . . .78
Output modes using secondary tray . . . . . . . . . . . . . . . . . . . . . . . . . . . . . . . . . . .79
Folding and stapling and folding modes . . . . . . . . . . . . . . . . . . . . . . . . . . . . . . . .80
Punch mode . . . . . . . . . . . . . . . . . . . . . . . . . . . . . . . . . . . . . . . . . . . . . . . . . . . . . .81
Tri-fold mode . . . . . . . . . . . . . . . . . . . . . . . . . . . . . . . . . . . . . . . . . . . . . . . . . . . . .82
Post inserter . . . . . . . . . . . . . . . . . . . . . . . . . . . . . . . . . . . . . . . . . . . . . . . . . . . . . .83
Manual finishing . . . . . . . . . . . . . . . . . . . . . . . . . . . . . . . . . . . . . . . . . . . . . . . . . . .85
Output mode for MFP without finisher . . . . . . . . . . . . . . . . . . . . . . . . . . . . . . . . . .87
Face down exit . . . . . . . . . . . . . . . . . . . . . . . . . . . . . . . . . . . . . . . . . . . . . . . .88
Face up exit . . . . . . . . . . . . . . . . . . . . . . . . . . . . . . . . . . . . . . . . . . . . . . . . . .89
8 Originals
Original direction. . . . . . . . . . . . . . . . . . . . . . . . . . . . . . . . . . . . . . . . . . . . . . . . . . .92
Text/photo enhance . . . . . . . . . . . . . . . . . . . . . . . . . . . . . . . . . . . . . . . . . . . . . . . .92
Text mode . . . . . . . . . . . . . . . . . . . . . . . . . . . . . . . . . . . . . . . . . . . . . . . . . . . .92
Photo mode . . . . . . . . . . . . . . . . . . . . . . . . . . . . . . . . . . . . . . . . . . . . . . . . . . .92
Increase contrast mode . . . . . . . . . . . . . . . . . . . . . . . . . . . . . . . . . . . . . . . . . 93
Original . . . . . . . . . . . . . . . . . . . . . . . . . . . . . . . . . . . . . . . . . . . . . . . . . . . . . . . . . .94
Mixed original . . . . . . . . . . . . . . . . . . . . . . . . . . . . . . . . . . . . . . . . . . . . . . . . .94
Z-folded original . . . . . . . . . . . . . . . . . . . . . . . . . . . . . . . . . . . . . . . . . . . . . . .95
Original form . . . . . . . . . . . . . . . . . . . . . . . . . . . . . . . . . . . . . . . . . . . . . . . . . .95
9 Output function
Output function menu . . . . . . . . . . . . . . . . . . . . . . . . . . . . . . . . . . . . . . . . . . . . . . .98
Sheet/cover insertion . . . . . . . . . . . . . . . . . . . . . . . . . . . . . . . . . . . . . . . . . . . . . . .99
Insertion mode. . . . . . . . . . . . . . . . . . . . . . . . . . . . . . . . . . . . . . . . . . . . . . . . .99
Front cover mode. . . . . . . . . . . . . . . . . . . . . . . . . . . . . . . . . . . . . . . . . . . . . . .99
Back cover mode. . . . . . . . . . . . . . . . . . . . . . . . . . . . . . . . . . . . . . . . . . . . . . .99
Chapter . . . . . . . . . . . . . . . . . . . . . . . . . . . . . . . . . . . . . . . . . . . . . . . . . . . . . . . .101
Combination . . . . . . . . . . . . . . . . . . . . . . . . . . . . . . . . . . . . . . . . . . . . . . . . . . . . .103
Combination specifications . . . . . . . . . . . . . . . . . . . . . . . . . . . . . . . . . . . . . .103
Booklet . . . . . . . . . . . . . . . . . . . . . . . . . . . . . . . . . . . . . . . . . . . . . . . . . . . . . . . .104
OHT interleave . . . . . . . . . . . . . . . . . . . . . . . . . . . . . . . . . . . . . . . . . . . . . . . . . . .105
Image insert . . . . . . . . . . . . . . . . . . . . . . . . . . . . . . . . . . . . . . . . . . . . . . . . . . . . .106
Book copy . . . . . . . . . . . . . . . . . . . . . . . . . . . . . . . . . . . . . . . . . . . . . . . . . . . . . .108
Program job . . . . . . . . . . . . . . . . . . . . . . . . . . . . . . . . . . . . . . . . . . . . . . . . . . . . .109
Erase non-image area. . . . . . . . . . . . . . . . . . . . . . . . . . . . . . . . . . . . . . . . . . . . . .110
Reverse image . . . . . . . . . . . . . . . . . . . . . . . . . . . . . . . . . . . . . . . . . . . . . . . . . . .112
Repeat image . . . . . . . . . . . . . . . . . . . . . . . . . . . . . . . . . . . . . . . . . . . . . . . . . . . .112
Vertical/horizontal width setting mode . . . . . . . . . . . . . . . . . . . . . . . . . . . . . .112
Auto detection mode . . . . . . . . . . . . . . . . . . . . . . . . . . . . . . . . . . . . . . . . . . .113
Repeat mode . . . . . . . . . . . . . . . . . . . . . . . . . . . . . . . . . . . . . . . . . . . . . . . . .113
Frame/fold erasure . . . . . . . . . . . . . . . . . . . . . . . . . . . . . . . . . . . . . . . . . . . . . . . .115
Auto layout . . . . . . . . . . . . . . . . . . . . . . . . . . . . . . . . . . . . . . . . . . . . . . . . . . . . . .116
All-image area. . . . . . . . . . . . . . . . . . . . . . . . . . . . . . . . . . . . . . . . . . . . . . . . . . . .117
Image shift. . . . . . . . . . . . . . . . . . . . . . . . . . . . . . . . . . . . . . . . . . . . . . . . . . . . . . .117
To adjust position of copy image . . . . . . . . . . . . . . . . . . . . . . . . . . . . . . . . . .117
To reduce and shift copy image. . . . . . . . . . . . . . . . . . . . . . . . . . . . . . . . . . .119
Stamp . . . . . . . . . . . . . . . . . . . . . . . . . . . . . . . . . . . . . . . . . . . . . . . . . . . . . . . . . .120
Overlay . . . . . . . . . . . . . . . . . . . . . . . . . . . . . . . . . . . . . . . . . . . . . . . . . . . . . . . . .123
Overlay memory. . . . . . . . . . . . . . . . . . . . . . . . . . . . . . . . . . . . . . . . . . . . . . .124
To overlay image stored in hard disk. . . . . . . . . . . . . . . . . . . . . . . . . . . . . . .125
ENWW v
Page 8

10 Software
MFP software . . . . . . . . . . . . . . . . . . . . . . . . . . . . . . . . . . . . . . . . . . . . . . . . . . . .128
Software features. . . . . . . . . . . . . . . . . . . . . . . . . . . . . . . . . . . . . . . . . . . . . .128
Printer drivers . . . . . . . . . . . . . . . . . . . . . . . . . . . . . . . . . . . . . . . . . . . . . . . .128
Software for Macintosh computers . . . . . . . . . . . . . . . . . . . . . . . . . . . . . . . . 130
Installing the printing system software . . . . . . . . . . . . . . . . . . . . . . . . . . . . .130
Uninstalling the software . . . . . . . . . . . . . . . . . . . . . . . . . . . . . . . . . . . . . . . .133
Software for networks . . . . . . . . . . . . . . . . . . . . . . . . . . . . . . . . . . . . . . . . . .134
Utilities . . . . . . . . . . . . . . . . . . . . . . . . . . . . . . . . . . . . . . . . . . . . . . . . . . . . . .134
To print internal pages . . . . . . . . . . . . . . . . . . . . . . . . . . . . . . . . . . . . . . . . . . . . .136
Using the embedded Web server . . . . . . . . . . . . . . . . . . . . . . . . . . . . . . . . . . . . .136
To access the embedded Web server . . . . . . . . . . . . . . . . . . . . . . . . . . . . .136
Using the hp toolbox . . . . . . . . . . . . . . . . . . . . . . . . . . . . . . . . . . . . . . . . . . . . . .138
Supported operating systems . . . . . . . . . . . . . . . . . . . . . . . . . . . . . . . . . . . .138
Supported browsers. . . . . . . . . . . . . . . . . . . . . . . . . . . . . . . . . . . . . . . . . . . .138
To view hp toolbox. . . . . . . . . . . . . . . . . . . . . . . . . . . . . . . . . . . . . . . . . . . . .138
HP toolbox sections. . . . . . . . . . . . . . . . . . . . . . . . . . . . . . . . . . . . . . . . . . . .138
Status tab. . . . . . . . . . . . . . . . . . . . . . . . . . . . . . . . . . . . . . . . . . . . . . . . . . . . 139
Alerts tab . . . . . . . . . . . . . . . . . . . . . . . . . . . . . . . . . . . . . . . . . . . . . . . . . . . . 139
HP toolbox links. . . . . . . . . . . . . . . . . . . . . . . . . . . . . . . . . . . . . . . . . . . . . . .139
Network configuration . . . . . . . . . . . . . . . . . . . . . . . . . . . . . . . . . . . . . . . . . . . . .139
Parallel configuration . . . . . . . . . . . . . . . . . . . . . . . . . . . . . . . . . . . . . . . . . . . . . . 139
Enhanced I/O (EIO) configuration . . . . . . . . . . . . . . . . . . . . . . . . . . . . . . . . . . . .140
HP Jetdirect print servers . . . . . . . . . . . . . . . . . . . . . . . . . . . . . . . . . . . . . . .140
Available enhanced I/O interfaces. . . . . . . . . . . . . . . . . . . . . . . . . . . . . . . . .140
NetWare networks . . . . . . . . . . . . . . . . . . . . . . . . . . . . . . . . . . . . . . . . . . . .140
Windows and Windows NT networks . . . . . . . . . . . . . . . . . . . . . . . . . . . . . .141
AppleTalk networks . . . . . . . . . . . . . . . . . . . . . . . . . . . . . . . . . . . . . . . . . . . .141
UNIX/Linux networks . . . . . . . . . . . . . . . . . . . . . . . . . . . . . . . . . . . . . . . . . .141
Digital sending. . . . . . . . . . . . . . . . . . . . . . . . . . . . . . . . . . . . . . . . . . . . . . . . . . . .141
11 Job memory
Job store . . . . . . . . . . . . . . . . . . . . . . . . . . . . . . . . . . . . . . . . . . . . . . . . . . . . . . . .144
Job recall. . . . . . . . . . . . . . . . . . . . . . . . . . . . . . . . . . . . . . . . . . . . . . . . . . . . . . . . 145
Job memory form . . . . . . . . . . . . . . . . . . . . . . . . . . . . . . . . . . . . . . . . . . . . . . . . .145
12 Tandem mode
Tandem mode operation. . . . . . . . . . . . . . . . . . . . . . . . . . . . . . . . . . . . . . . . . . . .148
To stop scanning/printing. . . . . . . . . . . . . . . . . . . . . . . . . . . . . . . . . . . . . . . .150
To cancel the job in the secondary MFP only . . . . . . . . . . . . . . . . . . . . . . . .150
Troubleshooting . . . . . . . . . . . . . . . . . . . . . . . . . . . . . . . . . . . . . . . . . . . . . . 150
13 Shortcuts
Set reserve job . . . . . . . . . . . . . . . . . . . . . . . . . . . . . . . . . . . . . . . . . . . . . . . . . . .154
Store originals scanned from scanner glass. . . . . . . . . . . . . . . . . . . . . . . . . . . . .154
Store originals scanned from the document feeder . . . . . . . . . . . . . . . . . . . . . . .154
Stapling and folding, and folding . . . . . . . . . . . . . . . . . . . . . . . . . . . . . . . . . . . . .154
Mixed original . . . . . . . . . . . . . . . . . . . . . . . . . . . . . . . . . . . . . . . . . . . . . . . . . . . .155
Sheet/cover insertion . . . . . . . . . . . . . . . . . . . . . . . . . . . . . . . . . . . . . . . . . . . . . .155
Chapter . . . . . . . . . . . . . . . . . . . . . . . . . . . . . . . . . . . . . . . . . . . . . . . . . . . . . . . . .155
Combination: copy 2, 4, or 8 originals on 1 sheet. . . . . . . . . . . . . . . . . . . . . . . . .156
Booklet . . . . . . . . . . . . . . . . . . . . . . . . . . . . . . . . . . . . . . . . . . . . . . . . . . . . . . . . . 156
OHT interleave . . . . . . . . . . . . . . . . . . . . . . . . . . . . . . . . . . . . . . . . . . . . . . . . . . .156
Image insert . . . . . . . . . . . . . . . . . . . . . . . . . . . . . . . . . . . . . . . . . . . . . . . . . . . . .157
Book copy . . . . . . . . . . . . . . . . . . . . . . . . . . . . . . . . . . . . . . . . . . . . . . . . . . . . . . .157
vi ENWW
Page 9

Program job. . . . . . . . . . . . . . . . . . . . . . . . . . . . . . . . . . . . . . . . . . . . . . . . . . . . . .157
Erase non-image area. . . . . . . . . . . . . . . . . . . . . . . . . . . . . . . . . . . . . . . . . . . . . .158
Reverse image . . . . . . . . . . . . . . . . . . . . . . . . . . . . . . . . . . . . . . . . . . . . . . . . . . .158
Repeat image . . . . . . . . . . . . . . . . . . . . . . . . . . . . . . . . . . . . . . . . . . . . . . . . . . . .158
Frame/fold erasure . . . . . . . . . . . . . . . . . . . . . . . . . . . . . . . . . . . . . . . . . . . . . . . .159
Auto layout . . . . . . . . . . . . . . . . . . . . . . . . . . . . . . . . . . . . . . . . . . . . . . . . . . . . . .159
All-image area . . . . . . . . . . . . . . . . . . . . . . . . . . . . . . . . . . . . . . . . . . . . . . . . . . .159
Image shift/reduce and shift . . . . . . . . . . . . . . . . . . . . . . . . . . . . . . . . . . . . . . . . .159
Stamp/overlay. . . . . . . . . . . . . . . . . . . . . . . . . . . . . . . . . . . . . . . . . . . . . . . . . . . .160
Loading paper. . . . . . . . . . . . . . . . . . . . . . . . . . . . . . . . . . . . . . . . . . . . . . . . . . . .160
MFP user-adjustable trays: Tray 2 (500), Tray 3 (500), and
Tray 4 (1,500) . . . . . . . . . . . . . . . . . . . . . . . . . . . . . . . . . . . . . . . . . . . . .160
HCI (high capacity input: Q3637A/Q3638A) service-adjustable
Tray 5 (4,000) . . . . . . . . . . . . . . . . . . . . . . . . . . . . . . . . . . . . . . . . . . . . .161
Adding toner . . . . . . . . . . . . . . . . . . . . . . . . . . . . . . . . . . . . . . . . . . . . . . . . . . . . .161
14 Key operator mode
To the key operator. . . . . . . . . . . . . . . . . . . . . . . . . . . . . . . . . . . . . . . . . . . . . . . .164
How to access the key operator mode. . . . . . . . . . . . . . . . . . . . . . . . . . . . . .164
15 Maintenance and supplies
Loading paper . . . . . . . . . . . . . . . . . . . . . . . . . . . . . . . . . . . . . . . . . . . . . . . . . . .190
Paper indicator. . . . . . . . . . . . . . . . . . . . . . . . . . . . . . . . . . . . . . . . . . . . . . . .190
Paper empty indicator . . . . . . . . . . . . . . . . . . . . . . . . . . . . . . . . . . . . . . . . . . 190
Using the HELP button . . . . . . . . . . . . . . . . . . . . . . . . . . . . . . . . . . . . . . . . .190
Loading paper in Trays 2 and 3. . . . . . . . . . . . . . . . . . . . . . . . . . . . . . . . . . .190
Loading paper in Tray 4. . . . . . . . . . . . . . . . . . . . . . . . . . . . . . . . . . . . . . . . .191
Loading paper in HCI (Q3637A/Q3638A) . . . . . . . . . . . . . . . . . . . . . . . . . . .191
Loading tabbed sheets in Tray 2, 3, or 4 . . . . . . . . . . . . . . . . . . . . . . . . . . . .192
Loading tabbed sheets in HCI (Q3637A/Q3638A) . . . . . . . . . . . . . . . . . . . .193
Adding toner . . . . . . . . . . . . . . . . . . . . . . . . . . . . . . . . . . . . . . . . . . . . . . . . .194
Inserting a new staple cartridge into the stapler/stacker and
multi-function finisher . . . . . . . . . . . . . . . . . . . . . . . . . . . . . . . . . . . . . . . . . .195
Emptying punch waste box of punch kit . . . . . . . . . . . . . . . . . . . . . . . . . . . . . . . 196
Preventive maintenance . . . . . . . . . . . . . . . . . . . . . . . . . . . . . . . . . . . . . . . . . . . .196
Cleaning the ADF glass . . . . . . . . . . . . . . . . . . . . . . . . . . . . . . . . . . . . . . . . . . . .196
Cleaning the document glass and cover . . . . . . . . . . . . . . . . . . . . . . . . . . . . . . .197
Service, repairs, and supplies . . . . . . . . . . . . . . . . . . . . . . . . . . . . . . . . . . . . .197
Service. . . . . . . . . . . . . . . . . . . . . . . . . . . . . . . . . . . . . . . . . . . . . . . . . . . . . .197
Repairs. . . . . . . . . . . . . . . . . . . . . . . . . . . . . . . . . . . . . . . . . . . . . . . . . . . . . .197
Supplies. . . . . . . . . . . . . . . . . . . . . . . . . . . . . . . . . . . . . . . . . . . . . . . . . . . . .198
16 Troubleshooting
Call for service . . . . . . . . . . . . . . . . . . . . . . . . . . . . . . . . . . . . . . . . . . . . . . . . . . .200
Limited use of the MFP . . . . . . . . . . . . . . . . . . . . . . . . . . . . . . . . . . . . . . . . . . . .200
Memory overflow . . . . . . . . . . . . . . . . . . . . . . . . . . . . . . . . . . . . . . . . . . . . . . . . .200
Power off/on screen . . . . . . . . . . . . . . . . . . . . . . . . . . . . . . . . . . . . . . . . . . . . . . .201
Clearing paper jams . . . . . . . . . . . . . . . . . . . . . . . . . . . . . . . . . . . . . . . . . . . . . .201
Troubleshooting hints . . . . . . . . . . . . . . . . . . . . . . . . . . . . . . . . . . . . . . . . . . . . . .202
17 MFP specifications
Index
ENWW vii
Page 10

viii ENWW
Page 11

1Introduction
Key operator functions . . . . . . . . . . . . . . . . . . . . . . . . . . . . . . . . . . . . . . . . . . . . . . . 2
MFP service, repairs, and supplies . . . . . . . . . . . . . . . . . . . . . . . . . . . . . . . . . . . . .2
Help mode. . . . . . . . . . . . . . . . . . . . . . . . . . . . . . . . . . . . . . . . . . . . . . . . . . . . . . . . .2
Product overview . . . . . . . . . . . . . . . . . . . . . . . . . . . . . . . . . . . . . . . . . . . . . . . . . . . 2
Features . . . . . . . . . . . . . . . . . . . . . . . . . . . . . . . . . . . . . . . . . . . . . . . . . . . . . . . . . .2
MFP features. . . . . . . . . . . . . . . . . . . . . . . . . . . . . . . . . . . . . . . . . . . . . . . . . . .2
ENWW 1
Page 12

Welcome to the HP LaserJet 9055mfp/9065mfp. The following topics relate to general product
information and provide tips on using this manual.
Key operator functions
Custom settings can be made by the key operator or anyone who is responsible for the MFP. Access to
the key operator mode may require a key operator password. For more information, see “Key operator
mode” on page 163.
MFP service, repairs, and supplies
MFP service and repairs should be performed only by an authorized HP service representative. To
maintain personal safety and to avoid MFP damage, never disassemble the MFP for any reason. To
ensure optimal copy quality, use only supplies that are recommended by HP. For convenience, see
“Service, repairs, and supp lie s” on pag e197 to record all service, repair, and supply contact in formation.
Help mode
Help can be obtained for any function or mode that is displayed on the screen by pressing the HELP
button on the control panel .
Product overvie w
The MFP can be used as a stand alo ne digi tal co pier or as a high -speed netw ork printer when co nnecte d
to the optional HP Print Controller.
HP Digital Technology enables you to perform the following tasks:
● feed originals only once to make multiple copies
● store images in memory
● create chapters and booklets
● insert covers and images
● enhance photos and images, and improve text image quality
● overlay stamp, watermark, or scanned images on the scanned originals
● reduce toner consumption and produce cleaner copies
● organize images into booklet format
● insert images scanned from the glass into a set scanned from the automatic document feeder
● check copying conditions and produce a proof copy before making multiple copied sets
● confirm the current MFP status
● select multiple sort, group, staple, and fold modes using the optional Stapler/Stacker and
Multi-function finisher (Q3633A/Q3634A)
● set reserve jobs to make copies of different types in succession
● store image data in a hard disk (optional) for future printing
Features
MFP features
Standard equipment
● MFP with 4 paper trays (100/500/500/1,500 sheets)
● Automatic D ocu me nt Feeder (ADF)
● Automatic Duplex Unit (ADU)
2 Introduction ENWW
Page 13

Optional equipment
● Stapler/Stacker (Q3633A) equipped with 2 exit trays
• Secondary tray: 4 output types can be specified on the Select finisher mode menu
• face-down non-sort exit
• face-up non-sort exit
• face-down group exit
• face-up group exit
• Primary tray supports 4 output types
•sort exit
• staple sort exit
• non-sort exit
• group exit
● Multi-function Finisher (Q3634A) is equipped with 3 exit trays
• Secondary tray supports 4 output types
• face-down non-sort exit
• face-up non-sort exit
• face-down group exit
• face-up group exit
• Primary tray supports 4 output types
•sort exit
• staple sort exit
• non-sort exit
• group exit
• Booklet tray: stapled and folded or simply folded booklets are delivered to this tray
● Punch Kit creates 2-hole (Q3689A), 4-hole Swedish (Q3691A), 3-hole (Q3635A), and 4-hole
(Q3690A) punches in output copies
● Post Inserter(Q3636A)
● High capacity input (HCI) tray (Q3637A) (4,000 sheets letter/A4)
● High capacity input (HCI) tray (Q3638A) (4,000 sheets ledger/A3)
● Print Kit (Q3639A)
● Copy controller hard disk (Q3642A)
ENWW Features 3
Page 14

4 Introduction ENWW
Page 15

2Safety information
User instructions . . . . . . . . . . . . . . . . . . . . . . . . . . . . . . . . . . . . . . . . . . . . . . . . . . .6
MFP safety labels . . . . . . . . . . . . . . . . . . . . . . . . . . . . . . . . . . . . . . . . . . . . . . . . . . . 6
Environmental Product Stewardship Program . . . . . . . . . . . . . . . . . . . . . . . . . . . . .9
Protecting the environment . . . . . . . . . . . . . . . . . . . . . . . . . . . . . . . . . . . . . . . .9
Declaration of Conformity . . . . . . . . . . . . . . . . . . . . . . . . . . . . . . . . . . . . . . . . . . . .11
Electrical specifications . . . . . . . . . . . . . . . . . . . . . . . . . . . . . . . . . . . . . . . . . . . . .12
Acoustic emissions . . . . . . . . . . . . . . . . . . . . . . . . . . . . . . . . . . . . . . . . . . . . . . . . . 12
Regulations. . . . . . . . . . . . . . . . . . . . . . . . . . . . . . . . . . . . . . . . . . . . . . . . . . . . . . .13
Installation and power requirements . . . . . . . . . . . . . . . . . . . . . . . . . . . . . . .14
Handling and care . . . . . . . . . . . . . . . . . . . . . . . . . . . . . . . . . . . . . . . . . . . . . . 15
Routine safety . . . . . . . . . . . . . . . . . . . . . . . . . . . . . . . . . . . . . . . . . . . . . . . . .16
ENWW 5
Page 16
User instructions
The following pages include important safety information, which you must read and understand before
you attempt to operate the MFP. If you have any concerns about safety matters, please contact your
service representative.
MFP safety labels
MFP safety labels are attached to the internal area of the MFP. The purpose of safety labels is to alert
you of imminent or potentially hazardous situations or conditions. Be sure to heed all safety label
information. If any safety label is removed or becomes illegible due to soilage, etcetera, please contact
your service representative for replacements.
To avoid injury, do not touch any part of the MFP that contains a warning or caution label.
Do not remove WARNING or CAUTION labels. If any label is removed, please contact your service
representative for replacements.
Clean labels as needed to mai ntain le gibili ty. If cleaning does not render the label legible , please cont act
your service representative for label replacements.
The following standard safety categories are commonly used on product labelling.
Warning indica tes a poten tially ha zardous s ituation, w hich, if n ot av oid ed, could re sult in dea th or se rious
injury.
WARNING
CAUTION
Caution indicates a potentially hazardous situation, which, if not avoided, may result in minor or
moderate bodily injury.
The following standard callouts are used extensively throughout this guide.
WARNING! Warning messages alert the reader to a specific procedure or practice which, if not followed correctly,
could cause personal injury or catastrophic loss of data or equipment.
CAUTION Caution messages appear b ef ore pro cedure s wh ich, if n ot obse rved, co uld res ult in lo ss of da ta or damage to
equipment
Note Notes contain impor tant information.
6 Safety information ENWW
Page 17
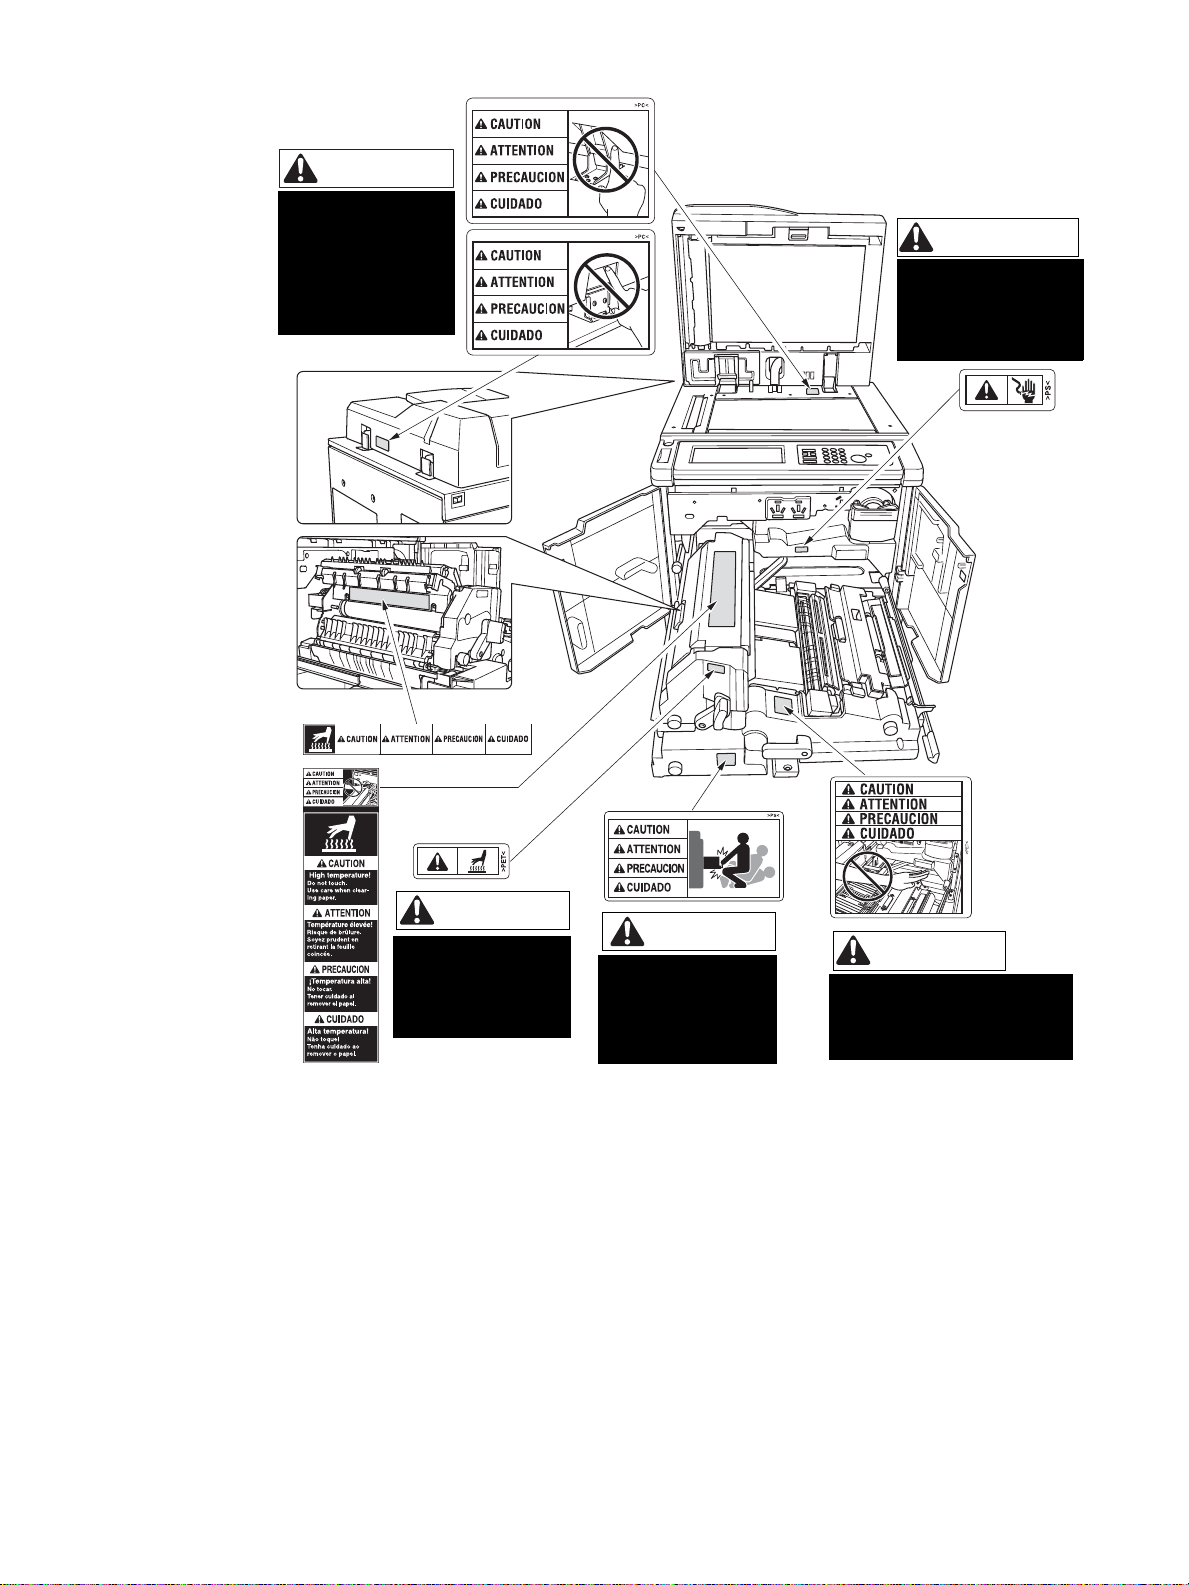
CAUTION
DO NOT INSERT
your finger into the
2 RADF hinge
portions;
otherwise you may
be injured.
WARNING
This area generates
high voltage. If touched,
electrical shock may
occur. DO NOT TOUCH.
CAUTION
The fixing unit is
very hot. To avoid
getting burned, DO
NOT TOUCH.
CAUTION
The conveyance fixing
unit is heavy. Use care
and draw it out gently;
otherwise you may be
injured.
CAUTION
DO NOT put your hand between
the main body and developing
fixing unit; otherwise you may
be injured.
ENWW MFP safety labels 7
Page 18
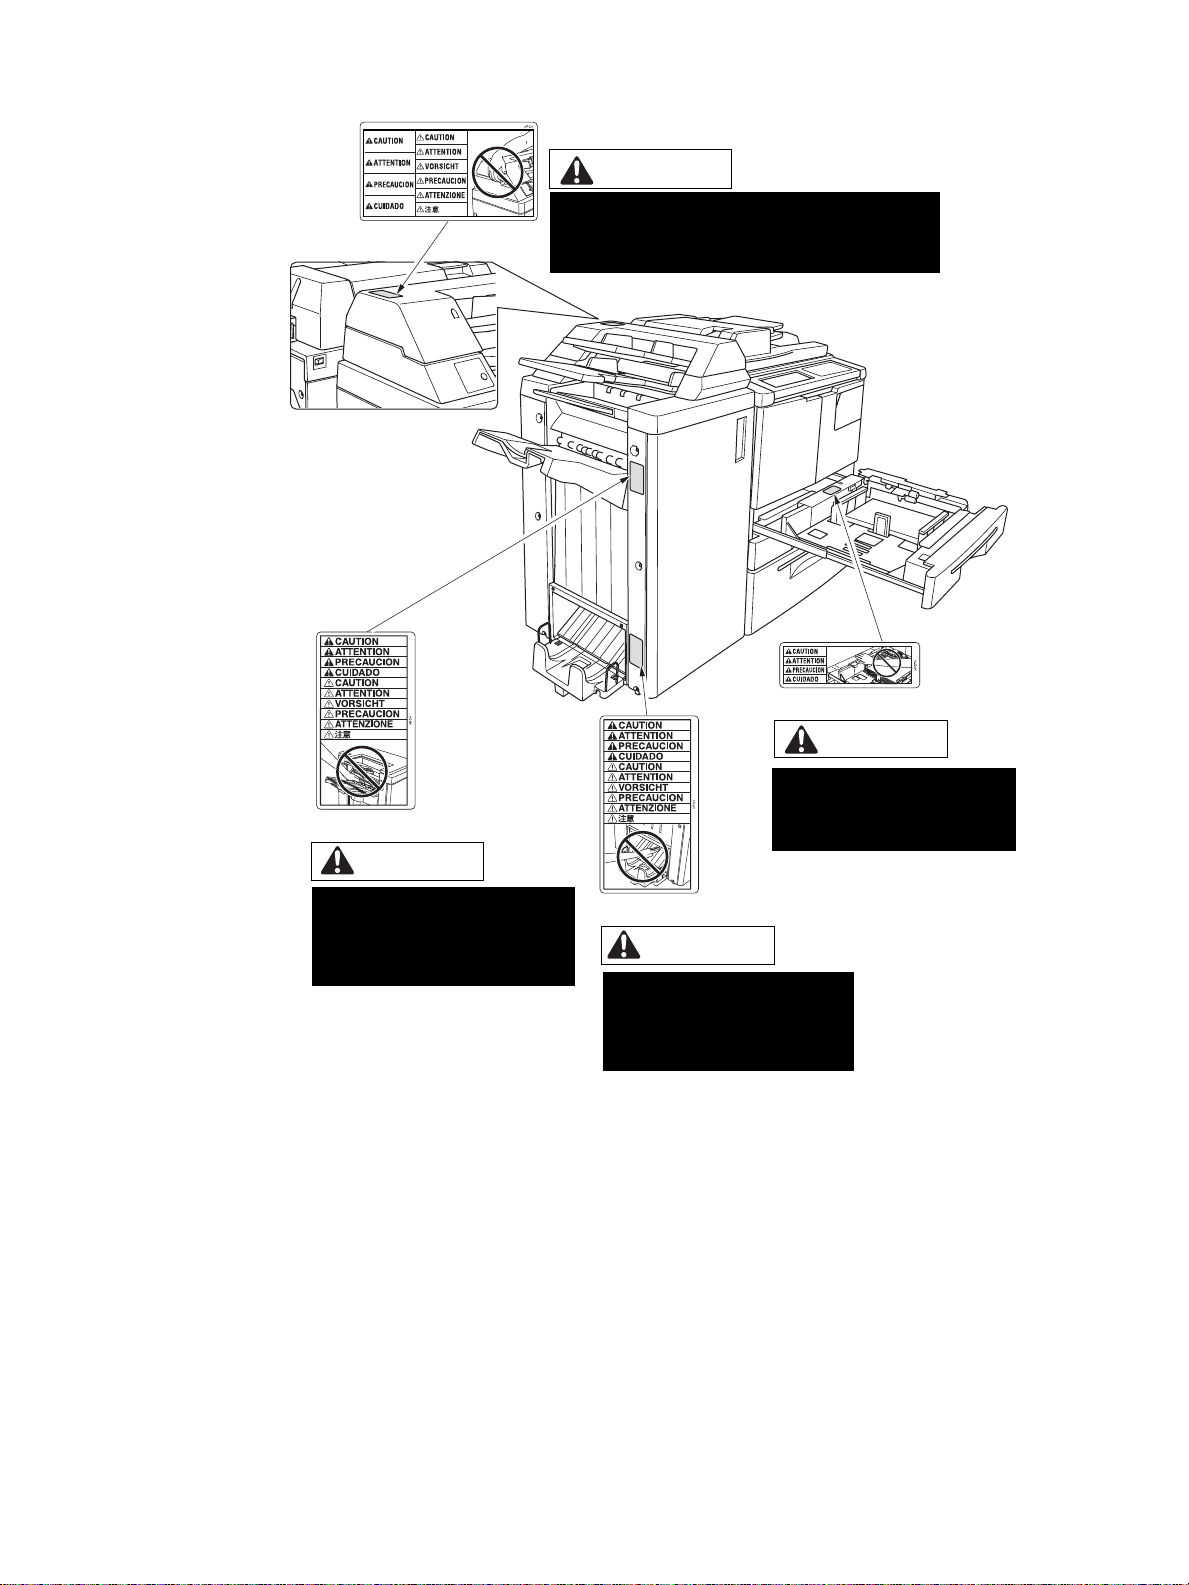
CAUTION
DO NOT insert your finger into the bottom of the
upper part of the feeder when returning to its
original position; otherwise you may be injured.
CAUTION
CAUTION
Use care after opening the
paper exit outlet. DO NOT put your
hand into it; otherwise you may be
injured.
DO NOT put your hand between
the main body and tray;
otherwise you may be injured.
CAUTION
Inside the lower paper exit outlet
is the roller drive unit. DO NOT
put your hand into it; otherwise
you may be injured.
8 Safety information ENWW
Page 19
Environmental Product Stewardship Program
Protecting the environment
Hewlett-Packard Company is committed to providing quality products in an environmentally sound
manner . Thi s pro duc t has b een designed with several attributes to minimize impacts on our environment.
Ozone protection
This product contains an ozone filter to protect indoor air quality. The ozone filter should be replaced
every 250,000 pages during preventive maintenance.
Power consumpt ion
Power usage drops significantly while in Sleep mode, which saves natural resources and saves money
without affecting the high performance of this product. This product qualifies for ENERGY STAR
(Version 1.0), which is a voluntary program to encourage the development of energy-efficient office
products.
®
ENERGY STAR
has determined that this product meets ENERGY STAR (Version 1.0) Guidelines for energy efficiency.
For more information, see http://www.energystar.gov/.
is a U.S. registered mark. As an ENERGY STAR Partner, Hewlett-Packard Company
®
Paper use
This product’s automatic duplex capability can reduce paper usage and the resulting demands on
natural resources.
Plastics
Plastic parts over 25 grams are marked according to international standards that enhance the ability to
identify plastics for recycling purposes at end-of-life.
Paper
This product is capable of using recycled papers when the paper meets the guidelines outlined in the
Print Guide. This product is suitable for the use of recycled paper according to EN 12281:2000.
Material restrictions
This HP product contains mercury in the fluorescent lamp on the liquid crystal display control panel that
may require special handling at end-of-life.
This HP product contains lead in solder that may require special handling at end-of-life.
This HP product contains a lithium battery located on the memory board unit that may require special
handling at end-of-life.
For recycling information, you can contact http://www.hp.com/go/recycle or contact your local authorities
or the Electronics Industries All iance at http://www.eiae.org/.
ENWW MFP safety labels 9
Page 20

Material safety data sheet
Material Safety Data Sheets (MSDS) can be obtained by contacting the HP LaserJet printer supplies
website at http://www.hp.com/go/msds.
For more information
To obtain information about these environmental topics:
● product environmental profile sheet for this and many related HPproducts
● commitment to the environment
● environmental management system
● end-of-life product return and recycling program
● MSDS
Visit http://www.hp.com/go/environment or http://www.hp.com/hpinfo/community/environment
10 Safety information ENWW
Page 21

Declaration of Conformity
Manufacturer's Name: Hewlett-Packard Company
Manufacturer's Address: 11311 Chinden Boulevard
declares that the product
Product Name: HP LaserJet 9055mfp / 9065mfp
Product Numbers: Q3631A, Q3632A
Product Options: ALL
conforms to the following Product Specifications:
Safety: IEC 60950:1999 / EN60950:2000
EMC: CISPR 22:1997 / EN 55022:1998-Class A
Supplementary Information:
The product herewith complies with the requirements of the EMC Directive 89/336/EEC and the Low Voltage
Directive 73/23/EEC, and carries the CE-Marking accordingly:
1 The product was tested in a typical configuration with Hewlett-Packard Personal Computer
Systems.
2 This Device c om pl ies w ith Part 15 of the FCC Rules. Opera tion is su bje ct to the following two
Conditions: (1) this device may not cause harmful interference, and (2) this device must
accept any interference received, including interference that may cause undesired operation.
Declaration of Conformity
according to ISO/IEC Guide 22 and EN 45014
Boise, ID, 83714-1021, USA
IEC 60825-1:1993 +A1/ EN 60825-1+A11
(Class 1 Laser/LED Product)
GB4943-1995
EN 61000-3-2:1995 / A14
EN 61000-3-3:1995
EN 55024:1998
FCC Title 47 CFR, Part 15 Class A / ICES-003, Issue 3 /
GB9254-1998
AS / NZS 3548:1995+A1+A2
Boise, Idaho USA
12 June 2003
For Regulatory Topics Only
Australia Contact: Product Regulations Manager, Hewlett-Pac kard A ustralia Ltd., 31-41 Joseph Street, Blackburn,
Victoria 3130, Australia.
European Contact: Your Local Hewlett-Packard Sales and Service Office or Hewlett-Packard Gmbh, Department
HQ-TRE / Standards Europe, Herrenberger Straáe 130, D-71034 Böblingen (FAX: +49-7031-14-3143)
USA Contact: Product Regulations Manager, Hewlett-Packard Company, PO Box 15, Mail Stop 160, Boise, Idaho
83707-0015, Phone: 208-396-6000)
ENWW MFP safety labels 11
:
Page 22

Electrical specifications
WARNING! Power requirements are based on the country/region where the MFP is sold. Do not convert
operating voltages. This may damage the MFP.
110-volt models 220-volt models
Power requirements 100-127V (+/-10%)
50/60 Hz (+/- 2 Hz)
Minimum recommended c ir cuit ca pacity f or typ ical
product
Power consumption (average, in watts)
Product model Printing Copying Idle/
hp LaserJet 9055mfp 1035 W (55 PPM) 1155 W (55 PPM) 280 W 240 W 18 W < 1 W
hp LaserJet 9065mfp 1225 W (65 PPM) 1265 W (65 PPM) 280 W 240 W 18 W < 1 W
● Auto-off (Sleep 2) power is the base copier with the anti-humidity heaters off.
● Auto-off (Sleep 2) default activ at ion time is 90 min ute s. Low power (Sleep 1) default activation time
is 15 minutes.
● Printing power consumption is with the HP Print Kit option pr inting in c ontinuous simplex. Copying
power consumption is continuous simplex from ADF.
● These values are subject to change. Go to http://www.hp.com/support/lj9055mfp or
http://www.hp.com/support/lj9065mfp for current information.
20A 10A
Low power
ready
(sleep1)
220-240V (+/-10%)
50/60 Hz (+/- 2 Hz)
Auto-off
(sleep 2)
Off
Acoustic emissions
Sound power level Declared per ISO 9296 and ISO 7779
hp LaserJet 9055mfp
Copy/print (55 PPM)
Idle
hp LaserJet 9065mfp
Copy/print (65 PPM)
Idle
Sound pressure level bystander position Declared Per ISO 9296 and ISO 7779
hp LaserJet 9055mfp
Copy/print (55 PPM)
Idle
hp LaserJet 9065mfp
Copy/print (65 PPM)
Idle
● Configuration tested: base unit using standard Tray 3, letter paper, printing simplex using ADF
copy/print mode, 1 copy per original to passive output tray.
● These values are subject to change. Go to http://www.hp.com/support/lj9055mfp or
http://www.hp.com/support/lj9065mfp current information.
LWAd = 7.6 Bels (A)
LWAd = 5.7 Bels (A)
LWAd = 7.7 Bels (A)
LWAd = 5.8 Bels (A)
LpAm = 59 dB(A)
LpAm = 39 dB(A)
LpAm = 60 dB(A)
LpAm = 39 dB(A)
12 Safety information ENWW
Page 23

Regulations
FCC Class A Statement
This equipment has been tested and found to comply with t he limits for a Class A digital device, pursuant
to Part 15 of the FCC R u les. These limits are designe d to provide reasonable prot ection against harmful
interference when the equipment is operated in a commercial environment. This equipment generates,
uses, and can radiate radio frequency energy and, if not installed and used in accordance with the
instruction manual, may cause harmful interference to radio communications. Operation of this
equipment in a residential area is likely to cause harmful interference, in which case the user will be
required to correct the interference at his own expense. The end user of this product should be aware
that any changes or mod ifica tions m ade to this equ ipmen t with out the appro v al of He wle tt-P ackard could
result in the prod uct no t meet ing the Class A l imits , i n whic h cas e the F CC co uld v oid the us er’s authority
to operate the equipment.
Canadian DOC regulations
Complies with Canadian EMC Class A requirements.
“Conforme á la classe A des normes canadiennes de compatibilité électromagnétiques “CEM”.”
FDA regulations
This MFP is certified as a “Class 1” laser product under the U.S.Department of Health and Human
Service Radiation P erf ormanc e Standard accord ing to th e Radiati on Control f or Hea lth and Saf ety Ac t of
1968. Since radiation emitted inside this MFP is completely confined within protective housings and
covers, the laser beam cannot escape during any phase of normal operation.
Laser safety
The Center for Devices and Radiological Health (CDRH) of the U.S. Food and Drug Administration has
implemented regulations for laser products manufactured since August 1, 1976. Compliance is
mandatory for products mark ete d in the U nite d State s . The MFP is certified as a “Class 1” laser prod uc t
under the U.S. Department of Health and Human Services (DHHS) Radiation Performan ce Standard
according to the Radiation Control for Health and Safety Act of 1968. Since radiation emitted inside the
MFP is completely confined within protective housings and external covers, the laser beam cannot
escape during any phase of normal user operation.
WARNING! Using controls, making adjustments, or performing procedures other than those specified in this user
guide may result in exposure to hazardous radiation.
Laser Statement for Finland
Luokan 1 laserlaite
Klass 1 Laser Apparat
HP LaserJet 9055 mfp/9065 mfp laserkirjoitin on käyttäjän kannalta turvallinen luokan 1 laserlaite.
Normaalissa käytössä kirjoittimen suojakotelointi estää lasersäteen pääsyn laitteen ulkopuolelle.
Laitteen turvallisuusluokka on määritetty standardin EN 60825-1 (1994) mukaisesti.
VAROITUS!
Laitteen käyttäminen muulla kuin käyttöohjeessa mainitulla tavalla saattaa altistaa käyttäjän
turvallisuusluokan 1 ylittävälle näkymättömälle lasersäteilylle.
VARNING!
Om apparaten används på annat sätt än i bruksanvisning specificerats, kan användaren utsättas för
osynlig laserstrålning, som överskrider gränsen för laserklass 1.
HUOLTO
HP LaserJet 9055mfp, 9065mfp -kirjoittimen sisällä ei ole käyttäjän huollettavissa olevia kohteita.
Laitteen saa avata ja huoltaa ainoastaan sen huoltamiseen koulutettu henkilö. Tällaiseksi
huoltotoimenpiteeksi ei katsota väriainekasetin vaihtamista, paperiradan puhdistusta tai muita käyttäjän
käsikirjassa lueteltuja, käyttäjän tehtäväksi tarkoitettuja ylläpitotoimia, jotka voidaan suorittaa ilman
erikoistyökaluja.
ENWW Regulations 13
Page 24

VARO!
Mikäli kirjoittimen suojakotelo avataan, olet alttiina näkymättömällelasersäteilylle laitteen ollessa
toiminnassa. Älä katso säteeseen.
VARNING!
Om laserprinterns skyddshölje öppnas då apparaten är i funktion, utsättas användaren för osynlig
laserstrålning. Betrakta ej strålen. Tiedot laitteessa käytettävän laserdiodin säteilyominaisuuksista:
Aallonpituus 775-795 nm
Teho 5 m W
Luokan 3B laser
EMI statement (Korea)
Taiwanese Class A regulations
Installation and power requirements
WARNING! Failure to heed the following cautions may result in bodily injury and/or MFP damage.
Temperature and humidity
Install the MFP away from direct sunlight, heat sources (stoves, heaters), and cold temperatures (air
conditioners). Use only in an environment that is 10° to 30° C (50° to 86° F), with 10 to 80 percent
humidity.
Ventilation
Do not allow the MFP to come in contact with dust, ammonia, gas, or fumes from printing or cleaning
solutions, and so forth. Install the MFP in a well-ventilated area.
Vibrations
If the MFP is constantly vibrated or jolted, trouble may occur. Install the MFP on a level, horizontal floor,
free from vibrations.
Space allotment
Install the MFP in an area wi th ade quate space f or p erforming all operations, re pl acing su pp ly ite ms, and
conducting preventive maintenance. See “Site requirements” on page 28.
14 Safety information ENWW
Page 25

Relocation and transportation
Be sure to contact your service representative when moving or transporting the MFP.
WARNING! Failure to heed the following cautions may result in MFP damage, overheating, risk of electrical
shock, and/or personal injury.
Electrical outlet
A plug socket is limited in capacity. Use a dedicated circuit for this MFP to prevent overheating and/or
smoking. The total power consumption of the MFP, plus all peripherals, must not exceed the capacity of
the main power supply.
Be sure the outlet is near the equipment and is easily accessible.
Plug and cord (lead)
Unless the power plug is firmly inserted into the electrical outlet, o v erhe ating and /or smoking ma y occu r.
Firmly insert the power cord plug into the elect rical out let be fore turning on the MFP power switch. If the
inserted plug is loose in the electrical outlet, disconnect it, and consult an electrician for repair. Do not
attempt to operate the MFP.
Be sure the electrical outlet is near the equipment and is easily accessible.
A damaged powe r cord may result in over hea tin g, s hort circuit, or fire . D o not be nd, crush, wi nd, k ick, or
strike the cord with any item. Do not roll up the cord. If the MFP power cord is bent or damaged,
immediately contact your service representative. Do not attempt to repair it yourself. Do not continue to
operate the MFP.
Adapters and multiple loads
Neve r us e ad apte r s an d n ever connect m u lti ple l oad s or a branched socket to 1 socke t o utl et; otherwise,
overheating or fire may occur.
Extension cords (leads)
An extension cord or lead is limited in capacity. Unless the cord or lead has adequate capacity, smoking
and overheating may occur. Should smoking and/or overheating occur, turn off the MFP and contact an
electrician immediately. If you require further info rmation about po wer requirements , po wer cons umption ,
extension c ord s , adapters, and connec tors, please contact yo ur se rvice rep res enta tive, and consult your
electrician.
Handling and care
WARNING! Failure to heed the following warning may result in death or serious injury and/or MFP damage.
MFP contact
● Never touch an internal high voltage area, indicated with a WARNING label.
● Never touch the dr um surface.
● Never put your hand into the developing unit when removing a paper jam.
For more information, see “MFP safety labels” on page 6.
WARNING! Failure to heed the following cautions may result in MFP damage, overheating, and/or personal
injury.
ENWW Regulations 15
Page 26

MFP contact
● Never touch internal high temperature or magnetic areas indicated with a caution label.
● Never touch the inside of the MFP for any purpose except removing a pape r jam or addin g toner.
● Use care when pulling out the ADU.
For more information, see “MFP safety labels” on page 6.
MFP care
Do not drop paper clips, staples, or other small metallic objects into the MFP, or spill liquid into the MFP.
Do not use the MFP surface to support vases, books, etcetera. These items will interfere with the work
space and may cause damage to the MFP or to original documents.
Abnormal conditions
If any abnormal s ound, od or, or smoke ge nera tes fro m the MFP, immed iately stop usi ng the MFP, turn off
the main power switch, disconnect the plug, and contact your service representative.
If a circuit breaker is tripped or if a fuse blows, stop using the MFP and contact an electrician. If more
detailed information is needed regarding the power source or power consumption of this MFP, contact
your service representative.
Modifications
Do not modify the MFP in any way or remove any part or screw. Never attempt to perform any
maintenance function that is not specifically described in this manual. Do not connect the MFP with any
options ot her than those specified.
Routine safety
WARNING! Failure to heed the following cautions may result in MFP damage, overheating, and/or personal
injury.
Periodic check
Check f or loo se co nnect ions o r excessive heat on the po we r plug, damag e to the po w er cord and/or p lug
(creased, frayed, scratched, cut, and so forth). Be sure the plug is inserted fully and ground wire is
connected correctly. If any abnormality occurs, do not continue to operate the MFP.
Service messages
If a service message displays, report the condition to your service representative.
Toner
Keep tone r out of the reach of c hildre n. If ton er dust es capes as a resu lt of m ishan dling , a v oid i nhalat ion,
eye, or skin contact as a precautionary measure. Please refer to the material safety data sheet for
additional toner safety information. A Material Safety Data Sheet is available for professional use at
http://www.hp.com/go/msds.
Paper
Check paper to be sure it meets the specifications outlined in “ Paper information” on page 35.
Cleaning materials
Check the type of cleaning material used on your MFP to be sure it is recommended by HP. If necessary,
check with your service representative. Never use cleaning materials for purposes other than cleaning,
and be sure to keep all cleaning materials out of the reach of children or anyone who is incapable of
using them safely.
16 Safety information ENWW
Page 27

Sleep mode
Use Sleep mode for short periods of MFP inactivity. When not using the MFP for long periods of time,
turn the main power switch off, unless the weekly timer function is operating.
Disposal of the MFP
Hewlett-P ac kard off ers end-of-l if e HP product retu rn programs in certain geogra phic areas . To determine
if a program is available for this HP product in your area, please refer to our recycling Web site at
http://www.hp.com/go/recycle or contact your nearest HP sales office.
Roller drive unit
The roller drive unit is inside the booklet mode outlet. Do not put your hand into it when removing the
folded or stapled and folded sheet, or you may be injured.
To avoid inj ury when stapling lar ge siz e cop ie s , do not put your hand into the open paper exit outlet.
ENWW Regulations 17
Page 28

18 Safety information ENWW
Page 29

3MFP configuration
External MFP . . . . . . . . . . . . . . . . . . . . . . . . . . . . . . . . . . . . . . . . . . . . . . . . . . . . .20
External MFP callouts . . . . . . . . . . . . . . . . . . . . . . . . . . . . . . . . . . . . . . . . . . .20
Internal MFP . . . . . . . . . . . . . . . . . . . . . . . . . . . . . . . . . . . . . . . . . . . . . . . . . . . . . . 22
Internal MFP callouts. . . . . . . . . . . . . . . . . . . . . . . . . . . . . . . . . . . . . . . . . . . .22
Optional equipment . . . . . . . . . . . . . . . . . . . . . . . . . . . . . . . . . . . . . . . . . . . . . . . .23
Optional equipment details . . . . . . . . . . . . . . . . . . . . . . . . . . . . . . . . . . . . . . . . . . .24
Site requirements . . . . . . . . . . . . . . . . . . . . . . . . . . . . . . . . . . . . . . . . . . . . . . . . . .28
MFP Weight. . . . . . . . . . . . . . . . . . . . . . . . . . . . . . . . . . . . . . . . . . . . . . . . . . .29
Control panel layout . . . . . . . . . . . . . . . . . . . . . . . . . . . . . . . . . . . . . . . . . . . . . . . .30
Touchscreen . . . . . . . . . . . . . . . . . . . . . . . . . . . . . . . . . . . . . . . . . . . . . . . . . .31
Main screen. . . . . . . . . . . . . . . . . . . . . . . . . . . . . . . . . . . . . . . . . . . . . . . . . . .32
ENWW 19
Page 30
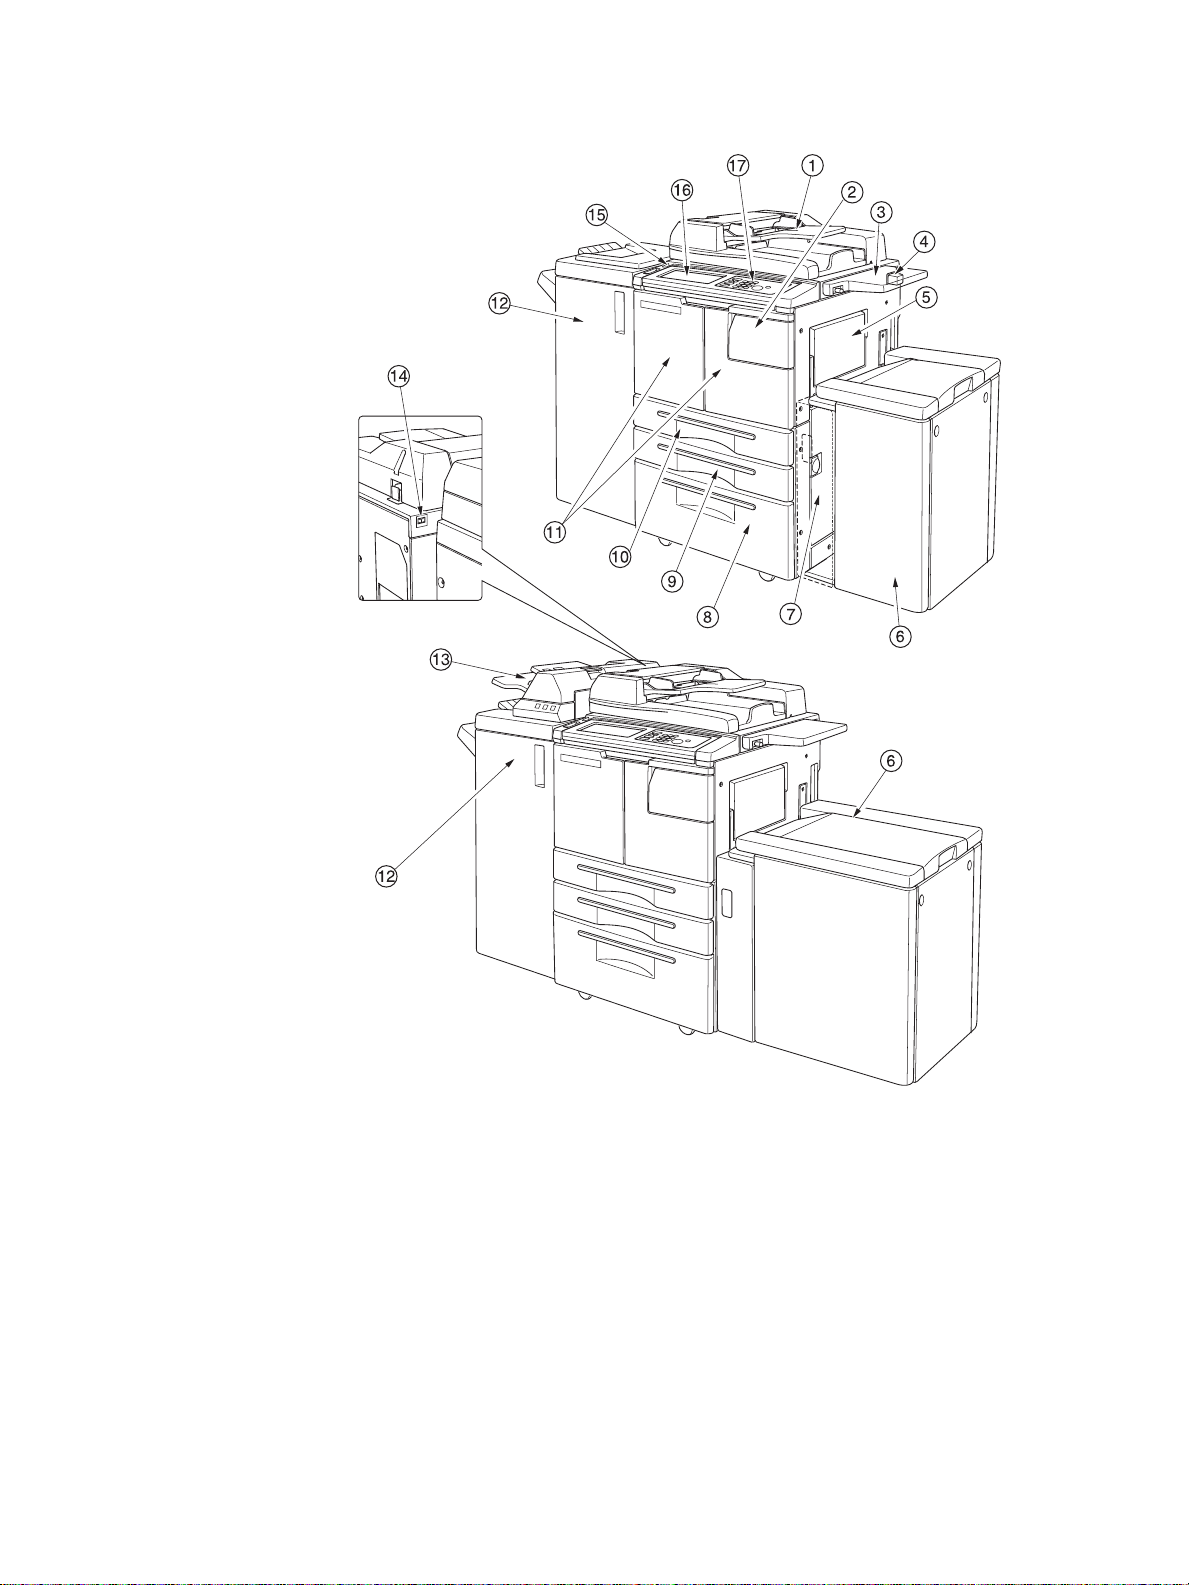
External MFP
External MFP callouts
1 Automatic document feeder (ADF) automatically feeds multiple originals one at a time to the ADF
glass for copying.
2 Toner access door opens to replenish the toner.
3Shelf provides a convenient workspace for documents both before and after copying.
4 Foreign Interface Harness (FIH) attachment allows optional third-party devices.
5Tray 1 used for small quantity copying onto plain paper or special paper.
6 High Capacity input (HCI) tray Q3637A/Q3638A (optional) holds 4,000 sheets.
Q3637A High capacity input tray (optional) (Letter/A4) (top illustration), or
Q3638A High capacity input tray (optional) (Ledger/A3) (bottom illustration)
7 Right side door opens to allow removal of paper jams.
20 MFP configuration ENWW
Page 31

8Tray 4 (universal tray) is user-adjustable and holds 1,500 sheets of paper.
9Tray 3 (universal tray) is user-adjustable and holds 500 sheets of paper.
10 Tray 2 (universal tray) is user-adjustable and holds 500 sheets of paper.
Note Trays 2, 3, 4, and 5 are available for loading wide types of the regular sizes specified above.
11 Front door opens to the internal MFP to allow clearing of paper jam.
12 Finisher (optional) sorts, staple-sorts, and groups into finished sets.
With a Punch Kit (optional) installed, 2-hole, 3-hole, or 4-hole punches can be made in the output
sheets. Q3634A folds or staples and folds sheets into booklet-styled sets, and also folds in tri-fold
mode.
13 Post inserter (optional) inserts cover sheet paper and allows manual finishing.
14 Primary power switch turns MFP power on or off when pressed.
15 Secondary power switch turns MFP power on or off to operate it as a copier, scanner, server, or
printer.
16 Touchscreen displays interactive operation screens.
17 Control panel controls MFP operations.
ENWW External MFP 21
Page 32

Internal MFP
Internal MFP callouts
1 Toner bottle holds toner supply.
2 Toner bottle handle can be pulled forward to withdraw the toner bottle holder when replacing the
toner bottle.
3 ADU passes the paper through the drum unit and fuses the toner onto the copy paper. It may be
withdrawn for removal of paper jams.
4 ADU Lever A can be moved to withdraw the ADU for removal of paper jams.
5 Drum unit forms the image.
6 Fuser fuses the toner onto the paper.
7 Counter indicates the total number of copies and prints made.
22 MFP configuration ENWW
Page 33

Optional equipment
Punch Kits:
Q3689A 2-hole
Q3691A 4-hole Swedish
Q3635A 3-hole
Q3690A 4-hole
Q3636A Post inserter
Q3639A Print controller
Q3642A Copy controller hard disk drive
Q3633A Stapler/
stacker
FIH
Q3637A High capacity
input tray
Q3634A Multi-function finisher Q3638A High capacity input tray
ENWW Optional equipment 23
Page 34

Optional equipment details
Q3633A Stapler/stacker
Q3634A Multi-function
finisher
1 Finisher door opens to the internal finisher to allow paper jams to be cleared, staples to be
replenished, and the punch waste box to be emptied.
2 Booklet mode outlet (Q3634A Multi-function finisher only) ejects finished copied sets when
selecting folding mode, stapling and folding mode, or tri-fold mode.
3 Booklet tray (Q3634A Multi-function finisher only) holds sets ejected in folding mode, stapling and
folding mode, or tri-fold mode.
4Primary tray holds sets ejected in non-sort mode, sort mode (offset), staple-sort mode, or group
mode (offset).
5 Secondary tray holds sets ejected in non-sort mode or group mode with face down/up mode.
24 MFP configuration ENWW
Page 35

Q3633A Stapler/stacker
Q3634A Multi-function
finisher
1 Entrance lever opens downward to remove paper jams.
2Punch kit (optional) creates 2-hole, 4-hole Swedish, 3-hole, or 4-hole punches in the output copies.
3 Post inserter conveyance lever opens to remove paper jams.
4 Paper exi t tray conveyance lever opens to remove paper jams.
5 Stacker conveyance lever opens to remove paper jams.
6 Lower lever opens to remove paper jams.
7 Stacker unit knob (multi-functional finisher only) can be turned to ease removal of paper jam from
the stacker unit.
8 Stacker unit stacks and staples jobs. Also used for folding in the Q3634A multi-function finisher.
9 Punch waste box holds punched out waste paper.
10 Cartridge housing holds the staple cartridge and is to be replaced when supplying staples.
11 Stacker unit handle withdraws the stacker to allow removal of paper jams and replacement of
staple cartridges.
ENWW Optional equipment 25
Page 36

1 Control panel controls post inserter operations.
2 Release lever can be moved to slide the upper position of the post inserter for removal of paper
jams.
3 Upper tray guide plates hold sheets to fix the position.
4Upper tray holds sheets for use in cover sheet finisher mode.
5Lower tray holds sheets for use in cover sheet finisher mode or a copied set in manual
stapling/punching/tri-fold mode.
6 Lower tray guide plates hold sheets to fix the position.
26 MFP configuration ENWW
Page 37

Q3637A High capacity
input tray
Q3638A High capacity
input tray
1 High capacity input tray top cover opens to allow paper loading.
2 High capacity input door tray opens to allow removal of paper jams.
3 High capacity input tray jam access lever can be moved downward to ease removal of paper
jams.
4 High capacity input tray paper guides hold paper to fix the position.
5 Paper loading button is touched to lower the bottom plate to allow loading paper.
6 High capacity input tray bottom plate goes up automatically when paper supply becomes low,
and goes down when the paper loading button is touched.
7 Rear stopper fixes the rear end of paper.
ENWW Optional equipment 27
Page 38

Site requirements
hp 9055mfp/9065mfp + 100-sheet output tray
63.8
(1620)
44.9
(1140)
3.9
(100)
39.0
(990)
29.2
(741)
(656)
25.8
16.1
(410)
79.5
(2021)
25.6
(650)
16.9
(430)
3.9
(100)
63.8
(1620)
37.4
(950)
hp 9055mfp/9065mfp + Q3633A finisher + Q3637A HCI tray input tray
63.8
(1620)
44.9
(1140)
39.0
(990)
3.9
(100)
13.0
(331)
29.2
(741)
25.8
(656)
16.1
(410)
25.6
(650)
26.4
(670)
3.9
(100)
63.8
(1620)
Unit: inches (mm)
30.2
(766)
72.3
(1836)
Unit: inches (mm)
37.4
(950)
4.7
(120)
30.2
(766)
See “Note”
4.7
(120)
89.0
(2261)
72.3
(1836)
hp 9055mfp/9065mfp + Q3634A finisher + Q3636A post inserter + Q3638A HCI input tray
Note The paper exit face do wn tray of the Q3633A Stapler/Sta cker and Q 3634A Multi-functi on finisher gr adually
goes down while jobs are being output. Do not allow any object to interfere with the operation of the tray
on the left side of the finisher, or the finisher can be damaged.
28 MFP configuration ENWW
Page 39

MFP Weight
418.5 lb (190 kg)
+29 lb (13 kg) w/ADF
+121 lb (55 kg) w/Q3633A Stapler/Stacker
+143 lb (65 kg) w/Q3634A Multi-function finisher
+23 lb (10.5 kg) w/Q3636A Post inserter
+4.4 lb (2 kg) w/Q3635A Punch kit
+66 lb (30 kg) w/HCI (Q3637A)
+93 lb (42 kg) w/HCI (Q3638A)
ENWW Optional equipment 29
Page 40

Control panel layout
1 Power switch turns MFP power on or off when pressed.
2 Touchscreen displays status, help information, interactive screens, and touch keys for selecting all
functions.
3 CHECK displays a screen showing all settings that are selected for the current job.
4 Mode switches the MFP operation mode to copy, send/store, or print.
5HELP displays a screen with help for the currently selected function, or accesses the key operator
mode.
6Keypad enters numeric values.
7PROOF COPY outputs a single set to confirm whether the current settings are selected properly.
8 INTERRUPT stops current progress to allow copying from the scanner glass.
9STOP stops the current sequence; deletes the stored memory.
10 Timer lights when the timer function is set.
11 SLEEP ON/OFF activates power-sa v ing mo de for times when the MFP is inactive or activates timer
interrupt mode when weekly timer function is active.
12 START activates copying or scanning.
13 CLEAR QTY. allows resetting of print quantity.
14 P displays the counter screen or a c cesses programming modes for setting special functions.
15 JOB MEMORY displays screens for selecting job store/job reca ll functions.
16 RESET resto res MFP to automatic mode settings or to key operator settings.
30 MFP configuration ENWW
Page 41

Touchscreen
The touchscreen is a touch-sensitive LCD that displays interactive screens with touch keys for selecting
copy job opti ons. Selections are highlighte d whe n to uc hed . The screens also work with the conventional
control panel butto ns.
CAUTION The touchscreen is c ov ered w ith glass . Do not d rop hea vy it ems on the gl ass or put e xcess weight or p ressu re
on it, or the glass can break or become scratched.
After the secondary power switch is turned on, the HPlogo displays for approximately 10 seconds until
initial MFP settings are established.Then the warm-up screen displays for 5-6 minutes, until the fuser
reaches working temperature.
When the main screen is displayed, the touchscreen becomes interactive. The interactive condition
enables you to communicate with the MFP system by touching keys displayed on the screen. The
screen automatically displays the status of the MFP. Additional help is available any time. The HELP
button can be pressed from any screen, except the Job Memory or Key Operator mode screens.
ENWW Optional equipment 31
Page 42

Main screen
The main screen displays after the MFP has warmed-up and the initial settings are loaded. Except for
quantity of copies, all initial settings can be changed only by the key operator.
These modes can be accessed from the main screen: FINISHER, DUPLEX, CONTRAST, SCALE, PAPER,
and ADVANCED.
1 Folde r keys
2 Notice icons
3 Message area
4 ORIGINAL COUNT
5 Master/Sub/HDD/Rotation Original direction icons
6 PAPER TYPE/SIZE key
7 COUNT/SET indicator
8 Memory indicator
9 STATUS key
10 ORIGINALS
11 OUTPUT key
12 ROTATION OFF key
13 STORE key
14 Paper size area
15 Lens mode area
16 Copy density area
17 Copy mode area
18 Output mode keys
19 Output icon area
32 MFP configuration ENWW
Page 43

Initial settings
Initial settings represent the initial condition when power is turned on, when the copy monitor password
is set, or when Reset mode is restored manually or automatically.
● print quantity: 1
● finisher: non-sort on primary exit tray
● duplex: 1`1
● contrast: auto
● scale: 1:1
● paper select: auto
Reset mode
The reset function can be set for off, or between 30 seconds and 5 minutes, at 30 second intervals, by
the key operator. Initially, the mode is set to 1 minute of MFP inactivity. The RESET button function also
re-displays the main screen, unless these settings are changed by the key operator. See “System initial
setting 1” on page168.
Automatic paper select
When AUTO in the PAPER column on the touchscreen is highlighted, the appropriate paper size is
automatically selected. When copyi ng from the scanner glass or automa t ic d oc ument feeder , a uto paper
select detects standard sizes. For key operator settings of auto paper select, see “Tray auto select
setting 11” on page 180.
Automatic scale
An appropriate scale ratio is automatically selected based on the relationship of paper size to chosen
original size.
Automatic contrast
When AUTO in the CONTRAST column on the to uch sc ree n i s h igh li ghte d, the appropriate contrast level is
automatically selected to match the contrast of the original. Manual contrast adjustments override auto
contrast.
Automatic tray switching
If the selected paper tray becomes empty during printing, automatic tray switching detects if the same
paper size is loaded in another tray and will allow the job to continue printing without interruption (if set
by the key operator). Tray 1 is not included in tray switching.
Lead edge delete
When using the ADF, a few millimeters on the lead edge of an image will be deleted to control copy
quality and copy reliability. This can be deactivated by the key operator. See “Paper type / special size
set 6” on page 175.
Service settings
The following functions can be changed by your authorized HP service representative.
Finisher paper capacity
In the defaul t condi tion, th is prod uct produc es unl imite d sets . If req uired, y o ur service represe ntative can
set the MFP to stop accepting output when a specified number is reached.
Stapled sheet capacity
Stapled sheet is changeable, and may be set to 50, 45, 40, or 35 by your service representative.
ENWW Optional equipment 33
Page 44

34 MFP configuration ENWW
Page 45

4Paper information
Paper size conversion chart . . . . . . . . . . . . . . . . . . . . . . . . . . . . . . . . . . . . . . . . . .36
Positioning originals on the scanner glass . . . . . . . . . . . . . . . . . . . . . . . . . . . . . . .36
Specifications. . . . . . . . . . . . . . . . . . . . . . . . . . . . . . . . . . . . . . . . . . . . . . . . . . 37
Using the automatic document feeder (ADF) . . . . . . . . . . . . . . . . . . . . . . . . . . . .37
Specifications in 1`1, 1`2, 2`2, 2`1 copying. . . . . . . . . . . . . . . . . . . . . . . . . .37
Using mixed original mode* . . . . . . . . . . . . . . . . . . . . . . . . . . . . . . . . . . . . . . . . . .37
Unsuitable ADF originals. . . . . . . . . . . . . . . . . . . . . . . . . . . . . . . . . . . . . . . . .38
Positioning originals . . . . . . . . . . . . . . . . . . . . . . . . . . . . . . . . . . . . . . . . . . . .38
Positioning mixed originals . . . . . . . . . . . . . . . . . . . . . . . . . . . . . . . . . . . . . . .38
Paper in MFP trays . . . . . . . . . . . . . . . . . . . . . . . . . . . . . . . . . . . . . . . . . . . . . . . .39
Paper in Q3637A high capacity input (optional) . . . . . . . . . . . . . . . . . . . . . . . . . . . 40
Paper in Q3638A high capacity input (optional) . . . . . . . . . . . . . . . . . . . . . . . . . . . 40
Paper in automatic duplex unit . . . . . . . . . . . . . . . . . . . . . . . . . . . . . . . . . . . . . . . .41
Paper in Tray 1 . . . . . . . . . . . . . . . . . . . . . . . . . . . . . . . . . . . . . . . . . . . . . . . . . . . . 41
Paper in Q3633A stapler/stacker and Q3634A multi-function finisher (optional) . 41
Q3633A stapler/stacker and Q3634A multi-function finisher
primary (main) tray . . . . . . . . . . . . . . . . . . . . . . . . . . . . . . . . . . . . . . . . . .42
Q3633A stapler/stacker and Q3634A multi-function finisher secondary tray. .42
Q3634A multi-function finisher booklet tray. . . . . . . . . . . . . . . . . . . . . . . . . . .43
Paper in Q3636A post inserter (optional) . . . . . . . . . . . . . . . . . . . . . . . . . . . . . . . .44
Paper in punch kits . . . . . . . . . . . . . . . . . . . . . . . . . . . . . . . . . . . . . . . . . . . . . . . . . 44
Paper in Q3689A punch kit (optional) . . . . . . . . . . . . . . . . . . . . . . . . . . . . . . . 44
Paper in Q3635A punch kit (optional) . . . . . . . . . . . . . . . . . . . . . . . . . . . . . . . 45
Paper in Q3690A punch kit (optional) . . . . . . . . . . . . . . . . . . . . . . . . . . . . . . . 45
Paper in Q3691A punch kit (optional) . . . . . . . . . . . . . . . . . . . . . . . . . . . . . . . 45
Paper weight compatibility chart . . . . . . . . . . . . . . . . . . . . . . . . . . . . . . . . . . . . . .47
ENWW 35
Page 46

Paper size conversion chart
The following table provides dimensions for the paper sizes referenced in this guide.
Size English (inches) Metric (millimeters)
A3 11.69 by 16.54 297 by 420
A4 8.27 by 11.70 210 by 297
A4-R 11.70 by 8.27 297 by 210
A5 5.83 by 8.27 148 by 210
A5-R 8.27 by 5.83 210 by 148
A6-R 148.5 by 105 5.85 by 4.14
B4 * 10.12 by 14.33 257 by 364
B4-R * 14.33 by 10.12 364 by 257
B5 * 7.17 by 10.12 182 by 257
B5-R * 10.12 by 7.17 257 by 182
B6-R * 5.02 by 7.17 128 by 182
Exec (JIS) 8.5 by 13 215.9 by 330
Executive 7.25 by 10.50 184.2 by 266.7
5.5 by 8.5 (see note below) 5.5 by 8.5 140 by 216
5.5 by 8.5R+ (see note be low) 5.5 by 8.5 216 by 140
Letter 8.5 by 11 215.9 by 279.4
Letter-R 11.0 by 8.5 279.4 by 215.9
Legal 8.5 by 14 215.9 by 355.6
Ledger/Tabloid 11.0 by 17.0 279.4 by 431.8
* B sizes are JIS
Note Due to localization considerations, 5.5 by 8.5 is also known as “statement” in the drivers.
Positioning originals on the scanner glass
Use the scanner glass when originals are not suitable for use with the document feeder. For example,
when size is incompatible, or when originals are folded, stapled, torn, or in generally poor condition.
1 Raise the document cover.
2 Place original face down in the left rear corner, aligning the edge with the left and rear alignment
guides.
36 Paper information ENWW
Page 47

3 Gently close the document cover to prevent the original from shifting on the glass.
Note When the selected print quantity exceeds the maximum capacity, remove the printed sheets while paper
is exiting to avoid jams.
To eliminate black copy marks on edges when copying from a book without selecting book copy mode,
touch Frame/fold erasure or Erase non-image area in output mode.
Specifications
● maximum original size: Ledger/A3 (sheet or book)
● maximum book weight/thickness: 6.8kg (15 lb)/30 mm (1.2")
● original placement: face down in left rear corner
Using the automatic document feeder (ADF)
Specifications in 1`1, 1`2, 2`2, 2`1 copying
● original size:automatically detects standard sizes
● original weight: 13lb - 34 lb
● maximum feeder capacity: 100 original sheets (20 lb bond paper)
● maximum original exit tray capacity: 100 original sheets (20 lb bond paper)
● original placement: face up; orientation same as paper in tray
● curling tolerance: 10 mm or less
Using mixed original mode*
● original size: Ledger, Legal, Letter, Letter-R, 5.5 by 8.5-R+ mixed
(5.5 by 8.5 original is available in portrait type feeding only)
● mixed feeder capacity: 100 original sheets (20 lb bond paper)
*See “Mixed original” on page 94 for details of the mixed original mode.
ENWW Using the automatic document feeder (ADF) 37
Page 48

Unsuitable ADF originals
1 Curled, creased, or folded originals
2 Paste-ups or cut-outs
3 Books
4 Glossy or transparent (OHP) film, art paper, cellophane
5 Folded, punched, or stapled originals
6 Thin or thick originals
Positioning originals
The ADF automatically feeds up to 100 originals directly to the ADF glass, starting with the top sheet.
The ADF should only be used for unstapled, unfolded, smooth, flat originals.
● Original size detection requires accurate paper guide adjustment.
● Auto paper select detects standard sizes.
● Size, weight, and capacity are specified for all copy modes on the following pages.
Before placing originals in the tray, be sure the document feeder is closed fully.
1 Position original(s) face up on the document feeder tray.
Place 2-sided originals with page 1 face up.
2 Adjust paper guides.
Positioning mixed originals
Mixed size originals can be copied together from the ADF in either auto paper select mode or a uto sc ale
mode. In auto paper select mode, copies will be output on mixed paper sizes to match the originals. In
auto scale mode, copies will be output on 1 common paper size that you select in which case an
appropriate auto scale ratio is selected automatically. To use the mixed original mode, see “Mixed
original” on page 94.
● mixed original size: Ledger, Legal, Letter, Letter-R, 5.5 by 8.5R+, and 5.5 by 8.5 mixed (5.5 by 8.5
original is available in portrait type feeding only) (13 lb - 34 lb)
● automatic document feeder capacity: maximum 100 sheets (20 lb bond paper)
● copy quantity: maximum 9,999 sheets
● incompatible ba si c cop yi ng conditions: rotation exit, staple-sort with auto paper sel ec t, fo ld, stapling
and folding in auto paper select, tri-fold
● Incompatible special originals: custom size, z-folded original, tab paper
● incompatible output: sheet/cover insertion, chapter, combination, booklet, OHT interleave, image
insert, book copy, pro gram jo b, erase non-imag e area, re peat, au to layo ut, ove rlay, s toring i mage i n
overlay memory
38 Paper information ENWW
Page 49

Before using the mixed original mode, be sure the document feeder is closed completely.
1 Arrange originals in order, and place them as described below:
a Place ledger/legal originals face up or side 1 up in the document feeder, in landscape
b Position letter size in either portrait or landscape orientation.
c Position 5.5 by 8.5 size in portrait orientation only.
2 Position mixed originals face up, aligned with the left rear side of the ADF tray.
3 Adjust paper guides to fit largest original.
Paper in MFP trays
Paper size Standard paper sizes Ledger, Exec (JIS), Legal, Letter, Letter-R, 5.5 by 8.5, A3,
Paper size equivalents Exec (JIS) 203 mm by 330 mm (8.5" by 13”)
Paper weight General tray 16 - 24 lb
Paper capacity Tray 2 and 3 500 sheets 20 lb/user-adjustable to any standard/wide
orientation (in other words, with the short edge feeding).
B4,A4, A4-R, B5 , B5 - R
Standard size (spec.) Specify A4-R instead of Letter-R; specify A5 instead of
Custom size Input the measures of paper between minimum
Wide paper Ledger+, Letter+, Letter-R+, 5.5 by 8.5+, A3+, B4+, A4+,
A3 297 mm by 420 mm (11.7" by 16.5")
B4 257 mm by 364 mm (10.1" by 14.3")
A4 210 mm by 297 mm (8.3" by 11.7")
B5 182 mm by 257 mm (7.2" by 10.1")
A5 148 mm by 210 mm (5.9" by 8.3")
Tray specified in thick 200 g/m
Tray specified in thin 13 lb - 15 lb (1`1 or 2`1 mode only)
Tray specified in tab
paper
Tray 4 1,500 sheets 20 lb/ user-adjustable to any standard/wide
Total capacity 2,600 sheets, including 100-sheet Tray 1
5.5 by 8.5
210 mm by 140 mm and maximum 314 mm by 459 mm
A4-R+, B5+, A5 +
2
thick paper (25 lb - 110 lb)
25 lb - 45 lb (1`1 or 2`1 mode only)
size from Ledger+, 5.5 by 8.5-R
size from Ledger+, 5.5 by 8.5-R
Note A5 paper is available in portrait orientation loading only.
Legal-W paper is not available.
Standard size (spe c.)/custom siz e/wide pap er setting f or each tr ay can b e made in the key o perator mode .
See “Paper type / special size set 6” on page 175.
Paper type setting for each tray can be made in the Key Operator mode. See “Paper type / special size
set 6” on page 175.
Reliability and cop y qual ity are not gu aranteed f or all s pecial pape rs. Use on ly paper that is recommende d
by HP.
ENWW Paper in MFP trays 39
Page 50

Regionalization switch settings
Depending upon your engine’s regionalization switch settings, the paper sizes Executive and
Executive-R, or 8K, 16K, and 16K-R are available. Executive and Executive-R are found in U.S. models,
while 8K, 16K, and 16K-R are enabled in the Taiwanese models.
Paper in Q3637A high capacity input (optional)
Paper size Standard size Letter, A4 (service-adjustable), B5,
Standard size (spec.) Cannot be specified
Custom size Input the measures of paper between minimum
Wide paper Letter, A4+ (service-adjustable), B5+
Paper weight Standard weight 16lb-24 lb
HCI specified in thick 200 g/m
HCI specified in thin 13 lb - 15 lb (1`1 or 2`1 mode only)
HCI specified in tab paper 25 lb - 45 lb (1`1 or 2`1 mode only)
Paper capacity 4,000 sheets 20 lb/ fixed to standard/wide size LETTER+ or A4+
6,600 sheets Including 3 MFP trays and 100-sheet Tray 1
16K (TW), and Executive (U.S.) (see “Regionalization
switch settings” on page 40
257 mm by 182 mm and maximum 314 mm by 223 mm
2
thick paper (25 lb - 110 lb)
Note Paper type setting for HCI can be made in the key operator mode. See “Paper type / special size set 6”
on page 175.
Paper in Q3638A high capacity input (optional)
Paper size Standard size Ledger, Exec (JIS), Legal, Letter, Letter-R+, A3, B4, A4,
A4-R (service-adjustable),
8K and 16K (TW) (see “Regionalization switch settings”
on page 40)
Standard size (spec.) Cannot be specified
Custom size Input the measures of paper between minimum
Wide paper Wide paper: Ledger, Letter+, Letter-R+, A3+, B4+, A4+,
Paper weight Standard weight 16lb-24 lb
HCI specified in thick 200 g/m
HCI specified in thin 13 lb - 15 lb (1`1 or 2`1 mode only)
HCI specified in tab paper 25 lb - 45 lb (1`1 or 2`1 mode only)
Paper capacity 4,000 sheets 20 lb/fixed to standard/wide size
6,600 sheets Including 3 MFP trays and 100-sheet Tray 1
210 mm by 195 mm and maximum 314 mm by 459 mm
A4-R+ (service-adjustable)
2
thick paper (25 lb - 110 lb)
Note Paper type setting for HCI can be made in the key operator mode. See “Paper type / special size set 6”
on page 175.
Reliability and copy quality are not guaranteed f or a ll specia l pa per. Use only paper that is recom mend ed
by HP.
40 Paper information ENWW
Page 51

Paper in automatic duplex unit
Paper i n Tray 1
Paper size Standard size A3, B4, A4, A4-R, B5, B5-R, A5, Ledger, Legal, Letter,
Standard size (spec.) N/A
Wide paper Ledger+, Letter+, Letter-R+, A3+, B4+, A4+, A4-R+, B5+,
Paper weight Standard weight 200g/m
Paper size Standard size Ledger, Legal, Letter, Letter-R, 5.5 by 8.5, 5.5 by 8.5-R,
Standard size (spec.) Exec (JIS), A4-R, A5, A5-R, B6-R
Custom size Input the measures of paper between minimum
Wide paper Ledger+, Letter+, 8.5 by 11R+, 5.5 by 8.5+,
Paper weight General mode 16 lb - 24 lb
Thick mode 25 lb - 110 lb (200 g/m
Thin mode 13 lb - 15 lb
Tab paper mode 25 lb - 45 lb
Miscellaneous OHT transparencies, rag content can be loaded
Paper capacity 100 sheets 20 lb stacked: single feed special stock
Letter-R, 5.5 by 8.5, Exec (JIS),
8K, 16K, 16K-R (TW) and Executive, Executive-R (U.S.)
(see “Regionalization switch settings” on page 40
B5-R+, A5+, 5.5by8.5+
2
thick paper (16 lb - 110 lb)
A3, B4, A4, B5, B5-R, A6-R
8K, 16K, 16K-R (TW), and Executive, Executive-R (U.S)
(see “Regionalization switch settings” on page 40)
100 mm by 148 mm and maximum 314 mm by 459 mm
5.5 by 8.5-R+, A3+, B4+, A4+, A4-R+, B5+, B5-R+, A5+,
A5+R
2
thick paper)
Note Reliability and copy quality are not guaranteed f or a ll specia l pa per. Use only paper that is recom mend ed
by HP.
Paper in Q3633A stapler/stacker and Q3634A multi-function finisher
(optional)
The optional finisher acessories accept Ledger, Legal, and 8.5 by 11R+ standard/wide paper sizes
(5.5 by 8.5-R/W in non-sort, sort or group mode).
ENWW Paper in automatic duplex unit 41
Page 52

Q3633A stapler/stacker and Q3634A multi-function finisher primary (main) tray
Note Q3633A Stapler/Stacker and Q3634A Multi-function finisher (capacities at 20lb, unless otherwise
indicated)
Non-sort/sort/group 500 sheets A3, B4, A4, A4-R, B5, B5-R, A5, A5-R, B6-R, A6-R, PC,
2,500 sheet,
3,000 sheet bin
Staple-sort mode 1,000 sheets Ledger/Ledger-W, Legal, Letter/Letter-W,
Ledger/Ledger-W (A3/A3+) Legal, Letter/Letter+, 8.5 by 11R+/8.5 by 11R+
Number of copies 2 staples 1 staple 2 staples 1 staple
2 - 9 50 sets 50 sets 100 sets 100 sets
10 - 20 50 50 50 50
21 - 30 30 30 30 30
31 - 40 25 25 25 25
41 - 50 20 20 20 20
Your service representative can set the MFP to stop copying when the number of sets reaches the above capacity.
Ledger, Legal, Letter, Letter-R, 5.5 by 8.5, 5.5 by 8.5-R,
Exec (JIS)
A3+, B4+, A4+, A4-R+, B5+, B5-R+, A5+, A5-R+,
Ledger+, Letter+, Letter-R+, 5.5 by 8.5+, 5.5 by 8.5-R+,
custom
8K, 16K, 16K-R (TW), Executive and Executive-R (U.S.)
(see “Regionalization switch settings” on page 40)
A3, B4, A4, A4-R, B5, B5-R, A5, A5-R, B6-R, A6-R, PC,
Ledger, Legal, Letter, Letter-R, 5.5 by 8.5, 5.5 by 8.5-R,
Exec (JIS)
A3+, B4+, A4+, A4-R+, B5+, B5-R+, A5+, A5-R+,
Ledger+, Letter+, Letter-R+, 5.5 by 8.5+, 5.5 by 8.5-R+,
8K, 16K, 16K-R (TW), Executive and ExecutiveR (U.S.)
(see “Regionalization switch settings” on page 40)
Letter-R/Letter-WR, variable according to the number of
pages to be stapled. See the following table.
(B4/B4R,
A4/A4+, A4R/A4-R+, B5/B5+, A5/A5+
)
Q3633A stapler/stacker and Q3634A multi-function finisher secondary tray
Note Q3633A Stapler/Stacker and Q3634A Multi-function finisher (capacities at 20lb, unless otherwise
indicated)
200 sheets; maximum 314 mm by 459 mm (12.36" by 18.08"), minimum 100 mm by 148 mm
(3.94" by 5.83").
CAUTION When the finisher capac ity is exceeded due to the quantity selected, remo ve the completed sets whil e the paper
is exiting; otherwise paper jams may occur.
42 Paper information ENWW
Page 53

Q3634A multi-function finisher booklet tray
Folding mode Standard paper size Ledger, Legal, Letter-R, A3, B4, A4R,
8K (TW) (see “Regionalization switch settings” on
page 40)
Wide paper size Ledger+, Letter-R+, A3+, B4+, A4-R+
2
Paper weight 16 lb - 110 lb (200 g/m
Number of folded sheets 3 sheets maximum
Booklet tray capacity Approximately 100 sheets maximum
(Ledger, Legal, A3, B4)
33 sets maximum of 3-sheet-folded booklet
(33 x 3 = 99 sheets)
50 sets maximum of 2-sheet-folded booklet
(50 x 2 = 100 sheets)
Approximately 75 sheets maximum (Letter-R, A4R)
25 sets maximum of 3-sheet-folded booklet
(25 x 3 = 75 sheets)
37 sets maximum of 2-sheet-folded booklet
(37 x 2 = 74 sheets)
stapling and folding
mode
Tri-fold mode Pa per size Letter-R, A4-R
Standard paper size Ledger, Legal, Letter-R, A3, B4, A4R,
Wide paper size Ledger+, Letter-R+, A3+, B4+, A4-R+
Paper weight 200 g/m
Number of folded sheets 20 sheets maximum (using 20 lb paper only)
Booklet tray capacity Approximately 100 sheets max. (Ledger, Legal, A3, B4)
Paper weight 20 lb
Number of folded sheets 3 sheets maximum
Booklet tray capacity Approximately 50 sheets maximum (when tri-folded)
8K (TW) (see “Regionalization switch settings” on
page 40)
2
thick paper (16 lb - 110 lb)
19 sheets maximum (a thick cover paper included)
20 sets maximum of 5-sheet-folded booklet
(20 x 5 = 100 sheets)
10 sets maximum of 10-sheet-folded booklet
(10 x 10 = 100 sheets)
5 sets maximum of 20-sheet-folded booklet
(5 x 20 = 100 sheets)
Approximately 75 sheets maximum (Letter-R, A4R)
15 sets maximum of 5-sheet-folded booklet
(15 x 5 = 75 sheets)
7 sets maximum of 10-sheet-folded booklet
(7 x 10 = 70 sheets)
3 sets maximum of 20-sheet-folded booklet
(3 x 20 = 60 sheets)
thick paper)
WARNING! Inside the booklet mode outlet is the roller drive unit. DO NOT put your hand into the roller drive unit
when removing folded or stapled and folded sheets; otherwise you may be injured.
ENWW Paper in Q3633A stapler/stacker and Q3634A multi-function finisher (optional) 43
Page 54

Paper in Q3636A post inserter (optional)
Note 5.5 by 8.5R+ and A5+ paper is available in portrait orientation feeding only.
Paper size Upper tray A4, A4-R, Letter, Letter-R, B5 , B5-R, A5, 5.5 by 8.5,
Lower tray A3, B4, A4, A4-R, B5, B5-R, Letter, Letter-R, A5,
Paper weight Standard 200 g/m
Manual stapling 200 g/m
Manual punchi ng 13 lb - 45 lb
Manual stapling and
folding
Manual tri-fold 200 g/m
Note Some 45 lb paper types may not be punched easily
Punching special paper (self-adhesive sheets, etcetera) will cause problems with the MFP.
Paper in punch kits
16K, 16K-R (TW), and Executive, Executive-R (U.S. ) (see
“Regionalization switch settings” on page 40)
A4+, A4-R+, B5+, B5-R+, A5+, Letter+, Letter-R+,
5.5 by 8.5+
5.5 by 8.5, Ledger, Legal, Exec (JIS),
8K, 16K, 16K-R (TW) (see “Regionalization switch
settings” on page 40)
A3+, B4+, A4+, A4-R+, B5+, B5-R+, A5+, Ledger+,
Letter+, Letter-R+, 5.5 by 8.5+
2
thick paper (13 - 110 lb)
2
thick paper (13 lb - 110 lb)
2
200 g/m
thick paper (16 lb - 110 lb)
2
thick paper (16 lb - 110 lb)
Paper in Q3689A punch kit (optional)
Paper s i ze See “Punch Table” on page 45
Paper weight 13 - 45 lb
Number of punch holes 2
Hole diameter 8.0 mm ± 0.5 mm (0.315" ± 0.020")
Hole pitch 108 mm ± 0.5 mm (4.253" ± 0.020")
Note Some 45 lb paper types may not be punched easily.
Special paper (OH T film, labels, tab paper) cannot b e punched. Usi ng special paper w ill damage the pun ch
kit.
44 Paper information ENWW
Page 55

Paper in Q3635A punch kit (optional)
Paper s i ze See “Punch Table” on page 45
Paper weight 13 - 45 lb
Number of punch holes 3
Hole diameter 8.0 mm ± 0.5 mm (0.315" ± 0.020")
Hole pitch 108 mm ± 0.5 mm (4.253" ± 0.020")
Note Some 45 lb paper types may not be punched easily.
Special paper (OH T film, labels, tab paper) cannot b e punched. Usi ng special paper w ill damage the pun ch
kit.
Paper in Q3690A punch kit (optional)
Paper s i ze See “Punch Table” on page 45
Paper weight 13 - 45 lb
Number of punch holes 4
Hole diameter 8.0 mm ± 0.5 mm (0.315" ± 0.020")
Hole pitch 108 mm ± 0.5 mm (4.253" ± 0.020")
Note Some 45 lb paper types may not be punched easily.
Special paper (OH T film, labels, tab paper) cannot b e punched. Usi ng special paper w ill damage the pun ch
kit.
Paper in Q3691A punch kit (optional)
Paper s i ze See “Punch Table” on page 45
Paper weight 13 - 45 lb
Number of punch holes 4 (Swedish)
Hole diameter 8.0 mm ± 0.5 mm (0.315" ± 0.020")
Hole pitch 108 mm ± 0.5 mm (4.253" ± 0.020")
Note Some 45 lb paper types may not be punched easily.
Special paper (OH T film, labels, tab paper) cannot b e punched. Usi ng special paper w ill damage the pun ch
kit.
Punch Table
Paper
Size
A6-R
B6-R
2-Hole 3-Hole 4-Hole 4-Hole
Punch: NO
Punch with Staple: NO
Punch: NO
Punch with Staple: NO
Punch: NO
Punch with Staple: NO
Punch: NO
Punch with Staple: NO
Punch: NO
Punch with Staple: NO
Punch: NO
Punch with Staple: NO
(Swedish)
Punch: NO
Punch with Staple: NO
Punch: NO
Punch with Staple: NO
ENWW Paper in punch kits 45
Page 56

Paper
Size
A5-R
A5
B5-R
B5
A4-R
A4
B4-R
A3-R
5.5 by 8.5-R
5.5 by 8.5
Letter-R
Executive
Executive-R
Letter
Legal-R
Exec (JIS) -R
Ledger-R
8K-R
16K
16K-R
A5-R+
A5+
B5-R+
B5+
A4-R+
A4+
B4-R+
A3-R+
5.5 by 8.5-R+
5.5 by 8.5+
Letter-R+
2-Hole 3-Hole 4-Hole 4-Hole
(Swedish)
Punch: YES
Punch with Staple: NO
Punch: YES
Punch with Staple: YES
Punch: YES
Punch with Staple: YES
Punch: YES
Punch with Staple: YES
Punch: YES
Punch with Staple: YES
Punch: YES
Punch with Staple: YES
Punch: YES
Punch with Staple: YES
Punch: YES
Punch with Staple: YES
Punch: YES
Punch with Staple: NO
Punch: YES
Punch with Staple: YES
Punch: YES
Punch with Staple: YES
Punch: YES
Punch with Staple: YES
Punch: YES
Punch with Staple: YES
Punch: YES
Punch with Staple: YES
Punch: YES
Punch with Staple: YES
Punch: YES
Punch with Staple: YES
Punch: YES
Punch with Staple: YES
Punch: YES
Punch with Staple: YES
Punch: YES
Punch with Staple: YES
Punch: YES
Punch with Staple: YES
Punch: NO
Punch with Staple: NO
Punch: NO
Punch with Staple: NO
Punch: NO
Punch with Staple: NO
Punch: NO
Punch with Staple: NO
Punch: NO
Punch with Staple: NO
Punch: NO
Punch with Staple: NO
Punch: NO
Punch with Staple: NO
Punch: NO
Punch with Staple: NO
Punch: NO
Punch with Staple: NO
Punch: NO
Punch with Staple: NO
Punch: NO
Punch with Staple: NO
Punch: NO
Punch with Staple: NO
Punch: NO
Punch with Staple: NO
Punch: NO
Punch with Staple: NO
Punch: YES
Punch with Staple: NO
Punch: NO
Punch with Staple: NO
Punch: YES
Punch with Staple: YES
Punch: YES
Punch with Staple: NO
Punch: YES
Punch with Staple: YES
Punch: NO
Punch with Staple: NO
Punch: NO
Punch with Staple: NO
Punch: NO
Punch with Staple: NO
Punch: YES
Punch with Staple: YES
Punch: NO
Punch with Staple: NO
Punch: YES
Punch with Staple: YES
Punch: NO
Punch with Staple: NO
Punch: NO
Punch with Staple: NO
Punch: YES
Punch with Staple: YES
Punch: YES
Punch with Staple: NO
Punch: YES
Punch with Staple: NO
Punch: NO
Punch with Staple: NO
Punch: NO
Punch with Staple: NO
Punch: NO
Punch with Staple: NO
Punch: NO
Punch with Staple: NO
Punch: NO
Punch with Staple: NO
Punch: NO
Punch with Staple: NO
Punch: NO
Punch with Staple: NO
Punch: NO
Punch with Staple: NO
Punch: NO
Punch with Staple: NO
Punch: NO
Punch with Staple: NO
Punch: NO
Punch with Staple: NO
Punch: NO
Punch with Staple: NO
Punch: NO
Punch with Staple: NO
Punch: NO
Punch with Staple: NO
Punch: NO
Punch with Staple: NO
Punch: YES
Punch with Staple: NO
Punch: NO
Punch with Staple: NO
Punch: YES
Punch with Staple: YES
Punch: YES
Punch with Staple: NO
Punch: YES
Punch with Staple: YES
Punch: NO
Punch with Staple: NO
Punch: NO
Punch with Staple: NO
Punch: NO
Punch with Staple: NO
Punch: YES
Punch with Staple: NO
Punch: NO
Punch with Staple: NO
Punch: YES
Punch with Staple: NO
Punch: NO
Punch with Staple: NO
Punch: NO
Punch with Staple: NO
Punch: YES
Punch with Staple: NO
Punch: YES
Punch with Staple: NO
Punch: YES
Punch with Staple: NO
Punch: NO
Punch with Staple: NO
Punch: NO
Punch with Staple: NO
Punch: NO
Punch with Staple: NO
Punch: NO
Punch with Staple: NO
Punch: NO
Punch with Staple: NO
Punch: NO
Punch with Staple: NO
Punch: NO
Punch with Staple: NO
Punch: NO
Punch with Staple: NO
Punch: NO
Punch with Staple: NO
Punch: NO
Punch with Staple: NO
Punch: NO
Punch with Staple: NO
Punch: NO
Punch with Staple: NO
Punch: NO
Punch with Staple: NO
Punch: NO
Punch with Staple: NO
Punch: NO
Punch with Staple: NO
Punch: YES
Punch with Staple: NO
Punch: NO
Punch with Staple: NO
Punch: YES
Punch with Staple: YES
Punch: YES
Punch with Staple: NO
Punch: YES
Punch with Staple: YES
Punch: NO
Punch with Staple: NO
Punch: NO
Punch with Staple: NO
Punch: NO
Punch with Staple: NO
Punch: YES
Punch with Staple: NO
Punch: NO
Punch with Staple: NO
Punch: YES
Punch with Staple: NO
Punch: NO
Punch with Staple: NO
Punch: NO
Punch with Staple: NO
Punch: YES
Punch with Staple: NO
Punch: YES
Punch with Staple: NO
Punch: YES
Punch with Staple: NO
Punch: NO
Punch with Staple: NO
Punch: NO
Punch with Staple: NO
Punch: NO
Punch with Staple: NO
Punch: NO
Punch with Staple: NO
Punch: NO
Punch with Staple: NO
Punch: NO
Punch with Staple: NO
Punch: NO
Punch with Staple: NO
Punch: NO
Punch with Staple: NO
Punch: NO
Punch with Staple: NO
Punch: NO
Punch with Staple: NO
Punch: NO
Punch with Staple: NO
Punch: NO
Punch with Staple: NO
46 Paper information ENWW
Page 57

Paper
2-Hole 3-Hole 4-Hole 4-Hole
Size
Letter+
Ledger+
Custom size
Punch: NO
Punch with Staple: NO
Punch: NO
Punch with Staple: NO
Punch: NO
Punch with Staple: NO
Paper weight compatibility chart
Automatic document feeder 13 - 34 lb
MFP trays All trays: 16
High capacity input tray 16
Automatic dupl ex unit 200 g/m
Tray 1 200 g/m
Q3633A stapler/stacker and Q3634A
multi-function finisher
Q3636A post inserter 200 g/m
Q3635A punch kit 13
*Some 45 lb paper types may not be punched easily.
Punch: NO
Punch with Staple: NO
Punch: NO
Punch with Staple: NO
Punch: NO
Punch with Staple: NO
- 24 lb
Thick mode: 200 g/m
Thin mode: 13
Tab paper mode: 25
- 15 lb
- 24 lb
Thick mode: 200 g/m
Thin mode: 13
Tab paper mode: 25
200 g/m
- 15 lb
2
thick paper (16 - 110 lb)
2
thick paper (13 - 110 lb)
2
thick paper (13 - 110 lb)
2
thick paper (13 - 110 lb)
- 45 lb*
(Swedish)
Punch: NO
Punch with Staple: NO
Punch: NO
Punch with Staple: NO
Punch: NO
Punch with Staple: NO
2
thick paper (25 - 110 lb)
Punch: NO
Punch with Staple: NO
Punch: NO
Punch with Staple: NO
Punch: NO
Punch with Staple: NO
- 45 lb (1`1 or 2`1 mode only)
2
thick paper (25 - 110 lb)
- 45 lb (1`1 or 2`1 mode only)
Note Reliability and cop y qual ity are not gu aranteed f or all s pecial pape rs. Use on ly paper that is recommende d
by HP.
ENWW Paper weight compatibility chart 47
Page 58

48 Paper information ENWW
Page 59

5MFP management
Power management . . . . . . . . . . . . . . . . . . . . . . . . . . . . . . . . . . . . . . . . . . . . . . . .50
Sleep mode . . . . . . . . . . . . . . . . . . . . . . . . . . . . . . . . . . . . . . . . . . . . . . . . . . .50
Auto low power (Sleep 1) . . . . . . . . . . . . . . . . . . . . . . . . . . . . . . . . . . . . . . . .50
Auto shut off (Sleep 2 ) . . . . . . . . . . . . . . . . . . . . . . . . . . . . . . . . . . . . . . . . . .50
Manual shut off . . . . . . . . . . . . . . . . . . . . . . . . . . . . . . . . . . . . . . . . . . . . . . . .50
Access management . . . . . . . . . . . . . . . . . . . . . . . . . . . . . . . . . . . . . . . . . . . . . . . 51
Usage management . . . . . . . . . . . . . . . . . . . . . . . . . . . . . . . . . . . . . . . . . . . . . . . .52
ENWW 49
Page 60

Power management
Sleep mode
The 2 sleep modes are described below:
● Low power mode enables you to conserve energy by maintaining a lower fuser temperature during
periods of MFP inactivity.
● Shut off mode conserves even more energy by partially turning off the power supply.
Auto low power (Sleep 1)
This function automatically lowers the power after a specified period of MFP inactivity. The auto low
power function can be set to 5 minutes, 10 minutes, 15 minutes, 30 minutes, 60 minutes, 90 minutes,
120 minutes, or 240 minutes. Initially, the mode is set to function after 15 minutes of MFP inactivity. For
the key operator setting, see “Sleep setting 12” on page 180.
Release auto low power
Press any button on the control panel. The auto low power is released and the touchscreen recovers its
usual brightness.
Auto shut off (Sleep 2 )
This function automatically shuts off the main power after a specified period of MFP inactivity. Auto shut
off can be set f or 30 minu tes , 60 mi nute s, 9 0 min utes , 120 m inu tes , or 240 m inut es . Initial ly, auto shut off
is set to function after 90 minutes of MFP inactivity. For the key operator setting, see “Sleep setting 12”
on page 180.
Release auto shut off
Press SLEEP ON/OFF. The MFP will become available after a warm-up period of approximately 5
minutes.
Manual shut off
Press SLEEP ON/OFF for 1 second or longer, then release it. The shut off mode will be activated.
Note The Manual shut off setting can be selected b y the key operator. For the key operator setting, see “Slee p
setting 12” on page 180. When selecting the manual shut off setting, the manual low power setting is
released.
The SLEEP ON/OFF LED will light and all other LEDs and the touchscreen will be turned off.
Note Be sure to press SLEEP ON/OFF for 1 second or longe r, oth erwise the foll owing message will be displa yed
and the shut off mode will not be activated.
Press SLEEP for more than one second, then release it for shut off mode.
Release manual shut off
Press SLEEP ON/OFF. The manual shut off will be released after a warm-up period of approximately 5
minutes, with the SLEEP ON/OFF LED turned off and the touchscreen displayed.
50 MFP management ENWW
Page 61

Access management
Entering a copy monitor password
A copy monitor password is required only when the copy monitor feature is activated, a user passwor d is
assigned, and Enter Copy Monitor password is displayed on the touchscreen.
1 Enter your 8-digit copy monitor password by using the keypad. If the copy monitor password is
invalid, th e MFP will reset to the initial mode. In that ca se, enter the correct password or contact the
key operator.
Note Some countries/regions may use a copy monitor password having less than 8 digits.
2 Press START once to display your current copy count and copy limit for 3 seconds.
Current count / limit 018888/025000
Ready to copy
When your copy count reaches the copy limit, the following message is displayed:
Copy limit reached / 025001/025000
In that case, contact the key operator to reset your copy limit.
3 Make copying selection and enter the quantity, as required.
4 When all settings are acceptable, press START.
Weekly timer function
When an MFP is using the weekly timer functi on, the tim er indicator on the right side of the contro l panel
is lit.
Note When the timer indicator i s lit, the MFP automatically turns off . Do not turn it off by pressing the po wer switch.
Timer interrupt
When the timer indicato r light i s on an d other i ndica tors are o ff , the M FP is un a v ailab l e due to t he w eekly
timer function. However, the MFP will become available if you perform the following procedure.
1 Press SLEEP ON/OFF. The main screen will be displayed along with the messages shown below.
Please wait
MFP is warming up
Timer interrupt mode
Enter password
Note The timer interrupt password is not factory set and must be entered by the key operator. To learn how to
set the password, see “Timer interrupt password setting 5” on page 179.
In the event the timer interrupt password has not been entered by the key operator, the message shown
in Step 3 will display instead.
2 Enter a 4-digit timer interrupt password using the keypad on the control panel.
If an invalid password is entered, enter a valid 4-digit password.
Timer interrupt mode
Enter password ********
3 Press START.
Input copy time
0 hour(s) 05 minute(s)
4 Enter a 1-digit hour (for example, 3 is 3 hours) using the keypad on the control panel (0- 9).
ENWW Power management 51
Page 62

5 Press START.
Input copy time is
3 hour(s) 05 minute(s)
6 Enter 2-digit minutes (for example, 7 minutes is 07) using the keypad on the control panel. (05 - 60).
Input copy time is
3 hour(s) 07 minute(s)
7 Press START. Copying is available until the set duration is up.
8 When your copying operation is completed, press SLEEP ON/OFF for 1 second or longer, then
release it. The MFP returns to the off state and copying is disabled.
Usage management
Counter list
This function allo ws you to view the current indi ca tion of the following items as a list on the touchscreen:
Total counter, Copier counter, Printer counter, Start date. Check the list, then print it
from the counter list screen, if desired.
To display the counter list
1 Press P COUNTER to display the Counter list screen.
2 Touch EXIT to return to the main screen.
To print the counter list
1 Press P COUNTER to display the Counter list screen.
2 Touch Counter menu. The main screen will be displayed.
3 Press START. The counter list will be printed out, and the management list print mode will be
released.
52 MFP management ENWW
Page 63

6Basic operations
The main screen. . . . . . . . . . . . . . . . . . . . . . . . . . . . . . . . . . . . . . . . . . . . . . . . . . .54
Recalling previous job settings . . . . . . . . . . . . . . . . . . . . . . . . . . . . . . . . . . . . . . . .55
Duplex mode . . . . . . . . . . . . . . . . . . . . . . . . . . . . . . . . . . . . . . . . . . . . . . . . . . . . .56
Using Tray 1 . . . . . . . . . . . . . . . . . . . . . . . . . . . . . . . . . . . . . . . . . . . . . . . . . . . . . . 57
Contrast. . . . . . . . . . . . . . . . . . . . . . . . . . . . . . . . . . . . . . . . . . . . . . . . . . . . . . . . . .57
Automatic exposure. . . . . . . . . . . . . . . . . . . . . . . . . . . . . . . . . . . . . . . . . . . . .57
Manual mode (lighter, normal, darker). . . . . . . . . . . . . . . . . . . . . . . . . . . . . . . 58
Density shift. . . . . . . . . . . . . . . . . . . . . . . . . . . . . . . . . . . . . . . . . . . . . . . . . . .58
Lens mode . . . . . . . . . . . . . . . . . . . . . . . . . . . . . . . . . . . . . . . . . . . . . . . . . . . . . . .58
Automatic paper select . . . . . . . . . . . . . . . . . . . . . . . . . . . . . . . . . . . . . . . . . .58
Automatic scale . . . . . . . . . . . . . . . . . . . . . . . . . . . . . . . . . . . . . . . . . . . . . . . .59
Paper size. . . . . . . . . . . . . . . . . . . . . . . . . . . . . . . . . . . . . . . . . . . . . . . . . . . . . . . .62
Binding mode . . . . . . . . . . . . . . . . . . . . . . . . . . . . . . . . . . . . . . . . . . . . . . . . . . . . .64
Reserve. . . . . . . . . . . . . . . . . . . . . . . . . . . . . . . . . . . . . . . . . . . . . . . . . . . . . . . . . . 65
Store mode . . . . . . . . . . . . . . . . . . . . . . . . . . . . . . . . . . . . . . . . . . . . . . . . . . . . . . . 67
Interrupt mode . . . . . . . . . . . . . . . . . . . . . . . . . . . . . . . . . . . . . . . . . . . . . . . . . . . .68
Rotation. . . . . . . . . . . . . . . . . . . . . . . . . . . . . . . . . . . . . . . . . . . . . . . . . . . . . . . . . . 69
Rotation and auto paper select . . . . . . . . . . . . . . . . . . . . . . . . . . . . . . . . . . . .70
Rotation and auto scale. . . . . . . . . . . . . . . . . . . . . . . . . . . . . . . . . . . . . . . . . .70
To release automatic rotation . . . . . . . . . . . . . . . . . . . . . . . . . . . . . . . . . . . . .70
To resume automatic rotation . . . . . . . . . . . . . . . . . . . . . . . . . . . . . . . . . . . . .70
Check and proof copy. . . . . . . . . . . . . . . . . . . . . . . . . . . . . . . . . . . . . . . . . . . . . . .70
Change/release settings . . . . . . . . . . . . . . . . . . . . . . . . . . . . . . . . . . . . . . . . .71
Help mode . . . . . . . . . . . . . . . . . . . . . . . . . . . . . . . . . . . . . . . . . . . . . . . . . . . . . . .71
ENWW 53
Page 64

The main screen
The main screen is the default for the touchscreen and displays when the power is turned on or when
sleep mode is deactivated. Most job options are selected from the main screen using the touch keys.
Other job options are made on the control pad using conventional buttons such as JOB MEMORY.
When the copy monitor is activated, a valid 8-digit copy monitor password must be entered before
copying can be performed. The password is set by the key operator. See “Copy monitor data edit 1” on
page 172.
All of the initial settings in the mai n scr een , except quantity, can be configured b y the key operator in the
Initial copier setting screen.
Note The original count displayed in the center of the message area counts the original pages placed in the
document feeder as they are scanned. A duplex original as well as a simplex original count as 1. When
scanning from the scanner gl ass, the counter increases by 1 for every image scanned. The popup men u
appears on the main screen to select the basic copying conditions.
During the process of successive copying jobs, the message Warming up may be displayed in the
message area of the main screen while adjustments are made to maintain the copy image quality.
1 Position the original document in the document feeder or on the scanner glass.
2 Press START to start copying with initial settings, or make other selections, then press ST ART.
Basic copy settings
Duplex mode : see page 56.
Using Tray 1 : see page 57.
Contrast : see page 57.
Scale : see page 58.
Paper size : see page 62.
Binding mode : see page 64.
Set reserve job : see page 65.
Other basic copying operations
Store mode : see page 67.
Glass store mode : see page 67.
ADF store mode : see page 68.
Interrupt mode : see page 68.
Rotation : see page 69.
Check and Proof Copy : see page 70.
Help mode : see page 71.
Finisher mode : see “Finisher modes” on page 73.
Original : see “Originals” on page 91.
54 Basic operations ENWW
Page 65

Output : see “Output function” on page 97.
Tandem mode : see “Tandem mode operation” on page148.
Note If the main screen disp la ys Adjustment mode in the m essage are a, this means tha t the MFP wa s left in
the service adjustment mode b y a techn ician. If th is occurs , please c ontact the technician and reques t that
the mode be turned off; otherwise copying may be adversely affected.
Setting job during warm-up
While the MFP is w arming u p, a user can selec t c opy conditions and st art scanning so th e j ob can begin
as soon as the MFP is ready.
1 Turn on the main power and secondary power switches on the MFP.
A few seconds after the warm-up screen appears in the touchscreen, 7 types of warm-up screens
display in succession for 5.5-6.0 minutes.
2 Touch the LCD panel to change the warm-up screen to the main screen. Check that the message
Ready to Copy Reserve is displayed on the main screen.
3 Set the desired copying conditions and enter the quantity desired.
4 Position original(s) face up in the automatic document feeder or face down on the scanner glass.
5 Press START. The original will be scanned. When s canning is comp leted, the highligh ted Free Job
folder key will change to Reserve Job, and the next free job becomes active.
6 If setting more than 1 reserve job, touch the next free job to highlight it.
Repeat Steps 3 to 5. Up to 5 reserve jobs can be prepared. The reserve jobs will automatically start
copying after the MFP completes the warm-up.
Note To stop printing, press STOP.
The Job status display screen allows you to alter the output order of the reserve jobs or to delete the reserve
job. See “Job status display screen” on page 65.
To stop scanning or printing
Follow the procedure below to stop scanning or printing.
1 Touch SCAN JOB or PRINT JOB to be suspended.
2 Press STOP. The current selected job will be suspended, and the popup menu will display on the
main screen asking you to continue or cancel the job.
3 Touch EXIT to cancel the job and delete the data or CONTINUE to complete the job.
Recalling previous job settings
Follow the procedure below to copy using the settings from the previous job.
Note Only the last-complet ed job settings can be recalled as the pre vious job setting s. Non-comp lete or reserve
job settings cannot be recalled, even if the setting operations were made last.
The previous job settings can be recalled, even after the MFP power is turned off then on.
1 Press JOB MEMORY on the control panel to display the Job Memory mode screen.
2 Touch PRE-JOB RECALL, then touch OK to retu rn to the main sc reen . Change the settings recalled
on the screen, if desired.
3 When all settings are acceptable, position original(s) in the document feeder or on the scanner
glass, then press START.
ENWW Recalling previous job settings 55
Page 66

Duplex mode
Duplex mode using automatic document feeder
Before selecting a duplex mode, read specifications on the previous page and see “Positioning originals
on the scanner glass” on page 36 for information on positioning originals.
1 Touch the desired mode key on the main screen: 1`1, 1`2, 2`1, or 2`2. A duplex mode k ey
appears dimmed if it is incompatible with other selections made.
Note When selecting 1`2 or 2`2, specify the origina l direction and the binding mode on the Select condition
to scan originals menu and the Select finisher mode men u, respectively. See Steps 1 and 2
below for details.
2 Position the originals face up in the document feeder.
3 When all settings are acc eptab le, pres s START. To cancel the mode, touch the desired duple x mo de
key on the main screen.
Note When the selected quantity exceeds the finisher maximum capacity, remove the completed jobs while
paper is exiting to avoid jams.
1`2 Duplex mode using scanner glass
When copying in 1`2 mode from the scanner glass, use the store mode. See “Positioning originals on
the scanner glass” on page 36 for details on positioning originals.
1 Touch ORIGINALS on th e m ai n s creen to display the Select condition to scan originals
menu, then touch the desired original direction key to highlight it.
Touch OK to return to the main screen.
2 Touch OPTIONS menu to display the Select finisher mode menu, then touch the desired
binding mode key to highlight it.
Touch OK to return to the main screen.
Note Selecting TOP BIND will make copies upside down on the reverse side, while RIGHT & LEFT BIND
copies normally.
3 Open the document f e eder. Place original f a ce do w n on t he sc anner glass , t hen cl ose t he documen t
feeder.
Note Place and scan originals in regular order of pagination.
4 Touch 1`2. The STORE key is automatically highlighted on the screen.
5 Make the desired copying selections.
6 Press START to scan the original. Repeat Steps 3 and 6 until all originals are scanned.
7 Touch STORE to exit the store mode. The STORE key will return to the normal display.
8 Enter the quantity of copie s de si red us in g the k eypad. The quantity entered will be disp layed on the
upper right message area of the main screen.
To change the print quantity, press C CLEAR QTY. and enter the correct quantity.
To delete the scann ed data without p rinting, pres s ST OP, then touch EXIT on the popup menu to be
sure the data is deleted.
9 Press START to print.
Note When the selected qu antity exceeds the finisher maximum cap acity , avo id jams by removi ng the completed
jobs while paper is exiting.
56 Basic operations ENWW
Page 67

Using Tray 1
1 Open Tray 1 located on the right side of the MFP. When loading ledger- or legal-size paper,
withdraw extension on Tray 1.
2 Load paper and align the paper guides to the paper size.
Load transparency film 1 sheet at a time or stack paper up to 100 sheets (20 lb bond).
Load offset tabbed sheets so that the tab extensions are on the right at the rear (not front) of the
tray. The top sheet is designated face up as the first tab of the finished set. Subsequent offset tab
sheets follow in sequence. The tab extension width should be 12.5 mm (0.5") or less.
When loading tabbed sheets in Tray 1, be sure to specify the paper type as Tab on the PAPER
TYPE/SIZE setting screen. See “Selecting paper type/size for Tray 1” on page 62.
Tabbed sheets loaded in position for 1 finished set.
4
1
3
2
4
5
6
6
Contrast
Tabbed sheets loaded in position for 3 finished sets.
4
1
3
2
5
6
4
5
6
Legend
1 Rear 4 1st tab(s)
2 Front 5 2nd tab(s)
3 Printed side 6 3rd tab(s)
Automatic exposure
When AUTO under the CONTRAST column is highlighted, the MFP will detect the contrast of the original
image and automatically select the appropriate exposure for the copy.
ENWW Using Tray 1 57
Page 68

Manual mode (lighter, normal, darker)
Manual adjustments can be made in 9 levels by touching the up arrow, RESET, or down arrow key to
highlight the desired exposure.
Density shift
Density shift divides each of 9 density levels into 3 levels of lighter and 3 levels of darker. Density shift
can be used in 4 modes: Auto (Text/Photo), Text, Photo, and Increase contrast.
Density shift 0
Density shift 1
Density shift 2
Density shift 3
Density shift 4
Density shift 5
1 Touch ORIGINALS to display the Select condition to scan originals menu.
2 Select the desired enhance mode.
To select Auto (Text/Photo) mode, touch Mixed to highlight it, then press P COUNTER.
The following message will be displayed:
Density Shift (Auto <Text/Photo>)
2 (0 - 5)
To select the Increase Contras t mod e , touc h Increase contrast to highlight it, then press
P COUNTER.
The following message will be displayed:
Density Shift (Increase contrast)
# (0 - 5)
To select the Photo mode, touch Photo to highlight it, then press P COUNTER.
The following message will be displayed:
Density Shift (Photo)
2 (0 - 5)
To select the Text mode, touch Text to highlight it, then press P COUNTER.
The following message will be displayed:
Density Shift (Text)
2 (0 - 5)
Press any button (from 0 - 5) using the keypad to de termine the Density shift.
3 Touch OK on the Select condition to scan originals menu. Density shift is determined.
Lens mode
Automatic paper select
The MFP detects the size of originals placed on the ADF or scanner glass and automatically selects and
feeds paper of the same size, or selects an appropriate size according to the scale ratio selected.
If the appropriate paper is not loaded in any tray, no copying will be performed, and a message will
prompt you to load the appropriate paper.
Original sizes detected are: Ledger, Legal, Letter, Letter-R, 5.5 by 8.5, 5.5 by 8.5-R.
Wide paper sizes cannot be detected.
Automatic paper select mode is incompatible with auto scale.
58 Basic operations ENWW
Page 69

An example of the relation of original size, scale ratio and copy paper size is shown below.
ORIGINAL SIZE
Copy size
11x17 8.5x14 8.5x11 8.5x11R 5.5x8.5 5.5x8.5R
Copy size
0.25 - 0.50 5. 5x8.5
0.51 - 0.61 8. 5x11R
0.62 - 0.65
0.66 - 0.77 8. 5x14
0.78 - 0.79
0.80 - 1.00 8.5x14 0.80 - 1.00
1.01 - 1.29
Magnification Ratio
1.30 - 1.55
1.56 - 4.00 11x17 1.56 - 4.00
(8.5x11)
11x17
5.5x8.5
8.5x11R
(8.5x11)
11x17 11x17 11x17
5.5x8.5 5.5x8.5
8.5x11
(8.5x11R)
8.5x11
(8.5x11R)
5.5x8.5 5.5x8.5
8.5x11
(8.5x11R
+)
11x17
8.5x11
(8.5x11R
+)
8.5x14 1.30 - 1.55
0.25 - 0.50
0.51 - 0.61
0.62 - 0.65
0.66 - 0.77
0.78 - 0.79
1.01 - 1.29
Automatic scale
Automatic scale is one of the initial settings that functions when the ADF is used and paper size is
selected manually.
Note Automatic s cale is incompatib le with auto paper se lect, change scale , book cop y , ov erlay , er ase non-image
area, repeat, auto layout, and storing image in overlay memory
An appropriate reduction or enl argeme nt ratio will be sel ected au tomati cally and appl ied to the im age on
the paper size. Automatic scale automatically calculates and selects the correct ratio.
Wide paper size can be s pec ifi ed wh en th e au to s cal e is in u se. In this case, the same scale ratio as the
standard size will be selected automatically.
Auto scale ratio examples are sh own in the table below.
Magnification Ratio
AUTO SCALE
TABLE
11”x17”/
11”x17”W
8.5”x14” 0.77 1.00 0.77 1.00 1.00 1.55 0.73
8.5”x11”/
8.5”x11”W
8.5”x11”R/
8.5”x11”R+
5.5”x8.5”/
COPY SIZE
5.5”x8.5”+
5.5”x8.5”R/
5.5”x8.5”R+
A4/A4+ 0.49
ENWW Lens mode 59
11”x17” 8.5”x14” 8.5”x11” 8.5”x11”R 5.5”x8.5” 5.5”x8.5”R A4
1.00 1.21 1.00 1.29 1.29 2.00 0.94
0.50
(0.65)
0.65 0.79 0.77
0.32
(0.50)
0.50 0.61 0.50
(0.69)
0.61
(0.79)
0.39
(0.61)
0.59
(0.84)
ORIGINAL SIZE
1.00 0.77
(1.00)
1.00 1.00
(1.00)
0.65 0.50
(0.65)
0.65 0.65
(0.65)
0.97 0.75
(0.97)
1.20 1.00
(1.29)
1.29 0.73
(1.29)
1.00 0.65
(1.00)
1.00 0.47
(1.00)
1.38 0.97
(1.38)
( ) : Rotation functions
0.94
(0.94)
0.67
(0.67)
1.00
Page 70

Selecting a special ratio for custom paper
To determine reduction or enlargement ratios when using non-standard paper sizes, refer to the special
ratio table a nd follow the procedure below.
Original-copy width
1 Locate the original width on the horizontal axis.
2 Locate the copy width on the vertical axis.
3 Find the ratio on the table where these 2 values meet.
Original-copy length
1 Locate the original length on the horizontal axis.
2 Locate the copy length on the vertical axis.
3 Find the ratio on the table where these 2 values meet.
The ratio you use must fall within the available scale range of 0.25- 4.00. Use the smaller ratio for
reduction and use the larger ratio for enlargement.
1 First, determine the correct ratio, as described above.
2 Touch ZOOM on the main screen to display the popup menu for setting the zoom ratio.
3 Use the touchpad on the popup me n u to ent er the des ire d redu cti on or enlarg em ent ratio in 3 digits
or use arrows to scroll to the desired ratio.
4 When the desired ratio is specified, touch OK to complete the setting.
To cancel the setting, touch ZOOM again, select the desired ratio, then touch OK.
5 Position original(s) face down on the scanner glass or face up in the document feeder.
6 When all other settings are accep table, press START.
Special ratio table
Note Ratio chart is shown in inches.
COPY SIZE
ORIGINAL SIZE
60 Basic operations ENWW
Page 71

Preset and user presets ratios
Use the preset and user presets ratios to increase or decrease scale in fixed amounts.
If required, the 8 initially set preset ratios shown below can be adjusted in the key operator mode. In
addition, 3 user-def ined r atios are adju stab le b y the k e y op erato r. All ratios remain effective until the y a re
replaced.
● 8 preset ratios: 0.50, 0.65, 0.77, 0.93, 1.21, 1.29, 1.55, and 2.00
● 3 user-defined ratios: programmable by the key operator and selected from 0.25- 4.00
● to copy 5.5 by 8.5 originals to 5.5 by 8.5 paper, touch 5.5 by 8.5 paper size, then touch 1.00
magnification.
1 Touch REDUCE to display the popup menu for selecting the desired preset/userset ratio.
2 Select the desired scale. The selected key is highlighted, and the popup menu fades automatically.
Then the selected ratio is displayed on the main screen. To cancel the setting, touch REDUCE again,
then select the desired ratio.
3 Position original(s) face down on the scanner glass or face up in the document feeder, as required.
4 When all settings are acceptable, press START.
Zoom mode
Use the zoom mode to reduce or enlarge the original image in 1 percent increments.
● zoom range: 25 percent - 400 percent
1 Touch ZOOM on the main screen to display the popup menu for setting the zoom ratio.
2 Use the keypad on the popup menu to enter a 3-digit zoom ratio, or use arrows to scroll to the
desired ratio.
3 Touch OK to complete the setting and return to the main screen. To cancel the setting, touch ZOOM
again, select the desired ratio, then touch OK.
4 Position original(s) face down on the scanner glass or face up in the document feeder, as required.
5 When all settings are acceptable, press START.
Vertical/ horizontal zoom
Use the zoom mode to reduce or enlarge vertical and horizontal dimensions, independently.
● vertical/horizontal z o om rang e:0.25 - 4.00
1 Touch ZOOM on the main screen to display the popup menu for setting the zoom ratio.
2 Touch Vert to select a vertical ratio.
3 Use the keypad on the popup menu to enter a 3-digit vertical zoom ratio, or use arrows to scroll to
the desired ratio.
4 Touch Horiz to select a horizontal ratio.
5 Use the keypad to enter a 3-digit horizontal zoom ratio, or use arrows to scroll to the desired ratio.
6 Touch OK to complete the settin g.
To cancel the setting, touch ZOOM again to display the popup menu. Specify the desi red ratios, then
touch OK.
7 AUTO under the PAPER column on the touchscreen is automatically released. Select the desired
copy size key.
8 Position original(s) face down on the scanner glass or face up in the document feeder, as required.
9 When all settings are acceptable, press START.
ENWW Lens mode 61
Page 72

Paper size
The tra y se le cti on keys below PAPER o n t he touchscreen are used to se lec t a specific input tra y. When a
specific tray is selected, the AUTO key in the PAPER column is deselected and the AUTO key in the
SCALE column is highlighted. The size may require a ratio adjustment. When using the automatic
document fee der w ith ini tia l setti ng s , a r ati o will be sel ec ted aut om atically.
Tray locations correspond to Trays 2, 3, and 4, HCI (Tray 5), and Tray 1. Paper types such as heavy,
OHT, light, vellum, tab, custom, rough, cardstock, pre-punched, pre-printed, and letterhead can be
specified by the key operator, but paper types cannot be detected by the MFP.
Note To avoid jams, do not load paper type other than that specified.
● When a selected tray is empty , an out -of-paper icon will flash on the tray key , alo ng w ith a mess age
to load paper in the empty tray.
● When Tray 1 is touched and highlighted, the PAPER TYPE /SIZE key appears abov e th e Tray 1 key.
Touch the ke y to displ a y the type an d siz e pop up men u, the n spec ify the type an d siz e of the spec ial
paper to be loaded on the Tray 1. See “Selecting paper type/size for Tray 1” on page62.
● Incompatible basic copying conditions with auto scale: auto paper select, change scale
● Incompatible origin al with auto scal e: non e
● Incompatible applications with auto scale: book copy, erase non-image area, repeat, auto layout,
stamp/overlay
1 Touch the desired tray key. AUTO in the PAPER column is deselected, and AUTO in the SCALE
column is highlighted.
To restore the auto paper select, touch AUTO in the PAPER column. AUTO in the SCALE column is
deselected.
2 Position original(s) face down on the scanner glass or face up in the document feeder, as required.
3 When all settings are acceptable, press START from the control panel.
Selecting paper type/size for Tray 1
1 Open Tray 1, and load the paper in the tray.
2 Touch Tray 1, then touch PAPER TYPE/SIZE. The paper type/size menu will be displayed.
3 Touch the desired key.
a When Heavy, OHT, Light, Vellum, Tab, or Custom is highlighted, a print job will conform to
the selected paper type.
b If no paper type indication is needed, touch the highlighted key to clear the selection. The
selection w ill be reflected on the main screen when restored.
Note When selecting Tab paper, AUTO under the SCALE column is automatically selected.
62 Basic operations ENWW
Page 73

● When STD. size is highlighted, the popup menu will appear. Use arrows to scroll to the desired
size. In this case, both the paper size and type selected will be indicated on the main screen.
● When Custom size is highlighted, the popup menu will appear.
1 To set the vertical size, touch the vertical size key to highlight it. Then use the keypad on the popup
menu to enter the vertical size, or use arrows to scroll to that number.
2 To set the horizontal size, touch the horizontal size key to highlight it. Then use the keypad on the
popup menu to enter the horizontal size, or use arrows to scroll to that number. In this case, the
Special indication and paper type selected will be displayed on the main screen, but the actual size
information cannot be dis pl ayed.
● When Wide paper is highlighted, the popup menu will appear. Use arrows to scroll to the desired
wide size, then specify the precise dimensions of paper to be used, following the procedure below.
1 Touch Input size. The INPUT SIZE popup menu will appear.
ENWW Paper size 63
Page 74

2 Touch the vertical size key to highlight it, then use the keypad on the popup menu to enter the
vertical size, or use arrows to scroll to that number. The entered number should be equal to, or
greater than, the standard size paper ver tical dimension, not to exceed 314 mm.
3 Touch the horizontal size key to highlight it, then use the keypad on the popup menu to enter the
horizontal size, or use arrows to scroll that number. The entered number should be equal to, or
greater than, the standard size paper horizontal dimension, not to exceed 429 mm.
4 Touch SELECT SIZE to re turn to the s el ect s ize menu. Touch Leading edge or Trailing edge
to select the image starting position.
5 Touch OK to return to the main screen.
Binding mode
When copy in g i n 1`2 or 2`2 mode, specify the b ind ing m ode on the Select finisher mode menu to
obtain the desired copy result.
● RIGHT & LEFT BIND: normal duplex copies
● TOP BIND: duplex copies arranged upside down on the reverse side
1 Touch OPTIONS menu to display the Select finisher mode menu, then touch to highlight the
desired binding mode key.
2 Touch OK to return to the main screen.
64 Basic operations ENWW
Page 75

Reserve
Set reserve job
The reserve functio n allo ws y o u to se t up a n e w job while a cu rrent sc an or p rint job is in pro gr ess. Whe n
the current job is finished, the reserve job starts printing immediately.
The FREE JOB key on the screen is touch-sensitive and active only when another job is in progress;
otherwise it appears dimmed.
● Job settings: maximum 5 (current job plus 4 reserve jobs).
● The reserve job is a va ilabl e to be set a fter the MFP s tarts to scan the current jo b . When set ting more
than 1 reserve job, the next reserve job setting will be available after the MFP starts to scan for the
previous reserve job. When the current job is under STORE mode, Image insert, or Book Copy,
the reserve job setting will be available after the MFP starts to print the current job.
● If certain conditions occur while a reserve job is being set, such as activation of interrupt mode,
paper jam, or depletion of paper, the current printing job will cease and the FREE JOB indicator on
the screen will be replaced by INTERRUPT, JAM or ADD PAPER, as appropriate. Perform the
required measure for the situation at hand.
● The order of the reserve jobs can be altered on the Job status display screen.
● The reserve jobs can be deleted on the Job status display screen.
● Incompatible basic copy conditions: interrupt copying, scanning in store mode, proof copy.
● Incompatible applications: storing image in overlay memory.
1 Touch FREE JOB to display the Reserve job setting screen.
2 Set the desired copying conditions for the reserve job. When the Reserve job setting screen is
displayed, all keys on the touchscreen and all buttons on the control panel will function for the
reserve job.
Note When having trouble while setting the reserve job, the PRINT JOB or SCAN JOB key changes to JAM or
ADD PAPER on the main screen. See “When paper is depleted for the job in progress” on page 67.
3 Position original(s) face up in the ADF or face down on the scanner glass after completing scan for
the current job.
4 Press START. The original for the reserve job will be scanned.
Note When the message Please Load Size ** Paper in any Tray except Tray # is displayed,
load the specified paper into the appropriate trays.
5 When the scanning for the reserve job is completed, the main screen for the current printing job is
restored.
6 Repeat Steps 2 to 4 to reserve more than 1 job.
7 Copying of the reserve job will start automatically after completing the current job.
Job status display screen
Touch the STATUS key on the main screen to display the Job status display (see below).
This screen allows you to perform the following functions.
● confirm MFP status
● change order of reserve job
● delete reserve job
● view previous job list
● view incomplete job list
To return to the main screen, touch OK on the Job status display screen.
ENWW Reserve 65
Page 76

STATUS ITEM DESCRIPTION
NUMBER Displays the number (01-99) for each job assigned to the MFP.
MODE Displays the MFP’s current mode of operation. 3 modes are listed below.
STATUS Displays the current status for each job.
TOTAL PAGE(s) Displays the number of scanned pages for each job (0 to 9999).
PAGE(s) LEFT Displays the remaining copy count of the job.
MINUTE(s) TO GO Displays the time (in minutes) required for completing the job.
OTHER The following message will be displayed on the second bar when the reserved job does
MFP / PRINTER / SC AN NER
Indication
READY
INTERRUPT
ERROR
PRINTING
NO PAPER
STOP
RESERVE
JAM
0 to 9999 (The number exceeding 9999 will be displayed as 9999↑).
Copy count = Number of scanned pages x Print quantity
Exceeding 999 minutes: 999↑
Shorter than 1 minute: <1
not exist.
Meaning
Ready to use in each mode
Interrupting the previous job
Error in each mode
Printing in each mode
No paper in copy/print mode
Stop in each mode
Setting reserve job
Jam in each mode
RESERVED JOB DOES NOT EXIST
To change the order of reserve jobs
1 Touch the desired reserve job key to highlight it.
2 Touch JOB PRIORITY. The highlighted reserve j ob is advanced by 1 in printing order unle ss the j ob
preceding the selected one is already in progress.
3 To return to the main screen, touch OK on the Job status display screen.
T o clear reserve jobs
1 Touch the desired reserve job key to highlight it.
2 Touch JOB CLEAR.
3 The Job clear setting screen will be displayed. Touch YES. The highlighted reserve job is cleared.
4 To return to the main screen, touch OK on the Job status display screen.
To check user name (not MFP information)
1 Touch USER NAME CHECK to d isplay the User Name Chec k sc reen. C hec k th e user n ame in dicate d
on the right side of the job number and operation mode.
2 To return to the Job status display screen, touch OK.
3 To return to the main screen, touch OK on the Job status display screen.
To display Previous Job List
1 Touch PREVIOUS JOB LIST to display the Previous Job List screen.
2 Touch ↓ to scroll to the next page, if needed. Up to 16 previous jobs can be displayed. Touch ↑ to
return to the previous page.
3 To return to the Job Status display screen, touch OK.
4 To return to the main screen, touch OK on the Job status display screen.
66 Basic operations ENWW
Page 77

To display Incomplete Job List
1 Touch INCOMPLETE JOB LIST to display the Incomplete job list screen.
2 Touch
3 To return to the Job status display screen, touch OK.
4 To return to the main screen, touch OK on the Job status display screen.
↓ to scroll to the next page , if needed . Up to 16 incompl ete jobs ca n be displayed. Touch ↑ to
return to the previous page.
Paper jam during the reserve setting
If a jam occurs with the print/scan job in progress while you are setting a reserve job, the PRINT
JOB/SCAN JOB key on the screen will change to JAM.
If originals of the reserve job are already scanned when the paper jam occurs, the reserve job printing
can be performed after the paper jam is cleared and the current job is completed.
1 Touch JAM to display the Jam Position screen.
2 To view help screen instructions, touch Guide and Remove paper/original.
3 JAM will change to PRINT JOB or SCAN JOB.
4 Press START. The print/scan job will be reprocessed.
5 Touch FREE JOB to continue setting the reserve job.
If scanning is not c ompl eted whe n the m isf e ed oc curs , b ut re serv e sett ings ha v e already been made , th e
reserve job can be perf o rmed after the current job is compl eted. Sim ply in sert the original docum ent and
press START.
Store mode
When paper is depleted for the job in progr ess
If the paper supply for a print job in progress becomes depleted while you are setting a reserve job, the
PRINT JOB key on the screen will change to ADD PAPER (blinking).
In this case, you can still continue the reserve job setting.
1 Touch Add Paper to display the main screen for the print job.
2 Confirm the empty tray and supply the paper.
3 Press START. The print job will be reprocessed.
4 Touch FREE JOB to continue setting the reserve job.
Store mode allows you to scan mul tiple originals by touchi ng STORE on the main screen after setting
copying conditions and then outputting the complete set by pressing START.
● Glass store mode: scan originals from the scanner glass
● ADF store mo de: scan originals from the ADF
Glass store mode
Use glass store mode for originals that cannot be fed through the document feeder due to thickness,
size, or condition.
When scanning thick originals that require keeping the document cover open, select Erase
non-image area to prevent exposure of the glass area around the border of the original. This feature
ensures a clean copy result and reduces toner consumption. The erase non-image area mode
automatically releases after the original for which it is selected is scanned. Additional images may be
scanned.
ENWW Store mode 67
Page 78

incompatible output: storing image in overlay memory
●
1 Open the document feeder.
2 Place original face down on the scanner glass, then close the document feeder.
Note Place and scan the original in regular order of pagination.
3 Make the desired copying selections, and select 1`1 or 1`2 copy mode.
4 Touch STORE on the main screen to highligh t it.
5 Press START to scan the original.
6 Repeat Steps 1, 2, and 5 until all originals are scanned.
7 Touch STORE to exit the store mode.
8 Use the keypad to enter the quantity. The entered quantity will be displayed on the upper right
message area of the main screen. To change the quantity, press C CLEAR QTY. and re-enter the
correct quantity. T o delete th e scanned dat a without printing, press STOP, then touch CANCEL on th e
popup menu to ensure that you delete the data.
9 Press START. The MFP starts the printing job.
ADF store mode
Use this feature to scan more than 100 originals into memory from the document feeder. Use this
function in conjunction with the reserve function to increase efficiency of the copying job.
Incompatible output: image insert, book copy, storing image in overlay memory
1 Touch STORE on the main screen to highligh t it.
2 Make the desired copying selections.
3 Positi on the orig ina ls face up on the document fe ede r. The number of originals may not exceed 100.
4 Enter the quantity, using the keypad. The entered quantity will be displayed on the upper right
message area of the main screen. To change the quantity, press C CLEAR QTY. and re-enter the
correct quantity.
5 Press START to scan the originals.
6 Repeat Steps 3 through 5 until all originals are scanned. To delete the scanned data without
printing, press ST OP, then touch CANCEL on the popup menu to ensure that you delete the data.
7 Touch STORE to exit the store mode.
8 Press START. The MFP starts the printing job.
Interrupt mode
Use the interrupt mode to interrupt copying in progress to perform a simple job. When interrupt copying
is completed, the settings for the initial job restore automatically and the main screen displays. Press
INTERRUPT when the MFP is in the following conditions:
● continuously printing data stored using store mode
● scanning the originals using store mode
● scanning the originals using store mode while printing in reserve mode
● incompatible basic copying conditions: reserve
● incompatible output: storing image in overlay memory
68 Basic operations ENWW
Page 79

If desired, the key operator can change the timing to stop current MFP operation for interrupt copying.
Note that the compatible copying conditions vary according to the timing selected.
1 To stop the current copying job, press INTERRUPT. For particular jobs in progress, copying will
cease only after certain phases of the immediate operation are completed, as indicated by LED
conditions described below.
• Collectively printing data stored in memory: The interrupt LED blinks until one set of the
current job is printed, then the LED remain s steady f or the tempo rary job perf o rmed in Interrupt
mode.
• Scanning originals into memory: The interrupt LED blinks until scanning is completed for all
originals placed in the document feeder, then the LED remains steady for the temporary job
performed in interrupt mode.
• Scanning originals into memory w hile printing in reserve mode (see No te 1): The interrupt
LED blinks until the MFP completes the current printing job, and scans all originals placed on
the document feeder. The LED remains steady for the temporary job performed in Interrupt
mode. All job indicators on the main screen will change to interrupt.
2 Remove any document from the scanner glass or from the document feeder, if present.
3 Place new original(s) on the scanner glass or in the document feeder.
4 The copying settin gs in Interrupt mode are as follows.
Duplex mode: 1`1
ADF:ON
Auto exposure:ON
Scale mode: 1:1 (1.00)
Auto paper select:ON
Paper quantity:1
Finisher: Sort mode using primary tray
Select other copying features that are compatible with the Interrupt mode, if desired.
5 Press START.
6 When Interrupt cop ying is co mpl ete d, press INTERRUPT again to return to the settings of the initial
job.
7 Replace the initial original, then press START to resume copying.
Note In reserve mode, p res sing INTERRUPT before the MFP finishe s sc anning origin als o f the re serve j ob w ill
clear the settings selected for reserve job.
When CHECK is pressed during interrupt copying, the information displayed reflects the initial copy job
settings. Check mode will not display Interrupt copy job information.
Rotation
This function allows you to use auto paper select or auto scale and copy the original size documents
described below onto Lett er or 5. 5 by 8.5, irrespective of the pap er feeding direction. By def ault, rotation
requires auto select or au to to func tio n. However, the key oper a tor m ay set rotation to alwa y s func tio n or
when auto select, auto, or reduce is selected.
● rotation copying uses memory
● copy size: Letter, Letter-R, 5.5 by 8.5-R (landscape type feeding ( ) only)
● original size: Ledger, Legal, Letter, Letter-R, 5.5 by 8.5, 5.5 by 8.5-R
● incompatible basic copying conditions: vertical or horizontal zoom, rotation sort, rotation group,
tandem mode
● incompatible output: book copy, erase non-image area, repeat (except 2/4/8 repeat), auto layout,
storing image in overlay memory
ENWW Rotation 69
Page 80

Rotation and auto paper select
In auto paper select, the MFP automatically copies onto the same paper size as the original(s) in 1:1.
For example, when letter-size paper is loaded in the tray in landscape orientation and the MFP detects
that the original is placed in portrait orientation, rotation and auto select work together to rotate the
original image by 90 degrees and output the letter-size copy to match the direction of the paper.
Similarly, when letter-size paper is loaded in the tray in portrait orientation and the MFP detects that the
original is placed in landscape orientation, rotation and auto paper select work together to rotate the
original image by 90 degrees and output the letter-size copy to match the direction of the paper.
Rotation and auto scale
When letter-size paper is loaded in the tray in landscape orientation and the MFP detects that the
original is placed in portrait orientatio n, rotation (if require d) rotates the original image b y 90 degre es and
the copy is made with the appropriate auto scale ratio to fit the portrait style of the paper.
Similarly, when letter-size paper is loaded in the tray in portrait orientation and the MFP detects that the
original is placed in landscape orientation, rotation (if required) rotates the original image by 90 degrees
and the copy is made with the appropriate auto scale ratio to fit the landscape style of the paper.
When the 5.5 by 8.5 tra y is sel ected and the MFP dete cts that the original is pl aced in po rtrait orientation,
Rotation rotates the original image by 90 degrees and the copy is made with the appropriate auto scale
ratio to fit the portrait style of the paper.
To release automatic rotation
The MFP is initially set to activate the rotation function automatically.
Touch ROTATION OFF on the main screen to highlight it. The rotation icon will go out and the rotation
function will be disabled.
To resume automatic rotation
Touch ROTATION OFF on the main screen to enable it. The rotation icon will be displayed and the
rotation function will be reactivated.
Check and proof copy
Use the check mo de to confirm cop yin g select ions bef ore pre ssing the START button. The Check screen
allows you not only to view the current settings but to change or release them directly from the check
mode.
In this mode, use proof copy to produce a sample of the copied set before copying multiple copies. This
is a convenient and cost effective way of viewing the results of the following copying selections:
● copying conditions using store mode
● booklet
● sheet/cover insertion
● image insert
● chapter
● book copy
● combination
● program job
With proof copy, all originals are scanned into memory, and only 1 set is output after you press the
PROOF COPY button on the control panel or touch the PROOF COPY touchkey on the Check screen.
After pressing PROOF COPY, some copying condition keys may appear dimmed in the Check screen.
You cannot change or release the copying conditions indicated on these.
When the START button is pressed, the job resumes copying until the job is completed.
● all settings made can be viewed in the Check screen
● incompatible copying conditions with proof copy mode: group
70 Basic operations ENWW
Page 81

1 Press CHECK on the control panel to display the Check screen.
2 Verify the settings made for the current job.
3 If necessary, press PROOF COPY on th e c on trol pan el or touch PROOF COPY on the Check sc ree n
to output a set of sample copy.
4 Touch EXIT (or press CHECK) to exit from the Check mode and return to the main screen.
5 Press START when the ma in screen is displayed.
Change/release settings
If you want to change or release any settings, follow the procedure below.
To change the settings:
1 Touch the desired copying condition key on the Check screen to highlight it.
Note Any ke y that cannot be highli ghted indicates th at the copyi ng condition canno t be changed from the Ch eck
screen.
Although the following output functions can be highlighted, they cannot be changed but only released by
touching Release Setting: Overlay, Erase non-image area, Reverse image, Auto layout,
All-image area.
2 Touch CHANGE SETTING. The touchscreen will display the appropriate screen to change the
copying condition selected.
● Selecting a basic copying condition key will display the main screen.
● Selecting ENHANCE mode, SPECIAL ORIG., or ORIGINALS key will display the Select
condition to scan originals menu.
● Selecting an outpu t function ke y will d ispla y the Change o utput selec tion scree n. When BOOK MARK
has been checked on a subsequent screen, selecting the output function key will jump to that
screen.
3 Change the setting as desired, then restore the Check screen to return to the checking steps or to
the main screen to star t copying.
To release the settings:
1 Touch the desired original key or output function key on the Check screen to highlight it.
2 Touch RELEASE SETTING.
3 Touch YES to cancel the output function, or No to restore. When YES is touched, the selected
function will be released and the key will disappear from the Check screen.
Help mode
Use the HELP button to access information about the current screen mode and to learn about setting
procedures. The HELP button can be pressed from any screen except Job Memory and Key Operator
mode screens.
The HELP screen also includes the Help menu icon in the center. When the HELP menu button is
touched, the HELP menu screen displays a list of all of the MFP functions. When a function item is
touched, the Help screen displays information specific to that topic.
The KEY OPERATOR MODE key is also provided in the lower left position of the Help screen. When
touched, the Key Operator Password Entry screen will be displayed to access the Key Operator mode.
See “How to access the key operator mode” on page 164.
1 While in any screen, press HELP to display the Help screen.
2 Touch TONER SUPPLY, PAPER SUPPLY, ADF, STAPLE SUPPLY, PUNCH, FOR ASSISTANCE, or the
SERVICE CALL TELEPHONE NUMBER AND FAX NUMBER to display specific help information.
3 For help on operations, touch HELP in the center area of the screen. The Help screen will be
displayed. Select one of the 7 help menu items.
ENWW Help mode 71
Page 82

4 The weekly timer key displays only when the weekly timer system is activated. Touch the key to
display the settings of the weekly timer.
5 Touch EXIT to return to the screen that was displayed before pressing HELP.
72 Basic operations ENWW
Page 83

7Finisher modes
Q3633A stapler/stacker and Q3634A multi-function finisher specifications . . . . . .74
Finisher type . . . . . . . . . . . . . . . . . . . . . . . . . . . . . . . . . . . . . . . . . . . . . . . . . .74
Primary tray . . . . . . . . . . . . . . . . . . . . . . . . . . . . . . . . . . . . . . . . . . . . . . . . . . .74
Secondary tray . . . . . . . . . . . . . . . . . . . . . . . . . . . . . . . . . . . . . . . . . . . . . . . .75
Booklet tray (multi-function finisher only) . . . . . . . . . . . . . . . . . . . . . . . . . . . .75
Post inserter. . . . . . . . . . . . . . . . . . . . . . . . . . . . . . . . . . . . . . . . . . . . . . . . . . .75
Punch kit . . . . . . . . . . . . . . . . . . . . . . . . . . . . . . . . . . . . . . . . . . . . . . . . . . . . .75
Non-sort mode using primary tray . . . . . . . . . . . . . . . . . . . . . . . . . . . . . . . . . . . . . 76
Sort mode using primary tray . . . . . . . . . . . . . . . . . . . . . . . . . . . . . . . . . . . . . . . . .77
Staple-sort mode using primary tray . . . . . . . . . . . . . . . . . . . . . . . . . . . . . . . . . . .77
Group mode using primary tray . . . . . . . . . . . . . . . . . . . . . . . . . . . . . . . . . . . . . . .78
Output modes using secondary tray . . . . . . . . . . . . . . . . . . . . . . . . . . . . . . . . . . .79
Folding and stapling and folding modes . . . . . . . . . . . . . . . . . . . . . . . . . . . . . . . . 80
Punch mode . . . . . . . . . . . . . . . . . . . . . . . . . . . . . . . . . . . . . . . . . . . . . . . . . . . . . .81
Tri-fold mode . . . . . . . . . . . . . . . . . . . . . . . . . . . . . . . . . . . . . . . . . . . . . . . . . . . . .82
Post inserter . . . . . . . . . . . . . . . . . . . . . . . . . . . . . . . . . . . . . . . . . . . . . . . . . . . . . .83
Manual finishing . . . . . . . . . . . . . . . . . . . . . . . . . . . . . . . . . . . . . . . . . . . . . . . . . . .85
Output mode for MFP without finisher . . . . . . . . . . . . . . . . . . . . . . . . . . . . . . . . . .87
Face down exit . . . . . . . . . . . . . . . . . . . . . . . . . . . . . . . . . . . . . . . . . . . . . . . .88
Face up exit . . . . . . . . . . . . . . . . . . . . . . . . . . . . . . . . . . . . . . . . . . . . . . . . . .89
ENWW 73
Page 84

Q3633A stapler/stacker and Q3634 A multi-function finisher specifications
Use only paper that is recommended by HPand stored under the environmental conditions stated for
copy quality. Special stock is not guaranteed for re liability or copy quality.
This finisher also accommodates wide paper sizes in addition to the standard sizes described below.
See “ Paper information” on page 35.
Finisher type
● primary tray with built-in 2 stapling: moving tray type
● secondary tray
● booklet tray (multi-function finisher only)
● post inserter Q3636A (optional)
● punch kit Q3635A (optional)
Primary tray
● non-sort mode
• paper size: see “Q3633A stapler/stacker and Q3634A multi-function finisher primary (main)
tray” on page 42
2
• paper weight: 16- 24 lb; special stock (65 lb (176 g/m
2-, 3-, or 4-hole punch (depending on the accessory installed), rag content
• paper capacity for 20 lb.:
500 sheets 5.5 by 8.5
3,000 sheets Letter, Letter-R (Q3633A)
2,500 sheets 5.5 by 8.5, Letter-R (Q3634A)
1,500 sheets Ledger, Legal
● sort mode/group mode
• paper size: see “Q3633A stapler/stacker and Q3634A multi-function finisher primary (main)
tray” on page 42
• paper weight: 16 - 24 lb
paper capacity for 20 lb:
500 sheets 5.5 by 8.5
3,000 sheets Letter, Letter-R (Q3633A)
2,500 sheets Letter, Letter-R (Q3634A)
1,500 sheets Ledger, Legal
● staple-sort mode
• paper size: see “Q3633A stapler/stacker and Q3634A multi-function finisher primary (main)
tray” on page 42
• paper weight: 16 - 24 lb
• paper capacity f or 20 lb: 1,000 sheets. Variable accordin g to the num ber of pages to be staple d.
See “Staple-sort mode” on page42
• staple capacity: 50 sheets (5.0mm thick or less ). Staple sh eet capaci ty is chang eabl e, and ma y
be set to 45, 40, or 35 by your service representative.
• staple position: See “Staple-sort mode” on page 42
cover paper), transparency film, labels,
Note Using exc essiv ely cu rled paper o r some ty pes of th in pap er in stap le-sort mode ma y ca use poor r esults in
arrangement of the stapled sets.
74 Finisher modes ENWW
Page 85

Secondary tray
● non-sort and face down exit
● non-sort and face up exit
● group and face down exit
● group and face up exit
• paper size: see “Q 3633A s tapler/ stac k er an d Q363 4A m ulti-fun ction finish er second ary tra y” o n
page 42
• paper weight: 16 - 24 lb
• paper capacity for 20 lb: 200 sheets
Booklet tray (multi-function finisher only)
● folding mode
• paper size: see “Q3634A multi-function finisher booklet tray” on page 43
• paper weight: 16- 24 lb; special stock (20 lb paper is recommended)
• number of folding sheets: 3 sheets maximum (without being stapled)
• booklet tray capacity:
approximately 100 sheets maximum
33 sets maximum of 3-sheet-folded booklet (33 x 3 = 99 sheets)
50 sets maximum of 2-sheet-folded booklet (50 x 2 = 100 sheets)
approximately 75 sheets maximum for Letter-R, A4R
25 sets maximum of 3-sheet-folded booklet (25 x 3 = 75 sheets)
● stapling and folding mode
• paper size: see “Q3634A multi-function finisher booklet tray” on page 43
• paper weight: 16- 24 lb; special stock (20 lb paper is recommended)
• number of folding sheet: 20 sheets maximum (using 20 lb paper only)
19 sheets maximum (a thick cover paper included)
• booklet tray capacity:
approximately 100 sheets maximum
20 sets maximum of 5-sheet-folded booklet (20 x 5 = 100 sheets)
10 sets maximum of 10-sheet-folded booklet (10 x 10 = 100 sheets)
6 sets maximum of 16-sheet-folded booklet (6 x 16 = 96 sheets)
approximately 75 sheets maximum
15 sets maximum of 5-sheet-folded booklet (15 x 5 = 75 sheets)
Post inserter
● paper size: see “Paper in Q3636A post inserter (optional)” on page 44
● paper weight in cover sheet mode: 200 g/m
● paper weight in manual staple: 16 - 24 lb
2
thick paper (13 - 110 lb)
Punch kit
● punch mode (available in combination with primary tray output modes)
• paper size: see “Punch Table” on page 45
• paper weight: 13 - 45 lb
• number of holes: depends on punch kit installed
• hole diameter:
• 3-hole: 8.0 mm ± 0.5 mm (0.32 inches ± 0.02 inches)
• 2 or 4-hole: 6.5 mm ± 0.5 mm (0.26 inches ± 0.02inches)
ENWW Q3633A stapler/stacker and Q3634A multi-function finisher specifications 75
Page 86

• hole pitch:
• 2-hole (North America): 70 mm ± 0.5 mm (2.76 ± 0.02 inches)
• 3-hole (North America): 108 mm ± 0.5 mm (4.25 ± 0.02 inches)
• 4-hole (Europe): 80mm ± 0.5 mm (3.15 ± 0.02 inches)
• 4-hole (Sweden): between the 2 middle holes: 70 mm ± 0.5 mm (2.76 ± 0.02 inches);
from the top-middle hole to the top hole: 21 mm ± 0.5 mm (0.83 ± 0.02 inches);
from the bottom-middle hole to the bottom hole: 21 mm ± 0.5 mm (0.83 ± 0.02 inches)
Non-sort mode using primary tray
The non-sort mode simply means that the offset-stacker finisher modes are not selected. Copies will be
stacked upon exit without being offset between sets.
With the primary tray initially selected on the Select finisher mode men u, Q3633A/Q363 4A outputs
the printed sheets face down in the proper order.
● paper size: Ledger, Legal, Letter-R, Letter, 5.5 by 8.5
● paper capacity for 20 lb:
500 sheets 5.5 by 8.5
3,000 sheets Letter, Letter-R (Q3633A)
2,500 sheets Letter, Letter-R (Q3634A)
1,500 sheets Ledger, Legal
3
2
1
3
2
1
1 Touch SORT on the main screen to deselect it, if highlighted.
2 Enter the desired quantity.
3 Position original(s) in the document feeder or on the scanner glass, and make copying selections,
as required.
4 Press START to begin copying in non-sort mode. Copies will exit face down, with the page heading
toward the front of the MFP.
CAUTION When the select ed qua ntity exceeds the fin is her maximum capacity, remove the printed s he ets while paper is
exiting to avoid paper mishandling.
76 Finisher modes ENWW
Page 87

Sort mode using primary tray
Use this mode when you want to output multiple copies of the original set, and have each sorted set
offset upon exit. The staple mode can be selected with the sort mode.
With the primary tray initially selected on the Select finisher mode men u, Q3633A/Q363 4A outputs
the printed sheets face down in the proper order.
● paper size: Ledger, Legal, Letter, Letter-R, 5.5 by 8.5, 5.5 by 8.5-R
● paper capacity for 20 lb:
500 sheets 5.5 by 8.5
3,000 sheets Letter, Letter-R (Q3633A)
2,500 sheets Letter, Letter-R (Q3634A)
1,500 sheets Ledger, Legal
1 Touch SORT on the main screen to highli gh t it.
2 Enter the desired quantity.
3 Position the originals in the document feeder, and make copying selections as required.
4 Press START.
3
2
1
3
2
1
30 mm
Note When the selected quantity e xceeds the fini sher maximum c apacity , rem ove the pri nted sheets while pa per
is exiting to avoid paper jams.
Staple-sort mode using primary tray
Use this mode when you want to offset and staple each copied set. Stapling position and number of
staples (1 or 2) can be designated on the finisher mode popup menu. Each finished set will be offset
from the next copied set.
With the primary tray initially selected on the Select finisher mode menu, Q3634A outputs the
printed sheets face down in the proper order.
● stapled paper at 1 position: Ledger, Legal, Letter-R, Letter
(5.5 by 8.5 is available in portrait orientation only)
● stapled paper at 2 pos itions : only letter paper that f eeds lon g edg e first, a nd Le dger, Legal, Letter-R,
Letter paper that feeds short edge first
● paper capacity for 20 lb: 1,000 sheets (variable according to the number of pages to be stapled.)
● staple capacity:50 sheets 20 lb (5.0 mm thick or less)
(staple capacity is changeable, and may be set to 45, 40, or 35 by service technician)
● staple position:1 corner staple; 2 flat position staples.
(corner staple may change to parallel staple when using some copy sizes.)
● incompatible copy conditions: using scanner glass (available when using image insert, book copy,
and glass store modes), folding, stapling and folding, tri-fold, OHT interleaving
Note Using exc essiv ely cu rled paper o r some ty pes of th in pap er in stap le-sort mode ma y ca use poor r esults in
arrangement of the stapled sets.
ENWW Staple-sort mode using primary tray 77
Page 88

3
3
2
1
2
2
1
3
3
3
2
3
1
1
2
1 Touch STAPLE on the main screen to highlight it. The staple position icon will be displayed in the
finisher icon area. When not changing the staple position, proceed to step 7.
2 Touch OPTIONS menu on the main screen to display the Select finisher mode menu.
3 Touch the desired key among the 4 keys on the screen to select the staple position. When making
double-sided copies, also touch the desired key to highlight the desired binding mode key.
4 Touch OK on the Select finisher mode menu to complete the setting and return to the main
screen. The selection made in stapling position will be displayed in the finisher icon area.
5 Touch ORIGINALS on th e m ai n s creen to display the Select condition to scan originals
menu.
6 Touch to select the desired original set direction, then touch OK to return to the main screen.
7 Select additional copying features, as required.
8 Enter the desired quantity.
9 Position the originals in the document feeder.
10 Press START.
Note When the selected quantity e xceeds the fini sher maximum c apacity , rem ove the pri nted sheets while pa per
is exiting to avoid paper jams.
Group mode using primary tray
Use this mode when y ou w a nt to g roup toge ther m ultip le cop ies of ea ch origina l an d offset the sets upo n
exit. Grouped sets cannot be stapled.
● paper size: Ledger, Legal, Letter, Letter-R, 5.5 by 8.5, 5.5 by 8.5-R
● paper capacity for 20 lb:
500 sheets 5.5 by 8.5
3,000 sheets Letter-R, Letter (Q3633A)
2,500 sheets Letter-R, Letter (Q3634A)
1,500 sheets Ledger, Legal
78 Finisher modes ENWW
Page 89

3
3
2
2
1
1
30 mm
1 Touch OPTIONS menu on the main screen to display the Select finisher mode menu.
2 Touch GROUP, then OK to complete the setting and return to the main sc ree n. The grou p icon will be
displayed in the finisher icon area.
3 Enter the desired quantity.
4 Position the originals in the document feeder, and make copying selections as required.
5 Press START.
CAUTION When the select ed qua ntity exceeds the fin is her maximum capacity, remove the printed s he ets while paper is
exiting to avoid paper mishandling.
Output modes using secondary tray
In addition to the primary tray, Q3633A Stapler/Stacker and Q3634A Multi-function finisher is equipped
with a secondary tray that can be selected on the Select finisher mode menu.
The secondary tray provides 4 types of output as specified below, also to be specified on the Select
finisher mode menu.
● face down non-sort exit
● face up non-sort exit
● face down group exit
● face up group exit
• paper size: Ledger - 5.5 by 8.5
• paper weight: 16 - 24 lb
• paper capacity for 20 lb: 200 sheets
1 Touch OPTIONS menu on the main screen to display the Select finisher mode menu.
2 Touch UPPER BIN to display the popup menu Finisher <options>.
3 Touch the desired key(s) on the popup menu to specify 1 of the 4 output modes.
a To select non-sort and face down exit, touch FACE-DOWN.
b To select non-sort and face up exit, touch FACE-UP.
c To select group and face down exit, touch GROUP and FACE-DOWN.
d To select group and face up exit, touch GROUP and FACE-UP.
4 Touch OK on the Select finisher mode menu to complete the setting and return to the main
screen. The selection made in finisher mode using upper bin will be reflected in the finisher icon
area of the main screen.
5 Enter the desired quantity.
ENWW Output modes using secondary tray 79
Page 90

6 Position the originals in the document feeder, and make copying selections as required.
7 Press START.
Note When the selected quantity e xceeds the fini sher maximum c apacity , rem ove the pri nted sheets while pa per
is exiting to avoid paper jams.
Folding and stapling and folding modes
The folding and stapling and folding modes are available only when the multi-function finisher option is
installed. When any mode is selected, the booklet feature is automatically selected and indicated on the
output selection screen.
Note When copying 2-sided signature originals using the Folding or stapling and folding mode, release the
automatically selected booklet mode on the output selection screen.
When copying dark originals or using reverse image mode together with folding or stapling and folding
mode, the folded line of the output copies may be slightly shifted.
The following copy results may be expected when using folding or stapling and folding mode:
In the folding mode, each copied set is folded and output to the booklet tray of the finisher.
In the stapling and folding mode, each copied set is stapled at 2 positions (2-position flat), then folded
and output to the booklet tray.
● use automatic document feeder
● maximum number of folded sheets (20 lb Bond) in both modes:
• folding: 3 sheets (less than in stapling and folding mode because they are not stapled first)
• stapling and folding: 20 sheets; 19 sheets when using thick cover paper
● paper size: Ledger, Legal, Letter-R, A4R
● paper weight: 16- 24 lb; special stock (20 lb paper is recommended)
● Booklet tray capa cit y:
When the booklet tray capacity is exceeded, the finisher will stop operating. Select the appropriate
quantity by referring to the following capacities.
• approximately 100 sheets maximum
folding: 33 sets maximum of 3-sheet-folded booklet (33 x 3 = 99 sheets)
stapling and folding: 20 sets maximum of 5-sheet-folded booklet (20 x 5 = 100 sheets)
6 sets maximum of 15-sheet-folded booklet (6 x 15 = 90 sheets)
• approximately 75 sheets maximum (Letter-R, A4R)
folding:25 sets maximum of 3-sheet-folded booklet (25 x 3 = 75 sheets)
stapling and folding: 15 sets maximum of 5-sheet-folded booklet (15 x 5 = 75 sheets)
● incompatible basic copying conditions with booklet selected: auto paper select, 1
sort, staple-sort, group, cover sheet feeding, tri-fold, rotation sort, rotation group, punch
● incompatible originals with booklet selected: mixed original, entire area in custom size, tab paper
● incompatible output with booklet selected: sheet/cover insertion, combination, OHT interleave,
program job, erase non-image area, reverse image, repeat
● incompatible condi tions withou t booklet: s ort, staple-sort, group, rota tion sort, rota tion group, tri- fold,
punch, OHT interleave, reve rse image
`
1, 2`1, rotation,
80 Finisher modes ENWW
Page 91

Folding
Stapling and Folding
3 sheets maximum
20 sheets maximum
19 sheets maximum when using thick cover paper
Note Selecting FOLDING or STAPLING AND FOLDING will automa ticall y s w itch the ou tput tray to booklet tray.
Notice that the arrow pointing to the primary tray shifts to the booklet tray.
When loading originals, heed the following limits on capacity:
Folding mode: 12 pages or less for simplex copying, 6 pages or less for duplex copying;
stapling and folding mode: 80 pages or less for simplex copying, 40 pages or less for duplex copying.
Exceeding these capacity limits may cause trouble in the finisher.
When the booklet tray capacity is exceeded, the finisher will cease operating.
1 Close the automatic document feeder securely, then press RESET.
2 Touch OPTIONS menu on the main screen to display the Select finisher mode menu.
3 Touch STAPLING AND FOLDING or FOLDING, as desired.
4 Touch OK on the Select finisher mode menu. The main screen will be restored and the
selection made in the finisher mode will be reflected in the FInisher icon area.
5 Select additional copying features, as required.
No Cover Sheet of Booklet is automatically selected. To change this selection, touch OUTPUT
on the main screen to display the output selection screen, then touch Booklet twice to display the
booklet mode selection screen to make another selection or to release the setting.
6 Enter the desired quantity.
7 Position the originals in the document feeder.
8 Press START.
Punch mode
The punch mode is available only when one of the punch kit options is installed in one of the finishers.
When the punch mod e is select ed in combi nation with any of the primary tra y outpu t modes , each copied
sheet is punched and output to the primary tray according to the selected output mode.
● copy paper size: Ledger, Letter (20 lb paper recommended)
● paper weight:20 lb - 24 lb bond recommended
thin paper: 16 lb - 19 lb
thick paper: 25 lb - 45 lb
● hole diameter:
• 3-hole: 8.0 mm ± 0.5 mm (0.32 inches ± 0.02 inches)
• 2 or 4-hole: 6.5 mm ± 0.5 mm (0.26 inches ± 0.02inches)
ENWW Punch mode 81
Page 92

hole pitch:
●
• 2-hole (North America): 70 mm ± 0.5 mm (2.76 ± 0.02 inches)
• 3-hole (North America): 108 mm ± 0.5 mm (4.25 ± 0.02 inches)
• 4-hole (Europe): 80mm ± 0.5 mm (3.15 ± 0.02 inches)
• 4-hole (Sweden): between the 2 middle holes: 70 mm ± 0.5 mm (2.76 ± 0.02 inches);
from the top-middle hole to the top hole: 21 mm ± 0.5 mm (0.83 ± 0.02 inches);
from the bottom-middle hole to the bottom hole: 21 mm ± 0.5 mm (0.83 ± 0.02 inches)
● incompatible basic copying conditions: using scanner glass (available when using glass store
mode), folding, stapling and foldin g, tri-fold , finishe r modes us ing secon dary tr ay, cover sh eet mode
● incompatible originals: mixed original (Letter-R, 5.5 by 8.5 mixed), custom size
● incompatible output: sheet/cover insertion, copy insertion mode in chapter, cover sheet mode in
booklet, OHT interleave, program job
1 Touch OPTIONS menu on the main screen to display the Select finisher mode menu.
2 Touch PUNCH to display the punch position popup menu.
3 Touch the desired punch position key to highlight it.
4 Touch OK on the punch position popup menu to restore the Select finisher mode menu.
5 Touch OK on the Select finisher mode menu to complete the setting and return to the main
screen. The selection made in punch position will be displayed in the finisher icon area.
6 Touch ORIGINALS on th e m ai n s creen to display the Select condition to scan originals
menu.
7 Touch to select the desired original set direction, then touch OK to return to the main screen.
8 Select additional copying features, as required.
9 Enter the desired quantity.
10 Position the originals in the document feeder.
11 Press START.
Note Some staple positions previously selected may conflict with this function.
Do not punch special paper type such as transparencies, labels, tabbed sheets, etcetera.
Be sure that the paper guides of the paper tray are securely aligned to the paper; otherwise the copies
may not be punched in position.
If the automatic tray switching functions while the MFP uses the punch mode, the punch holes may be
slightly off the appropriate positions.
When the selected qu antity e xce eds the f inisher ma ximum ca pacit y, remove the finished sets whil e paper
is exiting to avoid paper mishandling.
Tri-fold mode
The tri-fold mode is available only when the multi-function finisher option is installed.
82 Finisher modes ENWW
Page 93

In this mode, t he original image is c opied on Le tter-R or A4R cop y paper and o utput t o the bookl et tr a y of
the finisher.
● copy paper size: Letter-R, A4R (20 lb paper recommended)
● maximum number of folded sheets (20 lb bond): 3 sheets
● paper weight: 16- 24 lb; special stock (20 lb paper is recommended)
● booklet tray capacity: 50 sets maximum of 1-sheet-folded set (50 sheets)
● incompatible basic copying conditions: sort, group, finisher modes using secondary tray, folding,
stapling and folding, punch
● incompatible output: OHT interleave, book copy, program job, reverse image
Z
A
Tri-folding copy
1 Load Letter-R or A4R paper in a tray.
2 Touch OPTIONS menu on the main screen to display the Select finisher mode menu.
3 Touch TRI-FOLD to highligh t it.
4 Touch OK on the popup menu to complete the setting and return to the main screen.
The tri-fold icon will be displayed in the finisher icon area.
5 Select additional copying features, as required. Touch to highlight the Letter-R or A4R tray key, if
not already highlighted.
6 Enter the desired quantity.
7 Position the originals in the document feeder.
Note Up to 3 originals can be tri-folded as a set.
8 Press START.
Note When the booklet tray capacity is exceeded, the finisher will cease operating. To avoid this, select the
appropriate quantity from the specifications.
Post inserter
The Post Inserter (Q3636A) is available as an option on both finishers.
Load cover sheet paper into this device and use the sheets as front covers for copied sets output to the
primary tray or use the sheets as booklet-type covers for copied sets output to the booklet tray in the
folding or stapli ng and folding mode.
Note Paper loaded into the post inserter cannot be copied.
This function is i ncom patib le with co v er s heet m ode (co v er with cop y shee t and co v er w ith b la nk sh eet) in
booklet and cover mode in sheet/cover Insertion.
ENWW Post inserter 83
Page 94

cover paper size
●
• upper tray: Letter, Letter-R, 5.5 by 8.5
• lower tray: Ledger, Legal, Letter, Letter-R, 5.5 by 8.5 (5.5 by 8.5 paper is available in portrait
type feeding only)
● cover paper weight: 200 g/m
● tray capacity: 200 sheets (200 g/m
● incompatible basic copying conditions: output to secondary tray, punch
● incompatible output: cover mode in sheet/cover insertion, cover sheet mode in booklet, OHT
2
cover paper (13 - 110 lb)
2
cover paper (110 lb) or 30 mm thick for both trays
interleave
Copied set with cover
attached
Copied sets with cover
attached in Folding or
Stapling and Folding
mode
1 Close the automatic document feeder securely, then press RESET.
2 Touch OPTIONS menu on the main screen to display the Select finisher mode menu.
3 Touch COVER SHEET to display the cover sheet insert selection screen.
4 Touch FRONT, FRONT+BACK, or BACK to highlight it, then select the covers tray. When selecting
Front+Back mode, different tray sources can be specified for each.
Note Paper sizes available to be loaded are different in each tray.
Cover sheet
5 Touch OK to restore the Select finisher mode menu.
6 Touch OK on the Select finisher mode menu. The main screen will be restored.
7 Select additional copying features, as required.
84 Finisher modes ENWW
Page 95

8 Load the cover sheet paper into the post inserter.
If the paper size load ed in the Post inserter is not suitable , th e following messages will be disp layed
and copying will be unavailable.
Please Load Cover Sheet in Post Inserter
Adapt paper size between cover sheet and selected paper
Upper tray
Lower
tray
9 Enter the desired quantity.
10 Position the originals in the document feeder or on the scanner glass.
11 Press START.
Note When the selected quantity exceeds the finisher maximum capacity, remove the completed sets while
paper is exiting to avoid paper mishandling.
Manual finishing
The manual finishing function is available only with the post inserter option installed on one of the
finishers. To use this convenient function, simply place a set of paper into the lower tray of the post
inserter, select th e desire d mode fro m the ma nual finish ing con trol pane l, then tou ch the s tart/stop touch
key .
Available finishing modes according to the optional configuration are described below.
stapler/stacker + Q3636A post inserter
● 1 corner staple: primary tray
● 2 flat posit ion staples: primary tray
stapler/stacker + Q363 6A post inserter + punch kit
● 1 corner staple
● 2 flat position staples
● punch
multi-function finisher + Q3636A post inserter
● 1 corner staple
● 2 flat position staples
● stapling and folding (2 staples in the center + folding)
● tri-fold
ENWW Manual finishing 85
Page 96

multi-function finisher + Q3636A post inserter + punch kit
● 1 corner staple
● 2 flat position staples
● stapling and folding (2 staples in the center + folding)
● tri-fold
● punch
Specifications for manual stapling 1 corner staple and 2 flat position staples
● paper size: Ledger, Legal, Letter, Letter-R, 5.5 by 8.5, A4, A4R
● paper weight: 16 - 24 lb (20 lb paper is recommended)
● staple capacity: 50 sheets maximum (20 lb paper)
● output tray: primary tray
Specifications for manual punch
● paper size: Ledger, Letter, A4
● paper weight: 16 - 24 lb (20 lb paper is recommended)
● punch capacity: 200 sheets maximum (24 lb paper) or within 30 mm thick
● output tray: primary tray
Specifications for manual stapling and folding mode
● paper size: Ledger, Legal, Letter-R, A4, A4R
● paper weight: 16 - 24 lb (20 lb paper is recommended)
● staple capacity: 20 sheets maximum (20 lb paper)
19 sheets maximum (20 lb paper with a thick paper cover)
● output tray: booklet tray
Specifications for tri-fold mode
● paper size: Letter-R, A4R
● paper weight: 16 - 24 lb (20 lb paper is recommended)
● folding capacity: 3 sheets maximum (20 lb paper)
● output tray: booklet tray
Stapling and
Folding
1 oblique staple
2 parallel staples
Tri-fold
Start/Stop button
Punch
86 Finisher modes ENWW
Page 97

1 Place a set of paper to be finished into the lower tray of the Post inserter, as described below for
each mode, then align the guide plate. The indicator light of the START button will turn green.
• 1 corner staple / 2 flat position staples: face up
• punch: face up
• stapling and folding: face up for the print to be folded to the outside of the finished set
• tri-fold: face up for the print to be folded to the outside of the folded set
Lower
tray
Guide plate
Note Refer to the specifications on previous page for available paper size and capacity in each mode.
2 Touch the STAPLE mode selection key and/or PUNCH key to select the desired mode.
Note Punch mode is compatible with 1 corner staple, 2 flat position staples, or stapling and folding mode.
3 Press the START button.
Finished sheets will be delivered to the appropriate tray according to the selected mode.
Note If you wa nt to s top the m anual finishi ng oper ation, p ress the STOP button. The finisher will stop op erating.
When using stapli ng a nd folding mode, the unf ini sh ed s et w i ll b e le ft in the stacker unit inside the fini sh er.
When the booklet tray capacity is exceeded, the finisher will cease operating.
When the selected quantity e xceeds the fini sher maximum c apacity , rem ove the printed sheets while pa per
is exiting to avoid paper jams.
Output mode for MFP without finisher
This section describes 8 finisher modes for a MFP without the finisher.
● face down non-sort exit (default)
● face down group exit
● face up non-sort exit
● face up group exit
● face down rotation sort exit
● face down rotation group exit
● face up rotation sort exit
● face up rotation group exit
ENWW Output mode for MFP without finisher 87
Page 98

Face do wn
non-sort (default)
Face do wn
rotation sort
Face do wn
group
Face do wn
rotation group
Face up
non-sort
Face up
rotation sort
Face up
group
Face up
rotation group
Face down exit
● Non-sort mode copies the original set in amounts determined by the quantity setting, then outputs
sorted sets normally.
● Rotation sort mode rotates e v ery other sorted set by 90 d egree s upon e xit, p rovid ed the same paper
size is loaded in 2 tr ays, 1 tray with paper loaded in portrait orientation and the oth er tr ay with paper
loaded in landscape orientation.
● Group mode copies each origina l pag e in amo unt s determined by the quantity setting, then outputs
grouped sets normally.
● Rotation group mode rotates every other grouped set by 90 degrees upon exit, provided the same
paper size is lo aded in 2 trays, 1 tray with paper loade d i n po rtrait orienta tio n a nd the other tray with
paper loaded in landscape orientation, for example, Letter and Letter-R.
To set face down non-sort exit
1 Confirm that the OPTIONS key is not highlighted.
If OPTIONS menu is highlighted, touch OPTIONS menu to display the Select finisher mode
menu. Select FACE-DOWN and deselect all the other keys, then touch OK.
2 Confirm that the SORT key is not highlighted. If SORT is highlighted, touch SORT to deselect it.
88 Finisher modes ENWW
Page 99

To set face down rotation sort exit
1 Confirm that the OUTPUT key is not highlighted.
If OUTPUT is highlighted, touch OUTPUT to display the Output mode popup menu. Select to
highlight FACE-DOWN and deselect all the other keys, then touch OK.
2 Touch SORT to highlight it.
To set face down group exit
1 Touch OPTIONS on the main screen to display the Select finisher mode menu.
2 Touch GROUP and Face Down to highlight them.
3 Touch OK to complete the setting and return to the main screen.
To set face down rotation group exit
1 Touch OPTIONS menu on the main screen to display the Select finisher mode menu.
2 Touch ROTATION GROUP and FACE-DOWN to highlight them.
3 Touch OK to complete the setting and return to the main screen.
Face up exit
Unless Face Up Exit is selected, all simplex copies and odd-numbered duplex copies exit to the tray
face down. When Face Up Exit is selected, all simplex copies and odd-numbered duplex copies exit
face up. While the face up exit mode reduces the amount of paper movement, you will be required to
arrange pages in the correct order manually.
● Face up exit can be selected together with non-sort, rotation sort, group, or rotation group.
● When using the scanner glass with simplex (1`1) copyin g, st art cop y ing from the last page firs t and
continue in that reverse order to output the set in correct order.
To set face up non-sort exit
1 Confirm that the SORT key is not highlighted.
If SORT is highlighted, touch SORT to deselect it.
2 Touch OPTIONS menu to display the Select finisher mode menu.
3 Touch FACE-UP to highlight it
4 Touch OK to complete the setting and return to the main screen.
To set face up rotation sort exit
1 Touch OPTIONS menu to display the Select finisher mode menu.
2 Touch FACE-UP to highlight it.
3 Touch OK to complete the setting and return to the main screen.
4 Touch SORT to highlight it.
To set face up group exit
1 Touch OPTIONS menu to display the Select finisher mode menu.
2 Touch GROUP and FACE-UP to highlig ht them .
3 Touch OK to complete the setting and return to the main screen.
To set face up rotation group exit
1 Touch OPTIONS menu to display the Select finisher mode menu.
2 Touch ROTATION GROUP and FACE-UP to highlight it.
3 Touch OK to complete the setting and return to the main screen.
ENWW Output mode for MFP without finisher 89
Page 100

90 Finisher modes ENWW
 Loading...