

Page 1
hphpLaserJet 9055 mfp
LaserJet 9065 mfp
Quick Reference
Page 2

Page 3

hp LaserJet 9055mf p and 9065mfp
quick reference guide
Page 4

Copyright Information
© 2003 Copyright Hewlett-Packard
Development Company, LP
Reproduction, adaptation, or translation
without prior written permission is prohibited,
except as allowed under the copyright laws.
A user of the Hewlett-Packard printer
associated with this user guide is granted a
license to: a) print hard copies of this user
guide for PERSONAL, INTERNAL, or
COMP ANY use subject to the restriction not to
sell, re-sell, or otherwise distribute the hard
copies; and b) place an electronic copy of this
user guide on a network server , provided
access to the electronic copy is limited to
PERSONAL, INTERNAL users of the
Hewlett-Packard printer associated with this
user guide.
The information contained in this document is
subject to change without notice.
Part number: Q3643-90901
Edition 1: 11/2003
FCC Class A Statement
This equipment has been tested and found to
comply with the limits for a Class A digital
device, pursuant to Part 15 of the FCC Rules.
These limits are designed to provide
reasonable protection against harmful
interference when the equipment is operated
in a commercial environment. This equipment
generates, uses and can radiate radio
frequency energy and, if not installed and
used in accordance with the instruction
manual, may cause harmful interference to
radio communications. Operation of this
equipment in a residential area is likely to
cause harmful interference, in which case the
user will be required to correct the
interference at his own expense. The end
user of this product should be aware that any
changes or modifications made to this
equipment without the approval of
Hewlett-Pac kard could result in the product
not meeting the Class A limits, in which case
the FCC could void the user's authority to
operate the equipment.
Trademark Credits
All products mentioned herein may be
trademarks of their respective companies.
Page 5

Table of Contents
1 Getting started
MFP parts. . . . . . . . . . . . . . . . . . . . . . . . . . . . . . . . . . . . . . . . . .2
The MFP . . . . . . . . . . . . . . . . . . . . . . . . . . . . . . . . . . . . . . .2
The control panel . . . . . . . . . . . . . . . . . . . . . . . . . . . . . . . . .3
The touch screen . . . . . . . . . . . . . . . . . . . . . . . . . . . . . . . . .4
Turning the MFP on and off . . . . . . . . . . . . . . . . . . . . . . . . .5
Help mode . . . . . . . . . . . . . . . . . . . . . . . . . . . . . . . . . . . . . . . . .5
2 Copying
Using the scanning glass . . . . . . . . . . . . . . . . . . . . . . . . . . . . . .8
Using the ADF . . . . . . . . . . . . . . . . . . . . . . . . . . . . . . . . . . . . . .9
Choosing a paper size . . . . . . . . . . . . . . . . . . . . . . . . . . . . . . .10
Orientation . . . . . . . . . . . . . . . . . . . . . . . . . . . . . . . . . . . . .10
To reduce and enlarge. . . . . . . . . . . . . . . . . . . . . . . . . . . .10
Duplexing (2-sided copying). . . . . . . . . . . . . . . . . . . . . . . . . . .10
Using the optional finisher features . . . . . . . . . . . . . . . . . . . . .11
To staple . . . . . . . . . . . . . . . . . . . . . . . . . . . . . . . . . . . . . .11
To punch holes. . . . . . . . . . . . . . . . . . . . . . . . . . . . . . . . . .11
To fold in the center . . . . . . . . . . . . . . . . . . . . . . . . . . . . . .11
To make a triple fold. . . . . . . . . . . . . . . . . . . . . . . . . . . . . .12
To insert covers . . . . . . . . . . . . . . . . . . . . . . . . . . . . . . . . .12
To create booklets . . . . . . . . . . . . . . . . . . . . . . . . . . . . . . .12
Finishing feature paper sizes. . . . . . . . . . . . . . . . . . . . . . .12
3 Printing
Accessing the print screen . . . . . . . . . . . . . . . . . . . . . . . . . . . .16
To access the configuration page . . . . . . . . . . . . . . . . . . .16
4 Loading trays
Tray 1 . . . . . . . . . . . . . . . . . . . . . . . . . . . . . . . . . . . . . . . . . . . .18
To load paper. . . . . . . . . . . . . . . . . . . . . . . . . . . . . . . . . . .18
To load tabs . . . . . . . . . . . . . . . . . . . . . . . . . . . . . . . . . . . .18
Trays 2 and 3 . . . . . . . . . . . . . . . . . . . . . . . . . . . . . . . . . . . . . .19
To load paper. . . . . . . . . . . . . . . . . . . . . . . . . . . . . . . . . . .19
To load tabs . . . . . . . . . . . . . . . . . . . . . . . . . . . . . . . . . . . .20
Tray 4 . . . . . . . . . . . . . . . . . . . . . . . . . . . . . . . . . . . . . . . . . . . .21
To load paper. . . . . . . . . . . . . . . . . . . . . . . . . . . . . . . . . . .21
To load tabs . . . . . . . . . . . . . . . . . . . . . . . . . . . . . . . . . . . .22
Optional tray 5 . . . . . . . . . . . . . . . . . . . . . . . . . . . . . . . . . . . . .23
To load paper. . . . . . . . . . . . . . . . . . . . . . . . . . . . . . . . . . .23
To load tabs . . . . . . . . . . . . . . . . . . . . . . . . . . . . . . . . . . . .24
Supported paper sizes for trays . . . . . . . . . . . . . . . . . . . . . . . .25
5 Adding toner
Adding toner . . . . . . . . . . . . . . . . . . . . . . . . . . . . . . . . . . . . . . .28
ENWW iii
Page 6

6 Emptying the punch waste box
Emptying the punch waste box. . . . . . . . . . . . . . . . . . . . . . . . .32
7 Clearing paper jams
Clearing paper jams . . . . . . . . . . . . . . . . . . . . . . . . . . . . . . . . .34
Appendix A Paper Sizes
Appendix B Warranty and regulatory information
Hewlett-Packard limited warranty statement . . . . . . . . . . .37
iv ENWW
Page 7

1
Getting started
ENWW 1
Page 8
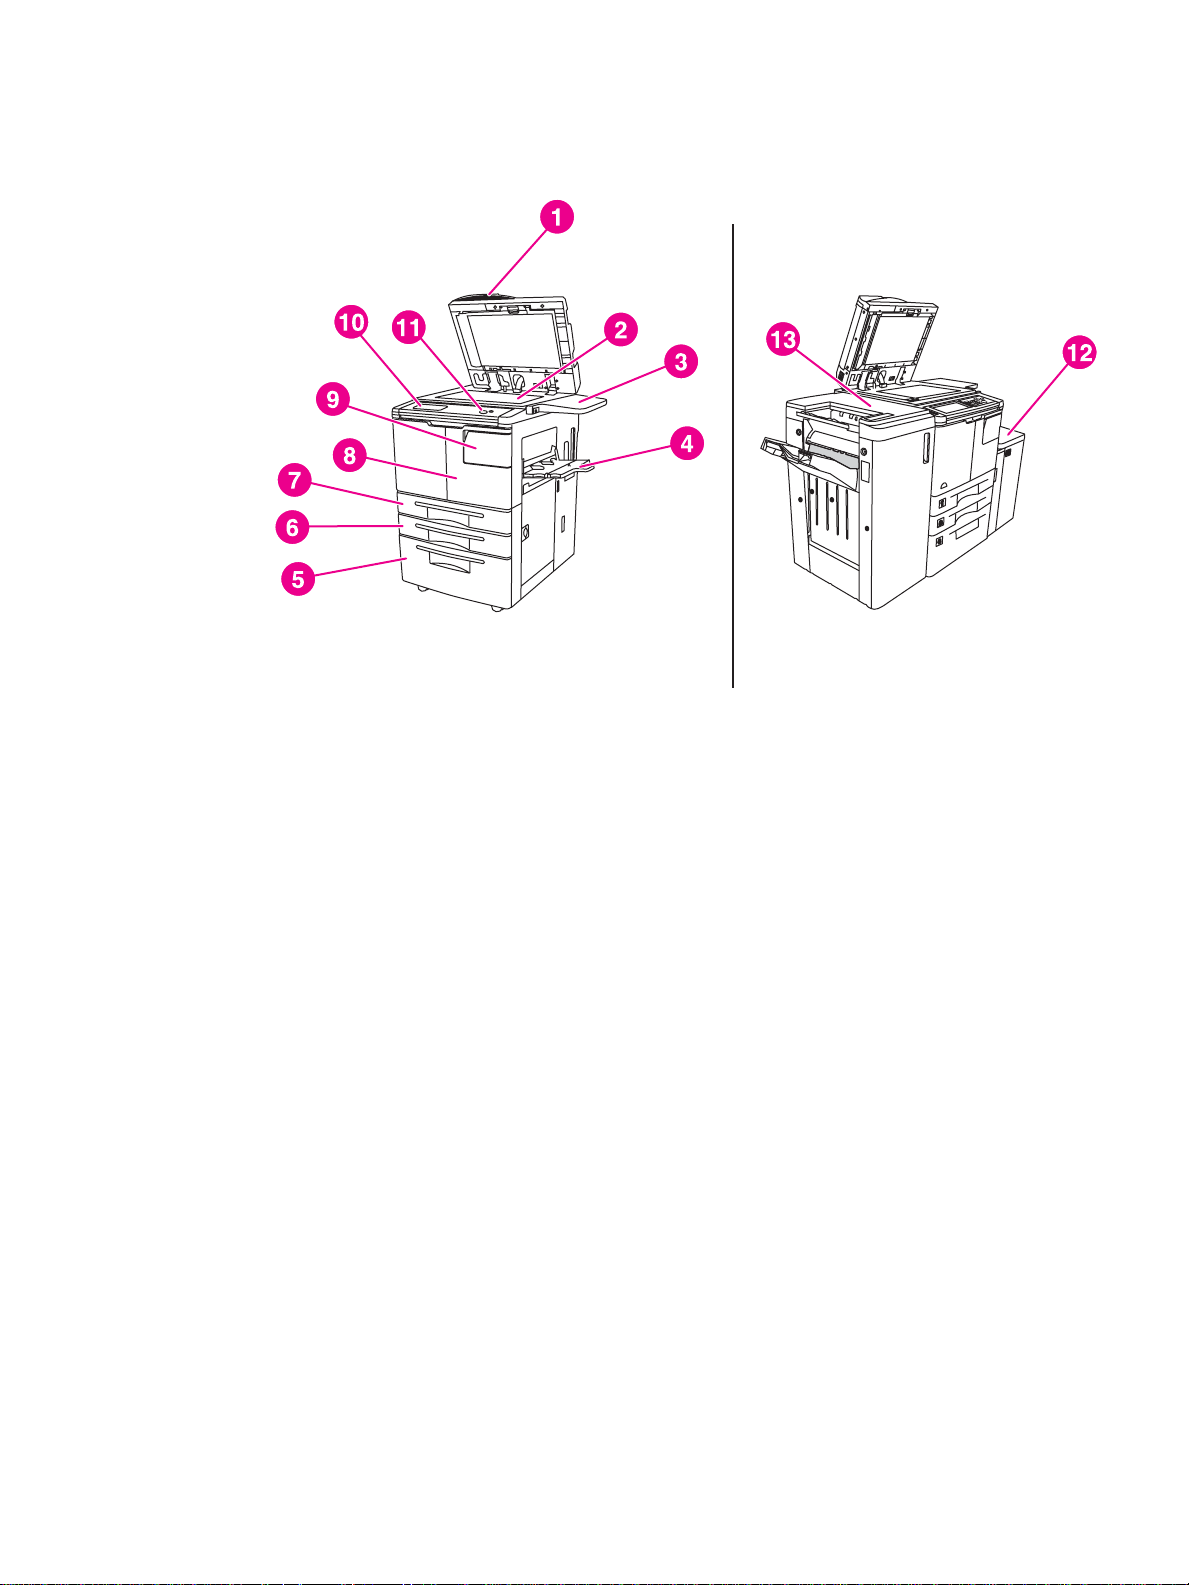
MFP parts
The MFP
1 Automatic document feeder (ADF)
2 Scanning glass
3Shelf
4Tray 1
5Tray 4
6Tray 3
7Tray 2
8 Front door
9 Toner access door
10 T ouch screen
11 Control panel
12 Optional Tray 5 (high capacity input device)
13 Optional finisher (output device)
2 1 Getting started ENWW
Page 9
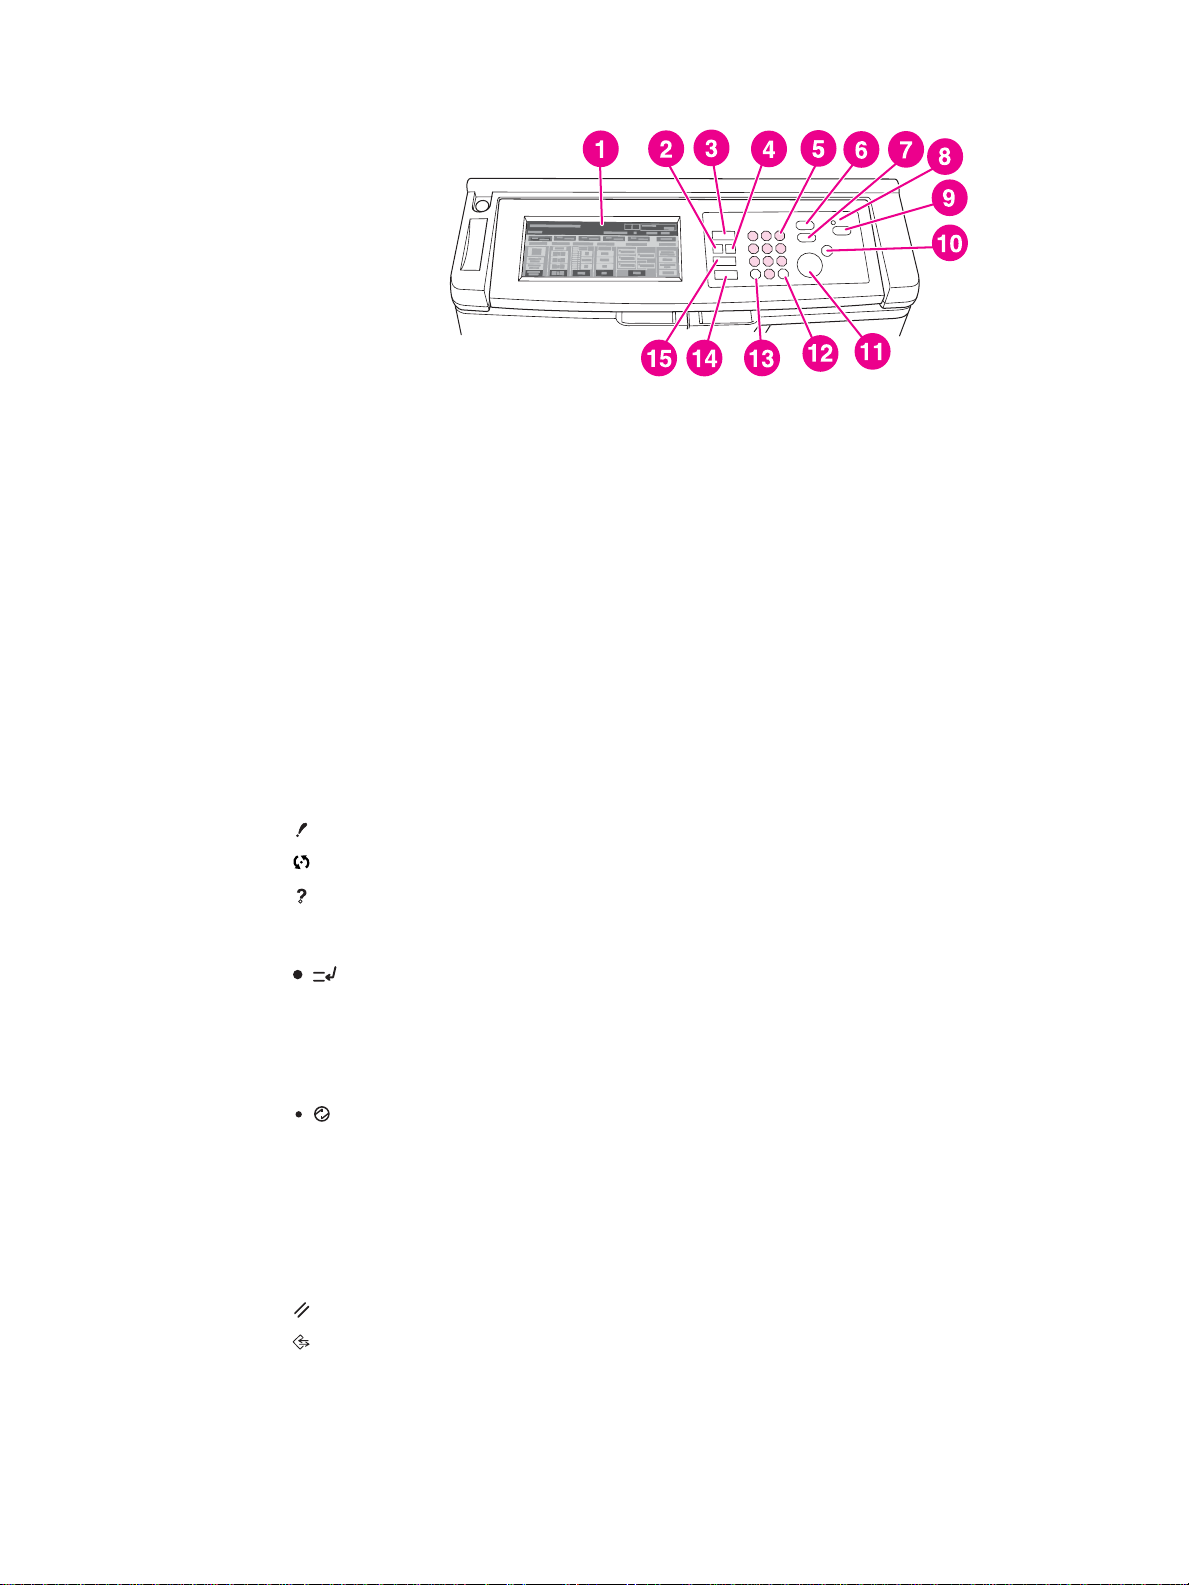
The control panel
1) Touch screen 9) Sleep On/Off
2) Check 10) Stop
3) Mode selection key 11) Start
4) Help 12) Clear Quantity
5) Numeric keypad 13) Counter
6) Interrupt 14) Reset
7) Proof Copy 15) Job Memory
8) Timer
The control panel allows access to the following functions:
● Check (2) displays a screen summarizing all settings that are selected for the current job.
● Mode selection key (3) switches the machine operation mode to copy, scan/fax, or print.
● Help (4) displays a screen with help for the currently selected function, or accesses the Key
Operator Mode screen. Not every function has a corresponding help screen.
● Numeric keypad (5) provides the means for entering numeri c values.
● Interrupt (6) stops copying that is in progress to allow copying from the scanning glass.
● Proof Copy (7) outputs a single set of copies to confirm whether the current settings are
selected properly.
● Timer (8) lights when the Weekly Timer function is activated. The function allows the MFP to
automatically shut down power for specific periods of time, up to one week in duration.
● Sleep On/Off (9) activates power-saving mode for times when the MFP is inactive, or
activates the timer interrupt mode when the weekly timer function is active.
● Stop (10) stops the copying and deletes the stored memory.
● Start (11) activates copying or scanning.
● Clear Quantity (12) allows resetting of the copy quantity.
● Counter (13) displays the counter screen or accesses programming modes for setting special
functions.
● Reset (14) restores the MFP to automatic mode settings or to Key Operator settings.
● Job Memory (15) displays screens for selecting job store/job recall functions.
ENWW MFP parts 3
Page 10

The touch screen
CAUTION Do not apply weight or pressure to the touch screen glass, or it may be damaged.
The touch screen is an LCD that displays interactive screens with touch keys for making job
selections. Selections are highlighted when they are touched. The touch screen is not active until
the MFP is completely warmed up.
Use the initial screen to access the FINISHER, DUPLEX, CONTRAST, SCALE, PAPER, and
ADVANCED options.
Under FINISHER, choose OPTIONS, which leads to selections about EXIT BIN, BINDING,
STAPLE, OUTPUT, and STORE FOR HDD. You may also choose STAPLE and SORT. STAPLE turns
the stapling function on and off. SORT turns the sort function on and off.
Under DUPLEX, choose duplexing options for 1- or 2-sided originals and printing.
Under CONTRAST, choose RESET or AUTO. These settings allow you to make the contrast of the
copy lighter or darker.
Under SCALE, choose AUTO, ZOOM, or PRESETS. This allows you to reduce or enlarge a
document. You may choose a preset ratio using PRESETS, or manually adjust the ratio using
ZOOM. AUTO returns the ratio to 1:1.
Under PAPER, choose the tray from which to copy. The size of the paper is displayed.
Corresponding icons show how much paper is left in each tray.
Under ADVANCED, choose ORIGINALS, OUTPUT, ROTATION OFF, or STORE. ORIGINALS allows
you to tell the MFP what kind of original you are copying (for example, a mixed-size original or an
original on tab paper). OUTPUT allows you to select options for your copy, such as cover insertion,
transparency interleave, repeat an image, or add a stamp/overlay. ROTATION OFF , when selected
and highlighted, deactivates the automatic mode that enables an original image to rotate 90
degrees to fit the orientation of the copy page with no loss of data. For example, when ROTATION
OFF is selected, a landscape-oriented image will not rotate before printing on a portrait-oriented
copy sheet. If you would like to print a landscape document on portrait paper (or alternately, a
portrait document on landscape) by first rotating the image, the automatic mode should be
activated (ROTATION OFF not highlighted).STORE allows you to scan a document and save it in
the MFP to print later.
4 1 Getting started ENWW
Page 11
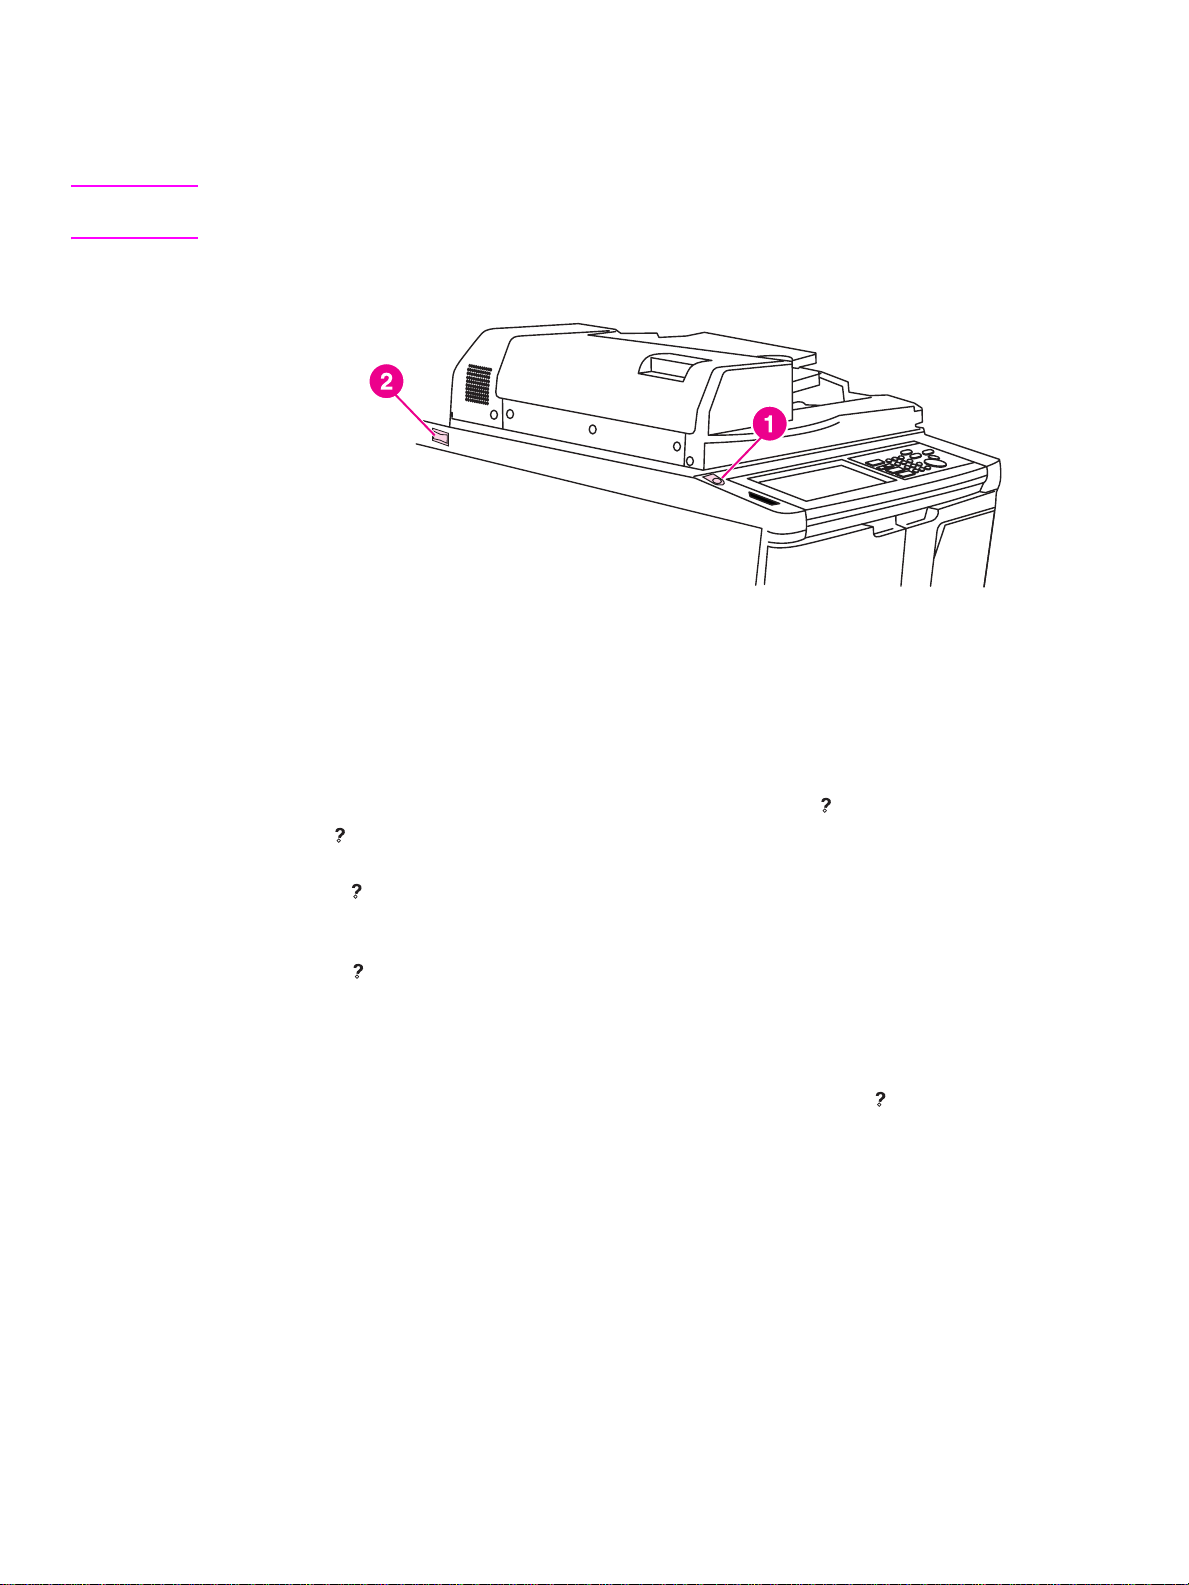
Turning the MFP on and off
To turn on the MFP, press the primary power switch (2), and then press the secondary power
switch (1).
CAUTION Always turn off the MFP by pressing the secondary power switch (1), and then pressing the primary
power switch (2).
1 Secondary power switch
2 Primary power switch
Help mode
Most functions provide a help option. To display the help, press Help on the control panel.
Use the Help option to access information about the current screen mode and to learn about
making jobs.
When the Help option is selected, the screen displays a list of all MFP functions. When a
function is touched, the help screen displays information specific to that function. To use the help,
perform the following procedure:
1 Press Help.
2 Touch STAPLE SUPPLY, PUNCH, ADF, TONER SUPPLY, PAPER SUPPLY, Help MENU, or FOR
ASSISTANCE to display specific help information. Select the topic you want.
3 For help on operations, touch Help MENU in the center of the screen.
4 Touch Exit to return to the screen displayed before pressing the Help option.
ENWW Help mode 5
Page 12

6 1 Getting started ENWW
Page 13

2
Copying
ENWW 7
Page 14
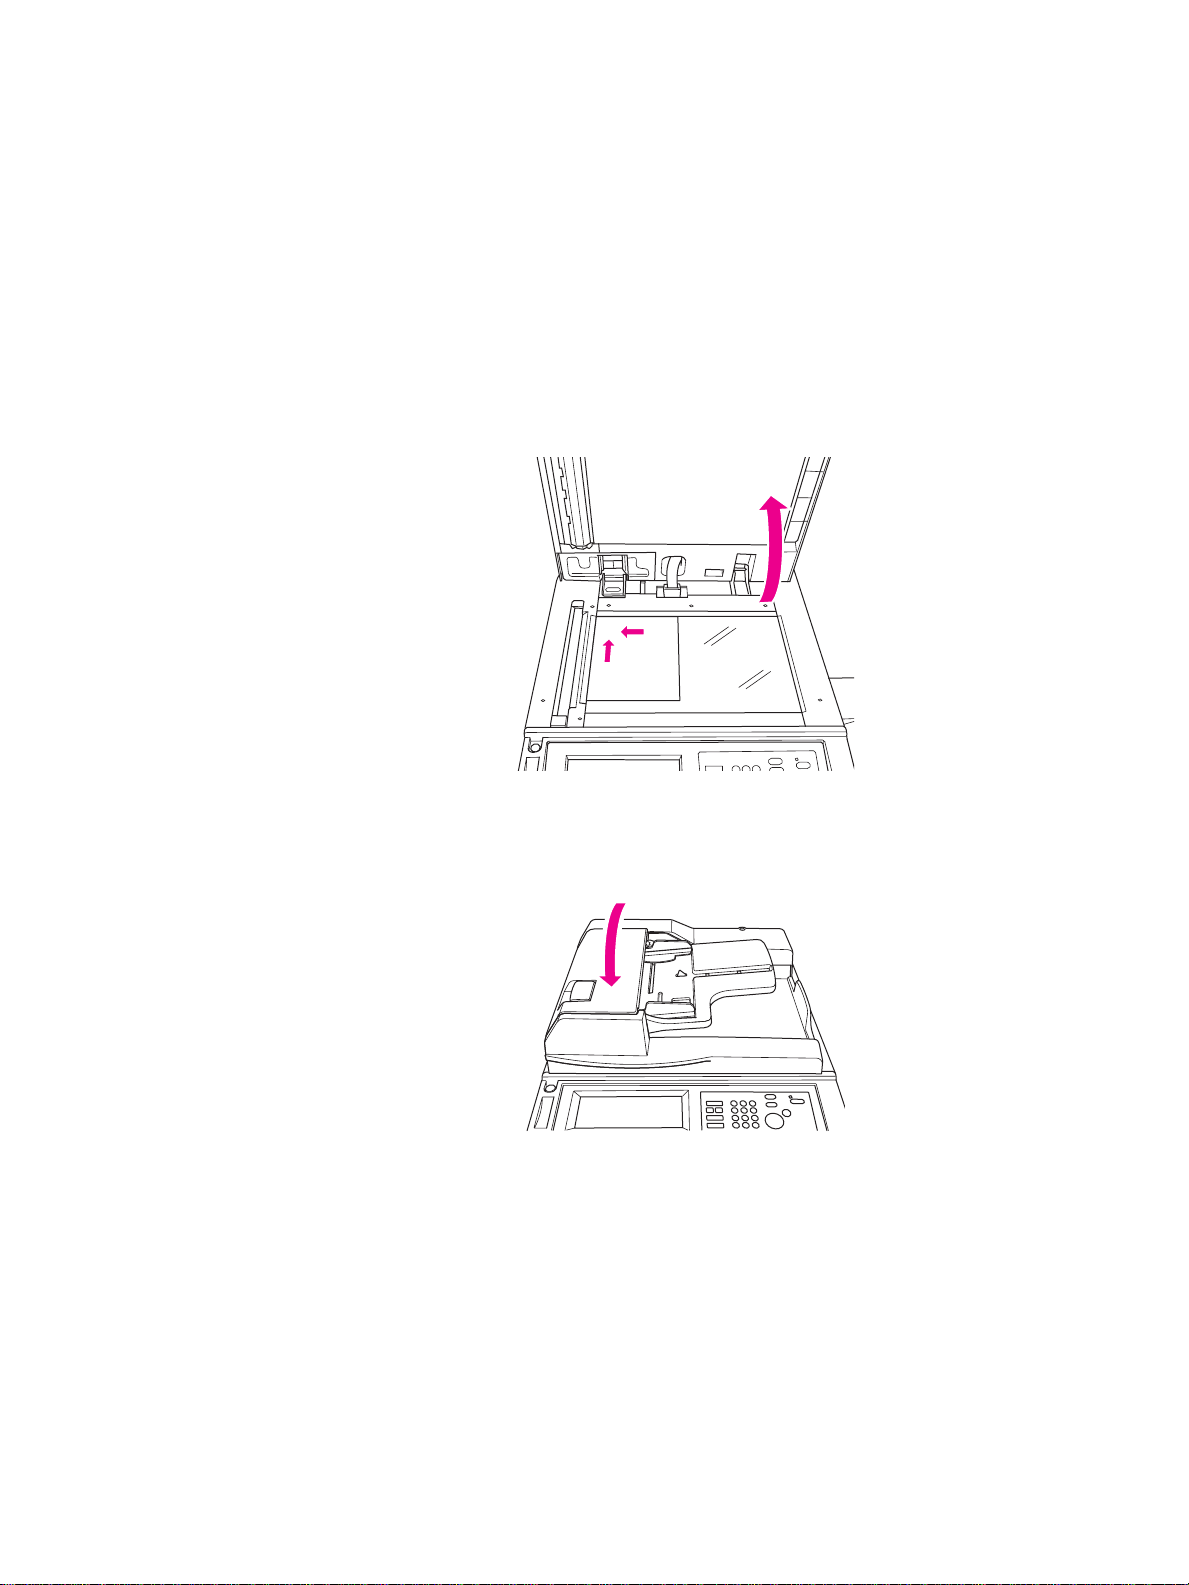
Using the scanning glass
Use the scanning glass when originals are not suitable for use with the automatic document feeder
(for example, when the size is incompatible, or when originals are folded, stapled, torn, or in poor
condition).
Use the scanning glass up to the following sizes:
● 280 by 432 mm (11 by 17 inches) sheet or book
● 6.8 kg (15 lb) book weight
● 30 mm (1.2 inches) thickness
To use the scanning glass
1 Place the original document face-down on the scanning glass, in the rear-left corner.
2 Close the document cover to prevent the original document from shifting on the scanning
glass.
3 Select any options, and press Start.
8 2 Copying ENWW
Page 15
Using the ADF
The Automatic Document Feeder (ADF) automatically feeds up to 100 originals that are placed
face-up in the tray. The ADF should be used only for unstapled, unfolded, smooth, flat original
documents. See Paper Sizes
for dimensions of various paper sizes. The following sizes can be
used in the ADF:
•A3 •B4 •5.5x8.5R+
•A4 •B5 •Letter
•A4R •B5R •LetterR
• A5 • B6R • Legal
•A5R •5.5x8.5 •Tabloid/Ledger
Do not use the ADF for the following original documents:
● curled, creased, or folded
● paste-ups or cut-outs
● books
● glossy paper, overhead transparencies, pre printed forms, or cellophane
● folded, punched, or stapled originals
● very thin or very thick originals (thin paper is 49 to 57 g/m
to 200 g/m
2
(25 to 110 lb bond)).
2
(13 to 15 lb bond), thick paper is 90
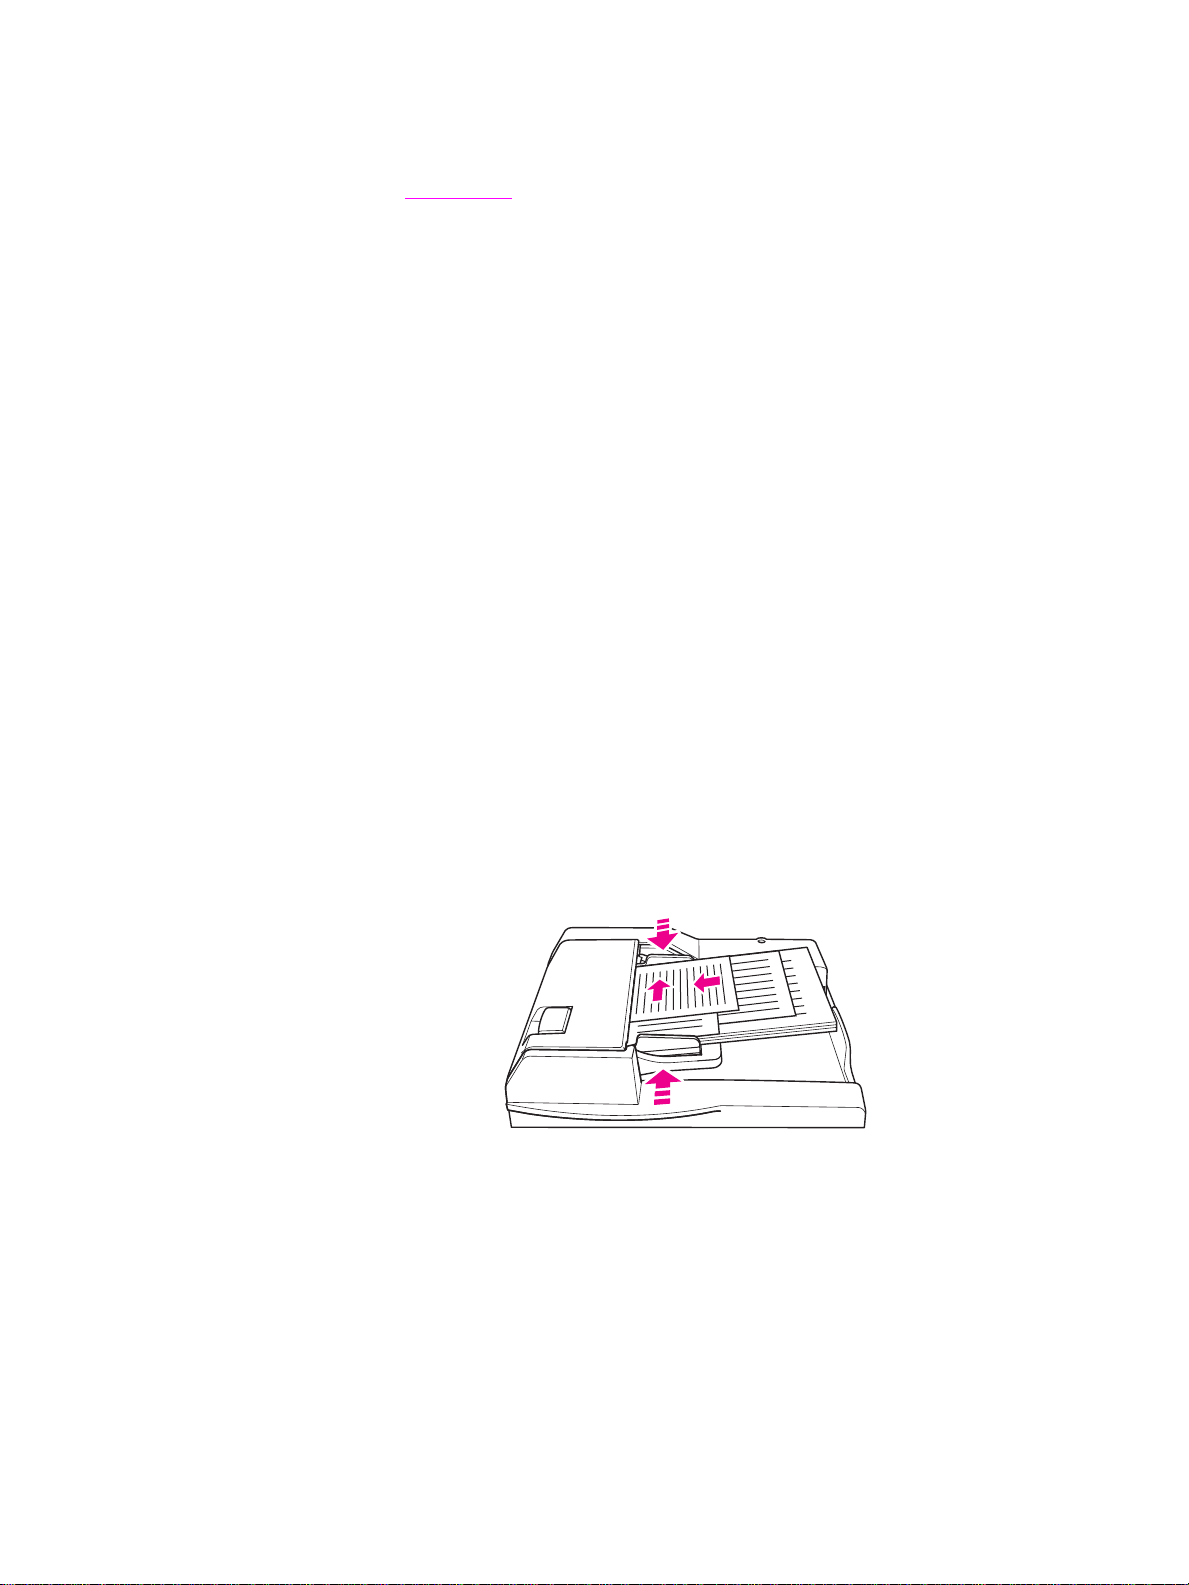
To use the ADF
The MFP determines the correct paper size to use according to the paper guide adjustments on
the ADF.
1 Place the original document face-up in the ADF tray. Make sure the ADF is completely closed.
2 Adjust the paper guides to the size of the document being fed through the ADF.
3 Use the numeric keypad to enter the number of copies that you want.
4 Press Start.
To use the ADF with mixed originals
Original documents that contain a variety of paper sizes can be copied from the ADF in one of two
Auto modes. In the Auto mode under PAPER, copies will output on mixed paper sizes to match the
originals. In the Auto mode under SCALE, copies will output on one common paper size that you
select. An appropriate magnification ratio is selected automatically.
1 Place the original document, face-up and in order, in the ADF tray, aligned with the left-rear of
the tray. Anything larger than A4 paper (210 by 297mm (8.3 by 11.7 inches)) should be fed
short edge first.
ENWW Using the ADF 9
Page 16

2 Adjust the paper guides to the largest original page.
3 Press Start.
Choosing a paper size
Orientation
You can use the Auto mode under either SCALE or PAPER to copy original documents on paper
that feeds into the copier differently than the original. For example, if the original document feeds
into the ADF short-edge first, and the only paper loaded is the same size, but oriented long-edge
first, the MFP will automatically rotate the image so that the copy comes out correctly.
Auto mode under SCALE will rotate the image, and reduce or enlarge the original image to fit the
selected paper.
Auto mode under PAPER will only rotate the image, selecting the same size paper as the original.
to turn automatic rotation off
The default setting for automatic rotation is on (ROTATION OFF is highlighted). You can turn
automatic rotation off by touching ROTATION OFF on the touch screen.
To reduce and enlarge
Use the Zoom mode to reduce or enlarge the copied original image in 1 percent increments.
1 On the touch screen, touch ZOOM.
2 Use the numbers or arrows on the pop-up menu to set the desired ratio.
3 Touch OK.
4 Place the original document in the ADF or place it on the scanning glass.
5 Press Start.
Vertical/horizontal zoom (delete)
Use the Vertical/Horizontal Zoom mode to reduce or enlarge vertical and horizontal dimensions.
1 On the touch screen, touch ZOOM.
2 Touch Vert. to select a vertical ratio, or touch Horiz. to select a horizontal ratio.
3 Use the numbers or arrows on the pop-up menu to set the desired ratio.
4 Touch OK.
5 Select the desired copy size.
6 Place the original document in the ADF tray or place it on the scanning glass.
7 Press Start.
Duplexing (2-sided copying)
Use duplexing when you want to make a 2-sided copy from a multiple-page original document that
is printed on one side, or an original document that is printed on both sides.
To duplex
1 If the original document is printed on one side, and you would like to duplex, touch 12.
If the original document is printed on two sides, and you would like to duplex, touch 22.
2 Place the original document in the ADF tray or place it on the scanning glass.
3 Press Start.
10 2 Copying ENWW
Page 17

Using the optional finisher features
To staple
The stapling feature allows you to make stapled copies. You may choose a single-corner staple or
two staples along one edge. For specific paper sizes, see Finishing feature paper sizes
1 Touch OPTIONS.
2 Under the STAPLE menu, select the appropriate staple position and binding mode (if
necessary).
3 Touch OK.
4 Touch ORIGINALS.
5 Select the appropriate original orientation, and then touch OK.
6 Select any additional copying features, including the number of copies.
7 Place the original document in the ADF tray.
8 Press Start.
To punch holes
For specific paper sizes, see Finishing feature paper sizes.
Note Do not punch holes in special paper (for example, labels, tabbed sheets, or transparent films).
.
1 Touch OPTIONS.
2 Touch PUNCH.
3 Select the appropriate punch position.
4 Touch OK.
5 Touch ORIGINALS.
6 Select the appropriate original orientation, and then touch OK.
7 Select any additional copying features, including the number of copies.
8 Place the original document in the ADF tray.
9 Press Start.
To fold in the center
You can fold up to three sheets without using the stapling function. For specific paper sizes, see
Finishing feature paper sizes
1 Close the document cover securely, and then press Reset to clear previous settings.
2 Touch OPTIONS.
3 Touch FOLDING.
4 Touch OK.
5 Select any additional copying features, including the number of copies.
.
6 Place the original document in the ADF tray.
7 Press Start.
ENWW Using the optional finisher features 11
Page 18

To make a triple fold
This finisher option, which is useful for brochures and letters, takes A4- or letter-size paper and
folds it three times. For specific paper sizes, see Finishing feature paper sizes
1 Touch OPTIONS.
2 Touch TRI-FOLD.
3 Touch OK.
4 Select any additional copying features, including the number of copies.
5 Place the original document in the ADF tray.
6 Press Start.
.
To insert covers
For specific paper sizes that the optional post insertion kit uses, see Finishing feature paper sizes.
1 Close the document cover securely, and then press Reset to clear previous settings.
2 Touch OPTIONS.
3 Touch COVER SHEET.
4 Select the appropriate front and back cover option. Select the tray that you would like to use
for each cover.
5 Touch OK twice.
6 Select any additional copying features, including the number of copies.
7 Load the covers into the post insertion trays.
8 Place the original document in the ADF tray.
9 Press Start.
To create booklets
1 Close the document cover securely, and then press Reset to clear previous settings.
2 Touch OPTIONS.
3 Touch Stapling & Folding.
4 Touch OK.
5 If a cover will be inserted, touch COVER SHEET, and then touch Booklet. Select the
appropriate options.
6 Select any additional copying features, including the number of copies.
7 Place the original document in the ADF tray.
8 Press Start.
12 2 Copying ENWW
Page 19

Finishing feature paper sizes
The following table shows the standard paper sizes that can be used for stapling, hole punching,
center folding, tri-folding, and inserting covers.
Size Stapling Hole
punching
A3
A4
A4R
A5
B4
B5
B5R
5.5x8.5
5.5x8.5R+
Folio (F4)R
Letter
Center
folding
Tri-folding Inserting covers
Upper tray Lower tray
LetterR
Legal
Tabloid/Ledger
Note Some wide paper sizes are supported. For more information, see the System Administrator’ s Gu ide.
ENWW Using the optional finisher features 13
Page 20

14 2 Copying ENWW
Page 21

3
Printing
ENWW 15
Page 22

Accessing the print screen
You can use the MFP to store jobs sent from your computer. To access these jobs later, perform
the following procedure:
1 Press Mode selection key twice.
2 To print the job, select the name of the stored job.
3 Press Start.
To access the configuration page
To access the configuration page, perform the following procedure:
1 Press Mode selection key twice.
2 Touch INFORMATION.
3 Touch CONFIGURATION PAGE.
4 Press Start.
16 3 Printing ENWW
Page 23

4
Loading trays
ENWW 17
Page 24

Tray 1
Tray 1 can accommodate up to 100 sheets of 75 g/m2 (20 lb) paper. Any size between 100 by 148
mm (5.5 by 8.26 inches) and 314 by 459 mm (12.36 by 18.07 inches) can be used. For specific
paper sizes, see Supported paper sizes for trays
To load paper
Note Load overhead transparencies one at a time.
1 Open Tray 1. Tray 1 is located on the right side of the MFP.
2 Open the tray extender.
.
3 Place the paper in the tray, and adjust the paper guides to the appropriate size.
To load tabs
The top sheet is designated face-down as the first tab of the finished set. Subsequent offset tab
sheets follow in sequence.
1 Open Tray 1, and open the tray extender.
18 4 Loading trays ENWW
Page 25

2 Load offset tabbed sheets so that the tab extensions are on the right, at the rear of the tray.
The tab extension width should be 12.5 mm (0.5 inches) or less.
Trays 2 and 3
Trays 2 and 3 can accommodate up to 500 sheets of 75 g/m2 (20 lb) paper. Any size between 210
by 140 mm (8.26 by 5.51 inches) and 314 by 459 mm (12.36 by 18.07 inches) can be used. For
specific paper sizes, see Supported paper sizes for trays
To load paper
Note When the paper type is displayed on the tray indicator of the touch screen, load the specified paper.
1 Pull out Tray 2 or 3, and open the paper feed roller.
.
2 Place paper in the tray and, if necessary, adjust the side guide to fit paper.
Note Do not stack paper above the thick red line.
3 Move the green lever of the rear paper guide to the edge of the paper.
4 Close the paper feed roller.
5 Close the tray.
ENWW Trays 2 and 3 19
Page 26

To load tabs
The top sheet is designated face-down as the first tab of the finished set. Subsequent offset tab
sheets follow in sequence.
1 Load offset tabbed sheets so that the tab extensions are on the left, at the rear of the tray. The
tab extension width should be 12.5 mm (0.5 inches) or less.
2 Specify the paper type as TAB in the Key Operator Mode.
20 4 Loading trays ENWW
Page 27

Tray 4
Tray 4 can accommodate up to 1,500 sheets of 75 g/m2 (20 lb) paper. Any size between 210 by
140 mm (8.26 by 5.51 inches) and 314 by 459 mm (12.36 by 18.07 inches) can be used. For
specific paper sizes, see Supported paper sizes for trays
To load paper
Note When the paper type is displayed on the tray key of the touch screen, load the specified paper.
1 Pull out Tray 4, and open the paper feed roller.
2 Place paper in the tray.
.
Note Do not stack paper above the thick, red line.
3 Move the green lever of the rear paper guide to the edge of the paper.
Note Do not move the front and rear paper guides without using the green lever.
ENWW Tray 4 21
Page 28

4 Close the paper feed roller and, if necessary, adjust the side guide to fit paper.
5 Close the tray.
To load tabs
See To load tabs under the Trays 2 and 3 section.
22 4 Loading trays ENWW
Page 29

Optional tray 5
Tray 5 can accommodate up to 4,000 sheets of 75 g/m2 (20 lb) paper. The following two versions
of Tray 5 are available with this MFP:
● hp 4000 sheet high capacity input (A4/Letter): This optional tray is configured for A4 or Letter
during installation.
● hp 4000 sheet high capacity input (A3/Ledger): This optional tray is configured for A3 or
Ledger during installation.
Note The A4/Letter version is configured for either A4 or Letter during installation, while the A3/Ledger
version is configured for A3 or Ledger during installation. To configure Tray 5 for other paper sizes,
contact your service provider.
For specific paper sizes, see Supported paper sizes for trays
.
To load paper
Note When the paper type is displayed on the tray key of the touch screen, load the specified paper.
1 Open the Tray 5 top door.
2 Press the paper loading button to lower the bottom plate.
Note Do not stack paper above the red line.
3 Place paper in the tray.
4 Close the top door.
ENWW Optional tray 5 23
Page 30

To load tabs
The top sheet is designated face-down as the first tab of the finished set. Subsequent offset tab
sheets follow in sequence.
1 Load offset tabbed sheets so that the tab extensions are on the right, at the rear of the tray.
The tab extension width should be 12.5 mm (0.5 inches) or less.
2 Specify the paper type as TAB in the Key Operator Mode.
24 4 Loading trays ENWW
Page 31

Supported paper sizes for trays
The following table shows the standard paper sizes for each of the trays.
Size Tray 1Tray 2Tray 3Tray 4Tray 5
A4/Letter A3/Ledger
A3
A4
A4R
A5
B4
B5
B5R
5.5x8.5
Folio (F4)
Letter
LetterR
Legal
Tabloid/ledger
3
23
3
3
2
1111
3
23
1111 3
3
3
1
Requires “special size setting” in Key Operator Mode. See the System Administrator’s Guide.
2
Tray 5 is configured for A4 or Letter during installation. Other paper sizes require changes to the
tray. Contact your service provider.
3
Tray 5 is configured for A3 or Ledger during installation. Other paper sizes require changes to the
tray. Contact your service provider.
Note Some wide paper sizes are supported. For more information, see the System Administrator’ s Gu ide.
ENWW Supported paper sizes for trays 25
Page 32

26 4 Loading trays ENWW
Page 33

5
Adding toner
ENWW 27
Page 34

Adding toner
Toner can be replaced while the MFP is operating.
WARNING! If you get toner on your skin or clothing, wash with cold water. Hot water sets toner.
1 Open the toner supply door.
2 Pull the toner bottle supply unit toward you.
3 Remove the empty toner bottle.
4 Hold the new toner bottle vertically, and shake the bottle slightly up and down.
5 Remove the toner cap.
28 5 Adding toner ENWW
Page 35

6 Place the bottle horizontally, and align the position of the rings on the toner bottle with the
grooves on the toner supply unit.
7 Push in the toner supply unit, and close the tone r sup pl y door.
8 Recycle or dispose of empty toner bottle in accordance with local requirements.
ENWW Adding toner 29
Page 36

30 5 Adding toner ENWW
Page 37

6
Emptying the punch waste box
ENWW 31
Page 38
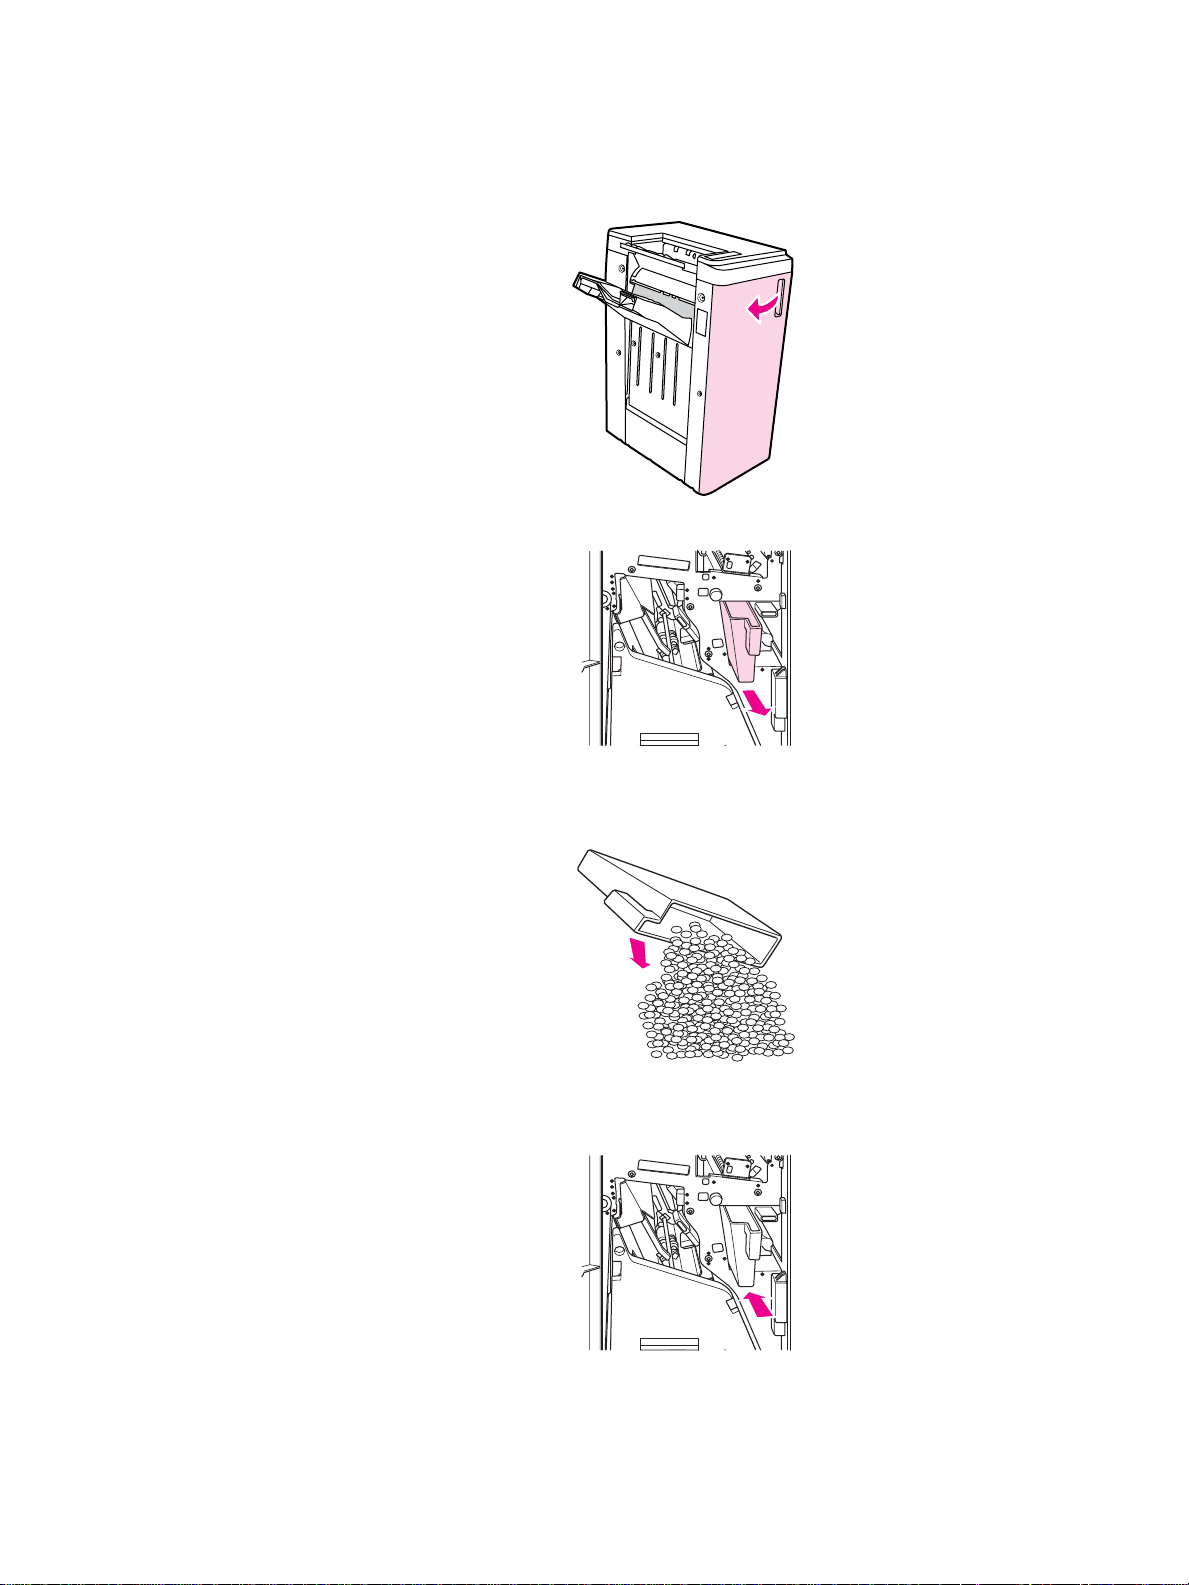
Emptying the punch waste box
If an optional punch kit is installed, a message appears on the touch screen indicating when it is
time to empty the punch waste box.
1 Open the finisher door, and take out the punch waste box.
2 Empty the punch waste box.
3 Return the punch waste box to its original position, and then close the finisher door.
32 6 Emptying the punch waste box ENWW
Page 39

7
Clearing paper jams
ENWW 33
Page 40

Clearing paper jams
WARNING! Observe the following information to protect yourself from possible injury:
● The right, rear area of the ADU (Automatic Duplexing Unit) generates high voltage. Do not
touch this area while power is applied to the MFP.
● The fuser is very hot. Do not touch the fuser when withdrawing the ADU or removing paper
jams.
● The ADU is heavy. Use care and draw it out gently.
● Do not put your hand between the MFP chassis and the ADU.
● Do not put your hand inside the booklet tray on the optional finisher when removing booklets;
there is a roller drive unit that can injure you.
CAUTION When clearing a paper jam, make sure that you remove all pieces of jammed paper from the MFP . A void
touching the drum or scratching it in any way . K eep all metal and magnetic objects such as watches and
jewelry away from the drum area.
When a paper misfeed occurs, the MFP stops copying or printing, and a jam code displays on the
screen to indicate a paper jam. A flashing code indicates the area that should be cleared first. To
view help screen instructions, touch the illustration explanation when the flashing mishandled
paper code displays. Remove the paper from each flashing location until all locations are cleared.
The following illustration is an example of how a paper jam display appears on the screen.
The following table shows the various codes for the MFP locations where paper jams occur.
Paper jam codes
Code Location Code Location Code Location
1 Tray 2 8 Between Tray 5 and MFP 14 ADF
2 Tray 3 9 Upper-right corner 15 ADF
3 Tray 4 10 Upper center 16 Upper finisher
5 Tray 5 11 Upper-left corner 17 Post insertion
6 Tray 1 12 Middle center 18 Booklet tray
7 Right door of MFP 13 ADU or middle center
34 7 Clearing paper jams ENWW
Page 41

A
Paper Sizes
The following table provides dimensions for commonly used paper sizes.
Size English
(inches)
A3 11.69 by 16.54 297 by 420
A4 8.27 by 11.70 210 by 297
A4R 11.70 by 8.27 297 by 210
A5 5.83 by 8.27 148 by 210
A5R 8.27 by 5.83 210 by 148
B4 10.12 by 14.33 257 by 364
B4R 14.33 by 10.12 364 by 257
B5 7.17 by 10.12 182 by 257
B5R 10.12 by 7.17 257 by 182
B6R 5.02 by 7.17 128 by 182
5.5x8.5 5.5 by 8.5 140 by 216
5.5x8.5R+ 8.5 by 5.5 216 by 140
Metric
(millimeters)
Letter 8.5 by 11.0 215.9 by 279.4
LetterR 11.0 by 8.5 279.4 by 215.9
Legal 8.5 by 14 215.9 by 355.6
Tabloid/Ledger 11.0 by 17.0 279.4 by 431.8
ENWW 35
Page 42

36 A Paper Size s ENWW
Page 43

Warranty and regulatory
B
information
Hewlett-Packard limited warranty statement
1 HP offers the customer no product warranty on this MFP; however, for information on a
Service Maintenance Contract on your product, please contact your authorized HP Reseller.
The Supplies warranty is set forth below.
2 HP products may contain remanufactured parts equivalent to new in performance or may have
been subject to incidental use.
3 TO THE EXTENT ALLOWED BY LOCAL LAW, THE ABOVE WARRANTIES (IF ANY) ARE
EXCLUSIVE AND NO OTHER WARRANTY OR CONDITION, WHETHER WRITTEN OR
ORAL, IS EXPRESSED OR IMPLIED AND HP SPECIFICALLY D ISCLAIMS ANY IM PLIED
WARRANTIES OR CONDITIONS OF MERCHANTABILITY, SATISFACTORY QUALITY, AND
FITNESS FOR A PARTICULAR PURPOSE. Some countries/regions, states, or provinces do
not allow limitations on the duration of an implied warranty , so the above limitation or exclusion
might not apply to you. This warranty gives you specific legal rights and you might also have
other rights that vary from country/region to country/region, state to state, or province to
province.
4 TO THE EXTENT ALLOWED BY LOCAL LAW, THE REMEDIES IN THIS WARRANTY
STATEMENT ARE YOUR SOLE AND EXCLUSIVE REMEDIES. EXCEPT AS INDICATED
ABOVE , IN NO EVEN T WILL HP OR ITS SUPPL IERS B E LIAB LE FOR LOSS OF D ATA FOR
FOR DIRECT, SPECIAL, INCIDENTAL, CONSEQUENTIAL (INCLUDING LOST PROFIT OR
DATA), OR OTHER DAMAGE, WHETHER BASED IN CONTRACT, TORT, OR OTHERWISE.
Some countries/regions, states, or provinces do not allow the exclusion or limitation of
incidental or consequential damages, so the above limitation or exclusion may not apply to
you.
5 THE WARRANTY TERMS CONTAINED IN THIS STATEMENT, EXCEPT TO THE EXTENT
LAWFULLY PERMITTED, DO NOT EXCLUDE, RESTRICT, OR MODIFY AND ARE IN
ADDITION TO THE MANDATORY STATUTORY RIGHTS APPLICABLE TO THE SALE OF
THIS PRODUCT TO YOU.
ENWW 37
Page 44

38 B Warranty and regulatory information ENWW
Page 45

Index
Numerics
2-hole punch 11
2-sided copying 10
3-hole punch 11
A
adding toner 28
ADF 9
automatic document feeder 9
B
bigger image 10
booklet folding 11
booklets, creating 12
brochure folding 12
C
center folding 11
changing toner 28
clearing paper jams 34
codes, paper jam 34
control panel 3
covers, adding 12
creating booklets 12
D
different-sized originals 9
dimensions
paper sizes
duplexing 10
35
E
emptying punch waste box 32
enlarging 10
F
filling Tray 1 18
filling Tray 2 19
filling Tray 3 19
filling Tray 4 21
filling Tray 5 23
filling trays
paper sizes
finishing feature paper sizes 12
folding
paper sizes
folding paper 11
25
12
H
Help 5
help mode 5
hole punch 11
horizontal zoom 10
I
inserting covers 12
paper sizes 12
J
jammed paper 34
L
letter folding 12
loading Tray 1 18
loading Tray 2 19
loading Tray 3 19
loading Tray 4 21
loading Tray 5 23
loading trays
paper sizes
25
M
mixed-size originals 9
O
orientation 10
P
Paper 34
paper jams 34
paper sizes
commonly used
filling trays 25
folding 12
inserting covers 12
punching holes 12
stapling 12
Part ii
platen glass 8
print screen 16
printing 16
punching holes 11
paper sizes 12
35
R
reducing 10
ENWW 39
Page 46

S
scanning glass 8
smaller image 10
staple 11
stapling 11
paper sizes 12
T
Tray 1 18
Tray 2 19
Tray 3 19
Tray 4 21
Tray 5 23
trays
supported paper sizes
tri-folding 12
turn off 5
turn on 5
V
vertical zoom 10
25
40 ENWW
Page 47

Page 48

© 2003 Copyright Hewlett-Packard Development Company, L.P.
www.hp.com
*Q3643-90901*
*Q3643-90901*
Q3643-90901
 Loading...