

Page 1
’
Page 2

Page 3

HP LaserJet 5 and 5M Printers
User’s Manual
EN i
Page 4

© Copyright Hewlett-Packard
Company 1996
All Rights Reserved.
Reproduction, adaptation, or
translation without prior written
permission is prohibited, except
as allowed under the copyright
laws.
Publication number
C3916-90901
First edition, April 1996
Second edition, May 1996
Warranty
The information contained in
this document is subject to
change without notice.
Hewlett-Packard makes no
warranty of any kind with
regard to this material,
including, but not limited to,
the implied warranties of
merchantability and fitness for
a particular purpose.
Hewlett-Packard shall not be
liable for errors contained herein
or for incidental or consequential
damages in connection with the
furnishing, performance, or use
of this material.
Trademark Credits
Adobe™, PostScript™ and the
PostScript Logo™ are
trademarks of Adobe Systems
Incorporated which may be
registered in certain
jurisdictions.
Arial, Times New Roman, and
Monotype are registered
trademarks of the Monotype
Corporation.
CompuServe is a U.S. trademark
of CompuServe, Inc.
Helvetica and Univers are
trademarks of Linotype AG
and/or its subsidiaries in the U.S.
and other countries.
Macintosh computer is a product
of Apple Computer,Inc.
Microsoft® is a U.S. registered
trademark of Microsoft
Corporation.
TrueType™ is a trademark of
Apple Computer, Inc.
WordPerfect is a registered
trademark of WordPerfect
Corporation.
Hewlett-Packard Company
11311 Chinden Boulevard
Boise, Idaho 83714
Page 5

Network Security
Note
This information is NOT repeated in this manual.
HP LaserJet 5/5M printers allow you to lock out other users’ abilities to
change most printer control panel settings. This is done by setting a
password and turning the lock command on. To verify, the message
ACCESS DENIED will appear when you enter a change using the printer
control panel.
There are three ways to implement printer security:
1 HP LaserJet Utility for Macintosh users.
2 JetAdmin for Novell networks.
3 PJL escape sequence sent from any ASCII editor.
HP LaserJet Utility (Macintosh)
1 Select the HP LaserJet Utility icon in the HP LaserJet folder on
your hard drive.
2 If necessary, click on the Select Printer button to select the HP
LaserJet 5M.
3 Select the Security panel by scrolling down and clicking on the key icon.
4 Click on the Lock Control Panel button. You will be prompted to
enter a password if the password has been set. If a password has not
been set, go to the next step.
5 Click the Set Password button. On the Printer Security dialog, enter
the new password (numeric values can be set from 0 to 65535), and
click on the OK button.
EN iii
Page 6

HP JetAdmin Utility (Novell Networks)
1 Run JETADMIN.
2 Select the printer you want to configure. It is listed under its
“JetDirect Interface Name” which appears on the self test
page/configuration plot.
3 Click on Printer at the top of the menu.
4 Click on Properties.
5 When the Property Pages appear click on the Security tab.
6 Select the Lock option under Control Panel Lock
7 Click on the OK button.
ASCII PJL Escape Sequence
Password: send this sequence to the printer from any ASCII editor:
E
%-12345X@PJL JOB
C
@PJL DEFAULT PASSWORD=[numeric password (0 to 65535)]
@PJL EOJ
E
%-12345X
C
CPLOCK: to turn on or off, assuming that a password has NOT been
set, send the following ASCII sequence to the printer:
E
%-12345X@PJL JOB
C
@PJL DEFAULT CPLOCK=ON [OFF]
@PJL EOJ
E
%-12345X
C
If a password HAS been set, send the following ASCII sequence to the
printer to turn CPLOCK on or off.:
E
%-12345X@PJL JOB PASSWORD=(numeric password)
C
@PJL DEFAULT CPLOCK=ON(OFF)
@PJL EOJ
E
%-12345X
C
iv EN
Page 7

Conventions
This manual uses the following conventions:
Bold indicates emphasis or a minor heading.
Italic refers to a document title or is used for emphasis.
COMPUTER type indicates text visible on a computer screen.
DISPLAY FONT indicates text visible on the printer control panel display.
The cursive letter l is used in examples to distinguish the letter l from
the numeral 1 (one). The character 0 is used in examples to distinguish
the numeral 0 from the letter O.
[Key Face] indicates keys (such as [Menu]) on the printer control panel.
[Key Face] indicates keys (such as [Enter]) on your computer keyboard.
Note
Caution
WARNING!
Notes contain important information set off from the text.
Caution messages appear before procedures which, if not observed,
could result in loss of data or in damage to equipment.
Warning messages alert you to a specific procedure or practice which, if
not followed correctly, could cause serious personal injury.
EN v
Page 8
Supplementary Documents
The technical reference guides listed below are designed for
programmers. The Paper Specification Guide is useful for purchasing
agents and paper buyers. These documents are available in English only.
You can order the documents listed below. There is a charge for some
documents. See the inside cover of this manual for telephone numbers.
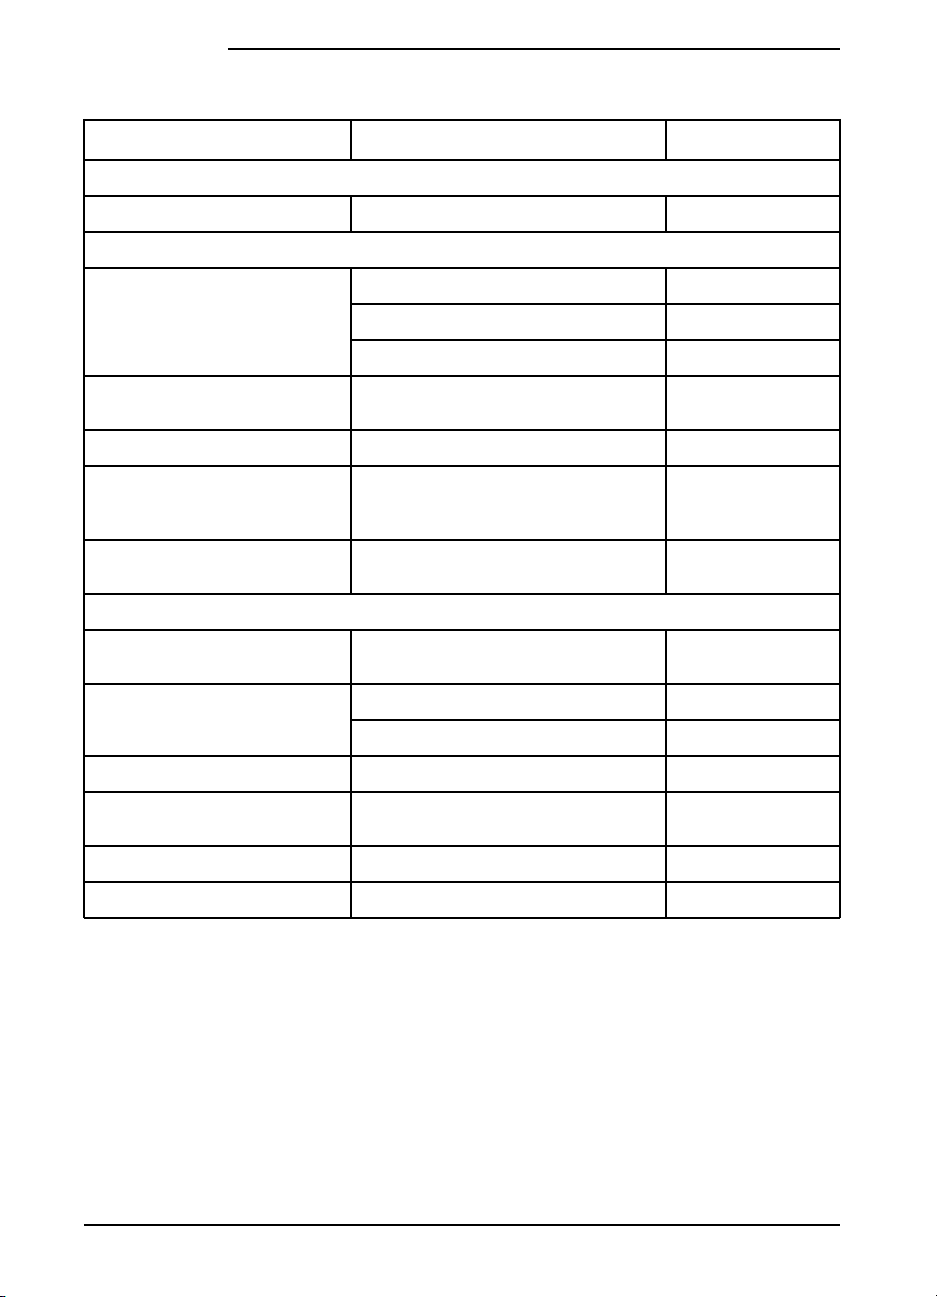
Documentation Available for the HP LaserJet 5\5M Printers
Title Part Number
PCL/PJL Technical Reference Package
PostScript SIMM Technical Reference
HP LaserJet Printer Family Paper Specification Guide
5961-0633
C3129-90901
5961-0920
vi EN
Page 9

Contents
1 About Your Printer
Introduction . . . . . . . . . . . . . . . . . . . . . . . . . . . . . . 1-1
HP LaserJet 5 Printer Features . . . . . . . . . . . . . . . . . . . . 1-2
HP LaserJet 5M Printer Features . . . . . . . . . . . . . . . . . . . 1-4
Accessories and Options . . . . . . . . . . . . . . . . . . . . . . . 1-5
Ordering Information . . . . . . . . . . . . . . . . . . . . . . . . 1-7
HP LaserJet Printer Parts . . . . . . . . . . . . . . . . . . . . . . . 1-8
2 Printing Software Overview
Introduction . . . . . . . . . . . . . . . . . . . . . . . . . . . . . . 2-1
Software for MS Windows . . . . . . . . . . . . . . . . . . . . . . 2-2
MS Windows Printer Drivers . . . . . . . . . . . . . . . . . . . 2-2
MS Windows Status Utilities . . . . . . . . . . . . . . . . . . . 2-3
Fonts . . . . . . . . . . . . . . . . . . . . . . . . . . . . . . . . 2-4
Network Management Utilities . . . . . . . . . . . . . . . . . . 2-5
Software for DOS . . . . . . . . . . . . . . . . . . . . . . . . . . . 2-6
DOS Printer Drivers . . . . . . . . . . . . . . . . . . . . . . . . 2-6
DOS Utilities . . . . . . . . . . . . . . . . . . . . . . . . . . . . 2-6
Remote Control Panel . . . . . . . . . . . . . . . . . . . . . . . 2-7
Software for Macintosh . . . . . . . . . . . . . . . . . . . . . . . . 2-8
Macintosh Printer Drivers . . . . . . . . . . . . . . . . . . . . . 2-8
Fonts . . . . . . . . . . . . . . . . . . . . . . . . . . . . . . . . 2-8
HP LaserJet Utility . . . . . . . . . . . . . . . . . . . . . . . . . 2-9
Optional Software . . . . . . . . . . . . . . . . . . . . . . . . . . . 2-9
Optional Printer Drivers Available . . . . . . . . . . . . . . . . . 2-9
Optional Networking Software Available . . . . . . . . . . . . 2-10
3 Using the Printer Control Panel
Introduction . . . . . . . . . . . . . . . . . . . . . . . . . . . . . . 3-1
Control Panel Layout . . . . . . . . . . . . . . . . . . . . . . . . . 3-2
Control Panel Keys . . . . . . . . . . . . . . . . . . . . . . . . . 3-2
Control Panel Menus . . . . . . . . . . . . . . . . . . . . . . . . . 3-4
Printing Menu . . . . . . . . . . . . . . . . . . . . . . . . . . . 3-6
PCL Fonts Menu . . . . . . . . . . . . . . . . . . . . . . . . . . 3-8
PostScript Menu . . . . . . . . . . . . . . . . . . . . . . . . . . 3-9
Job Menu . . . . . . . . . . . . . . . . . . . . . . . . . . . . . 3-10
Configuration Menu . . . . . . . . . . . . . . . . . . . . . . . 3-11
Memory Configuration Menu . . . . . . . . . . . . . . . . . . 3-13
Parallel Menu . . . . . . . . . . . . . . . . . . . . . . . . . . . 3-14
Serial Menu . . . . . . . . . . . . . . . . . . . . . . . . . . . . 3-15
Resets Menu . . . . . . . . . . . . . . . . . . . . . . . . . . . 3-16
Test Menu . . . . . . . . . . . . . . . . . . . . . . . . . . . . 3-17
EN Contents-1
Page 10

4 Printing
Introduction . . . . . . . . . . . . . . . . . . . . . . . . . . . . . . 4-1
Preparing for Printing . . . . . . . . . . . . . . . . . . . . . . . . . 4-2
Selecting Paper and Other Print Media . . . . . . . . . . . . . . 4-2
Media Input Options . . . . . . . . . . . . . . . . . . . . . . . . 4-4
Loading Tray 2 . . . . . . . . . . . . . . . . . . . . . . . . . . 4-6
Loading Tray 1 . . . . . . . . . . . . . . . . . . . . . . . . . . 4-7
Printing Tasks . . . . . . . . . . . . . . . . . . . . . . . . . . . . . 4-8
Stopping a Print Job . . . . . . . . . . . . . . . . . . . . . . . . 4-8
Manually Feeding Pages . . . . . . . . . . . . . . . . . . . . . 4-9
Reserving or Locking-out Trays . . . . . . . . . . . . . . . . . . 4-10
Printing on Special Media . . . . . . . . . . . . . . . . . . . . . . 4-13
Printing Letterhead and Preprinted Forms . . . . . . . . . . . . 4-13
Printing Envelopes . . . . . . . . . . . . . . . . . . . . . . . . 4-16
Printing Labels and Transparencies . . . . . . . . . . . . . . . . 4-18
Printing with Optional Accessories . . . . . . . . . . . . . . . . . . 4-20
Printing from the 500-sheet Tray 3 . . . . . . . . . . . . . . . . 4-20
Printing with the Duplex Unit (2-Sided Printing) . . . . . . . . . 4-24
Printing with the Envelope Feeder . . . . . . . . . . . . . . . . 4-27
Printing with the Infrared Serial Port . . . . . . . . . . . . . . . 4-30
5 PostScript Printing
Introduction . . . . . . . . . . . . . . . . . . . . . . . . . . . . . . 5-1
Preparing for PostScript Printing . . . . . . . . . . . . . . . . . . . 5-2
Using PostScript Printer Drivers . . . . . . . . . . . . . . . . . 5-2
Printer Memory and PostScript Printing . . . . . . . . . . . . . 5-3
Printing a Legal Page in PostScript . . . . . . . . . . . . . . . . 5-4
Switching Printer Languages (Personalities) . . . . . . . . . . . . . 5-5
Control Panel Differences with PostScript . . . . . . . . . . . . . . 5-6
PostScript Menu . . . . . . . . . . . . . . . . . . . . . . . . . . 5-7
Menu Items Affected by PostScript . . . . . . . . . . . . . . . . 5-10
Printing a PostScript Configuration Page . . . . . . . . . . . . . . 5-11
PostScript Configuration Page . . . . . . . . . . . . . . . . . . . 5-12
6 Adjusting Print Quality
Introduction . . . . . . . . . . . . . . . . . . . . . . . . . . . . . . 6-1
Choosing Print Resolution . . . . . . . . . . . . . . . . . . . . . . 6-2
Fine-Tuning Print Quality . . . . . . . . . . . . . . . . . . . . . . 6-3
Adjusting Print Density . . . . . . . . . . . . . . . . . . . . . . 6-3
Enhancing Resolution . . . . . . . . . . . . . . . . . . . . . . . 6-4
Harmonizing Print Density and REt Settings . . . . . . . . . . . 6-5
EconoMode Printing . . . . . . . . . . . . . . . . . . . . . . . . . 6-6
Saving Toner with EconoMode . . . . . . . . . . . . . . . . . . 6-6
Contents-2 EN
Page 11

7 Solving Printer Problems
Introduction . . . . . . . . . . . . . . . . . . . . . . . . . . . . . . 7-1
Calling for Help . . . . . . . . . . . . . . . . . . . . . . . . . . 7-1
Clearing Paper Jams . . . . . . . . . . . . . . . . . . . . . . . . . . 7-2
Paper Pickup and Transfer Guide Paper Jams . . . . . . . . . . . 7-4
Fusing Assembly Paper Jams—Top Cover . . . . . . . . . . . . 7-5
Fusing Assembly and Paper Exit Paper Jams— Rear Cover . . . 7-6
Optional Tray 3 Paper Jam . . . . . . . . . . . . . . . . . . . . . 7-7
Optional Duplex Unit Paper Jams . . . . . . . . . . . . . . . . . 7-8
Repeated Paper Jams . . . . . . . . . . . . . . . . . . . . . . . . 7-9
Resetting the Printer . . . . . . . . . . . . . . . . . . . . . . . . . 7-10
Testing the Printer . . . . . . . . . . . . . . . . . . . . . . . . . . 7-11
Self Tests . . . . . . . . . . . . . . . . . . . . . . . . . . . . . 7-11
Understanding the Self Test Printout . . . . . . . . . . . . . . . 7-12
Checking Installed PCL Fonts . . . . . . . . . . . . . . . . . . 7-14
Understanding the PCL Font List Printout . . . . . . . . . . . 7-14
Improving Print Quality . . . . . . . . . . . . . . . . . . . . . . . 7-16
Print Quality Checklist . . . . . . . . . . . . . . . . . . . . . . 7-16
Vertical Fade . . . . . . . . . . . . . . . . . . . . . . . . . . . 7-16
Dropouts . . . . . . . . . . . . . . . . . . . . . . . . . . . . . 7-16
Vertical Lines . . . . . . . . . . . . . . . . . . . . . . . . . . 7-17
Toner Smear . . . . . . . . . . . . . . . . . . . . . . . . . . . 7-17
Background Gray Toner Shading . . . . . . . . . . . . . . . . 7-17
Vertical Repetitive Defects . . . . . . . . . . . . . . . . . . . . 7-18
Improperly Formed Characters . . . . . . . . . . . . . . . . . 7-18
Vertical Line at Edge of Paper . . . . . . . . . . . . . . . . . . 7-18
Understanding Printer Messages . . . . . . . . . . . . . . . . . . 7-19
Status Messages . . . . . . . . . . . . . . . . . . . . . . . . . 7-19
Warning Messages . . . . . . . . . . . . . . . . . . . . . . . . 7-21
Error Messages . . . . . . . . . . . . . . . . . . . . . . . . . . 7-22
Service Messages . . . . . . . . . . . . . . . . . . . . . . . . . 7-24
Troubleshooting Checklist . . . . . . . . . . . . . . . . . . . . . 7-26
Printer Response Problems . . . . . . . . . . . . . . . . . . . . 7-26
Software/Computer/Printer Interface Problems . . . . . . . . . 7-28
Problems Using Optional Accessories . . . . . . . . . . . . . . 7-33
PostScript Troubleshooting . . . . . . . . . . . . . . . . . . . 7-35
8 Maintaining and Adjusting the Printer
Introduction . . . . . . . . . . . . . . . . . . . . . . . . . . . . . . 8-1
Managing the Toner Cartridge . . . . . . . . . . . . . . . . . . . . 8-2
Toner Cartridge Life . . . . . . . . . . . . . . . . . . . . . . . . 8-2
Storing, Installing, and Recycling the Toner Cartridge . . . . . . 8-2
HP’s Policy on Use of Non-HP Toner Cartridges . . . . . . . . . 8-2
Clearing the TONER LOW Message . . . . . . . . . . . . . . . 8-3
Extending Toner Cartridge Life . . . . . . . . . . . . . . . . . . 8-4
Cleaning the Printer . . . . . . . . . . . . . . . . . . . . . . . . . . 8-5
Printer Cleaning Tasks . . . . . . . . . . . . . . . . . . . . . . . 8-6
EN Contents-3
Page 12

Saving Power with the PowerSave Feature . . . . . . . . . . . . . 8-7
User-Replaceable Parts . . . . . . . . . . . . . . . . . . . . . . . . 8-9
Tray 1 Paper Pickup Roller & Separation Pad . . . . . . . . . . 8-10
Tray 2 Pickup Roller . . . . . . . . . . . . . . . . . . . . . . . 8-11
Transfer Roller . . . . . . . . . . . . . . . . . . . . . . . . . . . 8-12
Fusing Assembly . . . . . . . . . . . . . . . . . . . . . . . . . . 8-13
Optional Tray 3 Pickup Roller . . . . . . . . . . . . . . . . . . . 8-14
A Media Specifications
Introduction . . . . . . . . . . . . . . . . . . . . . . . . . . . . . . A-1
Paper and Preprinted Forms . . . . . . . . . . . . . . . . . . . . . A-2
Adhesive Labels . . . . . . . . . . . . . . . . . . . . . . . . . . . A-4
Overhead Transparencies . . . . . . . . . . . . . . . . . . . . . . . A-5
Envelopes . . . . . . . . . . . . . . . . . . . . . . . . . . . . . . . A-6
B Common PCL Printer Commands
PCL Printer Commands (Escape Sequences) . . . . . . . . . . . . B-1
C Specifications & Regulatory Information
Location Requirements . . . . . . . . . . . . . . . . . . . . . . . . C-1
Printer Specifications . . . . . . . . . . . . . . . . . . . . . . . . . C-2
Regulatory Information . . . . . . . . . . . . . . . . . . . . . . . . C-6
D Printer Memory
Determining Needed Printer Memory . . . . . . . . . . . . . . . . D-1
How Your Printer Uses Memory . . . . . . . . . . . . . . . . . . . D-2
SIMM Board Installation . . . . . . . . . . . . . . . . . . . . . . . D-6
E Serial Pin-out and Cabling Configuration
Serial Communication . . . . . . . . . . . . . . . . . . . . . . . . E-1
F Warranty and Software License
Limited Warranty . . . . . . . . . . . . . . . . . . . . . . . . . . . F-1
Service During the Warranty Period . . . . . . . . . . . . . . . . . F-3
Service After the Warranty Period . . . . . . . . . . . . . . . . . . F-4
Repacking Guidelines . . . . . . . . . . . . . . . . . . . . . . . . . F-4
HP Software Product License . . . . . . . . . . . . . . . . . . . . . F-5
G Sales and Service Offices
Calling for Help . . . . . . . . . . . . . . . . . . . . . . . . . . . G-1
Index
Contents-4 EN
Page 13
About Your Printer
Introduction
This chapter introduces the features of the HP LaserJet 5 and 5M
printers and provides illustrations of key printer parts.
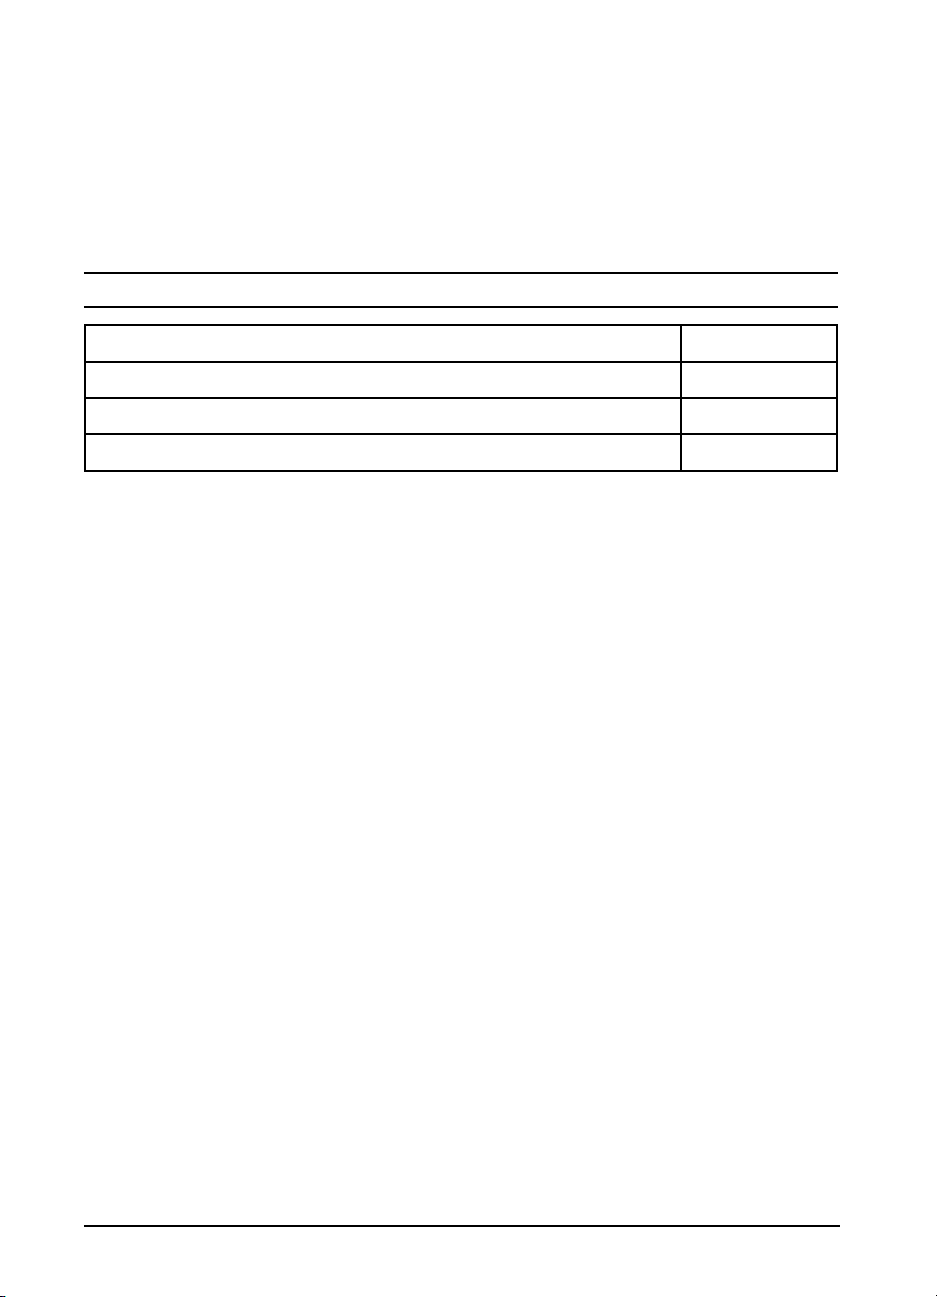
Figure 1-1
1
Introducing the HP LaserJet 5/5M printer
This chapter is divided into the following sections:
• HP LaserJet 5 Printer Features
• HP LaserJet 5M Printer Features
• Accessories and Options
• Ordering Information
• HP LaserJet Printer Parts
EN About Your Printer 1-1
Page 14

HPLaserJet 5 Printer Features
Print Speed A12 page-per-minute engine with Accelerated Printing Technologies for
impressive performance.
Print Quality The printer offers true 600-dpi printing with Resolution Enhancement
technology (REt), MicroFine toner, and 120 levels of gray for smooth,
photo-like images. REt adjusts the size and placement of each dot to
smooth edges and curves. Combined with MicroFine toner, this sharpens
the appearance of text and graphics.
PCL
Language
Language
Switching
Paper
Handling
The printer comes with the PCL 6 printer language, which is compatible with
all previous HP LaserJet printers. PCL 6 offers faster printing performance,
built-in Intellifont and TrueType type scaling technologies, built-in HP-GL/2
vector graphics, and advanced imaging capabilities, such as reverse (white
on black) printing and patterned fonts.
When optional printer languages (such as PostScript) are installed, the
printer can automatically determine and switch to the appropriate language
of a print job.
The printer can print on a variety of sizes and weights of paper as well as
envelopes, labels, and transparencies.
•Tray 1 adjusts to hold envelopes and various sizes of paper that can be fed
manually or stacked for multiple copies.
•Tray 2 holds up to 250 sheets of 20 lb. (75 g/m
•An optional Tray 3 holds up to 500 sheets of 20 lb. (75 g/m
2
) paper.
2
) paper.
•An optional Duplex Unit allows printing on both sides of the paper.
•An optional Envelope Feeder holds approximately 75 envelopes for
continuous envelope printing.
Memory The printer comes with 4 MBytes of memory and is upgradable to a maximum
of 66 MBytes. The printer has four SIMM slots for additional 1, 2, 4, 8, and 16
MByte industry-standard memory modules. The SIMM slots can also hold
optional languages (such as PostScript), typefaces, and Flash SIMMs.
1-2 About Your Printer EN
Page 15

Memory
Management
Software
Utilities
Memory Enhancement technology (MEt) allows most documents to print using
the printer’s standard amount of memory. MEt automatically compresses data to
print complex pages.
In addition to printer drivers that let you select most printer options from your
computer screen, the software includes utilities specific for Windows,
Macintosh and networked computers. See Chapter 2 for a description of the
various software utilities.
1
About your
Printer
I/O Features
•The printer provides automatic I/O switching between all installed I/O ports
allowing multiple computers to be connected simultaneously.
•The printer comes with a Modular I/O (MIO) slot designed to support
optional HP JetDirect cards or compatible MIO cards from other companies.
(See the “Accessories and Options” section later in this chapter for a list of
HP JetDirect cards.)
•The printer comes with an IEEE 1284 parallel interface for high-speed
two-way communications between the printer and the computer.
•A standard RS-232 serial port is included.
•A serial infrared port is included for wireless printing with the optional HP IR
adapter.
Energy
Savings
The printer is designed with the PowerSave feature to conserve electricity by
substantially reducing power consumption when it is idle for a specified
length of time. The user-adjustable PowerSave feature qualifies the
HP LaserJet 5 Printer for the U.S. Environmental Protection Agency’s
ENERGY STAR Computers award.
Toner
Savings
Fonts The printer comes with 45 scalable TrueType fonts built-in and an additional
Options The HP LaserJet 5 printer also offers a wide variety of accessories and
The EconoMode feature lowers printing costs by reducing the amount of
toner on the printed page by 50%, so the toner cartridge lasts longer. The
printed result is similar to the draft mode found on some dot matrix printers.
65 on disk for MS Windows. HP FontSmart software is also included for
simple font management in MS Windows.
options, such as a PostScript language SIMM, Flash SIMM, extra memory,
Network Interface Cards, duplexer (for two-sided printing), additional trays
(with varying sizes and capacities) and an envelope feeder.
EN About Your Printer 1-3
Page 16

HPLaserJet 5M Printer Features
The HP LaserJet 5M printer offers all the features of the HP LaserJet 5
printer, plus more memory, a built-in PostScript language SIMM, and an
HP JetDirect card that can connect your printer to LocalTalk and
EtherNet networks.
Memory The printer has 6 MBytes of installed memory (upgradable to 52 MBytes),
and 3 available SIMM slots for additional 1, 2, 4, 8, and 16 MByte
industry-standard memory modules.
PostScript The HP LaserJet 5M printer comes with the Adobe PostScript Level 2
software, which is backward compatible with earlier versions of Adobe
PostScript. The printer also comes with Adobe PostScript Level 2 printer
drivers for Macintosh and Windows (version 3.1 and later), and the
LaserJet Utility for the Macintosh
Fonts The printer comes with 35 built in fonts and an additional 75 fonts on disk for
MS Windows.
.
HP
Networking
The printer’s JetDirect card lets you connect directly to your LAN (Local Area
Network) for faster printing. You can also print in multiple platform
environments. The HP JetDirect card automatically switches between
protocols, so a single printer can serve many networks at once or be moved
to a new network with no additional hardware investment.
The HP JetDirect card supports the following networks. Clients can be DOS,
Windows, OS/2, Macintosh, or UNIX.
•Novell NetWare 3.x, 4.x
•Microsoft LAN Manager for OS/2, v. 2.x
•IBM LAN Server for OS/2, v. 2.x, 3.x
•Microsoft Networking
•HP-UX v. 9.x, 10.x
•SunOS v. 4.1.3, 4.1.4
•SCO UNIX V/386 (contact OS vendor for level of support)
•Solaris v. 2.3, 2.4
•IBM/AIX (contact OS vendor for level of support)
•Apple EtherTalk, phase 1 and 2
1-4 About Your Printer EN
Page 17
Accessories and Options
You can increase your printer’s capabilities by adding the following
accessories and options. See the inside front cover of this manual for
HP dealer and ordering information.
1
About your
Printer1About your
Printer
Note
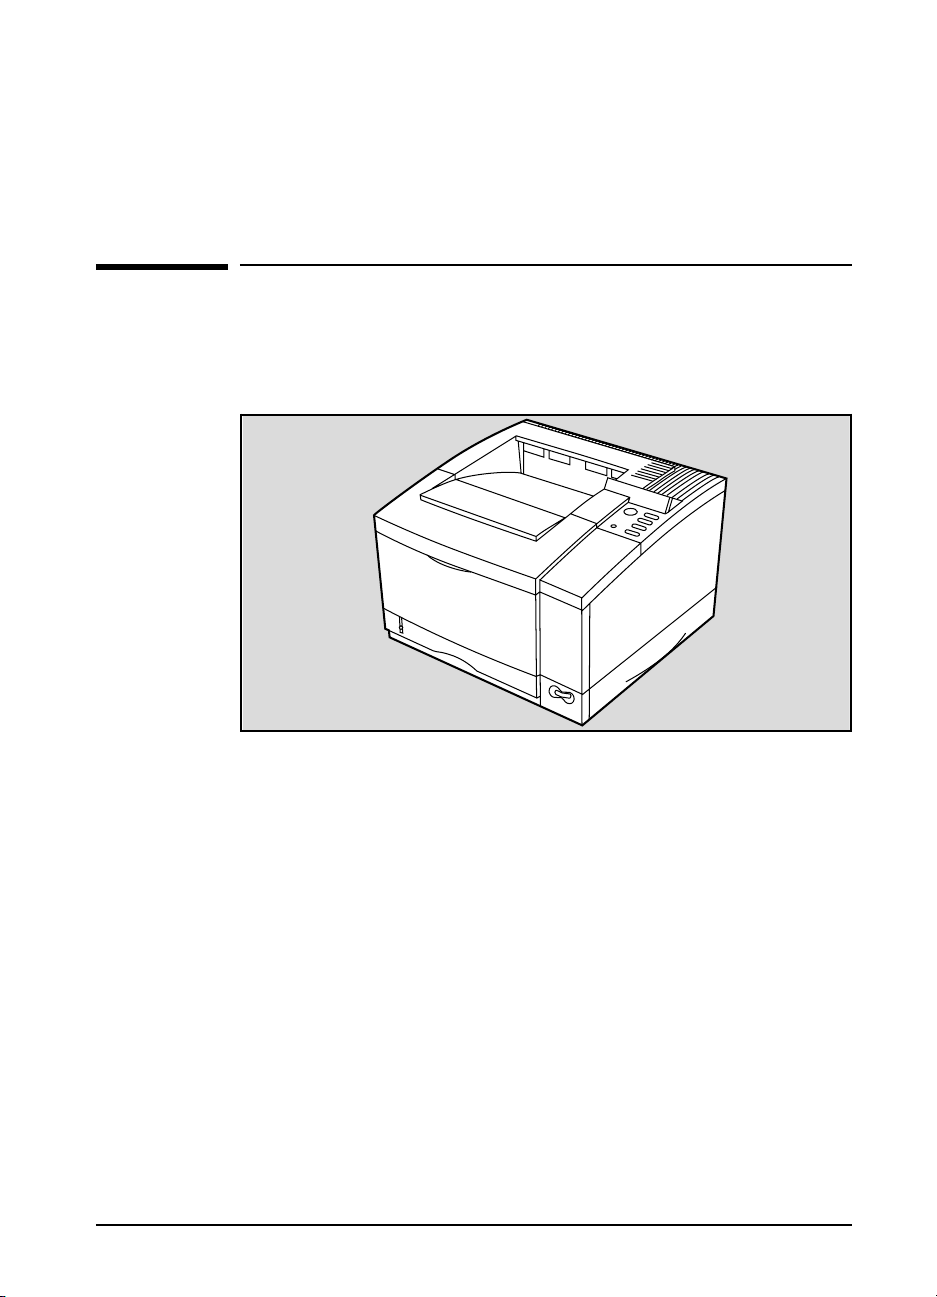
Figure 1-2
Accessories and Options from previous HP LaserJet printers do not
work with the HP LaserJet 5\5M printers.
Printer with options shown shaded
A. Envelope Feeder D. IR Adapter
(wireless printing)
Note
B. Duplex Unit
(for two-sided printing)
C. 500-sheet Tray 3 F. Flash SIMM
Other accessories and options (not shown) are available. For a complete
E. PostScript SIMM
listing, see the table on the following page.
EN About Your Printer 1-5
Page 18
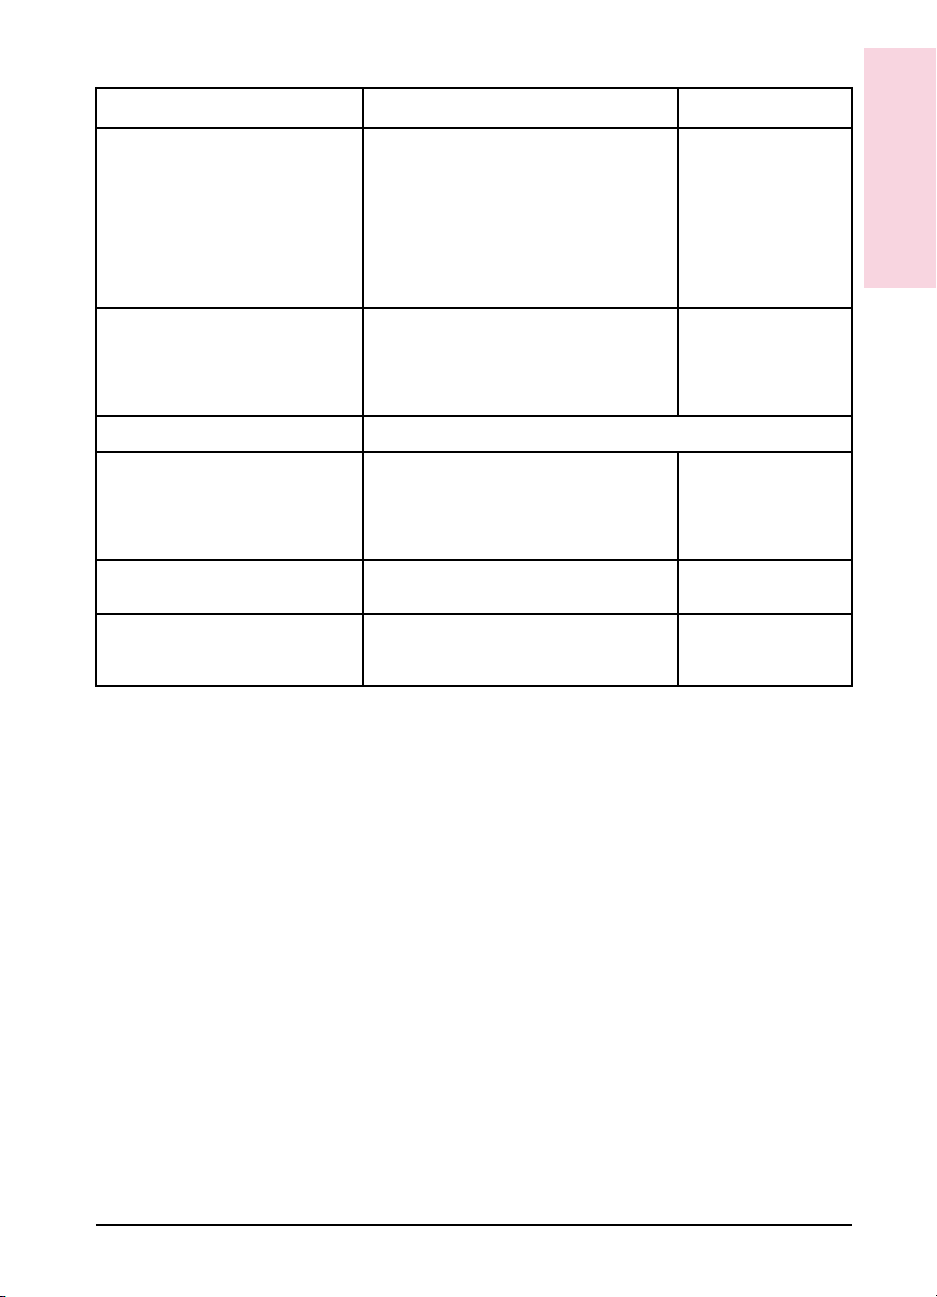
HP LaserJet 5/5M Accessories and Options
Option Description or Use Part Number
Toner Cartridge
Toner Cartridge Replacement toner cartridge. 92298A
Paper Handling Accessories
Tray 2 replacement 250 sheettray: legal, letter, executive,A4. C3924A(universal)
250 sheet tray, letter only. C3925A(letter)
250 sheettray,A4 only. C3926A(A4)
Tray 3 assembly Includes a base unit and an adjustable 500
Tray 3 replacement 500 sheettray: legal, letter, executive,A4. C3923A(legal/universal)
Envelope Feeder 75-envelopepower feeder.
Duplex Unit The Duplex Unitallows you to automaticallyprint
Cable and Interface Accessories
Parallel cable 2 Meter IEEE-1284cable
Serial cables 9-9 pin serial cable (male/female). C2932A
SerialAdapter 25-9 pin adapter. C2909A
HP IR Adapter Unit requiredfor an Infrared interface with a
Macintosh Serial Cable 92215S
Macintosh Network Cable-Kit For PhoneNETor LocalTalk. 92215N
sheet tray for legal, letter, executive,and A4.
Supports Commercial#10, #7
C5, and B5 envelope sizes.
on both sides of a page.
3 Meter IEEE-1284cable
9-25 pin serial cable (male/female). C2933A
IrDA-compliant portable device.
3
⁄4(Monarch) DL,
C3921A(universal)
C3927A
C3920A
C2950A
C2951A
C2929A
1-6 About Your Printer EN
Page 19
Option Description or Use Part Number
Modular I/O and Network Cards HP JetDirectMulti-protocol Network Cardwith
Ethernet/IEEE802.310Base-T.
J2550A
1
About your
Printer1About your
Printer
HP JetDirectMulti-protocol Network Cardwith
LocalTalk and Ethernet/IEEE802.310Base-T,
BNC, and DN8.
HP JetDirectMulti-protocol Network Cardwith
Token Ring (DB9 and RJ45).
UNIX InterfaceSoftware HP JetDirectinterface software for HP-UX
Memory, additional languages
Memory SIMMs You can install up to 64 MBytes of additional
Flash SIMM Additional non-volatile RAM. 2MByte - C3930A
Adobe PostScript Level 2 printer
language (this includes 2MB of
additional memory).
* Ships with HP LaserJet 5M
systems.
HP JetDirectinterface software for SunOS and
Solaris UNIX systems.
memory, in the HP LaserJet 5 and up to 48
MBytes in the HP LaserJet 5M.
You can add the Adobe Level 2 PostScript
language by installing this SIMM in your printer.
J2552A*
J2555A
J2374C
J2375C
1 MByte - C3130A
2 MByte - C3131A
4 MByte - C3132A
8 MByte - C3133A
16 MByte - C3146A
4 MByte - C3931A
C3918A*
Ordering Information
To order HP LaserJet 5/5M accessories and options :
United States
• Call HP Direct Ordering at (800) 538-8787.
• To find a dealer near you (or if your dealer is temporarily out of
stock), call the HP Customer Information Center (800) 752-0900.
Worldwide
EN About Your Printer 1-7
• See Appendix G for Sales and Service Offices for authorized dealers
outside of the U.S.
Page 20
HPLaserJet Printer Parts
The following illustrations give the location and names of key printer
parts.
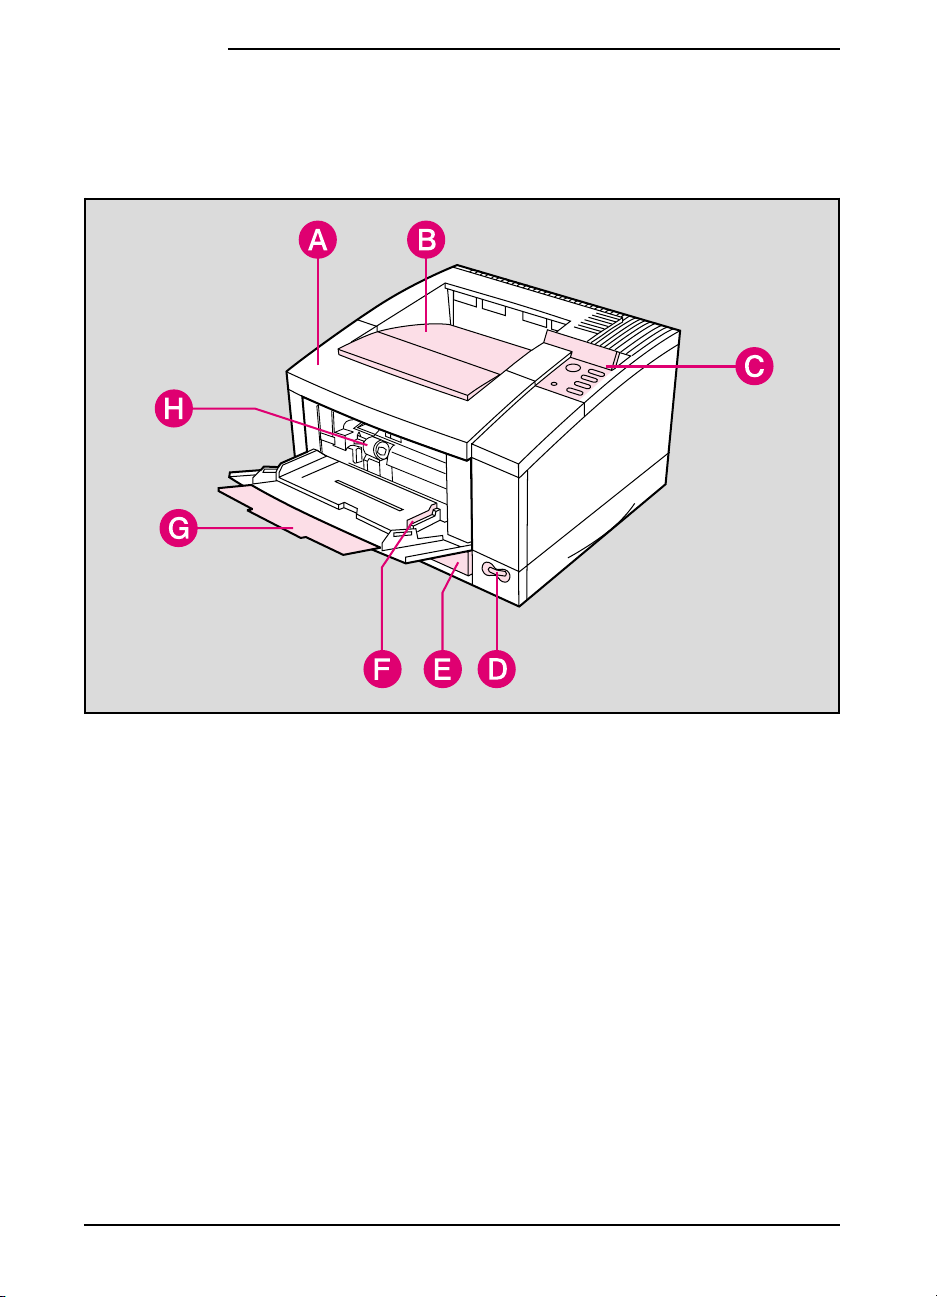
Figure 1-3 Front/right side view (with Tray 1 open)
A. Top cover E. 250-sheet Tray 2
B. Outputbin F. Tray 1 paper width guide
C. Control panel and display G. Tray 1 and extension
D. ON/OFFpower switch H. Envelope Feeder access cover location
(shown with cover removed)
1-8 About Your Printer EN
Page 21
1
About your
Printer1About your
Printer
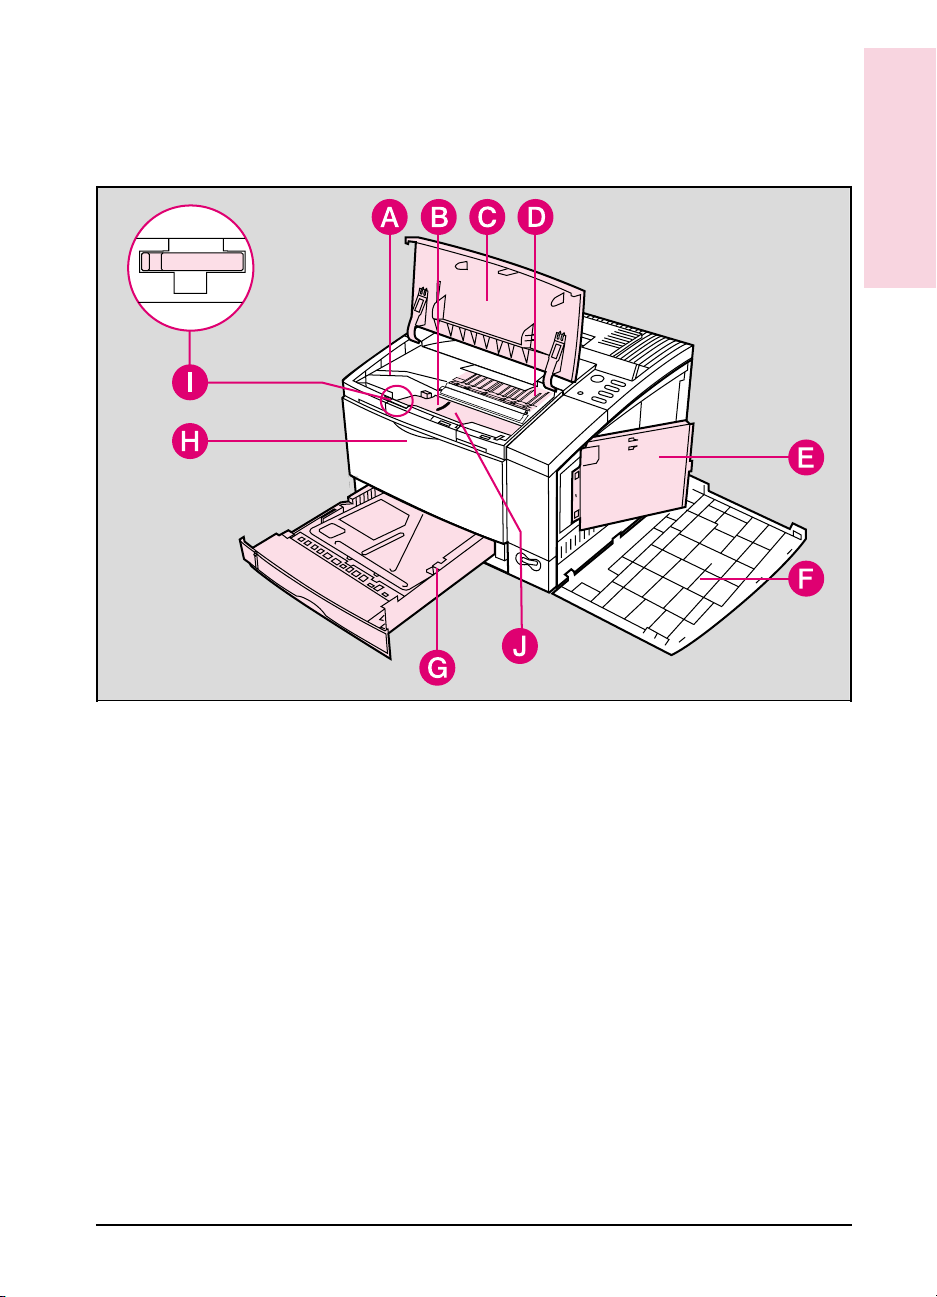
Figure 1-4 Top/right side view with top door open and toner cartridge removed
A. Toner cartridge guides F. Right side cover (opened)
B. Paper access door
(for paper jam removal)
C. Top door (opened) H. Tray 1 release point (pull to open)
D. Toner cartridge location
(shown with cartridge removed)
E SIMM slots access door J. Serial Number Label
EN About Your Printer 1-9
G. 250-sheet Tray 2
I. Transfer Roller removal tool
Page 22
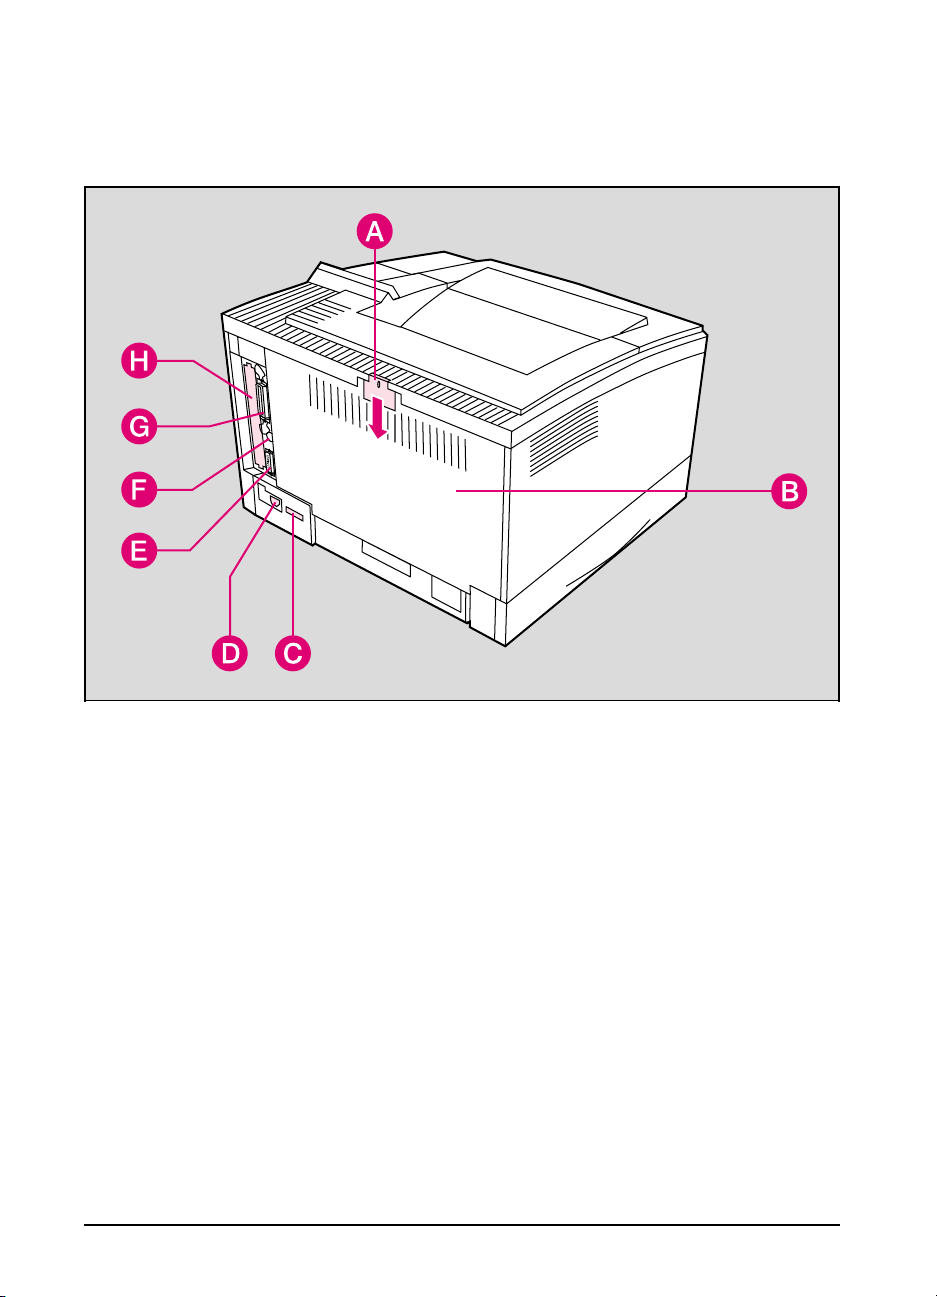
Figure 1-5 Rear/left side view
A. Rear access cover latch
(press down to release)
B. Rear access cover F. Serial Infrared port
C. Serial number label G. Bi-Tronics parallel port
D. Power plug connector H. Modular I/O (MIO) slot
E. Serial port
1-10 About Your Printer EN
Page 23

Printing Software Overview
Introduction
This chapter introduces the software you received with your printer and
briefly describes its features. It also lists additional software you can
obtain for your printer by contacting HP Distribution or your authorized
HP dealer.
Your printer is packaged with the software you need to take full
advantage of your printer’s features in MS Windows, some DOS
environments, and to connect your printer to a wide variety of networks.
The HP LaserJet 5M printer also comes with software you need to use
your printer with the PostScript language for Macintosh and MS
Windows environments.
2
Note
If you have set up your printer correctly, you have already installed the
appropriate software for your printer and environment. If you have not
installed the software, see the Getting Started Guide.
This chapter is divided into the following sections:
• Software for MS Windows
• MS Windows Printer Drivers
• MS Windows Status Utilities
• Fonts
• Network Management Utilities (HP JetAdmin)
• Software for DOS
• DOS Printer Drivers
• DOS Utilities
• Software for Macintosh
• Macintosh Printer Drivers
• Bitmapped Screen Fonts
• HP LaserJet Utility
• Optional Software
• Optional Printer Drivers Available
• Optional Networking Software Available
EN Printing Software Overview 2-1
Page 24

Software for MS Windows
Your printer comes with the HP LaserJet 5/5M Printing System for
Microsoft Windows. If you have set up your printer correctly, you have
already used the auto-installation setup program to load the following:
• MS Windows Printer Drivers
• Status Utilities
• Fonts
• Network Management Utilities
MS Windows Printer Drivers
The printer drivers enable your MS Windows applications to communicate
with your printer and use all of your printer’s features. Once you load the
MS Windows drivers, you can reach them from the Print dialog box in any
MS Windows application. This is usually accessed from the Printer Setup
or Printer Options selection, however, each application may be different.
The MS Windows Printer Drivers work in the MS Windows 3.1, 3.11,
MS Windows for Workgroups and MS Windows 95 environments.
Note
Each driver has screen helps which can be activated from the Help
button on each property sheet on the printer driver. These help screens
can give detailed information about the specific driver you are using.
These driver helps are separate from your software application’s screen
helps. You will know that you are in an HP printer driver if the HP logo
is on the bottom of the window.
HP LaserJet 5/5M - Standard
The standard driver provides full backward compatibility for LaserJet
printers. This allows you to print documents created with other HP
drivers and ensure that the output will be similar. This driver can be
selected in the Printers settings window located in the MS Windows
Control Panel.
2-2 Printing Software Overview EN
Page 25

HP LaserJet 5/5M - Enhanced
This is a new, enhanced driver which provides better printing
performance with complex graphics in MS Windows, as well as better
WYSIWYG (what-you-see-is-what-you-get) performance. This may
provide output which is slightly different than earlier drivers which were
not WYSIWYG. This driver can be selected from the MS Windows
Printer Control Panel.
PostScript Level 2
The PostScript for MS Windows driver for MS Windows 3.1 and MS
Windows 95 provides new functions such as n-up printing and
watermarks.
MS Windows Status Utilities
Status utilities display the printer’s status, job status and error messages
on the computer screen. Status utilities are provided for both networked
environments and directly connected computers.
Note No status utilities are available when using serial cables or switch boxes.
Status Window
2
Printing Software
Overview
Note
This utility is for computers using the MS Windows 3.1 environment
that are directly connected to the printer.
The Status Window is a program that reports printer activities directly
on your computer screen. When a printer condition arises that needs
your attention, the Status Window displays a description of the
condition and suggests an action. For example, if the printer runs out of
paper or is low on toner an appropriate message will pop-up on the
computer screen.
Status Window is only available if your printer and computer are
directly connected through a parallel port (for example, LPT1 or LPT2).
EN Printing Software Overview 2-3
Page 26

HP JetPrint
The HP JetPrint utility for networks reports printer activities similar to
the Status Window. It also allows users to see all accessible print
queues and allows users to manage their print jobs. The Job Details
button on the HP JetPrint screen provides more detailed information on
a print job.
HP JetPrint is represented by an icon in the lower left hand corner in the
MS Windows 3.1 Networked Environment.
In MS Windows 95, HP JetPrint is available for both networked
environments and directly connected computers. HP JetPrint is
represented as a tray icon in the lower right hand corner.
To see status information, click on the icon. The icon changes colors
based on the status of the printer:
• Red- the printer is not able to print.
• Yellow- warning message.
• Green- the printer is ready to print.
Fonts
HP FontSmart
HP FontSmart is a MS Windows application that delivers the screen
fonts for the printer’s internal 45 printer fonts, plus another 65 fonts on
disk. HP FontSmart adds font management for MS Windows 3.1/3.11,
MS Windows 95 and MS Windows NT. When PostScript is available,
HP FontSmart also delivers the matching screen fonts for the 35
PostScript fonts using the MS Windows font names.
2-4 Printing Software Overview EN
Page 27

TrueType Screen Fonts
Screen fonts allow you to see a close representation on the computer
screen of what the printed page will look like. This is known as
WYSIWYG, short for “what-you-see-is-what-you-get.” The TrueType
fonts match the printer’s internal fonts. These fonts are automatically
loaded and configured when you install the HP LaserJet 5/5M Printing
System for Microsoft Windows.
Network Management Utilities
Note
Network Management Utilities allow remote configuration and control
of networked printers. These utilities allow network administrators to
setup and configure networked printers in a variety of network
environments.
Network utilities are available through the Custom setup option during
software installation. These utilities will not be loaded when running
the default (Typical) installation unless you are signed on as a network
administrator. To add these utilities at a later time re-load the
installation program (see Getting Started Guide) and run the Custom
setup option. Follow the instructions on the screen.
HP JetAdmin
HP JetAdmin allows management and configuration of the printers and
accessories on a Novell Netware or Microsoft network. This also offers
in-depth printer and network diagnostics, as well as the ability to upload
printer drivers to a network file server. Management of the flash
accessory is also provided through HP JetAdmin.
HP JetAdmin is available through the Control Panel in MS Windows 95
or from the LaserJet group in MS Windows 3.1.
2
Printing Software
Overview2Printing Software
Overview
EN Printing Software Overview 2-5
Page 28

Software for DOS
Your printer comes with two DOS application printer drivers and two
DOS-environment software utilities.
DOS Printer Drivers
Printer drivers are program files that allow your software to use the
printer’s features, including the internal fonts. Printer drivers for the
following DOS applications are included on the DOS Application
Utilities and Drivers diskette:
• WordPerfect 5.1 and 6.0
• Lotus 1-2-3 versions 2.3, 2.4, 3.1, 3.4, 4.0
Note To obtain printer drivers for additional DOS applications:
• Check your DOS application’s installation disks to see if they include
support for the HP LaserJet 5/5M printer.
• Order an updated driver from your DOS application’s vendor.
DOS Utilities
Note
2-6 Printing Software Overview EN
The DOS utilities are only available when the printer is directly
connected to the computer with a parallel cable. They will not be
available if a serial cable or switch box is being used.
Page 29

Status Monitor
The Status Monitor, a terminate-and-stay-resident (TSR) program,
reports printer messages and error conditions directly to your computer
screen. It is especially useful if you can’t see the printer while you
work. When a printer condition arises, the Status Monitor displays a
message on your screen without affecting your work in progress.
You can set up your computer to run the Status Monitor automatically
when you turn on your computer, or you can load it at any time.
To load the Status Monitor, type STAT at the DOS prompt. You can
display the Status Monitor Main Menu at any time by typing [Ctrl] +
[Alt] + [E], the default hot-key combination.
Remote Control Panel
The Remote Control Panel, or RCP, enables you to change printer
settings if your DOS software application does not support the printer
feature you want to use.
2
Printing Software
Overview2Printing Software
Overview
Note
Note
Some DOS applications, such as WordPerfect for DOS, may override
settings you specify from the RCP. Change all desired settings available
in your software application first, and any remaining settings with the
RCP.
You can start the Remote Control Panel from the Status Monitor by
typing [R]. You can also start the Remote Control Panel from the DOS
prompt by typing RCP.
Additional help is available for the Remote Control Panel by clicking on
the help tab at the top of the screen or by typing [Alt] + [H].
You can use the Remote Control Panel and Status Monitor only in DOS,
and only if your printer and computer are directly connected through a
local parallel port (for example, LPT1 or LPT2). These applications do
not work on networked printers.
EN Printing Software Overview 2-7
Page 30

Software for Macintosh
The HP LaserJet 5M printer comes with an installer program that
automatically installs the following on your hard disk:
• Macintosh printer drivers
• Bitmapped screen fonts
• HP LaserJet Utility
Macintosh Printer Drivers
HP LaserJet
The “HP LaserJet” is an Adobe PostScript Level 2 printer driver. Once
you install this driver, most of your printer’s features are available from
the Print and Page Setup dialog boxes.
LaserJet 5M GX
The “LaserJet 5M GX” is a printer driver designed to give you access to
your printer from a Macintosh with QuickDraw GX installed. If you are
not using QuickDraw GX, you will not need this driver.
Fonts
Bitmapped Screen Fonts
When you install the HP LaserJet 5M printer driver, bitmapped screen
fonts are automatically installed on your system. These screen fonts
match your printer’s 35 internal PostScript fonts, allowing you to see on
screen how your printed page will look.
2-8 Printing Software Overview EN
Page 31

HPLaserJet Utility
The HP LaserJet Utility allows you to control most printer features from
your computer screen. You can display or customize the current control
panel message. You can name the printer, assign it to a zone on your
network, download files and fonts, and change most of the printer
default settings using this utility. You can set the printer’s password and
even lock out the control panel without leaving your computer. The
utility’s illustrated screens make selecting printer features from your
Macintosh easier than ever.
Optional Software
Optional Printer Drivers Available
You can order the following optional printer drivers from HP
Distribution or your nearest authorized HP Dealer (see the HP Support
pages at the front of this manual):
• OS/2 PCL/PCL XL printer driver
• OS/2 PostScript printer driver
(These two drivers listed above are also available from IBM and they
are packaged with OS/2.)
• MS Windows NT Driver
2
Printing Software
Overview2Printing Software
Overview
Note
EN Printing Software Overview 2-9
If your software is not listed here, please contact your software
manufacturer or distributor and request a driver for the HP LaserJet 5
printer or the HP LaserJet 5M printer. If a driver is unavailable, you
could use an older HP LaserJet printer driver (such as the HP LaserJet
4 Plus printer) until a new driver becomes available, however, you may
not be able to access the advanced features of your new printer without
the proper driver.
Page 32

Optional Networking Software Available
You can order optional networking software from HP Distribution or
your nearest authorized HP Dealer (see the HP Support pages at the
front of this manual). Software for the following networks is available:
• Microsoft LAN Manager for OS/2
• IBM LAN Server for OS/2
• HP-UX
• SunOS
• Solaris
• Novell Netware NLM
To learn more about networking with the HP LaserJet 5M printer, see
the HP JetDirect Print Server Software Installation Guide and
Macintosh Notes for the HP LaserJet 5M Printer.
2-10 Printing Software Overview EN
Page 33

Using the Printer Control Panel
Introduction
You can perform most routine printing tasks from your computer,
through your software application. Software is usually the most
convenient way to control your printer. Many of the functions described
in this chapter can also be performed using the software that comes with
your printer. Refer to Chapter 2, “Printing Software Overview” or the
online help files associated with the software for more information.
Note Software commands override printer control panel settings. Use the
printer control panel to access printer features not supported by your
software.
This chapter is divided into the following sections:
3
• Control Panel Layout
• Control Panel Keys
• Control Panel Menus
Not e for
Macintosh
Users
If you purchased the HP LaserJet 5M printer, see the Macintosh Notes
for additional information. The following terms, which you may
recognize from the Macintosh interface, have different meanings in this
user guide:
• Control Panel refers to the control panel on the printer and has
nothing to do with the Controls Panels folder in your System Folder
or the control panels that are stored there.
• Menu refers to a key on the printer control panel and to the menus of
items available on the printer control panel, not the pull-down or
pop-up menus that are part of your Macintosh user interface.
EN Using the Printer Control Panel 3-1
Page 34

Figure 3-1
Control Panel Layout
The printer control panel consists of a 16-character display panel and six
keys, three of which have forward and backward scrolling functions.
Control Panel Layout
Note
In the right side of the display panel a square icon blinks when receiving
data or processing a print job.
Control Panel Keys
The table on the following page explains how the printer control panel
keys work.
3-2 Using the Printer Control Panel EN
Page 35

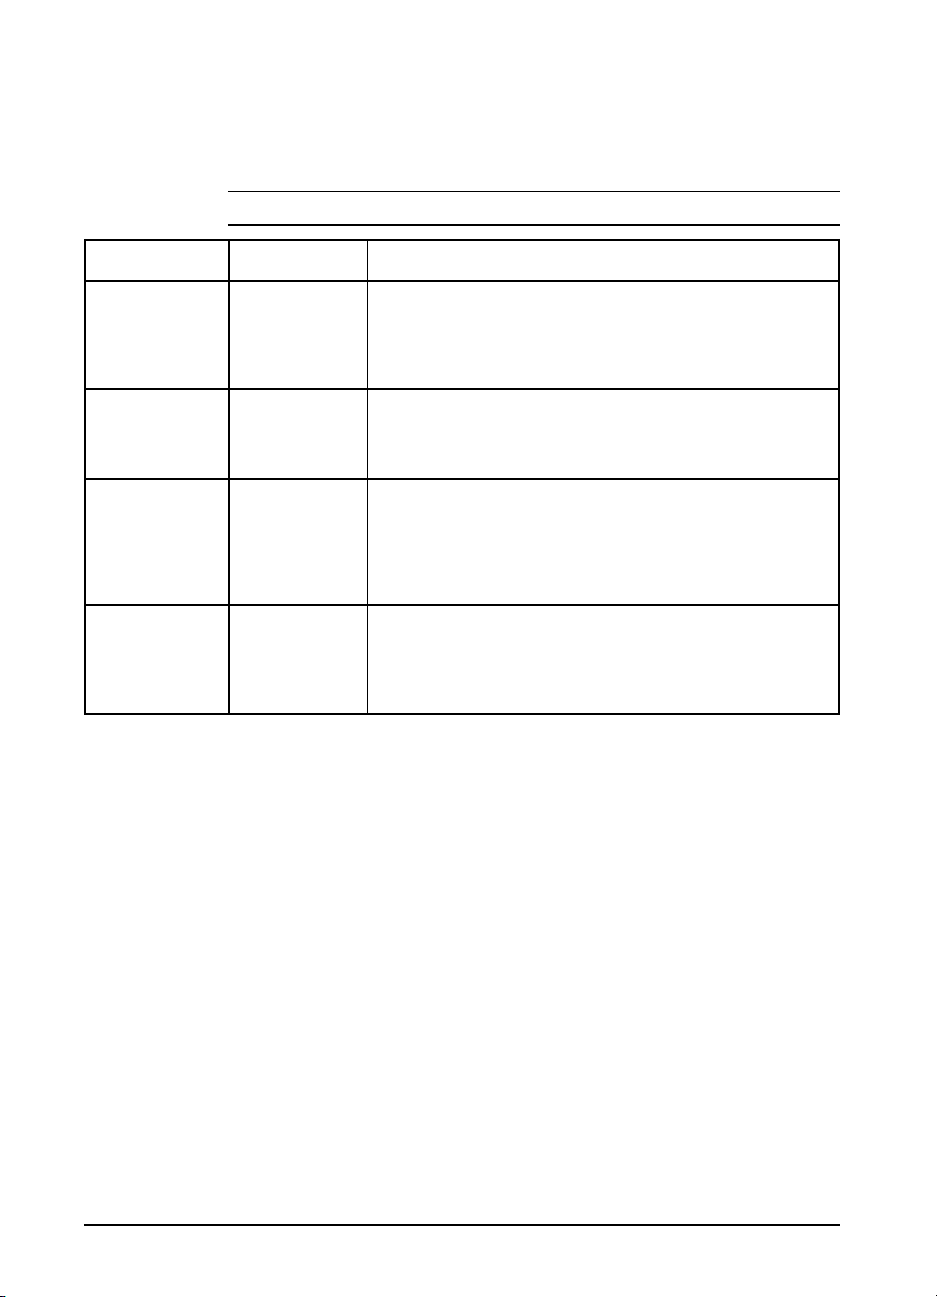
Table 3-1 Control Panel Keys
Key Explanation
[Go]
[Job Cancel]
[Menu]
The [Go] key replaces theOn Line, Form Feed and Continue keys from previous HP LaserJet
printers. The [Go] key performs six main functions:
• Switches the state of communication between computer and printer either on(on line) oroff (off
line).
• Prints any data remaining in printer’sbuffer. Does
printer.
not
send a blank sheet of paper through the
• Allows the printerto resume printing after a printer message has placed it off line. Clears most
printer messages and places the printer back on line.
• Overrides paper or envelope size selectionregardless of size of media in Tray 1, optional
Envelope Feeder, Tray 2, or Tray 3.
• Confirms a manual feed request if there is media in Tray 1.
• Overrides a requestto manually feed paper or an envelopeby selecting paper from the next
available source instead.
The [Job Cancel] key deletesa print job from the printer:
• Press [Job Cancel] to cancela job that the printer is currently processing. The printer will
display CANCELING JOB, clear the printer buffer,and return to a READY state. This may take a
while, depending on the size of the print job.
If [Job Cancel] is accidentally pushed the job must be reprinted. There is no undo function.
If [Job Cancel] is pushed when the printer is idle, NO JOB TO CANCEL will appear briefly, and
then a READY display will reappear.
Press [Menu] to cycle through the printer control panel menus. Press the [>] end of the key to
move forwardthrough the menus. Press the [<] end of the key to move backward through the
menus.
3
Panel
Using the Control
When an option is added to the printer (PostScript, for example), a menu for that option appears
in the sequence. See “Control Panel Menus,”in this chapter, formore information.
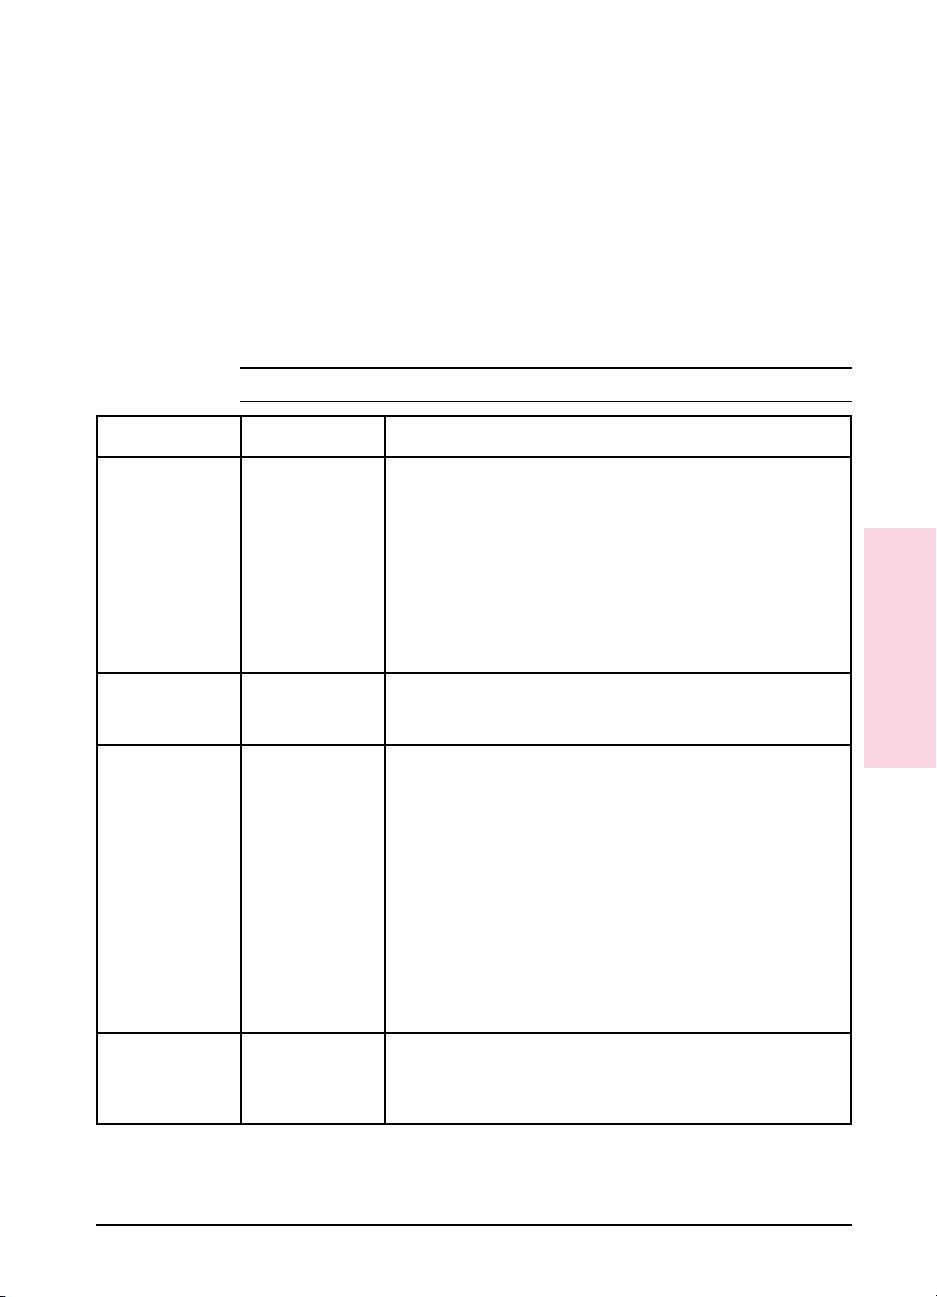
[Item]
[- Value +]
[Select]
EN Using the Printer Control Panel 3-3
Press [Item] to cycle through the selectedmenu’s items. Press the [>] end of the key to move
forward through the items. Press the [<] end of the key to move backward through the items
Menu items vary depending on options installed and configuration of other menu choices.
Press [- Value +] to cycle through the selected item’s values. Press the [>] end of the key to move
forward through the values. Press the [<] end of the key to move backwardthrough the values.
The [Select] key savesa printer control panel setting you selected. An asterisk (*) appears next
to the saved selection, indicatingthat it is the default. Default settings remain in place when the
printer is switchedoff or reset.
The [Select] key is also used when printinga test page or configuration page from the printer
control panel.
Page 36

Control Panel Menus
Pressing [Menu] gives you access to menus, one after another. Each
menu is described in a separate table in this section. When options
(such as the PostScript language or duplex printing) are installed in the
printer, new menus or menu items are automatically added to the control
panel menus.
To print a menu map of the control panel menus:
1 Press [Menu] until PRINTING MENU appears.
2 Press [Item] until PRINT MENU MAP appears.
3 Press [Select] to print the menu map.
Store the menu map near the printer for a useful reference. An
additional copy of the HP LaserJet 5 menu map is provided on the
following page. The appearance of the menu map will vary for the HP
LaserJet 5M. It will also vary depending on the options currently
installed in your printer.
To change a printer control panel setting:
1 Press [Menu] repeatedly until the desired menu appears.
2 Press [Item] repeatedly until the desired item appears.
3 Press [- Value +] until the desired setting appears.
4 Press [Select] to save your selection.
Note
3-4 Using the Printer Control Panel EN
An asterisk (*) appears next to your selection in the display, indicating
that it is now the default.
5 Press [Go] to exit the menu.
These instructions are also provided on the Menu Map printout (see
following page), letter K.
Page 37

Figure 3-2 Control Panel Menu Map
3
Panel
Using the Control
EN Using the Printer Control Panel 3-5
Page 38

Printing Menu
When a Printing Menu item is changed through the printer control panel,
the new setting then becomes the default value. However, any selections
made through a software application will override printer control panel
settings. See Figure 3-2, item A for the location of the Printing Menu on
the Menu Map.
Table 3-2 Printing Menu Items
Item Options Explanation
PRINT MENU MAP No options available WhenPRINT MENU MAP is displayed, press [Select] to print a
PWRSAVE OFF,
COPIES 1* to 999 Selectany number from 1 to 999. Press [- Value +] once to
PAPER
ENVELOPE
WIDEA4 NO*
COURIER REGULAR*
15 MIN,
30 MIN*,
1 HR,
2 HRS,
3 HRS
LETTER* (110V printers),
A4* (220V printers),
Executive,
Legal,
A5 (from Tray1 only)
COM10* (110V printers),
DL* (220V printers),
Monarc,
C5,
B5
YES
DARK
configurationpage and a menu map. The message
PRINTING CONFIGURATION PAGE is displayed. (See
``Understandingthe Self Test Printout,’’in Chapter 7.)
PWRSAVE stands for PowerSave. This menu itemsets the
amount of time the printer is idle before the printer cools down.
The printerautomatically starts warming to printing temperature
when a job is sent to the printer,a printer controlpanel key is
pressed, paper is loaded or removed, or the top door is opened.
(See “SavingPower with the PowerSave Feature” in Chapter 8.)
change setting by increments of 1 or hold down to scroll by
increments of 10.
The default image size for paper or envelopes can be set with
the printercontrol panel.
The Wide A4 setting changes the number of characters that
may be printedon a single line of A4 paper. For example,
when set to NO, 78 10-pitch characters will be printedon one
line. When set to YES, 80 10-pitch characters will be printed.
When setto REGULAR, the internal courier font is the same font
used in the LaserJet series 4 printers. When set to DAR K,the
internal courierfont is the same as the LaserJet series 3
printers. Both fonts are not available at the same time.
ORIENTATION P*
L
P stands for portrait (vertical) and L stands for landscape
(horizontal)orientation of type on the page.
*Indicates factory default.
3-6 Using the Printer Control Panel EN
Page 39

Table 3-2 Printing Menu Items (continued)
Item Options Explanation
FORM
(5 to 128 LINES)
MANUAL FEED OFF*
RET OFF
ECONOMODE OFF*
DUPLEX OFF*
BIND LONG EDGE*
*Indicates factory default.
Shading denotes optional items.
60* (110V printers)
64* (220V printers)
ON
LIGHT
MEDIUM*
DARK
ON
ON
SHORT EDGE
Sets verticalspacing, from 5 to 128 lines,for default papersize.
Press [- Value +] once to change setting by increments of 1 or hold
down to scroll by increments of 10.
Available only through Tray1. When Manual Feed is ON and Tray
1 is empty, the printer goes offline when it receives a print job and
displaysMANUALLY FEED
Pages” in Chapter 4.
RET stands for “Resolution Enhancement technology.” It
refines the print quality of characters and graphics by
smoothing the fine gradations alongthe angles and curves of
the printed image. See “Enhancing Resolution”in Chapter 6
for more information.
EconoMode substantially reduces the amount of toner on the
printed page; the result is similar to draft mode on some dot
matrix printers. See “EconoMode Printing” inChapter 6.
Determines whetherthe printer printson both sides (duplex)or
one side (simplex) of a sheet. See “Printingwith the Duplex
Unit” in Chapter 4.
Determines orientationof print on the page when using a
duplex unit. See “Specifying a Duplex Setup”in Chapter 4.
media size
. See “Manually Feeding
3
Panel
Using the Control
EN Using the Printer Control Panel 3-7
Page 40

PCLFonts Menu
PCL Fonts Menu items allow you to choose the default font and symbol
set. Printer Control Language (PCL) is HP’s printer language. You can
also change such PCL Menu items as the SOURCE through your software
application. See Figure 3-2, item B for the location of the PCLFonts
Menu on the Menu Map.
Table 3-3 PCL Fonts Menu Items
Item Options Explanation
PCL FONT LIST No options available Press [Select] to print a list of the PCLfonts. (See “Understanding the
SOURCE INTERNAL*
NUMBER 0 to 999 Theprinter assigns a number to each font and lists them on the PCL Font
PITCH
or
PT. SIZE
SYM SET PC-8*
SOFT
N
SLOT
Pitch:
10.00*
Pt:
12.00*
Many others
PCL Font List Printout,” in Chapter 7.)
Internal fonts*
Permanent soft fonts
SIMM Module: n=slot number. Fonts stored in one of the fourROM
SIMM slots (SLOT=slot 1,for example).
List, which you can print out. (See top row in this table for how to print a
PCL Font List.) The font number appears inthe Font # columnof the
printout.
Defaults andother conditions are as follows:
Internal*
Soft
SLOT
The pitch or point size item availabledepends on the SOURCE and NUMBER
you select. Press [- Value +] once to change setting by increments of .01 for
pitch and .25 for point-size or hold down to scroll by increments of 1.
Pitch:
Point:
Asymbol set is a unique grouping of all the characters in a font. PC-8 or
PC-850 is recommended for line draw characters. Symbol set charts
appear in the
0* is the default.
1* is the default. You can select from the controlpanel
only a permanentsoft font that is currently in the printer.
Do not use the ID number of a downloaded soft font.
SIMM Module; n=SIMM slot (1-4). Fonts stored in one of
the four ROM SIMM slots (1=FONT 1, for example).
For fixed-pitchoutline fonts, selectpitch sizes from .44 to
99.99.
For proportionally-spaced outline fonts, select point sizes
from 4.00 to 999.75 in .25-pointincrements.
HP LaserJet Printer Technical Reference Guide
.
*Indicates factory default.
3-8 Using the Printer Control Panel EN
Page 41

PostScript Menu
When the PostScript language is installed in the printer the following
items will automatically appear in the printer control panel menus. See
Figure 3-2, item C for the location of the PostScript Menu on the Menu
Map.
Table 3-4 PostScript Menu Items
PS FONT LIST No options available Press [Select] to print a list of the fonts. While the list is being printed the
PRT PS ERRS OFF*
ON
JAM RECOVER OFF*
ON
*Indicates factory default.
message PRINTING FONT LIST is displayed.
PRT PS ERRS stands for PRINT POSTSCRIPT ERRORS. This setting
allows PostScripterror messages to be printed.
PostScript can be set to automaticallyreprint jammed pagesafter a paper
jam is cleared.
3
Panel
Using the Control
EN Using the Printer Control Panel 3-9
Page 42
Job Menu
You can change Job Menu items through your software application if
you have installed an appropriate printer driver. See Figure 3-2, item D
for the location of the Job Menu on the Menu Map.
Table 3-5 Job Menu Items
Item Options Explanation
RESOLUTION 300
600*
PERSONALTY AUTO*
PCL
POSTSCRIPT
(optional)
PAGEPROTCT AUTO*
ON
I/O TIMEOUT 15*
(5 to 300)
*Indicates factory default.
At 600-dpi (dots per inch), the printer might need as much as four times
more memory to format a page than it needs at 300-dpi. For most
purposes, 600-dpi is recommended. It is recommendedthat you use
300-dpi for some bitmapped fonts andgraphics designed to be printed at
300-dpi or for compatibility with the HP LaserJet 3 family of printers.
The printercan be switched from its standard personality(language), PCL,
to other personalities, such as PostScript. When PERSONALTY is set to
AUTO, the printeranalyzes each print job it receives and switches
personalitiesautomatically.
This menu item will not be availableunless a 21 PAGE TOO COMPLEX,
PRESS GO KEY error occurs (see “UnderstandingPrinter Messages” in
Chapter 7). Memory Enhancement technology (MEt) attempts to
guarantee that all pages will print. If the page does not print, turn
PAGEPROTCT to ON. This may increasechances of a 20 INSUFFICIENT
MEMORY, PRESS GO KEY message. If this occurs, you need to add memory.
I/O timeout refers to the time, measured in seconds, that theprinter waits
before ending a print job. This setting allows you to adjust timeoutfor best
performance. If data from other ports appear in the middle of your print
job, increasethe timeout value. Press [- Value +] once to change setting
by increments of 1 or hold down to scroll by increments of10.
3-10 Using the Printer Control Panel EN
Page 43

Configuration Menu
Configuration Menu items can be selected only from the printer control
panel. Y oucannot temporarily change them in your softwareapplication.
See Figure 3-2, item E for the location of the Configuration Menu on the
Menu Map.
Table 3-6 Configuration Menu Items
Item Options Explanation
TRAY1 FIRST*
CASSETTE
SIZE 1 LETTER* (110V printers)
A4* (220V printers)
Executive
Legal
A5
COM10
DL
Monarch
C5
B5
LOCK TRAY NONE*
1 (Tray1)
2 (Tray2)
3 (Tray3)
(Combinations of the
above)
When set to FIRST Tray 1 is configured as the default tray and will be
used first duringprinting. TRAY1=FIRST is not recommended for
networked (shared) environments.
When set to CASSETTE Tray 1 no longer operates as a universal tray.
Apaper size must be assigned to Tray1 using the SIZE 1 option (the
next Item in the Configuration Menu when TRAY 1=CASSETTE). This
allows Tray1 to be used as a reserved tray. When Tray1 is set as a
cassette, Tray2 becomes the new default paper source.
This menu item only appears if TRAY 1 priority has been changed
from the default FIRST setting to CASSETTE. This item sets the size of
media in Tray 1.
You can lock out a tray or a combination of trays so the printer will not
draw paper from it. (See “Reserving or Locking-outTrays” in Chapter
4.) Lock-outoptions depend on how Tray 1 is configured and whether
an optionalTray 3 is installed. When Tray 1 is set to FIRST and no
other tray is installed, no paper sources are availableto be locked
out. All possible options and their definitions are as follows:
NONE
1
2
3
1, 2
1, 3
2, 3
No trays locked out.
Tray 1 is locked out.
Tray 2 is locked out.
Tray 3 is locked out.
Only Tray3 is available.
Only Tray2 is available.
Only Tray1 is available.
3
Panel
Using the Control
ENV FEED COM10*
DL
Monarc
C5
B5
This menu item only appears if the optional envelope feeder is
installed in the printer. It is necessary to designatethe envelope size
through the printer control panel since the envelopefeeder cannot
automatically sensethe size of the envelope.
*Indicates factory default.
Shading denotes optional items
EN Using the Printer Control Panel 3-11
Page 44

Table 3-8 Configuration Menu Items (continued)
Item Options Explanation
CLR WARN ON*
JOB
AUTO CONT OFF*
ON
TONER DENSITY 1
2
3*
4
5
TONER LOW CONT*
STOP
CLR WARN stands for “clearable warnings.” This setting determines how
long a clearable warning will be displayed on the printer control panel.
When set to ON, the warning is displayed until the [Go] key is pushed.
If set to JOB, the warning will be displayed until the end of the print job in
which it was generated.
The auto continue function determines how the printer reacts todata and
printer errors. When auto continue is set to OFF, the printer displays an
error message and goes off line until you press [Go].
When auto continue is set to ON, the printer displays amessage and goes
off line for about 10 seconds, then comes back on line.
If your printer is part of a network or remote spoolingsystem, set auto
continue to ON.
Determines the relative darkness ofprint on the paper. To make print
darker,choose a highernumber; to make it lighter, choose a lower
number. See “Fine-TuningPrint Quality” in Chapter 6.
The TONER LOW message will first appearwhen the printer is almostout of
toner (about 100 to 300 sheets can still be printed).
If TONER LOW is set to CONT, the printer will remain on line and continue to
print while the message is displayed.
If TONER LOW is set to STOP, the printer will go off line and wait for further
action. See “Clearing the TONER LOW Message”in Chapter 8.
*Indicates factory default.
3-12 Using the Printer Control Panel EN
Page 45
Memory Configuration Menu
This menu contains the items for personality Resource Saving and I/O
Buffering. Depending on how your printer’s memory is configured, any
combination of menu items and possible values can appear. See Chapter
5 for additional PostScript information.
When you change an item in this menu, the printer automatically resets,
and all fonts, macros and downloaded data in the printer are lost.
Memory Configuration Menu items can be selected only from the
printer control panel. You cannot change them temporarily in your
software application. See Figure 3-2, item F for the location of the
Memory Configuration Menu on the Menu Map.
Table 3-9 Memory Configuration Menu Items
Item Options Explanation
I/O BUFFER AUTO*
I/O SIZE
RESRCSAVE AUTO*
PCL MEM
PS MEM
OFF
ON
10K and up When I/O BUFFER is set to ON, this item appears in the menu. Press
OFF
ON
0K and up When Resource Saving is set to ON, each installed personality (for
The I/O buffer is a portionof the printer memory set aside to hold
incoming data. This reduces the time your computer must wait whena
job is sent to the printer.
When this itemis set to AUTO, the memory set aside for I/O buffering is
automatically determined by the printer, basedon available memory.
When it is set to ON, the size can be manually adjusted.
When it is set to OFF, no memory is set aside for I/O buffers. (See “How
I/O BufferingImproves Performance” in AppendixD.)
- Value + to add or reduce I/O buffer memory in increments of 10 KBytes
up to 100 KBytes, then in 100 KByte increments.
This item appears when a certain amount of memory and a personality
SIMM are installed in the printer. This item enables or disablesResource
Saving.
If it is set to AUTO, the printer automaticallydetermines the amount of
memory to allocate to each installedpersonality (language),and no
additional items appear in the menu.
When it is set to ON, additionalmemory management item selections
appear for each installed personality.
When it is set to OFF, no memory is allocated and personality-dependent
resources, such as fonts and macros, arelost when personality or
resolution changes. (See “How Your Printer Uses Memory” in
Appendix D.)
example, PCL and PostScript)is added as a menu item. You can
increase memory for each installed personality in incrementsof 100
KBytes up to the maximum amount of memory available.
3
Panel
Using the Control
*Indicates factory default.
EN Using the Printer Control Panel 3-13
Page 46

Parallel Menu
Parallel Menu items can be selected only from the printer control panel.
You cannot change or override them from your software application.
See Figure 3-2, item G for the location of the Parallel Menu on the Menu
Map.
Table 3-10 Parallel Menu Items
Item Options Explanation
HIGH SPEED YES*
NO
ADV FNCTNS ON*
OFF
*Indicates factory default.
The speed at which data is transmittedto the printer.
YES sets the parallel interface to run at a higherdata rate which is
supported by newer computers.
NO sets the parallel interface to run at a slower speed which is
compatible with older computers.
ADV FNCTNS=ON enables bi-directionalparallel communication,which
allows your printer to send status readback messages to your computer.
Setting advance functions to ON may slow personality switching.
3-14 Using the Printer Control Panel EN
Page 47

Serial Menu
Serial Menu items can be selected only from the printer control panel.
You cannot change or override them from your software application.
See Figure 3-2, item H for the location of the Serial Menu on the Menu
Map.
Table 3-11 Serial Menu Items
Item Options Explanation
PACING DTR/DSR*,
XON/XOFF
BAUD RATE 9600*
300 to 57600
ROBUST XON ON*
OFF
DTR POLARITY HI*
LO
*Indicates factory default.
Pacing (or
send information. Select DTR/DSR if your computer requires hardware
flow control(most personal computers do). Select XON/XOFF if your
computer requires software flow control (for example, if you are using a
UNIX workstation).
The baud rate tells the printerhow fast informationwill be transferred
from the computer to the printer.
Appears only whenPACING is set to XON/XOFF. If it is set to ON, the printer
sends an XON when the printer is on line and when sufficient buffer
space has become available. If it is set to OFF, the printer sends one
XON when it can accept more data or when it is on line.
Determines whether pin #8 is high or low when the printer is ready. When
it is set to HI, pin #8 is high when the printer isready. When it is set to LO,
pin #8 is low when the printeris ready.
handshaking
) allows the printer to tell the computer when to
3
Panel
Using the Control
EN Using the Printer Control Panel 3-15
Page 48

Resets Menu
Reset options are available through the Resets Menu. Use the Resets
Menu option with caution.
Note
You can lose buffered page data or printer configuration data when you
select these options. You should only use it in the following
circumstances:
• You want to restore the default printer settings.
• Communication between the printer and computer is interrupted.
• You are using both the serial and parallel I/O ports, and one of the
ports is having problems.
See Figure 3-2, item I for the location of the Resets Menu on the Menu
Map.
Table 3-12 Resets Menu Items
Menu
Selection
MEMORY RESET CLEARING MEMORY Press [Select] to perform a MEMORY RESET. This will clear the printer buffer
FACTORY
DEFAULT
RESETACTIVE
I/O
RESET ALL I/O RESETTING ALL I/O Press [Select] to perform an RESET ALL I/O. This clears the input and
Printer
Response
FACTORY DEFAULTS
BEING RESTORED
RESETTING ACTIVE
I/O
Explanation
and make the printer control panel defaults current.
Press [Select] to perform a FACTORY DEFAULT. This restores most of the
printer’s factory default settingsas it performs a simple reset.
Items in the Config, Memory Configuration,Parallel, and Serial Menus are
not reset. MEMORY RESET clears only theactive input buffer.
Press [Select] to perform an RESET ACTIVE I/O. This clears the inputand
output buffers
output buffers
for the active I/O only
for all I/Os
and performs a simple reset.
and performs a simple reset.
Note The printer control panel resets will clear all memory in the printer,
while the [Job Cancel] key only clears the current job.
3-16 Using the Printer Control Panel EN
Page 49

Test Menu
Test Menu items can be selected only from the printer control panel.
You cannot change or override them from your software application.
See Chapter 5, “PostScript Printing’’ for additional information. See
Figure 3-2, item J for the location of the Test Menu on the Menu Map.
Table 3-13 Test Menu Items
Item Explanation
PRINT SELF TEST When PRINT SELF TEST is displayed, press [Select] to print a self test. The printer will display
PRINT LJ5 DEMO When PRINT LJ5 DEMO is displayed, press [Select] to begin printing. The display willscroll the
PRINT PS CONFIG When PRINT PS CONFIG is displayed, press [Select] to print a PostScript configuration page. The
PRINT LJ5M DEMO When PRINT LJ5M DEMO is displayed, press [Select] to begin printing. The display will scrollthe
PRINT FLASH PAGE When PRINT FLASH PAGE is displayed, press [Select] to begin printing. The display willscroll the
CONT SELF TEST When CONT SELF TEST is displayed,press [Select] to begin printing a series of PCL Configuration
PRINTING CONFIGURATION PAGE. (See ``Understandingthe Self Test Printout,’’in Chapter 7.)
message PRINTING DEMO PAGE while the page is beingconfigured and printed.
display will scroll the message PRINTING CONFIGURATION PAGE. (See Chapter 5 for a description
and example of the PostScript configuration page.)
message PRINTING DEMO PAGE while the page is beingconfigured and printed.
message PRINTING FLASH PAGE while the page is beingprinted.
Pages. The display will continue to scroll the message CONTINUOUS TEST, PRESS JOB CANCEL
KEY until [Job Cancel] is pressed. Severalpages may print until the buffer clears.
EN Using the Printer Control Panel 3-17
Page 50

3-18 Using the Printer Control Panel EN
Page 51

Printing
• Preparing for Printing
• Printing Tasks
• Printing on Special Media
• Printing with Optional Accessories
4
Introduction
This chapter explains your printing options and gives common printing
tasks:
• Selecting Paper and Other Print Media
• Media Input Options
• Loading Tray 2
• Loading Tray 1
• Stopping a Print Job
• Manually Feeding Pages
• Reserving or Locking-out Trays
• Printing Letterhead and Preprinted Forms
• Printing Envelopes
• Printing Labels and Transparencies
• Printing from the 500-sheet Tray 3
• Printing with the Duplex Unit (2-Sided Printing)
• Printing with the Envelope Feeder
• Printing with the Infrared Serial Port
EN Printing 4-1
Page 52

Preparing for Printing
Selecting Paper and Other Print Media
HP LaserJet printers produce documents of excellent print quality. You
can print on a variety of print media, such as paper (including recycled
paper), envelopes, labels, overhead transparencies and custom sized
media. Properties such as weight, grain, and moisture content are
important factors affecting printer performance and output quality.
Note
Note
Figure 4-1
T oachieve the best possible print quality use only high quality, copier-grade
paper. See Appendix A for more detailed paper specificati ons.
Always test a sample of paper before purchasing large quantities.
Your paper supplier should understand the requirements specified in the
HP LaserJet Printer Family Paper Specifications Guide (HP part
number 5961-0920). See the HP Support pages at the front of the
manual for ordering information.
Hewlett-Packard neither warrants nor recommends the use of a
particular brand of print media. Media properties are subject to change
by the manufacturer and HP has no control over these changes.
Printing on Custom Sizes of Paper
Custom sized paper can be printed from Tray 1. Minimum and
maximum sizes are shown below.
Minimum to Maximum Paper Sizes
4-2 Printing EN
Page 53

Note
All media sizes should be inserted lengthwise (vertically) into the
printer. If you want to print horizontally (in landscape mode), make this
selection through your software. Inserting paper horizontally may cause
a paper jam.
Printing on Standard Sizes of Paper
The printer can print on standard sizes and types of media.
Table 4-1 Paper and Media Specifications
Paper Type Dimensions Tray 1 Tray 2 Optional
Paper,Letter 8 1/2 x 11 in
216 x 279 mm
Paper,Legal 8 1/2 x 14 in
216 x 356 mm
Paper,Executive 7.25x 10.5 in
191 x 267 mm
Paper,A4 8.27 x 11.69 in
210 x 297 mm
Paper,A5 5.83 x 8.27 in
148 x 210 mm
Transparencies Letter,A4 X
Labels Letter, A4 X
Envelopes X Envelope Feeder
* A Universal Tray 2 is an optional accessory. See “Accessories and Options” in Chapter 1 for ordering
information.
X X Tray 3
X Universal Tray 2*,
Tray 3
X Universal Tray 2*,
Tray 3
X X Tray 3
X
4
Printing
EN Printing 4-3
Page 54

Media Input Options
The printer comes with two standard paper trays. By default, the printer
draws first from Tray 1. If Tray 1 is empty, the printer draws from
Tray 2. (If the optional 500-Sheet Tray 3 is attached to the printer the
print order will change. See “Printing from the 500-sheet Tray 3.”)
Tray 1
Caution
Tray 1 (A) serves as a multipurpose input tray.
• Tray 1 can hold up to 100 sheets of 20 lb. (75 g/m
envelopes.
2
) paper or up to 10
• Tray 1 adjusts to hold a variety of both paper and envelope sizes.
• Tray 1 can be reserved or locked out of the paper selection order (see
“Reserving or Locking-out Trays” later in this chapter).
Heavy-weight papers, labels, and transparencies should be printed from
Tray 1 only. Load only one size of paper at a time in Tray 1.
Tray 2
Tray 2 (B) holds about 250 sheets of 20 lb. (75 g/m2) paper.
Figure 4-2 Standard Media Input Options
4-4 Printing EN
Page 55

Figure 4-3
A gauge on the front left of Tray 2 shows the media level in the tray.
When the gauge is at the top, the tray is full.
Optional Media Inputs
You can also purchase other media inputs for the printer:
A Optional 500-sheet Tray 3 Assembly:
• Includes base unit and a universal paper tray (adjusts to legal, letter,
A4, and executive paper sizes).
B Optional Envelope Feeder
C Universal Paper Tray for Tray 2
Figure 4-4 Optional Media Inputs
See “Accessories and Options” in Chapter 1 for additional accessories,
part numbers and ordering information.
EN Printing 4-5
4
4
Printing
Printing
Page 56

Loading Tray 2
Tray 2 holds about 250 sheets of 20 lb.
(75 g/m
2
) paper.
To load Tray 2:
1 Pull Tray 2 straight out of the printer.
2 Slide a stack of paper into the tray
until the paper is in solid contact with
the rear of the tray. Do not fill above
the arrows on the left rear of the tray.
Note
See the sections on letterhead and duplex
printing later in this chapter for proper
media orientation for specific jobs.
3 Press down on all four corners of the
paper stack to ensure that the paper
rests flat in the tray and fits under the
front left corner tab.
4 Slide Tray 2 back into the printer.
Caution
Do not remove the tray while the printer
is printing. This could cause a paper jam.
Note
If paper curls or skews excessively when
printed, turn over the stack of paper in
Tray 2.
4-6 Printing EN
Page 57

Loading Tray 1
Tray 1 allows you to automatically feed
up to 100 sheets of paper or manually
feed one sheet at a time. Tray 1 can be
used for standard and odd-sized papers,
envelopes, labels, and transparencies.
To load Tray 1:
1 Open Tray 1 by pulling down on the
top center of the door.
2 Pull out the tray extension until it
clicks into place.
3 Slide the paper width guide to the far
right side of the tray.
4 Place paper in the tray. The paper
should be flush left, under the arrows
on the paper guide tabs.
Note
See the sections on letterhead, envelope,
and duplex printing later in this chapter
for proper media orientation for specific
jobs.
5 Slide the paper width guide to the left
until it lightly touches the stack of
paper without bending the paper.
EN Printing 4-7
4
4
Printing
Printing
Page 58

Printing Tasks
Stopping a Print Job
A print job can be stopped from the [Job Cancel] button or from a
software application. In either case, the printer prints the pages it
received before you stopped the print job, then cancels the remainder of
the job.
Note
Note
Caution
Do not stop a print job from both the printer and the computer. Cancel
the job from only one location.
If the printer experiences an error, such as a paper jam, the error must be
cleared before a print job can be canceled.
To stop a print job from the printer:
Press [Job Cancel] to stop the print job. The message CANCELING JOB
is displayed until the current job is canceled. The printer waits until the
computer stops sending data and then cancels the job.
Pressing [Job Cancel] will cancel only the current job in the printer. If
more than one print job is in printer memory [Job Cancel] must be
pushed once for each job.
If you are hooked up to a network, be sure that the job you are canceling
is your own!
To stop a print job from a software application:
If many jobs have been sent to the printer, they may be waiting in a print
queue (like Windows Print Manager, for example). See your software
instruction manual for instructions on canceling a print job from your
software application.
4-8 Printing EN
Page 59

Manually Feeding Pages
Occasionally (such as when printing transparencies), you may want the
printer to pause between printing each page. The Manual Feed feature
allows you to feed paper into the printer by hand rather than
automatically being fed from one of the trays.
Manual Feed should normally be set through a software application. If
your software does not have this option, set Manual Feed through the
printer control panel.
To turn on MANUAL FEED in your software application
1 In your software application select Print or Print Setup.
2 In the Source option select Manual Feed.
3 Print the document.
To turn on MANUAL FEED in the printer control panel
1 Press [Menu] until PRINTING MENU is displayed.
2 Press [Item] until MANUAL FEED=setting is displayed.
3 Press [- Value +] until MANUAL FEED=ON is displayed.
4 Press [Select] to save your selection.
5 Press [Go] to return to the READY message.
When the Manual Feed option is turned ON the printer will respond in
the following ways when a job is received:
• When Tray 1 is configured as the primary tray (TRAY1=FIRST):
• The printer will automatically print on media that is loaded into
Tray 1. The printer will not pause between pages.
• If Tray 1 is empty the printer will display the message MANUALLY
FEED [media size]. Once the media is loaded the printer will
automatically print the sheet. The printer will then pause, waiting
for additional pages to be loaded.
• When Tray 1 is not configured as the primary tray in the printing
order (TRAY1=CASSETTE):
• The printer will display the message, MANUALLY FEED [media
size]. Load the desired media. The printer will start printing. If
the desired media is already in Tray 1 press Go . The printer will
continue to print from Tray 1 until the end of the print job or until
Tray 1 becomes empty.
EN Printing 4-9
4
Printing
Page 60

Reserving or Locking-out Trays
You can reserve a tray to hold a designated size or type of media. For
instance Tray 1 can be reserved to hold letterhead while Tray 2 holds
regular paper. Another example would be to designate Tray 1 to hold
envelopes, while Tray 2 is reserved for letterhead.
Once the tray is reserved it will be locked-out of the automatic selection
during printing. The printer will not draw from a reserved tray unless
specifically requested to do so. To print from the reserved tray it must
be selected from your software application.
Note Reserving or locking out trays helps prevent unwanted printing on
special media.
Media Size Designations
Tray 1 does not have the ability to sense the size of the installed media.
When Tray 1 is reserved or locked out a size needs to be assigned
through the control panel. Table 4-2 lists the sizes available. See the
procedure on the following page for assigning a size to Tray 1.
Table 4-2
Media Size Designations Available for Tray 1
Paper Size Supported Executive
Letter
A4
A5 (from Tray 1 only)
Legal
Envelope Size Supported Com10
Monarch
C5
DL
B5
4-10 Printing EN
Page 61

To reserve and lock out Trays:
This procedure does the following:
• Changes the configuration of Tray 1 from the primary printing source
(TRAY 1=FIRST) to a reserved printing source (TRAY 1=CASSETTE),
and specifies a media size.
• Selects a size for Tray 1 from the control panel.
Locking Tray 1
1 Press [Menu] until CONFIG MENU appears.
2 Press [Item] until TRAY 1=setting appears.
3 Press [- Value +] until TRAY 1=CASSETTE appears, then press [Select].
4 Press [Item] until LOCK TRAY=NONE appears.
5 Press [- Value +] until LOCK TRAY=1 appears, then press [Select] to
save your selection.
6 Press [Item] until SIZE 1=setting appears.
7 Press [- Value +] until the desired size of paper you have selected
appears, then press [Select].
8 Press [Go] to place the printer back on line.
9 Place a stack of paper into Tray 1.
Tray 1 is now locked out from automatic selection. The printer will not
draw from Tray 1 unless it is selected through a software application.
Locking Tray 2 and Optional Tray 3
• To reserve and lock out Tray 2 when no Tray 3 is present, first
change the configuration of Tray 1 to TRAY 1=CASSETTE (follow
steps 1-3).
• Tray 2 and the optional Tray 3 are locked out the same way as Tray 1
(follow steps 4 through 8).
EN Printing 4-11
4
Printing
Page 62

To print a document from a reserved tray:
1 In your software application select Print or Print Setup.
2 In the Source option select the reserved tray (for example, “Tray 1”).
3 Print the document.
To print a multiple-page document from two trays:
1 In your software application find the Source option setting. This may
be found under Page Setup, Print or Print Setup.
Note Some software applications may not give the option of pre-selecting
more than one source for the media. If this option is not available, see
“Manually Feeding Pages” earlier in this chapter for another method of
printing on more than one type of media for a print job.
2 Set the First Page setting to the reserved tray (for example, Tray 1
holding letterhead).
3 Set the Other Pages setting to the second paper source (for example,
Tray 2 for plain paper).
4 Print the document.
The printer prints page 1 on letterhead from Tray 1 and subsequent
pages on plain paper from Tray 2.
4-12 Printing EN
Page 63

Printing on Special Media
Printing Letterhead and Preprinted Forms
If letterhead and forms will be printed regularly, it may be useful to
reserve and lock-out a tray for these special papers. If letterhead and
form printing is only occasional, Tray 1 can be used to easily print these
special papers.
Regular Printing on Special Paper
The HP LaserJet 5/5M printer can be set to recognize a paper source
(such as Tray 1) as being reserved for letterhead, preprinted forms, or
other type of special paper. This is helpful when several multi-page
jobs print on more than one type of media. For instance, if a letter is
longer than one page, the first page may be printed on letterhead and
subsequent pages on regular paper.
If the printer is networked, locking-out the tray in which the preprinted
paper is loaded will remove the tray from the automatic selection during
printing. The printer will not draw from a reserved tray unless
specifically requested to do so. This may help prevent other users from
accidentally printing their jobs on the letterhead or forms. To print from
the reserved tray it must be selected from your software application.
To reserve a tray for a specified paper type, see the section “Reserving
or Locking-out Trays,” earlier in this chapter.
EN Printing 4-13
4
Printing
Page 64

Occasional Printing on Special Paper
Tray 1, by default, will be printed from first. This feature can be useful
when printing an occasional multi-page job on more than one type of
media. The following example demonstrates how to print the first page
of a letter on letterhead (from Tray 1) and the following pages on regular
paper (from Tray 2).
1 Place a sheet of preprinted letterhead in Tray 1, print-side-up, top edge
in, (see “Letterhead Orientation” on the following page).
2 Load regular (plain) paper in Tray 2 (see “Loading Tray 2,” earlier in
this chapter).
3 Print the letter from your software application.
The printer will print on the sheet of letterhead in Tray 1 first, and all
subsequent pages on paper from Tray 2.
4-14 Printing EN
Page 65

Tray 1 Letterhead Orientation
Figure 4-5 Tray 1 letterhead orientation: print-side up, top edge forward.
Tray 2 Letterhead Orientation
Figure 4-6 Tray 2 letterhead orientation: print-side down, bottom edge forward.
Note Letterhead orientation is different when printing with a Duplex Unit.
See “Printing with the Duplex Unit,” later in this chapter.
EN Printing 4-15
4
Printing
Page 66

Printing Envelopes
You can print envelopes from Tray 1 or from the optional Envelope
Feeder. This section explains how to print envelopes from Tray 1 using
your software application or the printer control panel. If you purchased
the optional Envelope Feeder, see “Printing with the Envelope Feeder”
later in this chapter (see the Envelope Feeder User’s Guide for detailed
instructions).
Caution
Table 4-3
Never use envelopes with clasps, snaps, windows, coated linings,
self-stick adhesives (peel and seal), or other synthetic materials. These
items can severely damage your printer. Never try to print on both sides
of an envelope. Jamming and printer damage can result.
Before you load envelopes in Tray 1, make sure they are regular in
shape and undamaged. Also, check to see that the envelopes are not
stuck together.
Table 4-3 lists the kinds of envelopes you can print in Tray 1. It is
important that the basis weight of the envelope paper be no more than
28 lb (105 g/m
2
). Thicker envelopes can jam your printer. (See
Appendix A for additional notes on envelope construction and
specifications.)
Envelope Specifications for Tray 1
Item Specifications
Minimum envelope size 3.5 in x 6.3 in (90 mm x 160 mm)
Maximum envelope size 8.5 in x 14.0 in (216 mm x 356 mm)
2
Weight 16 to 28 lb (60 to 105 g/m
Quantity Maximum 10 envelopes
Envelope Size Dimensions
)
Commercial #10 (COM 10) 4.1 in x 9.5 in (105 mm x 241 mm)
#7 3/4 (Monarch) 3.9 in x 7.5 in (99 mm x 191 mm)
DL 110 mm x 220 mm (4.3 in x 8.7 in)
C5 162 mm x 229 mm (6.4 in x 9.0 in)
B5 176 mm x 250 mm (6.9 in x 9.8 in)
4-16 Printing EN
Page 67

To Load Envelopes into Tray 1:
1 Open Tray 1 by pulling down on the
top center of the door.
2 Pull out the tray extension until it
snaps into place.
3 Place up to 10 envelopes against the
left side of the tray, print-side up,
with the postage-end in (see
illustration for orientation). Slide the
stack of envelopes into the printer as
far as it will go without forcing it. If
the stack of envelopes jams while
feeding into the printer try reducing
the amount of envelopes in the tray.
4 Slide the paper width guide to the left
until it lightly touches the right side
of the envelope stack without bending
the envelopes.
Note
The paper width guide ensures that
envelopes feed correctly into the printer.
Envelopes must fit squarely and firmly
between the paper width guide and the left
side of Tray 1. If they do not, they may
feed into the printer incorrectly resulting
in a paper jam.
4
Printing
EN Printing 4-17
Page 68

Printing Labels and Transparencies
Print labels and transparencies from Tray 1, rather than from Tray 2 or
optional trays. Tray 1 has a straighter paper path, resulting in fewer
paper jams.
Note
Caution
Caution
If labels and transparencies jam or multiple pages are fed at one time
during printing try the following:
• Fan the stack of labels or transparencies, allowing space between
each sheet.
• If problems persist, print one sheet at a time through Tray 1.
Do not try to print on both sides of labels or transparencies. Do not try
to print labels or transparencies from the optional Tray 3. Damage to
the printer may occur.
Label Guidelines
Only use labels recommended for use in laser printers (the labels must
be compatible with the heat and pressure of the fusing assembly
process). See Appendix A for media specifications.
• Do not use labels that are separating from the backing sheet or that
are wrinkled or damaged in any way.
• Do not use label sheets with the backing sheet exposed, such as labels
with any spaces between them.
• Do not feed a sheet of labels through the printer more than once. The
label adhesive is designed for only one pass through the printer.
If a sheet of labels becomes jammed in the printer, turn off the printer,
remove the toner cartridge, and carefully pull the labels out towards the
front of the printer.
Transparency Guidelines
Only use transparencies recommended for use in laser printers, such as
HP or 3M overhead transparency film. See Appendix Afor media
specifications.
• To avoid transparency curl, remove the transparency as it comes out
of the printer and set it on a flat surface to cool.
• To avoid transparencies sticking together, remove any transparencies
in the output bin before printing another transparency.
4-18 Printing EN
Page 69

To Print Transparencies or Labels:
1 Open Tray 1 by pulling down on the
top center of the door.
2 Pull out the tray extension until it
clicks into place.
3 Place up to 8 mm of labels or
transparencies print-side-up in
Tray 1.
Caution
Do not load transparencies up to the arrow
on the paper guide tabs. The stack of
transparencies shouldn’t reach higher than
2 mm below the arrow.
4 In your software’s print setup, specify
paper size and Tray 1 for the paper
source.
5 After printing, remove the printed
sheet from the output bin and lay it on
a flat surface.
4
Printing
EN Printing 4-19
Page 70

Printing with Optional Accessories
Printing from the 500-sheet Tray 3
An optional 500-Sheet Lower Assembly is available for your printer. It
consists of a base and a 500-sheet paper tray. Your printer rests on top
of the Tray 3 base.
Note
Figure 4-7
See the Set-up Guide included with the 500-Sheet Lower Assembly for
installation and setup instructions.
Tray 3 adjusts for letter, legal, A4, and executive paper and holds about
500 sheets of 20 lb. (75 g/m
See “Accessories and Options” in Chapter 1 for part numbers and
ordering information.
WARNING!
4-20 Printing EN
Do not pick up the printer with the optional Tray 3 Assembly installed.
If relocating the printer, first separate the printer from the Tray 3
assembly.
2
) paper.
Page 71

Figure 4-8
When an optional Tray 3 Assembly is installed, it replaces Tray 2 as the
second default source in the printing order. As long as Tray 1 settings have
not been changed the printer will now print on media in the following order:
Media Source Default Printing Priority
Tray 1 1 (first)
Tray 3 2 (second)
Tray 2 3 (third)
For example, assuming all paper sizes are the same, if you send a job to
the printer and Tray 1 is empty, the printer prints the job from Tray 3
unless you specify otherwise. If Tray 3 is also empty, the printer prints
the job from Tray 2.
500-Sheet Tray 3 Details
A Adjust paper length here.
B Adjust paper width here.
C Set paper size with this knob.
D Adjust spring tension for each change in paper size and weight with
this knob.
E Indicates amount of paper in tray.
Note For best results, always fill the tray to the arrows in the middle of the
paper length bracket (see step 3 on the next page). Overfilling the tray
will cause paper jams.
When loading the printer with a new size or weight of media, be sure to
adjust the (C) paper size and (D) tension control. Seethe following pages
for instructions on adjusting the spring tension on the Tray 3 Assembly.
EN Printing 4-21
4
Printing
Page 72

To Load Paper into the Optional Tray 3:
1 Pull the tray straight out of the printer.
2 Adjust the tray length guide for the
desired paper size.
3 Slide up to 500 sheets of paper into
the tray until the front end of the
stack fits against the adjustable paper
length bracket in the back of the tray.
Do not fill above the arrows in the
middle of the paper length bracket.
Note
For best results, always fill the tray
completely when loading paper.
4 Press down on all four corners of the
paper stack to ensure that the paper
rests flat in the tray and fits under the
front left metal holder.
5 Set the paper size knob to correspond
with the paper being loaded. The
paper size indicator on the front of the
tray will show the new paper size.
Continued on next page
4-22 Printing EN
Page 73

Note
Step 6 is only necessary if you are
changing the size of the paper or the
weight of the paper in Tray 3. Tray 3
comes preajusted for 20 lb. (75 g/m
letter sized paper. If you are not changing
paper size or weight, skip to Step 7.
6 Lightly push on the stack of paper to
make sure it moves freely up and
down. Release the tray width guide if
necessary. Adjust the tray spring
tension by turning the tension knob
until the adjustable arrow lines up
with the stationary arrow.
Note
This adjustment may be easier if the tray
is inserted part way into the printer
7 Adjust the tray width guide to rest
firmly against the side of the paper
stack.
8 Slide the full tray back into the Tray 3
assembly.
2
)
4
Printing
EN Printing 4-23
Page 74

Figure 4-9
Printing with the Duplex Unit (2-Sided Printing)
With an optional duplex unit, a print job can be printed on both sides of
a sheet of paper (this is known as duplexing). See “Accessories and
Options” in Chapter 1 for part numbers and ordering information.
Specifying a Duplex Setup
To use the Duplex Unit a 2-sided setup must be selected in the HP
Printer Driver. The drivers, can be reached from the Print dialog box in
any MS Windows application. This is usually accessed from the Printer
Setup or Printer Options command, however, each application may be
different.
Paper orientation and setup work together. The setup determines how
the printer sets each page so that the printed areas on the front and back
of each sheet match.
Caution The duplex unit only prints letter, A4, legal, and executive size pages.
Never try to print on both sides of labels, transparencies, envelopes,
odd-sized pages, or paper heavier than 24 lb (90 g/m
2
). Damage to
your printer and paper jamming can result.
WARNING!
Do not pick up the printer with the duplex unit installed. If relocating
the printer, first separate the Duplex Unit from the printer.
4-24 Printing EN
Page 75

Figure 4-10
Paper orientation options for duplex (2-sided) printing
The four paper orientation options are shown and explained on this page.
A Long-edge landscape orientation
This kind of layout is often used in accounting, data processing, and
spreadsheet applications. With this setup, every other printed image is
oriented upside-down so that pages can be flipped through, as for a
calendar.
B Long-edge portrait orientation
This is the conventional layout used. With this setup, every printed
image is oriented right side up.
C Short-edge portrait orientation
This kind of layout is often used with clipboards. When short-edge
binding in portrait orientation is selected, every other printed image is
oriented upside-down.
D Short-edge landscape orientation
This layout is a variation that is also used. Each printed image is
oriented right side up.
EN Printing 4-25
4
Printing
Page 76

Tray 1 Letterhead Orientation for 2-Sided Printing
Figure 4-11 Tray 1 orientation for 2-sided printing: print-side down, bottom edge forward.
Tray 2 Letterhead Orientation for 2-Sided Printing
Figure 4-12 Tray 2 orientation for 2-sided printing: print-side up, top edge forward.
4-26 Printing EN
Page 77

Printing with the Envelope Feeder
An optional Envelope Feeder is available for the printer. It holds up to
75 envelopes and prints up to nine envelopes per minute. See
“Accessories and Options” in Chapter 1 for ordering information.
Note
Figure 4-13
Note
See the “Envelope Feeder User’s Guide” included with the Envelope
Feeder for complete installation and setup instructions.
Envelope Feeder Details
A Pressure Plate
B ExtensionTray
C Side Guide
The Minimum envelope size that can be used in the envelope feeder is
3.5 in. x 6.3 in. (90 mm x 160 mm).
The Maximum envelope size that can be used in the envelope feeder is
7 in. x 10 in. (178 mm x 254 mm).
4
4
Printing
Printing
EN Printing 4-27
Page 78

Inserting the Envelope Feeder
1 Turn the printer off
Caution
Always turn the printer off before
inserting or removing the envelope feeder
2 Open Tray 1
3 Remove the black, envelope feeder
access cover. Grasp the top handle
(A), pull it firmly downward (B), and
gently pull it toward you (C).
4 Insert the envelope feeder into the
printer as far as it will go.
Select the desired envelope size using the
following steps:
A Turn the printer on.
B Press [Menu] until CONFIG MENU
appears.
C Press [Item] until ENV FEED= size
appears.
D Press [- Value +] to select the desired
envelope size.
E Press [Select] to save your selection.
F Press [Go] to exit the menus.
4-28 Printing EN
Page 79

Loading Envelopes in the Envelope Feeder
Note
Only print on approved envelopes. See
“Printing Envelopes” earlier in this
chapter and “Envelopes” in Appendix A.
1
Lift up the pressure plate (A). It will
stay in a vertical position. Pull the
extension tray out (B).
2 Squeeze the release lever against the
envelope side guide (A) and slide the
side guide all the way to the right (B).
3 Load envelopes into the Envelope
Feeder with the print-side up, the
sealing flap down, and the postage
end in.
Note
Do not fill the Envelope Feeder above the
arrow on the envelope side guide. Make
sure envelope flaps are not interlocked or
stuck together.
4 Lower the pressure plate against the
envelope stack.
5 Slide the envelope side guide against
the envelope stack. The guide should
be pressed firmly against the stack,
but not tight enough to buckle the
envelopes.
Note
Make sure the envelopes are pushed into
the Envelope Feeder as far as they can go.
EN Printing 4-29
4
Printing
Page 80

Figure 4-14
Printing with the Infrared Serial Port
An optional HP infrared (IR) adapter is available for the HP LaserJet
5/5M printer. This adapter is compliant with the specifications
determined by the Infrared Data Association (IrDA).
The HP IR adapter works by transmitting data similarly to a serial
interface but without the cable. Data transmission occurs at speeds up to
115 k bits per second.
The HP infrared adapter attaches to the IR port on the back of the
printer, located between the parallel port and serial port (see Figure
4-14).
The HP IR adapter is compatible with a wide variety of IrDA-compliant
portable devices (such as a laptop computer); however, the method for
printing will vary depending on the type of device and the operating
system in use. Refer to the instruction manual for your portable
equipment for specific instructions on printing from that device.
Note
4-30 Printing EN
The IrDA standard for infrared communications represents an emerging
technology. Older non-IrDA-compliant portable devices may not be
compatible with the HP LaserJet 5/5M printer. If you experience
problems when printing with the IR adapter, contact the manufacturer or
dealer of your portable device to verify compatibility with the IrDA
standard.
See “Accessories and Options” in Chapter 1 for ordering information.
Page 81

Figure 4-15
To print using the HP Infrared Adapter:
1 Make sure that the printer is in READY mode.
2 Align your laptop computer (or other portable equipment) that is
equipped with an IrDA-compliant IR window within 2 to 3 feet (1 m) of
the HP IR adapter on the printer and at an angle of +/- 15 degrees to
ensure an adequate connection for printing.
EN Printing 4-31
4
Printing
Page 82

3 Send the print job. The status light above the IR adapter should turn on.
If not, realign the adapter with the IR port on the sending device, resend
the print job, and keep the equipment within the range of operation
during printing.
4 If you have to move the equipment, for example, to add paper, make
sure it remains within the range of operation to maintain the connection.
If the connection is interrupted before your print job is complete, the IR
adapter status light will turn off. You have between 3 to 40 seconds to
correct the interruption and continue the job. In this case, the HP IR
adapter status light will turn back on.
Note
The connection can be permanently broken if the sending port is moved out
of range of operation or if anything passes between the ports blocking the
transmission, such as a hand, piece of paper, or direct sunlight.
Printing with the IR adapter is generally slower than printing with a direct
connection through the parallel port, depending on the size of the print job.
4-32 Printing EN
Page 83

PostScript Printing
Introduction
The PostScript language is available as an option for the HP LaserJet 5
printer and comes standard with the HP LaserJet 5M printer. Chapter 3
focused on using the printer in the PCL mode. Some tasks are
performed differently when printing in the PostScript mode.
This chapter describes differences the PostScript option makes in printer
performance and discusses the following PostScript specific information:
• Preparing for PostScript Printing
• Control Panel Differences with PostScript
• Printing PostScript Test Pages
Printer functions not included in this chapter work the same as described
in Chapter 4, “Printing,” Chapter 3, “Using the Printer Control Panel,”
and other chapters of this manual.
5
Not e for
Macintosh
Users
If you purchased an HP LaserJet 5M printer, see the Macintosh Notes
for additional information. Some standard Macintosh terms may have
different meanings in this manual:
• Control panel refers to the control panel on the printer and has
nothing to do with the Controls Panels folder in your System Folder
or the Control Panels that are stored there.
• Menu refers to a key on the printer control panel and to the menus of
items available on the printer control panel, not the pull-down or
pop-up menus that are part of your Macintosh user interface.
EN PostScript Printing 5-1
Page 84

Preparing for PostScript Printing
This chapter assumes a PostScript language SIMM is installed in your
printer (see Appendix D, “Printer Memory.”). Your PostScript language
SIMM contains genuine PostScript Level 2 software from Adobe. It is
backward-compatible with earlier versions of PostScript software.
Additional requirements for PostScript printing:
• A PostScript printer driver.
• Sufficient printer memory (printing 600-dpi and duplex printing
requires more memory in PostScript than in PCL).
Using PostScript Printer Drivers
PostScript Printer Drivers for MS Windows
To make full use of the printer features in MS Windows, you must use
the PostScript printer driver that came with the printer or your
PostScript SIMM. For the latest driver installation and setup
instructions (as well as an additional explanation of PostScript driver
features), see the “readme” file on the PostScript disk.
PostScript Printer Drivers for DOS/UNIX Applications
For DOS/UNIX applications, you must select a PostScript language
printer driver from within your software application. If your software
does not offer a PostScript language printer driver selection, it may not
support PostScript printing. For more information on DOS/UNIX
PostScript printer driver installation and selection, see your software
documentation or contact your software vendor.
5-2 PostScript Printing EN
Page 85

Printer Memory and PostScript Printing
The HP LaserJet 5M printer comes with Adobe PostScript Level 2 and
6 MBytes of installed memory.
Table 5-1 shows the total memory required to print a letter/A4 or legal
size page and to use the I/O Buffering and Resource Saving features.
(For an explanation of I/O Buffering and Resource Saving, see “How
Your Printer Uses Memory” in Appendix D.) Print a self test page to
determine current printer memory (see “Printing a PostScript
Configuration Page” later in this chapter for printing instructions).
Table 5-1 PostScript Printing Memory Recommendations
Requirement 300 dpi Simplex* 300 dpi Duplex* 600 dpi Simplex 600 dpi Duplex
Letter/A4 6 MBytes 6 MBytes 6 MBytes 10 MBytes
Legal 6MBytes 6 MBytes 6 MBytes 12 MBytes
I/O Buffering 6 MBytes 12 MBytes 6 MBytes 12 MBytes
Resource Saving 8 MBytes 13 MBytes 8 MBytes 13 MBytes
*If you are printing complex PostScript graphics files in 300 dpi and want increased performance, you may
need more memory.
EN PostScript Printing 5-3
5
Printing5PostScript
Printing
PostScript
Page 86

Printing a Legal Page in PostScript
Most legal-size pages will print at 600 dpi. To print a legal page at
300 dpi, your printer must have at least 6 MBytes of installed memory.
(The HP LaserJet 5M comes with 6 MB.) Printing 600 dpi legal-size
pages requires at least 6 MBytes of installed memory. To check how
much memory you have print a PS Config Page (see later in this
chapter).
Note
If you have less than 12 MBytes of installed memory with the optional
duplex unit installed and duplex selected, a “mini-legal” or “mini-A4”
page—pages with slightly increased margins—may be printed instead.
If this is not satisfactory, you must set resolution to 300 dpi or add more
memory.
5-4 PostScript Printing EN
Page 87

Switching Printer Languages
(Personalities)
The HP LaserJet 5 printer comes with the PCL 6 printer personality or
operating language, which gives you 45 built-in scalable fonts. You can
also add a PostScript SIMM (Single In-Line Memory Module) which
gives you Adobe’s 35 Type 1 fonts.
If more than one printer language is installed, your printer is set by
default to switch automatically between languages as it receives printing
jobs. This allows you to print either HP PCL 6 or PostScript Level 2
language documents without leaving your application.
Note
Normally you should not change the printer personality setting from
AUTO, the default. If you do change it to a specific printer language (PCL
or PS), the printer will not automatically switch from one language to
another unless software commands are sent to the the printer.
To change the printer’s personality setting:
1 Press [Menu] until JOB MENU appears.
2 Press [Item] until PERSONALTY=setting appears.
3 Press [- Value +] until the setting you want appears.
4 Press [Select] to save your selection. An asterisk (*) appears next to
your selection in the display.
5 Press [Go] to exit menus.
EN PostScript Printing 5-5
5
Printing5PostScript
Printing
PostScript
Page 88

Control Panel Differences with PostScript
As explained in Chapter 3, “Using the Printer Control Panel,” pressing
[Menu] provides access to menus, one after another. Most menus and
items apply to all installed personalities. Only those that specifically
apply to PostScript are described in this chapter.
The Menu Map in Chapter 3 lists the placement of the PostScript
options in the control panel system of menus (see the shaded entries).
To select a menu item:
1 Press [Menu] repeatedly until the menu you want appears.
2 Press [Item] repeatedly until the item you want appears.
3 Press - Value + until the setting you want appears.
4 Press [Select] to save your selection. An asterisk (*) appears next to
your selection in the display, indicating that it is now the default.
5 Press [Go] to exit the menus.
Note
Remember: When a control panel setting is changed, it is changed for all
installed languages, including PCL, as well as PostScript.
5-6 PostScript Printing EN
Page 89
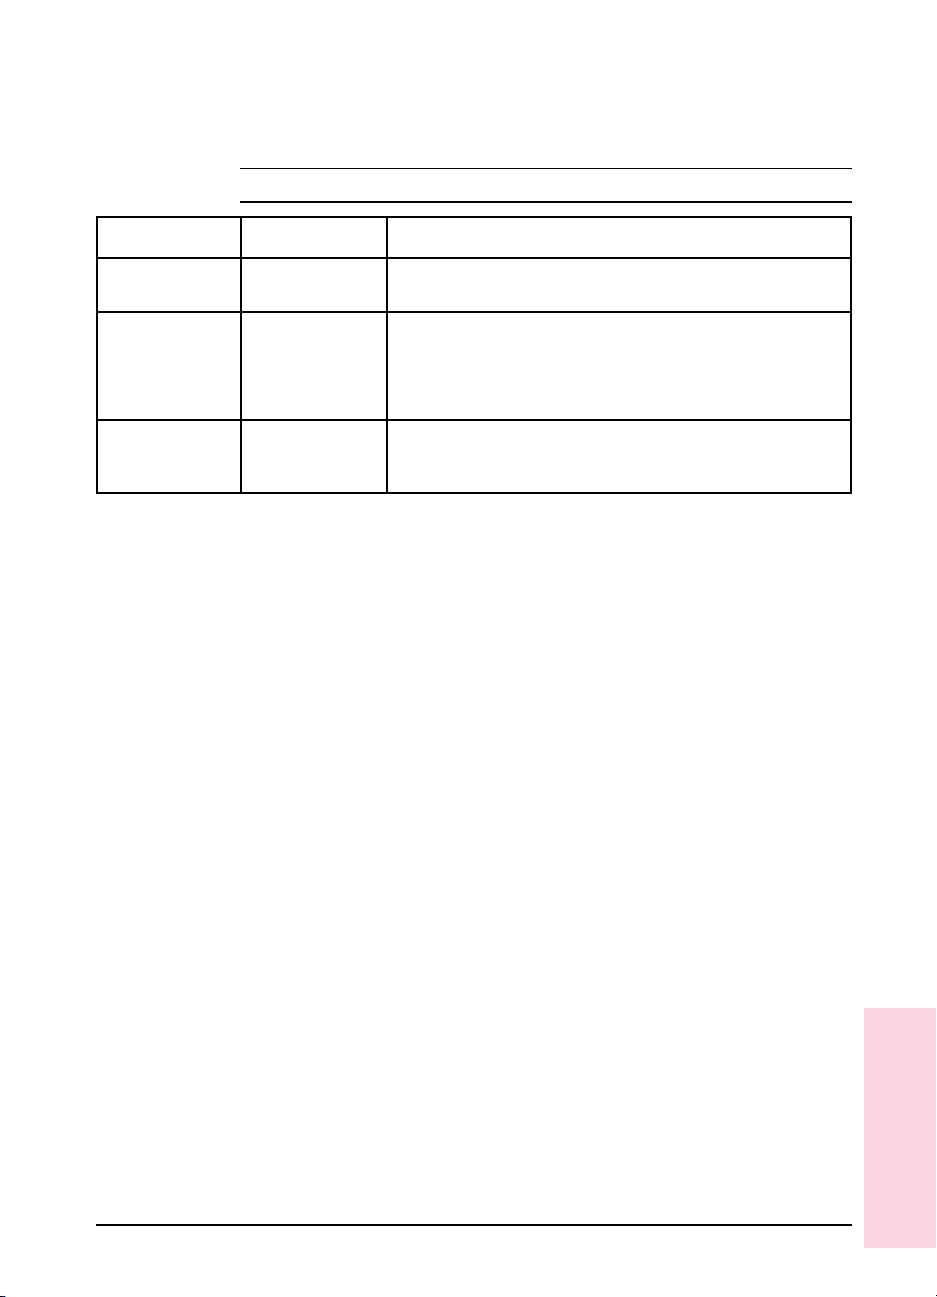
PostScript Menu
When PostScript is installed, a PostScript language menu is added to the
control panel system of menus.
Table 5-2 PostScript Menu Items
Item Options Explanation
PS FONTS LIST None A printed list of PostScriptfonts is available by pressing [Select] when
PRT PS ERRS OFF*
ON
JAM RECOVER OFF*
ON
*Indicates factory default.
this item is displayed.
When this optionis set to ON, the printer prints a page that describes
errors the PostScript interpreter encounters. No PostScript error
messages display onthe control panel. This page is useful if you are
developing a PostScript technicalapplication or troubleshooting a
problem. Otherwise, leave this item set to OFF.
Lets you decide whether PostScript automatically attempts to recover
from paper jams. Settingthis item to ON will reduce the printer’s printing
performance.
EN PostScript Printing 5-7
5
Printing5PostScript
Printing
PostScript
Page 90

PostScript Fonts List
The PostScript Fonts List has samples of the 35 built-in PostScript
language fonts (see Figure 5-1 on the following page).
The PostScript Fonts List displays only the 35 PostScript language
fonts, with print samples for each font. The list will not display the
printer’s internal or downloaded PCL fonts or any PostScript language
downloaded fonts.
The characters shown on the PostScript Fonts List are printed in only
one size. When printing from many applications you can scale these
characters to a wide range of sizes.
Note You cannot use your PostScript fonts in combination with PCL fonts
resident in your printer or with other PCL fonts. Language switching
allows you to use either the PostScript- or PCL-supported type, but not
both simultaneously.
To print a PostScript Fonts List:
1 Press [Menu] repeatedly until PS MENU appears.
2 Press [Item] repeatedly until PS FONT LIST appears.
3 Press [Select] to print the page.
5-8 PostScript Printing EN
Page 91

Figure 5-1 PostScript Fonts List
EN PostScript Printing 5-9
5
Printing5PostScript
Printing
PostScript
Page 92

Menu Items Affected by PostScript
Most PostScript menu items are similar to those for the PCL mode.
Those that are different are listed in the following tables. For menu
items common to PostScript and PCL, see Chapter 3, “Using the Printer
Control Panel.”
Table 5-3 Printing Menu Differences
Item Options Explanation
PAPER None These settings are ignored because of the way PostScript formats pages.
ORIENTATION
FORM
Table 5-4 Job Menu Differences
Item Options Explanation
RESOLUTION 300
600*
PERSONALTY AUTO*
PCL
PS
I/O TIMEOUT 15*
(5 to 300)
*Indicates factory default.
If your PostScript printer drivercannot select 600 dpi, you can select 600
dpi resolutionfrom the printer’s controlpanel. Note that a fileset for 300
dpi overrides the600 dpi control panel setting
job at 300 dpi. The setting reverts to the default after the job prints.
When you set personality to AUTO, the printer automaticallyselects
PostScript when it receives a PostScript job. When you set personality to
PS, the printer stops switching personalities automatically. Instead, it
switches to another personality only whena software command
specifically instructsit to do so. AUTO is recommended,especially in
shared printer environments.
I/O timeout refersto the time, measured in seconds, that the printer waits
before ending a print job. The PostScript wait timeout and job timeout
operators arenot affected by this menuitem. The I/O TIMEOUT setting
does not affect how long a PostScript job is allowedto run or how long
PostScript waits for input.
for that file only,
printing the
5-10 PostScript Printing EN
Page 93

Table 5-5 Configuration Menu Differences
Item Options Explanation
AUTO CONT n/a PostScript language errors will not appearon the control panel display.
Table 5-6 Memory Configuration Menu Differences
Item Options Explanation
IO BUFFER n/a With 6 MBytes of memory (12 MBytes for duplex), the I/O buffering option
RESRCSAVE n/a With 7 MBytes of memory (13 MBytes for duplex), Resource Saving
appears.
appears.
Printing a PostScript Configuration Page
1 Press [Menu] repeatedly until TEST MENU appears.
2 Press [Item] repeatedly until PS CONFIG PAGE appears.
3 Press [Select] to print the page. The page will print in less than one
minute.
See the following pages for descriptions and examples of the PostScript
configuration page.
5
Printing5PostScript
Printing
PostScript
EN PostScript Printing 5-11
Page 94

PostScript Configuration Page
The PostScript configuration page (the PS CONFIG PAGE item in the
Test Menu) is shown in Figure 5-2 on the following page.
Table 5-7
A Settings: Current printer control panel default settings and product-specific
information such as Printer Name and PostScript version. PostScript-specific settings
include (but are not limited to):
HalftoneType: The current halftone type.
Wait Timeout: The PostScript timeout, not the timeout value in the Job Menu.
Printer Name: Name set by user (a network name, for instance).
Print Errors: Value set through the printer control panel’s PS Menu.
PostScript Version: The version of PostScript installed.
System Password/Job Password: Values are either “0” (default) or “Not Default”
Jam Recovery: Indicates whether Jam Recovery is ON or OFF.
B Memory: The value shows how PostScript uses printer memory. This may be useful
for more experienced users since PostScript Level 2 allows users to configure
memory parameters (see the PostScript Level 2 “Red Book” for specific information
about these values).
C Flash Accessory: This setting will appear when the Flash SIMM is installed. It will
include the number and the SIMM size
D Printable Area: Gives the dimensions within the margins of the image area. Printable
area is dependent on the amount of memory installed. The current default is shown in
the hollow box.
E Page Count: Shows how many pages have been printed by the printer in all printer
languages. Youcan use the page count to track printer use.
PostScript Configuration Page Printout Items
(a password is present).
5-12 PostScript Printing EN
Page 95

Figure 5-2 PostScript Configuration Page
EN PostScript Printing 5-13
5
Printing
PostScript
Page 96

5-14 PostScript Printing EN
Page 97

Adjusting Print Quality
Introduction
This chapter explains special tasks to be performed occasionally, in
order to adjust print quality using the control panel. These include:
• Choosing print resolution
• Fine-tuning print quality
• EconoMode printing
Many of these functions can also be performed using the software that
came with your printer. Refer to Chapter 2, “Printing Software
Overview” or the online help files associated with the software for more
information.
6
EN Adjusting Print Quality 6-1
Page 98

Choosing Print Resolution
The default resolution setting for the printer is 600 dpi (dots per inch).
This setting offers the best print quality. The resolution setting can be
adjusted to 300 dpi from the RESOLUTION item in the Job Menu (see
Chapter 3).
To take best advantage of 600 dpi printing, use the internal fonts (or
accessory scalable fonts) and the software printer drivers designed for
the printer.
Note
If possible, set print resolution from your software application. If your
software application does not adjust the print resolution, set print
resolution from the control panel. Settings that are selected in your
software application override control panel settings.
6-2 Adjusting Print Quality EN
Page 99

Fine-Tuning Print Quality
Print quality can be fine-tuned by adjusting print density and setting
Resolution Enhancement technology (REt). Print density and REt settings
work together, so both should be adjusted at the same time (see
“Harmonizing Print Density and REt Settings,” at the end of this section).
Adjusting Print Density
Print density is a measure of the darkness of print on the page. Print
density settings range from 1 to 5, with 1 producing the lightest print,
and 5 the darkest. By default, print density is set to 3.
6
Quality
Adjusting Print
Note
Print density is affected by the Resolution Enhancement setting.
To adjust print density from the control panel:
1 Press [Menu] until CONFIG MENU appears.
2 Press [Item] until DENSITY=setting appears.
3 Press - Value + to reach the print density setting you want.
4 Press [Select] to save your selection. An asterisk (*) appears next to
your selection in the display.
5 Press [Go] to exit the menus.
6 Print a self test and examine the print pattern (see Chapter 7, “Testing
the Printer”).
7 Continue adjusting print density until you are satisfied with the print
pattern.
EN Adjusting Print Quality 6-3
Page 100

Figure 6-1
Enhancing Resolution
Resolution Enhancement technology (REt) refines the print quality of
characters and graphics by smoothing the fine gradations along the
angles and curves of the printed image. Figure 6-1 shows two
magnified images: the left one shows Resolution Enhancement set to
OFF; the right one shows it set to MEDIUM, the default. You can also
select LIGHT or DARK.
Note
The REt setting should normally be set through a software application.
If your software does not have this option, set REt through the printer
control panel.
To adjust REt from the control panel:
1 Press [Menu] until PRINTING MENU appears.
2 Press [Item] until RET=setting appears.
3 Press - Value + until the desired setting appears.
4 Press [Select] to save your selection. An asterisk (*) appears next to
your selection in the display.
5 Press [Go] to exit the menus.
6-4 Adjusting Print Quality EN
 Loading...