

Page 1

HP LaserJet 4V
and 4MV Printers
User’s Manual
Page 2

© Copyright HewlettPackard Company 1994
All Rights Reserved.
Reproduction, adaptation,
or translation without prior
written permission is
prohibited, except as
allowed under the
copyright laws.
Publication number
C3141-90915
First edition, October 1994
Printed in USA
Warranty
The information contained
in this document is subject
to change without notice.
Hewlett-Packard makes
no warranty of any kind
with regard to this
material, including, but
not limited to, the
implied warranties of
merchantability and
fitness for a particular
purpose.
Hewlett-Packard shall not
be liable for errors
contained herein or for
incidental or consequential
damage in connection with
the furnishing,
performance, or use of this
material.
Trademark Credits
Adobe, PostScript and
the PostScript Logo are
trademarks of Adobe
Systems Incorporated
which may be registered in
certain jurisdictions. Arial,
Times New Roman, and
Monotype are registered
trademarks of the
Monotype Corporation.
Bi-Tronics is a trademark
of Hewlett-Packard
Company. Helvetica and
Univers are trademarks of
Linotype AG and/or its
subsidiaries in the U.S. and
other countries. Macintosh
computer is a product of
Apple Computer, Inc.
Microsoft® is a U.S.
registered trademark of
Microsoft Corporation.
PageMaker® is a U.S.
registered trademark of
Aldus Corporation.
TrueType is a trademark
of Apple Computer, Inc.
WordPerfect is a registered
trademark of WordPerfect
Corporation.
Hewlett-Packard Company
11311 Chinden Boulevard
Boise, Idaho 83714
Page 3

Conventions
This manual uses the following conventions:
Bold indicates emphasis or a minor heading.
Italic refers to a document title or is used for emphasis.
COMPUTER type indicates text visible on a computer screen.
DISPLAY FONT indicates text visible on the printer control panel’s display.
The cursive letter l is used in examples to distinguish the letter l from the
numeral 1 (one). The character 0 is used in examples to distinguish the
numeral 0 from the letter O.
[Key Face] indicates keys (such as [On]Line] ) on the printer’s control panel.
[Key Face] indicates keys (such as [Insert] ) on your computer keyboard.
Note
Caution
Warning
Notes contain important information set off from the text.
Caution messages appear before procedures which, if not observed, could
result in loss of data or in damage to equipment.
Warning messages alert you to a specific procedure or practice
which, if not followed correctly, could cause serious personal
injury.
ii
Page 4
Supplementary Documents
The technical reference guides listed below are designed for programmers.
The paper specification guide is useful for purchasing agents and paper
buyers. These documents are available in English only.
You can order the documents listed below through HP Direct Distribution or
by contacting your authorized HP Dealer (see the inside cover or
Appendix F). There is a charge for some documents.
Documentation Available for the HP LaserJet 4V and 4MV Printers
Title Part Number
The
PCL/PJL Technical Reference Package
•
PCL 5 Printer Language Technical Reference Manual
Explains the PCL 5 printer language for experienced users and programmers.
•
Printer Job Language Technical Reference Manual
Explains HP’s Printer Job Language (PJL) for experienced users and
programmers.
•
PCL/PJL Technical Quick Reference Guide
•
PCL Comparison Guide
Describes the different implementation of commands and extensions across the
printer family supporting PJL and PCL 5.
.
contains the following documents: 5961-0701
.
.
.
HP LaserJet Printer Family Paper Specification Guide
iii
. 5002-1801
Page 5
Customer Service
Customer Support
Customer Support options US and Canada
Customer Support Assistance (208) 323-2551
(Mountain Time) During the Warranty Period
Obtaining Printer Drivers Phone: (303) 339-7009 Internet: Anonymous FTP to
Fax: (303) 330-7655
Mail: Hewlett Packard
Accessories and Supplies (800) 538-8787
HP Authorized Dealers and Service (800) 243-9816 (US) (800) 387-3867 (Canada)
HP Repair Contracts (800) 633-3600 (US) (800) 268-1221 (Canada)
Software Application Notes and Audio Tips
HP FIRST* (800) 333-1917
(208) 344-4809
All other countries contact your authorized HP dealer, see Appendix F.
Customer Support options Europe
Customer Support Assistance See the flyer included with printer.
Obtaining Printer Drivers Call HP First.
Accessories and Supplies See Appendix F.
HP Authorized Service See Appendix F.
HP Dealer See Appendix F.
Software Application Notes
HP FIRST* United Kingdom 0-800-96-02-71
Netherlands 06-02-22-420
Belgium 078-11-19-06
Belgium (French) 078-11-70-43
Germany 0130-8100-61
France 05-90-5900
Switzerland (German) 155-1527
Switzerland (French) 155-1526
Austria 0660-8128
English outside of U.K. (31) 20-681-5792
* HP First (Fax Information Retrieval Support Technology) is a no-charge, 24 hours self-help service that provides answers to
the most common questions about your printer. Through HP FIRST, you can receive ordering information, software application
notes and printer driver update request forms.
Simply dial the HP FIRST number from a touch tone phone connected with a Group 3 Facsimile machine and follow the voice
prompts that guide you to select an index of available support and product documents.
Mon-Fri 7 a.m. to 6 p.m. Wednesday 7 a.m. to 4 p.m.
192.6.71.2 or ftp.boi
Download: Using your Modem,
(208) 344-1691
P.O. Box 1754
Greeley, CO 80632
Page 6

Contents
1 About Your Printer
Introduction . . . . . . . . . . . . . . . . . . . . . . . . . . . . . . . . 1-1
The HP LaserJet 4V Printer . . . . . . . . . . . . . . . . . . . . . . . 1-2
Enhanced Print Quality . . . . . . . . . . . . . . . . . . . . . . . . 1-2
PCL Language and Language Switching . . . . . . . . . . . . . . . 1-2
Paper Handling . . . . . . . . . . . . . . . . . . . . . . . . . . . . 1-3
Memory and Memory Management . . . . . . . . . . . . . . . . . . 1-3
Printer Drivers and Software . . . . . . . . . . . . . . . . . . . . . 1-3
Input/Output (I/O) Features . . . . . . . . . . . . . . . . . . . . . . 1-4
Toner Economy and Energy Savings . . . . . . . . . . . . . . . . . 1-4
Typefaces . . . . . . . . . . . . . . . . . . . . . . . . . . . . . . . . 1-4
PCL Typefaces . . . . . . . . . . . . . . . . . . . . . . . . . . . . . . 1-5
The HP LaserJet 4MV Printer . . . . . . . . . . . . . . . . . . . . . . 1-6
PostScript and Memory . . . . . . . . . . . . . . . . . . . . . . . . 1-6
Networking Capabilities . . . . . . . . . . . . . . . . . . . . . . . . 1-6
PostScript Typefaces . . . . . . . . . . . . . . . . . . . . . . . . . . . 1-7
Accessories and Options . . . . . . . . . . . . . . . . . . . . . . . . . 1-8
HP LaserJet 4V/4MV Printer Parts . . . . . . . . . . . . . . . . . . . 1-10
2 Software For Your Printer
Introduction . . . . . . . . . . . . . . . . . . . . . . . . . . . . . . . 2-1
Software for the HP LaserJet 4V Printer . . . . . . . . . . . . . . . . 2-2
Software for Windows 3.1 . . . . . . . . . . . . . . . . . . . . . . . 2-2
Software for DOS . . . . . . . . . . . . . . . . . . . . . . . . . . . . 2-3
Software for the HP LaserJet 4MV Printer . . . . . . . . . . . . . . . 2-4
Software for the Macintosh . . . . . . . . . . . . . . . . . . . . . . 2-4
PostScript Driver for Windows 3.1 . . . . . . . . . . . . . . . . . . 2-5
Networking Software . . . . . . . . . . . . . . . . . . . . . . . . . 2-5
Optional Networking Software . . . . . . . . . . . . . . . . . . . . 2-6
Optional Printer Drivers Available . . . . . . . . . . . . . . . . . . 2-6
3 Printing Tasks
Introduction . . . . . . . . . . . . . . . . . . . . . . . . . . . . . . . . 3-1
Printing Paper from the Best Paper Source . . . . . . . . . . . . . . . 3-2
Selecting Paper and Other Print Media . . . . . . . . . . . . . . . . . 3-3
Loading Paper . . . . . . . . . . . . . . . . . . . . . . . . . . . . . . 3-5
Adjusting the Paper Stop . . . . . . . . . . . . . . . . . . . . . . . 3-5
Loading Paper into the Letter or A4 Paper Cassette . . . . . . . . . . 3-6
Loading Paper into the 11x17 or A3 Paper Cassette . . . . . . . . . . 3-8
Loading Letter, Legal, 11x17, A4, or A3 Paper into the MP Tray . . . 3-10
Manually Feeding Pages from the MP Tray . . . . . . . . . . . . . . 3-12
Printing Labels or Transparencies from the MP Tray . . . . . . . . . 3-13
Contents-1
Page 7

Printing on Custom-sized Paper from the MP Tray . . . . . . . . . . 3-15
Printing Letterhead Documents, Preprinted Forms, and Special
Papers . . . . . . . . . . . . . . . . . . . . . . . . . . . . . . . . . 3-17
Reserving or Locking Out the MP Tray or Paper Cassettes . . . . . . 3-18
Printing an Envelope from the MP Tray . . . . . . . . . . . . . . . . 3-19
Loading an Envelope into the MP Tray . . . . . . . . . . . . . . . . 3-20
Printing an Envelope from a Software Application . . . . . . . . . . 3-21
Printing from the Optional 500-sheet Universal Lower Cassette . . . 3-22
Loading Paper into the Optional Lower Cassette . . . . . . . . . . . . 3-23
Stopping a Print Request . . . . . . . . . . . . . . . . . . . . . . . . 3-24
4 Understanding the Control Panel
Introduction . . . . . . . . . . . . . . . . . . . . . . . . . . . . . . . . . 4-1
Control Panel Layout . . . . . . . . . . . . . . . . . . . . . . . . . . . . 4-2
Indicator Lights . . . . . . . . . . . . . . . . . . . . . . . . . . . . . 4-2
Control Panel Keys . . . . . . . . . . . . . . . . . . . . . . . . . . . 4-3
Settings and Defaults . . . . . . . . . . . . . . . . . . . . . . . . . . 4-5
Control Panel Menus . . . . . . . . . . . . . . . . . . . . . . . . . . . . 4-6
To select a menu item: . . . . . . . . . . . . . . . . . . . . . . . . . . 4-6
Printing Menu . . . . . . . . . . . . . . . . . . . . . . . . . . . . . . 4-7
PCL Menu . . . . . . . . . . . . . . . . . . . . . . . . . . . . . . . . 4-8
Job Menu . . . . . . . . . . . . . . . . . . . . . . . . . . . . . . . . . 4-9
Configuration Menu . . . . . . . . . . . . . . . . . . . . . . . . . . 4-10
Memory Configuration Menu . . . . . . . . . . . . . . . . . . . . . 4-12
Parallel Menu . . . . . . . . . . . . . . . . . . . . . . . . . . . . . 4-13
Test Menu . . . . . . . . . . . . . . . . . . . . . . . . . . . . . . . 4-14
Menu of Resets . . . . . . . . . . . . . . . . . . . . . . . . . . . . . 4-15
Contents-2
5 Special Tasks
Introduction . . . . . . . . . . . . . . . . . . . . . . . . . . . . . . . . . 5-1
Switching Printer Languages (Personalities) . . . . . . . . . . . . . . . 5-2
Testing Your Printer . . . . . . . . . . . . . . . . . . . . . . . . . . . . 5-3
Printing a Test Page . . . . . . . . . . . . . . . . . . . . . . . . . . . 5-3
Understanding the Self Test Printout . . . . . . . . . . . . . . . . . 5-3
Checking Installed PCL Fonts . . . . . . . . . . . . . . . . . . . . . . . 5-6
Understanding the PCL Typeface List Printout . . . . . . . . . . . . 5-6
How Much Memory Do You Need? . . . . . . . . . . . . . . . . . . . . 5-8
How Your Printer Uses Memory . . . . . . . . . . . . . . . . . . . . . . 5-9
Keeping Downloaded Resources in Memory . . . . . . . . . . . . . . 5-9
How I/O Buffering Improves Performance . . . . . . . . . . . . . . 5-11
Choosing Print Resolution . . . . . . . . . . . . . . . . . . . . . . . . 5-11
Fine-Tuning Print Quality . . . . . . . . . . . . . . . . . . . . . . . . 5-12
Adjusting Print Density . . . . . . . . . . . . . . . . . . . . . . . . 5-12
To Adjust Print Density . . . . . . . . . . . . . . . . . . . . . . . . 5-13
Enhancing Resolution . . . . . . . . . . . . . . . . . . . . . . . . . 5-14
Harmonizing Print Density and REt Settings . . . . . . . . . . . . 5-15
Saving Toner with EconoMode . . . . . . . . . . . . . . . . . . . . . 5-16
Page 8

Saving Energy with Power Save . . . . . . . . . . . . . . . . . . . . 5-17
6 PostScript Printing
Introduction . . . . . . . . . . . . . . . . . . . . . . . . . . . . . . . . 6-1
Using the Right Printer Driver . . . . . . . . . . . . . . . . . . . . . . 6-2
How Much Memory Do You Need? . . . . . . . . . . . . . . . . . . . . 6-2
Control Panel Differences . . . . . . . . . . . . . . . . . . . . . . . . 6-3
How Form Feed and Reset Work . . . . . . . . . . . . . . . . . . . 6-3
To select a menu item: . . . . . . . . . . . . . . . . . . . . . . . . . 6-4
PostScript Menu . . . . . . . . . . . . . . . . . . . . . . . . . . . . 6-5
Menu Items Affected by PostScript . . . . . . . . . . . . . . . . . . 6-5
Test Menu Items . . . . . . . . . . . . . . . . . . . . . . . . . . . . . 6-7
To print a Test Menu page . . . . . . . . . . . . . . . . . . . . . . . 6-7
PostScript Configuration Page . . . . . . . . . . . . . . . . . . . . 6-8
PostScript Demonstration Page . . . . . . . . . . . . . . . . . . . . 6-10
PostScript Typeface List . . . . . . . . . . . . . . . . . . . . . . . . 6-10
The PostScript Disk Accessory . . . . . . . . . . . . . . . . . . . . . . 6-12
7 Maintaining Your Printer
Introduction . . . . . . . . . . . . . . . . . . . . . . . . . . . . . . . . 7-1
Cleaning the Printer . . . . . . . . . . . . . . . . . . . . . . . . . . . 7-1
Printer Cleaning Tasks . . . . . . . . . . . . . . . . . . . . . . . . . 7-2
Working with the Toner Cartridge . . . . . . . . . . . . . . . . . . . . 7-3
Toner Cartridge Life . . . . . . . . . . . . . . . . . . . . . . . . . . 7-3
Storing, Installing, and Recycling the Toner Cartridge . . . . . . . 7-3
HP’s Policy on Use of Non-HP Toner Cartridges . . . . . . . . . . . 7-3
Extending Toner Cartridge Life . . . . . . . . . . . . . . . . . . . . . 7-4
Clearing the TONER LOW Message . . . . . . . . . . . . . . . . . . 7-5
8 Solving Printer Problems
Introduction . . . . . . . . . . . . . . . . . . . . . . . . . . . . . . . . 8-1
Troubleshooting Check List . . . . . . . . . . . . . . . . . . . . . . . 8-2
Printer Response Problems . . . . . . . . . . . . . . . . . . . . . . 8-2
Software, Computer, and Printer Interface Problems . . . . . . . . 8-4
Problems Using Optional Accessories . . . . . . . . . . . . . . . . . 8-9
PostScript Troubleshooting . . . . . . . . . . . . . . . . . . . . . . 8-11
Clearing Paper Jams . . . . . . . . . . . . . . . . . . . . . . . . . . . 8-12
Removing Paper Jams . . . . . . . . . . . . . . . . . . . . . . . . . . 8-14
Cassette Area Paper Jams . . . . . . . . . . . . . . . . . . . . . . . 8-16
Repeated Paper Jams . . . . . . . . . . . . . . . . . . . . . . . . . 8-17
Improving Print Quality . . . . . . . . . . . . . . . . . . . . . . . . . 8-18
Print Quality Checklist . . . . . . . . . . . . . . . . . . . . . . . . 8-18
Fade . . . . . . . . . . . . . . . . . . . . . . . . . . . . . . . . . . . 8-18
Dropouts . . . . . . . . . . . . . . . . . . . . . . . . . . . . . . . . 8-19
Lines . . . . . . . . . . . . . . . . . . . . . . . . . . . . . . . . . . 8-19
Toner Smear . . . . . . . . . . . . . . . . . . . . . . . . . . . . . . 8-19
Background Gray Toner Shading . . . . . . . . . . . . . . . . . . . 8-20
Contents-3
Page 9

Repetitive Defects . . . . . . . . . . . . . . . . . . . . . . . . . . . 8-20
Improperly Formed Characters . . . . . . . . . . . . . . . . . . . 8-20
Line at Edge of Paper . . . . . . . . . . . . . . . . . . . . . . . . . 8-21
Understanding Printer Messages . . . . . . . . . . . . . . . . . . . . 8-22
Clearable Warnings . . . . . . . . . . . . . . . . . . . . . . . . . . 8-28
Calling for Help . . . . . . . . . . . . . . . . . . . . . . . . . . . . . . 8-29
A Common PCL Printer Commands
PCL Printer Commands (Escape Sequences) . . . . . . . . . . . . . . A-1
PCL Printer Command Syntax . . . . . . . . . . . . . . . . . . . . A-1
Using PCL Printer Commands . . . . . . . . . . . . . . . . . . . . A-2
PCL Font Selection . . . . . . . . . . . . . . . . . . . . . . . . . . A-3
B Environmental Specifications
Location Requirements . . . . . . . . . . . . . . . . . . . . . . . . . . B-1
FCC Regulations . . . . . . . . . . . . . . . . . . . . . . . . . . . . B-3
VCCI Statement (Japan) . . . . . . . . . . . . . . . . . . . . . . . B-3
Safety Information . . . . . . . . . . . . . . . . . . . . . . . . . . . B-4
Laser Statement for Finland . . . . . . . . . . . . . . . . . . . . . B-5
C Media Specifications
Introduction . . . . . . . . . . . . . . . . . . . . . . . . . . . . . . . . C-1
Paper and Preprinted Forms . . . . . . . . . . . . . . . . . . . . . . C-2
Adhesive Labels . . . . . . . . . . . . . . . . . . . . . . . . . . . . . C-3
Overhead Transparencies . . . . . . . . . . . . . . . . . . . . . . . . C-3
Envelopes . . . . . . . . . . . . . . . . . . . . . . . . . . . . . . . . C-4
Contents-4
D Memory/Personality SIMM Installation
General Information . . . . . . . . . . . . . . . . . . . . . . . . . . . D-1
Memory SIMM Part Numbers . . . . . . . . . . . . . . . . . . . . D-1
Installing a SIMM Board . . . . . . . . . . . . . . . . . . . . . . . . . D-2
Testing a SIMM Board . . . . . . . . . . . . . . . . . . . . . . . . . . D-4
Memory SIMM . . . . . . . . . . . . . . . . . . . . . . . . . . . . . D-4
PostScript SIMM . . . . . . . . . . . . . . . . . . . . . . . . . . . D-5
Troubleshooting a SIMM Board . . . . . . . . . . . . . . . . . . . . . D-5
Service / Error Messages . . . . . . . . . . . . . . . . . . . . . . . D-5
E Warranty and Software License
Limited Warranty . . . . . . . . . . . . . . . . . . . . . . . . . . . . E-1
Exclusions . . . . . . . . . . . . . . . . . . . . . . . . . . . . . . . E-2
Warranty Limitations . . . . . . . . . . . . . . . . . . . . . . . . . E-3
Limit of Liability . . . . . . . . . . . . . . . . . . . . . . . . . . . . E-3
Service During the Warranty Period . . . . . . . . . . . . . . . . . . E-3
Service After the Warranty Period . . . . . . . . . . . . . . . . . . . E-4
Repacking Guidelines . . . . . . . . . . . . . . . . . . . . . . . . . . E-4
Help From the HP Customer Support Center . . . . . . . . . . . . . . E-5
HP Software Product License . . . . . . . . . . . . . . . . . . . . . . E-6
Page 10

F Sales and Service Offices
Calling for Help . . . . . . . . . . . . . . . . . . . . . . . . . . . . . . F-1
Index
Contents-5
Page 11

Contents-6
Page 12
About Your Printer
Introduction
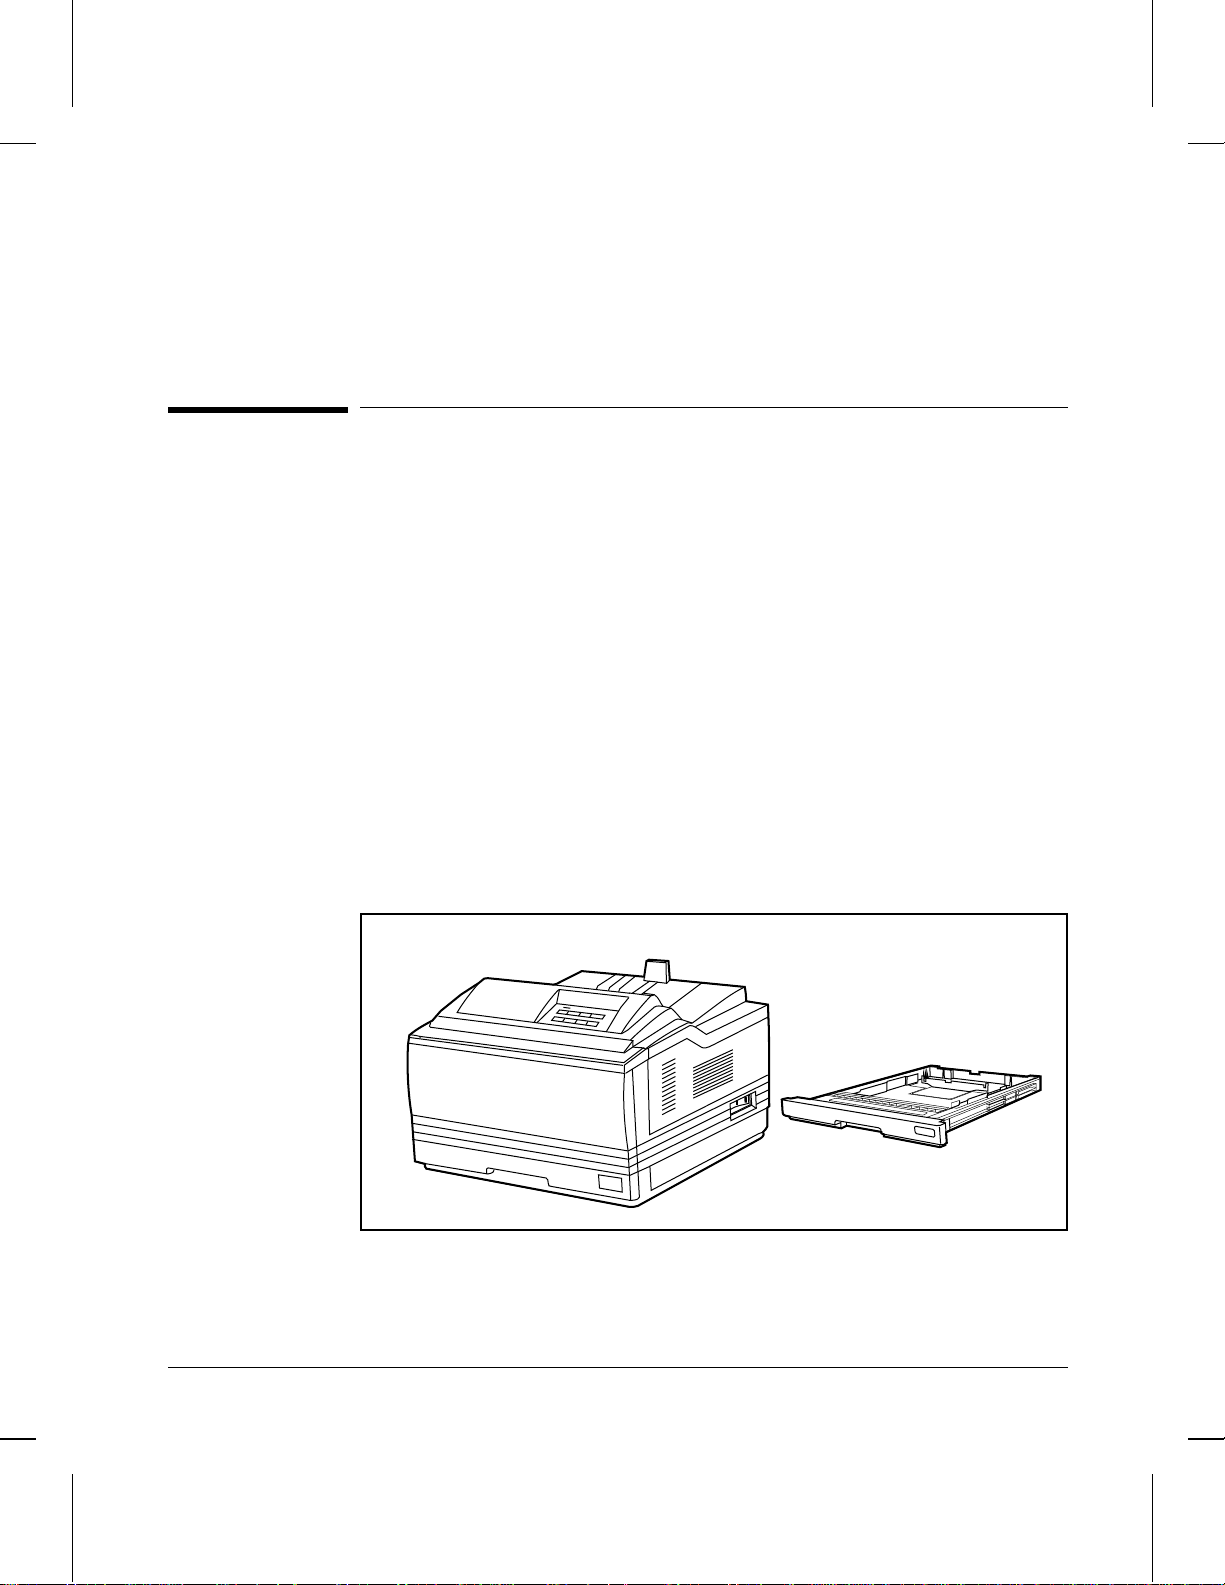
This chapter introduces the features listed below for the HP LaserJet 4V
and 4MV printers (Figure 1-1). More information about these features
appear in later chapters.
• Enhanced Print Quality
• PCL Language and Language Switching
• Paper Handling
• Memory and Memory Management
• Printer Drivers and Software
• Input/Output Features
• Energy Savings and Toner Economy
• Typefaces
• PostScript and Memory
• Networking Capabilities
• Accessories and Options
• HP LaserJet 4V and 4MV Printer Parts
1
Figure 1-1
HP LaserJet 4V/4MV printer with interchangeable Paper Cassette
About Your Printer 1-1
Page 13

The HP LaserJet 4V Printer
The HP LaserJet 4V printer provides 16-page-per-minute printing of Letter
or A4 paper at true 600-dpi (dots-per-inch) resolution. Your printer can
easily handle a wide variety of paper sizes, including wide format paper.
Your HP LaserJet 4V can grow along with your printing and networking
needs by adding a wide variety of accessories and options. For example,
Adobe’s PostScript language, extra memory, I/O cards, additional 250-sheet
paper cassettes, and an optional 500-sheet Universal Lower Cassette are
available to increase your printing capabilities.
Enhanced Print Quality
The HP LaserJet 4V prints at true 600-dpi with Resolution Enhancement
technology (REt) and MicroFine toner. REt adjusts the size and placement
of each dot to smooth angles and curves. Combined with MicroFine toner,
this sharpens the appearance of text and graphics.
The printer also offers 300-dpi printing with REt to give you a wider range
of printing alternatives.
PCL Language and Language Switching
The HP LaserJet 4V printer arrives with enhanced PCL 5 printer language,
which is compatible with all previous HP LaserJet printers. PCL 5 provides
faster printing performance, built-in Intellifont and TrueType type scaling
technologies, built-in HP-GL/2 vector graphics, and advanced imaging
capabilities, such as reverse (white on black) printing and patterned fonts.
When optional, additional printer languages (such as PostScript) are
installed, the HP LaserJet 4V printer can assess printer jobs as it receives
them and automatically switch to the appropriate language.
1-2 About Your Printer
Page 14

Paper Handling
Your printer arrives with a pull-down Multipurpose (MP) Tray to handle a
variety of print media. The MP Tray holds approximately 100 sheets of
paper, and adjusts to print on an envelope, labels, or transparencies. You
also receive two interchangeable 250-sheet Paper Cassettes for Letter or A4,
and 11x17 or A3 paper. These features are shown along with the media
sizes they handle in Figure 3-1 of Chapter 3.
Optional replacement Paper Cassettes and a 500-sheet Universal Lower
Cassette base unit are also available. They are described later in this
chapter.
Memory and Memory Management
The HP LaserJet 4V printer comes with 4 MBytes of memory and can be
expanded to 68 MBytes. The printer has four SIMM (Single In-line Memory
Module) slots for additional 1, 2, 4, 8, and 16 MBytes. The SIMM slots can
also hold optional languages (such as PostScript), typefaces, and other
SIMM-based products.
Memory Enhancement technology (MEt), a standard printer feature, allows
most documents to print using the printer’s standard amount of memory.
MEt automatically compresses data to print complex pages.
Printer Drivers and Software
Your printer arrives with a software package that contains DOS drivers and
the HP LaserJet 4V/4MV Printing System for Microsoft Windows 3.1 which
includes 45 TrueType screen fonts.
About Your Printer 1-3
Page 15

Input/Output (I/O) Features
Standard built-in Bi-Tronics parallel interface allows high-speed two-way
communication between the printer and your computer. Your printer also
comes with a Modular I/O (MIO) slot designed to support optional MIO
cards. Automatic I/O switching between all installed I/O ports allow you to
connect multiple computers or even multiple networks to the printer
simultaneously. If serial connection is required, contact your local dealer for
information about an optional serial MIO card or serial-to-parallel converter.
Toner Economy and Energy Savings
The printer’s EconoMode reduces the amount of toner on the printed page
and is ideal for printing document drafts. When EconoMode is on, the print
on the page appears significantly lighter but still readable.
The HP LaserJet 4V and 4MV printers are designed to conserve electricity
by substantially reducing power consumption when idle for a user-specified
length of time. Adjustable Power Save qualifies both models for the U.S.
Environmental Protection Agency’s Energy Star Computers award.
The EPA, as a matter of policy, does not endorse any particular company or
its products.
Typefaces
The HP LaserJet 4V Printer comes with 35 scalable Intellifont typefaces, as
well as 10 TrueType typefaces, and one bitmapped line printer font that
match the Windows 3.1 type offering. You can scale TrueType typefaces
within the printer. You also receive matching TrueType screen fonts for true
WYSIWYG, short for “what you see is what you get.” Type samples appear
in Figure 1-2.
1-4 About Your Printer
Page 16

PCL Typefaces
Figure 1-2
About Your Printer 1-5
Page 17

The HP LaserJet 4MV Printer
The HP LaserJet 4MV printer offers all the features of the HP LaserJet 4V
printer, plus is fully configured with additional memory, Adobe’s PostScript
Level 2 language, and an HP JetDirect interface that allows you to connect
your printer to LocalTalk or Ethernet networks.
PostScript and Memory
The HP LaserJet 4MV printer comes with Adobe’s PostScript Level 2, which
is backward compatible with earlier versions of Adobe’s PostScript. Type
samples are shown in Figure 1-3.
The printer contains 12 MBytes of installed memory. By adding optional 1,
2, 4, 8, or 16 MByte SIMMs you can increase memory to a total of 44
MBytes. An optional 42.8 MByte PostScript Disk Accessory is available for
storing downloaded fonts.
Networking Capabilities
The printer’s factory installed HP JetDirect card lets you connect your
printer directly to your local area network (LAN). The HP JetDirect card
automatically switches among networked protocols, so a single printer can
serve many networks at once or be moved to a new network with no
additional hardware investment.
The printer’s built-in HP JetDirect card supports the following network
operating systems. Clients can be DOS, Windows, OS/2, Macintosh, or
UNIX.
• Novell NetWare 286 v. 2.15c and beyond; 386 v. 3.11, 3.12, 4.0, 4.01
• Microsoft LAN Manager for OS/2, v. 2.1
• IBM LAN Server for OS/2, v. 3.0
• Microsoft Windows for Workgroups, v. 3.1, 3.11
• Microsoft Windows NT, v. 1.0
• HP-UX v. 8.0, 9.0
• SunOS v. 4.1.1, 4.1.2, 4.1.3
• SCO UNIX V/386 v. 3.2.2, 3.2.4
• Solaris v. 2.1, 2.2
• IBM/AIX v. 3.2.5
• Apple EtherTalk System 6 and 7
• Apple LocalTalk System 6 and 7
1-6 About Your Printer
Page 18
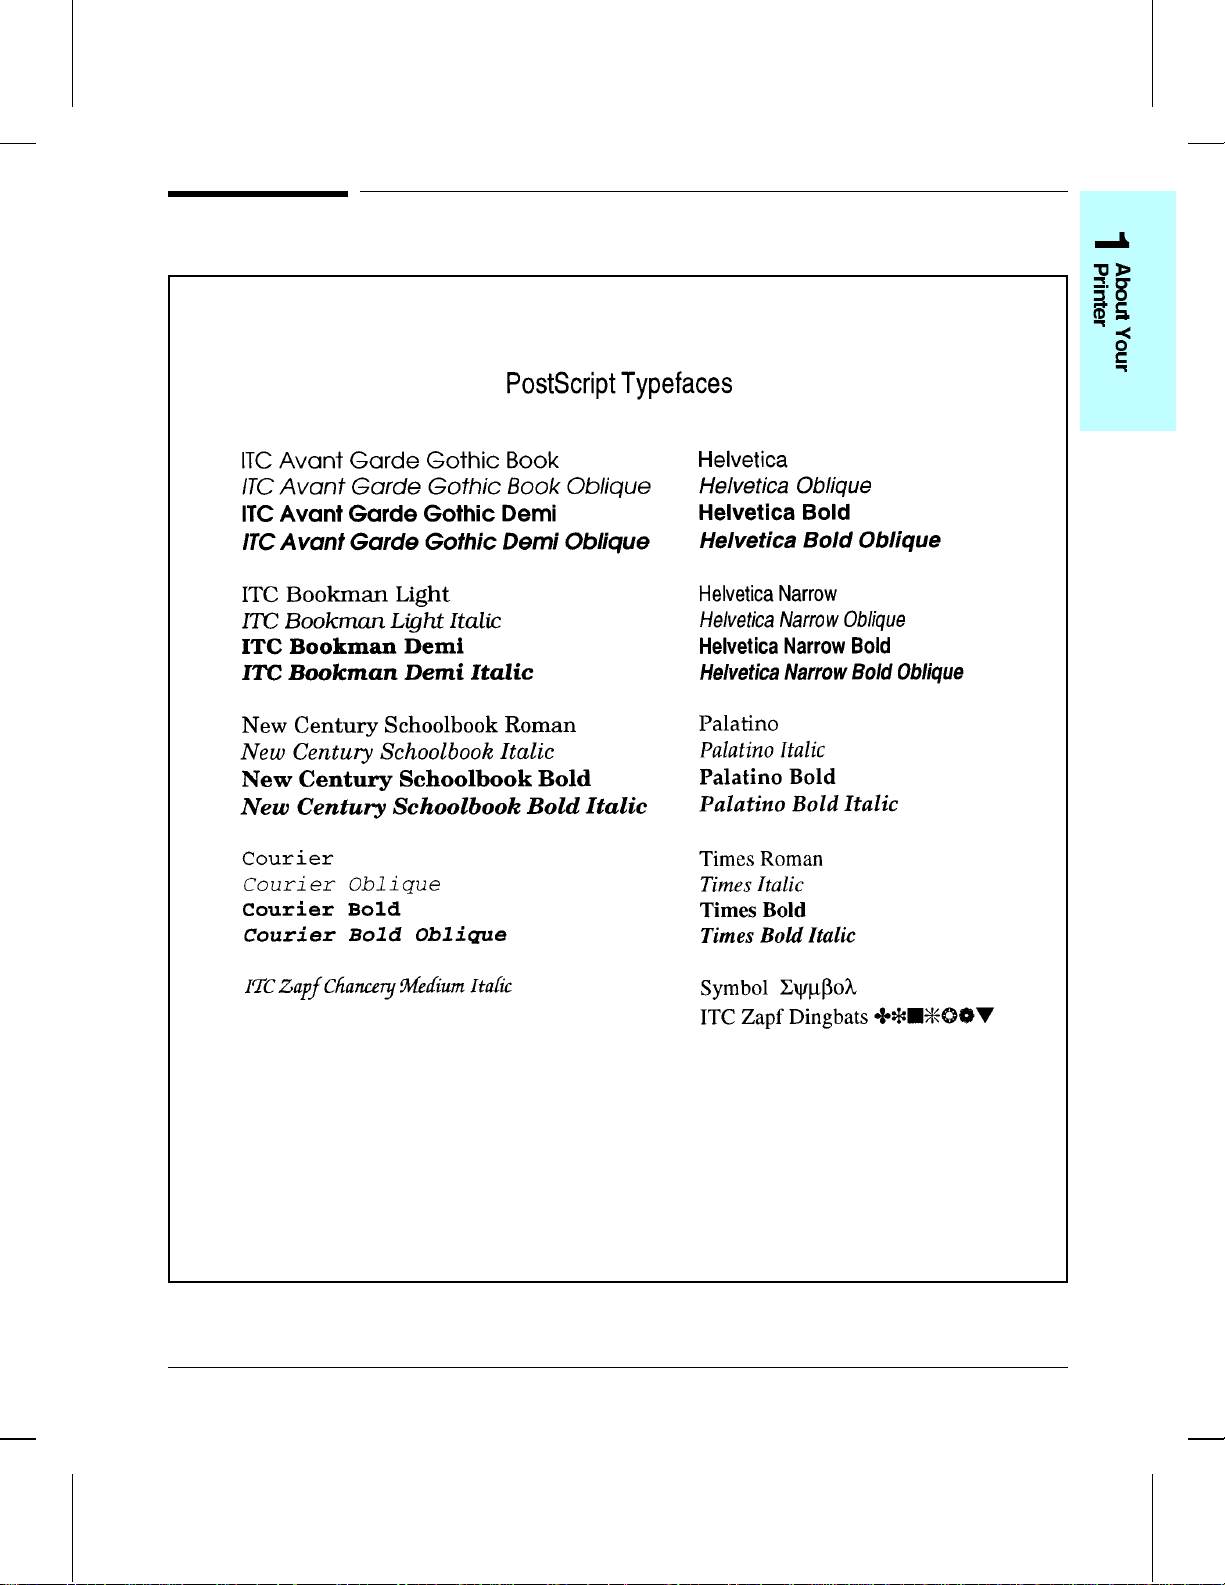
PostScript Typefaces
Figure 1-3
About Your Printer 1-7
Page 19
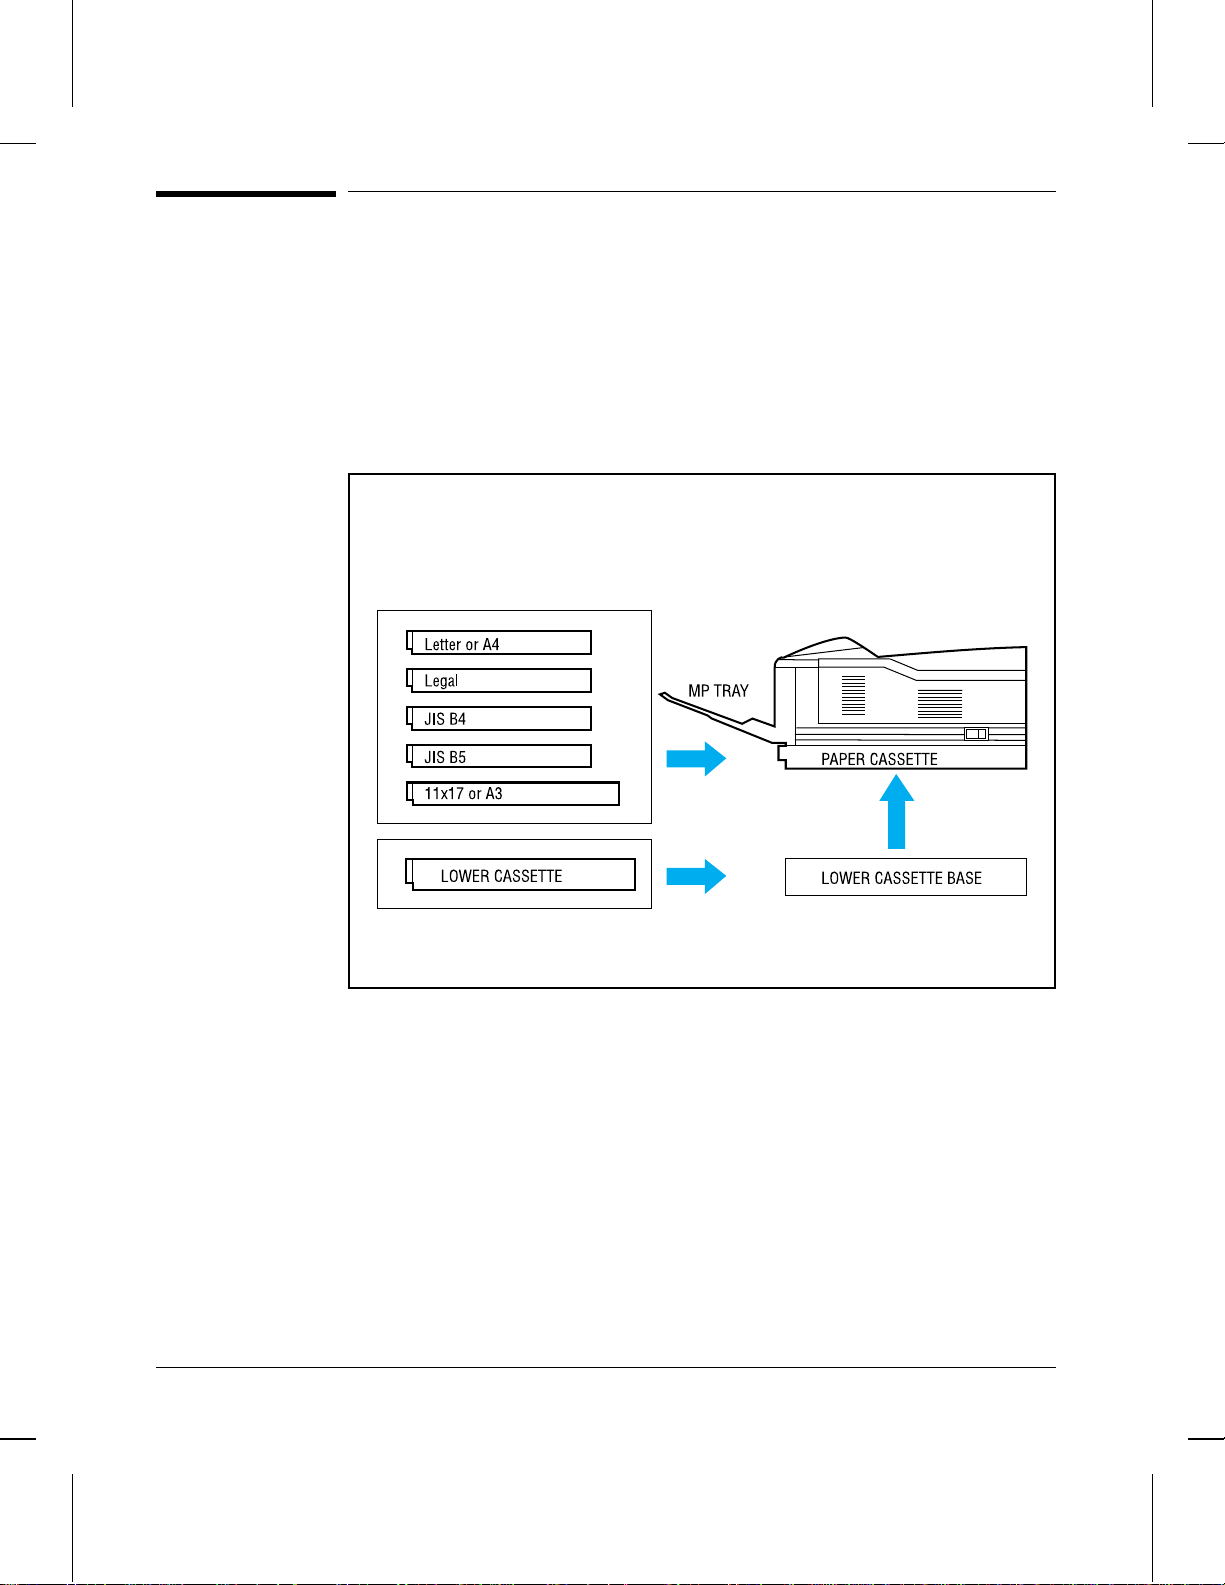
Figure 1-4
Accessories and Options
You can increase your printer’s capabilities by adding accessories and
options such as the 500-sheet Universal Lower Cassette and replacement
250-sheet Paper Cassettes shown in Figure 1-4. Table 1-1 on the next page
lists the paper sizes and capacity for each option. See the inside front cover
of this manual for HP dealer and ordering information. See Chapter 3 to
find more information about media specifications.
Printer with Paper Cassette options.
1-8 About Your Printer
Page 20
Table 1-1 Accessories and Options
Option Part Number Description or Use
Toner Cartridge C3900A Replacement toner cartridge.
Memory upgrades 1 MByte - C3130A
Adobe’s PostScript Level 2 printer
language
250-sheet replacement Paper
Cassette
250-sheet replacement Paper
Cassette
250-sheet replacement Paper
Cassette
250-sheet replacement Paper
Cassette
250-sheet replacement Paper
Cassette
500-sheet Universal Lower
Cassette Base Unit (includes
500-sheet paper cassette)
500-sheet replacement paper
cassette for Universal Lower
Cassette Base
2 MByte - C3131A
4 MByte - C3132A
8 MByte - C3133A
16 MByte - C3146A
C3159A You can add Adobe’s Level 2 PostScript language by
C3160A 250 sheet, adjustable between Letter and A4.
C3161A 250 sheets, adjustable between 11x17 and A3.
C3162A 250 sheets, legal only.
C3163A 250 sheets, JIS B4 only.
C3164A 250 sheets, JIS B5 only.
C3760A 500 sheets, adjustable for Letter, legal, 11x17, A4, A3,
C3761A 500 sheets, adjustable for Letter, legal, 11x17, A4, A3,
You can upgrade to a total of 68 MBytes of memory, in
the HP LaserJet 4V and upgrade to 44 MBytes in the
HP LaserJet 4MV.
installing this SIMM in your printer. (Additional memory
required.) It is standard in the 4MV printer.
JIS B4.
JIS B4.
Bi-Tronics Parallel cable 24542D HP-recommended Bi-Tronics parallel cable.
Modular I/O and Network Cards J2550A
J2552A
J2555A
UNIX Interface Software J2374B HP JetDirect interface software for HP-UX systems.
J2375B HP JetDirect interface software for SunOS and Solaris
PostScript Disk Accessory C3295A 42.8 MBytes
HP JetDirect Multi-protocol Network Card with
Ethernet/IEEE802.3 10Base-T.
HP JetDirect Multi-protocol Network Card with
LocalTalk, DIN-8 and Ethernet/IEEE802.3 10Base-T,
BNC. (Standard in 4MV.)
HP JetDirect Multi-protocol Network Card with Token
Ring (DB9 and RJ45).
UNIX systems.
About Your Printer 1-9
Page 21

12
11
HP LaserJet 4V/4MV Printer Parts
The following illustrations show the locations and names of key printer
parts (Figures 1-5 through 1-7).
32
1
4
5
10
Figure 1-5 Front and right side view with MP Tray open
1. Front cover 7. 250-sheet Letter or A4 Paper Cassette
2. Control panel 8. Front cover release button
3. Output bin 9. Multipurpose (MP) Tray
4. Adjustable paper stop 10. MP Tray extension
5. 250-sheet 11x17 or A3 Paper Cassette 11. MP Tray paper width guides
6. ON/OFF switch 12. Fuser assembly door
1-10 About Your Printer
6879
Page 22
1
2
3
4
5
6
7
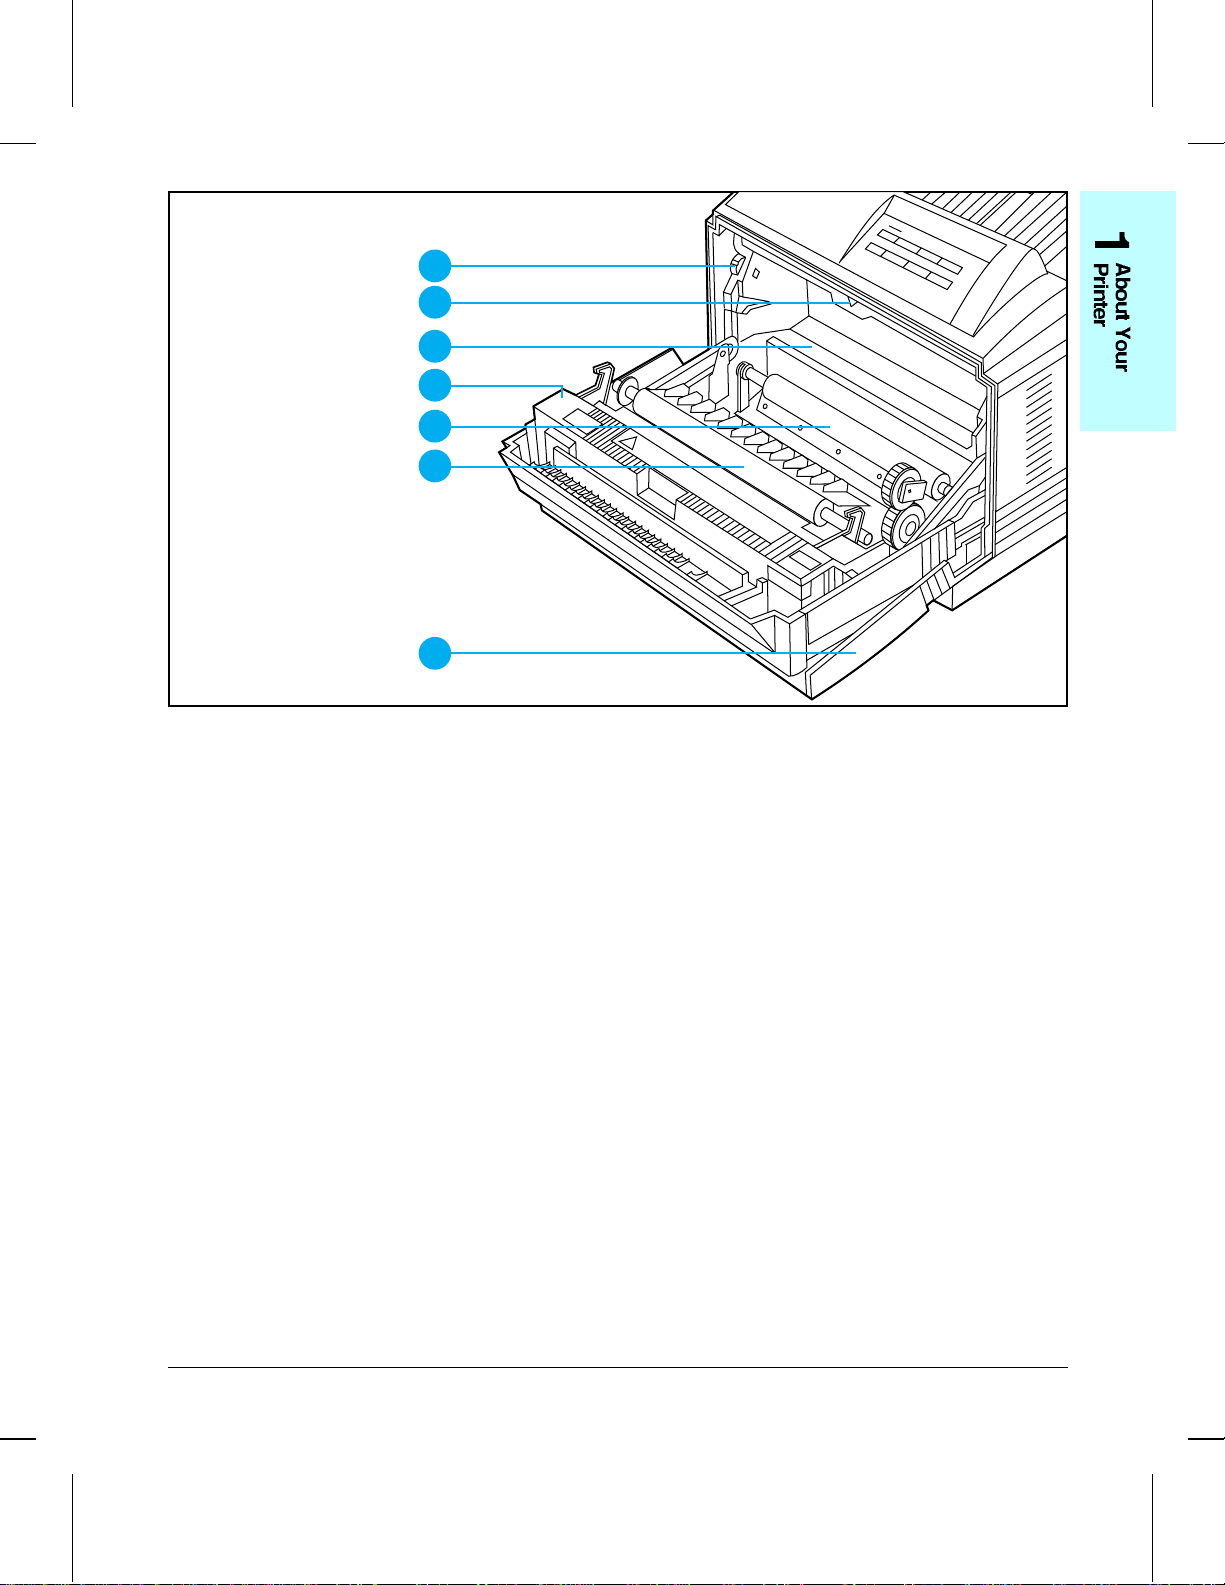
Figure 1-6 Front view with front cover open (with toner cartridge removed)
1. Print density dial 3. Location of toner cartridge 6. Transfer roller
2. Arrow guide for installing
toner cartridge in printer
4. Fuser 7. Multipurpose (MP) Tray
5. Registration roller
About Your Printer 1-11
Page 23
1
2
3
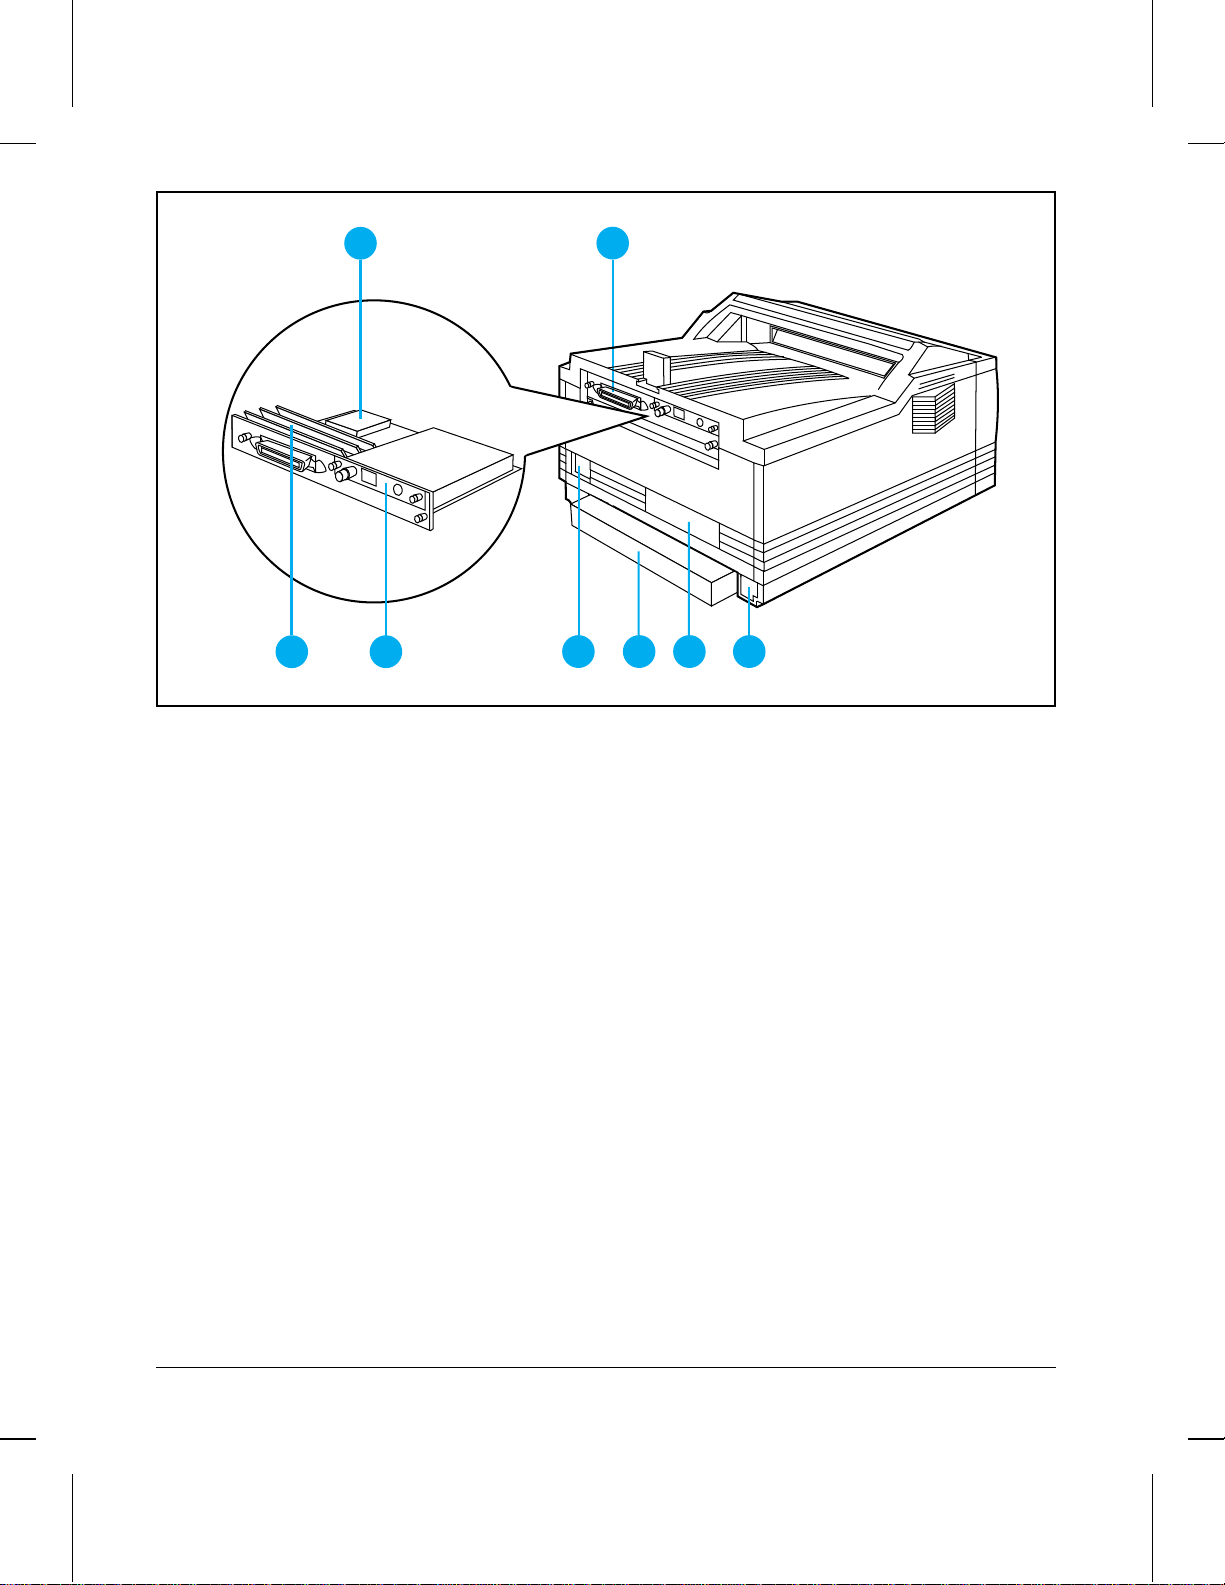
Figure 1-7 Rear and left side view
1. Optional PostScript Disk
Accessory location
2. Parallel Bi-Tronics interface 7. Serial number location
3. Single In-line Memory
Module [SIMM] slots
4
4. HP JetDirect interface
(optional on LaserJet 4V
printer)
5. Power connector outlet 8. Optional Universal Lower
5678
6. Dust cover for 250-sheet
1 1x17 or A3 Paper Cassette
Cassette connector access
1-12 About Your Printer
Page 24

Software For Your Printer
Introduction
This chapter introduces the software you received with your printer and
briefly describes its features. It also lists additional software you can obtain
for your printer by contacting HP Distribution or your authorized HP dealer
(see the inside cover of this manual).
Packaged with the HP LaserJet 4V printer is software you need to take full
advantage of your printer’s features in Windows and DOS environments.
The HP LaserJet 4MV printer also comes with software to use with Adobe’s
PostScript language and software to connect your printer to a wide variety
of networks.
To set up your printer correctly, you must have already installed the
appropriate software for your printer and environment. If you have not
installed the software, see the Getting Started Guide.
2
Software For Your Printer 2-1
Page 25

Software for the HP LaserJet 4V Printer
The HP LaserJet 4V printer comes with Windows and DOS software drivers
that you need to use your printer with Hewlett-Packard’s PCL printer
language. Drivers are program files that allow your software to use the
printer’s features, including the internal typefaces.
Note
Installing a driver is an important part of setting up your printer. Follow
the instructions in the Getting Started Guide to install the software for your
printer.
Software for Windows 3.1
Your printer comes with the HP LaserJet 4V/4MV Printing System for
Microsoft Windows 3.1 software, which includes the following:
• Windows PCL printer driver
• TrueType screen fonts
Windows PCL Printer Driver
The printer driver enables your Windows applications to communicate with
your printer and use all of your printer’s features. Once you load the
Windows driver, you can change printer settings or access features using
the Print dialog box in any Windows application by choosing Print Setup, or
from the Windows Control Panel group.
TrueType Screen Fonts
Screen fonts allow you to see on your computer screen what your printed
page will look like. This approximation of screen display to printed result is
known as WYSIWYG, short for “what you see is what you get.” The
TrueType fonts match the printer’s internal typefaces. These fonts are
automatically loaded and configured when you install the HP LaserJet
4V/4MV Printing System for Windows 3.1.
2-2 Software For Your Printer
Page 26

Software for DOS
Included with your printer is a package that contains drivers and
installation instructions for serveral DOS applications. If a driver for your
DOS software package was not included, contact your software
manufacturer.
Note
If a driver is not yet available, you could use an older HP LaserJet printer
driver (such as the HP LaserJet 4 or III printer driver) until a newer driver
becomes available. However, you may not be able to access the advanced
features of your new printer without the proper driver.
Software For Your Printer 2-3
Page 27

Software for the HP LaserJet 4MV Printer
In addition to the capabilities of the HP LaserJet 4V printer, the HP
LaserJet 4MV printer comes with both the PCL and PostScript languages
and connectivity features. The HP LaserJet 4MV printer comes with all the
HP LaserJet 4V software described earlier in this chapter, plus the software
listed on the following pages.
Software for the Macintosh
The HP LaserJet 4MV printer comes with software that installs the
following Macintosh software on your computer’s hard disk:
• HP LaserJet Printer Driver and Guide
• Bitmapped screen fonts
• HP LaserJet Utility and Guide
HP LaserJet Printer Driver and Guide
The HP LaserJet 4MV printer comes with printer driver for Macintosh
computers, an auto-installation utility and an online printing guide. Once
you install this driver, most of your printer’s features are available from the
Print Options dialog box.
Bitmapped Screen Fonts
When you install the HP LaserJet 4MV printer driver, bitmapped screen
fonts are automatically installed on your system. These screen fonts match
your printer’s 35 internal PostScript fonts, allowing you to see on screen
how your printed page will look.
HP LaserJet Utility and Guide
The LaserJet Utility allows you to control most printer features from your
computer screen. You can display or customize the current control panel
message. You can name the printer, assign it to a zone on your network,
download files and fonts, and change most of the printer’s default settings
using this utility. The utility also allows you to permanently download fonts
to the printer’s optional PostScript Disk Accessory. You can set the printer’s
password and even lock out the control panel without leaving your
computer. This utility’s illustrated screens make selecting printer features
from your Macintosh easier than ever. The HP LaserJet Utility Guide is an
online manual that explains how to use the HP LaserJet Utility.
2-4 Software For Your Printer
Page 28

PostScript Driver for Windows 3.1
The HP LaserJet 4MV printer comes with a printer driver for use with
Adobe’s PostScript language. Once you install this driver, most of your
printer’s features are available from the Print Setup dialog box within your
Windows applications. You can also use this software to permanently
download fonts to the printer’s optional PostScript Disk Accessory.
Networking Software
You can connect the HP LaserJet 4MV printer to more kinds of network
environments than ever before. For Windows and DOS, your printer comes
with software for Novell NetWare. For OS/2 platforms, Microsoft LAN
Manager and IBM LAN Server print utilities are supplied. You can also
obtain printer software for other networking environments, as explained
later in this section.
Novell Networking Software
The HP LaserJet 4MV printer comes with printer description files for Novell
networking, plus the following utilities.
HP JetAdmin for Windows and DOS: HP JetAdmin is a utility for
Novell network administrators that helps you set up and manage your
printer in a Novell networked environment. HP JetAdmin provides simple
installation, configuration, troubleshooting, and management of HP
JetDirect-connected printers. The HP JetAdmin utility allows you to
remotely configure, troubleshoot, and manage all the HP network printers
and plotters on a Novell network from computers running Windows or DOS.
You can also set passwords for the printer’s control panel using
HP JetAdmin.
HP JetPrint Utility for Windows: The HP JetPrint Utility makes
network printing easier and more productive than ever by allowing you to
view, select, and print to all HP printers on the network from an easy-to-use
screen. HP JetPrint allows you to view control panel messages and to check
the status and progress of print jobs on your computer screen. The HP
JetPrint Utility works only in Windows.
Software For Your Printer 2-5
Page 29

Microsoft LAN Manager and IBM LAN Server
This software helps network administrators quickly setup HP LaserJet
printers through an OS/2 server. Along with an installer, there are two
software components. The Redirector allows the redirection of print data
from a spooler directly to the HP LaserJet printer. The Setup component
allows the network administrator to specify which printer receives print
data and provides seamless integration between the Redirector and the
LAN Manager or LAN Server print system.
Optional Networking Software
You can order optional networking software from HP Distribution or your
nearest authorized HP Dealer (see inside cover of this manual). Software for
the following networks is available:
• Windows for Workgroups
• HP-UX
• SunOS
• Solaris
To learn more about networking with the HP LaserJet 4MV printer, see the
HP JetDirect Network Interface Configuration Guide.
Optional Printer Drivers Available
You can order the following optional printer drivers from HP Distribution or
your nearest authorized HP Dealer (see inside cover of this manual):
• OS/2 PCL printer driver
• OS/2 PostScript printer driver
Note
2-6 Software For Your Printer
If your software is not listed here, please contact your software
manufacturer or distributor and request a driver for the HP LaserJet 4V
printer or the HP LaserJet 4MV printer. If a driver is not yet available, you
could use an older HP LaserJet printer driver (such as the HP LaserJet 4 or
III printer driver) until a newer driver becomes available. However, you
may not be able to access the advanced features of your new printer without
the proper driver.
Page 30

Printing Tasks
Introduction
Your new LaserJet printer makes it easy for you to perform a wide variety
of printing tasks. You can print on several sizes and weights of paper and
envelopes, as well as on transparencies and labels.
This chapter explains how to do the following:
• Printing paper from the best paper source
• Selecting paper and other print media
• Loading paper into the Letter or A4 and 11x17 or A3 Paper Cassettes
• Loading Letter, Legal, 11x17, A4, or A3 paper into the Multipurpose
(MP) Tray
• Manually feeding paper from the MP Tray
• Printing on labels, transparencies, or custom-sized paper from the MP
Tray
• Printing Letterhead documents, preprinted forms, and special papers
• Reserving or locking out the MP Tray or Paper Cassettes
• Printing an envelope from the MP Tray
• Printing from the optional 500-sheet Universal Lower Cassette
• Stopping a print request
3
Printing Tasks 3-1
Page 31

Printing Paper from the Best Paper
Source
Your printer can print on envelopes and all the paper sizes identified in
Figure 3-1 and Table 3-1 using the adjustable Multipurpose (MP) Tray (1)
the Letter or A4 Paper Cassette, and 11x17 or A3 Paper Cassette (2) that
arrived with your printer. You can use the MP Tray to hold one, several or
as many as 100 sheets of paper. The MP Tray also adjusts for many
envelope sizes. The Paper Cassettes can hold approximately 250 sheets of
paper.
You can purchase the optional 500-sheet Universal Lower Cassette (3) or
250-sheet replacement trays. These options and accessories are listed in
Chapter 1 with paper size specifications.
1
2
3
Figure 3-1 Paper sources (optional sources are shaded)
Caution Print heavy-weight papers, labels, and transparencies only from the MP
Tray. Load only one size of paper at a time in the MP Tray.
3-2 Printing Tasks
Page 32

Selecting Paper and Other Print Media
Table 3-1 presents guidelines to select supported paper for printing from the
MP Tray or Paper Cassette. (See Appendix C for more information.)
Table 3-1
MP Tray Dimensions Weight Capacity
Maximum Paper Size 11.7 x 17.7 in
Minimum Paper Size 3.9 x 5.8 in
Paper, Letter 8 1/2 x 11 in
Paper, A4 8.3 x 11.7 in
Paper, Executive 7.3 x 10.5 in
Paper, Legal 8 1/2 x 14 in
Paper, 11x17 11 x 17 in
Paper, A3 11.7 x 16.5 in
Paper, JIS B5 6.9 x 9.8 in
Media Specifications
297 x 450 mm
100 x 148 mm
216 x 279 mm
210 x 297 mm
191 x 267 mm
216 x 356 mm
297 x 432 mm
297 x 420 mm
176 x 250 mm
Single sided:16 to 20 lb.
(60 to 75 g/m
Single side:16 to 28 lb.
(60 to 105 g/m
2
)
2
)
100 sheets of 20# paper
Paper, JIS B4 9.8 x 13.9 in
250 x 353 mm
Postcard, JPOST 3.9 x 5.8
100 x 148 mm
Postcard, JPOSTD 5.8 x 7.9
148 x 200 mm
Transparency See minimum and
maximum paper sizes
listed above.
Labels 0.005 in to 0.007 in thick
Envelopes see “Printing an Envelope” later in this chapter 1 at a time
0.0039 in to 0.0045 in.
thick
(0.099 to 0.114 mm)
(0.127 to 0.178 mm)
limit to paperfill mark
on paper width guides
Printing Tasks 3-3
Page 33

Table 3-1
(cont.)
Media Specifications
Paper Cassette Dimensions Weight Capacity
Paper, Letter 8 1/2 x 11 in
216 x 279 mm
Paper, A4 8.3 x 11.7 in
210 x 297 mm
Paper, 11x17 11 x 17 in
297 x 432 mm
Paper, A3 11.7 x 16.5 in
297 x 420 mm
Paper, Legal
(optional)
Paper, JIS B4
(optional)
Paper, JIS B5
(optional)
8 1/2 x 14 in
216 x 356 mm
9.8 x 13.9 in
250 x 353 mm
6.9 x 9.8 in
176 x 250 mm
Single sided:
16 to 28 lb.
(60 to 105 g/m
250 sheets of 20# paper
2
)
3-4 Printing Tasks
Page 34

Figure 3-2
Loading Paper
Your printer handles paper from the Multipurpose (MP) Tray (1, Figure 3-2)
or a Paper Cassette (2, Figure 3-2). By default, the printer draws first from
the MP Tray, unless you specify otherwise through your software or the
control panel configuration.
12
Adjusting the Paper Stop
Printed pages are delivered to the output bin located at the top of your
printer. When loading paper, set the adjustable paper stop (Figure 3-3) on
the output tray to match the paper size you are loading. This adjustment
allows the paper to exit the printer and lie flat in the output bin.
Figure 3-3
Printing Tasks 3-5
Page 35

1
2
Loading Paper into the Letter or A4
Paper Cassette
The Letter or A4 Paper Cassette holds
approximately 250 sheets of paper. See Table
3-1 and Appendix C for media specifications.
Caution
To avoid a paper jam, never remove the
cassette while printing. If paper curls or
skews excessively when printed, take the
cassette out and turn the stack of paper over.
To load paper into the Paper
Cassette:
1 Pull the Letter or A4 Paper Cassette out
of the printer and place it on a flat surface.
2 Load paper with the side-to-be-printed up
and top of page toward the left side of the
cassette.
(Continued on the next page.)
3-6 Printing Tasks
Page 36

3
3 Slide in a stack of paper until it is in solid
contact with the rear of the cassette.
Press down on all four corners of the
paper stack so paper rests flat in the
cassette, fits under front metal holders,
and below back tabs.
Make sure the height of the paper stack
does not exceed the limit mark on the
right side of the cassette.
4
4 Slide the cassette back into the printer.
Remember to adjust the paper stop guide
on the output bin (see Figure 3-3).
Note
Use this procedure to load paper into the
optional JIS B5 Paper Cassette.
Printing Tasks 3-7
Page 37

1
2
Loading Paper into the 11x17 or A3 Paper
Cassette
The 11x17 or A3 Paper Cassette holds
approximately 250 sheets. See Table 3-1 and
Appendix C for media specifications.
Caution
To avoid a paper jam, never remove the
cassette while printing. If paper curls or
skews excessively when it is printed, take the
cassette out and turn the stack of paper over.
To load paper into the Paper
Cassette:
1 Pull the 11x17 or A3 Paper Cassette out of
the printer and place it on a flat surface.
2 Load paper with the side-to-be-printed up
and top of page toward the front of the
cassette.
(Continued on the next page.)
3-8 Printing Tasks
Page 38

3
3 Slide in a stack of paper until it is in solid
contact with the rear of the cassette.
Press down on all four corners of the
paper stack so paper rests flat in the
cassette, fits under front metal holders,
and below back tabs.
Make sure the height of the paper stack
does not exceed the limit mark on the
right side of the cassette.
4
4 Slide the cassette back into the printer.
Remember to adjust the paper stop guide
on the output bin (see Figure 3-3).
Note
Use these procedures to load paper into the
optional legal and JIS B4 Paper Cassettes.
Printing Tasks 3-9
Page 39

1
2
Loading Letter, Legal, 11x17, A4, or A3
Paper into the MP Tray
The Multipurpose (MP) Tray allows you to
feed one sheet of paper at a time, or to
automatically feed a stack of approximately
100 sheets. The MP Tray can be used for
standard and custom-sized papers, envelopes,
labels, and transparencies. See Table 3-1 and
Appendix C for the MP Tray’s media
specifications.
Caution
To avoid a paper jam, never add paper or
other print media to the MP Tray while the
printer is printing.
To load paper into the MP Tray:
1 Open the MP Tray by grasping the door
on the front of the printer, at the pattern
of raised dots on each side.
Pull the tray down gently until it stops.
3
3-10 Printing Tasks
2 Pull out the tray extension, if needed for
the paper size you are printing.
3 Slide the paper width guides to the
appropriate size marked on the tray.
(Continued on the next page.)
Page 40

4a
4b
4 Place paper in the MP Tray, with
side-to-be-printed down. The height of the
paper stack should not exceed the limit
mark on the paper width guides.
Paper loading differs by size.
a. Load Letter or A4 with the top of the
page to be printed placed toward the left
side of the MP Tray.
b. Load Legal, 11x17 or A3 with the top
of the page to be printed leading into the
printer.
5 Slide paper into the printer as far as it
will go, until leading edges rest lightly
against the printer.
Make sure the paper fits squarely and
firmly between the paper width guides,
without bending the paper.
5
Remember to adjust the paper stop guide
on the output bin (see Figure 3-3).
Printing Tasks 3-11
Page 41

Manually Feeding Pages from the MP
Tray
On rare occasions (when printing transparencies, for instance), you may
want the printer to stop after each page. Usually, you select Manual Feed
through your software. However, if it is not available you can set MANUAL
FEED=ON in the Printing Menu of the printer’s control panel.
To manually print a single sheet of paper with software:
1 Make sure the MP Tray is empty.
2 In your software application’s print setup, set Paper Source to Manual Feed
or complete the procedure below.
Note
The paper source you select in your software application overrides the
control panel setting. To manually feed paper, be sure you select Manual
Feed in your software application’s print setup.
3 Send the document to the printer. The printer goes off-line. The control
panel displays the message, MF FEED LETTER, if you choose Letter size paper.
4 Place the sheet of paper into the MP Tray with the side-to-be-printed down.
Move the paper width guides to lightly touch the edges of the paper. The
printer automatically pulls the sheet of paper into the printer.
To select Manual Feed from the control panel:
1 Press [On Line] to take the printer off line.
2 Press [Menu] once to reach PRINTING MENU.
3 Press [Item] until MANUAL FEED=setting appears.
4 Press [+/-] once to reach MANUAL FEED=ON.
5 Press [Enter] to save your selection.
6 Press [On Line] to put the printer back on line.
3-12 Printing Tasks
Page 42

Printing Labels or Transparencies from
the MP Tray
Print labels and transparencies from the MP Tray to prevent them from
curling or jamming in the printer.
Caution
To avoid damaging the printer: Do not print labels or transparencies
from a Paper Cassette or optional Universal Lower Cassette. Do not print
on both sides of labels or transparencies.
Guidelines and Specifications
Use only labels recommended for laser printers. The labels must be
compatible with the heat and pressure of the fusing assembly process. See
Appendix C for media specifications.
Do not use labels that separate from the backing sheet or that are wrinkled
or damaged in any way. Do not feed a sheet of labels through the printer
more than once because the label adhesive is designed for only one pass
through the printer.
Use only transparencies recommended for use in laser printers, such as HP
or 3M overhead transparency film. Because transparency films tend to stick
to each other, remove each transparency from the output bin before printing
the next one.
For best results when printing labels and transparencies, use the loading
and printing procedures on the next page.
Printing Tasks 3-13
Page 43

1
To load and print labels or
transparencies:
1 Open the MP Tray by grasping the door
on the front of the printer, at the pattern
of raised dots on each side.
Pull the tray down gently until it stops.
2 Pull out the tray extension if needed for
the paper size you are printing.
2
3
3 Place labels or transparencies,
side-to-be-printed down, with top of page
to the left of the MP Tray. Move the paper
width guides to lightly touch the paper on
both sides.
In your software application’s print setup,
specify the paper size and Manual Feed.
Note
When printing multiple transparencies, as
each print, promptly remove it from the
output bin so sheets won’t stick together.
3-14 Printing Tasks
Page 44

1
Paper Source:
Paper Size:
2
Printing on Custom-sized Paper from the
MP Tray
You can print on custom-sized paper from the
MP Tray. The largest size of paper supported
is 11.7x17.7 inches (297x450 mm) of 20 lb.
paper and the smallest size is 3.9x5.8 inches
MP Tray
Maximum
(100x148 mm). When you select custom-sized
paper, the printer assumes the maximum page
size is 11.7x17.7 inches (297x450 mm).
To print Tabloid Bleeds:
Since the printer has the ability to print on
specially cut paper up to 11.7x17.7 inches, you
can print tabloid size (11x17 in.) bleed images
with crop marks. Refer to your software
application and HP LaserJet Utility Guide
(Macintosh) or Windows on-line help.
To print on Custom-sized Paper:
Some software applications require you to
calculate margins in order to print on
custom-sized paper. The following example is
provided as a guideline. Adapt this example to
your paper size and unit of measurement.
1 In your software application, select MP
Tray for the paper source and “Maximum”
(Windows PCL) or “Oversize” (Macintosh
and Windows PostScript) for the paper
size.
2 Calculate margins to identify the area to
be printed. Illustration 2 and steps 2A
and 2B show how to calculate a margin
for 4x6 inch paper.
A. Take the maximum paper width size
11.7 inches, and subtract 4 inches for the
width of the card. Take the answer, 7.7
inches, and divide it by 2 which equals
3.85 inches.
In your software application, select a left
margin of 3.85 and a right margin of 3.85
inches.
(Continued on the next page.)
Printing Tasks 3-15
Page 45

3
B. If your software allows for it, also set the
bottom margin. Take the maximum paper
length size 17.7 inches, subtract 6 inches (the
length of the card). The bottom margin equals
11.7 inches.
Note
The edge of the paper feeding into the printer
must be at least 3.9 inches (100 mm) to allow
rollers inside the printer to grab the paper.
Side edges must be at least 5.8 in (148 mm).
4
5
3 Open the MP Tray by grasping the door
on the front of the printer, at the pattern
of raised dots on each side.
Pull the tray down gently until it stops.
4 Pull out the tray extension if needed for
the paper size you are printing.
5 Place paper in the tray between the paper
width guides, with the side-to-be-printed
down.
Adjust the paper width guides to lightly
touch both edges of the paper, without
bending.
Remember to adjust the paper stop guide
on the output bin of the printer (see
Figure 3-3).
Send the document to the printer.
3-16 Printing Tasks
Page 46

1
Printing Letterhead Documents,
Preprinted Forms, and Special Papers
Use the following procedures to print the first
page of a document on preprinted or special
paper and the next on different paper.
Note for Network Users
You might want to reserve the cassette in
which your preprinted paper is loaded so
other users won’t accidentally print on your
Letterhead or forms. The procedure for
reserving or locking out a cassette is on the
next page.
2
To print the first page of a
document on Letterhead:
The following steps explain how to print a
two-page letter using Letter or A4 paper as an
example.
Note
These steps assume the printer is set to MP
TRAY=FIRST, the printer’s default setting. See
Configuration Menu in Chapter 4.
1 Place a sheet of Letterhead in the MP
Tray, side-to-be-printed down, with top of
page toward the left of the printer.
2 Load plain paper (for the second page of
the letter) in the Paper Cassette.
Print the Letter.
Printing Tasks 3-17
Page 47

Reserving or Locking Out the MP Tray or
Paper Cassettes
You can reserve, or lock out, paper cassettes that hold special papers from
other users. Reserve one or more cassettes (including the MP Tray) by
locking them out from the paper selection process through the printer’s
control panel. (Your software application can override these settings.)
The following procedure configures the MP Tray as a cassette, then locks
out the MP Tray so it is a protected source of Letterhead, a preprinted form,
or colored paper. Lock out any other paper cassette or combination of
cassettes the same way.
To reserve or lock out a cassette:
1 From the printer’s control panel, press [On Line] to take the printer off line.
2 Press [Menu] until CONFIG MENU appears.
3 Press [Item] until MP TRAY=setting appears.
4 Press [+/–] until MP TRAY=CASS appears, then press [Enter].
5 Press [Item] until LOCK=SETTING appears.
6 Press [+/-] until LOCK=MP appears, then press [Enter] to save your selection.
7 Press [On Line] to place the printer back on line.
8 Press [MP Paper Size], then select the size of paper you have in the MP Tray
9 Place a stack of paper into the MP Tray with side-to-be-printed down. Load
3-18 Printing Tasks
(by pressing the [+/- ), then press [Enter] to save your selection.
Letter or A4 paper with the top of the page placed toward the left side of the
printer. Load legal, 11x17, and A3 paper with top of page leading into the
printer.
The MP Tray is now locked out from its default selection.
Page 48

Printing an Envelope from the MP Tray
You can print an envelope from the MP Tray. This section explains how to
print an envelope using your software application.
Table 3-2 lists the kinds of envelopes you can print. Thick envelopes might
jam inside the printer. (See Appendix C for media specifications.).
Table 3-2
Caution Never use envelopes with clasps, snaps, windows, coated linings, self-stick
Envelope Specifications for the MP Tray
Item Specifications
Quantity 1 envelope, maximum
Envelope Size Dimensions
Commercial #10 (COM 10) 4.1 in x 9.5 in (105 mm x 241 mm)
#7 3/4 (Monarch) 3.8 in x 7.5 in (98 mm x 191 mm)
DL 109 mm x 218 mm (4.3 in x 8.6 in)
C5 163 mm x 231 mm (6.4 in x 9.1 in)
ISO B5 178 mm x 251 mm (7.0 in x 9.9 in)
adhesives (peel and seal), or other synthetic materials. These items can
severely damage your printer. Never try to print on both sides of an
envelope. Jamming and printer damage can result.
Before you load an envelope in the MP Tray, check to make sure it is
regular in shape and undamaged. It’s a good idea to run a pen or pencil
down the leading edge to flatten it before you insert it in the MP Tray.
Printing Tasks 3-19
Page 49

1
2
Loading an Envelope into the MP Tray
1 Open the MP Tray by grasping the door
on the front of the printer, at the pattern
of raised dots on each side.
Pull the tray down gently until it stops.
2 Pull out the tray extension if needed for
the envelope size you are printing.
3 Gently slide one envelope in the tray
between the paper width guides, with
side-to-be-printed down, the back flap
lying against the right paper guide.
4 Slide paper width guides until they lightly
touch both sides of the envelope without
bending it.
Send the envelope printing job to the
printer.
3
4
3-20 Printing Tasks
Note
The paper guide ensures that the envelope
feeds correctly into the printer without
jamming. An envelope must fit squarely and
firmly between the paper width guides.
Page 50

1
Printing an Envelope from a Software
Application
1 Load an envelope into the MP Tray.
2 Specify MP Tray in your software
application’s printer setup and set the
page-size setting to the appropriate
envelope size, such as COM 10 or DL.
3 If your software does not automatically
format an envelope, specify Landscape for
page orientation in your software
application’s print setup.
2
Paper Source:
Paper Size:
3
Orientation
MP Tray
COM 10
Portrait
Landscape
Send the envelope printing job to the
printer.
Caution
To avoid a printer jam, once you begin
printing,
reinsert it.
do not remove the envelope and
To set margins for return and
mailing address:
For best print quality, use the following table.
It gives you typical address margins for a
Commercial #10 or DL envelope. For
envelopes of other sizes, adjust the margin
settings until they please you. Try to avoid
printing over the area where an envelope’s
three back flaps meet.
Type of Address Left
Margin
Return 0.5 in
(15 mm)
Mail destination 4.0 in
(85 mm)
Top
Margin
0.5 in
(15 mm)
2.0 in
(51 mm)
Printing Tasks 3-21
Page 51

Figure 3-4
Printing from the Optional 500-sheet
Universal Lower Cassette
An optional 500-sheet Universal Lower Cassette is available for your
printer. It consists of a base into which a paper cassette slides. Your printer
rests on top of the Lower Cassette base.
3-22 Printing Tasks
The Lower Cassette adjusts for Letter, legal, 11x17, A4, A3, and JIS B4
paper. The cassette holds approximately 500 sheets of 20 lb. (75 g/m
When a Lower Cassette is installed, by default the printer prints on media
in the following order:
1 MP Tray 2 Lower Cassette 3 Paper Cassette
You can change the printing order by reconfiguring it through the printer
control panel. For example, assume all paper sources contain the same size
of paper. If you send a print request to the printer and the MP Tray is
empty, the printer prints from the Lower Cassette unless you specify
otherwise. If the Lower Cassette is also empty, the printer prints from the
Paper Cassette.
2
) paper.
Page 52

1
2
3,4
Loading Paper into the Optional Lower
Cassette
1 Pull the Lower Cassette out of the base.
2 Adjust the cassette for the paper size you
want to load by moving the side paper
guides and rear paper guide. The rear
guide must click in the correct
position for the paper size you are
printing.
3 Slide approximately 500 sheets of paper
into the cassette, not to extend beyond the
limit mark on the sides.
Paper loading differs by size.
A. Load Letter or A4 paper with the top
of the page toward the left side of the
Lower Cassette, side-to-be-printed up
(shown in illustration 3).
B. Load 11x17, legal, A3, or JIS B4
paper with top of the page toward the
front of the printer, side-to-be-printed up.
4 Press down on all four corners of the
paper stack to ensure the paper rests flat
in the cassette, without bending the paper.
The paper stack must be in contact
with the front slanted wall of the
Lower Cassette.
5
5 Slide the Lower Cassette back into the
base.
Remember to adjust the paper stop guide
on the output bin (see Figure 3-3).
Printing Tasks 3-23
Page 53

Stopping a Print Request
You can stop a print request from your software application or from the
printer’s control panel. In either case, the printer prints the pages it
received and stored in memory before you stopped the print request, then
cancels the remainder.
If many requests have been sent to the printer through your software, they
may be waiting in a print queue (Windows Print Manager, for example). See
the instructions that came with your software for specific instructions on
canceling a print request.
To stop a print request from the printer’s control panel:
1 Press [On Line] to take the printer off-line.
The printer stops receiving data.
2 When the display reads 00 OFFLINE, hold down [Shift] and press [Reset] until
the display reads 07 RESET. Any remaining pages in the printer’s memory
are cleared.
3-24 Printing Tasks
Page 54

Understanding the Control Panel
4
Note for
Window s
and
Macinto sh
Users
Introduction
You can perform most routine printing tasks from your computer, through
your software applications. Software is usually the most convenient way to
control your printer. Many of the functions described in this chapter can
also be performed using the software that came with your printer. Refer to
Chapter 2, Software for your Printer, or the online help files associated
with the software for more information.
The commands in your software override control panel settings. Use the
control panel only to access printer features not supported by your software.
Some special tasks can only be performed from the printers control panel.
(See Chapter 5, Special Tasks.)
If you use the PostScript language option, see Chapter 6, PostScript
Printing, for additional information about the control panel.
The following terms, which you know from the Windows and Macintosh
interfaces, have different meanings in this users guide:
Control panel
screen.
items on the printers control panel that you reach by pressing this key, not
to a menu you choose from your computer screen.
refers to the printers control panel, not to your computer
Menu
refers to a control panel key, and to the menus of selectable
Understanding the Control Panel 4-1
Page 55

Fi g ure 4- 1
Control Panel Layout
The control panel consists of a 16-character display panel, three indicator
lights, and eight keys, three of which have alternate functions.
Indicator Lights
The control panels indicator lights are described in the following table. The
column furthest to the right includes an action only when an action is
requir ed.
When this
indicat or : Looks like this: It means thi s: Do this:
Ready On
Flashi ng
Off
On Line On
Flashing
Off
Form Feed On
Flashing
Off
4-2 Understanding the Control Panel
Ready to print.
Print job in progress.
Not ready to print.
Ready to receive data.
Going off line.
Printer is off line. Access other keys or press [On Line]
Dat a st ill in print buffer.
Buffered data is printing.
No buffered data in printer.
Let job finish printing.
See display panel message.
to place printer back on line.
Take printer off line; press [Form Feed];
press [On Line] to place pr int er back
on line.
Page 56

Control Panel Keys
Note
You must take the printer off line (press
panel keys, except for
The control panel has two rows of keys. Each key in the top row has a single
function that you perform by pressing the key.
Three keys in the bottom row have more than one function. The name of
each keys primary function appears above the key. To perform a keys
primary function , press the key.
The name of each keys alternate function appears below the key. These
alternate function names are color-coded to match the
must hold down to select an alternate function.
[MP]Paper Size]
[On Line]
and keys related to its operation.
to do so) to use control
[Shift]
key, which you
To select an alternate function:
•
Hold down
You can rapidly scroll through some selections by holding down the
Table 4-1 explains how control panel keys work.
[Shift]
and press the second-row key of your choice.
Understanding the Control Panel 4-3
[+/-]
4
key.
Page 57

Table 4-1 Control Panel Keys
Key Explanation
[On Line] Switches the state of communication between computer and printer either on
(on line) or off (of f line). For the printer to receive data, both the On Line and
Ready indicator lights must be lit.
[Form Feed] Prints any data remaining in printer’s buffer. Does
paper through the printer.
[MP Paper Size] Only active when MP Tray is set to cassette (select MP TRAY=CASS in th e
Configuration Menu). Selects size of paper loaded in MP Tray. Pressing [Enter]
saves your selection. (See Chapter 3 for more information about the MP Tray.)
[Enter] Saves a contr ol panel key setting you selected. An asterisk (*) appears next to
the saved selection, indicating that it is the default. Default settings remain in
place when the printer is switched off or reset.
[Shift] Accesses alternate functions of bottom-row control panel keys, which are color
coded to match it. Hold down while pressing an associated key.
[Menu] Cycles through menus, returning to 00 OFFLINE at the end of the cycle unless
a problem is encountered. When an option is added t o the printer (PostScri pt,
for example), a menu for that option appears in the sequence. (See “Control
Panel Menu” in this chapter.)
Reset
([Shift]
[Item] Cycles through the selected menu’s items. Menu items vary depending on
Continue
([Shift]
Reset])
+
Continue])
+
Resets the printer (displays 07 RESET). Clears the printer’s buffer and makes
the current control panel values the defaults. (See “The Menu of Resets” at the
end of this chapter).
options installed and configuration of other menu choices.
Allows the printer to resume printing after a printer message (such as
20 MEM 0VERFLOW) has placed it off line. Clears most printer messages (such
as manual feed requests) and places the printer back on l ine.
not
send a blank sheet of
[+] or [-] Press [+] to step through a menu’s items. Hold down [+] to scroll through items.
Press or hold down [] ([Shift] + [-]) to move through items in reverse order.
4-4 Understanding the Control Panel
Page 58

Settings and Defaults
The printer makes most printing decisions based on either temporary
settings or permanent defaults.
Note
Table 4-2 Setting the Defaults
Set ting or Def ault Explanatio n
Temporary setting A value set for the current print job by your software application. For
Control panel default A value you set at the control panel by selecting a menu item, then
Factory default The value set for each menu item at the factory. Factory defaults are
Settings you send from software applications override printer defaults.
example, a request from your software to print three copies instead of the
control panel default value of one copy is a tempor ar y setting. The printer
continues to use the temporary setting until you send another software
request or reset the printer.
pressing [Enter]. An asterisk appears following the item’s name to indicate
that it is now the default. The printer retains this default when it is
switched off.
marked with an asterisk in the menu tables on the pages that follow.
Understanding the Control Panel 4-5
4
Page 59

Control Panel Menus
Pressing
[Menu]
gives you access to the menus, one after another. Each
menu is described in a separate table in this section. When options (such as
the PostScript language) are installed in the printer, new menus or menu
items automatically appear in the appropriate menus.
Control Panel Menu Map
PRINTING MENU PCL MENU PS MENU JOB MENU
COPIES FONT
PAPER
[ENVELOPE]
ORIENTATION PITCH or PT
FORM SYM SET IO TIMEOUT AUTO CONT PCL MEM PCL DEMO PAGE
MANUAL FEED LOW TONER PS MEM PS CONFIG PAGE
RET PS TYPEFACE LIST
ECONOMODE PS DEMO PAGE
You can change these menu items either from a software
application or from the printer’s control panel.
Shaded items appear when the PostScript opti on is install ed.
* These items will appear if sufficient memory is avail able.
Additional menu items may appear if options are install ed (such as MIO cards).
SOURCE
FONT
NUMBER
SIZE
PRT PS ERRS RESOLUTION MP TRAY IO BUFFER HIGH SPEED SELF TEST
JAM
RECOVER
PERSONALITY LOCK IO SIZE ADV FNCTNS CONT SELF TEST
PWR SAVE CLR WARN RESRCSAVE PCL T YPEF ACE LIST
CONFIG
MENU
Y ou c an change these menu ite ms only from the printer’s
control panel .
MEM CONFIG
MENU*
PARALLEL
MENU TEST MENU
To select a menu item:
1
2
3
4
5
6
4-6 Understanding the Control Panel
[On Line]
Press
Press
Press
Press
[Menu]
[Item]
[+]
to take the printer off line.
repeatedly until the menu you want appears.
repeatedly until the item you want appears.
repeatedly (or hold down
appears.
[Enter]
Press
to save your selection. An asterisk appears next to your
selection, indicating that it is now the default.
[On Line]
Press
to place the printer back on line.
[+]
to scroll) until the setting you w ant
Page 60

Printing Menu
You can override or change any Printing Menu setting through most
software applications. When you change a setting from the printers control
panel, the new setting becomes the printers default value.
Table 4-3 Printing Menu Items
Item Options Explanation
COPIES 1* to 999 Select any number from 1 to 999.
PAPER
ORIENTATION P *, L P means portrait (vertical) and L means lan dscape
FORM 5 to 128 LINES
MANUAL FEED OFF*, ON Available only through MP Tray. When Manual Feed is
RET OFF, LIGHT, MEDIUM*,
ECONOMODE OFF*, ON EconoMode substantially reduc es the amount of toner
LETTE R** , LEGAL,
A4***, EXEC, 1 1x17, A3,
JIS B4 , JI S B5, CUSTO M
COM10**, MONARCH,
C5, DL***, B5, JPOST,
JPOSTD
(60** and 64***)
DARK
Sets default image size at which printer formats page
unless a software setting overrides it.
(horizontal) orientati on of print on the page.
Sets vertical spacing, from 5 to 128 lines, for def ault
paper size. Scrolls in increments of 1 line.
on and the MP Tray is empty, the printer goes off line
when it receives a print job and displ ay s MF FEED
paper size
a sheet in the MP Tray, the printe r goes back on line
and prints the sheet.
Refines print quality of characters and graphics by
smoothing the fine gradations along the angles and
curves of the printed image. (See “Enhancing
Resolution” in Chapter 5.)
on the printed page; the result is similar to draft mode
on some dot matrix printers. (See “Saving Toner with
EconoMode” in Chapter 5.)
or ME FEED
envelope size
. When you place
4
*Factory default. **Fa ctory defaul t for 110V printer s. ***Fa ctory defaul t for 220V printer s.
Understanding the Control Panel 4-7
Page 61

PCL Menu
PCL Menu items allow you to choose the printers default font and symbol
set. Printer Control Language (PCL) is HPs printer language. You can also
change such PCL Menu items as the
application.
Table 4-4 PCL Menu Items
Item Options Explanation
FONT SOURCE
through your software
FONT SOUR CE I*
S
Mn
FONT NUMBER 0 to 999 The printer assigns a number to each typeface and lists them on the
PITCH
or
PT. SI Z E
Range
Pitch:
10.00*
Poi nt:
12.00*
Internal fonts*
Permanent soft fonts
SIMM Module: n=slot number . T ypefaces stored in one of the four
ROM SIMM slots (M1=slot 1, for example).
PCL Typeface List, which you can print out. (See “Checking
Installed PCL Fonts” in Chapter 5.) The font num ber appears in the
Font # column of the printout.
You must select a FONT SOURCE in order for FONT NUMBER to appear.
Defaults and other conditions are as follows:
I*
0* is the default.
S
1* is the default. You can select from the control panel
only a permanent soft font that is currently in the printer.
Mn
The pitch or point size item available depends on the FONT SOURCE
and FONT NUMBER you select.
Pitch:
Point:
SIMM Modul e; n=SIMM slot (1-4). Typefaces stored in
one of the four ROM SIMM slots (M1=slot 1, for example).
For fixed-pitch outline typefaces, select pitch sizes from
.44 to 99.99.
For proportiona lly-spaced outl ine typ efaces, select point
sizes from 4.00 to 999.75 in .25-point increments.
SYM SET ROMAN - 8 *
Many ot hers
*Factory default.
4-8 Understanding the Control Panel
A symbol set is a unique grouping of all the characters in a font.
PC-8 or PC-850 is recommended for line draw characters. Symbol
set charts appear in the
HP LaserJet Printer T echnical Reference
.
Page 62

Job Menu
You can change Job Menu items through your software application if you
have installed an appropriate prin ter driver.
Table 4-5 Job Menu Items
Item Options Explanation
RESOLUT ION 300 or 600* At 600 dpi (dots per inch), the printer might need as much as
four times more memory to format a page than i t needs at
300 dpi. For most purposes, 600 dpi is recommended.
PERSONAL TY AUTO*
PCL
PS
PWRSAVE OFF, 15 MIN,
30 MIN*, 1 HR,
2 HRS, 3 HRS
IO TIMEOUT 5 to 300
15*
PAGEPROTCT AUTO*
ON
Personality
from its standard personality, PCL, to other personalities,
such as PostScript. When PERSONALTY is set to AUTO, the
printer analyzes each print job it receives and switches
personalities automatically .
When you make another personality the default, the printer
stops switching personalities aut omatical ly unless a software
command specifically instructs it to do so. (See “Switching
Printer Languages (Personaliti es)” in Chapter 5.)
If you select PS as the default, you may want to set
ADV FNCTNS in the Parallel Menu to OFF.
Sets the amount of time the printer is idl e before the fuser
shuts down. The printer automatically starts warming the
fuser when you send a pri nt job to the printer, press a control
panel key, load or remove paper, or open the top door. (See
“Saving Energy with Power Save” in Chapter 5.)
I/O timeout refers to the time, measured in seconds, that the
printer waits before ending an incomplete print job. Scrolls in
increments of 10. This setting allows you to adjust timeout for
best performance. If data from other ports appear in the
middle of your print job, increase the timeout value.
You will not see this item unless the error 21 PRINT OVERRUN
has occurred. (See Chapter 8, “Solving Printer Problems.”)
means printer language. Your printer can switch
4
*Factory default.
Understanding the Control Panel 4-9
Page 63

Configuration Menu
Configuration Menu items can be selected only from the printers control
panel. You cannot temporarily change them in your software application.
Table 4-6 Configuration Menu Items
Item Options Explanati on
MP TRAY FIRST*
CASS
MANUAL
LOCK NONE*
MP
PC
LC
and combinations
Draws paper from the MP Tr ay regardless of paper size..
MP TRAY=FIRST is not recommended for shared
environments.
Operates as a paper cassette. Paper feeds automati-
cally. Paper size must be selected with the
[MP[Paper]Size] key because the MP Tray cannot sense
the size of the paper. If the MP Tray is set as a cassette,
the Paper Cassette (or Lower Cassette) becomes the
default. The [MP Paper]Size] key works only when the MP
Tray i s s e t to CASS.
Operates only as a manual feed tray.
You can lock out a tray or a combination of trays so the
printer will not draw paper from it. (See “Reserving
Cassettes” in Chapter 3.) Lock-out options depend on
how the MP Tray is configured and whether an optional
500-sheet Lower Cassette (LC) is installed. When the
MP Tray is set to MANUAL or FIRST and no optional Lower
Cassette is installed, no paper sources are available to
be locked out. All possible options and their defi nit ions
are as follows:
NONE
MP
PC
LC
PC MP
LC MP
LC PC
No trays or cassettes locked out.
The MP Tray is locked out.
The Paper Cassette is locked out.
The optional Lower Cassette is locked out.
Only the optional Lower Cassette is available.
Only the Paper Cassette is available.
Only the MP Tray is available.
*Factory default.
4-10 Understanding the Control Panel
Page 64

Table 4-6 Configuration Menu Items
Item Options Explanation
CLR WAR N ON*, JOB A clearable warning indicates a transient condition in the
printer. The printer continues to function because it is still on
line.
When CLR WARN is s e t to ON, the last clearable warning
message displayed repl aces 00 READY until you press [Shift]
+ [Continue] . When this item is set to JOB, the message
remains visible unt il the printer receives another job.
A number of clearable warning messages can appear for
each job to be printed, depending in the length and
complexity of the job. (See “Clearable Warnings” in
Chapter 8.)
AUTO CONT OFF*, ON The auto continue function determines how the printer
reacts to data and printer errors. When auto continue is set
to OFF, the printer displays a message and goes off line until
you press [Shift] + [Continue]. When auto continue is set to
ON, the printer displays a message and goes off line for
about 10 seconds, then comes back on line. If your pr i nter is
part of a network or remote spooling system, set auto
continue to ON.
LOW TONER CONT*, STOP Determines printer’s response to the message,
16 TONER LOW, which indicates the printer senses the
cartridge is running out of toner. When LOW TONER=CONT, the
printer remains on line and continues to print after the
16 TONER LOW message appears; print quality may degrade.
When TONER LOW=STOP, the printer goes off li ne and waits for
the printer operator to take action. (See “Clearing the
TONER LOW Mess age” in Chapter 7.)
*Factory default.
(continued)
4
Understanding the Control Panel 4-11
Page 65

Memory Configuration Menu
This menu contains the items for personality Resource Saving and I/O
Buffering. Depending on how your printers memory is configured, any
combination of menu items and possible values can appear. See Chapter 6,
PostScri pt Printi ng for additional information.
When you change an item in this menu, the printer automatically resets,
and all fonts, macros and dow nloaded data in the printer are lost (except
data stored on the optional PostScript Disk Accessory). Memory
Configuration Menu items can be selected only from the printers control
panel.
Table 4-7 Memory Configuration Menu Items
Item Options Explanation
IO BUFFE R AUTO*, OFF, ON The I/O buffer is a portion of the printer’s memory set
aside to hold incoming data. When this item is set to AUTO,
the memory set aside for I/O buffering is a utom at ically
determined by the printer based on available memory.
When it is set to ON, the size can be manually adjusted.
When it is set to OFF, no memory is set aside. If you have
a 4MV printer it was set to OFF at the factory. (See “How
I/O Buffering Improves Performance” in Chapter 5.)
[IO SIZE] 10K and up When IO BUFFER is set to ON, I/O SIZE appears in the
menu. Use this item to add or reduce I/O buffer memory in
increments of 10 KBytes up to 100 KBytes, then in
100 KByte increments.
RESRCS AVE AUTO*, OFF, ON This item appears when a certain amount of memory and
a personality SIMM are installed in the printer. If it is set to
AUTO, the printer automatically determines the amount of
memory to allocate to installed personalities (languages) .
When it is set to ON, additional memory management item
selections appear for each installed personality (see next
item). When it is set to OFF, no memory is allocated and
personality-dependent resources (such as fonts) are lost
when personality changes. If you have a 4MV printer it
was set to OFF at the factory. (See “How Your Printer Uses
Memory” in Chapter 5.)
4-12 Understanding the Control Panel
Page 66

Parallel Menu
Parallel Menu items can be selected only from the printers control panel.
You cannot change or override them from your software application.
Table 4-8 Parallel Menu Items
Item Options Explanation
HIGH SPEED YES*, NO T he speed at which data is transmitted to the printer. YES sets
the Bi-tronics parallel interface to run at a higher data rate
supported by newer computers. NO sets the Bi-tronics parallel
interface to run at a slower speed compatible with older
computers.
ADV FNCTNS ON * , OFF Choosing ADV FNCTNS=ON enables bi-directional parallel
communicat ion, which al lows your printer to send status
readback messages to your computer. Setting advance functions
to ON may slow personal ity switching.
*Factory default.
Understanding the Control Panel 4-13
4
Page 67

Te st M e n u
Test Menu items can be selected only from the printers control panel. You
cannot change or override them from your software application. See
Testing Your Printer in Chapter 5 for detailed information about running
printer tests and interpreting their results. Additional information about
test printouts appears in Chapter 6, PostScript Printing.
Table 4-9 Test Menu Items
Item Explanation
SELF TEST When SELF TEST is displ ayed, and you press [Enter], the printer
runs a self test during which it displays the message 05 SELF
TEST and all control panel lights are lit. During the printing portion
of the self t est , the message 06 PRINTING TEST is displayed. (See
‘‘Understanding the Self Test Printout,’’ in Chapter 5.)
CONT SELF TEST
(Continuous Self Test)
PCL TYPE LIST Pr ints a list of the typefaces and bitmapped fonts currently
PCL DEMO PAGE Prints a page that illustrates the printer’s features.
Prints continuous self-test pages until you press [On Line] or
[Shift] + [Continue]. Then the 04 portion of the display blinks and
several more pages print until the buffer clears. Press [On Line]
when pages stop printing.
available in your printer (both internal and accessory) for PCL pri nt
jobs. (See “Understanding the PCL Typeface List Printout,” in
Chapter 5.)
4-14 Understanding the Control Panel
Page 68

Menu of Resets
Additional reset options are available through the Menu of Resets. You can
lose buffered page data or p rinter configuration da ta when you select this
option. Use it only in the following circumstances:
•
You want to restore the default printer settings.
•
Communication between the printer and computer is interrupted.
•
You are using both the Bi-Tronics parallel I/O port and MIO ports, and
one of the ports is not working properly.
To access the Menu of Resets:
1
2
3
4
5
Opti on Sel ect ed Print er Response Exp lan ation
RESET=MENU 09 MENU RESET RESET=MENU restores most of the printer’s factory
RESET=ACTIVE I/O 09 RST ACTIVE I/O RESET=ACTIVE I/O clears the input and output buffers
[On Line]
Press
Hold down both
appears on the display.
[+]
Use
Press
Press
The following table shows the three reset options:
or
[Enter]
[On Line]
to take the printer off line.
[Shift]
[Shift]
[-]
+
to cycle through the items.
to select your choice of resets.
to execute the reset.
Menu of Resets
[Reset]
and
default settings. It also performs a reset.
Items in the Config, Memory Configuratio n and
Parallel Menus are not reset. RESET=MENU clears only
the active input buffer.
for the active I/O only and performs a simple reset.
for at least 10 seconds until
RESET=MENU*
4
RESET=ALL I/O 09 RESET ALL I/O RESET=ALL I/O clears the input and output buffers for
all I/Os and performs a simple reset.
Understanding the Control Panel 4-15
Page 69

4-16 Understanding the Control Panel
Page 70

Special Tasks
Introduction
This chapter explains special tasks you perform occasionally to adjust your
printer, manage its memory, and fine-tune print quality using the printer’s
control panel. Many of these functions can also be performed using the
software that came with your printer. Refer to Chapter 2, “Software for your
Printer,” or the online help files associated with the software for more
information.
For more information about the printer’s control panel, see Chapter 4,
“Understanding the Control Panel.”
Chapter 6, “PostScript Printing,” describes special tasks you perform
differently when you print with Adobe’s PostScript language.
This chapter explains how to perform the following special tasks:
5
• Switching printer languages (personalities)
• Printing a test page
• Printing a list of PCL typefaces
• Determining how much memory you need
• Choosing print resolution
• Fine-tuning print quality
• Saving toner with EconoMode
• Saving energy with Power Save
Special Tasks 5-1
Page 71

Switching Printer Languages
(Personalities)
If more than one printer language is installed, by default your printer is set
to switch automatically between languages as it receives printing jobs. For
example, if you have a HP LaserJet 4M printer, you can send jobs to the
printer in either Hewlett-Packard’s PCL or Adobe’s PostScript language
documents without making special control panel settings.
In your printer’s control panel, printer languages are referred to as
personalities.
Note
Normally you should not change the printer’s personality setting from AUTO,
the default. If you do change it to a specific printer language (PCL or PS), the
printer will not automatically switch from one language to another unless
software commands are sent to the printer.
To change the printer’s personality setting:
1 Press [On Line] to take the printer off line.
2 Press [Menu] until JOB MENU appears.
3 Press [Item] until PERSONALTY=setting appears.
4 Press [+] or [Shift] + [-] until the setting you want appears.
5 Press [Enter] to save your selection. An asterisk (*) appears next to your
selection.
6 Press [On Line] to place the printer back on line.
5-2 Special Tasks
Page 72

Testing Your Printer
Using the printer’s control panel, you can run the following tests to get
information about your printer’s current settings, options, and print quality.
(If PostScript is installed, you can also print three PostScript tests. See
Chapter 6, “PostScript Printing,” for more information.)
• Self Test
• Continuous Self Test
When you run a self test, the printer checks its internal controller and I/O
interface, then prints a test page. You can review the self test printout to
verify proper installation of such options as paper trays or personalities.
You can also use the self test printout to view current print density and
Resolution Enhancement settings and harmonize them.
Printing a Test Page
You print all test pages from the printer control panel’s Test Menu.
To print a test page:
1 Press [On Line] to take the printer off line.
Note
2 Press [Menu] until TEST MENU appears.
3 Press [Item] until the test you want to print appears.
4 Press [Enter] to print the test.
5 Press [On Line] to place the printer back on line.
When you select CONT SELF TEST, the printer prints self test pages
continuously until you press [Shift] + [Continue] or [On Line].
Understanding the Self Test Printout
Figure 5-1 is a sample self test printout. Numbers in the sample printout
match numbers in the key to the printout on the following page. The
appearance of the self test printout varies depending on the options
currently installed in your printer.
Special Tasks 5-3
Page 73

1
13
2
3
4
5
12
6
7
8
9
10
11
Figure 5-1
5-4 Special Tasks
Page 74

Item Key to Figure 5-1
1 Menu selections: Lists selections in the order in which they appear in the control panel
display. Also includes options such as PostScript and Modular I/Os.
2 MIO information: Reserved for MIO and network statistics. For some installed MIO options,
this block of information can be as long as 20 lines and three columns.
3 Serial Number and Formatter Number: Shows version number of internal code.
4 RAM size: Shows total installed printer memory.
5 Page Count: Shows the number of pages the printer has printed.
6 Firmware Datecode: Eight-digit date (YYYYMMDD) and version number of formatter code.
7 Control Panel options status: Shows status of control panel Lock and Password functions.
8 Other installed options: Lists optional paper trays, personalities, and other installed options.
9 PostScript Disk: Appears when the option is installed and displays access status.
10 I/O Buffering and Resource Saving: Information about the current configuration appears
here. If the printer does not have enough memory installed to enable I/O Buffering or
Resource Saving, the amount of additional memory needed appears here.
11 Print Pattern: Illustrates print density and quality.
12 Resolution Enhancement: When resolution is set to 600 dpi, the REt block appears here.
The REt block illustrates current resolution enhancement. (See “Fine-Tuning Print Quality,” in
this chapter).
13 PCL Memory Information: Shows the total amount of installed memory. Also indicates the
amount of available memory for PCL applications (such as font downloading software).
Special Tasks 5-5
Page 75

Checking Installed PCL Fonts
Your HP LaserJet printer comes with 45 scalable typefaces (35 Intellifont
and 10 TrueType internal scalable typefaces) and one bitmapped Line
Printer font. You can find out which PCL fonts are currently installed in
your printer by printing a PCL Typeface List.
You can also print a PostScript Typeface List. See Chapter 6, “PostScript
Printing,” for more information.
The typeface list printout shows the standard PCL typefaces and fonts,
optional SIMM-based fonts and permanent soft fonts. Permanent soft fonts
are downloaded soft fonts that stay resident in the printer until you
download other fonts to replace them, or until you turn the printer off.
To print a PCL Typeface List:
Follow the steps shown on page 5-3, selecting PCL TYPE LIST in step 3.
Understanding the PCL Typeface List Printout
Figure 5-2 is the first page of a sample PCL Typeface List. Numbers in the
sample typeface list match numbers in the key to Figure 5-2 shown below.
See Appendix A, “Common PCL Printer Commands,” for step-by-step
instructions on using printer commands to select a font in DOS applications.
Item Key to Figure 5-2
1 Typeface is the name of the typeface.
2 Pitch/Point indicates the specified pitch or point size of the font. “Scale” indicates a scalable
typeface.
3 Escape Sequence (a PCL programming command) is used to select the designated font.
4 Font # is the number you use to select internal or downloaded soft fonts from the control
panel. (Do not confuse the font
preceding the font number shows the source of the font (I means
Permanent
5 Font ID is the number
software.
5-6 Special Tasks
soft font, and M means
number
you assign
with the soft font ID, described next.) The letter
Internal,
SIMM
) (slot number follows).
to soft fonts when you download them through your
and S means
Page 76

Figure 5-2
Special Tasks 5-7
Page 77

How Much Memory Do You Need?
The amount of memory you need depends on how you use your printer. Your
HP LaserJet 4V printer, which contains only the PCL language, comes with
4 MBytes of internal memory. The PCL printer language is compact and
efficient, so you can print most text and graphics at 300 or 600 dpi without
adding memory to your printer.
You might want to add memory to your printer if you commonly print
complex graphics, use many downloaded typefaces, print complex
documents or you want to use advanced functions (such as I/O Buffering
and Resource Saving). For the HP LaserJet 4V printer, you can add up to 64
MBytes of memory for a total of 68 MBytes.
Your HP LaserJet 4MV printer comes with 4 MBtyes of internal memory,
and a pre-installed 8 MByte memory SIMM for a total of 12 MBytes. You
can add up to 32 MBytes of additional memory.
For storage of downloaded fonts, an optional 42.8 MByte PostScript Disk
Accessory is available. See Chapter 6, “PostScript Printing,” for more
information about PostScript printing.
Note
To find out how much memory is installed in your printer, print a self test.
See “Printing a Test Page,” earlier in this chapter, for more information.
5-8 Special Tasks
Page 78

How Your Printer Uses Memory
The printer’s memory receives, holds, and processes data from incoming
print jobs and manages downloaded resources. Resources include PCL soft
fonts, symbol sets, macros, and patterns, and (when the PostScript option is
installed) PostScript fonts, forms, and patterns.
Keeping Downloaded Resources in Memory
When only the PCL personality is installed, the printer uses all available
memory to maintain downloaded resources. When two or more personalities
are installed, the printer reserves a portion of memory for each personality’s
resources. This feature is called Resource Saving. It enables the printer to
keep downloaded resources in memory under most conditions.
Resource Saving in PCL-Only Printers
In a PCL-only printer, available memory is automatically allocated to keep
downloaded resources in memory. When you add memory to the printer,
more memory automatically becomes available for Resource Saving. You
need not change the amount of memory available for Resource Saving in a
PCL-only printer.
Resource Saving in PCL and PostScript Printers
When the PostScript option is installed, Resource Saving automatically
becomes available when sufficient memory is installed. By default, the
printer automatically allocates resources to each printer personality,
depending on the amount of memory each personality needs. Most users will
not need to customize the printer’s Resource Saving configuration, but you
can change the amount of memory allocated to each printer personality.
If you download a large number of PostScript fonts, consider ordering the
optional 42.8 MByte PostScript Disk Accessory.
Special Tasks 5-9
Page 79

You may want to change the amount of memory allocated if you download
an unusually large number of fonts, or if your printer is in a shared
environment. These instructions do not pertain to fonts downloaded to the
optional PostScript Disk Accessory.
To determine how much memory to allocate to a
personality:
1 Press [On[Line] to take the printer off line, then press [Menu] until MEM
CONFIG MENU appears.
2 Press [Item] until RESRCSAVE appears, then press [+ until ON appears. Press
[Enter] to save your selection. An asterisk (*) appears.
3 Press [Item] until either PS MEM or PCL MEM appears. Choose the personality
you want.
4 Hold down [+] until the highest value is displayed. This amount varies
depending on how much memory is installed in the printer. Press [Enter] to
save your selection. An asterisk (*) appears. Press [On Line] to return the
printer on line.
5 Using your software package, download all the fonts you want to use in the
printer personality you selected.
6 Print a PCL self test (see “Printing a Test Page” earlier in this chapter). The
amount of memory the fonts use is listed next to the personality. Round up
this figure to the nearest 100 KBytes. For example, if the self test shows
that 475 KBytes are used, 500 KBytes should be reserved.
10 Press [On[Line] to return the printer on line.
Note
5-10 Special Tasks
7 Press [On Line] to take the printer off line, then press [Menu] until MEM
CONFIG MENU appears.
8 Press [Item] until either PCL MEM or PS MEM appears, then press [+] or [Shift +
[–] until the number you determined in Step 6 appears.
9 Press [Enter] to save your selection. An asterisk (*) appears.
All downloaded resources are deleted when you change the Resource Saving
setting. Download your fonts again.
Page 80

How I/O Buffering Improves Performance
When you send a job to the printer, you can get back to work more quickly
after you press Print from a software program because your printer
automatically reserves a portion of its memory, an I/O buffer, to hold jobs in
progress.
In most cases, it is to your advantage to let the printer automatically
reserve memory for I/O buffering. See “Memory Configuration Menu” in
Chapter 4 for information about changing this setting.
For each MByte of memory you add to your printer, 100 KBytes will
automatically be reserved to hold print jobs in progress. This feature, called
I/O Buffering, and works like a print spooler. The printer’s memory holds
the job while it prints, freeing up your system so you can get back to work.
Note
Note
When you change the IO BUFFER setting, all downloaded resources are
deleted, unless they are stored on the optional PostScript Disk Accessory.
Choosing Print Resolution
You can select 300 or 600 dpi (dots per inch) from the RESOLUTION item in
the Job Menu (see Chapter 4). Your printer offers greatly improved print
quality at 600 dpi. To take best advantage of 600-dpi printing, use software
printer drivers designed for your printer.
When you change the RESOLUTION setting, all downloaded resources are
deleted, unless they are stored on the optional PostScript Disk Accessory.
Special Tasks 5-11
Page 81

Fine-Tuning Print Quality
You can fine-tune the quality of your printer’s output by adjusting print
density and setting Resolution Enhancement technology (REt). Print
density and REt settings work together, so it is likely that when you adjust
one, you will want to adjust the other. To do so most effectively, see
“Harmonizing Print Density and REt Settings,” at the end of this section.
Adjusting Print Density
Print density is a measure of the darkness of print on the page. Print
density adjustments are made using the print density dial. The printer is
shipped with the dial in the center position.
Note
Print density is affected by the Resolution Enhancement setting you select.
The new print density setting stabilizes after you print about 20 pages.
The higher the print density setting, the more toner the printer uses. To
extend the life of your toner cartridge, choose lighter print density settings.
The steps to adjust print density are on the next page.
5-12 Special Tasks
Page 82

1
2
3
To Adjust Print Density
You can change the print density using the
printer’s density dial by following these steps:
Warning
The fusing assembly gets HOT. Do not
touch the fusing assembly.
1 Using both hands, open the MP Tray by
grasping the door on the front of the
printer, at the pattern of raised dots on
each side. If the MP Tray is open, remove
any paper.
2 Push up the front cover release button
and gently pull open the front cover.
3 The density dial is located at the upper
left corner of the printer. Move the dial
forward (toward you) to increase the
density or backward (away from you) to
reduce the density. The factory default is
set at the center or mid-range.
4 Using both hands, gently close the front
cover and, unless you want to use it, close
the MP Tray.
4
Note
It may take printing up to 20 pages for the
new print density setting to stabilize.
Special Tasks 5-13
Page 83

Figure 5-3
Enhancing Resolution
Resolution Enhancement technology (REt) refines the print quality of
characters and graphics by smoothing the fine gradations along the angles
and curves of the printed image. Figure 5-3 shows two magnified images:
the left one shows REt set to OFF; the right one shows it set to MEDIUM, the
default. You can also select LIGHT or DARK.
To adjust REt:
You can change this setting using the software that came with your printer
(see software and online help) or through the printer’s control panel by
following these steps:
5-14 Special Tasks
1 Press [On Line] to take the printer off line.
2 Press [Menu] until PRINTING MENU appears.
3 Press [Item] until RET=setting appears.
4 Press [+] or [Shift] + [-] until the setting you want appears.
5 Press [Enter] to save your selection. An asterisk (*) appears next to your
selection.
6 Press [On Line] to place the printer back on line.
Checking the Effect of an REt Setting
You can check the effect of a REt setting by printing a self test at 600 dpi
and examining the Resolution Enhancement block on the printout (see
Figure 5-1, Item 12). The Resolution Enhancement block does not appear on
self test printouts printed at 300 dpi.
Page 84

Figure 5-4
Figure 5-4 illustrates three REt settings. Set REt so that the REt block is a
uniform gray with no vertical lines (see Image 2 below). Image 1 is too light
and Image 3 is too dark.
Harmonizing Print Density and REt Settings
Because print density and REt settings affect each other, it is wise to adjust
them at the same time.
To harmonize print density and REt settings:
1 Make sure printer resolution is set to 600 dpi.
2 Adjust the print density dial. (The center default position usually produces a
uniform gray REt block on the self test printout.)
3 Print a self test and examine the Resolution Enhancement block.
4 Set REt to produce a block as close to a uniform gray as possible, as shown
in Image 2 of Figure 5-4.
Special Tasks 5-15
Page 85

Figure 5-5
Saving Toner with EconoMode
EconoMode lowers printing costs by reducing the amount of toner on the
printed page. We recommend EconoMode for draft copy only due to
substantial reduction of print quality. When set to ON, the printed image is
lighter (like A, below), but still readable. (B, below represents the default
OFF setting.)
AB
To turn on EconoMode:
You can change this setting using the software that came with your printer
(see software and online helps) or through the printer’s control panel by
following these steps:
Note
5-16 Special Tasks
1 Press [On Line] to take the printer off line.
2 Press [Menu] until PRINTING MENU appears.
3 Press [Item] until ECONOMODE=OFF appears.
4 Press [+] to select ECONOMODE=ON.
5 Press [Enter] to save your selection. An asterisk (*) appears next to your
selection.
6 Press [On Line] to place the printer back on line.
HP does not recommend full-time use of EconoMode. Full-time use will
result in a loss of print quality due to normal toner cartridge mechanical
wear.
Page 86

Saving Energy with Power Save
To reduce the amount of power it consumes, your printer has an adjustable
Power Save feature. Power Save shuts down the printer’s fuser after the
printer has been idle for a specified amount of time.
The Power Save feature is both adjustable and optional. You can set Power
Save to start after the printer has been idle for 15 minutes, 30 minutes, 1
hour, 2 hours, or 3 hours, or you can turn Power Save off. By default, Power
Save is set to ON. and the amount of idle time is set to 30 minutes.
When the printer is in Power Save mode, the printer’s control panel displays
the message 00 POWERSAVE, which replaces messages on the control panel
(such as 00 READY or 00 OFF LINE).
Note
Error messages override the Power Save message. When an error condition
is present, the printer displays the error message. At the appropriate time,
the printer goes into Power Save, but the error message continues to be
displayed.
The printer automatically warms up when you send a print job to the
printer, press a control panel key, load or remove paper, or open the front
cover.
To change the Power Save se tting:
You can change this setting using the software that came with your printer
(see software and online helps) or through the printer’s control panel by
following these steps:
1 Press [On Line] to take the printer off line.
2 Press [Menu] until JOB MENU appears.
3 Press [Item] until PWRSAVE=setting appears.
4 Press [+] until the setting you want appears.
5 Press [Enter] to save your selection. An asterisk (*) appears next to your
selection.
6 Press [On Line] to place the printer back on line.
Special Tasks 5-17
Page 87

5-18 Special Tasks
Page 88

PostScript Printing
Introduction
Adobe’s PostScript language is available as an option for the HP LaserJet
4V printer and is standard with the HP LaserJet 4MV printer. This is
genuine Adobe PostScript Level 2 software and it is backward compatible
with earlier versions.
Chapters 4 and 5 focus on using your printer with Hewlett-Packard’s PCL
language. You perform some tasks differently when you print with Adobe’s
PostScript language.
This chapter describes differences the PostScript option makes in how your
printer works and shows you the following:
• Using the right printer driver
• Control panel differences
• Test Menu items
• PostScript Disk Accessory
6
Note for
Macintosh
and
Windows
Users
Printer functions not included in this chapter work the same as described in
other chapters of this manual.
The following terms, which you know from the Macintosh and Windows
interfaces, have different meanings in this user’s guide:
Control panel refers to the printer’s control panel, not to your computer
screen. Menu refers to a control panel key, and to the menus of selectable
items on the printer’s control panel that you reach by pressing this key, not
to a menu you choose from your screen.
PostScript Printing 6-1
Page 89

Using the Right Printer Driver
This chapter assumes you have an HP LaserJet 4MV printer or that you
have added the PostScript language SIMM to your HP LaserJet 4V printer.
To print in Adobe’s PostScript language you also need the right printer
driver for your software.
Printer Drivers for Macintosh
The HP LaserJet 4MV printer and HP JetDirect network cards come with a
printer driver for Macintosh computers, bitmapped screen fonts and the HP
LaserJet Utility and Guide.
Printer Drivers for Windows
To make full use of your printer’s features, you must use the PostScript
printer driver that came with your printer.
Printer Drivers for DOS Applications
For DOS applications, you must select a PostScript language printer driver
from within your software application. If your software does not include a
PostScript language printer driver selection, it may not support PostScript
printing. For more information on selecting and installing a DOS PostScript
printer driver, see your software documentation or contact your software
vendor.
How Much Memory Do You Need?
The HP LaserJet 4MV printer comes with 4 MBytes of internal memory and
an 8 MByte SIMM for a total of 12 MBytes of memory. If you have the HP
LaserJet 4V printer and are adding PostScript, we recommend that you
install at least 8 MBytes of additional memory and turn I/O Buffering and
Resource Saving to OFF at the control panel.
To use I/O Buffering and Resource Saving, we recommend adding additional
memory beyond 12 MBytes.
6-2 PostScript Printing
Page 90

Control Panel Differences
As explained in Chapter 4, “Understanding the Control Panel,” pressing
[Menu] gives you access to menus, one after another. Most menu items apply
to all installed personalities (languages) and are the same as described in
Chapter 4. Only those that specifically apply to PostScript are described in
this chapter.
The menu map on the next page shows you the placement of PostScriptspecific items in the control panel system of menus.
How Form Feed and Reset Work
Most indicator lights and control panel keys work the same way in PCL and
in PostScript languages. [Form]Feed] and [Reset] work differently. The
differences in PostScript are as follows:
• Pressing [Form Feed] does not send a page through the printer.
• Pressing [Shift] + [Reset] removes all downloaded data, including fonts
and forms (except those stored on the optional PostScript Disk
Accessory.).
PostScript Printing 6-3
Page 91

Control Panel Menu Map
PRINTING MENU PCL MENU PS MENU JOB MENU
COPIES FONT
PAPER
[ENVELOPE]
ORIENTATION PITCH or PT
FORM SYM SET IO TIMEOUT AUTO CONT PCL MEM PCL DEMO PAGE
MANUAL FEED LOW TONER PS MEM PS CONFIG PAGE
RET PS TYPEFACE L IST
ECONOMODE PS DEMO PAGE
SOURCE
FONT
NUMBER
SIZE
PRT PS ERRS RESOLUTION MP TRAY IO BUFFER HIGH SPEED SELF TEST
JAM
RECOVER
PERSONALTY LOCK IO SIZE ADV FNCTNS CONT SELF TEST
PWR SAVE CLR WARN RESRCSAVE PCL TYPEFACE LIST
You can change these menu items either from a software
application or from the printer’s control panel.
CONFIG
MENU
You can change these menu items only from the printer’s
control panel.
MEM CONFIG
MENU*
PARALLEL
MENU TEST MENU
Shaded items appear when the PostScript language is installed.
* These items will appear if sufficient memory is available.
Additional menu items may appear if options are installed (such as MIO cards).
To select a menu item:
1 Press [On Line] to take the printer off line.
2 Press [Menu] repeatedly until the menu you want appears.
3 Press [Item] repeatedly until the item you want appears.
4 Press [+] repeatedly (or hold down [+] to scroll) until the setting you want
appears.
5 Press [Enter] to save your selection. An asterisk appears next to your
selection, indicating it is now the default.
6 Press [On Line] to place the printer back on line.
Note
Remember: When you change a control panel setting, it changes for all
installed languages, such as PCL, as well as for PostScript.
6-4 PostScript Printing
Page 92

PostScript Menu
When PostScript is installed, a PostScript language menu is added to the
control panel system of menus.
Table 6-1 PostScript Menu Items
Item Options Explanation
PRT PS ERRS OFF*, ON When this option is set to ON, the printer prints a page
that describes errors the PostScript interpreter
encounters. No PostScript error messages display on
the control panel. This page is useful if you are
developing a PostScript technical application or
troubleshooting a problem. Otherwise, leave this item
set to OFF.
JAM RECOVER OFF*, ON Setting this item to ON causes the printer to reprint
page(s) after recovering from a paper jam.
*Factory default.
Menu Items Affected by PostScript
Most PostScript menu items are similar to those for the PCL language.
Those that are different are listed in the following tables. For menu items
common to PostScript and PCL, see Chapter 4, “Understanding the Control
Panel.”
Table 6-2
Item Options Explanation
PAPER None These settings are ignored because of the way PostScript formats
ORIENTATION
FORM
Printing Menu Differences
pages.
PostScript Printing 6-5
Page 93

Table 6-3 Job Menu Differences
Item Options Explanation
RESOLUTION 300 or 600* If your PostScript printer driver cannot select 600 dpi, you can
select 600 dpi resolution from the printer’s control panel. Note that
a file set for 300 dpi overrides the 600 dpi control panel setting
that file only,
printing the job at 300 dpi.
PERSONALTY AUTO*, PCL,PSWhen you set personality to AUTO, the printer automatically
selects PostScript when it receives a PostScript job. When you
set personality to PS, the printer stops switching personalities
automatically. Instead, it switches to another personality only
when a software command specifically instructs it to do so. AUTO
is recommended, especially in shared printer environments.
for
IO TIMEOUT 15*
(5 to 300)
The PostScript waittimeout and jobtimeout operators are not
affected by this menu item. The IO TIMEOUT setting does not
affect how long a PostScript job is allowed to run or how long
PostScript waits for input.
*Factory default.
Table 6-4
Memory Configuration Menu Differences
Item Options Explanation
IO BUFFER n/a With 12 MBytes of memory, the I/O buffering option appears.
RESRCSAVE n/a With 12 MBytes of memory, the Resource Saving option appears.
6-6 PostScript Printing
Page 94

Test Menu Items
The PostScript Test Menu includes:
• PS Config Page
• PS Typeface List
• PS Demo Page
To print a Test Menu page
1 Press On Line] to take the printer off line.
2 Press [Menu] repeatedly until TEST MENU appears.
3 Press [Item] repeatedly until PS CONFIG PAGE (or another PS test page)
appears.
4 Press [Enter] to print the page. The page will print in less than one minute.
5 Press [On Line] to place the printer back on line.
PostScript Printing 6-7
Page 95

PostScript Configuration Page
The PostScript configuration page (the PS CONFIG PAGE item in the Test
Menu) is shown in Figure 6-1.
Table 6-5
Item Explanation
1 Settings: Current printer control panel default settings and product-specific information:
Printer Name: Name set by user (a network name, for instance).
Product Name: HP LaserJet printer model.
System Password/Job Password: Values are either “0” (default) or “Not Default”
(a password is present).
PostScript Version: The version of PostScript installed.
Copies: The default number of copies that will be printed.
Resolution: Either 600 or 300 dots per inch.
Resolution Enhancement: See “Enhancing Resolution” in Chapter 5.
HalftoneType: The current halftone type.
Economode: On or Off. See “Saving Toner with EconoMode” in Chapter 5.
Wait Timeout: This setting shows how long PostScript waits for additional data.
Print Errors: Value set through the printer control panel’s PS Menu.
Jam Recovery: Indicates whether Jam Recovery is ON or OFF.
Paper Cassette: Indicates size of paper in the cassette.
Manual Feed: Either On or Off.
2 Printable Area: Gives the dimensions within the margins of the image area. The current
default is shown in the hollow box.
3 Memory: The values show how PostScript uses printer memory. This may be useful for more
experienced users since PostScript Level 2 allows users to configure memory parameters
(see Adobe’s
values).
4 Page Count: Shows how many pages have been printed by the printer in all printer
languages. You can use the page count to track printer use.
5 Fixed Disk: Shows whether the optional disk is installed, the total capacity of the disk, and
how many bytes are available for use.
PostScript Configuration Page Printout Items
PostScript Language Reference Manual
for specific information about these
6-8 PostScript Printing
Page 96

Figure 6-1 PostScript Configuration Page
PostScript Printing 6-9
Page 97

PostScript Demonstration Page
The PostScript language demonstration page (PS DEMO PAGE in the control
panel’s Test Menu) is designed to illustrate your printer’s features and print
quality when using the PostScript printer language.
PostScript Typeface List
The PostScript Typeface List (PS TYPE LIST in the control panel’s Test
Menu) has samples of the 35 built-in PostScript language typefaces plus
fonts downloaded to the printer’s memory and optional PostScript Disk
Accessory (see Figure 6-2).
To print the list, see “To Print a Test Menu Page,” earlier in this chapter.
Because of the complexity of the PostScript Typeface List, it may take more
than 30 seconds before printing begins.
The list will not display the printer’s internal or downloaded PCL typefaces.
The characters shown on the PostScript Typeface List are printed in only
one size. When printing from a software application, you can scale these
characters to virtually any size.
6-10 PostScript Printing
Page 98

Figure 6-2 PostScript Typeface List
PostScript Printing 6-11
Page 99

The PostScript Disk Accessory
If you have an HP LaserJet 4MV printer or if you have added the PostScript
option to your HP LaserJet 4V printer, you can install the optional 42.8
MByte PostScript Disk Accessory.
The PostScript Disk Accessory can be used to permanently store
downloaded fonts and forms in the printer. Unlike the standard printer
memory, permanently downloaded items remain in the printer even when
the printer is powered off.
Fonts downloaded to the PostScript Disk Accessory are available to all
PostScript users of the printer.
Macintosh users can use the HP LaserJet Utility and Windows users can
use the HP printer software to download fonts. The PostScript Disk
Accessory can also be write protected through software for additional
security. Refer to the online help associated with your software for more
information.
If you are a PostScript language programmer, refer to Adobe’s PostScript
Language Reference Manual for information about downloading forms,
patterns, etc. to the disk. For the Macintosh environment, refer to the
HP LaserJet Utility Guide on-line help included with the HP LaserJet
Utility Software. For the Windows environment, refer to your Windows
on-line help.
6-12 PostScript Printing
Page 100

Maintaining Your Printer
Introduction
Your printer requires minimum routine maintenance. This chapter explains
the following tasks:
• Cleaning the printer
• Working with the toner cartridge
• Extending toner cartridge life
• Clearing the TONER LOW message
Cleaning the Printer
To maintain print quality, thoroughly clean your printer:
• Every time you change the toner cartridge
• After printing approximately 7,500 pages
• Whenever print quality problems occur
7
Caution
Clean the outside of the printer with a lightly water-dampened cloth. Clean
the inside with only a dry, lint-free cloth. Observe the warnings and
cautions that follow the cleaning tasks on the following page.
To avoid permanent damage to the toner cartridge, do not use ammoniabased cleaners on or around your printer.
Maintaining Your Printer 7-1
 Loading...