

Page 1
hpLaserJet 4100
user guide
Page 2

Page 3

HP LaserJet 4100, 4100N,
4100TN, and 4100DTN Printers
User Guide
Page 4

Hewlett-Packard Company
11311 Chinden Boulevard
Boise, Idaho 83714 USA
© Copyright Hewlett-Packard
Company 2002
All Rights Reserved.
Except as allowed by cop yright
laws or herein, reproduction,
adaptation, or translation
without prior written
permission is prohibited.
A user of the Hewlett-P ackard
printer associated with this
user guide is granted a license
to (a) print hard copies of this
user guide for personal,
internal, or company use
subject to the restriction not to
sell, re-sell or otherwise
distribute the hard copies; and
(b) place an electronic copy of
this user guide on a network
server provided access to the
electronic copy is limited to
personal, internal users of the
Hewlett-Packard printer
associated with this user
guide.
Third Edition, March 2002
Warranty
The information contained in
this document is subject to
change without notice.
Hewlett-Packard makes no
warranty of any kind with
respect to this information.
HEWLETT-PACKARD
SPECIFICALLY DISCLAIMS
THE IMPLIED WARRANTY
OF MERCHANTABILITY AND
FITNESS FOR A
PARTICULAR PURPOSE.
Hewlett-Packard shall not be
liable for any direct, indirect,
incidental, consequential, or
other damage alleged in
connection with the furnishing
or use of this information.
Trademark Credits
Adobe and PostScript are
trademarks of Adobe Systems
Incorporated which may be
registered in certain
jurisdictions.
Arial and Times New Roman
are U.S . registered trademarks
of the Monotype Corporation.
AutoCAD is a U.S. trademark
of Autodesk, Inc.
E
NERGY STAR
is a U.S.
registered service mark of the
U.S. EPA.
HP-UX Release 10.20 and
later and HP-UX Release
11.00 and later on all HP 9000
computers are Open Group
UNIX products.
Microsoft and MS-DOS are
registered trademarks of
Microsoft Corporation.
T rueT ype is a U.S . trademark of
Apple Computer, Inc.
UNIX is a registered trademark
of the Open Group.
Page 5

EN
Contents
3
Contents
About this guide 9
How to use this online user guide . . . . . . . . . . . . . . . . . . . . . . . . .9
Navigational features in this guide . . . . . . . . . . . . . . . . . . . . . .9
Features of Acrobat Reader . . . . . . . . . . . . . . . . . . . . . . . . . .10
Where to look for more information. . . . . . . . . . . . . . . . . . . . . . . .13
Setting up the printer. . . . . . . . . . . . . . . . . . . . . . . . . . . . . . . .13
Using the printer . . . . . . . . . . . . . . . . . . . . . . . . . . . . . . . . . . .14
1 Printer basics
Overview . . . . . . . . . . . . . . . . . . . . . . . . . . . . . . . . . . . . . . . . . . . .15
Printer features and benefits. . . . . . . . . . . . . . . . . . . . . . . . . . . . .16
Printer configurations . . . . . . . . . . . . . . . . . . . . . . . . . . . . . . . . . .18
Printer parts and locations. . . . . . . . . . . . . . . . . . . . . . . . . . . . . . .19
Accessories and supplies . . . . . . . . . . . . . . . . . . . . . . . . . . . . . . .21
Ordering information . . . . . . . . . . . . . . . . . . . . . . . . . . . . . . . . . . .22
Items and part numbers . . . . . . . . . . . . . . . . . . . . . . . . . . . . .22
Ordering through service or support providers . . . . . . . . . . . .22
Ordering directly through the embedded web server . . . . . . .22
Ordering directly through the printer software. . . . . . . . . . . . .23
Control panel layout . . . . . . . . . . . . . . . . . . . . . . . . . . . . . . . . . . .29
Control panel. . . . . . . . . . . . . . . . . . . . . . . . . . . . . . . . . . . . . .29
Control panel lights. . . . . . . . . . . . . . . . . . . . . . . . . . . . . . . . .29
Control panel keys . . . . . . . . . . . . . . . . . . . . . . . . . . . . . . . . .30
Using the printer online help system. . . . . . . . . . . . . . . . . . . .31
Control panel menus. . . . . . . . . . . . . . . . . . . . . . . . . . . . . . . .32
Printer software. . . . . . . . . . . . . . . . . . . . . . . . . . . . . . . . . . . . . . .33
Software provided. . . . . . . . . . . . . . . . . . . . . . . . . . . . . . . . . .33
Printer drivers . . . . . . . . . . . . . . . . . . . . . . . . . . . . . . . . . . . . .35
Software for Windows-based computers . . . . . . . . . . . . . . . .36
Software for Macintosh computers . . . . . . . . . . . . . . . . . . . . .40
Software for networks. . . . . . . . . . . . . . . . . . . . . . . . . . . . . . .41
Page 6

4 Contents
EN
2 Printing tasks
Overview . . . . . . . . . . . . . . . . . . . . . . . . . . . . . . . . . . . . . . . . . . . .43
Selecting the output bin. . . . . . . . . . . . . . . . . . . . . . . . . . . . . . . . .44
Printing to the top output bin. . . . . . . . . . . . . . . . . . . . . . . . . .44
Printing to the rear output bin . . . . . . . . . . . . . . . . . . . . . . . . .45
Loading tray 1 . . . . . . . . . . . . . . . . . . . . . . . . . . . . . . . . . . . . . . . .46
Loading trays 2, 3, and 4. . . . . . . . . . . . . . . . . . . . . . . . . . . . . . . .47
Printing both sides of paper (optional duplexer) . . . . . . . . . . . . . .49
Guidelines for printing both sides of paper . . . . . . . . . . . . . . .50
Placement for paper requiring a specific orientation. . . . . . . .51
Layout options for printing both sides of paper. . . . . . . . . . . .52
Printing special paper . . . . . . . . . . . . . . . . . . . . . . . . . . . . . . . . . .53
Printing small or narrow paper . . . . . . . . . . . . . . . . . . . . . . . .53
Printing letterhead, prepunched, or preprinted paper (single-
sided) . . . . . . . . . . . . . . . . . . . . . . . . . . . . . . . . . . . . . . . .53
Printing envelopes . . . . . . . . . . . . . . . . . . . . . . . . . . . . . . . . .55
Printing labels . . . . . . . . . . . . . . . . . . . . . . . . . . . . . . . . . . . . .61
Printing transparencies. . . . . . . . . . . . . . . . . . . . . . . . . . . . . .62
Printing cards, custom-size, and heavy paper . . . . . . . . . . . .63
Advanced printing tasks . . . . . . . . . . . . . . . . . . . . . . . . . . . . . . . .65
Using features in the printer driver . . . . . . . . . . . . . . . . . . . . .65
Customizing what tray is used for printing . . . . . . . . . . . . . . .68
Job retention features . . . . . . . . . . . . . . . . . . . . . . . . . . . . . . . . . .72
Quick copying a job. . . . . . . . . . . . . . . . . . . . . . . . . . . . . . . . .72
Proofing and holding a job . . . . . . . . . . . . . . . . . . . . . . . . . . .74
Printing a private job. . . . . . . . . . . . . . . . . . . . . . . . . . . . . . . .76
Storing a print job . . . . . . . . . . . . . . . . . . . . . . . . . . . . . . . . . . . . .78
Printing a stored job . . . . . . . . . . . . . . . . . . . . . . . . . . . . . . . .78
Deleting a stored job. . . . . . . . . . . . . . . . . . . . . . . . . . . . . . . .79
Printing with the optional HP Fast InfraRed Receiver. . . . . . . . . .80
Setting up to print with Windows 9x . . . . . . . . . . . . . . . . . . . .80
Setting up to print with Macintosh computers. . . . . . . . . . . . .80
Printing a job. . . . . . . . . . . . . . . . . . . . . . . . . . . . . . . . . . . . . .81
Interrupting and resuming printing . . . . . . . . . . . . . . . . . . . . .82
3 Printer maintenance
Overview . . . . . . . . . . . . . . . . . . . . . . . . . . . . . . . . . . . . . . . . . . . .83
Managing the toner cartridge . . . . . . . . . . . . . . . . . . . . . . . . . . . .84
HP toner cartridges. . . . . . . . . . . . . . . . . . . . . . . . . . . . . . . . .84
Non-HP toner cartridges. . . . . . . . . . . . . . . . . . . . . . . . . . . . .84
Toner cartridge authentication . . . . . . . . . . . . . . . . . . . . . . . .84
Toner cartridge storage. . . . . . . . . . . . . . . . . . . . . . . . . . . . . .85
Toner cartridge life expectancy. . . . . . . . . . . . . . . . . . . . . . . .85
Checking the toner level . . . . . . . . . . . . . . . . . . . . . . . . . . . . .85
Cartridge interaction (shaking) . . . . . . . . . . . . . . . . . . . . . . . .86
Toner low and toner out conditions. . . . . . . . . . . . . . . . . . . . .87
Page 7

EN
Contents
5
Cleaning the printer. . . . . . . . . . . . . . . . . . . . . . . . . . . . . . . . . . . .88
General guidelines . . . . . . . . . . . . . . . . . . . . . . . . . . . . . . . . .88
Cleaning procedure. . . . . . . . . . . . . . . . . . . . . . . . . . . . . . . . .89
Cleaning the fuser. . . . . . . . . . . . . . . . . . . . . . . . . . . . . . . . . . . . .91
Running the cleaning page manually . . . . . . . . . . . . . . . . . . .91
Running the cleaning page automatically. . . . . . . . . . . . . . . .92
Performing preventative maintenance. . . . . . . . . . . . . . . . . . . . . .93
Configuring alerts . . . . . . . . . . . . . . . . . . . . . . . . . . . . . . . . . . . . .94
4 Problem solving
Overview . . . . . . . . . . . . . . . . . . . . . . . . . . . . . . . . . . . . . . . . . . . .95
Clearing paper jams . . . . . . . . . . . . . . . . . . . . . . . . . . . . . . . . . . .96
Paper jam locations . . . . . . . . . . . . . . . . . . . . . . . . . . . . . . . .97
Clearing jams from the top cover and toner cartridge areas. .98
Clearing jams from the optional envelope feeder . . . . . . . . .100
Clearing jams from the input tray areas . . . . . . . . . . . . . . . .102
Clearing jams from the optional duplexer . . . . . . . . . . . . . . .104
Clearing jams from the output areas. . . . . . . . . . . . . . . . . . .106
Clearing jams from the fuser area. . . . . . . . . . . . . . . . . . . . .107
Solving repeated paper jams . . . . . . . . . . . . . . . . . . . . . . . .110
Understanding printer messages . . . . . . . . . . . . . . . . . . . . . . . .111
Mopy disk error messages . . . . . . . . . . . . . . . . . . . . . . . . . . . . .126
Correcting output quality problems . . . . . . . . . . . . . . . . . . . . . . .128
Light print (partial page) . . . . . . . . . . . . . . . . . . . . . . . . . . . .130
Light print (entire page). . . . . . . . . . . . . . . . . . . . . . . . . . . . .130
Specks . . . . . . . . . . . . . . . . . . . . . . . . . . . . . . . . . . . . . . . . .130
Dropouts . . . . . . . . . . . . . . . . . . . . . . . . . . . . . . . . . . . . . . . .131
Lines . . . . . . . . . . . . . . . . . . . . . . . . . . . . . . . . . . . . . . . . . . .131
Gray background . . . . . . . . . . . . . . . . . . . . . . . . . . . . . . . . .132
Toner smear . . . . . . . . . . . . . . . . . . . . . . . . . . . . . . . . . . . . .132
Loose toner. . . . . . . . . . . . . . . . . . . . . . . . . . . . . . . . . . . . . .133
Repeating defects. . . . . . . . . . . . . . . . . . . . . . . . . . . . . . . . .133
Repeating image. . . . . . . . . . . . . . . . . . . . . . . . . . . . . . . . . .134
Misformed characters . . . . . . . . . . . . . . . . . . . . . . . . . . . . . .134
Page skew . . . . . . . . . . . . . . . . . . . . . . . . . . . . . . . . . . . . . .134
Curl or wave . . . . . . . . . . . . . . . . . . . . . . . . . . . . . . . . . . . . .135
Wrinkles or creases . . . . . . . . . . . . . . . . . . . . . . . . . . . . . . .135
Vertical white lines . . . . . . . . . . . . . . . . . . . . . . . . . . . . . . . .135
Tire tracks. . . . . . . . . . . . . . . . . . . . . . . . . . . . . . . . . . . . . . .136
White spots on black. . . . . . . . . . . . . . . . . . . . . . . . . . . . . . .136
Determining printer problems . . . . . . . . . . . . . . . . . . . . . . . . . . .137
Troubleshooting flowchart. . . . . . . . . . . . . . . . . . . . . . . . . . .137
Troubleshooting flowchart for Macintosh users . . . . . . . . . .143
Troubleshooting the optional printer hard disk accessory. . . . . .146
Troubleshooting PS. . . . . . . . . . . . . . . . . . . . . . . . . . . . . . . . . . .147
Troubleshooting optional HP Fast InfraRed Receiver problems.148
Page 8

6 Contents
EN
Communicating with an optional HP JetDirect print server . . . . .150
Checking the printer configuration. . . . . . . . . . . . . . . . . . . . . . . .151
Menu map. . . . . . . . . . . . . . . . . . . . . . . . . . . . . . . . . . . . . . .151
Configuration page . . . . . . . . . . . . . . . . . . . . . . . . . . . . . . . .152
Supplies status page. . . . . . . . . . . . . . . . . . . . . . . . . . . . . . .154
PCL or PS font list. . . . . . . . . . . . . . . . . . . . . . . . . . . . . . . . .156
5 Service and support
HP Customer Care Service and Support . . . . . . . . . . . . . . . . . .157
Online services . . . . . . . . . . . . . . . . . . . . . . . . . . . . . . . . . . .157
HP fraud hotline . . . . . . . . . . . . . . . . . . . . . . . . . . . . . . . . . .161
Customer support options worldwide . . . . . . . . . . . . . . . . . . . . .162
HP Customer Care Center and product repair assistance for the
U.S. and Canada . . . . . . . . . . . . . . . . . . . . . . . . . . . . . .162
European HP Customer Care Center language and in-country
options available. . . . . . . . . . . . . . . . . . . . . . . . . . . . . . .163
In-country/region support numbers. . . . . . . . . . . . . . . . . . . .164
Warranty information. . . . . . . . . . . . . . . . . . . . . . . . . . . . . . . . . .165
Guidelines for repacking the printer . . . . . . . . . . . . . . . . . . . . . .165
Service information form . . . . . . . . . . . . . . . . . . . . . . . . . . . . . . .166
Hewlett-Packard limited warranty statement. . . . . . . . . . . . . . . .167
Limited warranty for toner cartridge life. . . . . . . . . . . . . . . . . . . .169
HP software license terms. . . . . . . . . . . . . . . . . . . . . . . . . . . . . .170
Worldwide country/region sales and service offices . . . . . . . . . .172
Appendix A Specifications
Overview . . . . . . . . . . . . . . . . . . . . . . . . . . . . . . . . . . . . . . . . . . .187
Paper specifications . . . . . . . . . . . . . . . . . . . . . . . . . . . . . . . . . .188
Supported sizes and weights of paper . . . . . . . . . . . . . . . . .189
Supported types of paper . . . . . . . . . . . . . . . . . . . . . . . . . . .192
Guidelines for using paper . . . . . . . . . . . . . . . . . . . . . . . . . .192
Labels . . . . . . . . . . . . . . . . . . . . . . . . . . . . . . . . . . . . . . . . . .196
Transparencies. . . . . . . . . . . . . . . . . . . . . . . . . . . . . . . . . . .196
Envelopes. . . . . . . . . . . . . . . . . . . . . . . . . . . . . . . . . . . . . . .197
Card stock and heavy paper. . . . . . . . . . . . . . . . . . . . . . . . .198
Printer specifications. . . . . . . . . . . . . . . . . . . . . . . . . . . . . . . . . .200
Physical dimensions . . . . . . . . . . . . . . . . . . . . . . . . . . . . . . .200
Environmental specifications . . . . . . . . . . . . . . . . . . . . . . . .201
Product compatibility matrix . . . . . . . . . . . . . . . . . . . . . . . . . . . .203
Page 9

EN
Contents
7
Appendix B Control panel menus
Overview . . . . . . . . . . . . . . . . . . . . . . . . . . . . . . . . . . . . . . . . . . .205
Control panel menu map. . . . . . . . . . . . . . . . . . . . . . . . . . . . . . .205
Quick Copy Jobs Menu. . . . . . . . . . . . . . . . . . . . . . . . . . . . . . . .206
Private/Stored Jobs Menu. . . . . . . . . . . . . . . . . . . . . . . . . . . . . .207
Information Menu . . . . . . . . . . . . . . . . . . . . . . . . . . . . . . . . . . . .208
Paper Handling Menu . . . . . . . . . . . . . . . . . . . . . . . . . . . . . . . . .210
Printing Menu . . . . . . . . . . . . . . . . . . . . . . . . . . . . . . . . . . . . . . .213
Print Quality Menu. . . . . . . . . . . . . . . . . . . . . . . . . . . . . . . . . . . .217
Configuration Menu. . . . . . . . . . . . . . . . . . . . . . . . . . . . . . . . . . .219
I/O Menu . . . . . . . . . . . . . . . . . . . . . . . . . . . . . . . . . . . . . . . . . . .222
Resets Menu. . . . . . . . . . . . . . . . . . . . . . . . . . . . . . . . . . . . . . . .223
EIO Menu . . . . . . . . . . . . . . . . . . . . . . . . . . . . . . . . . . . . . . . . . .225
Appendix C Printer memory and expansion
Overview . . . . . . . . . . . . . . . . . . . . . . . . . . . . . . . . . . . . . . . . . . .229
Installing memory . . . . . . . . . . . . . . . . . . . . . . . . . . . . . . . . . . . .230
Checking memory installation . . . . . . . . . . . . . . . . . . . . . . . . . . .232
Saving resources (permanent resources). . . . . . . . . . . . . . . . . .232
Installing EIO cards/mass storage. . . . . . . . . . . . . . . . . . . . . . . .233
Appendix D Printer commands
Overview . . . . . . . . . . . . . . . . . . . . . . . . . . . . . . . . . . . . . . . . . . .235
Understanding PCL 5e printer command syntax. . . . . . . . . . . . .236
Combining escape sequences . . . . . . . . . . . . . . . . . . . . . . .237
Entering escape characters . . . . . . . . . . . . . . . . . . . . . . . . .237
Selecting PCL 5e fonts . . . . . . . . . . . . . . . . . . . . . . . . . . . . .238
Common PCL 5e printer commands. . . . . . . . . . . . . . . . . . .239
Appendix E Regulatory information
FCC regulations . . . . . . . . . . . . . . . . . . . . . . . . . . . . . . . . . . . . .243
Environmental product stewardship program . . . . . . . . . . . . . . .244
Protecting the environment. . . . . . . . . . . . . . . . . . . . . . . . . .244
Material safety data sheets. . . . . . . . . . . . . . . . . . . . . . . . . .246
Safety statements . . . . . . . . . . . . . . . . . . . . . . . . . . . . . . . . . . . .248
Laser safety statement . . . . . . . . . . . . . . . . . . . . . . . . . . . . .248
Canadian DOC regulations. . . . . . . . . . . . . . . . . . . . . . . . . .248
EMI statement (Korea) . . . . . . . . . . . . . . . . . . . . . . . . . . . . .248
VCCI statement (Japan) . . . . . . . . . . . . . . . . . . . . . . . . . . . .248
Laser statement for Finland . . . . . . . . . . . . . . . . . . . . . . . . .249
Page 10

8 Contents
EN
Appendix F Embedded web server
Overview . . . . . . . . . . . . . . . . . . . . . . . . . . . . . . . . . . . . . . . . . . .251
Accessing the embedded web server . . . . . . . . . . . . . . . . . . . . .252
Embedded web server pages . . . . . . . . . . . . . . . . . . . . . . . . . . .252
Home pages . . . . . . . . . . . . . . . . . . . . . . . . . . . . . . . . . . . . .253
Device pages . . . . . . . . . . . . . . . . . . . . . . . . . . . . . . . . . . . .253
Network pages . . . . . . . . . . . . . . . . . . . . . . . . . . . . . . . . . . .254
Index
Page 11

EN
How to use this online user guide
9
About this guide
How to use this online user guide
This user guide is provided in an Adobe™ Acrobat portable
document format (PDF file). This section will help familiarize you
with using PDF documents.
Navigational features in this guide
Click the Table of Contents icon to go to the table of
contents for the online user guide. The entries are
linked to their related locations in the user guide.
Click the Introduction icon to return to this section for
tips on using this online user guide.
Click the Index icon to go to the index for the online
user guide. The index entries are link ed to their related
topics.
Click the Up Arrow icon to go to the previous page.
Click the Down Arrow icon to go to the next page.
Page 12
10 About this guide
EN
Features of Acrobat Reader
Finding information in PDF documents
To find specific information in a PDF document, click Contents or
Index in the upper-left corner of the Acrobat Reader window, and
then click the topic you want.
Viewing PDF documents
For complete instructions on how to view PDF documents, see the
online help included with Acrobat Reader.
Magnifying the Page View
You can use the zoom-in tool, the magnification box in the status bar,
or the toolbar buttons to change the screen magnification. When you
zoom in on a document, you can use the hand tool to move the page
around.
Acrobat Reader also offers magnification level choices that control
how the page fits on-screen:
Fit Page scales the page to fit within the main window.
Fit Width scales the page to fit the width of the main window.
Fit Visible fills the window with the page’s content area only.
To increase magnification: Select the zoom-in tool and click on
the document page to double the current magnification.
To decrease magnification: Select the zoom-in tool while holding
down Ctrl (Windows and UNIX
®
) or Option (Macintosh), and click
the center of the area you want to reduce.
Page 13
EN
How to use this online user guide
11
Paging through a document
The following options are available for paging through a document.
Browsing with thumbnails
A thumbnail is a miniature view of each document page. You can
display thumbnails in the overview area. Use a thumbnail to jump
quickly to a page and to adjust the view of the current page.
Finding words
Use the
Find
command to find part of a word, a complete word, or
multiple words in the active document.
Printing the document
To print selected pages:
From the
File
menu, choose
Print
. Choose
Pages
. In the From and To box es type the range of pages you wish to
print. Then click OK.
To go to the next page:
Click the Ne xt P age b utton in the toolbar, or
press the Right Arrow or Down Arrow.
To return to the previous page:
Click the Previous Page button in
the toolbar, or press the Left Arrow or Up Arrow.
To go to the first page:
Click the First Page button in the toolbar.
To go to the last page:
Click the Last Page button in the toolbar.
To jump to a specific numbered page:
Click the page number box
in the status bar at the bottom of the main window, type the page
number, and click OK.
Click on a thumbnail to move to the page it represents.
Click on the Find button, or choose
Find
from the
Tools
menu.
Page 14

12 About this guide
EN
To print the whole document: From the File menu, choose Print.
Choose All n pages (n represents the total number of pages in the
document), then click OK.
Note Go to http://www.adobe.com/
for the latest versions and additional
languages of Adobe™ Acrobat Reader.
Page 15
EN
Where to look for more information
13
Where to look for more information
Several references are available for use with this printer. Additional
information is available at http://www.hp.com/support/lj4100
.
Setting up the printer
Getting Started Guide
Information for setting up your printer
(Getting Started), as well as tips and
quick information for using the printer
(Quick Reference). For additional
copies, contact HP DIRECT at (800)
538-8787 (U.S.) or contact your
HP-authorized dealer.
HP JetDirect Print Server
Administrator’s Guide
Information for configuring and
troubleshooting the HP JetDirect
print server, available on the CD that
came with the printer.
Page 16
14 About this guide
EN
Using the printer
Getting Started Guide
Information for setting up your printer
(Getting Started), as well as tips and
quick information for using the printer
(Quick Reference). For additional
copies, contact HP DIRECT at (800)
538-8787 (U.S.) or contact your
HP-authorized dealer.
Online Help
Information on printer options that are
availab le from within printer drivers . To
view a help file, access the online help
through the printer driver.
HP Fast InfraRed Receiver
User Guide
Information on using and
troubleshooting the HP Fast InfraRed
Receiver.
Accessory guides
Instructions for installing and using
accessories or toner cartridges,
included with the accessory.
Page 17

EN
Overview
15
1
Printer basics
Overview
Congratulations on your purchase of an HP LaserJet 4100 series
printer. If you have not done so, see the getting started guide
provided with the printer for setup instructions.
Now that the printer is set up and ready to use, take a f ew moments to
get to know the printer. This chapter introduces the following:
●
features and benefits of the printer
●
important printer parts and locations
●
accessories and supplies available for the printer
●
the layout and basic operation of the printer control panel
●
helpful printer software for increased printing flexibility
Page 18

16 Chapter 1 - Printer basics
EN
Printer features and benefits
Speed and throughput
● instant-on fuser prints the first page in 12 seconds
● prints letter-size paper at 25 pages per minute (ppm) or A4-size
paper at 24 ppm
● “RIP ONCE” capability with 32 MB or hard disk options
Resolution
● FastRes 1200—produces 1200-dpi print quality for fast, high-
quality printing of business text and graphics
●
ProRes 1200—produces 1200-dpi printing for best quality of
graphic images
● HP UltraPrecise toner for crisp, sharp output
Paper handling
●
HP LaserJet 4100 and 4100N: hold 600 sheets of paper
●
HP LaserJet 4100TN and 4100DTN: hold 1100 sheets of paper
●
expandable to hold up to 1600 sheets of paper with optional
accessories
●
prints a wide range of sizes, types, and weights
Language and fonts
●
HP PCL 6, PCL 5e, and PostScript Level 2 emulation
●
80 fonts for Microsoft® Windows
Toner cartridge
● supplies status page with toner gauge, page count, and
information on paper sizes used
● no-shake cartridge design
●
check for authentic HP toner cartridges
Page 19

EN
Printer features and benefits
17
Expandable design
●
optional paper handling accessories:
• stackable 500-sheet paper trays (up to two additional trays)
• power envelope feeder (holds up to 75 envelopes)
• duplex printing accessory (for two-sided printing)
●
flash storage (for forms, fonts, and signatures)
●
expandable memory (up to 256 MB)
●
two EIO slots for connecting to networks or additional devices
●
HP JetSend enabled
●
hard disk (for job retention)
Page 20
18 Chapter 1 - Printer basics
EN
Printer configurations
This printer is available in four configurations:
HP LaserJet 4100
● 16 MB RAM
● 100-sheet paper tray
● 500-sheet paper tray
HP LaserJet 4100N
● 32 MB RAM
●
HP JetDirect 10/100Base-TX print server card for network
connection
●
100-sheet paper tray
●
500-sheet paper tray
HP LaserJet 4100TN
●
32 MB RAM
●
HP JetDirect 10/100Base-TX print server card for network
connection
●
100-sheet paper tray
●
two 500-sheet paper trays
HP LaserJet 4100DTN
●
32 MB RAM
●
HP JetDirect 10/100Base-TX print server card for network
connection
●
100-sheet paper tray
●
two 500-sheet paper trays
●
duplex printing accessory (duplexer)
Page 21
EN
Printer parts and locations
19
Printer parts and locations
Top cover (toner
cartridge underneath)
Control panel
Power switch
Tray 1 (100-sheet)
Top output bin
Additional
memory can be
installed here
Printer parts (front view, HP LaserJet 4100/4100N printer)
Tray numbers
Paper level
indicator
Tray 2 (500-sheet)
2
1
Page 22
20 Chapter 1 - Printer basics
EN
1 Fuser (can be removed to clear paper jams)
2 Rear output bin (straight-through paper path)
3 Power connector
4 Dust cover (tray 2 dust cover not installed if duplexer is installed)
5 Parallel interface port
6 Enhanced I/O (EIO) slots
7 Fast InfraRed (FIR) port for an optional FIR receiver
8 Memory access door (more than one DIMM can be installed)
9 Accessory interface port
10 Serial and model numbers (under top cover)
11 Toner cartridge access (under top cover)
11
1
2
3
56
7
8
9
10
Printer parts (back view)
4
Page 23
EN
Accessories and supplies
21
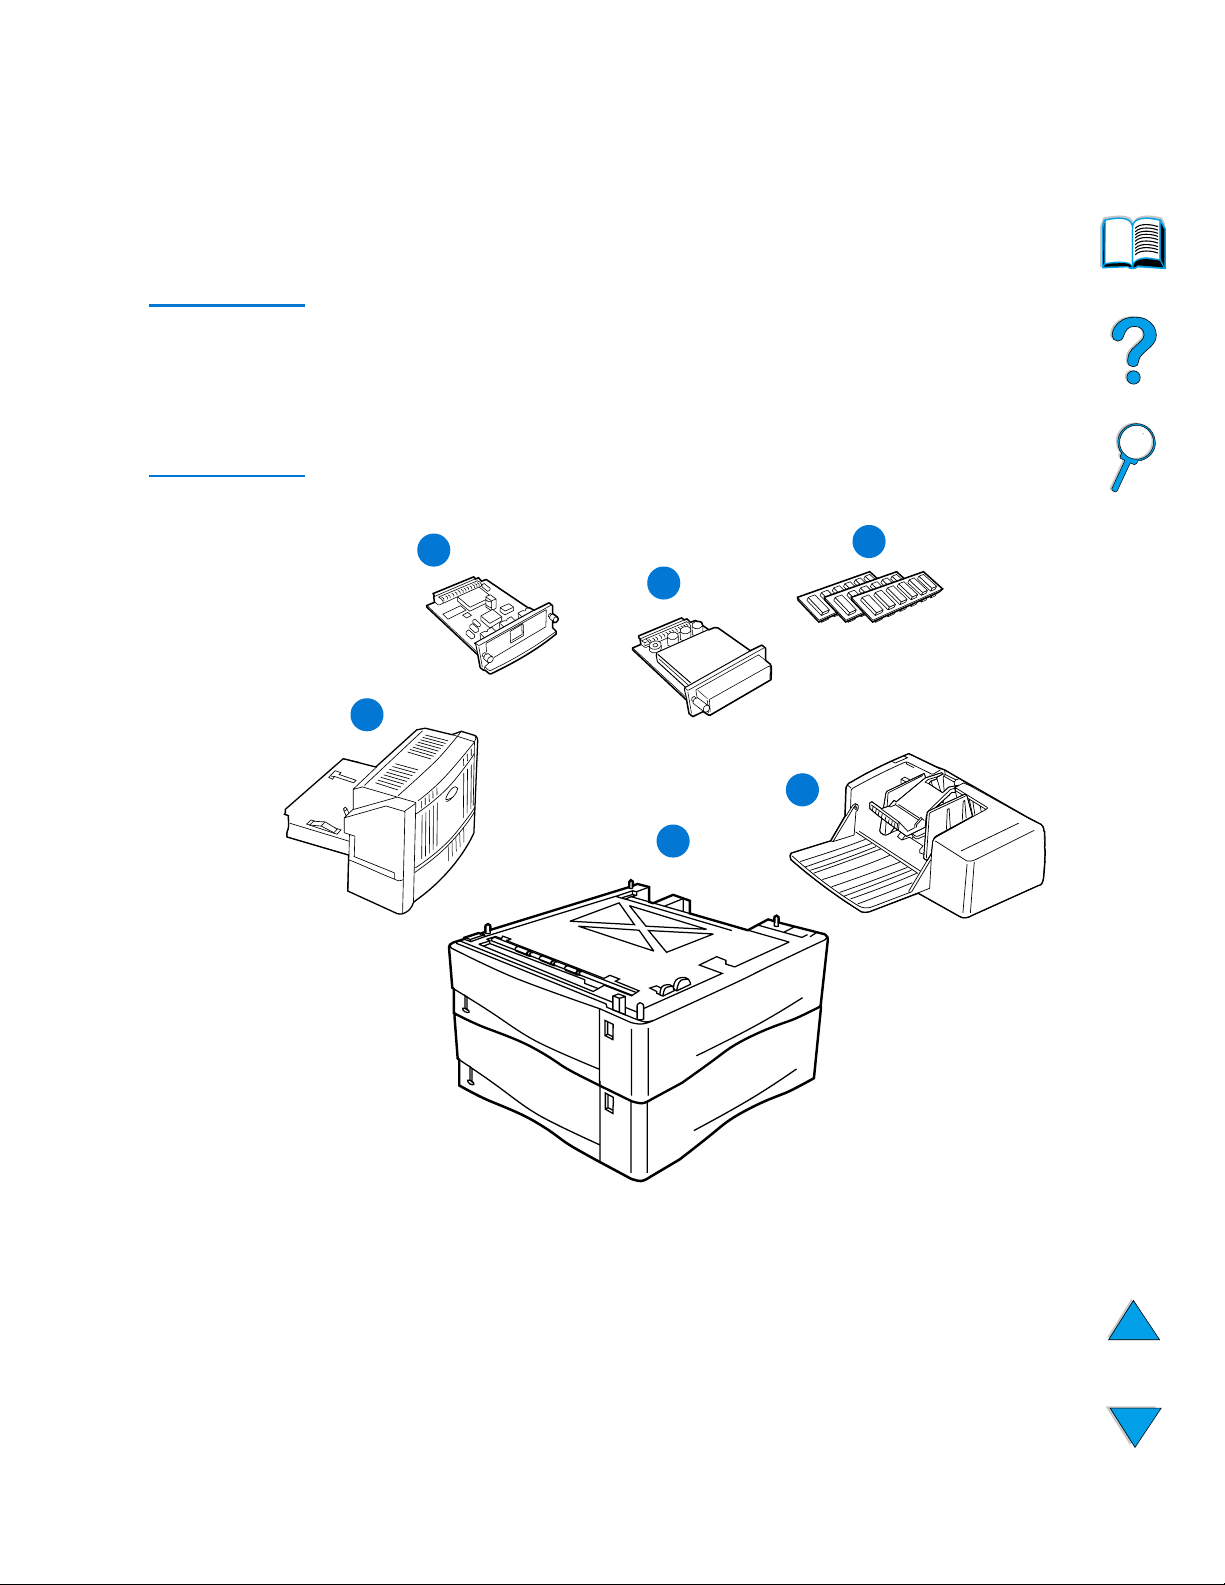
Accessories and supplies
You can increase the capabilities of the printer with optional
accessories and supplies, as shown below. See “Ordering
information” on page 22.
Note
Use accessories and supplies specifically designed for the printer to
ensure optimum performance.
The printer supports two enhanced input/output (EIO) cards. One of
the card slots is already used in the HP LaserJet 4100N/4100TN/
4100DTN for the HP JetDirect 10/100Base-TX print server card.
1
HP JetDirect print server (EIO card)
2
Hard disk accessory (EIO card)
3
Memory DIMM, flash DIMM, or font DIMM
4
Duplex printing accessory (duplexer), for 2-sided printing
5
Stackable 500-sheet paper tr a y (maximum of two , as sho wn here,
for a total input capacity of 1,600 sheets)
6
Envelope feeder
2
3
4
6
1
5
Page 24

22 Chapter 1 - Printer basics
EN
Ordering information
Items and part numbers
Use only parts and accessories specifically designed for this printer.
See the table ahead, which is organized according to type of
accessory:
● paper handling
● memory, fonts, and mass storage
● hardware
● cables and interfaces
●
documentation
● maintenance
● printing supplies
See “Product compatibility matrix” on page 203 for information on the
compatibility of accessories for the HP LaserJet 4000, 4050, and
4100 Series printers.
Ordering through service or support
providers
To order a part or accessory, contact an HP-authorized service or
support provider (see “HP direct ordering for accessories or supplies”
on page 160, “HP direct ordering for genuine HP parts” on page 160,
or “HP authorized resellers and support” on page 160).
Ordering directly through the embedded web
server
Use the following steps to order printing supplies directly through the
embedded web server (see “Accessing the embedded web server” on
page 252 for an explanation of this feature).
1 In your web browser, enter the IP address for the printer home
page. This takes you to the printer status page.
2 Click the Device tab at the top of the screen.
3 If asked to provide a password, enter the password.
Page 25

EN
Ordering information
23
4
On the left side of the Device Configuration page, double-click
Order Supplies
. This provides a URL from which to purchase
consumables. Supplies inf ormation with part numbers and printer
information is provided.
5
Select the part numbers you wish to order and follow the
instructions on the screen.
Ordering directly through the printer software
The printer software gives you the ability to order parts and
accessories directly from your computer . Three things are required to
use this feature:
●
the “Supplies Information and Ordering” software must be
installed on your computer (use the custom installation option to
install this software)
●
the printer must be directly connected to your computer (parallel)
●
you must have access to the World Wide Web
1
At the bottom right of your screen (in the system tray), click the
Printer icon. This opens the status window.
2
On the left side of the status window, click the Printer icon from
which you wish to obtain status.
3
At the top of the status window, click
Supplies
link. You can also
scroll down to Supplies Status.
4
Click
Order Supplies
. This opens a browser that produces a
URL from which to purchase consumables.
5
Select the supplies you wish to order.
Page 26
24 Chapter 1 - Printer basics
EN
Paper handling
Item Part number Description or use
500-sheet feeder and paper
tray
C8055A Stackable paper feeder and 500-sheet
paper tray.
Envelope feeder C8053A Automatically feeds up to 75 envelopes.
Duplex printing accessory
(duplexer)
C8054A Allows automatic printing on both sides of
paper.
Replacement 500-sheet
paper tray (without the
feeder)
C8056A Supports multiple paper sizes and custom
sizes (see “Supported sizes and weights
of paper - trays 2, 3, and 4” on page 190).
Memory, fonts, and mass storage
Item Part number Description or use
SDRAM DIMM (Dual In-line
Memory Module)
4 MB
8 MB
16 MB
32 MB
64 MB
128 MB
C4140A
C4141A
C4142A
C4143A
C3913A
C9121A
Boosts the ability of the printer to handle
large print jobs (maximum 256 MB with
HP-brand DIMMs).
Flash DIMM
2 MB
4 MB
C4286A
C4287A
Permanent storage for fonts and forms.
Font DIMM
Korean
Simplified Chinese
Traditional Chinese
D4838A
C4293A
C4292A
8-MB Asian MROM.
EIO hard disk C2985B Permanent storage for fonts and forms.
Also used for making multiple original
prints and Job Retention features.
Page 27
EN
Ordering information
25
Hardware
Item Part number Description or use
FIR receiver C4103A Fast InfraRed Receiver.
Cables and interfaces
Item Part number Description or use
Parallel cables
2-meter IEEE-1284 cable
3-meter IEEE-1284 cable
C2950A
C2951A
Macintosh computer
serial cable
92215S For connecting to a Macintosh
computer.
Macintosh network
cable kit
92215N For connecting to PhoneNET or
LocalTalk.
Enhanced I/O (EIO) cards
Token Ring networks
Fast Ethernet (10/100Base-TX
single RJ-45 port)
HP JetDirect Connectivity card (EIO)
for USB, Serial, LocalTalk
J4167A
J4169A
J4135A
HP JetDirect EIO internal print
server network cards.
Page 28
26 Chapter 1 - Printer basics
EN
Documentation
Item Part number Description or use
HP LaserJet Printer Family Paper
Specification Guide
5963-7863 A guide to using paper and other print
media with HP LaserJet printers
(English only).
HP LaserJet 4100 Software and
User Documentation CD-ROM
Americas/Western Europe
Europe
Asia Pacific
C8049-60104
C8049-60105
C8049-60106
An additional copy of the software
and user documentation CD.
Getting Started Guide
C8049-90903 Printed copy of the getting started
guide for the HP LaserJet 4100,
4100N, 4100TN, and 4100DTN
printers (English only).
Maintenance
Item Part number Description or use
Printer maintenance kit
110 V printer kit
220 V printer kit
C8057A
C8058A
User-replaceable parts and
instructions for printer maintenance.
Page 29
EN
Ordering information
27
Printing supplies
Item Part number Description or use
Toner cartridges
6,000 pages
10,000 pages
C8061A
C8061X
Replacement HP UltraPrecise toner
cartridge.
HP LaserJet Paper
Letter (8.5 by 11 in), 500 sheets/
ream, 10-ream carton
Letter (8.5 by 11 in), 200 sheets/
ream, 12-ream carton
Letter (8.5 by 11 in), 3-hole, 500
sheets/ream, 10-ream carton
Legal (8.5 by 14 in), 500 sheets/
ream, 10-ream carton
A4 (216 by 279 mm), 500 sheets/
ream, 5-ream carton
HPJ1124
HPJ200C
HPJ113H
HPJ1424
CHP310
For use with HP Color LaserJet
printers and HP LaserJet
monochrome printers. Good for
letterhead, high-value memos, legal
documents, direct mail, and
correspondence.
Specifications: 96 bright, 24 lb.
HP LaserJet Soft Gloss Paper
Letter (8.5 by 11 in), 50 sheets/box
A4 (216 by 279 mm), 50 sheets/
box
C4179A
C4179B
For use with HP Color LaserJet
printers and HP LaserJet
monochrome printers. Coated paper,
good for business documents with
high impact, such as brochures,
sales material, and documents with
graphics and photographic images.
Specifications: 32 lb.
HP LaserJet Transparency
Letter (8.5 by 11 in), 50 sheets/box
A4 (216 by 279 mm), 50 sheets/
box
92296T
92296U
For use with HP LaserJet
monochrome printers.
Specifications: 4.3 mil thickness.
HP MultiPurpose Paper
Letter (8.5 by 11 in), 500 sheets/
ream, 10-ream carton
Letter (8.5 by 11 in), 500 sheets/
ream, 5-ream carton
Letter (8.5 by 11 in), 250 sheets/
ream, 12-ream carton
Letter (8.5 by 11 in), 3-hole, 500
sheets/ream, 10-ream carton
Legal (8.5 by 14 in), 500 sheets/
ream, 10-ream carton
HPM1120
HPM115R
HP25011
HPM113H
HPM1420
For use with all office equipment—
laser and inkjet printers, copiers, and
fax machines. Created for
businesses that want one paper for
all their office needs. Brighter and
smoother than other office papers.
Specifications: 90 bright, 20 lb.
Page 30
28 Chapter 1 - Printer basics
EN
HP Office Paper
Letter (8.5 by 11 in), 500 sheets/
ream, 10-ream carton
Letter (8.5 by 11 in), 3-hole, 500
sheets/ream, 10-ream carton
Legal (8.5 by 14 in), 500 sheets/
ream, 10-ream carton
Letter (8.5 by 11 in), Quick Pack,
2,500-sheet carton
A4 (216 by 279 mm), 500 sheets/
ream, 5-ream carton
HPC8511
HPC3HP
HPC8514
HP2500S
CHP110
For use with all office equipment—-
laser and inkjet printers, copiers, and
fax machines. Good for high-volume
printing.
Specifications: 84 bright, 20 lb.
HP Office Recycled Paper
Letter (8.5 by 11 in), 500 sheets/
ream, 10-ream carton
Letter (8.5 by 11 in), 3-hole, 500
sheets/ream, 10-ream carton
Legal (8.5 by 14 in), 500 sheets/
ream, 10-ream carton
HPE1120
HPE113H
HPE1420
For use with all office equipment—
laser and inkjet printers, copiers, and
fax machines. Good for high-volume
printing.
Satisfies U.S . Executive Order 13101
for en vironmentally preferable
products.
Specifications: 84 bright, 20 lb, 30%
post-consumer content.
HP Premium Choice LaserJet
Paper
Letter (8.5 by 11 in), 500 sheets/
ream, 10-ream carton
A4 (216 by 279 mm), 500 sheets/
ream, 4-ream carton
A4 (216 by 279 mm), 250 sheets/
ream, 8-ream carton
HPU1132
CHP410
CHP415
For use with HP Color LaserJet
printers, HP LaserJet monochrome
printers, and color copiers. Good for
hardcopy presentations, business
reports and proposals, data sheets,
price lists, and newsletters.
Specifications: 98 bright, 32 lb.
HP Printing Paper
Letter (8.5 by 11 in), 500 sheets/
ream, 10-ream carton
A4 (216 by 279 mm), 500 sheets/
ream, 5-ream carton
HPP1122
CHP210
For use with laser and inkjet printers.
Created especially for small and
home offices. Heavier and brighter
than copier paper.
Specifications: 92 bright, 22 lb.
Printing supplies (continued)
Item Part number Description or use
Page 31

EN
Control panel layout
29
Control panel layout
Control panel
The printer’s control panel consists of the following:
Control panel lights
Ready
Data
Attention
Menu
Item
–Value+
Select
Go
Cancel
Job
Two-line
display
READY
Printer
online
help
Light Indication when lit
Ready The printer is ready to print.
Data The printer is processing information.
Attention Action is required. See the control panel display for an
associated message.
Page 32

30 Chapter 1 - Printer basics
EN
Control panel keys
Key Function
GO • Places the printer either online or offline.
• Prints any data residing in the printer’s buffer.
• Allows the printer to resume printing after being offline. Clears most
printer messages and places the printer online.
• Allows the printer to continue printing with an error message such as
TRAY
x LOAD [TYPE] [SIZE]
or
UNEXPECTED PAPER SIZE
.
• Confirms a manual feed request if tray 1 is loaded and
TRAY 1
MODE=CASSETTE
has been set from the Paper Handling Menu in the
printer’s control panel.
• Overrides a manual feed request from tr a y 1 by selecting paper from the
next available tray.
• Exits the control panel menus. (To save a selected control panel setting,
first press S
ELECT
.
C
ANCEL JOB
Cancels the print job that the printer is processing. (Press C
ANCEL JOB
only
once.) The time it takes to cancel depends on the size of the print job.
M
ENU
Cycles through the control panel menus. Press the right side of the key to
move forward or the left side of the key to move backward.
I
TEM
Cycles through the items in the selected menu. Press the right side of the
key to move forward or the left side of the key to move backward.
-V
ALUE
+ Cycles through the values in the selected menu item. Press + to move
forward or - to move backward.
S
ELECT
• Saves the selected v alue for that item. An asterisk (*) appears ne xt to the
selection, indicating that it is the new default. Default settings remain
when the printer is switched off or reset (unless you reset all factory
defaults from the Resets Menu).
• Prints one of the printer information pages from the control panel.
Page 33

EN
Control panel layout
31
Using the printer online help system
This printer features an online help system on the control panel that
provides instructions for resolving most printer errors. Certain control
panel error messages alternate with instructions on accessing the
online help system.
Whenever a ? appears in an error message or a message alternates
with
FOR HELP PRESS THE ? KEY
, press the right side of the I
TEM
key
to navigate through a sequence of instructions.
Note
To exit the online help system, press G
O
or
S
ELECT
.
Page 34

32 Chapter 1 - Printer basics
EN
Control panel menus
For a complete list of control panel items and possible values, see
"Control panel menus" on page 205.
Press M
ENU
for access to all control panel menus. When additional
trays or other accessories are installed in the printer, new menus or
menu items might automatically appear.
To print a control panel menu map
To see the current settings for the menus and items available in the
control panel, print a control panel menu map. You might want to store
the menu map near the printer for reference.
1 Press M
ENU
repeatedly until
INFORMATION MENU
appears.
2 Press I
TEM
repeatedly until
PRINT MENU MAP
appears.
3 Press S
ELECT
to print the menu map.
Note Certain menu options appear only when the associated accessory is
installed. For e xample, the EIO men u appears only if you ha v e an EIO
card installed.
To change a control panel setting
1 Press M
ENU
repeatedly until the desired menu appears.
2 Press I
TEM
repeatedly until the desired item appears.
3 Press -V
ALUE
+ repeatedly until the desired setting appears.
4 Press S
ELECT
to save the selection. An asterisk (*) appears next
to the selection in the display, indicating that it is now the default.
5 Press G
O
to exit the menu.
Note Settings in the printer driver and software application ov erride control
panel settings. (Software application settings override printer driver
settings.)
If you cannot access a menu or item, it is either not an option for the
printer, or y ou have not enabled the associated higher le vel option. See
your network administrator if this function has been lock ed (the control
panel reads
ACCESS DENIED MENUS LOCKED
).
Page 35

EN
Printer software
33
Printer software
Software provided
The printer comes with printing software and other helpful software
on a CD. If your computer does not have a CD drive but you have
access to one, you can copy the software onto diskettes for
installation into your computer. See the getting started guide for
installation instructions.
The printer drivers provided on the CD must be installed to take full
advantage of printer features. The other software programs are
recommended, but are not required for operation. See the
ReadMe.wri file for more information.
Note
Check the ReadMe.txt file provided on the CD for late-breaking
information.
Note Network administrators
: HP Resource Manager should be installed
only on the network administrator computer . Load all other applicable
software on the server and all client computers.
Windows
client
Macintosh
client
Network
administrator—
Windows software
Drivers
Network administrator
—
Macintosh software
PPDs
HP LaserJet Utility*
Fonts*
Windows software
Drivers
Macintosh software
PPDs
HP LaserJet Utility
* Not supported for the languages of Czech, Korean, Japanese, Russian,
Simplified Chinese, Traditional Chinese, or Turkish.
Page 36

34 Chapter 1 - Printer basics
EN
Depending on the configuration of Windows-based computers, the
installation program for the printer software automatically checks the
computer for Internet access and can obtain the latest software. If y ou
do not have access to the Internet, see "HP Customer Care Service
and Support" on page 157 for information on obtaining the most
recent software.
Included with the printer is a CD containing the HP LaserJet Printing
System. On the CD are software components and drivers for end
users and network administrators. See the ReadMe.wri file for the
most current information.
The CD includes software designed for end users and network
administrators operating in the following environments:
● Microsoft Windows 9x
● Microsoft Windows NT 4.0
●
Microsoft Windows 2000
●
Apple Mac OS, version 7.5 3 or greater
●
AutoCAD™ drivers, versions12–15
Additional drivers and documentation for Windows NT 3.51 are
available on the Internet. Additional drivers, font installer, and
documentation for Windows 3.1x are available on the CD that came
with the printer.
Page 37

EN
Printer software
35
Printer drivers
Printer drivers access the printer features and allow the computer to
communicate with the printer (via a printer language).
Note
Check the ReadMe.wri file provided on the CD for additional software
included and supported languages.
Certain printer features are a v ailable only from the PCL 6 driv ers. See
the printer software help for availability of features.
The following printer drivers are included with the printer. The most
recent drivers are available at http://www.hp.com/support/lj4100
.
Depending on the configuration of Windows-based computers, the
installation program for the printer software automatically checks the
computer for Internet access to obtain the latest drivers.
You can obtain the following additional printer drivers by downloading
them from the Internet, or by requesting them from an HP-authorized
service or support provider. (See "HP Customer Care Service and
Support" on page 157.)
●
NT 3.51 PCL 5e, NT 3.51 PS (available for English only)
●
UNIX and Linux Model Scripts
OS/2 drivers are available from IBM and are packaged with OS/2.
They are not available for the languages of Japanese, Korean,
Simplified Chinese, or Traditional Chinese.
Note
If the desired printer driver is not on the CD or is not listed here, check
the software application’s installation disks or ReadMe files to see if
they include support for the printer. If not, contact the software
manufacturer or distributor and request a driver for the printer.
Operating system PCL 5e PCL 6 PS
a
PPDs
Windows 3.1x
✓✓
✓
b
Windows 9x
✓✓✓✓
Windows NT 4.0
✓✓✓✓
Windows 2000
✓✓✓✓
Macintosh OS
✓
a. PostScript 2 emulation is referred to as PS throughout this user guide.
b. Level 1 emulation only.
Page 38

36 Chapter 1 - Printer basics
EN
Software for Windows-based computers
Network administrators: If the printer is attached to a network
through an HP JetDirect EIO card, the printer must be configured for
that network before you can print. For Microsoft and Novell NetWare
networks, you can use the printer installation software. For other
options, refer to the HP JetDirect Print Server Administrator’s Guide
(included with printers that contain an HP JetDirect print server).
Use the Customization Utility option to create a set of disks with the
exact software you want the end users to use. This allows you to
distribute drivers without distributing administration software to end
users.
Access the Windows printer driver
To configure the driver, access it in one of the following ways:
Note Settings in the printer driver and software application ov erride control
panel settings. (Software application settings override printer driver
settings.)
Operating system
Temporarily change settings
(from a software application)
Change default settings
(across all applications)
Windows 9x From the
File
menu, click
Print
, and
then click
Properties
. (The actual
steps can vary; this is the most
common method.)
Click the
Start
button, point to
Settings
, and then click
Printers
.
Right-click the printer icon, and
choose
Properties
.
Windows NT 4.0 From the
File
menu, click
Print
, and
then click
Properties
. (The actual
steps can vary; this is the most
common method.)
Click the
Start
button, point to
Settings
, and then click
Printers
.
Right-click and choose
Document
Defaults
or
Properties
.
Windows 2000 From the
File
menu, click
Print
, and
then click
Properties
. (The actual
steps can vary; this is the most
common method.)
Click the
Start
button, point to
Settings
, and then click
Printers
.
Right-click and choose
Printing
Preferences
or
Properties
.
Windows 3.1x and
Windows NT 3.51
From the
File
menu, click
Print
, click
Printers
, and then click
Options
.
(The actual steps can vary; this is the
most common method.)
From the Windows control panel,
double-click
Printers
, highlight the
printer, and click
Setup
.
Page 39

EN
Printer software
37
Choose the right printer driver for your needs
Choose a printer driver based on the way you use the printer.
●
Use the PCL 6 driver to take full advantage of the printer’s
features. Unless backward compatibility with previous PCL
drivers or older printers is necessary, the PCL 6 driver is
recommended.
●
Use the PCL 5e driver if you want print results to look comparable
to those from older printers, or for font DIMM support.
●
Use the PS driver for compatibility with PostScript Level 2.
Certain features are not available in this driver .
●
The printer automatically switches between PS and PCL printer
languages.
Printer driver help
Each printer driver has help screens that can be activated either from
the Help button, the F1 key, or a question mark symbol in the upper
right corner in the printer driver (depending on the Windows oper ating
system used). These help screens give detailed inf ormation about the
specific driver. Printer driver help is separate from the software
application help.
HP Resource Manager
The HP Resource Manager should be installed only on the network
administrator’s computer. The HP Resource Manager allows you to
control the hard disk and flash memory accessory features not found
in the drivers. Bidirectional communication is required.
Use the HP Resource Manager to do the following:
●
initialize disk and flash memory
●
download, delete, and manage f onts and macros to disk and flash
memory across networks
• PostScript Type 1, PostScript Type 42, TrueType™ fonts
converted to PostScript format, TrueType, and PCL bitmap
fonts
• To download Type 1 fonts, Adobe Type Manager must be
loaded and turned on.
You can obtain a copy of HP Resource Manager over the Internet.
See “Online services” on page 157 for details.
Note
HP Resource Manager is not available for the Macintosh.
Page 40

38 Chapter 1 - Printer basics
EN
HP JetSend communications technology
HP JetSend is a technology from HewlettPackard that allows devices to communicate
with each other simply and directly. HP
JetSend is built into your printer , allo wing it to
receive information from any HP JetSendenabled sending device anywhere on your
network, whether it is in the same office or at
a remote location. When you use the HP F ast
InfraRed Receiver accessory, your printer can also receive
information from any HP JetSend-enabled infrared device. Examples
of HP JetSend sending devices include computers or laptops running
HP JetSend software or scanners with HP JetSend built in.
HP JetSend uses simple IP addressing between networked devices
and cableless communication between infrared devices.
To enable HP JetSend on your computer or laptop, visit the
HP JetSend website (www.jetsend.hp.com/products) for information
on HP JetSend software. With the software, you will be able to
exchange intra-company documents directly between two or more
computers and send to any HP JetSend enabled printers, without the
problems of incompatible software applications or versions.
HP JetSend software will allow your colleagues to create documents
on their computers and send copies directly to this printer without any
device-specific drivers or configuration difficulties.
You can visit the HP JetSend website to learn which other devices are
available to communicate easily and directly with your HP JetSendenabled printer.
Note HP JetSend software is not supported for the languages of Japanese,
Korean, Simplified Chinese, or Traditional Chinese.
Page 41

EN
Printer software
39
How the JetSend communications technology works
Networked devices
To use the HP JetSend capability between networked devices, print a
configuration page to find your HP JetSend IP address, and give y our
address to anyone who wants to send information to your printer via
HP JetSend. (See “Configuration page” on page 152.)
From an HP JetSend sending device, a person only needs to enter
the printer’s IP address and press “send.”
Infrared devices
To use HP JetSend infrared capability, line up the infrared sensors
between the sending and receiving devices, and choose the “send”
option on the sending device.
The devices will automatically negotiate the best possible outcome
because they have HP JetSend in them.
Note
HP JetSend software is not available for the Macintosh computer.
Page 42

40 Chapter 1 - Printer basics
EN
Software for Macintosh computers
PostScript Printer Description files (PPDs)
PPDs, in combination with the Apple LaserWriter 8 Driver , access the
printer features and allow the computer to communicate with the
printer. An installation program for the PPDs and other software is
provided on the CD. Use the Apple LaserWriter 8 Driver that comes
with the computer.
HP LaserJet Utility
HP LaserJet Utility allows control of features that are not available in
the driver. The illustrated screens make selecting printer features
from the Macintosh computer easier than ever. Use the HP LaserJet
Utility to do the following:
● customize the printer control panel messages
●
name the printer, assign it to a zone on the network, download
files and fonts, and change most of the printer settings
●
set a password for the printer
●
from the computer, lock out functions on the printer control panel
to prevent unauthorized access (see the printer software help)
● configure and set the printer for IP printing
Note The HP LaserJet Utility is not supported for the languages of Czech,
Korean, Japanese, Russian, Simplified Chinese, Traditional Chinese,
or Turkish.
Page 43

EN
Printer software
41
Software for networks
For a summary of available HP network installation and configuration
software solutions, see the
HP JetDirect Print Server Administrator’s
Guide
. You can find this guide on the CD included with the printer.
HP Web JetAdmin
HP Web JetAdmin is a browser-based management tool and should
be installed only on the network administrator’s computer. It can be
installed and run on the following systems:
●
Microsoft Windows NT and Windows 2000
●
HP-UX
●
Sun Solaris
●
Red Hat Linux
●
SuSE Linux
HP Web JetAdmin is available from the Internet at
http://www.hp.com/go/webjetadmin
.
Note
For the latest list of supported host systems, visit HP Customer Care
Online at http://www.hp.com/go/webjetadmin.
When installed on a host server, HP W eb JetAdmin can be accessed
by any client through a supported web browser (such as Microsoft
Internet Explorer 4.x or Netscape Navigator 4.x or later) by browsing
to the HP Web JetAdmin host.
Use HP Web JetAdmin to do the following:
●
Install and configure printers that are connected to a network with
an HP JetDirect print server. When installed on a supported
Microsoft host system, HP Web JetAdmin will configure Novell
NetWare parameters on the HP JetDirect print server and
NetWare server.
●
Manage and troubleshoot network printers from any location.
UNIX
The HP JetDirect Printer Installer for UNIX is a simple printer
installation utility for HP-UX and Solaris networks. It is available for
download from HP Customer Care Online at
http://www.hp.com/support/net_printing
.
Page 44

42 Chapter 1 - Printer basics
EN
Page 45

EN
Overview
43
2
Printing tasks
Overview
This chapter presents
basic printing tasks
, such as:
●
selecting the output bin
●
loading the trays
●
printing on both sides of paper with the optional duplexer
●
printing on special paper, such as letterhead and transparencies
●
using the optional power envelope feeder
This chapter also introduces some
advanced printing tasks:
●
printing multiple originals
●
creating Quick Sets to save the printer’s setup information for
different kinds of print jobs
●
printing pages with a watermark in the background
●
printing the first page of a document on a different kind of paper
than the rest of the pages
●
printing multiple pages on one sheet of paper
●
printing booklets
●
printing with ZoomSmart
●
customizing what tray is used for printing
Page 46

44 Chapter 2 - Printing tasks
EN
Selecting the output bin
The printer has two output locations: the rear output bin and the top
output bin. To use the top output bin, be sure the rear output bin is
closed. To use the rear output bin, open it.
● If paper coming out of the top output bin has problems, such as
excessive curl, try printing to the rear output bin.
● To avoid paper jams, do not open or close the rear output bin
while the printer is printing.
Printing to the top output bin
The top output bin collects paper face-down, in correct order. The top
output bin should be used for most print jobs and for transparencies.
Page 47

EN
Selecting the output bin
45
Printing to the rear output bin
The printer always prints to the rear output bin if it is open. Paper
printed to this bin will be face-up, with the last page on top.
To open the rear output bin, grasp the handle at the top of the bin. Pull
the bin down, and slide out the extension.
Printing from tray 1 to the rear output bin provides the straightest
paper path (which can reduce curl). Opening the rear output bin might
improve performance with the following:
●
envelopes
●
labels
●
small custom-size paper
●
postcards
●
paper heavier than 28 lb (105 g/m2)
Note
Opening the rear output bin disables the optional duple xer (if installed)
and the top output bin.
Page 48

46 Chapter 2 - Printing tasks
EN
Loading tray 1
Tray 1 is a multi-purpose tray that holds
up to 100 sheets of paper, 10 env elopes ,
or 20 index cards. The printer’s default is
to pull paper from tray 1 first. To change
this, see “Customizing tray 1 operation”
on page 69.
Tray 1 pro vides a con v enient w a y to print
envelopes, transparencies, custom-size
paper, or other types of media without
having to unload the other trays. It can
also be used just as a convenient
additional input tray. For supported sizes
of paper, see “Supported sizes and
weights of paper” on page 189.
Note
To avoid paper jams, do not load trays
while the printer is printing.
1 Open tray 1.
2 Pull out the tray extension.
3 Set the side guides to the desired
width.
4 Load paper in the tray.
Note
Make sure the paper fits under the tabs
on the guides and not above the load
level indicators.
Generally, load paper with the side to be
printed up, and the top, short edge
toward the printer. For information on
loading special paper, see “Printing
special paper” on page 53.
5 Adjust the side guides so that they
lightly touch the paper stack but do
not bend the paper.
1
2
3
4
5
Page 49

EN
Loading trays 2, 3, and 4
47
Loading trays 2, 3, and 4
Trays 2, 3, and 4 are 500-sheet paper
trays. Tray 3 is optional and comes with
the 4100TN and 4100DTN models. Tray
4 is an additional 500-sheet option.
The trays adjust for six standard sizes of
media, as well as for man y custom sizes
(for details, see “Supported sizes and
weights of paper - trays 2, 3, and 4” on
page 190). Three adjustments on the
trays let the printer sense the paper size
that is loaded.
Note
To avoid paper jams, do not load trays
while the printer is printing.
1
Pull the tray completely out of the
printer.
2
If the tray is not already set to the
desired paper size, you will need to
make up to three adjustments:
2A:
To adjust the width, squeeze the
lever on the left guide and slide the
guides into place to match the width
of the paper.
2B:
To adjust the length, squeeze
the lev er on the rear paper guide and
slide it to the desired paper size until
it clicks into place. Standard sizes
are labeled. For A5-size paper, lift
the metal backstop near the center
of the tray.
2C:
To make the third adjustment,
squeeze the blue tab located on the
right side of the tray and move it to
the correct position based on the
paper size required.
Continued on the next page.
1
2A
2B
2C
Page 50

48 Chapter 2 - Printing tasks
EN
3 Load paper into the tray.
4 Make sure the paper is flat in the tra y
at all four corners and below the
front and back tabs.
5 Slide the tray back into the printer.
Note
If the tray is not properly adjusted, the
printer might display an error message
or paper might jam.
For paper orientation when you are
printing on both sides, see “Printing both
sides of paper (optional duplexer)” on
page 49. For information on loading
special paper, see “Printing special
paper” on page 53.
3
5
4
Page 51

EN
Printing both sides of paper (optional duplexer)
49
Printing both sides of paper (optional duplexer)
The printer can automatically print on both sides of paper with an
optional duplex printing accessory (duplexer). This is called
duplexing.
The duplexer supports the following paper sizes: Letter, Legal,
Executive, A4, and B5 (JIS). It does not support custom sizes.
Note
See the documentation included with the duplexer for installation
instructions. Duplexing might require additional memory (see “Printer
memory and expansion” on page 229).
The tray 2 dust cover must be removed when the optional duplexer is
installed.
Installed Removed
Page 52

50 Chapter 2 - Printing tasks
EN
Guidelines for printing both sides of paper
Note the following guidelines:
● Do not print on both sides of labels, transparencies, envelopes,
vellum, or paper heavier than 28 lb (105 g/m
2
). Paper jamming
might occur with these types of media, and damage to the printer
might occur with labels.
● You might need to configure the printer driver to recognize the
duplexer. (See the printer driver online help for details.)
● To print on both sides of paper, make the selection from the
software or printer driver. (See the printer driver online help.)
● If you do not use the printer driver that came with the printer, you
might need to change the Duplex setting from the P aper Handling
Menu in the printer control panel to
DUPLEX=ON
. Also in the Paper
Handling Menu, set Binding to long edge or short edge. (For more
information, see “Layout options for printing both sides of paper”
on page 52.)
●
Close the rear output bin to use the duplexer (see “Selecting the
output bin” on page 44). Opening the rear output bin disables the
duplexer.
Page 53

EN
Printing both sides of paper (optional duplexer)
51
Placement for paper requiring a specific
orientation
Several kinds of paper require a specific orientation when you
duplex—for example, letterhead, preprinted paper, and paper with
watermarks and prepunched holes. The duplexer prints the second
side of paper first. Orient paper in the trays as shown below.
For tray 1, load the front side facing do wn and the top tow ard y ou. For
all other trays, load the front side facing up and the top toward the
printer.
Tray 1 Trays 2, 3, 4
Page 54

52 Chapter 2 - Printing tasks
EN
Layout options for printing both sides of
paper
The four duplex orientation options are shown below. These options
can be selected from the printer driver or from the printer control
panel (set
BINDING
from the Paper Handling Men u and
ORIENTATION
from the Printing Menu).
Note When using Windows drivers, select “Flip P ages Up” to get the binding
options designated with (*) above.
2
3
5
25
3
3
5
2
3
5
2
4. Short-edge
landscape
3. Short-edge
portrait*
2. Long-edge
landscape*
1. Long-edge
portrait
1. Long-edge portrait This is the default printer setting, and the most common layout
used, with every printed image oriented right side up. Facing
pages are read from top to bottom on the left page, then from top
to bottom on the right page.
2. Long-edge landscape This layout is often used in accounting, data processing, and
spreadsheet applications. Every other printed image is oriented
upside-down. Facing pages are read continuously from top to
bottom.
3. Short-edge portrait This layout is often used with clipboards. Every other printed
image is oriented upside-down. Facing pages are read
continuously from top to bottom.
4. Short-edge landscape Each printed image is oriented right side up. Facing pages are
read from top to bottom on the left page, then from top to bottom
on the right page.
Page 55

EN
Printing special paper
53
Printing special paper
This section discusses printing on types of paper that require special
handling:
●
“Printing small or narrow paper” on page 53
●
“Printing letterhead, prepunched, or preprinted paper (singlesided)” on page 53
●
“Printing envelopes” on page 55
●
“Printing labels” on page 61
●
“Printing transparencies” on page 62
●
“Printing cards, custom-size, and heavy paper” on page 63
Printing small or narrow paper
Follow the guidelines belo w if y ou will be printing primarily on small or
narrow paper:
●
Use the 6,000-page toner cartridge (part number C8061A). Toner
might leak if large quantities of small or narrow media are printed
using the 10,000-page cartridge (part number C8061X). (See
“Ordering information” on page 22.)
●
Print from tray 1 to the rear output bin if you experience problems
such as paper jams or curl.
See “Printing cards, custom-size, and heavy paper” on page 63 for
further information on printing on non-standard sizes.
Printing letterhead, prepunched, or preprinted
paper (single-sided)
When printing letterhead, prepunched, or preprinted paper, it is
important to correctly orient the paper. For instructions, see the next
page.
Note
Follow the guidelines in this section for printing on one side only. For
guidelines on duplexing, see “Guidelines for printing both sides of
paper” on page 50.
Page 56

54 Chapter 2 - Printing tasks
EN
For tray 1, load paper with the side-to-be-printed facing up, and the
top, short edge toward the printer.
For all other tra ys , load paper with the side-to-be-printed f acing down,
and the top edge toward y ou.
Paper orientation for tray 1
Paper orientation for trays 2, 3, and 4
Page 57

EN
Printing special paper
55
Printing envelopes
With the optional envelope feeder, the printer will automatically feed
up to 75 envelopes. To order an envelope feeder, see “Ordering
information” on page 22. To print with the envelope feeder, see
“Feeding envelopes automatically (optional envelope feeder)” on
page 57. For envelope specifications, see “Envelopes” on page 197.
Many types of envelopes can be printed from tray 1. Up to 10 can be
stacked in the tr a y. Printing performance depends on the construction
of the envelope. Always test a few sample envelopes before
purchasing a large quantity.
●
In the software, set margins at least 15 mm (0.6 in) from the edge
of the envelope.
●
Open the rear output bin to get a straight paper path. This
produces better results if enve lopes are curling.
If you print large quantities of envelopes continuously or if you
interleave env elopes with wide media, y ou might need to select
SMALL
PAPER SPEED = SLOW
at the printer control panel. This setting reduces
the throughput speed of narrow media to allow the heat generated
from printing this media to dissipate. Although using this feature will
slow your printer's throughput speed, it will help protect your printer
from damage while ensuring excellent print quality.
WARNING!
Nev er use envelopes with coated linings, e xposed self-stick adhesives ,
or other synthetic materials. These items can emit noxious fumes.
CAUTION
Envelopes with clasps, snaps, windows, coated linings, exposed selfstick adhesiv es, or other synthetic materials can se v erely damage the
printer.
To avoid jamming and possible printer damage, never try to print on
both sides of an envelope.
Before y ou load envelopes, make sure they are flat and not damaged
or stuck together. Do not use envelopes with pressure-sensitive
adhesive.
Page 58

56 Chapter 2 - Printing tasks
EN
Loading envelopes in tray 1
1 Open tray 1, but do not pull out the
extension. (Most envelopes feed
best without the extension. How ev er ,
oversize envelopes might need the
extension.)
2 Load up to 10 envelopes in the
center of tray 1 with the side-to-beprinted facing up, and the postageend toward the printer. Slide the
envelopes into the printer as far as
they will go without forcing them.
3 Adjust the guides to touch the
envelope stack without bending the
envelopes . Make sure the en v elopes
fit under the tabs on the guides.
Note
If envelopes curl, use the rear output bin
(see “Printing to the rear output bin” on
page 45).
1
2
3
Page 59

EN
Printing special paper
57
Feeding envelopes automatically (optional envelope
feeder)
With the optional envelope feeder, the printer will automatically feed
up to 75 envelopes. To print envelopes without an envelope feeder,
see “Printing envelopes” on page 55.
The envelope feeder supports only standard-size envelopes (see
“Supported sizes and weights of paper - optional envelope f eeder” on
page 191).
Note
See the documentation included with the envelope feeder for
installation instructions.
You might need to configure the printer driver to recognize the
envelope feeder. See the printer driver online help for details.
Tray
extension
Guides
Envelope
weight
Release lever
Page 60

58 Chapter 2 - Printing tasks
EN
Inserting and removing the
envelope feeder
1 Open tray 1.
2 Remove the plastic cover from the
printer. (Replace the co v er when the
envelope feeder is not attached.)
3 Insert the envelope feeder into the
printer until it locks into place. (The
connector on the top right side of the
envelope feeder fits into the plug in
the printer.) Pull gently on the
envelope feeder to be sure that it is
securely in place.
4 To remove the envelope feeder,
press the release button on the left
side and pull the envelope feeder
away from the printer.
1
2
3
4
Page 61

EN
Printing special paper
59
Loading envelopes in the
envelope feeder
Note
Print only on envelopes approv ed f or use
in the printer (see “Printing envelopes”
on page 55 and “Envelopes” on
page 197).
1
Fold down the tr a y e xtension. Lift the
envelope weight.
2
Squeeze the release lev er on the left
envelope guide and slide the guides
apart.
3
Load envelopes into the envelope
feeder with the side-to-be-printed
facing up, and the postage end
toward the printer. Push the
envelopes into the envelope feeder
as far as they will go without forcing
them. Push the bottom envelopes in
slightly farther than the top
envelopes. (Stack them as shown.)
Continued on the next page.
1
2
3
Page 62

60 Chapter 2 - Printing tasks
EN
4 Adjust the guides to touch the
envelopes without bending them.
Make sure the env elope feeder is not
overfilled.
5 Lower the envelope weight onto the
envelopes.
Note
Select the envelope size from the
software application (if the setting is
available), the printer driver, and the
Paper Handling Menu in the printer
control panel (see “Paper Handling
Menu” on page 210). To print by type
and size of paper, see “Printing by type
and size of paper (locking trays)” on
page 70.
4
5
Page 63

EN
Printing special paper
61
Printing labels
Use only labels recommended for use in laser printers. Make sure
that labels meet the correct specifications (see “Labels” on
page 196).
Do:
●
Print a stack of up to 50 labels from tray 1 or a stack of 50 to 100
labels from other trays.
●
Load labels in tray 1 with the side-to-be-printed f acing up , and the
top, short edge toward the printer . F or other tra ys , load paper with
the side-to-be-printed facing down, and the top edge toward you.
●
Try opening the rear output bin to reduce curl and other problems
(see “Printing to the rear output bin” on page 45).
Do not:
●
Do not load the trays to capacity because labels are heavier than
paper.
●
Do not use labels that are separating from the backing sheet,
wrinkled, or damaged in any way.
●
Do not use labels that have the backing sheet exposed. (Labels
must cover the entire backing sheet with no exposed spaces.)
●
Do not feed a sheet of labels through the printer more than once.
The adhesive backing is designed for only one pass through the
printer.
●
Do not print on both sides of labels.
●
Do not print on sheets from which labels have been removed.
CAUTION
Failure to follow these instructions can damage the printer.
Page 64

62 Chapter 2 - Printing tasks
EN
Printing transparencies
Use only transparencies recommended for use in laser printers. For
transparency specifications, see “Transparencies” on page 196
● Load transparencies face up in tray 1 with the top toward the
printer. Up to 50 transparencies can be loaded in tray 1.
● A stack of 50 to 100 transparencies can be printed from tray 2, 3,
or 4 (although stacking more than 50 at a time is not
recommended). Because transparencies are heavier than paper,
do not load tray 2, 3, or 4 to capacity. Load them with the side-tobe-printed facing down, and the top edge toward you.
● To prevent transparencies from becoming too hot or sticking
together, use the top output bin.
●
Remove each transparency from the output bin before printing
another.
● Do not feed transparencies through the printer more than once.
●
Print only on one side of a transparency.
●
Place transparencies on a flat surface to cool after remo ving them
from the printer.
●
Select the transparency paper type from the printer driver so that
the printer uses the low fuser mode that is best for printing them.
● If two or more transparencies feed at the same time, try fanning
the stack.
Page 65

EN
Printing special paper
63
Printing cards, custom-size, and heavy paper
Custom-size paper can be printed from any tray. For paper
specifications, see “Paper specifications” on page 188.
The maximum paper weight is 199 g/m
2
(53 lb) from tray 1 and
105 g/m
2
(28 lb) from trays 2, 3, and 4.
Note
To prevent curl and other problems, heavy paper and very small
custom-size paper should be printed from tray 1 to the rear output bin.
Open the rear output bin to use it (see “Printing to the rear output bin”
on page 45).
The printer control panel can be set for one custom size at a time. Do
not load more than one size of custom paper into the printer.
Guidelines for printing custom-size paper
●
Do not attempt to print on paper smaller than 76 mm (3 in) wide
or 127 mm (5 in) long.
●
In the software application, set page margins at least 4.23 mm
(0.17 in) away from the edges.
●
Feed short-edge first.
Setting custom paper sizes
When custom paper is loaded, size settings need to be selected from
the software application (the preferred method), the printer driver, and
the printer control panel.
Tray Minimum size Maximum size
Tray 1 76 by 127 mm
(3 by 5 in)
216 by 356 mm
(8.5 by 14 in)
Tray 2, 3, or 4 148 by 210 mm
(5.8 by 8.2 in)
216 by 356 mm
(8.5 by 14 in)
Page 66

64 Chapter 2 - Printing tasks
EN
Note Settings in the printer driver and software application ov erride control
panel settings. (Software application settings generally o verride printer
driver settings.)
If the settings are not available from the software, set the custom
paper size from the control panel:
1 From the Printing Menu set
CONFIGURE CUSTOM PAPER=YES
.
2 From the Printing Menu, select inches or millimeters as the unit of
measurement.
3 From the Printing Menu, set the X dimension (the front edge of
the paper) as shown in the figure abov e . The X dimension can be
76 to 216 mm (3 to 8.5 in).
4 Set the Y dimension (the side edge of the paper) as shown in the
figure above . The Y dimension can be 127 to 356 mm (5 to 14 in).
For example, if the custom paper is 203 by 254 mm (8 by 10 in),
set X=203 mm and Y=254.
5 If custom paper is loaded into tray 1, set
TRAY 1 MODE=CASSETTE
and then set
TRAY 1 SIZE=CUSTOM
from the Paper Handling
Menu in the printer control panel. See “Customizing tray 1
operation” on page 69.
If custom paper is loaded in tray 2, 3, or 4, be sure the paper siz e
slider is set to Custom (see “Loading trays 2, 3, and 4” on
page 47).
X (front edge)
Y (side edge)
Feed short
edge first
Page 67

EN
Advanced printing tasks
65
Advanced printing tasks
This section will help you take full advantage of the printer’s features.
Using features in the printer driver
When you print from a software application, many of the printer’s
features are available from the printer driver. To access Windows
printer drivers, see “Access the Windows printer driver” on page 36.
Note
Certain printer features might not be available with all drivers. Check
the drivers for available options.
Settings in the printer driver and software application generally ov erride
control panel settings. (Software application settings generally o verride
printer driver settings.)
Printer collation
The Printer Collation feature, only a vailable with a minimum of 32 MB
of RAM or a hard disk accessory, allows multiple original prints
(mopying) that provides you the following advantages:
●
reduces network traffic
●
faster return to application
●
all documents are original
Note
See the application or printer driver online help for specific steps.
RIP ONCE
RIP ONCE allows the print job to be processed one time at the
printer. The RIP ONCE capability creates an image of the page then
saves a compressed image of the page into memory. RIP ONCE is
enabled when a minimum of 32 MB of RAM or a hard disk accessory
is installed in the printer. Pages are printed by decompressing page
images without pausing to process the print job again. The print job
will print exactly the same ev ery time because the compressed image
is not dependent on any other printer data.
Page 68

66 Chapter 2 - Printing tasks
EN
Saving printer setup information (Quick Sets)
Printer drivers allow you to save the printer settings you use most
often as the default settings. For example, the driver might be set to
print on letter size paper, portrait orientation, with automatic tray
selection (from the first available tray).
Windows PCL 6 and PCL 5e printer drivers will allow you to save
printer settings for multiple kinds of print jobs. F or e xample , y ou might
want to create a Quick Set for enve lopes, or for printing the first page
of a document on letterhead.
See the printer driver online help for more information on the Quick
Sets feature.
Scaling page image (ZoomSmart)
Windows PCL 6 and PCL 5e printer drivers include a feature called
ZoomSmart that lets you scale the page image from any page size to
any page size. You can do this either by a numeric percentage or by
specifying a different paper size scale.
See the printer driver online help for more information on the
ZoomSmart feature.
Printing booklets
Windows PCL 6 and PCL 5e printer drivers let y ou control the printing
of booklets when duplexing. You have the choice of binding on the left
or right side on Letter, Legal, or A4 paper size.
See the printer driver online help for more information on this feature.
Printing with a watermark
A watermark is a notice, such as “Top Secret,” printed in the
background of each page in a document. Check the driver for
available options, or see the printer driver online help for more
information.
Page 69

EN
Advanced printing tasks
67
Different first page
Follow these instructions for printing a first page that is different from
other pages in the print job.
1
For Windows, select “Use different paper for first page” in your
printer driver. Choose one tr ay (or Manual F eed) f or the first page
and one of the other trays for the remaining pages. Place the
paper for the first page in tray 1 (or whichever tray you selected).
(For manual feed, place paper in tray 1 after the job is sent to the
printer and the printer requests paper.) For loading tray 1, place
the paper with the side-to-be-printed up, the top of the page
facing the rear of the printer.
For Macintosh computers, select “First from” and “Remaining
from” in the print dialog box.
Note
Where and how you make selections depends on your software
application or associated printer driver. (Some options may only be
available through the printer driver.)
2
Load the paper for the remaining pages of the document into
another tray. You may select the first and remaining pages by type
of paper . F or more inf ormation, see “Manually f eeding paper from
tray 1” on page 71.
Printing multiple pages on one sheet of paper (n-up)
You can print more than one page on a single sheet of paper. This
feature is available in some printer drivers, and provides a costeffective way to print draft pages.
To print more than one page on a sheet of paper, look for a Layout or
Pages Per Sheet option in the printer driver. (This is sometimes called
2-up, 4-up, or n-up printing.)
Page 70

68 Chapter 2 - Printing tasks
EN
Customizing what tray is used for printing
Understanding tray order
When the printer receives a print job, it selects the paper tra y b y trying
to match the requested paper type and size with what has been
loaded in the trays. Using an “autoselect” process, it searches all
available input paper trays for the paper that satisfies the request,
starting with the bottom tray and ending with the top tray (tr ay 1). The
printer begins printing the job as soon as it finds the proper type/size.
If any paper is loaded in tray 1 and tray 1 is set to
FIRST
mode in the
Paper Handling Menu, the printer will always pull paper from tray 1
first. (See the explanation of FIRST mode in “Customizing tray 1
operation” on page 69.)
If the search fails, the printer displa ys a message on the control panel
requesting you to load the correct paper type/size. You can load that
paper type/size, or you can override the request by entering a
different type/size at the control panel.
If a tray runs out of paper during a print job, the printer automatically
switches to any paper tray that contains the same paper type/size.
The autoselect process changes somewhat if you customize tray 1
operation (as explained in “Customizing tr a y 1 operation” on page 69)
or set tray 1 for manual f eed (as explained in “Manually f eeding paper
from tray 1” on page 71).
Page 71

EN
Advanced printing tasks
69
Customizing tray 1 operation
The printer can be set to print from tray 1 as long as it is loaded, or to
print only from tray 1 if the type of paper loaded is specifically
requested. Set
TRAY 1 MODE=FIRST
or
TRAY 1 MODE=CASSETTE
in
the Paper Handling Menu at the printer control panel (see “Paper
Handling Menu” on page 210).
Setting Explanation
TRAY 1
MODE=FIRST
Means that the printer usually pulls paper from
tray 1 first unless it is empty or closed. If you do not
keep paper in tray 1 all the time, or you use tr ay 1
only for manually feeding paper, keep the default
setting of
TRAY 1 MODE=FIRST
in the Paper
Handling Menu.
TRAY 1
MODE=CASSETTE
Means that the printer treats tray 1 like trays 2, 3,
and 4. Instead of looking for paper in tra y 1 first, the
printer pulls paper from the tray that matches type
and size settings selected from the software.
When
TRAY 1 MODE=CASSETTE
is set, an option
appears in the Paper Handling Menu to configure
size
as well as
type
settings for tray 1.
Through the printer driver, you can select paper
from any tray (including tray 1) by type, size, or
source. To print by type and size of paper, see
“Printing by type and size of paper (locking trays)”
on page 70.
Page 72

70 Chapter 2 - Printing tasks
EN
Printing by type and size of paper (locking trays)
You can configure the printer to select paper by type (such as plain or
letterhead) and size (such as letter or A4), as opposed to source (a
paper tray).
See “Supported sizes and weights of paper” on page 189 and
“Supported types of paper” on on page 192.
Benefits of printing by type and size of paper
If you frequently use several different kinds of paper, once trays are
set up correctly, you do not have to check which paper is loaded in
each tray before you print. This is especially helpful when the printer
is shared, and more than one person loads or removes paper.
Printing by type and size of paper is a way to be sure that print jobs
always print on the desired paper. (Some older model printers hav e a
feature which “loc ks out” tr ays to prevent printing on the wrong paper.
Printing by type and size of paper eliminates the need to lock out
trays.)
To print by type and size of paper
1 Be sure to load the trays correctly and make all three
adjustments. (See the sections on loading paper, starting with
“Loading tray 1” on page 46).
2 From the Paper Handling Menu in the printer control panel, select
the paper type for each tray. If you are unsure what type you are
loading (such as bond or recycled), check the label on the
package of paper.
3 Select the paper size settings from the control panel.
• Tray 1: If the printer has been set to
TRAY 1 MODE=CASSETTE
from the Paper Handling Menu, also set the paper size from
the Paper Handling Menu. If custom paper is loaded, set the
size of custom paper from the Printing Menu to match the
paper loaded in tray 1. To print custom-size paper, see
“Guidelines for printing custom-size paper” on page 63.
• Trays 2, 3, and 4: Paper size is automatically detected when
paper is properly loaded into the tray and the paper size
adjustments have been made to match the paper size (see
“Loading trays 2, 3, and 4” on page 47 for information on tray
adjustments). If custom paper is loaded, set the size of custom
paper from the Printing Menu to match the paper loaded in the
tray. Set the paper size slider in the tray to Custom. To print
custom-size paper, see “Guidelines for printing custom-size
paper” on page 63.
Page 73

EN
Advanced printing tasks
71
•
Optional envelope f eeder
: Set the paper size from the P a per
Handling Menu.
4
From the software or printer driver, select the desired type and
size of paper.
Note
The type and size settings can also be configured from HP Web
JetAdmin software for netw orked printers. See the printer driver online
help.
To print by type and size, it might be necessary to unload or close tray
1, or set
TRAY 1 MODE=CASSETTE
from the Paper Handling Men u in the
printer control panel. For more information, see “Customizing tray 1
operation” on page 69.
Settings in the printer driver and software application ov erride control
panel settings. (Software application settings generally o verride printer
driver settings.)
Manually feeding paper from tray 1
The manual feed feature is another way of printing on special paper
from tray 1. Setting manual feed to on either from the printer control
panel or from the printer driver will stop the printer after each job is
sent, allowing you time to load special media in tray 1. Press
G
O
to
continue printing.
If there is already paper in tray 1 when you send the print job and the
printer control panel has
TRAY 1= FIRST
as the default configuration
for tray 1 operation, the printer will
not
stop and wait for paper to be
loaded. To use this feature, set
TRAY 1=CASSETTE
in the Paper
Handling Menu (see the description of “TRAY 1 MODE= FIRST” on
page 210).
If you hav e selected
MANUAL FEED=ON
in the printer control panel, this
setting will override the printer driver, and all print jobs sent to the
printer will request manually fed paper in tray 1 unless a specific tray
has been selected from the printer driver. If this feature is to be used
only occasionally, it is best to set
MANUAL FEED=OFF
in the printer
control panel and to select the manual feed option from within the
printer driver on a job-by-job basis.
Page 74

72 Chapter 2 - Printing tasks
EN
Job retention features
To use the job retention features listed below, you must install a hard
disk accessory in the printer and properly configure the drivers.
To support job retention features for complex jobs, HP recommends
that you install additional memory (see “Ordering information” on
page 22).
CAUTION Make sure to identify your jobs in the printer driver before printing. Using
default names ma y ov erride previous jobs with the same def ault name
or cause the job to be deleted.
Quick copying a job
The quick cop y f eature prints the requested number of copies of a job
and stores a copy on the printer’s hard disk accessory. Additional
copies of the job can be printed later. This feature can be turned off
from the driver.
For more information about specifying the number of quick copy jobs
that can be stored, see the
QUICK COPY JOBS
control panel item
described in “Quick Copy Jobs Menu” on page 206.
Printing additional copies of a quick copy job
To print additional copies of a job stored on the printer’s hard disk
accessory from the control panel:
1 Press M
ENU
repeatedly until
QUICK COPY JOBS MENU
appears.
2 Press I
TEM
until the desired user or job name appears.
3 For Macintosh computers only: The user name appears on the
first line of the display and the job name appears on the second
line of the display. After you have selected the desired user name
using I
TEM
, press -V
ALUE
+ until the desired job name appears.
4 Press S
ELECT
to select the job.
COPIES=1
appears.
5 Press -V
ALUE
+ until the desired number of copies appears.
6 Press S
ELECT
to print the job.
Page 75

EN
Job retention features
73
Deleting a quick copy job
When a user sends a quick copy job, the printer overwrites any
previous jobs with the same user and job name. If there is not a quick
copy job already stored under the same user and job name and the
printer needs additional space, the printer may delete other quick
copy jobs starting with the oldest job. The default number of quick
copy jobs that can be stored is 32. The number of quic k cop y jobs that
can be stored is set from the control panel (see the description of
“
QUICK COPY JOBS=32
” on page 221).
Note
If you turn the printer off, all quick cop y , proof and hold, and private jobs
are deleted. A quick cop y job can also be deleted from the control panel
or from HP Web JetAdmin.
1
Press M
ENU
repeatedly until
QUICK COPY JOBS MENU
appears.
2
Press I
TEM
until the desired user name appears.
3
For Macintosh computers only: The user name appears on the
first line of the display and the job name appears on the second
line of the display. After you have selected the desired user name
using I
TEM
, press -V
ALUE
+ until the desired job name appears.
4
Press S
ELECT
to select the job.
COPIES=1
appears.
5
Press -V
ALUE
+ until
DELETE
appears.
6
Press S
ELECT
to delete the job.
Page 76

74 Chapter 2 - Printing tasks
EN
Proofing and holding a job
The proof and hold feature provides a quic k and easy wa y to print and
proof one copy of a job and then print the additional copies.
To permanently store the job and prevent the printer from deleting it
when space is needed for something else, select the Stored Job
option in the driver.
Printing the remaining copies of a held job
The user can print the remaining copies of a job held on the printer’s
hard disk accessory from the control panel.
1 Press M
ENU
repeatedly until
QUICK COPY JOBS MENU
appears.
2 Press I
TEM
until the desired user name appears.
3 For Macintosh computers only: The user name appears on the
first line of the display and the job name appears on the second
line of the display. After you have selected the desired user name
using I
TEM
, press -V
ALUE
+ until the desired job name appears.
4 Press S
ELECT
to select the job.
COPIES=1
appears.
5 Press -V
ALUE
+ until the desired number of copies appears.
6 Press S
ELECT
to print the job.
Page 77

EN
Job retention features
75
Deleting a held job
When a user sends a proof and hold job, the printer automatically
deletes that user’s previous proof and hold job. If there is not a proof
and hold job already for that job name and the printer needs
additional space, the printer may delete other proof and hold jobs
starting with the oldest one.
Note
If you turn the printer off, all quick cop y , proof and hold, and private jobs
are deleted. A job can also be deleted from the control panel.
1
Press M
ENU
repeatedly until
QUICK COPY JOBS MENU
appears.
2
Press I
TEM
until the desired user name appears.
3
For Macintosh computers only: The user name appears on the
first line of the display and the job name appears on the second
line of the display. After you have selected the desired user name
using I
TEM
, press -V
ALUE
+ until the desired job name appears.
4
Press S
ELECT
to select the job.
COPIES=1
appears.
5
Press -V
ALUE
+ until
DELETE
appears.
6
Press S
ELECT
to delete the job.
Page 78

76 Chapter 2 - Printing tasks
EN
Printing a private job
The private printing feature lets a user specify that a job is not printed
until that user releases it using a 4-digit personal identification
number (PIN) through the printer control panel. The user specifies the
PIN in the driver and it is sent to the printer as part of the print job.
Specifying a private job
To specify that a job is private from the driver, select the Private Job
option and type a 4-digit PIN.
Releasing a private job
The user can print a private job from the control panel.
1 Press M
ENU
repeatedly until
PRIVATE/STORED JOBS MENU
appears.
2 Press I
TEM
until the desired user name appears.
3 For Macintosh computers only: The user name appears on the
first line of the display and the job name appears on the second
line of the display. After you have selected the desired user name
using I
TEM
, press -V
ALUE
+ until the desired job name appears.
4 Press S
ELECT
PIN:0000
appears.
5 Press -V
ALUE
+ to change the first number of the PIN, and then
press S
ELECT
. An * appears in place of the number . Repeat these
steps to change the remaining three numbers of the PIN.
COPIES=1
appears.
6 Press -V
ALUE
+ until the desired number of copies appears.
7 Press S
ELECT
to print the job.
Page 79

EN
Job retention features
77
Deleting a private job
A private job is automatically deleted from the printer’s hard disk
accessory after the user releases it for printing, unless the user
selects the Stored Job option in the driver.
Note
If you turn the printer off, all quick cop y , proof and hold, and private jobs
are deleted. A private job can also be deleted from the printer control
panel before it is ever printed.
1
Press M
ENU
repeatedly until
PRIVATE/STORED JOBS MENU
appears.
2
Press I
TEM
until the desired user name appears.
3
For Macintosh computers only: The user name appears on the
first line of the display and the job name appears on the second
line of the display. After you have selected the desired user name
using I
TEM
, press -V
ALUE
+ until the desired job name appears.
4
Press S
ELECT
to select the job.
PIN:0000
appears.
5
Press -V
ALUE
+ to change the first number of the PIN, and then
press S
ELECT
. An * appears in place of the number . Repeat these
steps to change the remaining three numbers of the PIN.
COPIES=1
appears.
6
Press -V
ALUE
+ until
DELETE
appears.
7
Press S
ELECT
to delete the job.
Page 80

78 Chapter 2 - Printing tasks
EN
Storing a print job
The user can download a print job to the printer’s hard disk accessory
without printing it. The user can then print the job at any time through
the printer control panel. For example , a user ma y want to download a
personnel form, calendar, time sheet, or accounting form that other
users can access and print.
To store a print job permanently on the hard disk accessory, select
the Stored Job option in the driver when printing the job.
Printing a stored job
The user can print a job stored on the printer’s hard disk accessory
from the control panel.
1 Press M
ENU
repeatedly until
PRIVATE/STORED JOBS MENU
appears.
2 Press I
TEM
until the desired user name appears.
3 For Macintosh computers only: The user name appears on the
first line of the display and the job name appears on the second
line of the display. After you have selected the desired user name
using I
TEM
, press -V
ALUE
+ until the desired job name appears.
4 Press S
ELECT
to select the job name.
COPIES=1
appears.
5 Press -V
ALUE
+ until the desired number of copies appears.
6 Press S
ELECT
to print the job.
Page 81

EN
Storing a print job
79
Deleting a stored job
Jobs stored on the printer’s hard disk accessory can be deleted from
the control panel.
1
Press M
ENU
repeatedly until
PRIVATE/STORED JOBS MENU
appears.
2
Press I
TEM
until the desired user name appears.
3
For Macintosh computers only: The user name appears on the
first line of the display and the job name appears on the second
line of the display. After you have selected the desired user name
using I
TEM
, press -V
ALUE
+ until the desired job name appears.
4
Press S
ELECT
to select the job.
COPIES=1
appears.
5
Press -V
ALUE
+ until
DELETE
appears.
6
Press S
ELECT
to delete the job.
Page 82

80 Chapter 2 - Printing tasks
EN
Printing with the optional HP Fast InfraRed
Receiver
The optional HP Fast InfraRed Receiver enables wireless printing
from any IRD A-compliant portable device (such as a laptop computer)
to the HP LaserJet Series printers.
The printing connection is maintained by positioning the sending
infrared (FIR) port within operating range. Note that the connection
can be blocked by objects such as a hand, paper, direct sunlight, or
any bright light shining into either FIR port.
Note For more information, see the user guide that came with the HP Fast
InfraRed Receiver.
If your operating system does not have infrared software installed,
contact your computer manufacturer for drivers and installation
instructions.
Setting up to print with Windows 9x
Before launching the InfraRed Driver, complete the following steps:
1 Click Start, click Settings, and then click Printers.
2 Select the HP LaserJet 4100, 4100N, 4100TN, or 4100DTN as
your default printer.
3 While in the same Printers folder, choose Properties/Details,
and make sure that Virtual Infrared LPT Port is selected.
4 Select the file to print.
Setting up to print with Macintosh computers
The first step for setting up an infrared printer is creating a Desktop
Printer icon using the Desktop Printer Utility. By default, the Desktop
Printer Utility is located in the Apple Extras/Apple LaserWriter
folder on the hard drive.
Printer IR will not be an option if the Infrared Control Panel and
extensions are not active. In addition, the infrared print capability is
possible only with the HP LaserWriter version 8.6 driver or later.
1 Launch the Desktop Utility.
2 Select Printer IR (Infrared) and click OK.
Page 83

EN
Printing with the optional HP Fast InfraRed Receiver
81
3
Change
PostScript Printer Description (PPD) File
to match the
printer.
4
On the
File
menu, select
Save
.
5
Enter a name and location for the desktop printer icon and click
OK
.
Note
Once the icon is on the desktop (or saved elsewhere), printer options
need to be manually configured. This step is essentially the same as
selecting
Configure
after setting up a printer in the Chooser. To set the
options, highlight the Desktop Printer icon and select
Change Setup
from the
Printing
menu.
Printing a job
1
Align your laptop computer (or other portable device equipped
with an IRDA-compliant FIR window) within 1 meter (3 feet)
maximum of the HP Fast InfraRed Receiver. The FIR window
must be at an angle of within +/- 15 degrees relative to the printer
to ensure an effective connection for printing.
2
Print the job. The status indicator on the HP Fast InfraRed
Receiver lights up, and, after a short delay, the printer status
panel displays
PROCESSING JOB
.
If the status indicator does not light up, realign the HP Fast InfraRed
Receiver with the FIR port on the sending device, resend the print job ,
and maintain the alignment of all devices. If you have to move the
equipment (for example, to add paper), make sure that all devices
remain within the range of operation to maintain the connection.
If the connection is interrupted before your print job is complete, the
HP Fast InfraRed Receiver status indicator turns off. You have up to
40 seconds to correct the interruption and continue the job. If the
connection is resumed within this time, the status indicator lights up
again.
Note
The connection is permanently broken if the sending port is moved out
of operating range or if anything passing between the ports blocks
transmission for more than 40 seconds. (This block could be a hand,
paper , or even direct sunlight.) Depending on the size of the job , printing
with the HP F ast InfraRed Receiv er may be slo wer than printing with a
cable connected directly to the parallel port.
Page 84

82 Chapter 2 - Printing tasks
EN
Interrupting and resuming printing
The job interrupt and resume feature lets you tempor arily stop the job
that is currently printing in order to print another job through an FIR
connection. When the FIR job is finished printing, the interrupted job
resumes printing.
To interrupt the job at the printer, connect to the FIR port on the
printer and send a job to the printer. The printer stops printing the
current job when it reaches the end of the copy it is printing. The
printer then prints the job sent over the FIR connection. When the
printer is done printing that job, it resumes printing the original job
with multiple copies where it left off.
Page 85

EN
Overview
83
3
Printer maintenance
Overview
This chapter explains basic printer maintenance:
●
managing the toner cartridge
●
cleaning the printer
●
cleaning the fuser (manual and automatic)
●
performing preventative maintenance
●
configuring alerts
Page 86

84 Chapter 3 - Printer maintenance
EN
Managing the toner cartridge
HP toner cartridges
When you use a genuine new HP toner cartridge (part number
C8061A or C8061X), you can obtain the following types of supplies
information:
● amount of toner remaining
● estimated number of pages remaining
● number of pages printed
● other supplies information
Non-HP toner cartridges
Hewlett-Packard Company cannot recommend use of non-HP toner
cartridges, either new or remanufactured. Because they are not
HP products, HP cannot influence their design or control their quality.
Service or repair required as a result of using a non-HP toner
cartridge will not be covered under the printer warranty.
When you use a non-HP toner cartridge, the printer is unable to
report on the number of pages that can still be printed with the
amount of toner left in the cartridge. The toner level estimate will only
be an approximate percentage.
If the non-HP toner cartridge was sold to you as a genuine HP
product, please call HP’s fraud hotline (see “HP fraud hotline” on
page 161).
Toner cartridge authentication
The printer will let you know that a cartridge is not a genuine HP toner
cartridge when you insert it in the printer. If you insert a used HP
cartridge from another HP printer, the printer can take up to 20
printed pages to receive the message authenticating that the
cartridge is a genuine HP part.
If the printer control panel message states that this is not a genuine
HP toner cartridge and you believe you purchased an HP cartridge,
call the HP fraud hotline at 1-887-219-3183 (toll-free in North
America).
Page 87

EN
Managing the toner cartridge
85
Toner cartridge storage
Do not remove the toner cartridge from its package until you are
ready to use it. The shelf life of a cartridge in an unopened package is
approximately 2.5 years.
CAUTION
To prevent damage to the toner cartridge, do not expose it to light for
more than a few minutes.
Toner cartridge life expectancy
The life of the toner cartridge depends on the amount of toner that
print jobs require. When printing text at 5% coverage, an HP toner
cartridge lasts an average of 10,000 or 6,000 pages, depending on
which toner cartridge is installed. (A typical business letter is about
5% coverage.) This assumes that print density is set to 3 and
EconoMode is off. (These are the def ault settings. F or details on other
settings, see the description of
ECONOMODE
and
TONER DENSITY
in
“Print Quality Menu” on page 217.)
At any time, y ou can v erify life e xpectancy b y chec king the toner le v el,
as described below.
Checking the toner level
You can check the toner level using the printer control panel, the
embedded web server, printer software, or HP Web JetAdmin.
Using the printer control panel
1
Press M
ENU
until
INFORMATION MENU
appears.
2
Press I
TEM
until PRINT SUPPLIES STATUS PAGE appears.
3
Press S
ELECT
to print the supplies status page. See “Supplies
status page” on page 154 for information on the supplies status
page.
Using the embedded web server
1
In your web browser, enter the IP address for the printer home
page. This takes you to the printer status page. (See “Accessing
the embedded web server” on page 252.)
2
On the left side of the screen, click
Supplies Status
. This takes
you to the supplies status page, which provides toner level
information. See “Supplies status page” on page 154 for
information on the supplies status page.
Page 88

86 Chapter 3 - Printer maintenance
EN
Using printer software
Three things are required to use this feature:
● the “Supplies Information and Ordering” software must be
installed on your computer (use the custom installation option to
install this software)
● the printer must be directly connected to your computer (parallel)
● you must have access to the World Wide Web
1 At the bottom right of your screen (in the system tray), double-
click the Printer icon. This opens the status window.
2 On the left side of the status window, click the Printer icon from
which you wish to obtain status.
3 At the top of the status window, click the Supplies link. You can
also scroll down to Supplies Status.
Note If you want to order supplies, click Order Supplies. This opens a
browser that produces a URL from which to purchase consumables.
Select the supplies you wish to order and finish the ordering process.
Using HP Web JetAdmin
In HP Web JetAdmin, select the printer device. The device status
page shows toner level information.
Cartridge interaction (shaking)
When you install a toner cartridge for the first time, gently shake it
from side to side to distribute the toner evenly inside the cartridge.
Due to new cartridge design, this is the only time you will need to
shake the cartridge.
Page 89

EN
Managing the toner cartridge
87
Toner low and toner out conditions
When toner is low
When toner is low, the printer control panel displays a
TONER LOW
message and the printer continues to print. The message first
appears when about 15% of the toner remains in the cartridge (about
1,500 pages remaining for the 10,000-page cartridge and about 900
pages remaining for the 6,000-page cartridge at 5% page coverage).
You might prefer to have the printer stop instead of continuing when
the
TONER LOW
message first appears—for example, if you want print
quality to remain consistently high during print jobs or if you do not
want toner to run out during a long print job. To configure the printer to
stop, change the
TONER LOW
menu item on the Print Quality Menu
from
CONTINUE
to
STOP
(see “TONER LOW= CONTINUE” on page 219).
Then when
TONER LOW
appears, the printer will stop printing. You can
resume printing by pressing G
O
.
When toner is out
When the toner cartridge runs out of toner, the printer control panel
displays a
TONER OUT
message and the printer stops printing. You
can continue printing the current job by pressing G
O
. The message
continues to appear for every job until you take one of the following
actions:
●
replace the toner cartridge
●
press GO (the printer will print the current job)
If you want the printer to continue printing when TONER OUT appears,
change the
TONER OUT
menu item on the Print Quality Menu from
STOP
to
CONTINUE
(see “TONER OUT= STOP” on page 219). Subsequent
jobs will continue to print indefinitely while
TONER OUT
is display ed.
Page 90

88 Chapter 3 - Printer maintenance
EN
Cleaning the printer
General guidelines
Follow the cleaning procedure on the following page every time you
change the toner cartridge or whenever print quality problems occur.
As much as possible, keep the printer free from dust and debris.
● Clean the outside of the printer with a slightly water-dampened
cloth.
● Clean the inside with a dry, lint-free cloth.
CAUTION Do not use ammonia-based cleaners on or around the printer.
While cleaning the printer, be careful not to touch the transf er roller (the
black, rubber roller located underneath the toner cartridge). Skin oils
on the roller can cause print quality problems.
Page 91

EN
Cleaning the printer
89
Cleaning procedure
1
Turn the printer off and unplug the
power cord.
2
Open the top cover and remove the
toner cartridge.
WARNING!
Avoid reaching too far into the printer.
The adjacent fusing area might be hot!
CAUTION
To prevent damage to the toner
cartridge, do not expose it to light for
more than a few minutes.
3
Wipe any dust or dirt off the paper
feed guides (shaded areas) with a
dry, lint-free cloth.
Note
If toner gets on your clothing, wipe it off
with a dry cloth and wash clothing in cold
water. (Hot water sets toner into fabric.)
4
Using the green handle, lift the paper
access plate and wipe off any
residue with a dry, lint-free cloth.
Continued on the next page.
2
3
4
1
Page 92

90 Chapter 3 - Printer maintenance
EN
5 Reinstall the toner cartridge, close
the top cover, plug the power cord in,
and turn the printer on.
5
Page 93

EN
Cleaning the fuser
91
Cleaning the fuser
Run the printer cleaning page to keep the fuser free of toner and
paper particles that can sometimes accumulate. Accumulation of
toner and particles can cause specks to appear on the front or back
side of your print jobs (see “Specks” on page 130).
To ensure optimum print quality, HP recommends that you use the
cleaning page every time you replace the toner cartridge or on an
automatic schedule that you can set up.
You can run a cleaning page in two ways:
●
manually as needed from the printer control panel
●
automatically according to an interval that you set
The cleaning procedure takes about 2.5 minutes to complete. A
message on the control appears while the cleaning is taking place
(either
PROCESSING CLEANING PAGE
or
PROCESSING AUTO CLEANING
PAGE
).
Running the cleaning page manually
In order for the cleaning page to work properly, print the page on
copier grade paper (not bond, heavy, or rough paper).
To run the cleaning page manually:
1
At the printer control panel, press M
ENU
until
PRINT QUALITY
MENU
appears.
2
Press I
TEM
until
CREATE CLEANING PAGE
appears.
3
Press S
ELECT
to create the cleaning page. A page with a black
stripe prints.
4
Follow the instructions on the cleaning page to complete the
cleaning process.
Page 94

92 Chapter 3 - Printer maintenance
EN
Running the cleaning page automaticall y
Using the procedure below, you can set the printer to print cleaning
pages automatically at an interval that you choose.
In order for the cleaning page to run without intervention, you must
keep the selected size and Plain paper type available in the printer.
The printer will not interrupt a printing job in process.
You can discard the output page created by the automatic cleaning
process.
To set the cleaning page to run automatically:
1 At the printer control panel, press M
ENU
until
PRINT QUALITY
MENU
appears.
2 Press I
TEM
until
AUTO CLEANING PAGE=OFF
appears.
3 Press -V
ALUE
+ to change
OFF
to
ON
and then press S
ELECT
.
4 Press I
TEM
until
AUTO CLEANING FREQUENCY=2000
appears.
The default frequency is e v ery 2,000 pages. To change this value,
press -V
ALUE
+ up or down. The options are 1,000, 2,000, 5,000,
10,000, and 20,000 pages.
5 Once you have selected the page frequency, press S
ELECT
to
save the choice.
6 Press I
TEM
once again until
CLEANING PAGE SIZE=LETTER
appears.
You can choose to run the cleaning page on either Letter size or
A4 size.
7 Press -V
ALUE
+ to select either A4 or Letter and then press
S
ELECT
to save your selection.
Page 95

EN
Performing preventative maintenance
93
Performing preventative maintenance
You should replace certain parts when the
PERFORM PRINTER
MAINTENANCE
message appears on the printer control panel. This will
help ensure that your printer maintains optimum performance.
The maintenance message will appear every 200,000 pages. To
check the number of pages the printer has printed, print either a
configuration page or a supplies status page (see “Configuration
page” on page 152 or “Supplies status page” on page 154 for details).
To order the printer maintenance kit, see “Ordering information” on
page 22. The kit includes:
●
fuser
●
rollers (transfer, pickup, and feed)
●
instructions
Note
The printer maintenance kit is a consumable item and is not covered
under warranty.
Page 96

94 Chapter 3 - Printer maintenance
EN
Configuring alerts
You can use HP Web JetAdmin or the printer’s embedded web server
to configure the system to alert you of problems with the printer. The
alerts take the form of e-mail messages to the e-mail account or
accounts that you specify.
You can configure the following:
● the device you want to monitor (in this case, the printer)
● what alerts are to be received (for example , alerts for paper jams,
paper out, toner low, toner out, and cover open)
● the e-mail account to which the alerts should be forwarded
For See the following
HP Web JetAdmin
●
“HP Web JetAdmin” on page 41 f or general
information about HP Web JetAdmin
●
HP Web JetAdmin online help f or details on
alerts and how to set them up
Embedded web server
●
“Embedded web server” on page 251 for
general information about the embedded
web server
●
Embedded web server online help for
details on alerts and how to set them up
Page 97

EN
Overview
95
4
Problem solving
Overview
This chapter will help you to troubleshoot and solve printer problems.
Clear paper jams
Occasionally, paper can jam during printing. This section will help
you to locate paper jams, properly clear them from the printer , and
solve repeated paper jams.
Understand
printer messages
Many different messages can appear on the printer control panel
display. Some messages tell the printer’s current status, such as
INITIALIZING
. Other messages require an action, such as
CLOSE TOP COVER
. Many of these messages are self-explanatory.
However, some messages indicate a problem with the printer, or
request further action or description. This section lists these types
of messages, and tells what to do if a message persists.
Correct output
quality problems
The printer should produce print jobs of the highest quality. If print
jobs do not look sharp and clear, def ects such as lines , specks, or
smears appear on the page, or paper is wrinkled or curled, use this
section to troubleshoot and solve the output quality problem.
Determine printer
problems
Before you can fix a printer problem, you must understand where
the problem lies. Use the flowchart in this chapter to determine the
printer problem, and then follow the corresponding troubleshooting
suggestions.
Check printer
configuration
From the printer , you can print information pages, which giv e details
about the printer and its configuration.
Page 98

96 Chapter 4 - Problem solving
EN
Clearing paper jams
If the printer control panel displays a paper jam message, look for
paper in the locations indicated in the figure on the next page, then
see the procedure for clearing the paper jam. You might need to look
for paper in other locations than indicated in the paper jam message.
If the location of the paper jam is not obvious, look first in the top
cover area underneath the toner cartridge.
When clearing paper jams, be very careful not to tear the paper. If a
small piece of paper is left in the printer, it could cause additional
jams. If paper jams are a recurring problem, see “Solving repeated
paper jams” on page 110.
Note The top cover of the printer must be opened and then closed to clear
a paper jam message.
Page 99

EN
Clearing paper jams
97
Paper jam locations
1
Top cover and toner cartridge area
2
Optional envelope feeder
3
Input tray areas
4
Optional duplexer
5
Output areas (top and rear)
6
Fuser area
Note
Loose toner might remain in the printer after a paper jam and cause
output quality problems. These should clear up within a few pages.
5
1
2
3
4
6
Front
Back
Page 100

98 Chapter 4 - Problem solving
EN
Clearing jams from the top
cover and toner cartridge
areas
1 Open the top cover and remove the
toner cartridge.
CAUTION
To prevent damage to the toner
cartridge, do not expose it to light for
more than a few minutes.
2 Use the green handle to lift the
paper access plate.
3 Slowly pull the paper out of the
printer. Do not tear the paper.
Note
If paper is difficult to remove, try
clearing it from the input tray area (see
“Clearing jams from the input tray
areas” on page 102).
Avoid spilling loose toner. Using a dry,
lint-free cloth, clean any loose toner
that might have fallen into the printer.
If loose toner falls into the printer, it
might cause temporary problems with
print quality. Loose toner should clear
from the paper path after a few pages
are printed.
If toner gets on your clothing, wipe it off
with a dry cloth and wash clothing in
cold water. (Hot water sets toner into
fabric.)
Continued on the next page.
2
3
1
 Loading...