


hp LaserJet 3380
start
démarrage
inbetriebnahme
avvio
inicio
startgids
início
lea esto primero

Copyright Information
© 2003 Copyright Hewlett-Packard Development Company, L.P.
Reproduction, adaptation or translation without prior written permission
is prohibited, except as allowed under the copyright laws.
The information contained in this document is subject to change
without notice.
The only warranties for HP products and services are set forth in the
express warranty statements accompanying such products and
services. Nothing herein should be construed as constituting an
additional warranty. HP shall not be liable for technical or editorial
errors or omissions contained herein.
Part number: Q2660-90938
Edition 1, 10/2003
FCC Regulations
This equipment has been tested and found to comply with the limits for
a Class B digital device, pursuant to Part 15 of the FCC rules. These
limits are designed to provide reasonable protection against harmful
interference in a residential installation. This equipment generates,
uses, and can radiate radio frequency energy. If this equipment is not
installed and used in accordance with the instructions, it may cause
harmful interference to radio communications. However, there is no
guarantee that interference will not occur in a particular installation. If
this equipment does cause harmful interference to radio or television
reception, which can be determined by turning the equipment off and
on, the user is encouraged to try to correct the interference by one or
more of the following measures:
Reorient or relocate the receiving antenna.
Increase separation between equipment and receiver.
Connect equipment to an outlet on a circuit different from that to which
the receiver is located.
Consult your dealer or an experienced radio/TV technician.
Any changes or modifications to the printer that are not expressly
approved by HP could void the user's authority to operate this
equipment.
Use of a shielded interface cable is required to comply with the Class B
limits of Part 15 of FCC rules.
This equipment complies with FCC rules, Part 68. On the back of this
equipment is a label that contains, among other information, the FCC
registration number and ringer equivalence number (REN) for this
equipment. If requested, this information must be provided to the
telephone company. The REN is used to determine the quantity of
devices which may be connected to the telephone line. Excessive
RENs on the telephone line may result in the devices not ringing in
response to an incoming call. In most, but not all, areas, the sum of the
RENs should not exceed five (5.0). To be certain of the number of
devices that may be connected to the line, as determined by the total
RENs, contact the telephone company to determine the maximum REN
for the calling area.
This equipment uses the following USOC jacks: RJ11C.
An FCC-compliant telephone cord and modular plug is provided with
this equipment. This equipment is designed to be connected to the
telephone network or premises wiring using a compatible modular jack
which is Part 68 compliant. This equipment cannot be used on
telephone company-provided coin service. Connection to Party Line
Service is subject to state tariffs. If this equipment causes harm to the
telephone network, the telephone company will notify you in advance
that temporary discontinuance of service may be required. If advance
notice is not practical, the telephone company will notify the customer
as soon as possible. Also, you will be advised of your right to file a
complaint with the FCC if you believe it is necessary. The telephone
company may make changes in its facilities, equipment, operations, or
procedures that could affect the operation of the equipment. If this
happens, the telephone company will provide advance notice in order
for you to make the necessary modifications in order to maintain
uninterrupted service. If trouble is experienced with this equipment,
please see the numbers in the front of this manual for repair and (or)
warranty information. If the trouble is causing harm to the telephone
network, the telephone company may request you remove the
equipment from the network until the problem is resolved. The following
repairs can be done by the customer: Replace any original equipment
that came with the device. This includes the print cartridge, the
supports for trays and bins, the power cord, and the telephone cord. It
is recommended that the customer install an AC surge arrestor in the
AC outlet to which this device is connected. This is to avoid damage to
the equipment caused by local lightning strikes and other electrical
surges.
See the electronic User Guide for more regulatory information.
Trademark Credits
Microsoft®, Windows®, and Windows NT® are U.S. registered
trademarks of Microsoft Corporation. All other devices mentioned
herein may be trademarks of their respective companies.
Informations de copyright
© 2003 Copyright Hewlett-Packard Development Company, L.P.
Il est interdit de reproduire, adapter ou traduire ce manuel sans
autorisation expresse par écrit, sauf dans les cas permis par les lois
régissant les droits d'auteur.
Les informations contenues dans ce document sont sujettes à
modification sans préavis.
Les seules garanties pour les produits et services HP sont décris dans
les déclarations de garantie expresses accompagnant ces mêmes
produits et services. Rien dans ce document ne pourra être en aucun
cas considéré comme une garantie supplémentaire. HP décline toute
responsabilité en cas d'erreur technique, de rédaction ou en cas
d'omissions contenues dans ce document.
Numéro de référence : Q2660-90938
Edition 1, 10/2003
Marques commerciales et déposées
Microsoft®, Windows® et Windows NT® sont des marques déposées
aux Etats-Unis de Microsoft Corporation. Tous les autres produits
mentionnés dans ce document peuvent être des marques
commerciales de leur détenteur respectif.
Hewlett-Packard Development Company, L.P.
20555 S.H. 249
Houston, TX 77070
1

Device configuration. The HP LaserJet 3380 all-in-one comes
with a 250-sheet media input tray, a 10-sheet priority input tray, a
50-sheet automatic document feeder (ADF) input tray, a flatbed
scanner, and 32 megabytes (MB) of random-access memory
(RAM).
The HP LaserJet 3380 all-in-one also includes a dual inline memory
module (DIMM) slot, parallel and universal serial bus (USB)
interface ports, and fax interface ports.
English Français Deutsch Italiano Español Nederlands Português
Configuration du périphérique. L'imprimante HP LaserJet 3380
all-in-one s'accompagne d'un bac d'alimentation de support de 250
feuilles, d'un bac d'alimentation prioritaire de 10 feuilles, d'un bac
d'alimentation automatique (BAA) de 50 feuilles et d'un scanner à
plat et de 32 Mo de RAM.
Gerätekonfiguration. Im Lieferumfang des HP LaserJet 3380 Allin-One-Geräts sind ein 250-Blatt-Druckmedienzufuhrfach, ein
Einzelblatteinzug für bis zu 10 Blatt, ein automatischer
Vorlageneinzug für bis zu 50 Blatt, ein Flachbettscanner sowie 32
Megabyte (MB) Arbeitsspeicher (RAM) enthalten.
Descrizione della periferica. La periferica HP LaserJet 3380 All-inOne viene fornita con un vassoio di alimentazione per i supporti da
250 fogli, un vassoio di alimentazione prioritario da 10 fogli, un
alimentatore automatico di documenti (ADF) da 50 fogli, uno
scanner piano e 32 MB di RAM (Random-Access Memory).
Configuración del dispositivo. La HP LaserJet 3380 all-in-one
incluye una bandeja de entrada para 250 hojas, una bandeja de
entrada de prioridad para 10 hojas, una bandeja de entrada del
alimentador automático de documentos (ADF)para 50 hojas, un
escáner de superficie plana y 32 megabytes (MB)de memoria de
acceso aleatorio (RAM).
Apparaatconfiguratie. De HP LaserJet 3380 all-in-one wordt
geleverd met een invoerlade voor 250 vel, een voorrangslade voor
10 vel, een automatische documentinvoer (ADI) voor 50 vel, een
flatbed scanner en 32 MB RAM-geheugen.
L'imprimante HP LaserJet 3380 all-in-one comprend également un
logement pour module DIMM, des ports d'interface USB parallèle et
universel ainsi que des ports d'interface pour le télécopieur.
Des Weiteren gehören zum Lieferumfang des HP LaserJet 3380 Allin-One-Geräts ein DIMM-Steckplatz (Dual Inline Memory Module),
Anschlüsse für die parallele und die USB-Schnittstelle (Universal
Serial Bus) sowie Anschlüsse für die Faxschnittstelle.
La periferica HP LaserJet 3380 All-in-One comprende, inoltre, un
alloggiamento per moduli di memoria DIMM (Dual Inline Memory
Module), porte di interfaccia parallela e USB (Universal Serial Bus)
e porte di interfaccia fax.
La HP LaserJet 3380 all-in-one también incluye una ranura de
módulo de memoria en línea dual (DIMM), un puerto de interfaz en
paralelo, otro para Bus Serie Universal (USB)y puertos de interfaz
de fax.
De HP LaserJet 3380 all-in-one wordt ook geleverd met een sleuf
voor een DIMM-geheugenmodule, parallelle en universele seriële
bus (USB)-interfacepoorten en fax-interfacepoorten.
Configuração do dispositivo. O multifunção HP LaserJet 3380 é
fornecido com uma bandeja de entrada de mídia de 250 folhas,
uma bandeja de entrada prioritária de 10 folhas, uma bandeja de
entrada do alimentador automático de documentos de 50 folhas,
um scanner de mesa e 32 megabytes (Mb) de memória RAM.
O multifunção HP LaserJet 3380 também inclui um slot DIMM, as
portas de interface USB e paralela e as portas de interface com o
fax.
2
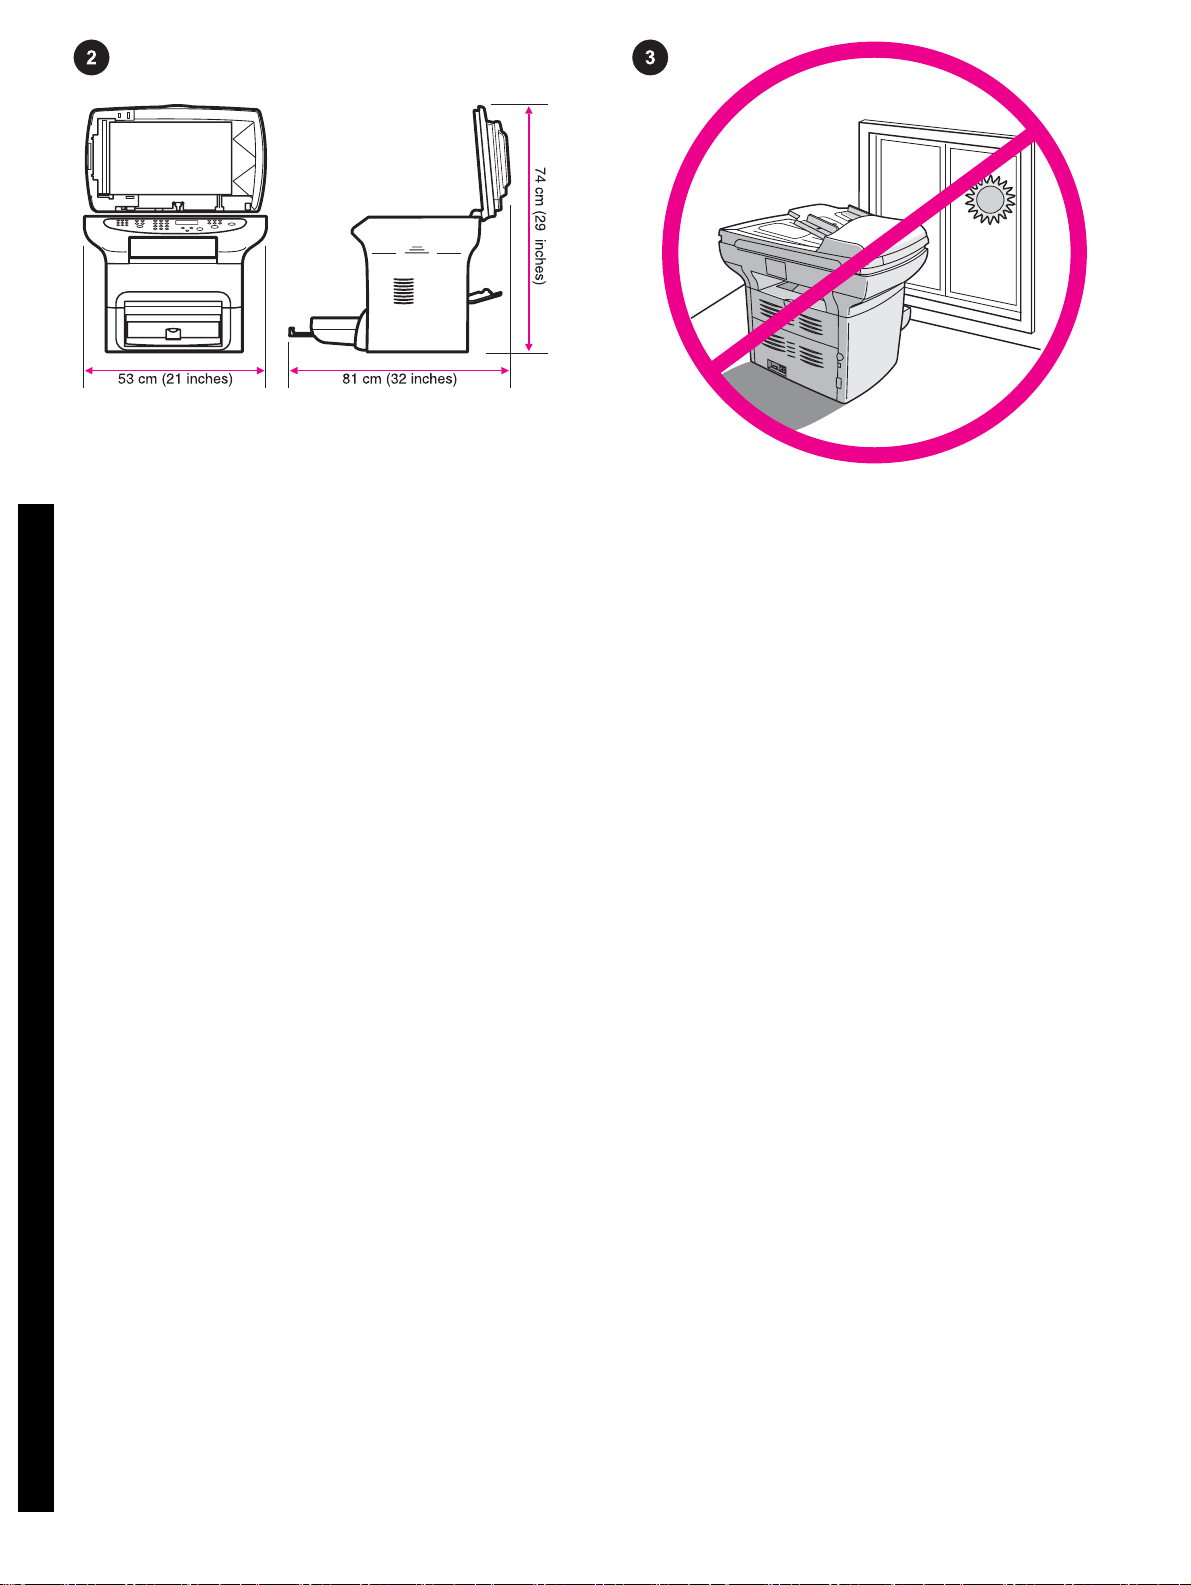
Prepare the location. Place the device on a sturdy, level surface
in a well-ventilated area. Make sure that there is enough space
around the device so that the air vents are not blocked.
Regulate the environment. Do not place the device in direct
sunlight or in an area that has abrupt temperature and humidity
changes. The recommended ranges are 15 degrees to 32.5
degrees C (59 degrees to 90.5 degrees F) and 10 percent to 80
percent relative humidity.
Environnement. Posez le périphérique sur une surface plane et
stable dans un environnement bien aéré. Assurez-vous qu'il y a
assez d'espace autour du périphérique afin que les aérations ne
soient pas obstruées.
Vorbereiten des Standorts. Stellen Sie das Gerät in einem gut
belüfteten Bereich auf eine stabile, ebene Fläche. Stellen Sie
sicher, dass rund um das Gerät ausreichend Platz vorhanden ist,
so dass die Luftzirkulation nicht blockiert wird.
Collocazione della periferica. Posizionare la periferica su una
superficie resistente e orizzontale in un ambiente ben ventilato.
Accertarsi che lo spazio intorno alla periferica sia sufficiente in
modo che non vi siano ostacoli alle prese d'aria.
Prepare la zona donde colocará el dispositivo. Coloque el
dispositivo en una superficie plana y resistente que se encuentre
en una zona bien ventilada. Asegúrese de dejar suficiente espacio
alrededor del dispositivo para no bloquear las ventilaciones de aire.
De locatie voorbereiden. Plaats het apparaat op een stevige,
vlakke ondergrond in een goed geventileerde ruimte. Controleer of
er voldoende ruimte rond het apparaat aanwezig is, zodat de
ventilatoren niet worden geblokkeerd.
Adaptation à l'environnement. N'exposez jamais le périphérique
directement à la lumière du soleil ou dans un endroit sujet aux
changements de température ou humide. Nous vous
recommandons une température comprise entre 15 et 32,5 °C et
une humidité relative à 10 %.
Sorgen Sie für ausgeglichene Umgebungsbedingungen. Stellen
Sie das Gerät nicht an einem Ort auf, an dem es direktem
Sonnenlicht ausgesetzt ist oder plötzliche Temperatur- und
Feuchtigkeitsschwankungen auftreten können. Empfohlen werden
eine Temperatur zwischen 15 und 32,5 °C sowie eine relative
Luftfeuchtigkeit zwischen 10 und 80 %.
Condizioni ambientali. Evitare di esporre la periferica alla luce
diretta del sole o di collocarla in un ambiente soggetto a sbalzi di
temperatura e di umidità. La temperatura consigliata varia tra 15 °C
e 32,5 °C (tra 59 °F e 90,5 °F) mentre per l'umidità relativa,
l'intervallo è compreso tra 10 e 80 %.
Acomode el entorno. No coloque el dispositivo bajo la luz directa
del sol ni en una zona con cambios bruscos de humedad o
temperatura. Los rangos recomendados son de 15 a 32,5 ºC (de
59 a 90,5 ºF)de temperatura y del 10 al 80% de humedad relativa.
Zorg voor een geschikte omgeving. Zet het apparaat niet in direct
zonlicht of op een plaats waar de temperatuur en luchtvochtigheid
abrupt kunnen veranderen. Het aanbevolen bereik ligt tussen 15 tot
32,5 °C (59 tot 90,5 °F) en 10 tot 80% relatieve luchtvochtigheid.
Prepare o local. Coloque o dispositivo em uma superfície firme,
plana e bem ventilada. Verifique se existe espaço suficiente ao
redor do dispositivo, para que as saídas de ar não fiquem
bloqueadas.
Português Nederlands Español Italiano Deutsch Français English
Regule o ambiente. Não coloque o dispositivo em um local em
que haja a incidência direta da luz solar ou que sofra mudanças
abruptas na temperatura e na umidade. As variações
recomendadas são 15 a 32,5 ºC e 10 a 80 % de umidade relativa.
3
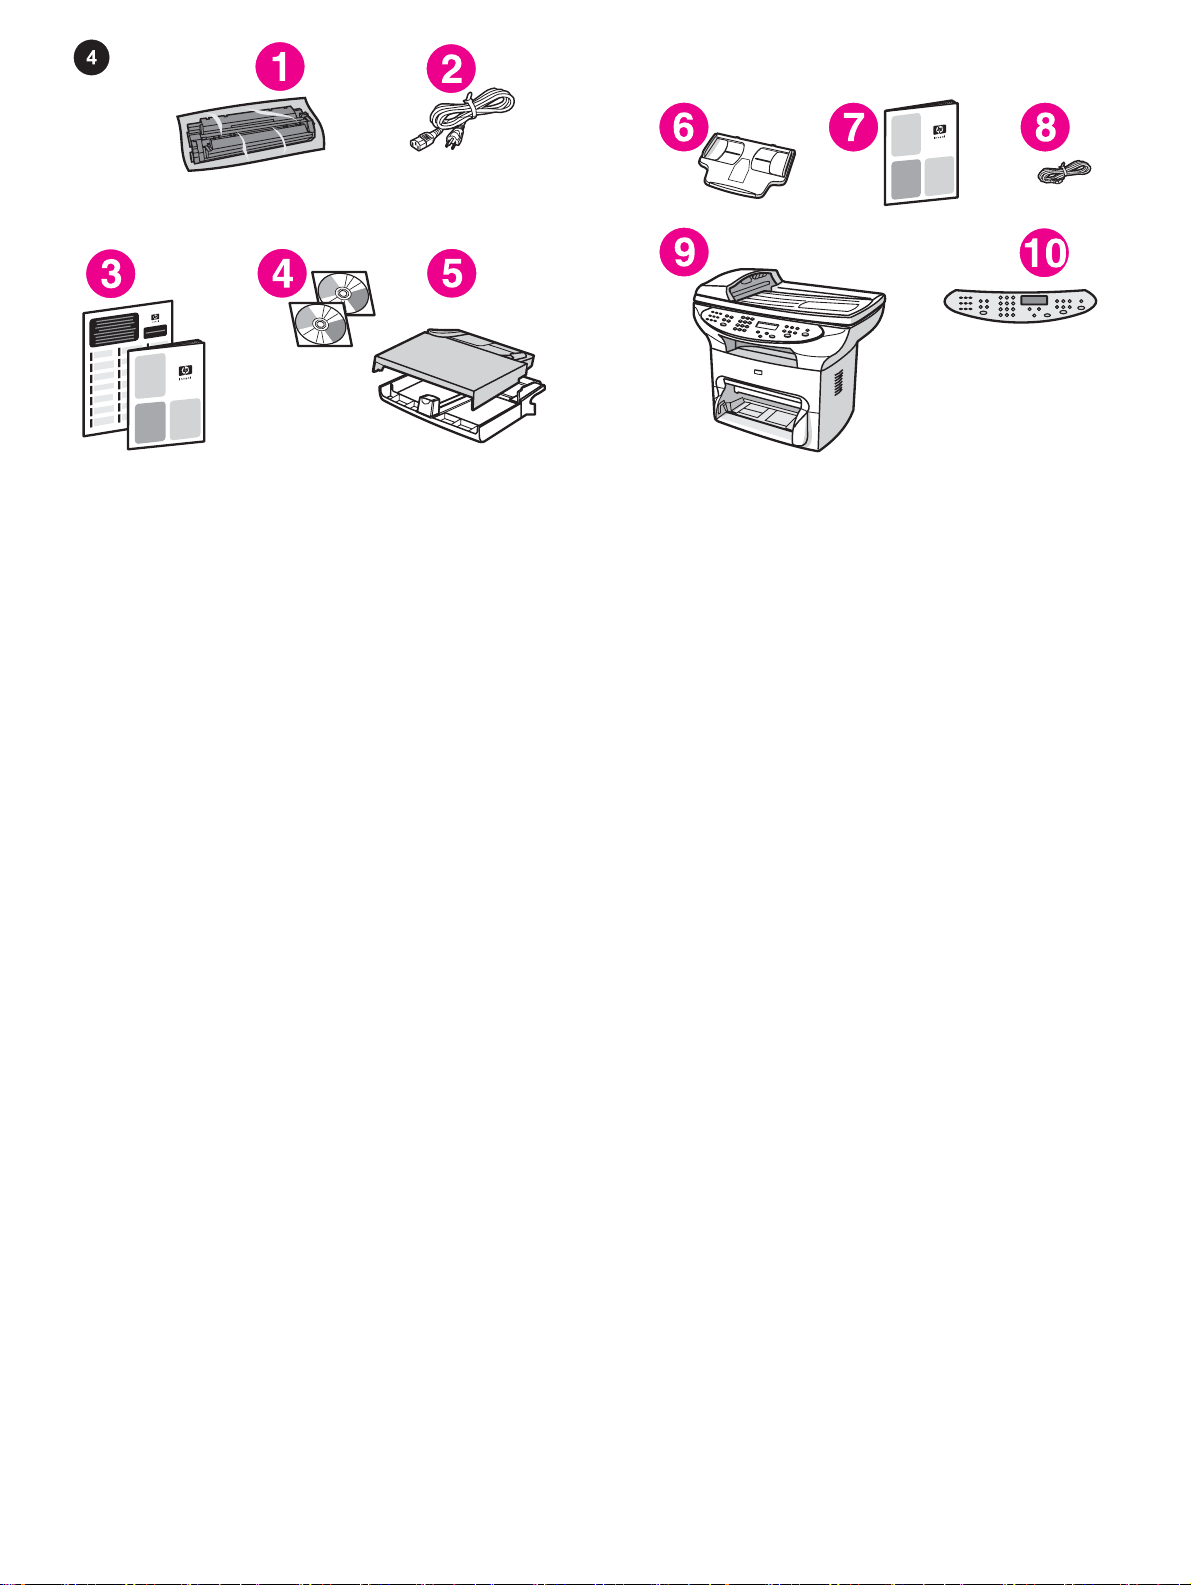
Package contents. 1)print cartridge; 2)power cord; 3)Start
Guide and support flyer; 4)CD-ROMs containing device software
and electronic User Guide; 5)250-sheet media input tray and 10sheet priority input tray;
6)automatic document feeder (ADF) input tray; 7)Fax Guide;
8)fax cord; 9)HP LaserJet 3380 all-in-one; 10)control-panel
faceplate (if not already installed). Note: The parallel cable and
USB device cable (A/B) are not included.
Contenu du carton 1)cartouche d'impression ; 2)cordon
d'alimentation ; 3)guide de mise en marche et brochure
d'assistance ; 4)CD-ROM contenant le logiciel du produit et le
guide d'utilisation électronique ; 5)bac d'alimentation de support de
250 feuilles et bac d'alimentation prioritaire de 10 feuilles ;
Verpackungsinhalt. 1)Druckpatrone; 2)Netzkabel; 3)Leitfaden
zur Inbetriebnahme und Hinweise zur Unterstützung; 4)CD-ROMs
mit Gerätesoftware und elektronischem Benutzerhandbuch; 5)250Blatt-Druckmedienzufuhrfach und Einzelblatteinzug für 10 Blatt;
Contenuto della confezione. 1)cartuccia di stampa; 2)cavo di
alimentazione; 3)Guida introduttiva e opuscolo di supporto; 4)CDROM contenenti il software e la Guida per l'utente in formato
elettronico; 5)vassoio di alimentazione per i supporti da 250 fogli e
vassoio di alimentazione prioritario da 10 fogli.
Contenido del embalaje. 1)Cartucho de impresión; 2)cable de
alimentación; 3)Guía de instalación inicial y folleto de asistencia
técnica; 4)CD que incluyen software para el dispositivo y la Guía
del usuario en formato electrónico; 5)bandeja de entrada para 250
hojas y bandeja de entrada de prioridad para 10 hojas;
Inhoud van de verpakking. 1)printcartridge; 2)netsnoer;
3)beknopte handleiding en ondersteuningsbrochure; 4)CD-ROM
met de software en een elektronische gebruikershandleiding; 5)de
invoerlade voor 250 vel en de voorrangsinvoerlade voor 10 vel
afdrukmateriaal;
6)bac d'alimentation automatique (BAA) ; 7)guide du télécopieur ;
8)cordon du télécopieur ; 9)imprimante HP LaserJet 3380 all-inone ; 10)plaque frontale du panneau de commande (si elle n'est
pas déjà installée). Remarque : Le câble parallèle et le câble USB
(A/B) du périphérique ne sont pas inclus.
6)Zufuhrfach für den automatischen Vorlageneinzug;
7)Faxhandbuch; 8)Faxkabel; 9)HP LaserJet 3380 All-in-One;
10)Bedienfeldblende (wenn nicht bereits eingebaut). Hinweis: Das
Parallelkabel und das USB-Gerätekabel (A/B) sind nicht im
Lieferumfang enthalten.
6)vassoio di alimentazione dell'ADF; 7)Guida all'utilizzo del fax;
8)cavo del fax; 9)HP LaserJet 3380 All-in-One; 10)mascherina
del pannello di controllo (se non installata). Nota: il cavo parallelo e
il cavo USB (A/B) non sono inclusi.
6)bandeja de entrada del alimentador automático de documentos
(ADF); 7)Guía del fax; 8)cable de fax; 9)HP LaserJet 3380 all-inone; 10)placa frontal para el panel de control (si no está instalada).
Nota: no se incluyen el cable paralelo ni el cable de dispositivo
USB (A/B).
6)automatische documentinvoer (ADI); 7)Faxhandleiding;
8)faxsnoer; 9)HP LaserJet 3380 all-in-one; 10)voorkant van het
bedieningspaneel (tenzij deze reeds is geïnstalleerd). Opmerking:
De parallelle kabel en de USB-kabel (A/B) zijn niet meegeleverd.
Conteúdo da embalagem. 1)Cartucho de impressão; 2)cabo de
alimentação; 3)Guia de primeiros passos e panfleto de assistência
técnica; 4)CD-ROM com o software do dispositivo e Guia
eletrônico do usuário; 5)bandeja de entrada para 250 folhas e
bandeja de entrada prioritária para 10 folhas;
6)bandeja de entrada do alimentador automático de documentos
(AAD); 7)Guia do fax; 8)cabo do fax; 9)multifunção HP LaserJet
3380; 10)placa de suporte do painel de controle (se já não estiver
instalada). Observação: O cabo paralelo e o cabo do dispositivo
USB (A/B) não estão incluídos.
4

Documentation. The device includes the following documents:
1)Start Guide, for initial setup and configuration instructions; 2)Fax
Guide, for fax configuration and operation instructions;
3)electronic User Guide on the device CD-ROMs, for extra
information and troubleshooting; 4)Toolbox software Help, for
instructions about operating the device through the software.
Documentation. Le périphérique comprend les documents
suivants : 1)guide de mise en route contenant les instructions
d'installation et d'exécution initiales ; 2)guide du télécopieur
contenant les instructions de configuration et d'exécution ;
Dokumentation. Zum Lieferumfang des Geräts gehören folgende
Dokumente: 1)Leitfaden zur Inbetriebnahme mit Anweisungen zur
Einrichtung und Konfiguration; 2)Faxhandbuch mit Anweisungen
zur Faxkonfiguration und zum Faxbetrieb;
Documentazione. Insieme alla periferica viene inclusa la
seguente documentazione: 1)Guida introduttiva, per istruzioni
sull'installazione iniziale e la configurazione; 2)Guida all'utilizzo del
fax, per istruzioni sulla configurazione del fax e sul suo utilizzo;
Documentación. El dispositivo incluye los documentos siguientes:
1)Guía de instalación inicial con instrucciones para la instalación y
la configuración iniciales; 2)Guía del fax con instrucciones sobre la
configuración y el funcionamiento del fax;
Documentatie. Bij het apparaat wordt de volgende documentatie
geleverd: 1)Beknopte handleiding voor instructies over de
installatie en configuratie; 2)Faxhandleiding voor de configuratie
van de fax en de bediening hiervan;
3)guide d'utilisation électronique sur les CD-ROM du périphérique
contenant des instructions sur le dépannage et des informations
supplémentaires ; 4)aide du logiciel Boîte à outils contenant des
instructions sur l'exécution du périphérique par le biais du logiciel.
3)Elektronisches Benutzerhandbuch auf den Geräte-CD-ROMs mit
zusätzlichen Informationen und zur Fehlerbehebung; 4)ToolboxSoftwarehilfe mit Anweisungen zum Betrieb des Geräts mit Hilfe
der Software.
3)Guida per l'utente in formato elettronico su CD-ROM, per
informazioni aggiuntive e per la risoluzione dei problemi; 4)Guida
al software Casella degli strumenti, per istruzioni sul funzionamento
della periferica tramite il software.
3)Guía del usuario en formato electrónico en los CD del
dispositivo, que incluye información adicional y de solución de
problemas; 4)Ayuda del software Caja de herramientas con
instrucciones sobre cómo controlar el dispositivo a través del
software.
3)elektronische gebruikershandleiding op de CD-ROM' s bij het
apparaat voor extra informatie en probleemoplossingen; 4)Help bij
de Werkset-software voor instructies over de bediening van het
apparaat via de software.
Documentação. O dispositivo inclui os seguintes documentos:
1)Guia dos primeiros passos, com as instruções iniciais de
configuração e definição; 2)Guia do fax, com instruções de
configuração e operação do fax.
Português Nederlands Español Italiano Deutsch Français English
3)Guia eletrônico do usuário nos CD-ROMs do dispositivo, com
informações adicionais e solução de problemas; 4)Ajuda do
software caixa de ferramentas HP, com instruções sobre como
operar o dispositivo através do software.
5
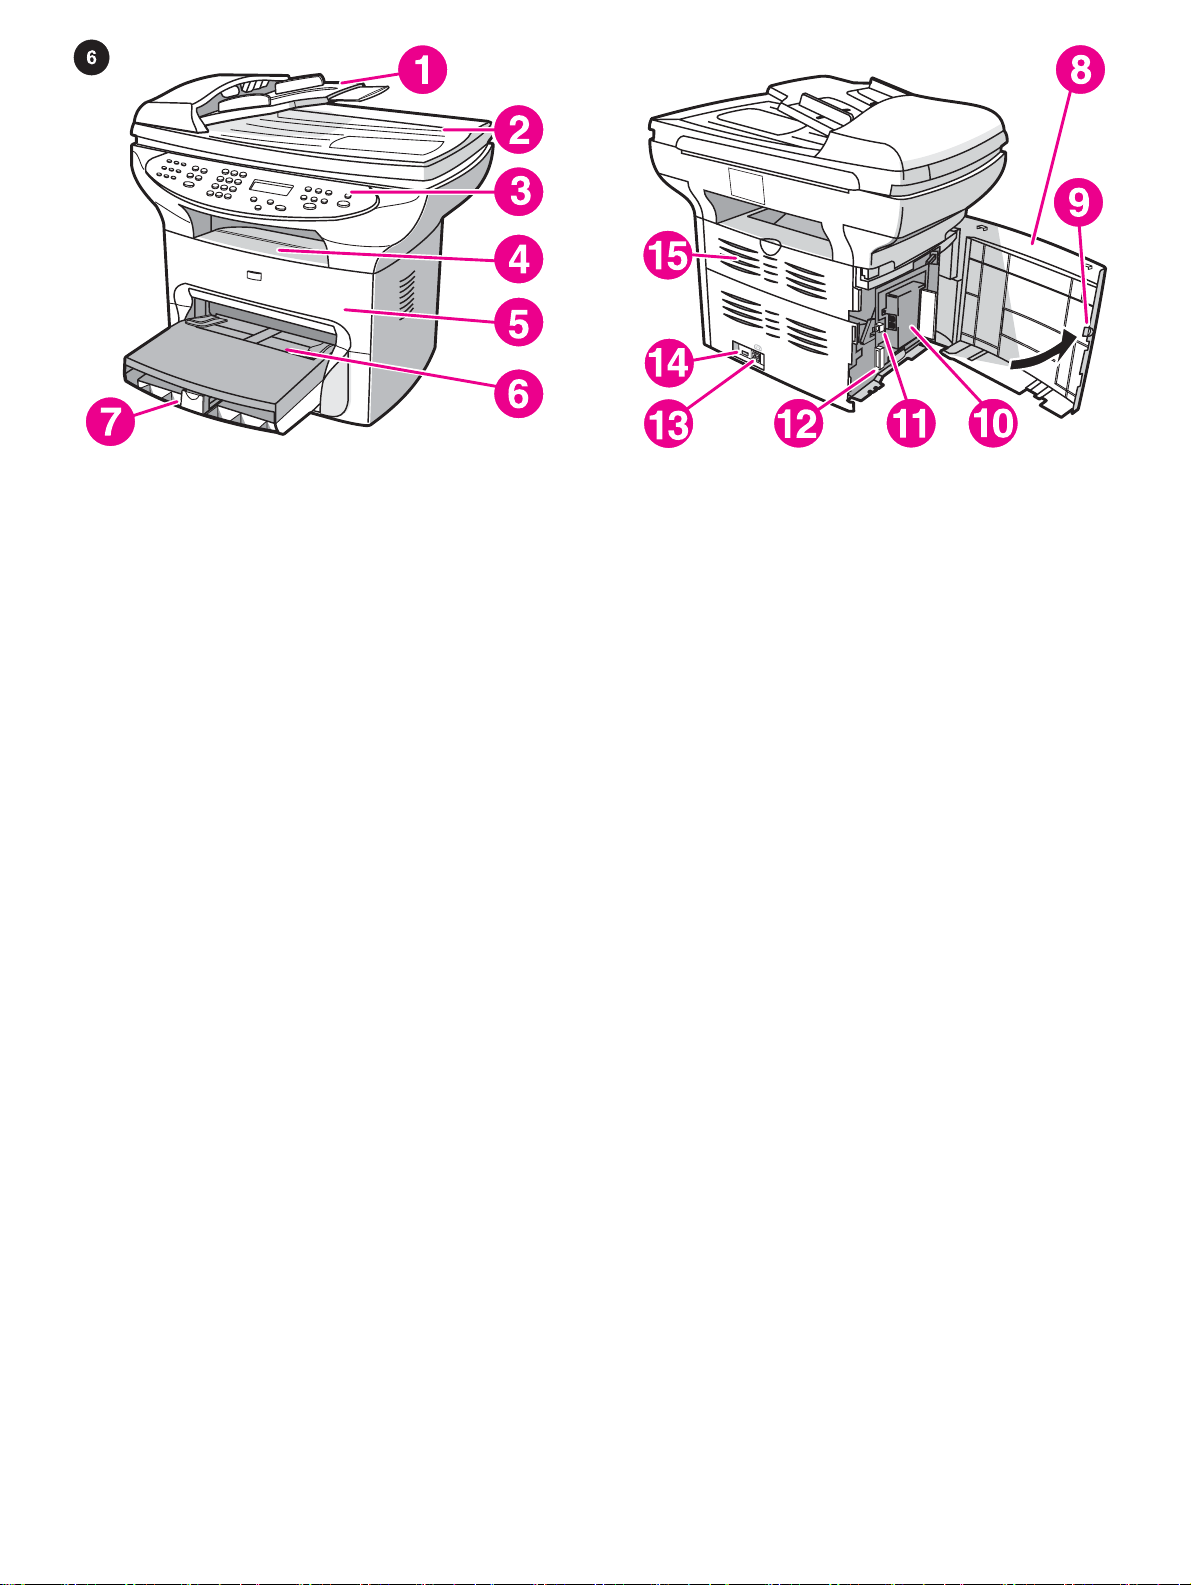
Locate the device parts. 1)ADF input tray; 2)flatbed scanner lid;
3)control panel; 4)output bin; 5)print-cartridge door; 6)priority
input tray; 7)media input tray;
8)left side panel; 9)left side panel latch; 10)fax interface ports;
11)USB port; 12)parallel port; 13)power socket; 14)power switch;
15)straight-through output door.
Localisation des pièces du périphérique. 1)bac d'alimentation
automatique ; 2)couvercle du scanner à plat ; 3)panneau de
commande ; 4)bac de sortie ; 5)porte d'accès aux cartouches
d'impression ; 6)bac d'alimentation prioritaire ; 7)bac
d'alimentation de support ;
Position der Geräteteile. 1)Zufuhrfach für den automatischen
Vorlageneinzug; 2)Abdeckung des Flachbettscanners;
3)Bedienfeld; 4)Ausgabefach; 5)Druckpatronenklappe;
6)Zufuhrfach für den Einzelblatteinzug; 7)Druckmedienzufuhrfach;
Individuazione dei componenti della periferica. 1)vassoio di
alimentazione dell'ADF; 2)coperchio dello scanner piano;
3)pannello di controllo; 4)scomparto di uscita; 5)sportello di
accesso alla cartuccia; 6)vassoio di alimentazione prioritario;
7)vassoio di alimentazione per i supporti;
Localice las piezas del dispositivo. 1)Bandeja de entrada del
ADF; 2)tapa del escáner de superficie plana; 3)panel de control;
4)bandeja de salida; 5)puerta del cartucho de impresión;
6)bandeja de entrada de prioridad; 7)bandeja de entrada de
soportes de impresión;
Zoek de onderdelen van het apparaat. 1)ADI invoerlade; 2)klep
van de flatbed scanner; 3)bedieningspaneel; 4)uitvoerbak; 5)klep
van de printcartridge; 6)voorrangsinvoerlade; 7)invoerlade voor
afdrukmateriaal;
8)panneau latéral gauche ; 9)loquet du panneau latéral gauche ;
10)ports d'interface du télécopieur ; 11)port USB ; 12)port
parallèle ; 13)prise d'alimentation ; 14)bouton d'alimentation ;
15)porte de sortie directe.
8)linke Seitenabdeckung; 9)Riegel linke Seitenabdeckung;
10)Anschlüsse für die Faxschnittstelle; 11)USB-Anschluss;
12)Parallelanschluss; 13)Netzbuchse; 14)Netzschalter;
15)Ausgabeklappe des geraden Papierpfads.
8)pannello laterale sinistro; 9)fermo del pannello laterale sinistro;
10)porte di interfaccia fax; 11)porta USB; 12)porta parallela;
13)presa di alimentazione; 14)interruttore; 15)sportello di uscita
diretta.
8)panel lateral izquierdo; 9)retén del panel lateral izquierdo;
10)puertos de interfaz de fax; 11)puerto USB; 12)puerto paralelo;
13)toma de alimentación; 14)interruptor de encendido; 15)puerta
de salida de papel rectilínea.
8)linkerpaneel; 9)vergrendeling linkerpaneel; 10)faxinterfacepoorten; 11)USB-poort; 12)parallelle poort;
13)stroomaansluiting; 14)aan/uit-schakelaar; 15)klep rechte
papierbaan.
Localize as peças do dispositivo. 1)bandeja de entrada do AAD;
2)tampa do scanner de mesa; 3)painel de controle; 4)bandeja de
saída; 5)porta do cartucho de impressão; 6)bandeja de entrada
prioritária; 7)bandeja de entrada de mídia;
8)painel lateral esquerdo; 9)trava do painel lateral esquerdo;
10)portas de interface do fax; 11)porta USB; 12)porta paralela;
13)soquete de alimentação; 14)chave liga/desliga; 15)porta da
saída direta.
6
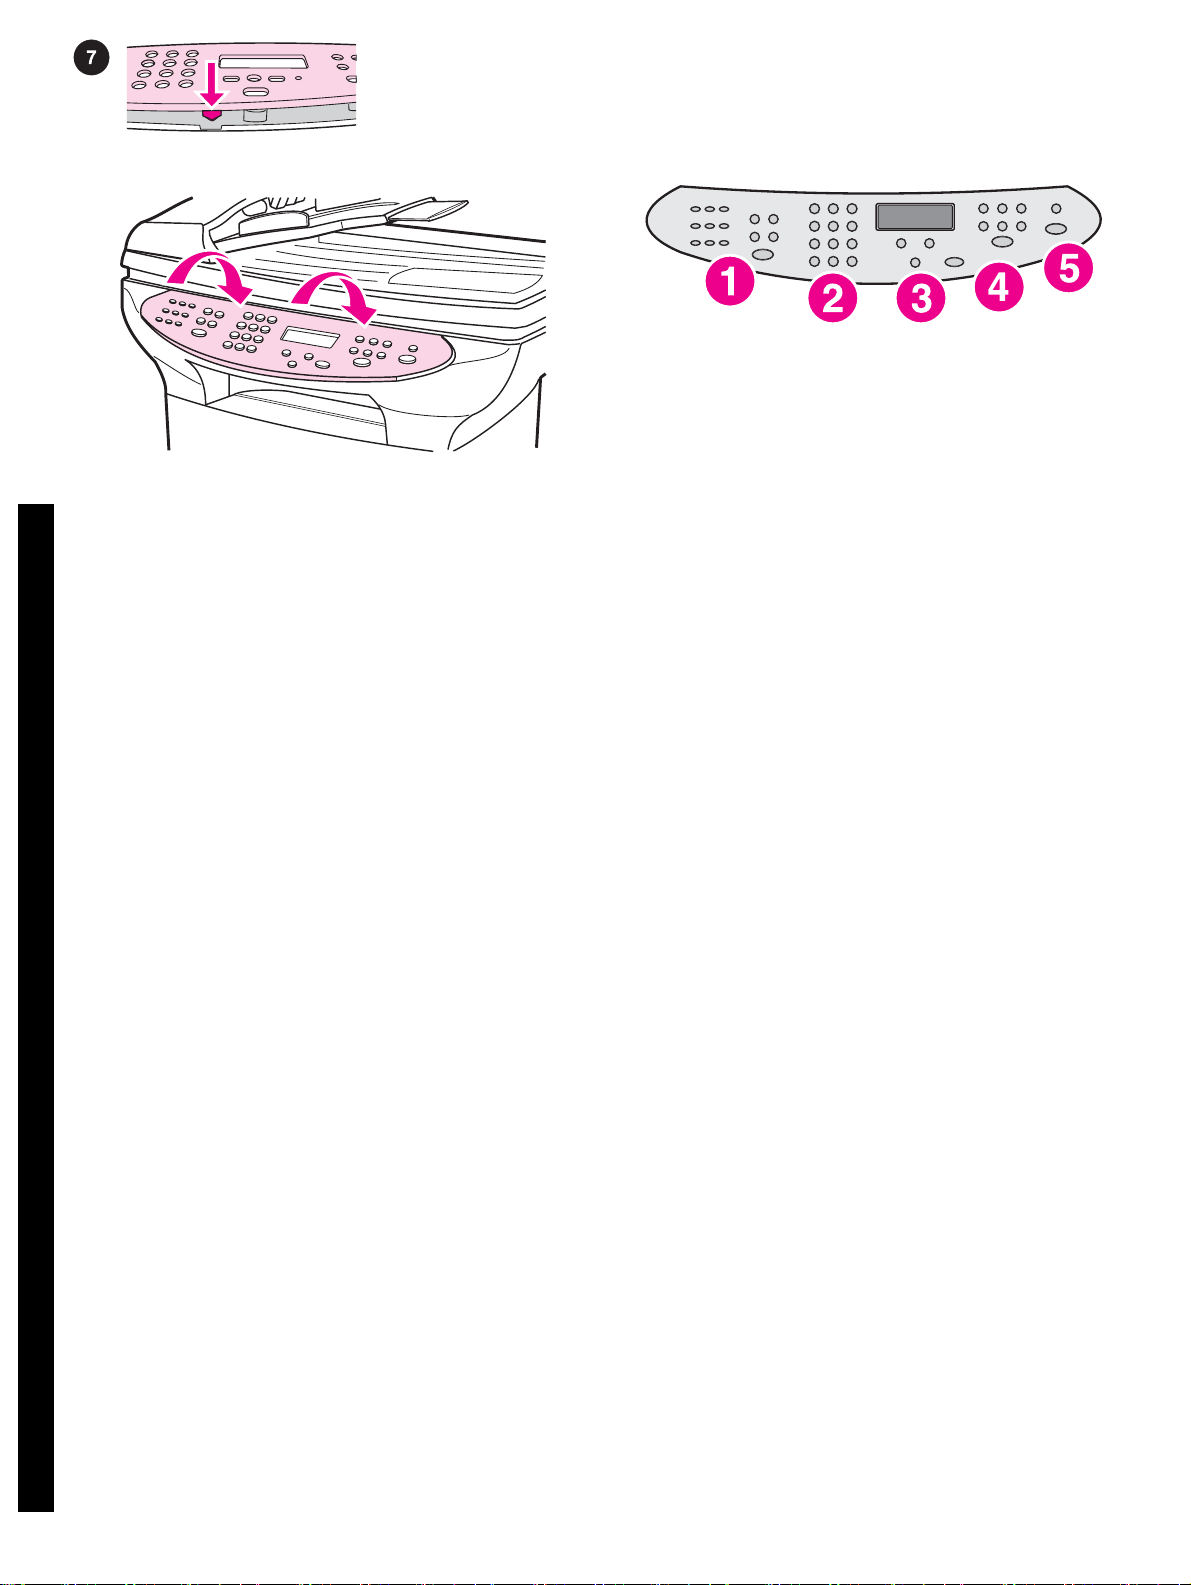
Install the control panel faceplate (if not already installed).
1)Align the tab in the center of the bottom of the faceplate with the
slot on the device. 2)Press the bottom of the faceplate onto the
device, and then continue to press while pushing your hands up
toward the top of the faceplate until it snaps into place.
Note: Make sure that the faceplate is aligned correctly and is not
pressing any buttons. The control panel includes the following
controls: 1)fax controls; 2)alphanumeric buttons; 3)menu and
cancel controls; 4)copy controls; 5)scan controls.
Installation de la plaque frontale du panneau de commande (si
elle n'est pas déjà installée). 1)Alignez l'ergot (situé au milieu de
la partie inférieure de la plaque frontale) avec la fente du
périphérique. Appuyez sur la partie inférieure de la plaque frontale
vers le périphérique. Continuez d'appuyer tout en effectuant une
pression sur la partie supérieure de la plaque frontale jusqu'à ce
qu'elle s'enclenche correctement.
Einsetzen der Bedienfeldblende (wenn diese nicht bereits
eingebaut ist). 1)Richten Sie die Lasche, die sich mittig auf der
Unterseite der Blende befindet, an der Vertiefung am Gerät aus.
2)Drücken Sie die Unterseite der Blende auf das Gerät. Schieben
Sie sie dabei in Richtung der oberen Blendenkante, bis die Blende
einrastet.
Installazione della mascherina del pannello di controllo (se non
installata). 1)Allineare la linguetta posta al centro della parte
inferiore della mascherina all'alloggiamento della periferica.
2)Premere la parte inferiore della mascherina sulla periferica,
spingendo contemporaneamente la mascherina verso l'alto fino a
bloccarla in posizione.
Instale la placa frontal del panel de control (si no está ya
instalada). 1)Alinee la pestaña de la parte central inferior de la
placa frontal con la ranura del dispositivo. 2)Presione la parte
inferior de la placa para introducirla dentro de la ranura del
dispositivo y continúe presionando mientras desliza las manos
hacia la parte superior de la placa hasta que ésta encaje en su sitio.
Installeer de voorkant van het bedieningspaneel (tenzij deze
reeds geïnstalleerd is). 1)Lijn de tab in het midden aan de
onderzijde van de voorkant uit met de sleuf op het apparaat.
2)Duw de onderzijde van de voorkant in het apparaat en duw
vervolgens met beide handen naar de bovenzijde totdat de
voorkant vastklikt.
Remarque : Assurez-vous que la plaque frontale soit bien alignée
et qu'elle n'exerce aucune pression sur aucun bouton. Le panneau
de commande comprend les commandes suivantes :
1)commandes du télécopieur ; 2)boutons alphanumériques ;
3)commandes de menu et d'annulation ; 4)commandes de copie ;
5)boutons de numérisation.
Hinweis: Vergewissern Sie sich, dass die Blende ordnungsgemäß
ausgerichtet ist und keine Tasten gedrückt sind. Das Bedienfeld
enthält folgende Bedienelemente: 1)Faxtasten;
2)alphanumerische Tasten; 3)Menü- und Abbruchtasten;
4)Kopiertasten; 5)Scantasten.
Nota: accertarsi che la mascherina sia correttamente allineata e
che non copra alcun pulsante. Sul pannello di controllo sono
disponibili i seguenti pulsanti: 1)pulsanti fax; 2)pulsanti
alfanumerici; 3)pulsanti menu e annulla; 4)pulsanti copia;
5)pulsanti scansione.
Nota: asegúrese de que la placa frontal está bien alineada y de
que no se encuentra sobre ningún botón. El panel de control
incluye los siguientes controles: 1)controles del fax; 2)botones
alfanuméricos; 3)controles del menú y de cancelación; 4)controles
de copia; 5)controles de escaneado.
Opmerking: controleer of de voorkant goed is uitgelijnd en of de
knoppen vrij zijn. Het bedieningspaneel omvat de volgende
knoppen: 1)knoppen voor faxen; 2)alfanumerieke toetsen;
3)menuknoppen en knop voor annuleren; 4)knoppen voor
kopiëren; 5)knoppen voor scannen.
Instale a placa de suporte do painel de controle (se já não
estiver instalada). 1)Alinhe a guia no centro da parte inferior da
placa de suporte com a fenda no dispositivo. 2)Pressione a parte
inferior da placa de suporte contra o dispositivo e continue
pressionando, enquanto empurra com as mãos para cima, na
Português Nederlands Español Italiano Deutsch Français English
direção do topo da placa de suporte, até ela encaixar-se na sua
posição.
Observação: Verifique se a placa de suporte está alinhada
corretamente e não está pressionando nenhum botão. O painel de
controle inclui os seguintes controles: 1)controles do fax; 2)botões
alfanuméricos; 3)controles de menu e de cancelar; 4)controles de
cópia; 5)controles de digitalização.
7
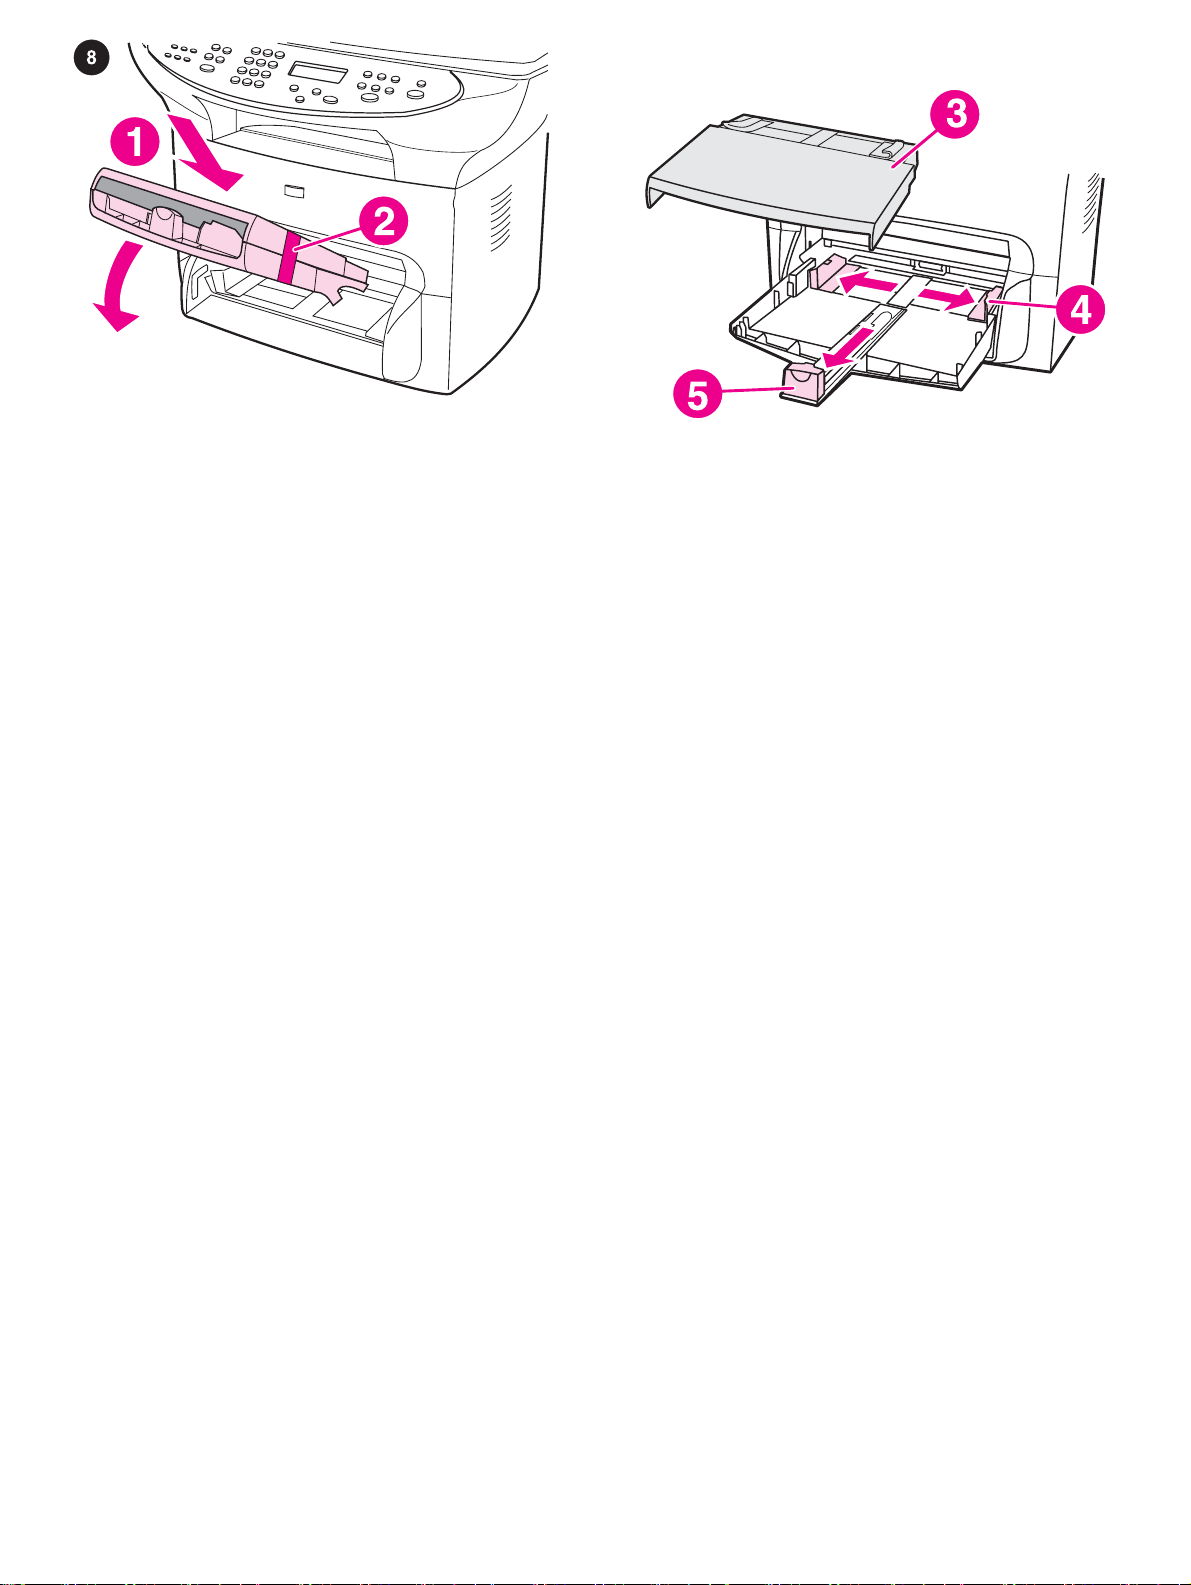
Install the media input and priority input trays. 1)Slide the trays
in and down at an angle until they fit securely. 2)Remove any
shipping tape inside and outside of the trays.
3)Remove the priority input tray. 4)Slide out the media guides.
5)Pull out the long-media support.
Installation des bacs d'alimentation de support et prioritaire.
1)Faites glisser les bacs en les faisant pivoter sur un angle jusqu'à
ce qu'ils s'emboîtent parfaitement. 2)Retirez tout adhésif pouvant
se trouver à l'intérieur ou à l'extérieur des bacs.
Einsetzen des Druckmedienzufuhrfachs und des Zufuhrfachs für
den Einzelblatteinzug. 1)Schieben Sie die Fächer im
entsprechenden Winkel nach unten ein, bis sie fest sitzen.
2)Entfernen Sie alle Transportsicherungen von den Innen- und
Außenseiten der Zufuhrfächer.
Installazione dei vassoi di alimentazione per i supporti e
prioritario. 1)Far scorrere i vassoi verso l'interno e verso il basso,
finché non si bloccano in posizione. 2)Rimuovere il nastro di
trasporto dai vassoi.
Instale las bandejas de entrada de soportes de impresión y de
entrada de prioridad. 1)Deslice las bandejas hacia dentro y hacia
abajo en ángulo hasta que queden bien sujetas. 2)Retire las cintas
de embalaje del interior y el exterior de las bandejas.
Installeer de invoerlade voor het afdrukmateriaal en de
voorrangsinvoerlade. 1)Schuif de laden in het apparaat en naar
beneden tot deze goed vastzitten. 2)Verwijder het
verpakkingsplakband aan de binnen- en buitenzijde van de laden.
3)Retirez le bac d'alimentation prioritaire. 4)Faites glisser les
guides vers l'extérieur. 5)Enlevez le long support.
3)Entfernen Sie das Zufuhrfach für den Einzelblatteinzug.
4)Ziehen Sie die Druckmedienführungen heraus. 5)Ziehen Sie die
Vorrichtung für lange Druckmedien heraus.
3)Rimuovere il vassoio di alimentazione prioritario. 4)Far scorrere
le guide per i supporti verso l'esterno. 5)Estrarre la guida dei
supporti.
3)Retire la bandeja de entrada de prioridad. 4)Deslice las guías
de los soportes de impresión hacia fuera. 5)Extraiga el apoyo para
soportes de impresión largos.
3)Verwijder de voorrangsinvoerlade. 4)Schuif de geleiders voor
het afdrukmateriaal naar buiten. 5)Trek de ondersteuning voor lang
afdrukmateriaal naar voren.
Instale as bandejas de entrada de mídia e de entrada prioritária.
1)Deslize as bandejas para dentro e para baixo, em uma direção
angulada, até que se encaixem de maneira segura. 2)Remova as
fitas de embalagem no interior e no exterior das bandejas.
3)Retire a bandeja de entrada prioritária. 4)Deslize as guias de
papel para fora. 5)Puxe para fora o suporte de mídia longa.
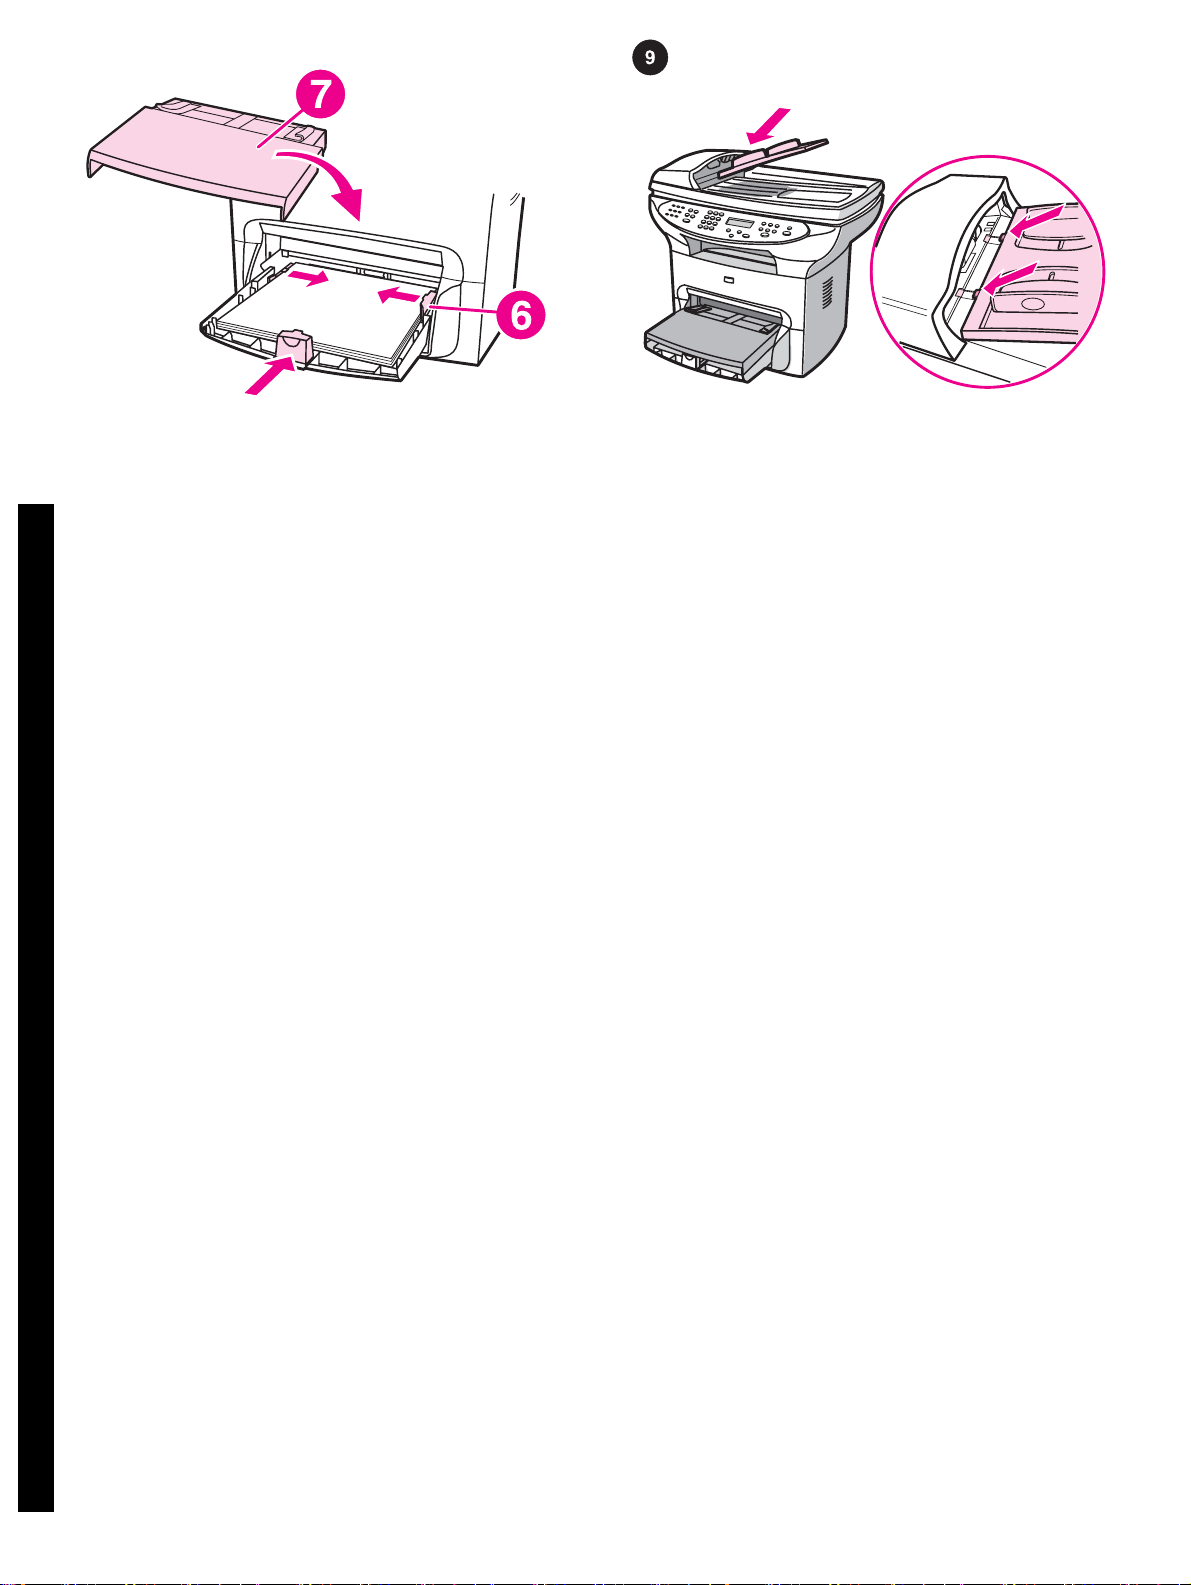
8
6)Place the media in the media input tray, and then adjust the
media guides until they are flush with the media. Note: Do not fan
the media before placing it in the tray. 7)Install the priority input
tray on top of the media input tray.
Install the automatic document feeder (ADF) input tray. 1)Align
the two tabs on the input tray with the two grooves in the ADF lid.
2)Slide the tray into the grooves until the tray snaps into place.
6)Positionnez le support dans le bac d'alimentation de support,
puis faites coulisser les guides pour les ajuster au support.
Remarque : Ne ventilez pas le support avant de le placer dans le
bac. 7)Installez le bac d'alimentation prioritaire au-dessus du bac
d'alimentation de support.
6)Legen Sie die Druckmedien in das Druckmedienzufuhrfach ein,
und richten Sie dann die Druckmedienführungen so aus, dass sie
mit den Druckmedien bündig abschließen. Hinweis: Fächern Sie
die Druckmedien nicht auf, bevor Sie sie in das Fach einlegen.
7)Setzen Sie das Zufuhrfach für den Einzelblatteinzug oberhalb
des Druckmedienzufuhrfachs ein.
6)Disporre i supporti nel vassoio di alimentazione, quindi regolare
le guide in modo che siano allineate ai supporti. Nota: non
sgranare le risme dei supporti prima di disporle nel vassoio.
7)Installare il vassoio di alimentazione prioritario sopra il vassoio di
alimentazione per i supporti.
6)Coloque el soporte de impresión en la bandeja de entrada y
ajuste las guías hasta que estén niveladas con el soporte de
impresión. Nota: no airee el soporte de impresión antes de
colocarlo en la bandeja. 7)Instale la bandeja de entrada de
prioridad sobre la bandeja de entrada de soportes de impresión.
6)Plaats het afdrukmateriaal in de invoerlade voor afdrukmateriaal
en pas de geleiders aan zodat deze tegen het afdrukmateriaal
rusten. Opmerking: waaier het afdrukmateriaal uit voordat u deze
in de lade plaatst. 7)Plaats de voorrangsinvoerlade boven de
invoerlade voor het afdrukmateriaal.
Installation du bac d'alimentation automatique (BAA). 1)Alignez
les deux ergots du bac d'alimentation sur les deux rainures situées
dans le couvercle du BAA. 2)Faites glisser le bac dans les rainures
jusqu'à ce qu'il s'enclenche.
Einsetzen des Zufuhrfachs für den automatischen
Vorlageneinzug. 1)Richten Sie die beiden Laschen am
Zufuhrfach an den beiden Aussparungen in der Abdeckung des
automatischen Vorlageneinzugs aus. 2)Schieben Sie das Fach in
die Aussparungen, bis es einrastet.
Installazione del vassoio di alimentazione dell'ADF 1)Allineare
le due linguette del vassoio di alimentazione alle scanalature del
coperchio dell'ADF. 2)Far scorrere il vassoio nelle scanalature fino
a quando non si blocca in posizione.
Instale la bandeja de entrada del alimentador automático de
documentos (ADF). 1)Alinee las dos pestañas de la bandeja de
entrada con las dos ranuras de la tapa del ADF. 2)Deslice la
bandeja en las ranuras hasta que la bandeja encaje en su sitio.
Invoerlade van de automatische documentinvoer. 2)Lijn de twee
tabs op de invoerlade uit op de twee groeven op de klep van de
automatische documentinvoer. 2)Schuif de lade in de groeven
totdat de lade vastklikt.
6)Coloque a mídia na bandeja de entrada e então ajuste as guias
até que elas prendam a mídia firmemente no lugar. Observação:
Não ventile a mídia antes de colocá-la na bandeja. 7)Instale a
bandeja de entrada prioritária sobre a bandeja de entrada de mídia.
Português Nederlands Español Italiano Deutsch Français English
Instale a bandeja de entrada do alimentador automático de
documentos (AAD). 1)Alinhe as duas guias da bandeja de
entrada com os dois encaixes da tampa do AAD. 2)Deslize a
bandeja nos encaixes até que ela se ajuste no lugar.
9

Install the print cartridge. 1)Make sure that the print-cartridge
door is open.
2)Remove the print cartridge from its packaging, and then shake
the cartridge gently five or six times. 3)Break the plastic tab at the
end of the cartridge. 4)Remove the sealing tape from the cartridge.
Installation de la cartouche d'impression. 1)Veillez à ce que la
porte d'accès aux cartouches d'impression soit ouverte.
Einsetzen der Druckpatrone. 1)Stellen Sie sicher, dass die
Druckpatronenklappe geöffnet ist.
Installazione della cartuccia di stampa. 1)Accertarsi che lo
sportello di accesso alla cartuccia sia aperto.
Instale el cartucho de impresión. 1)Asegúrese de que la puerta
del cartucho de impresión está abierta.
Installeer de printcartridge. 1)Controleer of de klep voor de
printcartridge is geopend.
2)Retirez la cartouche d'impression de son emballage, puis agitez
doucement la cartouche cinq à six fois. 3)Retirez le bout de
plastique se situant à l'extrémité de la cartouche. 4)Otez la bande
adhésive de la cartouche.
2)Entnehmen Sie die Druckpatrone aus der Verpackung, und
schütteln Sie die Druckpatrone fünf oder sechs Mal. 3)Knicken Sie
die am Ende der Druckpatrone befindliche Plastiklasche ab.
4)Ziehen Sie die Versiegelung aus der Druckpatrone heraus.
2)Rimuovere la cartuccia di stampa dalla confezione, quindi
agitarla leggermente per cinque o sei volte. 3)Rompere la linguetta
di plastica posta all'estremità della cartuccia. 4)Rimuovere il nastro
di sigillo dalla cartuccia di stampa.
2)Retire el embalaje del cartucho de impresión y agítelo con
suavidad cinco o seis veces. 3)Rompa la pestaña de plástico que
hay en el extremo del cartucho. 4)Retire la cinta selladora del
cartucho.
2)Verwijder de printcartridge uit de verpakking en schud de
cartridge voorzichtig vijf of zes keer heen en weer. 3)Breek de
plastic tab aan het einde van de cartridge af. 4)Verwijder de
verpakkingstape van de cartridge.
Instale o cartucho de impressão. 1)Verifique se a porta de
acesso ao cartucho está aberta.
2)Retire o cartucho da embalagem e então agite-o suavemente
cinco ou seis vezes. 3)Quebre a guia plástica localizada na
extremidade do cartucho. 4)Remova a fita de proteção do cartucho.
10

5)Hold the print cartridge by the handle and insert the cartridge as
shown. 6)Close the print-cartridge door. The print cartridge
engages when the door is closed.
CAUTION: If toner gets on your clothing, wipe the toner off with a
clean cloth, wash the items in cold water, and air dry. Using hot
water or heat from a dryer will set the toner in the fabric.
5)Maintenez la cartouche d'impression par la poignée et insérez-la
comme indiqué. 6)Fermez la porte d'accès aux cartouches
d'impression. La cartouche d'impression se met en place une fois la
porte fermée.
5)Halten Sie die Druckpatrone am Griff, und setzen Sie die
Patrone dann wie in der Abbildung dargestellt ein. 6)Schließen Sie
die Druckpatronenklappe. Die Druckpatrone rastet ein, wenn die
Klappe geschlossen wird.
5)Afferrare la cartuccia di stampa tenendola per la levetta e
inserirla come illustrato nella figura. 6)Chiudere lo sportello di
accesso alla cartuccia di stampa. Chiudendo lo sportello, la
cartuccia viene inserita correttamente.
5)Sujete el cartucho de impresión por el asa e introdúzcalo como
muestra la ilustración. 6)Cierre la puerta del cartucho de
impresión. El cartucho de impresión quedará encajado cuando
cierre la puerta.
5)Houd de printcartridge vast bij de hendel en plaats deze zoals is
weergegeven. 6)Sluit de klep van de printcartridge. De
printcartridge wordt geactiveerd als de klep is gesloten.
ATTENTION : Si vous vous tachez avec de l'encre, enlevez-la
avec un chiffon propre, nettoyez vos vêtements à l'eau froide et
faites-les sécher à l'air. L'eau chaude et l'air provenant d'un sèchelinge pourraient incruster l'encre dans le tissu.
VORSICHT: Wenn Ihre Kleidung mit Toner in Berührung kommt,
wischen Sie den Toner mit einem sauberen Tuch ab. Waschen Sie
die entsprechenden Kleidungsstücke mit kaltem Wasser, und
lassen Sie sie an der Luft trocknen. Bei Verwendung von heißem
Wasser oder durch die Hitze eines Wäschetrockners dringt der
Toner in das Gewebe ein.
ATTENZIONE: se il toner viene a contatto con gli indumenti,
tamponare con un panno pulito, lavare i capi con acqua fredda e
lasciare asciugare all'aria. L'utilizzo di acqua calda e calore
artificiale fissano il toner sui tessuti.
PRECAUCIÓN: si mancha la ropa con tóner, retire el tóner con un
paño limpio, lávela con agua fría y séquela al aire. El agua caliente
o el calor de un secador fijarían el tóner en el tejido.
VOORZICHTIG: als u toner op uw kleding krijgt, moet u de toner
afvegen met een schoon doekje. Was de kleding in koud water en
laat deze vervolgens aan de lucht drogen. Als u heet water of een
föhn gebruikt, kan de toner niet meer uit de stof worden verwijderd.
5)Segure o cartucho de impressão pela alça e insira-o da maneira
ilustrada. 6)Feche a porta de acesso ao cartucho de impressão. O
cartucho de impressão se encaixa quando a porta é fechada.
Português Nederlands Español Italiano Deutsch Français English
CUIDADO: Caso sua roupa se suje de toner, limpe-a com um pano
limpo, lave com água fria e seque ao ar. A água quente ou o calor
da secadora podem fixar o toner no tecido.
11

Note: Hewlett-Packard Company cannot recommend using non-HP
print cartridges, whether they are new, refilled, or remanufactured.
Because they are not HP products, HP cannot influence their
design or control their quality.
Connect the power cord. 1)Connect the power cord to the power
socket on the back of the device. 2)Connect the other end of the
power cord to a grounded alternating current (AC) outlet. Note: Use
only the power cord that came with the device.
Remarque : Hewlett-Packard Company ne peut en aucun cas
recommander l'utilisation de cartouches d'impression d'une marque
différente, qu'il s'agisse de cartouches neuves ou reconditionnées.
En effet, comme il ne s'agit pas de produits HP, HP n'a aucun
contrôle sur leur conception ou leur qualité.
Hinweis: Hewlett-Packard Company kann die Verwendung von
Druckpatronen anderer Hersteller nicht empfehlen, unabhängig
davon, ob es sich dabei um neue, nachgefüllte oder überholte
Druckpatronen handelt. Da es sich bei diesen Produkten nicht um
HP Produkte handelt, hat Hewlett-Packard keinen Einfluss auf
deren Beschaffenheit oder Qualität.
Nota: Hewlett-Packard sconsiglia l'utilizzo di cartucce di stampa
nuove, ricaricate o rigenerate di altri produttori. HP non offre alcuna
garanzia sul corretto funzionamento o sulla qualità dei prodotti non
originali.
Nota: Hewlett-Packard Company no recomienda el uso de
cartuchos de impresión que no sean de HP, ya sean nuevos,
recargados o reciclados. Puesto que no son productos HP, HP no
puede influir en su diseño ni controlar su calidad.
Opmerking: Hewlett-Packard Company raadt het gebruik van
nieuwe, hervulde of gerecyclede printcartridges van andere
fabrikanten af. Omdat dit geen HP producten zijn, heeft HP ook
geen invloed op hun ontwerp en kwaliteit.
Connexion du cordon d'alimentation. 1)Connectez le cordon
d'alimentation à la prise d'alimentation située à l'arrière du
périphérique. 2)Connectez l'autre extrémité du cordon
d'alimentation à une prise de courant mise à la terre. Remarque :
Utilisez uniquement le cordon d'alimentation livré avec le
périphérique.
Anschließen des Netzkabels. 1)Stecken Sie das Netzkabel in die
Netzbuchse auf der Rückseite des Geräts ein. 2)Schließen Sie das
andere Ende des Netzkabels direkt an einer Wandsteckdose an.
Hinweis: Verwenden Sie nur das mit dem Gerät gelieferte
Netzkabel.
Collegamento del cavo di alimentazione. 1)Collegare il cavo di
alimentazione alla presa posta sul retro della periferica.
2)Collegare l'altra estremità del cavo a una presa di corrente CA
con messa a terra. Nota: utilizzare esclusivamente il cavo di
alimentazione fornito con la periferica.
Conecte el cable de alimentación. 1)Conecte el cable de
alimentación a la toma de alimentación que hay en la parte
posterior del dispositivo. 2)Conecte el otro extremo del cable de
alimentación a una toma de corriente alterna (CA)con conexión de
tierra. Nota: utilice sólo el cable de alimentación que se incluye con
el dispositivo.
Het netsnoer aansluiten. 1)Sluit het netsnoer aan op de
stroomaansluiting aan de achterzijde van het apparaat. 2)Sluit het
andere einde van het netsnoer aan op een geaard stopcontact.
Opmerking: gebruik alleen het bij het apparaat geleverde netsnoer.
Observação: A Hewlett-Packard Company não recomenda o uso
de cartuchos de outros fabricantes, sejam novos, recarregados ou
refabricados. A HP não pode influenciar no projeto ou controlar a
qualidade de produtos que não fabrica.
Conecte o cabo de alimentação. 1)Conecte o cabo de
alimentação no soquete de alimentação, localizado na parte
posterior do dispositivo. 2)Conecte a outra extremidade do cabo
de alimentação a uma fonte aterrada de corrente alternada (CA).
Observação: Use somente o cabo de alimentação fornecido com o
dispositivo.
12

Connect a printer cable to the device. Note: If you are using the
device as a standalone fax machine or copier, go to step 13.
1)Open the print-cartridge door, and then open the left side panel.
2)Connect the parallel or USB device cable (A/B) to the correct
port.
3)Thread the cable through the left panel opening, and then close
the panel. 4)Shut the print-cartridge door.
Connexion d'un câble de l'imprimante au périphérique.
Remarque : Si vous utilisez le périphérique avec un télécopieur ou
copieur autonome, rendez-vous à l'étape 13. 1)Ouvrez la porte
d'accès aux cartouches d'impression, puis le panneau latéral
gauche. 2)Connectez la câble USB (A/B) ou parallèle du
périphérique sur le port qui convient.
Anschließen eines Druckerkabels am Gerät. Hinweis: Wenn Sie
das Gerät als eigenständiges Fax- oder Kopiergerät verwenden,
fahren Sie mit Schritt 13 fort. 1)Öffnen Sie die
Druckpatronenklappe und anschließend die linke Seitenabdeckung.
2)Verbinden Sie das Parallelkabel bzw. das USB-Gerätekabel (A/
B) mit dem entsprechenden Anschluss.
Collegamento del cavo della stampante alla periferica. Nota: se
si utilizza la periferica come apparecchio fax indipendente o come
copiatrice, andare al punto 13. 1)Aprire lo sportello di accesso alla
cartuccia di stampa, quindi il pannello laterale sinistro. 2)Collegare
il cavo parallelo o USB (A/B) alla porta corretta.
Conecte el cable de la impresora al dispositivo. Nota: si utiliza el
dispositivo como copiadora o fax autónomos, vaya directamente al
paso 13. 1)Abra la puerta del cartucho de impresión y el panel
lateral izquierdo. 2)Conecte el cable paralelo o USB del dispositivo
(A/B)al puerto apropiado.
Een printerkabel op het apparaat aansluiten. Opmerking: als u
het apparaat als standalone fax of copier gebruikt, gaat u verder
met stap 13. 1)Open de klep van de printcartridge, en open
vervolgens het linkerpaneel. 2)Sluit de parallelle of USB-kabel (A/
B) aan op de juiste poort.
3)Enfilez le câble au travers de l'ouverture du panneau gauche,
puis fermez ce dernier. 4)Fermez la porte d'accès aux cartouches
d'impression.
3)Führen Sie das Kabel durch die Öffnung in der linken
Seitenabdeckung, und schließen Sie dann die Abdeckung.
4)Schließen Sie die Druckpatronenklappe.
3)Inserire il cavo nell'apertura del pannello laterale sinistro, quindi
richiudere il pannello. 4)Chiudere lo sportello di accesso alla
cartuccia di stampa.
3)Introduzca el cable en la abertura del panel lateral izquierdo y, a
continuación, cierre el panel. 4)Cierre la puerta del cartucho de
impresión.
3)Voer de kabel door de opening in het linkerpaneel en sluit
vervolgens het paneel. 4)Sluit de klep van de printcartridge.
Conecte um cabo de impressora ao dispositivo. Observação: Se
você está usando o dispositivo como um aparelho de fax ou uma
copiadora autônomos, pule para a etapa 13. 1)Abra a porta de
acesso ao cartucho de impressão e então abra o painel lateral
esquerdo. 2)Conecte o cabo paralelo ou USB do dispositivo (A/B)
Português Nederlands Español Italiano Deutsch Français English
na porta correta.
3)Passe o cabo pela abertura no painel esquerdo e feche-o.
4)Feche a porta de acesso ao cartucho de impressão.
13

Note: Do not connect the cable to a computer or a network at this
time.
Connect to a telephone line. Note: If you are not using the device
fax functionality, go to step 14. 1)Open the print-cartridge door.
2)Open the left side panel. 3)Connect the included fax cord to the
device "line" port (the port that is marked with an "L").
Remarque : Ne connectez pas le câble à un ordinateur ou à un
réseau à ce moment précis.
Hinweis: Schließen Sie das Kabel zu diesem Zeitpunkt noch nicht
an einen Computer oder ein Netzwerk an.
Nota: durante queste operazioni, non collegare il cavo a un
computer o a una rete.
Nota: no conecte aún el cable a un equipo o a una red.
Opmerking: sluit de kabel op dit moment nog niet aan op een
computer of netwerk.
Connexion à une ligne téléphonique. Remarque : Si vous
n'utilisez pas le télécopieur, rendez-vous à l'étape 14. 1)Ouvrez la
porte d'accès aux cartouches d'impression. 2)Ouvrez le panneau
latéral gauche. 3)Connectez le cordon du télécopieur au port de la
ligne du périphérique (port marqué d'un L).
Anschließen an eine Telefonleitung. Hinweis: Wenn Sie die
Faxfunktion des Geräts nicht nutzen möchten, fahren Sie mit Schritt
14 fort. 1)Öffnen Sie die Druckpatronenklappe. 2)Öffnen Sie die
linke Seitenabdeckung. 3)Verbinden Sie das mitgelieferte
Faxkabel mit dem Geräteanschluss für die "Leitung" (dieser ist mit
einem "L" gekennzeichnet).
Collegamento a una linea telefonica. Nota: se non si utilizza la
funzione fax della periferica, andare al punto 14. 1)Aprire lo
sportello di accesso alla cartuccia di stampa. 2)Aprire il pannello
laterale sinistro. 3)Collegare un'estremità del cavo del fax fornito
con la periferica alla porta contrassegnata dalla lettera "L".
Conecte el dispositivo a una línea telefónica. Nota: si no va a
utilizar la funcionalidad de fax del dispositivo, vaya directamente al
paso 14. 1)Abra la puerta del cartucho de impresión. 2)Abra el
panel lateral izquierdo. 3)Conecte el cable de fax que se incluye
con el producto al puerto "lineal" del dispositivo (puerto marcado
con una "L").
Aansluiten op een telefoonlijn. Opmerking: als u de
faxfunctionaliteit niet gebruikt, gaat u verder met stap 14. 1)Open
de klep van de printcartridge. 2)Open het linkerpaneel. 3)Sluit het
meegeleverde faxsnoer aan op de " Line"-poort van het apparaat
(de poort is gemarkeerd met een "L").
Observação: Não conecte o cabo a um computador ou rede por
enquanto.
Conecte a uma linha telefônica. Observação: Se você não está
usando a funcionalidade de fax do dispositivo, pule para a etapa
14. 1)Abra a porta de acesso ao cartucho de impressão. 2)Abra o
painel lateral esquerdo. 3)Conecte o cabo de fax incluído à porta
de "linha" do dispositivo (aquela marcada com um "L").
14

4)Close the left side panel (make sure that the fax cord is routed
through the upper notch in the panel). 5)Close the print-cartridge
door. 6)Connect the cord to a telephone jack. Note: Use only the
fax cord that came with the device. For more information about
faxing, see the Fax Guide.
Turn on the device. Turn on the device by pressing the power
button next to the power socket on the back of the device.
4)Fermez le panneau latéral gauche, assurez-vous que la ligne
téléphonique passe par l'encoche supérieure du panneau.
5)Fermez la porte d'accès aux cartouches d'impression.
6)Connectez le cordon à la prise téléphonique. Remarque :
Utilisez seulement le cordon de télécopieur livré avec le
périphérique. Pour plus d'informations sur le télécopieur, consultez
le guide du télécopieur.
4)Schließen Sie die linke Seitenabdeckung. (Vergewissern Sie
sich, dass das Faxkabel durch die obere Kerbe in der Abdeckung
geführt wird.) 5)Schließen Sie die Druckpatronenklappe.
6)Verbinden Sie das Kabel mit einer Telefonbuchse. Hinweis:
Verwenden Sie nur das mit dem Gerät gelieferte Faxkabel. Weitere
Informationen zum Faxen finden Sie im Faxhandbuch.
4)Chiudere il pannello laterale sinistro accertandosi che il cavo del
fax passi attraverso il foro superiore del pannello. 5)Chiudere lo
sportello di accesso alla cartuccia di stampa. 6)Collegare il cavo a
una presa telefonica. Nota: utilizzare esclusivamente il cavo del fax
fornito con la periferica. Per ulteriori informazioni, consultare la
Guida all'utilizzo del fax.
4)Cierre el panel lateral izquierdo (asegúrese de que el cable del
fax se introduce en la muesca superior del panel). 5)Cierre la
puerta del cartucho de impresión. 6)Conecte el cable a una clavija
telefónica. Nota: utilice sólo el cable de fax que se incluye con el
dispositivo. Para obtener más información sobre el uso del fax,
consulte la Guía del fax.
4)Wanneer u het linkerpaneel sluit, moet u de faxlijn door de
bovenste opening in het paneel halen. 5)Sluit de klep van de
printcartridge. 6)Sluit het snoer aan op een telefoonaansluiting.
Opmerking: gebruik alleen het bij het apparaat geleverde faxsnoer.
Zie de faxhandleiding voor meer informatie over het faxen.
Mise sous tension du périphérique. Mettez le périphérique sous
tension en appuyant sur le bouton d'alimentation situé à côté de la
prise d'alimentation à l'arrière du périphérique.
Einschalten des Geräts. Schalten Sie das Gerät ein, indem Sie
den Netzschalter betätigen. Dieser befindet sich auf der
Geräterückseite neben der Netzbuchse.
Accensione della periferica. Accendere la periferica premendo
l'interruttore di alimentazione posto accanto alla presa sul retro
della periferica.
Encienda el dispositivo. Presione el botón de encendido que hay
junto a la toma de alimentación de la parte posterior del dispositivo
para encenderlo.
Schakeldeprinterin. Schakel het apparaat in door de aan/uitschakelaar naast de stroomaansluiting op de achterzijde van het
apparaat in te drukken.
4)Feche o painel esquerdo (verifique se a o cabo de fax está
passando pelo chanfro superior no painel). 5)Feche a porta de
acesso ao cartucho de impressão. 6)Conecte o cabo a uma
tomada telefônica. Observação: Use somente o cabo de fax
fornecido com o dispositivo. Para obter mais informações sobre o
Português Nederlands Español Italiano Deutsch Français English
envio de fax, consulte o Guia do fax.
Ligue o dispositivo. Ligue o dispositivo, pressionando o botão
Liga/desliga ao lado do soquete de alimentação, na parte posterior
do dispositivo.
15

Tip: If the device has no power and no lights are lit on the control
panel, make sure that the power cord is attached securely to both
the device and a power outlet. Also, if the power cord is connected
to a power strip, make sure that the power strip is switched on, or
connect the device directly to a wall outlet to test the power strip.
Set the control panel display language and location (if
necessary). If prompted by the control panel, select your
language and location information. Follow the instructions on the
control panel. Note: The device automatically turns off and then
turns on after you select the location.
Conseil : Si le périphérique ne semble pas être sous tension et
qu'aucun voyant n'est allumé, assurez-vous que le cordon
d'alimentation est correctement relié au périphérique et à la prise
de courant. De plus, si le cordon d'alimentation est relié à une
rallonge, assurez-vous que cette dernière est bien allumée, ou
connectez le périphérique directement à une prise murale pour
vérifier le bon fonctionnement de la rallonge.
Tipp: Wenn das Gerät keinen Strom empfängt, überprüfen Sie die
Netzkabelanschlüsse am Gerät und an der Steckdose. Falls das
Netzkabel an eine Verteilersteckdose angeschlossen ist, muss
diese eingeschaltet sein. Sie können das Gerät auch direkt an eine
Wandsteckdose anschließen, um Fehler bei der Verteilersteckdose
auszuschließen.
Suggerimento: se la periferica non si accende e le spie sul
pannello di controllo non si illuminano, accertarsi che il cavo di
alimentazione sia collegato correttamente alla periferica e alla
presa di corrente. Inoltre, se il cavo di alimentazione è collegato a
una basetta di alimentazione, assicurarsi che quest'ultima sia
accesa o collegare la periferica direttamente a una presa a muro
per verificare il funzionamento della basetta.
Sugerencia: si el dispositivo no recibe alimentación y no se
enciende ninguna de las luces del panel de control, asegúrese de
que el cable de alimentación está bien conectado al dispositivo y a
la toma de corriente. Si el cable de alimentación está conectado a
una regleta de alimentación, asegúrese de que está encendida o
conecte el dispositivo directamente a la toma de pared para probar
la regleta.
Tip: als het apparaat geen stroom heeft en er gaan geen lichtjes
branden op het bedieningspaneel, moet u controleren of het
netsnoer op zowel het apparaat als in het stopcontact goed is
aangesloten. Als het netsnoer is aangesloten op een stekkerblok,
moet u erop letter dat deze is ingeschakeld of sluit het apparaat
direct op een stopcontact om het stekkerblok te testen.
Définition de la langue d'affichage du panneau de commande et
son emplacement (si nécessaire). Si le panneau de commande
vous y invite, sélectionnez la langue choisie et indiquez les
informations sur l'emplacement. Suivez les instructions qui
s'affichent sur le panneau de commande. Remarque : Le
périphérique s'éteint automatiquement, puis se rallume après avoir
sélectionné l'emplacement.
Einstellen von Sprache und Ort für die Bedienfeldanzeige (sofern
erforderlich). Wenn Sie über das Bedienfeld dazu aufgefordert
werden, wählen Sie die für Sie zutreffenden Informationen zu
Sprache und Ort aus. Befolgen Sie die Anweisungen auf dem
Bedienfeld. Hinweis: Nachdem Sie den Ort ausgewählt haben, wird
das Gerät automatisch aus- und anschließend wieder eingeschaltet.
Impostazione del paese e della lingua sul display del pannello di
controllo (se necessario). Se il pannello di controllo lo richiede,
selezionare le informazioni relative al paese e alla lingua. Seguire
le istruzioni visualizzate sul pannello di controllo. Nota: dopo aver
selezionato il paese, la periferica si spegne e si riavvia
automaticamente.
Configure el idioma y la ubicación (si es necesario)para la
pantalla del panel de control. Si así se lo solicita el panel de
control, seleccione la información de idioma y de ubicación. Siga
las instrucciones del panel de control. Nota: el dispositivo se
apagará y encenderá automáticamente después de la selección de
ubicación.
Stel de taal en de locatie in op het display (indien gewenst).
Indien hierom wordt verzocht, selecteert u uw taal en de informatie
over de locatie. Volg de instructies op het bedieningspaneel op.
Opmerking: het apparaat schakelt automatisch uit en weer in als u
de locatie hebt geselecteerd.
Dica: Se o dispositivo não liga e as luzes do painel de controle não
acendem, verifique se o cabo de alimentação está firmemente
conectado ao dispositivo e à tomada. Além disso, se o cabo de
alimentação estiver conectado a um filtro de linha, verifique se o
filtro está ligado, ou conecte o dispositivo diretamente a uma
tomada na parede, para testar o filtro de linha.
Configure o idioma e o local do visor do painel de controle (se
necessário). Se for solicitado pelo painel de controle, selecione
as informações do seu idioma e do local. Siga as instruções do
painel de controle. Observação: O dispositivo desliga e então liga
automaticamente, depois de você selecionar o local.
16

Print a configuration report. 1)Press
the > button to select Reports, and then press
the < or the > button to select Config report, and then press
ENTER
.
Impression d'un rapport de configuration. 1)Appuyez sur
ENTRÉE
. 2)Appuyez sur < ou sur > pour sélectionner Rapports, puis
appuyez sur
MENU/ENTRÉE
. 3)Appuyez sur < ou sur > pour
sélectionner Rapport config., puis appuyez sur
Drucken eines Konfigurationsberichts. 1)Drücken Sie M
INGABE
. 2)Wählen Sie mit den Tasten < und > den Eintrag
E
Berichte aus, und drücken Sie M
MENU/ENTER
ENÜ/EINGABE
. 2)Press the < or
MENU/ENTER
MENU/ENTRÉE
. 3)Press
MENU
MENU
.
ENÜ
. 3)Wählen Sie mit
/
den Tasten < und > den Eintrag Konfig-Bericht aus, und drücken
Sie M
ENÜ/EINGABE
.
Tip: If the page that prints is totally blank, remove the print
cartridge, make sure that the sealing tape is removed (see step 10),
/
/
reinstall the print cartridge, and then try printing the page again.
Conseil : Si la page imprimée est vierge, retirez la cartouche
d'impression, assurez-vous que la bande adhésive a été enlevée
(voir l'étape 10), réinstallez la cartouche d'impression, puis
réessayez d'imprimer la page.
Tipp: Wenn die gedruckte Seite vollständig leer ist, entfernen Sie
die Druckpatrone, und vergewissern Sie sich, dass die
Versiegelung entfernt wurde (siehe Schritt 10). Setzen Sie die
Druckpatrone wieder ein, und drucken Sie die Seite erneut.
Stampa del rapporto di configurazione. 1)Premere
MENU/INVIO
2)Premere il pulsante < o > per selezionare Report, quindi
premere
Report config., quindi premere
Imprima un informe de configuración. 1)Pulse
MENU/INVIO
. 3)Premere il pulsante < o > per selezionare
MENU/INVIO
.
MENÚ/ENTRAR
2)Pulse el botón < o > para seleccionar Informes y, a
continuación, pulse
MENÚ/ENTRAR
seleccionar Config. informe y, a continuación, pulse
. 3)Pulse el botón < o > para
MENÚ/ENTRAR
Een configuratierapport afdrukken. 1)Druk op de knop
ENTER
. 2)Gebruik de knoppen < en > om Rapporten te selecteren
en druk vervolgens op de knop >
MENU/ENTER
. 2)Gebruik de knoppen
< en > om Config-rapport te selecteren en druk vervolgens op de
knop
MENU/ENTER
.
Imprima um relatório da configuração. 1)Pressione o
ATIVAR
. 2)Pressione o botão < ou o > para selecionar Relatórios ea
seguir pressione o
selecionar Relat. config. e a seguir pressione o
MENU/ATIVAR
. 3)Pressione o botão < ou o > para
MENU/ATIVAR
Português Nederlands Español Italiano Deutsch Français English
MENU
MENU
.
Suggerimento: se la pagina stampata risulta vuota, rimuovere la
cartuccia di stampa, accertarsi che il nastro di sigillo sia stato
rimosso (vedere il punto 10), reinstallare la cartuccia, quindi
riprovare a stampare la pagina.
.
Sugerencia: si la página se imprime totalmente en blanco, retire el
cartucho de impresión y asegúrese de que ha retirado la cinta
selladora (consulte el paso 10). Vuelva a instalar el cartucho de
.
/
impresión e imprima la página de nuevo.
Tip: als de afgedrukte pagina leeg is, moet u de printcartridge
verwijderen. Controleer of de verpakkingstape is verwijderd (stap
10), installeer de printcartridge opnieuw en probeer vervolgens de
pagina opnieuw af te drukken.
/
Dica: Se a página impressa estiver totalmente em branco, remova
o cartucho de impressão, verifique se a fita de proteção foi
removida (veja a etapa 10), reinstale o cartucho de impressão e
.
então tente imprimir a página novamente.
17

Self-test the copier by using the automatic document feeder
(ADF) input tray. 1)Load the configuration report that you just
printed print-side up into the ADF input tray. 2)Adjust the media
guides to sit against the page. 3)Verify that the original is loaded
print-side up, and then press
START/COPY
.
Tip: If the copy job produces a blank page, make sure that the
original is loaded print-side up and that no jams exist in the ADF
and paper path. For information about removing jams and other
troubleshooting tips, see the electronic User Guide on the device
CD-ROMs.
Test sur le copieur en utilisant le bac d'alimentation automatique
(BAA). 1)Chargez le rapport de configuration imprimé, face vers
le haut, dans le bac d'alimentation (BAA). 2)Réglez les guides de
support pour qu'ils soutiennent bien la page. 3)Vérifiez que
l'original est bien chargé face vers le haut, puis appuyez sur
DÉMARRER/COPIE
.
Selbsttest des Kopierers mit Hilfe des automatischen
Vorlageneinzugs. 1)Legen Sie den gerade gedruckten Bericht
mit der Druckseite nach oben in den automatischen
Vorlageneinzug ein. 2)Stellen Sie die Druckmedienführungen so
ein, dass sie an der Seite anliegen. 3)Überprüfen Sie, ob die
Vorlage mit der Druckseite nach oben liegt, und drücken Sie S
OPIE
.
K
TART
Esecuzione dell'auto-test della copiatrice mediante il vassoio di
alimentazione dell'ADF 1)Caricare il rapporto di configurazione
appena stampato nel vassoio di alimentazione dell'ADF con il lato
di stampa rivolto verso l'alto. 2)Regolare le guide per i supporti in
modo che aderiscano alla pagina. 3)Accertarsi che l'originale sia
caricato con il lato di stampa rivolto verso l'alto, quindi premere
AVVIO/COPIA
.
Utilice la bandeja de entrada del alimentador automático de
documentos (ADF)para que la copiadora realice una
autoprueba. 1)Cargue el informe de configuración que acaba de
imprimir con la cara impresa boca arriba en la bandeja de entrada
del ADF. 2)Ajuste las guías de los soportes de impresión a la
página. 3)Compruebe que ha cargado el original con la cara
impresa boca arriba y pulse
INICIO/COPIAR
.
Een zelftest van de copier uitvoeren met behulp van de
automatische documentinvoer (ADI). 1)Laad het
configuratierapport dat u zojuist hebt afgedrukt met de afdrukzijde
omhoog in de ADI. 2)Pas de geleiders voor het afdrukmateriaal
aan, zodat deze het papier net raken. 3)Controleer of het origineel
is geladen met de afdrukzijde omhoog en druk vervolgens op de
START/KOPIËREN
knop
.
Faça o autoteste da copiadora, usando a bandeja de entrada do
alimentador automático de documentos (AAD). 1)Carregue o
relatório de configuração, que você acaba de imprimir, na bandeja
do AAD com o lado impresso voltado para cima. 2)Ajuste as guias
da mídia firmemente contra a página. 3)Verifique se o original está
carregado com o lado impresso voltado para cima e a seguir
pressione o
INICIAR/COPIAR
.
Conseil : Si vous obtenez une page vierge, assurez-vous que
l'original est bien chargé face vers le haut et qu'aucun bourrage
papier ne s'est produit dans le bac d'alimentation automatique et le
circuit papier. Pour plus d'informations sur l'élimination d'un
bourrage papier et d'autres conseils de dépannage, consultez le
guide d'utilisation électronique des CD-ROM du périphérique.
Tipp: Wenn nach dem Kopiervorgang eine leere Seite ausgegeben
wird, vergewissern Sie sich, dass die Vorlage mit der Druckseite
nach oben eingelegt ist und weder im automatischen
Vorlageneinzug noch im Papierpfad ein Papierstau aufgetreten ist.
Informationen zum Beseitigen von Papierstaus sowie weitere Tipps
/
zur Fehlerbehebung finden Sie im elektronischen
Benutzerhandbuch auf den Geräte-CD-ROMs.
Suggerimento: se il processo di copia produce una pagina vuota,
accertarsi che l'originale sia caricato con il lato di stampa rivolto
verso l'alto e che non si siano verificati inceppamenti nell'ADF o
lungo il percorso della carta. Per informazioni sulla rimozione degli
inceppamenti e per altri suggerimenti riguardo alla risoluzione dei
problemi, consultare la Guida per l'utente in formato elettronico
presente nei CD-ROM della periferica.
Sugerencia: si el trabajo de copia produce una página en blanco,
asegúrese de que ha cargado el original con la cara impresa boca
arriba y de que no se han producido atascos en la ruta del papel o
en el ADF. Para obtener información sobre cómo eliminar atascos
u otras sugerencias para la solución de problemas, consulte la
Guía del usuario en formato electrónico que se incluye en los CD
del dispositivo.
Tip: als de kopieertaak een lege pagina geeft, controleert u of het
origineel met de afdrukzijde omhoog is geladen en of er geen
papierstoringen zijn opgetreden in de ADI en de papierbaan. Voor
informatie over het verwijderen van storingen en overige
probleemoplossingen moet u de elektronische
gebruikershandleiding op de CD-ROM's bij het apparaat
raadplegen.
Dica: Se o trabalho de cópia produzir uma página em branco,
verifique se o original está carregado com o lado impresso voltado
para cima e se não há um congestionamento no AAD e no
caminho do papel. Para obter informações sobre como remover
congestionamentos e outras dicas de soluções de problemas,
consulte o Guia eletrônico do usuário no CD-ROM do dispositivo.
18

Self-test the copier by using the flatbed scanner. 1)Open the
scanner lid, place the configuration report print-side down on the
flatbed scanner, and then close the scanner lid. 2)Press
START/COPY
Tip: If the copy job produces a blank page, make sure that the
original is loaded print-side down on the flatbed scanner and that
.
no jams exist in the paper path. For information about removing
jams and other troubleshooting tips, see the electronic User Guide
on the device CD-ROMs.
Test sur le copieur en utilisant le scanner à plat. 1)Ouvrez le
couvercle du scanner, placez le rapport de configuration face vers
le bas sur le scanner à plat, puis refermez le couvercle du scanner.
2)Appuyez sur
DÉMARRER/COPIE
.
Selbsttest des Kopierers mit Hilfe des Flachbettscanners.
1)Öffnen Sie die Scannerabdeckung, legen Sie den
Konfigurationsbericht mit der Druckseite nach unten auf den
Flachbettscanner, und schließen Sie dann die Scannerabdeckung.
2)Drücken Sie S
TART/KOPIE
.
Esecuzione dell'auto-test della copiatrice mediante lo scanner
piano. 1)Aprire il coperchio dello scanner, disporre il rapporto di
configurazione sullo scanner piano con il lato di stampa rivolto
verso il basso, quindi chiudere il coperchio dello scanner.
2)Premere
AVVIO/COPIA
.
Utilice el escáner de superficie plana para que la copiadora
realice una autoprueba. 1)Abra la tapa del escáner, coloque el
informe de configuración con la cara impresa boca abajo en el
escáner de superficie plana y, a continuación, cierre la tapa.
2)Pulse
INICIO/COPIAR
.
Zelftest van de copier uitvoeren met de flatbed scanner. 1)Open
de klep van de scanner, plaats het configuratierapport met de
afdrukzijde omlaag op de flatbed scanner en sluit vervolgens de
klep. 2)Druk op de knop
START/KOPIËREN
.
Faça um autoteste da copiadora, utilizando o scanner de mesa
1)Abra a tampa do scanner, coloque o relatório de configuração
com o lado impresso sobre o vidro do scanner de mesa e então
feche a tampa. 2)Pressione o
INICIAR/COPIAR
.
Português Nederlands Español Italiano Deutsch Français English
Conseil : Si vous obtenez une page vierge, assurez-vous que
l'original est bien chargé face vers le bas sur le scanner à plat et
qu'aucun bourrage papier ne s'est produit dans le circuit papier.
Pour plus d'informations sur l'élimination de bourrage papier et
d'autres conseils de dépannage, consultez le guide d'utilisation
électronique des CD-ROM du périphérique.
Tipp: Wenn nach dem Kopiervorgang eine leere Seite ausgegeben
wird, vergewissern Sie sich, dass die Vorlage mit der Druckseite
nach unten auf dem Flachbettscanner liegt und im Papierpfad kein
Papierstau aufgetreten ist. Informationen zum Beseitigen von
Papierstaus sowie weitere Tipps zur Fehlerbehebung finden Sie im
elektronischen Benutzerhandbuch auf den Geräte-CD-ROMs.
Suggerimento: se il processo di copia produce una pagina vuota,
accertarsi che l'originale sia caricato sullo scanner piano con il lato
di stampa rivolto verso il basso e che non si siano verificati
inceppamenti lungo il percorso della carta. Per informazioni sulla
rimozione degli inceppamenti e per altri suggerimenti riguardo alla
risoluzione dei problemi, consultare la Guida per l'utente in formato
elettronico presente nei CD-ROM della periferica.
Sugerencia: si el trabajo de copia produce una página en blanco,
asegúrese de que ha cargado el original con la cara impresa boca
abajo y de que no se han producido atascos en la ruta del papel.
Para obtener información sobre cómo eliminar atascos u otros
consejos de solución de problemas, consulte la Guía del usuario en
formato electrónico que se incluye en los CD del dispositivo.
Tip: als de kopieertaak een lege pagina geeft, controleert u of het
origineel met de afdrukzijde omlaag op de flatbed scanner is
geplaatst en of er geen papierstoringen zijn opgetreden in de
papierbaan. Voor informatie over het verwijderen van storingen en
overige probleemoplossingen moet u de elektronische
gebruikershandleiding op de CD-ROM's bij het apparaat
raadplegen.
Dica: Se o trabalho de cópia produzir uma página em branco,
verifique se o original está carregado com o lado impresso sobre o
vidro e se não há um congestionamento no caminho do papel.
Para obter informações sobre como remover congestionamentos e
outras dicas de soluções de problemas, consulte o Guia eletrônico
do usuário no CD-ROM do dispositivo.
19

Complete your device setup. If you are using the device as a
standalone copier, the setup is complete. If you are using the
device as a standalone fax, see the Fax Guide to set the fax
header and complete the device setup. The Fax Guide also
includes troubleshooting tips.
If you are connecting the device to a network, go to step 20. If you
are connecting the device directly to a computer, go to step 21. If
you are using all of the device functionality, see the Fax Guide to
set up the fax, and then go to step 20 (network connection) or step
21 (computer connection) in this Start Guide.
Fin de l'installation de votre périphérique. Si vous utilisez le
copieur de façon autonome, l'installation est terminée. Si vous
utilisez le télécopieur de façon autonome, consultez le guide du
télécopieur pour définir l'en-tête et terminer l'installation du
périphérique. Le guide du télécopieur comprend également des
conseils de dépannage.
Abschließen der Einrichtung des Geräts. Wenn Sie das Gerät als
eigenständigen Kopierer verwenden möchten, ist die Einrichtung
abgeschlossen. Wenn Sie das Gerät als eigenständiges Faxgerät
verwenden möchten, finden Sie im Faxhandbuch weitere
Informationen zum Einstellen der Faxkopfzeile und zum
Abschließen der Geräteeinrichtung. Das Faxhandbuch enthält
darüber hinaus auch Tipps zur Fehlerbehebung.
Completamento dell'installazione della periferica. Se si utilizza la
periferica come copiatrice indipendente, l'installazione è
completata. Se si utilizza la periferica come apparecchio fax
indipendente, consultare la Guida all'utilizzo del fax per impostarne
l'intestazione e completare l'installazione della periferica. Tale guida
include, inoltre, suggerimenti per la risoluzione dei problemi.
Complete la instalación del dispositivo. Si utiliza el dispositivo
como copiadora autónoma, la instalación puede considerarse
finalizada. Si utiliza el dispositivo como fax autónomo, consulte la
Guía del fax para establecer la cabecera del fax y completar así la
instalación del dispositivo. La Guía del fax también incluye
sugerencias para la solución de problemas.
De installatie van uw apparaat voltooien. Als u het apparaat als
een standalone copier gebruikt, is de installatie nu voltooid. Als u
het apparaat als standalone fax gebruikt, moet u de faxhandleiding
raadplegen om de faxkopregel in te stellen en de installatie van het
apparaat te voltooien. De faxhandleiding bevat ook tips bij
problemen.
Conclua a configuração do seu dispositivo. Se você está usando
o dispositivo como uma copiadora autônoma, a configuração está
concluída. Se você está usando o dispositivo como um fax
autônomo, consulte o Guia do fax para definir o cabeçalho e
concluir a configuração do dispositivo. O Guia do fax também inclui
dicas de solução de problemas.
Si vous essayez de connecter le périphérique à un réseau, rendezvous à l'étape 20. Si vous essayez de connecter le périphérique
directement à un ordinateur, rendez-vous à l'étape 21. Si vous
utilisez toutes les fonctionnalités du périphérique, consultez le
guide du télécopieur pour installer le télécopieur, puis rendez-vous
à l'étape 20 (connexion à un réseau) ou à l'étape 21 (connexion à
un ordinateur) dans ce guide de mise en route.
Wenn Sie das Gerät an ein Netzwerk anschließen möchten, fahren
Sie mit Schritt 20 fort. Wenn Sie das Gerät direkt an einen
Computer anschließen möchten, fahren Sie mit Schritt 22 fort.
Wenn Sie alle Funktionen des Geräts nutzen möchten, informieren
Sie sich im Faxhandbuch über das Einrichten der Faxfunktionen,
und fahren Sie dann mit Schritt 20 oder 21 fort.
Se si desidera collegare la periferica a una rete, andare al punto
20. Se si desidera collegare la periferica direttamente a un
computer, andare al punto 21. Se si desidera utilizzare tutte le
funzionalità della periferica, consultare la Guida all'utilizzo del fax
per la configurazione corretta, quindi andare al punto 20
(connessione di rete) o al punto 21 (connessione del computer)
nella Guida introduttiva.
Si desea conectar el dispositivo a una red, vaya directamente al
paso 20. Si desea conectar el dispositivo directamente a un
equipo, vaya directamente al paso 21. Si desea utilizar todas las
opciones de funcionamiento del dispositivo, consulte la Guía del
fax para configurar el fax y, a continuación, vaya al paso 20
(conexión a una red)o al paso 21 (conexión a un equipo)de esta
Guía de instalación inicial.
Als u het apparaat op een netwerk aansluit, gaat u verder met stap
20. Als u het apparaat direct op een computer aansluit, gaat u
verder met stap 21. Als u alle functionaliteiten van het apparaat wilt
gebruiken, moet u de faxhandleiding raadplegen om de fax in te
stellen en vervolgens gaat u verder met stap 20
(netwerkverbinding) of stap 21 (computerverbinding) in deze
Beknopte handleiding.
Se você está conectando o dispositivo a uma rede, pule para a
etapa 20. Se o está conectando diretamente a um computador,
pule para a etapa 21. Se está utilizando todas as funcionalidades
do dispositivo, consulte o Guia do fax para configurar o fax e então
pule para a etapa 20 (conexão à rede) ou a etapa 21 (conexão ao
computador) deste Guia dos primeiros passos.
20

Connect to a network. If you want to connect the device to a
network, see the instructions that are included with the HP print
server (which is not included with the HP LaserJet all-in-one). After
completing the instructions, go to the next step.
Connect to a computer. Note: To install the software for
Macintosh, go to step 23. 1)Close all programs that are running on
the computer. 2)Insert the software CD-ROM into the CD drive. If
the installation program does not begin automatically, click Start,
click Run, click Browse, select the HPSetup.exe file on the CD,
and then click OK.
Connexion à un réseau. Si vous souhaitez connecter le
périphérique à un réseau, reportez-vous aux instructions contenues
avec le serveur d'impression HP (qui n'est pas inclus avec
l'imprimante HP LaserJet all-in-one). Après avoir suivi les
instructions, passez à l'étape suivante.
Anschließen an ein Netzwerk. Wenn Sie das Gerät mit einem
Netzwerk verbinden möchten, lesen Sie die entsprechenden mit
dem HP Druckserver gelieferten Anweisungen (nicht im
Lieferumfang des HP LaserJet All-in-One-Geräts enthalten).
Nachdem Sie die Anweisungen vollständig ausgeführt haben,
fahren Sie mit dem nächsten Schritt fort.
Collegamento a una rete. Se si desidera collegare la periferica a
una rete, consultare le istruzioni fornite con il server di stampa HP
(non fornito con la periferica HP LaserJet All-in-One). Una volta
eseguite queste operazioni, passare al punto successivo.
Conexión a una red. Si desea conectar el dispositivo a una red,
consulte las instrucciones que se incluyen con el servidor de
impresión HP (no incluido con la HP LaserJet all-in-one). Tras
haber completado las instrucciones, vaya al paso siguiente.
Aansluiten op een netwerk. Als u het apparaat op een netwerk
wilt aansluiten, moet u de instructies die bij de HP Afdrukserver zijn
geleverd raadplegen (deze worden niet bij de HP LaserJet all-inone geleverd). Na het voltooien van de instructies gaat u verder
met de volgende stap.
Conexão a uma rede. Se você deseja conectar o dispositivo a
uma rede, consulte as instruções incluídas no servidor de
impressão HP (que não é fornecido com o multifunção HP
LaserJet). Depois de concluir as instruções, siga para a próxima
etapa.
Português Nederlands Español Italiano Deutsch Français English
Connexion à un ordinateur. Remarque : Pour installer le logiciel
sur un Macintosh, rendez-vous à l'étape 23. 1)Fermez tous les
programmes en cours d'exécution sur l'ordinateur. 2)Insérez le CDROM du logiciel dans le lecteur de CD-ROM. Si le programme
d'installation ne démarre pas automatiquement, cliquez sur
Démarrer, sur Exécuter, puis naviguez jusqu'au fichier HPSetup.
exe sur le CD.
Anschließen an einen Computer. Hinweis: Zum Installieren der
Software für Macintosh fahren Sie mit Schritt 23 fort. 1)Schließen
Sie alle Programme, die auf dem Computer ausgeführt werden.
2)Legen Sie die CD-ROM mit der Software in das CD-ROMLaufwerk ein. Wenn das Installationsprogramm nicht automatisch
gestartet wird, klicken Sie auf Start, klicken Sie auf Ausführen, und
wechseln Sie dann zur Datei "HPSetup.exe" auf der CD-ROM.
Collegamento a un computer. Nota: per installare il software su
Macintosh, andare al punto 23. 1)Chiudere tutti i programmi in
esecuzione sul computer. 2)Inserire il CD-ROM contenente il
software nell'unità CD del computer. Se il programma di
installazione non si avvia automaticamente, fare clic su Start,
quindi su Esegui e selezionare il file "HPSetup.exe" nel CD.
Conexión a un equipo. Nota: para instalar el software en un
equipo Macintosh, vaya directamente al paso 23. 1)Cierre todos
los programas que estén en ejecución en el equipo. 2)Inserte el
CD de software en la unidad de CD-ROM. Si el programa de
instalación no se ejecuta automáticamente, haga clic en Inicio,
Ejecutar y, a continuación, desplácese por el CD hasta encontrar el
archivo de instalación "HPSetup.exe".
Aansluiten op een computer. Opmerking: om de software voor
een Macintosh te installeren, gaat u naar stap 23. 1)Sluit alle
geopende programma's op uw computer. 2)Plaats de CD-ROM
met de software in uw CD-ROM-station. Als het
installatieprogramma niet automatisch wordt gestart, klikt u op
Start, Uitvoeren, en vervolgens bladert u naar het bestand
"HPSetup.exe" op de CD.
Conexão a um computador. Observação: Para instalar o
software para o Macintosh, pule para a etapa 23. 1)Feche todos
os programas que estejam sendo executados no computador.
2)Insira o CD-ROM do software na unidade de CD. Se o programa
de instalação não começar automaticamente, clique em Iniciar,
clique em Executar e a seguir procure o arquivo "HPSetup.exe" no
CD.
21

Note: You must have administrative privileges to install the
software for Windows NT 4.0 service pack 3, Windows XP, or
Windows 2000. 3)Select Install HP LaserJet software. 4)In the
Printer Connection Wizard, select a connection type.
5)The software prompts you to connect the device to a computer.
Connect the parallel or USB device cable (A/B) from the device to
the correct computer port or the network.
Remarque : Vous devez disposer de droits administrateur pour
installer le logiciel sur Windows NT 4.0 service pack 3, Windows XP
ou Windows 2000. 3)Sélectionnez Installer le logiciel HP Laserjet.
4)Dans l'Assistant de connexion de l'imprimante, sélectionnez un
type de connexion.
Hinweis: Zum Installieren der Software
Pack 3, Windows XP oder Windows
Administratorrechte. 3)Klicken
installieren. 4)Wählen Sie im Assistenten
Druckerverbindung einen Verbi
ndungstyp aus.
für Windows NT 4.0 Service
2000 benötigen Sie
Sie auf HP LaserJet Software
für die
Nota: è necessario disporre di privilegi di amministratore per
l'installazione del software su Windows NT 4.0 Service Pack 3,
Windows XP o Windows 2000. 3)Selezionare Installa HP Laserjet
Software. 4)Nella finestra relativa all'impostazione guidata della
connessione della stampante, selezionare un tipo di connessione.
Nota: si su sistema operativo es Windows NT 4.0 Service Pack 3,
Windows XP o Windows 2000, deberá tener privilegios de
administrador para instalar el software. 3)Seleccione Instalar
software de HP Laserjet. 4)En el Asistente de conexión de la
impresora, seleccione un tipo de conexión.
Opmerking: u moet over beheerdersrechten beschikken om de
software voor Windows NT 4.0 service pack 3, Windows XP of
Windows 2000 te installeren. 3)Selecteer HP Laserjet software
installeren. 4)In de wizard voor printer verbinden selecteert u een
verbindingstype.
5)Le logiciel vous invite à connecter le périphérique à un
ordinateur. Connectez le câble USB ou parallèle (A/B) du
périphérique au port de l'ordinateur approprié ou connectez le
périphérique au réseau.
5)Sie werden von der Software aufgefordert, das Gerät an einen
Computer anzuschließen. Verbinden Sie das am Gerät
angeschlossene Parallelkabel bzw. das USB-Gerätekabel (A/B) mit
dem entsprechenden Anschluss am Computer, oder verbinden Sie
das Gerät mit einem Netzwerk.
5)Il software richiede una connessione a un computer. Collegare il
cavo parallelo o USB (A/B) dalla periferica alla porta corretta sul
computer oppure collegare la periferica alla rete.
5)El software le solicitará que conecte el dispositivo a un equipo.
Conecte el cable paralelo o USB (A/B) desde el dispositivo al
puerto apropiado del equipo o conecte el dispositivo a una red.
5)De software vraagt u om het apparaat op de computer aan te
sluiten. Sluit de parallelle of USB-kabel (A/B) van het apparaat aan
op de juiste computerpoort of sluit het apparaat aan op het netwerk.
Observação: Você deve ter privilégios de administrador para
instalar o software no pacote de serviços 3 do Windows NT 4.0,
Windows XP, ou Windows 2000. 3)Selecione Instalar o Software
HP Laserjet . 4)No Assistente de conexão da impressora,
selecione o tipo de conexão.
5)O software solicita que você conecte o dispositivo a um
computador. Conecte o cabo paralelo ou USB (A/B) do dispositivo
à porta correta do computador, ou conecte o dispositivo à rede.
22

6)Select the Typical installation type, and then follow the
instructions to install the software.
Use the Toolbox. Note: The Toolbox does not support Macintosh
operating systems. 1)On the computer, click Start, and then click
Programs. 2)Click HP LaserJet all-in-one, and then click hp
Toolbox to open the Toolbox. Use the Toolbox to perform many
device functions from your computer. Go to step 25.
6)Sélectionnez le type d'installation par défaut, puis suivez les
instructions pour installer le logiciel.
6)Wählen Sie als Installationsart die typische Installation aus, und
befolgen Sie dann die Anweisungen zum Installieren der Software.
6)Selezionare il tipo di installazione Tipica, quindi seguire le
istruzioni per installare il software.
6)Seleccione la instalación Típica y siga las instrucciones para
instalar el software.
6)Selecteer het installatietype Normaal en volg de instructies om
de software te installeren.
Utilisation du logiciel Boîte à outils. Remarque : Boîte à outils ne
prend pas en charge les systèmes d'exploitation Macintosh. 1)Sur
votre ordinateur, cliquez sur Démarrer, puis cliquez sur
Programmes. 2)Cliquez sur HP LaserJet All-in-One, puis cliquez
sur Boîte à outils HP pour ouvrir la Boîte à outils. Utilisez la Boîte à
outils pour exécuter de nombreuses fonctionnalités de votre
périphérique à partir de votre ordinateur. Passez à l'étape 25.
Verwenden der Toolbox. Hinweis: Macintosh-Betriebssysteme
werden von der Toolbox nicht unterstützt. 1)Klicken Sie am
Computer auf Start, und klicken Sie dann auf Programme.
2)Klicken Sie auf HP LaserJet All-in-One, und klicken Sie dann
zum Öffnen der Toolbox auf HP Toolbox. Mit Hilfe der Toolbox
können Sie viele Gerätefunktionen über den Computer ausführen.
Fahren Sie mit Schritt 25 fort.
Utilizzo della Casella degli strumenti. Nota: la Casella degli
strumenti non supporta i sistemi operativi Macintosh. 1)Sul
computer, fare clic su Start, quindi su Programmi. 2)Fare clic su
HP LaserJet All-in-One, quindi su Casella degli strumenti HP per
aprire la Casella degli strumenti. La Casella degli strumenti
consente di eseguire dal computer molte delle funzioni della
periferica. Andare al punto 25.
Utilice la Caja de herramientas. Nota: la Caja de herramientas no
es compatible con los sistemas operativos Macintosh. 1)En el
equipo, haga clic en Inicio y, a continuación, en Programas.
2)Haga clic en HP LaserJet all-in-one y, a continuación, en Caja
de herramientas hp para abrir la Caja de herramientas. Utilice la
Caja de herramientas para controlar un gran número de funciones
del dispositivo desde el equipo. Vaya al paso 25.
De Werkset gebruiken. Opmerking: de werkset ondersteunt geen
Macintosh-besturingssystemen. 1)Op de computer klikt u op Start
en vervolgens op Programma's. 2)Klik op HP LaserJet all-in-one,
en vervolgens op HP werkset om de werkset te openen. Gebruik
de werkset om een groot aantal functies vanaf uw computer uit te
voeren. Ga verder met stap 25.
6)Selecione o tipo de instalação Típica e então siga as instruções
para instalar o software.
Português Nederlands Español Italiano Deutsch Français English
Usar Caixa de ferramentas. Nota: A Caixa de ferramentas não
suporta os sistemas operacionais Macintosh. 1)No computador,
clique em Iniciar e depois em Programas. 2)Clique em
multifunção HP LaserJet e depois em Caixa de ferramentas HP
para abrir a Caixa de ferramentas. Use-a para executar diversas
funções do dispositivo, a partir do seu computador. Pule para a
etapa 25.
23

Install the Macintosh software (OS 9). Note: Macintosh OS X
users should go to step 24. 1)Connect the USB device cable (A/B)
to the Macintosh. 2)Close all of the programs that are running on
the computer. 3)Insert the software CD-ROM into the CD drive.
4)In the CD folder, double-click the HP All-in-One Installer icon.
5)Follow the onscreen instructions, and then click Install. 6)When
prompted, restart the computer. 7)When the HP All-in-One Setup
Assistant starts, follow the instructions. Go to step 25.
Installation du logiciel Macintosh (OS 9). Remarque : Utilisateurs
Macintosh OS X, passez à l'étape 24. 1)Connectez le câble USB
(A/B) du périphérique au Macintosh. 2)Fermez tous les
programmes en cours d'exécution sur l'ordinateur. 3)Insérez le CDROM du logiciel dans le lecteur de CD-ROM. 4)Dans le dossier du
CD, cliquez deux fois sur l'icône HP All-in-One Installer.
Installieren der Macintosh-Software (OS 9). Hinweis: Macintosh
OS X-Benutzer fahren mit Schritt 24 fort. 1)Verbinden Sie das USBGerätekabel (A/B) mit dem Macintosh. 2)Schließen Sie alle
Programme, die auf dem Computer ausgeführt werden. 3)Legen
Sie die CD-ROM mit der Software in das CD-ROM-Laufwerk ein.
4)Doppelklicken Sie im CD-Ordner auf das Symbol HP All-in-OneInstaller.
Installazione del software per Macintosh (OS 9). Nota: gli utenti
Macintosh OS X devono fare riferimento al punto 24. 1)Collegare il
cavo USB (A/B) al computer Macintosh. 2)Chiudere tutti i
programmi in esecuzione sul computer. 3)Inserire il CD-ROM
contenente il software nell'unità CD del computer. 4)Nella cartella
relativa al CD-ROM, fare doppio clic sull'icona HP All-in-One
Installer.
Instalación del software para Macintosh (OS 9). Nota: los
usuarios de Macintosh OS X pueden ir directamente al paso 24.
1)Conecte el cable USB del dispositivo (A/B)al equipo Macintosh.
2)Cierre todos los programas que estén en ejecución en el equipo.
3)Inserte el CD de software en la unidad de CD-ROM. 4)En la
carpeta del CD, haga doble clic en el icono del Instalador HP All-inOne.
De Macintosh software installeren (OS 9). Opmerking:
gebruikers van Macintosh OS X gaan verder met stap 24. 1)Sluit
de USB-kabel (A/B) aan op de Macintosh. 2)Sluit alle programma's
af die actief zijn op uw computer. 3)Plaats de CD-ROM met de
software in uw CD-ROM-station. 4)Dubbelklik op HP All-in-One
Installer in de CD-map.
5)Suivez les instructions à l'écran, puis cliquez sur Installer. 6)Une
fois invité, redémarrez l'ordinateur. 7)Lorsque l'Assistant
d'installation HP All-in-One démarre, suivez les instructions. Passez
à l'étape 25.
5)Befolgen Sie die auf dem Bildschirm angezeigten Anweisungen,
und klicken Sie dann auf die Schaltfläche Installieren. 6)Starten
Sie den Computer neu, sobald Sie dazu aufgefordert werden.
7)Wenn der HP All-In-One-Einrichtungsassistent gestartet wird,
befolgen Sie die angezeigten Anweisungen. Fahren Sie mit Schritt
25 fort.
5)Seguire le istruzioni visualizzate sullo schermo, quindi fare clic
su Installa. 6)Quando viene richiesto, riavviare il computer.
7)All'avvio di HP All-in-One Setup Assistant, seguire le istruzioni.
Andare al punto 25.
5)Siga las instrucciones de la pantalla y haga clic en Instalar.
6)Cuando el sistema lo solicite, reinicie el equipo. 7)Siga las
instrucciones del Asistente de instalación de la HP All-in-One. Vaya
al paso 25.
5)Volg de instructies op het scherm en klik vervolgens op
Installeren. 6)Start de computer desgevraagd opnieuw op. 7)Volg
de instructies als de HP All-in-One Setup Assistant wordt gestart.
Ga verder met stap 25.
Instale o software Macintosh (OS 9). Observação: Os usuários
do Macintosh OS X devem pular para a etapa 24. 1)Conecte o
cabo USB do dispositivo (A/B) ao Macintosh. 2)Feche todos os
programas que estejam sendo executados no computador.
3)Insira o CD-ROM do software na unidade de CD. 4)Na pasta
CD, clique duas vezes no ícone do HP All-in-One Installer
5)Siga as instruções na tela e a seguir clique em Install.
6)Quando for solicitado, reinicialize o computador. 7)Quando o
Assistente de configuração do multifunção HP iniciar, siga as
instruções. Pule para a etapa 25.
24

Install Macintosh software (OS X). 1)Connect the USB device
cable (A/B) to the Macintosh. 2)Close all of the programs that are
running on the computer. 3)Insert the software CD-ROM into the
CD drive. 4)In the CD folder, double-click the HP All-in-One
Installer icon.
5)Follow the onscreen instructions, and then click Install. 6)When
prompted, restart the computer. 7)When the HP All-in-One Setup
Assistant starts, follow the instructions.
Installation du logiciel Macintosh (OS X). 1)Connectez le câble
USB (A/B) du périphérique au Macintosh. 2)Fermez tous les
programmes en cours d'exécution sur l'ordinateur. 3)Insérez le CDROM du logiciel dans le lecteur de CD-ROM. 4)Dans le dossier du
CD, cliquez deux fois sur l'icône HP All-in-One Installer.
Installieren der Macintosh-Software (OS X). 1)Verbinden Sie
das USB-Gerätekabel (A/B) mit dem Macintosh. 2)Schließen Sie
alle Programme, die auf dem Computer ausgeführt werden.
3)Legen Sie die CD-ROM mit der Software in das CD-ROMLaufwerk ein. 4)Doppelklicken Sie im CD-Ordner auf das Symbol
HP All-in-One-Installer.
Installazione del software per Macintosh (OS X). 1)Collegare il
cavo USB (A/B) al computer Macintosh. 2)Chiudere tutti i
programmi in esecuzione sul computer. 3)Inserire il CD-ROM
contenente il software nell'unità CD del computer. 4)Nella cartella
relativa al CD-ROM, fare doppio clic sull'icona HP All-in-One
Installer.
Instalación del software para Macintosh (OS X). 1)Conecte el
cable USB del dispositivo (A/B)al equipo Macintosh. 2)Cierre
todos los programas que estén en ejecución en el equipo.
3)Inserte el CD de software en la unidad de CD-ROM. 4)En la
carpeta del CD, haga doble clic en el icono del Instalador HP All-inOne.
De Macintosh-software installeren (OS X). 2)Sluit de USB-kabel
(A/B) aan op de Macintosh. 2)Sluit alle antivirusprogramma's af die
actief zijn op uw computer. 3)Plaats de CD-ROM met de software
in uw CD-ROM-station. 4)Dubbelklik op HP All-in-One Installer in
de CD-map.
5)Suivez les instructions à l'écran, puis cliquer sur Installer. 6)Une
fois invité, redémarrez l'ordinateur. 7)Lorsque l'Assistant
d'installation HP All-in-One démarre, suivez les instructions.
5)Befolgen Sie die auf dem Bildschirm angezeigten Anweisungen,
und klicken Sie dann auf die Schaltfläche Installieren. 6)Starten
Sie den Computer neu, sobald Sie dazu aufgefordert werden.
7)Wenn der HP All-In-One-Einrichtungsassistent gestartet wird,
befolgen Sie die angezeigten Anweisungen.
5)Seguire le istruzioni visualizzate sullo schermo, quindi fare clic
su Installa. 6)Quando viene richiesto, riavviare il computer.
7)All'avvio di HP All-in-One Setup Assistant, seguire le istruzioni.
5)Siga las instrucciones de la pantalla y haga clic en Instalar.
6)Cuando el sistema lo solicite, reinicie el equipo. 7)Siga las
instrucciones del Asistente de instalación de la HP All-in-One.
5)Volg de instructies op het scherm en klik vervolgens op
Installeren. 6)Start de computer desgevraagd opnieuw op. 7)Volg
de instructies als de HP All-in-One Setup Assistant wordt gestart.
Instale o software Macintosh (OS X). 1)Conecte o cabo paralelo
ou USB do dispositivo (A/B) ao Macintosh. 2)Feche todos os
programas que estejam sendo executados no computador.
3)Insira o CD-ROM do software na unidade de CD. 4)Na pasta
CD, clique duas vezes no ícone do HP All-in-One Installer
Português Nederlands Español Italiano Deutsch Français English
5)Siga as instruções na tela e a seguir clique em Install.
6)Quando for solicitado, reinicialize o computador. 7)Quando o
Assistente de configuração do multifunção HP iniciar, siga as
instruções.
25

Test the software installation. Print a page from any program to
make sure that the software is correctly installed. If the installation
failed, reinstall the software. If the reinstallation fails, see http://www.
hp.com/support/lj3380 or the support flyer for more information.
Register the device. Register with HP to keep your device running
smoothly and to receive free device updates and information that is
relevant to you, including driver or software update notifications,
device support alerts, and tips for using your HP device.
Test de l'installation du logiciel. Imprimez une page à partir de
tout programme pour vous assurer que le logiciel est correctement
installé. Si l'installation échoue, réinstallez le logiciel. Si la
réinstallation échoue également, rendez-vous sur le site http://www.
hp.com/support/lj3380 ou consultez la brochure d'assistance pour
plus d'informations.
Testen der Softwareinstallation. Drucken Sie über ein beliebiges
Programm eine Seite, um sicherzustellen, dass die Software
ordnungsgemäß installiert wurde. Falls während der Installation
Fehler aufgetreten sind, installieren Sie die Software erneut.
Weitere Informationen für den Fall, dass während der Installation
Fehler aufgetreten sind, finden Sie unter http://www.hp.com/support/
lj3380 und in den Hinweisen zur Unterstützung.
Verifica dell'installazione del software. Stampare una pagina da
un programma qualsiasi per accertarsi che il software sia installato
correttamente. Se l'installazione non è riuscita, reinstallare il
software. Se il problema persiste, visitare il sito Web all'indirizzo
http://www.hp.com/support/lj3300 oppure consultare l'opuscolo di
supporto per ulteriori informazioni.
Pruebe la instalación del software. Imprima una página desde
cualquier programa para asegurarse de que el software se ha
instalado correctamente. Si la instalación no se ha realizado
correctamente, vuelva a instalar el software. Si vuelve a fallar la
instalación, consulte la página http://www.hp.com/support/lj3380 o
el folleto de asistencia técnica para obtener más información.
Controleer of de software op de juiste wijze is geïnstalleerd.
Druk een pagina af vanuit een willekeurig programma om te
controleren of de software op de juiste wijze is geïnstalleerd.
Installeer de software opnieuw als de installatie is mislukt. Als de
installatie is mislukt, raadpleeg dan voor meer informatie de http://
www.hp.com/support/lj3380 of de ondersteuningsbrochure.
Inscription du périphérique. Inscrivez-vous sur le site HP pour
assurer un bon fonctionnement à votre périphérique, recevoir des
mises à jour gratuites ainsi que des informations importantes
(notifications de mises à jour d'un logiciel ou d'un pilote, des
annonces d'assistance ainsi que des conseils pour utiliser votre
périphérique HP).
Registrieren des Geräts. Registrieren Sie Ihr Gerät bei HewlettPackard, um dessen störungsfreien Betrieb sicherzustellen. Eine
Registrierung berechtigt Sie zum Empfang von kostenlosen
Updates für das Gerät sowie von Informationen, die für Sie relevant
sind. Dazu gehören z.B. Benachrichtigungen über Treiber- oder
Software-Updates, Unterstützungshinweise sowie Tipps zur
Verwendung des HP Geräts.
Registrazione della periferica. La registrazione presso HP
consente di operare nelle migliori condizioni e di ricevere
aggiornamenti gratuiti e informazioni importanti, compresi driver o
notifiche di aggiornamento del software, messaggi di avviso per
l'assistenza alla periferica e suggerimenti per il corretto utilizzo della
periferica HP.
Registre el dispositivo. Registre el dispositivo con HP para que
siga funcionando correctamente y para recibir actualizaciones
gratuitas e información de relevancia, incluyendo notificaciones de
actualizaciones de los controladores o el software, alertas de
asistencia del dispositivo y sugerencias sobre el uso del dispositivo
HP.
Het apparaat registreren. Registreer het apparaat bij HP om uw
apparaat goed te laten werken en voor gratis updates en informatie
die voor u relevant is, inclusief kennisgevingen over driver- of
software-updates, ondersteuningswaarschuwingen van het
apparaat en tips voor het gebruik van uw HP-apparaat.
Teste a instalação do software. Imprima uma página de qualquer
programa, para verificar se o software está instalado corretamente.
Se a instalação falhou, reinstale o software. Se a reinstalação
falhar, entre no site http://www.hp.com/support/lj3380 ou consulte o
folheto de suporte para obter informações adicionais.
Registre o dispositivo. Registre na HP para manter o seu
dispositivo funcionando sem problemas e para receber
atualizações e informações grátis e relevantes para você, incluindo
notificações de atualização de driver ou software, alertas de
suporte do produto e dicas sobre como usar o seu dispositivo HP.
26

You can register your device at http://www.hp.com/go/register .
Hewlett-Packard and its subsidiaries respect your privacy and are
committed to protecting it. Please see the HP privacy statement at
the registration website.
Support information. For customer support, see the support flyer
or see http://www.hp.com/support/lj3380 .
Vous pouvez inscrire votre périphérique sur le site http://www.hp.
com/go/register. Hewlett-Packard et ses filiales respectent la vie
privée et s'engagent à la protéger. Consultez la déclaration HP sur
le respect de la vie privée sur le site Web d'inscription.
Sie können Ihr Gerät unter http://www.hp.com/go/register
registrieren. Hewlett-Packard und seine Tochtergesellschaften
respektieren Ihre Privatsphäre und sind daher dem Datenschutz
verpflichtet. Weitere Informationen finden Sie auf der
Registrierungswebsite in der HP Datenschutzerklärung.
È possibile registrare la periferica all'indirizzo http://www.hp.com/go/
register. Hewlett-Packard e le sue consociate garantiscono la tutela
della privacy e si impegnano a salvaguardarla. Consultare la
dichiarazione sul trattamento dei dati personali HP sul sito Web di
registrazione.
Para registrar el dispositivo, visite la página http://www.hp.com/go/
register. Hewlett-Packard y sus empresas filiales respetan su
privacidad y se comprometen a protegerla. Consulte la declaración
de privacidad de HP en el sitio Web de registro.
U kunt uw apparaat registreren op http://www.hp.com/go/register.
Hewlett-Packard en haar dochterondernemingen respecteren uw
privacy en verplichten zich om deze te bewaren. Raadpleeg de HP
privacy statement op de registratiewebsite voor meer details.
Assistance. Pour toute information sur l'assistance clientèle,
consultez la brochure d'assistance ou rendez-vous sur le site http://
www.hp.com/support/lj3380.
Unterstützungsinformationen. Informationen zur
Kundenunterstützung finden Sie in den Hinweisen zur
Unterstützung sowie unter http://www.hp.com/support/lj3380.
Informazioni per l'assistenza. Per l'assistenza, consultare
l'opuscolo di supporto o visitare il sito Web all'indirizzo http://www.
hp.com/support/lj3300.
Información de asistencia técnica. Para obtener asistencia
técnica, consulte el folleto de asistencia técnica o visite la página
http://www.hp.com/support/lj3380.
Ondersteuningsinformatie. Ga naar http://www.hp.com/support/
lj3380 voor klantenondersteuning of om de
ondersteuningsbrochure te bekijken.
Você pode registrar o seu dispositivo no site http://www.hp.com/go/
register. A Hewlett-Packard e suas subsidiárias respeitam a sua
privacidade e estão comprometidas em protegê-la. Veja a
declaração de privacidade da HP no web-site de registro.
Português Nederlands Español Italiano Deutsch Français English
Informações de suporte. Para obter informações de atendimento
ao cliente, consulte o folheto de suporte ou visite o site http://www.
hp.com/support/lj3380.
27

Congratulations! The device is ready to use. See the Toolbox
(Windows 98, Millennium Edition (ME), 2000, or XP only) to open
the electronic User Guide and to use the tools to solve problems.
Félicitations ! Votre périphérique est prêt à être utilisé. Reportezvous au logiciel Boîte à outils (Windows 98, Millennium Edition
(Me), 2000 ou XP uniquement) pour ouvrir le guide d'utilisation
électronique et pour utiliser les outils permettant de résoudre les
problèmes éventuels.
Herzlichen Glückwunsch! Das Gerät ist nun betriebsbereit.
Informationen zum Öffnen des elektronischen Benutzerhandbuchs
sowie zur Verwendung von Tools für die Problemlösung finden Sie
in der Toolbox (nur für Windows 98, Millennium Edition (Me), 2000
und XP).
Complimenti. A questo punto la periferica è pronta per l'uso.
Vedere la Casella degli strumenti (solo Windows 98, Millennium
Edition (Me), 2000 o XP) per aprire la Guida per l'utente in formato
elettronico e per la risoluzione dei problemi.
¡Enhorabuena! Ya puede utilizar el dispositivo. Consulte la Caja
de herramientas (sólo para Windows 98, Millennium Edition (Me),
2000 o XP)para abrir la Guía del usuario en formato electrónico y
para utilizar las herramientas de solución de problemas.
Gefeliciteerd! Het apparaat is klaar voor gebruik. Zie de werkset
(alleen Windows 98, Millennium Edition (Me), 2000 of XP) om de
elektronische gebruikershandleiding te openen en om de
hulpprogramma's te gebruiken voor het oplossen van problemen.
Parabéns! O dispositivo está pronto para o uso. Consulte a Caixa
de ferramentas (somente Windows 98, Millennium Edition (Me),
2000 ou XP) para abrir o Guia eletrônico do usuário e utilizar as
ferramentas para resolver problemas.
28

29

30

© 2003 Hewlett-Packard Development Company, LP
www.hp.com/support/lj3380
*Q2660-90938*
*Q2660-90938*
Q2660-90938
 Loading...