

Page 1
Page 2

Page 3

hp LaserJet 3380 all-in-one
User Guide
Page 4

Copyright Information
© 2003 Copyright Hewlett-Packard
Development Company, L.P.
Reproduction, adaptation or translation
without prior written permission is
prohibited, except as allowed under the
copyright laws.
The information contained herein is subject
to change without notice.
The only warranties for HP products and
services are set forth in the express
warranty statements accompanying such
products and services. Nothing herein
should be construed as constituting an
additional warranty. HP shall not be liable
for technical or editorial errors or omissions
contained herein.
Part number Q2660-90937
Edition 1, 10/2003
FCC Requirements (United States)
This equipment has been tested and found
to comply with the limits for a Class B digital
device, pursuant to Part 15 of the FCC
rules. These limits are designed to provide
reasonable protection against harmful
interference in a residential installation. This
equipment generates, uses, and can radiate
radio frequency energy. If not installed and
used in accordance with the instructions, it
may cause harmful interference to radio
communications. However, there is no
guarantee that interference will not occur in
a particular installation. If this equipment
does cause harmful interference to radio or
television reception, which can be
determined by turning the equipment off
and on, the user is encouraged to try to
correct the interference by one or more of
the following measures:
Reorient or relocate the receiving antenna.
Increase separation between equipment
and receiver.
Connect equipment to an outlet on a circuit
different from that to which the receiver is
located.
Consult your dealer or an experienced
radio/TV technician.
Any changes or modifications to the device
that are not expressly approved by HP
could void the user’s authority to operate
this equipment.
Use of a shielded interface cable is required
to comply with the Class B limits of Part 15
of FCC rules.
This equipment complies with FCC rules,
Part 68. On the back of this equipment is a
label that contains, among other
information, the FCC registration number
and ringer equivalence number (REN) for
this equipment. If requested, this
information must be provided to the
telephone company. The REN is used to
determine the quantity of devices which
may be connected to the telephone line.
Excessive RENs on the telephone line may
result in the devices not ringing in response
to an incoming call. In most, but not all,
areas, the sum of the RENs should not
exceed five (5.0). To be certain of the
number of devices that may be connected
to the line, as determined by the total
RENs, contact the telephone company to
determine the maximum REN for the calling
area.
This equipment uses the following USOC
jacks: RJ11C.
An FCC-compliant telephone cord and
modular plug is provided with this
equipment. This equipment is designed to
be connected to the telephone network or
premises wiring using a compatible modular
jack which is Part 68 compliant. This
equipment cannot be used on telephone
company-provided coin service. Connection
to Party Line Service is subject to state
tariffs. If this equipment causes harm to the
telephone network, the telephone company
will notify you in advance that temporary
discontinuance of service may be required.
If advance notice is not practical, the
telephone company will notify the customer
as soon as possible. Also, you will be
advised of your right to file a complaint with
the FCC if you believe it is necessary. The
telephone company may make changes in
its facilities, equipment, operations, or
procedures that could affect the operation
of the equipment. If this happens, the
telephone company will provide advance
notice in order for you to make the
necessary modifications in order to maintain
uninterrupted service. If trouble is
experienced with this equipment, please
see the numbers in the front of this manual
for repair and (or) warranty information. If
the trouble is causing harm to the telephone
network, the telephone company may
request you remove the equipment from the
network until the problem is resolved. The
following repairs can be done by the
customer: Replace any original equipment
that came with the device. This includes the
print cartridge, the supports for trays and
bins, the power cord, and the telephone
cord. It is recommended that the customer
install an AC surge arrestor in the AC outlet
to which this device is connected. This is to
avoid damage to the equipment caused by
local lightning strikes and other electrical
surges.
Hewlett-Packard Development Company, L.P.
20555 S.H. 249
Houston, TX 77070
Page 5

Trademark Credits
Microsoft, Windows, Windows NT, and MSDOS are U.S. registered trademarks of
Microsoft Corporation.
All other devices mentioned herein may be
trademarks of their respective companies.
Safety Information
WARNING!
Potential Shock Hazard
Always follow basic safety precautions
when using this device to reduce risk of
injury from fire or electric shock.
Read and understand all instructions in the
electronic User Guide.
Observe all warnings and instructions
marked on the device.
Use only a grounded electrical outlet when
connecting the HP LaserJet 3380 all-in-one
device to a power source. If you do not
know whether the outlet is grounded, check
with a qualified electrician.
Do not touch the contacts on the end of any
of the sockets on the HP LaserJet 3380 allin-one. Replace damaged cords
immediately.
Unplug this device from wall outlets before
cleaning.
Do not install or use this device near water
or when you are wet.
Install the device securely on a stable
surface.
Install the device in a protected location
where no one can step on or trip over the
power cord and the power cord will not be
damaged.
If the device does not operate normally, see
the electronic User Guide.
Refer all servicing questions to qualified
personnel.
Hewlett-Packard Development Company, L.P.
20555 S.H. 249
Houston, TX 77070
Page 6

Hewlett-Packard Development Company, L.P.
20555 S.H. 249
Houston, TX 77070
Page 7

Table of contents
1 Introduction
Device overview.........................................................................................................................8
Preparing the location................................................................................................................9
Package contents.....................................................................................................................10
Hardware and software.....................................................................................................10
Documentation...................................................................................................................11
Locating the device parts.........................................................................................................12
2 Setting up your device
Installing the control panel faceplate (if not already installed).................................................14
Installing the input trays...........................................................................................................15
Installing the automatic document feeder (ADF) input tray.....................................................16
Installing the print cartridge......................................................................................................17
Connecting the power cord......................................................................................................18
Connecting a printer cable to the device.................................................................................18
Connecting to a telephone line................................................................................................20
Turning on the device...............................................................................................................21
Setting the control panel display language and location (if necessary)...................................21
Printing a configuration report..................................................................................................22
Testing the copier by using the automatic document feeder (ADF) input tray........................22
Testing the copier by using the flatbed scanner......................................................................23
Completing your device setup..................................................................................................24
Connecting to a network..........................................................................................................25
Connecting to a computer........................................................................................................2 5
Using the Toolbox....................................................................................................................26
Installing the Macintosh software (OS 9.x to OS X).................................................................27
Testing the software installation...............................................................................................28
Registering the device..............................................................................................................28
Getting support information......................................................................................................28
Congratulations........................................................................................................................28
ENWW v
Page 8

vi ENWW
Page 9

1
Introduction
● Device overview
Preparing the location
●
Package contents
●
Locating the device parts
●
ENWW 7
Page 10
Device overview
The HP LaserJet 3380 all-in-one comes with a 250-sheet media input tray, a 10-sheet priority
input tray, a 50-sheet automatic document feeder (ADF) input tray, a flatbed scanner, and 32
megabytes (MB) of random-access memory (RAM).
The HP LaserJet 3380 all-in-one also includes a dual inline memory module (DIMM) slot,
parallel and universal serial bus (USB) interface ports, and fax interface ports.
8 Chapter 1 Introduction ENWW
Page 11

Preparing the location
Place the device on a sturdy, level surface in a well-ventilated area. Make sure that there is
enough space around the device so that the air vents are not blocked.
Do not place the device in direct sunlight or in an area that has abrupt temperature and
humidity changes. The recommended ranges are 15 degrees to 32.5 degrees C (59 degrees
to 90.5 degrees F) and 10 percent to 80 percent relative humidity.
ENWW Preparing the location 9
Page 12

Package contents
Hardware and software
1. print cartridge
2. power cord
3. Start Guide and support flyer
4. CD-ROMs containing device software and electronic User Guide
Note
5. 250-sheet media input tray and 10-sheet priority input tray
6. automatic document feeder (ADF) input tray
7. Fax Guide
8. fax cord
9. HP LaserJet 3380 all-in-one
10. control-panel faceplate (if not already installed)
The parallel cable and USB device cable (A/B) are not included.
10 Chapter 1 Introduction ENWW
Page 13

Documentation
The package contains the following documents:
● Start Guide, for initial setup and configuration instructions
● Fax Guide, for fax configuration and operation instructions
● electronic User Guide on the device CD-ROMs, for extra information and troubleshooting
● Toolbox software Help, for instructions about operating the device through the software
ENWW Package contents 11
Page 14

Locating the device parts
1. ADF input tray
2. flatbed scanner lid
3. control panel
4. output bin
5. print-cartridge door
6. priority input tray
7. media input tray
8. left side panel
9. left side panel latch
10. fax interface ports
11. USB port
12. parallel port
13. power socket
14. power switch
15. straight-through output door
12 Chapter 1 Introduction ENWW
Page 15

2
Setting up your device
● Installing the control panel faceplate (if not already installed)
Installing the input trays
●
Installing the automatic document feeder (ADF) input tray
●
Installing the print cartridge
●
Connecting the power cord
●
Connecting a printer cable to the device
●
Connecting to a telephone line
●
Turning on the device
●
Setting the control panel display language and location (if necessary)
●
Printing a configuration report
●
Testing the copier by using the automatic document feeder (ADF) input tray
●
Testing the copier by using the flatbed scanner
●
Completing your device setup
●
Connecting to a network
●
Connecting to a computer
●
Using the Toolbox
●
Installing the Macintosh software (OS 9.x to OS X)
●
Testing the software installation
●
Registering the device
●
Getting support information
●
Congratulations
●
ENWW 13
Page 16

Installing the control panel faceplate (if not already installed)
1. Align the tab in the center of the bottom of the faceplate with the slot on the device.
2. Press the bottom of the faceplate onto the device, and then continue to press while
pushing your hands up toward the top of the faceplate until it snaps into place.
Note
Make sure that the faceplate is aligned correctly and is not pressing any buttons.
The control panel includes the following controls:
1. fax controls
2. alphanumeric buttons
3. menu and cancel controls
4. copy controls
5. scan controls
14 Chapter 2 Setting up your device ENWW
Page 17

Installing the input trays
1. Slide the trays in and down at an angle until they fit securely.
2. Remove any shipping tape inside and outside of the trays.
3. Remove the priority input tray.
4. Slide out the media guides.
5. Pull out the long-media support.
6. Place the media in the media input tray, and then adjust the media guides until they are
flush with the media.
ENWW Installing the input trays 15
Page 18

Note
Do not fan the media before placing it in the tray.
7. Install the priority input tray on top of the media input tray.
Installing the automatic document feeder (ADF) input tray
1. Align the two tabs on the input tray with the two grooves in the ADF lid.
2. Slide the tray into the grooves until the tray snaps into place.
16 Chapter 2 Setting up your device ENWW
Page 19

Installing the print cartridge
1. Make sure that the print-cartridge door is open.
2. Remove the print cartridge from its packaging, and then shake the cartridge gently five or
six times.
3. Break the plastic tab at the end of the cartridge.
4. Remove the sealing tape from the cartridge.
5. Hold the print cartridge by the handle and insert the cartridge as shown.
6. Close the print-cartridge door. The print cartridge engages when the door is closed.
CAUTION
ENWW Installing the print cartridge 17
If toner gets on your clothing, wipe the toner off with a clean cloth, wash the items in cold
water, and air dry. Using hot water or heat from a dryer will set the toner in the fabric.
Page 20

Note
Hewlett-Packard Company cannot recommend using non-HP print cartridges, whether they
are new, refilled, or remanufactured. Because they are not HP products, HP cannot influence
their design or control their quality.
Connecting the power cord
1. Connect the power cord to the power socket on the back of the device.
2. Connect the other end of the power cord to a grounded alternating current (AC) outlet.
Note
Use only the power cord that came with the device.
Connecting a printer cable to the device
Note
If you are using the device as a standalone fax machine or copier, go to the next section.
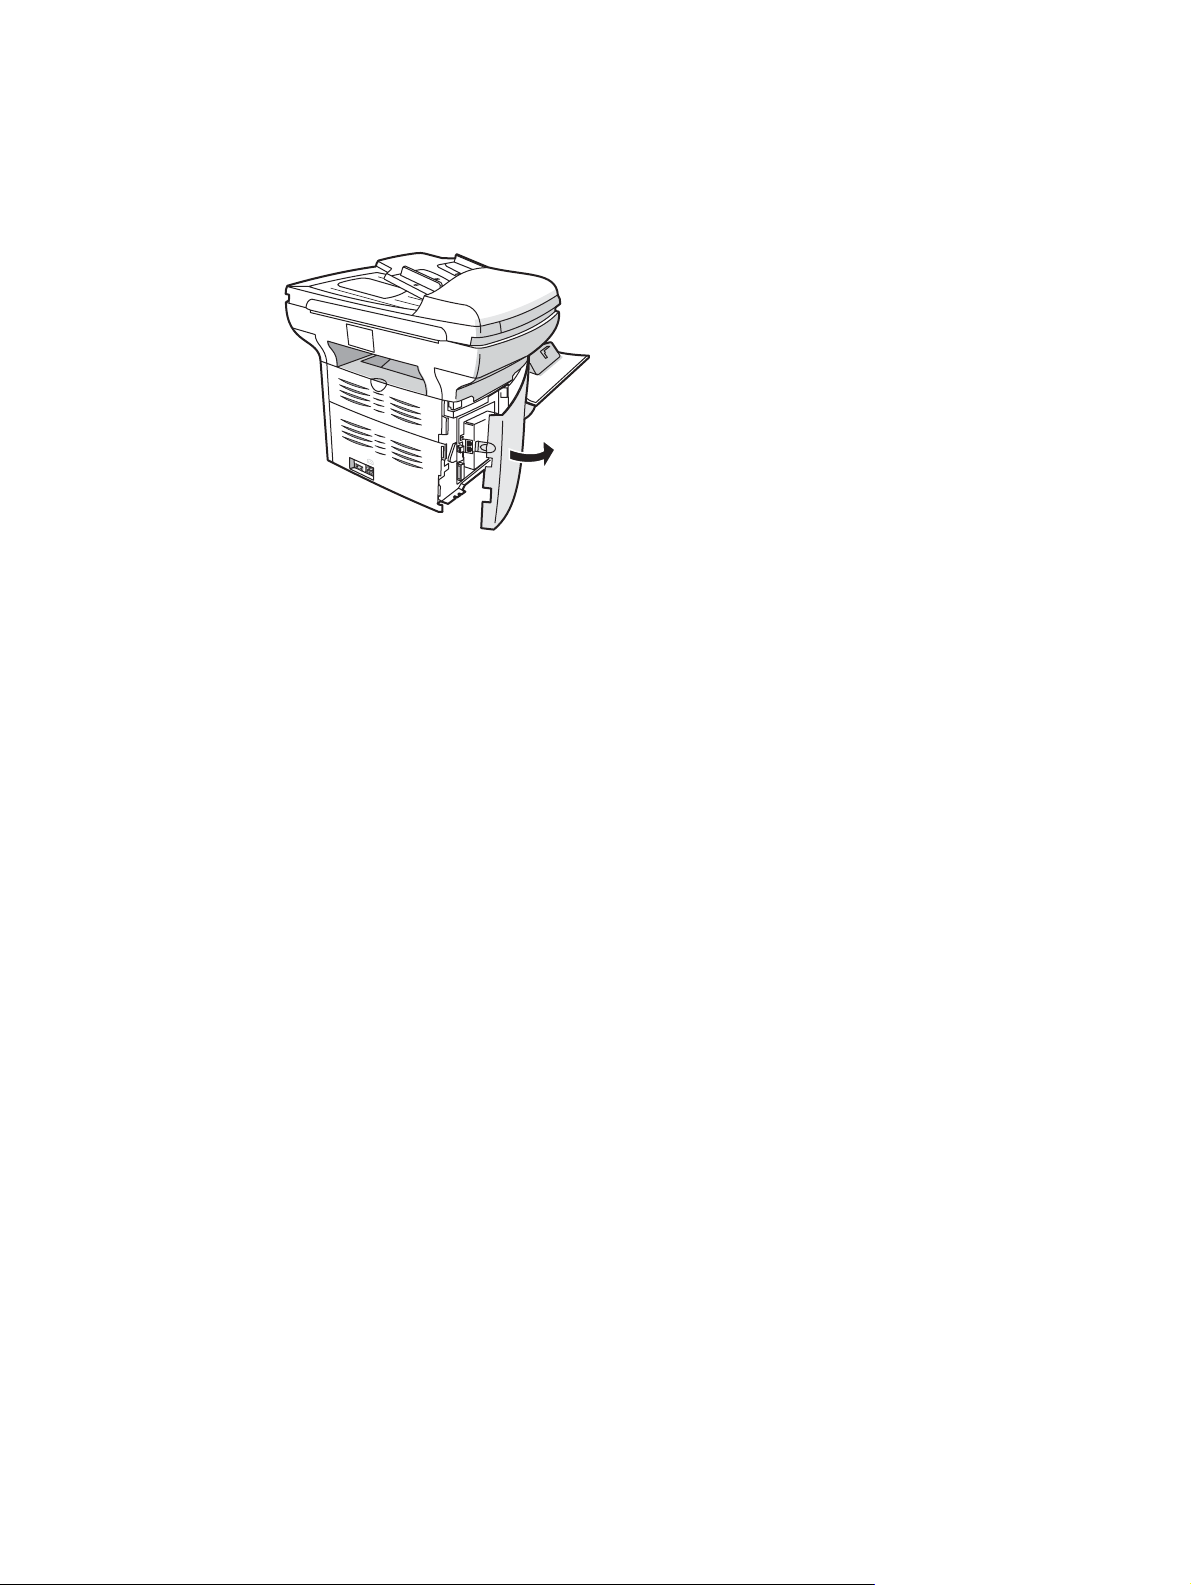
1. Open the print-cartridge door, and then open the left side panel.
2. Connect the parallel or USB device cable (A/B) to the correct port.
18 Chapter 2 Setting up your device ENWW
Page 21

3. Thread the cable through the left panel opening, and then close the panel.
4. Shut the print-cartridge door.
Note
Do not connect the cable to a computer or a network at this time.
ENWW Connecting a printer cable to the device 19
Page 22

Connecting to a telephone line
Note
If you are not using the device fax functionality, go to the next section.
1. Open the print-cartridge door.
2. Open the left side panel.
3. Connect the included fax cord to the device "line" port (the port that is marked with an
"L").
4. Close the left side panel (make sure that the fax cord is routed through the upper notch in
the panel).
5. Close the print-cartridge door.
6. Connect the cord to a telephone jack.
Note
20 Chapter 2 Setting up your device ENWW
Use only the fax cord that came with the device. For more information about faxing, see the
Fax Guide.
Page 23

Turning on the device
Turn on the device by pressing the power button next to the power socket on the back of the
device.
Tip: If the device has no power and no lights are lit on the control panel, make sure that the
power cord is attached securely to both the device and a power outlet. Also, if the power cord
is connected to a power strip, make sure that the power strip is switched on, or connect the
device directly to a wall outlet to test the power strip.
Setting the control panel display language and location (if necessary)
If prompted by the control panel, select your language and location information. Follow the
instructions on the control panel.
Note
The device automatically turns off and then turns on after you select the location.
ENWW Setting the control panel display language and location (if necessary) 21
Page 24

Printing a configuration report
1. Press
2. Press the < or the > button to select Reports, and then press
3. Press the < or the > button to select Config report, and then press
Tip: If the page that prints is totally blank, remove the print cartridge, make sure that the
sealing tape is removed (see "Installing the print cartridge"), reinstall the print cartridge, and
then try printing the page again.
MENU/ENTER
.
MENU/ENTER
.
MENU/ENTER
.
Testing the copier by using the automatic document feeder (ADF) input tray
1. Load the configuration report that you just printed print-side up into the ADF input tray.
2. Adjust the media guides to sit against the page.
3. Verify that the original is loaded print-side up, and then press
Tip: If the copy job produces a blank page, make sure that the original is loaded print-side up
and that no jams exist in the ADF and paper path. For information about removing jams and
other troubleshooting tips, see the electronic User Guide on the device CD-ROMs.
START/COPY
.
22 Chapter 2 Setting up your device ENWW
Page 25

Testing the copier by using the flatbed scanner
1. Open the scanner lid, place the configuration report print-side down on the flatbed
scanner, and then close the scanner lid.
2. Press
Tip: If the copy job produces a blank page, make sure that the original is loaded print-side
down on the flatbed scanner and that no jams exist in the paper path. For information about
removing jams and other troubleshooting tips, see the electronic User Guide on the device
CD-ROMs.
START/COPY
.
ENWW Testing the copier by using the flatbed scanner 23
Page 26

Completing your device setup
● If you are using the device as a standalone copier, the setup is complete.
● If you are using the device as a standalone fax, see the Fax Guide to set the fax header
and complete the device setup. The Fax Guide also includes troubleshooting tips.
● If you are connecting the device to a network, see "Connecting to a network".
● If you are connecting the device directly to a computer, see "Connecting to a computer".
● If you are using all of the device functionality, see the Fax Guide to set up the fax, and
then see "Connecting to a network" (network connection) or "Connecting to a
computer" (computer connection) in this Start Guide.
24 Chapter 2 Setting up your device ENWW
Page 27

Connecting to a network
If you want to connect the device to a network, see the instructions that are included with the
HP print server (which is not included with the HP LaserJet all-in-one). After completing the
instructions, see "Connecting to a computer".
Connecting to a computer
Note
Note
To install the software for Macintosh, see "Installing the Macintosh software (OS 9.x to OS
X)".
1. Close all programs that are running on the computer.
2. Insert the software CD-ROM into the CD drive.
If the installation program does not begin automatically, click Start, click Run, click
Browse, select the HPSetup.exe file on the CD, and then click OK.
You must have administrative privileges to install the software for Windows NT 4.0 service
pack 3, Windows XP, or Windows 2000.
3. Select Install HP LaserJet software.
4. In the Printer Connection Wizard, select a connection type.
ENWW Connecting to a computer 25
Page 28

5. The software prompts you to connect the device to a computer. Connect the parallel or
USB device cable (A/B) from the device to the correct computer port or the network.
6. Select the Typical installation type, and then follow the instructions to install the
software.
Using the Toolbox
Note
The Toolbox does not support Macintosh operating systems.
1. On the computer, click Start, and then click Programs.
2. Click HP LaserJet all-in-one, and then click hp Toolbox to open the Toolbox.
The Toolbox is a Web page that opens in a Web browser and provides access to the product
management and troubleshooting tools, embedded Web server, and product documentation.
Use the Toolbox to perform many device functions from your computer, and then go to
"Testing the software installation".
26 Chapter 2 Setting up your device ENWW
Page 29

Installing the Macintosh software (OS 9.x to OS X)
1. Connect the USB device cable (A/B) to the Macintosh.
2. Close all of the programs that are running on the computer.
3. Insert the software CD-ROM into the CD drive.
4. In the CD folder, double-click the HP All-in-One Installer icon.
5. Follow the onscreen instructions, and then click Install.
6. When prompted, restart the computer.
7. When the HP All-in-One Setup Assistant starts, follow the instructions.
ENWW Installing the Macintosh software (OS 9.x to OS X) 27
Page 30

Testing the software installation
Print a page from any program to make sure that the software is correctly installed. If the
installation failed, reinstall the software. If the reinstallation fails, see http://www.hp.com/
support/lj3380 or the support flyer for more information.
Registering the device
Register your HP LaserJet 3380 device now to receive these free benefits and get the most
from your HP product:
● Gain access to support and services
● Receive notification of driver updates
● Manage your profile and register your products
You can register your device at http://www.hp.com/go/register . Hewlett-Packard and its
subsidiaries respect your privacy and are committed to protecting it. Please see the HP
privacy statement at the registration website.
Getting support information
For customer support, see the support flyer or see http://www.hp.com/support/lj3380 .
Congratulations
The device is ready to use. See the Toolbox (Windows 98, Millennium Edition (ME), 2000, or
XP only) to open the electronic User Guide and to use the tools to solve problems. The
Toolbox lets you adjust the device settings from your computer.
The electronic User Guide is located on the software CD-ROM as well.
28 Chapter 2 Setting up your device ENWW
Page 31

Page 32

 Loading...