

Page 1

software
technical
reference
hp LaserJet 3015
hp LaserJet 3020/3030
hp LaserJet 3380
Page 2

Page 3

HP LaserJet
3015/3020/3030/3380
Software Technical Reference
Page 4

Copyright
(c) 2004 Copyright Hewlett-Packard
Development Company, L.P.
Reproduction, adaptation or translation
without prior written permission is prohibited,
except as allowed under the copyright laws.
The information in this document is subject
to change without notice.
The only warranties for HP products and
services are set forth in the express warranty
statements accompanying such products
and services. Nothing herein should be
construed as constituting an additional
warranty. HP shall not be liable for technical
or editorial errors or omissions contained
herein.
Part number: Q2660-online
Edition 1, 2/2004
Trademarks
Adobe (R), Acrobat (R), and PostScript (R)
are either registered tradmarks or
trademarks of Adobe Systems Incorporated
in the United States and/or other countries/
regions.
Microsoft (R), Windows (R), and Windows
NT (R) are U.S. registered trademarks of
Microsoft Corporation.
Pentium (R) is a US registered trademark of
Intel Corporation.
UNIX (R) is a registered trademark of The
Open Group.
Page 5

Table of contents
1 Purpose and scope 1
Introduction ...................................................................................................................................1
HP LaserJet all-in-one product comparison .................................................................................2
Software availability and fulfillment...............................................................................................5
Ordering software...................................................................................................................5
Documentation availability and localization...................................................................................7
2 Software overview 11
Operating systems.......................................................................................................................11
Supported Windows operating systems...............................................................................11
Windows supported operating systems.........................................................................12
Print-only supported operating systems.........................................................................12
Windows system requirements.............................................................................................12
Windows supported operating system requirements.....................................................13
Print-only supported operating system requirements....................................................13
Printing from other operating systems .................................................................................13
Software component information................................................................................................14
New all-in-one software features..........................................................................................14
Scanning system.........................................................................................................................15
Scanning methods................................................................................................................15
HP LaserJet Scan software..................................................................................................16
E-mail.............................................................................................................................18
Scan drivers..........................................................................................................................19
TWAIN scan driver.........................................................................................................19
TWAIN compatibility................................................................................................19
TWAIN scanning does not work with some applications .................................19
Additional information about TWAIN ................................................................19
TWAIN driver user interface....................................................................................20
Windows Image Acquisition (WIA) scan driver..............................................................21
HP Send Fax software................................................................................................................22
Faxing to multiple recipients.................................................................................................23
Creating a cover page...........................................................................................................24
Faxing without first printing and scanning the document.....................................................24
HP LaserJet all-in-one software for Windows.............................................................................25
Available product configurations.................................................................................................27
Software features by connection type .................................................................................27
Supported configurations......................................................................................................28
Direct connection............................................................................................................29
Network connection options...........................................................................................29
Local connection using Microsoft peer-to-peer networking (Windows only) ..........29
System requirements for peer-to-peer networking...........................................29
Networked with HP Jetdirect external print server..................................................29
HP Jetdirect networking requirements..............................................................30
Software Technical Reference i
Page 6

Multitasking capabilities ..............................................................................................................31
Differences between the network-connected and direct-connected configurations ..................32
Port communication...........................................................................................................................33
Overview......................................................................................................................................33
Parallel port connections.............................................................................................................33
Other parallel port devices....................................................................................................33
Changing parallel port modes...............................................................................................34
USB port connections .................................................................................................................34
Device conflicts in Windows........................................................................................................34
Opening the Windows Device Manager...............................................................................35
Check for device conflicts ....................................................................................................35
Guidelines for troubleshooting and resolving device conflicts .............................................35
Supported third-party software..........................................................................................................35
Optical character recognition (OCR) ..........................................................................................36
About OCR reliability ............................................................................................................36
Other PC fax programs ..............................................................................................................36
3 Macintosh software overview 37
Supported Mac operating systems....................................................................................................37
Supported e-mail programs...............................................................................................................37
All-in-one software for Mac................................................................................................................38
Software components for Mac.....................................................................................................38
Software features not available on Mac OS systems ................................................................40
Software component availability for Mac.....................................................................................40
Software component localization ...............................................................................................41
Ordering software for Mac...........................................................................................................41
System requirements (Mac)...............................................................................................................42
Installation overview ..........................................................................................................................43
Installation options.............................................................................................................................43
Macintosh installation instructions for direct connections...........................................................43
Installation instructions for Mac OS 9.1 or higher.................................................................43
Installation instructions for Mac OS X ..................................................................................44
Mac installation instructions for networked computers...............................................................44
Installation dialog box options for Mac OS systems .........................................................................45
Uninstall instructions for Mac.............................................................................................................56
4 The HP Toolbox 57
Overview of the HP Toolbox..............................................................................................................57
Starting the HP Toolbox..............................................................................................................58
Structure......................................................................................................................................58
Opening page..............................................................................................................................58
Navigation....................................................................................................................................58
System requirements.........................................................................................................................58
Web browser requirements.........................................................................................................59
Other requirements......................................................................................................................59
Key features.......................................................................................................................................59
Scan to e-mail or a folder............................................................................................................60
Receive faxes to this computer...................................................................................................60
Configuration options.........................................................................................................................61
HP Toolbox section.....................................................................................................................61
Status tab..............................................................................................................................61
Device Status page........................................................................................................62
Setup Status Alerts page................................................................................................63
ii Software Technical Reference
Page 7

Device Configuration page......................................................................................64
Print Info Pages page..............................................................................................67
Fax tab............................................................................................................................67
Fax Tasks ...............................................................................................................68
Fax Phone Book page.............................................................................................69
Fax Phone Book - Edit Entry page .........................................................................72
Fax Phone Book - Create a New Group page.........................................................73
Fax Phone Book - Edit a Group page......................................................................74
Import information into the Fax Phone Book page..................................................75
Phone Book Import - Select Entries page...............................................................77
Fax Send Log and Fax Receive Log pages............................................................78
Fax Viewer page......................................................................................................80
Fax Data Properties page........................................................................................81
Fax Reports page....................................................................................................82
Detailed Fax Settings page......................................................................................83
Scan to tab.....................................................................................................................83
Scan to E-mail or a Folder page..............................................................................84
Scan Preferences page...........................................................................................85
Troubleshooting tab........................................................................................................86
Print Problems page................................................................................................86
Fax Problems page..................................................................................................87
Copy Problems page...............................................................................................88
Scan Problems page...............................................................................................89
Error Messages page..............................................................................................90
Print Quality Tools page..........................................................................................91
Documentation tab.........................................................................................................91
How do I? pages......................................................................................................91
Print: How do I? page..............................................................................................92
Fax: How do I? page................................................................................................93
Copy: How do I? page.............................................................................................94
Scan: How do I? page.............................................................................................95
User Guide page......................................................................................................96
Readme page..........................................................................................................97
Device Settings section........................................................................................................97
System Settings tab.......................................................................................................97
Device Information page..........................................................................................98
Paper Handling page...............................................................................................99
Print Modes page...................................................................................................100
System Setup page...............................................................................................101
Volumes page........................................................................................................102
Date/Time page.....................................................................................................103
Service page..........................................................................................................104
Advanced Settings page........................................................................................105
Event Log page......................................................................................................106
Save/Restore Settings page..................................................................................107
Print Settings tab..........................................................................................................107
Printing page..........................................................................................................108
Print Quality page..................................................................................................109
PCL page...............................................................................................................110
PostScript page.....................................................................................................111
I/O page.................................................................................................................112
Fax Settings tab...........................................................................................................112
General Settings page...........................................................................................113
Send page..............................................................................................................114
Receive page.........................................................................................................115
Software Technical Reference iii
Page 8

Fax Setup Wizard page................................................................................................116
Copy Settings tab................................................................................................................116
Copying page...............................................................................................................117
Reduce/Enlarge page...................................................................................................118
Network Settings.......................................................................................................................118
Other pages...............................................................................................................................118
About HP Toolbox page......................................................................................................119
Select Device page.............................................................................................................119
Current Alerts page.............................................................................................................120
Text Map page....................................................................................................................120
Product Registration page..................................................................................................123
Order Supplies page...........................................................................................................124
Product Support page.........................................................................................................125
5 Software installation 127
Installation overview [Public] ...........................................................................................................127
Installation options...........................................................................................................................128
Windows installation for direct connections .............................................................................128
Setting up Windows sharing (peer-to-peer networking).....................................................128
Setting up the host computer running Windows 98SE, Me, NT 4.0, or 2000..............129
Setting up the host computer running Windows XP....................................................129
Setting up the client computers....................................................................................129
Setting up client computers running Windows 98SE, Me, NT 4.0, or 2000..........129
Setting up client computers running Windows XP.................................................130
Installation instructions for networked computers.....................................................................130
Network setup with an external Jetdirect print server.........................................................130
Windows installation instructions for networked computers...............................................131
Installing the printer driver only [Public]....................................................................................132
Printer driver installation for Windows 98SE and Me.........................................................132
Printer driver installation for Windows 2000 or XP.............................................................132
Printer driver installation for Windows NT 4.0....................................................................132
Installation dialog box options for Windows [Public] .......................................................................133
Uninstall...........................................................................................................................................151
Uninstall instructions for Windows............................................................................................151
Uninstalling a Typical or Custom installation......................................................................151
Using the HP LaserJet all-in-one software Uninstall component (recommended)......151
Using the HP LaserJet all-in-one software Add or Remove Software component .....152
Using the Windows Add/Remove programs component.............................................152
Uninstalling a Minimum installation....................................................................................152
Uninstalling an Add-Printer installation...............................................................................153
Windows 98SE or Windows ME...................................................................................153
History file..................................................................................................................................153
6 Engineering details 155
Readme ...........................................................................................................................................155
Windows Readme ....................................................................................................................155
Macintosh Readme...................................................................................................................155
Information about the hp LaserJet all-in-one software version 5.8....................................155
Contents.......................................................................................................................155
Supported HP Products ...............................................................................................156
Supported Operating Systems.....................................................................................156
For OSX Users Only.....................................................................................................156
How to Configure a Print or Fax Queue................................................................156
iv Software Technical Reference
Page 9

For OS 9.1.x and 9.2.x users only.........................................................................156
For More Information.............................................................................................157
Copyright ...............................................................................................................157
Index 159
Software Technical Reference v
Page 10

vi Software Technical Reference
Page 11

List of tables
Table 1-1. Features of the HP LaserJet all-in-one products ..............................................2
Table 1-2. CD-ROM part numbers for the HP LaserJet all-in-one software.......................6
Table 1-3. User documentation availability and localization...............................................7
Table 2-1. Software components for Windows.................................................................25
Table 2-2. Software features by connection type..............................................................28
Table 2-3. Multitasking capabilities ..................................................................................31
Table 3-1. Software components for Mac.........................................................................38
Table 3-2. Software component availability for Mac ........................................................40
Table 3-3. CD-ROM part numbers for the HP LaserJet all-in-one software.....................41
Table 4-1. Browsers supported by HP Toolbox................................................................59
Table 4-2. Alerts and notifications.....................................................................................63
Software Technical Reference vii
Page 12

viii Software Technical Reference
Page 13

List of figures
Figure 2-1. HP LaserJet Scan dialog box...........................................................................17
Figure 2-2. Scan Settings dialog box..................................................................................17
Figure 2-3. TWAIN driver user interface.............................................................................20
Figure 2-4. Scan Preferences dialog box...........................................................................21
Figure 2-5. Send Fax user interface...................................................................................22
Figure 2-6. Faxing to multiple recipients............................................................................23
Figure 2-7. Send Fax - cover page.....................................................................................24
Figure 3-1. Step 1 - HP Authenticate (OSX only)...............................................................45
Figure 3-2. Step 2 - HP Software License Agreement.......................................................46
Figure 3-3. Step 3 - Installing (progress indicator).............................................................46
Figure 3-4. Step 4 - Authenticate (OSX only).....................................................................47
Figure 3-5. Step 5 - Restart alert........................................................................................47
Figure 3-6. Step 6 - HP All-in-One Setup Assistant - Introduction.....................................48
Figure 3-7. Step 7 - HP All-in-One Setup Assistant - Select Device..................................49
Figure 3-8. Step 8 - HP All-in-One Setup Assistant - User Identification...........................50
Figure 3-9. Step 9 - HP All-in-One Setup Assistant - Phone Line......................................51
Figure 3-10. Step 10 - HP All-in-One Setup Assistant - Outside Line..................................52
Figure 3-11. Step 11 - HP All-in-One Setup Assistant - Distinctive Ring.............................53
Figure 3-12. Step 12 - HP All-in-One Setup Assistant - Answering Machine......................54
Figure 3-13. Step 13 - HP All-in-One Setup Assistant - Finish............................................55
Figure 3-14. Step 14 - HP All-in-One Setup Assistant - Congratulations.............................56
Figure 4-1. Device Status page..........................................................................................62
Figure 4-2. Set Up Status Alerts page................................................................................63
Figure 4-3. Device Configuration page - 1 of 4..................................................................64
Figure 4-4. Device Configuration page - 2 of 4..................................................................65
Figure 4-5. Device Configuration page - 3 of 4..................................................................65
Figure 4-6. Device Configuration page - 4 of 4..................................................................66
Figure 4-7. Print Information Pages page..........................................................................67
Figure 4-8. Fax Tasks page................................................................................................68
Figure 4-9. Fax Phone Book page......................................................................................71
Figure 4-10. Fax Phone Book - Edit Entry page...................................................................72
Figure 4-11. Fax Phone Book - Create a New Group page.................................................73
Figure 4-12. Fax Phone Book - Edit a Group.......................................................................74
Figure 4-13. Import information into the Fax Phone Book...................................................75
Figure 4-14. Phone Book Import - Select Entries page........................................................77
Figure 4-15. Fax Send Log page..........................................................................................78
Figure 4-16. Fax Receive log...............................................................................................79
Figure 4-17. Fax Viewer page..............................................................................................80
Figure 4-18. Fax Data Properties page................................................................................81
Figure 4-19. Fax Reports page.............................................................................................82
Figure 4-20. Detailed Fax Settings page..............................................................................83
Figure 4-21. Scan to E-mail or a Folder page......................................................................84
Figure 4-22. Scan Preferences page....................................................................................85
Figure 4-23. Print Problems page.........................................................................................86
Figure 4-24. Fax Problems page..........................................................................................87
Software Technical Reference ix
Page 14

Figure 4-25. Copy Problems page..............................................................................................88
Figure 4-26. Scan Problems page..............................................................................................89
Figure 4-27. Error Messages page.............................................................................................90
Figure 4-28. Print Quality Tools page.........................................................................................91
Figure 4-29. Print: How do I? page.............................................................................................92
Figure 4-30. Fax: How do I? page...............................................................................................93
Figure 4-31. Copy: How do I? page............................................................................................94
Figure 4-32. Scan: How do I? page............................................................................................95
Figure 4-33. User Guide page.....................................................................................................96
Figure 4-34. Readme page.........................................................................................................97
Figure 4-35. Device Information page.........................................................................................98
Figure 4-36. Paper Handling page..............................................................................................99
Figure 4-37. Print Modes page..................................................................................................100
Figure 4-38. System Setup page..............................................................................................101
Figure 4-39. Volumes page.......................................................................................................102
Figure 4-40. Date/Time page....................................................................................................103
Figure 4-41. Service page.........................................................................................................104
Figure 4-42. Advanced Settings page.......................................................................................105
Figure 4-43. Event Log page.....................................................................................................106
Figure 4-44. Save/Restore Settings page.................................................................................107
Figure 4-45. Printing..................................................................................................................108
Figure 4-46. Print Quality page.................................................................................................109
Figure 4-47. PCL page..............................................................................................................110
Figure 4-48. PostScript page....................................................................................................111
Figure 4-49. I/O page................................................................................................................112
Figure 4-50. General Settings page..........................................................................................113
Figure 4-51. Send page............................................................................................................114
Figure 4-52. Receive page........................................................................................................115
Figure 4-53. Fax Setup Wizard page........................................................................................116
Figure 4-54. Copying page........................................................................................................117
Figure 4-55. Reduce/Enlarge page...........................................................................................118
Figure 4-56. About HP Toolbox page.......................................................................................119
Figure 4-57. Current Alerts page...............................................................................................120
Figure 4-58. Text Map page - 1 of 2.........................................................................................121
Figure 4-59. Text Map page - 2 of 2.........................................................................................122
Figure 4-60. Product Registration page....................................................................................123
Figure 4-61. Order Supplies page.............................................................................................124
Figure 4-62. Product Support page...........................................................................................125
Figure 5-1. CD Browser screen ..............................................................................................134
Figure 5-2. HP LaserJet Documentation screen ....................................................................135
Figure 5-3. Online support screen...........................................................................................136
Figure 5-4. Step 1- Welcome to the HP LaserJet all-in-one Setup Wizard screen ...............137
Figure 5-5. Step 2 - HP Software License Agreement screen................................................138
Figure 5-6. Step 3 - Printer Connection screen......................................................................139
Figure 5-7. Step 4 - Network Setup screen ............................................................................140
Figure 5-8. Step 5 - Identify Printer screen ............................................................................141
Figure 5-9. Step 6 - Select Printer screen ..............................................................................142
Figure 5-10. Step 7 - Specify Printer screen ............................................................................143
Figure 5-11. Step 8 - Specify Network Path screen .................................................................144
Figure 5-12. Step 9 - Installation Type screen .........................................................................145
Figure 5-13. Step 10 - Features screen ...................................................................................146
Figure 5-14. Step 11 - Ready to Install screen ........................................................................147
Figure 5-15. Step 12 - Installation Status screen .....................................................................148
Figure 5-16. Step 13 - Finish screen ........................................................................................149
Figure 5-17. Step 14 - Test Page screen .................................................................................150
x Software Technical Reference
Page 15

Figure 5-18. Step 15 - Restart screen ...............................................................................150
Figure 5-19. Step 16 - Exit Setup screen ..........................................................................151
Software Technical Reference xi
Page 16

xii Software Technical Reference
Page 17

Purpose and scope
1
This chapter provides information about the following topics:
● Introduction
● HP LaserJet all-in-one product comparison
● Software availability and fulfillment
● Documentation availability and localization
Introduction
Note
This software technical reference (STR) provides information about and troubleshooting tips
for the all-in-one software for the following products.
● HP LaserJet 3015 all-in-one
● HP LaserJet 3020 all-in-one
● HP LaserJet 3030 all-in-one
● HP LaserJet 3380 all-in-one
This document is prepared in an electronic format to serve as a quick-reference tool for
Customer Care Center (CCC) agents, support engineers, system administrators,
management information systems (MIS) personnel, and end users, as appropriate.
This STR describes drivers that are shipped on the all-in-one software CD-ROM that comes
with the HP LaserJet all-in-one product. This STR does not cover drivers that will become
available on the Web.
The following information is included in this technical reference:
● overview of drivers and platforms
● procedures for installing and uninstalling software components
● descriptions of problems that can arise while using the HP LaserJet all-in-one products,
and known solutions to those problems
Note
EN Chapter 1 Purpose and scope 1
An addendum to this STR describes system modification information, including file lists and
changes to registry keys.
Page 18

HP LaserJet all-in-one product comparison
The following table contains descriptions of the four HP LaserJet all-in-one products that are
described in this STR.
Table 1-1. Features of the HP LaserJet all-in-one products
Feature
HP LaserJet 3015 HP LaserJet 3020 HP LaserJet 3030 HP LaserJet 3380
HP
Product
number
Memory
Speed
Q2668A Q2665A Q2666A Q2660A
● 4 megabytes
(MB) of ROM/
flash memory
● 32 MB of
RAM, which
includes 9
MB for the
product and
23 MB
available to
the user
● Prints and
copies up to
15 pages per
minute (ppm)
for letter-size
paper
● Prints and
copies up to
14 ppm for
A4-size paper
● First page
out in less
than 10
seconds
● 4 MB of
ROM/flash
memory
● 32 MB of
RAM, which
includes 9
MB for the
product and
23 MB
available to
the user
● Prints and
copies up to
15 ppm for
letter-size
paper
● Prints and
copies up to
14 ppm for
A4-size
paper
● First page
out in less
than 10
seconds
● 4 MB of
ROM/flash
memory
● 32 MB of
RAM, which
includes 9
MB for the
product and
23 MB
available to
the user
● Prints and
copies up to
15 ppm for
letter-size
paper
● Prints and
copies up to
14 ppm for
A4-size
paper
● First page
out in less
than 10
seconds
● 4 MB of
ROM/flash
memory
● 32 MB of
RAM, which
includes 9
MB for the
product and
23 MB
available to
the user
● One dual
inline
memory
module
(DIMM) slot
for adding
fonts and
memory
● Prints and
copies up to
20 ppm for
letter-size
paper
● Prints and
copies up to
19 ppm for
A4-size
paper
● First page
out in 8
seconds
2 HP LaserJet all-in-one product comparison EN
Page 19

Table 1-1. Features of the HP LaserJet all-in-one products (continued)
Feature
HP LaserJet 3015 HP LaserJet 3020 HP LaserJet 3030 HP LaserJet 3380
HP
Q2668A Q2665A Q2666A Q2660A
Product
number
Connectivity ● A universal
serial bus
(USB) port,
compatible
with 2.0
specifications
● IEEE-1284B
parallel port
Paper
handling
● One 30-sheet
automatic
document
feeder (ADF);
maximum
media size,
216 by 356
mm (8.5 by
14 inches)
● One 150-
sheet media
input tray;
maximum
media size,
216 by 356
mm (8.5 by
14 inches)
● One 10-sheet
priority input
slot;
maximum
media size,
216 by 356
mm (8.5 by
14 inches)
● A USB port,
compatible
with 2.0
specifications
● IEEE-1284B
parallel port
● One 50-
sheet ADF;
maximum
media size,
216 by 381
mm (8.5 by
15 inches)
● One 150-
sheet media
input tray;
maximum
media size,
216 by 356
mm (8.5 by
14 inches)
● One 10-
sheet priority
input slot;
maximum
media size,
216 by 356
mm (8.5 by
14 inches)
● A letter/A4-
size flatbed
scanner
● A USB port,
compatible
with 2.0
specifications
● IEEE-1284B
parallel port
● One 50-
sheet ADF;
maximum
media size,
216 by 381
mm (8.5 by
15 inches)
● One 250-
sheet media
input tray;
maximum
media size,
216 by 356
mm (8.5 by
14 inches)
● One 10-
sheet priority
input tray;
maximum
media size,
216 by 356
mm (8.5 by
14 inches)
● A legal-size
flatbed
scanner
EN Chapter 1 Purpose and scope 3
Page 20

Table 1-1. Features of the HP LaserJet all-in-one products (continued)
Feature
HP LaserJet 3015 HP LaserJet 3020 HP LaserJet 3030 HP LaserJet 3380
HP
Product
number
Print
Q2668A Q2665A Q2666A Q2660A
● 1200 dots
per inch (dpi)
effective
output quality
(600x600x2
dpi using HP
Resolution
Enhancement
Technology
[REt])
● Printer
control
● 1200 dpi
effective
output
quality
(600x600x2
dpi using HP
REt)
● PCL Level
5e and 6
● PS Level 2
emulation
● 1200 dpi
effective
output
quality
(600x600x2
dpi using HP
REt)
● PCL Level
5e and 6
● PS Level 2
emulation
● 1200 by
1200 dpi
● PCL Level
5e and 6
● PS Level 2
emulation
language
(PCL) Level
5e and 6
● Adobe(R)
PostScript
(R) (PS)
Level 2
emulation
Fax
Copy
● Full-
functionality
fax
capabilities
with a V.34
fax, including
a phone
book; fax
from ADF,
flatbed or
PC; and
delayed-fax
features
● 2 MB of flash
memory for
storing up to
110 pages
● Reduce/
enlarge
feature
● Up to 15 ppm
automatic
collation
● Not available ● Full-
functionality
fax
capabilities
with a V.34
fax,
including a
phone book;
fax from
ADF, flatbed
or PC; and
delayed-fax
features
● 2 MB of
flash
memory for
storing up to
110 pages
● Reduce/
enlarge
feature
● Up to 15
ppm
automatic
collation
● Reduce/
enlarge
feature
● Up to 15
ppm
automatic
collation
● Full-
functionality
fax
capabilities
with a V.34
fax,
including a
phone book;
fax from
ADF, flatbed
or PC;
delayed-fax
features;
and 4 MB of
flash
memory for
storing up to
250 pages
● Reduce/
enlarge
feature
● Up to 20
ppm
automatic
collation
4 HP LaserJet all-in-one product comparison EN
Page 21

Table 1-1. Features of the HP LaserJet all-in-one products (continued)
Feature
HP LaserJet 3015 HP LaserJet 3020 HP LaserJet 3030 HP LaserJet 3380
HP
Product
number
Scan
Q2668A Q2665A Q2666A Q2660A
● 24-bit
● 600 dpi
(9600
interpolated)
color
scanning
● 24-bit
● 600 dpi
(9600
interpolated)
color
scanning
● 24-bit
● 600 dpi
(9600
interpolated)
color
scanning
Software availability and fulfillment
Ordering software
To order the software if the CD is damaged or missing, contact Hewlett-Packard Support at
the following web site.
http://www.hp.com/cposupport/software.html
● 24-bit
● 600 dpi
(9600
interpolated)
color
scanning
To request the software CD-ROM by phone, see the following web site for the correct
contact number for your country/region.
http://welcome.hp.com/country/us/en/wwcontact.html
The following table presents the part numbers and language groups of the software CDROMs for the HP LaserJet 3015, the HP LaserJet 3020 and 3030, and the HP LaserJet
3380 all-in-one products.
EN Chapter 1 Purpose and scope 5
Page 22

Table 1-2. CD-ROM part numbers for the HP LaserJet all-in-one software
Part Number
Contents Languages Included on CD-ROM
Q 2660-60126 Windows software CD-ROM for
the HP LaserJet 3015, the HP
LaserJet 3020 and 3030, and the
HP LaserJet 3380 all-in-one
products
Q 2660-60127 ● Czech
Q 2660-60128
Asia
● Danish
● Dutch
● English
● Finnish
● French
● German
● Italian
● Norwegian
● Portuguese
● Spanish
● Swedish
● English
● Hungarian
● Polish
● Russian
● Turkish
● English
● Korean
● Simplified Chinese
● Thai
● Traditional Chinese
Q 2660-60119 Readiris Pro text recognition
software (OCR) CD-ROM for the
HP LaserJet 3015, the HP
LaserJet 3020 and 3030, and the
HP LaserJet 3380 all-in-one
products
Note
Due to contractual agreements,
the Readiris Pro CD-ROM is only
available by contacting an HP
Customer Care Representative.
6 Ordering software EN
The user interface for the Readiris
Pro text recognition software
(OCR) is available in the following
languages:
● Dutch
● English
● French
● German
● Italian
● Spanish
● Portuguese-Brazilian
Note
Readiris Pro text recognition
software can perform optical
character recognition (OCR) in 117
languages.
Page 23

Note
If you need a replacement CD or newer version of the software than what shipped with the
product, go to the web site for the product and click CD-ROM Order Page to order. Or click
Download drivers and software to get the software update.
Choose one of the following web sites according to the HP LaserJet all-in-one product you
have.
http://www.hp.com/support/lj3015
http://www.hp.com/support/lj3020
http://www.hp.com/support/lj3030
http://www.hp.com/support/lj3380
Documentation availability and localization
The documentation in the following table is available for the HP LaserJet 3015, the HP
LaserJet 3020 and 3030, and the HP LaserJet 3380 all-in-one products.
Table 1-3. User documentation availability and localization
Document name
Languages Part Number Location
HP LaserJet
3015 User Guide
The HP LaserJet 3015
User Guide is available in
electronic format on the
HP LaserJet all-in-one
software CD-ROM.
● Czech
● Dutch
● English
● French
● German
● Hungarian
● Italian
● Korean
● Polish
● Russian
● Simplified
Chinese
● Spanish
● Swedish
● Thai
● Traditional
Chinese
● Turkish
Q2669-90902
EN Chapter 1 Purpose and scope 7
Page 24

Table 1-3. User documentation availability and localization (continued)
Document name Languages Part Number Location
HP LaserJet
3020 and 3030
User Guide
HP LaserJet
3380 User Guide
● Czech
● Dutch
● English
● French
● German
● Hungarian
● Italian
● Korean
● Polish
● Russian
● Simplified Chinese
● Spanish
● Swedish
● Thai
● Traditional Chinese
● Turkish
● Czech
● Dutch
● English
● French
● German
● Hungarian
● Italian
● Korean
● Polish
● Russian
● Simplified Chinese
● Spanish
● Swedish
● Thai
● Traditional Chinese
● Turkish
Q2665-90902 The HP LaserJet 3020
and 3030 User Guide is
available in electronic
format on the HP
LaserJet all-in-one
software CD-ROM.
Q2660-90902 The HP LaserJet 3380
User Guide is available
in electronic format on
the HP LaserJet all-inone software CD-ROM.
8 Documentation availability and localization EN
Page 25

Table 1-3. User documentation availability and localization (continued)
Document name Languages Part Number Location
HP LaserJet
3015 Start Guide
HP LaserJet
3020 and 3030
Start Guide
HP LaserJet
3380 Start Guide
● Arabic
● Bulgarian
● Croatian
● Czech
● Danish
● Dutch
● English
● Estonian
● Finnish
● French
● German
● Greek
● Hebrew
● Hungarian
● Indonesian
● Italian
● Kazakh
● Korean
● Latvian
● Lithuanian
● Norwegian
● Polish
● Portuguese
● Romanian
● Russian
● Simplified Chinese
● Slovak
● Slovenian
● Spanish
● Swedish
● Thai
● Traditional Chinese
● Turkish
● Vietnamese
The part number
for the HP
LaserJet 3015
Start Guide is
Q2669-90921.
The part number
for theHP
LaserJet 3020
and 3030 Start
Guide is
Q2665-90921.
The part number
for the HP
LaserJet 3380
Start Guide is
Q2660-90938.
The HP LaserJet 3015
Start Guide, the HP
LaserJet 3020 and 3030
Start Guide, and the HP
LaserJet 3380 Start
Guide are available in
hardcopy and come in
the box with your HP
LaserJet all-in-one
product .
EN Chapter 1 Purpose and scope 9
Page 26

Table 1-3. User documentation availability and localization (continued)
Document name Languages Part Number Location
HP LaserJet
3015, 3030, and
3380 Fax Guide
● Arabic
● Czech
● Danish
● Dutch
● English
● Finnish
● French
● German
● Greek
● Hebrew
● Hungarian
● Indonesian
● Italian
● Korean
● Norwegian
● Polish
● Portuguese
● Russian
● Simplified Chinese
● Slovak
● Spanish
● Swedish
● Thai
● Traditional Chinese
● Turkish
● Vietnamese
Q2660-90920 The HP LaserJet 3015,
3030, and 3380 Fax
Guide is available in
hardcopy and comes in
the box with your HP
LaserJet all-in-one
product .
10 Documentation availability and localization EN
Page 27

2
Software overview
This chapter provides information about the following topics:
● Operating systems
● Software component information
● Scanning system
● HP Send Fax software
● HP LaserJet all-in-one software for Windows
● Available product configurations
● Port communication
Supported third-party software
●
Note
For information about the HP LaserJet all-in-one software for Macintosh systems, see
Chapter 3, Macintosh software overview.
Operating systems
This section contains information about the following topics:
● Supported Windows operating systems
● Windows system requirements
● Printing from other operating systems
Supported Windows operating systems
The all-in-one software for the HP LaserJet 3015, the HP LaserJet 3020 and 3030, and the
HP LaserJet 3380 all-in-one products supports the following operating systems.
EN Chapter 2 Software overview 11
Page 28

Windows supported operating systems
The following Windows operating systems are fully supported through the software installer
and drivers for these operating systems are available on the software CD-ROM that comes
with the product.
● Microsoft (R) Windows (R) 98 Second Edition (98SE)
● Microsoft Windows Millennium Edition (Windows Me)
● Microsoft Windows 2000
● Microsoft Windows XP (32-bit)
Note
Because the Windows XP 64-bit driver and the Windows 2003 Server driver are not certified by
the Windows Hardware Quality Lab (WHQL), when you install these drivers a message will
appear stating that the drivers are not digitally signed. Click OK to continue the installation.
Print-only supported operating systems
The following operating systems have print-only support by the HP LaserJet all-in-one product
software.
● Microsoft Windows 95 (parallel connection only)
● Windows 98 First Edition
● Windows XP 64-bit (driver available only on the Web)
● Windows 2003 Server (driver available only on the Web)
● Windows NT (R) 4.0 (parallel connection only)
You must use the Add Printer Wizard to install the printer driver for these operating systems. The
printer driver for these operating systems is available at the HP support web site for your product.
● http://www.hp.com/support/lj3015
● http://www.hp.com/support/lj3020
● http://www.hp.com/support/lj3030
● http://www.hp.com/support/lj3380
Windows system requirements
The HP LaserJet 3015, the HP LaserJet 3020 and 3030, and the HP LaserJet 3380 all-in-one
products can function as standalone fax machines and copiers without installing the software,
but certain functions are not available unless the full HP LaserJet all-in-one software is installed.
If you have a computer, HP strongly recommends installing the HP LaserJet all-in-one software.
This provides the full functionality of the HP LaserJet all-in-one products and is the easiest
method for setting required features.
Note
12 Windows system requirements EN
The HP LaserJet 3020 all-in-one product does not support faxing.
The HP LaserJet all-in-one software has the following minimum system requirements.
Page 29

Windows supported operating system requirements
● Microsoft Windows 98SE, Windows Me, Windows 2000, or Windows XP operating system
● Processor and RAM requirements:
● For Windows 98SE: a computer with at least a P150 processor and 128 MB of
RAM (256 MB recommended)
● For Windows Me: a computer with at least a P150 processor and 128 MB of RAM
(256 MB recommended)
● For Windows 2000: a computer with at least a P300 processor with 128 MB of
RAM (256 MB recommended)
● For Windows XP: a computer with at least a Pentium (R) 233 MHz processor with
128 MB of RAM (256 MB recommended)
● 210 MB or more of free hard disk space
● A 2x or above CD-ROM drive (required for installation)
● A direct connection to a computer for full product functionality requires either:
● A USB port (compatible with 2.0 specifications)
-Or-
● A dedicated, IEEE-1284B bidirectional or ECP-compliant parallel port
Note
If the parallel port has another device attached to it, such as an external storage device, the
device must be disconnected or you must add an additional parallel port.
Print-only supported operating system requirements
● A computer running Windows 95, Windows 98 (First Edition), Windows XP (64-bit),
Windows 2003 Server, or Windows NT 4.0.
● A computer processor and RAM that meets the minimum system requirements for the
operating system you are running.
Printing from other operating systems
You can print to your HP LaserJet all-in-one product from any operating system that
complies with the PCL command language, such as O/S2, UNIX (R), or Linux systems. The
O/S2 drivers will be available shortly after product release from the HP support web site for
your product.
UNIX systems require a Model Script to set up the UNIX environment to be able to print to
the product. The HP LaserJet III, or any generic HP LaserJet printer Model Script, should
work. These files are written and provided by the individual UNIX vendor. Users of HP-UX
can check for availability of the Model Script and the support model from the following web
site.
http://www.hp.com
Click the Support & Drivers link.
Linux users should check for the availability of drivers from the following web site.
http://www.linuxprinting.org
EN Chapter 2 Software overview 13
Page 30

Note
The Linux drivers are provided by HP, but HP does not support them. These drivers are
supported through the Linux community.
The HP LaserJet 3015, the HP LaserJet 3020 and 3030, and the HP LaserJet 3380 all-in-one
series printer drivers have been tested and are supported under Windows Terminal Server or
Citrix Metaframe.
Software component information
This section contains information about the following topics:
● New all-in-one software features
New all-in-one software features
The HP LaserJet all-in-one software includes new features since the release of the HP LaserJet
3300 Series product. New features for the HP LaserJet 3015, the HP LaserJet 3020 and 3030,
and the HP LaserJet 3380 all-in-one products include the following.
● New Installer.The HP LaserJet all-in-one products include a new Installer that improves
the software installation process and supports either a hardware-first or a software-first
installation.
● Software-first is the recommended installation method.
● The HP LaserJet all-in-one product software uses two separate installers, which run
together to properly set up the port and the printing and scanning software. If you
cancel the installation after the first installer finishes, your installation will consist of the
print and scan driver only.
● You have the option to perform a Minimum installation, which consists of print and scan
drivers only.
● HP Toolbox and Fax Management.The HP LaserJet all-in-one product software includes
a web application to easily communicate with and manage your HP all-in-one product. The
HP Toolbox allows you to monitor the status of the product, examine and change product
settings, gives you access to fax software functionality, allows you to scan from the all-inone product control panel, provides product alert functionality, and presents
troubleshooting and “How Do I” content.
● Scan Driver Architecture.The HP LaserJet all-in-one product software includes a
common architecture that provides TWAIN and WIA scanning support. This framework is
shared with other HP products providing camera and scanner support for a common user
experience.
14 Software component information EN
Page 31

● HP LaserJet Scan software. The HP LaserJet all-in-one product software includes a
separate scan application that provides access to scanning from the Start/Programs group
and performs other functions transparent to the user . This application allows you to e-mail
a scanned image, save it to a file, perform OCR on it, or open the scanned image in
another application that you specify.
● Improved Performance. The scan architecture, as well as some product enhancements of
the HP LaserJet all-in-one product software, improve the overall performance for scanning.
Scanning system
This section contains information about the following topics.
● Scanning methods
● HP LaserJet Scan software
● Scan drivers
Scanning methods
You can scan from your HP LaserJet all-in-one product using any of the following methods.
● From the HP LaserJet all-in-one software on your computer. At your computer,
click Start, click Programs, click Hewlett-Packard, click the name of your HP LaserJet
all-in-one product, and then click Scan. Or, if your computer is connected directly to
your HP LaserJet all-in-one product and you have enabled the Scan to e-mail or a
folderoption in the HP Toolbox, you press the START SCAN button on the HP
LaserJet all-in-one product control panel to automatically open the HP LaserJet Scan
software on your computer. See the
information.
● From the HP LaserJet all-in-one product control panel. On the HP LaserJet all-in-
one product control panel, press the SCAN TO button. Use the < or > buttons to make
a selection from the list, and then press the START SCAN or the MENU/ENTER button.
Chapter 4, The HP Toolbox for information about the following options.
See
● If you select an e-mail address that you had previously added in the HP Toolbox,
your scanned item is sent to that e-mail recipient as an attachment.
● If you select a folder location that you had previously added in the HP Toolbox,
your scanned item is saved in the folder location you specify.
● If you select MY SCANS, you will save the scanned item to the MY DOCUMENTS
\MY SCANS directory on your computer.
● If you select ADD NEW E-MAIL, the HP Toolbox automatically opens on your
computer allowing you to add e-mail recipients.
● If you select ADD NEW FOLDER, the HP Toolbox automatically opens on your
computer allowing you to add additional folder locations.
HP LaserJet Scan software section for more
EN Chapter 2 Software overview 15
Page 32

● From a TWAIN- or WIA-compliant software application. Check the Help system on
your software application to learn how to scan from a TWAIN- or WIA-compliant
scanner from within your software application.
● From the Camera and Scanner Wizard on Windows XP. In Windows XP, click Start,
click Control Panel, double-click Scanners and Cameras, and then double-click the
HP LaserJet all-in-one product scanner icon. The Camera and Scanner Wizard
appears. Follow the onscreen directions to save your scanned item to a file.
HP LaserJet Scan software
The HP LaserJet Scan software allows you to either scan from the HP LaserJet all-in-one
product or to read from a file and then do the following with the data.
● Save the scanned item to a file.
● Attach the scanned item to an e-mail.
● Perform OCR on the scanned item through Readiris Pro text recognition software (OCR) (if
Readiris Pro is installed on the computer).
● Open the scanned item with any third-party software application that supports drag and
drop.
The HP LaserJet Scan software uses scans via TWAIN and performs any necessary file
conversions. The HP LaserJet Scan software is set up to scan by default , but the General tab
on the Settings dialog box does provide an override to read a scanned item from a file. This is
helpful both for testing when a scanner is not available and for converting existing files into some
other output file type. The following file types are currently supported.
● .BMP
● .GIF
● .JPG
● .PDF
● .TIFF (both regular and compressed)
The following additional file types are supported as output by the Readiris Pro text recognition
software (OCR). If you want to use one of these formats, select Readiris as your destination and
save the file from within the Readiris Pro program.
● .CSV
● .DCA
● .DOC
● .DW
● .HTM
● .MM
● .PDF
● .RTF
● .TXT
● .WP
● .WPS
16 HP LaserJet Scan software EN
Page 33

● .WS
● .WS2
The HP LaserJet Scan software is composed of a simple user interface that provides only a
Where should the data go? drop-down menu and a Settings button.
Figure 2-1. HP LaserJet Scan dialog box
Clicking Settings displays a more detailed property dialog box called the Scan Settings
dialog box that allows you to make changes to the scan settings. The tabs available on the
Scan Settings dialog box depend on the destination you select on the HP LaserJet Scan
dialog box. For example, the E-mail tab appears only if the selected destination is Send it
through e-mail. Quick Sets are also available to store settings that you use on a regular
basis.
Figure 2-2. Scan Settings dialog box
EN Chapter 2 Software overview 17
Page 34

Note
If the Show the TWAIN dialog to allow cropping and preview scanning check box is not
selected on the Scan tab, the TWIN driver user interface will not appear. For an example of
the TWAIN driver user interface, see
If you do not change any settings on the Scan Settings dialog box, the HP LaserJet Scan
software prompts you for any needed information, such as a file name if you are sending the
scanned item to a file folder or an e-mail address if you are sending the scanned item via e-mail.
If you specify an e-mail address in the Scan Settings dialog box before you scan your item, the
e-mail is sent automatically without displaying the new message dialog box.
Every time the HP LaserJet Scan software is executed, an HPPSCAN2.LOG file is generated
within the current user's temporary directory. The HPPSCAN2.LOG file logs operations and aids
in troubleshooting problems.
TWAIN driver user interface.
Note
Note
The user's TEMP directory is often hidden from view. Use the File to e-mail tool to get this file
from a customer.
Scanning to a file sends the scanned image to a My Scans directory in your My Documents
folder unless you have specified otherwise.
Selecting the third-party destination option saves the scanned image to a file of the specified file
type. The HP LaserJet Scan software then launches the specified software application by
appending the filename after the application filename. The HP LaserJet Scan software does not
support automatic discovery of software applications. This means that you must specify the
following information.
● The correct software application
● A file type that your software application supports
● That the software application will open the the filename when it is passed as a command
line argument during launch
The HP LaserJet Scan software does not support multi-page scanning from the flatbed.
The HP LaserJet all-in-one software for Windows supports only MAPI-compliant e-mail
applications, not Internet-based e-mail programs such as Hotmail or Yahoo. The following
programs are examples of the type of e-mail programs supported by the HP LaserJet all-in-one
product software.
●
Microsoft Exchange
●
Microsoft Outlook
● Microsoft Outlook Express
● Lotus Notes (3.0 or later)
E-mail is always sent through your default e-mail client as noted in the E-mail control on your
computer. To see what your default e-mail client is, click Start, click Control Panel, click
Internet Options, click Programs, and then click E-mail.
18 HP LaserJet Scan software EN
Page 35

Scan drivers
The HP LaserJet all-in-one product software includes the following integrated scan drivers.
● TWAIN scan driver
● Windows Image Acquisition (WIA) scan driver
Note
Note
Someone with Administrator privileges must initiate a scan and send a fax before any other
faxes can be sent on the HP LaserJet all-in-one product.
TWAIN scan driver
The HP LaserJet all-in-one product software includes a TWAIN driver user interface that
allows great flexibility and a wide range of image quality options. TWAIN is an industry
standard scanning protocol, and scans from the HP LaserJet all-in-one product can be
initiated from any TWAIN-compliant application.
The current supported scan language is PML.
The TWAIN driver does not support duplex scanning.
TWAIN compatibility
TWAIN-compliant applications can acquire documents directly from the HP LaserJet all-inone product. Programs that follow the TWAIN standards should work. (The HP LaserJet allin-one products support only the required core functions for TWAIN compliance. It does not
support extended TWAIN options.)
TWAIN scanning does not work with some applications
For applications that are not TWAIN-compliant, use the following process as a workaround.
1 Scan the document in .TIF format (or any other file type supported by that application)
into a folder using the HP LaserJet Scan software.
2 Import the .TIF file into the program.
Additional information about TWAIN
For more information about TWAIN, visit the following Web site.
http://www.twain.org
EN Chapter 2 Software overview 19
Page 36

TWAIN driver user interface
Figure 2-3. TWAIN driver user interface
The TWAIN user interface contains the following options.
● New Scan. This control causes a rescan of the image. Flatbed rescans are always at 75
dpi and in color. ADF rescans are always at 300 dpi and in color.
● Accept. This control causes a rescan of the image if the original is on a flatbed scanner
and sends the image back to application with the specified settings.
● Resize. This control changes the selection area for final scan. The final scan is performed
within this selection area.
● Lighten/Darken. This control performs lightening or darkening on the scanned image. This
operation is done post-scan on the returned image. No device interaction takes place.
● Color Adjustment. This control performs color adjustment on the scanned image. This
operation is done post-scan on the returned image. No device interaction takes place.
● Resolution. This option designates the final resolution for the image. Resolutions above
600 dpi are interpolated by the software.
● Mirror. This option flips the scanned image horizontally. This operation is done post-scan
on the returned image. No device interaction takes place.
● Invert Colors. This control inverts the colors in the scanned image. This operation is done
post-scan on the returned image. No device interaction takes place.
● Descreen. This control applies a special algorithm to detect and remove undesirable
patterns from the scanned image. Choosing this option will automatically trigger a rescan,
because the descreen operation must take place as the image data is flowing in from the
scanner.
20 Scan drivers EN
Page 37

● Rotate. This control rotates the scanned image left or right by 90 degrees. This operation is
done post-scan on the returned image. No device interaction takes place.
● Zoom. This control zooms in on the selected area of the scan. This will automatically
cause a rescan if it is needed in order to get an image that is good enough to zoom in
on.
● Reset Tools. This option resets all the controls to their default values.
You can set additional scan settings by positioning your mouse over the Scan menu, and
then clicking Scan preferences.
Figure 2-4.
Scan Preferences dialog box
The Scan Preferences dialog box contains three tabs: Automatic, Quality vs. Speed, and
Preview. However, the HP LaserJet Scan software supports only the options on the
Automatic tab. The following options are available on the Automatic tab.
● Automatically straighten scanned images.
● Automatically adjust exposure.
● Automatically adjust color.
● Use enhanced color.
● Prompt for additional scans from glass/TMA.The HP LaserJet Scan software does
not currently support this option.
● Restore Defaults.
Windows Image Acquisition (WIA) scan driver
You can use any of the following methods to gain access to WIA scanning for Windows XP.
● You can launch WIA scanning through a WIA-compliant software application.
● You can right-click on the scanner icon in the My Computer folder, and then clicking
Scan.
● You can right-click on the scanner icon in the My Computer folder, and then clicking
Scanner Wizard.
● You can right-click on the scanner icon in the Scanners and Cameras folder in the
Control Panel, and then clicking Scan.
● You can right-click on the scanner icon in the Scanners and Cameras folder in the
Control Panel, and then clicking Scanner Wizard.
EN Chapter 2 Software overview 21
Page 38

WIA has its own user interface that is relatively simple and does not contain the wide range
of image quality options that are available in the TWAIN driver user interface.
When you use the WIA scan driver, you must modify brightness and contrast post-scan.
Contrast or brightness modifications cannot be set on the device. Only native device resolutions
are supported and software interpolation is not performed. The WIA scan driver supports scan
types of ADF or Flatbed, but does not support duplex scanning.
Note
WIA support is not installed when the scan driver is installed over a network. The scanner icon is
not visible and only TWAIN scans are possible.
HP Send Fax software
Note
The HP LaserJet 3020 all-in-one product does not support faxing.
The HP Send Fax software allows you to send faxes from your computer. To use the HP Send
Fax software, click Start, click Programs, click Hewlett-Packard, click the name of your HP
LaserJet all-in-one product, and then click Send Fax.
Figure 2-5. Send Fax user interface
Note
22 HP Send Fax software EN
The HP Send Fax software works together with the HP Toolbox. If you turn off the HP Toolbox,
you are not able to use some of the features of the HP Send Fax software, such as having
access to the fax phone book or editing your personal data. Cover pages are completed with
your name, company name, phone number, and fax number as you entered them when you last
edited them. However, you are still able to preview and send faxes.
Page 39

In some cases, faxing from the computer is more convenient than faxing from the HP LaserJet
all-in-one control panel, such as in the following examples.
● Faxing to multiple recipients
● Creating a cover page
● Faxing without first printing and scanning the document
Faxing to multiple recipients
If you need to send a fax to multiple recipients, the HP Send Fax software allows you to
enter the names and fax numbers of each recipient easily.
Figure 2-6. Faxing to multiple recipients
If you have stored entries in the fax phone book provided in the HP Toolbox, you can click
Phone Book on the Send Fax page to quickly select the recipients for the fax. Or you can
type in the entries at your keyboard and click Add To List. To add new entries to the fax
phone book in the HP Toolbox, click Edit to launch the HP Toolbox.
EN Chapter 2 Software overview 23
Page 40

Creating a cover page
If you want to create a cover page to accompany your fax, click Cover Page.
Figure 2-7. Send Fax - cover page
After you have run the HP Toolbox Fax Setup Wizard (you only need to do this once for the life
of the software), your name, company name, phone number, and fax number are entered
automatically into the cover page template. The recipient’s data is automatically filled in too.
When you click Cover Page, the Notes section appears for your use. To view a filled-in cover
page template, select one from the drop-down menu and click Preview.
Faxing without first printing and scanning the document
One of the most useful features of the Send Fax software is the ability to fax documents without
first printing and scanning them. For example, if you want to send a Microsoft Word document,
open the document, click File, click Print, and then select the Fax Printer Driver from the drop-
down menu of printers.
The HP Send Fax software is launched with the document already attached. If you want to view
the fax, click Preview. You can add a scanned document by clicking Pages in Document Tray
or add a cover page by clicking Cover Page.
24 Creating a cover page EN
Page 41

HP LaserJet all-in-one software for Windows
The HP LaserJet 3015, the HP LaserJet 3020 and 3030, and the HP LaserJet 3380 all-in-one
products include the following software components and programs for Microsoft Windows
operating systems:
Table 2-1. Software components for Windows
Components
HP installer Installs HP LaserJet all-in-one software based on the hardware it
HP scan installer Installs the HP LaserJet all-in-one scanner driver based on the
Uninstaller Removes files and folders installed when the HP LaserJet all-in-one
Scrubber utility After running the Uninstaller, removes files and folders installed when
Description
detects from the host computer.
hardware it detects from the host computer.
software was originally installed on the computer.
the HP LaserJet all-in-one software was originally installed on the
computer.
HP LaserJet Scan
software
HP LaserJet Fax
software
HP Toolbox
1
Allows access to the scan functions on your HP LaserJet all-in-one
product.
Allows access to the fax functions on your HP LaserJet all-in-one
product.
Provides an interface through your Web browser to manage the HP
LaserJet all-in-one products. Use the HP Toolbox to perform the
following tasks:
● Monitor the status of your HP LaserJet all-in-one product
● Change the print, fax, and copy settings for your HP LaserJet all-
in-one product
● Provides scanning functionality from the control panel of your HP
LaserJet all-in-one product
● Set the scan-to e-mail addresses and the scan-to folder locations
● Find troubleshooting information and instructions for performing
basic tasks
● Receive Status Alerts when certain events occur or conditions
exist on your HP LaserJet all-in-one product
EN Chapter 2 Software overview 25
Page 42

Table 2-1. Software components for Windows (continued)
Components Description
Driver software
Allows you to print, fax, and scan with the computer and the HP
LaserJet 3015, the HP LaserJet 3020
1
and 3030, and the HP LaserJet
3380 all-in-one products. This software includes the following drivers:
● The PCL 6 and PCL 5e printer drivers. The PCL 6 driver is
installed by default. To install the PCL 5e driver, use the Add
Printer wizard.
● The PostScript (PS) printer driver and PostScript Printer
Description (PPD) file for printing with PostScript Level 2
emulation. This driver is not installed by default. To install the PS
driver, use the Custom installation or the Add Printer wizard.
● The HP LaserJet 3380/3030/3015 Fax (PC fax) driver
● Scan drivers
● TWAIN driver.TWAIN is an industry standard scanning
protocol, and scans from the HP LaserJet all-in-one product
can be initiated from any TWAIN-compliant application.
● Windows Image Acquisition (WIA) driver. WIA scanning
(Windows XP only) can be launched from a WIA compliant
application or from the computer. WIA has its own user
interface that is relatively simple and does not contain the
wide range of image quality options that are available in the
TWAIN driver user interface.
Note
WIA support is disabled when the scan driver is installed over a
network. The scanner icon is not visible and only TWAIN scans are
possible.
Readiris Pro text
recognition
software (OCR),
version 8.0, by
IRIS
Note
The Readiris Pro
text recognition
software uses a
separate installer
and is shipped on
a separate CDROM.
Allows you to convert scanned images into text that can be edited in
word-processing programs.
The user interface of this software is localized into six languages.
However, the software supports OCR in 117 languages.
Readiris Pro text recognition software (OCR) 8.0 supports OCR in 2byte Asian characters. You must have your operating system set up to
display 2-byte characters in order to see the resulting text.
Note
You must start Readiris Pro and scan directly into the application to
perform OCR scanning. Readiris Pro automatically launches a wizard
to help you through this process.
When Readiris Pro is installed on the computer, Readiris Pro appears
as an option in the destination drop-down box in the HP LaserJet
Scan software. If you select Readiris Pro as the destination, your
image is scanned into .TIFF format and Readiris Pro launches
automatically to begin the OCR process.
26 HP LaserJet all-in-one software for Windows EN
Page 43

Table 2-1. Software components for Windows (continued)
Components Description
Online Help
1
The HP LaserJet 3020 does not support faxing.
Provides help for using the software for the HP LaserJet 3015, the HP
LaserJet 3020 and 3030, and the HP LaserJet 3380 all-in-one products.
The user documentation for these products is included on the
installation CD-ROM as both .CHM (online help) files and Adobe
Acrobat (R) .PDF files. The software CD-ROM uses a version of
Adobe Acrobat Reader that remains on the CD-ROM and does not
need to be installed on the computer. However, you need a Web
browser installed on the computer to view the contents from any .CHM
file.
Available product configurations
This section contains information about the following topics:
● Software features by connection type
● Supported configurations
● Configuration options
● Multi-tasking capabilities by connection type
● Differences between network and direct connection configurations
Note
Software features by connection type
The HP LaserJet 3015, the HP LaserJet 3020 and 3030, and the HP LaserJet 3380 all-inone products can function in one of three installations:
● As a standalone fax and copier not connected to a computer.
● Directly connected to a computer. If it is connected to a computer running Windows
98SE, Me, NT 4.0, 2000, and XP, you can share the product with other network users
(for printing only).
● Connected to a network.
The HP LaserJet 3020 all-in-one product does not support faxing.
The product works in any of these situations, but feature availability varies. The following
table shows which features are available depending on how you connect the product.
Details on which features can be used simultaneously in the direct or network connection
configurations are given in this section.
EN Chapter 2 Software overview 27
Page 44

Table 2-2. Software features by connection type
Connected Directly
to Computer, but
Shared with Other
Feature or Function
Connected Directly
to Computer, Local
1
User
Users
Connected to
Network via HP
2
Jetdirect Print
Server
Printing from the
X X X
computer to the
product
Faxing electronic
X X
documents from the
computer (PC faxing)
Combining paper
X X
and PC fax
documents in a fax
Scan to E-mail X X
Optical character
X X
recognition (OCR)
software for
converting scanned
images to editable
text documents
Gain access
X X
through the software
to the fax options
Access through the
X X
software to the
product setup
options and setup
for speed dial
numbers
1
Available to the user of the computer that is directly connected to
the product.
2
Available to the other users who are using the network when
Microsoft Windows sharing is enabled from the computer that is
directly connected to the product. When the computer that is
directly connected to the product is on a local area network, the
product can be shared with other computers on the network.
Users of shared computers can only print from their computers to
the product and they must have the full software package
installed on their computers.
Supported configurations
This section includes information about the following topics:
● Direct connection
● Network connections
28 Supported configurations EN
Page 45

Direct connection
In the direct (or local) configuration, the HP LaserJet all-in-one product is connected directly
to the host computer with an IEEE-1284B parallel or Universal Serial Bus (USB) cable. In
this configuration, the product is not shared. A single user has complete physical control
over the product. Most users are familiar with using peripherals that are directly connected to
their computers. You can gain access to all of the capabilities of the product in this
configuration.
Network connection options
The following networking options are available for the HP LaserJet 3015, the HP LaserJet
3020 and 3030, and the HP LaserJet 3380 all-in-one products:
Local connection using Microsoft peer-to-peer networking (Windows only)
Microsoft Windows allows a person to share a local printer over the network. The operating
system handles all of the networking issues. The product will print in this configuration, but
only the local computer will be able to use the faxing and scanning functionality; network
faxing and scanning are not supported in this configuration. Also, because Microsoft peer-topeer networking is unidirectional, network users do not receive printer status messages
when they print to the product.
Note
HP does not support vending drivers across operating systems that have different printer
driver architectures, such as HP Traditional drivers and HP Unidrivers. To use mixed
operating systems, you must install an alternate print driver and download the driver for the
specific operating system as described in the HP customer support document HP Color
LaserJet and LaserJet Printers - MS Windows NT 4.0 through MS Windows 2000 and
beyond, Print Driver Issues for Operating in a Mixed Operating System Environment.
System requirements for peer-to-peer networking
The network computers that will be using the HP LaserJet all-in-one software need to meet
the same requirements as a direct connection for operating systems, processor type and
speed, and available hard disk space.
Networked with HP Jetdirect external print server
In this configuration, your HP LaserJet all-in-one product is connected to a network through
an HP Jetdirect print server, such as the HP Jetdirect 300X and 500X (parallel) or the HP
Jetdirect en3700 (USB) print servers. The product can be under the direct control of a single
user or in a common area with other networked resources. All users on operating systems
that support the full product software have access to the printing, outbound faxing, and
scanning functionality of the product.
When networking using a supported HP Jetdirect print server, you are able to perform nearly
all of the functions just as if your HP LaserJet all-in-one product was directly connected.
There are some limitations on scan functions.
EN Chapter 2 Software overview 29
Page 46

HP Jetdirect networking requirements
The following are required for your HP LaserJet all-in-one product to work on an HP Jetdirect
network connection.
●
An installed network using the TCP/IP or IPX/SPX network protocol.
Note
If you are using the TCP/IP protocol, you must configure the HP Jetdirect print server for a
direct peer-to-peer connection from the computer to the product for network users to have
the full print, fax, and scan functionality of your HP LaserJet all-in-one product. The IPX/SPX
network protocol supports print functions only.
If you are setting up peer-to-peer printing ("Windows sharing") on a Windows 98SE, Me, NT 4.0,
2000, or XP network, you can use the driver installation software to print directly to the printer.
● A cable for your type of network connections (not included). This cable is used to connect
the HP Jetdirect print server to a network port.
● A supported HP Jetdirect external print server. The model used depends on the type of
network you have and how many HP LaserJet all-in-one products (or other devices) you
want to connect to the print server.
The following HP Jetdirect external print servers are supported.
● HP Jetdirect 170X (J3258B). Use this model if you have a 10-Base-T network, and only
need to connect the HP LaserJet all-in-one product to this print server. This print server
does not support Web Scan. This print server is not compatible with Mac systems.
● HP Jetdirect 175X (J6035C). Use this model if you have a 10-Base-T or a 100-Base-T
network, and only need to connect your HP LaserJet all-in-one product to this print server.
● HP Jetdirect 300X (J3263A) with firmware revision H.08.00 or higher. Use this model if you
have a 10-Base-T or 100-Base-TX network, and only need to connect your HP LaserJet allin-one product to this print server. This print server does not support Web Scan.
● HP Jetdirect en3700 (J7942A) with firmware revision A.25.00 or higher. Use this model if
you have a 10-Base-T or a 100-Base-TX network and only need to connect your HP
LaserJet all-in-one product to this print server.
● HP Jetdirect 380X (J6061A) external wireless, compatible with all firmware versions. It
connects one product to any 802.11b wireless Ethernet.
● HP Jetdirect 500X (J3265A) with firmware revision J.08.00 or higher. Use this model if you
have a BNC (10Base2), 10-Base-T, or 100-Base-TX network, and would like to connect
your HP LaserJet all-in-one product and up to two other devices to this print server. This
print server does not support Web Scan. This print server must be set up on Port 1.
Note
30 Supported configurations EN
You can check the firmware revision number by printing a configuration page for the HP Jetdirect
print server. If the firmware version is not H.08.00 or J.08.00 or higher, upgrade the firmware
before using the HP Jetdirect external print server with your HP LaserJet all-in-one product. See
the documentation that came with the HP Jetdirect print server for more information about
upgrading the firmware.
You can download a firmware upgrade from the following Web site.
http://www.hp.com/go/webjetamin_firmware
The HP Jetdirect 170X and 175X print server firmware is not upgradeable.
Page 47

Multitasking capabilities
The HP LaserJet 3015, the HP LaserJet 3020 and 3030, and the HP LaserJet 3380 all-in-one
products are designed to carry out multiple tasks simultaneously. This enables you to initiate
tasks when they are needed, without waiting.
The HP LaserJet all-in-one products perform multiple tasks such as printing, scanning,
copying, faxing, and PC faxing. Depending on which functions are in use, the HP LaserJet
all-in-one product can perform many functions at the same time. This high level of
multitasking is made possible by the two separate paper paths (a print paper path and a
scan paper path) of the HP LaserJet all-in-one products. Additionally, these products feature
at least 32 MB of memory that can efficiently manage multiple tasks, and a scan-ahead
feature that quickly clears the scan paper path for subsequent jobs.
The following table shows which tasks the HP LaserJet all-in-one products can perform while
another function is already in use.
Note
Note
The HP LaserJet all-in-one products can perform multiple tasks when directly connected to a
computer or when connected to a network with an HP Jetdirect external print server. The
copy and scan functions are not available when using a Windows sharing (peer-to-peer)
connection.
The HP LaserJet 3020 all-in-one product does not support faxing.
Table 2-3. Multitasking capabilities
If the
product
is:
Printing a
file
Printing a
paper fax
You are able to:
Send a
print job
Yes.
Prints
when
first
print job
ends.
Yes.
Prints
when
fax
printing
ends.
Receive a
paper fax
Yes. Prints
when first
print job
ends.
Yes. Prints
when first
job ends.
Send a
paper fax
Yes. Yes. Yes. Yes. Yes.
Yes. Yes. Yes. Yes. Yes.
Receive a
PC fax
Send a
PC fax
Scan to
the PC
Copy
Copy
pages
scans/
prints
when
PC
printing
ends.
Copy
pages
scans/
prints
when
fax
printing
ends.
EN Chapter 2 Software overview 31
Page 48

Table 2-3. Multitasking capabilities (continued)
Receiving
a paper fax
Yes.
Prints
when
fax
printing
ends.
No.
Telephone
line is in
use.
Yes.
Sends
when
first fax
job ends.
No.
Telephone
line is in
use.
Yes.
Sends
when
first
fax job
ends.
Yes. Yes.
Sending a
paper fax
Copying Yes.
Sending a
PC fax
Receiving
a PC fax
Yes. No.
Prints
when
copying
ends.
Yes. No.
Yes. No.
Telephone
line is in
use.
Yes. Prints
when
copying
ends.
Telephone
line is in
use.
Telephone
line is in
use.
Yes.
Sends
when
first fax
job ends.
Yes, if
the
scanner
is not in
use.
Yes.
Sends
when
first fax
job ends.
Yes.
Sends
when
first fax
job ends.
No.
Telephone
line is in
use.
Yes Yes. Yes, if
No.
Telephone
line is in
use.
No.
Telephone
line is in
use.
Yes.
Sends
when
first
fax job
ends.
Yes.
Sends
when
first
fax job
ends.
Yes.
Sends
when
first
fax job
ends.
Yes, if
the
scanner
is not in
use.
the
scanner
is not in
use.
Yes, if
the
scanner
is not in
use.
Yes. Yes.
Yes, if
the
scanner
is not in
use.
Yes.
Second
copy
begins
when
the first
copy job
ends.
Yes.
Scanning Yes. Yes. No. The
scanner
is in use.
Yes. Yes. No. The
scanner
is in use.
No. The
scanner
is in use.
Differences between the network-connected and direct-connected configurations
When networking using a supported HP Jetdirect print server, you can perform nearly all of the
product functions just as if your HP LaserJet all-in-one product was directly connected to your
computer. The following are a few exceptions:
●
The WIA scan driver for Windows XP is not available on a network.
● One touch scanning with the START SCAN button on the control panel of the HP LaserJet
all-in-one product is not supported on networked HP LaserJet all-in-one products. The
START SCAN button on the control panel of the HP LaserJet all-in-one product launches
the HP LaserJet Scan software on the PC in direct connections.
32 Differences between the network-connected and direct-connected configurations EN
Page 49

● The Scan to e-mail or folder functionality is turned off by default for network connections.
You must enable this function in the HP Toolbox for networked computers.
● The Scan to e-mail or folder entries will be prefixed with a host name abbreviation for
networked computers in order to differentiate between computers on the network.
Port communication
This section provides information on the following topics:
● Port communication overview
● Parallel port connections
● USB port connections
● Device conflicts in Windows
Overview
The HP LaserJet 3015, the HP LaserJet 3020 and 3030, and the HP LaserJet 3380 all-inone products include both an IEEE-1284B parallel port and a USB port.
The HP LaserJet all-in-one products can be connected with either the IEEE-1284B port or
the USB port.
Note
Do not connect both the parallel port and the USB port to the same computer.
Do not connect two computers directly to the same HP LaserJet all-in-one product. Use an
HP Jetdirect print server to connect more than one computer to one HP LaserJet all-in-one
product.
Parallel port connections
The HP LaserJet all-in-one products require a parallel port featuring a bidirectional data bus
to be directly connected to the computer. A port which is referred to as an enhanced
capabilities port (ECP) or IEEE-1284B qualifies.
Extended parallel port only (EPP-only) or unidirectional ports are not supported. However,
some ports can be set to EPP/ECP through the CMOS setup or a jumper setting, which is
supported.
Other parallel port devices
Your HP LaserJet all-in-one product must be directly connected to the computer parallel
port. If you have a switch box or other device connected to the parallel port, you must
disconnect it prior to connecting and using your HP LaserJet all-in-one product. Another
option would be to have two parallel ports installed on the computer. You can use parallel
port expansion cards, but HP does not support them.
EN Chapter 2 Software overview 33
Page 50

Changing parallel port modes
This section provides instructions to help you ensure that the parallel port is configured to
provide the best performance with your HP LaserJet all-in-one product.
The parallel port mode determines how the parallel port performs with your HP LaserJet all-inone product. This mode can default to different settings. Unfortunately, the HP LaserJet all-inone software cannot automatically select the best setting. Therefore, you need to check this
setting yourself. ECP mode generally provides the best printing and scanning performance.
Different basic input/output system (BIOS) options frequently exist within a computer
manufacturer's range of products. Changing the parallel port mode is similar for all computers if
they have the capability built in. See your computer documentation for specific instructions about
changing the parallel mode for your computer.
Even though the label on the parallel port mode says ECP, it might not follow the protocol. If the
port mode option you click does not work, then try another option in the Setup. If your computer
does not have the ECP capability built in, you can install an external parallel port card to add this
functionality.
In addition to the parallel port mode being set incorrectly, other areas of potential parallel port
conflict might exist involving software and hardware from other manufacturers. If none of the
options in the Setup allow your HP LaserJet all-in-one product to communicate with the
computer, or you have other devices that need a parallel port, you can add an external ECP
parallel port card to your computer. Then, connect your HP LaserJet all-in-one product to one of
the parallel ports and connect the other devices you have to the other parallel port. These
parallel port cards are available at computer stores and allow your HP LaserJet all-in-one
product to communicate with your computer without conflicting with other devices.
Note
USB port connections
USB version 2.0 is an input/output mode that is supported by both PCs and Macs. A wide variety
of consumer devices, such as digital cameras and scanners, also support USB. Version 2.0 is
the current standard. Note that the HP LaserJet all-in-one products are compatible with USB
version 2.0 specifications.
There is a distinction between a USB Host and a USB Device. The HP LaserJet all-in-one
products are USB Devices. They can only connect to a USB Host or a USB Hub.
Device conflicts in Windows
When two-way communication cannot be established with the HP LaserJet all-in-one product,
the Windows Device Manager might show a conflict. Conflicts should be resolved immediately
before continuing to troubleshoot two-way communication issues. The following sections contain
a few guidelines for identifying and resolving these conflicts.
This process applies to both USB and parallel port devices. However, USB devices are only
supported in Windows 98SE, Windows Me, Windows 2000, and Windows XP.
34 USB port connections EN
Page 51

Opening the Windows Device Manager
Follow these steps to open the Windows Device Manager.
1 For Windows 98SE and Windows Me, Click Start, click Settings, and then click Control
Panel.
For Windows 2000 and Windows XP, Click Start, and then click Control Panel.
2 Double-click the System icon.
3 On the Hardware tab, click Device Manager.
Note
In Windows 98SE, click the Device Manager tab.
Check for device conflicts
Follow these steps to check for device conflicts.
1 Look for devices that appear on the list with a yellow exclamation mark (!) or a red X .
2 Identify port conflicts by double-clicking Port or by clicking the plus sign (+). Conflicts
here usually interfere with two-way communication.
3 To check the status of a device, click the device name, and then click Properties. The
Device Status appears in the middle of the dialog box.
4 To check the Conflicting Device list, click the device name, and then click Properties.
Click the Resources tab, and look at the Conflicting Device list at the bottom of the
dialog box.
5 Click the plus sign (+) to the left of Open the Other Devices. Misidentified or
noncategorized devices are placed here.
Guidelines for troubleshooting and resolving device conflicts
Follow these steps for resolving device conflicts.
1 If the conflicting device is no longer present in the list of devices, click the device name,
click Remove, and then click Yes. Click Yes to restart Windows.
2 If the conflicting device is a duplicate (and one of the duplicate listings does not show a
conflict), click the name(s) of the device(s) that have a conflict, click Remove, and then
click Yes. Click Yes to restart Windows.
Note
You may not need to restart the computer in Windows 2000 or Windows XP, depending on
the type of port conflict you are resolving.
3 If a device has a conflict and you have the driver for that device, remove the device and
then reinstall it. After removing the device, restart the computer. When Windows
reinstalls devices, it usually finds nonconflicting resources.
Supported third-party software
The following third-party software applications are supported by your HP LaserJet all-in-one
product software.
EN Chapter 2 Software overview 35
Page 52

Optical character recognition (OCR)
The HP all-in-one product software does not have an integrated OCR feature. OCR capability is
provided by the third-party software program Readiris Pro text recognition software (OCR),
which is included on a separate CD-ROM shipped with your HP LaserJet all-in-one product.
About OCR reliability
OCR turns an image into computer-editable text by analyzing the image and defining the
characters to produce editable text. The accuracy obtained through OCR software depends on
the quality, size, and structure of the original document, and on the quality of the scan itself. To
obtain the best possible results when using OCR software, do the following:
● Process only pages that contain 9-point text or larger.
● Limit pages that contain underlining, forms, graphics, rotated text, photographs, and
handwriting.
● Scan images squarely.
● Make sure the pages are free of extraneous marks.
● Maximize the scanning resolution.
● Process only pages that have crisp clear text. Letters that have gaps, that "bleed" along
their edges, or that touch other letters do not work well. Text that is aligned closely to
nontext items, such as graphics, might also degrade OCR results.
● Fine-tune the amount of black and white on scanned images. See the user guide for
information.
Even if you follow these recommendations, you might still get less-than-perfect results. This is
because OCR technology itself is evolving and is still less than perfect.
Other PC fax programs
The PC fax program that came with the product is the only PC fax program that works with the
product.
If you want to continue to use your PC fax program, you must use it with the modem you already
have connected to your computer, rather than with the product. Using two PC fax programs can
cause both programs to work incorrectly.
36 Optical character recognition (OCR) EN
Page 53

3
Macintosh software overview
This chapter provides information about the following topics:
● Supported Mac operating systems
● Supported e-mail programs
● All-in-one software for Mac
● System requirements for a direct connection (Mac)
● Installation overview
● Installation options
● Installation dialog box options for Mac OS systems
● Uninstall instructions for Mac
Supported Mac operating systems
The Macintosh all-in-one software for the HP LaserJet 3020 and 3030 and the HP LaserJet
3380 all-in-one products supports the following operating systems.
● Apple Macintosh 9.1 and 9.2.x
● Apple Macintosh OS X (version 10.2.x)
Supported e-mail programs
The following programs are examples of the type of e-mail programs for the Macintosh
version of the HP LaserJet all-in-one product software. These e-mail programs are set up
automatically by the HP Aio Setup Assistant.
● Microsoft Outlook Express
● Apple Mail
● Microsoft Exchange
● America Online (AOL) Mail
EN Chapter 3 Macintosh software overview 37
Page 54

All-in-one software for Mac
This section provides information about the following topics:
● Software components for Mac
● Software features not available for Mac
●
Software component availability for Mac
● Software component localization for Mac
● Ordering software for Mac
Software components for Mac
The following table outlines the software components for the HP LaserJet 3020 and 3030 and
the HP LaserJet 3380 all-in-one products that are available for computers running the Macintosh
operating system .
Note
Table 3-1. Software components for Mac
Component
Description
Installer software Installs all the HP all-in-one software.
Driver software
Configure Device
Allows you to print, copy, and scan with the
computer and the HP all-in-one products. This
software includes:
● The PostScript Printer Description (PPD)
file for printing through PostScript Level 2
emulation.
● The HP LaserJet Fax driver.
● The HP LaserJet Scan driver (TWAIN scan
driver ).
Provides a user interface to allow you to
configure your HP LaserJet all-in-one product. It
can also be used to print configuration reports.
38 All-in-one software for Mac EN
Page 55

Table 3-1. Software components for Mac (continued)
Component Description
HP LaserJet Director
HP LaserJet Send Fax program
Note
This feature is not supported on the HP
LaserJet 3020.
Your HP all-in-one product automatically senses
when a document is inserted into the Automatic
Document Feeder (ADF) and signals the
computer to display the Director interface on the
computer screen. This "pop-up" feature gives
you immediate access to the product's fax,
copy, scan, and scan to e-mail functions.
Note
In network configurations in which your HP all-inone product is shared through an HP Jetdirect
print server, the Director's "pop-up" feature is
turned off by default, so that the Director
interface does not appear on the screens of all
users on the network when one person inserts a
document into the ADF.
Allows you to send faxes from the computer
through your HP all-in-one product's fax modem.
HP Send Fax also provides tools for managing
hardcopy faxing from the HP all-in-one product.
You can access the fax software from the HP
LaserJet Director .
Note
On Mac OS systems using the HP all-in-one
product software, you can send faxes from the
computer, but you cannot receive faxes to the
computer.
HP LaserJet Scanner program
Readiris Pro text recognition software
(OCR), version 7.0, by IRIS
Scan to e-mail
Allows you to select scan options, and then
store the image to a file. Access the scanning
software from either the HP LaserJet Director.
The default file format for the Scan-to-Email
feature is .PDF; other supported formats
include .JPEG, .PICT, and .TIFF.
You can also scan directly to TWAIN-compliant
applications. The product supports TWAIN 1.9
scanning protocol.
Allows you to convert scanned images into text
that can be edited in word-processing programs.
Note
The Readiris Pro text recognition software
(OCR) comes on a separate CD-ROM.
During installation, e-mail applications
supported by your HP all-in-one product
software are detected on the your system and
integrated into the HP Scan software. In
addition, each time the computer is started, the
software updates the list of e-mail applications
available for linking.
EN Chapter 3 Macintosh software overview 39
Page 56

Table 3-1. Software components for Mac (continued)
Component Description
Online Help
Provides help for using the software for the HP
LaserJet 3020 and 3030 and the LaserJet 3380
all-in-one products.
The user documentation for these products is
included on the installation CD-ROM in Adobe
Acrobat .PDF format. You must have Adobe
Acrobat Reader installed on your computer to
read the .PDF files. The HP Director also
provides a link to this documentation after you
have installed the software.
Software features not available on Mac OS systems
A number of features and functions of the Windows version of the HP all-in-one software are not
available in the Mac OS version of the software. These include:
● PCL 5e and PCL 6 printer drivers
● E-mail addresses using the SCAN-TO button on the HP LaserJet all-in-one product control
panel
● Receive faxes to this computer
● HP Toolbox
Software component availability for Mac
The following table lists the availability of the HP LaserJet all-in-one software components for
Mac.
Table 3-2. Software component availability for Mac
Component
Drivers
Mac PostScript Printer Description PPD X
Fax driver X
Scan driver X
Installers
Macintosh Installer for OS 9 X
Macintosh Installer for OS X X
Bidirectional communication
HP Communications Application X
Online Documentation
HP LaserJet 3020 and 3030 User Guide X
Mac
HP LaserJet 3380 User Guide X
40 Software features not available on Mac OS systems EN
Page 57

Table 3-2. Software component availability for Mac (continued)
Component Mac
HP LaserJet 3020/3030 Readme X
HP LaserJet 3380 Readme X
Help systems
Other
HP Aio Setup Assistant X
HP Director
Configure Device utility X
X
X
Software component localization
The Macintosh all-in-one software components for the HP LaserJet 3020 and 3030 and the
HP LaserJet 3380 are localized in the following languages.
● Dutch
● English
● French
● German
● Italian
● Spanish
Ordering software for Mac
To order the software if the CD is damaged or missing, contact Hewlett-Packard Support at
the following web site.
http://www.hp.com/cposupport/software.html
To request the software CD-ROM by phone, see the following web site for the correct
contact number for your country/region.
http://welcome.hp.com/country/us/en/wwcontact.html
The following table presents the part numbers and language groups of the software CDROMs for the HP LaserJet 3020 and 3030 and the HP LaserJet 3380 all-in-one products.
Table 3-3. CD-ROM part numbers for the HP LaserJet all-in-one software
Part Number
Q 2660-60118 Macintosh software CD-ROM for
Contents Languages Included on CD-ROM
● Dutch
the HP LaserJet 3020 and 3030,
and the HP LaserJet 3380 all-inone products
● English
● French
● Italian
● German
● Spanish
EN Chapter 3 Macintosh software overview 41
Page 58

Table 3-3. CD-ROM part numbers for the HP LaserJet all-in-one software (continued)
Part Number Contents Languages Included on CD-ROM
Note
Q 2660-60119 Readiris Pro text recognition
software (OCR) CD-ROM for the
HP LaserJet 3020 and 3030 and
the HP LaserJet 3380 all-in-one
products
Note
Due to contractual agreements,
the Readiris Pro CD-ROM is only
available by contacting an HP
Customer Care Representative.
If you need a replacement CD or newer version of the software than what shipped with the
product, go to the web site for the product and click CD-ROM Order Page to order. Or click
Download drivers and software to get the software update.
Choose one of the following web sites according to the HP LaserJet all-in-one product you have.
http://www.hp.com/support/lj3020
http://www.hp.com/support/lj3030
http://www.hp.com/support/lj3380
The user interface for the Readiris
Pro text recognition software
(OCR) is available in the following
languages:
● Dutch
● English
● French
● German
● Italian
● Spanish
● Portuguese-Brazilian
Note
Readiris Pro text recognition
software can perform optical
character recognition (OCR) in 117
languages.
System requirements (Mac)
The HP all-in-one software has the following minimum system requirements:
●
Mac OS 9.1, 9.2.x or OS X (version 10.2.x)
● Macintosh computer (Power PC processor), such as an iMac, Power Macintosh G3, or
Power Macintosh G4 233 MHz or higher
● RAM: Mac OS 9 - minimum system memory 64 MB; Mac OS X (version 10.2.x) - minimum
system memory 128 MB. These are minimum system requirements for memory. An
additional 32 MB of free memory is optimum for installation.
● 100 MB or more of free hard disk space
● A USB port or an ethernet connection using an HP Jetdirect print server
● A CD-ROM drive (required for installation)
42 System requirements (Mac) EN
Page 59

Installation overview
The software for the HP LaserJet 3020 and 3030, and the HP LaserJet 3380 all-in-one products
is shipped on one CD-ROM. On Mac OS systems, the HP all-in-one Installer program installs the
HP all-in-one software for your product from the CD-ROM onto the hard disk.
On Mac OS systems, your HP all-in-one product uses the HP all-in-one Installer. This
Installer provides an Easy Install option, which installs only the HP LaserJet all-in-one
product software on the current system startup drive that contains the active System folder.
By default, the HP All-In-One Software folder and the Readiris Pro folder are installed in the
Applications folder.
Installation options
The HP all-in-one software can be used with the HP LaserJet 3020 and 3030 and the the HP
LaserJet 3380 all-in-one products in the following configurations:
● A computer is directly connected to the product with a USB port and the HP all-in-one
software is loaded on the computer. (This situation provides the most product
functionality.)
● The product is connected to an HP Jetdirect print server and you install the HP all-in-
one software on a computer that has access to the HP Jetdirect network.
Macintosh installation instructions for direct connections
This section provides information about the following topics:
● Installation instructions for Mac OS 9.1 or higher
● Installation instructions for Mac OS X
Installation instructions for Mac OS 9.1 or higher
Use the instructions below to install the software on a Macintosh computer running Mac OS
9.1.
1 Insert the product software CD-ROM into your CD-ROM drive.
2 In the CD folder, double-click the HP all-in-one Installer icon.
3 The software license agreement appears. Click Accept. The installation begins.
4 Follow the onscreen instructions and click Install.
5 When prompted, restart the computer. After the computer restarts, the HP Setup
Assistant starts automatically.
6 Follow the onscreen instructions to complete the installation.
EN Chapter 3 Macintosh software overview 43
Page 60

Installation instructions for Mac OS X
Use the instructions below to install the software on a Macintosh computer running Mac OS X.
1 Insert the product software CD-ROM into your CD-ROM drive.
2 In the CD folder, double-click the HP all-in-one Installer icon.
3 If prompted to do so, enter a user name and password with Administrator privileges.
4 The software license agreement appears. Click Accept. The installation begins. During the
installation, you might be prompted again to provide a user name and password with
Administrator privileges.
5 When the installation is completed, a message appears stating that the installation was
successful. Click Restart.
6 The HP Setup Assistant starts automatically. Follow the onscreen instructions.
Note
Note
Note
If the HP Setup Assistant does not start automatically, click <system> (where <system> is
whatever location you have specified such as Macintosh HD, click Applications, click hp
laserjet aio, and then double-click hp all-in-one Setup Assistant.
Mac installation instructions for networked computers
To install the HP all-in-one software on networked Mac operating systems, follow these steps.
1 Connect and install your HP LaserJet all-in-one product to the network using the TCP/IP
protocol.
The Appletalk network protocol is not supported.
2 Insert the product software CD-ROM into the CD-ROM drive. In the CD-ROM window,
double-click the HP all-in-one Installer icon.
If the CD window does not open automatically, double-click the CD-ROM icon on the desktop to
open the CD-ROM window.
3 Click Install, and then follow the instructions on the screen to complete the software
installation.
4 When the software installation is complete, click Restart. After the computer restarts, the
HP setup assistant starts automatically.
5 In the Setup Assistant welcome screen, click Next.
6 Under Select Device, click the TCP/IP option, and then click Create. Enter the IP address
of the HP all-in-one product, and then click OK.
7 Follow the instructions on the screen to complete the setup and then click Done.
44 Mac installation instructions for networked computers EN
Page 61

Installation dialog box options for Mac OS systems
The table below describes the dialog box options that appear during the HP all-in-one software
installation on Macintosh systems.
Note
Figure 3-1. Step 1 - HP Authenticate (OSX only)
In the following installation sequence, the product name HP LaserJet 3020/3030/3380 is
used to represent the specific HP all-in-one product that you are installing.
Enter a username and password with Administrator privileges, and then click OK to continue.
EN Chapter 3 Macintosh software overview 45
Page 62

Cancel closes the installer.
Figure 3-2. Step 2 - HP Software License Agreement
Accept initiates the installation process (Step 3).
Print opens the Page Setup dialog for your default printer to allow you to print a copy of the
license agreement.
Language List allows you to change the language of the License Agreement and the user
interface.
Save As opens the system Save dialog, and allows you to save the text of the software license
agreement to disk.
Decline exits the Installer.
Figure 3-3. Step 3 - Installing (progress indicator)
46 Installation dialog box options for Mac OS systems EN
Page 63

This progress dialog displays the number of items remaining to be installed, and the name of the
software component currently being installed.
Figure 3-4. Step 4 - Authenticate (OSX only)
Enter a username and password with Administrator privileges, and then click OK to continue.
Cancel closes the installer.
Figure 3-5. Step 5 - Restart alert
Restart will exit the Installer and restart the computer. After the computer restarts, you must
log in to the computer, and then the HP All-in-One Setup Assistant starts automatically
(Step 6).
EN Chapter 3 Macintosh software overview 47
Page 64

Note
If the HP Setup Assistant does not start automatically, follow these steps.
1. Click Macintosh Hard Drive.
2. Click Applications.
3. Click hp laserjet aio.
4. Double-click hp all-in-one Setup Assistant.
Figure 3-6. Step 6 - HP All-in-One Setup Assistant - Introduction
48 Installation dialog box options for Mac OS systems EN
Page 65

Next takes you to the Select Device dialog (Step 7).
Figure 3-7. Step 7 - HP All-in-One Setup Assistant - Select Device
When you click USB, the HP LaserJet 3020/3030/3380 all-in-one product will appear in the
list box. If you have not yet connected the product to your computer, the No devices found
message appears on this dialog box instead of a list of HP all-in-one products. Connect the
product to the computer with the USB cable, and then click Rescan USB. The HP LaserJet
all-in-one product appears in the list box. When you click the product name, Next takes you
to the User Identification dialog (Step 8).
When you click TCP/IP, Create will bring up a text-entry dialog for you to enter the network
address or name for the HP LaserJet 3020/3030/3380 all-in-one product.
Back returns you to the Introduction dialog (Step 6).
EN Chapter 3 Macintosh software overview 49
Page 66

The Rescan button scans the system again looking for the designated product connection.
Figure 3-8. Step 8 - HP All-in-One Setup Assistant - User Identification
Note
This step occurs only when you are installing the HP LaserJet 3030 or the HP LaserJet 3380.
You must enter the required information in the red fields.
Next takes you to the Phone Line dialog (Step 9).
50 Installation dialog box options for Mac OS systems EN
Page 67

Back returns you to the Select Device dialog (Step 7).
Figure 3-9. Step 9 - HP All-in-One Setup Assistant - Phone Line
Note
This step occurs only when you are installing the HP LaserJet 3030 or the HP LaserJet 3380.
Select the appropriate options.
If you have a separate (dedicated) phone line for fax calls, click the Yes, I will have
separate fax and voice lines. option. Also, be sure to type in your fax number in the
Incoming Fax Number text box. If you will use one phone line for both phone calls and
faxes, click the No, I will use one line for both. option.
Whether you choose Yes (separate fax line) or No (shared line), Next takes you to the
Outside Line dialog (Step 10).
EN Chapter 3 Macintosh software overview 51
Page 68

Back returns you to the User Identification dialog (Step 8).
Figure 3-10. Step 10 - HP All-in-One Setup Assistant - Outside Line
Note
This step occurs only when you are installing the HP LaserJet 3030 or the HP LaserJet 3380.
Select the appropriate option.
If you do not need to dial a number to get to an outside line, click the No, I don't use a dial
prefix option. If you do need to dial a number to get an outside line, click the Yes, my dial prefix
is: option and type the number into the text box.
If you have separate voice and phone lines, Next takes you to the Finish dialog (Step 13).
If you have one phone line for both voice and fax, Next takes you to the Distinctive Ring dialog
(Step 11).
52 Installation dialog box options for Mac OS systems EN
Page 69

Back returns you to the Phone Line dialog (Step 9).
Figure 3-11. Step 11 - HP All-in-One Setup Assistant - Distinctive Ring
Note
This step occurs only when you are installing the HP LaserJet 3030 or the HP LaserJet 3380.
Select the appropriate option.
If you have a distinctive ring service, click Yes, and select the type of ring from the dropdown menu. If you do not have a distinctive ring service, click No.
If you clicked Yes, Next takes you to the Finish dialog (Step 13).
If you clicked No, Next takes you to the Answering Machine dialog box (Step 12).
EN Chapter 3 Macintosh software overview 53
Page 70

Back returns you to the Outside Line dialog (Step 10).
Figure 3-12. Step 12 - HP All-in-One Setup Assistant - Answering Machine
Note
This step occurs only when you are installing the HP LaserJet 3030 or the HP LaserJet 3380.
Select the appropriate option.
If you will have an answering machine answer calls at the specified number, click Yes, I will. If
you will not have an answering machine answer calls at the specified number, click No, I will not.
Next takes you to the Finish dialog (Step 13).
54 Installation dialog box options for Mac OS systems EN
Page 71

Back returns you to the Distinctive Ring dialog (Step 12).
Figure 3-13. Step 13 - HP All-in-One Setup Assistant - Finish
The information entered in previous dialogs is displayed. If any items need to be changed,
use the Back button.
If you have separate lines for your fax and voice calls, Back returns you to the Outside Line
dialog (Step 10).
If you have one line for your fax and voice calls, Back returns you to the Answering
Machine dialog (Step 12).
EN Chapter 3 Macintosh software overview 55
Page 72

Finish takes you to the Congratulations dialog (Step 14).
Figure 3-14. Step 14 - HP All-in-One Setup Assistant - Congratulations
Click Done to close the HP All-in-One Setup Assistant.
Uninstall instructions for Mac
Perform the following steps to uninstall the HP LaserJet all-in-one software from the computer.
1 Locate the HP All-in-One Uninstaller utility icon in the HP All-In-One Software folder. Double-
click the Uninstaller icon to launch it.
2 Choose whether you want to perform an uninstall for all HP devices, or for a specific device.
If you choose Uninstall selected, you must then choose the devices you wish to uninstall
from the list.
3 Click Next .
4 Select any additional items you want to uninstall using the check boxes.
5 Click Uninstall.
6 When the uninstall process is complete, click Restart.
56 Uninstall instructions for Mac EN
Page 73

The HP Toolbox
4
This section provides information about the following topics:
● Overview of the HP Toolbox
● System requirements
● Key features
● Configuration options
Overview of the HP Toolbox
Note
The HP Toolbox is available for Windows operating systems only.
The HP Toolbox is a web application that allows end users to easily communicate and
manage their HP LaserJet all-in-one product. The HP Toolbox provides the following
capabilities:
● Monitor the status of the HP LaserJet all-in-one product
● Examine and set the device settings for print, fax, and copy
● Provide access to Fax software functionality
● Common Fax Tasks
● Fax Phone book
● Send/Recieve logs
● Fax reports
● Provides scan to email and scan to folder software functionality when using the SCAN
TO button on the HP LaserJet all-in-one control panel
● Provide Troubleshooting and "How do I" content
● Provide access to online product documentation
● Provide Device Alert functionality, notifying the end user when particular events or
conditions occur at the device.
EN Chapter 4 The HP Toolbox 57
Page 74

Starting the HP Toolbox
You can start the HP Toolbox using any of the following methods.
● Double-click the Status Client icon in your Windows system tray.
● Click Start, click Programs, click Hewlett Packard, click HP LaserJet
3015/3020/3030/3380, and then click HP Toolbox and Fax Management for LaserJet
3015/3020/3030/3380.
● Double-click the HP Toolbox and Fax Management for LaserJet 3015/3020/3030/3380
icon on the Windows desktop.
Structure
The HP Toolbox is divided into two main sections: the HP Toolbox section and the Device
Settings section. Each of these sections has controls grouped into a set of tabs. In addition to
these two sections, the HP Toolbox has other pages that are accessible from various points
within the HP Toolbox.
Opening page
The opening page that appears in the HP Toolbox section depends on the installed configuration
of the HP Toolbox. If you have installed the HP Toolbox for a single HP LaserJet all-in-one
product, the Device Content Page for that HP LaserJet all-in-one product appears when you
open the program. If you have installed the HP Toolbox for multiple products, the Device Select
page appears when you open the program. On the Device Select page, you can select the HP
LaserJet all-in-one product you want to manage with the HP Toolbox.
Navigation
Every HP Toolbox page that appears in the HP Toolbox section contains a Left Navigation
section at the left side of the window. This navigation section allows you to gain access to the
following pages from any page that is displayed in the HP Toolbox section.
● Device Select page
● Current Alerts page
● Text Only page
The Left Navigation section contains a link to a Text Only version of the page that is being
displayed. Your Web browser’s Forward, Back, and History navigation buttons allow you to
navigate between pages that you have visited before. You can also set a bookmark for most
pages that are displayed in the HP Toolbox section.
System requirements
The following table describes the system requirements for the HP Toolbox.
58 Starting the HP Toolbox EN
Page 75

Web browser requirements
Table 4-1. Browsers supported by HP Toolbox
Browser category
Description Target browsers within this
category
Optimal All functionality operates as
designed, and graphical
appearances are correct. Minor
cosmetic differences may exist
from browser to browser, but the
overall appearance, look-andfeel, and behavior are consistent
for all browsers in this category.
Functional You are able to access
functionality and view web
content, but major formatting and
display issues might exist. For
example, tabs may not look like
tabs, and left navigation buttons
may not look or behave properly,
but you are still able to navigate
between the various tabs and
buttons.
Not operational You are not able to gain access
to some of the functionality
provided, or you are unable to
view certain portions of the web
content.
● Microsoft Internet Explorer
(IE) version 5.5 or version 6.0
and above
● Netscape version 6.2 or
version 7.0 and above
● Opera version 7.0 and above
● IE version 5.0
● Netscape version 6.1
● Opera version 6.05
● IE version 4.0
● Netscape version 4.75
Other requirements
The HP Toolbox runs on Windows operating systems with a minimum of 128 MB of RAM.
However, 256 MB is recommended for best performance. The TCP/IP protocol must also be
installed on the computer.
Key features
This section provides information about the following topics:
● Scan to e-mail or a folder
● Receive faxes to this computer
EN Chapter 4 The HP Toolbox 59
Page 76

Scan to e-mail or a folder
In the Scan to e-mail or a folder feature, you can set up the HP LaserJet all-in-one product to
later initiate a scan directly from the HP LaserJet all-in-one product control panel. On the HP
LaserJet all-in-one product control panel, press the SCAN TO button. Use the < or the >
button to select an e-mail recipient or folder location, and then press the START SCAN
button or the MENU/ENTER button. For e-mail, the scanned item is attached to an e-mail
message, which is then sent automatically to the e-mail recipient that you selected. For a
folder, the scanned item is saved to the specified folder.
Note
Note
You must program the SCAN TO button before you can use this method to scan to e-mail. Go to
the Scan to tab in the HP Toolbox. Click the Turn on scan to e-mail or a folder option, and
then click Apply.
To add an e-mail address, click the E-mail addresses option, type the e-mail address you want
to add in the text box. Type a new name in the Display at the device as text box, and then click
Add. The e-mail address and it's display name appears in the E-mail addresses and folders
list toward the bottom of the page.
To add a folder destination, click the Folder option, and click Browse to locate the folder on your
computer. Type a new name in the Display at the device as text box, and then click Add. The
folder and it's display name appears in the E-mail addresses and folders list toward the
bottom of the page.
The following destinations are set up automatically when a direct connection installation is
performed and appear on the HP LaserJet all-in-one product control panel: MY SCANS, ADD
NEW E-MAIL, and ADD NEW FOLDER. Selecting MY SCANS sends a copy of the scan to the
MY SCANS folder in the MY DOCUMENTS folder on your computer.
Selecting ADD NEW E-MAIL or ADD NEW FOLDER from the HP LaserJet all-in-one product
control panel opens the Scan to E-mail or a Folder page in the HP Toolbox on the computer.
Add e-mail addresses or folders by typing them into the E-mail addresses text box or the
Folder text box, and then clicking Add. These new entries appear on the HP LaserJet all-in-one
product SCAN TO list.
The scan to e-mail or a folder feature is turned off by default for network installations. To turn this
feature on, go to the Scan-to tab in the HP Toolbox. Click the Turn on scan to e-mail or a
folder option, and then click Apply.
Receive faxes to this computer
This feature of the HP Toolbox allows you to receive incoming faxes to the computer, rather than
printing them or forwarding them to another fax number.
Note
60 Scan to e-mail or a folder EN
If the host computer is turned off or disconnected from the HP LaserJet all-in-one product when
a fax is received, the fax is stored on the all-in-one product until the host computer is turned on
or reconnected to the HP LaserJet all-in-one product.
Laptop users must shut down and disconnect the computer instead of undocking from a docking
station.
Follow these steps to enable the Receive faxes to this computer feature.
1 Open the HP Toolbox by double-clicking the icon on the Windows desktop.
2 Click the Fax tab.
Page 77

3 On the Fax Tasks page, click the Receive faxes to this computer check box, and then
click OK.
4 Incoming faxes are uploaded to the computer where you can view them from the Fax
Receive Log page. If your computer is turned off when faxes arrive, they are stored in
the HP LaserJet all-in-one product memory and are automatically uploaded to your
computer when you turn it on again.
Note
Only one computer can have the Receive faxes to this computer option selected at one
time. You can also specify a pop-up message to appear on your computer to notify you
when a fax has been received. You can turn on the Receive faxes to this computer option
at the HP LaserJet all-in-one product control panel or in the HP Toolbox on the computer
that originally enabled the feature.
Configuration options
The HP Toolbox is divided into two main sections: the HP Toolbox section and the Device
Settings section. Each of these sections has controls grouped into a set of tabs. In addition
to these two sections, the HP Toolbox has other pages that are accessible from various
points within the HP Toolbox. The following lists describe the basic layout of these sections
and the configuration options available on each tab.
This section provides information about the following topics:
● HP Toolbox section
● Device Settings section
● Network Settings
● Other pages
HP Toolbox section
The HP Toolbox section is comprised of the following tabs.
● Status tab
● Fax tab
● Scan to tab
● Troubleshooting tab
● Documentation tab
Status tab
The Status tab contains the following pages.
● Device Status page
● Set up Status Alerts page
● Device Configuration page
● Print Info Pages page
EN Chapter 4 The HP Toolbox 61
Page 78

Device Status page
The Device Status page shows device status messages from the device. The Device Status
page also displays some pertinent product information and device settings.
Figure 4-1. Device Status page
62 HP Toolbox section EN
Page 79

Setup Status Alerts page
Use this page to set up the Status Alerts for the HP LaserJet all-in-one product.
Figure 4-2. Set Up Status Alerts page
The following alerts and notifications can be received.
Table 4-2. Alerts and notifications
Alerts
● Insufficient Memory
● Manually Feed Paper
● Printer Mispick (HP LaserJet 3380 only)
● Paper Jam
● Printer Door Open
● Paper Out (HP LaserJet 3380 only)
● Print Cartridge Missing
● Paper Out or No Paper Pick Up (HP LaserJet 3020 and HP
LaserJet 3030 only)
● Automatic Document Feeder Mispick
● Automatic Document Feeder Jam
● Automatic Document Feeder Door Open
● Scan Canceled
Notifications
● Fax Logs Updated
● Fax Printed
● Fax Received
EN Chapter 4 The HP Toolbox 63
Page 80
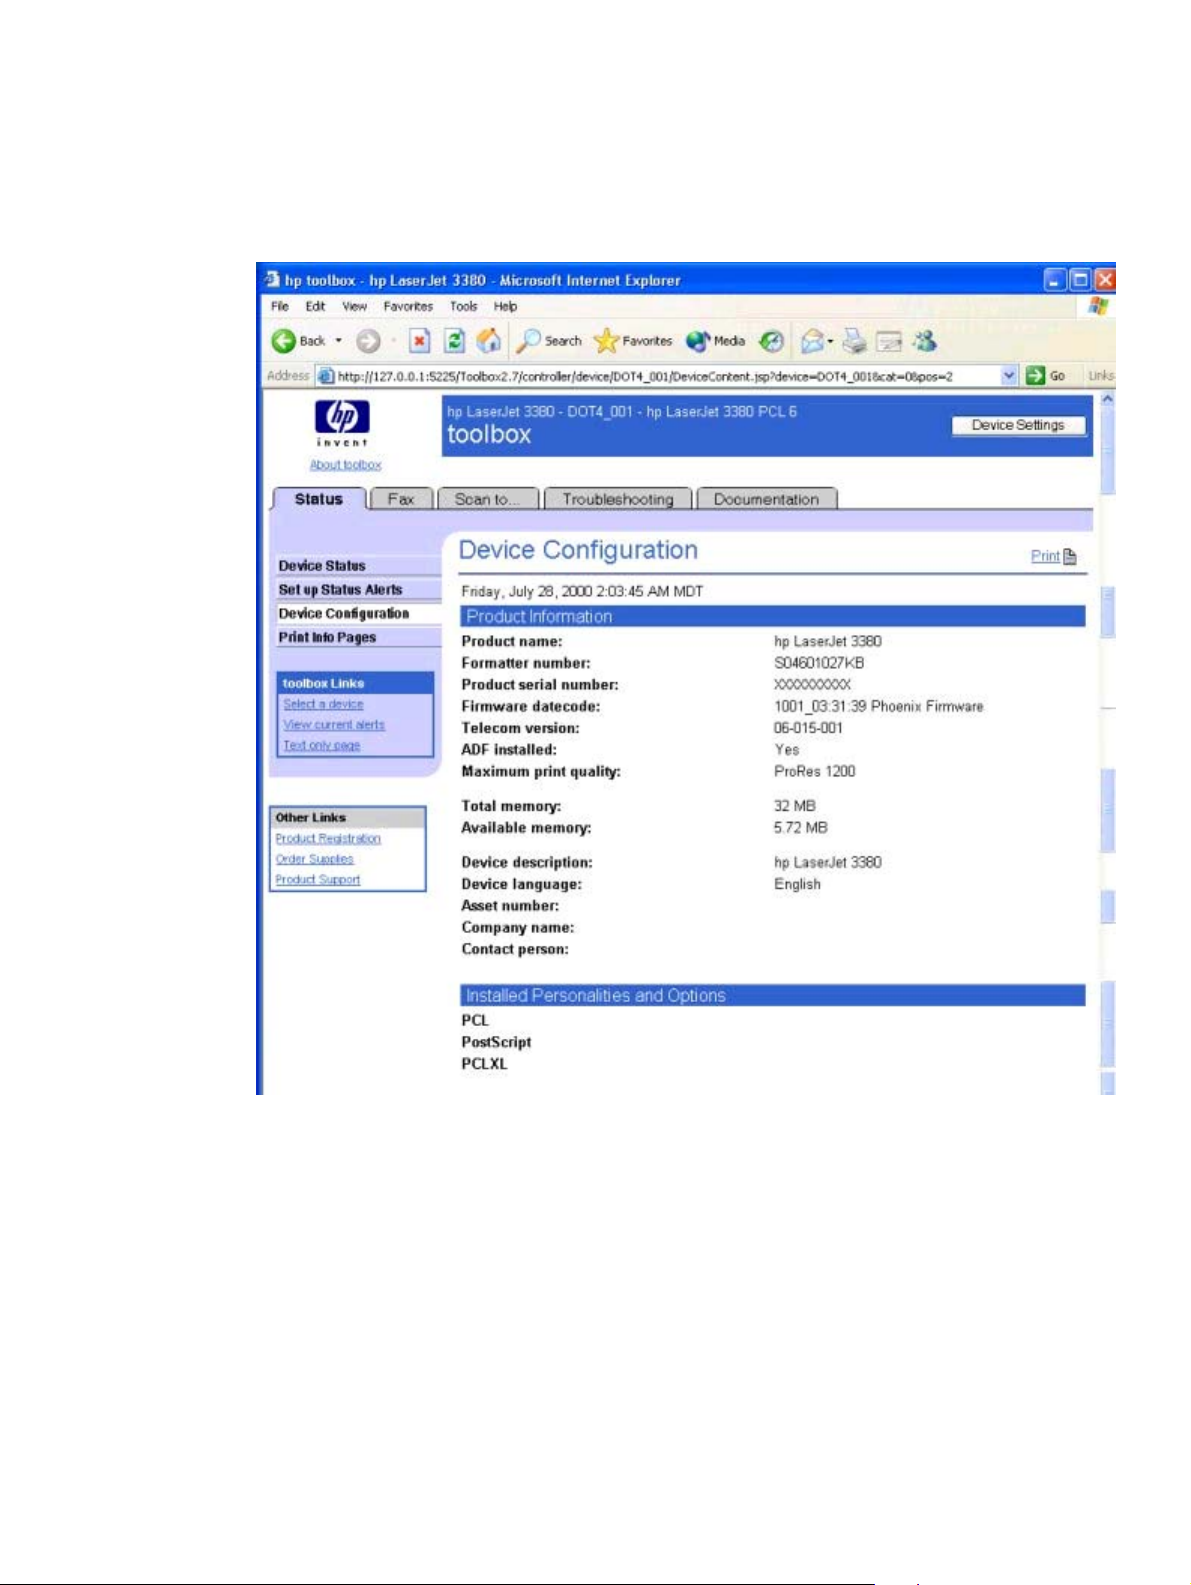
Device Configuration page
The Device Configuration page displays the values of all of the settings available to be set in the
device, and also other configuration items such as installed DIMMs, Personalities, and page
counts. The contents of this page should be consistent with the Configuration page generated by
the firmware.
Figure 4-3. Device Configuration page - 1 of 4
64 HP Toolbox section EN
Page 81

Figure 4-4. Device Configuration page - 2 of 4
Figure 4-5. Device Configuration page - 3 of 4
EN Chapter 4 The HP Toolbox 65
Page 82

Figure 4-6. Device Configuration page - 4 of 4
66 HP Toolbox section EN
Page 83

Print Info Pages page
The Print Info Pages page provides users the ability to easily print out the internal special pages
that are generated by the device.
Figure 4-7. Print Information Pages page
The contents of these reports are generated by the device firmware, and not by the HP
Toolbox.
The page also provides a button allowing users to easily go to the Fax Reports page.
Fax tab
The Fax tab contains the following pages.
● Fax Tasks page
● Fax Phone Book page
● Phone Book - Edit Entry page
● Phone Book - Create Group page
● Phone Book - Edit Group page
● Phone Book - Import page
● Phone Book Import - Select Entries page
● Fax Send Log and Fax Receive Log pages
● Fax Viewer page (Available from the Fax Send Log and Fax Receive Log pages)
● Fax Data Properties page
EN Chapter 4 The HP Toolbox 67
Page 84

● Fax Reports page
● Detailed Fax Settings page
Fax Tasks
This page provides access to common fax related functionality and settings.
Figure 4-8. Fax Tasks page
68 HP Toolbox section EN
Page 85

The options in the Fax Functions section send commands to the HP LaserJet all-in-one
product. The following options are available.
● Send Fax. The Send Fax button launches the Send Fax application.
● Reprint Last Faxes. The Reprint Last Faxes function was designed because the HP
LaserJet 3015, the HP LaserJet 3030, and the HP LaserJet 3380 all-in-one products do not
have a toner-low indicator. Most fax machines will stop printing faxes when the toner is low.
The HP LaserJet all-in-one products do not have the capability to detect when the toner is
low. When faxes start to print with streaks and some blank pages, you should replace the
toner cartridge and then click Reprint Last Faxes. The HP LaserJet all-in-one product
begins to reprint faxes, beginning with the last fax received. When the product has
reprinted the faxes you need, press the STOP button on the product control panel.
● Clear Stored Faxes. The HP LaserJet all-in-one firmware does not differentiate
between faxes that have been printed and faxes that have been sent directly to the
computer. The firmware manages fax storage by trying to keep as many pages of
received faxes as long as possible. After receiving a fax and then printing the pages or
sending the pages to the computer, the firmware marks the fax as "ok to delete." When
the firmware needs more room for fax storage, it will go through the faxes and delete
enough marked fax jobs to free up the fax storage needed. The Clear Stored Faxes
removes all faxes stored in the product's memory. This includes faxes marked "ok to
delete," faxes which have not yet been printed or sent to the computer, any delayedsend faxes, and any pending redial faxes.
The Fax Receive Mode section lists options for receiving faxes. You can choose one of
these options.
● Print the Received Faxes. This is the default selection. If you choose this option, you
also have the option to receive a notification (pop-up) message when a fax is printed.
● Receive faxes to this computer. If you choose this option, you also have the option to
receive a notification (pop-up) message when a fax is received.
● Forward received faxes to a different fax machine. If you choose this option, you
also must enter a fax number to which the fax is forwarded.
If the HP LaserJet all-in-one product is shared among multiple users on different client
computers, the Fax Receive Mode setting causes the following behavior .
● If one user selects Print the Received Faxes, the Print the Received Faxes option is
selected for all users. However, individual users can choose whether or not they want
to receive a notification message when a fax is printed.
● If one of the users selects Receive faxes to this computer, the Receive faxes to this
computer is selected and the other Fax Receive Modes are disabled for all of the
other users . The user who selected Receive faxes to this computer is designated by
HP Toolbox as the “Master Client”. In order for non-Master Clients to be able to change
the received faxes selection, the Master Client must select one of the other options.
● If one of the users selects Forward faxes to a different fax machine, the Forward
faxes to a different fax machine is selected for all users with the Fax Forward
Number designated by the other user. However, any user can change the Fax
Forward Number or the Fax Receive Mode.
Fax Phone Book page
Displays the phone book data from the device. The opening page initially displays the first
25 entries in the phone book.
EN Chapter 4 The HP Toolbox 69
Page 86

Users can add a new entry into the phone book by typing information in to the Add Entry
Information section, and clicking Add.
70 HP Toolbox section EN
Page 87

Figure 4-9. Fax Phone Book page
EN Chapter 4 The HP Toolbox 71
Page 88

Fax Phone Book - Edit Entry page
This page opens after clicking Edit for an entry that corresponds to an individual phone book
entry (NOT a group entry).
Figure 4-10. Fax Phone Book - Edit Entry page
72 HP Toolbox section EN
Page 89

Fax Phone Book - Create a New Group page
This page opens by clicking New Group on the Fax Phone Book page. The Entry number field
is populated with the first available entry in the phone book.
Figure 4-11. Fax Phone Book - Create a New Group page
EN Chapter 4 The HP Toolbox 73
Page 90

Fax Phone Book - Edit a Group page
This page opens by clicking Edit for a Group entry on the Fax Phone Book page. The
behavior of this page is identical to the Create a New Group page.
Figure 4-12. Fax Phone Book - Edit a Group
74 HP Toolbox section EN
Page 91

Import information into the Fax Phone Book page
Use the Import information into the Fax Phone Book page to import phone book data that
has been exported from external e-mail applications. You must select one of the following
applications.
● Microsoft Outlook
● Microsoft Outlook Express
● Lotus notes
Figure 4-13. Import information into the Fax Phone Book
Note
Phone book files that were created using the HP LaserJet 3300 series product software
cannot be imported into HP Toolbox for use with the HP LaserJet 3015, the HP LaserJet
3030, or the HP LaserJet 3380 all-in-one products. Any phone numbers used with the HP
LaserJet 3300 series product must be re-entered for use with the HP LaserJet 3015, the HP
LaserJet 3030, or the HP LaserJet 3380 all-in-one products.
EN Chapter 4 The HP Toolbox 75
Page 92

Before phone book entries can be imported into HP Toolbox, you must export the entries
from your mail application and save the file in .CSV format. Follow these steps to export your
phone book entries from an existing Microsoft Outlook address book.
1 In Microsoft Outlook, click File, and then click Import and Export.
2 Click Export to a file, and then click Next.
3 In the Create a file of type dialog box, click Comma Separated Values (Windows), and
then click Next.
4 Navigate to the folder that contains your address book (usually Contacts), click the folder
name, and then click Next.
5 In the Save exported file as text box, type a name for your file.
6 Click Browse to specify a location to save the file. Make sure the Save as type drop-down
menu specifies the file type as Comma Separated Values (Windows) (*.CSV), and then
click OK.
Note
Make a note of where you saved this file so that you can find it later.
Your designated file name and path now appear in the text box. Click Next to continue.
7 Click Finish.
8 Open the HP Toolbox and click the Fax tab.
9 From the left navigation bar, click Fax Phone Book.
10 Click Import Phone Book.
11 Click the phone book application option button from which you are importing.
12 Click Browse and navigate to the file you saved in step 6. Click the file name and then click
OK. The file name and path appear in the text box.
13 Click Continue.
14 Select entries from the list that you would like to import, and then click Save.
76 HP Toolbox section EN
Page 93

Phone Book Import - Select Entries page
This page displays all of the entries available in the imported file (selected on the Import page)
in the Import List. Also, all of the currently stored phone book entries are displayed in the
Phone Book section of this page.
Figure 4-14. Phone Book Import - Select Entries page
EN Chapter 4 The HP Toolbox 77
Page 94

Note
Although this illustration shows only the first 20 entries, you can import up to 120 entries.
Fax Send Log and Fax Receive Log pages
The Fax Send log and the Fax Receive log list the faxes that have been sent or received by the
HP LaserJet all-in-one product.
Figure 4-15. Fax Send Log page
78 HP Toolbox section EN
Page 95

Figure 4-16. Fax Receive log
Clicking the Refresh button causes the HP Toolbox to pull new fax data from the HP
LaserJet all-in-one product. The following information is displayed about each fax in the log.
● Date and time
● Job number
● Fax number
● Pages
● Result
EN Chapter 4 The HP Toolbox 79
Page 96

The fax logs can be sorted by any of these columns by clicking on the column name that you
want to sort by. A triangle appears next to the column heading that designates ascending or
descending order. To change the order from ascending to descending or vice versa, click
the column heading again. The last sort column and sort order you use is saved when you
exit the page.
If the fax was sent or received at the computer (rather than at the HP LaserJet all-in-one
product), each fax entry also has a View option. Click View to see the fax in a new window.
Faxes that have not yet been viewed appear in bold type.
A maximum of 40 fax log entries are displayed. To enable the HP Toolbox to automatically check
for updates to the fax log, click Turn on automatic fax log updates and then click Apply.
Fax Viewer page
This page allows you to see information about your fax, a thumbnail image of the fax, and allows
you to open the fax to view it in Adobe Acrobat Reader.
Figure 4-17. Fax Viewer page
80 HP Toolbox section EN
Page 97

Fax Data Properties page
Use these settings to manage the space used to store faxes on your computer. You can save
more faxes if you specify a larger total data size.
Figure 4-18. Fax Data Properties page
These settings apply to faxes that have been sent from or received to your computer. These
settings apply only if you have chosen to send or receive faxes remotely from your computer.
An entry will remain in the fax log even if the stored fax is deleted. When data files are
deleted, only the fax data is deleted.
EN Chapter 4 The HP Toolbox 81
Page 98

Fax Reports page
The Fax Reports page allows you to easily print out the internal fax reports that are
generated by the HP LaserJet all-in-one product.
Figure 4-19. Fax Reports page
82 HP Toolbox section EN
Page 99

Detailed Fax Settings page
This page provides navigational links to the Fax Settings tab and the Fax Set-up Wizard.
Figure 4-20. Detailed Fax Settings page
Scan to tab
The Scan to tab contains the following pages.
● Scan to E-mail or a Folder
● Scan Preferences
EN Chapter 4 The HP Toolbox 83
Page 100

Scan to E-mail or a Folder page
Use this page to add entries to the list that appears on the HP LaserJet all-in-one product
control panel when you press the SCAN TO button on the control panel. Enter an e-mail
address or a folder location to which you can send scanned information directly from the HP
LaserJet all-in-one product to your computer. For e-mail, you can enter any e-mail address
that you normally use to send e-mails. The e-mail is sent through the default e-mail client
that is specified in the computer's E-mail Control. Before the e-mail is sent, the e-mail
addresses are resolved through the address book of your e-mail application. You can
include single e-mail addresses or multiple e-mail addresses separated by commas. To scan
to e-mail or a folder, press the the SCAN TO button on the device. Use the < or > button to
make a selection, and then press the START SCAN button or the ENTER button.
Figure 4-21. Scan to E-mail or a Folder page
84 HP Toolbox section EN
 Loading...