

Page 1

user's guide
To find an answer to a question, select a topic beneath the picture of your printer
model:
● notices
● special features
● getting started
● connectivity
● printing
● maintenance
● troubleshooting
● specifications
● notices
● special features
● getting started
● connectivity
● printing
● maintenance
● troubleshooting
● specifications
Page 2

notices
● notices and acknowledgements
● terms and conventions
● accessibility
Page 3

notices and acknowledgements
hewlett-packard company notices
The information contained in this document is subject to change without notice.
Hewlett-Packard (HP) makes no warranty of any kind with regard to this material
including, but not limited to, the implied warranties of merchantability and fitness for
a particular purpose.
Hewlett-Packard shall not be liable for any errors or for incidental or consequential
damages in connection with the furnishing, performance, or use of this material.
All rights reserved. Reproduction, adaptation, or translation of this material is
prohibited without prior written permission of Hewlett-Packard, except as allowed
under copyright laws.
acknowledgements
Microsoft, MS, MS-DOS, Windows, and XP are registered trademarks of Microsoft
Corporation.
TrueType is a U.S. trademark of Apple Computer, Inc.
Adobe and Acrobat are trademarks of Adobe Systems Incorporated.
Copyright 2003 Hewlett-Packard Company
Page 4
terms and conventions
The following terms and conventions are used in the user's guide.
terms
The HP Deskjet printer may be referred to as the HP printer or printer.
symbols
The > symbol guides you through a series of software steps. For example:
Click File > Print.
cautions and warnings
A Caution indicates possible damage to the HP Deskjet printer or to other
equipment. For example:
Caution! Do not touch the print cartridge ink nozzles or copper
contacts. Touching these parts will result in clogs, ink failure, and bad
electrical connections.
A Warning indicates possible harm to you or to others. For example:
Warning! Keep both new and used print cartridges out of the reach
of children.
icons
A Note icon indicates that additional information is provided. For example:
For great results use HP products.
A Mouse icon indicates that additional information is available through the What's
This? help feature. For example:
To find more information about options on each tab screen, point to
an option and click the right mouse button to display the What's
This? dialog box. Click What's This? to view information about the
selected option.
A Do Not icon indicates that an action is not recommended.
Page 5

Do not clean the interior of the printer.
Page 6

accessibility
Your HP printer provides a number of features that make it accessible for people with
disabilities.
visual
The printer software is accessible for users with visual impairments or low vision
through the use of Windows accessibility options and features. It also supports most
assistive technology such as screen readers, Braille readers, and voice-to-text
applications. For users who are color blind, colored buttons and tabs used in the
software and on the HP printer have simple text or icon labels that convey the
appropriate action.
mobility
For users with mobility impairments, the printer software functions can be executed
through keyboard commands. The software also supports Windows accessibility
options such as StickyKeys, ToggleKeys, FilterKeys, and MouseKeys. The printer
doors, buttons, paper trays, and paper guides can be operated by users with limited
strength and reach.
support
For more details about the accessibility of this product and HP's committment to
product accessibility:
● Visit HP's Web site at: www.hp.com/accessibility
● Email HP at: accessibility@hp.com
Page 7
special features
Congratulations! You have purchased an HP Deskjet printer that is equipped with
several exciting features:
● Borderless printing: Use the entire page surface when printing photos and
cards using the borderless printing feature.
● Print screen: Prints the image displayed on your computer's monitor at the
touch of a button.
● Six-ink upgradeable printing: Enhance photo printing with a photo print
cartridge.
● Digital photo printing: Enhanced digital photo printing capabilities.
● Ink-backup mode: Ink-backup mode lets you continue printing with one print
cartridge when the other print cartridge has run out of ink.
● Auto-on and Auto-off: Enable the auto-off feature to place the printer into a
low-power, energy-efficient mode after it has been idle for 30 minutes. The
printer turns on automatically when you print a file.
● Print multiple pages on a single sheet of paper: Use the printer software
to print up to 16 pages on a single sheet of paper.
● Print Cancel Button: Cancel print jobs at the touch of a button.
● Optional Two-Sided Printing Accessory: Purchase a Two-Sided Printing
Accessory to print two-sided documents automatically.
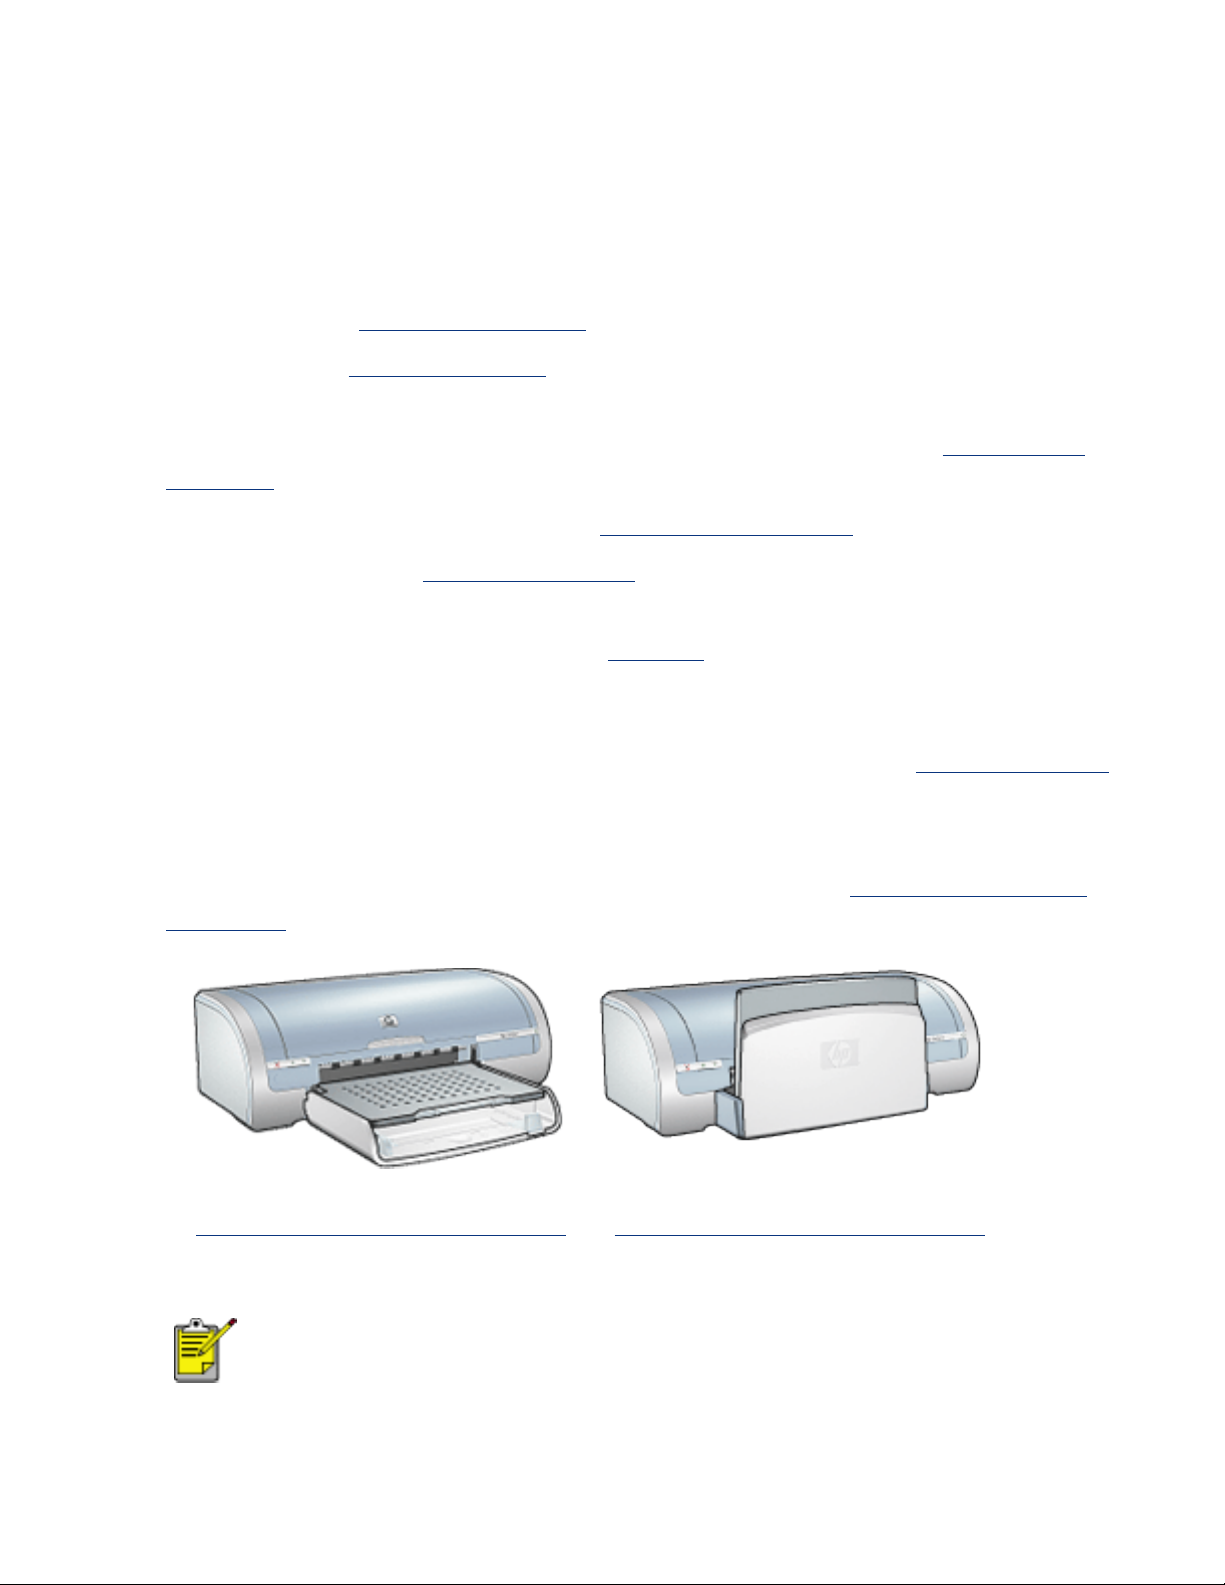
HP Deskjet 5150 series printer HP Deskjet 5160 series printer
All printer models are not available in all countries/regions.
Page 8

borderless printing
Borderless printing lets you print to edges of certain paper types and a range of
standard paper sizes from L size (89 x 127 mm) to Letter (8.5 x 11 in) and A4 (210 x
297 mm). The printer can also print on 4 x 6 inch photo paper with a tear-off tab.
guidelines
● Do not print borderless documents in ink-backup mode. Always have two print
cartridges installed in the printer.
● Open the file in a software application and assign the image size. Ensure that
the size corresponds to the paper size on which you want to print the image.
printing
Follow these steps to print a borderless document:
1. Open the file you want to print.
2. Open the
3. Select one of the borderless paper sizes from the Size is drop-down list. Verify
that the paper size you select matches the size of the paper loaded in the In
tray.
Printer Properties dialog box.
Page 9
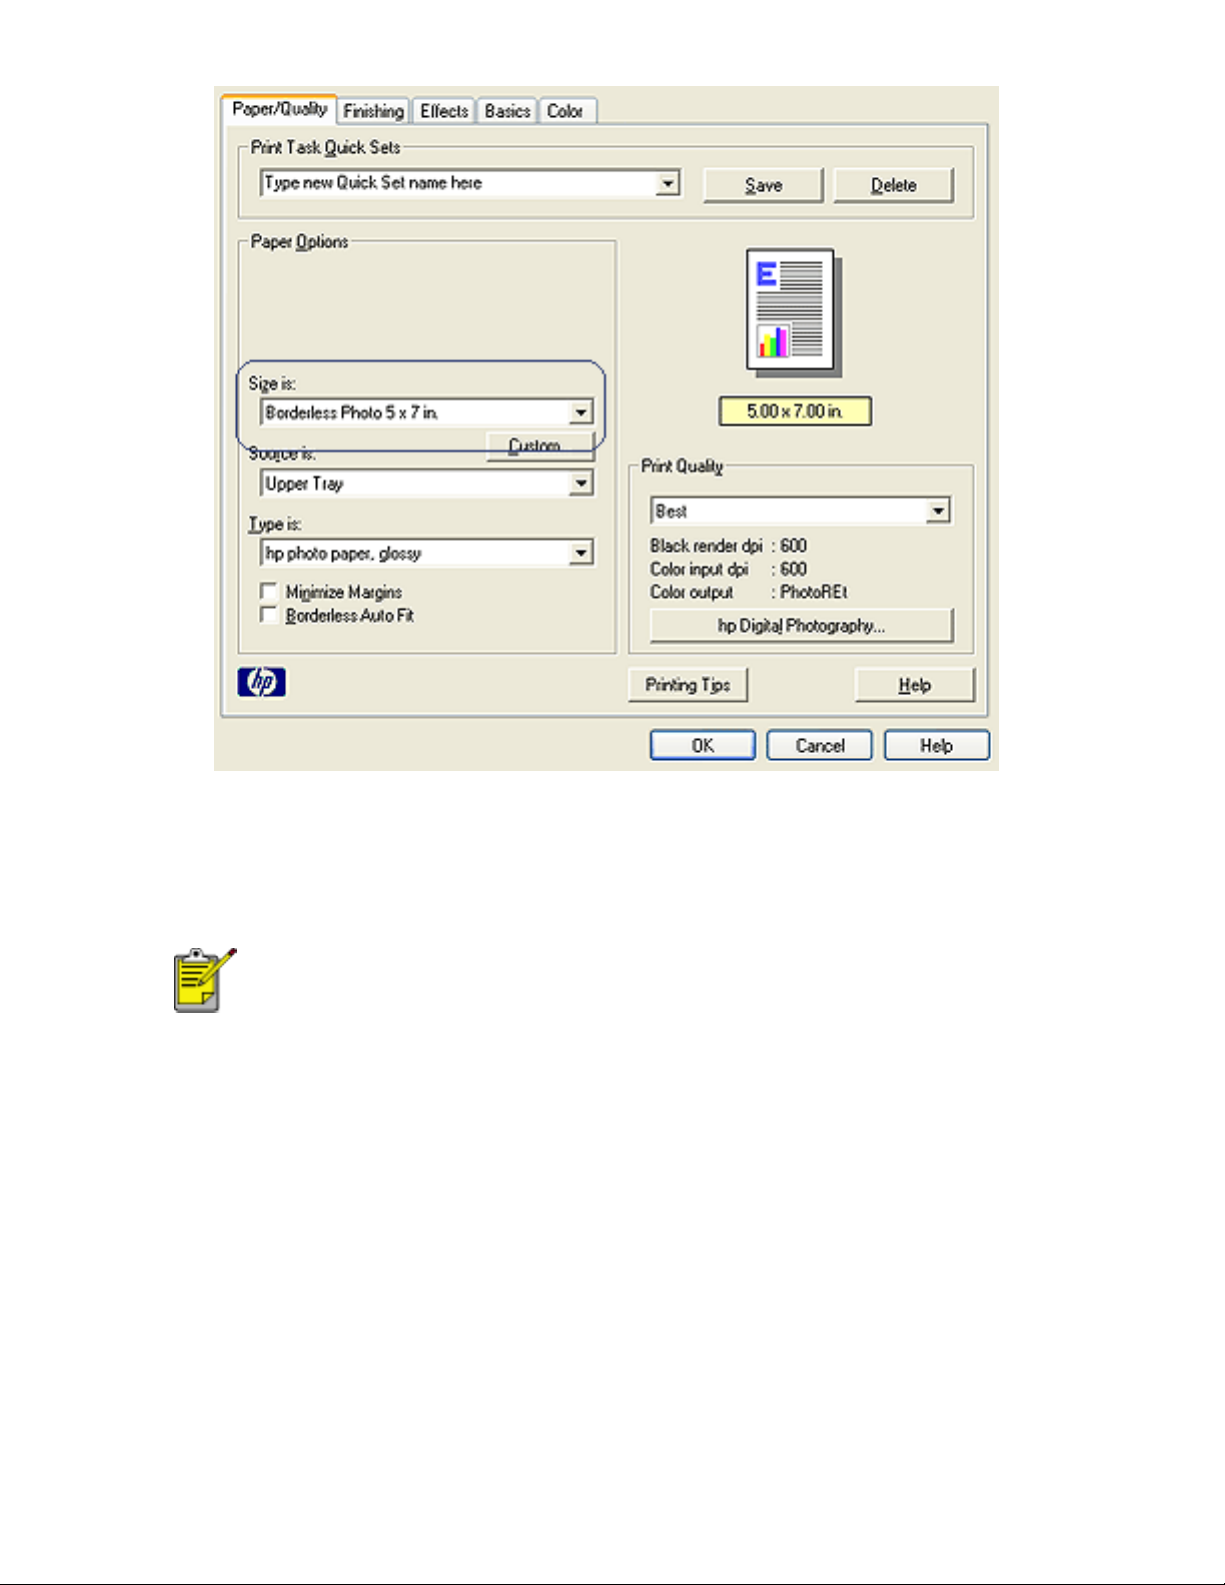
4. Select the appropriate paper type in the Type is drop-down list.
5. Click the Borderless Auto Fit checkbox to automatically resize the image to
print without a border.
The Borderless Auto Fit option is only available for photo
paper types.
Page 10
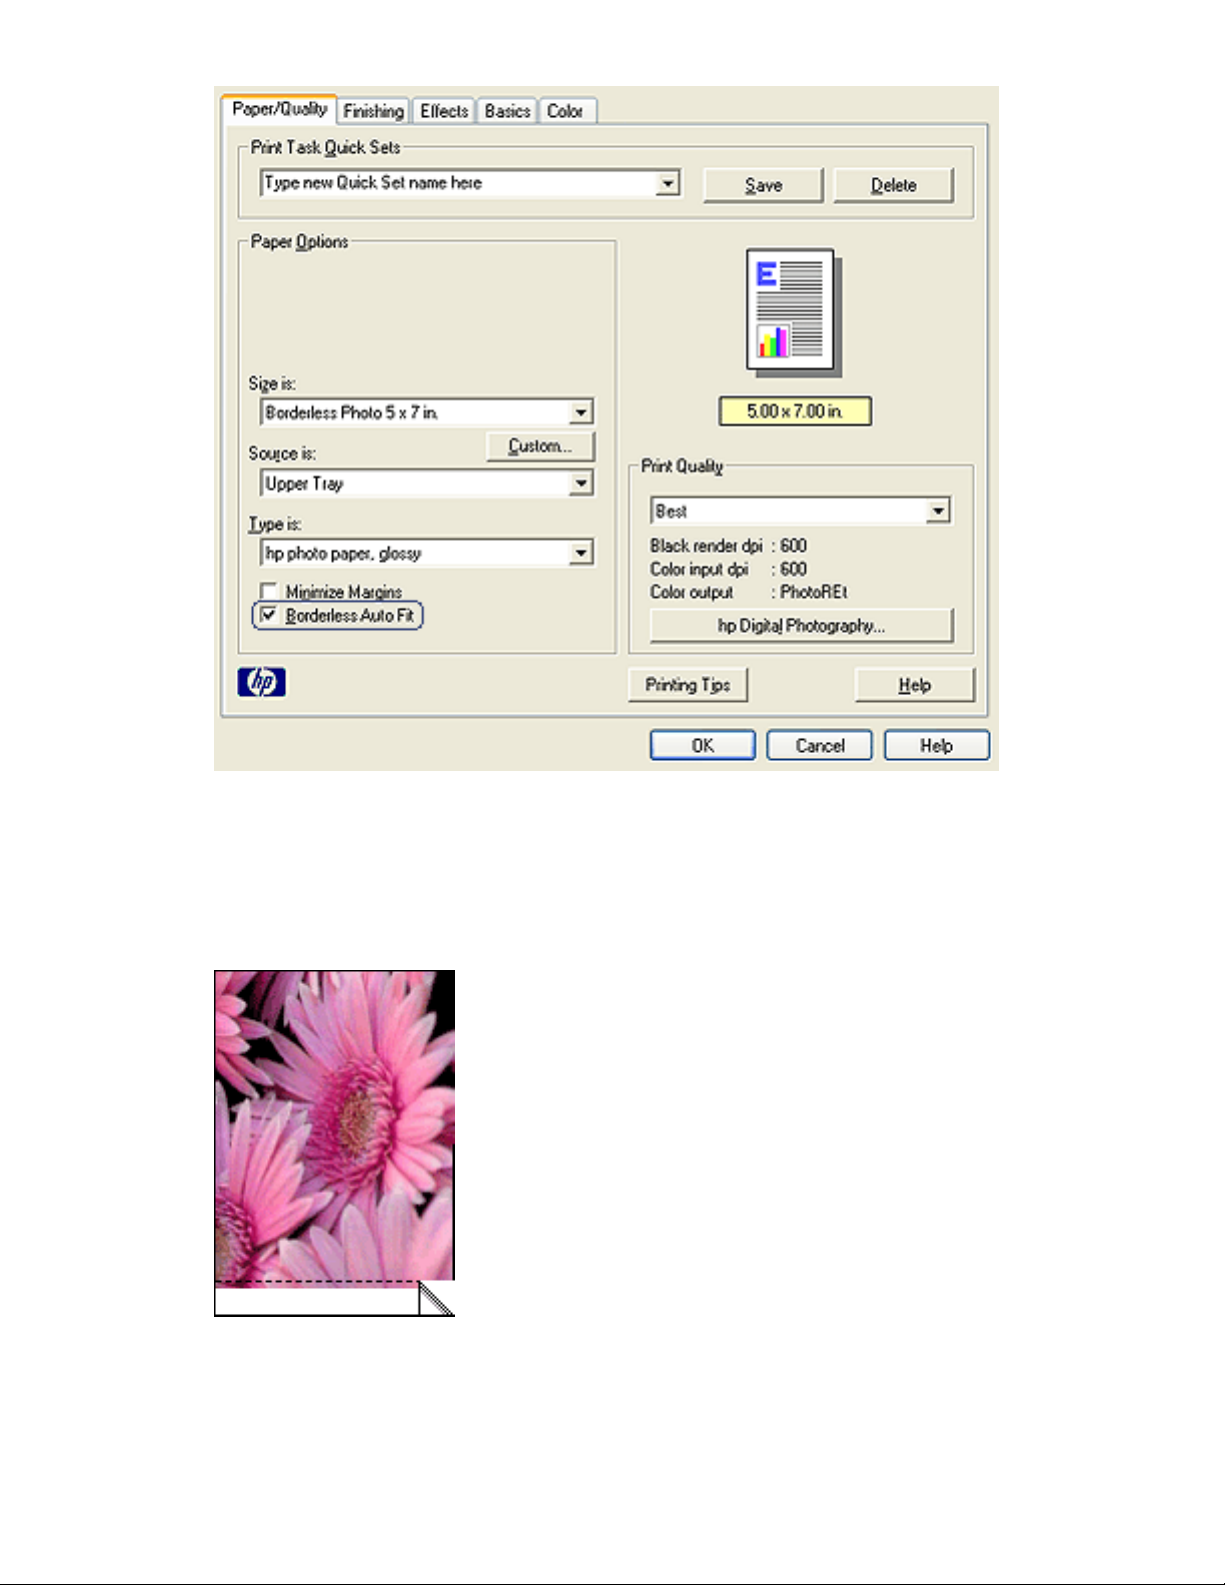
6. Select any other desired print settings, then click OK.
If you printed on photo paper with a tear-off tab, remove the tab to make the
document completely borderless.
Page 11
ink-backup mode
Ink-backup mode allows the printer to operate using only one print cartridge. It is
initiated when a print cartridge is removed from the cradle.
For instructions on removing a print cartridge, click here.
ink-backup mode output
Printing in ink-backup mode slows the printer and affects the quality of printouts.
when only this print cartridge is
installed...
black print cartridge
tri-color print cartridge
photo print cartridge
It is recommended that you do not use the photo print cartridge for
ink-backup mode.
the result is...
Colors are printed as grayscale.
Colors print but black is grayed and
is not a true black.
Colors are printed as grayscale,
black is grayed and is not a true
black.
exiting ink-backup mode
Install two print cartridges in the printer to exit ink-backup mode.
For instructions on installing a print cartridge, click here.
Page 12
replacing print cartridges
Before buying replacement print cartridges, verify the correct part numbers.
The printer can operate with only one print cartridge installed. For more information
click
To replace a print cartridge:
here.
1. Load a stack of plain white paper in the In tray.
2. Press the Power button to turn on the printer.
3. Open the printer cover.
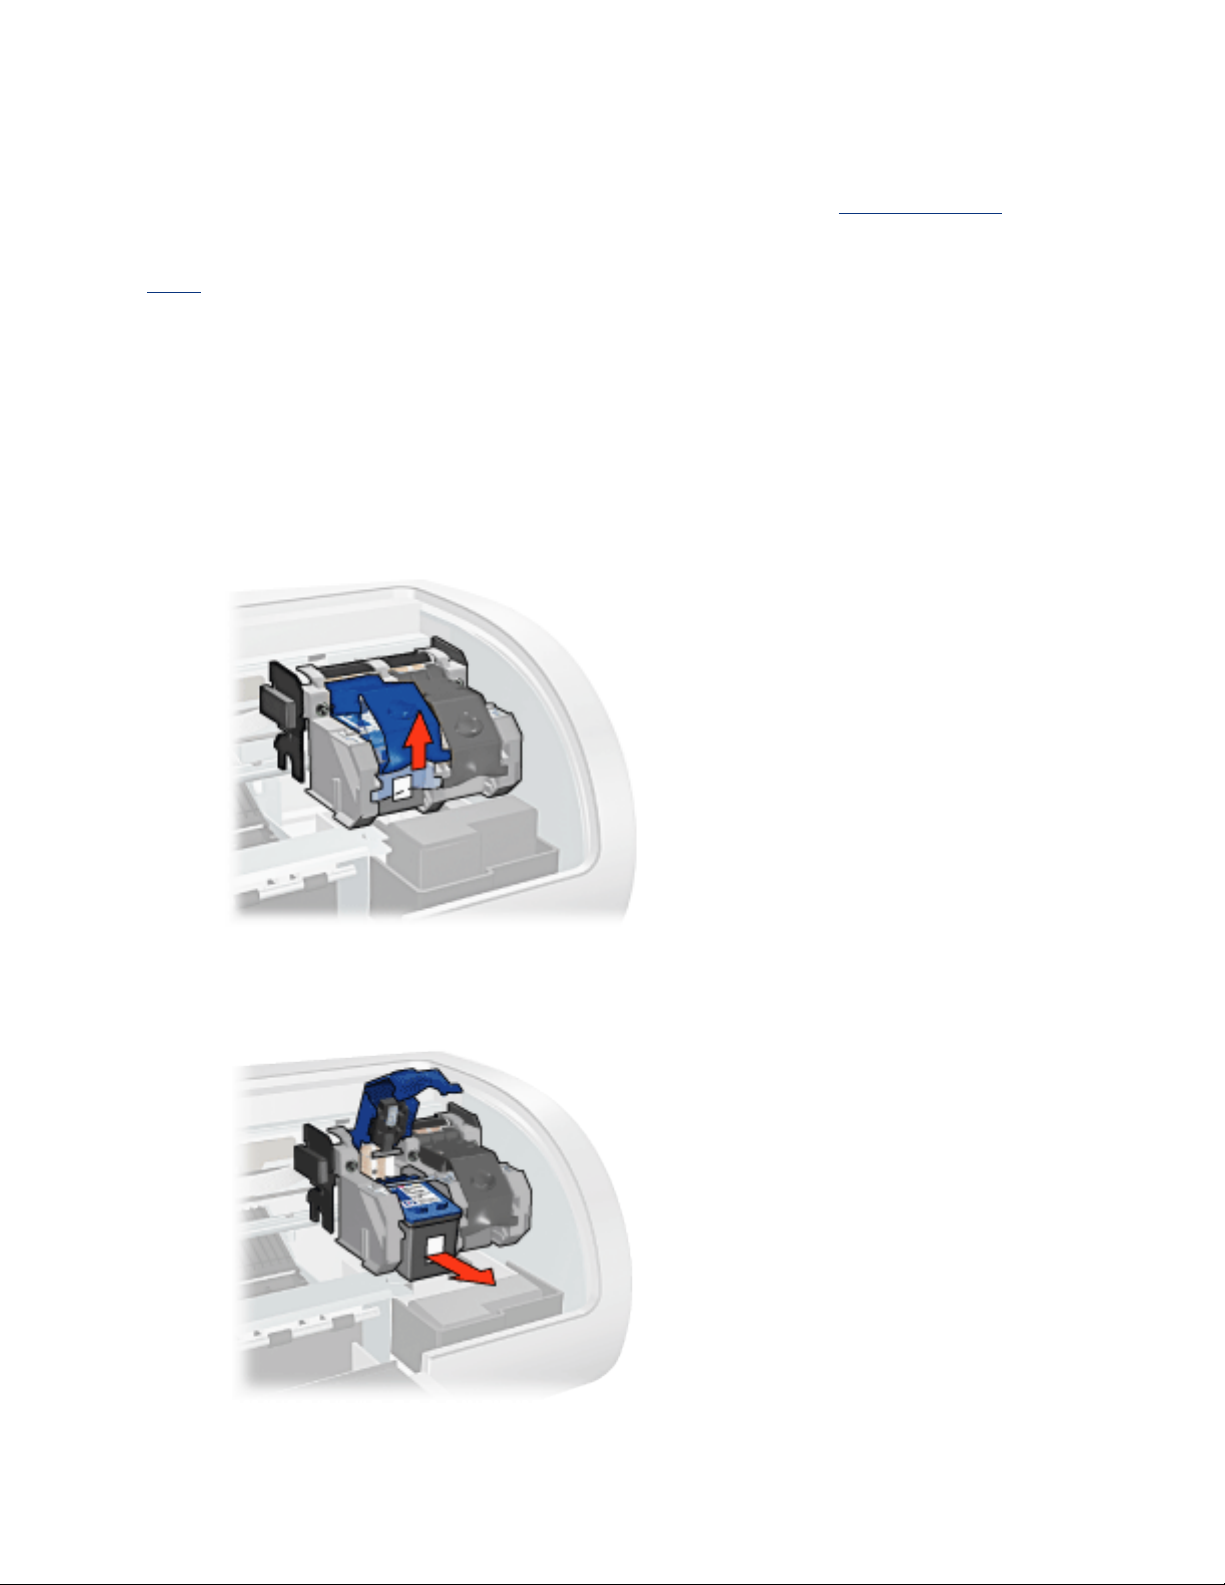
4. Lift the print cartridge latch to the open position.
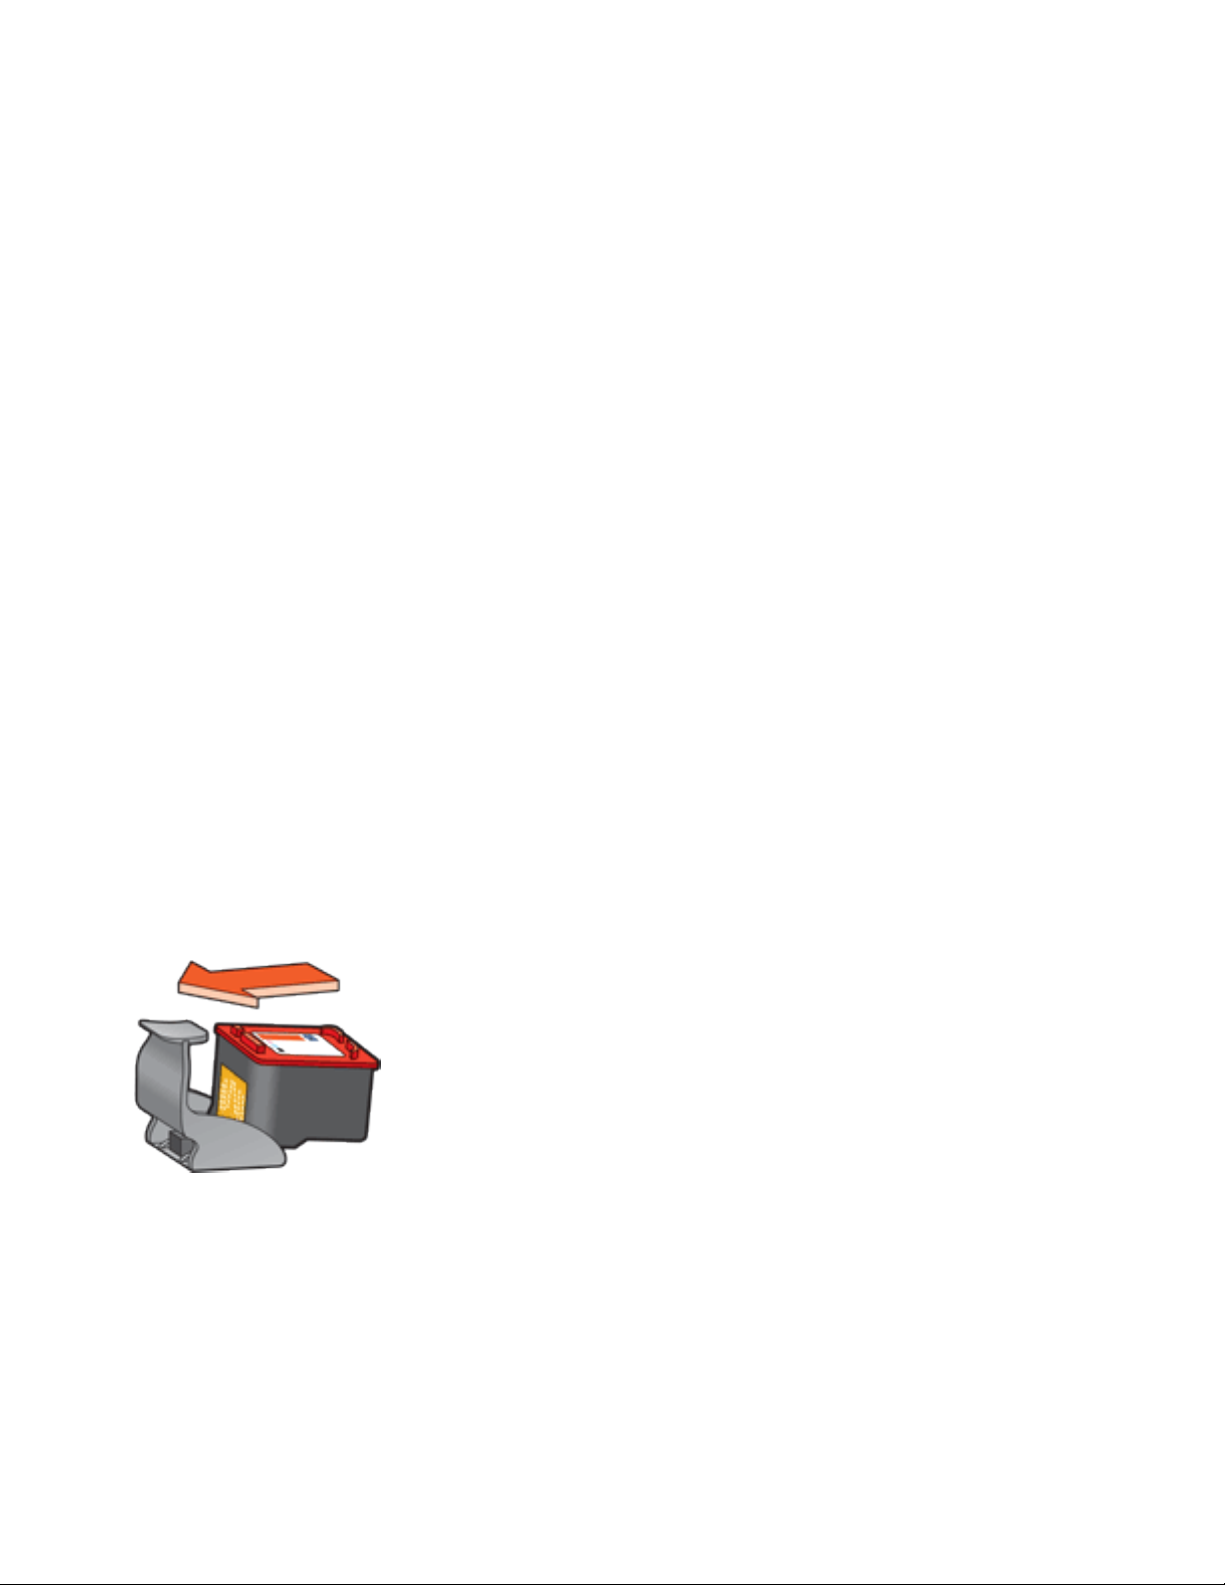
5. Slide the print cartridge out of the print cartridge cradle.
6. Remove the replacement print cartridge from its packaging and carefully
Page 13
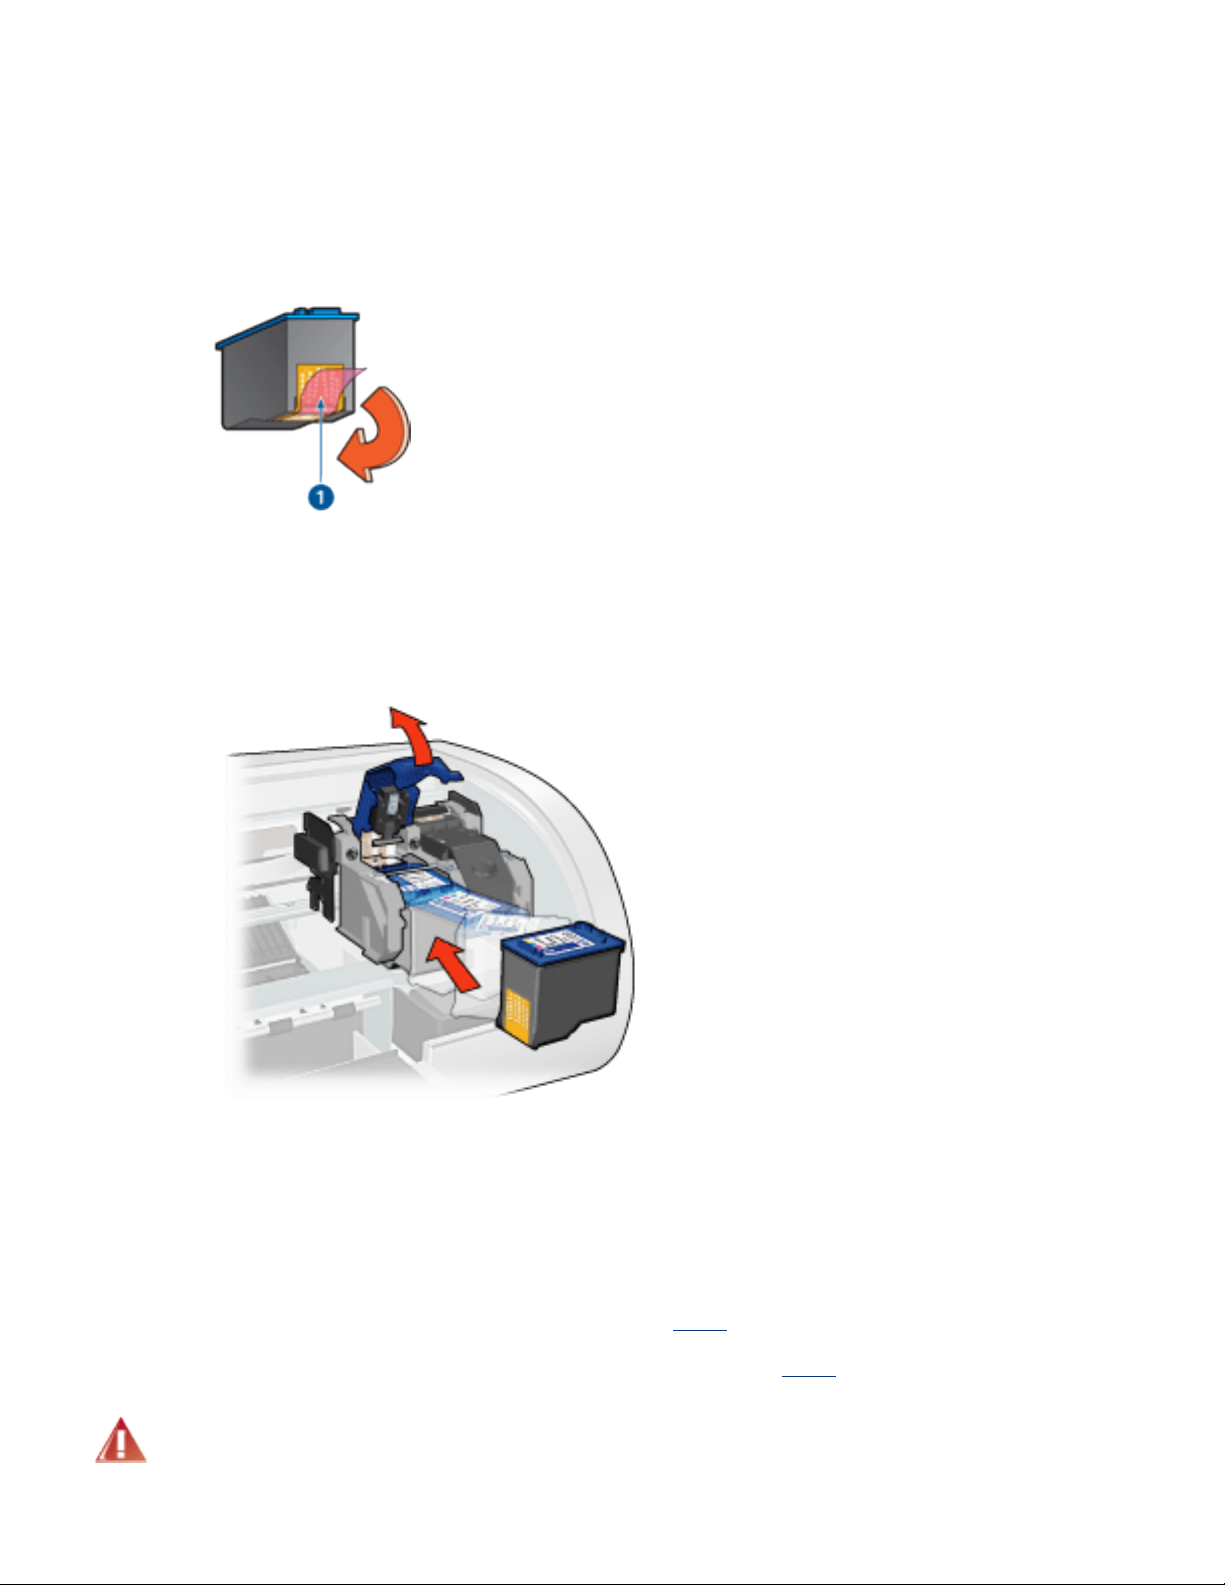
remove the plastic tape.
Caution! Do not touch the print cartridge ink nozzles or copper
contacts. Touching these parts will result in clogs, ink failure, and
bad electrical connections. Do not remove the copper strips. They
are required electrical contacts.
1. remove plastic tape
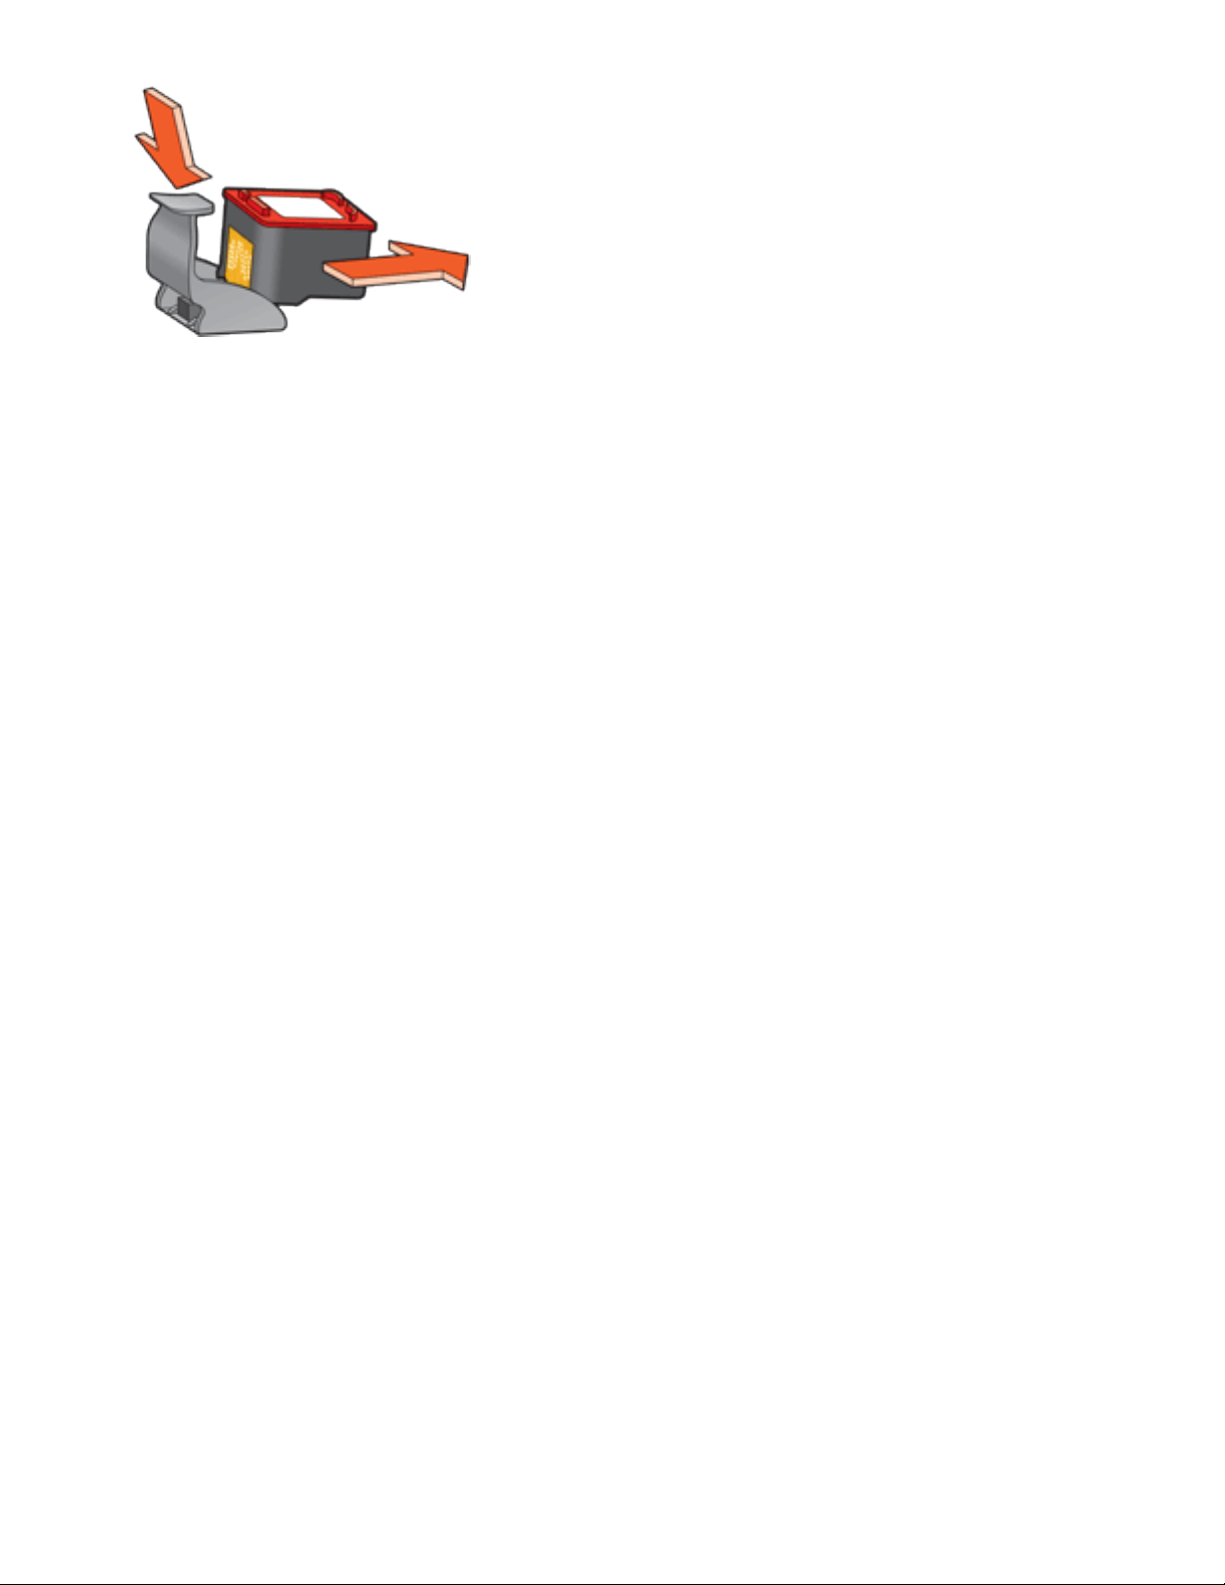
7. Hold the print cartridge so that the copper strip is on the bottom and facing
toward the printer, then slide the print cartridge into the cradle as shown.
8. Push down on the print cartridge latch until it snaps closed.
9. Close the top cover.
The printer automatically prints a calibration page.
For information on storing print cartridges, click here.
For information on recycling empty print cartridges, click
Warning! Keep both new and used print cartridges out of the reach
of children.
here.
Page 14
print cartridges
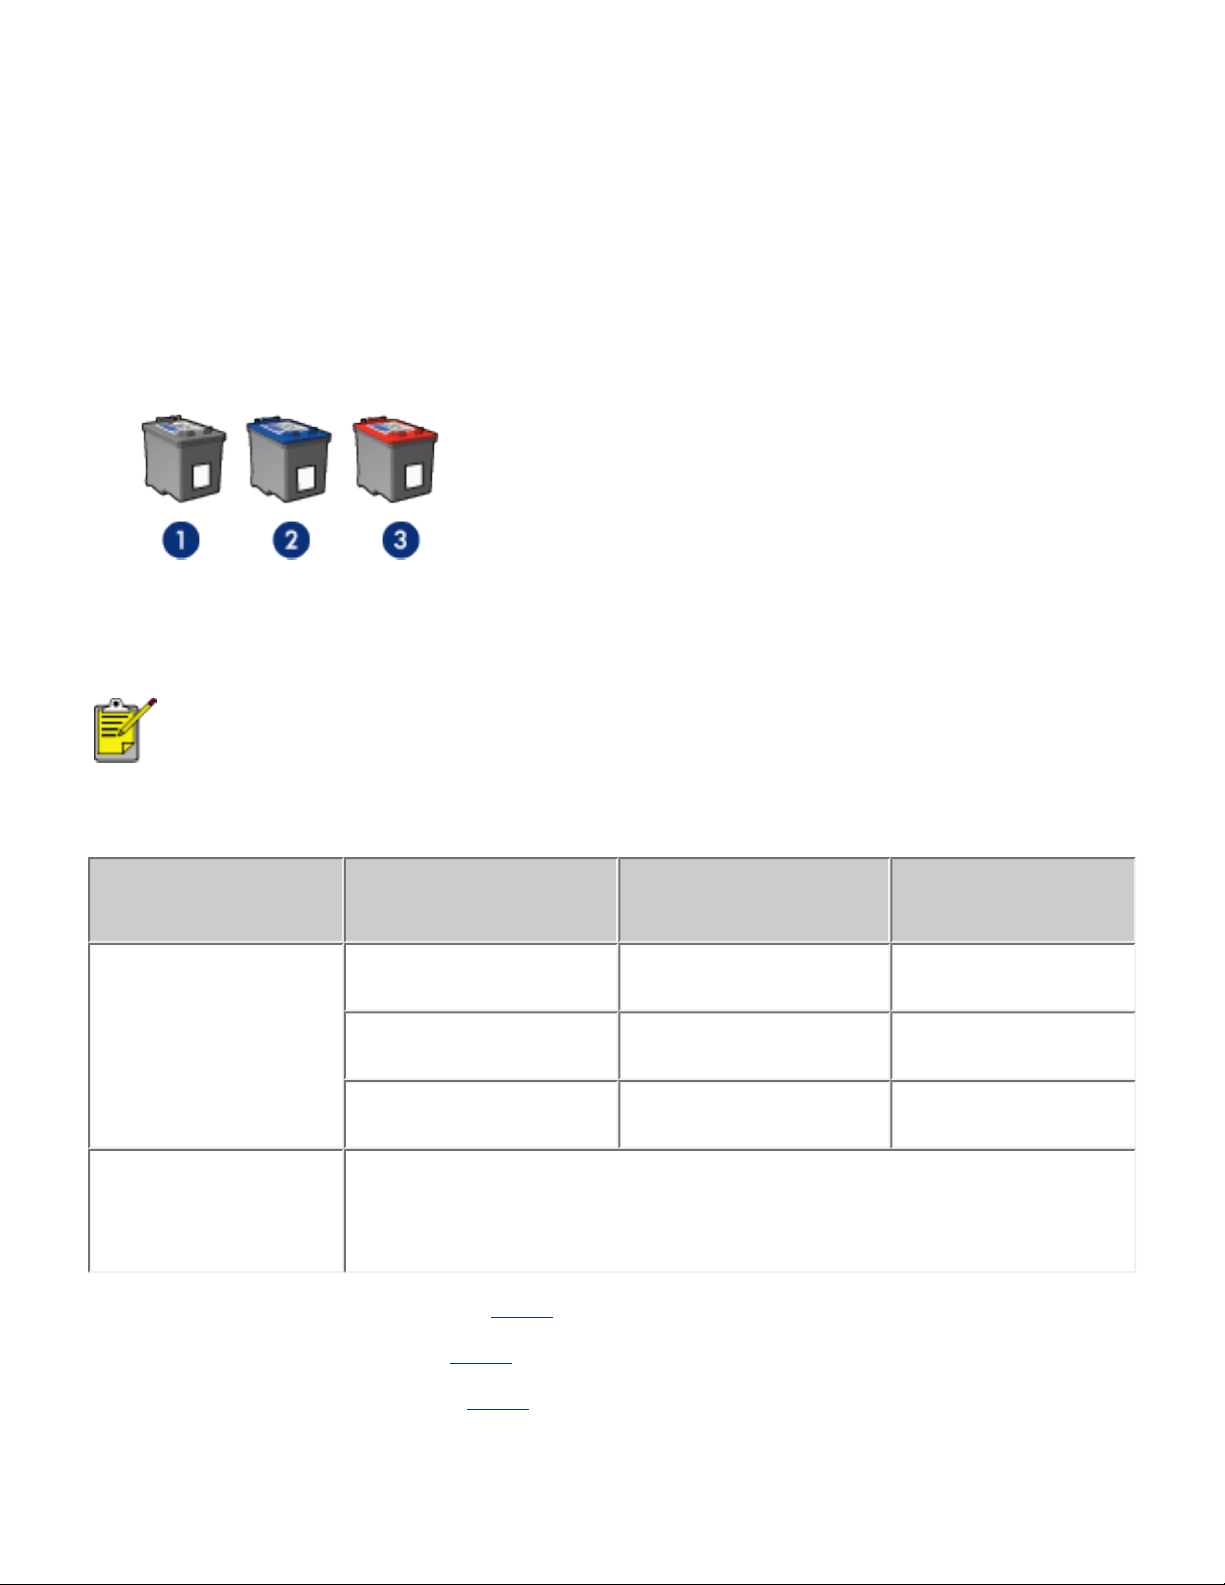
These print cartridges can be used with the printer.
● black print cartridge
● tri-color print cartridge
● photo print cartridge
1. black print cartridge 2. tri-color print cartridge 3. photo print cartridge
Not all print cartridges may be packaged with your printer.
All print cartridges are not available in all countries/
regions.
print cartridge selection
printer model print cartridge
black
HP Deskjet
5100 Series
(except HP
Deskjet 5168)
HP Deskjet
5168
Please refer to the graphic instructions located under the
printer cover, or the hardcopy reference guide that was
included with your printer.
For installation instructions, click
For storage instructions, click
For recycling instructions, click
tri-color
photo
here .
here .
here .
selection
number
56
57
58
product
number
c6656
c6657
c6658
Page 15

For print cartridge ink capacity, see the information included in the
print cartridge packaging.
For great performance from your HP printer, use only genuine, factory-filled HP print
cartridges.
Caution! Damage that is directly attributable to modified or refilled
HP print cartridges is specifically excluded from the HP printer's
warranty coverage.
Page 16
maintaining print cartridges
The following tips will help maintain HP print cartridges and ensure consistent print
quality:
● Keep all print cartridges in their sealed packages until they are needed. Print
cartridges should be stored at room temperatures (15-35 degrees C or 59-95
degrees F).
● Do not remove the plastic tape covering the ink nozzles until you are ready to
install the print cartridge in the printer. If the plastic tape has been removed
from the print cartridge, do not attempt to reattach it. Reattaching the tape
damages the print cartridge.
storing print cartridges
When print cartridges are removed from the printer, store them in a print cartridge
protector or an airtight plastic container.
A print cartridge protector comes with the photo print cartridge. If you store the print
cartridge in an airtight plastic container, make sure that the ink nozzles face down
but are not in contact with the container.
inserting the print cartridge into the print cartridge protector
Slide the print cartridge at a slight angle into the protector, and snap it securely in
place.
removing the print cartridge from the print cartridge protector
Press down and back on the top of the protector to release the cartridge. Slide the
cartridge out of the protector.
Page 17
Caution! Do not drop the print cartridge. Dropping the print cartridge
may damage it.
Page 18

print cartridge recovery
Customers interested in recycling their genuine HP print cartridges can participate in
HP's empty print cartridge return and recycle program. HP offers this program in
more countries/regions than any other print cartridge manufacturer in the world. This
program is provided as a free service to HP customers as an environmentally sound
solution for these products at end-of-life. It is not available in all countries/regions.
To participate, simply request postage-paid return envelopes or bulk boxes via the
Web at www.hp.com/recycle.
Because HP's unique recycling processes are very sensitive to material
contamination, we cannot take back and recycle cartridges from other manufacturers.
The end products of the recycling process are used in the manufacture of new
products, and HP must ensure the composition of the material is consistent. To do
that, we recycle only HP original cartridges. This program does not extend to refilled
cartridges.
Returned cartridges are separated for purification into raw materials for use in other
industries to manufacture new products. Examples of products made from recycled
HP print cartridge materials include automobile parts, trays used in microchip
fabrication processes, copper wire, steel plates, and the precious materials used in
electronics. Depending on the model, HP is able to recycle up to 65% of the print
cartridge by weight. The remaining parts that cannot be recycled (ink, foam, and
composite parts) are disposed of in an environmentally responsible manner.
Page 19

print settings
The printer is controlled by software installed on your computer. Use the printer
software, known as the printer driver, to change the print settings for a document.
To change the print settings, open the Printer Properties dialog box.
displaying the printer properties dialog box
Follow these steps to display the Printer Properties dialog box:
1. Open the file you want to print.
2. Click File > Print, then select Properties. The Printer Properties dialog box
appears.
The path to the Printer Properties dialog box may vary depending
on the software program.
using the printer properties dialog box
The Printer Properties dialog box has several tools that make it easy to use.
buttons and menus
The Printer Properties dialog box has the following features:
Page 20
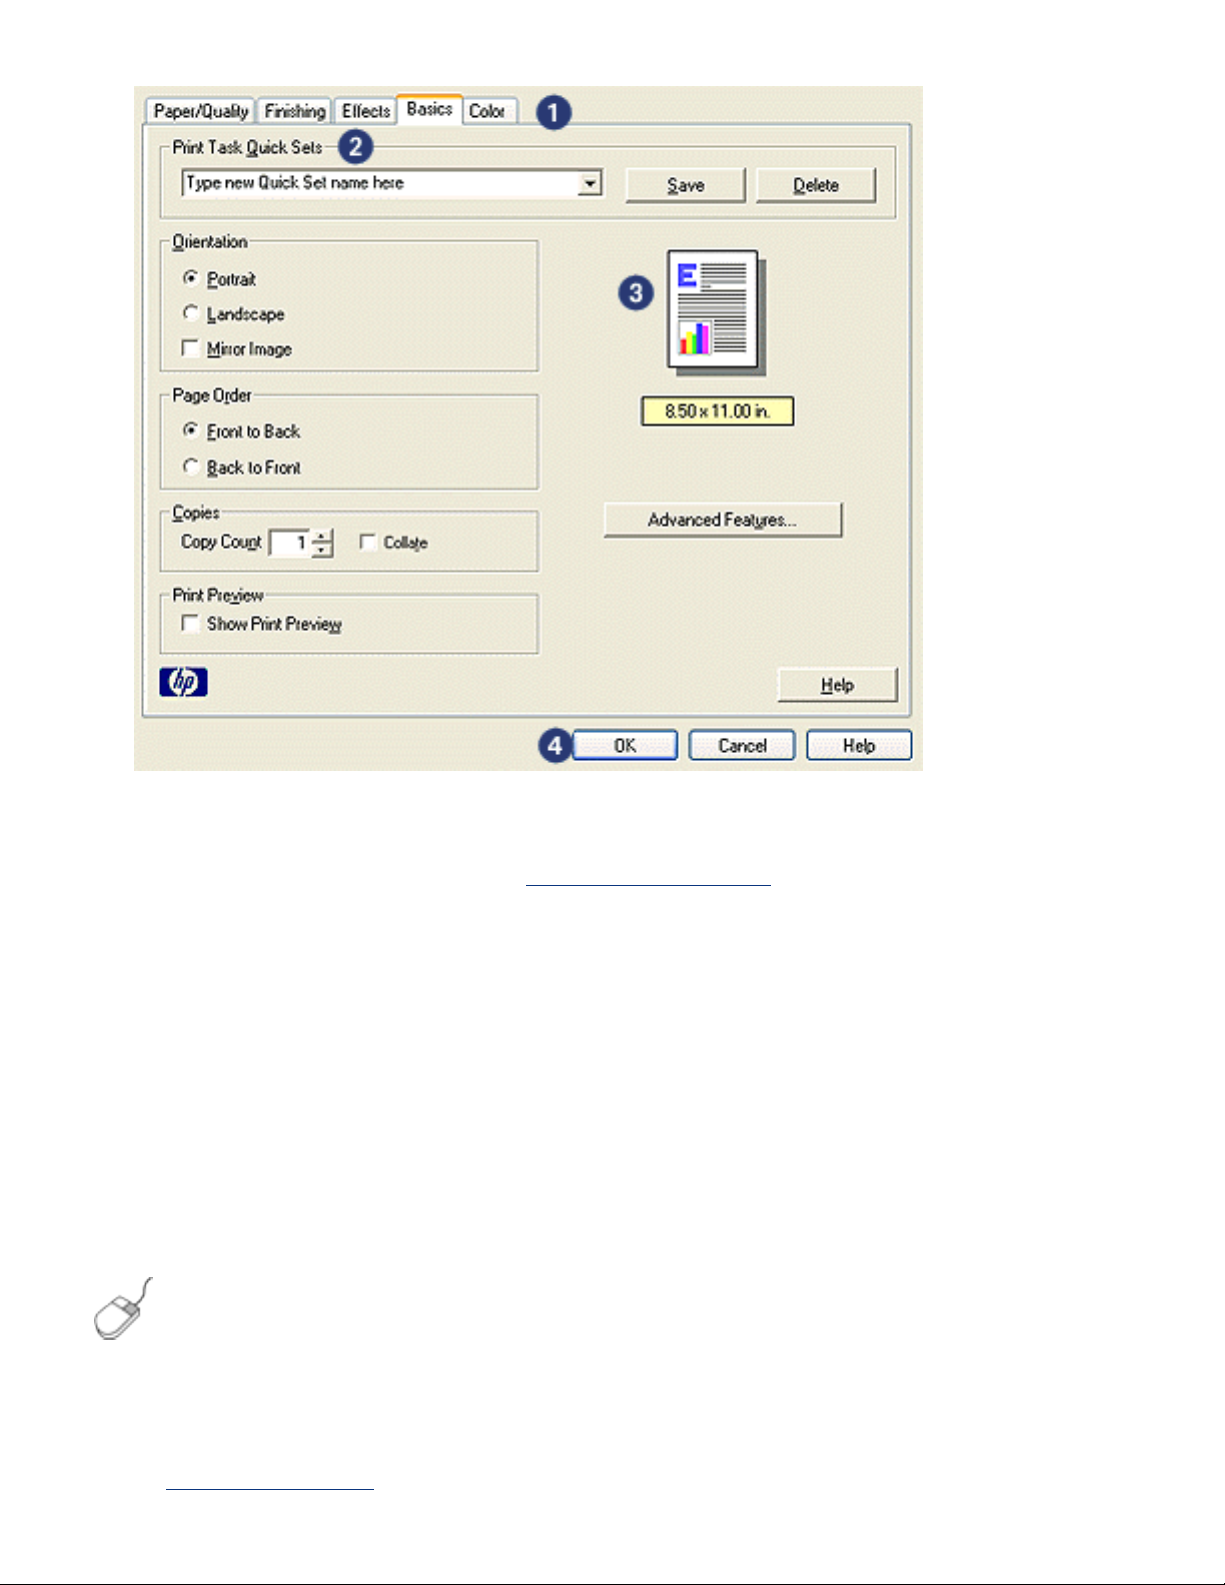
1. Tabs: Click a tab to see its contents.
2. Print Task Quick Sets: See
print task quick sets.
3. Preview: Shows how changes to the print settings affect the printout.
4. Buttons:
❍ OK: Saves and applies changes.
❍ Cancel: Closes the dialog box without saving the new settings.
❍ Help: Offers instructions for using the What's This? help feature.
An Apply button may also appear. The Apply button saves changes to the
settings without closing the dialog box.
To find more information about options on each tab screen, point to
an option and click the right mouse button to display the What's
This? dialog box. Click What's This? to view more information about
the selected item.
tabs
● paper/quality tab
Page 21

● finishing tab
● effects tab
● basics tab
● color tab
Printer features, and instructions on how to use them, are subject
to change. This document was released for publishing before all of
the printer features were determined.
Page 22
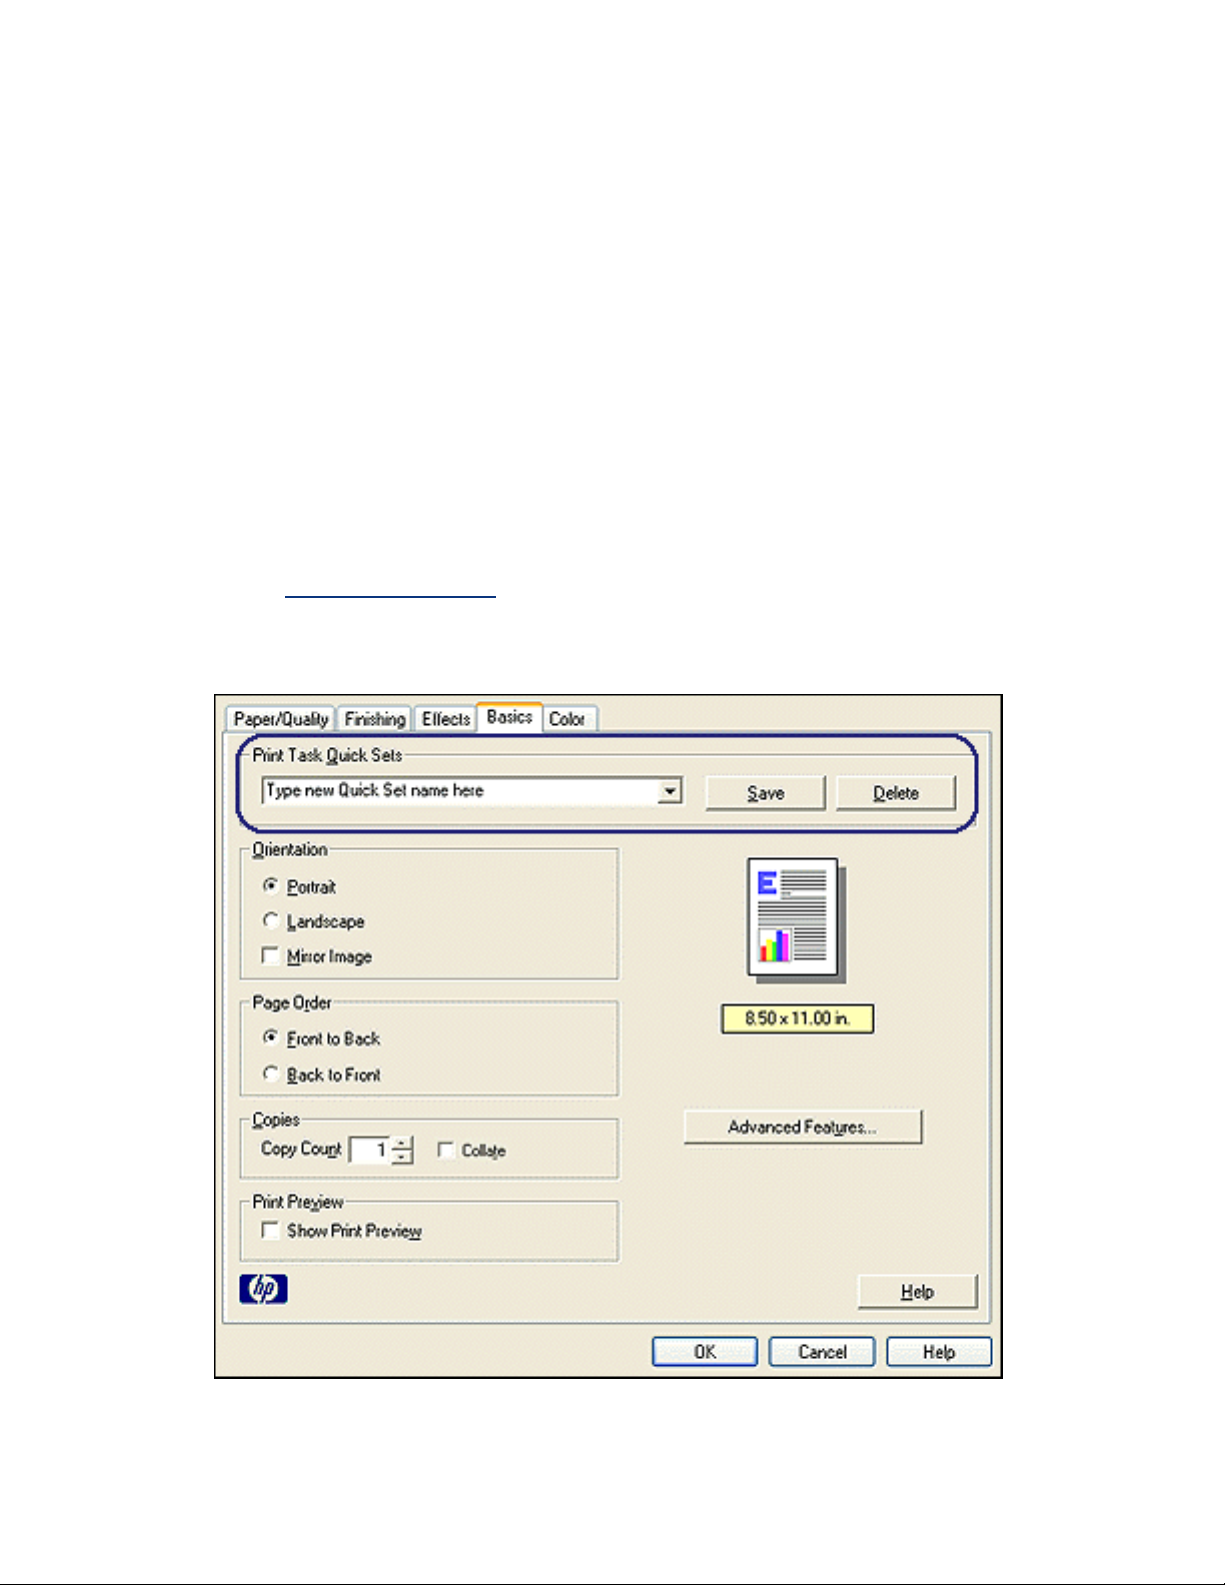
print task quick sets
Use print task quick sets to print with or save print settings you use often.
For example, if you frequently print envelopes, you can create a print task that
contains the paper size, print quality, and orientation setting you normally use for
envelopes. After creating the print task, simply select it when printing envelopes
rather that setting each of the print settings separately.
Create your own print task or use the specially designed print tasks available in the
Print Task Quick Sets drop-down list.
using a print task quick set
Follow these steps to use a print task quick set:
1. Open the
2. Select the print task you want to use from the drop-down list.
Printer Properties dialog box.
3. Click OK.
Page 23
To restore default print settings, select Default Print Settings from
the Print Task Quick Sets drop-down list, and click OK.
creating a print task quick set
Follow these steps to create a print task quick set:
1. Open the
Printer Properties dialog box.
2. Select the options you want to include in the new print task.
3. Enter a name for the new print task in the Print Task Quick Sets drop-down
list, then click Save.
The print task quick set is added to the drop-down list.
If you add more options to the print task, you must rename the
print task, then click OK.
deleting a print task quick set
Follow these steps to delete a print task quick set:
Page 24

1. Open the Printer Properties dialog box.
2. Select the print task you want to delete from the drop-down list, then click
Delete.
Some print task quick sets cannot be deleted.
Page 25
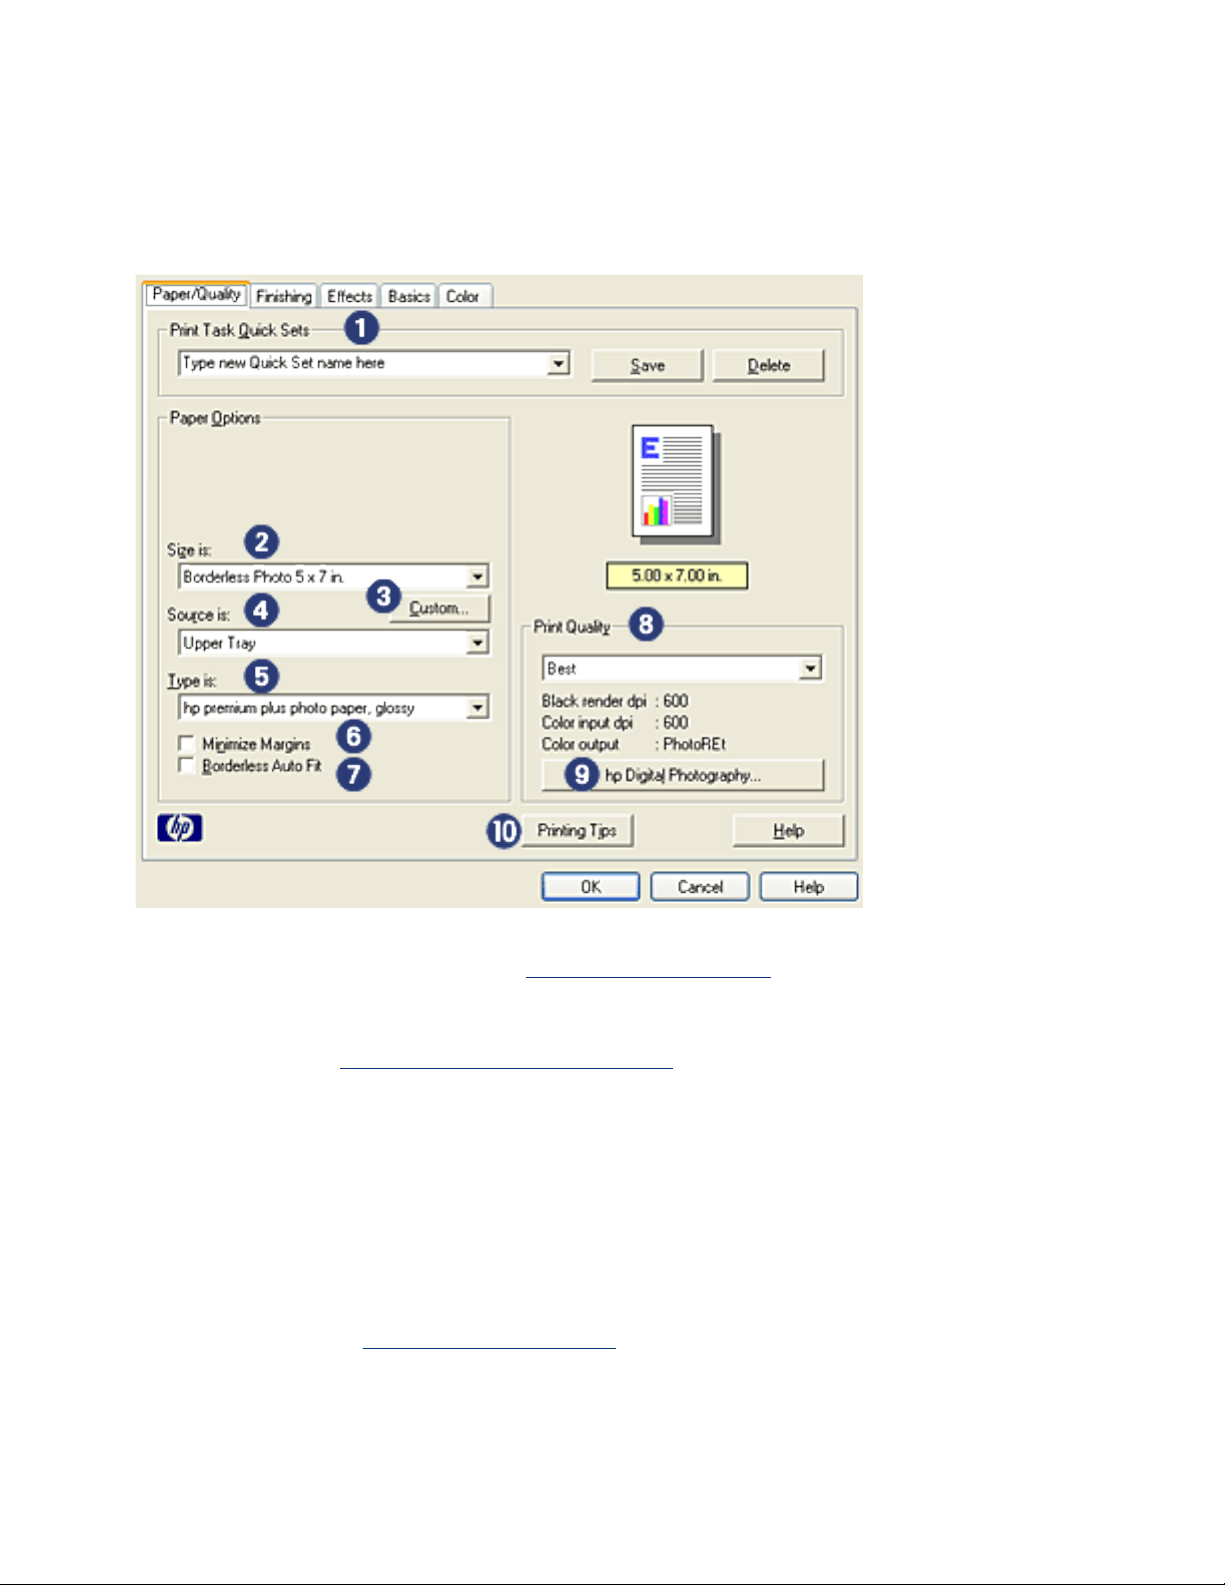
paper/quality tab
The Paper/Quality tab allows you to set these options:
1. Print Task Quick Sets: See
2. Size is: Size of paper used.
3. Custom: See
4. Source is: Select the tray from which you want to print. Select Upper Tray to
print from the printer's In tray.
5. Type is: Type of paper used.
6. Minimize Margins: Select to print closer to the bottom edge of the page. This
feature may cause ink to smear on certain paper types.
7. Borderless Auto Fit: Select to fit the printed image across the entire page
when printing a
8. Print Quality: There are five print quality options: FastDraft, Fast Normal,
Normal, Best, and Maximum dpi. As print quality increases from FastDraft to
Maximum dpi, the quality of the printed image improves and the print speed
decreases. FastDraft uses the least amount of ink. Maximum dpi mode uses
setting a custom paper size.
borderless document on certain paper types.
print task quick sets.
Page 26

the most amount of ink and requires a large amount of disk space.
9. hp Digital Photography: See printing digital photographs.
10. Printing Tips: Printing ideas.
Page 27

setting a custom paper size
Use the Custom Paper Size dialog box to print on a special paper size.
defining a custom paper size
Follow these steps to define a custom paper size:
1. Open the
2. Click the Paper/Quality tab.
Printer Properties dialog box.
3. Click the Custom button.
The Custom Paper Size dialog box is displayed.
Page 28
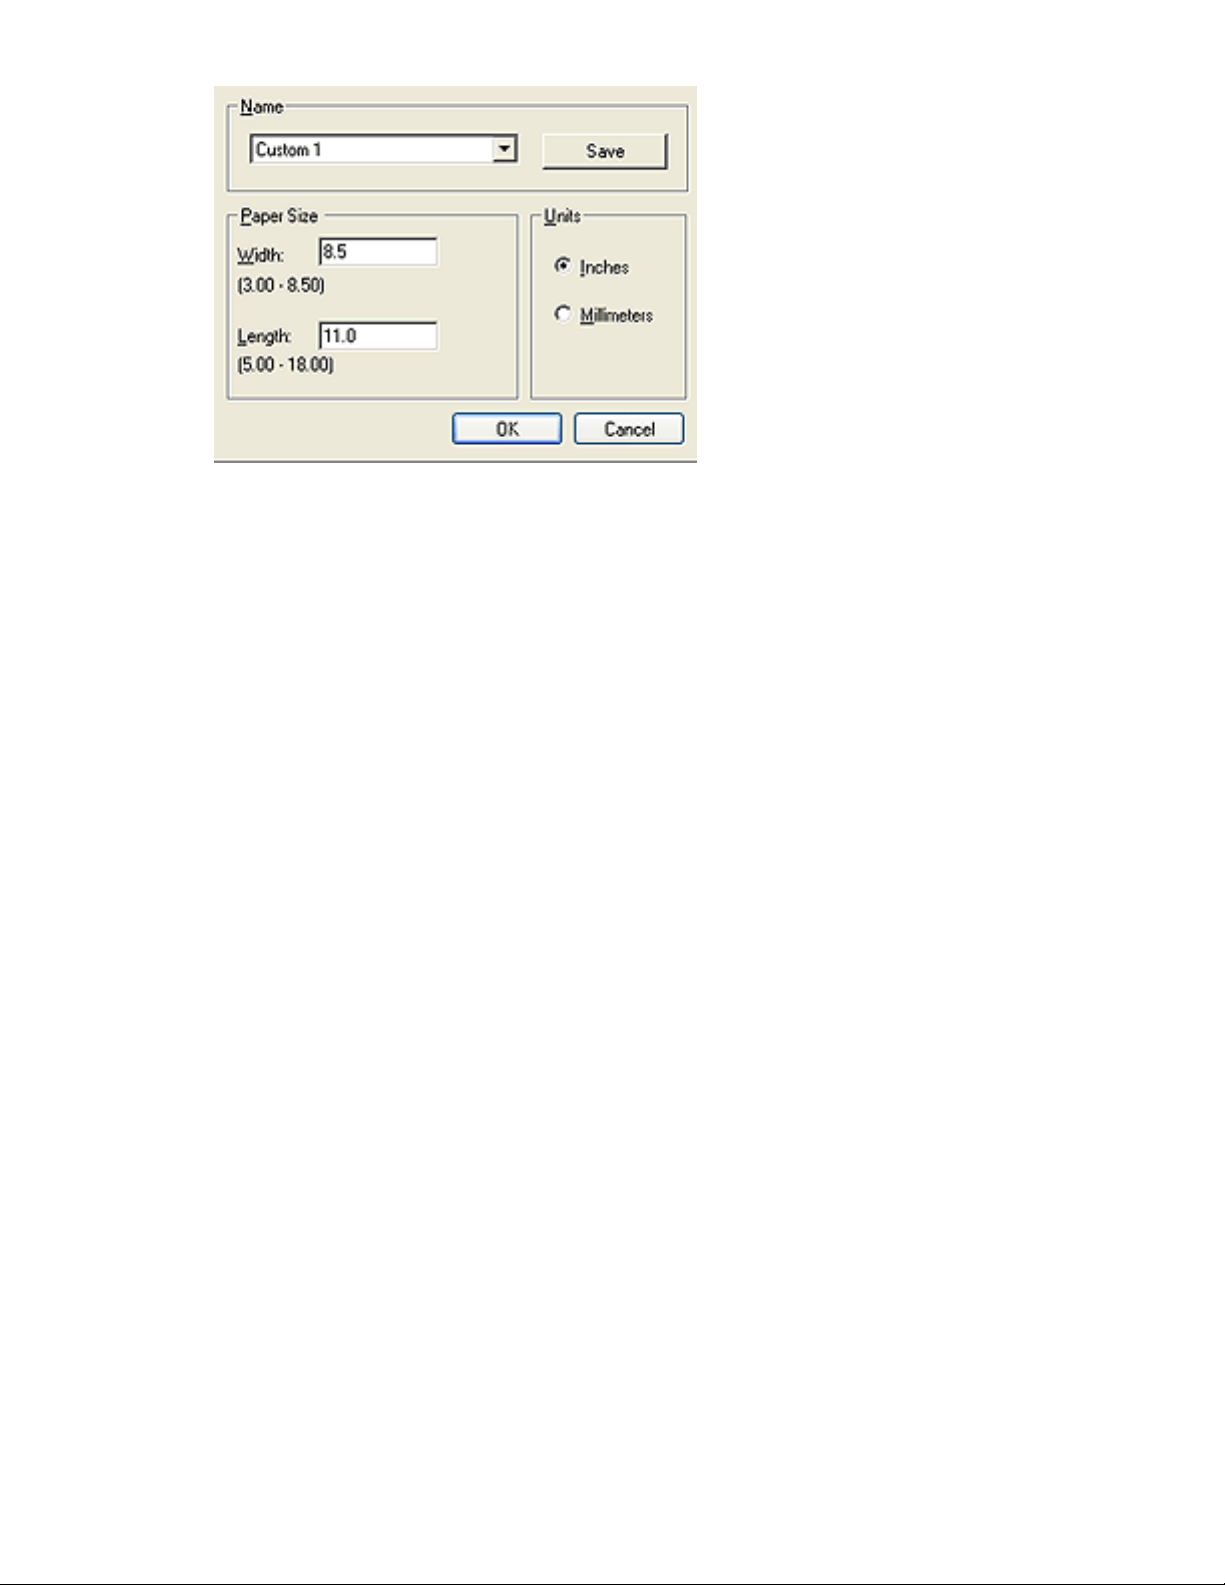
4. Select a custom paper size name from the Name drop-down list.
5. Enter the paper dimensions in the Width and Length boxes.
The minimum and maximum paper dimensions appear beneath each of the
boxes.
6. Select the unit of measurement: Inches or Millimeters.
7. Click Save to save the custom paper size.
You can save up to five custom paper sizes.
8. Click OK to exit the Custom Paper Size dialog box.
Page 29

printing digital photographs
The printer has several features to enhance the quality of digital photographs.
opening the hp digital photography options dialog box
Follow these steps to open the hp Digital Photography Options dialog box:
1. Open the
2. Click the Paper/Quality tab, then click the hp Digital Photography button.
Printer Properties dialog box.
using the hp digital photography options dialog box
Use the hp Digital Photography Options dialog box to set these options:
1. Red Eye Removal: Click On to remove or reduce red-eye from the
photograph.
2. Contrast Enhancement: Adjust contrast to preference. Click Automatic to
allow the printer driver to automatically balance the contrast.
3. Digital Flash: Lighten dark images. Click Automatic to allow the printer driver
to automatically balance lightness and darkness.
4. SmartFocus: Click On to allow the printer driver to automatically focus
Page 30

images.
5. Sharpness: Adjust image sharpness to preference. Click Automatic to allow
the printer driver to automatically sharpen the image.
6. Smoothing: Adjust distortion to preference. Click Automatic to allow the
printer driver to automatically smooth the image.
Page 31

finishing tab
The Finishing tab allows you to set these options:
1. Print Task Quick Sets: See
2. Print on Both Sides: See
3. Booklet Layout is: See
4. Pages per Sheet: See
5. Poster Printing: Select the number of pages you want your poster printed
across to determine the size of your poster.
6. Rotate By 180 Degrees: Rotates the printed image 180 degrees.
printing multiple pages on a single sheet of paper.
print task quick sets.
two-sided printing.
printing a booklet.
Page 32

two-sided printing
Use one of the following methods to print two-sided documents:
● manual two-sided printing
● automatic two-sided printing (duplexing)
manual two-sided printing
Use manual two-sided printing if:
● The Two-Sided Printing Accessory is not attached to the printer.
● You want to print on a media type not supported by the Two-Sided Printing
Accessory.
printing instructions
Follow these steps to print a two-sided document manually:
1. Open the
Printer Properties dialog box.
2. Select the Finishing tab.
Page 33

3. Select Print on Both Sides.
4. Deselect the Automatic checkbox, then do one of the following:
❍ For book binding: Verify that Flip Pages Up is not selected.
1. landscape 2. portrait
❍ For tablet binding: Select Flip Pages Up.
Page 34

1. landscape 2. portrait
5. Select any other desired print settings, then click OK.
The printer prints the odd-numbered pages first.
6. Once the odd-numbered pages have printed, reload the paper, with the printed
side facing up, according to the binding type and orientation selected:
❍ Book binding with portrait orientation: Reload the paper as shown below:
❍ Book binding with landscape orientation: Reload the paper as shown below:
❍ Tablet binding with portrait orientation: Reload the paper as shown below:
Page 35

❍ Tablet binding with landscape orientation: Reload the paper as shown below:
7. Click Continue to print the even-numbered pages.
automatic two-sided printing (requires accessory)
To print a two-sided document automatically, the Two-Sided Printing Accessory
(duplexer) must be attached to the printer.
The Two-Sided Printing Accessory (duplexer) only supports certain media types. For a
list of supported media types, see the documentation that came with the accessory.
manual two-sided printing to print on an unsupported media type.
Use
printing instructions
Follow these steps to print a two-sided document automatically:
1. Open the
Select the Finishing tab.
Printer Properties dialog box.
Page 36

2. Select Print on Both Sides.
3. Verify that the Automatic checkbox is selected.
4. Do one of the following:
❍ To automatically resize each page to match the document's onscreen layout:
Select Preserve Layout.
Not selecting this option may result in unwanted page breaks.
❍ To not resize each page to fit two-sided margins: Verify that Preserve Layout
is not selected.
5. Select a binding option:
❍ For book binding: Verify that Flip Pages Up is not selected.
1. landscape 2. portrait
Page 37

❍ For tablet binding: Select Flip Pages Up.
1. landscape 2. portrait
6. Select any other desired print settings, then click OK.
After the first side of the page is printed, the printer pauses while the ink dries. Once
the ink is dry, the paper is pulled back into the duplexer and the reverse side of the
page is printed.
Do not remove the paper from the duplexer until both sides of the
page have been printed.
Page 38

two-sided printing accessory (duplexer)
The duplexer is a special hardware device that enables the printer to automatically
print on both sides of a page.
Using a duplexer with your printer has several advantages. It allows you to:
● Print on both sides of a page without manually reloading the page.
● Print long documents quickly and efficiently.
● Use less paper by printing on both sides of paper sheets.
● Create professional-looking brochures, reports, newsletters, and other special
items.
If the duplexer is not packaged with your printer, it can be
purchased separately from
an authorized HP dealer.
The duplexer is not available in all countries/regions.
installing the duplexer
Follow these steps to attach the duplexer to your printer:
1. Push the two latch handles on the printer's Rear Access Door toward each
other, then remove the door.
Page 39

Do not discard the Rear Access Door. In order to print, the
duplexer or the Rear Access Door must be attached to the
printer.
2. Insert the duplexer in the back of the printer until both sides snap into place.
Do not press the buttons on either side of the duplexer when
installing it in the printer. Use the buttons only when
removing the duplexer from the printer.
printing with the duplexer
For instructions on printing a two-sided document with the duplexer, click here.
For instructions on making automatic two-sided printing the default print setting for
your printer, click
here.
supported media types
The duplexer only works with certain media types. For a list of supported media, see
the specifications in the documentation that came with the duplexer.
Page 40

changing default settings
Use the taskbar icon to change the printer's default print settings. The default print
settings apply to all documents printed by the printer.
1. taskbar icon
using the taskbar icon shortcut menu
Follow these steps to change the printer's default settings:
1. Click the taskbar icon.
The Printer Properties dialog box appears.
2. Select the options you want to use as the default settings.
3. Click OK.
A dialog box appears stating that the new settings will be used every time you
print. If you do not want to see this dialog box again, select Don't show me
this message again.
4. Click OK to save the new default print settings.
Page 41

printing a booklet
Booklet printing automatically arranges and resizes the pages of a document so when
the document is folded into a booklet, the page order is correct.
For the appropriate instructions, select one of the following topics:
● printing a booklet
● printing a booklet using the two-sided printing accessory
printing a booklet
Follow these steps to print a booklet:
1. Open the
2. Select the Finishing tab.
Printer Properties dialog box.
Page 42

3. Select Print on Both Sides.
4. Verify that Automatic is not selected.
5. Select a binding option in the Booklet Layout is drop-down list:
❍ Right Edge Binding: Places the binding on the right side of the booklet.
❍ Left Edge Binding: Places the binding on the left side of the booklet.
6. Do one of the following:
❍ To leave every other page of the booklet blank, select Print On One Side.
Page 43

❍ To print on all pages in the booklet, leave Print On One Side unchecked.
7. Select any other desired print settings, then click OK.
8. When prompted, reload the paper in the In tray as shown below.
9. Click Continue to finish printing the booklet.
printing a booklet using the two-sided printing accessory
Follow these steps to print a booklet using the Two-Sided Printing Accessory:
The Two-Sided Printing Accessory is optional. For more information,
click
here.
1. Open the Printer Properties dialog box.
2. Select the Finishing tab.
Page 44

3. Select Print on Both Sides.
4. Select Automatic.
5. Select Preserve Layout.
6. Select a binding option in the Booklet Layout is drop-down list:
❍ Right Edge Binding: Places the binding on the right side of the booklet.
❍ Left Edge Binding: Places the binding on the left side of the booklet.
7. Do one of the following:
Page 45

❍ To leave every other page of the booklet blank, select Print On One Side.
❍ To print on all pages in the booklet, leave Print On One Side unchecked.
8. Select any other desired print settings, then click OK.
Page 46

printing multiple pages on a single sheet of paper
The printer software allows you to print multiple pages of a document on a single
sheet of paper. The printer software automatically resizes the document text and
images to fit on the printed page.
Follow these steps to print multiple pages of a document on a single sheet of paper:
1. Open the
2. Click the Finishing tab.
Printer Properties dialog box.
3. From the Pages Per Sheet drop-down list, select the number of pages you want
to appear on each sheet of paper.
4. If you want a border to appear around each page image printed on the sheet
of paper, click the Print Page Borders checkbox.
5. Select a layout for each sheet of paper from the Page Order Is drop-down list.
6. Select any other desired print settings, then click OK.
Page 47

effects tab
The Effects tab allows you to set the following options:
1. Print Task Quick Sets: See
2. Print Document On: Prints a document on a paper size different than the
paper size for which it is formatted. Select the target paper size from the dropdown list.
3. Scale to Fit: Automatically resizes the printed image to fit on the paper size
selected in the Print Document On drop-down list.
4. % of Normal Size: Specify the percentage to which you want to reduce or
enlarge the printed image. For example, enter 70 to reduce the printed image
to 70 percent of its normal size.
5. Watermarks: See
watermarks.
print task quick sets.
Page 48

watermarks
Watermarks appear as background printing on documents.
applying an existing watermark to a document
Follow these steps to apply an existing watermark to a document:
1. Open the
Printer Properties dialog box.
2. Click the Effects tab.
3. Select a watermark from the Watermarks drop-down list.
If you do not want to use one of the listed watermarks,
create a new
watermark.
4. Do one of the following:
❍ If you want the watermark to appear on the first page only, select First Page
Only.
❍ If you want the watermark to appear on all printed pages, leave First Page
Page 49

Only unchecked.
5. Print the document according to the instructions for the paper type.
creating or changing a watermark
Follow these steps to create or change a watermark:
1. Open the
Printer Properties dialog box.
2. Click the Effects tab.
3. Click the Edit button.
The Watermark Details dialog box appears.
4. Do one of the following:
❍ Click the New button, or
❍ Select an existing watermark to change.
5. Enter the watermark message, message angle, and font attributes.
6. After you have set the watermark details, click OK.
For instructions on applying watermarks, click
here.
Page 50

To find more information about options on each tab screen, point to
an option and click the right mouse button to display the What's
This? dialog box. Click What's This? to view more information about
the selected item.
Page 51

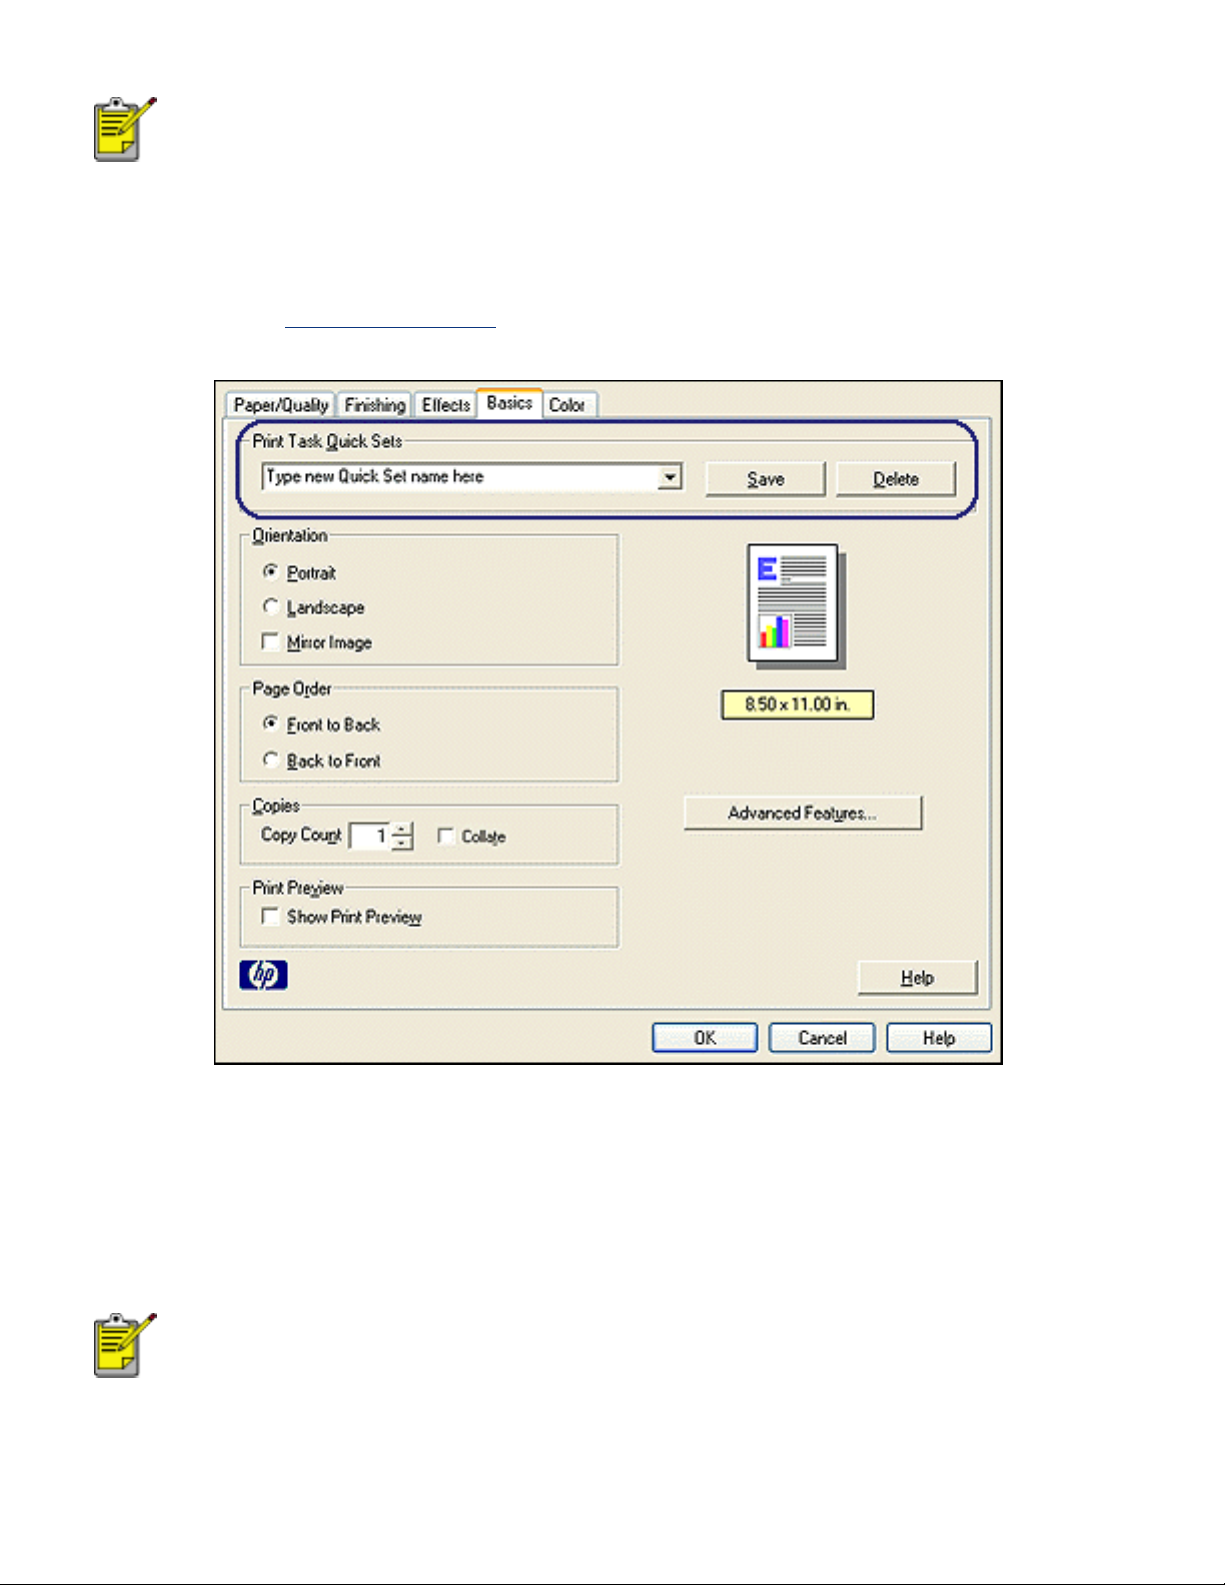
basics tab
The Basics tab allows you to set the following options:
1. Print Task Quick Sets: See
print task quick sets.
2. Orientation: Specify the page layout:
❍ Portrait: The printed page is longer than it is wide.
❍ Landscape: The printed page is wider than it is long.
❍ Mirror Image: Reverses the printed image from left to right.
3. Page Order: Select one of the following:
❍ Front to Back: First page will be on top when the document is finished
printing.
❍ Back to Front: Last page will be on top when the document is finished
printing.
4. Copies: Use to print multiple copies of a document.
❍ Copy Count: Number of copies printed.
Page 52

❍ Collate: Prints each copy of the document in its entirety when printing
multiple copies.
5. Print Preview: Select to view the layout of a document before it prints.
6. Advanced Features: See advanced features.
Page 53

advanced features
Printing photographs, transparencies, or documents with graphics may require you to
set options on the Advanced Features dialog box.
opening the advanced features dialog box
Follow these steps to open the Advanced Features dialog box:
1. Open the
2. Click the Basics tab, then click the Advanced Features button.
Printer Properties dialog box.
using the advanced features dialog box
Use the Advanced Features dialog box to set these options:
1. Ink Volume: Adjusts the amount of ink printed on a page. Reducing the ink
volume reduces the color quality.
2. Dry Time: Provides extra drying time for slow-drying printouts.
3. Low Memory Mode: Allows a document to be printed from a computer that
does not have enough memory or disk space to print the document under
normal conditions. Using this option may reduce the quality of the printout.
The Maximum dpi print quality mode is not available when the printer is in Low
Page 54

Memory Mode.
Page 55

color tab
The Color tab allows you to set these options:
1. Print Task Quick Sets: See
print task quick sets.
2. Print in Grayscale: Prints in shades of gray.
❍ High Quality: Uses the tri-color print cartridge and/or photo print
cartridge to print high-quality grayscale.
❍ Black Print Cartridge Only: Uses the black print cartridge to print
grayscale.
❍ Optimize For Photocopy or Fax: Uses the black print cartridge to
print grayscale suitable for photocopying and faxing.
3. Saturation: Adjusts the intensity of printed colors.
4. Brightness: Adjusts the lightness or darkness of printed colors.
5. Color Tone: Adjusts the warmth or coolness of printed colors.
6. Color Space: See digital photography technologies.
Page 56

digital photography technologies
The printer software offers several technical features for printing digital photgraphs.
● PhotoREt
● 4800 x 1200 optimized dpi
● Exif Print
● Six-ink printing
● Color spaces
PhotoREt printing
PhotoREt offers the best combination of print speed and quality for your image.
Follow these steps to print with PhotoREt technology:
1. Open the
Printer Properties dialog box.
2. Select the Paper/Quality tab.
3. Select Best from the Print Quality drop-down list.
4. Select any other desired
print settings, then click OK.
4800 x 1200 optimized dpi
4800 x 1200 optimized dpi is the highest quality resolution for this printer. When
4800 x 1200 optimized dpi is selected in the printer driver, the tri-color printcartridge
prints in the 4800 x 1200 optimized dpi mode. If a photo print cartridge is also
installed, the print quality is enhanced. A photo print cartridge may be purchased
separately if it is not included with your printer.
Follow these steps to print in 4800 x 1200 optimized dpi mode:
1. Open the
2. Select the Paper/Quality tab.
Printer Properties dialog box.
3. Select the appropriate photo paper type from the Paper Type drop-down list.
4. Select Maximum dpi from the Print Quality drop-down list.
5. Select any other desired
print settings, then click OK.
printing Exif Print-enhanced photographs
Page 57

Exif Print (Exchangeable Image File Format 2.2) is an international digital imaging
standard that simplifies digital photography and enhances printed photographs. When
a photograph is taken with an Exif Print-enabled digital camera, Exif Print captures
information such as exposure time, type of flash, and color saturation, and stores it in
the image's file. The HP Deskjet printer software then uses this information to
automatically perform image specific enhancements, resulting in outstanding
photographs.
Printing Exif Print-enhanced photos requires:
● A digital camera that supports Exif Print
● Exif Print-enabled photo software
● HP Deskjet printer software that supports Exif Print
● Windows 98, 2000, Me, or XP
Follow these steps to print Exif Print-enhanced photographs:
1. Open the file you want to print using Exif Print-enabled photo software.
2. Open the Printer Properties dialog box.
3. Select the Paper/Quality tab.
4. Select the appropriate photo paper type from the Type is drop-down list.
5. Select Normal or Best from the Print Quality drop-down list.
6. Select any other desired
print settings, then click OK.
The printer software automatically optimizes the printed image.
six-ink color printing
Use six-ink color printing to enhance the quality of photographs.
For six-ink color printing, a photo and a tri-color print cartridge must beinstalled. A
photo print cartridge may be purchased separately if it is not includedwith your
product.
Follow these steps to print in six-ink color print mode:
1. Open the
Printer Properties dialog box.
2. Select the Paper/Quality tab.
3. Select the appropriate photo paper type from the Type is drop-down list.
4. Select Normal, Best, or Maximum dpi from the Print Quality drop-down list.
5. Select any other desired
print settings, then click OK.
Page 58

color space
Color space defines the range of colors that can be printed. The printer software
translates the colors of your document from their current color space to the color
space selected.
The following color spaces are available:
● sRGB/sYCC
● Adobe RGB
sRGB/sYCC
sRGB/sYCC is an appropriate color space for most print jobs. It is used for most Webbased documents and current imaging devices.
Follow these steps to use the sRGB/sYCC color space:
1. Open the
Printer Properties dialog box.
2. Select the Color tab.
3. Select sRGB/sYCC from the Color Space drop-down list.
4. Select any other desired
print settings, then click OK.
Adobe RGB
Adobe RGB is an emerging color space that offers more colors than sRGB/sYCC, but
which only works for images.
When printing from a professional application using Adobe RGB, turn off the color
management in the application and allow the printer software to manage the color
space.
Follow these steps to use the Adobe RGB color space:
1. Open the
2. Select the Paper/Quality tab, the select the following:
Printer Properties dialog box.
❍ An HP photo paper from the Type is drop-down list.
❍ Best or Maximum dpi from the Print Quality drop-down list.
3. Select the Color tab.
4. Select Adobe RGB from the Color Space drop-down list.
5. Select any other desired print settings, then click OK.
If the the Adobe RGB color space is used for an image which was created in another
color space, then printed colors may appear more vivid.
Page 59

printing a screen image
Use the HP Print Screen Utility to print the image displayed on your computer's
monitor.
configuring the hp print screen utility
Follow these steps to configure the HP Print Screen Utility:
1. Go to
printer utilities, then click print screen.
2. Select the following configuration options as desired:
❍ Unload/Load HP Print Screen: Activates or deactivates the utility.
❍ Start with Windows: Sets the utility to start when Windows is started.
❍ Capture screen: Prints the screen image.
❍ Orientation: Toggles between landscape and portrait mode.
3. Click OK.
printing instructions
Follow these steps to print a screen image:
1. Verify that the HP printer is your computer's default printer.
2. Load either Letter or A4 paper in the In tray.
3. Do one of the following:
❍ To print the entire desktop: Press the Print Screen key on the keyboard.
❍ To print only the active window: Press the Alt key and the Print Screen key
simultaneously.
Page 60

auto-on and auto-off feature
auto-on
Auto-on is a default feature of the printer. The printer automatically turns on when
you print a file.
auto-off
Enable the auto-off feature to place the printer in a low-power, energy-efficient mode
after it has been idle for 30 minutes.
Follow these steps to activate the auto-off feature:
1. Go to
2. Click Configure the Printer.
3. Click Configure.
4. Select Activate the Hardware Auto-off feature.
5. Click Apply, then click OK.
printer maintenance.
Page 61

getting started (hp deskjet 5150)
For an overview of the printer features and the optional Two-Sided Printing
Accessory, click
Click the appropriate topic below for a description of a printer feature:
● buttons and lights
● paper trays
● print cartridges
here.
● ink-backup mode
For a description of the optional Two-Sided Printing Accessory, click here.
Page 62

printer features
The HP printer has several features to make printing easier and more efficient.
buttons and lights
1.
paper trays
2.
print cartridges
1.
ink-backup mode
2.
Page 63

connectivity
1.
two-sided printing accessory (optional)
2.
Page 64

buttons and lights
Use the printer buttons to turn the printer on and off, cancel a print job, and restart a
job. The printer lights give you visual cues about the status of the printer.
1. print cancel button 2. print cartridge status light 3. resume button 4. power button
print cancel button
Pressing the Print Cancel button cancels the current print job.
print cartridge status symbol and light
The Print Cartridge Status light turns on or flashes when a print cartridge needs
service.
resume button and light
The Resume light flashes when an action is required such as loading paper or clearing
a paper jam. When the problem is solved, press the Resume button to continue
printing.
power button and light
The Power button turns the printer on and off. It may take a few seconds for the
printer to turn on after pressing the Power button.
The Power light flashes when the printer is processing.
Caution! Always use the Power button to turn the printer on and off.
Using a power strip, surge protector, or a wall-mounted switch to turn
Page 65

the printer on and off may cause printer failure.
Page 66

printer lights are on or flashing
what the lights indicate
The printer lights indicate the printer status.
1. power light 2. resume light 3. print cartridge status light
power light is flashing
the printer is preparing to print
The light stops flashing when the printer has received all data.
resume light is flashing
the printer may be out of paper
1. Place paper in the In tray.
2. Press the Resume button on the front of the printer.
there may be a paper jam
Follow these instructions to clear a paper jam.
print cartridge status light is on or flashing
if the light is on and not flashing
Check to see if a print cartridge is low on ink.
If a print cartridge is low on ink, consider
replacing the print cartridge.
Page 67

If neither print cartridge is low on ink, press the Resume button. If the Print Cartridge
Status light remains on, turn off, then turn on the printer.
if the light is on and flashing
Verify that the correct print cartridges are installed.
If you were printing a borderless document when the light started flashing, follow
these
Otherwise, follow these steps:
guidelines.
1. Open the printer's top cover, remove the black or photo print cartridge, then
close the cover.
2. Do one of the following:
❍ If the light is flashing: Open the top cover, replace the print cartridge you
removed, then remove the tri-color print cartridge. Go to step 3.
❍ If the light is off: There is a problem with the print cartridge you removed.
Go to step 3.
3. Manually clean the print cartridge.
After cleaning the print cartridge, reinsert it into the printer.
If the print cartridge status light continues to flash,
replace the print cartridge.
all lights are flashing
the printer may need to be restarted
1. Press the Power button to turn off the printer, then press the Power button to
restart the printer.
Proceed to step 2 if the lights continue to flash.
2. Press the Power button to turn off the printer.
3. Disconnect the printer's power cord from the electrical outlet.
4. Reconnect the printer's power cord to the electrical outlet.
5. Press the Power button to turn on the printer.
Page 68

paper jam
follow these steps
1. Press the Resume button.
2. If you are printing labels, verify that a label did not become detached from the
label sheet while passing through the printer.
if the paper jam is not cleared
printer does not have a two-sided printing accessory attached
printer has a two-sided printing accessory attached
printer does not have a two-sided printing accessory attached
1. Push the two latch handles on the printer's Rear Access Door toward each
other, then remove the door.
2. Remove the paper jam from the back of the printer, then replace the Rear
Access Door.
3. Press the Resume button.
Page 69

4. Print the document.
printer has a two-sided printing accessory attached
1. Press the buttons on the left and right sides of the Two-Sided Printing
Accessory, then remove it from the printer.
2. Remove any paper in the back of the printer.
If the paper jam is cleared, proceed to step 3 below.
If the paper jam is not cleared, proceed to step 1 below.
1. Press the button on top of the Two-Sided Printing Accessory, then lower the
access door.
2. Remove any paper from the Two-Sided Printing Accessory, then close the
access door.
3. Reinsert the Two-Sided Printing Accessory into the printer until both sides snap
into place.
Page 70

Do not press the buttons on either side of the duplexer when
installing it in the printer. Use the buttons only when
removing the duplexer from the printer.
4. Press the Resume button.
Page 71

borderless printing problems
When printing borderless printouts, follow these guidelines:
● Verify that the paper size specified in the Size is drop-down list on the Paper/
Quality tab matches the size of the paper loaded in the In tray.
● Select the appropriate paper type in the Type is drop-down list on the Paper/
Quality tab.
● If printing in grayscale, select High Quality under Print in Grayscale on the
Color tab.
● Do not print borderless documents in ink-backup mode. Always have two print
cartridges installed in the printer.
part of the photograph is faded
fading occurs on the edges of a printout
Verify that photo paper is not curled. If the photo paper is curled, place the paper in
a plastic bag and gently bend it the opposite direction of the curl until the paper lies
flat. If the problem persists, then use photo paper that is not curled.
For instructions on preventing photo paper from curling, click
here.
fading occurs near the edges of a printout
Page 72

If fading occurs approximately 1 to 2.5 inches from the edge of a photograph, try the
following:
● Install a photo print cartridge in the printer.
● Open the Printer Properties dialog box, select the Paper Type/Quality tab, then
set the Print Quality to Maximum dpi.
● Rotate the image 180 degrees.
streaks appear in a light portion of a printout
If streaks appear in a light portion approximately 2.5 inches from one of the long
edges of a photograph, try the following:
● Install a photo print cartridge in the printer.
● Rotate the image 180 degrees.
image is printed at an angle
Page 73

Follow these steps if the image is printed at an angle:
1. Remove all paper from the In tray.
2. Load the photo paper correctly in the In tray.
3. Verify that the paper guides fit firmly against the media.
4. Follow loading instructions for the media type.
printout has an unwanted border
for most photo paper types
If the printout has an unwanted border, then
If printing a two-sided document, print the document
automatically.
calibrate the printer.
manually rather than
for photo paper with a tear-off tab
If the border appears below the tear-off tab, then remove the tab.
Page 74

If the border appears above the tear-of tab, then
calibrate the printer.
ink smears
Follow these steps if ink smears appear on the back of the printouts, or the paper
sticks together.
1. Open the
2. Move the Dry Time slider toward More.
3. Move the Ink Volume slider toward Light.
4. Click OK.
If the problem persists:
1. Remove the borderless printing media, then load plain paper in the In tray.
Advanced Features dialog box.
The colors in the image may become lighter.
Page 75

2. Press and hold down the Resume button until the printer starts printing a selftest page, then release the button.
3. Repeat step 2 until the self-test has no ink smears on the back of the paper.
Page 76

storing and handling photo paper
Follow these instructions to maintain the quality of your HP brand photo paper.
storage
● Keep unused photo paper in a resealable plastic bag, in the box in which it was
originally packaged. Store the packaged photo paper on a flat surface in a cool
place.
● When you are ready to print, remove only the paper that you plan to use
immediately. When you have finished printing, return any unused photo paper
to the plastic bag.
● Do not leave unused photo paper in the printer's paper tray. The paper may
start to curl, which can reduce the quality of your photographs.
handling
● Always hold photo paper by the edges. Fingerprints on photo paper can reduce
print quality.
● If the corners of the photo paper curl more than 10 mm or 3/8 inch, flatten the
paper by putting it in the resealable storage bag, then rolling the bag on a
table edge until the paper is flat.
Photo paper should be flat before printing.
Page 77

calibrating print cartridges
The printer automatically calibrates the print cartridges after a new print cartridge is
installed. You can also calibrate the print cartridges at other times to ensure optimal
print quality.
To calibrate print cartridges:
1. Load a stack of plain white paper in the In tray.
2. Go to
3. Click Calibrate Printer.
4. Click Calibrate, then follow the onscreen instructions.
printer maintenance.
Page 78

manually cleaning the print cartridges
If the printer is used in a dusty environment, a small amount of debris may
accumulate on the print cartridge contacts.
gathering cleaning supplies
You will need the following items to clean the print cartridges.
● Distilled water (tap water may contain contaminants that can damage the print
cartridge)
● Cotton swabs or other soft, lint-free material that will not stick to the print
cartridge
Be careful not to get
ink on your hands or clothing as you clean.
preparing to clean
1. Press the Power button to turn on the printer, then raise the printer cover.
2. Remove the print cartridges and place them on a piece of paper with the
nozzle plate facing up.
Do not leave the print cartridges outside the printer for more
than 30 minutes.
cleaning instructions
1. Lightly moisten a cotton swab with distilled water and squeeze any excess
water from the swab.
2. Wipe the print cartridge copper contacts with the cotton swab.
Do not touch the print cartridge ink nozzles. Touching the
ink nozzles will result in clogs, ink failure, and bad electrical
connections.
Page 79

1. clean only the copper contacts
Repeat this process until no ink residue or dust appears on a clean swab.
3. Insert the print cartridges in the printer, then close the printer cover.
Page 80

removing ink from skin and clothing
Follow these instructions to remove ink from skin and clothing:
to remove ink from... do this...
skin
white fabric
color fabric
Caution! Always use cold water to remove ink from fabric. Warm or
hot water may set the ink color into the fabric.
Wash the affected area with an abrasive soap.
Wash the fabric in cold water using chlorine bleach.
Wash the fabric in cold water using sudsy ammonia.
Page 81

paper trays
The printer has two paper trays: an In tray and an Out tray.
1. out tray 2. in tray
in tray
The In tray holds paper or other media to be printed.
Slide the paper guides firmly against the edges of the media on which you are
printing.
1. in tray 2. paper width guide 3. paper length guide
out tray
Printer pages are deposited in the Out tray.
Raise the Out tray to load most paper sizes. Remove the Out tray to load small media.
Page 82

Replace the Out tray before printing.
To prevent paper from falling out of the Out tray, pull out the Out tray extension.
1. out tray extension
When printing in FastDraft mode, pull out the Out tray extension, then unfold the Out
tray extension stop.
Page 83

1. out tray extension 2. out tray extension stop
Do not unfold the Out tray extension stop when printing on legal
paper.
After the print job finishes, fold the Out tray extension stop, then push the Out tray
extension into the Out tray.
Page 84

connectivity
● USB
● networking
❍ connecting via a networked computer
❍ using an hp jetdirect print server
Page 85

USB
The printer connects to the computer with a Universal Serial Bus (USB) cable. The
computer must be running Windows 98 or later to use a USB cable.
For instructions on connecting the printer with a USB cable, see the setup poster that
came with the printer.
Page 86

networking
Select the appropriate networking option:
● connecting via a networked computer
● using an hp jetdirect print server
Page 87

connecting via a networked computer
The printer can be connected directly to a computer on a network and then shared
with other computers on the network.
For instructions on sharing the printer on a network, use the printer software CD and
follow the onscreen network setup instructions.
Page 88

using an hp jetdirect print server
The printer can be connected to a network with an HP Jetdirect Print Server.
For instructions on using an HP Jetdirect Print Server, use the printer software CD
and the documentation that came with the print server.
Page 89

getting started (hp deskjet 5160)
For an overview of the printer features and the optional Two-Sided Printing
Accessory, click
Click the appropriate topic below for a description of a printer feature:
● buttons and lights
● paper trays
● print cartridges
here.
● ink-backup mode
For a description of the optional Two-Sided Printing Accessory, click here.
Page 90

printer features
The HP printer has several features to make printing easier and more efficient.
buttons and lights
1.
paper trays
2.
single envelope slot
3.
print cartridges
1.
ink-backup mode
2.
Page 91

connectivity
1.
duplexer (optional)
2.
Page 92

buttons and lights
Use the printer buttons to turn the printer on and off, cancel a print job, and restart a
job. The printer lights give you visual cues about the status of the printer.
1. print cancel button 2. print cartridge status light 3. resume button 4. power button
print cancel button
Pressing the Print Cancel button cancels the current print job.
print cartridge status symbol and light
The Print Cartridge Status light turns on or flashes when a print cartridge needs
service.
resume button and light
The Resume light flashes when an action is required such as loading paper or clearing
a paper jam. When the problem is solved, press the Resume button to continue
printing.
power button and light
The Power button turns the printer on and off. It may take a few seconds for the
printer to turn on after pressing the Power button.
The Power light flashes when the printer is processing.
Caution! Always use the Power button to turn the printer on and off.
Using a power strip, surge protector, or a wall-mounted switch to turn
the printer on and off may cause printer failure.
Page 93

Page 94

paper trays
For information about the paper tray, select one of the topics below:
● unfolding the paper tray
● in tray
● out tray
● Folding the paper tray
The HP deskjet 5160 series printer is not available in all countries/
regions.
unfolding the paper tray
Follow these steps to unfold the paper tray:
1. Lower the In tray.
2. Pull out the paper length guide to the edge of the In tray.
3. Lower the Out tray.
4. Pull out the Out tray extension.
Page 95

in tray
The In tray holds paper and other media to be printed.
1. in tray
paper width guide
Adjust the paper width guide to print on different sizes of paper.
1. paper width guide
paper length guide
Adjust the paper length guide to print on different sizes of paper.
Page 96

1. paper length guide
in tray extension
To print on large paper, such as legal paper, pull out the paper length guide to the
edge of the In tray, then pull out the In tray extension.
1. in tray extension
out tray
Printed pages are deposited in the Out tray.
1. out tray
To prevent paper from falling out of the tray, pull out the Out tray extension.
Page 97

1. out tray extension
When printing in FastDraft mode, pull out the Out tray extension, expand the Out
tray extension, then unfold the Out tray extension stop.
1. out tray extension 2. out tray extension stop
Do not unfold the Out tray extension stop when printing on legal
paper. Only unfold the Out tray extension stop when printing in
FastDraft mode on other types of media.
Folding the paper tray
Follow these steps to fold the paper tray:
1. Fold the Out tray extension stop, collapse the Out tray extension, then push
the Out tray extension into its storage slot.
Page 98

2. Raise the Out tray.
3. If necessary, push in the In tray extension.
4. Push the paper length guide into the interior of the printer until it stops.
5. Raise the In tray.
Page 99

envelopes
guidelines
● Avoid using envelopes that: have clasps or windows; have thick, irregular, or
curled edges; are shiny or embossed; are wrinkled, torn, or otherwise
damaged.
● Align the envelope edges before inserting them in the In tray.
● In tray capacity: Up to 20 envelopes
preparing to print a single envelope
1. Place the envelope, with the printable side down and the flap to the left, into
the single envelope slot.
2. Push the envelope into the printer until it stops.
preparing to print a stack of envelopes
1. Raise the Out tray, then remove all paper from the In tray.
2. Slide the paper width guide all the way to the left, then pull out the paper
length guide.
3. Place the envelopes, with the printable sides down and the flaps to the left,
into the right side of the In tray. Push the envelopes into the printer until they
stop.
Page 100

4. Slide the paper guides firmly against the envelopes.
5. Lower the Out tray.
printing
1. Open the Printer Properties dialog box, then select the following:
tab setting
Paper/
Quality
2. Select any other desired
Size is: Appropriate envelope size
Type is: Plain Paper
print settings, then click OK.
 Loading...