

Page 1
ENGLISH
DeskJet 400 Series Printer
User’s Gu ide
Page 2

Acknowledgments
ColorSmart is a trademark of Hewlett-Packard Company.
Microsoft is a U.S. registered trademark of Microsoft
Corporation.
Windows is a trademark of Microsoft Corporation.
Notice
The information contained in this document is subject
to change without notice.
Hewlett-Packard makes no warranty of any kind with
regard to this material, including, but not limited to, the
implied warranties of merchantability and fitness for a
particular purpose.
Hewlett-Packard shall not be liable for errors contained
herein or for incidental or consequential damages in
connection with the furnishing, performance, or use of
this material.
No part of this document may be photocopied,
reproduced, or translated to another language without
the prior written consent of Hewlett-Packard Company.
Print History
Edition 1– May 1997
© Copyright 1997 by Hewlett-Packard Company
Table of Contents
1
Packing List. . . . . . . . . . . . . . . . . . . . . . . . . . . . . . . . . 1
Printer Features . . . . . . . . . . . . . . . . . . . . . . . . . . . . . 1
STEP 1: Connecting the Power Adapter . . . . . . . . . 2
STEP 2: Connecting the Parallel Cable . . . . . . . . . . 2
STEP 3: Loading Paper. . . . . . . . . . . . . . . . . . . . . . . . 2
STEP 4: Installing a Print Cartridge . . . . . . . . . . . . . 3
STEP 5: Installing the Printer Software . . . . . . . . 3-4
Getting Help . . . . . . . . . . . . . . . . . . . . . . . . . . . . . . . . 4
2
Loading Other Size Paper . . . . . . . . . . . . . . . . . . . . . 5
Loading Envelopes, Labels, and Thick Paper . . . . . 5
Changing Print Cartridges. . . . . . . . . . . . . . . . . . . . . 6
Printing in Color and Grayscale . . . . . . . . . . . . . . . . 7
3
Problem-Solving Guidelines . . . . . . . . . . . . . . . . . . . 8
Frequently Asked Questions. . . . . . . . . . . . . . . . . . . 8
When the Printer Does Not Print . . . . . . . . . . . . . . . 9
When the Lights Blink . . . . . . . . . . . . . . . . . . . . . . . . 9
When Paper Is Jammed in the Printer. . . . . . . . . . 10
When Paper Is Not Loading . . . . . . . . . . . . . . . . . . 11
When the Print Quality Is Not Satisfactory . . . . 11-12
When the Ink Nozzles Are Clogged . . . . . . . . . . . . 12
Getting Started
Getting the Most Out of Your Printer
Solving Problems
4
Appendices
Customer Support . . . . . . . . . . . . . . . . . . . . . . . . . . 13
Printer Specifications. . . . . . . . . . . . . . . . . . . . . 15-16
HP Supplies. . . . . . . . . . . . . . . . . . . . . . . . . . . . . . . . 17
Regulatory Notices. . . . . . . . . . . . . . . . . . . . . . . . . . 18
HP Limited Warranty Statement. . . . . . . . . . . . . . . 19
Printing from DOS. . . . . . . . . . . . . . . . . . . . . . . . . . . 20
Page 3
Getting Started
Packing List
1. HP DeskJet 400 series printer
2. Black print cartridge
3. User’s guide
4. Power adapter
5. Printer software diskette
6. Print cartridge storage container
Printer Features
1. Power button ( )
2. Paper Feed button ( )
3. Change Cartridge button ( )
4. Paper size selector (A4 / LTR)
5. Paper width guide
6. Paper tray
7. Paper separator
8. Print cartridge holder
9. Envelope lever ( / )
10. Printer door
11. Manual feed slot
12. Power socket
13. Parallel port
14. Cable track
3
1
2
4
2
3
4
1
7
6
5
8
9
6
5
10
11
12
13
14
1
Page 4
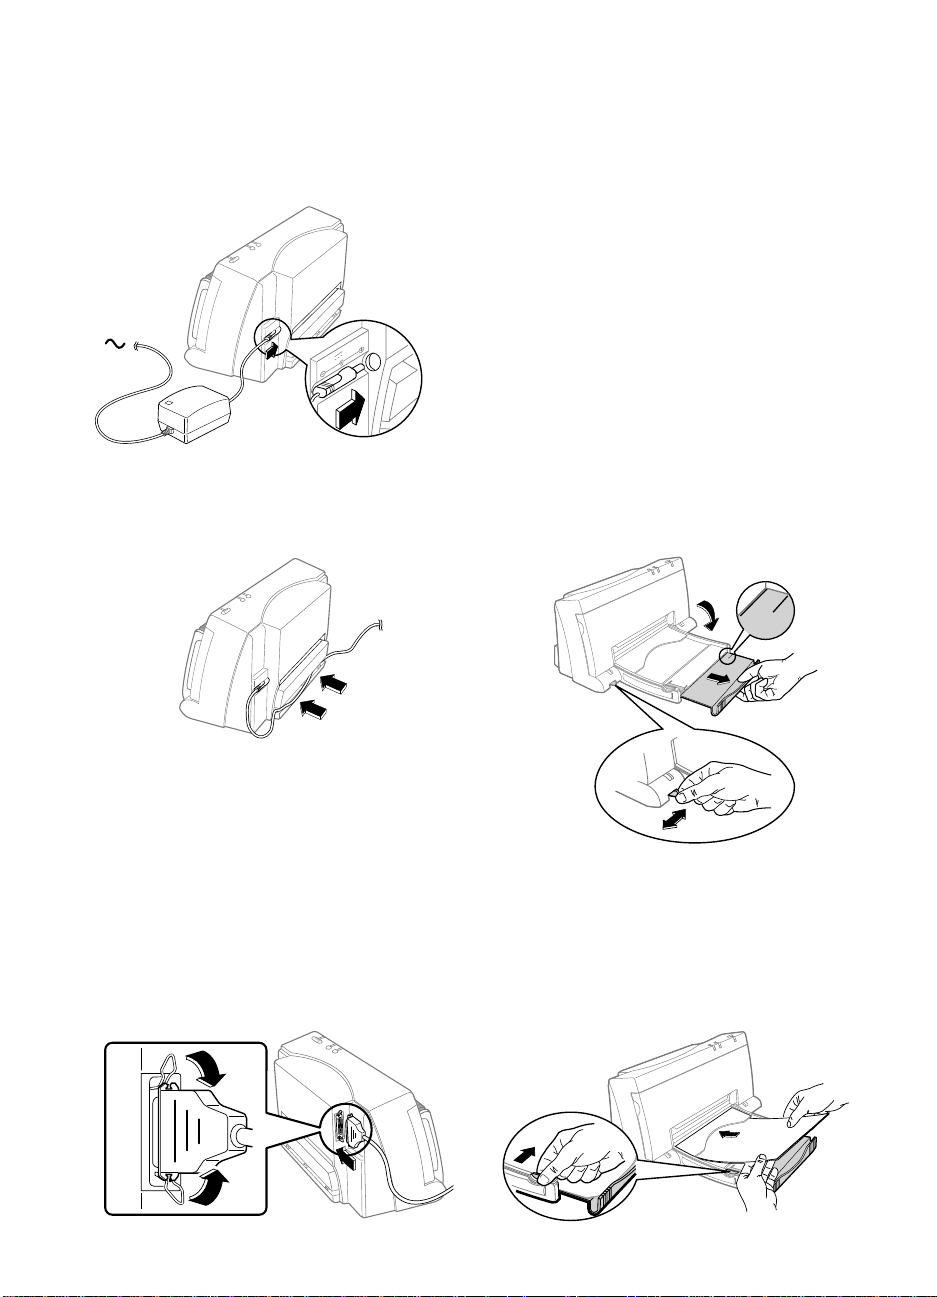
STEP 1: Connecting the Power Adapter
1. Plug the power adapter connector firmly into
the printer’s power socket.
2. Plug the other end of the power adapter cable
into a grounded electrical outlet.
30 V 400 mA
3. If the electrical outlet is on the same side as
the parallel port on the printer, fit the power
cable into the cable track so that the power
cable is neatly housed in place.
4. Connect the computer end of the parallel cable
to the parallel port on your computer and tighten
the screws on the connector.
To locate the parallel port on your computer, refer
to the user’s guide for your computer.
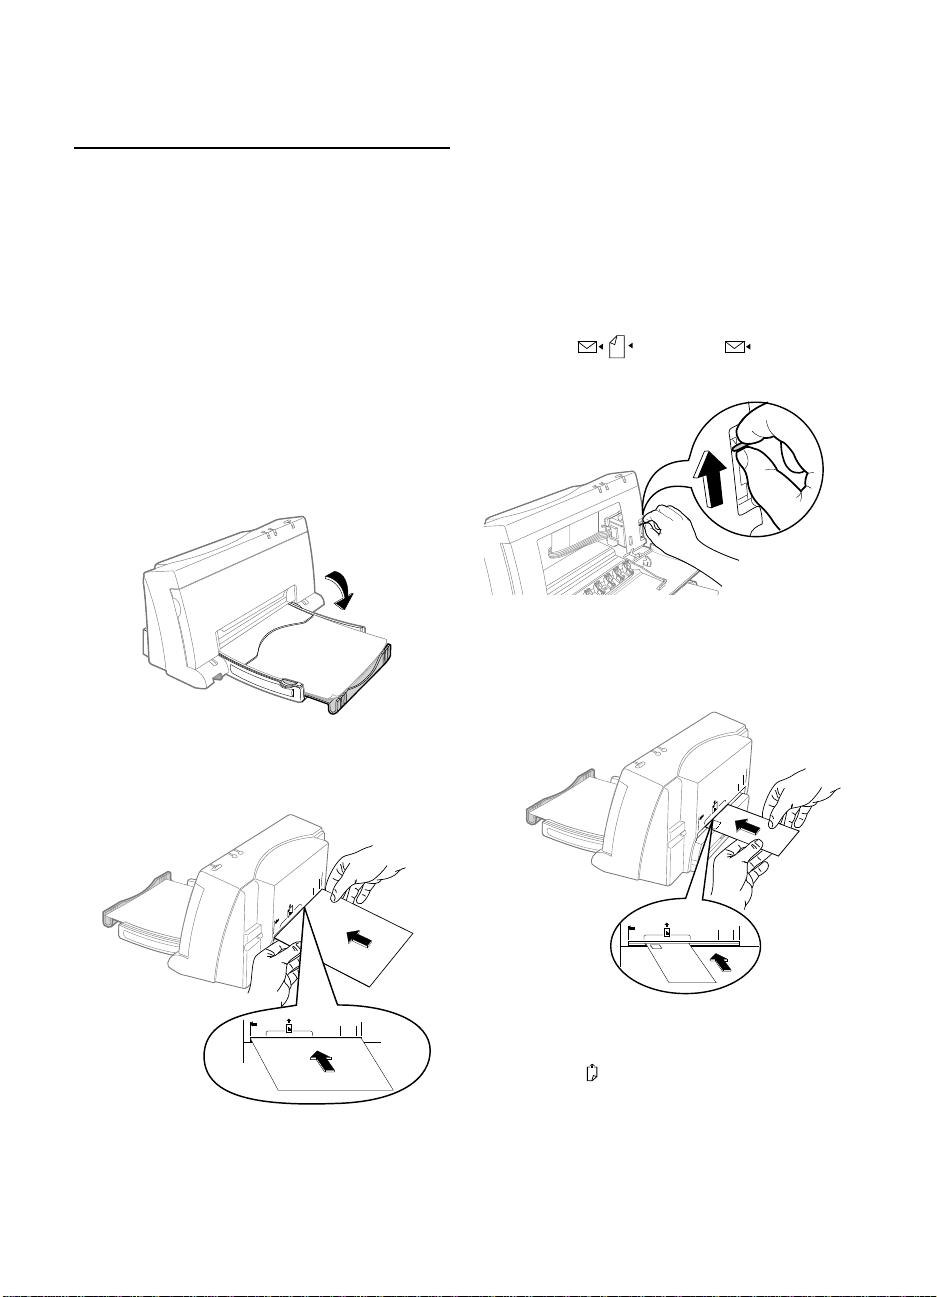
STEP 3: Loading Paper
The HP DeskJet 400 series printer prints on plain paper
and other paper types. Most plain paper used for
photocopying yields good results. See page 14,
“Recommended Printable Weight” for information on
other paper types you can use. See also page 5 for
information on loading other size paper, envelopes,
labels, and thick paper.
1. Open the paper tray.
2. Extend the paper tray to either the LTR
(US Letter) mark.
3. Switch the paper size selector
(A4 / LTR) to LTR.
LTR
A4
LTR
A4
STEP 2: Connecting the Parallel Cable
You must purchase separately a parallel cable to
connect your printer to your computer. Use any highquality parallel printer cable, or order HP part no.
C2950A or C2951A from your local HP dealer.
1. Make sure the printer and the computer are
turned off.
2. Connect the printer end of the parallel cable
firmly to the parallel port on the printer.
3. Snap both clips into the notches on the connector.
2
4. Insert a stack of paper squarely into the paper
tray, print side down, until it can go no farther.
Note: If you are loading letterheads or HP
transparencies, insert them print side down, with
the top of the page going into the printer first.
5. Move the paper width guide so that it presses
lightly against the paper stack.
Page 5
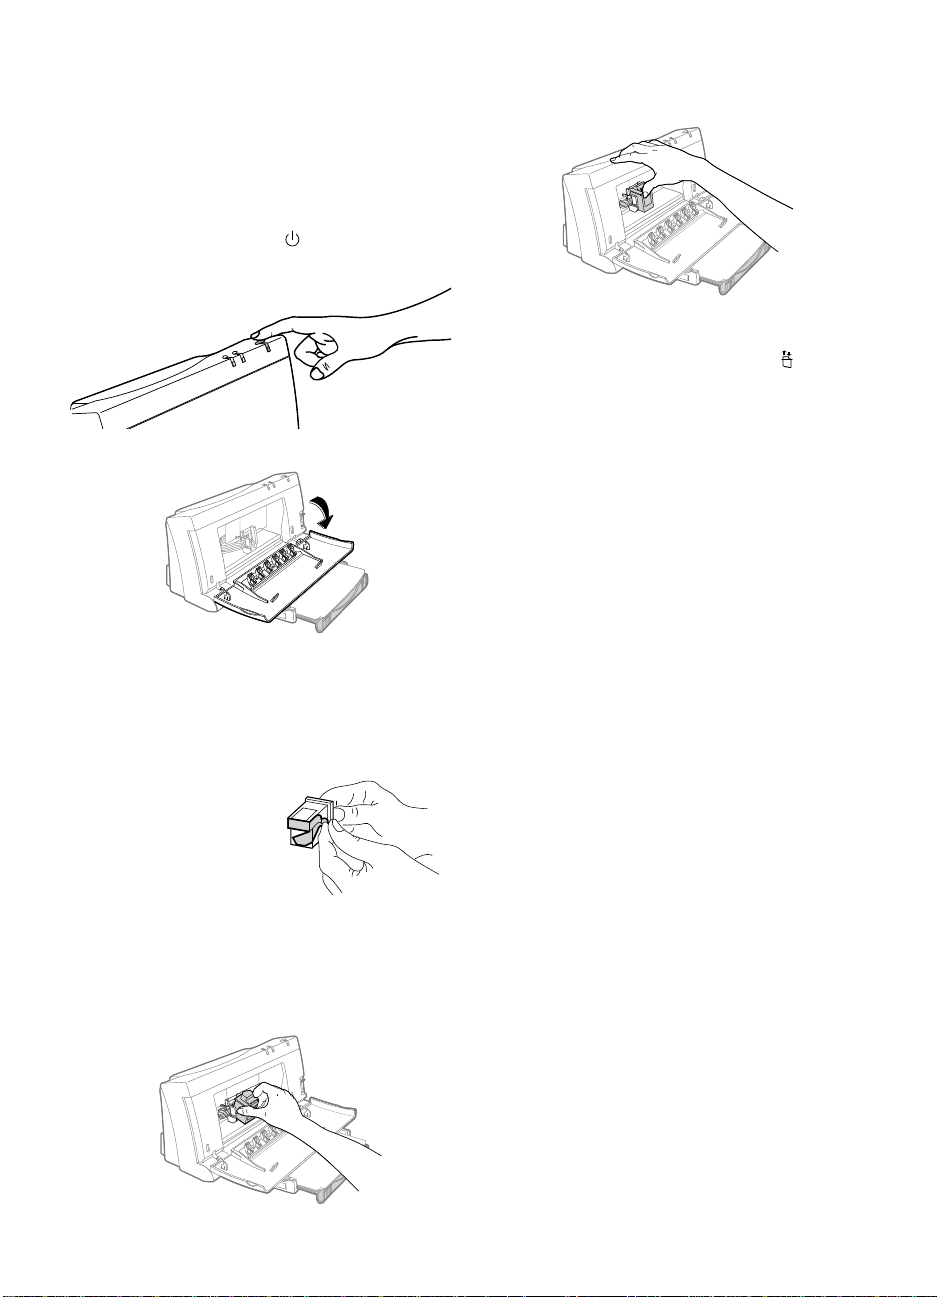
STEP 4: Installing a Print Cartridge
Note: Use the black print cartridge (HP part no.
51626A) supplied with the printer, or the color
print cartridge (HP part no. 51625A) which you
can purchase separately. You can use only one
of these print cartridges at one time.
1. Press the Power button ( ) to turn the printer on.
2. Open the printer door.
6. Push the green top in until the print cartridge
snaps into place.
7. Close the printer door.
8. Press the Change Cartridge button ( ).
Note: If you did not install a recommended print
cartridge, the print cartridge holder will move
back to the loading position, and the Change
Cartridge light will continue to blink.
CAUTION: The ink in the print cartridge has been
carefully formulated by Hewlett-Packard to
ensure superior print quality and compatibility
with your printer. Damage to the printer or the
print cartridge resulting from modifying or refilling
the print cartridge is not the responsibility of
Hewlett-Packard.
CAUTION: The star wheels on the printer door
have sharp edges. Make sure your hand does not
come in contact with the star wheels.
3. Remove the print cartridge from its box.
4. Gently remove the
tape(s) covering the
ink nozzles. Be
careful not to touch
the ink nozzles or the
copper contacts.
5. Insert the print cartridge into the holder at an
angle such that the green top is tilted toward you.
The arrow on the print cartridge should be
pointing toward the inside of the printer.
STEP 5: Installing the Printer Software
In a Windows Environment
To install the printer software, you need 8 MB of RAM
with Microsoft Windows 95 or 4 MB of RAM with
Windows 3.1 installed in your computer. Refer to page 15,
“Hardware Compatibility” for hardware requirements.
Note: The HP DeskJet 400 series printer is not
supported in network configuration.
Before you can use your printer, you must install the
printer software.
1. Perform all procedures given earlier in this section.
2. Turn on the printer, then turn on the computer.
3. Close any screen saver or other software
programs that are open and running in the
background on your computer. To close
software programs, follow these steps:
Windows 95 –
• For
Ctrl+Alt+Del keys. Then Highlight a program
on the Close Program list and choose End
Task. Repeat these steps until only the
Explorer is listed.
Simultaneously press the
3
Page 6

• For
Windows 3.1x–
Ctrl+Esc keys. Then highlight a program on
the Task List screen and choose End Task.
Repeat these steps until only the Program
Manager is listed.
Simultaneously press the
Windows 95:
To install the Windows 95 printer software, use the
following procedure:
1. Start Microsoft Windows 95.
2. Windows 95 should recognize the attached
printer as a newly added piece of hardware
and walk you through the installation
instructions. If a screen with instructions does
not appear, do the following:
3. Click on the Start button.
4. Choose Setting in the Start menu.
5. Click Printers in the Setting menu.
6. Click Add Printer in the Printers menu.
7. Follow the Wizard instructions that appear on
the screen.
8. Choose Local Printer.
9. Click Have Disk.
10. Insert the HP’s PrintSmart for Windows disk into
the disk drive of your computer.
11. Select the disk drive and press OK.
Note: You must restart Windows to initialize the printing
software. Until Windows 95 is restarted, the
printer will not perform as expected.
Windows 3.1:
To install the Windows 3.1 printer software, use the
following procedure:
1. Start Microsoft Windows and ensure no
Windows applications are running.
2. Click File in the Program Manager window menu.
3. Click Run in the File menu.
4. Insert the HP’s PrintSmart for Windows disk into
the disk drive of your computer.
5. Type your disk drive address (for example, A:\),
followed by SETUP, in the command line box.
Then click OK.
6. Follow the instructions that appear on the screen
to complete the installation of the printer software.
Note: You must restart Windows to initialize the
printing software. Until Windows 3.1 is restarted,
the printer will not perform as expected.
DOS Printing
Note: You do not need to install the DJPMenu
software if you are printing from your
Windows applications.
Use the DJPMenu software to define or change the
settings on the DeskJet 400 series printer if your DOS
applications do not allow you to do so.
Note: The DJPMenu software requires that your
printer is connected directly to the parallel port
of your computer. Refer to page 14, “Hardware
Compatibility” for hardware requirements.
1. Insert the HP’s PrintSmart for Windows disk
into drive A.
2. At the DOS prompt (A:\>), type A: \INSTALL and
press ENTER.
3. Follow the instructions on the screen.
4. To run the DJPMenu software, type
C:\ DESKJET\DJPMENU at the DOS prompt.
5. For more updated information on the
DJPMenu software, please refer to the file
C:\ DESKJET\DJPMENU.TXT that you have
just installed.
Selecting a printer software for the HP DeskJet 400
series printer in each DOS software program that you
use ensures the best support for your printer. If the
printer software for the HP DeskJet 400 series printer
is not available within your program, select the printer
software for the HP DeskJet 500C printer.
Getting Help
The printer software contains an online help that
describes how to use the dialog boxes.
Whenever you move the cursor over a setting in the
dialog box, a short description of the setting will be
displayed at the bottom of the dialog box.
You can invoke the online help by clicking the Help
button in the Print dialog box.
If you encounter a problem with the printer, you can also
refer to “Solving Problems” which starts on page 8.
4
Page 7
Getting the Most
Loading Envelopes,
Labels, and Thick Paper
Out of Your Printer
Loading Other Size Paper
Legal, Executive, and B5 size paper must be fed into
the printer manually, one by one, from the back of the
printer. See page 15, “Printable Paper Sizes” for the
paper sizes that you can print.
Note: If you are loading letterheads or HP
transparencies from the back of the printer,
insert them print side up, with the top of the
page going into the printer first.
1. Ensure that you have selected Manual Feed in
the Printer Setup dialog box.
2. Open the paper tray.
Envelopes, labels, and thick paper must be fed into the
printer manually, one by one and print side up, from
the back of the printer. See page 15, “Printable Paper
Sizes” for the envelope sizes that you can print.
1. Ensure that you have selected Manual Feed in
the Printer Setup dialog box.
2. Open the paper tray.
3. Open the printer door and switch the envelope
lever ( / ) to Envelope ( ). Then close the
printer door.
4. Align the envelope, label, or thick paper against
the respective molded lines on the manual feed
slot. Insert the envelope, label, or thick paper
until the printer pulls it in.
3. Align the paper against the molded line on the
manual feed slot (on the back of the printer).
Insert the paper until the printer pulls the paper in.
LTR
A4
B5
LTR
A4
B5
4. Access the print command from your computer.
LTR
A4
B5
LTR
A4
B5
5. Access the print command from your computer.
Note: Remember to switch the envelope lever to
paper
()
after you have finished printing
envelopes, labels, or thick paper. For optimal
print quality, ensure that the envelope lever is
adjusted according to what you want to print.
5
Page 8
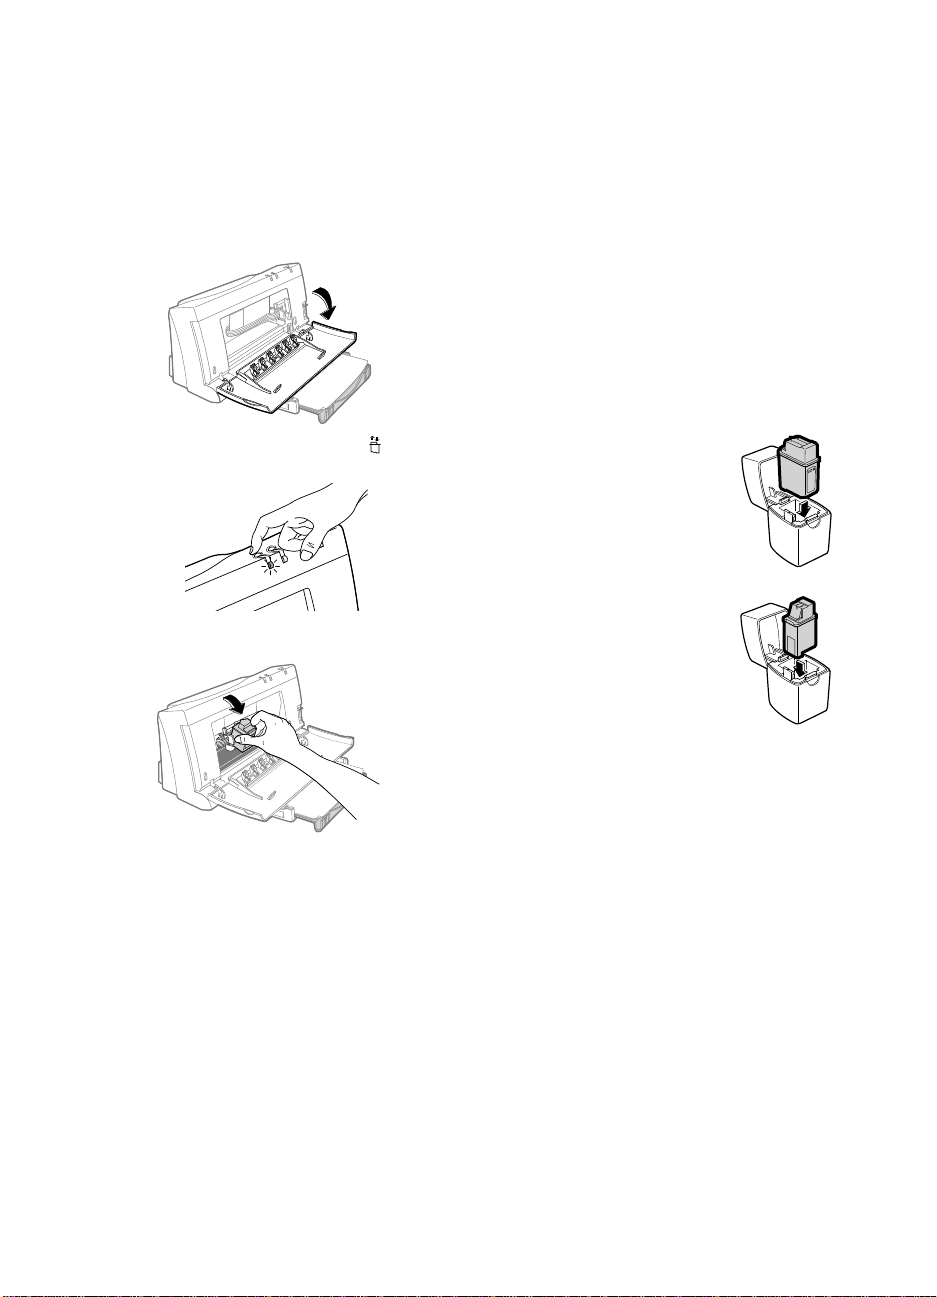
Changing Print Cartridges
The HP DeskJet 400 series printer takes any one of the
following print cartridges at a time: black print cartridge
(HP part no. 51626A) or color print cartridge (HP part
no. 51625A). See your local HP dealer or office supply
store to purchase the color print cartridge.
1. Open the printer door.
2. Press the Change Cartridge button ( ) to move
the print cartridge holder to the middle position.
3. Remove the print cartridge by pulling it by its
green top.
4. To install another print cartridge, follow steps 4
through 8 on page 3.
Using the Print Cartridge
Storage Container
You can use either the black print cartridge supplied
with the printer (HP part no. 51626A), or you can use
the color print cartridge purchased separately (HP part
no. 51625A). However, you can only use one of these
print cartridges in the printer at one time.
Note: Always store the print cartridge that is not
currently being used in the storage container.
The storage container protects the ink
nozzles from damage and prevents the ink
from drying out while the print cartridge is
not in use. This prolongs the life of the print
cartridge, protecting your investment.
1. To store the color print
cartridge, make sure the
arrow on the top of the
color print cartridge
points toward the
cartridge clip at the back
of the storage container.
2. To store the black print
cartridge, make sure the
arrow on the top of the
black print cartridge
points toward the
cartridge clip on the left
of the storage container.
3. When removing a print cartridge from the
storage container, be sure that the cartridge
clip is disengaged, then lift the print cartridge
out of the storage container.
6
Page 9

Printing in Color and Grayscale
The HP DeskJet 400 series printer is designed to
print in color using the optional color print cartridge
purchased separately. See your local HP dealer or
office supply store to purchase the color cartridge
(HP part no. 51625A).
When you select Print from your software application,
HP’s ColorSmart technology (which is built into the
printer) scans your document and automatically adjusts
the color settings for great-looking output.
For each type of object on the page – text, simple
graphics, or complex images – ColorSmart chooses just
the right color settings for optimum results. In most
cases, ColorSmart provides the best output, so you
don’t have to select other color options.
You can, however, override the ColorSmart choices
whenever you wish and select exactly the color settings
you want from the options available in the printer
software.
When printing with the optional color cartridge, the
black that appears, called “composite black,” is a
mixture of the cyan, yellow, and magenta inks. The
darkness of the composite black depends on the
intensity settings and the print quality mode selected
through your printer software. Use the darkest intensity
and the highest print quality available to produce the
“blackest” composite black.
For printing documents with the color print cartridge,
remove the black cartridge from the printer, store it in
the storage container, insert the optional color cartridge
in the printer, and print your color document.
How to print in grayscale
You can print drafts of your color documents in
grayscale if you want to save time and ink. Click
Print in Grayscale in the printer software. Your
color documents print in shades of gray until you
change the setting.
Note: For faster draft printing in grayscale, use the
black print cartridge, not the optional color
print cartridge.
7
Page 10

Solving Problems
If you encounter a problem with your printer, you can
seek help from the following sources:
■ Online Help
Read the suggestions in the error messages.
If you need more help, press the Help button.
■ User’s Guide
Read the following tips to solve the problem.
■ Customer Support
If the problem cannot be solved by the help
suggestions in the User’s Guide, refer to
page 13, “Customer Support” for a listing of
resources available to you for the support and
maintenance of your printer.
Frequently Asked Questions
What is the difference between
LTR and A4 paper?
LTR paper is commonly used in North America.
The size is 8.5 inches x 11 inches (216 mm x 279 mm).
A4 paper is commonly used in Europe, Australia,
New Zealand, Asia, and South America. The size is
210 mm x 297 mm.
How should paper be loaded into
the printer?
First, switch the paper size lever on the left bottom
corner to the correct paper setting, either LTR or A4.
Then insert the paper into the paper tray until it can
go no further. Finally, move the paper width guide,
located on the tray, so that it presses lightly against
the paper stack.
Is the sound the printer makes
when it starts working normal?
Yes, when the printer functions properly, a sound
occurs when you turn the printer on and also when it
picks up paper. The sound when you turn the printer
on is the print cartridge finding its starting position.
The sound when the printer picks up paper is due to
the activation of the printer mechanism.
What print cartridges can I use
with the printer?
Use the HP black cartridge (HP part no. 51626A) for
great looking black output. Purchase the optional HP
color cartridge (HP part no. 51625A) for color output.
How do I print in color using
Microsoft Windows software?
Use the optional HP color cartridge (HP part no.
51625A) for color printing and use the HP black print
cartridge (HP part no. 51626A) for black printing. If you
print in black, remember to check the Print in
Grayscale setting in the printer setup menu.
How can I get the best print
quality?
To ensure the highest print quality from the HP DeskJet
400 series printer, use original HP print cartridges
together with HP’s Premium InkJet Paper or Premium
Glossy Paper.
The HP printer software gives you optimal results
when you select the Best printing setting in the printer
setup menu.
How do I print envelopes, labels, or
thick paper (heavier than 24 lb)?
You must feed envelopes, labels, and thick paper one
sheet at a time from the back of the printer. Be sure that
you have selected Manual Feed and the appropriate
Paper Size in the printer setup menu. Then open the
printer door and switch the envelope lever to Envelope.
Close the printer door and print one page.
What do I do if I get a paper
path error?
To clear the paper path error:
1. Turn off the printer.
2. Remove the paper from the paper tray.
3. Remove the printer door by grasping it by its
sides, then pulling the door up.
4. Carefully pull the paper out of the printer.
To avoid paper path errors, be sure to set the paper size
lever to the correct setting and to move the paper width
guide so that it presses lightly against the paper stack.
Also, be sure to feed paper that is heavier or lighter than
16 to 24 lb from the back of the printer manually.
8
Page 11
When the Printer Does Not Print
The printer shows no response at all to the
print command.
■ The printer is not properly connected to the
power source. Make sure the printer’s power
adapter is firmly plugged into the printer and
into the wall power outlet.
■ The printer is off. Press the Power button ( )
until the Power LED lights up.
■ The printer is not properly connected to the
computer. Make sure the interface cable is
firmly connected to the parallel port of the
printer and the computer.
■ You may be using a wrong parallel cable or the
parallel cable may be defective. Use any of the
following parallel cables: HP part no. C2950A
or C2951A.
■ Your printer is not selected as the current or
default printer. Select your printer using the
Printer Setupmenu in your software program.
Alternatively, select your printer from Printers
in the Control Panel.
The printer appears to be printing, but nothing
prints on the paper.
■ The ink nozzles of the print cartridge are
covered by a sealing tape. Remove the tape(s).
See page 3, “STEP 4: Installing a Print
Cartridge.”
■ The ink nozzles of the print cartridge are
clogged with dried ink. See page 12, “When the
Ink Nozzles Are Clogged.”
■ The print cartridge is out of ink. Use a new
print cartridge.
The printed page looks incomplete or has
odd-looking characters.
■ Your printer is not selected as the current or
default printer. Select your printer using the
Printer Setup menu in your software program.
Alternatively, select your printer from Printers
in the Control Panel.
■ The printer is not properly connected to the
computer. Make sure the interface cable is
firmly connected to the parallel port of the
printer and the computer.
■ You may be using a wrong parallel cable or the
parallel cable may be defective. Use one of the
following parallel cables: HP part no. C2950A
or C2951A.
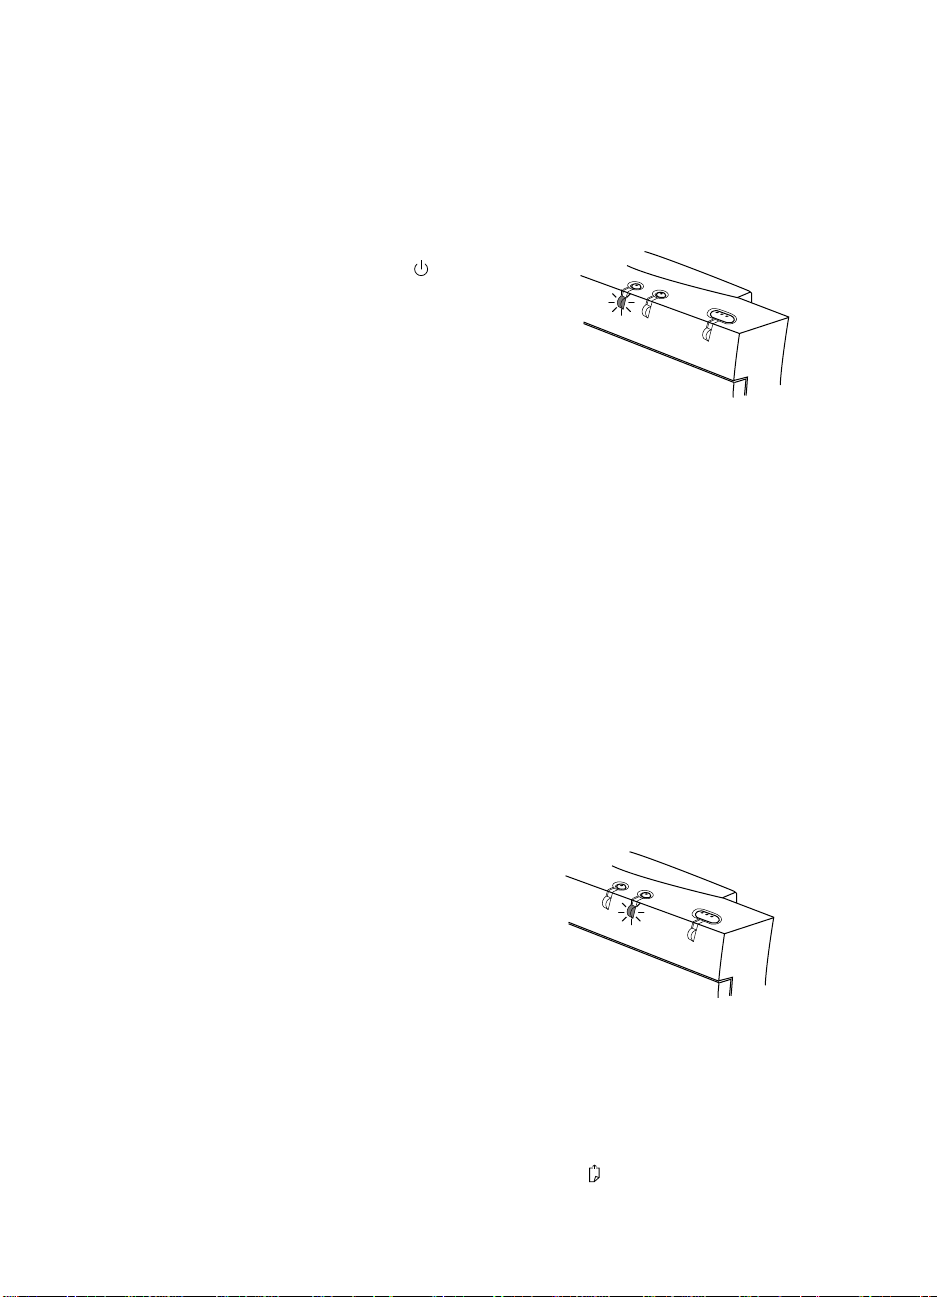
When the Lights Blink
A. The Change Cartridge light is blinking.
Note: The Change Cartridge light blinks when the
holder is in the middle position; this is NOT an
error condition. In other cases, one of the
following is true:
■ You may be printing a black document with a
color print cartridge, or vice-versa. Change the
print cartridge accordingly.
■ No print cartridge has been loaded. Load a
print cartridge. (See page 3, “STEP 4: Installing
a Print Cartridge”.)
■ The print cartridge is improperly installed in the
printer. Remove the print cartridge and then reload the print cartridge.
■ A wrong print cartridge has been loaded. See
page 3, “STEP 4: Installing a Print Cartridge”
for a list of print cartridges you can use.
B. The Paper Feed light is blinking.
■ No paper has been loaded or the printer is out
of paper. To load paper, see page 2, “STEP 3:
Loading Paper.”
■ Paper is not loading. See page 11, “When
Paper Is Not Loading.”
■ After loading paper, press the Paper Feed
button ( ) to continue printing.
9
Page 12

C. All the three lights are blinking.
Paper is jammed in the printer. To clear the jam, see
below, “When Paper Is Jammed in the Printer.”
If there is no paper jam, turn the printer off and then on
again. If the three lights still blink, call the Customer
Support Center.
When Paper Is Jammed in the Printer
To clear the paper jam, perform the following steps:
1. Turn off the printer.
2. Remove the paper from the paper tray.
5. Open the paper separator (the flap that
separates the printed pages from the blank
sheets) by pulling it toward you. With the paper
separator out of the way, your fingers will have
a better grip on the jammed paper.
6. Grip the jammed paper firmly by its sides and
pull it out slowly.
7. After clearing the paper jam, close the paper
separator.
3. Open the printer door.
4. Remove the printer door by grasping it by its
sides and then pulling the door up. (Use your
thumbs to hold down the printer while pulling
the door.)
10
8. Re-attach the printer door by first placing the
door flat on the paper tray. Then align the
hinges on the printer door with the pins on the
printer. Press the printer door down until the
printer door clicks into place.
9. Close the printer door.
10. Load paper and try printing again.
Page 13

When Paper Is Not Loading
Paper does not feed into the printer properly.
■ Re-load the paper. See page 2, “STEP 3:
Loading Paper.”
■ You are printing on a US Letter size paper, but
the paper size selector (A4 / LTR) is set to A4.
Or you are printing on an A4 size paper, but the
paper size selector (A4 / LTR) is set to LTR
(US Letter). Adjust the paper size selector
(A4 / LTR) according to the paper size.
■ Too many sheets of paper were loaded.
Remove some paper.
■ Paper is damaged, wrinkled, or curled. Replace
paper with a new stack.
■ Some paper in the stack may be of a different
type, size, and weight. Make sure the paper in
the stack are of the same type, size, and weight.
Paper does not eject from the printer.
■ Paper is jammed in the printer. To clear the
jam, see page 10, “When Paper Is Jammed in
the Printer.”
■ The printer door is not closed properly.
■ The computer was turned off while the printer
was printing. Turn off the printer and turn on
the computer. Then turn the printer on.
More than one sheet of paper are fed into the
printer at a time.
■ The sheets of paper are stuck together.
Remove the paper stack, separate the sheets,
and re-load the paper stack.
■ Too many sheets are loaded in the paper tray.
Remove some paper.
■ Some paper in the stack may be of a different
type, size, and weight. Make sure the paper in
the stack are of the same type, size, and weight.
■ Paper is not fed into the printer properly.
Re-load the paper. See page 2, “STEP 3:
Loading Paper.”
Printing is slanted on the A4 size paper.
■ You are printing on an A4 size paper, but the
paper size selector (A4 / LTR) is set to LTR
(US Letter). Switch the paper size selector
(A4 / LTR) to A4.
■ Paper is not fed into the printer properly.
Reload the paper. See page 2, “STEP 3:
Loading Paper.”
Printing is slanted on the Legal size paper,
envelope, label, or thick paper.
The Legal size paper, envelope, label, or thick paper is
not fed into the printer properly. Push evenly the Legal
size paper, the envelope, or the thick paper into the
back of the printer until the printer pulls in the paper.
See page 5, “Loading Other Size Paper.”
Legal size paper, envelope, label, or thick
paper does not advance into the printer.
Legal size paper, envelope, label, or thick paper should
be loaded from the back of the printer, one at a time.
Push evenly the Legal size paper, envelope, label, or thick
paper into the back of the printer until the printer pulls in
the paper. See page 5, “Loading Other Size Paper.”
When the Print Quality Is Not
Satisfactory
Ink is smearing or paper is wrinkling.
■ You are printing on an envelope, label, or thick
paper, but the envelope lever ( / )
behind the printer door is set to paper ( ).
Adjust the lever to envelope ( ).
■ You may have touched the printed page before
the ink dried. Wait until the ink dries before you
pick up the printed page.
■ Too much ink was used on the page. Lower the
intensity setting in your software application.
11
Page 14

The printed page looks faded.
■ You are printing on paper, but the envelope
lever ( / ) behind the printer door is set to
envelope ( ). Adjust the lever to paper ( ) .
■ The ink nozzles are clogged. See “When the
Ink Nozzles Are Clogged” on this page.
■ The print cartridge is running out of ink. Use a
new print cartridge.
■ You may be printing a black-only document
with a color print cartridge. Increase the
intensity setting or use a black print cartridge.
Characters, dots, or lines are missing or are
incomplete.
■ The print cartridge is running out of ink. Use a
new print cartridge.
■ The ink nozzles of the print cartridge may be
clogged. Clean the print cartridge. (See “When
the Ink Nozzles Are Clogged” on this page.)
Ink coverage is inconsistent.
■ The ink nozzles of the print cartridge may be
clogged. Clean the print cartridge. (See “When
the Ink Nozzles Are Clogged” on this page.)
■ The paper may not be suitable for the printer.
Try another paper type.
Too much ink on the printed page.
■ The paper may not be suitable for the printer.
Try another paper type.
■ You may be printing a black-only document
with a color print cartridge. Decrease the
intensity setting or use a black print cartridge.
A color page is printed in black.
■ A black print cartridge is installed in the
printer. Use a color print cartridge.
■ Select Automatic in the ColorSmart dialog box
and make sure the Print in Grayscale box is not
checked.
Some colors are missing.
■ The ink nozzles are clogged. Clean the print
cartridge. (See “When the Ink Nozzles Are
Clogged” below.)
■ The color print cartridge has run out of one or
more color ink. Use a new color print cartridge.
When the Ink Nozzles Are Clogged
Prolonged exposure to air may cause ink crust to form
on the ink nozzles of the print cartridge. You can try to
clear the crusted ink from the print cartridge, as follows:
Note: Ink may stain your hands or clothing.
1. Hold the print cartridge by its green top. Using
a water-damp cloth, gently and slowly wipe the
dried ink off the print cartridge nozzles into a
trash container. Repeat this step, using a clean
portion of the damp cloth to wipe residual ink
off the nozzles.
2. Install the print cartridge in the printer and load
paper in the paper tray.
3. Turn off the printer.
4. While pressing the Change Cartridge button ( ),
press the Power button ( ) to activate the
cleaning process. A page will then be printed.
If the print quality is unsatisfactory, the print
cartridge may be out of ink. In this case, use a
new print cartridge.
12
Page 15

Appendices
Printer Software
Printer software allows your printer to talk with your
computer. (Printer software is also referred to as a
Customer Support
The information in the previous chapter suggests
printer driver or a printer file.) If you need to replace or
upgrade a printer driver, you have several options:
solutions to common problems. If your printer is not
operating properly and these suggestions do not solve
your problem, try using one of the following support
services to obtain assistance.
Electronic Support Information
HP Web Site – If you have access to the Internet, you
can check out HP’s web site at URL http://www.hp.com
or http://www.hp.com/go/peripherals for support
documentation, the latest printer software, and the
latest news from HP.
User Forums – In addition to the latest printer
software that is available via the CompuServe and
America Online user forums, you can also get friendly
help from knowledgeable users and system operators.
In the user forums, you can leave your question and
check back later for ideas and solutions suggested by
other users. You can read through old messages left by
other users to see if anyone else has had a problem
similar to yours and has provided the solution online
Also, the forum keeps a list of FAQs (Frequently Asked
Questions) which you can peruse for hints.
CompuServe – Access the HP Peripherals
forum (Go HPPER). To subscribe to
CompuServe, in the U.S. call 1-800-848-8199
and ask for representative #51. Canadian
residents should consult their phone directory
for the nearest CompuServe office. (This
service is not operated by Hewlett-Packard.
America Online – Access the HP forum. Click
“keyword” on the “Go To” menu, type “HP,”
and press the Enter key to bring the HP forum
home page directly to your screen.
HP Telephone Support
Our highly responsive support staff can help you get
your new printer up and running. They are available to
answer questions about your printer and explain how it
works. We’re ready to help you Monday thru Friday, 6
am to 10 pm (MST), and Saturday, 9 am to 4 pm (MST).
To reach us, call (208) 344-4131.
Ninety Days Free Support – Within 90 days from the
time you purchase your new printer, telephone support
is provided to you free of charge. Before placing a call
to the HP Telephone Support Center, please make sure:
HP First Fax
Technical documentation and troubleshooting
information is available 24 hours a day, seven days a
week, every day of the year. Dial (800) 333-1917 from
any touch-tone phone to access HP First Fax. By
selecting from a series of menu choices, you can
identify documents containing the information you
need. You may request up to three documents per call.
We’ll fax them to you within minutes.
During the 90-day period, all questions about your
printer and printer software are answered free of charge.
■ Download the driver by accessing
CompuServe, America Online, or HP’s Web
site, as previously described.
■ Download the driver from the HP Bulletin
Board. You’ll need a modem and
communications software, set to N, 8, 1.
Dial (208) 344-1691 and choose from the
menus provided.
■ If you don’t have access to CompuServe,
America Online, or the World Wide Web, you
can get a new driver (if one is available) on
disks. HP provides Windows 3.1, 3.11, or
Windows 95 printer drivers and printer driver
updates for the cost of the disks plus shipping.
You can order them by calling (970) 339-7009
Monday thru Saturday, 24 hours a day.
(For DOS printer drivers, contact the
manufacturer of your software program.)
■ You have referenced your user’s manual and on-
line help for installation and troubleshooting tips.
■ You are seated in front of your computer, with
the printer nearby.
■ You have the following information available:
– Your printer’s serial number (on the label
on the back of the printer).
– Your printer’s model number (on the label
on the font of the printer).
– The model of the computer.
– The version of the printer driver and
software program (if applicable).
13
Page 16

After the Free Support Period – You can still get help
for a fee (prices are subject to change without notice):
■ For quick questions in the United States only,
call (900) 555-1500. You are charged $2.50 per
minute and the charges begin when you
connect with a support technician.
■ For calls from Canada, or for calls in the U.S.
that might be longer than ten minutes in length,
call (800) 999-1148. The fee is $25 per call,
charged to your Visa or Master Card.
If during the phone call it is determined that your
printer requires repair, and if you are within your
printer’s hardware warranty period, your phone
charges are reversed.
Repairing Your Printer
To speak to someone to verify that your printer needs
repair, please call the HP Telephone Support Center
Monday thru Friday, 6 am to 10 pm (MST), and
Saturday, 9 am to 4 pm (MST). If your printer requires
repair, the HP Support Agent will coordinate the
process. This service is free of charge during the
warranty period of your printer. Outside of the
warranty period, repairs are charged on a time and
materials basis.
HP also offers a variety of options to complement the
standard warranty. Call (800) 446-0522 in the U.S. or
(800) 268-1221 in Canada for details.
Extended Warranty Options
If you would like to extend your printer coverage
beyond the one year factory warranty, you have the
following options:
■ Consult your reseller to get extended coverage.
■ If your reseller does not offer service
contracts, please call Hewlett-Packard directly
and ask about our service agreement offering.
In the U.S. call (800) 446-0522, in Canada call
(800) 268-1221. For service agreements outside
the U.S.and Canada, contact your local HP
Sales Office.
A Note about Letters
If you need technical help or have something you
want to say to HP, it is best that you call us when you
are in front of your computer and printer. This way
we can work through the problem quickly. If you
write a letter to HP, then we must call you back,
which can be very difficult to do. Because of this, we
request that you call us rather than write us, so we
can help you immediately!
14
Page 17

Printer Specifications
Print Method
Plain paper drop-on-demand thermal inkjet printing
Black Print Speed
These are approximate figures. Exact speed will vary
depending on the system configuration and software used.
Letter quality mode: 2 pages per minute
Draft quality mode: Up to 3 pages per minute
Color Print Speed
These are approximate figures. Exact speed will vary
depending on the system configuration and software used.
Full color graphics: 4-7 minutes per page
Mechanism Speed
Letter quality mode: 167 cps at 10 cpi
Draft quality mode: 330 cps at 10 cpi
Resolution
Letter quality mode: 600 x 300 dpi (black),
300 x 300 dpi (color)
Draft quality mode: 150 x 300 dpi
Graphics Resolution
Full-page 75, 100, 150, and 300 dpi, and 600 dpi in
horizontal axis for black only
Printer Command Language
HP PCL Level 3 with extensions
Character Set Support
HP Roman8, PC-8, PC-8 (D/N), ISO 7-bit languages
(German, French, Italian, Norwegian, Portuguese,
Swedish, Spanish, U.K.), PC-850, ASCII, ECMA-94
Latin 1, and HP Legal
Built-in (internal) Fonts
Courier (Portrait)
Pitch: 5, 10, 16.67, 20 cpi
Point size: 6 and 12 pt.
Style: Upright (italic: 5, 10, 20 cpi only)
Stroke weight: Normal, Bold
Courier (Landscape)
Pitch: 10, 16.67, 20 cpi
Point size: 6, 12, and 24 pt.
Style: Upright
Stroke weight: Normal, Bold
CG Times (Portrait)
Pitch: Proportional
Point size: 6 and 12 pt.
Style: Upright, Italic
Stroke weight: Normal, Bold
Letter Gothic (Portrait)
Pitch: 6 and 12, and 24 cpi
Point size: 6 and 12 pt.
Style: Upright, Italic
Stroke weight: Normal, Bold
Hardware Compatibility
Windows Environment
80386 processor and above
Windows 95 or 3.1x
DOS 3.3 and above
8 MB RAM for Windows 95
4 MB RAM for Windows 3.1x
10 MB of free hard disk space
DOS Environment
8088 processor and above
DOS 3.3 and above
Software Compatibility
Microsoft Windows 95 or 3.1x
DOS (with DeskJet 500C driver compatible)
Recommended Printable Weight
Paper: [Auto feed] 60 to 90 g/m2(16 to 24 lb)
[Manual feed] 60 to 135 g/m
Envelopes: 75 to 90 g/m
Cards: 110 to 200 g/m
max. thickness)
2
(16 to 36 lb)
2
(20 to 24 lb)
2
(110 lb Index max.: 8.5 pt
15
Page 18

Printable Paper Sizes
US Letter: 216 x 279 mm (8.5 x 11 in.)
US Legal: 216 x 356 mm (8.5 x 14 in.)
Executive: 184 x 267 mm (7.25 x 10.5 in.)
A4: 210 x 297 mm
B5-JIS: 182 x 257 mm
US No. 10 envelope: 104.7 x 241.3 mm (4.12 x 9.5 in.)
DL envelope: 220 x 110 mm
Paper Handling
Paper tray (up to 50 sheets of 60 g/m2or 16 lb paper)
Manual feed (for paper, labels, postcards, and envelopes)
I/O Interface
Parallel, IEEE 1284 compliant with 1284-B receptacle (ECP)
Printer Memory
16 Kbyte input buffer
Power Requirements
Depending on the power adapter ordered: 100 V (50/60
Hz), 120 V (60 Hz), 127 V (60 Hz), 220 V (50 Hz), 230 V
(50 Hz), or 240 V (50 Hz). Each of the input AC voltages
is subject to +6%, -10% tolerance. Each of the
frequencies is subject to ±3 Hz tolerance.
Power Consumption
4.5 W when idle
12 W during printing
Print Cartridges
Black
51626A or 26A
Color
51625A or 25A
Operating Environment
Temperature
Maximum operating temperature: 5°C to 40°C
(41°F to 104°F)
Humidity: 10–80% RH non-condensing
Recommended operating conditions for best print
quality: 15°C to 35°C (59°F to 95°F), 20 to 80%
RH non-condensing
Storage temperature: -40°C to 60°C (-40°F to 140°F)
Noise Levels per ISO 9296
Letter quality mode
Sound Power, LwAd: 6.1 B(A)
Sound Pressure, LpAm: 46 dB(A) [bystander position]
Draft quality mode
Sound Power, LwAd: 6.4 B(A)
Sound Pressure, LpAm: 49 dB(A)
[bystander position]
Dimensions
With the paper tray closed
W x H x D: 348.5 x 176.9 x 163.3 mm
(13.7 x 6.96 x 6.43 in.)
With the paper tray extended
W x H x D: 348.5 x 176.9 x 281.9 mm
(13.7 x 6.96 x 11.1 in.)
Weight
3 kg (6.6 lb)
Reliability
25,000 page life. 20,000 hours MTBF
5,000 printed pages per year
Product Certifications
Safety Certifications
Power Adapter:
UL, CSA, TÜV, SEMKO, NEMKO, KEMA, FIMKO, LCIE,
SECV, DEMKO, SEV, MITI, NOM1.
The socket-outlet shall be installed near the equipment
and shall be easily accessible.
Printer with Power Adapter:
UL, CSA, TÜV, NOM1.
EMI Certifications
Printer with Power Adapter:
FCC Class B when used with a Class B computing
device (USA), EMC Directive 89/336/EEC (European
Community), VCCI (Japan), SABS (South Africa)
16
Page 19

HP Supplies
Description HP Part No.
Premium Transparency (US Letter, 50 sheets): 216 x 279 mm (8.5 x 11 in.) C3834A
Premium Transparency (US Letter, 20 sheets): 216 x 279 mm (8.5 x 11 in.) C3828A
Premium Transparency (A4, 50 sheets): 210 x 297 mm C3835A
Premium Transparency (A4, 20 sheets): 210 x 297 mm C3832A
Premium Glossy Paper (US Letter, 50 sheets): 216 x 279 mm (8.5 x 11 in.) C3836A
Premium Glossy Paper (US Letter, 10 sheets): 216 x 279 mm (8.5 x 11 in.) C3833A
Premium Glossy Paper (A4, 50 sheets): 210 x 297 mm C3837A
Premium Glossy Paper (A4, 10 sheets): 210 x 297 mm C3831A
Premium InkJet Paper (US Letter, 200 sheets): 216 x 279 mm (8.5 x 11 in.) 51634Y
Premium InkJet Paper (A4, 200 sheets): 210 x 297 mm 51634Z
HP Bright White (US Letter, 500 sheets) C1824A
HP Bright White (A4, 500 sheets) C1825A
HP Greeting Card Paper Kit (20 sheets, 20 envelopes) C1812A
17
Page 20

Regulatory Notices
Potential for Radio/Television Interference (U.S.A. only)
The HP DeskJet 400 printer generates and uses radio frequency energy and may cause interference to radio and
television reception. Your printer complies with the specifications in Subpart B of Part 15 of the Federal
Communications Commission rules for a Class B computing device. These specifications provide reasonable
protection against such interference in a residential installation. However, there is no guarantee that interference
will not occur in a particular installation. If the printer does cause interference to radio or television reception,
which can be determined by turning the printer off and on, you can try to eliminate the interference problem by
doing one or more of the following:
■ Re-orient the receiving antenna.
■ Re-orient the position of the printer with respect to the receiver.
■ Move the printer away from the receiver.
■ Plug the printer into a different outlet so that the printer and receiver are on different branch circuits.
To comply with FCC rules Part 15B Class B computing device, use only shielded interface cables.
Compliance Statement (Canada)
This Class B digital apparatus meets all requirements of the Canadian Interference-Causing
Equipment Regulations.
Cet appareil numérique de la class B respecte toutes les exigences du Règlement sur le matériel brouilleur
du Canada.
Power adapter statement
The power adapter cannot be repaired. If it is defective it should be discarded or returned to the supplier.
Das Netzteil (einschließlich Kabel und Adapter) können nicht repariert werden. Falls ein Teil des Netzteiles
defekt ist, die ganze Einheit wegwerfen und durch eine neue Einheit ersetzen.
18
Page 21

Hewlett-Packard Limited Warranty Statement
HP Product Duration of Limited Warranty
Software 90 Days
Print cartridges 90 Days
Printer peripheral hardware 1 Year
A. Extent of Limited Warranty
1. Hewlett-Packard (HP) warrants to the end-user customer
that HP products will be free from defects in materials and
workmanship, for a specified time after the date of
purchase by the customer. The duration of this limited
warranty is stated above. Certain additional conditions and
limitations of HP’s warranty are stated in the user’s guide.
Those conditions and limitations include:
a. For software products, the warranty applies only to the
media upon which the product is recorded; and
b. HP does not warrant the operation of any product to
be uninterrupted or error free.
2. HP’s limited warranty covers only those defects which
arise as a result of normal use of the product, and do not
apply to any:
a. Improper or inadequate maintenance;
b. Software or interfacing not supplied by HP;
c. Unauthorized modification or misuse;
d. Operation outside the product’s environmental
specifications, including duty cycle abuse or use
of a mechanical switchbox without a designated surge
protector;
e. Use of non-supported printing media or memory
boards; or
f. Improper site preparation or maintenance.
3. For HP printer products, the use of a non-HP print
cartridge or a refilled print cartridge does not affect either
the warranty to the customer or any HP support contract
with the customer; print cartridge includes both toner
cartridges and ink cartridges. However, if printer failure or
damage is attributable to the use of a non-HP or refilled
print cartridge, HP will charge its standard time and
materials charges to service the printer for the particular
failure or damage.
4. If any software media product or print cartridge product
proves defective during the applicable warranty period,
and if the product is covered by HP’s warranty, the
customer shall return the product for replacement.
5. If HP receives, during the applicable warranty period,
notice of a defect in a hardware product which is covered
by HP’s warranty, HP shall either repair or replace the
product, at its option. Any replacement product may be
either new or like-new, provided that it has functionality at
least equal to that of the product being replaced.
6. If HP is unable to repair or replace, as applicable, a
defective product which is covered by HP’s warranty, HP
shall, within a reasonable time after being notified of the
defect, refund the purchase price for the product, provided
the customer returns the product.
7. HP’s warranty is valid in any country where the HP
products listed above are distributed by HP, except for the
Middle East, Africa, Argentina, Brazil, Mexico, Venezuela,
and France’s “Departments D’Outre Mer”; for those
excepted areas, the warranty is valid only in the country of
purchase. Contracts for additional warranty services, such
as on-site service, may be available from any authorized
HP service facility where the listed HP product is
distributed by HP or an authorized importer.
8. This Limited Warranty Statement gives the customer
specific legal rights. The customer may also have other
rights which vary from state to state in the United States,
from province to province in Canada, and from country to
country elsewhere in the world.
B. Limitations of Warranty
1. NEITHER HP NOR ANY OF ITS THIRD PARTY
SUPPLIERS MAKES ANY OTHER WARRANTY OF ANY
KIND, WHETHER EXPRESS OR IMPLIED, WITH
RESPECT TO HP PRODUCTS. HP AND ITS THIRD PARTY
SUPPLIERS SPECIFICALLY DISCLAIM THE IMPLIED
WARRANTIES OF MERCHANTABILITY AND FITNESS
FOR A PARTICULAR PURPOSE.
2. To the extent that this Limited Warranty Statement is
inconsistent with the law of the locality where the
customer uses the HP product, this Limited Warranty
Statement shall be deemed modified to be consistent with
such local law. Under such local law, certain limitations of
this Limited Warranty Statement may not apply to the
customer. For example, some states in the United States,
as well as some governments outside the United States
(including provinces in Canada), may:
a. Preclude the disclaimers and limitations in this
Warranty Statement from limiting the statutory rights
of a consumer (e.g., Australia and the United
Kingdom);
b. Otherwise restrict the ability of a manufacturer to make
such disclaimers or impose such limitations; or
c. Grant the customer additional warranty rights, specify
the duration of implied warranties which the
manufacturer cannot disclaim, or not allow limitations
on how long an implied warranty lasts.
3. To the extent allowed by local law, the remedies provided
in this Warranty Statement are the customer’s sole and
exclusive remedies.
C. Limitations of Liability
1. EXCEPT FOR THE OBLIGATIONS SPECIFICALLY SET
FORTH IN THIS WARRANTY STATEMENT, IN NO EVENT
SHALL HP BE LIABLE FOR ANY DIRECT, INDIRECT,
SPECIAL, INCIDENTAL, OR CONSEQUENTIAL
DAMAGES, WHETHER BASED ON CONTRACT, TORT,
OR ANY OTHER LEGAL THEORY AND WHETHER
ADVISED OF THE POSSIBILITY OF SUCH DAMAGES.
19
Page 22

Printing from DOS
What is a printer driver?
If you use DOS software programs (whether or not they are running within Microsoft Windows), you need a specific
printer driver for each DOS program in order to print to your HP DeskJet 400 series printer.
A printer driver is software that allows you to access your printer’s features from within your software program’s
print menus or selections.
Why do I need to contact the software manufacturer?
DOS software manufacturers provide and update printer drivers for their DOS software programs. In DOS, each
program is developed independently under different development standards. Therefore, the software manufacturer is
able to tailor the printer driver to work specifically with their software program. The software manufacturer uses
HP’s printer language, called PCL, to develop printer drivers for HP DeskJet printers. Therefore, you can sometimes
use a different HP DeskJet printer driver to print. However, the best driver to use is the one designed specifically for
the HP DeskJet 400 series printer. Some drivers are simply renamed from previous drivers.
Why isn’t there a printer driver for my brand new printer?
The software industry is moving toward development of individual software programs under a common set of
development standards. The most common standard is Microsoft Windows. HP uses this common development
standard to supply a printer driver for use with all Microsoft Windows compatible software programs. This is the
reason that fewer DOS printer drivers are being developed over time.
If there is not a DOS printer driver for my new printer, is there another
printer driver I can use instead?
Selecting a printer driver for the HP DeskJet 400 series printer in each DOS software program that you use ensures
the best support for your printer. If there is not a printer driver available within your program for the HP DeskJet
400 series printer, select one of the following drivers.
Printer Driver Level of Support
HP DeskJet 500C/540 Most black or color printing features
HP DeskJet 340/320/310 Most black or color printing features
HP DeskJet Portable Most black printing features
HP DeskJet 520/510 Most black printing features
HP DeskJet 560C/550C Most black printing features
HP DeskJet 500/PLUS/HP DeskJet Some black printing features
How do I install DOS printer drivers?
To install the DOS drivers listed in this document, follow the instructions supplied by the software manufacturer. If
you have questions or concerns about the performance of your printer when using one of these drivers, contact the
software manufacturer.
20
Page 23

Energy Consumption
As an Energy Star Partner, Hewlett-Packard has
determined that this product meets the Energy Star
guidelines for energy efficiency.
EPA POLLUTION PREVENTER
21
Page 24

*C2642-90043*
HP Part Number C2642-90043
© Copyright 1997
Hewlett-Packard Company
Printed on recycled paper
Printed in the USA 6/97
 Loading...