

Honeywell YTHX9421, THX9421R5021WW User Manual
Prestige® IAQ
with Equipment Interface Module
Installation Guide
TM
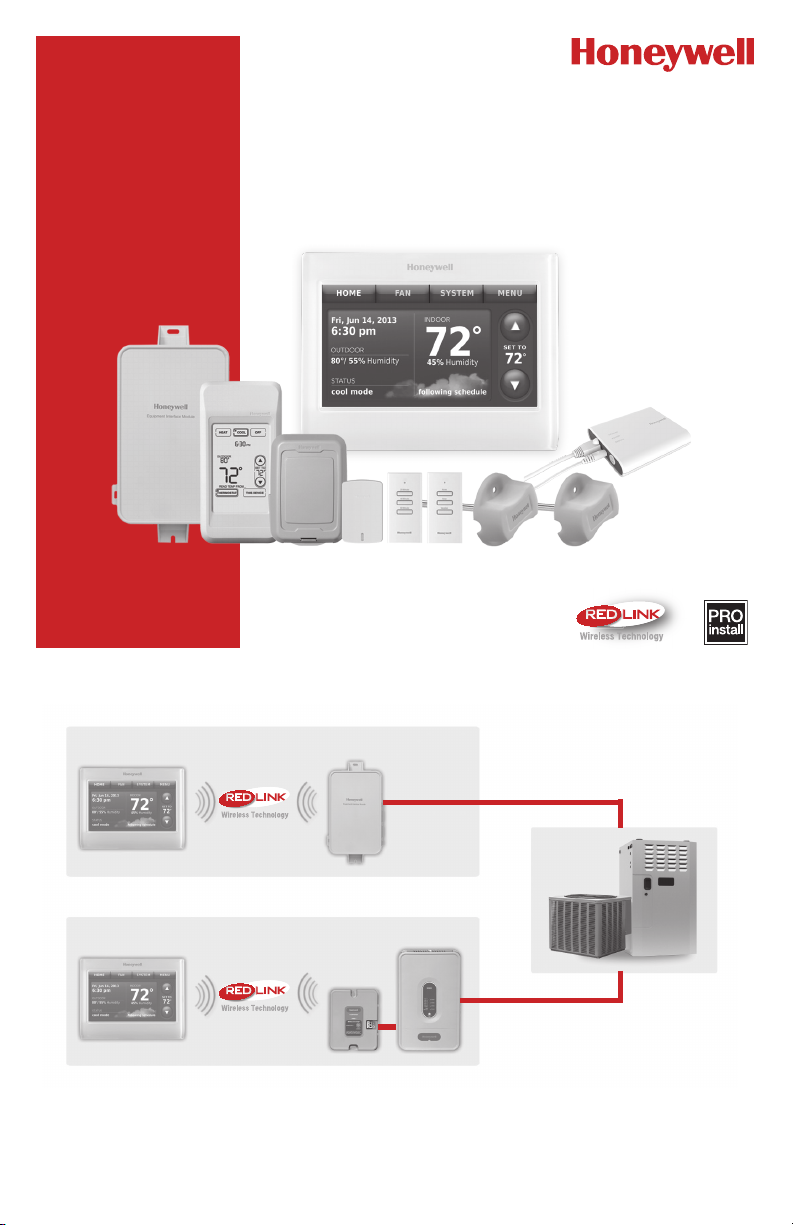
RedLINK to Equipment Interface Module
TM
2 Wires for Power
OR
RedLINK to TrueZONE Wireless Adapter
TM
2 Wires for Power
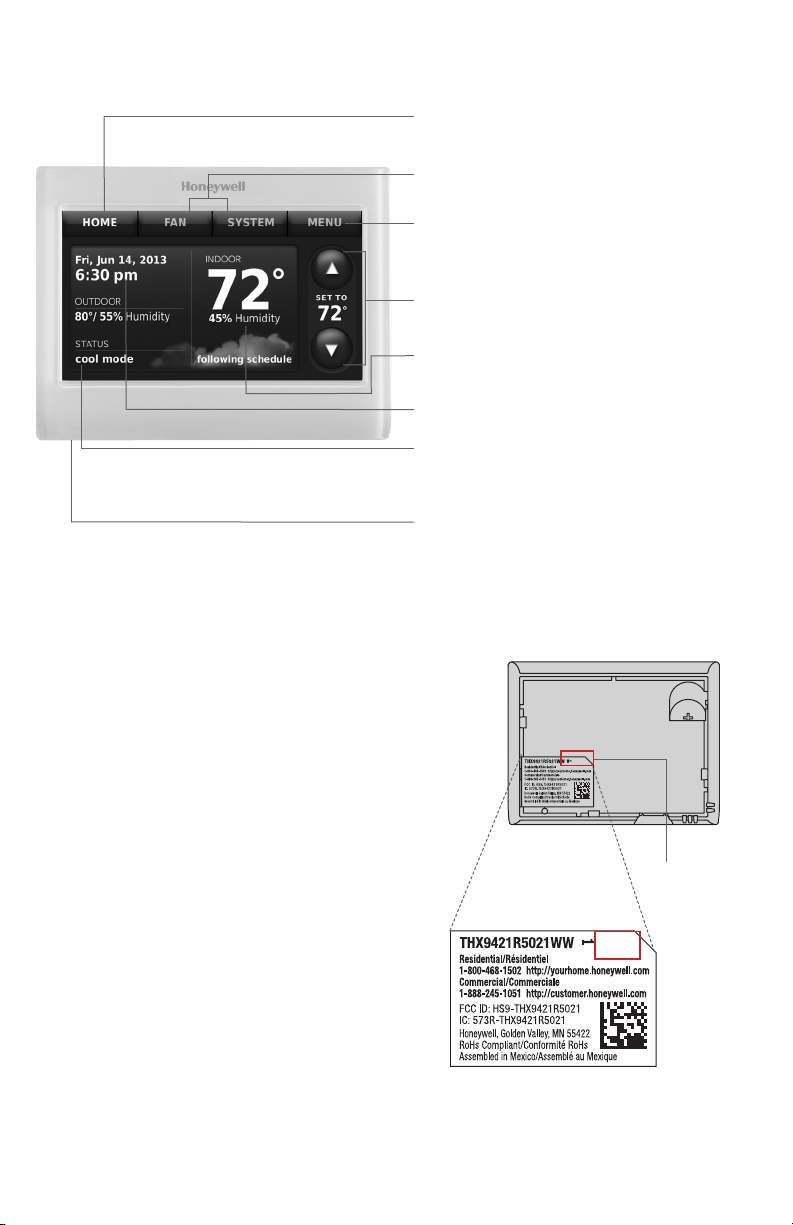
Reference to key features
Current display. Button pressed in
signifies current display
Mode control buttons. Use to change
settings for Fan or System Heat/Cool.
Menu. Select options to: set schedules,
view equipment status, change IAQ
settings, access installer options*, etc.
Current schedule. Shows desired
temperature and schedule status.
Indoor conditions. Shows indoor
temperature and humidity.
Current date and time.
Current status. Shows system mode
(heat/cool), outdoor temperature
and humidity (with optional outdoor
sensor).
* Password is date code.
Getting started
Follow these basic steps to install this
thermostat, link it with the equipment
interface module (EIM) and wireless
accessories and
set installer options.
Installing the Equipment Interface
1
Module (EIM)
Installing the thermostat
2
Powering optional RedLINK accessories
3
Performing initial setup
4
Finding your password (Date Code)
5
• To add or remove RedLINK accessories
• To make changes to Installer Setup
• To perform an Installer Test
• To view Data Logs
USB port. Use USB device to load
settings and dealer information.
Thermostat (back view)
1624
Password
(Date Code)
1624
2
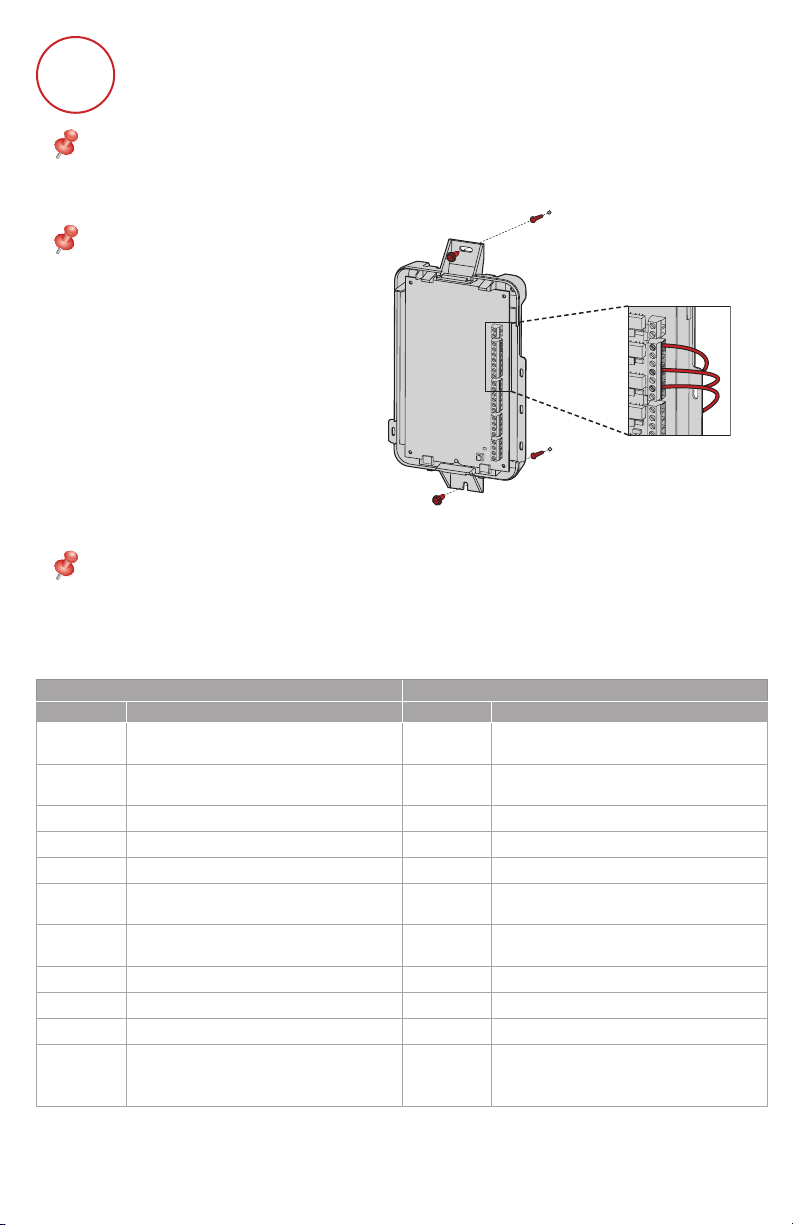
Installing the equipment interface module (EIM)
1
NOTE: If an EIM is mounted inside a metal cabinet, it is recommended to
use a THM4000R1000 Wireless Adapter for extended wireless range. Mount
the Wireless Adapter outside the metal cabinet and connect to the ABCD
terminals at the EIM.
NOTE: When installing multiple
thermostats and EIMs, mount
the EIMs at least 2 feet apart for
best RedLINK performance.
1.1 Mount EIM.
Mount the EIM near the HVAC
equipment or on the equipment
itself.
Use screws and anchors as
appropriate for the mounting
surface.
1.2 Wire EIM as shown.
Refer to the table and wiring diagrams on pages 35.
NOTE: If you are installing discharge and return air sensors, refer to the
mounting instructions in the Alerts and Delta T Diagnostics Installation
Instructions packed in the kit.
R
C
W
O/B
W2
AUX1
W3
AUX2
Y
Y2
G
A
L/A
Terminal Designations
Conventional System Heat Pump
Terminal Description Terminal Description
R*
Common wire from 24 VAC
C
transformer.
Power wire from 24 VAC
transformer.
Common wire from 24 VAC
C
transformer.
Power wire from 24 VAC
R
transformer.
RH* Heating power. RH Heating power.
RC* Cooling power. RC Cooling power.
W Heat Stage 1 O/B Changeover valve for heat pumps.
W2 Heat Stage 2 AUX 1
W3 Heat Stage 3 AUX 2
Backup Heat Stage 1/Emergency
Heat Stage 1
Backup Heat Stage 2/Emergency
Heat Stage 2
Y Compressor Stage 1 Y Compressor Stage 1
Y2 Compressor Stage 2 Y2 Compressor Stage 2
G Fan Relay G Fan Relay
Connect to Economizer Module or
A
Lighting Panel (TOD).
L/A
Connect to Compressor Monitor,
Zone Panel, Economizer Module
or Lighting Panel (TOD).
* Remove jumpers when separate transformers are used.
3

Terminal Designations
2
ONE DRY CONTACT DEVICE
Conventional System Heat Pump
Terminal Description Terminal Description
Universal relay for
humidification,
dehumidification, ventilation,
or a stage of heating/cooling. U
terminals are dry contacts that
require power.
Universal input for a wired
indoor sensor, outdoor sensor,
discharge sensor, return sensor,
dry contact device for alerts or
dry contact device for remote
setback.
U1 / U1**
U2 / U2**
U3 / U3**
S1 / S1***
S2 / S2***
S3 / S3***
S4 / S4***
Universal relay for humidification,
dehumidification, ventilation,
or a stage of heating/cooling. U
terminals are dry contacts that
require power.
Universal input for a wired indoor
sensor, outdoor sensor, discharge
sensor, return sensor, dry contact
device for alerts or dry contact
device for remote setback.
U1 / U1**
U2 / U2**
U3 / U3**
S1 / S1***
S2 / S2***
S3 / S3***
S4 / S4***
A
B
C
D
** See wiring diagrams on pages 45.
*** See wiring diagram below for wiring Dry Contact Devices to display alerts.
Connect to THM4000R1000
Wireless Adapter for extended
wireless range.
A
B
C
D
Connect to THM4000R1000
Wireless Adapter for extended
wireless range.
Wiring dry contact devices to display alerts
DISCONNECT POWER BEFORE INSTALLATION.
Do not apply power to S1, S2, S3 or S4
terminals.
NOTE: The dry contact device must
EIM
be rated for low voltage.
MULTIPLE DRY CONTACT DEVICES
Connect a dry contact device such as a
water sensor to S1, S2, S3 or S4 terminals.
The thermostat displays an alert when a
problem is detected.
Connecting a stage of heating or cooling to a universal relay
(U1, U2, U3)
U3
1
U1, U2, and U3 are normally
open dry contacts when set up
for a stage of heating or cooling.
You must install a field jumper if
the stage of heating or cooling is
powered by the system trans-
1
former. Do NOT install a field
jumper if the stage of heating
has its own transformer.
4
VAC
U3
U2
HEAT STAGE 3,
U2
COOL STAGE 3,
COOL STAGE 4 OR
U1
GEOTHERMAL
RADIANT HEAT
U1
2
RH
RC
R
24
C
ON ONE SET OF TERMINALS
TRANSFORMER
24
VAC
120
VAC
VA
24
VA
VA
24
1
2
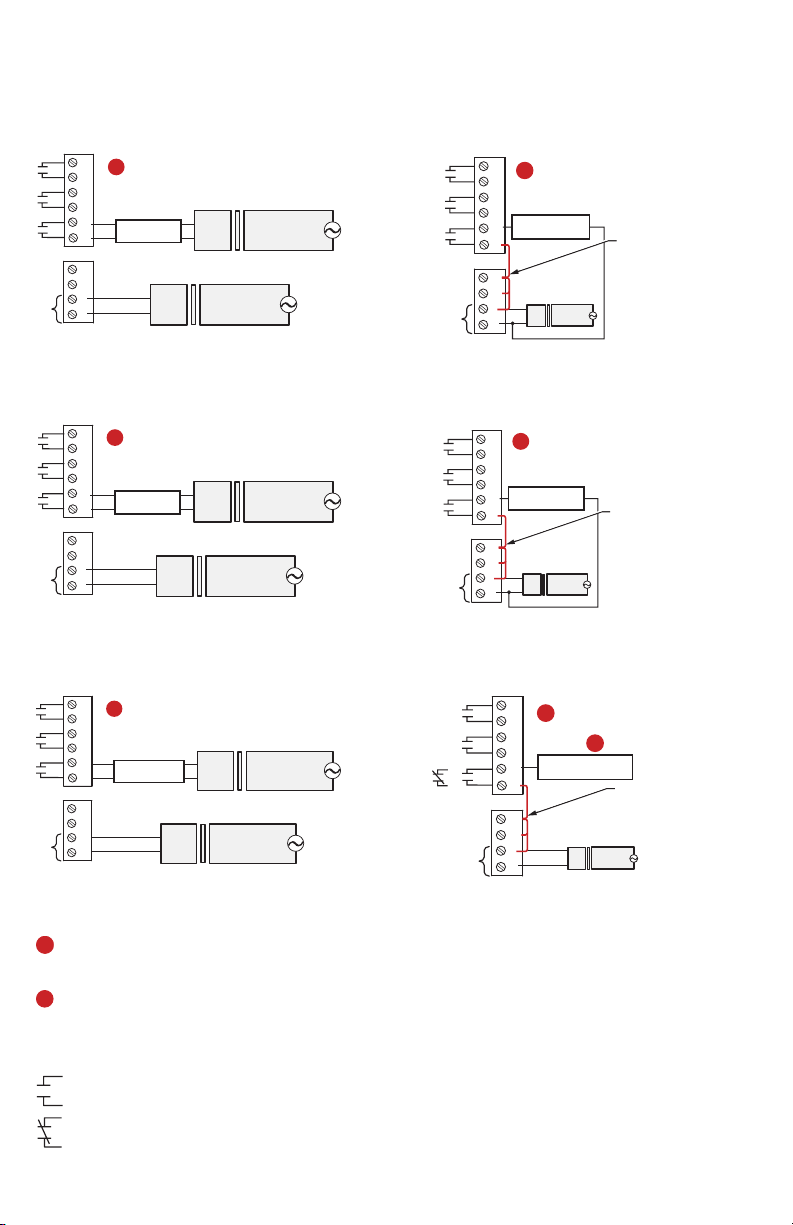
Wiring humidification, dehumidification and ventilation
Typical hookup of powered humidifier Typical hookup of non-powered
humidifier
U3
1
U3
U2
U2
U1
POWERED
HUMIDIFIER
U1
RH
RC
R
24
C
C
VAC
24
VAC
24
120
VAC
120
VAC
Typical hookup of powered ventilation
U3
1
U3
U2
U2
U1
POWERED
VENTILATOR
U1
RH
RC
R
24
C
C
VAC
24
VAC
24
120
VAC
120
VAC
Typical hookup of powered dehumidifier
(whole house dehumidifer)
U3
1
U3
U2
U2
U1
POWERED
DEHUMIDIFIER
U1
RH
RC
R
24
C
C
VAC
24
VAC
24
VAC
120
VAC
120
Typical hookup of variable speed blower
for dehumidification in low speed
U3
1
U3
U2
U2
NON-POWERED
U1
HUMIDFIER
U1
RH
RC
R
VAC
24
VAC
C
120
VAC
FIELD INSTALLED
JUMPER BETWEEN
R AND U1
Typical hookup of non-powered
ventilation
U3
1
U3
U2
U2
NON-POWERED
U1
VENTILATOR
VAC
OR
24 VAC
U1
RH
RC
R
C
24
VAC
U3
1
U3
U2
U2
U1
WITH LOW SPEED FAN
U1
RH
RC
R
C
DEHUMIDIFICATION
120
VAC
24
VAC
FIELD INSTALLED
JUMPER BETWEEN
R AND U1
2
FIELD INSTALLED
JUMPER BETWEEN
R AND U1
120
VAC
Any combination of universal relays (U1, U2, U3) can be used. They are set in the
thermostat installer setup.
Wire the universal EIM relay to the low speed fan for dehumidification control at
the equipment. The EIM relay can be set to be normally open or normally closed in
the thermostat installer setup.
Normally open, dry contacts
Normally closed, dry contacts
5
 Loading...