

Page 1

Thor™ VM1
Vehicle-Mount Computer
With Microsoft Windows® Embedded CE 6 or Windows®
Embedded Standard 2009 Operating System
Quick Start Guide
VM1-QS Rev B
7/14
Page 2

The Thor VM1 can be connected to vehicle power as follows:
!
!
• Direct power connection (12-48VDC vehicles). See Connecting
the Power Cable, below.
• Replace a previously installed VX6/VX6 or Thor VX8/VX9 with an
adapter cable. See Adapter Cables, below.
• High voltage forklifts (over 60V). Refer to the “DC/DC Power
Supply Installation Instructions,” available at
www.honeywellaidc.com.
Connecting the Power Cable
The following power option is for 12-48VDC vehicles (10-60VDC
direct connection).
CAUTION - For installation by trained service personnel only.
Fuse Requirements
WARNING - For proper and safe installation, the input power
cable must be connected to a fused circuit on the vehicle. If
the supply connection is made directly to the battery, the fuse
should be installed in the positive lead within 5 inches of the
battery’s positive (+) terminal. The fused circuit requires a
maximum time delay (slow blow) fuse with a current rating as
noted below.
• F o r 12VDC input, use a 10A slow blow fuse that has a DC
voltage rating greater than 12VDC.
• F o r 24VDC input, use a 6A slow blow fuse that has a DC
voltage rating greater than 24VDC.
• F o r 36VDC input, use a 4A slow blow fuse that has a DC
voltage rating greater than 36VDC.
• F o r 48VDC input, use a 3A slow blow fuse that has a DC
voltage rating greater than 48VDC.
Note: For North America, a UL Listed fuse must be used.
• Refer to the wiring diagram for wire colors and connections.
Page 3
• Choose a mounting location so that the power cable does not
extend outside the vehicle and that provides sufficient clearance
so that the power cable (especially the dock connector end) is not
pressed against part of the vehicle.
• Regularly insp ect power cable for damage, especially in low
temperature environments.
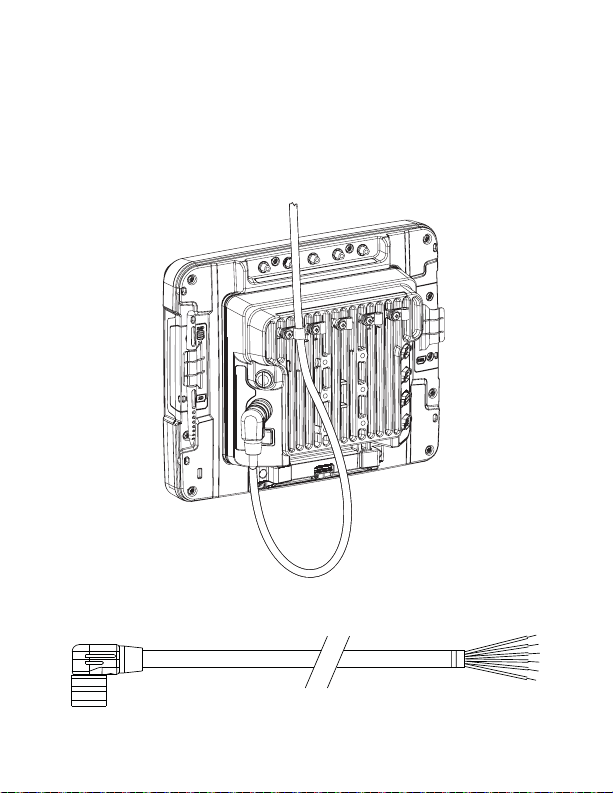
Power Cable Routing
Power Cable Wiring Diagram
Page 4

Twist the red and red/white wires together and twist the black and
!
black/white wires together before connecting to vehicle power.
Connect the green wire to vehicle ground:
For battery powered vehicles:
The green wire must be connected to the vehicle chassis
ground.
For internal combustion engine powered vehicles:
The green wire is connected to the vehicle chassis ground,
which can also be battery negative.
Wire Color Connection
Red DC + (10-60 VDC)
Red/White DC + (10-60 VDC)
Black DC -
Black/White DC -
Green Ground
Blue Ignition Input (optional)
Refer to the Thor VM1 User’s Guide,
available at www.honeywellaidc.com, for
further information about ignition control.
Power Cable Installation
1. The Thor VM1 must not be mounted in the Quick Mount
Smart Dock. The power switch on the dock must be turned
Off. The power cable must be UNPLUGGED from the
dock.
2. While observing the Fuse Requirements in panel 2, connect the power cable as close as possible to the actual battery terminals of the vehicle (if using unswitched power).
Page 5

3. The cable is rated for a maximum temperature of 221°F
(105°C). The cable should be protected from surfaces that
exceed this temperature, from physical damage from moving parts, and from chemicals or oil that cause the insulation to deteriorate.
4. Avoid sharp bends. The power cable is less flexible in low
temperature environments.
5. Route the cable the shortest way possible removing any
leftover cable, making sure the cable does not interfere with
safe operation and maintenance of the vehicle.
6. Secure the cable to the vehicle structure at approximately
one foot intervals, taking care not to over tighten, pinch conductors, or penetrate the insulation.
7. Use proper electrical and mechanical fastening means for
terminating the cable. Properly sized “crimp” type electrical
terminals are an accepted method of termination. Select
electrical connectors sized for use with 20AWG (0.81mm2)
conductors.
8. Connect the watertight connector end of the power cable to
the Thor VM1 Quick Mount Smart Dock power connector by
aligning the connector pins to the power connector; push
down on the watertight connector and twist it to fasten
securely.
9. Secure the power cable to the Thor VM1 using strain relief
cable clamps, and place the Thor VM1 in the dock.
10. If using the Screen Blanking feature, install the screen
blanking box or switch. (Refer to the installation instructions
that came with the Screen Blanking box, or to the Thor VM1
User’s Guide, available at www.honeywellaidc.com for further information about the Screen Blanking box.)
11. Press the power switch on the back of the Thor VM1 dock.
12. Press the power button on the front of the Thor VM1.
Page 6

Adapter Cables
!
This section assumes the VX6/VX7 or Thor VX8/VX9 power cable is
properly connected to vehicle power. Refer to the appropriate Vehicle Mounting Reference Guide for details.
Note: For high voltage forklifts (over 60V), refer to the “DC/DC
Power Supply Installation Instructions,” available at
www.honeywellaidc.com.
VX6/VX7 Adapter Cable
CAUTION - Because the Thor supports 10-60 VDC
power input, verify input voltages before using this
adapter cable with an existing VX6 or VX7 power connection installation.
This adapter cable is available to attach the Thor VM1 to a vehicle previously equipped with a VX6/VX7 DC power cable.
When this adapter cable is used, there is no provision for an
ignition switch input. Therefore the vehicle ignition monitoring
function is not available when using this cable.
1. The Thor VM1 must not be mounted in the Quick Mount
Smart Dock. The power switch on the dock must be turned
Off. The power cable must be UNPLUGGED from the
dock.
2. Connect the cable to the Thor VM1 power cable by aligning
the connector pins to the power connector; push down on
the watertight connector and twist it to fasten securely.
3. The cable is rated for a maximum temperature of 221°F
(105°C). The cable should be protected from surfaces that
exceed this temperature, from physical damage from moving parts, and from chemicals or oil that cause the insulation to deteriorate. Route the cable so that it does not
interfere with safe operation and maintenance of the vehicle.
Page 7

4. Secure the cable to the vehicle structure at approximately
one foot intervals, taking care not to over tighten, pinch conductors, or penetrate the insulation.
5. Connect the watertight connector end of the power cable to
the Thor VM1 Quick Mount Smart Dock power connector by
aligning the connector pins to the power connector; push
down on the watertight connector and twist it to fasten
securely.
6. Secure the power cable to the Thor VM1 using strain relief
cable clamps, and place the Thor VM1 in the dock.
7. If using the Screen Blanking feature, install the screen
blanking box or switch. (Refer to the installation instructions
that came with the Screen Blanking box, or to the Thor VM1
User’s Guide, available at www.honeywellaidc.com for further information about the Screen Blanking box.)
8. Press the power switch on the back of the Thor VM1 dock.
9. Press the power button on the front of the Thor VM1.
Thor VX8/VX9 Adapter Cable
This adapter cable is available to attach the Thor VM1 to a vehicle previously equipped with a VX8/VX9 DC power cable. This
cable has bare wires for ground and ignition sense connection
plus a D9 cable that connects to a COM port on the Thor VM1
dock to provide a screen blanking signal.
1. The Thor VM1 must not be mounted in the Quick Mount
Smart Dock. The power switch on the dock must be turned
Off. The power cable must be UNPLUGGED from the
dock.
2. Connect the cable to the Thor VM1 power cable by aligning
the connector pins to the power connector; push down on
the watertight connector and twist it to fasten securely.
Page 8

3. Connect the green wire to vehicle ground:
!
For battery powered vehicles:
The green wire must be connected to the vehicle chassis
ground.
For internal combustion engine powered vehicles:
The green wire is connected to the vehicle chassis
ground, which can also be battery negative.
4. If ignition control will be used, connect the blue wire to an
ignition switched circuit (less than 1mA over input voltage
range). If ignition control is not used, the blue wire can be
left disconnected,
5. If the VX8/VX9 cable is connected to a screen blanking box
or switch, connect the D9 connector to a COM port on the
dock. (Refer to the installation instructions that came with
the Screen Blanking box, or to the Thor VM1 User’s Guide,
available at www.honeywellaidc.com, for further information
about the Screen Blanking box.)
6. The cable is rated for a maximum temperature of 221°F
(105°C). The cable should be protected from surfaces that
exceed this temperature, from physical damage from moving parts, and from chemicals or oil that cause the insulation to deteriorate. Route the cable so that it does not
interfere with safe operation and maintenance of the vehicle.
7. Secure the cable to the vehicle structure at approximately
one foot intervals, taking care not to over tighten, pinch conductors, or penetrate the insulation.
8. Connect the watertight connector end of the power cable to
the Thor VM1 Quick Mount Smart Dock power connector by
aligning the connector pins to the power connector; push
down on the watertight connector and twist it to fasten
securely.
9. Secure the power cable to the Thor VM1 using strain relief
cable clamps, and place the Thor VM1 in the dock.
Page 9

10. If using the Screen Blanking feature, install the screen
blanking box or switch.
11. Press the power switch on the back of the Thor VM1 dock.
12. Press the power button on the front of the Thor VM1.
Note: Have the following information available before setting up
your Thor VM1:
• Network ID (SSID) of the Access Point
• WEP key or LEAP authentication credentials
Setting up the Thor VM1 Software
1. Connect the Thor VM1 to an external power source.
2. Press the Power button.
3. For a 12-key Thor VM1, you may want to attach a USB keyboard
via the USB adapter cable during the setup process.
4. Accept the EULA.
5. Calibrate the touch screen.
6. Set the date and time.
7. Edit the radio parameters.
8. Edit the RFTerm Terminal Emulation parameters (optional).
9. Perform a reboot.
Page 10

Bluetooth and Thor VM1
Refer to the Thor VM1 User’s Guide, available at
www.honeywellaidc.com, for information when using the Thor VM1
with Bluetooth.
ActiveSync
Installing ActiveSync on Desktop/Laptop
ActiveSync (version 4.5 or higher for Windows desktop/laptop
computers) must be resident on the host (desktop/laptop) computer. Windows Mobile Device Center is required for a Windows
Vista/Windows 7 desktop/laptop computer. ActiveSync and
Windows Mobile Device Center for the PC are available from
the Microsoft website. Follow Microsoft's instructions to locate,
download and install ActiveSync or Windows Mobile Device
Center on your desktop/laptop.
ActiveSync using USB-Client Connection
The only connection type is USB Client.
1. Connect the Thor VM1 end of the USB cable to the USB
port on the back of the Thor VM1 Quick Mount Smart Dock.
2. Connect the other end of the cable to a USB port on a PC
or laptop.
ActiveSync starts automatically when the USB cable is connected.
When the Thor VM1 loses connection (e.g., enters Suspend
Mode), the connection to ActiveSync will be temporarily lost.
When the Thor VM1 resumes, the ActiveSync session will automatically re-connect.
Page 11

Refer to the Thor VM1 User’s Gouide, available at
www.honeywellaidc.com, for further information about
ActiveSync information.
Wireless Network Configuration
If the access point uses an authentication protocol (WEP, LEAP,
etc.), your radio must use the same authentication. Contact your IT
department for any necessary keys, login credentials, or certificates.
Refer to the Thor VM1 User’s Guide, available at
www.honeywellaidc.com, for further information or for configuration
options not listed here.
1. Tap Start > Programs > Summit > SCU or tap the Summit
Client Utility icon on the desktop.
2. Tap the Admin Login button and enter the password (default =
SUMMIT).
3. Tap the Profile tab and make sure the Default profile is selected.
4. Select SSID and enter the SSID of the access point.
5. If the access point is using WPA or WPA2:
5a. Set Encryption to WPA TKIP, WPA CCKM, WPA2 AES,
WPA2-TKIP, or WPA2 CCKM.
5b. Set EAP type to PEAP/MSCHAP, PEAP/GTC, WPA/
LEAP, EAP-FAST or EAP-TLS.
5c. Set Auth Type to Open unless using WEP/LEAP. For
WEP/LEAP set Auth Type to correspond to the access
point’s setting.
5d. Tap the Credentials button and complete the entries on
the popup screen.
5e. Tap OK. Skip to step 8.
Page 12

6. If the access point is using WPA PSK:
6a. Set Encryption to WPA PSK, WPA2-PSK-TKIP, WPA-
PSK-AES, or WPA2 PSK.
6b. Set EAP type to None.
6c. Tap the WEP keys/PSKs button and enter the PSK .
6d. Tap OK. Skip to step 8.
7. If the access point is using LEAP:
7a. Set Encryption to WEP EAP.
7b. Set EAP Type to LEAP.
7c. Set Auth Type to correspond to the access point’s set-
ting.
7d. Tap the Credentials button and enter the User Name and
Password.
7e. Tap OK. Skip to step 8.
8. Tap the Commit button to save the radio configuration.
9. Tap the Main tab. Wait for a radio connected message.
10. Tap the Admin Logout button when finished.
11. Reboot the Thor VM1.
Setting Up AppLock (CE 6.0 only)
Thor VM1 devices are shipped to boot in Administration mode. In
this mode, the user has full access to the device and no password is
needed. After the administrator completes the process below, the
Thor VM1 switches to end-user mode and restricts access to only
the specified application(s).
Page 13

1. Tap the Start > Settings > Control Panel or System >
Administration icon.
2. Assign application(s) on the Application tab screen.
3. Assign a password on the Security tab screen.
4. Select a view level on the Status tab screen, if desired.
5. Tap OK.
6. Press the hotkey (Ctrl + Shift + A) sequence to launch AppLock
and lock the configured application(s).
7. The device is now in end-user mode.
Connecting Using RFTerm
Before you make a host connection, you will, at a minimum, need to
know:
• the alias name or IP address (Host Address) and
• the port number (Telnet Port) of the host system to properly set
up your host session.
1. Make sure the mobile client network settings are properly
configured. If you are connecting via WLAN (802.11x), make
sure your Thor VM1 is connected to the network.
2. Launch RFTerm by tapping the RFTerm icon on the desktop.
3. Select Session > Configure from the application menu and
select the host type. This is dependent on the host system to
which you are connecting; i.e., 3270 mainframe, AS/400 5250
server or VT host.
4. Enter the Host Address of the system. This may either be a
DNS name or an IP address of the host system.
®
Page 14

5. Update the telnet port number if your host application is
configured to listen on a specific port. If not, use the default
telnet port.
6. Select OK.
7. Select Session > Connect from the application menu or tap the
Connect button on the Tool Bar.
8. Upon a successful connection, the host application screen is
displayed.
To change options (e.g., Display, Colors, Cursor, Bar Code), refer to
the RFTerm Reference Guide, available at www.honeywellaidc.com,
for further information about these and other features.
Rebooting the Thor VM1
To warmboot the Thor VM1 with Windows CE 6.0:
1. Select Start > Settings > Control Panel > Registry.
2. Tap the Warmboot button.
To warmboot the Thor VM1 with Windows Embedded Standard:
1. Select Start > Shutdown > Restart to reboot.
When the Thor VM1 is booting, there may be small delays while the
wireless client connects, applications launch, remote management
completes and Bluetooth devices connect.
Page 15

Disclaimer
Honeywell International Inc. (“HII”) reserves the right to make changes in
specifications and other information contained in this document without prior
notice, and the reader should in all cases consult HII to determine whether
any such changes have been made. The information in this publication does
not represent a commitment on the part of HII.
HII shall not be liable for technical or editorial errors or omissions contained
herein; nor for incidental or consequential damages resulting from the furnishing, performance, or use of this material. HII disclaims all responsibility
for the selection and use of software and/or hardware to achieve intended
results.
This document contains proprietary information that is protected by copyright. All rights are reserved. No part of this document may be photocopied,
reproduced, or translated into another language without the prior written consent of HII.
2011-2014 Honeywell International Inc. All rights reserved.
Other product names or marks mentioned in this document may be trademarks or registered trademarks of other companies and are the property of
their respective owners.
Web Address: www.honeywellaidc.com
Patents
For patent information, please refer to www.hsmpats.com.
Technical Assistance
Contact information for technical support, product service, and repair can be
found at www.honeywellaidc.com.
Limited Warranty
Refer to www.honeywellaidc.com/warranty_information for your product’s
warranty information.
User Documentation
To download the Thor VM1 user documentation go to
www.honeywellaidc.com.
Page 16

 Loading...