


Instructions for Use
Washing machine

390909
Thank you for your confidence in purchasing our washing machine, and congratulations on the excellent choice.
Your new washing machine meets the requirements of modern treatment of laundry. It is rational in the consumption of energy, water and washing agents.
Our appliances are friendly to the environment. Some of the materials may be recycled, others deposited or decomposed. To avoid pollution of environment, once your appliance is no longer useful, take it to your local authorized waste appliance dealer.
The appliance is intended exclusively for use in households. If the appliance is used for professional purposes, for profit, or for purposes beyond regular use in a household, or if appliance is used by a person who is not a consumer, the warranty period equals the shortest warranty period possible as stipulated by the relevant legislation.
Description of washing machine .................................. |
3 |
Cautions .......................................................................... |
4 |
Installation and connection........................................... |
5 |
Operation......................................................................... |
9 |
Tips for washing and energy saving .......................... |
16 |
Cleaning and maintenance.......................................... |
17 |
Troubleshooting ........................................................... |
19 |
Tables ............................................................................ |
23 |
2

Description of washing machine
|
|
|
|
|
|
|
|
|
|
|
|
|
|
|
|
|
|
|
|
|
|
|
|
|
|
|
|
|
|
|
|
|
|
|
|
1. |
Front panel |
5. Adjustable legs |
||||||
2. |
Detergent dispenser |
6. |
Water outlet hose |
|||||
3. |
Door |
7. |
Water inlet hose |
|||||
4. |
Filter lid |
8. |
Mains power cable |
|||||
|
|
|
|
|
|
|
|
|
Technical information
(depending on model)
• Max. load: 7 kg /6 kg / 5,5 kg |
• Max. load: 5 kg |
Dimensions (w x d x h): |
Dimensions (w x d x h): |
600 mm x 600 mm x 850 mm |
600 mm x 440 mm x 850 mm |
Depth with door open: 105 cm |
Depth with door open: 88 cm |
Weight (net): 72 kg |
Weight (net): 61 kg |
Nominal voltage: 230 V, 50 Hz |
Nominal voltage: 230 V, 50 Hz |
Rated power: 2000 W |
Rated power: 2000 W |
Power socket: (230 V, 50 Hz, 10 A) |
Power socket: (230 V, 50 Hz, 10 A) |
Water pressure: min. 0,05 MPa, max. 0,8 MPa |
Water pressure: min. 0,05 MPa, max. 0,8 MPa |
Fuse: 10 A |
Fuse: 10 A |
|
|
Rating plate with basic information is located above the opening of the machine.
390909
3

390909
Cautions
•Be sure to remove transport brackets prior first use of the appliance. Attempted operation of the blocked machine may result in irreparable damage which is not covered by the manufacturer’s warranty!
•When connecting your washing machine to water supply, be sure to use brand new water inlet hose and appropriate sealing gaskets (attached).
•Do not locate the machine in a room with temperature below 0°C. Parts of the machine may be damaged if frozen.
•Install the washing machine in a perfectly horizontal position, on solid flat concrete floor.
•Follow the instructions for correct installation and water and mains connections.
•Never immerse the end of the drain hose into the draining water.
•Prior starting the washing cycle lock the door by pressing them at the designed spot.
•Door may not be open during the washing cycle.
•We recommend running the self-cleaning program before the first wash in order to remove any impurities from the washing machine drum (see chapter on” Selecting additional functions”).
•Use only detergents and softeners for machine wash. Manufacturer may not assume responsibility for any damage and eventual discoloring of gaskets and plastic components as a consequence of incorrect use of bleach and/or coloring agents.
•For removal of lime residues use such agents with added anti-corrosion agents. Follow the manufacturer’s instructions. Finish the lime removal by multiple rinsing to remove completely eventual acid residues.
•Never use detergents containing solvents, since there is a danger of creating toxic gasses which may damage the machine and result in ignition or explosion.
•This product does not release silver ions during the washing cycle.
•Upon completion of washing operation close the water faucet.
•Before any transport block the machine by inserting at least one transport blocking rod. Prior this operation disconnect the appliance from the mains power!
•Rating plate with basic information is located above the opening of the machine.
•The warranty shall not apply to consumables (bulbs), minor discoloration or deviations of color, increased noise level as a consequence of appliance age, which does not affect appliance functionality, and aesthetical deficiencies which do not affect appliance functionality or safety.
•The appliance is manufactured in compliance with all relevant safety standards; however, it is recommended that persons with impaired physical, motional, or mental abilities, or persons with inadequate experience and knowledge, do not use the appliance without due supervision. The same recommendation applies to minors using the appliance.
 Before connecting the appliance read these instructions carefully. Repairing the failure arising from inappropriate connections or use of the appliance is not covered by the guarantee.
The symbol on the product or on its packaging indicates that this product may not be treated as household waste. Instead it shall be handed over to the applicable collection point for the recycling of electrical and electronic equipment. By ensuring this product is disposed of correctly, you will help prevent potential
negative consequences for the environment and human health, which could otherwise be caused by inappropriate waste handling of this product. For more detailed information about recycling of this product, please contact your local city office, your household waste disposal service or the shop where you purchased the product.
4
Installation and connection
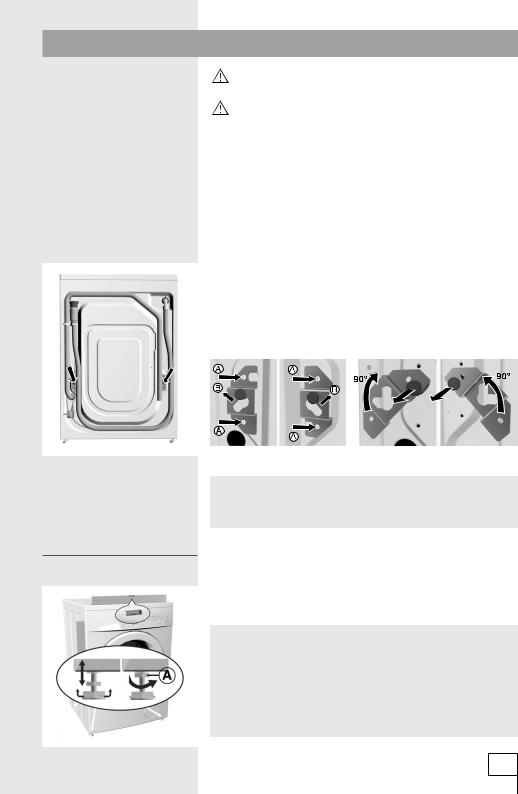
Package removal |
|
In removing the wrapping be careful not to damage the |
|
|
appliance with a sharp object. |
|
|
Before connecting the appliance, let it warm up to room |
|
|
temperature (wait for two hours). |
|
• Our appliances are packed in environmentally friendly |
|
|
|
materials which may be recycled, deposited or decomposed |
|
|
without any threat to the environment. |
|
• To this end all wrappings are marked accordingly. |
|
|
|
|
Removal of transport |
• Move the pipes. |
|
brackets |
• Loosen screws (A) at the rear of the machine (Fig. 1). |
|
|
• Remove the brackets (B) (Fig. 1) and slide them into the |
|
|
|
groove on the blocking rod (Fig. 2) - the right one should be |
|
|
turned around. |
|
• Use the brackets to rotate blocking rods for 90° and pull them |
|
|
|
out. |
|
• Close the openings with attached plastic pegs. |
|
|
Save transport brackets for eventual later use. |
|
Fig. 1 |
Fig. 2 |
 Be sure to remove the transport brackets prior first use, otherwise the appliance may be permanently damaged. In such cases the warranty conditions are void.
Leveling the appliance • Put the appliance in horizontal position by turning the adjustable legs. The legs are adjustable up to +/- 1 cm.
After the adjustment tighten the nuts firmly (A) - towards the bottom of the machine!
 Vibrations, moving of the appliance and loud operation due to incorrect setting of the adjustable feet shall not be covered by this warranty.
 The appliance should be placed on a surface with concrete base; the surface should be dry and clean in order to prevent slipping. The adjustable feet should also be cleaned before installation.
390909
5

Water inlet connection
390909
•If you have a tumble dryer of the same dimensions, you can place it on top of the washing machine.
 To ensure correct operation of the appliance, water pressure inlet must be between 0,05 and 0,8 MPa.
 Minimum water pressure can be established by measuring the quantity of poured out water. 3 litres of water must be poured out from completely opened tap in 15 seconds.
•Take the water inlet hose from the drum and attach the inlet hose angle extension (1) to the washing machine by screwing it onto the provided thread (certain models only).
•Insert the gasket with a filter net into the straight inlet hose attachment nut (2) and screw the nut onto the water tap. (With some models, the gasket with filter net is already fitted and any additional fitting into the nut on the straight attachment is not required).
•If your model has connections for both hot and cold water, then connect one hose to the cold water supply (blue wing nut or blue mark on the hose) and the other one to the hot water supply (red wing nut or red mark on the hose), as indicated on the back wall of the appliance (letters C and H) (C - cold; H – hot).
 The inlet hose should be tightened manually, firmly enough to prevent any leaks. After tightening the hose, check for any leaks.
Use of pliers, wrenches, or other similar tools is not allowed when installing the hose, as these tools can damage the nut thread.
Partial Aqua-stop (water stop system)
In case of damage on the interior pipe, leaking is prevented by automatic closing system which stops water inlet to the machine. In such cases display A turns red.
Inlet pipe must be replaced.
Complete Aqua-stop (certain models only)
In case of damage on the interior pipe, leaking is prevented by automatic closing system which stops water inlet to the machine. Security system also detects whether there is any water leakage within the interior of the machine. In such cases washing is suspended, machine switches on the pump and signals error.
 Do not immerse the Aqua-stop system inlet pipe into the water, because it contains the electric valve!
6

Water outlet connection |
• Fix the outlet hose to run into the sink or the bathtub, or |
||||
|
|
|
|
connect it directly to the wall drain outlet (diameter min. 4 cm). |
|
|
|
|
• Wall drain must be installed properly and must enable |
||
|
|
|
|
occasional cleaning. |
|
|
|
|
• Fasten the outlet hose support with a piece of rope led through |
||
|
|
|
|
the hose elbow, to prevent the hose from slipping to the floor. |
|
|
|
|
|
The end of outlet hose should be placed between minimum 60 |
|
|
|
|
|
cm and maximum 100 cm above the floor level. |
|
|
|
|
|
|
|
|
|
|
|||
Connect the appliance to |
• Plug the mains power cable to the wall mains socket. |
||||
the mains supply |
• Required voltage and other information are written on the |
||||
|
|
|
|
rating plate above the door opening of the machine. |
|
|
|
|
|
|
|
|
|
|
|
The wall socket must be accessible at all times and |
|
|
|
|
|
must be equipped with an earth lead (in accordance |
|
|
|
|
|
with the local safety regulations). |
|
|
|
|
|
The permanent connection must be fitted by an |
|
|
|
|
|
authorized personnel only. |
|
|
|
|
|
Damaged mains power cable may be replaced only by |
|
|
|
|
|
the producer or his authorized personnel. |
|
|
|
|
|
Never plug the appliance into the electric shaver socket |
|
|
|
|
|
or hair dryer socket. |
|
|
|
|
|
|
|
|
|
|
|
|
|
|
|
|
|
|
|
|
|
|
|
|
|
|
|
|
|
|
|
390909
7

 This appliance must be earthed!
Connect the appliance with the cable and plug to a suitable 13 amp socket which is properly earthed.
Required nominal voltage and frequency are indicated on the rating plate.
The connection to the mains supply and earthing have to be made according to current standards and regulations. The appliance resists temporary voltage tolerance up to -15 to +10 %.
If the fitted plug is not suitable for your socket outlet, then it should be cut off and disposed of safely in order to avoid a possible shock hazard.
A suitable plug of 13 amp or 15 amp rating should then be fitted to the cable.
The wires in the mains lead are coloured in accordance with the following code (see fig.).
1. The GREEN AND YELLOW wire must be connected to the terminal in the plug, which is marked with the letter E or by the earth, symbol or coloured green or green and yellow.
2. The BLUE wire must be connected to the terminal which is marked with the letter N or coloured black.
3.The BROWN wire must be connected to the terminal which is marked with the letter L or coloured red.
390909
8

Operation
A - program selector knob |
|
|
Signal LED’s: |
|
|
|
|
||
|
|
|
|
|
|
||||
|
|
|
|
|
|
||||
|
|
|
|
|
|
||||
|
|
|
|
|
|
||||
B - key - selection of spinning speed (rpm) |
- washing program stages |
|
|||||||
/ stop pump |
|
|
|
• wash + pre-wash |
|
||||
C - short program (Quick wash) |
• rinse |
|
|
|
|
||||
D - higher water level (Water plus) |
• spin |
|
|
|
|
||||
E - START / PAUSE button |
|
|
|
|
|
|
|
|
|
F - delayed start |
|
|
|
|
|
|
|
|
|
G - display |
|
|
|
|
|
|
|
|
|
|
|
|
|
|
|
|
|
|
|
|
|
|
|
|
|
|
|
||
Program selector |
|
Basic programs |
|
Partial programs |
|
||||
|
|
|
|
|
|
|
|
|
|
|
|
|
Cotton |
|
|
Softening |
|
||
|
|
|
Pre-wash |
|
|
|
|||
|
|
|
Quick program |
|
(Conditioner) |
|
|||
|
|
|
20°-Tap water + (ECO) |
|
|
|
|
|
|
|
|
|
Synthetics |
|
|
Pumping water (Drain) |
|
||
|
|
|
Easy iron |
|
|
|
|||
|
|
|
|
|
|
|
|
|
|
|
|
|
|
|
|
|
|
||
|
|
|
Delicate |
|
|
Spinning |
|
||
|
|
|
|
|
|
|
|
|
|
|
|
|
Wool |
|
|
|
|
|
|
|
|
|
|
|
|
|
|
|
|
|
|
|
Mix |
|
|
|
|
|
|
|
|
|
|
|
|
|
|
|
|
|
|
|
|
|
|
|
|
|
|
Washing procedure |
|
• Open the door of the machine. |
|
|
|
|
|||
|
|
• Load the laundry into the drum. |
|
|
|
|
|||
|
|
• Close the door. |
|
|
|
|
|
|
|
• Open the water inlet faucet.
• Select the desired program.
• Add washing and treatment agents (detergent and softener).
• Start the operation by pushing the START knob (E).
390909
9
Washing machine operation
390909
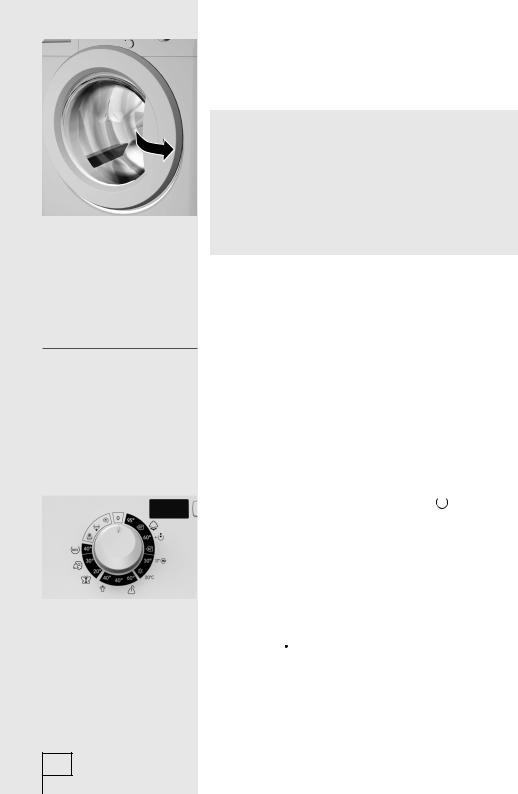
- Open the door of the machine.
Door is opened by pulling the handle (lever) on the right hand side of the door towards you.
- Sort the laundry by the type of fabrics.
 Do the buttons and zippers, tie the strings and pull out the pockets.
 Very delicate laundry should be put in a special protective sack.
 It is suggested to load the drum with items of different sizes.
 Pay attention to the labels on the clothes, indicating the recommending washing mode (see table of textile
treatment symbols on the last page of these instructions).
-Load the laundry into the drum.
Check that the drum is empty.
-Close the door of the appliance.
-Open the water inlet faucet.
-Push the ON/OFF button and select washing program.
Program is selected by turning the program selector (A) from the “0” position to the desired washing program. LED next to the START key starts flashing. Duration of the selected program is indicated on the display. The program selector (A) may be turned in both directions, and the appropriate program selected according to the type of laundry washed and the required washing temperature (see Program Chart for help). You may select basic or partial programs.
Select additional functions by pressing their relevant knobs (E).
- Selection of basic programs ( ,
,  ,
,  ,
,  ,
,  )
)
Basic programs represent integral programs containing all washing stages, including softening and spinning (see Program Chart). They are selected by turning the program selector (A) to the appropriate position.
 Cotton: whites/colored
Normally stained cotton and flax bed linen and underwear, table cloth, bathroom towels, top garments, etc.
To wash heavily soiled laundry that will not discolor, use the program with a prewash  .
.
For smaller loads (non-delicate cotton, linen, synthetic, and mixed fabric) and smaller quantities of soiled laundry (laundry refreshment, laundry wet with perspiration, etc.), we recommend the use of the
 quick program. To activate the program, turn the (A) button to the setting “Cotton 30°C” and then press the “Short Program (C)” key. You will save both energy and time.
10
 Loading...