


EN
DETAILED INSTRUCTIONS
HOW TO USE YOUR WASHING MACHINE
www.gorenje.com
We thank you for your trust and the purchase of our washing machine.
Your new washing machine complies with the requirements of modern laundry care. Your laundry will
be impeccably white even at low temperatures, owing to special washing programs like Ultra White. Problems with stains? With programs like StainExpert, this won't be a problem at all.
SensoCare technology allows simple control of the washing machine. Your washing machine is highly economical when it comes to use of power, water, and detergent.
The washing machine is intended exclusively for use in households, for washing the laundry that is indicated as machine washable.

TABLE OF CONTENTS
4 |
WASHING MACHINE |
INTRODUCTION |
5 |
Technical information |
|
6Front panel
8SAFETY PRECAUTIONS
10 |
INSTALLATION AND CONNECTION |
PREPARING THE |
10 |
Removal of transport brackets |
APPLIANCE FOR |
11 |
Selecting the room |
THE FIRST USE |
11 |
Installation |
|
13Water inlet connection
14Aqua - stop
14Popolni aqua - stop
15Water outlet connection
16Connect the appliance to the mains supply
17Moving and transport
17Subsequent transport
18BEFORE THE USE
19 WASHING STEPS (1 - 7)
191. Step: check the tags on your laundry
202. Step: preparing the washing process
223. Step: choosing a programme
254. Step: choosing the settings
285. Step: selecting additional functions
316. Step: program start
317. Step: end of washing program
32CLEANING AND MAINTENANCE
32Cleaning the detergent dispenser
33Cleaning the dispenser housing, inlet hose screen and door rubber gasket
34Cleaning the filter
35Cleaning the washing machine
STEPS OF THE WASHING PROCESS
CLEANING & MAINTENANCE OF THE APPLIANCE
36 INERRUPTING AND CHANCHING THE PROGRAM
38What to do ...?
39Troubleshooting table
41 RECOMMENDATIONS FOR WASHING AND ECONOMIC USE YOUR
WASHING MACHINE
43 Grandma's advice for natural stain removal
45DISPOSAL
46TYPICAL CONSUMPTION TABLE
TROUBLE-
SHOOTING
OTHER
354011
3
WASHING MACHINE
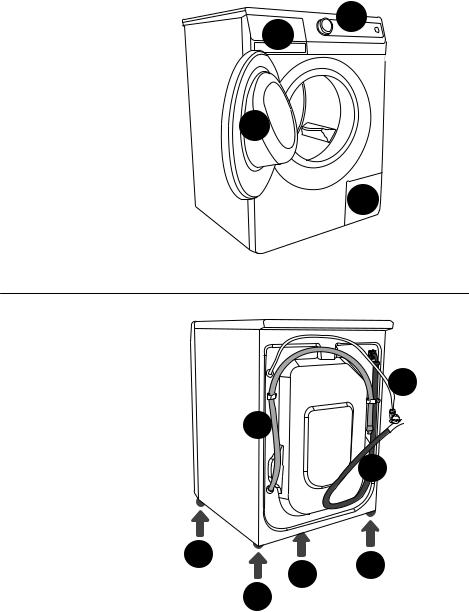
(WASHING MACHINE DESCRIPTION)
FRONT |
1 |
|
|
1 Front panel |
2 |
2Dispenser
3 Door
4Filter
3
4
BACK
1 Water inlet pipe
2Power cord
3 Water discharge pipe
4Adjustable feet
2
3
1
4
4
4
4
354011
4

TECHNICAL INFORMATION
(DEPENDING ON THE MODEL)
The rating plate with the basic information on the washing machine is located under the washing machine door.
Maximum load |
See rating plate |
See rating plate (SLIM) |
|
Width |
600 mm |
600 mm |
|
Height |
850 mm |
850 mm |
|
Depth |
600 mm |
440 mm |
|
Depth with door open |
108 cm |
92 cm |
|
Washing machine weight |
x kg |
x kg |
|
(depending on the model) |
(depending on the model) |
||
|
|||
Rated Voltage |
See rating plate |
See rating plate |
|
Nominal power |
See rating plate |
See rating plate |
|
Connection |
See rating plate |
See rating plate |
|
Water pressure |
See rating plate |
See rating plate |
|
Current |
See rating plate |
See rating plate |
|
Frequency |
See rating plate |
See rating plate |
Rating plate
TYPE: PS10/XXX |
|
MODEL: XXXXXX |
|
|
|
|
|
||||||||||||||||||||
|
|
|
|||||||||||||||||||||||||
Art.No.: XXXXXX |
|
Ser.No.: XXXXXX |
|
||||||||||||||||||||||||
|
|
||||||||||||||||||||||||||
AC 220-240V 50/60 Hz |
|
|
|
|
|
|
10A Pmax.: 2400W |
||||||||||||||||||||
|
|
|
|
|
|
||||||||||||||||||||||
|
|
|
|
|
|
|
|
|
|
|
|
|
2000W |
XXX/min |
Xkg 0,05-0,8 MPa |
||||||||||||
|
|
|
|
|
|
|
|
|
|
|
|
|
|||||||||||||||
IPX4 |
|
|
|||||||||||||||||||||||||
MADE IN SLOVENIA |
|
|
|||||||||||||||||||||||||
354011
5

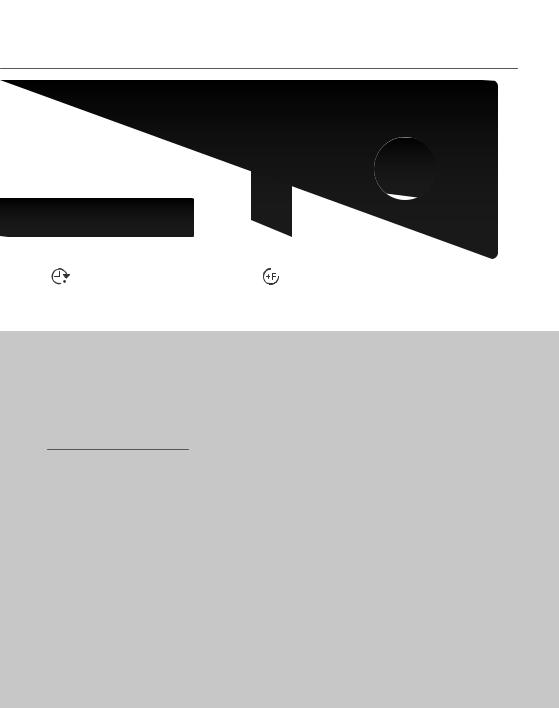
FRONT PANEL
OFF
1 |
|
|
2 |
3 |
4 |
Washing machine ON/ |
WASHING STYLE key |
||
1 OFF and program |
2 (SensoCare) |
||
SELECTOR DIAL |
|
|
|
|
NORMALcare |
|
|
|
|
|
|
|
|
|
|
|
TIMEcare |
|
|
|
|
|
|
|
|
|
|
|
ALERGYcare |
|
|
|
|
|
|
|
|
||
|
ECOcare |
|
|
|
|
|
|
|
Washing style will appear on |
||
|
the display above the key. |
||
3WASHING TEMPERATURE key
Washing temperature will appear on the display above the key.
4SPINNING RPM / PUMP
(DRAIN) / STOP PUMP
(RH) key
SPINNING RPM /
PUMP (DRAIN)/
PUMP STOP (RH)
will appear on the display above the key.
354011
6
|
9 |
|
|
7a |
|
|
7b |
|
|
7c |
8 |
5 |
6 |
|
START|PAUSE
WASHING PROGRAM |
a , b, c ADDITIONAL |
START/PAUSE key |
5 COMPLETION TIME |
7 FUNCTION keys |
8 Use this key to start or |
(END TIME) key |
7a Prewash |
stop the program. |
WASHING TIME |
7b Extra water |
|
COMPLETION will appear on |
7c SterilTub |
When the machine is turned |
the display above the key. |
|
on, the signal light on the |
|
|
key starts to flash; when the |
6 STAIN EXPERT key |
|
program is started, it is lit |
|
continuously. |
FRUIT
COFFIE
WINE
ORGANIC
Type of stain will appear on the display above the key.
 -->Drum illumination (depending on the model)
9PROGRAM INFORMATION
(consumption values) display
354011
7

SAFETY PRECAUTIONS
Please, do not use the washing machine without reading and understanding these instructions or use first.
Be sure to remove transport brackets prior first use of the appliance. Attempted operation of the blocked machine may result in irreparable damage which is not covered by the manufacturer’s warranty!
When connecting your washing machine to water supply, be sure to use the supplied water inlet hose and sealing gaskets.
Failure to observe the instructions for use or inappropriate use of the washing machine may result in damage to the laundry or machine, or injury to the user.
Keep the instructions for use handy, near the washing machine.
Do not install the machine in a room where temperature can drop below 0°C. Parts of the machine may be damaged if the water inside them freezes.
Install the washing machine in a perfectly horizontal position, on solid flat (concrete) floor.
Follow the instructions for correct installation and water and mains connections (see chapter "Installation and connections").
Never immerse the end of the drain hose into the draining water.
Prior starting the washing cycle lock the door by pressing them at the designed spot.
354011
Door may not be open during the washing cycle.
We recommend running the self-cleaning program before the first wash in order to remove any impurities from the washing machine drum. (See chapter on” Selecting additional functions”.
Use only detergents and softeners for machine wash. Manufacturer may not assume responsibility for any damage and eventual discolouring of gaskets and plastic components as a consequence of incorrect use of bleach and/or colouring agents.
For removal of lime residues use such agents with added anti-corrosion agents.
Follow the manufacturer’s instructions.
Finish the lime removal by multiple rinsing to remove completely eventual acid residues (e.g. vinegar etc.).
Never use detergents containing solvents, since there is a danger of creating toxic gasses which may damage the machine and result in ignition or explosion.
This product does not release silver ions during the washing cycle.
Upon completion of the washing cycle, close the water faucet and unplug the mains cord.
Before transporting the machine after it has been used, block the drum by inserting at least one transport blocking rod.
Disconnect the appliance from the mains power before inserting the rod!
8

Rating plate with basic information is located above the opening of the machine.
Leave any repairs and similar tasks on the washing machine to an expert.
Unprofessional repair may result in an accident or major malfunction.
The warranty shall not apply to consumables (bulbs), minor discoloration or deviations of colour, increased noise level as a consequence of appliance age, which does not affect appliance functionality, and aesthetical deficiencies which do not affect appliance functionality or safety.
The appliance is intended exclusively for use in households. If the appliance is used for professional purposes, for profit, or for purposes beyond regular use in a household, or if appliance is used by a
person who is not a consumer, the warranty period equals the shortest warranty period possible as stipulated by the relevant legislation.
THE APPLIANCE IS MANUFACTURED IN COMPLIANCE WITH ALL RELEVANT SAFETY STANDARDS.
THIS APPLIANCE CAN BE USED BY CHILDREN AGED FROM 8 YEARS AND ABOVE AND PERSONS
WITH REDUCED PHYSICAL, SENSORY OR MENTAL CAPABILITIES OR LACK OF EXPERIENCE AND
KNOWLEDGE IF THEY HAVE BEEN GIVEN SUPERVISION
OR INSTRUCTION CONCERNING USE OF THE APPLIANCE IN A SAFE WAY AND UNDERSTAND THE HAZARDS INVOLVED. CHILDREN SHALL NOT PLAY WITH THE
APPLIANCE. CLEANING AND USER MAINTENANCE SHALL
NOT BE MADE BY CHILDREN WITHOUT SUPERVISION.
BEFORE CONNECTING THE WASHING MACHINE:
Carefully read the instructions for use before connecting the washing machine. Repair or any warranty claim resulting from incorrect connection or use of the washing machine shall not be covered by the warranty.
354011
9
INSTALLATION AND CONNECTION
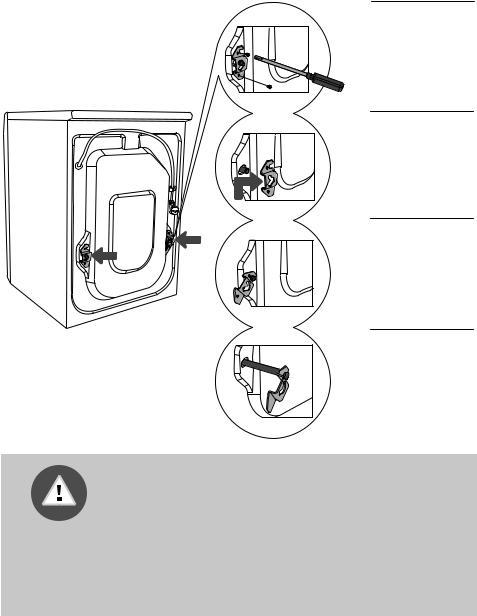
REMOVAL OF TRANSPORT BRACKETS
1 Move the pipes.
Loosen screws at the rear of the machine.
2 Remove the
brackets.
|
Slide brackets |
|
3 into the groove |
|
on the blocking |
|
rod - the right one |
|
should be turned |
|
around. |
|
Use the |
|
4 brackets to |
|
rotate blocking rods |
Close the openings with attached plastic |
for 90° and pull |
pegs. |
them out. |
Be careful to prevent personal injury.
In removing the wrapping be careful not to damage the appliance with a sharp object.
Remove transport protection devices; as running the washing machine with the blocking rods in place could result in damage. Save transport brackets for eventual later use.
Warranty shall be void in cases of such damage.
354011
10
SELECTING THE ROOM
The appliance should be placed on a surface with concrete base; the surface should be dry and clean in order to prevent slipping. The adjustable feet should also be cleaned before installation.
INSTALLATION
Use a water scale and spanner No. 22 (for feet) and 17 (for the nut).
1 Put the appliance in horizontal
position by turning the adjustable legs. The legs are
adjustable up to +/- 1 cm.
2 After the adjustment
tighten the nuts firmly - towards the bottom of the machine!
Vibrations, moving of the appliance and loud operation due to incorrect setting of the adjustable feet shall not be covered by this warranty.
354011
11
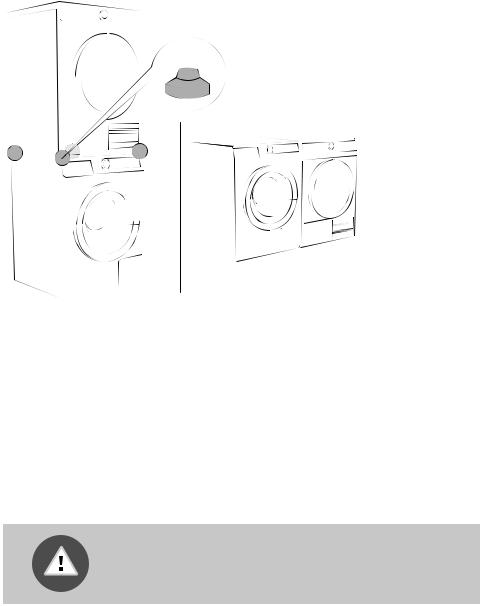
If you have a tumble dryer of the same dimensions, you can place it on top of the washing machine by using the vacuum feet or side by side.
4X
Before connecting the appliance, let it warm up to room temperature (wait at least two hours).
354011
12
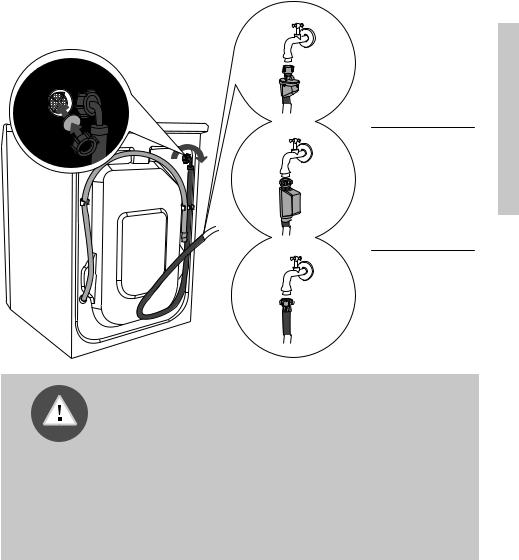
WATER INLET CONNECTION
Insert the gasket with a filter net into the straight inlet hose attachment nut and screw the nut onto the water tap (with some models, the gasket with filter net is already fitted and any additional fitting into the nut on the straight attachment is not required).
A
A AQUASTOP
1
B
B
C
C
TOTAL AQUA-
STOP
REGULAR
ATTACHMENT
To ensure correct operation of the appliance, water pressure inlet must be between 0,05 and 0,8 MPa. Minimum water pressure can be established by measuring the quantity of poured out water. 3 litres of water must be poured out from completely opened tap in 15 seconds.
If your model has connections for both hot and cold water, then connect one hose to the cold water supply (blue wing nut or blue mark on the hose) and the other one to the hot water supply (red wing nut or red mark on the hose), as indicated on the back wall of the appliance (letters C and H) (C - cold; H – hot).
Hot water (a mixture of hot and cold water) is added only on the programs of 60° or more.
354011
13
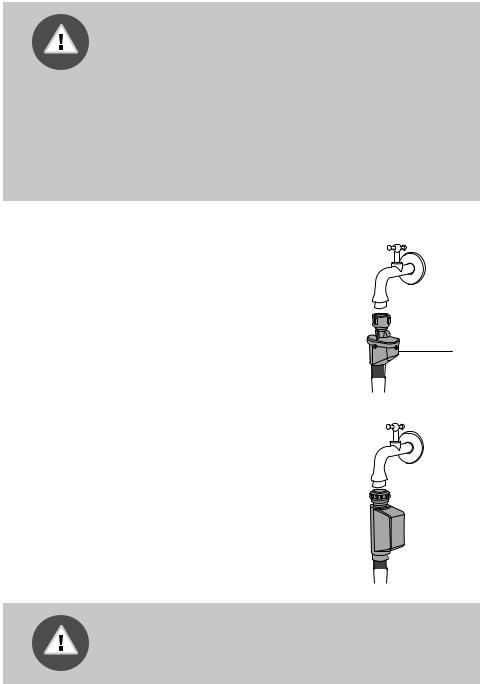
If your washing machine features both cold and hot water attachments, but you only wish to connect it to the cold water supply, please remove the hot water inlet hose from the back of the appliance. Then, use the supplied cover to close the hot water inlet. (picture 1)
If your washing machine allows connecting both hot and cold water with total Aqua-Stop (option B), but you only wish to connect it to the cold water supply, then seal the hot water tube with a suitable 3/4" plug which is not attached to the machine.
The inlet hose should be tightened manually, firmly enough to prevent any leaks. After tightening the hose, check for any leaks. Use of pliers, wrenches, or other similar tools is not allowed when installing the hose, as these tools can damage the nut thread.
AQUA - STOP
(CERTAIN MODELS ONLY)
In case of damage on the interior pipe, leaking is prevented by automatic closing system which stops water inlet to the machine.
In such cases display (A) turns red. Inlet pipe must be replaced. |
A |
|
POPOLNI AQUA - STOP
(CERTAIN MODELS ONLY)
In case of damage on the interior pipe, leaking is prevented by automatic closing system which stops water inlet to the machine. Protection system will also detect whether there is any water leakage in the washing machine interior. In such cases, washing is suspended, water supply is cut off, and machine switches on the pump and signals an error.
Do not immerse the Aqua-stop system inlet pipe into the water, because it contains the electric valve!
354011
14

WATER OUTLET CONNECTION
Fix the drain hose to run into the sink or the bathtub, or connect it directly to the wall drain outlet (diameter min. 4 cm). The end of outlet hose should be placed between minimum 60 cm and maximum 100 cm above the floor level. It can be attached in three ways (A, B, C).
max 150 cm
|
max |
|
A |
100 |
|
cm |
||
|
max |
min |
|
100 |
60 |
|
cm |
||
cm |
||
|
B
C
max |
90 |
|
|
cm |
|
|
|
max90cm
max 160 cm
A
 B
B
 C
C
|
-40 |
cm |
|
|
|
max |
30 |
|
|
|
min60cm
max 100 cm
AOutlet hose can be led into
a wash basin or a bathtub. Use a string to attach the hose to the opening in the elbow support to prevent it from slipping to the floor.
BDrain hose can also be
attached directly to the basin drain.
CDrain hose can also be
connected to a wall drain with a trap that is properly installed to allow cleaning.
354011
15
 Loading...