

Page 1

INSTRUCTIONS
FOR USE
1
Washer disinfector
46-2,46-4,46-5
Mfg. no.. SEV0632001-
5018610-00 Rev.D
Instructions for use5018610-00 Rev.D
Edition 0703
Page 2

2
5018610-00 Rev.D Edition 0703
Instructions for use
Page 3

Contents
3
Contents
Foreword ________________________________________________________ 4
Safety regulations ________________________________________________ 5
Important ______________________________________________________ 5
Product liability _________________________________________________ 5
In an emergency: _______________________________________________ 5
Symbols on the machine _________________________________________ 6
Isolator switch __________________________________________________ 6
Attention symbols _______________________________________________ 6
General __________________________________________________________ 7
Control system _________________________________________________ 8
Door function ___________________________________________________ 8
Dosing system _________________________________________________ 9
Drying _________________________________________________________ 9
Control panel ____________________________________________________ 10
Operating instructions ___________________________________________ 11
Loading goods to be washed into the machine ______________________ 11
Choose a program ______________________________________________ 11
Aborting an ongoing program _____________________________________ 11
When the program is complete ___________________________________ 11
Changing parameters ___________________________________________ 12
Printing out a program (for a machine with printer (option))____________ 12
Fault indications _________________________________________________ 13
Handling alarms ________________________________________________ 13
Fault codes in the machine ______________________________________ 14
Alarm ________________________________________________________ 14
Fault codes in the master supervisory system (option)_______________ 16
Inspection _______________________________________________________ 17
Daily _________________________________________________________ 17
When necessary _______________________________________________ 18
Printer (option) _________________________________________________ 19
Detergents ______________________________________________________ 21
Getinge detergent for mechanical washing of: ______________________ 21
Acidic detergents and neutralizing agents __________________________ 21
Lubricants and rinse aids ________________________________________ 21
Flusher detergents _____________________________________________ 21
Instructions for use5018610-00 Rev.D
Edition 0703
Page 4
4
Foreword
This instruction manual is intended for users of the Getinge 46-series washer
disinfector.
The instruction manual describes the design and operation of the machine and the
maintenance for which the user is responsible. The purpose of the information in
the manual is to ensure safe operation and optimum efficiency.
Before using the machine for the first time, users must have read this instruction
manual and familiarized themselves with the operation of the machine and its safety
instructions.
The information in this manual describes the machine as dispatched from Getinge.
There may be differences due to customization.
The machine is accompanied by the following documentation:
• Instructions for use (this book)
• Installation instructions
• Service instructions
• Spare parts list
Foreword
Read through the instruction manual before using the machine
Getinge reserves the right to change the specification and design without prior
notice. The information in this manual was up to date on the date of issue of the
manual.
© Copyright
The content of this manual must not be copied,
in whole or in part, without Getinge’s written consent.
5018610-00 Rev.D Edition 0703
Instructions for use
Page 5

Safety regulations
Safety regulations
This machine has been designed with a number of built-in safety devices. To avoid
injury, it is very important that these safety devices are not bypassed and thus
disabled.
The equipment must be used in accordance with the safety instructions below.
If in doubt, contact a representative of the reseller without delay.
Important
• Read the instructions thoroughly before use.
• The equipment must only be used by personnel who know about it and are
trained to use it. Personnel must also receive regular training on this equipment.
• Take care when handling the chemical agent used in the machine. Read the
details on the container or contact the manufacturer:
- if the agent comes into contact with the operator’s eyes or skin or if the
vapours are breathed in, etc.
5
- about storing the agent and disposing of empty containers.
• Take care, because the machine uses hot water and possibly steam.
• Installation and service work must be done by personnel trained for this
machine.
• Never bypass the door switch of the machine.
• Leakage in the system, due to a worn door seal for example, must be repaired
without delay.
• The electric power must be cut off before the machine cabinet is opened. (The
machine cabinet contains electrical components).
• make sure that there is always detergent in the bottles. This is important both for
the operation of the machine and for keeping the washing chamber free from
discolorations.
• The machine must be kept clean if it is to work properly.
• Do not wash down or hose down the machine with water.
Product liability
Any modification or incorrect use of the equipment without the approval of Getinge
Disinfection AB invalidates Getinge Disinfection AB’s product liability.
In an emergency
• switch off the main switch
• Close shutoff valves in the water and (where present) steam supply lines.
Instructions for use5018610-00 Rev.D
Edition 0703
Page 6
6
Symbols on the machine
Warning, see instructions for use.
Warning, hot surface.
Isolating device
The machine should be fitted with a separate isolating device in the electric power
supply. The isolating device must be easily accessible on a wall close to the
machine.
Attention symbols
Some of the warnings, instructions and advice in this manual are so important that
we use special symbols to draw attention to them. The symbols used are as follows:
This symbol indicates a warning in the text of the manual. The nature of the
hazard that the warning relates to is such that it may result in more or less
severe injury and in certain cases mortal danger.
Safety regulations
It also highlights warnings to avoid damage to equipment.
The Getinge 46-Series are Washer Disinfectors for washing, intermediate level of
disinfection and drying of Surgical Instruments (rigid and tubular), Hollow ware, Wash
bowls, Suction bottles and Baby bottles, Containers, laboratory glass and Anesthetic
accessories (critical items, such as invasive surgical instruments and anesthesia
devices, must be further processed by terminal sterilization before use in any
procedure).
Validation on different goods to verify intended use are made with Getinge
Disinfection AB standard loads.
The customer is responsible that Installation Qualification, Operating Qualification and
Performance Qualification are performed according to EN ISO 15883 before product
usage.
5018610-00 Rev.D Edition 0703
Instructions for use
Page 7
General
General
The Getinge 46-Series are Washer Disinfectors for washing, intermediate level of
disinfection and drying of Surgical Instruments (rigid and tubular), Hollow ware,
Wash bowls, Suction bottles and Baby bottles, Containers, laboratory glass and
Anesthetic accessories (critical items, such as invasive surgical instruments and
anesthesia devices, must be further processed by terminal sterilization before use in
any procedure).
Validation on different goods to verify intended use are made with Getinge
Disinfection AB standard loads.
The customer is responsible that Installation Qualification, Operating Qualification
and Performance Qualification are performed according to EN ISO 15883 before
product usage.
The machine has spray arms and dockings as follows:
• 46-2 has three spray arms and one docking:
• 46-4 has two spray arms and two dockings:
• 46-5 has two spray arms and three dockings:
The machine can be equipped with several different accessories for different
cleaning requirements. These accessories are presented in a special accessories
catalogue.
7
There are several possible ways of installing and equipping the machine depending
on its field of application:
• 46-2 has electric heating.
46-4 and 46-5 have electric or steam heating.
• 46-2 is fitted with a single door.
46-4 and 46-5 are fitted with a single or double door
.
• Connection of distilled or de-ionised water.
• Extra dosing pumps which allow chemical disinfection of heat-sensitive goods.
• With or without built-in drying system.
• Audible signal on fault code.
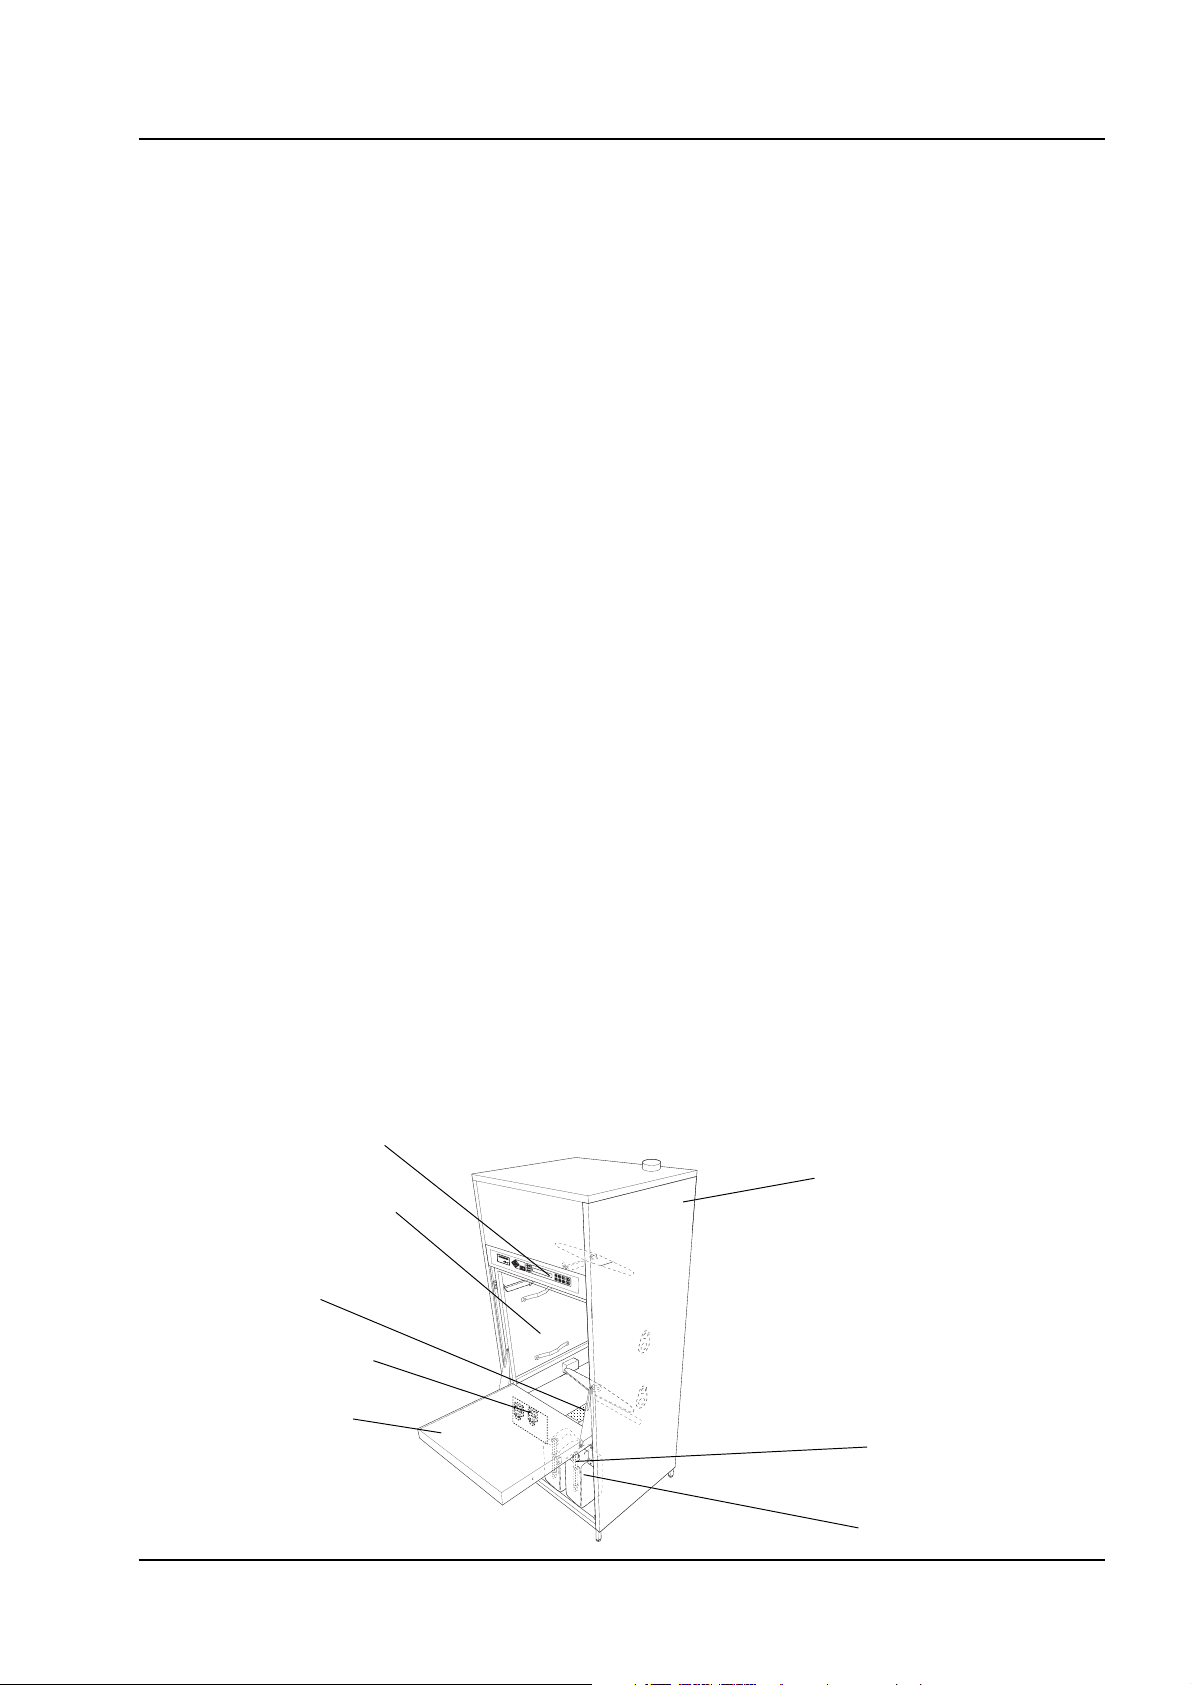
Control panel
Dryer module
Washing chamber
Bottom strainer
with handle
Dosing pumps
Hinged door
Suction pipe with
Container alarm
V1627
Instructions for use5018610-00 Rev.D
Detergent
container
Edition 0703
Page 8

8
control system
The machine has an electronic controller which can hold up to 10-15 programs. Six
of these programs can be chosen with the program selection buttons. Other
programs are chosen with the menu buttons; see Operating instructions.
The machine comes with a number of standard programs in the control system (see
the separate program sheet). Contact the your reseller for customized programs.
Door function
46-2 is fitted with a single door. 46-4 and 46-5 are fitted either with a single door or
with double doors.
Machines with double doors have a system of interlocks to ensure that only one
door can be opened at a time. This means that the clean-side door must be closed
before the soiled-side door can be opened.
General
Programming may only be done by authorized personnel.
When you press V, the door is locked and a yellow lamp flashes for about 10
seconds. If you press Vagain during this “cancel time”, the soiled-side door is
unlocked and the door can be opened.
When the program is complete, a green lamp lights up on both sides (if there are
double doors) and the clean-side door is unlocked. When the door has been opened
manually, the green lamp goes out. With double doors, the clean-side door must be
closed before the soiled-side door can be unlocked.
Soiled sideClean side
V398
5018610-00 Rev.D Edition 0703
Instructions for use
Page 9

General
Dosing system
In standard form, the machine has two dosing systems. One is for alkaline
detergent and one is for rinse-aid or acid detergent.
The machine cannot be started until detergent has been added. If the detergent
holder is empty, “DOS 1 LOW LEVEL”, for example, appears on the display.
A third and a fourth dosing system for chemical disinfection of heat-sensitive goods
or instrument milk, for example, can be installed.
9
Empty container alarm
Drying
V1627
Container for detergent/rinse-aid
If the machine does not have a dryer, we recommend that the goods are dried in a
separate drying cabinet.
Instructions for use5018610-00 Rev.D
Edition 0703
Page 10

10
Control panel
The machine is operated from the control panel above the soiled-side door. The
picture below shows the location of buttons and indicators.
Menu selection buttons
(see “Service instructions”)
Control panel
Before starting: Chosen program
While running: Program phase
(eg “Rinsing”)
V1624
Yellow lamp:
Program running
Green lamp:
Program complete
Program number
P01 OP-SHORT-D
47.0°C
Red lamp:
Fault indication
Alarm reset button
Start button for
washing
programs
Program selection buttons
V1762
5018610-00 Rev.D Edition 0703
Instructions for use
Page 11

Operating instructions
Operating instructions
Loading goods to be washed into the machine
• Load the items to be washed on to the trolley and run the trolley into the
machine. Examples showing how to load the trolley are shown on the goods
positioning sign.
NOTE:
Maximum weight of items to be washed and wash trolley:
46-2: 35 kg
46-4: 50 kg
46-5: 60 kg
• Make sure that the washer arms can rotate freely without touching the goods.
• Close the door.
A fine filter must be used when cleaning and disinfecting tubular instruments
with a passage smaller than 1 mm, to prevent particles getting stuck in the
instruments. Blocked or reduced water flow may result in cleaning and
disinfection failing to take place.
11
Choose a program
• Choose a program in one of the following ways:
- Press one of the program selection buttons 1 -6
- Press S. The display now shows “CHOOSE PROGRAM”.
Press S again.
Choose a program from the list with H and J.
Press S to confirm your choice.
You can see the machine programs on the separate program sheet.
• Press V. A yellow lamp flashes for 10 seconds. During this time, the program
can be aborted by pressing V again.
While a program is running
While the program is running, a yellow lamp at N is lit and the program phase (eg
“Rinse”) and the current temperature are shown on the display. Press S to see
how much time remains.
When the program is complete
• When the program is complete, a green lamp lights up at N. The door (on the
clean side if the sterilizer has two doors) is unlocked and can be opened.
If the items are still hot after a program, handle them with care to avoid burns.
• Empty the machine (and if the machine has double doors, close the clean-side
door).
• If the same program is to be used again, there is no need to select the program
again. Simply press V immediately.
Note:
The display switches to standby mode after 30 minutes and returns automatically when a
program is started or selected.
Instructions for use5018610-00 Rev.D
Edition 0703
Page 12

12
Operating instructions
Changing parameters
Normally the preset parameter settings of the installed programs are used, but in
special cases it may be necessary to adjust certain parameters for matching to a
specific wash process. Information about the parameters that can be changed and
their limit values can be found under heading “A- or P-parameters” in Chapter 4 of
the service manual.
Printing out a program for a machine with printer (option)
An example of a program printout is shown below. In the example, program P02
OP-D, programmed on menu selection button 2 is used.
PROGRAM:P2 OP-D
DATE:13/04/2004
PROGRAM START:13:44:46
MACHINE NAME:46-4
MACHINE NO:1
CYCLE COUNTER:1
Parameter
WASH DOS TEMP 35.0C
WASH DOS 1 00:01:00
WASH TEMP. 60.0C
WASH TIME 00:03:00
FINAL R DOS TEMP 80.0C
FINAL R DOS 3 00:00:21
DISINF TIME 00:01:00
DISINF TEMP 90.0C
DRYING TEMP9 0.0C
DRYING TIME 00:18:00
SIGNALS
A107
TEMP INDEP. CHAMB
PH20-DRAINING 40 s
00:14:18 61.5
PH330-RINSE 1
00:15:29 61.5
PH20-DRAINING 40 s
00:17:39 55.1
PH360-RINSE 2
00:18:46 55.5
PH20-DRAINING 40 s
00:20:55 53.2
PH440-FINAL RINSE
00:22:03 53.5
00:27:53 80.1
DOS START
PROGTIME A107
PH1-START
00:00:00 30.8
PH2-DRAINING 10 s
00:00:00 31.2
PH220-PRE RINSE CW
00:00:10 31.0
PH20-DRAINING 40 s
00:02:42 16.2
PH25-WASHING
00:03:51 18.1
00:05:52 35.2
DOS START
00:06:53 39.9
DOS.STOP
00:11:17 60.0
00:12:17 608
00:13:17 61.9
00:14:17 61.5
00:28:15 81.5
DOS.STOP
00:30:26 90.0
PH450-DISINFECTION
00:30:27 90.1
00:31:26 92.3
PH20-DRAINING 40 s
00:31:28 92.3
PH900-DRYING
00:32:36 91.7
00:51:27 80.8
PH1000-ENDING
00:52:43 81.1
SIGNATURE: .........
5018610-00 Rev.D Edition 0703
Instructions for use
Page 13

Fault indications
Fault indications
Red lamp: Alarm indication Handling alarm or fault code
Handling alarms
Handling alarms appear on the display in plain text.
P01
DOSE 1 LOW LEVEL
13
V1624
DOSE 1 LOW LEVEL
The machine cannot be started until the fault has been put right.
The following handling alarms can be displayed:
DOSE 1 LOW LEVEL Empty container alarm 1. If detergent 1 is finished, a handling alarm is
generated The alarm is reset automatically when detergent is added.
DOSE 2 LOW LEVEL Empty container alarm 2. If detergent 2 is finished, a handling alarm is
generated The alarm is reset automatically when detergent is added.
DOSE 3 LOW LEVEL Empty container alarm 3. If detergent 3 is finished, a handling alarm is
generated The alarm is reset automatically when detergent is added.
DOSE 4 LOW LEVEL Empty container alarm 4. If detergent 4 is finished, a handling alarm is
generated The alarm is reset automatically when detergent is added.
Note:
When the handling alarm is activated (appears on the display) there is always enough
detergent left for one run; in other words, if you have started a program it can run to the
end.
Instructions for use5018610-00 Rev.D
Edition 0703
Page 14

14
Alarms
If the red lamp at O lights up, the process has been aborted because of a fault.
The display shows a fault code.
F01
Acknowledging a fault code
Acknowledge the fault code by:
• Note the fault code
• Cancel the acoustic signal by pressing U . The machine remains locked but
the program has been stopped. The display shows the password entry menu.
• Correct the fault or call service personnel.
• Enter the password (558387) using the arrow keys and press S. All liquid is
drained from the machine and the soiled-side door is unlocked*.
Fault indications
• Open the door and remove the items.
The items in the machine are not clean and must be washed again from the
beginning with a new program.
If the items are still hot, handle them with care to avoid burns.
* If the drain pump is faulty, water cannot be drained from the machine and the fault cannot be put right
until the door has been opened. The soiled-side door is unlocked as soon as a the password is confirmed.
Fault codes in the machine
Fault codes indicate that a serious fault has occurred in the machine or the washing
process. The fault must be put right by an authorized service technician.
The following fault codes may occur:
Fault code Description of fault
F00 Power failure
F0 1 Motor cutout has tripped.
F0 2 Water filling takes more than 10 minutes.
F0 3 Draining takes longer than five minutes or there is water remaining in
the washing chamber at the end of the draining phase.
F0 4 Water leakage in the drying unit.
F0 5 Soiled-side door does not lock within 10 seconds of program start or
the door is opened while a program is running.
F0 6 Soiled-side door does not unlock within 10 seconds of the end of a
program.
5018610-00 Rev.D Edition 0703
Instructions for use
Page 15

Fault indications
Fault code Description of fault
F0 9 Clean-side door does not lock within 10 seconds of program start or if
F1 0 Clean-side door does not unlock within 10 seconds of the end of a
F15 Not enough detergent 1 dosed.
F16 Not enough detergent 2 dosed.
F19 Not enough detergent 3 dosed.
F20 Not enough detergent 4 dosed.
F23 High conductivity.
F2 4 Low pressure in drying unit.
F2 5 High pressure in drying unit.
15
the door is opened while a program is running.
program.
F2 6 Low pressure from circulation pump.
F2 7 High pressure from circulation pump.
F2 8 Low temperature in drying unit.
F3 0 Faulty (controlling) temperature sensor in washing chamber
F3 1 Faulty (independent) temperature sensor in washing chamber
F3 2 Faulty temperature sensor in drying unit.
F33 Incorrect temperature in washing chamber. (Temperature too low
because of a heating fault.)
F34 Incorrect temperature in washing chamber. (Sensor fault)
F35 Not used.
F3 6 Fault message from independent supervisory system; see under Fault
codes in independent supervisory system
F37 Incorrect temperature in washing chamber. (Temperature too high
because of a heating fault.)
F38 Disinfection temperature lower than set temperature.
Instructions for use5018610-00 Rev.D
Edition 0703
Page 16

16
Fault codes in the master supervisory system (option)
The fault codes indicate that the monitoring system has detected serious fault in the
machine or in the current wash program. All fault codes in the supervisory system
must be acknowledged on the washer disinfector’s control panel. The fault must be
put right by an authorized service technician. When the fault is pur right, the fault
code is reset automatically.
The following fault codes may occur:
Fault code Description of fault
F0 0 Faulty (controlling) temperature sensor in washing chamber
F0 1 Faulty (independent) temperature sensor in washing chamber
F0 2 Low pressure from circulation pump.
F04 Incorrect temperature in washing chamber. (Sensor fault)
F0 5 Low pressure from circulation pump.
Fault indications
F0 6 High pressure from circulation pump.
F08 Not enough detergent 1 dosed.
F09 Not enough detergent 2 dosed.
F10 Not enough detergent 3 dosed.
F11 Not enough detergent 4 dosed.
F13 High conductivity.
F1 4 Incorrect disinfection time.
F15 Disinfection temperature lower than set temperature.
F1 6 Fault message from control system
F17 Power outage, emergency stop
5018610-00 Rev.D Edition 0703
Instructions for use
Page 17

Inspection
Inspection
Daily
• Check that no objects have fallen down into the bottom of the washing chamber.
Loose objects may cause blockages and seriously reduce the performance of
the washer disinfector.
• Check that the spray arms can rotate freely. Check that the holes in the spray
arms are not blocked. Blocked spray holes may adversely affect the cleaning
result.
If the arms need cleaning, remove them by unscrewing the central nut. The
arms can then be lifted off and washed clean. Check that the arms can rotate
freely when re-installed.
17
Centre nut
V317
Coarse strainer
Fine strainer
Detergent/rinse-aid container
• Remove and clean the strainer in the bottom of the washing chamber. A dirty
coarse strainer may prevent water from circulating and provide the conditions
for the growth of bacteria.
The heating coils under the coarse strainer may be hot.
• If necessary for cleaning, open the strainer with the two nuts.
• Open the detergent door and check that there is detergent/rinse-aid in the
containers.
V1625
• Check that the trolley docks properly with the water connections. If the trolley
does not dock properly, adjust the spring.
• Visually check the accessories of the machine with regard to intended use and
function, eg blocked ducts or damaged and missing parts that might adversely
affect the performance of the machine.
• Check that the dockings move easily.
Instructions for use5018610-00 Rev.D
Edition 0703
Page 18

18
When necessary
Washing chamber
Keep the washing chamber free of limescale deposits. Remove any remaining
deposits as follows:
• Open the door and dispense 200 ml NEODISHER BU descaler (sold by Dr.
Weigert) into the wash chamber.
• Close the door and run the descaling program.
(NOTE: Do not have any goods in the machine with this program. It is only for descaling
the machine and insert.
Inspection
V1627
The outside
The front and side walls can be cleaned and disinfected with an alcohol-based
cleaning agent, medical spirit or an ordinary cleaner. the control panel is cleaned in
the same way.
Remove stains with an ordinary cleaner for stainless steel.
If the washer disinfector is used without automatic descaling for incoming water,
the heating element must be checked regularly for limescale deposits.
It is important to maintain a high level of hygiene around the machine.
5018610-00 Rev.D Edition 0703
Instructions for use
Page 19

Inspection
Printer (optional)
Replacing the paper roll
• Open the front door of the printer.
• Remove any paper residue.
• Fold down the printing mechanism by pressing the latch marked PUSH (A).
• Cut the end of the new roll square (B). (This makes it easier to thread the paper
into the printer mechanism.)
19
A
V1973
B
V1972
• Insert the paper into the opening of the print mechanism and press the FEED
(C) button on the printer. The paper is now automatically fed through the printer
mechanism.
C
V1973
D
• Fold away the printing mechanism and lock it with the latch (D).
• Tear off the paper and close the front panel of the printer.
• The printer is now ready to use again.
Never use the printer without paper and/or ink ribbon.
Do not pull on the printer feed when the printer is on.
Instructions for use5018610-00 Rev.D
Edition 0703
Page 20

20
Ribbon cassette replacement
• Open the front door of the printer.
A
• Remove the ink ribbon by pressing gently on the left-hand side of the ribbon
cassette.
• Insert the new ribbon cassette. The printer is now ready to use again.
Inspection
V1973
Never use the printer without paper and/or ink ribbon.
5018610-00 Rev.D Edition 0703
Instructions for use
Page 21

Detergents
Detergents
The machine has been tested with Getinge detergents. We recommend that you use
Getinge detergent or detergent from a reputable manufacturer.
Getinge detergent for mechanical washing of:
A - Surgical instruments B - MIS-instruments
C - Anesthesia equipment D - OP shoes
E - Containers F - Baby-bottles G - Lab glassware
21
Products Alkalinity Surfactants Phosphates Enzymes Suitable for optics Goods to
Getinge Power Wash Amines + - + + A, B, C, D, E
Getinge Wash Extra Alkaline salts - + - ( +) A , C, D, (E), F
Getinge Wash Intensive Caustic soda + - - - A, C, D, F
Getinge Wash Enzyme - + - + + A, B, C, D, E
Getinge Wash LAB Caustic soda - - - - G
and anodized alu. be washed
Acidic detergents and neutralizing agents
Products Acids Effects Prewash for Dosage
Getinge Neutralization P Phosphoric Neutralization of alkaline residues, Removal of First rinse after the alkaline
acid, citric removal of mineral residues, e.g. mineral residues wash for neutralization or
acid rust and lime prewash
Getinge Neutralization Citric acids Neutralization of alkaline residues First rinse after the
lab glassware
alkaline wash
Lubricants and rinse aids
Products Ingredients Effects Dosage
Getinge Instrument milk Paraffinum perliquidum Lubrication of instruments Final rinse
Getinge Rinse Surfactants Reduction of surface tension Final rinse
emulsifying agents
of water, improved drying
Flusher detergents
Products Alkali Dispersion agents Complexing agents Surfactants
GD Wash + - ++ +
GD Flush - ++ + -
Getinge detergents can be ordered from resellers of Getinge products.
Instructions for use5018610-00 Rev.D
Edition 0703
Page 22

22
This product is manufactured by:
GETINGE DISINFECTION AB, Ljungadalsgatan 11, Box 1505, 351 15 Växjö, Sweden
5018610-00 Rev.D Edition 0703
Instructions for use
 Loading...