

Page 1

INSTALLING THE GAME
WARLORDS BATTLECRY II and click on Electronic Registration. Follow all on-screen
prompts to complete the registration.
Before you get started, please make sure your system meets the
minimum system requirements listed below. You must install the
ARLORDS BATTLECRY II files to your hard drive and have the WARLORDS
W
BATTLECRY II CD in your CD-ROM drive in order to play this game. To
install the game, insert the CD into the CD-ROM drive. When the popup window appears, click on the Install option. If you have disabled
the Windows Autorun function, or if it does not operate, explore the
CD and double-click the Setup icon. Follow all on-screen prompts to
complete the installation.
System Requirements
To run WARLORDS BATTLECRY II you need the following minimum system
requirements:
®
• Windows
• Pentium
•845 MB of hard disk space
• 64MB RAM
• 8X CD-ROM
• DirectX compatible video adapter with 4MB of memory and a
Color SVGA Monitor
• 8 MB video card (DirectX 8 compatible)
• Windows compatible pointing device
• Support for 1- 6 players LAN 1-4 players Internet (56K Modem or
faster required)
In addition to the basic system requirements, the game requires that
DirectX 8.1 or higher be installed to your hard drive. The option to
install DirectX 8.1 appears during the game installation. At the end of
installation, you are prompted to register W
electronically. For Internet play you need a DirectPlay compatible
modem.
The following are the recommended system requirements:
• Pentium
• 128 MB RAM
95/98/ME/2000/XP
®
II 350 Mhz PC or compatible
®
III 450 or AMD®K6-3 500
ARLORDS BATTLECRY II
Electronic Registration
If you did not register your copy of WARLORDS BATTLECRY II after
installation and wish to do so later: From your desktop select the
Start button, click on Programs, click on the folder that contains
Uninstalling the Game
Select the Uninstall option from the Autorun Menu, or choose Settings from the
Windows Start Menu and select Control Panel. In the Control Panel, select
Add/Remove Programs, left-click on Warlords Battlecry II and click on the
Add/Remove button. The game and all its components are then removed from your
hard drive, except for data that was changed after the initial install (i.e. save games,
character data, and game options file). These can be found in the My Documents/
Warlords Battlecry II directory.
Starting the Game
Every time the CD-ROM drive is closed with the CD in place, the WARLORDS BATTLECRY II
Autorun menu appears with options to run the game, Install DirectX, view the
Readme.txt file or uninstall the game. The game can also be started by opening the
Start Menu, selecting programs, choosing the folder where the game was installed
and clicking on the W
The first time you run W
through the main screens. Move your cursor over the writing to see explanations
for various parts of the screen. When you are ready, click on the screen to close it.
These dialogues can be activated at any time on that screen by pressing the F1 key.
For complete and specific “how to play” information, please refer to the appropriate
sections of the manual. Note that some changes were made too late to include in this
manual. Please read the Readme.txt file in your game folder for more information.
ARLORDS BATTLECRY II program item.
ARLORDS BATTLECRY II, help dialogues appear to guide you
Saving Games
WARLORDS BATTLECRY II requires space on your hard drive for Saved Games and
temporary files. Each saved game can take up to 2 MB of hard drive space.
Electronic Documentation and Website
Extra information not included in this manual is in the “Documentation” directory on
the WARLORDS BATTLECRY II CD. There are full details of all units in “Battlecry II
Units.chm”, tables and hot-keys in “Battlecry II Appendix.chm”, spell descriptions
and costs in “Battlecry II Spells.chm”, and instructions for the editor in “Battlecry II
Editor.chm”.
Further information, including FAQs, extra scenarios, battle reports and other extra
material can be found on the SSG website: http://www.ssg.com.au
This product has been rated by the Entertainment Software Rating Board. For
information about the ESRB rating, or to comment about the appropriateness of the
rating, please contact the ESRB at 1-800-771-3772.
2
3
Page 2
INTRODUCTION
WARLORDS BATTLECRY II is a fantasy strategy game of combat, heroes,
and magic. It provides a unique blend of role-playing and strategy,
where you improve your hero, build an empire, produce units, cast
spells, go on quests, and battle other races.
ARLORDS BATTLECRY II has many exciting new features, including:
W
• Heroes – Twelve different races to play.
• Unit races – Twelve different sides to play.
• Units – Over one hundred and forty unique units, including heroes,
archers, mages, and siege weapons.
• Buildings – Almost two hundred unique buildings.
• Skills – Numerous skills to upgrade your units and buildings.
• Spells – Over one hundred spells with spectacular special effects.
• Formations – Eight different formations to control your troops.
• Victory conditions – Thirteen different conditions from which
to choose.
• Quests – Hundreds of different quests for your hero to complete.
• Editor – Create your own fully customizable scenarios.
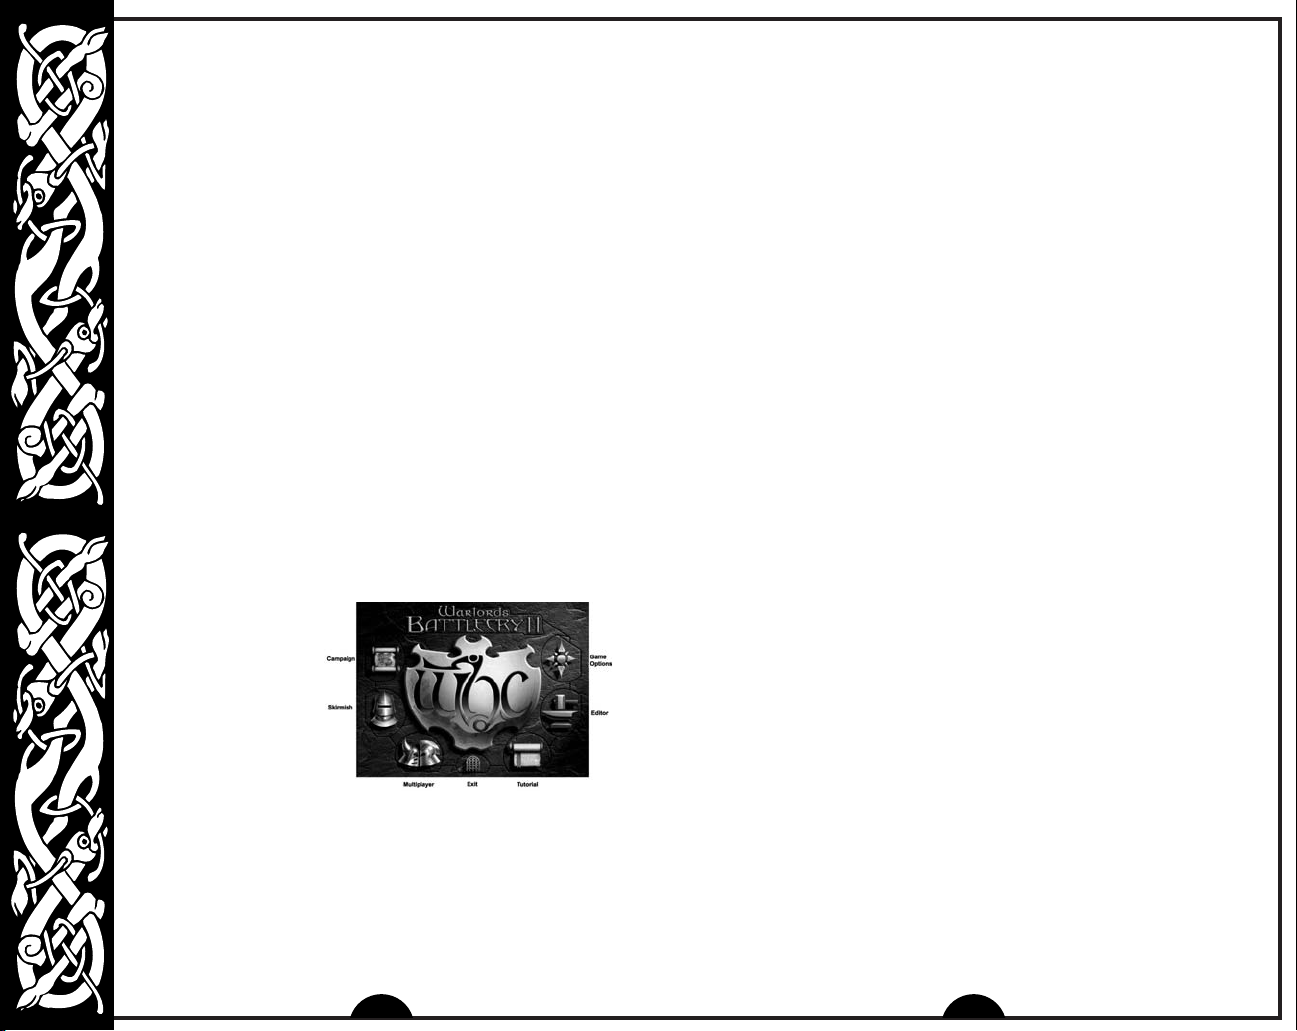
STARTING THE GAME
Main Menu
The Main Menu appears
after the opening movie
has played. Press the
Escape key to skip the
movie. There are seven
options on the W
BATTLECRY II Main Menu.
Campaign Play the hero and battle other races for the land of
Skirmish Play a single player game versus up to five computer
ARLORDS
Etheria. Engage in duels, challenges, and uprisings;
purchase special items; and unlock new units to use.
For details, see page 5.
AI players, on either a standard or random map. For
details on how to play “Skirmish”, see page 8.
4
Multiplayer Play other human warlords via IPX, TCP/IP, Internet or
Tutorial There is one simple-to-learn tutorial on how to play the game,
Editor The editor allows you to create your own exciting new scenarios
Options Allows you to control game options for sound, settings, and graphics.
Exit Exit to Windows.
modem. For details on how to play “Multiplayer”, see page 12.
covering all the basics such as how to select and move units, attack,
build buildings, and produce units.
to play by yourself against the computer, or with your friends.
All existing scenarios are fully customizable. Every aspect of the
scenario, including terrain, buildings, units, events, sides and game
options is available to be edited. For full instructions on how to
use the “Editor”, see the “Battlecry II Editor.chm” documentation
included on the W
You can also view the introduction video and the credits. For details
on the options available, see page 14.
ARLORDS BATTLECRY II CD.
PLAYING THE CAMPAIGN
The WARLORDS BATTLECRY II campaign is an epic battle for possession of all sixtyseven regions of Etheria. From your home citadel, you expand to conquer
neighboring regions, occupy enemy citadels and take control of their forces.
You will ultimately engage in duels to the death with other heroes, and even quell
uprisings by your vanquished foes. As your treasury grows, merchants offer
special items for sale, mercenaries offer to join you in battle, and followers flock to
your banner.
Each region has a unique map, with its own goals and victory conditions. You gain
different bonuses from each region – some for just your hero, some for all units or
buildings. All regions have a Tribute, which goes into your treasury when you
conquer the region. A constant income is also available from some regions. Every
time you win a battle, each of your provinces will contribute the amount specified
as Income to your treasury.
Your hero and retinue are carried forward from battle to battle, growing stronger
and more powerful. Although the campaign is only available in single player mode,
you can play any one of the twelve hero races, so why not try them all! You can
find detailed information about “Heroes” starting on page 29.
Creating A New Hero
To play the campaign, choose Campaign from the Main Menu. The Book of
Heroes Screen appears. Click on Create a New Hero, the helmet icon, then
choose a race for your hero. A brief description of each of the twelve races, and
the general statistics for strength, intelligence, dexterity, and charisma are
included on the screen.
5
Page 3
After you have chosen a race, you go to the “Create your Identity”
Screen. On this screen you need to select a portrait, and type in a
name for your hero. You can also enter a password for your hero,
ensuring that nobody can use your hero without knowing the
password. Clicking on Create Hero accepts the new hero, and takes
you to the “Campaign” Screen.
Adventurous players, who feel like a challenge, may also choose to
create heroes in one of our three advanced modes: I
RONZEMAN and TINMAN.
B
RONMAN heroes gain double Experience Points (XP) from any battle in
I
which they fight, but they only have one life. If they are ever slain,
they are automatically removed from your roster of available heroes.
RONZEMAN heroes gain 150% XP from any battle in which they fight
B
and survive, but if they are slain in a battle they revert to the
beginning of their current level.
INMAN heroes gain 125% XP from any battle in which they fight, but
T
only if they are still alive at the end of that battle. Otherwise they gain
no XP at all.
RONMAN,
Selecting A Hero
If you have already started the
campaign, the Book of Heroes
Screen lets you view all heroes
currently available, using View
Previous and View Next. When
you find your desired hero, simply
click on Select this Hero to take
you to the “Campaign” Screen
where you left off.
If at any time you wish to delete a hero from the “Book of Heroes”,
open the book at the selected hero, and press the DELETE key.
A confirmation message appears.
The Campaign
Screen
This screen charts your
progress in your current
campaign game. The first
time you enter this
screen, the “Campaign
Options” will appear,
allowing you to set the
Difficulty, Resolution,
and Borderlines. The options can be accessed and changed at any time during a
campaign by clicking on the compass-rose icon in the bottom left of the map.
The flag of your hero is shown in the top right and left of the screen, and when you
conquer a region, this flag will appear on the map. Your home citadel is of a similar
color, originally surrounded by gold sparkles. These gold sparkles indicate all
adjacent regions available for you to attack.
To start a battle, move your mouse cursor over the regions with sparkles. The
cursor will change to show crossed swords, indicating that you may attack this
region. Choose a region to attack and left-click when the crossed sword cursor is
over that region. Left-clicking will mark it with a spinning sword icon and activate
the Ready button in the bottom right of the screen. Click this, and a dialogue will
appear, telling you which region you are fighting, the expected level of resistance
from the region’s defenders, and any special conditions. Click Okay on this battle
dialogue to start the battle.
If you capture an enemy citadel, you can then use that citadel’s troops in future
campaign battles. You can choose the race you will use from the list box on the
battle dialogue. The “Expected Resistance” may change with different races
depending on how many previous victories you have had with that race.
To gain information about regions on the “Campaign Screen”, you can right-click
on the desired region and a dialogue appears giving you the name, description,
current owner, expected resistance, bonus, tribute and income. For the regions
without sparkles, when you move your mouse cursor over them, it changes to a
book. Left-clicking on these regions also brings up the dialogue.
From the “Campaign Screen” you can check your progress against the other races
by clicking the Progress Report button – the crossed swords and shield icon in
top left of the map. You can check any bonuses you have from regions by selecting
the Bonuses button – which is the crossed flags icon in top right of the map.
Winning a Campaign
There are sixty-seven regions in Etheria. Once you have conquered forty-seven of
these regions, the remaining rulers in Etheria, concerned by your growing power,
will try to arrange a peace settlement. This means that you don’t have to conquer
all the provinces to win the campaign, but naturally you may elect to continue the
campaign. As each new province falls to your forces, the rewards offered by those
still opposing you will grow ever more lucrative, and their attitude towards you will
grow ever more respectful.
If you continue to the bitter end, and conquer the very last region, your reward will
be the Orb of Etheria. This is a unique and very powerful item that can only be
gained by totally completing a campaign. There are several types of Orb, and the
power of the Orb reflects the difficulty level of the campaign you finished. Rest
assured, even the least of the Orbs is a mighty and most desirable item, available
nowhere else, and marking its possessor as having achieved total victory in an
Etherian campaign.
6
7
Page 4
STARTING A SKIRMISH
Select Skirmish from the Main Menu to go into battle against up to
five AI opponents.
You are taken to the Book of Heroes Screen, where you can select
either an existing hero, or create a new hero to take into the
scenario. For more details on “Selecting a Hero”, see page 6. When
you have the hero that you would like to be your champion in the
upcoming battle, simply click on Select this Hero on the far right to
take you to the Side Selection Screen.
If you have a previously saved game, on the Book of Heroes Screen
click Load a Saved Game, the compact disc icon. You are
prompted with a picture with the name of the saved game, and
selecting it starts the game automatically.
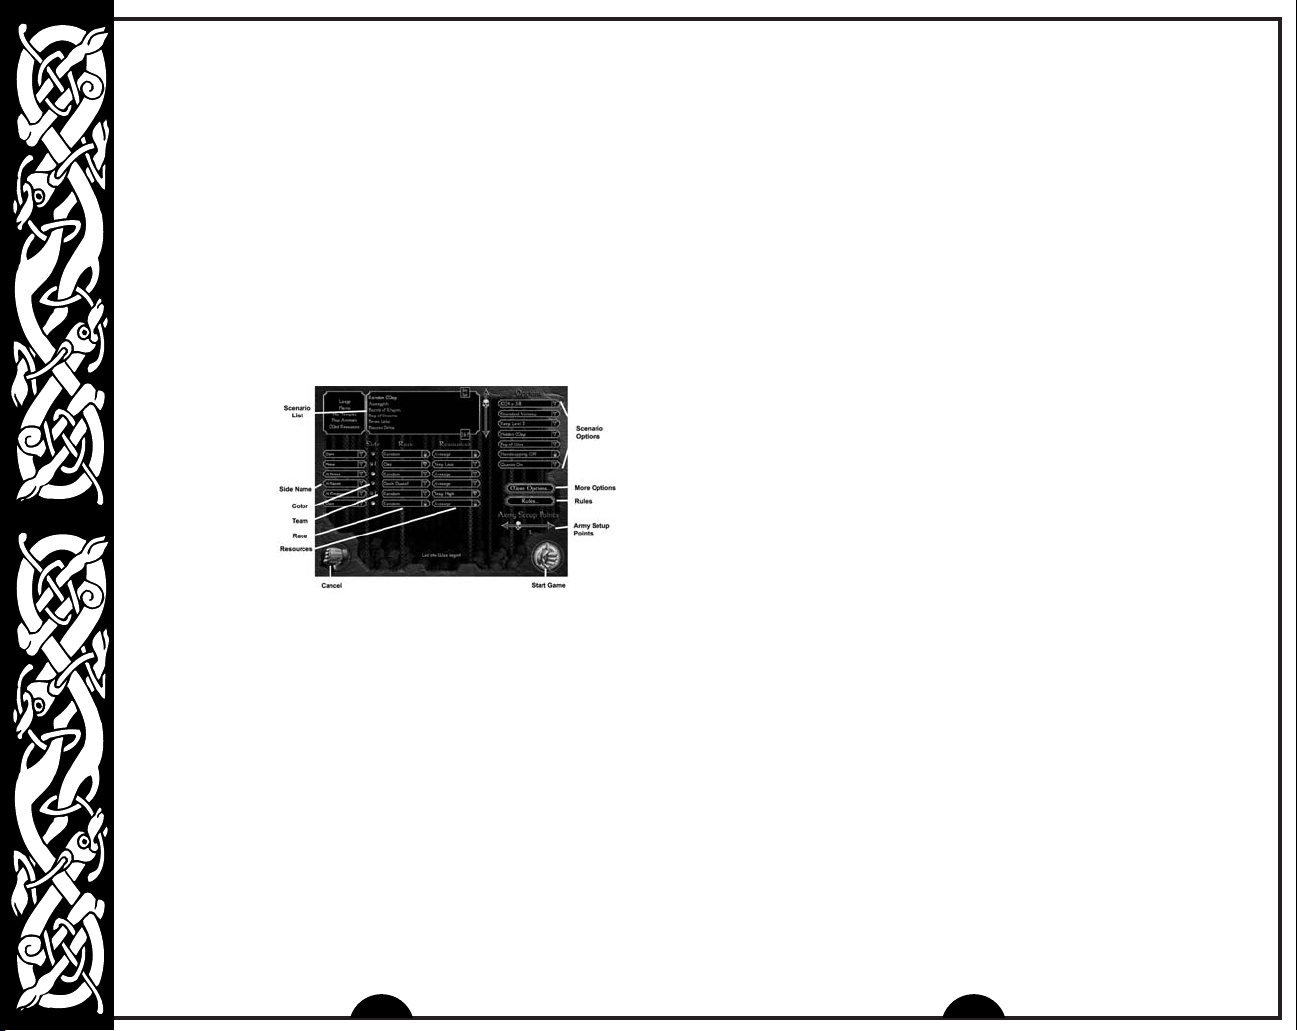
Setting Up
a Game
From the “Side
Selection” Screen
you configure your
scenario options
and start the
game. For a quick
start, all you need
to do is:
• Choose a scenario by clicking on a scenario name, or random map,
in the list box. This highlights it, and causes the information about
the sides and options to change.
• Choose a side by clicking on the Player space, next to one of the
side color buttons, to select it for your hero.
• Choose the opponents by clicking on one or more Players from the
other sides, changing them to “Computer AI”. The AI difficulty level
ranges from Squire the easiest, to Emperor the hardest. Note:
there must be at least one “Computer AI”.
• Click on Start to begin play.
There are a multitude of options available on the “Side Selection”
Screen for creating precisely the kind of scenario you feel like
playing. These include the Temporay Heroes option, which allows you
to create a Hero of unlimited power for just one battle. The following
sections explain those options in greater detail. For specifics on
gameplay, see page 15.
Map Options
At the top of the screen is the Scenario List. Click to highlight the scenario you
want to play. Two buttons on the right side allow you to sort the scenario list by
map size and allowed number of players. If you click on Random Map the map
display is replaced by the controls for the Random Map, explained below:
Map Size: Choose the size of your map from Small to X-Large.
Terrain Type: The general landscape of the map. You can choose between Plains,
Woods, Highlands, Badlands, Desert, Wastelands, Orclands, Icelands,
Snow Fields, and Lakelands.
Number of Temples: Varies the number of neutral temples that appear on the game
map. The number available ranges between 0 and 4. Temples randomly appear as
any of four types: Elemental, Dragon, Celestial, or Infernal, and will produce
powerful Allied units for you, once you have converted them.
Number of Animals: : Controls the population of sheep, cows, camels, geese and
penguins on the map. The numbers available range between No Animals and
Lots of Animals. Depending on which race you play, these animals can be useful
for ammunition or healing.
Resources: Controls the amount of resources on the map between Low, Medium
and High.
You can also set the Random Map Generator to make random choices for each of
these options.
Side Options
In the center of the screen are the Side Selectors. There are several options for
each side:
Player: Choose who will control each side. You can control one side, then you must
assign at least one slot to an AI side. The AI has six difficulty levels – Squire,
Knight, Lord, Prince, Warlord, and Emperor. If you are setting up a
multiplayer game, you can leave some slots Open for other human players. In a
single player game, any sides with Open slots are not used when play begins.
Team: Click on the colored gem if you want to set up alliances with other sides.
Sides with matching numbers are on the same team. There can be up to four
teams.
Race: Choose one of the twelve races for your unit. The Races are described
starting on page 39.
Resources: Choose the level of resources that you start with in the scenario, from
Very Low to Very High.
8
9
Page 5

Scenario Options
On the far right of the screen are several scenario options:
Screen Resolution: Choose between four in-game screen resolutions –
800x600, 1024x768, 1280x1024, and 1600x1200. Depending on the
resolution you have chosen, the control panels on the game screen are
slightly different.
Victory Conditions: Choose one of the 13 victory conditions. For details,
see below.
Keeps: Set the maximum Keep level for all players between 1 and 5, or
No Keep at all. This option adds some variety to the game, but usually
scenarios are played with the default of Keep Level 5 so all
buildings, units and skills are available.
Map: Choose between an Exposed (all visible) map, or a Hidden (all
blacked out at the start) map that must be explored first.
Vision: Fog of War is the term for the way the game map only shows
changes when one of your units is close enough to see them. For
example, if Fog of War is in effect and an enemy tower is built in an
area you have already explored, you will not see the tower on the map
until one of your units passes through the area again. Select No Fog
of War to eliminate it for the game, and show all changes and unit
movements in any area you have explored (the entire map if you
choose Exposed above). Select Line of Sight to only clear the fog
in the direction each of your units is facing.
Handicapping: If you are battling against a higher level hero and
Handicapping is On, you receive a bonus number of unit setup points.
Only available in multiplayer.
Quests: Toggle quests On and Off for your heroes. For details about
“Quests” see page 35.
The More Options button contains several more scenario options:
Tough Starting Towers: Sets the initial starting towers on a random
map to have increased hit points, speed and damage.
Random Weather: Allows the weather to change randomly between
night and day, raining and fine. If this option is not on, the only time the
weather changes is due to a spell or special ability from a unit or
building.
Resignation Kills Side: If an AI or human resigns from the game, the
side is effectively “killed”. All of that side’s remaining units are
removed from the map, and all remaining buildings change to Neutral
ownership.
AI Resignation: If an AI player does not have many units or buildings
left, including no hero, no general, no builder, nor unit-producing
buildings, it will resign. This saves you having to track down and kill
every last unit or building on the map.
10
Play with a Temporary Hero: Lets you play with a hero of any level between 4 and
50 (set on the slider bar), for the current scenario only. After you leave the “Side
Selection” Screen and before the battle, you can customize all attributes of the
hero – Race, Profession, Speciality, Abilities, etc. So try out a new hero type
against the AI or friends.
I Am The Greatest: Lays down a challenge to all enemies! In response, all enemy
AIs are set to the top level (Emperor), and all enemy heroes are level 50. Hidden
Map and Fog of War are turned On, Quests are turned Off, Unit Points are set to 5,
Keep Level is set to 5, and Walls may not be built. If you are victorious, you gain a
30 XP bonus.
Game Speed: Set the overall pace of play between Very Slow and Very Fast.
Rules: Contains options to add some variety to the game: No Dragons, No
Eyries, No Titans, Tough Towers, No Towers, No Walls, No Heroes. The
Tough Towers option increases hit points, speed and damage of any tower built
on the map. The other options prohibit the building or production of the specified
items.
Unit Setup Points: Set the number of points (0-50) available to spend on units to
take into battle. If you set this number to greater than 0, a version of the Retinue
Screen appears, allowing you to assemble a starting army from your retinue and
basic units of your race. See “Retinue” on page 31 for more details.
Victory Conditions
Victory conditions are the circumstances you must fulfil in order to win a certain
scenario. WARLORDS BATTLECRY II has thirteen different victory conditions for you to
choose from, playable with any scenario. The conditions are located on the right of
the “Side Selection” Screen, with the scenario options. Click to scroll through all
thirteen conditions, which are described below:
Standard Victory: The goal is to eliminate all significant enemy units and buildings
on the map.
Raze All Buildings: The goal is to eliminate all enemy buildings on the map
(excluding mines). When the game starts you will see a 5-minute counter, counting
down. It is impossible to lose within the first 5 minutes (unless all your units and
buildings are destroyed).
Kill All Units: The goal is to eliminate all enemy units on the map. When the game
starts you will see a 5-minute counter, counting down. It is impossible to lose
within the first 5 minutes (unless all your units and buildings are destroyed).
Assassination: The goal is to be the last hero left alive. As soon as your hero is
slain, you lose the game.
Raze Fest: The goal is to destroy as many enemy buildings as possible within a 30
minute time limit.
Slug Fest: The goal is to destroy as many enemy units as possible within a 30
minute time limit.
Fortress: The goal is to defend your Keep. As soon as your last remaining Keep is
destroyed, you lose the game.
11
Page 6

King Of The Castle: The goal is to be the first player to build a level 5
Keep.
Merchants: The goal is to be the first player to accumulate 2,500 of
each four resources.
Against The Horde: The goal is the same as for standard victory, but
the sides are set up differently. Side one is “The Horde” with a lot of
units, and all other sides are allied. You can play either “The Horde”,
or one of the allied sides.
Battle Of The Titans: The goal is the same as for standard victory, but
all enemy heroes are at level 50, and each side gets a Titan to start
with.
Pitched Battle: The goal is the same as for standard victory, but all
sides start the game with 50 unit setup points, and no building is
allowed.
Capture The Flag: The goal is to convert and own all the flags on the
map. Only available in multiplayer.
MULTIPLAYER BATTLES
Nothing can match the excitement of going head to head with
another human being. To play with or against other human players
select Multiplayer from the Main Menu. Up to six players can
connect to a game across a network, up to four players on the
Internet, or two players across a modem.
First you need to choose a champion. For more details on “Selecting
a Hero”, see page 6. Once you’ve selected your hero you need to
choose a connection method:
Modem: Allows you to play two-player multi-player games. The
joining player must have the host’s phone number, each player’s
modem must be properly configured for Windows, and both players
must have their modems set to the same connection speed.
IPX Network: Allows you to play up to six-player multi-player games
over an IPX Local Area Network. Each player must be connected to
the same network. Every network is different, and something in your
network’s structure may effect game play or prevent you from
connecting. If you encounter difficulties consult your Network
Administrator.
TCP/IP: Allows you to play up to four-player multi-player games over
the Internet, or a network that uses the TCP/IP protocol. In order to
play a TCP/IP game each player must know the host’s IP address,
which is given to the host when a game is created.
Internet: Allows you to play up to four-player multi-player games over the Ubi.com
network. You may choose to play on either the secure server (where heroes are
securely stored online & may not be used in single-player games), or on the nonsecure server (where players may take heroes who have been built up in singleplayer skirmish or campaign battles).
After selecting your connection method, you have the option of hosting or joining a
game.
Hosting a Multiplayer Game
To host a game, after choosing a connection type, click Create, and when
prompted, type in the name of the game. Click Create again, and it takes you to the
“Side Selection” Screen where you can set up your multiplayer game. For details
on how to start a game, see “To start a new game” under “Skirmish” on page 8.
The host is the only player able to change the scenario map, options, and unit
setup points. If you select a map that other players do not have, for example, one
you created yourself, a Send button appears below the scenario map. Click on
Send to automatically transfer the map data to all other players.
The host is also able to close sides permanently, but only if they are not already
selected by other players. You can kick other players out of the game by clicking on
their side name; a confirmation message appears. By right-clicking on a human
player’s name you can view the details of their chosen hero.
All players, including the host, must click Ready before the host can start the
game. If you change your mind before the game starts, click Ready again. When
all players’ Ready buttons are highlighted, the host can click Start to start the
game.
Joining a Multiplayer Game
To join a game, after choosing the connection type, click Connect, and when
prompted, select the name of the game you wish to join. Click Connect again, and
you go to the “Side Selection” Screen. All you are able to change here is the
screen resolution, and the details of the side you choose to play (team, race, and
resources). When you are finished, click Ready.
Additional Multiplayer Information
In most aspects of the game, multiplayer skirmishes are very much like single
player games. However, there are some differences:
Chatting During a Game
To chat with other players during the game:
• Press Enter to activate the chat prompt and type in your message.
12
13
Page 7
• To send the message to every player in the game, press Enter again.
• To send the message only to your allies, press Ctrl + Enter.
• To send the message only to your enemies, press Shift + Enter.
Losing Your Connection
If you lose your connection after a skirmish has begun you will usually
be ejected completely from the game. You will not be able to rejoin the
current battle. Inside the game, the units and buildings of a
disconnected player are taken over by the computer.
If you deliberately exit or resign from the game, you are taken to the
“Defeat Screen”.
Hints for Multiplayer Games
• Resources are vital. Destroy enemy resources whenever possible,
secure your own resources quickly, and protect them well.
• Take advantage of building queues. Stacking up several units to
be built, or using the continuous production button for one unit
saves time.
• Build multiple production buildings as soon as you can, to keep
unit production running smoothly.
• High level Keeps need to be protected at all costs.
• Protect your hero carefully during the beginning of a game, until
you produce a unit that can convert resource structures. If you
lose your hero early, it is extremely difficult to pick up the speed of
production later in the game.
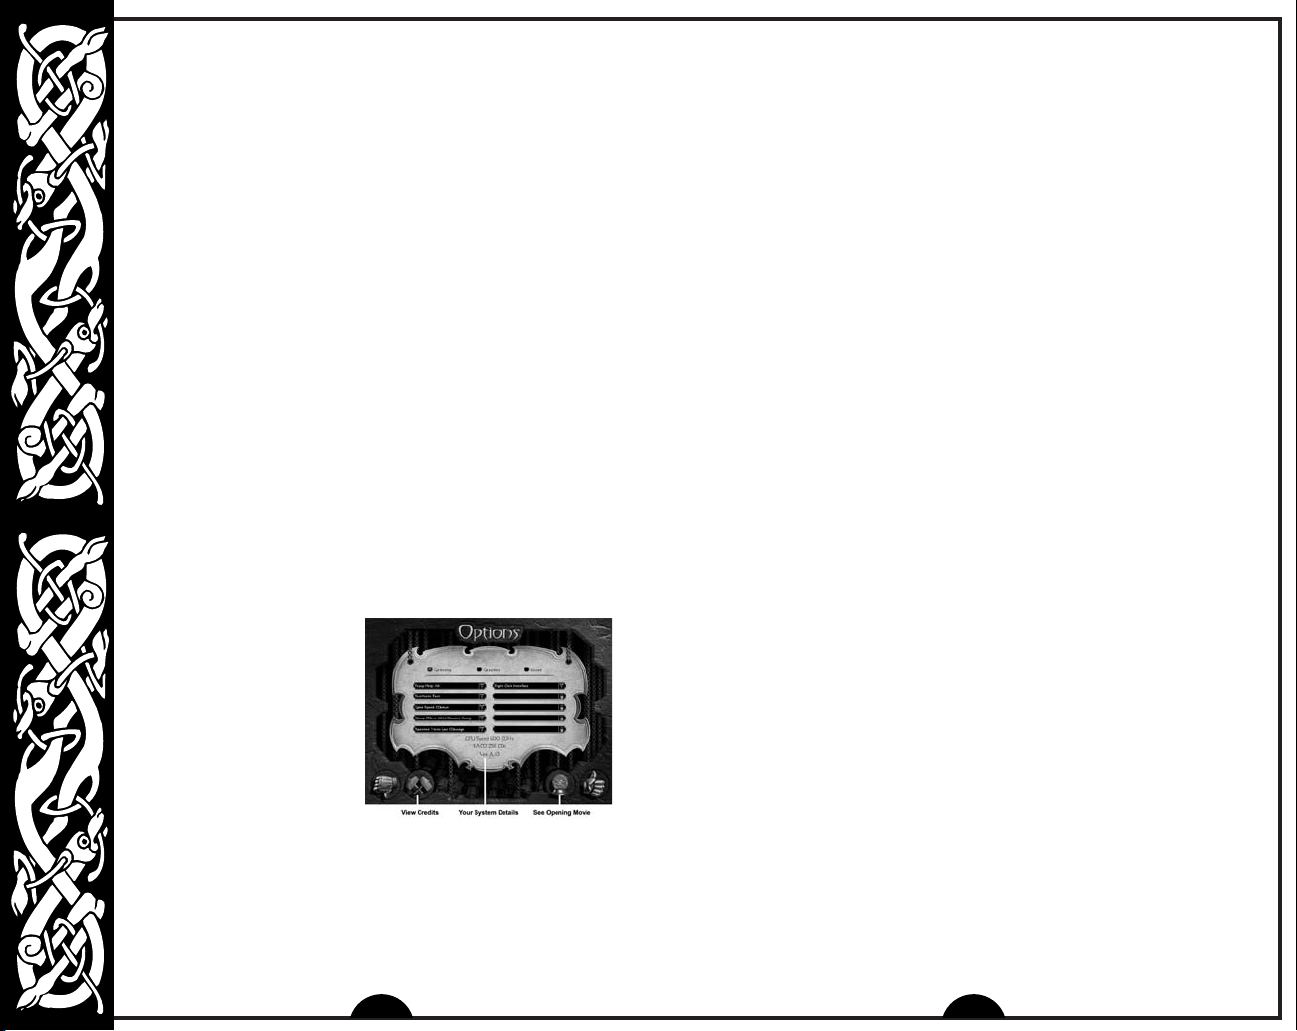
SETUP
OPTIONS
Setup options in three
categories allow you to
customize the game
environment to match your personal preferences. Simply select
Options from the Main Menu to proceed to the Options Screen. Check
the boxes at the top of the screen to access the options for
Gameplay, Graphics and Sound, described in detail below. When
you have finished making changes, select Save & Exit to return to the
Main Menu with your new settings, or Cancel to exit without making
changes. You can also view the Credits and see the Opening Movie
from this screen.
Gameplay
Popup Help: Adjusts the amount of in-game help that appears between All and
None. If All is selected, then a Help Panel appears at the top of the map. Moving
the mouse over a unit or structure causes information about the unit or structure to
be displayed in the Help Panel.
Scroll Rate: Adjusts the rate at which the view scrolls when you move the cursor to
the edge of the screen between Very Slow and Very Fast.
Game Speed: Sets the overall pace of play between Very Slow and Very Fast.
To alter the game speed while playing the game, press the + (plus) key to increase
the speed, and the – (minus) key to slow it down. This option does not work in
multiplay games.
Group Move: Toggles between having all units in a group move at the pace of the
Slowest Unit or having each unit move as Fast as Possible.
Spacebar: Toggles the spacebar between Visit Last Message or Pauses, for
your convenience. At all times, Page Up visits the last message, and F12 pauses
the game, though you cannot pause in multiplay games.
Interface: Toggles between Right Click and Left Click for performing actions
such as moving and attacking. The default is Right Click, but you may prefer the
Left Click as used in some other strategy games.
Graphics
Resolution: Choose between four in-game screen resolutions – 800x600, 1024x768,
1280x1024, and 1600x1200. Depending on the resolution you have chosen, the
control panels on the game screen are slightly different. In 1024x768 and higher
mode, an extra box on the right displays the unit or building currently under the
cursor on the game map, along with its hit point bar. An extra box on the left is the
current “locked in” unit or building. Click on its picture at any time to select it. You
can lock in a new unit or building by moving the cursor to the unit and pressing
CTRL-L.
Shadows: Toggles shadows On and Off, which can affect game performance.
Ambient Animations: Toggles animations other than unit movement On and Off.
Blood: Toggles the display of blood in the game On and Off.
Gamma Correction: Switches between five levels of correction for brightness.
Animated Water: Toggles the animation of the water On and Off.
Particles: Sets the display of particles in the game for spell effects, smoke, etc.
between Off and Maximum.
Decals: Toggles the display of footprints, blood splatters, dirt scarring, etc. in the
game On and Off.
Lighting Effects: Sets the lighting effects in the game between Off and Maximum.
14
15
Page 8
Mouse Click Effects: Toggles the display of particle feedback under
the mouse cursor On and Off.
ARLORDS BATTLECRY II will run internal performance checks, and
Note: W
turn off any graphics options that would degrade game performance.
Sound
Environmental Sounds: Toggles background noises On and Off.
Footsteps: Toggles the sounds of your units moving On and Off.
SFX: Adjusts the overall volume of the sound in the game between
Off and Full.
Music: Toggles the game music On and Off.
Combat Sounds: Toggles the sounds of battle On and Off.
Unit Speech: Toggles your units’ voices On and Off.
EAX Support: If your sound card supports EAX, this toggles it On and
Off. Otherwise it reads N/A for Not Available.
Victory/Defeat Buildup: Toggles the buildup noise at the end of a
scenario On and Off.
Hero Heartbeat: Toggles the heartbeat noise when a hero is injured
On and Off.
Soundtrack: This allows you to set the current soundtrack being
played. The game ships with a default soundtrack, but more may be
made available after release. Check the SSG website
http://www.ssg.com.au. You may even create your own, by adding
MP3 files to your Music directory.
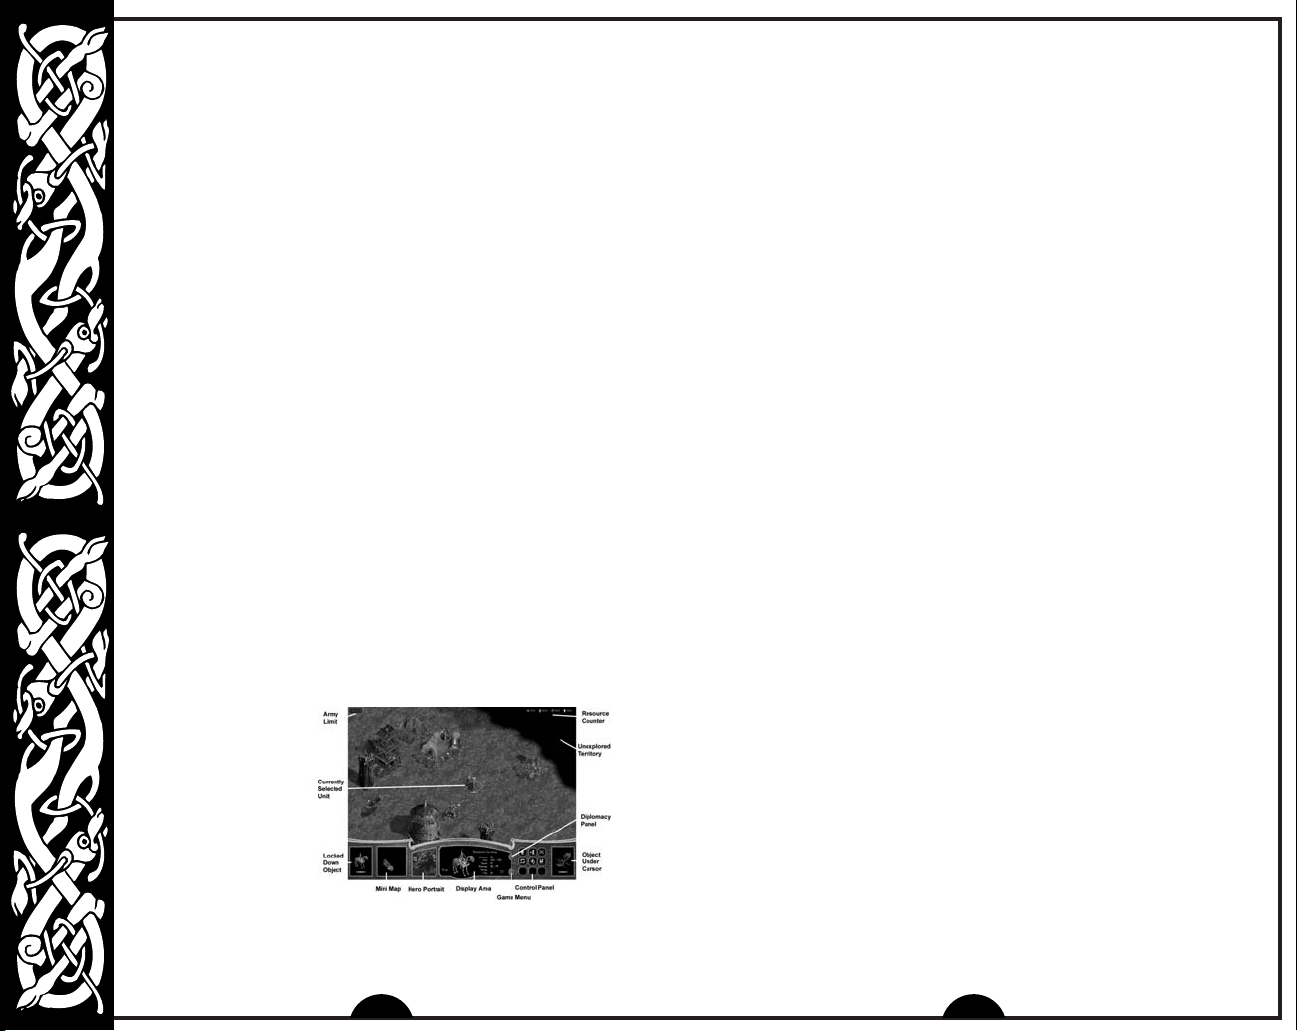
Control Panel: Nine context sensitive buttons that command your units and
buildings. Detailed explanation of the buttons starts on page 1
Display Area: This displays a picture and some details on the currently selected
unit. For example, you can check the progress of a construction project by
selecting the building; the percentage of completion appears in the Display Area.
Mini Map: A small scale version of the entire game map. Rough terrain features
are shown on the Mini Map, along with tiny squares representing buildings.
Resource squares are made up of two triangles, the lower colored to show the
type of resource it is, the upper triangle gray for Neutral mines, then changing with
the owner’s color. Quest buildings are shown as white squares.
Hero Portrait: A picture of your hero. Click on the Portrait to select your hero and
double click to center the map on him or her.
Resource Indicators: In the upper right corner of your screen are four symbols and
numbers, indicating the amount of each type of resource you currently possess.
From left to right, these are gold, ore, stone and crystal. See “Resources” on page
32 for more information.
Lock-In Box: This box, not available at 800x600 resolution, shows the current
“locked in” unit or building. Click on its picture at any time to select it. You can lock
in a new unit or building by selecting a different unit and pressing CTRL-L.
Cursor Box: This box, not available at 800x600 resolution, displays the unit or
building currently under the cursor on the game map, along with its hit point bar.
8.
The Game Map
The bulk of the main game screen is taken up by the Game Map. On the map units
move, buildings are built, battles are fought, etc. To learn how to select and move
units, and attack with them, play the tutorial, or read the instructions below.
THE GAME SCREEN
When you start a
campaign episode,
skirmish or multiplayer
game, the Game Screen
appears. From this
screen you control your
units as they explore,
attack, defend, and
conquer battlefields.
The most important of
the Game Screen features are:
Game Map: The playing area, described in further detail below.
16
Selecting Units, Buildings and Multiple Objects
To select a single unit, simply left-click on it. A selection circle appears around it,
with a green bar below to indicate the unit’s hit points, and a blue bar for its mana
points (if applicable).
To select a group of units, you can do any of the following:
• Left-click and drag a box out over multiple units.
• Double-click on a unit to select all units of the same type that are visible on
the screen.
• Hold down SHIFT, and left-click on individual units to add them to the units
already selected.
• Press CTRL-S to select all units currently on the screen.
• Press CTRL-A to select as many units as possible.
17
Page 9
You can always select your hero by clicking on his Portrait at the
bottom of the screen. Double-clicking selects the hero and centers
him on the screen.
These buttons change, depending on the type of unit or structure selected but here
are the most common.
Selection Limits
The size of a group of selected units is limited by the size of the
Display Area. Less powerful units have small unit pictures, and you
can therefore fit a large number of units into a single group. More
powerful units have larger pictures, which limits the number of the
more powerful units that can be combined into a single group. The
exception to this rule is your Hero, who always has a minimum size
picture, regardless of how powerful he has become.
Creating Groups
To create a group:
• Select the units that you want to group.
• Hold down CTRL, and press any number (0-9) that you want to
assign to that group.
Once a group has been assigned a number, you can press that
number at any time to select it. If you press that number twice, the
group is selected, and the screen centers on the group’s leader.
To remove a unit from a group, right-click on it in the Display Area, or
SHIFT left-click on it on the map.
Unit Formations
There are eight different ways you can choose to arrange your units
on the battlefield. All have various strengths and weaknesses.
The default arrangement is “Block”. If you have two or more units
selected, the Formations button becomes active. Clicking on this
button displays the actual formations to choose. You can also bring
up the formation options by pressing SHIFT-F. For more information,
see page 22.
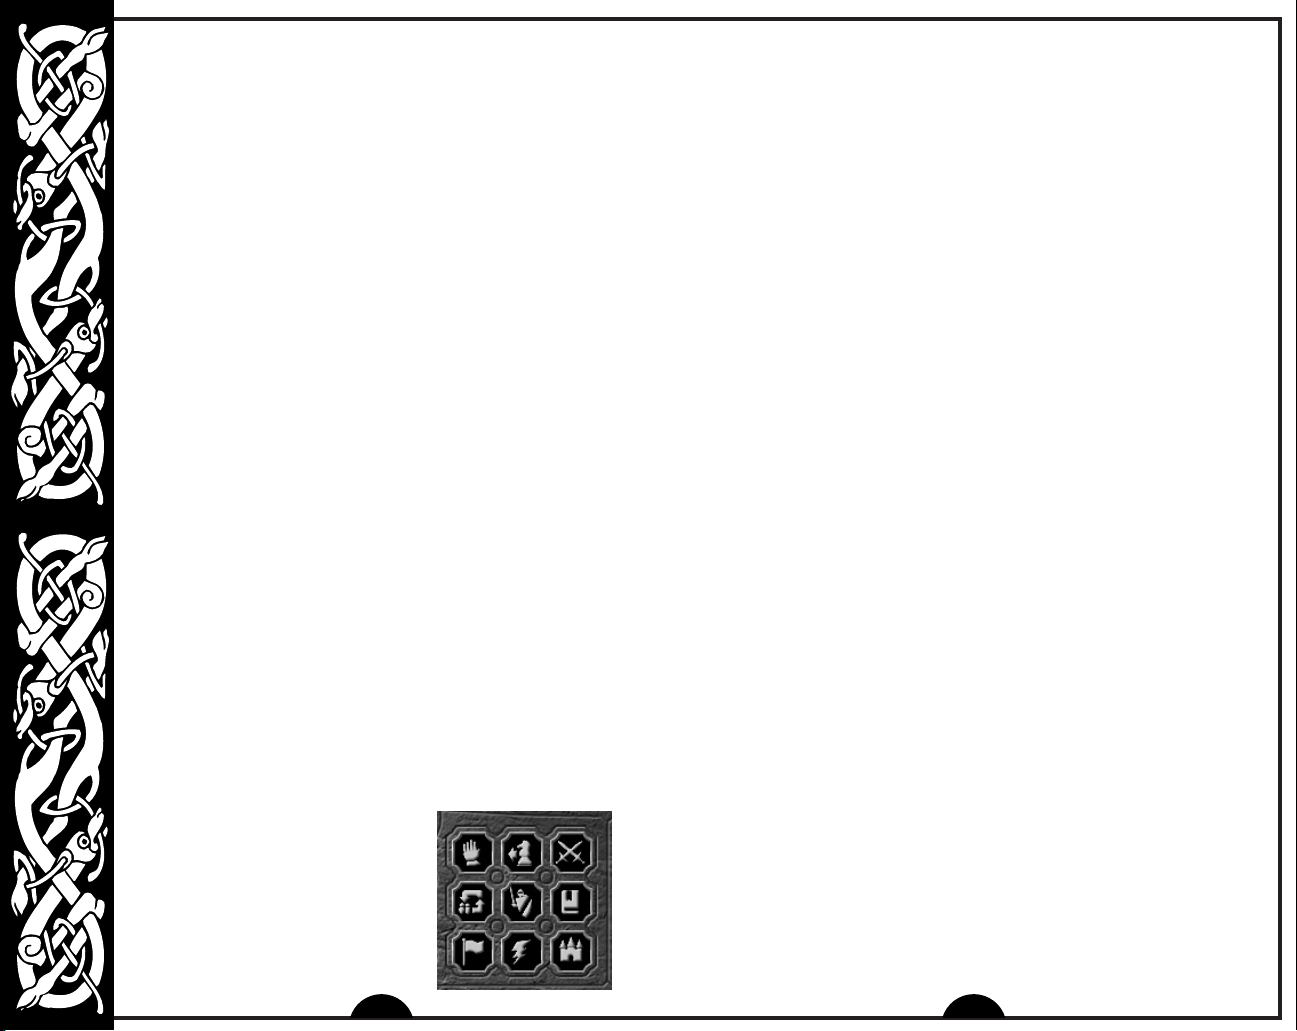
The Control Panel
The Control Panel allows you to command
and control your heroes, units and
buildings. When you select a unit or
structure, the available commands appear
as buttons on the Panel. Move the cursor
over a button to receive help, and see the
keyboard shortcut for that command.
General Controls: Stop
Ceases whatever action the unit or building is engaged in, be it moving, attacking
or building. The unit or building then waits for new orders.
General Controls: Attack
Heroes, units and some buildings can attack. All units can attack buildings. To
order a tower, unit or group to attack, select them, then right-click on the enemy
unit or building you wish to attack, or click on the Attack button in the Control
Panel and click on the enemy. Note the cursor changes into crossed swords to
indicate battle. Your units automatically move into battle.
To improve a group’s efficiency when attacking a large enemy group, have them
selected, press A, then right-click on the ground beyond the enemy unit or building
you wish to attack. Your units will individually select enemy targets, instead of you
selecting targets one at a time.
Keep an eye on your units during combat. If their health bar turns red, they are
close to death and may need to be ordered out of the line of fire.
General Controls: Convert
Heroes, Generals, and the Phoenix are the only units that can convert neutral or
enemy buildings to your side. This is a particularly useful way to obtain resources.
To learn how to convert buildings, you can also play the tutorial.
A Keep of any level can also convert buildings in a wide area around itself. This is
a slow process, but is useful for getting resource points at the start of a game. It
also allows you to still convert buildings if your hero has been killed early in the
battle.
To convert a building with a unit, move the unit next to the desired building, then
select Convert in the Control Panel. Your unit stays there until the building is
converted. If you are using your Keep to convert, all the buildings in the area that
are being converted will be highlighted with a red circle, and your Keep can do
nothing else until the process is finished.
You can check on the progress of the conversion by selecting your unit or Keep.
The percentage counter is shown in the Display Area. A sound, and a gold sparkle
over the building alert you to a successful conversion.
General Controls: Unload
Towers can hold units inside of them. When units are inside, the Unload button
activates on the Control Panel.
18
19
Page 10
To place selected units or groups into a tower, just right-click on the
tower. The cursor changes into a hand, and the units disappear into
the tower. Units in a tower do not use their individual attacks, but
improve the tower’s combat capabilities. Only four small or medium
sized land units can be put into each tower, which have the following
effects on the tower:
Basic infantry +1 Speed +3 Combat
Advanced infantry +2 Speed +6 Combat
Basic missile unit +10 Damage +1 Range
Advanced missile
unit & Spellcasters +20 Damage +1 Range
Heroes +2 Speed +6 Combat +20 Damage +2 Range
Note that the attack type of a tower will be changed if units with a
different attack type are placed inside.
To remove units from a tower, select the tower, and click on the small
picture of the unit in the control panel, or click Unload from the
Control Panel.
Unit Controls: Move
To move a selected unit, you can simply right-click where you want
the unit to move on the map, or select Move in the Control Panel,
then click where you want the unit to go. Note the cursor changes
into a pair of boots to indicate movement. To move a group, do the
same as for a single unit. The group moves at the speed of the
slowest unit by default. If you want each unit to move as fast as
possible, hold down CTRL while you click. You can change the default
in the “Setup Options” described on page 14.
To move selected units or groups using waypoints, hold down SHIFT
and right-click points along the path. Waypoints are orders that you
can queue up for your units, and can include moving, attacking,
converting or building. To insert a waypoint at the beginning of a path,
hold down ALT and click on a new point.
Unit Controls: Patrol
To assign a unit to patrol in a certain area, select the unit, choose
Patrol from the Control Panel, and click on the area to be patrolled.
A series of waypoints is automatically generated. You can view and
change this path using the method described above. To lay out a
complex patrol path made up of multiple points, hold down SHIFT
while clicking the various locations along the path.
20
Unit Controls: Guard
This control allows you to designate a unit or building for the selected unit to
guard. Select the unit, choose Guard from the Control Panel, and click on a target.
The guarding unit will move to its designated assignment, or as close as possible.
It will then devote itself to protecting its assigned target, moving with a mobile unit
if necessary. Select the guarding unit and choose Stop to countermand the order
to guard.
A production building can also be set to guard a unit. This does not mean that the
building moves with a mobile unit, but that any unit produced from that building will
automatically move to the designated unit and guard it as described above.
Unit Controls: Attitude
Attitude affects the way a unit or hero reacts to the enemy, and is defaulted
appropriately for each type of unit. The current attitude icon is shown on the right
of the Display Area when the unit is selected. To change a unit’s attitude, simply
press Attitude on the Control Panel, and click on one of the many states which
are described in the pop-up help, and below. You can also set the attitude of a
building, and then any unit produced from that building will have that designated
attitude.
The full list of attitudes are: Aggressive, Cowardly, Defensive, Fallback, Guardian,
Magic Attacker, Magic Defender, Magic Guardian, Rampant, Roaming Guardian,
Scout, Stand Ground, Standard.
• The Magic attitudes are useful for any spellcaster units you have, as it allows
the unit to assess the situation and casts appropriate spells as necessary,
without you having to manage them.
• The Scout attitude is good at the start of a Hidden Map game. You can set this
attitude on a weak unit, and it will gradually uncover the map for you.
• Guardian attitudes act like Guard described above.
• The Fallback attitudes order your units out of the line of fire if they are close to
death, and are especially good for ensuring the safety of your hero or generals.
• Rampant attitude is useful towards the end of a battle when you are trying to
flush out the last of the enemy. Your unit moves randomly around the map,
looking for enemies to attack.
Unit Controls: Build Buildings
and Build Walls and Towers
Constructing buildings allows you to produce
units and upgrade skills. Constructing walls
and towers helps you defend your land.
Only builder units and heroes are able to
build. Building costs one or more resources,
depending on your race and the type of
21
Page 11

building. To learn how to construct buildings, play the tutorial. For a
full list of the buildings for each race, see “Race Dependencies”
starting on page 38.
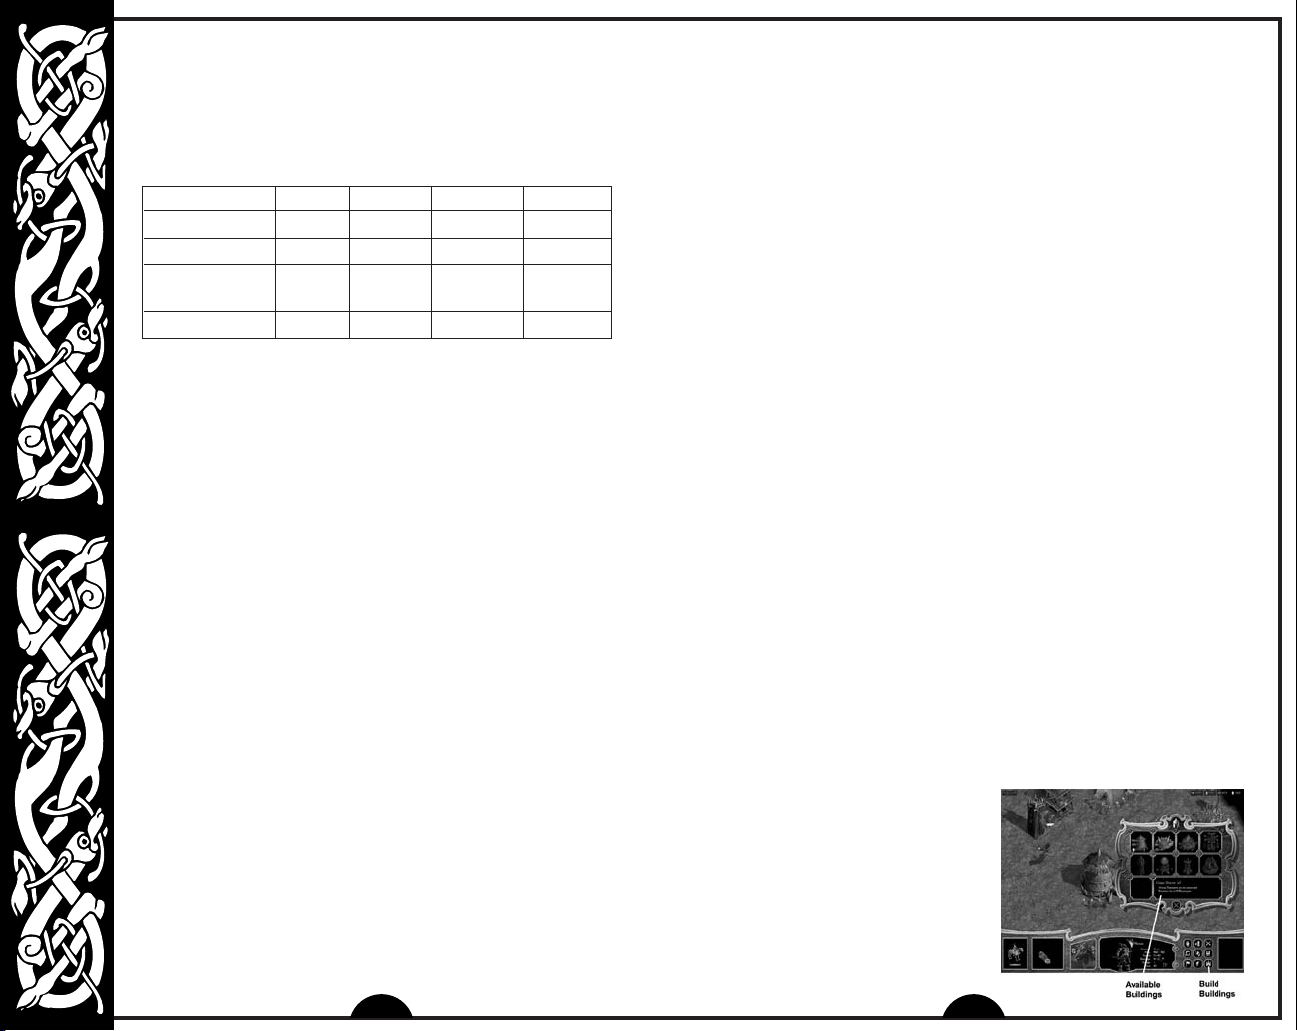
Constructing a Building
Select your unit and select Build Building in the Control Panel.
A window pops up with pictures of all the buildings you are able to
construct (see screenshot above).
• If a building appears in color with the cost, you are able to build it
right now.
• If it appears grayed out with the cost, you do not have enough
resources to build it now.
• If it appears grayed out with no cost, you have not met the
requirements to build it yet.
Click on an available building, and place it on the desired location on
the map. Your unit disappears while building, then reappears and
announces when the job is finished. To check the progress of a
building, select the building in progress, and look at the percentage
counter in the building display area.
Constructing a Wall or Tower
This is the same as constructing a building, however you select the
Build Wall or Tower button from the Control Panel. Once you have
built a tower, you can place units inside it. Units in a tower do not use
their individual attacks, but improve the tower’s combat capabilities.
To place units in a tower, simply select the desired units and rightclick on the tower. The cursor changes into a hand, and the units
disappear into the tower. Only four small or medium sized land units
can be put into each tower, the effects of which are described under
“General Controls: Unload” on pag
To stop building or reselect your builder unit at any time, just select
the building in progress, and press Stop, or Select Builder on the
Control Panel (see “Control Panels” on page 18). If you stop the
building partway through, it eventually falls to ruins. Selecting the
builder does not stop the building, and is used for queuing up orders
(waypoints) to be carried out when finished building.
e 19.
Unit Controls: Formation
There are eight different ways you can choose to arrange your units
on the battlefield. The default arrangement is “Block”. If you have
two or more units selected, the Formations button becomes active.
Clicking on this button displays the actual formations to choose from.
A unit in formation starts with the orientation
shown on the button, with missile units kept in
the back and melee units defending in front.
Your units automatically assemble in
formation in the direction of movement. In
other words, if they are moving west, the point
of a Wedge formation will be facing west. This
can result in an illogical position once they
reach their target, for instance with the
missile units at the edge instead of the back,
click on the Rotate buttons to rotate the orientation of the formation clockwise or
counter-clockwise and solve this problem.
Building Controls: Buy Units and Skills
In addition to producing units and researching skills, this button also controls
upgrading buildings. When this button is selected, a window appears with pictures
of all the units you are able to produce, research, or upgrade.
• If a picture appears in color with the cost, you are able to produce, research, or
upgrade that right now.
• If it appears grayed out with the cost, you do not have enough resources to
produce, research, or upgrade that right now.
• If it appears grayed out with no cost, you have not met the requirements to
produce, research, or upgrade that yet.
Producing a Unit
Click on an available unit to start producing it, and watch the progress on the
percentage counter in the building display area. After completion, the unit
produced appears near the building, and moves to the rally point if one exists.
To produce multiple units, click on any available unit more than once, or a
combination of different units. A queue appears in the building display area, along
with the progress percentage counter. The queue only graphically displays the first
six units being produced, and a counter at the end for extra units. Alternatively, you
can select any one available unit and click the Continuous Production button in
the building display area to have that unit produced continuously.
The unit cost is deducted from your resources at the instant that a unit starts
production. To remove a unit from the queue, click on it in the queue. To stop
production, click Stop in the Control Panel.
Researching a Skill
Most buildings have skills available to upgrade units, improve a hero’s abilities, or
improve the building itself. The skills available at the building depend on your race.
For a full list of the skills available, see page 30.
22
23
Page 12

Select an available skill to start producing it, and watch the progress
on the percentage counter in the building display area. A system
message alerts you when your research is complete. If the skill is to
upgrade or improve a certain type of unit, the research affects all
units of that type currently in existence, as well as any new units that
are produced. Experience point upgrades only apply to units
produced after the upgrade is researched.
Upgrading a Building
Select the upgrade picture. It has a circled number on it, indicating
level, and becomes available when resource and other requirements
have been met. You can check the progress of the upgrade on the
percentage counter in the building display area. A system message
alerts you to a successful upgrade.
Building Controls: Set Rally Point
To set a rally point (a point where your produced units gather), select
a production building, then right-click where you want the units to
appear on the map. Alternatively, you can click Rally Point in the
Control Panel, then click on a location on the map. To move a rally
point, simply set a new one.
To display a rally point for a building, select the building and hold
down SHIFT or ALT. A dotted line leading to the rally point marker
appears.
Building Controls: Repair
To repair a damaged building, select it, and click Repair in the
Control Panel. There are two options – fast or slow repairs. Fast
repairs cost twice the resources, but are twice the speed of slow
repairs. Select one to repair your building, and watch the progress on
the percentage counter in the building display area.
The Diplomacy
Window
Diplomacy is used to trade
resources between sides. It is
mainly used for multiplayer games,
when you want to give resources to
your ally. The “Diplomacy” screen,
reached by clicking on Diplomacy
(the blue gem) in the Control Panel,
allows you to give resources to
24
other sides. Alliances have to be set up on the “Side Selection” Screen before the
scenario starts; they cannot be formed once in the scenario. For details on how to
set alliances, see “Skirmish” on page 8.
The Game Menu
To bring up the game menu for WARLORDS BATTLECRY II, click on the red gem in the
Control Panel. A dialogue appears with the following options:
Load Game: Select this to bring up the name and a picture of the saved game, and
click Load Game if you wish to load it. This option is not available in multiplay
games.
Save Game: Select this to save the current game. An alternative way to save the
game is to press ALT-S. This option is not available in multiplay games. In
singleplay games, only one save game is allowed for each Hero, and this save
game is removed at the end of battle. This condition removes the confusion that
would occur if a hero had multiple existences in multiple save games.
Pause Game: Select this to pause the game. A message appears. To restart the
game, click Pause Game again. An alternative way to pause the game is to press
F12. This option is not available in multiplay games.
Options: Select this to alter the sound effects and music volumes, scroll rate,
gamma correction, and pop-up help to suit your preferences. See “Setup Options”
on page 14 for the full range of options available.
Victory Conditions: Select this to review the victory conditions for this scenario.
“Victory Conditions” are described on page 11. Victory conditions can be reviewed
in game by pressing ALT-V.
Resign: Resign from this scenario without saving, and return to the Main Menu.
Quit: Quit the game without saving and exit W
ARLORDS BATTLECRY II entirely.
The Results Screens
and the Retinue Screen
At the end of a scenario, either because of
victory, defeat or resignation, the Results
Screens appear. In the bottom left of either
the Victory or Defeat Screens is a paper
and magnifying glass icon which takes you
to the Combat Results Screens. These
show you information about both your hero
and your opponent(s) in four categories: Hero, Resources, Units and Buildings.
When you have finished viewing the results, click the hand icon to continue. After
you exit the Results Screen, the Retinue Screen usually appears. Here you can add
to your retinue high level units and allies that you acquired during the game, and
sometimes other random units drawn to your banner by your heroic deeds. For
details on this screen, see “Retinue” starting on page 31.
25
Page 13

UNITS
Your units are the bulk of your forces. They are your foot soldiers,
and if you nurture them carefully, they can also be your leaders.
Each race has different types of units that it can produce or ally with.
See “The Bestiary”, starting on page 51 for details.
Producing Units
To produce a unit, select a building that is able to produce units, and
click Buy Units & Skills in the Control Panel. Click on an available
unit to start producing it (see page 23 for more information). When the
percentage counter reaches 100%, the unit appears near the building,
and moves to the rally point if one has been assigned (see page 24 for
more information on rally points).
Army limit
There is a limit on the number of units you can have in a game. The
limit is displayed in the top left of the game screen, and is calculated
as below:
• Five units for each level of Keep from level one to four.
• Ten units for a level five Keep.
• Two additional units for most other buildings you own (not
including walls, or resources buildings).
• An additional number of units equal to your half of the hero’s
command skill (rounded down).
For example, if you own a level three Palace, four other buildings, one
Gold Mine, and have a hero with a command skill of 11, your army
limit is 28.
Note that if you own multiple Keeps, the army limits for Keeps apply
to only one Keep – the one with the highest level.
You can eliminate your own units or buildings at any time, by
selecting them and pressing CTRL-D. You may wish to do this if you
have exceeded your army limit with too many builders, and need to
produce better fighting units instead. If you eliminate units or
buildings, no resources are returned to your total, unless you
eliminate a mine, in which case resources of the appropriate type are
added to your total as if you had pillaged an enemy mine.
26
Units And Medals
All units, except Heroes and Titans, receive experience points during a scenario for
destroying enemy units or buildings. Experience points are calculated as below,
and when they reach certain numbers, a medal, representing a level is awarded.
Each medal a unit receives increases its attack ability, combat speed, building skill
and / or has some other beneficial effect. For details on the levels, see “Hero &
Unit Levels” in the “Battlecry II Appendix.chm” documentation included on the
ARLORDS BATTLECRY II CD.
W
• 1 point for each enemy unit killed.
• 3 points for each enemy building destroyed.
• 1 point extra for each enemy building destroyed that is able to shoot missiles.
• 5 points, or points equal to the enemy hero’s level if higher than five, for each
enemy hero killed.
Special Note: Wraiths and Shadows have the Energy Drain skill. This allows
them to steal the XP of any unit, including heroes, they kill. Thus, if they kill an
enemy unit with 14XP, they get 14XP+1XP for killing the unit.
When a unit has reached third level it becomes available to be saved to your hero’s
retinue if it lives to the end of a scenario. Special units, such as Generals and
Allies, become available to be saved to the retinue at any level of experience.
Generals And Allies
Generals are another powerful unit similar to (but usually weaker than) Heroes.
They have a command radius, and the ability to convert buildings. They differ in
that they cannot cast spells, carry items, or receive quests. Generals can be
produced once you own a level 5 Keep, or they may offer to join you after your hero
completes a quest. They can be carried over in your retinue to other scenarios.
Generals do not have to be of the same race as either your hero or the side you are
playing, but they commonly are. Details of Generals can be found in “The Bestiary”
starting on page 51.
Allies are very tough units that offer to join you as a reward for completing a quest,
or as a result of a summoning spell. Allies can also be produced like regular units
at each of the four Temple buildings that may appear in a scenario. They can be
carried over in your retinue to other scenarios. Details of Allies can be found in
“The Bestiary” starting on page 51.
Titans
Titans are amongst the toughest units in the game, second only to very high level
Heroes. They wreak havoc and destruction wherever they go. They can only be
produced later in a battle, after you have a level 5 Keep and lots of resources.
Each race can only build one Titan per game, and they take about fifteen minutes to
produce, but are well worth the wait. Details on which buildings they are produced
at can be seen in “Race Dependencies” starting on page 38.
27
Page 14

The death of a Titan is a cataclysmic event, producing storms of ice
or fire which damage all units, friend or foe, unlucky enough to be
close to the dying Titan.
If you can’t wait to produce a Titan, play a skirmish or multiplayer
map with the victory condition Battle of the Titans (see page 12 for
details), and you will start the scenario with your Titan. You can
immediately start waging war, but be wary as you will not be able to
produce another Titan in this scenario.
The Titans for each race are:
Humans: Sirian, page 65
Undead: Lord Bane, page 64
Dwarves: King Khalid, page 65
Barbarians: Tempest, page 66
Minotaurs: Skull of Sartek, page 65
Orcs: Gornak Elfeater, page 64
High Elves: King Lunarion, page 65
Wood Elves: Ironbark, page 65
Dark Elves: Kargoth, page 65
Fey: Forestmaster, page 64
Daemons: Balora, page 64
Dark Dwarves: Grond, page 65
Researching Skills
Most buildings have skills available to upgrade units. The skills
available at the building depend on your race. For a full list of the
skills available, see page 30.
To research a skill, select a building and click Buy Units & Skills in
the Control Panel. Click on an available skill to start researching it
(see page 23 for more information). A system message alerts you
when your research is complete. If the skill is to upgrade or improve a
certain type of unit, the research affects all units of that type
currently in existence, as well as any new units that are produced.
HEROES
Heroes are very powerful units, who are able to carry items, convert buildings, cast
spells, and receive quests. Heroes cannot be produced like regular units, nor do
they offer to join your side during a game. Heroes do not have to be of the same
race as the units they lead into battle, but gain bonuses if they are. For details on
the bonuses and penalties, see “Hero-Side Race Bonuses” in the “Battlecry II
Appendix.chm” documentation included on the W
A hero cannot be killed permanently. That is, they may be mortally wounded in one
scenario, but always makes a full recovery in time for the next battle (unless they
are an Ironman Hero, in which case once they die, they are gone forever).
Statistics And Skills
A hero has four statistics: strength, intelligence, dexterity, and charisma. These
statistics are used to calculate the hero’s ten skills. Initially these statistics and
skills are determined by the hero’s race, and cannot be altered. To see a hero’s
statistics from within the game, right-click once on the hero picture in the bottom
Control Panel. To see a hero’s skills, right-click twice on the hero picture.
When a hero reaches levels 2 and 3, statistics and skills increase depending on
which profession and speciality is chosen. At level 4 or higher, a hero can choose
to spend their ability points on increasing one or more of these statistics or skills.
For example, Horus the Human reaches level 2, and chooses to be a Warrior. His
strength increases by 1, from 5 to 6. When he reaches level 3, he chooses to be a
Ranger, and his intelligence increases by 1, from 5 to 6 also. For the hero’s racial
statistics, see the W
Statistics
• Strength (ST) - Physical prowess and health.
• Intelligence (IQ) - Knowledge and ability to learn magic.
• Dexterity (DX) - Speed and agility.
• Charisma (CH) - Personality and leadership skills.
ARLORDS BATTLECRY II fold-out card.
ARLORDS BATTLECRY II CD.
28
29
Page 15

Skills
• Combat (ST+ST) - Melee combat skill.
• Health (ST+DX) - Hit points and regeneration.
• Speed (DX+DX) - Movement speed.
• Command (IQ+CH) - Number of units and command
radius.
• Morale (DX+CH) - Increase strength and speed
of units.
• Magery (IQ+IQ) - Spell casting and mana.
• Resistance (IQ+DX) - Resist psychological effects.
• Training (ST+IQ) - Learning, train others.
• Conversion (ST+CH) - Convert buildings.
• Merchant (CH+CH) - Discounts on purchases.
Casting Skill
If a hero is a spellcaster (generally only a Wizard or Priest) they have
a casting skill in one or more of the eleven spheres of magic. To see a
hero’s casting skills from within the game, right-click three times on
the hero picture in the bottom Control Panel. For more information on
the spheres of magic, see “Spells” on page 36.
Heroes And Levels
Heroes are awarded experience points at the end of every scenario, be it
campaign, skirmish, or multiplayer, which allow them to gain levels. Heroes do not
have to win the scenario to be awarded experience points, but the number of
points is higher if they do claim victory. Heroes are also awarded more experience
points if they survive the battle, play on larger map sizes, play with hidden map on,
battle many enemies or tougher opponents.
Heroes do not get medals like other units, but are awarded ability points when they
gain levels. For details on the number of experience points needed, and ability
points awarded, see “Hero & Unit Levels” in the “Battlecry II Appendix.chm”
documentation included on the W
When heroes reach level 2, they can choose one of four professions. When they
reach level 3, they can choose one of twenty different specialities. These are
detailed in the following table:
Profession Speciality
Warrior Barbarian, Deathknight, Fighter, Ranger
Wizard Alchemist, Archmage, Icemage, Illusionist, Necromancer,
Rogue Assassin, Bard, Merchant, Thief
Priest Druid, Healer, Paladin, Runemaster, Shaman
When heroes reach level 4, they begin to gain ability points. They can choose to
spend their ability points either on special abilities, statistics, skills, or spells. The
special abilities available depend upon the hero’s race and speciality, and are
listed on the W
Any ability points that are not spent carry over, and may be spent the next time the
hero gains a level.
Pyromancer, Summoner
ARLORDS BATTLECRY II foldout card.
ARLORDS BATTLECRY II CD and foldout card.
Command Radius
A command radius is an area of effect around heroes, which gives bonuses to
friendly units. Some spell effects are limited to the hero’s command radius, so
attacking spells only cause harm to enemy units within this radius. The actual size
of the ring can be viewed on the screen by pressing the R key. The size of the
command radius depends on the hero’s command skill.
30
Retinue
Your retinue consists of Generals, Allies, and high-level units that can be carried
over to another scenario. The number of units you are able to have in your retinue
depends on the command skill of your hero. For the exact retinue limits, see
31
Page 16

“Command” in the “Battlecry II Appendix.chm” documentation
included on the WARLORDS BATTLECRY II CD. If a scenario you play
allows the players to start with units (see “Unit Setup Points” on
page 11, a version of the Retinue Screen appears before the game
begins. From this screen you can select members of your retinue
and basic units for your race to start the skirmish with.
At the completion of a
scenario, after the
Results Screen, the
Retinue Screen always
appears, provided that
your hero can have a
retinue, and that units
remain alive to fill spaces
in it. On the Retinue
Screen you are given the
option to include one or more new units in your retinue. Any regular
units who have two or more medals, any Generals you have built, and
any Allies that have joined you, are eligible for your retinue.
Sometimes Allies will appear randomly at the end of a skirmish,
having been drawn to your hero by tales of his virtuous or dastardly
deeds. The available recruits appear on the left side of the screen,
while units already in your retinue are on the right.
To add a unit to your retinue, left-click on it, then drag the unit over to
an empty square in your retinue, left-click on it. If there are no empty
squares, you can click on a unit in your retinue and replace it with the
new one.
Any unit from your retinue that is killed in battle is placed in the
graveyard. You can visit the graveyard from the “Retinue” Screen via
the Graveyard button. The strongest unit who has fought in your
retinue is displayed prominently in a position of honor.
You can give an individual unit in your retinue a specific name, simply
left-click on their current name and then type over it.
ADDITIONAL GAMEPLAY
INFORMATION
Resources
There are four resources in the game: Gold, Metal, Stone, and Crystal,
which are needed for building and unit production. These resources
are produced at the resource buildings: Gold mines, Ore mines,
Quarries and Crystal mines, which are found at set locations on the
32
map. Each mine can be level 1, 2 or 3. The higher the level, the more resources it
has, and the faster it will give them to you. Resources can also be given as a
reward for completing a quest.
You cannot build any more resource buildings during the game, only convert them.
Resource collection is automatic once you own a resource building. You do not
need to send units out to collect resources, but you can boost your resource
collection by placing basic builder units in your mines. You can also gain a one time
boost in resources by razing a mine, or locating resource carts, described under
“Items” on page 35.
Putting Units to Work
You can increase the productivity of your mines by stocking them with workers.
For every builder unit you place into a mine, you get +1 to that resource every five
seconds. Up to eight units can be put into each mine, but only certain units are
eligible, described in “The Bestiary” on page 51.
To place a builder unit into a mine, select the unit, and move the cursor over a
mine. The cursor changes into a hand; right-click on the mine, and the unit
disappears into it. In the Control Panel, to the left of the building display area, there
is a unit counter. Once a unit is placed in a mine, it is not available for selection
again, and is eliminated if the mine is converted or destroyed.
Stockpiling Resources
In order to build some of the more powerful buildings and units, and to research
high-level spells, you will need a sizeable number of resources. Your resource
totals are displayed in the top right corner of the game screen, showing from left to
right: Gold, Metal, Stone, and Crystal stockpiles. As you receive more resources
and spend them, you will see these values increase and decrease.
The maximum number of resources you can stockpile is 500 of each resource plus
500 for each level of the highest level Keep you own. For example, if you own a
level four Keep, you can have 2,500 of each of the four resources.
Defense Buildings
Each race can build their own towers, walls or ramparts for defence. To build
any of these, select the Build Wall or Tower button from the Control Panel.
See page 21 for more details.
33
Page 17

Guardians are also defense buildings, but cannot be built. They are
summoned by Alchemists, or placed by the creator of the map in the
Editor. The Guardians – Clay, Stone and Iron, range from weakest to
strongest and shoot bolts of energy.
The Wall of Thorns and Wall of Ice are basic wall sections that can
only be summoned by magic.
Summoned Buildings
Two buildings only
appear on the map
temporarily, as they
are summoned by a
spell. The Black
Portal is summoned
by Necromancers to
aid in many necromantic spells, such as the summoning of Undead.
The Circle of Power is created by Summoners to aid in many of their
spells, such as the summoning of creatures.
Items
Items can be found at various locations
on the map, or given as a reward for
completing a quest. Resource items
look like carts, with gold, metal, stone
or crystal inside. Special items appear
in a treasure chest.
To pick up a resource item, simply
move your hero next to the cart, and
the resource is automatically added to
your total.
To pick up a special item, move your hero next to the chest, and the hero’s
Inventory Screen appears automatically. The name of the item, along with its
effects when in use are displayed in the bottom left of the Inventory Screen. Click
on an item in the chest, then click on any green highlighted square on your hero’s
outline to equip it, or place it in your backpack. Note that while you can carry
several similar items, such as two helmets and a crown, your hero can only have
one equipped at a time. Your hero does not get the benefits of an item unless it is
equipped. If a hero is killed, you keep all the equipped items, but any items in the
backpack are lost, and appear on the map in a treasure chest.
There are also eight sets of ancient artifacts, which when equipped give the hero a
special power. They can occasionally be found in treasure chests on a skirmish
map, or are given as rewards for Duels in the campaign. There are three items in
each set, and they are easily identified by the gold sparkles on them.
At any time in the game, you can view your hero’s inventory by clicking on the
pouch on the left of the hero portrait, or pressing the I key. You can close the
inventory by pressing the same key.
Animals
Cows, sheep, camels, geese and penguins can be present on any
game map. While they are harmless creatures, they have their uses.
For example, cows can be hurtled by Catapults, and cause greater
damage than usual ammunition. Sheep can be thrown by Trolls, also
wreaking a large amount of havoc. In addition, all Minotaur units feed
on animals to obtain healing, often raising sheep in Pens specifically
for this purpose.
34
Quests
Quests are special missions performed
by heroes in order to gain Allies and
other rewards. Only heroes can receive
quests from the two special buildings –
Mausoleum and Shrine.
35
Page 18

To receive a quest, select your hero, and move the cursor over one of
the special buildings until it changes into a key. Right-click on the
building, and when the hero reaches it, a Dialogue Screen with the
quest appears automatically. You have the choice to accept or
decline the quest. If you decline this quest, another quest does not
become available to you at this building for about five minutes.
If you accept this quest, a grail (cup) appears on your Hero Portrait.
You generally have about five minutes (300 seconds) to complete the
quest and return to the same building from which you got the quest to
receive the reward. The exact time remaining to complete an
accepted quest is shown, in seconds, as a counter next to the grail in
the center of the hero portrait. When this counter reaches zero, the
quest expires.
If you want to check on the requirements for the quest, click on the
grail, or press the Q key.
Spells
In WARLORDS BATTLECRY II, heroes, and some units, have the ability to
cast spells. Only heroes have a spellbook and the ability to learn new
spells. A hero’s mana points are indicated in the Control Panel, below
the small blue orb on the right of the hero picture. Left-clicking on this
orb, clicking on the Spellbook button in the Control Panel, or
pressing the S key, brings up the spellbook.
Run the cursor over a
spell name to see a
description of its effects
on the right side of your
spellbook. To cast a spell,
simply click on it.
Each spell has a casting
cost associated with it.
This is deducted from the
caster’s mana points each
time the spell is cast, no
matter if the outcome is a success or failure. If the caster does not
have enough mana points, the spell cannot be cast. Mana points
regenerate over time, at a speed which depends upon the caster’s
magery skill level. Spells you cannot cast because you don’t have
enough mana are grayed out in the spellbook.
Spheres of Magic
There are ten spheres of magic that can be studied, each of which has ten spells.
There are four Level 1 spells, three Level 2 spells, two Level 3 spells, and one very
rare Level 4 spell. The spells must be learned in level order. There are also three
common spells, which are automatically known by every spellcaster. Most
spellcasters specialize in one or two spheres.
A level 1 hero generally cannot cast spells. When a hero reaches level 2, and
chooses a profession of either Wizard or Priest, they automatically learn the three
common spells. At level 3, the hero chooses a speciality, and automatically learns
the first level 1 spell from that sphere of magic. Any further spells must be bought
with ability points when the hero reaches level 4 and above.
For detailed descriptions and costs of all the spells, see the “Battlecry II Spells.chm”
documentation included on the W
Sphere of Magic Description
Common Very basic protection, attack & command spells.
Healing Healing, resurrection, protection from poison/disease.
Necromancy Raise undead, drain hit points.
Pyromancy Fire spells – damage & protection.
Nature Lightning, animal summoning.
Alchemy Create items and potions, engineering.
Summoning Summon extra-planar creatures, teleport.
Illusion Invisibility, alteration.
Runes Stone spells & item creation.
Ice Ice spells – damage & protection.
Chaos Strange random effects, mana & health drain.
ARLORDS BATTLECRY II CD.
Spell Effects and Weather
From time to time, your units may be negatively affected by other units. The weather
can have a negative or positive effect on your units’ combat ability.
36
37
Page 19

Psychological Effects, Poison & Disease
These effects are caused naturally by some units, or by heroes
casting spells. For example, Slayer Knights cause Chaos. There are
six effects, as described below. For details on each race’s
vulnerability and resistance to these effects, see page 39.
Effect Effect on Enemy Units Duration
Awe Half speed & loss of any ranged attack 30 sec.
Fear Half damage & -4 to speed 45 sec.
Terror Run away from enemies, & -2 to speed 15 sec.
Chaos No positive bonuses apply, & armor
is reduced to zero 30 sec.
Poison Hit points degenerate to one-eighth
of maximum 10 min.
Disease No hit point regeneration, combat and
speed degenerate to one 10 min.
Weather Effects
Changes in weather conditions affect a unit’s combat skill. A table
with the bonuses and penalties to each race’s combat skill in each of
the four weather conditions is in the “Battlecry II Appendix.chm”
documentation included on the WARLORDS BATTLECRY II CD. For
example, after looking at the table, if you are Human, you really do not
want to fight the Undead on a stormy night!
By default, the weather conditions are fine and daytime. Spells cast
by heroes, some units, or particular buildings can alter these
conditions. The effects of the spell only last a certain time, then the
weather changes back to fine daytime. You can have random weather
effects by turning on this option under the More Options button on
the Side Selection Screen, see page 10 for details.
Humans
Humans are a good all round side. They have a selection of good infantry, archers
and cavalry all available fairly early in a battle. A peculiarity of the Human side is
that they have three Generals – a Red Mage, a White Mage, and a Black Mage.
The race has no specific weakness, but no outstanding strength either. Humans
require lots of gold and metal for unit production, and stone for buildings, but do
not have much need for crystal.
For tips on playing the Human race, see the electronic documentation included on
this CD titled “Battlecry II Appendix.chm”.
RACE DEPENDENCIES
Each race has its own strengths and weaknesses, buildings they can
construct and units they can produce. The following pages give
general descriptions of each race, tips for playing, and a building
dependency diagram showing all buildings, units and skills of that
race. For detailed descriptions of each unit, see “The Bestiary”
starting on page 51.
38
39
Page 20

Undead
Undead are a unique race in that they cannot produce many units
from buildings in the normal way. Most of their stronger units are
created by transforming lesser units. Undead are slow, not having
any cavalry, but strong, and are immune to all psychological effects.
They are quite resistant to most forms of attack, but are vulnerable
to crushing weapons. Undead primarily require metal and crystal.
For tips on playing the Undead race, see the electronic documentation
included on this CD titled “Battlecry II Appendix.chm”.
Dwarves
Dwarves are a tough and hardy race, with plenty of hit points. They are highly
resistant to magic. They are slow, not having any cavalry, but are very good at
building. The defensive structures of the Dwarves are the best available, as are the
siege weapons. Dwarves require lots of gold and metal for unit production, and
stone for buildings.
For tips on playing the Dwarves race, see the electronic documentation included
on this CD titled “Battlecry II Appendix.chm”.
40
41
Page 21

Barbarians
Barbarians are a fierce, but limited, warrior race.
They have a poor selection of units, although they are quick to
produce, and quite upgradeable. Their units are very fast, with fairly
high combat skills, but with very poor armor. Barbarians require metal
for unit production and stone for buildings.
For tips on playing the Barbarians race, see the electronic
documentation included on this CD titled “Battlecry II Appendix.chm”.
Minotaurs
Minotaurs have the smallest selection of units of any race, but those units are also
the most upgradeable. The few units that they do have are very strong, can cause
a lot of damage, and have a lot of hit points. Minotaurs require metal for unit
production and stone for buildings.
For tips on playing the Minotaurs race, see the electronic documentation included
on this CD titled “Battlecry II Appendix.chm”.
42
43
Page 22

Orcs
Orcs have a wide variety of units, half of which are disease and
poison carriers. They are quite fast to produce, and reasonably strong
early in the game. Orcs do not have many upgrades. They have poor
defense against attacks from the air. Orcs primarily require stone, and
a little metal.
For tips on playing the Orcs race, see the electronic documentation
included on this CD titled “Battlecry II Appendix.chm”.
High Elves
High Elves are a proud and noble race. They are very fast, have good scouting
abilities, and high combat skills, but not many hit points. Their cavalry are amongst
the best in the game. High Elves require metal and crystal.
For tips on playing the High Elves race, see the electronic documentation included
on this CD titled “Battlecry II Appendix.chm”.
44
45
Page 23

Wood Elves
Wood Elves are nature lovers. They are very fast, have good scouting
abilities, but not many hit points. They are extremely weak in melee
combat, but their archers are the best missile units in the game.
Wood Elves require gold and crystal.
For tips on playing the Wood Elves race, see the electronic
documentation included on this CD titled “Battlecry II Appendix.chm”.
Dark Elves
Dark Elves are an evil and sinister race. They are very fast, have good scouting
abilities, and fairly high combat skills, but not many hit points. They have very
powerful Mages, who have many upgrades. Dark Elves require stone and crystal.
For tips on playing the Dark Elves race, see the electronic documentation included
on this CD titled “Battlecry II Appendix.chm”.
46
47
Page 24

Fey
The Fey are a race of faerie and woodland creatures. They may seem
small and harmless, but when angered they will attack in large
numbers and can be fast, cruel and deadly. Fey require mainly
crystal.
For tips on playing the Fey race, see the electronic documentation
included on this CD titled “Battlecry II Appendix.chm”.
Daemons
Daemons are an evil race with many powerful flying units. They are slow to build at
the start of a game, but once established, their units have powerful summoning
abilities. They can create hordes of units by summoning and opening portals for
lesser Daemons, with only a mana cost. Daemons require all four resources.
For tips on playing the Daemons race, see the electronic documentation included
on this CD titled “Battlecry II Appendix.chm”.
48
49
Page 25

Dark Dwarves
Dark Dwarves have been corrupted by the forces of chaos. They are
too cowardly to enter battle themselves, but build large golems and
siege weapons to hassle the enemy from afar. They are a race of
engineers with strong defenses. Dark Dwarves require mainly gold.
For tips on playing the Dark Dwarves race, see the electronic
documentation included on this CD titled “Battlecry II Appendix.chm”.
THE BESTIARY
The following list contains all units in WARLORDS BATTLECRY II in alphabetical order.
It shows general ratings and special abilities, and for more exact statistics on all
units, see the “Battlecry II Units.chm” documentation included on the WARLORDS
BATTLECRY II CD. For details on which buildings the units can be produced from, see
the “Race Dependencies” starting on page 38.
Archon Combat: Excellent Speed: Fast
Armor: Good, but excellent against fire and magic
Attack: Melee fire attack to both ground & air units
Special Ability: Causes Awe. Does double damage
to all evil units.
Assassin Combat: Very Good Speed: Very Fast
Ballista Combat: Good Speed: Very Slow
Banshee Combat: Very Good Speed: Average
Barbarian Combat: Average Speed: Average
Basilisk Combat: Average Speed: Slow
Armor: Good
Attack: Melee slashing attack to ground units only
Special Ability: Poisons, and has a 4% chance of
assassinating enemies.
Armor: Good, except poor against fire
Attack: Extremely long-range piercing attack to
ground units only
Special Ability: Does carry-through damage.
Armor: Very Good
Attack: Close-range magic attack to both ground
and air units
Special Ability: Converts buildings. Attacks
multiple enemies at once. Casts Scare spell.
Armor: Average
Attack: Middle-range piercing attack to both
ground and air units
Special Ability: Spears do carry-through damage.
Armor: Excellent
Attack: Middle-range magic attack to both ground and air units
Special Ability: Turns enemy units to 100 stone.
50
51
Page 26

Bat, Giant Combat: Poor Speed: Fast
Armor: Average
Attack: Melee piercing attack to air units only
Special Ability: Is only worth 1/2 army point.
Battering Ram Combat: Good Speed: Very Slow
Armor: Good, but poor against fire and magic
Attack: Melee crushing attack to ground units only
Special Ability: Does quadruple damage to
buildings.
Daemon Combat: Very Good Speed: Fast
Armor: Good, but excellent against fire and magic
Attack: Melee slashing attack to both ground and air units
Special Ability: Causes Chaos. Does double damage to all good
units. Summons Imps. Can devour Souls to gain mana.
Dark Archer Combat: Average Speed: Fast
Armor: Good, but excellent against magic
Attack: Long-range piercing attack to both ground and air units
Special Ability: Fires poison arrows.
Blackguard Combat: Excellent Speed: Fast
Armor: Excellent
Attack: Melee slashing attack to ground units only
Special Ability: Converts buildings. Casts
Invisibility spell.
Black Mage Combat: Very Good Speed: Average
Armor: Average, but excellent against magic
Attack: Middle-range magic attack to both ground
and air units
Special Ability: Converts buildings. Casts Hand of
Ice and Drain Mana spells. Gains 5 mana for each
enemy unit killed.
Bone Catapult Combat: Good Speed: Very Slow
Armor: Very good, but poor against crushing
attacks
Attack: Extremely long-range crushing attack to
ground units only
Special Ability: Causes splash damage.
Bronze Golem Combat: Very Good Speed: Slow
Armor: Excellent
Attack: Melee crushing attack to both ground and
air units
Special Ability: Converts buildings. Collects
resources from razed buildings.
Catapult Combat: Good Speed: Very Slow
Armor: Very good, except poor against fire and magic
Attack: Extremely long-range crushing attack to
ground units only
Special Ability: Causes splash damage. Can pick up
and throw cows.
Dark Infantry Combat: Average Speed: Average
Armor: Good, but excellent against magic
Attack: Melee piercing attack to ground units only
Special Ability: None
Dark Rider Combat: Good Speed: Fast
Armor: Good
Attack: Melee slashing attack to ground units only
Special Ability: None
Doomknight Combat: Very Good Speed: Slow
Armor: Extreme
Attack: Melee slashing attack to both ground and air units
Special Ability: None
Dragon Combat: Extreme Speed: Fast
Armor: Excellent – but slightly vulnerable to piercing
Attack: Close-range fire attack to both ground and air units
Special Ability: Causes Terror. Does splash damage.
Dragonliche Combat: Excellent Speed: Fast
Armor: Excellent
Attack: Close-range fire attack to both ground and air units
Special Ability: Causes Terror. Does splash damage.
Dragon Knight Combat: Very Good Speed: Very Fast
Armor: Very good, but extreme against fire
Attack: Melee slashing attack to both ground and air units
Special Ability: None
52
53
Page 27

Druid Combat: Good Speed: Fast
Armor: Average, but excellent against magic
Attack: Middle-range magic attack to both ground
and air units
Special Ability: Casts Lightning and Light/Darkness
spells.
Dwarf Smith Combat: Poor Speed: Average
Armor: Average, but excellent against magic
Attack: Melee crushing attack to ground units only
Special Ability: Builds buildings. Counts for 2 men when put
into mines.
Dryad Combat: Very Good Speed: Very Fast
Armor: Average, but excellent against magic
Attack: Close-range magic attack to both ground
and air units
Special Ability: Converts buildings 25% faster.
Dwarf Berserker Combat: Very Good Speed: Very Slow
Armor: Excellent, but average against fire
Attack: Melee slashing attack to ground units only
Special Ability: None
Dwarf Crossbow Combat: Average Speed: Slow
Armor: Average, but excellent against magic
Attack: Long-range piercing attack to both ground
and air units
Special Ability: None
Dwarf Infantry Combat: Average Speed: Slow
Armor: Good, but excellent against magic
Attack: Melee slashing attack to ground units only
Special Ability: Does triple damage to Elves.
Dwarf Lord Combat: Excellent Speed: Slow
Armor: Very good, but excellent against magic
Attack: Melee slashing attack to ground units only
Special Ability: Converts buildings. Resistant to
missiles. Does double damage to buildings.
Dwarf Runner Combat: Poor Speed: Good
Armor: Average, but excellent against magic
Attack: Melee crushing attack to ground units only
Special Ability: Resistant to missiles.
Eagle Combat: Average Speed: Fast
Armor: Average
Attack: Melee slashing attack to air units only
Special Ability: Builds buildings.
Elemental, Air Combat: Very Good Speed: Very Fast
Armor: Very Good
Attack: Melee crushing attack to both groun and air units
Special Ability: Causes Fear.
Elemental, Earth Combat: Excellent Speed: Very Slow
Armor: Excellent
Attack: Melee crushing attack to ground units only
Special Ability: Causes Fear. Quadruple damage to buildings.
Elemental, Fire Combat: Very Good Speed: Average
Armor: Good, but excellent against fire and magic
Attack: Long-range fire attack to both ground and air units
Special Ability: Causes Fear. Can set enemy units alight.
Elemental, Water Combat: Very Good Speed: Slow
Armor: Excellent, but average against fireand magic
Attack: Short-range magic attack to both ground and air units
Special Ability: Causes Fear.
Elven Hunter Combat: Very Good Speed: Very Fast
Armor: Good
Attack: Middle-range piercing attack to both ground and air units
Special Ability: Unlockable in campaign only.
Engineer Combat: Poor Speed: Slow
Armor: Good, but excellent against magic
Attack: Melee crushing attack to ground units only
Special Ability: Builds buildings. Counts for 2 men when put
into mines. Casts Earthpower.
54
55
Page 28

Eye of Oros Combat: Cannot Fight Speed: Extreme
Armor: Excellent
Attack: None
Special Ability: Extra-long viewing range
Gladewarden Combat: Average Speed: Average
Armor: Average, but very good against magic
Attack: Long-range piercing attack to both ground and air units
Special Ability: None
Faerie Dragon Combat: Average Speed: Fast
Armor: Good, but very good against fire and magic
Attack: Middle-range fire attack to both ground
and air units
Special Ability: None
Firebat Combat: Poor Speed: Fast
Armor: Average, but excellent against fire
Attack: Melee fire attack to air units only
Special Ability: None
Firebomb Combat: Average Speed: Fast
Armor: Good
Attack: Melee fire attack to both ground and air
units
Special Ability: Explodes when attacking or when
attacked.
Flamecannon Combat: Very Good Speed: Very Slow
Armor: Very Good
Attack: Very long range fire attack to ground units
only
Special Ability: None
Forestguard Combat: Poor Speed: Average
Armor: Good
Attack: Melee piercing attack to ground units only
Special Ability: None
Goblin Combat: Poor Speed: Fast
Armor: Good, but average against fire and magic
Attack: Melee crushing attack to ground units only
Special Ability: Causes Disease.
Goblin Shaman Combat: Very Good Speed: Fast
Armor: Good, but excellent against magic
Attack: Middle-range magic attack to both ground and air units
Special Ability: Casts Lightning, Berserker and Light/Darkness
spells.
Gobshooter Combat: Good Speed: Very Slow
Armor: Very good, but average against fire
Attack: Long-range crushing attack to ground
units only
Special Ability: Does splash damage. Chance of Goblin
surviving.
Griffon Combat: Good Speed: Fast
Armor: Good
Attack: Melee slashing attack to both ground and air units
Special Ability: None
Halberdier Combat: Good Speed: Average
Armor: Very Good
Attack: Melee slashing attack to ground units only
Special Ability: Unlockable in campaign only. Does triple damage
to cavalry.
Giant Combat: Excellent Speed: Average
Armor: Very Good
Attack: Melee crushing attack to both ground and
air units
Special Ability: Converts buildings. Causes Fear.
Does splash damage.
56
Harpy Combat: Average Speed: Average
Armor: Good
Attack: Melee slashing attack to ground units only
Special Ability: Poison. Casts Drain Mana spell.
Hellbore Combat: Good Speed: Slow
Armor: Excellent, but average against crushing
Attack: Very long range magic attack to both ground and air units
Special Ability: None
57
Page 29

Iceguard Combat: Average Speed: Fast
Armor: Very good, and excellent against fire and
magic
Attack: Melee piercing attack to ground units only
Special Ability: None
Lightning Hawk Combat: Average Speed: Fast
Armor: Average, but good against magic
Attack: Close-range magic attack to ground units only
Special Ability: None
Imp Combat: Good Speed: Fast
Armor: Poor, but excellent against fire and magic
Attack: Middle-range magic attack to both ground
and air units
Special Ability: None
Knight Combat: Very Good Speed: Very Fast
Armor: Very good, but average against magic
Attack: Melee slashing attack to ground units only
Special Ability: None
Knightlord Combat: Excellent Speed: Very Fast
Armor: Excellent, but average against magic
Attack: Melee slashing attack to ground units only
Special Ability: Each Knight Lords adds +1 to the
hero’s Morale skill.
Kobold Combat: Poor Speed: Average
Armor: Average, but very good against crushing
Attack: Melee slashing attack to ground units only
Special Ability: Poisons. Builds buildings. Can be
put into mines.
Kobold Sniper Combat: Average Speed: Average
Armor: Average, but very good against crushing
Attack: Very long range piercing attack to both
ground and air units
Special Ability: Unlockable in campaign only.
Liche Combat: Very Good Speed: Average
Armor: Very good, but only average against
crushing
Attack: Middle-range fire attack to both ground
and air units
Special Ability: None
Longbow Combat: Average Speed: Fast
Armor: Good
Attack: Long-range piercing attack to both ground and air units
Special Ability: None
Mercenary Combat: Good Speed: Very Fast
Armor: Good
Attack: Melee slashing attack to ground units only
Special Ability: None
Minotaur Combat: Good Speed: Average
Armor: Average
Attack: Melee crushing attack to ground units only
Special Ability: Can be upgraded to missile unit. Eats animals to
heal & cure.
Minotaur King Combat: Excellent Speed: Fast
Armor: Good, but excellent against magic
Attack: Melee slashing attack to both ground and air units
Special Ability: Causes Fear. Converts buildings.
Ignores enemy armor. Eats animals to heal & cure.
Minotaur Shaman Combat: Very Good Speed: Fast
Armor: Good, but excellent against fire and magic
Attack: Middle-range fire attack to both ground and air units
Special Ability: Casts Berserker, Pillar of Fire and Ring of Fire
spells. Eats animals to heal & cure.
Moonguard Combat: Excellent Speed: Fast
Armor: Very good, but average against fire
Attack: Long-range piercing attack to both ground and air units
Special Ability: Converts buildings. Can fire multiple arrows.
Mystic Combat: Good Speed: Average
Armor: Good
Attack: Middle-range magic attack to both ground and air units
Special Ability: Casts White Ward and Ring of Ice spells.
58
59
Page 30

Nightmare Combat: Good Speed: Very Fast
Armor: Very good, but excellent against fire and
magic
Attack: Melee crushing attack to ground units only
Special Ability: None
Pikeman Combat: Average Speed: Average
Armor: Good
Attack: Melee piercing attack to ground units only
Special Ability: Does triple damage to cavalry.
Oakman Combat: Poor Speed: Slow
Armor: Average, but excellent against piercing
and magic
Attack: Melee crushing attack to ground units only
Special Ability: Builds buildings. Can be put into
mines.
Ogre Combat: Good Speed: Average
Armor: Very Good
Attack: Melee crushing attack to both ground and
air units
Special Ability: None
Orc Combat: Average Speed: Average
Armor: Good
Attack: Melee slashing attack to ground units only
Special Ability: None
Peasant Combat: Poor Speed: Average
Armor: Average
Attack: Melee piercing attack to ground units only
Special Ability: Builds buildings. Can be put into
mines. Only costs 1/4 of an Army Point.
Pegasus Combat: Good Speed: Very Fast
Armor: Good
Attack: Melee crushing attack to both ground and
air units
Special Ability: None
Phoenix Combat: Average Speed: Fast
Armor: Average, but excellent against fire
Attack: Middle-range fire attack to both ground
and air units
Special Ability: Converts buildings.
Pixie Combat: Average Speed: Very Fast
Armor: Average, but excellent against magic
Attack: Middle-range magic attack to both ground and air units
Special Ability: None
Quasit Combat: Poor Speed: Fast
Armor: Good, very good against fire and magic
Attack: Melee crushing attack to ground units only
Special Ability: Builds buildings. Can be put into mines. Poisons.
Queen Spider Combat: Average Speed: Very Fast
Armor: Good, but average against crushing and fire
Attack: Melee piercing attack to ground units only
Special Ability: Can lay eggs in vanquished foes that hatch
into Spiders.
Reaver Combat: Excellent Speed: Fast
Armor: Average, but good against magic
Attack: Melee slashing attack to ground units only
Special Ability: Converts buildings. Does triple damage to large
units.
Red Mage Combat: Very Good Speed: Average
Armor: Average, but excellent against magicand fire
Attack: Long-range fire attack to both ground and air units
Special Ability: Converts buildings. Casts Ring of Fire and Resist
Fire spells.
Rider Combat: Good Speed: Very Fast
Armor: Average, but good against slashing and magic
Attack: Melee piercing attack to ground units only
Special Ability: None
Runelord Combat: Very Good Speed: Very Slow
Armor: Good, but excellent against magic and fire
Attack: Long-range fire attack to both ground and air units
Special Ability: Casts Stonecall and Doomstones spells.
60
61
Page 31

Salamander Combat: Very Good Speed: Average
Armor: Good, but excellent against fire
Attack: Melee fire attack to both ground and air
units
Special Ability: Can set units alight. Hits multiple
enemies with one attack.
Sorceror Combat: Very Good Speed: Fast
Armor: Average, but very good against magic and fire
Attack: Long-range magic attack to both ground air units
Special Ability: Casts Summon Zombie, Darkstorm and Pillar of
Fire spells.
Scorpion Combat: Very Good Speed: Slow
Armor: Very Good
Attack: Very long range piercing attack to ground
units only
Special Ability: Can shoot multiple bolts.
Shadow Combat: Very Good Speed: Average
Armor: Very Good
Attack: Melee magic attack to both ground and
air units
Special Ability: Drains enemy XP. Gets +5 to
Combat at night.
Skeleton Combat: Poor Speed: Average
Armor: Good, but poor against crushing, and
excellent against piercing
Attack: Melee slashing attack to ground units only
Special Ability: Resistant to normal missiles.
Can morph to Wight or Wraith.
Skeleton Cavalry Combat: Good Speed: Fast
Armor: Very good, except poor against crushing
Attack: Melee slashing attack to ground units only
Special Ability: Unlockable in campaign only.
Resistant to normal missiles.
Slayer Knight Combat: Good Speed: Slow
Armor: Excellent
Attack: Melee slashing attack to ground units only
Special Ability: Causes Chaos. Can morph to a
Doom Knight.
Spider Combat: Poor Speed: Fast
Armor: Average
Attack: Melee piercing attack to both ground and air units
Special Ability: Poisons.
Spriggan Combat: Poor Speed: Fast
Armor: Good
Attack: Melee piercing attack to ground units only
Special Ability: None
Sprite Combat: Poor Speed: Fast
Armor: Average, but very good against magic
Attack: Middle-range piercing attack to both ground and air units
Special Ability: None
Squire Combat: Average Speed: Fast
Armor: Average, but good against magic and fire
Attack: Middle-range piercing attack to both ground and air units
Special Ability: None
Stone Golem Combat: Average Speed: Very Slow
Armor: Excellent, but only average against crushing
Attack: Melee crushing attack to both ground and air units
Special Ability: None
Succubus Combat: Good Speed: Average
Armor: Very Good
Attack: Melee slashing attack to both ground and air units
Special Ability: Leaves Souls for mana collection.
Summoner Combat: Very Good Speed: Fast
Armor: Very good, but excellent against magic and fire
Attack: Mid-range magic attack to both ground and air units
Special Ability: Converts buildings. Casts Banish and
Daemongate spells. Can devour Souls to gain mana.
62
63
Page 32

Sylph Combat: Poor Speed: Very Fast
Armor: Poor, but excellent against magic
Attack: Melee piercing attack to both ground and
air units
Special Ability: None
Titan, Grond Combat: Excellent Speed: Slow
Armor: Excellent
Attack: Melee crushing attack to both ground and air units
Special Ability: Causes Terror. Ignores enemy armor. Splash
damage. Explodes on death.
Thrall Combat: Poor Speed: Slow
Armor: Poor
Attack: Melee crushing attack to ground units only
Special Ability: Builds buildings. Can be put into
mines.
Titan, Balora Combat: Excellent Speed: Fast
Armor: Excellent
Attack: Melee slashing attack to both ground and
air units
Special Ability: Causes Terror. Ignores enemy
armor. Splash damage. Explodes on death.
Titan, Lord Bane Combat: Excellent Speed: Fast
Armor: Excellent
Attack: Long-range fire attack to both ground and
air units
Special Ability: Causes Terror. Ignores enemy
armor. Explodes on death.
Titan, Combat: Excellent Speed: Very Fast
Forestmaster Armor: Excellent
Attack: Very long range magic attack to both
ground and air units
Special Ability: Causes Terror. Ignores enemy
armor. Explodes on death.
Titan, Gornak Combat: Excellent Speed: Fast
Elfeater Armor: Excellent
Attack: Long-range magic attack to both ground
and air units
Special Ability: Causes Terror. Ignores enemy
armor. Turn enemies into 100 Stone. Explodes on
death.
Titan, Ironbark Combat: Excellent Speed: Fast
Armor: Excellent
Attack: Melee crushing attack to both ground and air units
Special Ability: Causes Terror. Ignores enemy
armor. Splash damage. Explodes on death.
Titan, Kargoth Combat: Excellent Speed: Very Fast
Armor: Excellent
Attack: Long-range magic attack to both ground and air units
Special Ability: Causes Terror. Ignores enemy armor. Explodes
on death.
Titan, Combat: Excellent Speed: Fast
King Khalid Armor: Excellent
Attack: Long-range magic attack to both ground and air units
Special Ability: Causes Terror. Ignores enemy
armor. Explodes on death.
Titan, Combat: Excellent Speed: Very Fast
King Lunarion Armor: Excellent
Attack: Melee crushing attack to both ground and air units
Special Ability: Causes Terror. Ignores enemy armor. Splash
damage. Explodes on death.
Titan, Sirian Combat: Excellent Speed: Very Fast
Armor: Excellent
Attack: Melee fire attack to both ground and air units
Special Ability: Causes Terror. Ignores enemy armor.
Splash damage. Explodes on death.
Titan, Combat: Excellent Speed: Fast
Skull of Sartek Armor: Excellent
Attack: Long-range magic attack to both ground and air units
Special Ability: Causes Terror. Ignores enemy armor.
Explodes on death.
64
65
Page 33

Titan, Tempest Combat: Excellent Speed: Fast
Armor: Excellent
Attack: Long-range magic attack to both ground
and air units
Special Ability: Causes Terror. Ignores enemy
armor. Explodes on death.
Treant Combat: Excellent Speed: Slow
Armor: Very good, but average against fire
Attack: Melee crushing attack to both ground and
air units
Special Ability: Builds buildings. Causes Fear.
Casts Entangle spell.
Treant, Ancient Combat: Excellent Speed: Slow
Armor: Excellent, but average against fire
Attack: Melee crushing attack to both ground and
air units
Special Ability: Causes Fear. Casts Entangle spell.
Splits into 2 Treants on death.
Troll Combat: Good Speed: Slow
Armor: Good, but poor against fire
Attack: Middle-range crushing attack to both
ground and air units
Special Ability: Fast regeneration of hits. Can pick
up and throw sheep.
War Dog Combat: Very Good Speed: Very Fast
Armor: Good
Attack: Melee slashing attack to ground units only
Special Ability: None
White Mage Combat: Good Speed: Average
Armor: Good, but excellent against magic
Attack: Middle-range magic attack to both ground and air units
Special Ability: Converts buildings. Casts Cure and Heal Group
spells.
Wight Combat: Good Speed: Slow
Armor: Very Good
Attack: Melee slashing attack to ground units only
Special Ability: Can morph to Liche or Slayer Knight.
Wisp Combat: Poor Speed: Fast
Armor: Average, but excellent against magic and fire
Attack: Close-range magic attack to both ground and air units
Special Ability: Builds buildings. Can merge with 3 other Wisps
to make an Ancient Wisp.
Wisp, Ancient Combat: Good Speed: Average
Armor: Good, but excellent against magic and fire
Attack: Long-range magic attack to both ground and air units
Special Ability: Builds buildings. Generates crystal equal to a
level 2 Crystal Mine.
Unicorn Combat: Good Speed: Very Fast
Armor: Average, but excellent against magic
Attack: Melee piercing attack to ground units only
Special Ability: Causes Awe. Casts Healing and
Curing spells.
Vampire Combat: Very Good Speed: Fast
Armor: Very good, but only average against
piercing
Attack: Melee slashing attack to ground units only
Special Ability: Convert buildings. Drains enemy
hits. Summons bats.
66
Wolfrider Combat: Good Speed: Very Fast
Armor: Good
Attack: Melee slashing attack to ground units only
Special Ability: Can be upgraded to have Disease.
Woodrider Combat: Average Speed: Very Fast
Armor: Good
Attack: Melee slashing attack to ground units only
Special Ability: None
Wraith Combat: Good Speed: Average
Armor: Very Good
Attack: Melee magic attack to both ground and air units
Special Ability: Can morph to Shadow. Drains enemy XP.
67
Page 34

Wyvern Combat: Good Speed: Very Fast
Armor: Very Good
Attack: Melee slashing attack to both ground and
air units
Special Ability: None
Zombie Combat: Poor Speed: Slow
Armor: Good, but poor against fire
Attack: Melee crushing attack to ground units only
Special Ability: Builds buildings. Can be put into
mines. Causes Disease.
68
CREDITS
SSG Team
Lead Design
Steve Fawkner
Additional Design
Gregor Whiley
Mick Robertson
Dean Farmer
Chris Proctor
Programming
Steve Fawkner
Dean Farmer
Mick Robertson
Producer
Gregor Whiley
Art Direction
Alister Lockhart
Steve Fawkner
Janeen Fawkner
Dave McLeod
Lead Artists
Grant Arthur
Janeen Fawkner
Alister Lockhart
Dave McLeod
Chris Proctor
3D Artists
Toby Charlton
Fiona Kerr
Wayne Osborne
Alex Voliani (Microforte Pty Ltd)
Michael Lynne (Microforte Pty Ltd)
Shamus Baker
Jay Kyburz
Alex Whitlam
Guy Robinson
James Neale
Sam Jorgenson
Concept Artists
Alister Lockhart
Rodrigo Perez
Chris Shepherd
Steve J. Scholtz
Dave McLeod
Video Design & Direction
Alister Lockhart
Opening Video
Alister Lockhart
James Neale
In-game Video
Daniel Todd
David Henderson
David Little
Jason Bell
Doug Stephenson
Padraig Byrne
Ranutra Thenuwara
Lee Murray
Alister Lockhar
Janeen Fawkner
Video Playback Code
Bink by RAD Software
Voice Direction & Engineering
Andrew Neil (SoundFirm Pty Ltd)
Voice & Video Sound Producer
James Tutton (SoundFirm Pty Ltd)
Voice Acting
Genevieve Hegney
SoundFirm Pty Ltd
Scenario Design
Steve Fawkner
Mick Robertson
Chris Proctor
Janeen Fawkner
Mark J. J. Hill
Steve Hand
Manual
Janeen Fawkner
Music
Steve Fawkner
Sound Editing
Mick Robertson
Steve Fawkner
Sound Code
Miles Sound System by RAD Software
69
Page 35

Game Testing
Ian Trout
Tom Trout
Jackson Trout
Janeen Fawkner
Chris Proctor
Sara Eggen
Miriam Robertson
Stephen Thomas
Rachel Zilm
Ben Miller
Mark J. J. Hill
Karl-Peter Baum
Tim Wakeman
Gregor Whiley
Gabriella Lowgren
Andrew Taubman
Andrew McLaren
Roger Keating
Rowan Keating
Shelley Keating
Conor Keane
Jessica McKeough
Ryan McKeough
Gary Makin
Steve Hand
Alister Lockhart
Volker Stephens
Jeremy Foster
Peter Faber
Charles Gallagher
Special Thanks to
Mitch Soule & Jeff Roberts of RAD
Software, Sara Eggen for help with
the Fey, Daniel Todd and the team
at the Computer Graphics College
for their selfless efforts on short
notice, all the players from the
Battlecry messageboards &
fansites who have contributed
feedback & ideas
Ubisoft Team
VP of Product Development
Bret Berry
Executive Producer
Dexter Chow
Producer
Garrett Graham
Associate Producer
Laurentiu Ruso
Senior Marketing Manager
Tena Lawry
Public Relations Manager
Karen “KC” Conroe
International Coordinators
Alexis Godard
Anne Blondel
Localization Managers
Coralie Martin
Yutaka Noma
Content Manager
Fabrice Pierre-Elien
Beta Testers
Chuck Yager
Don Laabs
Stan Biesiadecki
Jim Stoddard
Jorg Becker
QA Manager
Eric Tremblay
QA Lead Tester
François McCann
QA Testers
Michael Richard
Marc Brouillette
Allen Tremblay
Marc-André Dessureault
Philippe Dion
Antoine Thisdale
QA Compatibility Testers
David Lévesque
Jason Alleyne
Package and Manual Design
Price Design Team
70
71
Page 36

NOTES
72
 Loading...