

Page 1
Warcraft® II
Battle.net™ Edition
1
Page 2
Copyright © 1995 - 1999 by Blizzard Entertainment. All rights reserved
The software and the manual are copyrighted. All rights reserved. They may not, in whole or
part, be copied, photocopied, reproduced, translated or reduced to any electronic medium or
machine-readable form without prior consent, in writing, from Blizzard Entertainment. The
user of this product shall be entitled to use the product for his or her own use, but shall not be
entitled to sell or transfer reproductions of the software or manual to other parties in any
way, nor to rent or lease the product to others without permission of Blizzard Entertainment.
Battle.net is a trademark and Blizzard Entertainment and Warcraft are trademarks or registered
trademarks of Davidson and Associates, Inc. in the U.S. and other countries. All other
trademarks and trade names are the properties of their respective owners.
Uses Bink Video Technology. Copyright © 1997-1999 by RAD Game Tools, Inc.
Uses Smacker Video Technology. Copyright © 1994-1999 by RAD Game Tools, Inc.
Portions © Copyright 1993-1995, SciTech Software
Contains licensed program materials of Metagraphics Software Corporation
Copyright © 1986-1989 Metagraphics Software Corporation, Scotts Valley, CA 95066
www.blizzard.com
Havas Interactive UK Ltd.
Customer Services / Mail Order / Tech Support Department
2 Beacontree Plaza
Gillette Way
Reading • Berkshire
RG2 OBS
United Kingdom
2
Warcraft II: Battle.net Edition
Page 3

Table of Contents
Getting Started .............................................................................................................................. 4
Troubleshooting ............................................................................................................................ 5
Tutorial ......................................................................................................................................... 6
Unit Commands and Combat ....................................................................................................... 12
Multiplayer Games ....................................................................................................................... 17
The Multiplayer Setup Screen ........................................................................................................ 21
Multiplayer Game Templates ........................................................................................................ 22
Options & Preferences .................................................................................................................. 22
Spawning ..................................................................................................................................... 23
The Map Editor ............................................................................................................................ 24
Legends of the Land (Azeroth) ...................................................................................................... 28
Creatures of the Land ................................................................................................................... 30
Resources of the Land ................................................................................................................... 31
Places of Mystery ......................................................................................................................... 32
Map of Azeroth ............................................................................................................................ 33
A Brief History of the Fall of Azeroth ............................................................................................ 34
Nations of the Alliance ................................................................................................................. 39
Alliance Ground Troops ................................................................................................................ 42
Alliance Air Units ......................................................................................................................... 45
Alliance Naval Units ..................................................................................................................... 46
Paladin Spells ............................................................................................................................... 48
Mage Spells .................................................................................................................................. 49
Alliance Buildings ..........................................................................................................................51
Human Unit Dependencies ........................................................................................................... 55
Human Building Dependencies .....................................................................................................56
The History of Orcish Ascension .................................................................................................. 57
Clans of the Horde ....................................................................................................................... 66
Ground Units of the Orcish Horde ................................................................................................69
Air Units of the Horde .................................................................................................................. 72
Naval Units of the Horde .............................................................................................................. 73
Ogre Mage Spells ......................................................................................................................... 75
Death Knight Spells ...................................................................................................................... 76
Orc Buildings ............................................................................................................................... 78
Orc Unit Dependencies ................................................................................................................ 82
Orc Building Dependencies .......................................................................................................... 83
The Aftermath of the Second War ................................................................................................ 84
Legends of the Land (Draenor) ..................................................................................................... 87
Clans of Draenor .......................................................................................................................... 89
Map of Draenor............................................................................................................................. 91
Credits ......................................................................................................................................... 92
Technical support ......................................................................................................................... 95
Warranty...................................................................................................................................... 96
Blizzard Entertainment
3
Page 4

GETTING STARTED
IBM-PC SYSTEM REQUIREMENTS
Computer: Warcraft II: Battle.net Edition requires a 100% IBM PC compatible computer, with a Pentium®
60 MHz or better processor and at least 16 megabytes of memory.
Operating System: You may play Warcraft II: Battle.net Edition under Windows® 95, Windows 98 or
Windows NT.
Controls: A keyboard and a 100% Microsoft®-compatible mouse are required.
Disk Drives: A hard drive and CD-ROM drive are required to play Warcraft II: Battle.net Edition. To
view the animations from the CD, your CD-ROM drive must be quad-speed or faster. Blizzard strongly
recommends that you do not run Warcraft II: Battle.net Edition from a compressed drive.
Video: Warcraft II: Battle.net Edition requires a DirectX compatible Local-bus SuperVGA card.
Sound: Warcraft II: Battle.net Edition supports DirectX 100% compatible cards.
INSTALLATION UNDER WINDOWS 9x AND NT
Place the CD into your CD-ROM drive. If your computer is AutoPlay capable, a Warcraft II: Battle.net
Edition menu will automatically appear on the screen. Select “Install Warcraft II: Battle.net Edition” to
start the installation program. Follow the on-screen instructions to install Warcraft on your system.
After the game has been successfully installed, you will have the option of adding a Warcraft II: Battle.net
Edition shortcut to your Start menu.
If your computer is not AutoPlay capable, open the “My Computer” folder on your desktop, then select
the drive letter which represents your CD-ROM drive. Finally, double click the “Setup” icon.
MACINTOSH SYSTEM REQUIREMENTS
Computer: Warcraft II: Battle.net Edition requires a Macintosh® with a PowerPC® processor and 16
megs of physical RAM. Running with Virtual Memory enabled can decrease game performance.
Operating System: Warcraft II: Battle.net Edition requires System 7.6 or higher.
Controls: A keyboard and a mouse are required. If you own a two button mouse, please consult your
mouse manual for instructions on configuring the second button to simulate a command (z) click.
Disk Drives: A hard drive and CD-ROM drive are required to play Warcraft II: Battle.net Edition. To
view the animations from the CD, your CD-ROM drive must be quad-speed or faster.
Video: Warcraft II: Battle.net Edition requires a 14" or better 256-color display.
Sound: Warcraft II: Battle.net Edition will work with any Mac OS compatible system’s built in sound.
INSTALLATION ON THE MACINTOSH
Place the CD into your CD-ROM drive. Double-click on the Warcraft II: Battle.net Edition CD icon, and
then double-click on the Warcraft II: Battle.net Edition Installer to copy the required game and system
files to your hard drive.
4
Warcraft II: Battle.net Edition
Page 5

TROUBLESHOOTING (PC)
Warcraft II Battle.net Edition requires that you have Microsoft’s DirectX 2.0 or higher installed and that your video and sound cards are
DirectX 2.0 compatible. DirectX 6.0 is included on the Warcraft II Battle.net Edition CD and can be installed by clicking on “Install
DirectX” from the list of options on the Warcraft II Battle.net Edition install screen.
The most common problem with a DirectX game:
Old, incompatible, corrupt or incorrect drivers for the sound and or video card can cause problems installing or running a DirectX
compatible game. If you experience a problem please contact your computer manufacturer, or the sound and video card manufacturers
(either through their web sites or over the telephone) for information on downloading and installing the latest drivers.
DirectSound and DirectDraw Errors:
These errors are caused by incompatible, corrupt, or out of date drivers for the sound and or video card. Try installing DirectX from
the Warcraft II: Battle.net Edition CD, if this does not help, contact your sound and or video card manufacturer about downloading and
installing the latest version of their drivers for your hardware.
I do not have any video when I start Warcraft II: Battle.net Edition:
This problem is usually attributed to older, or incompatible, DirectX drivers. Warcraft II: Battle.net Edition runs in 640x480 mode and
some video cards have a problem with DirectX automatically switching to that resolution. You can manually change the screen
resolution to 640x480 with 256 colors as the color depth by clicking on the Start button on your Desktop Taskbar, then selecting
Settings, then Control Panel. Open the Display Control Panel, Click on the Settings tab, and change your Display Area and Color
Palette settings.
I am not hearing any music or sound effects in Warcraft II: Battle.net Edition:
Make sure that your sound card is compatible with DirectX 2.0 or higher. Sound cards that are not supported under Microsoft’s
DirectX will not work with Warcraft II: Battle.net Edition. Install DirectX 6.0 from the Warcraft II: Battle.net Edition CD. If you are still not
hearing sound or music, then contact your sound card manufacturer to get the latest drivers for your system and information on
installing them.
I keep hearing static or feedback during the game:
This can occur when the line out volume is turned on but nothing in plugged in to the line out on your sound card. Check the volume
settings by clicking the Start button on your Task bar, select Programs, Accessories, and then Multimedia. Select the “Volume
Control” option. Adjust the volume control as needed. If this does not help contact your sound card manufacturer about downloading
and installing the latest sound drivers.
I’m getting a black screen when I start Warcraft II: Battle.net Edition:
Either your video card is not DirectX compatible, you are using an older version of DirectX, or you need the updated video drivers.
First download and install the latest drivers from the video card manufacturer. If you are still having problems, download and install
the latest version of Direct X, or install the version on the Warcraft II: Battle.net Edition CD.
Is there any way to play the full version of Warcraft II: Battle.net Edition without the CD:
You can play Multi-player without the CD. See the multi-player section of this manual for information on “spawning”. To play single
player or create a multi-player game you need to have a Warcraft II: Battle.net Edition CD in your local CD-ROM drive.
Can I install Warcraft II: Battle.net Edition to a compressed drive:
This can cause problems during the game, we recommend not using a compressed drive.
TROUBLESHOOTING (MAC)
Warcraft II: Battle.net Edition and Multi Button Mice:
Warcraft II: Battle.net Edition includes support for multi button mice via Apple’s Input Sprocket technology. However, some multi
button mice may not function correctly with this technology. If you are having trouble using the second, third or fourth buttons on
your programmable mouse, or you lose mouse and keyboard control at some point during the game, disable the ‘multi button mouse’
and ‘quit other applications’ options we included in the startup options for Warcraft II: Battle.net Edition. If you do not see the startup
options screen, quit and then hold down the Option key when you start Warcraft II: Battle.net Edition again.
Modem:
For modem to modem games, make sure your modem’s extensions and control panels are installed and active in the startup extension
set you use. Then check the Chooser in the Apple Menu and make sure no printers or other devices are trying to use the modem port.
If you use an internal modem, it should be displayed on the game’s Modem Selection screen as “internal modem”. If you use an
external modem you will see an option for “modem port.” Select the appropriate modem type for your system. If you have problems
with the connection, try different init strings. ATZ or AT &F1 should work for most modems. Init strings are set in the game’s
startup options screen.
Battle.net:
Games played over Battle.net require an active TCP/IP connection with low latency. You may need to start your ISP connection
manually prior to starting the game. When your ISP connection is active you will be able to see an IP address listed in the TCP/IP
control panel. If the game is disconnecting your ISP connection when it starts, make sure the ‘quit other applications’ option is not
selected in the game’s startup options screen.
Is there any way to play the full version of Warcraft II: Battle.net Edition without the CD:
You can play Multi-player without the CD see the multi-player section of this manual for information on “spawning”. To play single
player or create a multi-player game you need to have a Warcraft II: Battle.net Edition CD in your local CD-ROM drive.
FOR A LARGER, MORE UP-TO-DATE LIST OF POSSIBLE SOLUTIONS
CHECK
OUT THE TECHNICAL SUPPORT SECTION OF OUR WEBSITE AT WWW.BLIZZARD.COM
5
Page 6
TUTORIAL
STARTING A NEW SINGLE PLAYER GAME
1. The game begins with a graphic introduction to the world of Warcraft II. If you would like
to bypass this introduction, press the space bar or click the left mouse button. After the
introduction you will be taken to the main menu.
2. Click on the Single Player Game option, or type “S” to begin a single player game. You
will also notice that the letter S in the first word is a different color than the rest of the
message. This different colored letter is a “hotkey” which, when entered, allows you to
bypass clicking with the mouse. This convention is used throughout the game. You will
now be taken to the Scenario Screen.
3. Click on New Campaign. You will now be taken to the Race Selection Screen where you
will choose which army you will command and which campaign you will play.
4. Choose to marshall the Humans in the Tides of Darkness campaign by selecting Human
Campaign. There will be a short description of your first assignment, and then you will be
taken to the main game screen, the Command Screen.
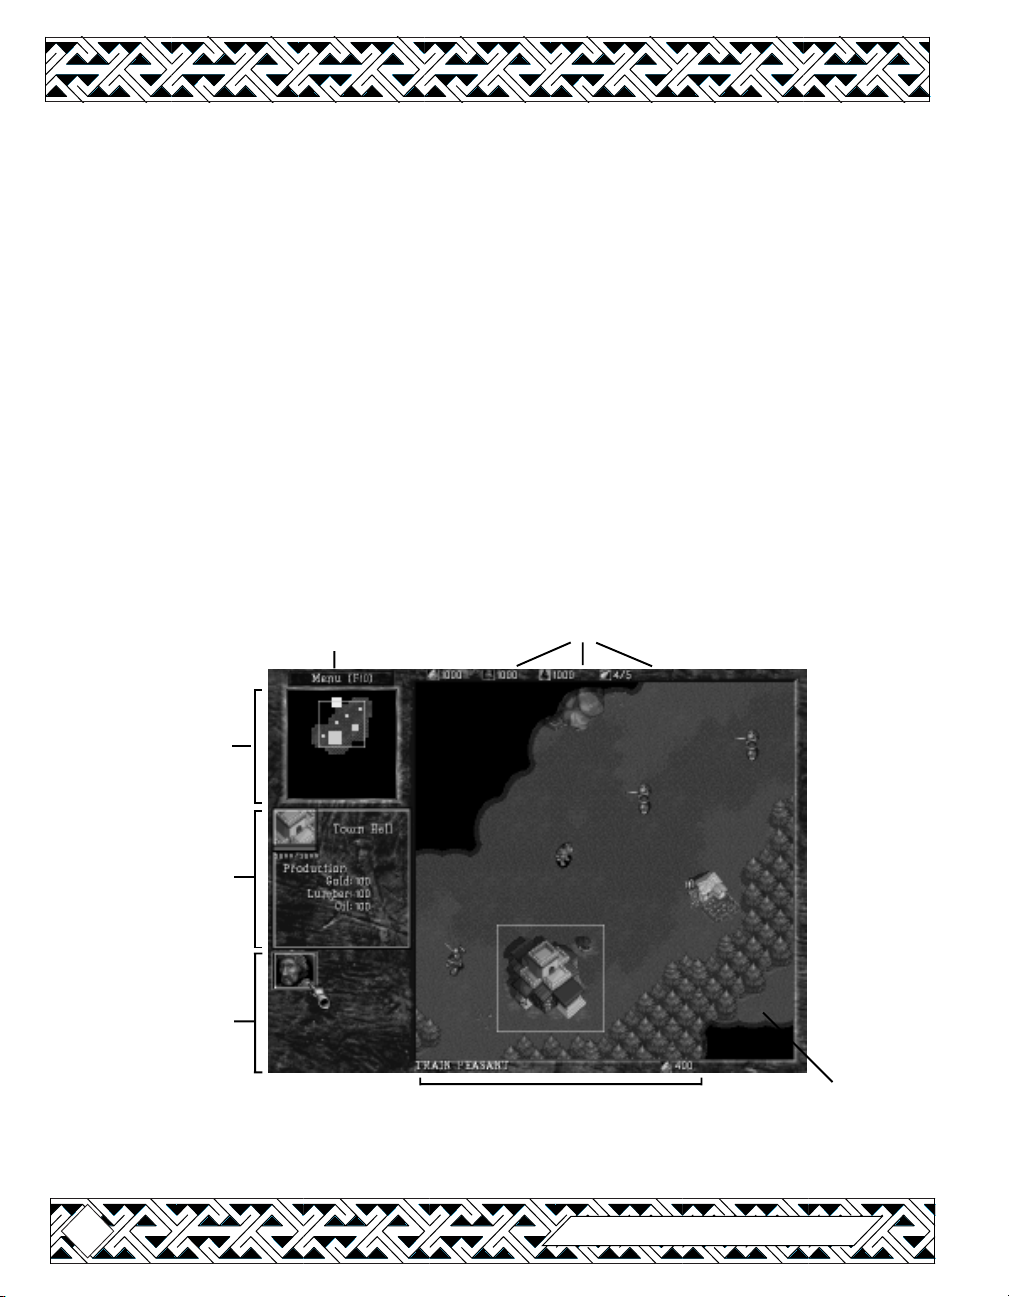
MENU
RESOURCES
MINIMAP
UNIT
DESCRIPTION
UNIT
COMMAND
INFO TEXT
The diagram above displays the main screen used in Warcraft and identifies the key
aspects used in game play. Each of these sections are described on the next page.
COMMAND
MAP
6
Warcraft II: Battle.net Edition
Page 7

RESOURCES
This is the amount of harvested lumber, mined gold, hauled oil (used in later scenarios),
and food that is available to use for creating and training various units and to use as
building materials for construction.
INFO TEXT
This will give you information on any units, buttons or buildings that you select.
UNIT DESCRIPTION
This is detailed information, including numeric statistics on any building or single unit
selected in the Command Map window.
UNIT COMMANDS
These are the different commands available to the unit, such as construction, attack, etc.
MINI MAP
This is a bird’s eye view of your Command Map which allows you to see the entire area at
once. Your buildings and units appear as green squares. Other units and buildings
appear as different colors. This map will increase in detail as you explore the lands
surrounding your settlement.
COMMAND MAP
This is the main field of play. Here you will be able to see, in great detail, the events that
transpire in the area around you. You may select units or buildings in this window by
using the mouse to select them. When one of your units is selected, a green box will
surround the unit, indicating that it is now prepared to receive your orders.
MENU
This button calls up the Warcraft Options menu.
Save: This allows you to save the game you are currently engaged in.
Load: This allows you to load and continue a game that you have previously saved.
Options: This allows you to change Sound, Speed, and game Preferences.
Help: This allows you access to a list of Keystrokes as well as Warcraft II Tips.
Scenario Objectives: This allows you to review the objectives of the scenario.
End Scenario: This allows you to Restart, Surrender, Quit to the Main Menu,
or Exit the Program.
During a Single Player Game clicking the Menu Button also pauses the game at any time.
Blizzard Entertainment
7
Page 8
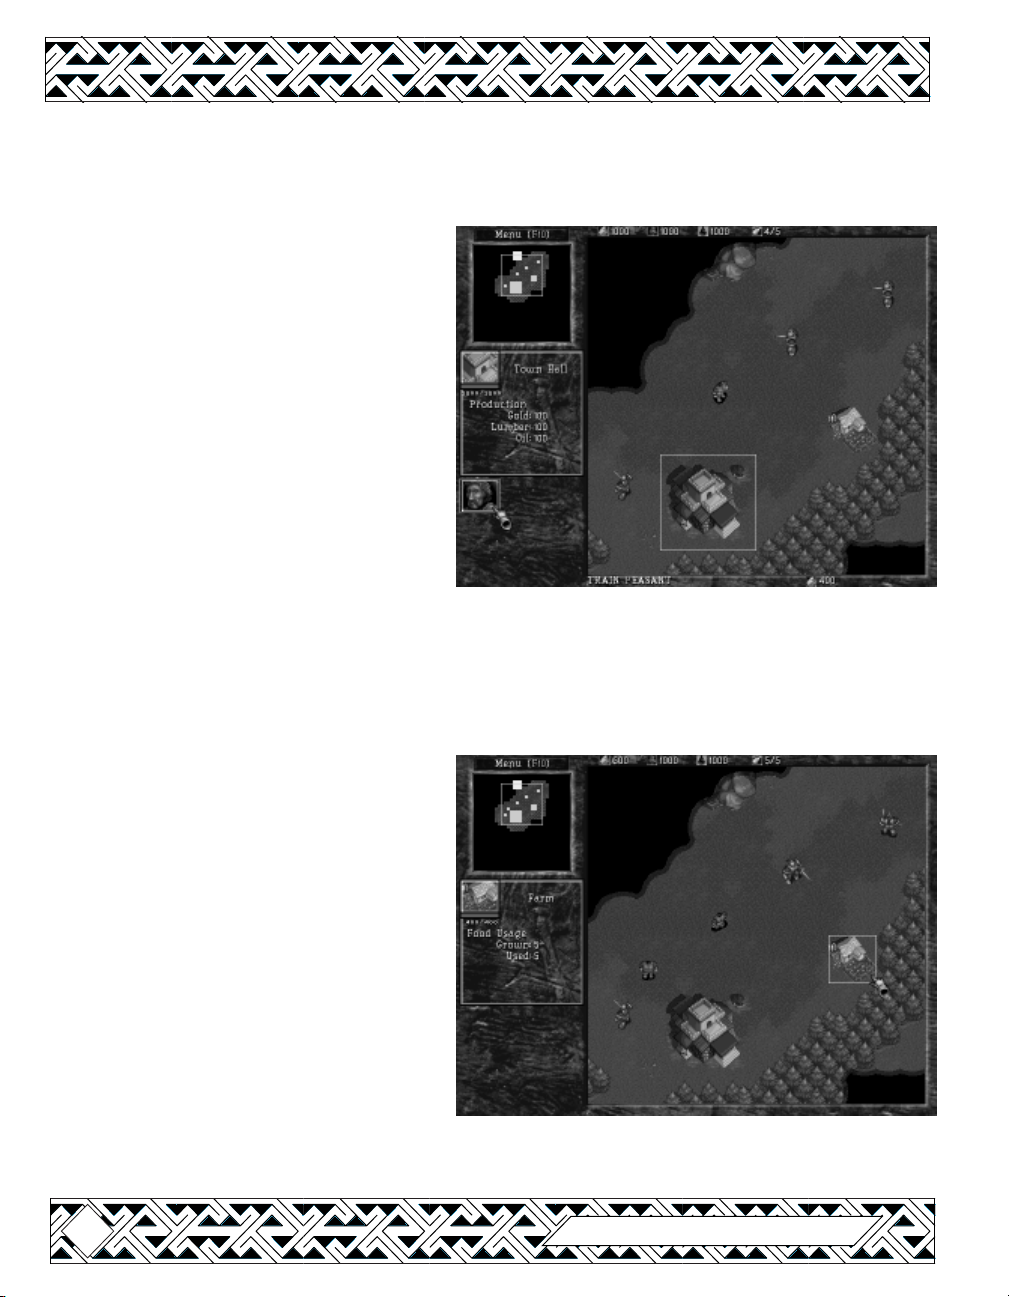
ESTABLISHING YOUR SETTLEMENT
You will be creating a settlement from the ground up, so to speak. In the center of your
Command Map, you will see a Town Hall, a Farm, three Footmen and a Peasant.
1. Move the arrow over the Town Hall.
When you are over a unit or building
on the Command Map that you are
able to select, the arrow will change
into a magnifying glass.
2. Select the Town Hall. When you select
a unit or building, a colored square
highlights your choice. Also, a
description of the selection will
appear to the left of the Command
Map in the Unit Description area.
TRAINING PEASANTS
3. Move the arrow over the Peasant icon.
The words Train Peasant will appear in the Info Text area. Note that the cost of training this
unit appears on the right side of the Info Text area. Costs for buildings and upgrades will appear in
this same area.
4. Click on the Peasant icon. This begins the process of training your Peasant. Note that the
rate of completion is shown in the Unit Description area.
5. After the Peasant is trained, he will
appear on the Command Map.
6. Should you attempt to train another
Peasant, you will receive the message
Not Enough Food…Build More
Farms in the Info Text area.
7. To view your current food supply, look
in the food indicator in the upper right
of the screen, or select any Farm. In
the unit description area, the rate of
production and consumption will be
displayed. You must have food available
in order to train more units. To increase
the food supply available for your settlement, another farm must be built. Each Town Hall
can support one unit, while each Farm provides food for four units.
8
Warcraft II: Battle.net Edition
Page 9
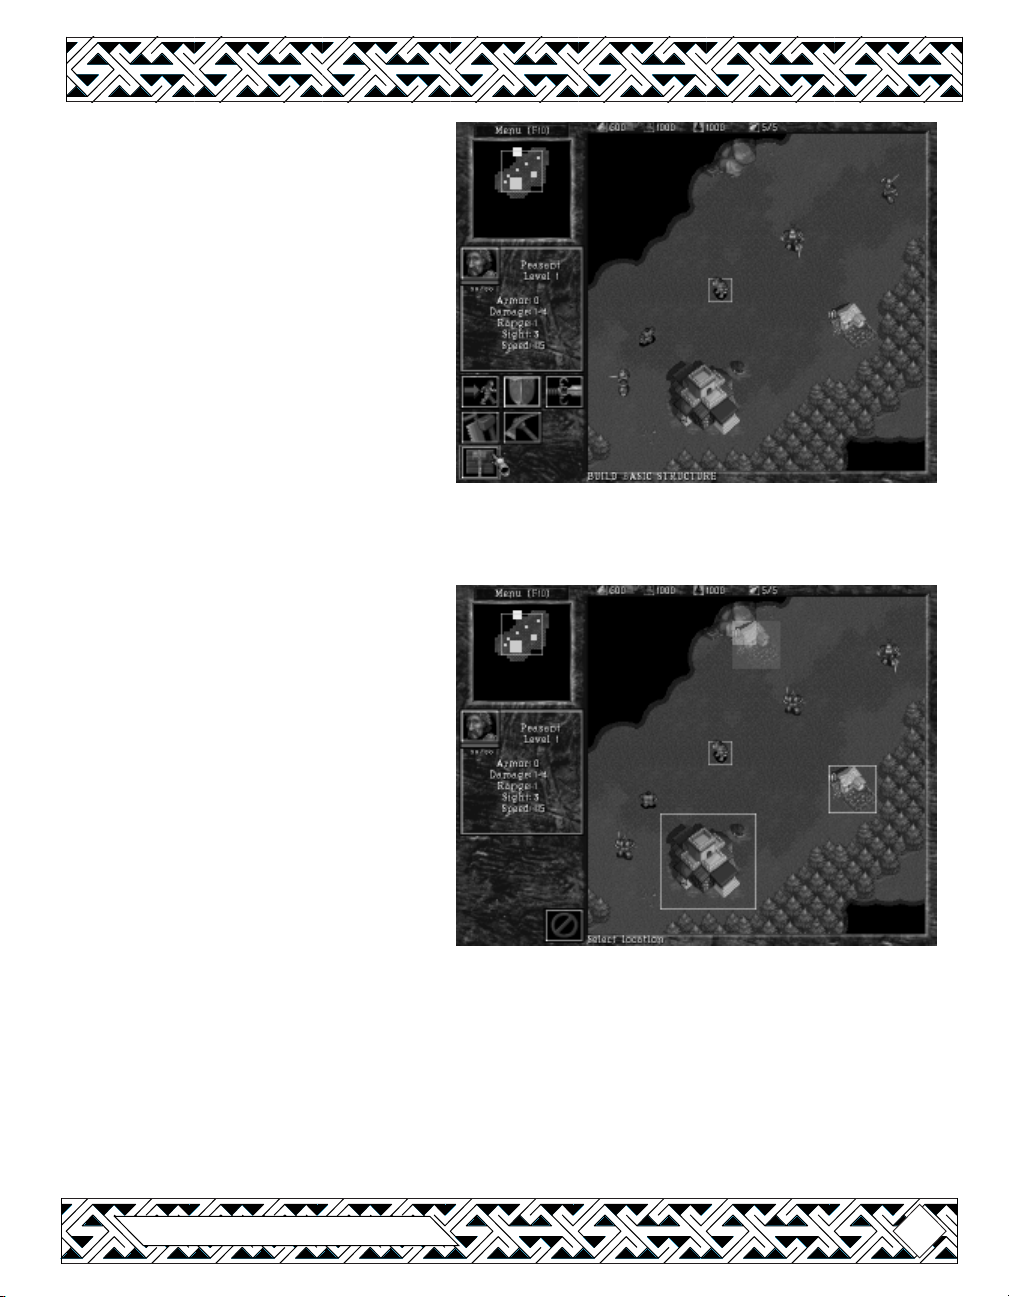
CONSTRUCTION OF BUILDINGS
1. Select a Peasant.
2. Move the arrow over the Build Basic
Structure icon and select this option.
This will open the Basic Structure
selections.
3.Move the mouse over the icons, and
select the one that says Build Farm in
the Info Text area. A green tinted
image of a farm will appear on the
Command Map that represents the
amount of space required for this
structure.
Buildings must have ample space available in explored territory in order to be placed, and
non-coastal buildings may not be constructed on dirt, ice or mud.
Specific Restrictions
Town Halls must be a minimum distance
from any Gold Mines.
Shipyards and Oil Refineries must be a
minimum distance from any Oil Patch.
Shipyards, Foundries and Oil Refineries
must be placed on a coast.
Oil Platforms may only be placed on an
Oil Patch.
If you attempt to place a building in a
location that is restricted, the portion
of the building image that lies within
the restricted location will pulsate red.
Also, a message will inform you why you cannot build there, and you will be unable to
place the building.
4. To place a building, select an area that falls within the restrictions for construction.
When you have chosen an appropriate site, click to place the building. The Peasant will
move to the site and begin construction. Note: Construction does not begin until the Peasant
reaches the selected site. Any obstacles present when the peasant reaches the site will prevent the
construction from commencing.
Blizzard Entertainment
9
Page 10

If you select the new Farm while it is
being constructed you will notice a
Completion Status bar in the Unit
Description area, as well as a status bar,
under the portrait, that indicates how
much damage the structure can take.
Note: a building under construction begins
in a weakened state and only reaches full
strength when construction is completed.
5. Once the Peasant has completed his
construction, either look at your food
indicator or select the new Farm.
Notice that your available food has
been increased.
Some buildings have buttons that allows certain upgrades. When an upgrade is available,
selecting the button will generate a message in the Info Text area that will inform you of what the
upgrade will affect.
EXPLORATION AND THE FOG OF WAR
By this point, you will find that you are
running short on resources such as
lumber and gold. To increase your
stores, you must find forests to harvest
lumber from and search for gold mines
that may be found about the area.
Initially the lands around your Town Hall
and Farm are unknown and will appear
as great black regions in both your
Command Map and Mini Map.
1. Select a Peasant. Then select the Move icon in his Unit Command area.
2. A selection cursor will appear on the Command Map. Use this to indicate the destination
of the unit selected.
3. Send your Peasant into the
immediately head off in that direction, surveying any territory he encounters.
4. As your unit enters unknown regions, they will become visible on both your Command
Map and the Mini Map.
10
unmapped region to the top of the command map. He will
Warcraft II: Battle.net Edition
Page 11

5. The space that is no longer in the vision of any of your units or buildings, becomes grey.
The terrain that is there is still known, but any units in this “Fog of War” are not visible on
the Command Map or Mini Map.
6. When units re-enter grey areas, their knowledge of the terrain, as well as any units or
buildings that inhabit that area, will be updated.
7. If buildings exist in an area that is later shrouded by the Fog of War, the knowledge of
their existence and condition is retained, although it will not be updated until another
unit enters into that areas line of sight.
HARVESTING RESOURCES
1. Just above the town should be a Gold Mine. Instruct your Peasant to Harvest gold by
selecting the corresponding icon in his Unit Command area.
2. A selection cursor will appear as you move the mouse back to the Command Map. Click it
on the Gold Mine you want him to harvest.
3. Your Peasant will begin working the mine for gold and will return this gold to the Town
Hall on his own. He will continue to repeat this cycle of harvesting until he empties the
mine out, is attacked or is given another command.
Now that you have found a source of gold, harvesting lumber is the next step.
1. Select a Peasant. Then select the Harvest icon in his Unit Command area.
2. A selection cursor will appear as you move the mouse back to the Command Map. Use
this to choose a spot in the forest that you wish the Peasant to harvest.
3. Your peasant will begin chopping down trees to be used for lumber, and will return the
lumber to the Town Hall on his own. He will continue to repeat this cycle of harvesting
until he either cuts down all available trees in that area, is attacked or is given another
command.
Note: If you stop a Peasant while he is returning to the Town Hall with a load of resources, the Info
Text Window will remind you that he is carrying lumber or gold. Also the Harvest icon will be
replaced by a Return with Goods icon that you can select to resume delivery and continue harvesting.
VIEWING THE MAPS
To move around in each scenario, you can use either the Mini Map or the
Command Map
1. To move using the Mini Map, select the white box and move it around
by holding down the left mouse button and dragging it where desired .
2. You can also select any area on the Mini Map and jump to that location.
Blizzard Entertainment
11
Page 12
3. To move on the Command Map, move the arrow cursor to any edge of
the screen and the map will automatically scroll in the direction the
arrow is pointing.
4. To use the keypad to move on the Command Window use the numeric
keypad arrows, or the arrow keys.
Circles of Power
Some scenarios may require that you locate specific destination on the map. These will be
shown with a glowing Circle of Power. Entering the area where the Circle is located fulfills
any requirements for completing a scenario that involve a specific destination.
UNIT COMMANDS & COMBAT
This is what your unit looks like.
PORTRAIT
HIT POINTS
Status bar and numbers indicate unit’s health.
ARMOR
The amount of damage inflicted to a unit that is
absorbed by the unit’s defenses
RANGE
Indicates range of attack (w/ one being touch).
SPEED
How fast your unit moves
LEVEL
This is an indication of how many upgrades
the unit has; Level 1 is the default, each
upgrade adds one level.
DAMAGE
The amount your unit inflicts against an enemy
unit. Min-Max, with Min being the minimum
amount of damage done (no matter what armor
the enemy may have) and Max being the
maximum against an enemy with no armor.
SIGHT
The range at which your unit can spot objects.
You can give commands to your units at any time. All of your units share common commands,
but some have specific abilities.
1. Select a Footman. This will open the Unit Description area and the Unit Command area to
the left of the Command Map.
OPTIONS
Move
2. While having the footman selected, click the Move icon.
3. A selection cursor will appear on the Command Map. Use this to
indicate the destination the selected unit will be sent to.
12
Warcraft II: Battle.net Edition
Page 13
Stop
4. While the Footman is moving, click the Stop icon. The unit will halt
all actions and await new orders.
Attack
5. While the Footman is selected, click the Attack icon.
6. A selection cursor will appear on the Command Map. Use this to
indicate the target the selected unit will be sent to engage.
7. Select the Town Hall as the target you wish to engage. Normally
you would never attack your own buildings, but until you feel ready to
tackle the Orcs, they make for an easy fight.
8. While the Footman is attacking it, select the Town Hall.
9. Note that the HP bar and number both get smaller as the structure sustains damage.
10. Select the attacking Footman and click the Stop icon in the Unit Command area to disengage.
Patrol
11. While the Footman is selected, click the Patrol icon.
12. A selection cursor will appear on the Command Map. Use this to
indicate the second point of a patrol route (the first point being the
current location of the unit). The unit will now move between
these two points repeatedly. While in patrol mode your units will
attack any enemy units they encounter.
13. To cease patrolling, select the Footman and click the Stop icon.
Stand Ground
14. While the Footman is selected, click the Stand Ground icon.
15. The Footman will now stand his ground and defend that specific
point, not moving to engage an enemy unit.
16. To cease standing ground, select the Footman and click the Stop icon.
Attack Ground
17. This is used to order a unit that has a ranged attack to provide
constant fire into a specific area. Only units with ranged attacks
may use the Attack Ground icon.
Blizzard Entertainment
13
Page 14
Auto Commands
18. When you have a unit or group selected, the Right Mouse Button can be used to issue
commands that will automatically be carried out. Macintosh users with a one button
mouse can hold down the command (
z) key and click and to use Auto Commands.
19. Select a Peasant.
20. While the Peasant is selected, move the arrow over an area of trees. Right-click
(Macintosh:
z-click) on the area to be harvested.
21. The Peasant will automatically move to the trees and begin harvesting lumber.
22. Select a Footman.
23. While the Footman is selected, move the arrow to an open piece of land. Right-click
(Macintosh:
z-click) on the area to move the Footman into.
24. The Footman will automatically move to the selected area.
25. Units can be ordered to perform logical tasks (move, harvest, repair, attack) without multiple
keystrokes or button commands.
ADDITIONAL ORDERS
Grouping Units
1. There are several different
ways of grouping units and
issuing commands to them
as a group. Up to nine
units may be placed in any
one group.
2. Clicking and dragging
across the command map
allows you to draw a
rectangle around the units
you wish to select.
3. You may also select groups
by holding down the shift key while selecting units. Holding shift while selecting a unit
will add him to the current group.
4. Holding shift while clicking on a portrait in the Unit Description area will remove just that
unit from a group.
14
Warcraft II: Battle.net Edition
Page 15
5. Clicking on a portrait in the Unit Description area will select ONLY that unit and remove
all other units from the group.
6. If you have only one unit selected and click on his portrait, it will center the Command
Map on his location.
7. Groups are automatically saved into memory and can be recalled by selecting any member
of that group while holding down the alt key (option key on the Macintosh.)
8. You can also save up to ten groups by selecting a group and pressing ctrl+a # key (0-9).
You can recall that group instantly by pressing its correponding number key.
Follow Command
8. Troops can be made to follow a specific unit.
9. Select a unit or group that will be
following a lead unit.
10. To choose the lead unit, immediately
select it with the right mouse button
(or z-click on the Macintosh.) The
lead unit will then be outlined by a
blinking green box.
11. Moving the lead unit causes the
attached units to “follow the leader”
until it does anything other than
move or stop, thus causing the link
to break.
SPECIAL UNIT COMMANDS
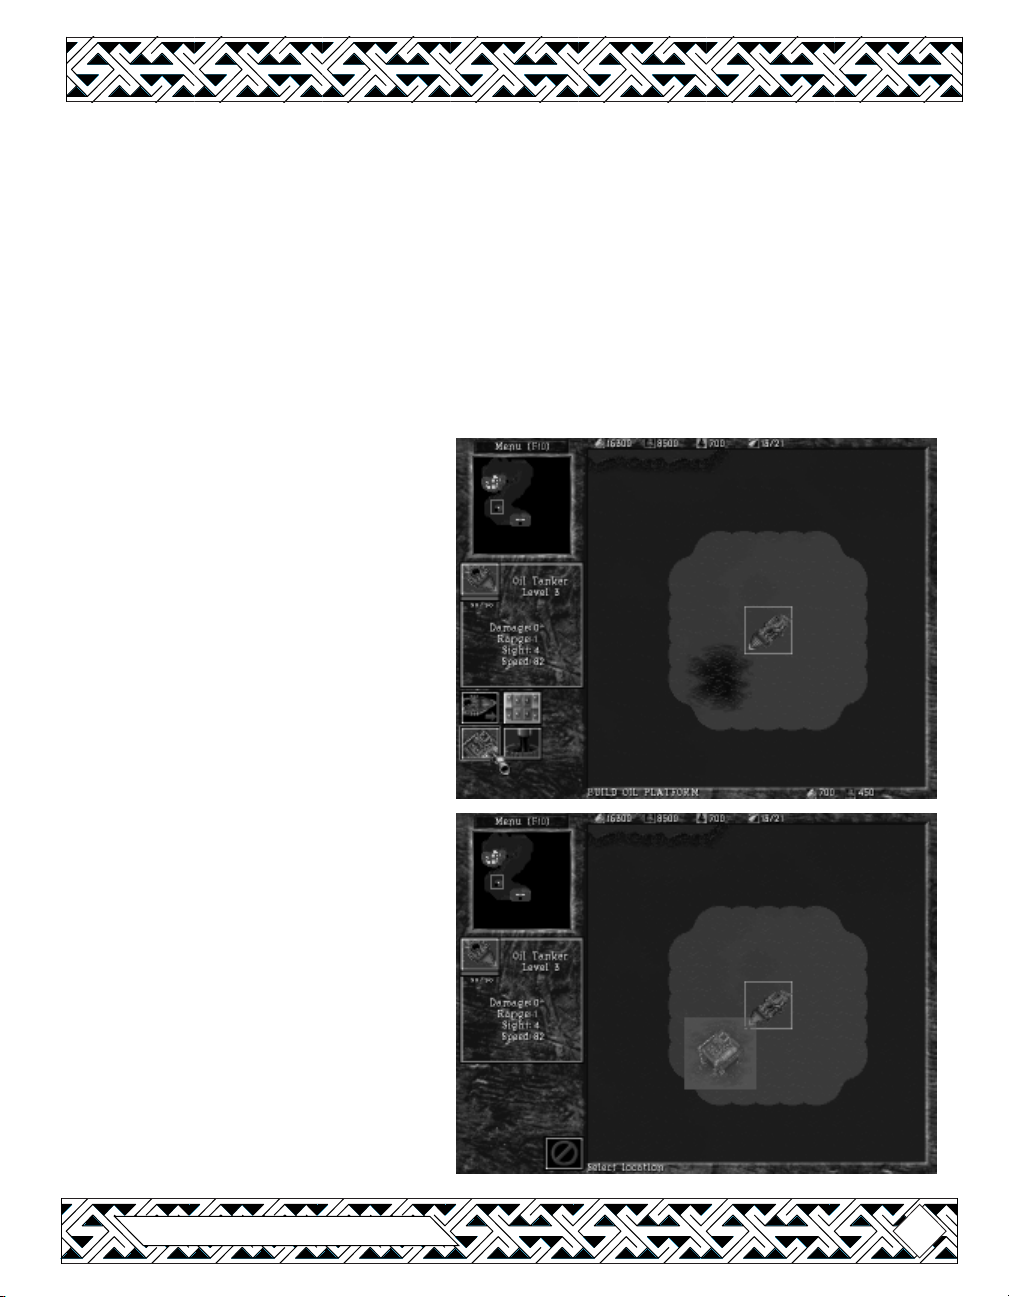
Oil Tankers
1. Tankers are used to haul oil much in
the same manner that Peasants are
used to harvest lumber or mine gold.
Tankers, however, must construct an
Oil Platform from which to drill for
this resource. The first step is to find
a suitable location to place a
Platform.
2. There are Oil Patches that represent
concentrated areas of oil. Use your
Tanker to scout out one of these sites
by moving it around the waterways.
Blizzard Entertainment
15
Page 16
3. When you have found an Oil Patch, click the Build Oil Platform icon in the Oil Tanker’s
Unit Command area.
4. A green tinted image of an Oil Platform will appear on the Command Map that represents
the amount of space required to build the Platform. If you attempt to place the Platform
over any area that is not an Oil Patch, the image will pulsate red.
5. When you have chosen an appropriate site, place the Oil Platform. The Tanker will move
to the site and begin construction.
6. When the Oil Platform is completed, the Tanker will automatically begin hauling oil back
to the Shipyard. Any new Tankers that are constructed may be ordered to carry oil from
an existing Oil Platform by selecting Haul Oil in its Unit Command area.
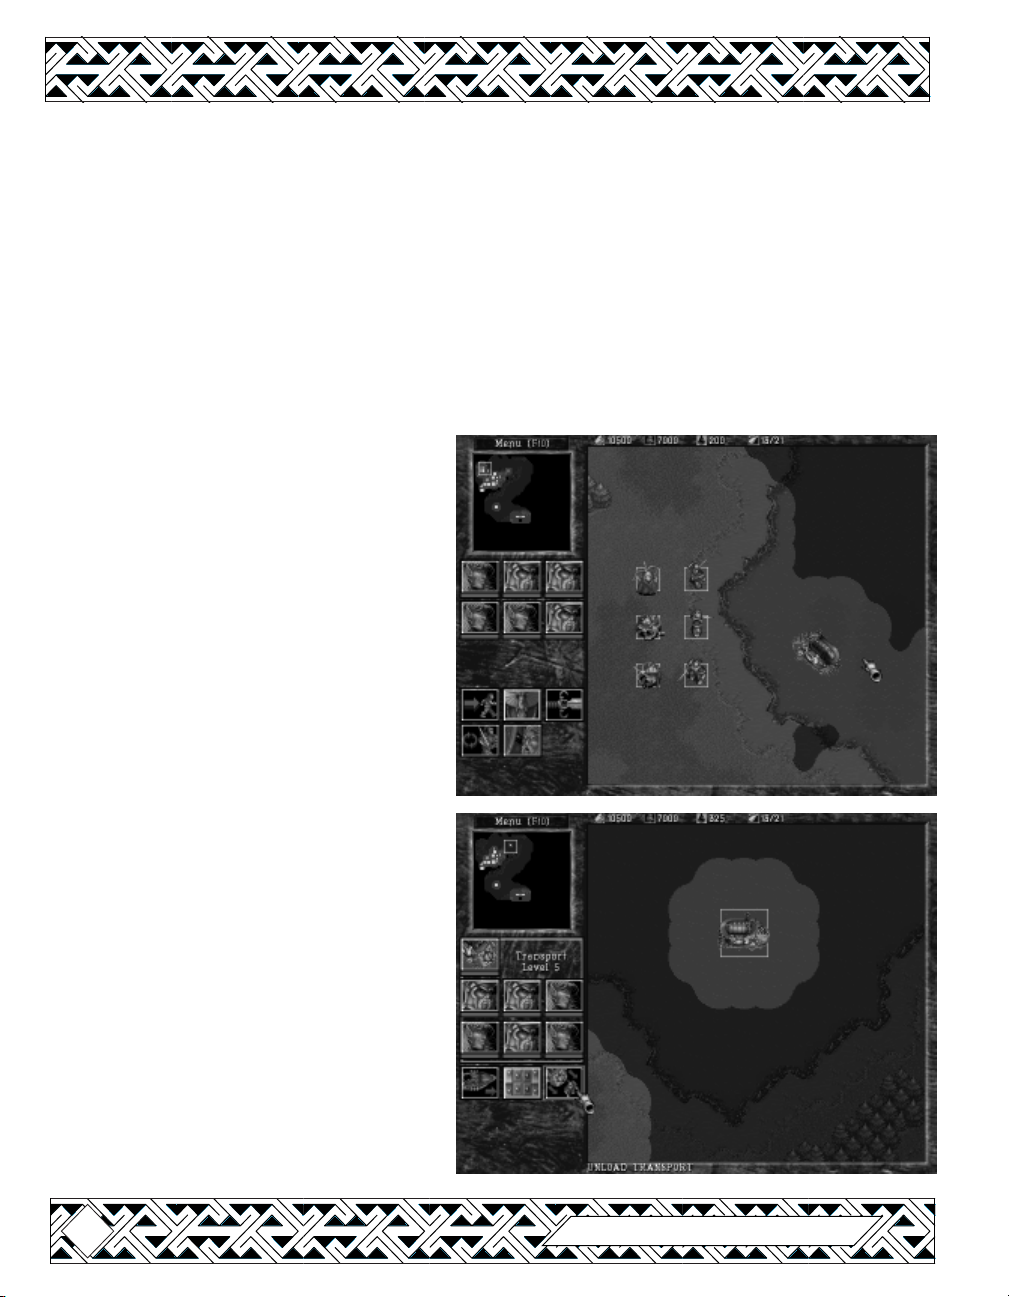
Transports
7. Transports are used to ferry your
units across vast stretches of water.
You can automatically load up to six
(6) units onto a Transport by group
selecting the units you would like to
place onto the ship, and then rightclick the Transport.
8. The Transport will be outlined in a
blinking green box and will
automatically move towards the
shoreline. The selected units will
also move towards the shore and
enter the Transport when it docks.
9. Units can disembark from a
Transport, after the ship has moved
to its shoreline destination, by
selecting the Unload Transport icon
in its Unit Command area.
10. Specific units can be made to
disembark from a Transport by
selecting the desired portrait from the
Unit Description area while the
Transport is selected. This will cause
only the unit whose portrait is
chosen to disembark from the ship.
16
Warcraft II: Battle.net Edition
Page 17
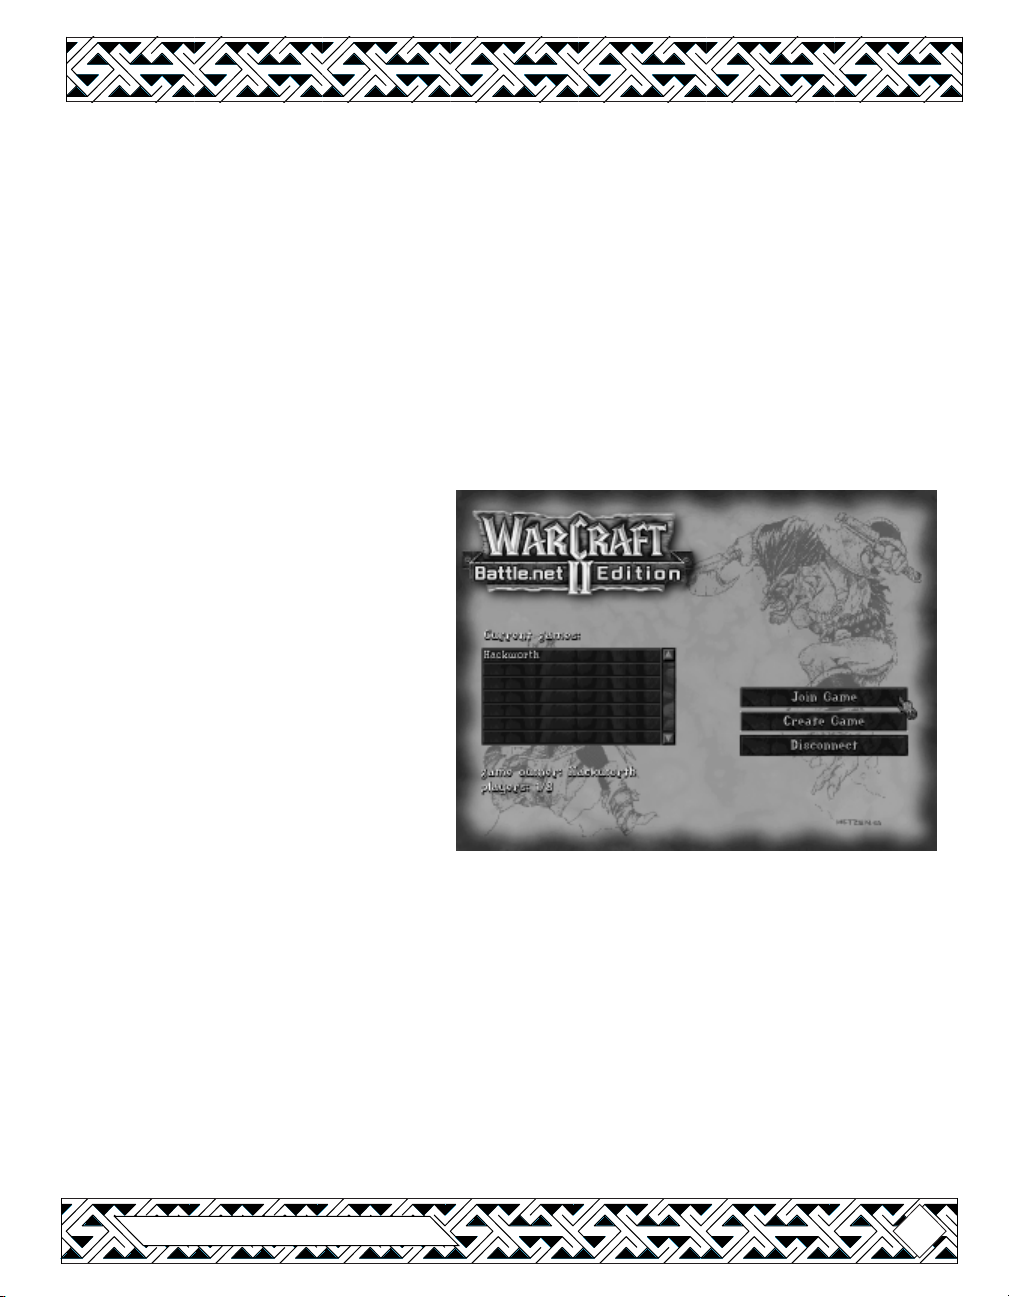
MULTIPLAYER GAMES
To begin a new multi player game click
on the Multi Player Game option. You
will now be taken to the Sign In screen.
Enter the name you wish to be known
by during multi player games. Click OK
to go to the Connection Method screen.
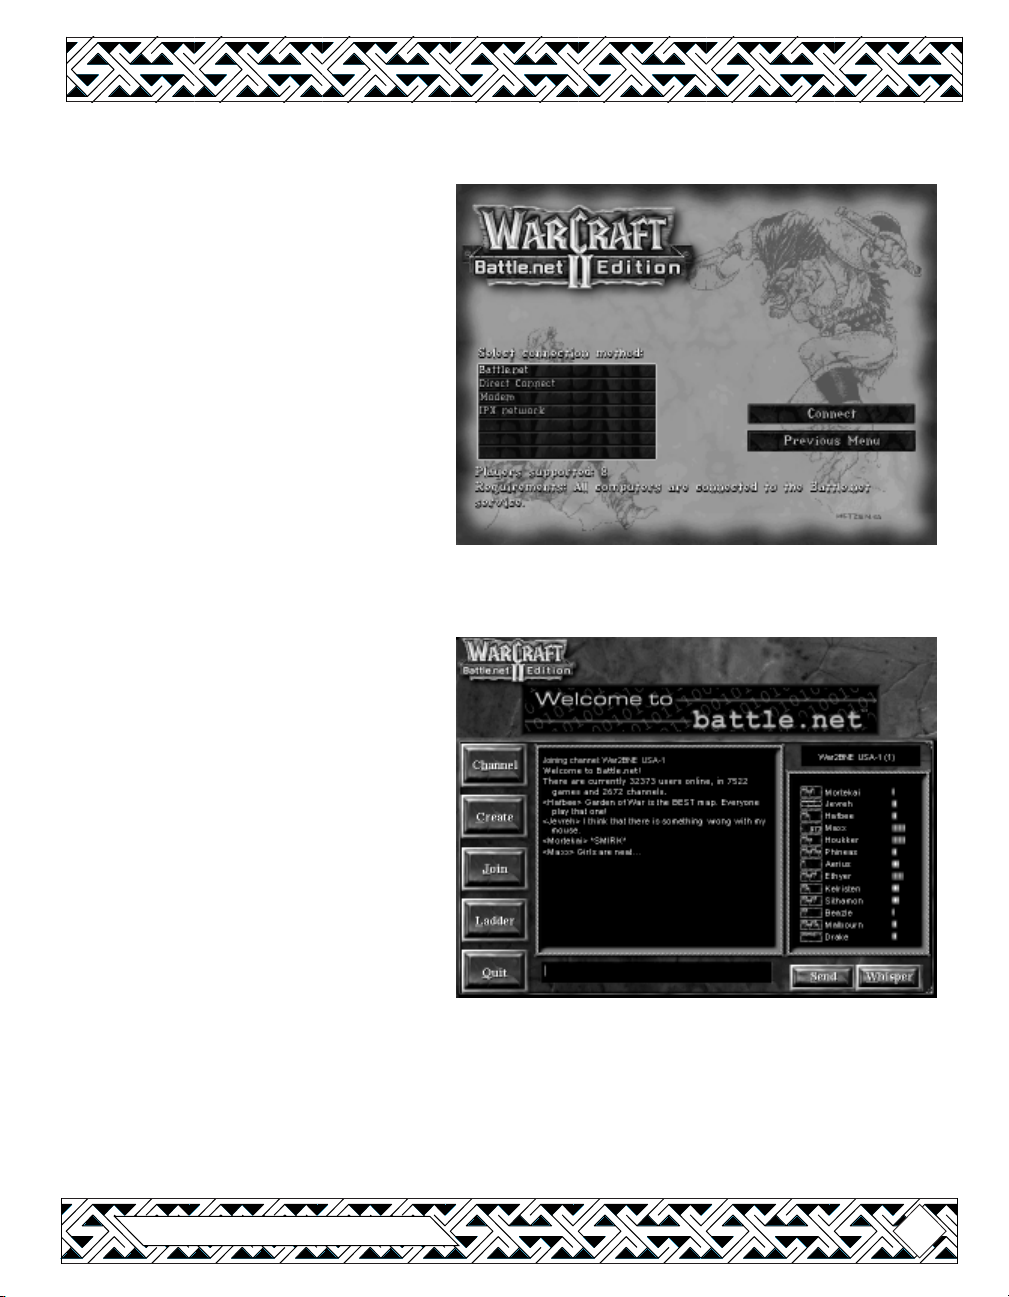
Warcraft II: BNE supports several
connection protocols: Battle.net, Direct
Connect, Modem, and IPX Network, as
well as AppleTalk and TCP/IP on the
Macintosh. These connection methods
and their use are described below.
Connection Methods
Battle.net Connection
Supports: 2-8 players
Requires: A 32-bit TCP/IP connection to
the Internet. This can either be a dialup connection or a direct connection.
Battle.net is Blizzard Entertainment’s
Internet gaming service. It allows players
from around the world to battle against
each other. Battle.net also supports a
world-wide ranking system, enabling
you to test your Warcraft II: BNE skills
against comparable opponents. Select
the “Battle.net” connection method to
connect to Battle.net. If your computer
is configured to automatically dial out,
Warcraft II: BNE will dial your Internet
Service Provider. Otherwise, you must
establish a connection to your Internet Sevice Provider before running Warcraft II: BNE. Once
connected to Battle.net, you can chat with other players to arrange, create, and join games.
Specific information is available from within Battle.net by pressing the F1 key on the keyboard.
Blizzard Entertainment
17
Page 18
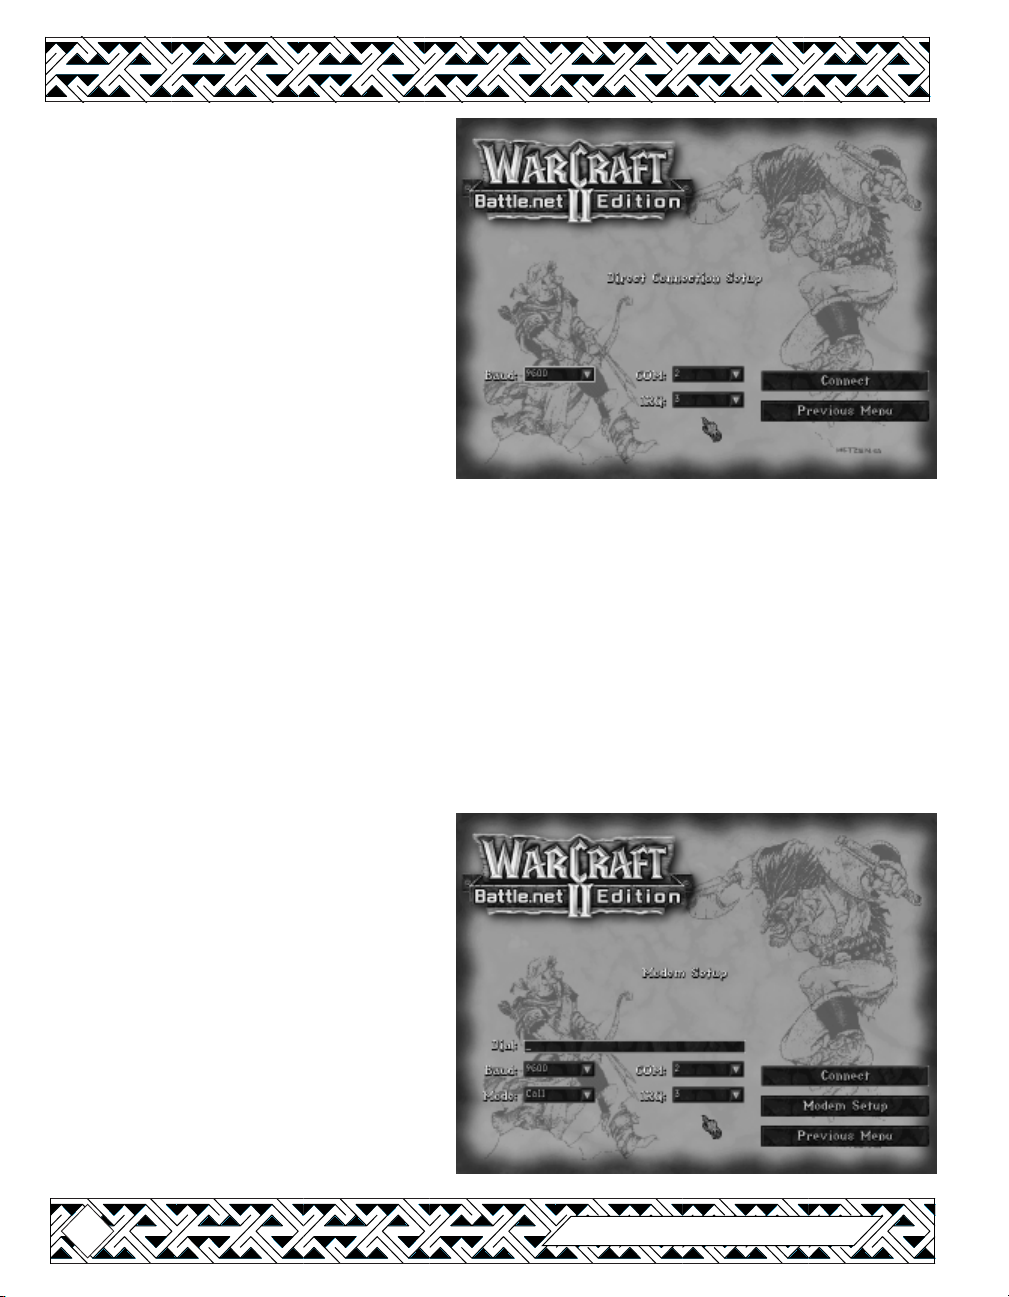
Direct Connect
Supports 2 Players
Requirements: 2 computers directly
connected together by using a NULL
MODEM cable attached to their serial
ports. Macintosh computers need to use
a modem cable connected to an IBM-PC
null modem cable to start a direct link
connection with an IBM-PC system. For
Macintosh vs. Macintosh games,
AppleTalk is the recommended method.
Baud Rate: This is the speed at which your
computers will communicate, and is
regulated by UARTs (serial card chips
which handle communications). Older machines may have problems connecting at higher
baud rates.
COM: IBM-PC only. This is the port number which you have the NULL MODEM cable connected
to. The COM port cannot be in use by any other devices, such as a modem or mouse.
IRQ: IBM-PC only. This is the interrupt request line, and defaults to 3 for COM 2 & 4, and 4 for
COM 1 & 3. The IRQ cannot be in use by any other devices.
Connect: This connects the two computers. The prompt Waiting for response will appear
until your computers are connected. Should there be problems connecting, choose Cancel,
Join and retry your connection.
Modem
Supports 2 Players
Requirements: 2 computers, each with
their own modem and phone line.
Dial: This is the Phone Number that you
wish to dial with your modem. Numbers
can be denoted with a dash (including
area codes when applicable) if you wish.
Baud Rate: This is the speed at which
your computers will communicate via
modem, and is regulated by the
communication rate of your modem. If
you have problems connecting, try
starting at the 9600 setting and working
18
Warcraft II: Battle.net Edition
Page 19
your way up.
Mode: This is set to either Call or Answer, depending on whether you are initiating the call or
receiving it. If only one computer has a Warcraft II: Battle.net Edition CD, it should be the
Calling computer.
COM: IBM-PC only. This is the port number through which your modem is connected.
IRQ: IBM-PC only. This is the interrupt request line, and is usually 3 for COM 2 & 4, and 4 for
COM 1 & 3. The modem’s IRQ cannot be in use by any other devices, such as the mouse.
Port: Macintosh only. Set to indicate whether the modem is connected to the Macintosh modem
port or printer port.
Connect: This connects the two computers. The prompt Waiting for response will appear
until your computers are connected. Should there be problems connecting, choose Cancel,
Join and retry your connection.
Modem Setup
If you are unsure of any of these settings,
please consult the owners manual for
your modem.
Clear: This is the command line that your
computer will issue to the modem when
you want to clear your modem line.
Init: This is the command line that your
computer will issue to the modem to
initiate a connection to another
computer. For the most reliable
connection, you should use an
initialization string that disables data
compression and error control.
Hang up: This is the command line that your computer will issue to the modem when you are
through with your connection.
Tone or Pulse: This is the type of dialing system your modem uses.
IPX Network
Supports 2 to 8 Players
Requirements: All computers must be connected to an IPX compatible network. Windows
users can use Windows’ built-in IPX protocol support by going to their Network control
panel and enabling IPX/SPX, NetBEUI, and NetBIOS. Macintosh users need to configure their
system using the MacIPX control panel.
Current Games: This is a list of games currently available to join into, located on the network.
Blizzard Entertainment
19
Page 20

Join Game: This allows you to join into the game that you have selected.
Create Game: This allows you to create a game for others to join. You must have the
Warcraft II: Battle.net Edition CD in your CD-ROM drive to create a game.
Mac TCP/IP
Macintosh only
Supports up to 8 Players
Requirements: Up to 8 computers
connected via a TCP/IP connection over
the Internet
IP Address: To join a game that someone
else has created, enter the IP address of
their system here.
Create Game: Select this to be the game
creator. You must have the Warcraft II:
Battle.met Edition CD in your CD-ROM
drive to create a game.
Join Game: Click on Join Game after entering the IP address of the game creator in the IP
Address box.
AppleTalk
Macintosh only
Supports up to 8 Players
Requirements: Up to 8 computers
connected via a LocalTalk or Ethernet
AppleTalk network.
Current AppleTalk Games: This is a list of
games currently available to join into,
located on the AppleTalk network.
Select Zone: If your AppleTalk network
has multiple zones, click on Select Zone
and choose the zone that you wish to
search for a game on.
Join Game: This allows you to join the
game that you have selected.
Create Game: This allows you to create a game for others to join. You must have the Warcraft
II: Battle.net Edition CD in your CD-ROM drive to create a game.
20
Warcraft II: Battle.net Edition
Page 21
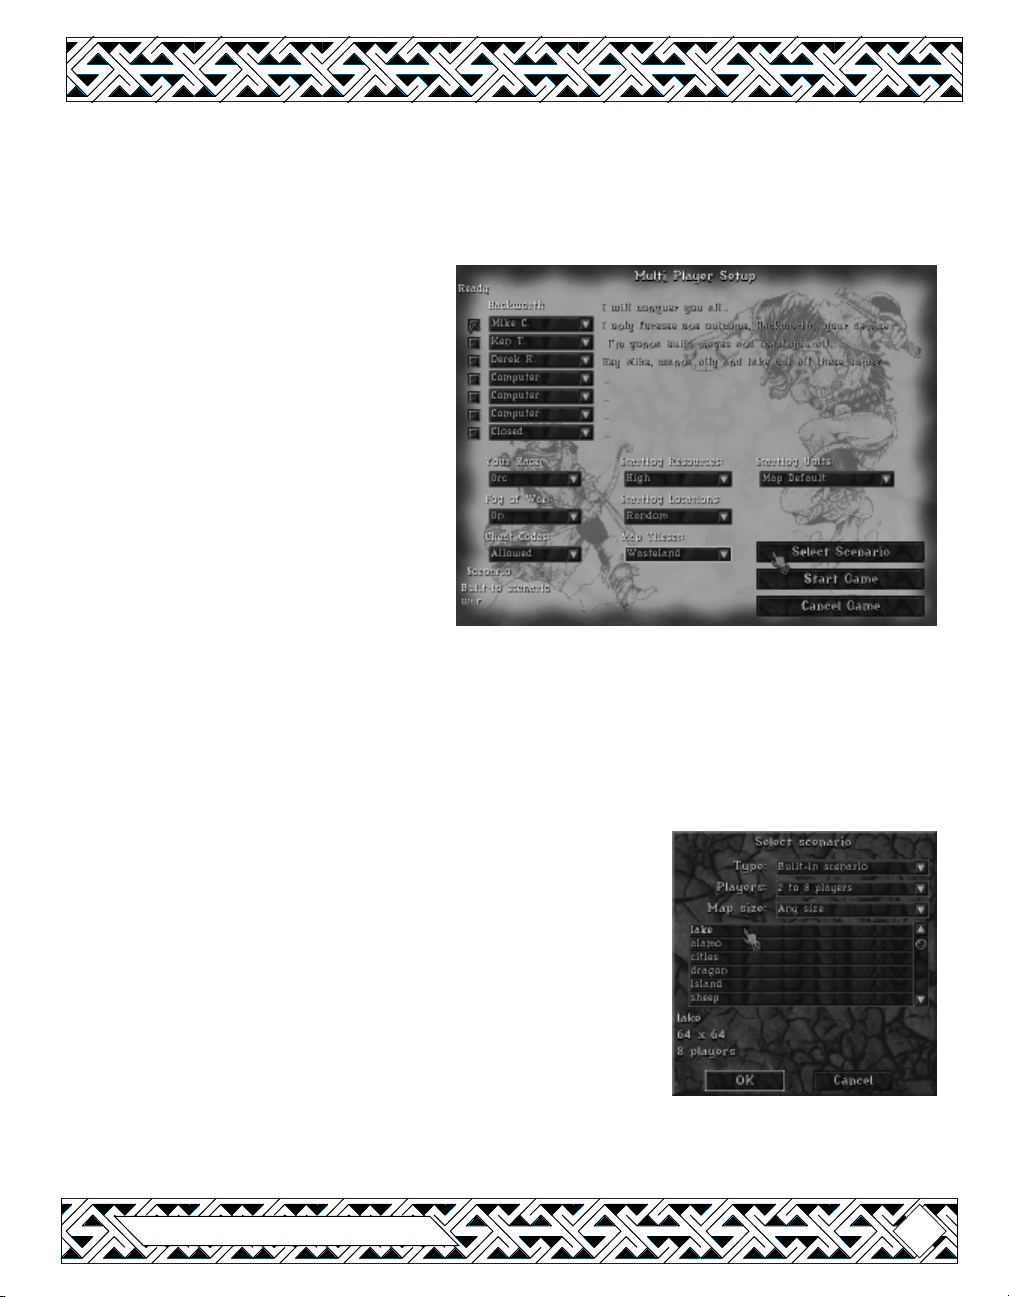
THE MULTIPLAYER SETUP SCREEN
If you have joined a multiplayer game, rather than creating one, the only option you can set is your
race. Once you have picked your race, click on the “Ready” box to the left of your name to indicate that
you are ready to play.
If you are the Creator of this game, your name
appears in the top player position. You have
the option to leave the other slots available
for other players, make them computer
players or close them (thus reducing the
number of possible players for a game).
Your Race: You may choose to play either
Human or Orc.
Fog of War: You may choose to have this
feature either On or Off.
Cheat Codes: You may choose to have these
either Allowed or Disabled.
Starting Resources: You may choose to use
the Map Default, or reset these for being
either Low, Medium or High
Starting Locations: You may choose to have
these be issued at Random, or to use the Fixed Locations as defined in the game map.
Map Tileset: You may choose to use the Map Default, or reset the map to either the Forest, Winter,
Wasteland or Orc Swamp settings.
Starting Units: You may choose to use the Map Default or begin with One Peasant Only.
Select Scenario
Type: You may use either a Built-in scenario, or load a Saved Game or a Custom Scenario.
Players: This changes which maps are displayed, according to the
number of players the map can support
Map Size: This shows you the available maps for Any Size, or
specifically for 32x32, 64x64, 96x96 and 128x128.
Map listing: This is the area to select what map to play on, with the
name of the map, the map size and possible number of players being
displayed in the lower left of the screen.
Type: You may use either a Built-in scenario, or load a Saved Game or
a Custom Scenario.
Starting the Game:
You cannot start the game until all of the other players have clicked on
the “Ready” box to the left of their name. Once all the players are
ready, the Start Game button will light up.
Blizzard Entertainment
21
Page 22
MULTIPLAYER COMMANDS
To send messages to opponents during multiplayer games, press [Enter], type in your message and press
[Enter] again to send it. To toggle which opponents receive your messages during multiplayer games,
click the Messages icon near the top right of the screen.
To toggle which players are your allies, click the Allies icon near the top right of the screen. Your units
will not attack Allies, even if the Allied units attack them. Marking Allied Victory indicates that you want
the scenario to end when all of your non-Allied opponents are destroyed. All Allies on a side need to
select the Allied Victory option for it to be enabled.
During multiplayer games, clicking the Menu Button does not pause the game. Click the pause button to
pause the game. In a multiplayer game, each player is limited to three pauses, so use them wisely.
MULTIPLAYER GAME TEMPLATES
Warcraft II: Battle.net Edition also offers different multi-player game templates to present further
variations in gameplay. These templates are:
Melee - This is the normal method of play. Normal strategy with the option to ally if you
should desire to.
Free For All - Every man for himself. No allying option.
One on One- Just like it sounds, Two player head to head action.
Top vs. Bottom- This game type is designed to go with maps that are designed for team
combat. It automatically allies players that are in the same starting area, so that instant
cooperation can be achieved.
Use Map Settings- For specially designed scenario maps with preset settings, be sure to use
this game template.
Ladder- When you play games of this type, the outcome is automatically logged on Battle.net
and recorded for public ranking. These games can only be played on Blizzard approved
Ladder Maps and you must accumulate ten wins in standard Battle.net games to be
eligible for Ladder games.
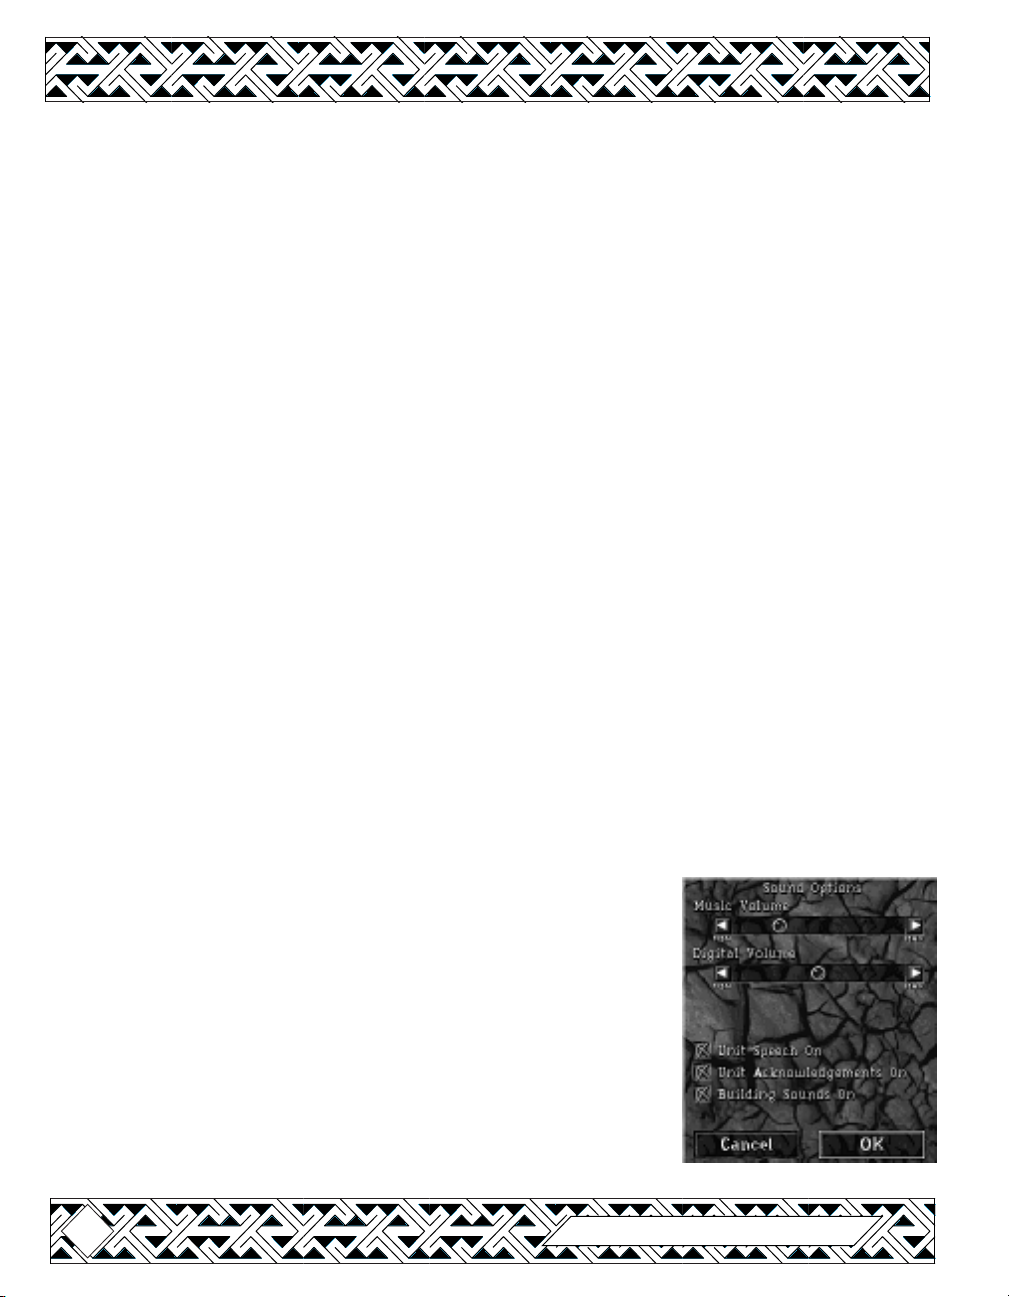
OPTIONS & PREFERENCES
Sound Options
Music Volume, Digital Volume
These set the different volume levels for music and sounds.
Unit Speech On
This selects whether the units will inform you of events happening
in their vicinity, such as being approached or attacked.
Unit Acknowledgments on
This selects whether the units will verbally acknowledge
commands or not.
Building Sounds On
This selects whether the buildings will respond to mouse clicks
with sounds or not.
22
Warcraft II: Battle.net Edition
Page 23
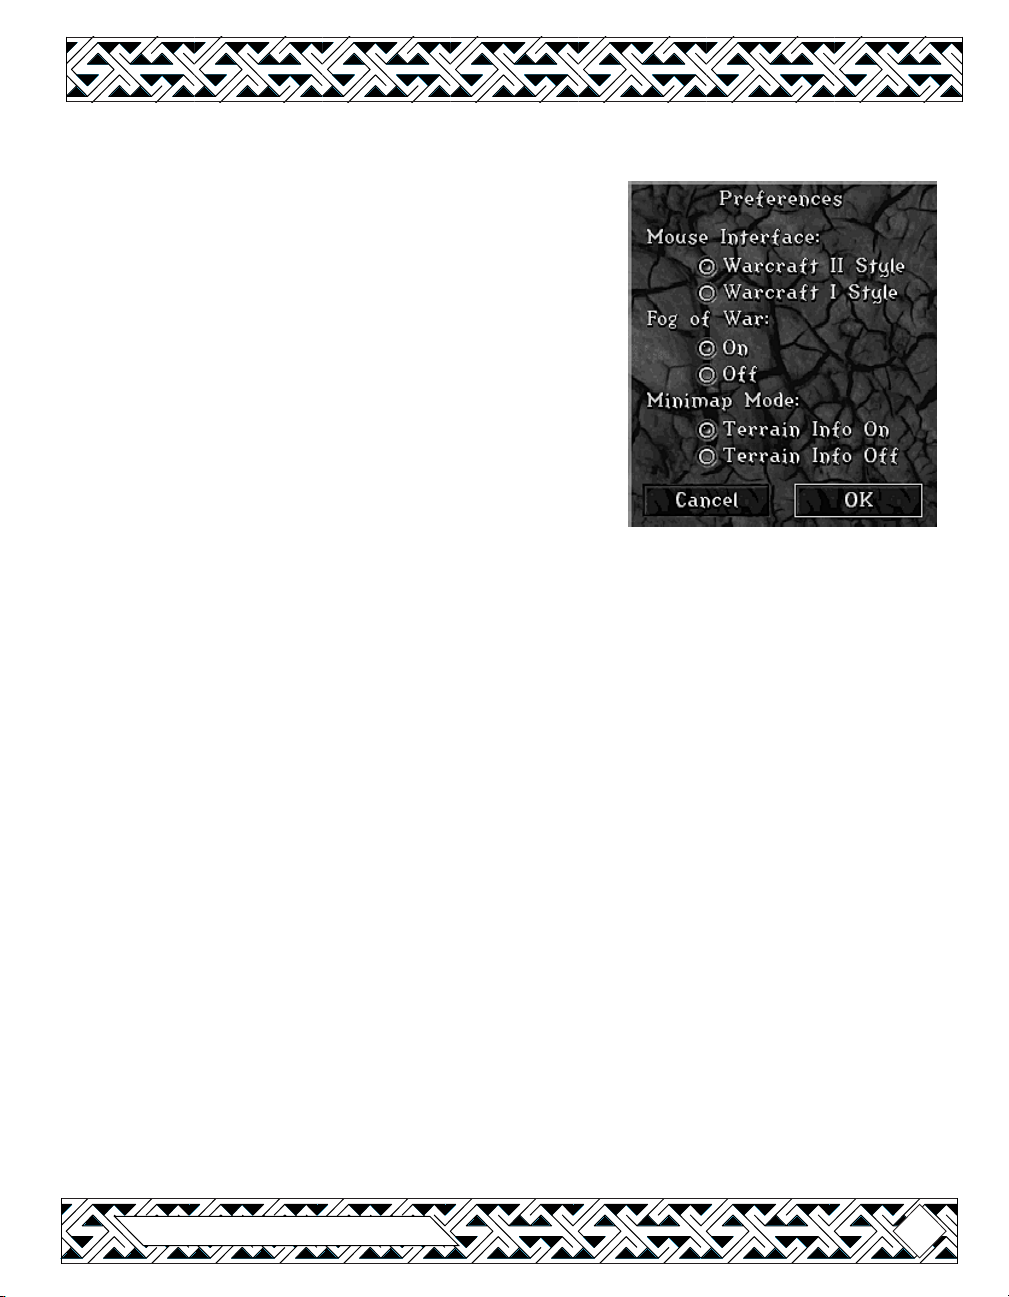
Mouse Interface and Preferences
Warcraft I Style
This sets your keyboard and mouse commands to function
in the same manner as Warcraft I. Differences include
automatic centering on the Mini Map and Command Map
with the use of the right mouse button, and the loss of the
Automatic Commands function through the use of the right
mouse button or command key (
Warcraft II Style
This sets your keyboard and mouse commands to function
with the Warcraft II: BNE interface. Differences include the
use of Automatic Commands through the use of the right
mouse button, and the loss of automatic centering on the
Mini Map and Command Map with the use of the right
mouse button or command key (
Fog of War
This allows the player to choose whether or not to use the Fog of War. If a scenario doesn’t
seem to end when you’ve completed the mission objectives, you might try turning off the Fog
of War to see if there are any enemy units hiding where you can’t see them.
Minimap Mode
These buttons let the player choose the background of the game's interface minimap. You
can either display unit and building positions with terrain features or simply unit and building
positions with a black background.
z) on the Macintosh.
z) on the Macintosh.
SPAWNING
It is possible to play Warcraft II: Battle.net Edition with your friends, even if they have not yet
purchased the game. You can install a “spawned” copy of the game on to their computer
using your CD-ROM. Your friends will then be able to join multi-player games that you have
created and enjoy all the features of the Warcraft II: Battle.net Edition multi-player experience,
but they will not be able to play the single player missions or create multi-player games of
their own. You can play games with up to 7 opponents off of your single CD-ROM in this
manner.
To install a “spawned” copy, simply insert your CD-ROM in their drive and select the “Install
Spawn” option. When it has finished installing, replace the CD-ROM in your computer’s
drive, and start a game
Blizzard Entertainment
23
Page 24

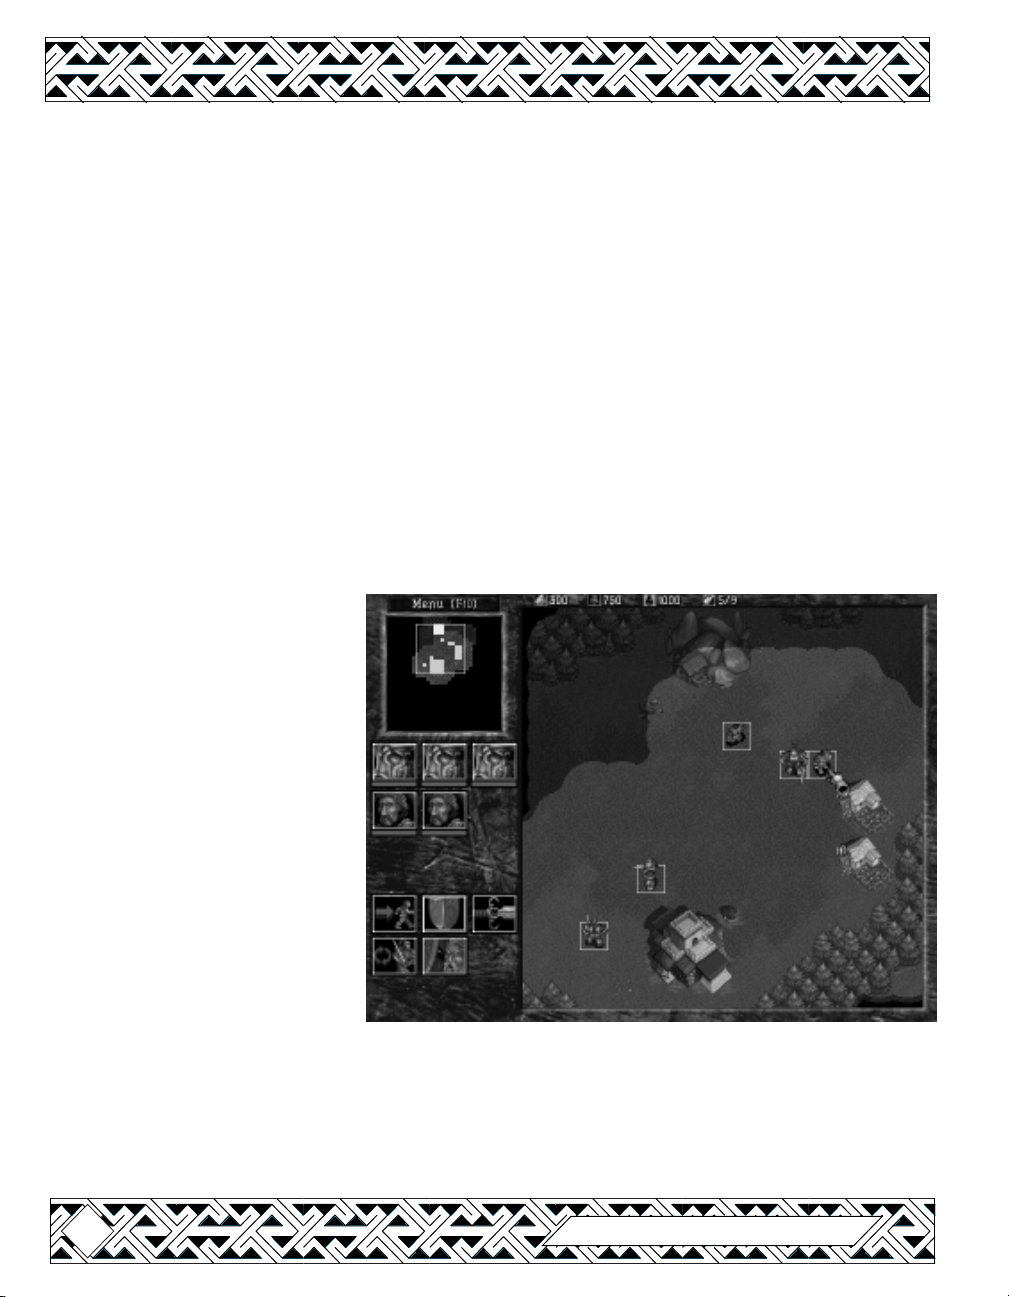
THE MAP EDITOR
The editor included with Warcraft II:
Battle.net Edition allows Windows 95
and Macintosh users to create their own
scenarios by editing the map, units, and
even sound effects. Custom scenarios are
called PUDs, and can be exchanged from
system to system.
Detailed help files are available in the
map editor. This section is intended to
provide an overview of the features
available. When you first open the map
editor, it defaults to a Large (128x128)
map using the Forest terrain set. The
menus available are as follows:
File
New: This starts you in a new, blank PUD.
Open: This allows you to select a PUD file that you wish to edit.
Save: This saves the PUD that you are currently editing.
Save As: This allows you to save your PUD under a different name or location.
Exit/Quit: This leaves the map editor. You will be prompted to save your current PUD file if
you have made any changes to it.
Edit
Delete: This deletes any items that are currently selected.
View
Toolbar: This toggles the Toolbar off and on. The Toolbar contains shortcut icons for the most
commonly used commands.
Status Bar: This toggles the status bar at the bottom of the screen on and off.
Animate: This option is only available if your display is set to 256 colors. It animates the
water and other terrain features on the map to show you how they will look.
Mini Map: This displays or hides the mini map.
24
Warcraft II: Battle.net Edition
Page 25
Tools
Select: This switches the cursor to select mode, which allows you to get information on and
edit items that are already placed on the map.
Map Brush: This allows you to change the brush size, and the type of terrain that it will
“paint” on the map.
Human/Orc Start Location and Units: Select the unit type that you want to place on the map. A
Start location needs to be set for each player that can be human controlled.
Gold Mine/Oil Patch/Critter/Circle of Power/Dark Portal/Runestone:
These are all map features that are not directly controlled by
any player. Note that the Circle of Power and the Dark Portal
do not affect the Scenario Objective of a custom scenario. To
change the amount of gold or oil in a mine or oil patch, right
click on the mine/oil patch (z-click on the Macintosh) and enter a resource amount in the
dialog box that appears.
NPCs: This allows you to place any of the Legendary Heroes from Warcraft II. Generally, you
want to make them a rescuable unit of a different color to differentiate them during a game.
Player
Player 1-8: This is for switching between the different player’s units that you are placing. If
you have a unit selected when you switch to another player, that unit will change ownership.
Map Properties: This brings up a dialog box that allows you to change the map terrain type
and add a brief description.
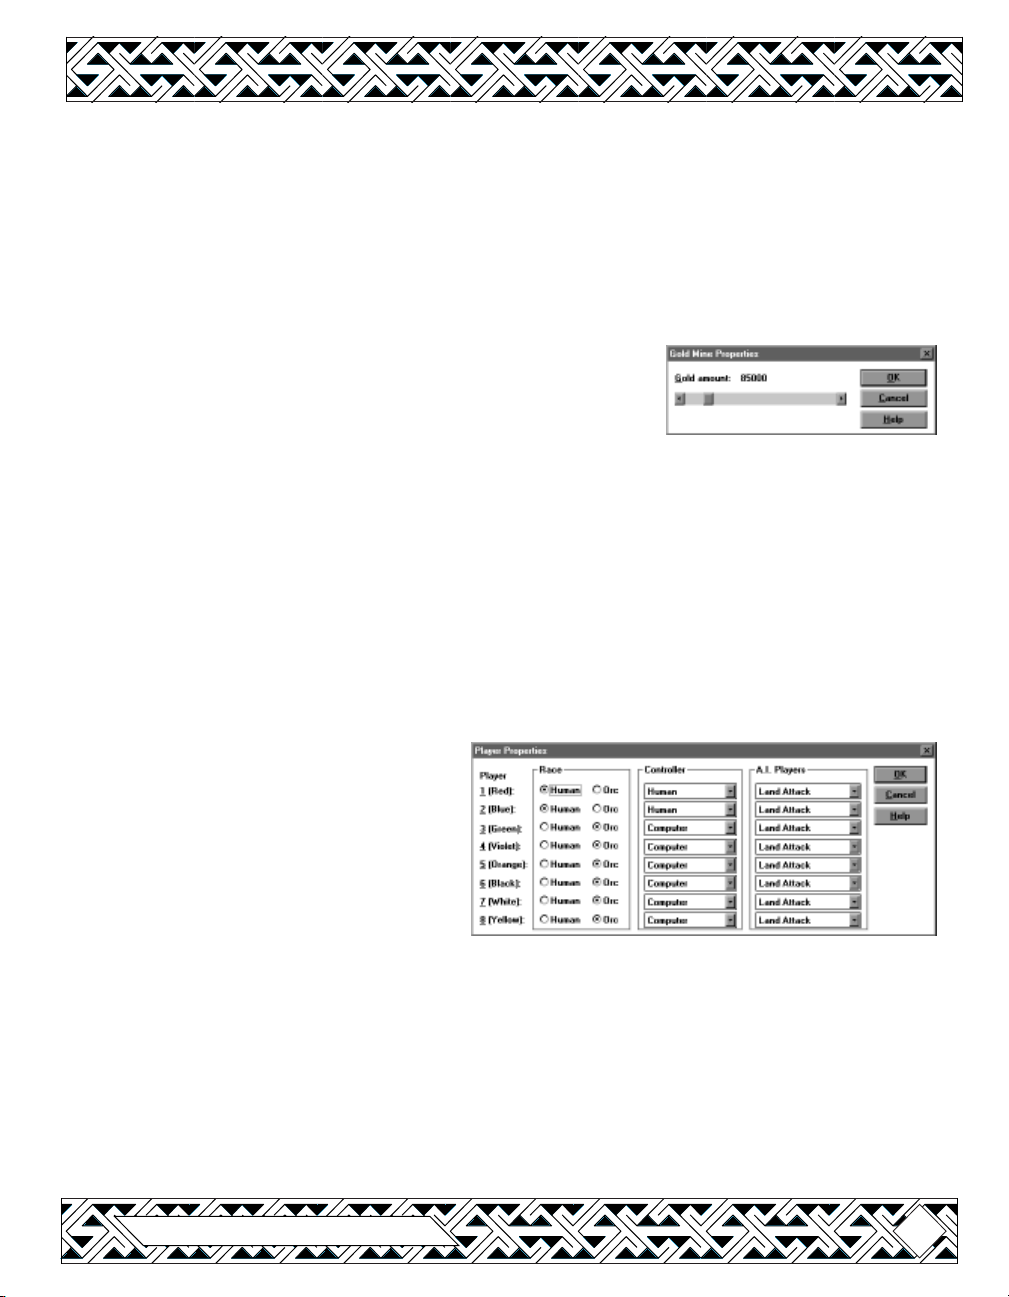
Player Properties: The Player Properties
screen allows you to set the race, default
controller (human or computer) and A.I.
scheme used for each player. The A.I.
scheme does not affect human-controlled
units. The different schemes that are
available are:
Land Attack: The computer will concentrate on building up a sizeable army of ground troops.
While it will not build any transports or other ships, it will use any that it starts with.
Air Attack: The computer will build a minimal ground defense, and concentrate on air units
and air defences, such as guard towers and archers/axe throwers. This scheme requires a lot
of resources to be effective.
Sea Attack: The computer will focus on building up a large and varied navy, with only a
minimal number of ground troops for defending its town. This scheme also requires a large
amount of resources to be effective.
Blizzard Entertainment
25
Page 26
Starting Conditions: This allows you to change the starting resources for each player. You
should generally start each player out with enough gold and lumber to build a town hall.
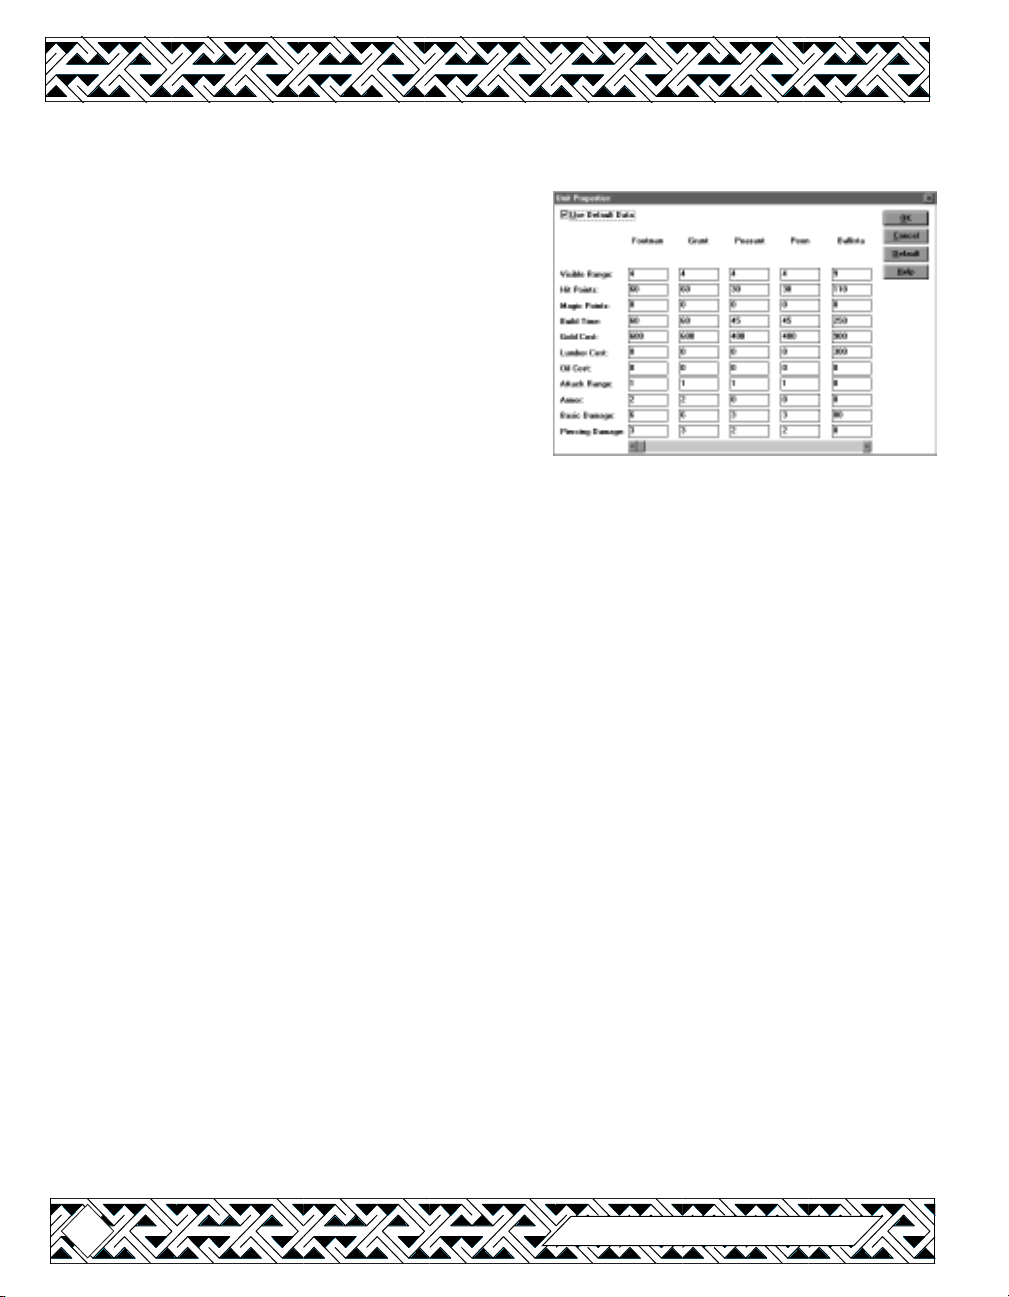
Unit Properties: Using the Unit Properties screen,
you can change the combat variables for each of
the units in the game. Any changes affect all players.
Note that if you change the default values, you
should uncheck the “Use Default Data” box. The
adjustable ratings are:
Visible Range: This is how far the unit can see.
Hit Points: This is how much damage the unit can
take before dying.
Magic Points: This toggle is not currently enabled.
Build Time: This is how long it takes to build this particular unit.
Gold Cost: The amount of gold required to build this unit.
Lumber Cost: The amount of lumber required to build this unit.
Oil Cost: The amount of oil required to build this unit. In land based sceanrios, you can set a
unit’s oil cost higher to restrict the number that can be built.
Attack Range: This is the distance that the unit can reach with its attacks. Note that a unit that
normally can only attack in hand-to-hand combat can be given a higher range.
Armor: This is how much damage the unit’s armor absorbs with each attack.
Basic Damage: This is the maximum amount of damage that the unit deals with each attack.
Piercing Damage: This is the value that determines how much damage the unit always does
with each attack, regardless of the opponent’s armor.
Damage in combat is determined by subtracting the target’s Armor from the attacking unit’s
Basic Damage, and then adding in the attacking unit’s Piercing Damage. The attacking unit
has a chance of doing either full damage or half damage with each attack.
Example: A Footman and an Ogre are engaged in combat. If neither unit has upgraded weapons
or armor, the Ogre will deal (8 Basic Damage minus 2 Armor, plus 4 Piercing Damage) either
5 or 10 points of damage with each attack, while the Footman will do only (6 Basic Damage
minus 4 Armor, plus 3 Piercing Damage) 3 or 5 points of damage with each attack. If the
Footman was completely upgraded, it would only take 3-6 damage per attack and would do
5-9 points of damage to the Ogre with each attack.
Help
The map editor has extensive help files which provide more detail on each of the individual
unit properties and settings.
26
Warcraft II: Battle.net Edition
Page 27
Tips & Techniques
• Place the Start Location for each player right next to their initial units.
• Each player should start out with a town hall or have enough resources to build one.
• Make sure that each side has enough resources to fight effectively. Computer opponents
that are set for Sea Attack or Air Attack need a lot of gold and lumber.
• Keep plenty of space between preplaced buildings, to give the computer room to expand.
• Make sure that all computer controlled players have clear paths to resources and other
players to keep troops from “hanging up” on obstacles.
• A human player can be given computer controlled allies by placing “Active Rescue” units
on the map. The units that start on the map can be rescued by any human player, but
once new structures are built by the rescuable
player, they are completely under the
control of the computer.
• A player can be “handicapped” by
changing the distance to gold mines,
starting resources, or initial units.
Having one extra peon at the
beginning of the game can make a
significant difference.
• For a challenge, try fighting against
one of each of the different computer
A.I. schemes on the same map.
The Sound Utility
Warcraft II: Battle.net Edition includes an
utility that extracts the sounds from the
game and makes them available for you
to edit or change. For instructions
on how to use this utility, please
refer to the sound utility’s help file.
Blizzard Entertainment
27
Page 28
Legends of the Land (Azeroth)
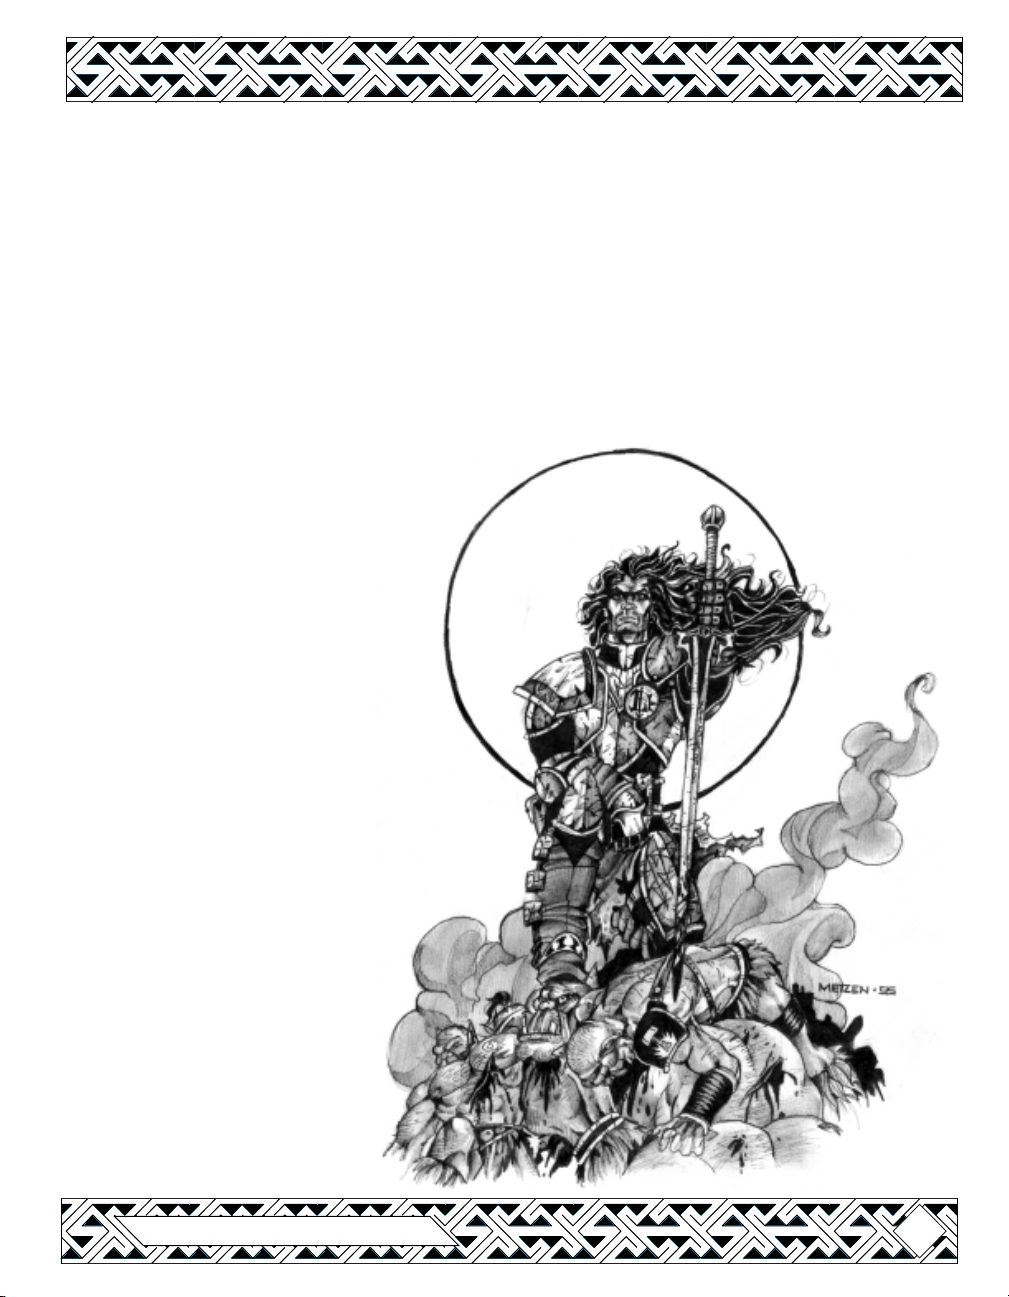
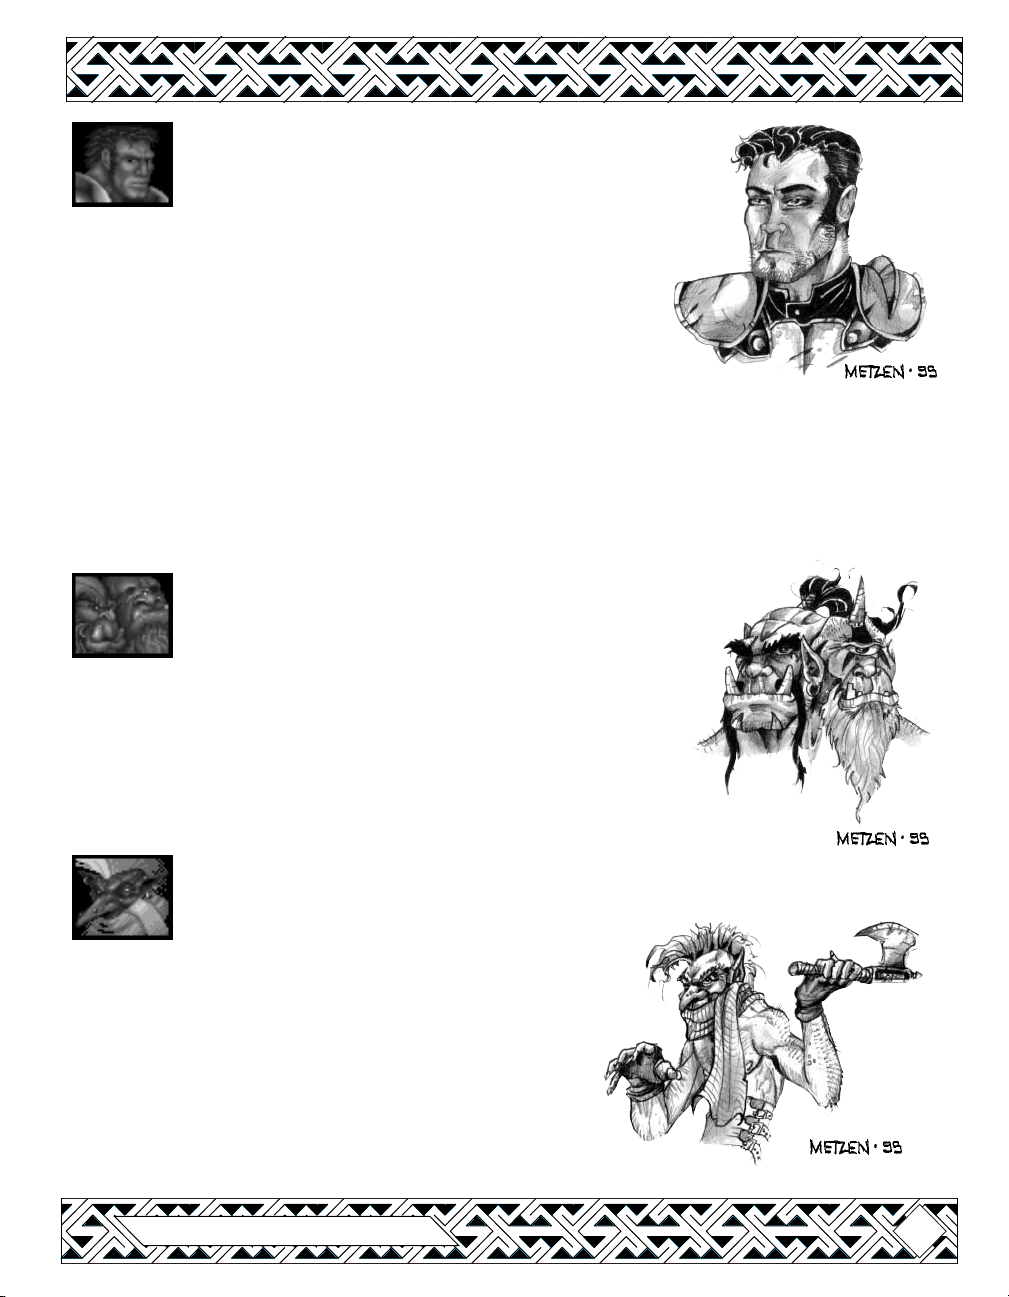
SIR ANDUIN LOTHAR
Sired and raised in the Kingdom of Azeroth, Anduin
Lothar has spent well-nigh all of his fifty-seven
years in service to the lands he calls home. A proud and
noble warrior, Lothar was accredited a position within
the King’s Honor Guard at a considerably early age.
After becoming a Knight and rising to the position
of Armsman to the Brotherhood of the Horse, he
undertook a quest to seek out the Tome of Divinity a task which all but killed him. Upon returning the
sacred writings to the Clerics of Northshire, Sir Lothar
led the armies of Azeroth into battle against the Orcish Horde.
As the Horde ultimately ravaged the Kingdom of Azeroth and
killed its advocate, King Llane, Lothar rallied his countrymen and charted their retreat across
the Great Sea - and onto the shores of Lordaeron.
In recognition of his services to his people, Sir Lothar was given the title of Regent Lord of
Azeroth. As commander of all land and air forces within the Alliance, Lothar has made a
solemn pledge to avenge both King and comrades by vanquishing the Orcish Horde once and
for all.
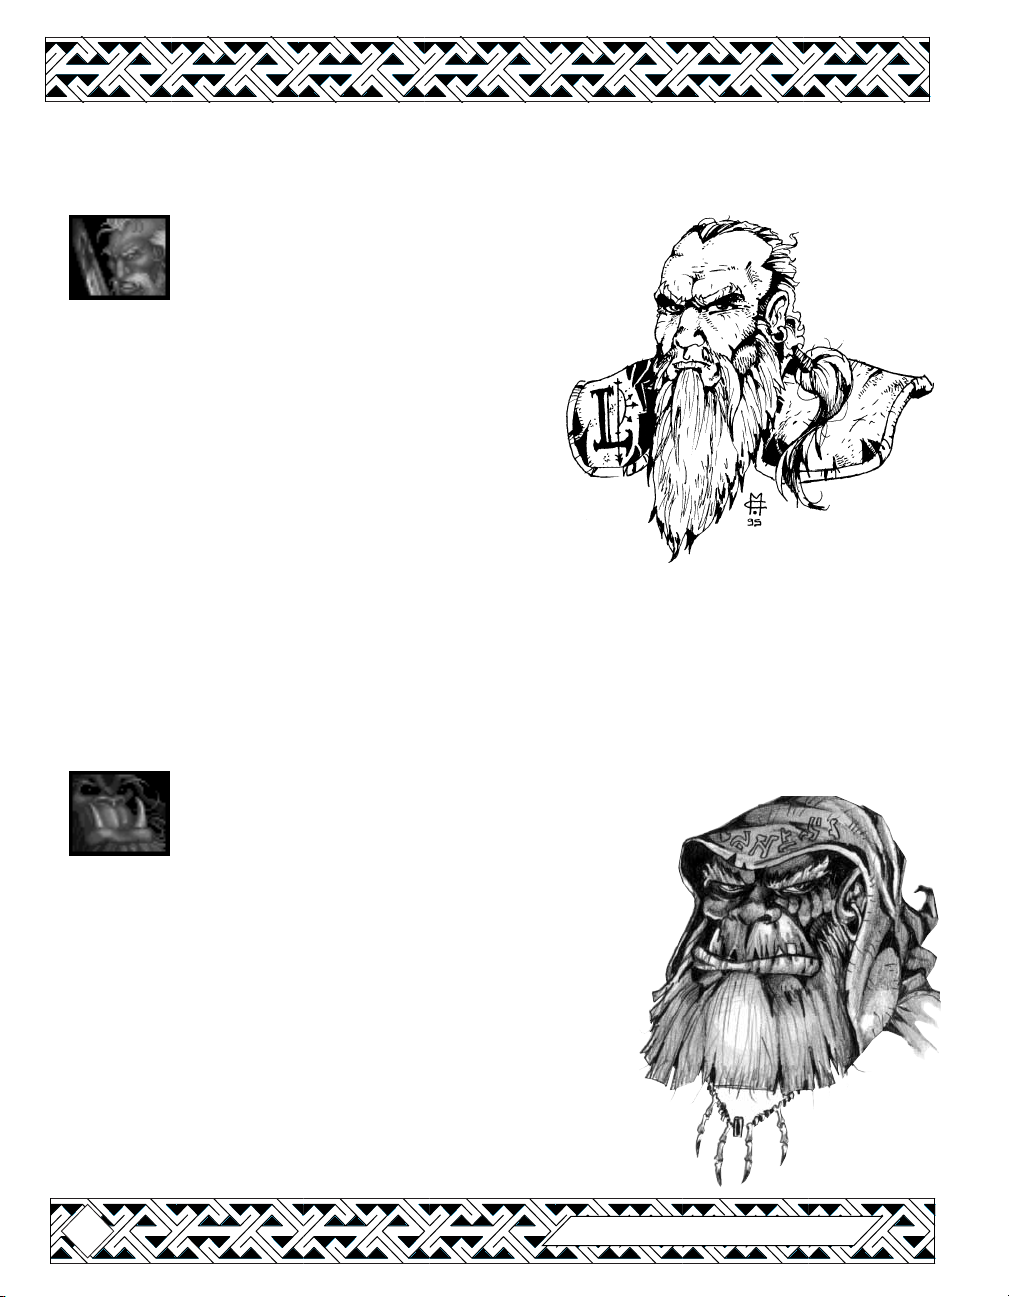
GUL’DAN
Gul’dan - Warlock of the Inner Circle and Destroyer
of Dreams - is the true mastermind behind not only
the inner workings of the Horde, but those of the secretive Shadow
Council as well. Trained in the arts arcane by the Daemon
Kil’jaeden, Gul’dan is perhaps the most powerful Warlock ever
to walk the temporal plane. Obsessed with discovering the
legendary Tomb of Sargeras, he hopes to obtain ultimate power
by deciphering the secrets ascribed by the Daemonlord since
times long forgotten. Gul’dan has used his magiks to bring
into being a host of servants for the Horde. Necrolytes, OgreMagi, and the dread Death Knights are all results of his endless
experiments with the forces of magic. Although his spawn of his
work have strengthened the Horde, the true loyalties of Gul’dan lie
only with himself and his quest to become omnipotent.
28
Warcraft II: Battle.net Edition
Page 29
SIRE UTHER LIGHTBRINGER
Apprentice to the aged Archbishop Alonsus Faol who was
the leader of the Holy Order of Northshire Clerics that
guided the kingdom of Azeroth during the First War, Uther Lightbringer
learned first hand that faith alone would not defeat the terrible
Horde. Many of the Clerics were slain during the First War, and
so the Archbishop devoted himself to rebuilding the Order as to
provide the citizens of Lordaeron with hope and faith. Knowing
that this war with the unholy Orcs could not end soon, Uther
discerned that the Archbishop’s new Order must be able to defend
the people as well as heal them. Thus, young Uther took up sword and shield and issued the
call to the most pious amongst the Knights of Lordaeron. Many great Knights heeded Uther’s
beckoning and joined the Order which became known as the Knights of the Silver Hand. With
the strength of arms - and faith - possessed by these Paladins, Uther hopes to bear witness to
the free people of the Northlands that the Orcish Horde can be cast back into the stygian pits
that spawned them.
CHO’GALL
Initiate of the fifth circle of the Shadow Council and
Chieftain of the Twilight’s Hammer clan, Cho’gall is one
of the grimmest and most respected leaders within the Horde. Cho’gall
was the first of the Ogre-Magi, having tutored himself in magic before
the Horde’s passing into Azeroth. Cho’gall has a special loyalty to
Gul’dan who helped the struggling yet determined ogre to master
the arcane energies of the Twisting Nether. Cho’gall is a firm believer
in his clan’s sacred mission to bring oblivion to all peoples of the far-realms.
ZULJIN
The feared, rogue Troll known as Zuljin has gained
a great amount of notoriety over the years.
Known best for his daring raids on guarded Elven villages,
Zuljin brought together many of the nomadic Troll warparties
and forged them into an intimidating fighting force. The
Trolls revere Zuljin and follow his leadership
unconditionally. When approached by Doomhammer
about joining up with the Horde, Zuljin initially declined.
But with the increased tensions between the Trolls and
Elves due to the coming war, Zuljin knows that only an
alliance with the Orcs will save his people.
Blizzard Entertainment
29
Page 30

Creatures of the Land
DAEMONS
Daemons are the ancient and
corrupt denizens of the lower
planes. These winged creatures of fire are
legendary for their fondness of destruction and
brutal cruelty. Daemons harbor a lustful hatred
for all mortals and hunger for any chance to
bring pain and death upon them. It is rumored
that Gul’dan has entered into a pact with a sect
of Daemons loyal to the Daemonlord Sargeras
who are willing to aid the Warlock in finding
their master’s Tomb.
THE UNDEAD
These unfortunate warriors gave
their lives in battle only to be
brought back into soulless servitude by
arcane Orc magiks to fight for the Horde.
Rising up from the battlefield, the
Undead tirelessly hack and slash at
their terrified enemies. These
skeletal horrors retain none of the
personality or emotions that
permeated their living bodies and thus
will do their master’s bidding until they are
destroyed. Only mortal creatures such as
the Humans, Elves, Orcs, Trolls, and Ogres
can be bound by these dark powers and
be remade into the Undead.
30
Warcraft II: Battle.net Edition
Page 31

Resources of the Land
GOLD
Mined from the rich earth of Azeroth and Lordaeron, this precious metal is
commonly used in exchange for goods and services. As a rare substance that is
always in short supply, Gold must be dug out from the rock and soil within established Gold
Mines. Many of these Mines were abandoned when the Orc raids began and the workers fled
for their very lives. Since the beginning of the War, these sites are frequently operated while
under the protection of military forces.
LUMBER
Harvested from the abundant forests that inhabit all but a few regions in the
realm, the uses for Lumber are nearly infinite. Once a tree has been felled and
returned to the community, it is processed and made ready for use as Lumber. Craftsman
then use this material to build many different structures and ships, as well as certain weapons
and machines of war. Lumber may also be used in the research and construction of strange
new devices — or by those adept in the arcane arts to aid with their magical studies.
OIL
Large pools of this highly flammable substance are found far beneath the surface
of the sea. Special Platforms must be constructed in order to drill deep enough
into the ocean floor to get at this sticky, black substance. Dark oily patches, created by small
geysers that form on the ocean floor and spew modest amounts of oil the into the surrounding
waters, serve as a beacon to Oil Tankers hunting for the rich black liquid. Although Oil is
commonly used in the construction and powering of ships, it has been utilized in the
development of both experimental flying craft and extremely powerful weapons.
Blizzard Entertainment
31
Page 32

Places of Mystery
THE RUNESTONE AT CAER DARROW
The Runestone was an ancient monolith erected by the Elven Druids and inscribed with
powerful runes of protection and warding. The Runestone, seized by Gul’dan and his Ogres,
was eventually hewn into slates that were then used to construct the Altars of Storms. The
Elves, knowing that their sacred artifact had been defiled to create the Ogre-Magi, have sworn
to destroy all of the unholy Altars across the kingdom.
THE TOMB OF SARGERAS
Buried beneath the Great Sea for over one thousand years, the ancient Tomb of Sargeras
waits to be discovered by any foolish enough to pursue its secrets. The Tomb is rumored to
house the remains of the ancient Daemonlord Sargeras, defeated in a contest of arcane mastery
by the legendary Guardian Aegwyn. The sorcerer Medivh - scion of Aegwyn - promised to
divulge the location of the Tomb to Gul’dan in exchange for the destruction of Azeroth.
Before Medivh could do so, his tower was invaded and he was slain by the warriors of Azeroth.
Gul’dan, believing that the Tomb contains power absolute, hopes to find and claim it as his
own. Success may indeed make him a living god.
THE PORTAL
Encircled by a ring of towering obsidian stones, the Portal stands some fifty feet above the
marshy ground of the Black Morass. Being the original gateway to Azeroth that was opened
by the wizard Medivh before the First War, its constant use has increased it in both size and
power. It serves as a passage to untold numbers of Orc and Ogre warriors, reinforcing the
Horde’s already overflowing ranks. The lands around the Portal that were once dead swamps
have been transformed into barren soil the color of blood and are now teeming with strange,
demonic beasts. This dark perversion of the land is steadily spreading across the continent of
Azeroth and threatens to consume the entire world.
32
Warcraft II: Battle.net Edition
Page 33

QUEL 'THALAS
QUEL 'THALAS
LORDAERON
LORDAERON
LORDAERON
DALARAN
HILLSBRAD
GILNEAS
ZUL 'DARE
KUL TIRAS
SOUTHSHORE
TOL BARAD
CRESTFALL
TARREN MILL
STRATHOLME
CAER DARROW
ALTERAC
STROMGARDE
DUN MODR
KHAZ MODAN
KHAZ MODAN
TYR'S HAND
DUN ALGAZ
GRIM BATOL
IRONFORGE
TOMB OF SARGERAS
G
E
H
T
BALOR
Map design by Stu Rose and Chris Metzen
Blizzard Entertainment
T
A
E
R
STORMWIND
A
E
S
NORTHSHIRE
BLACKROCK SPIRE
AZEROTH
AZEROTH
DARK PORTAL
33
Page 34

A Brief History of
the Fall of Azeroth
(as told by the Matriarch of Tirisfal)
34
Warcraft II: Battle.net Edition
Page 35

y name is Aegwyn, and for over one thousand years I have wandered the
realms of this world and endeavored to safeguard the peoples of its lands
against the ethereal powers of the Great Dark Beyond. I have seen mighty
kingdoms rise and fall. I have witnessed the deeds of high nobility and the
lowliest of rabble both conspire to define the destiny of mankind.
It has been only recently that I have, regrettably, become directly involved in the matters of
men. For countless ages it has been the charge of my Order to shelter and protect mortal
man from the mysteries of the Great Dark, and the palpable, heinous evils of the realms
beyond. To battle these dark forces of the Twisting Nether we were given considerable power.
and longevity rivaling that of even the ancient Elves. With this power came one grave burden
- The Guardian must not interfere with the affairs of men until the time comes when a successor
must be chosen and the mantle of guardianship is passed to another.
Thus did I - Aegwyn, last Guardian of the Order of Tirisfal - judge that my time had come.
Forty-two winters had passed since I first came to the kingdom of Azeroth in search of the
Conjurer Nielas Aran. It was he whom I had chosen to sire the heir of my powers. Nielas was
exceptionally talented in the simple conjurative magiks of men, and I believed that he would
be the perfect mortal father for my child… and so he was.…
I gave birth to a son and named him Medivh - or “Keeper of Secrets” in the ancient tongue of
the Elves - in the fall of the year 559. I transferred all of my knowledge and power into the
infant, locking it deeply within him to manifest itself only when he reached physical maturity.
Believing that my work on this world was done and seeing that my son would be cared for by
Nielas’ people, I wandered across the fields of time, preparing myself for the passing.
I kept a distant, watchful eye on my son for much of his young life. I was assured that the
deep-seeded altruism of Tirisfal would guide him in his trials and temper his heart and mind
as to make him worthy of the Guardianship that was, I believed, his destiny.
On the eve of the marking of his thirteenth birthday, the power locked deep inside of my son
awakened. Unable to deal with the raw, cosmic energies surging inside him, Medivh suffered
a massive psychic trauma. He was pacified by the good Clerics of the Northshire. They
removed the youth to their sacred Abbey and for six years tended to his all but comatose
body.
Eventually, Medivh awakened from his sleep seemingly in full control of his faculties and
powers. Yet, underneath the confident and almost arrogant facade, I somehow knew that my
son had become malevolent and corrupt. The wisdom and power that was his birthright had
been perverted by distant forces within the Twisting Nether, altering the Human part of his
soul and marking him with its evil touch forever.
Blizzard Entertainment
35
Page 36

It was not until the first wave of those wretched creatures known as the Orcs thundered
through the dark rift that I realized how incredibly dangerous my son had become…
With his mastery over the arcane energies increasing almost by the moment, Medivh had set
out to probe the extent of his ability to manipulate the world around him. Delving into the
forbidden arts of Necromancy, Medivh began to unravel the mysteries of life and death. He
took to consorting with Daemons from the lower planes, using their powers to augment his
own. His hunger for power became stronger, and with every minor success Medivh fell ever
deeper into the dark abyss of madness. He traveled far throughout the astral plane, exploring
the infinite secrets of the Great Dark Beyond. It was then, in the midst of swirling chaotic
hallucinations, that Medivh first encountered a world beyond his own and captured a glimpse
of the aberrant, murderous denizens of that place.
Here at last, was the tool that Medivh had been searching for…
Desirous of complete dominion over Azeroth, Medivh used the insights gained from the
knowledge of Tirisfal to strike a bargain with Gul’dan the Warlock - the mightiest of the rulers
on the dark, red world that haunted Medivh’s visions. Communicating through deep trances
and astral projection, Medivh told Gul’dan of an ancient tomb lost beneath the north sea that
contained power beyond imagination. It was to this tomb that I had banished the ancient
Daemonlord Sargeras after a long and exhausting battle eight hundred years before. Even I
cannot say whether or not the power of Sargeras remains entombed there. The promise of
incredible power tapped from a true monarch of the underworld was enough to make the
insatiable Gul’dan agree to do Medivh’s bidding.
Medivh agreed to furnish the location of the Tomb of Sargeras to Gul’dan as well as an entire
world to conquer. In exchange for this gift, Medivh required the total destruction of the only
force he believed capable of contending his ascendancy to power - the great Kingdom of
Azeroth.
Thus, in the year 583, the first of Medivh’s unnatural Portals was opened between the world
of Azeroth and the red world of the Orcs. Although the time of my passing had drawn near,
I traveled to Medivh’s mystic tower to reason with him and attempt to dissuade him from a
path that would surely lead to his own destruction. The power that was once of Tirisfal had
become so twisted inside him that my pleas seemed as nothing. I fought with what energy
remained in my weakened body, but having given all of my powers to him so long ago, I was
easily defeated and banished from his sight.
The arrival of Gul’dan and the Horde War Chief Blackhand heralded a war that tore the realm
of Azeroth asunder for nearly five years. The once rich lands of the kingdom were razed and
36
Warcraft II: Battle.net Edition
Page 37

left fallow by the merciless Orc armies. And yet, for all of his craft and guile, Medivh did not
survive to see his plans come to fruition. My son was killed by a bold Azerothien raiding
party who broke into his tower and slew him in the very room where he first made contact
with the minions of the Horde. Even the great War Chief Blackhand was eventually destroyed
as his ultimate victory drew near, betrayed by his servant Orgrim Doomhammer.
The greatest loss to the peoples of Azeroth came when King Llane, their benevolent and just
ruler, was killed as Stormwind Keep fell under the siege and was overthrown by the Orcish
Hordes. Only the valiant leadership of Anduin Lothar, Knight errant in the Brotherhood of the
Horse and a hero in the war, allowed the survivors of Azeroth to escape from their decimated
homeland with their lives.
Even with Medivh and his vile magiks gone, the Portal continued to channel hundreds of Orcs
into the Human lands every day. With the death of Blackhand, Orgrim
was quick to seize control over the Blackrock clan - the most
powerful Orcish force on Azeroth. While others still vie for
supremacy over the rest of the scattered Orc clans,
Gul’dan, the infamous Warlock and
chieftain of the Stormreaver clan, is
rumored to be amassing a great navy
to find the legendary Tomb of
Sargeras for himself. Rend and Maim,
the barbarous sons of Blackhand,
also have secured a strong
following amongst the Orcs, and
hope to wrest ultimate control of the
Horde away from the treacherous
Doomhammer.
Although other factions grow stronger
within the chaotic Horde, it seems certain
that all of the clans will follow Doomhammer’s
plans to hunt down and destroy the renegade
Humans of Azeroth wherever they choose to run…
Blizzard Entertainment
Lothar leads the Exodus
from Azeroth
37
Page 38

The Alliance of Lordaeron
With the arrival of the Azerothien refugees upon the shores of Lordaeron, King Terenas formed
a council of delegates from each of the seven kingdoms under his rule. Recounting terrible
tales of destruction and carnage wrought by the Orcish invaders in Azeroth, the Steward Lord
Anduin Lothar convinced the sovereign of Lordaeron to unite themselves against this great
threat. Despite much quarreling and debate, the lords acquiesced to Lothar and Terenas, and
agreed to unite their armies under the general command of Lothar himself. As the shores of
Lordearon had already been savaged by small bands of Orc marauders, Lothar found a strong
ally in his longtime friend Admiral Daelin Proudmoore of the seaside kingdom of Kul Tiras.
Thoras Trollbane, lord of Stromgarde, was also quick to offer his support to this newly forged
Alliance, sensing that the time for glorious battle was at hand. These warriors were not the
only ones to get ready for battle…
As the holy writ commandeth that the whole armor of rightousness be worn in the war
against evil, Alonsus Faol - Abbot of the now destroyed Northshire Abbey - convinced the
ecclesiastic ministers of Lordaeron to gird their priests and followers alike with weapons of
war. As the guardians took up swords of light to defend the heavens, so must the holy men of
earth be prepared to combat the dark tide that was quickly approaching from the south.
From the ancient subterranean halls of Khaz Modan came the stoic Dwarves of Ironforge,
reporting that the Orcs had already begun to assault their mountain kingdom. The Dwarves
offered their support n arms and ingenious technologies to the Alliance, who in turn assured
them that the Orcs would be driven back at all costs.
The reclusive Elves of Silvermoon ventured forth from the shadowy forests of Quel’thalas to
offer their services to the Alliance. Their magiks, so closely
tied to the forces of the earth, had shown evidence that the
Orcs had been defiling the very lands of Lordaeron
as part of their sinister plans. The ill-bred prejudice
that had existed for eons amongst the three races
was put aside, and a bond was formed between
these ancient neighbors. This bond would
become a force known across the whole
of Lordaeron as the Alliance.
Thus, united in arms against a common
foe, the Alliance stands upon the
shores of destiny and awaits the
coming of the Tides of Darkness.
38
Warcraft II: Battle.net Edition
Page 39

Nations of the Alliance
Azeroth
Leader: Regent Lord Anduin Lothar
Nation Color: Blue
Background: Before the coming of the Age of Chaos when the
Portal was first opened, the kingdom of Azeroth was the mightiest
of all Human nations. Ruled by the wise and just King Llane,
Azeroth stood as a beacon of light and truth throughout the known
world. After the First War, Azeroth and all of its lands were
devastated by the Horde. With King Llane dead, Sir Lothar
took charge of the shattered armies of Azeroth and led the
survivors across the Great Sea to the shores of Lordaeron.
King Terenas, ruler of Lordaeron, agreed to support the landless
Azerothiens. The people of Azeroth settled near the Southshore
region of Lordaeron, pledging their loyalty to the Alliance.
Battle-hardened and brave, the last of the once great armies of
Azeroth now seek retribution for the loss of their homeland.
Lordaeron
Leader: King Terenas
Nation Color: White
Background: Ruled by the benevolent King Terenas, the nation
of Lordaeron stands as the last bastion of hope for humanity.
The armies of Lordaeron were the first to heed the call to arms
issued by Sir Lothar and the people of Azeroth. As patron of
the Alliance, King Terenas has assumed the heavy mantle of
leadership to protect all who abide in his domain. The armies
of Lordaeron are deeply religious and are driven by the belief
that humanity must stand steadfast against the blasphemous
onslaught of the Horde.
Blizzard Entertainment
39
Page 40

Stromgarde
Leader: Thoras Trollbane
Nation Color: Red
Background: The kingdom of Stromgarde retains a strict
martial philosophy which makes it a highly regarded addition
to the Alliance. Situated amongst the foothills of the Alterac
Mountains, Stromgarde serves as a sentinel against any
invasion across the Orc-controlled borders of Khaz Modan.
Possessing a long history of warfare against the Trolls, the warriors
of Stromgarde are well prepared to engage in open combat with all
enemies of humanity.
Kul Tiras
Leader: Lord Admiral Daelin Proudmoore
Nation Color: Green
Background: Before the First War, the far ranging merchant
ships of Kul Tiras made it the most prosperous nation in the known
world. When the Orcs began to raid the coastal settlements of
Lordaeron, Admiral Proudmoore took it upon himself to construct
an armada of warships. At the behest of his long time friend
Anduin Lothar, Proudmoore has pledged the assistance of his
merchant-nation to the Alliance.
Gilneas
Leader: Genn Greymane
Nation Color: Black
Background: Despite the impending Orcish invasion,
Gilneas has remained separate from the Alliance of Lordaeron.
As ruler of one of the strongest Human nations, Genn
Greymane is convinced that his own armies can deal with
any threat, and has therefore remained unmoved by Lord
Lothar’s pleas for unity. Despite this apparent disdain for
the Alliance, the denizens of Gilneas harbor no fondness for the
Orcs or their allies and are prepared to meet them blade for blade.
40
Warcraft II: Battle.net Edition
Page 41

Dalaran
Leader: The Kirin Tor
Nation Color: Violet
Background: Dalaran is a small, magocratic nation ruled by
a conclave of Wizards known as the Kirin Tor. The capital of
Dalaran is the Violet Citadel at Cross Island. This nexus of
supernatural forces is home to the four great towers that are
sanctum to many of the land’s greatest sorcerers. The Kirin Tor are
strong supporters of the Alliance and to its cause have devoted the
knowledge contained within their voluminous libraries as well as the
power of their awesome magiks.
Alterac
Leader: Lord Perenolde
Nation Color: Orange
Background: Alterac is the weakest of the Human nations
and is only a minor contributor of troops and equipment to the
Alliance. Although Lord Perenolde praises Lothar and Terenas
for their ongoing efforts, he is beset by the fear that when the
Horde comes, the Alliance will fail, and only the surrender of
his forces and his sovereignty will save the lives of his subjects.
Perenolde alone knows whether or not - when the final call to
arms is sounded - Alterac will fight for its freedom alongside
the other nations of the Alliance.
Blizzard Entertainment
41
Page 42

Alliance Ground Units
PEASANT
Peasants are trained from the hard-working and stout-
hearted citizens that live in the numerous kingdoms of
Lordaeron. By mining gold and harvesting lumber to meet the everincreasing needs of the fighting force which must push back the
unrelenting Horde, they are the backbone of the Alliance. Trained not
only in the construction and maintenance of the myriad buildings found in
every community, but also those necessary to wage war, they take great
pride in the invaluable service they provide. Roused by tales of the Orcish
atrocities in Azeroth, these Peasants have learned to use both pick and
axe for their own defense if threatened.
FOOTMAN
Footmen are the initial line of defense against the
Horde. Arrayed in hardened steel armor, they
courageously wield broadsword and shield in hand-to-hand
combat against their vile Orcish foes. The valorous
Footmen are ever prepared to heed the call to arms.
ELVEN ARCHER
Out of the mysterious forests of Quel’thalas come the
Elven Archers to aid the Alliance in its darkest hour.
Descendants of the elder race of Lordaeron, these sylvan
woodsmen are unmatched in their use of the bow. Unencumbered
by helm or heavy armor, Archers are keen of eye and fleet of foot.
These Elves have long been embroiled in a bloody conflict with
the hated Trolls of Lordaeron and are swift to let loose a rain
of arrows upon any foe, including those that attack from
the skies above.
42
Warcraft II: Battle.net Edition
Page 43

ELVEN RANGER
Rangers are a special cadre of Elven Archers who are
intimately bound to the wildlands of Lordaeron. Their pursuit
of mastery in Longbow, Marksmanship, and Scouting make them more
rugged and even deadlier than their brothers - traits for which they
are greatly feared amongst their enemies. These secretive and elite
warriors have never involved themselves in the affairs of Humans,
but when Horde onslaughts threatened to destroy the Elven homelands,
they quickly offered their services to the Alliance. Although their
numbers are few, their presence could change the course of the war if
they are deployed wisely.
KNIGHT
The Knights of Lordaeron represent the fiercest fighting force
in the armies of the Alliance. Protected by suits of heavy
armor, they carry mighty warhammers with which to crush all who would
threaten the freedom of their lands. Astride great warhorses, these
honorable and just warriors serve as a symbol of order to the peoples of
Lordaeron in these dark and chaotic times. Having learned of the fate
the Knights of Azeroth suffered after the First War, they have sworn to
both avenge their fallen brethren and free their homelands from the
grip of the Orcish Hordes.
Paladins are a holy order of warriors whose purpose is
to defend and shepherd the war-torn populace of
Lordaeron. The Archbishop Alonsus Faol perceived that the pious
Clerics of Northshire, who suffered such terrible attrition in the First
War, were ill-suited for the dangers of combat. Along with many of
the surviving Clerics of Northshire, he sought those of only the greatest
virtue among the knighthood of Lordaeron and tutored them in the
ways of magic. Led by the crusading Uther Lightbringer, it now rests
upon these Paladins - christened the Knights of the Silver Hand - to
heal the wounds sustained in combat and to restore faith in the promise
of freedom from Orcish tyranny.
Blizzard Entertainment
PALADIN
43
Page 44

BALLISTA
Ballista launch steel-tipped bolts to
impale all in their path. As they require
an awesome amount of force to be placed upon
their tremendous bowstrings, these machines of
war are reinforced with lumber from the precious
Ironwood trees. The Ballista, a product of Human
design and Elven craftsmanship, is a symbol of the unity
between all those who have allied themselves against the Horde. The Dwarves prove to be
another valuable ally, in that they may be employed to design improved missiles which make
the Ballista the most devastating weapon of the Alliance.
MAGE
Once students of the Conjurers of Azeroth, this new
order of Mages have been forced to discover untapped
magical forces to command in their war against the ruthless Orcs.
Although masters of their arts, the Conjurers who fell during
the First War were unprepared for the rigors of warfare.
Determined to avoid a similar fate, the Mages have undertaken
a regimen equally demanding on body and soul, thus dedicating
themselves to the command of more aggressive and destructive
magiks. Whether in their sanctum at the Violet Citadel in
Dalaran or on the many battlefields of Lordaeron, the Mages
are resolute in their efforts to defend the people.
DEMOLITION SQUAD
From the deep, subterranean halls of Khaz Modan, the
Dwarven Demolition Squads come to aid the
Alliance in their crusade for the liberation of Khaz Modan.
As masters in the handling and arming of explosives, these
Squads are renowned for their ability to demolish any
obstacle - from a mighty wall to a bulwark of solid stone.
Reckless and bold, these Dwarves are zealous in their
loyalty to the Alliance and would not hesitate to detonate
their explosive payload should the situation turn grim…
44
Warcraft II: Battle.net Edition
Page 45

Alliance Air Units
GNOMISH FLYING MACHINE
The Gnomes of Khaz
Modan have long
offset their lack of physical
strength with ingenuity and daring.
As members of the Alliance, they
have continued to display their
talents by inventing and piloting the
unbelievable Flying Machine.
Although having no armaments, these
awkward contraptions can be used to
survey vast areas of terrain, and detecting
the otherwise hidden movements of
underwater units (as all flying units can),
making them invaluable for discovering the
movements of the Horde.
GRYPHON RIDER
From the ominous and
foreboding peaks of
Northeron come the Dwarven
Gryphon Riders. Mounted upon
their legendary beasts and wielding
the mystic Stormhammers forged
deep within the secret chambers of their
Aviaries, these feral Dwarves fear no enemy
- and rely upon no friend. They have allied
themselves only with the Elves of Quel’thalas,
distrusting both their Dwarven cousins and the
Humans alike. When the call to battle is
sounded, however, they can be counted upon
to fight alongside any who oppose the Horde.
Blizzard Entertainment
45
Page 46

Alliance Naval Units
OIL TANKER
As the only ships which do not require oil be built,
Oil Tankers make possible the construction of the
Alliance fleet. They are manned by hard working, dependable
mariners who search for the rich oil deposits which lie beneath
the waves. The crew of every Tanker is skilled in building Oil
Platforms and ferrying the oil back to a Shipyard or Oil Refinery
where it may be processed and put to use.
ELVEN DESTROYER
Elven Destroyers are powerful warships from the fleets
of Quel’thalas. Crewed with highly-skilled Elven
seafarers, these swift-sailing vessels are prepared to engage the
enemy wherever they may be found. Elven Destroyers constitute
a critical part of the Alliance naval defense force as they can unleash
their firepower upon dreaded aerial forces of the Horde.
TRANSPORT
Transports are a vital part of the Alliance war effort,
for it is these sturdy vessels which allow troops to
traverse various waterways to engage in battle. Designed to
carry and deliver several ground units directly onto the shore,
Transports are slow and unarmed, and thus rely upon protection
from Destroyers and Battleships.
46
Warcraft II: Battle.net Edition
Page 47

BATTLESHIP
The Alliance relies upon its great Battleships to control
the seas. These hulking behemoths possess armor
and weaponry far greater than that of any other
Alliance vessel. The combination of devastating weaponry
and substantial armor that they brandish more than outweigh
their somewhat slow speeds in waterborne combat.
GNOMISH SUBMARINE
The resourceful Gnomish Inventors have designed an
amazing craft known as the Submarine. This watertight
vessel can submerge beneath the waves and surreptitiously keep
watch on enemy forces above the surface. The Gnomish Submarine
is visible only to Towers, aerial forces, and other vessels that move
beneath the waves. Using cunning and craft to carry out surprise
attacks on more powerful enemies makes the Submarine an
invaluable part of the Lordaeron armada.
Blizzard Entertainment
47
Page 48

Paladin Spells
HOLY VISION
As the spirit of mankind is everywhere, so the Holy Vision of the Paladin extends
to all corners of the land. The area unveiled by this incantation grants the Paladin
knowledge of the terrain and of all those who may dwell there. When this spell dims, the
Paladin maintains knowledge of the lands he has seen, although he loses sight of the denizens
in these lands.
HEALING
Aiding our brethren in times of pain and illness remains the fundamental concern
of any within the holy Order. By focusing his spiritual powers, the Paladin can
heal those who have been wounded in battle. While only one being at a time may be healed
in this fashion, it serves to replenish the strength and courage of all who strive for victory
against the unfeeling Orcs.
EXORCISM
Calling upon the forces of light and purity, the Paladin is able to dispel the walking
dead that plague the lands of Azeroth. Exorcism can be used to cause injury to
entire groups of these undead terrors, or to utterly eradicate a lone creature. These creatures
of Hades seem to gain strength in numbers, thus the greater number of undead that are
exorcised within a group, the less actual damage each undead will take. This act is extremely
taxing upon the Paladin, making it necessary for him to observe a period of rest before once
again invoking this great power.
48
Warcraft II: Battle.net Edition
Page 49

Mage Spells
LIGHTNING
The Mages of Lordaeron have the ability to discharge lightning from their hands
when entering into a melee. These swift bolts of energy strike their victims
regardless of any armor they may wear. Being the simplest of nature’s forces to command,
Lightning requires but a fraction of the caster’s mana to employ.
FIREBALL
Magiks involving the cardinal elements of the universe are favorites of the Mages.
The Fireball is launched from the palms of the Mage and streaks like a comet
blazing across the battlefield - slamming its fiery bulk into whatever stands in its path.
FLAME SHIELD
Serving as both a weapon and a barrier, the Flame Shield is a binding of the
chaotic force of fire to the aura of the chosen target. A twisting helix of fire that
whirls about, the Flame Shield accompanies the one so enchanted wherever he may roam.
Flame Shield will deliver damage to any grounded barrier that it comes into contact with.
SLOW
The Mages of Lordaeron have been able to create a spell that hinders both
movement and reflex. By warping the very patterns of time that surround his
target, Slow enables the caster to bring an enemy’s offensive to a crawl. Time cannot be held
in check by even the mightiest of Mages, however, so the effects of this temporal shift cease
as the power of the spell wanes.
INVISIBILITY
Gleaned from sacred tomes rescued from the debris of Northshire Abbey, this
spell grants the ability to cloud the perceptions of others so that they cannot
perceive the physical existence of the caster’s target. The individual that is rendered Invisible
may not perform any tasks such as attacking, harvesting or spellcasting. Should the individual
interact with his environment in any fashion more aggressive than simple movement, the
Invisibility will be dispelled and their personage shall be revealed.
Blizzard Entertainment
49
Page 50

BLIZZARD
Summoning torrential storms from the frozen Mountains of Northeron, this potent
spell calls down a fierce tempest of ice to assault the enemies of the Mage with a
flurry of cold blades. Blizzard can be cast over large portions of the battlefield, making it an
extremely powerful spell when facing legions of Orcish troops.
POLYMORPH
Perhaps the most fearsome of the Mage spells, Polymorph alters the physical
form of its target. This metamorphosis changes man to beast, forever warping
both mind and body. This sorcery wholly transforms the victim into a creature of the wilds,
thus losing their reasoning - making commands for direction
or battle impossible. Although there is no counter
for this spell, possessing a greater
stamina does decrease the
possibility of this enchantment
taking effect.
50
Warcraft II: Battle.net Edition
Page 51

Alliance Buildings
TOWN HALL
The Town Hall serves as a center for the community and commerce of the
various towns and military outposts in Lordaeron. As the chief economic
building in any settlement, these sites are equipped to process vital resources
such as lumber and gold. The steady stream of peasants, who laboriously
harvest and transport resources, makes for constant activity near the Town
Hall. The training that Peasants require to assist in the growth of their community is also
given here. In time the Town Hall may be improved and upgraded into a Keep.
FARM
Farms are a vital part of the many communities in Lordaeron. Producing various
grains and foodstuffs, Farms not only generate sustenance for peasants and
workers, but for the armies as well. The overall amount of food produced from a
town’s Farms is vital to the number of new workers or soldiers that the community
can accommodate. It is imperative that this production be monitored at all times, so that the
population remains well fed and the town runs smoothly.
BARRACKS
Barracks are large, fortified structures that offer training and housing for the
many warriors in the Alliance. An integral part of any defended community,
the Barracks foster unity and good will between the races. Human Footmen
live alongside Elves and Dwarves - all training together under one roof. The
training of Ballista crews and the construction of these war machines also take place within
the Barracks compound.
ELVEN LUMBER MILL
Seeking insight into the mysteries of the great Ironwood trees of Northeron,
the Elves of Quel’thalas constructed Lumber Mills where they became
exceptional craftsmen. The Elves offered their superior skills in service to
the Alliance, providing more efficient means for processing lumber. The
production of ships and war machines becomes possible with the addition of these structures.
Lumber mills are also responsible for producing the perfectly crafted arrows that make the
Elven Archers feared throughout the Horde. When given the necessary resources, Elven
craftsmen will upgrade the quality of these arrows, thus increasing the possible damage that
can be inflicted. Elven Rangers, after being trained at the Barracks, have been known to
gather at the mills, honing their skills in Longbow, Marksmanship and Scouting.
Blizzard Entertainment
51
Page 52

BLACKSMITH
Blacksmiths are an important part of many settlements dependent on military protection.
While the metals that they forge are a vital component in the construction
of advanced buildings, they are especially known for their skill at weaponcrafting and armoring. The smiths of Lordaeron, occasionally aided by
their skillful Dwarven allies, are renowned for producing some of the finest
quality weapons in the northlands. The Blacksmiths and Elves are rumored
to be developing a machine that may alter the course of the war against
the Horde.
TOWERS
Scout Towers are tall, sturdy structures constructed to
guard the borders of many settlements. From these sites,
the defenders of Lordaeron can spot enemy troops from
high above, making it difficult for the Orcs to launch
surprise attacks. Their presence in the wildlands assures
the swift deployment of our armies to meet any Orc
incursion. These Towers may be outfitted with either deadly bolts that can pierce targets on
land, sea and air, or with great cannon that while powerful, cannot attack threats from above.
Scout Guard Cannon
SHIPYARD
Shipyards are primarily responsible for the construction of the various warships
in the Alliance’s naval forces. Elevated on strong pillars of Ironwood, these
waterfront structures are also responsible for receiving and processing the oil
necessary to construct these ships of war. Shipyards are manned by dedicated
sailors and shipwrights who strive tirelessly to keep the fleet running smoothly
and efficiently.
FOUNDRY
The introduction of Foundries makes the construction of the mighty vessels
known as Transports and Battleships possible. Obsessed with creating the
strongest force in the Alliance, these skilled artisans need only ample
resources to design better armor and weaponry for the fleet. Located on the
coast to easier supplement Alliance Shipyards, they are an integral part of
warship maintenance. Constantly filled with heavy clouds of soot and ash,
the intense heat that radiates from the huge smelting pools cause some to
jest that they may be in an Orcish building instead of Human one.
52
Warcraft II: Battle.net Edition
Page 53

OIL REFINERY
These large steel-shod buildings are designed to refine raw oil for use in the
construction and maintenance of the Alliance fleets as well as the creation of
unconventional war machines. Like the Shipyard, a Refinery is built along
the coastline so that Tankers can deliver their cargo directly to its doors. A
Refinery allows oil to be processed with far greater efficiency, increasing the
amount of usable oil garnered from every load of crude.
KEEP
In large and well-defended settlements, the Keep replaces the Town Hall as
the center of commerce where Peasants can deliver shipments of gold and
lumber for processing. The artisans who dwell here have mastered means
of better extracting the gold from the ore mined by the Peasants, thus
increasing the yield of mining operations. The Keep is also a military
structure protected by high granite walls, making it difficult to destroy. Advancing legions of
Orcish warriors force the Alliance to assign their elite troops - the Knights of Lordaeron and
the mysterious Elven Rangers - only to such places, where their presence will serve to deny
the Horde further strategic gains. As control of these towns becomes more critical, the Keep
may need to be upgraded into a Castle.
STABLES
Stables are maintained to breed and house Lordaeron’s prized warhorses.
Determined to condition the horses to be faster, stronger, and more responsive
to their riders, the trainers at these sites take great pride in their work. These
brave and loyal stallions carry Knights into battle. and contribute precious
fertilizer for the bountiful farms about Lordaeron. The Stables are manned
by dependable horsemen and stable-hands who tend to the steeds with great devotion.
CHURCH
Churches are places of worship where the citizens of Lordaeron seek spiritual
enlightenment. Once led by devout Clerics, Churches now depend on Paladins
to minister to the masses in this time of war. It is in these places for healing
and serenity that the holy warriors gather to deepen their faith. Through
meditating, communing and tithing at these sanctified sites, Paladins discover
new ways to channel their healing and spiritual powers.
Blizzard Entertainment
53
Page 54

GNOMISH INVENTOR
The Inventors are highly adept at creating outlandishly clever contraptions for
military use. Among the many bizarre inventions created by the Gnomes are
the Flying Machines that hover high above both land and sea, as well as the
implausible Submarine that can move under the seas. The Gnomes are also
responsible for perfecting the technique of extracting various chemical
compounds out of oil to make gunpowder and explosives. Although the Gnomes
are a bit odd and eccentric, none can deny their value to the Alliance.
MAGE TOWER
Serpentine spires of living rock form the foundation of the Mage Towers where
glowing spheres of mystic energy serve to replenish and focus the awesome
magiks wielded against the Orcish Horde. These Towers hold ominous secrets
that none but the Mages of Lordaeron dare to explore. As extensions of the
Violet Citadel in Dalaran, these towers allow the Mages to research arcane
spells, unfettered by the affairs of the temporal plane.
GRYPHON AVIARY
An homage to the legendary beasts housed within, the colossal aspect of the
Gryphon Aviary looms over all that it surveys. Hewn from solid rock by the
Dwarves of Northeron, their Aviary inspires dread in the hearts of whomsoever
these Gryphon Riders call foe. Deep inside these massive structures are the
Gryphon aeries and the Dwarven workshops where saddle and harness are
crafted.
Most sacred to the Dwarves is the enchanted forge that lies at the heart of each Aviary. It is
here that the magical weapons known as Stormhammers are fashioned. A Stormhammer,
when thrown, strikes with the fury of lightning and the force of thunder. This destructive
weapon, combined with the indomitable spirit of the Gryphon Riders, justifies their position
as masters of the skies.
CASTLE
The mighty Castles of Lordaeron are the center of large military cities.
As with the lesser Keeps, Peasants may bring gold and lumber here for
judicious dispersal in order to sustain the war effort. These bastions
against invasion are guarded by fortified battlements, making them
virtually indestructible. The Castle represents the strength of the peoples
of the Alliance and their unyielding resolution to defend the whole of
humanity against the Orcish Hordes.
54
Warcraft II: Battle.net Edition
Page 55

Human Unit Dependencies
Ground Units Air Units
Peasant Town Hall
Footman Barracks
Elven
Archer
Elven
Ranger
Ballista Barracks Lumber Mill Blacksmith
Knight Barracks Blacksmith Stables
Barracks Lumber Mill
Barracks Lumber Mill Upgrade at
Keep
Flying
Machine
Gryphon
Rider
Gnomish
Inventor
Gryphon
Aviary
Lumber Mill
Naval Units
Oil Tanker Shipyard
Destroyer
Shipyard
Paladin Barracks Blacksmith Stables Upgrade at
Dwarven
Demolition
Mage Mage Tower
Gnomish
Inventor
Church
Blizzard Entertainment
Transport Foundry
Battleship
Submarine Gnomish
Shipyard
Shipyard
Shipyard
Foundry
Inventor
55
Page 56

Human Building Dependencies
Town Hall
Barracks
Farm
Blacksmith
Scout
Tower
Required for
Barracks
Keep Upgrade Castle Upgrade
Keep
Cannon
Tower
Required for
Lumber Mill Blacksmith Stables
Stables
Inventor
Castle
Church
Gryphon
Aviary
Mage Tower
Lumber Mill
Wall
56
Guard
Tower
Shipyard
Oil Refinery
Foundry
Warcraft II: Battle.net Edition
Page 57

The History of Orcish Ascension
( as told by Gul’dan, Chieftain of the Stormreaver clan)
Blizzard Entertainment
57
Page 58

The Rise of the Shadow Council
Like an elemental force of havoc and destruction we thundered through the lands of the Draenei
devastating all that we beheld. Not one life was spared. No building was left standing. The only
traces of their existence were the blood-soaked fields they had worked for nearly five thousand years
and the rank, acrid smell of the huge victory fires that consumed the bodies of their young. The
Draenei were a weak people - hardly worth the effort of our raiding sweep. In the end, however, even
these simple victories serve to keep the inferior in their place…
It has always been so with my kind. The savage, brutal tendencies of the masses are easily manipulated
by those who hold true power. Power is the true force that drives the great destructive machine that is
the Horde. Those who imagine themselves in possession of this power rally around their clan banners
of violence. Yet without a common foe, even the leaders of the Orc clans blindly turn upon each other.
The appetite for destruction that prevails amongst these fools drives the Horde; might and might alone
is honored above all things.
I am Gul’dan - the greatest of all Warlocks and Initiate of the Seventh Circle of the Shadow Council. No
one knows the dark, burning allure of ultimate power better than I.
In what passed as my youth, I studied Orc magiks through the tribal Shaman of my clan. My natural
talent for channeling the cold, negative-energies of the Twisting Nether brought me notable standing
amongst the other Shaman, and I knew that even Ner’zhul, the greatest of my teachers, became jealous
of me as my abilities grew ever stronger.
My aspirations rose higher than those of my peers and masters alike, for I knew that the scope of their
vision was limited by their devotion to the advancement of the Horde. I cared nothing for the Horde or
its petty politics. I cared nothing for this world over which we had complete dominion. I cared only for
the chance to fathom the spiraling mysteries of the Great Dark Beyond. I had begun secret explorations
of energies far beyond the scope of anything that my so-called tutors could possibly comprehend. It
was at this time that I discovered a being of immense power - the Daemon Kil’jaeden. I was in awe of
his heartless fury. To witness his awesome power was to be all but consumed. In the fleeting, fevered
nightmares he brought me, I touched the essence of that which lies Beyond. Within me an unfathomable
lust was sewn - a desire to wield the fury of ethereal storms and to stand unscathed within the dying
hearts of burning suns.
Under the tutelage of Kil’jaeden, I realized how limited even my understanding had been. Untold
histories of ancient Daemon races and primal magical dimensions were made known to me. I learned
that there existed worlds without number, scattered throughout the darkness beyond the sky - worlds
to which I might lead the Horde as only one of my abilities could. Though I remained with my people
on the dark, red world of the Draenei, I soon learned to project myself into the depths of the Twisting
Nether, being driven nearly mad by the whispering chaos contained therein. Although it seemed it
would mean my death, I was irresistibly compelled to continue my sojourn until, finally unbound from
my corporeal existence, I understood the whispers. It was then that I first spoke to the dead…
58
Page 59

Ancestral worship has long been at the heart of Orcish religion. While nearly all of the Orcish Hordes
believed that our dead elders watched and guided us from the depths of some lost realm of chaos, I
believed this notion to be a product of ritual and not reality. Within the Twisting Nether I discovered
that the spirits of the dead do linger on, floating on the astral winds between the worlds. I learned that
they kept their endless, silent vigil over the clans in hope of finding some means of escape from their
lifeless torment. I knew then that these spirits of the dead would be a useful tool for anyone who could
bind them to his will.
Years passed. My apprenticeship under Kil’jaeden had allowed me to become the most powerful
Warlock the clans had seen in many generations. My place within in the Horde was as a respected
leader, but as ever, tensions ran high amongst the clans. The destruction of the Draenei left nothing
upon which the great beast of war- could feed. After centuries of violence and warfare, we had finally
conquered the whole of our world. With no enemies left to crush and no new lands to conquer, the
clans had fallen into a state of utter anarchy. Minor disputes between clans led to open battle and
massive bloodshed. Those chieftains who attempted to assume the position of overlord soon found
themselves slaughtered by the ravenous legions of the disheartened Horde. I knew that the time had
come to claim the mantle of power that I had so long neglected.
I quickly gathered together the few Warlocks who had shown some spark of passion and desire to rise
above the petty quarrelling of the clans. To these Warlocks I bestowed the knowledge of the dead by
leading them in secret rituals and communing with the spirits of the Twisting Nether. Those who were
incapable of channeling this power were destroyed. After a time a pact was forged between the
members of our circle and the dark spirits whose energies we had learned
to invoke. I would use my place among the Warlocks to shape
the thoughts of others while, cloaked by a veil of secrecy,
they would be immune to the caprices of the bloodthirsty
masses. Thus did the Shadow Council come to be.
Within a few short months the Shadow Council had its hand
in all of the important political matters within the Horde.
Nothing occurred within the Horde that we did not know
about, and many events took place by our design - so
cleverly implemented that even the clan chieftains were
oblivious to our manipulations. Before half a year had
passed, we had assumed near total control of the inner
workings of the Horde. Yet, behind all of our secret
machinations, there loomed the silent and ominous
shadow of the Daemon Kil’jaeden.
In pursuit of furthering our magical resources, I opened
a new school of magical discipline that became known
as Necromancy. We began training young Warlocks
in the arcane mysteries of life and death. Again, with
tutelage from the Daemon Kil’jaeden, these Necrolytes
Blizzard Entertainment
Gul’dan the Warlock
59
Page 60

delved into the dark arts, eventually gaining power enough to animate and control the bodies of the
newly dead. Every victory - every success - left me with an emptiness I could not fill. I came to realize
that the Shadow Council could serve my purposes only to an extent, and thus I would require even
greater power should I wish to become the true harbinger of our destiny.
The Mastery of Forces - Medivh and Blackhand
Things were well within the Horde. Though the Shadow Council kept the warring clans pacified by the
promise of escape from the dying world, I knew that this new order - much like the war against the
Draenei - would provide only a brief respite if I could not find new lands for the Orcs to conquer. My
contemplation on this matter was disturbed late one night when I was surprised by the sound of
screams emanating from the Warlocks’ Tower. I arrived to find many of the apprentices locked in deep
trances, their faces twisted into masks of pain. The Warlocks, whom I questioned in detail, could tell
me only that they had felt an unexplainable presence in their dreams. I returned to my Stronghold,
deeply puzzled by the fact that whatever it was that had contacted the Warlocks, had made no attempt
to reach me.
I sought the counsel of Kil’jaeden about this presence. He also was touched by this power - a power
that was beyond any he had ever experienced before Whether it was the image of a force so awesome
that it could cause this baneful Daemon to actually feel fear, or my own trepidation, I fled - moving
aimlessly through the Twisting Nether for what seemed an eternity.
It was during my fevered flight that the Presence finally
made contact with me. It radiated untold power, but it
lacked the emotionless control displayed by Kil’jaeden.
My senses seemed to take control over the dread that
had engulfed me, and my mind began to cipher and
reason. I knew that if I could divine the desires of
this force, no matter how powerful, I could use it to
further my own ends. The presence identified itself
as Medivh, a sorcerer from some far and distant
world. We communicated not in words, but in a
guarded joining of minds. His mind seemed
boundless, but his thoughts moved so swiftly that
it was difficult to learn anything from him. All the
while, I knew that he was probing me - learning
more and more about the Orcs and our magic. I
could never learn as much from him as he would
from me, and I soon broke contact with him.
I sought the counsel of Kil’jaeden, but he refused
to answer my summons. Somehow I knew that
he had forsaken his students because he was
afraid of this Medivh. I found myself again
60
The Demon Kil’jaeden
Page 61

doubting my skills. Could I contend with a being who could intimidate my own master? I continued to
venture into the Twisting Nether for several weeks, all but forgetting the disturbance that had caused
me to question myself. Then one night, Medivh appeared to me in my dreams…
“You fear me, for you do not understand me. See my world and understand your fear. Then fear no
more”
I was powerless to resist what came next
…barren wastes…
…dark swamps, teeming with life…
…endless fields of emerald grasses…
…forests of magnificent trees…
…farmlands filled with rich harvests…
…villages of proud, strong people…
Images came, flashing much too quick to comprehend. And then…something. A fleeting picture that
left a longing stirring inside of my soul…
…buried deep beneath the ocean; dark and ruined, but still breathing…
…still pulsing with the lifeblood of the earth itself…
…an ancient power…
…ancient and terrible…
I awoke. I embraced consciousness knowing all along that the dream had been real. Medivh had
shown me the wonders of his world, knowing that the Horde would not be content until his world was
ours…
I met with the members of the Shadow Council concerning the visions that we had seen. Although
there was much debate as to the true intentions of this Medivh, I informed the Shadow Council that a
way to escape from our world would soon be ours. I would seek the aid of Medivh in creating a way to
get to his world, and then we would subjugate his race as we had done to all others who stood before
us. Although he had appeared to many Warlocks with these images of a new and fertile world, we
agreed to keep the knowledge of this enigmatic message to ourselves. Those Warlocks outside of the
Shadow Council who had shared in the visions were killed; for if the secret were revealed before
preparations were made, the Horde would tear itself apart. Weeks passed with no word from Medivh.
My attempts to contact him were fruitless. It was as if he had erased any trace of himself from the
Twisting Nether. Some members of the Council gave up any hope of the wizard ever returning.
…Then the rift appeared…
It took considerable time to expand the rift enough to send the massive frame an Orc through. The first
scouts to return from the other side seemed to be driven completely mad by what they had seen.
These early failures did not deter us, and subsequent quests confirmed that the world beyond this rift
Blizzard Entertainment
61
Page 62

appeared similar to what was depicted in our visions. With the combined powers of the Horde’s
Warlock clans and the Shadow Council, we were able to enlarge the mysterious rift so as to create a
Portal. This Portal was used to move a great number of Orcs into this unknown land. A small outpost
was quickly built on the other side of the rift, and Orc scouts were sent to explore the surrounding
areas.
The agents of the Shadow Council reported that the denizens of this world were called Humans, and
their lands were known as Azeroth. We found that these Humans were a weak race, farming their
fields and living peacefully in the countryside. I feared that they would prove no more of a challenge
than the Draenei, and would not appease the hunger of the Orcish war machine for long. The clan
chieftains, quickly swayed by their lust for blood and war, agreed that it was time to leave this dying
world and lay claim to the domains of Azeroth.
While the Shadow Council kept close watch over the workings of the Horde, the masses looked to the
clan chiefs as their leaders. Two chieftains arose who were well respected and feared by the various
clans - Cho’gall, the Ogre-Mage of the Twilight’s Hammer clan, and Kilrogg Deadeye of the Bleeding
Hollow clan. These powerful leaders were expected to direct the Horde to a swift and savage victory
over the Humans. Thus, as the Horde gradually channeled through the rift into Azeroth, Cho’gall and
Kilrogg began to plan their assault against the Human stronghold of Stormwind.
The attack against Stormwind was catastrophic. Our armies, expecting to meet weak resistance,
charged headlong into the enemy fortress. Surprisingly, the Humans soldiers held our forces at bay.
Then they unleashed warriors mounted upon beasts of muscle and sinew to devastate our troops. The
Humans forced our troops to retreat back into the swamplands surrounding our outpost and the Portal
where, only by the invoking the shrouding mists of shadow, were we able to escape. This decisive and
humiliating defeat threw the Horde into chaos. Cho’gall and Kilrogg blamed each other’s incompetence
for the failure, and the Orcs quickly polarized into factions that supported either chieftain. The Shadow
Council desperately sought a remedy to the violence that was sure to follow, but the volatile nature of
the Orcs made it difficult to appeal to reason or wisdom. I realized that the Horde needed a strong
leader that could unify the clans under his control - and be kept in his place. Thus did I first learn of
Blackhand the Destroyer…
Blackhand, chieftain of the young Blackrock clan and a Raider in the Sythegore Arm, was well honored
by most Orcs within the Horde. More importantly, he was extremely lustful, and this made him easily
corruptible. With help from the Shadow Council, I set the eager Blackhand upon the horned throne of
the War Chief. To his credit, Blackhand was a ruthless dictator who inspired awe and terror from his
warriors. While the Horde rallied under Blackhand and the other chieftains acquiesced control to him,
it was I who dictated policy by blackmailing and bribing Blackhand.
With Blackhand’s ascension to War Chief, order was restored to the Horde. I was visited again by the
visage of Medivh, who appeared more in control of his powers, but less in control of his mind. Petitioning
the Horde to destroy the kingdom of Azeroth, but to make him ruler of its people, Medivh offered all
manners of treasures and baubles to me. I assured him that his world was ours for the taking, and that
he held nothing that could persuade the Horde to do his bidding. His face broke into a wicked sneer as
62
Page 63

he proceeded to show me the image of an ancient tomb upon which was etched the name of the
Daemonlord Sargeras. The Tomb of Sargeras! The Daemonlord who had instructed my own tutor
Kil’jaeden was entombed upon this pathetic little world! Destiny had chosen to lay the hand upon my
shoulders alone, for Kil’jaeden had told me that the lost Tomb contained power absolute - enough to
make any who could control it into a living god. Medivh pledged that he would grant me the location
of the Tomb if only I would use the Horde to destroy his enemies…
Thus, the Orcish Hordes made war against the kingdom of Azeroth.
The First War of Orcish Ascension
We took the lands of Azeroth from the Humans and razed all that we surveyed. My personal assassin,
Garona the Half-Orc, executed Azeroth’s leader King Llane and returned his heart to me. Although the
Horde dominated Azeroth and the pathetic worms who defended it, my own plans were badly hampered.
A small band of Human warriors stormed Medivh’s
Tower and engaged the insane sorcerer in direct
combat. As his body was slashed and torn by the
swords of Azeroth, Medivh began to transmit
telepathic waves of trauma across the astral
plane which easily shattered even my
formidable defenses. I attempted to reach
into the sorcerer’s mind and steal the
location of the Tomb from him directly,
but before I could divest the location,
Medivh was killed by the Azerothiens. H a v i n g
been inside his mind at the moment of his
temporal death, I suffered a massive psychic
backlash and fell into a catatonic state.
For weeks I slept as if dead, closely guarded by my
faithful Warlocks. When I finally arose, I learned of
the shift in the balance power within the Horde.
Blackhand had been killed. Without my magiks
and counseling to aid him, Blackhand fell prey
to a surprise attack launched by one of his
strongest and most trusted generals - Orgrim
Doomhammer. Orgrim was quick to consolidate
his power within the Horde, justifying the
assassination of Blackhand by securing false
testimony that supported his claims of the
Destroyer’s incompetence as War Chief.
Orgrim Doomhammer presents the
Blizzard Entertainment
head of Blackhand
63
Page 64

It seemed that the hand of fate had struck me a harsh blow. Orgrim set out to uncover the inner
workings of the Horde, leaving no stone unturned. Eventually, his spies captured my servant Garona
and under intensive, agonizing torture, forced her to reveal the existence and location of the Shadow
Council. She was weaker than I had expected.
Suspecting that the Shadow Council was a threat to his control of the Horde, Doomhammer led his
Wolfriders in a surprise attack against my Citadel near the ruins of Stormwind Keep. The Warlocks,
caught unprepared by Orgrim’s assault, held off the Horde as long as their magiks would last. Having
no time to rest or replenish their energies, the Warlocks fell before the wrath of Orgrim. In the end, the
Doomhammer was victorious. Any surviving Warlocks were branded as traitors to the Horde. The
public executions were effective in weakening my position and strengthening his…
I was taken before Orgrim and questioned at length about my involvement with the Shadow Council.
Being greatly weakened by the backlash of Medivh’s death as well as the energies I had expended
during the battle, I found that I was in no position to either threaten nor harm the War Chief. Orgrim
made it clear to me that the Horde was under his control, and that he was not as easily swayed as his
predecessor. The gleam in his eye and the steel at his side bespoke his intentions, but I would not be
defeated so easily. While he may have held the upper hand, I reminded him that with the death of the
Warlocks, I was the last true sorcerer within the Horde. Orgrim, made impudent by his victory, agreed
that perhaps I could prove useful, and agreed to let me live - by his good graces. I silently vowed that
he would one day take those words to his grave.
Although his suspicions of me were never fully assuaged, I did succeed in
convincing the War Chief that the Raiders were preparing to unite
with the sons of Blackhand in a revolt against him. Although this
claim was untrue, Orgrim was already suspicious of Rend and
Maim and so disbanded the multitude of Wolfriders, sending
them into the various arms of the Grunt forces. To
demonstrate my ‘loyalty’ to Orgrim and the Horde, I
promised to create a host of undead riders that would
be completely loyal to him alone. Although the
Doomhammer did not fully trust me, the idea was
sufficiently appealing, and so I was allowed to
enter seclusion to create this new legion.
64
Gul’dan “submits” to
Doomhammer
Even with the aid of my Necrolytes, I was
unsuccessful in bringing forth this undead force.
Failure and weakness were all that these
minions could offer me, until I sensed that while
their spirits were willing - it was the flesh that
was weak. I summoned them to a great alter
constructed of Ironwood and Blackroot where,
at the height of a black incantation, I took the
lives of every last one of them. In the bloody
Page 65

wake of their executions, the Necrolytes would then, at last, nourish my creation of the ultimate
undead servant.
Using what few resources I still controlled within the Horde, I acquired many of the long-dead corpses
of the fallen Knights of Azeroth. Into these twisted and decayed forms I instilled the essences of the
greater members of the Shadow Council who were quite willing to return to the mortal plane to wreak
terror and havok once again. I furnished each of the dark riders a jeweled truncheon through which
they could better focus the unearthly powers they would brandish. Into these jewels were infused the
raw, necromantic magiks of the freshly slain Necrolytes. Thus were the Death Knights born.
Orgrim Doomhammer was pleased with these Knights of Death. Although the spirits of the Shadow
Council remained loyal to me, they feigned allegiance to the War Chief. Orgrim was well satisfied with
the realization of my promise, and allowed me to go about my own affairs.
I will be patient and bide my time, pretending to be the faithful servant until the time comes to show
this presumptuous, boisterous upstart who is greater between us. My designs to discover the Tomb of
Sargeras still remain. I have assembled the Stormreaver clan to be my support when the season finally
comes to strike back at Orgrim for his insolent crimes against me…
That day draws near - and Doomhammer cannot know what terrors await him,
for I am Gul’dan…
I am darkness incarnate.
I will not be denied.
Blizzard Entertainment
65
Page 66

Clans of the Horde
Blackrock Clan
Chieftain: Orgrim Doomhammer
Clan Colors: Red
Background: Although years of war have
reduced their numbers, the Blackrock clan remains
the strongest within the Horde. Ruled for many years
by Blackhand the Destroyer, the Blackrock clan rose quickly
in power and was responsible for numberless victories against
the Humans in the First War. Orgrim Doomhammer - known
also as the Backstabber - assassinated the ruthless, but
careless Blackhand, and named himself clan chieftain and
War Chief of the Horde. The Blackrock clan continues to
dictate the course of the war intimidating the lesser clans
within the Horde into following Orgrim’s lead. The forces of the
Blackrock clan are fanatically loyal to the Doomhammer and will
serve him with their lives.
Domain: Blackrock Spire, Azeroth
Stormreaver Clan
Chieftain: Gul’dan the Warlock
Clan Colors: Blue
Background: The Stormreavers are a small but powerful
clan whose origins are fixed in the history of the Horde since
its coming to Azeroth. As the last of his kind, the Warlock
Gul’dan maintains absolute control over this clan. Gul’dan,
who secretly ruled the Horde through his unwitting puppet
Blackhand, has found that the shrewd Doomhammer harbors
no trust or fondness for him. This forced Gul’dan to found
the Stormreavers in order to protect himself from any action
Orgrim might take against him. With the support of his clan,
Gul’dan intends to find the lost Tomb of the Daemonlord Sargeras. It
is legend that this Tomb contains unimaginable power - power which
Gul’dan means to possess.
Domain: Stormwind, Azeroth and Balor, Azeroth
66
Page 67

Twilight’s Hammer Clan
Chieftain: Cho’gall the Ogre-Mage
Clan Colors: Violet
Background: Obsessed with the notion that the Horde is the
harbinger of apocalyptic doom to all the lands that it ravages, the
Twilight’s Hammer feels a sacrosanct gratification in the destruction
of all that it encounters. Led by the cunning Ogre Mage Cho’gall,
the Twilight’s Hammer has strong ties to Gul’dan and the
Stormreaver clan. Its loyalty to the Horde is not as strong as its
belief in its sacred mission of oblivion.
Domain: Northshire, Azeroth
The Black Tooth Grin Clan
Chieftain: Rend and Maim, the sons of Blackhand
Clan Colors: Black
Background: The Black Tooth Grin clan was originally part
of the Blackrock clan, but splintered off before the Horde’s passing
into Azeroth. After their father was deposed from his position as
War Chief by Orgrim Doomhammer, Rend and Maim decided to
gain control over their own faction within the Horde without
directly opposing the Doomhammer’s ascension to power. The
Black Tooth Grin, noted for its custom of each member knocking
out one of his own teeth to symbolize his loyalty to the clan, is
charged with the protection and preservation of the dreaded
Portal. The unity of The Black Tooth Grin may be sorely tested
should the opportunity arise for Rend and Maim to reclaim their
father’s station and avenge his death.
Domain: The Black Morass, Azeroth
Bleeding Hollow Clan
Chieftain: Kilrogg Deadeye
Clan Colors: Green
Background: The Bleeding Hollow clan was one of the largest
in the Horde before passing into Azeroth. Led by the aged Kilrogg, the
Bleeding Hollow embodies the unrelenting savagery required for many
long years of successful Orcish warfare. In accordance with their
unequaled performance in battle, they have been given the honor of
Blizzard Entertainment
67
Page 68

safeguarding the refinement operations in the occupied lands of Khaz
Modan. Allegiant to the Blackrock clan, these veteran warriors place
the needs of the Horde above all else.
Domain: Ironforge, Khaz Modan
Dragonmaw Clan
Chieftain: Zuluhed the Whacked
Clan Colors: White
Background: Led by the Shaman Zuluhed, the Dragonmaw
clan is a small but elite faction within the Horde. With its legacy
dating back into the time before the Warlocks, the
Dragonmaw was quick to become one of Blackhand’s
strongest supporters in Azeroth. After his demise, the
Dragonmaw honored its fealty to Blackhand by pledging
itself into the service of his sons and The Black Tooth Grin.
Using ritualistic magiks dowered by the ancient Shaman, the
Dragonmaw clan was responsible for the capture of the
Dragon Queen Alexstraza and the Horde’s current subjugation
of the Dragons of Azeroth.
Domain: Grim Batol, Khaz Modan
Burning Blade
Chieftain: None
Clan Colors: Orange
Background: The Burning Blade is not a clan as much
as it is an elemental force of nature. Chaotic and
unpredictable, the Burning Blade is a brotherhood of demented
Orcs whose only objective is to raze and plunder with no
regard for their own safety. This leaderless swarm is held in
check by the Ogres - to be unleashed by the clans in times of
urgent duress. The Burning Blade holds loyalty to no one
and will attack any that they perceive to be a threat - even
their fellow Orcs.
Domain: Nomadic
68
Page 69

Ground Units of the Orcish Horde
Peon
The label of Peon denotes the lowest station amongst
those in the Orcish Horde. Inferior in all skills of import,
these dogs are relegated to menial tasks such as harvesting lumber
and mining gold. Their labor is also required for the construction
and maintenance of buildings necessary to support the vast
undertakings of the Horde. Downtrodden, the Orc Peons slave
thanklessly to please their overseers.
Grunt
Those Orcs who distinguish themselves enough in
the arts of war to be trained as Grunts epitomize
the merciless spirit of the Horde. Equipped with mighty axes
and battle-worn armor, they are prepared to fight to the
death. Devoted to the Horde and to their clans, the Grunt
lusts for battle - wanting nothing more than to wade into the
field of carnage and die a bloody death surrounded by the
bodies of his fallen enemies.
Troll Axethrower
The Trolls of Lordaeron have suffered ages of
attrition at the hands of the Humans, Dwarves,
and Elves. The appearance of the Orcish Horde has given
them the opportunity to ally themselves with kindred spirits
with whom they can seek revenge upon their many enemies.
More agile than the brutish Orcs, Trolls employ throwing
axes - along with a cunning attack and retreat stratagem
- to assail their foes. This combination of speed, range
and the ability to bring down threats from above makes
them a valuable addition to the Orcish Horde.
Blizzard Entertainment
69
Page 70

Troll Berserker
Berserkers are a bloodthirsty sect of Trolls
dedicated to the total annihilation of their hated
enemies, the Elves. Suffering numerous experiments with
strange chemicals and potions by the Goblin
Alchemists, the Berserkers have had many strange
abilities bestowed upon them that make them all
but unstoppable in the heat of battle. Berserkers
are hardier and stronger than most Trolls,
effectively transforming them into a veritable
whirling cyclone of death and destruction.
Ogre
The Ogres are the monstrous two-headed allies of the Orcs
that were brought through the Portal by the Warlock Gul’dan
after the First War to act as enforcers in an effort to quell needless
infighting between the Orc clans. Due to the constant bickering between
their two heads, Ogres exhibit less intelligence than even the lowly
Peons. Their incredible strength and unnatural toughness, however,
make them some of the fiercest warriors in the Horde.
70
Ogre-Mage
The Ogre-Magi were originally a small band of
extremely loyal Ogre enforcers, transformed by
Gul’dan into scheming and malicious sorcerers. By warping and
twisting the Elf-magiks of the Runestone at Caer Darrow, Gul’dan
was able to infuse the magical abilities of long dead Warlocks
into the bodies of these unsuspecting hosts. Once hulking
simpletons, the transformed Ogre-Magi can direct their
death magiks as easily as their lesser cousins would deliver
a crushing blow to any foolish enough to stand in their
path. The Ogre-Magi have also become extremely cunning
and insidious - serving the Horde only as they see fit.
Page 71

Catapult
Sharpened horns, crimson with blood of those
unfortunate enough to be caught in their path, herald
the advance of the Orcish Catapult. Approaching on
the battlefield, its grim visage is enough to make the weak
Human troops flee in stark terror. These cumbersome,
wheeled machines launch deadly incendiary shot which
explodes upon impact. The sheer destructive force of
these great engines of war make them feared and
respected throughout the land.
Death Knight
These soldiers of darkness were created by
Gul’dan to replace the slaughtered Warlock
clans. Assembled from the corpses of the
Knights of Azeroth slain in the last battles of the First War,
these abominations were then instilled with the ethereal
essence of the Shadow Council. Further empowered with
magical energies culled from the slain Necrolytes, the Death
Knights wield an arsenal of necromantic and elemental spells
that mete out all but certain death to the enemies of the
Horde.
Goblin Sappers
The mischievous Goblin Sappers are known
throughout the Horde for their incredible
aptitude for destruction. These diabolical Goblins are
invariably armed with extremely volatile explosives; which
enable them to level enemy structures and weapon
emplacements. Although the Sappers are highly
unpredictable and insubordinate, they have become
necessary to the plans of conquest maintained by the Horde.
Blizzard Entertainment
71
Page 72

Air Units of the Horde
Goblin Zeppelin
Zeppelins are ingenious inventions that allow
small teams of Goblins to soar above the
countryside and spy on enemy positions. The
Zeppelins are cumbersome, awkward and
maintain no armament. Their airborne
capabilities, extensive line of sight,
and ability to spot underwater
units (as with all flying units),
however, make them an
integral part of the Horde’s
spy network.
Dragon
Dragons are native to the untamed northlands of Azeroth. Reclusive by nature,
Dragons have had little contact with their earthbound neighbors over the
centuries. Rend and Maim, the Chieftains
of The Black Tooth Grin clan,
masterminded the capture of the
Dragon Queen Alexstraza by the
Dragonmaw clan. With their Queen
held captive, these majestic creatures
have been forced into subservience by
the Horde - her progeny being raised
by the Dragonmaw clan to slaughter the
enemies of the Horde.
72
By combining their incredible destructive
powers with a keen intellect, the Dragons
represent the single most powerful force
within the Horde. The devastating flame that
issues forth from the mouths of older serpents
can level any number of enemy troops, while
their powerful wings allow them to
tirelessly soar through the skies.
Page 73

Naval Units of the Horde
Oil Tanker
The Orc Oil Tanker is crudely constructed, as its purpose
is for bearing cargo - not weapons or troops. The Tanker,
being little more than a collection of wood, bone and storage space,
is crewed by a mob of Orcs scarcely more capable than the lowly
Peons. Other than being able to pilot the craft, the crew of the Tanker
performs tasks equivalent to those of a Peon - building Oil Platforms
and returning their cargo so that it may be processed and used as
the overseer chooses.
Troll Destroyer
The Troll Destroyers are swift, ill-visaged longboats
designed to cut through enemy armadas and deal
damage to enemy vessels and their flying support. The savage
Troll crewmen are eager to enter into combat against Alliance
ships of war and hungrily await any chance to stand mast to
mast against the Elven Destroyers.
Transport
Transports are huge, skeletal ships charged with ferrying
Horde troops across large bodies of water. Being slow
and bulky, Transports rely upon magical armor to repel enemy fire.
Although the Horde is known to defend their Transports with
Destroyers and Juggernaughts, some reckless crews will sail straight
into a naval engagement to deliver their troops to land.
Blizzard Entertainment
73
Page 74

Ogre Juggernaught
These gargantuan ships of war are the main
armament in the dark armada of the Horde.
Heavily armed and armored, the Juggernaughts are
veritable floating fortresses that constitute the greatest
implement of destruction within the Horde’s naval forces.
While not as swift as the Troll warships, these ruinous
craft have quickly come to be feared across the seas of
Azeroth for the unrelenting onslaught they render against
the Alliance.
Giant Turtle
These Giant sea Turtles are native to the southern
seas and were captured by the Stormreaver clan.
Pacified by potent spells of control, these lumbering
monstrosities are fitted with watertight canopies strapped onto
the backs of their shells and are used as submersible Orcish
craft. By submerging under the waves, the Giant Turtles can
steal upon unsuspecting enemy craft and report their position
to the Horde fleet as they are visible solely to Towers, creatures
of the air, and other submersible vessels. The daring Goblins
who control them are dedicated to destroying enemy ships by
launching hazardous, steam-driven canisters containing highly
volatile liquids that can shred even the strongest of armor.
74
Page 75

Ogre-Mage Spells
Eye of Kilrogg
The Ogre-Mage creates a free-floating apparition in the form of a disembodied
Eye that he can then direct through the air to look down upon enemy forces and
encampments. Named for the great leader of the Bleeding Hollow clan, this ever vigilant Eye
transmits its view to the caster, giving him the knowledge of both the lands it wanders and
those creatures who live there. The Eye will vanish after a time, leaving the Ogre-Mage with
the knowledge of the terrain.
Bloodlust
This enchantment is used to instill an insatiable lust for blood into a fellow warrior,
causing him to enter into a savage, berserk rage. A fighter who feels this Bloodlust
deals more damage to his opponents than normally could be done. Although this spell bestows
no permanent effects upon one so enchanted, it has been known to push an already bloodthirsty
Orc over the edge…
Runes
The casting of ancient and powerful Runes enables the Ogre-Mage to lay an
abstruse trap for those hapless enough to enter into it. When these Runes explode,
they cause massive damage to anyone standing over them as well as all those in adjacent
areas. Those who are diligent and watchful will catch a glimpse of the Rune as they approach
it. The chaotic forces that make up this enchantment can not discern between ally or enemy
and will kill a friend as surely as a foe. Heed these warnings well, as even staying near these
Runes can be hazardous - for when the dwoemer dissolves, they explode as if their magiks
had been triggered.
Blizzard Entertainment
75
Page 76

Death Knight Spells
Touch of Darkness
By enveloping their truncheons with the dark essence of Hel, the Death Knights
are able to deplete vital energies from those they lash out against. Their ability to
discharge this energy over short distances makes this a menacing attack. Although the effects
of this spell are abhorrent to the living, the Touch of Darkness is a but a lesser enchantment
within the arsenal of these vile horsemen.
Death Coil
Death Coil is a particularly potent variation of the Touch of Darkness spell. By
channeling the necromantic powers of the underworld through his ghoulish form,
the Death Knight creates a field of dark energy that drains the life-force from any who come
in contact with it. This life-force is then consumed - thereby replenishing the strength of one
so enchanted, be he friend or foe. The icy embrace of death can be beneficial…for those who
know how to control it.
Haste
By magically increasing the speed at which a body generates vital energy, the
caster may bestow great speed to any being. All actions taken by one so enchanted
are swifter than a common adversary - an advantage that is evident on the battlefield. The
effects of Haste can persist for but a short time.
Unholy Armor
This ancient Necromantic spell transforms a portion of the recipient’s life force
into an unearthly, phantasmal suit of armor. This spectral armor then absorbs
the damage from any attack directed at its wearer for a limited amount of time. As the magiks
that link this armor to its host cease, so will the invulnerability that it grants.
76
Page 77

Death and Decay
The aphotic, swirling clouds
conjured by the Death
Knights can cause anything within
their path to rot and decompose.
The vapor created by Decay
can consume anything flesh, bone, wood or even
the strongest metal.
Heavily laden with
base substances, these
clouds descend and
quickly diffuse,
leaving only
suffering in
their wake.
Whirlwind
This focusing of the winds of the underworld causes any caught within
to be cast about with great force and violence. Bones are easily shattered and
mainsails are quickly snapped within the torrents of these fierce winds. The howl of these
winds allow no commands to be issued to those trapped within the Whirlwind, rendering
those unfortunates helpless until the magiks fade.
Raise Dead
This dark magik is the final legacy of the Orc Necrolytes who were destroyed
shortly after the First War. The Death Knight can animate corpses of the newly
dead and then command these monstrosities to attack their enemies. This terrifying spell is
the paramount power of the Death Knight as it serves to augment the Horde forces with vast
armies of the Undead.
Blizzard Entertainment
77
Page 78

Orc Buildings
Pig Farm
Farms provide the necessary raw foodstuffs to sustain both the slave labor force
and the war parties in the field. Without a sufficient food supply, new units cannot
be acquired. The staple diet of the Orcs - along with their kindred Troll and Ogre
brothers - is fresh meat. To satisfy this hunger for flesh, wild Boars are trapped and bred for
food. Readily abundant in most regions, they have become a bonfire favorite (along with a
tankard of Bloodmead) among the hardened troops engaged in a long war march.
Great Hall
This structure serves many purposes, such as being the gathering place
and command center, for most Orcish settlements. Unfit for battle, the
lowly Peons are trained here to perform the menial tasks of construction,
repair and harvesting. This is also where vital raw materials are gathered
to be processed and then distributed. The Great Hall is always a source
of fevered activity as the laboring Peons work to please their overseers.
When settlements achieve greater prosperity and require stronger
defenses, the Great Hall can be reinforced to become a Stronghold.
Barracks
The most highly honored structure in any Orcish community, the Barracks
maintains the necessary facilities to train Orc, Troll and Ogre troops for battle.
The clash of cold steel and the war cries of Troll Axethrowers can be heard
from dawn until dusk - serving as a constant reminder of the warlike mentality
of the Horde.
Troll Lumber Mill
Carved from the husk of an ancient Ironwood tree, the Troll Lumber Mill is a
vital part of the Horde’s lumber processing operation. The Trolls, having
lived in the forests of the far north for centuries, have devised a unique method
of harvesting. By treating a group of trees with a volatile alchemical solvent,
the Trolls can deaden and weaken large sections of wood. Though it is extremely
hazardous to Peon and earth alike, this site makes the process of cutting lumber more efficient.
Trolls have become quite adept at fashioning a special sort of throwing axe. The crafting and
use of this weapon is always being honed to perfection. Troll Berserkers frequent the Ironwood
trees to digest potions given to them by the Goblin Alchemists stationed there. These potions
enable them to throw their axes greater distances or sharpen their sight. It is also said that
the speed at which healing occurs is increased if the correct potion is ingested. This process
of regeneration is one of the most distinct and unbelievable powers of the Troll Berserkers.
78
Page 79

Blacksmith
The Orcs that live and work in the Blacksmith shops are veteran warriors
themselves. Understanding the value of strong steel, they are always developing
new techniques and methods to improve their weapons or upgrade the quality
of their armor. The steel that they forge is essential in the manufacture of the
devastating Catapult, and their skills also aid in the crafting of the strange
mechanical workings that are used to improve the accuracy and strength of these great
machines. Their expertise is often required for the construction of advanced structures.
Watch Tower
Rising high above the treeline, Watch Towers resemble
primitive huts laced with animal bones and giant tusks of
every kind. These insubstantial - but highly useful - lookout posts are ideal for spotting the cowardly and deceitful
Human forces from above, making them a desired part of any Orcish settlement’s defenses.
These emplacements may be upgraded to loose deadly projectiles upon any approaching
enemies, or to rain explosive death down upon their foes on land and sea..
Watch Guard
Cannon
Shipyard
Although a haphazard collection of stone, mortar and cheap lumber, the
shabby Orc Shipyard is perhaps the most important structure in the Hordes’
war effort. As the construction site for Warships, Transports and Tankers,
Shipyards serve as a vital link between the scattered clans across Lordaeron.
These sites also have crude processing facilities, enabling Tankers to deliver
shipments of oil to them. The Shipyards are manned by procrastinating, slovenly Orcs who
somehow manage to keep production and maintenance on schedule.
Foundry
Known by the trio of towering smokestacks that surround this structure,
the Foundry is instrumental in creating the massive armor plates and lethal
cannons that are found on the greatest of the Orc warships - the
Juggernaught. Abysmally dark and sweltering with unnatural heat, Foundries
are filled with an acrid layer of smoke and soot - making most Orcs feel
right at home when visiting one. Heat emanates from all openings as Foundry
workers pour molten slag into casts for new cannons, while pounding resounds for miles
along the coast as they shape ore into new armor.
Blizzard Entertainment
79
Page 80

Oil Refinery
The Oil Refinery uses the large, arching pipelines on either side of the main
structure to pump oil from the Tankers into its processing holds. Built on the
rim of the sea, Refineries are constantly threatened by attacks from waterborne
vessels. As a Refinery allows oil to be processed much more efficiently, the
sight of warships deployed for the defense of these structures is a common one.
Stronghold
The massive, jagged spires of the Orc Stronghold are a constant reminder
to the Horde of their power and dominance. As the center of larger Orcish
settlements, the Stronghold can process resources in the same fashion as
a Great Hall - and the overseer can induce the production of more gold
from the pitiful worms under his command. These intimidating structures
of steel and stone use techniques in their construction that serve as strong
barriers, greatly reducing the damage inflicted by attacking forces. Convinced
of their innate superiority as warriors, Troll Berserkers and Ogres will only act under the
direction of an overseer who has proven himself capable enough to establish a Stronghold.
As need and resources dictate, a Stronghold can be reinforced and refitted as a Fortress.
Ogre Mound
After being trained in the rudiments of combat at the Barracks, Ogres
congregate at these crude, stone huts to enhance their endurance, strength
and speed. These two-headed titans increase their great strength by engaging
in contests which involve the hurling and crushing of giant rocks. This serves
to increase their already formidable strength and resilience - and those that
do escape the pounding delivered by their brethren find themselves the quicker for it. Even
the half-witted Peons dare not come near this place, for stray boulders tend to find the heads
of inattentive visitors.
Altar of Storms
Carved from the Runestone at Caer Darrow, the Altar of Storms channels
dark and arcane energies through the bronze figures that tower above it to
pervert the innate Elven magiks of the Runestone. These energies, lost
when the Orc Warlocks were destroyed by the Doomhammer, are now used
to create the powers of the Ogre-Magi. It is here that the Ogre-Magi are
imbued with new spells and skills to aid them in their fight against the
Alliance. The Altars are avoided by the rest of the Horde as the intense
energies that emanate from their cold surfaces can be… unhealthy.
80
Page 81

Goblin Alchemist
The maniacal and brilliant Goblin Alchemists are masters of volatile chemicals,
explosives, and strange mechanical devices. Having constructed Zeppelins
to soar above the battlefield, as well as inventing watertight pilot-shacks for
use on the enslaved race of giant Sea Turtles, the Goblins have defied the
very laws of nature. They also create the devastating explosives used by
their cousins, the Goblin Sappers. The Alchemists take a peculiar delight in these intellectual
endeavors that few understand, but all in the Horde respect the havoc that they produce.
Temple of the Damned
Temples of the Damned - called Grombolar, or bowels of the giant in the
Orcish tongue - are the cabalistic dwellings of the dead. Created by Gul’dan
to house his blasphemous Death Knights, the Temples were formed from
petrified carcasses of the race of giants that inhabited the Orcish homeworld.
The subterranean labyrinth of the Temple contains the fetid halls where the
Death Knights dwell and study their depraved necromancy on fallen warriors
reaped from the battlefields above.
Dragon Roost
Mighty chains of adamantine steel bind the most powerful creature in all of
Azeroth - Alexstrasza the Dragon Queen. Captured and ensorcelled by
magiks contrived by the Dragonmaw clan, the great Dragon is kept in a
constant state of weakness and pain. As the unwilling slave of the Horde,
the Queen is closely watched as she lays her precious eggs. The Dragonmaw
clan then raises her young to fight for the Horde - slaying the whelps when
they become too powerful to be properly controlled. Constant efforts are
made to break Alexstrasza’s will in an attempt to master the control of more
mature dragons.
Fortress
As the military and economic center of the largest Orc cities, the Fortress
can hold and process all the gold and lumber that the Peons can be
made to harvest. Protected by obsidian spires shaped from the earth
itself, the Fortress is all but impervious to the attacks of the feeble
Human forces. Constructed by Orcish leaders attaining arrant mastery
both on and off the field of battle, the Fortress serves as a proclamation
to the Alliance of the inevitable triumph of the Orcish Horde.
Blizzard Entertainment
81
Page 82

Orc Unit Dependencies
Ground Units Air Units
Peon Great Hall
Grunt Barracks
Tro l l
Axethrower
Tro l l
Berserker
Catapult Barracks Lumber Mill Blacksmith
Ogre Barracks Blacksmith
Barracks Lumber Mill
Barracks Lumber Mill Upgrade at
Stronghold
Ogre
Mound
Zeppelin
Dragon Dragon
Goblin
Alchemist
Roost
Naval Units
Oil Tanker Shipyard
Destroyer
Lumber Mill
Shipyard
Ogre-Mage Barracks Blacksmith Ogre
Goblin
Sappers
Mage Temple of the Damned
Goblin
Alchemist
Mound
82
Upgrade at
Altar of Storms
Transport Foundry
Juggernaught
Giant Turtle Goblin
Shipyard
Shipyard
Shipyard
Foundry
Alchemist
Page 83

Orc Building Dependencies
Great Hall
Barracks
Pig Farm
Blacksmith
Scout
Tow e r
Required for
Barracks
Stronghold
Upgrade
Stronghold
Required for
Lumber Mill Blacksmith Ogre Mound
Castle Upgrade
Ogre
Mound
Alchemist
Cannon
Tow e r
Fortress
Altar of
Storms
Dragon
Roost
Temple of
the Damned
Lumber Mill
Wall
Guard
Tow e r
Shipyard
Oil Refinery
Foundry
Blizzard Entertainment
83
Page 84

The Aftermath of the Second War
84
Page 85

or long months the forces of the Alliance worked to seek out the renegade
Orcs that had gone into hiding after the fall of the Dark Portal. The Blackrock,
Dragonmaw, and Black Tooth Grin clans were captured by the Alliance and
herded into guarded reserves and prison camps. While the leaders of the
Alliance argued over what was to be done with them, Orgrim Doomhammer,
the Warchief of the Horde, was placed under arrest and kept as an honored prisoner under
the care of King Terenas of Lordaeron. Some members of the Alliance pleaded that the Orcs
should be exterminated like animals, while others opted for a sentence of life imprisonment.
Having discussed the obvious benefits of a treaty with Doomhammer, King Terenas fervently
hoped that the Orcs could be kept pacified long enough to eventually lose their lust for
conquest. Thoras Trollbane of Stromgarde and Genn Greymane of Gilneas both disagreed
vehemently with Terenas, resolving that the Orcs were too great a threat to leave alive.
After months of debate and frustration, both leaders withdrew the support of their nations
from the Alliance. Azeroth alone stood fast in its commitment to the Alliance. Even with
the dynamic young Varien Wrynn seated upon Azeroth’s throne, the distance between the
kingdoms of Azeroth and Lordaeron made their union a hollow one.
Amid the strife that was slowly dissolving the great Alliance, the fact remained that the
once vast numbers of the Horde were no more. The Twilight’s Hammer and Stormreaver
clans were decimated by their own brethren in civil wars that erupted during the War. The
Burning Blade clan was routed and ultimately destroyed by troops under the command of
Uther Lightbringer during the Final Battle at the Portal. Only the Bleeding Hollow clan was
left unaccounted for as the cunning Kilrogg Deadeye managed to evade the best
efforts of the Alliance to capture his clan. Elven scouts
were placed on continual patrol within the Black
Morass searching for any sign of the renegade
Bleeding Hollow.
Blizzard Entertainment
• • •
Suspended ominously above the Black
Morass, a tear in the fabric of reality
hung like a disembodied eye, keeping
watch over the ruins of the Dark Portal.
This rift was the remnants of the
twisted wizard Medivh’s original Portal
into Draenor - the dark, red world
85
Page 86

from which the Orcs passed into Azeroth. The Kirin Tor of Dalaran traveled to the lands
overlooking the ruins on this site and constructed the Citadel of Nethergarde to serve as
guardian should the rift ever open again....
On the Eve of Summer in the year 606, a freak darkness swept across of the Black Morass.
All attempts by the mages at Nethergarde to probe into the darkness were futile, but they
could sense that the rift was growing once more. Then, as if from a dream, the mages
heard the sounds of a marching army. Hundreds strong, the sounds of armor and sword
charged through the ruined portal and then as quickly fell silent. The thunderous shrieks
of Dragons crying to the skies passed overhead, and then as suddenly disappeared into the
gloom. Venemous undead whispers, barely audible under the clash of metal plates seemed
to echo and repeat one phrase - “We will return…”
When the darkness lifted, the portal was visible once again. It illuminated the ruins as it
always had, but the eerie light seemed to play tricks with the shadows. It was only upon
closer inspection that the trampled mud that marked the passing of the Bleeding Hollow
clan from Azeroth was found to be more than mere illusion.
• • •
The Bleeding Hollow crossed over into Draenor and
rejoined the ‘old clans’ that had never seen the
fields of Azeroth. To many, the warriors of
the Bleeding Hollow were considered
mighty heroes as these Orcs had been
living in the Human lands for over thirty
years. Kilrogg met with the Elder Shaman
Ner’zhul who now controlled the
remaining clans in Draenor. The Shaman
ordered that the newly arrived Death
Knights, Trolls and Dragons were to be used
by all of the clans in conjuncture. Ner’zhul
also informed Kilrogg of his plan to retrieve
certain artifacts from Azeroth as to open rifts
into other worlds and take the Orcish Hordes
to great victories beyond the Dark Portal...
Kilrogg leads the
remnants of his clan
through the Portal
86
Warcraft II: Battle.net Edition
Page 87

Legends of the Land (Draenor)
The Alliance
KHADGAR
Khadgar became a great hero in recognition for his valiant service and advice to
the kingdom of Azeroth during the First War. On a quest to fathom the awesome
magiks required to create the Dark Portal, Khadgar traveled to Dalaran to discuss
the origins of the gateway with the mysterious Kirin Tor. Khadgar then returned to Azeroth
following the Second War to oversee the ongoing study of the ruined Portal.
ALLERIA
The elusive Elven Ranger known as Alleria learned of the devastation the Horde
could bring as she searched for the remains of her family amongst the ashes of
the once glorious Quel’thalas. Her all-consuming hatred for the Orcs led her to
Azeroth where she leads an elite cadre of Rangers to hunt down the remaining Orc renegades
of the Bleeding Hollow clan.
DANATH
A veteran mercenary captain in the Stromgarde militia and hero of the Second
War, Danath made a name for himself as a great leader during the final battle for
the liberation of Khaz Modan. Danath now resides at New Stormwind in Azeroth
and acts as a Overseer of the camps that hold the Orc captives.
TURALYON
Turalyon was one of the first Knights of Lordaeron to be trained as a Paladin by
Uther Lightbringer. Although Turalyon is a firm believer that order can be
maintained only through extreme martial discipline, he is honored by his friends
and foes alike. Turalyon was among the forces that Lord Lothar led into ambush at Blackrock
Spire, and secretly harbors a deep regret of his inability to save the great Knight.
KURDRAN
The proud and belligerent dwarf Kurdran is one of the more notorious heroes of
the Second War. Having slain nine Dragons throughout the course of the war,
Kurdran and his Gryphon Sky’rie retain the reputation as being undisputed masters
of the skies. Kurdran works for the Alliance forces in Azeroth as a scout and warrior to this
day.
Blizzard Entertainment
87
Page 88

The Horde
Grom Hellscream
The mighty Chieftain of the Warsong clan is as ferocious as his battle cry.
Hellscream has long waited to venture into Azeroth and prove the dominance of
the Warsong clan on the field of battle. Although Grom distrusts the shaman Ner’zhul, he
will lead his clan screaming onto the fields of bloody death.
Kargath Bladefist
A razor-sharp scythe setting in place of his severed left hand, Kargath is always
willing to engage in frenzied combat. His ruthless tactics and single-mindedness
have earned him the Chieftainship of the feared Shattered Hand clan. Like Hellscream, Kargath
waits only for the time his clan is unleashed upon the unsuspecting humans to engage in
massive bloodshed.
Teron Gorefiend
The ancient Orc spirit of Gorefiend writhes within the decaying body of this fallen
Knight of Azeroth. Malicious and extremely cunning, Gorefiend desires to open
his own Portal from Draenor and claim a world for his own. Although the wretched Death
Knight has discerned the true magikal nature of the Dark Portal, he would share that knowledge with Ner’zhul for a price.
Dentarg
The Ogre Mage Dentarg is a valued servant of Ner’zhul and the Shadow Moon
clan. Dentarg is often called upon to rally support from wayward clans and put
them back in line should they oppose Ner’zhul’s absolute rule.
Deathwing
Second in power to only Alexstrasza herself, Deathwing is one of the greatest
terrors of the known world.
During the Second War, Goblin alchemists adhered plates of adamantine steel to the Black
Dragon. This made the great beast virtually invulnerable to almost any physical attack.
Deathwing has taken control of a group of renegade Dragons and roosts with them upon his
mountain in the Northeast of Draenor.
88
Warcraft II: Battle.net Edition
Page 89

Clans of Draenor
Shadow Moon Clan
Leader: Ner’zhul the Shaman
Color: Black
The nefarious Shadow Moon clan rules over the scattered clans of Draenor.
Although the clans Draenor do not maintain the unity of the Horde in
Azeroth, Ner’zhul keeps these houses subjugated through fear and brute
force. The Shadow Moon is heavily influenced by ancient shamanistic
principles and exemplifies the raw power of the dark Orcish magiks.
Warsong Clan
Leader: Grom Hellscream
Color: Red
Ripping into every combat crying epic battle-hymns of blood and death,
the Warsong clan is the most distinguishable of the Draenor clans. Led by
the ravenous Grom Hellscream, the Warsong clan awaits Ner’zhul’s order
to invade Azeroth and bathe in the blood of their enemies.
Shattered Hand Clan
Leader: Korgath Bladefist
Color: White
As those of the Black Tooth Grin clan, the members of the Shattered Hand
practice the rituals of self mutilation to demonstrate their loyalty to the
clan. Orcs who rise to the status of warrior within the clan offer their left
hands to be broken or completely removed. Their ruined stumps are often
replaced by some sort of crude weapon or tool.
Bleeding Hollow Clan
Leader: Kilroggg Deadeye
Color: Orange
This clan has achieved legendary status for battling the forces of Azeroth
throughout both the First and Second Wars. Kilroggg was able to avoid
capture by the Alliance after the defeat of the Horde in the Second War,
and with the help of Ner’zhul was able to lead his clan back to the safety
of Draenor. The Bleeding Hollow now serves Ner’zhul and will stop at
nothing to bring his dark plans to fruition.
Blizzard Entertainment
89
Page 90

Thunderlord Clan
Leader: Fenris the Hunter
Color: Violet
The Thunderlord clan has strong ties to both the Blackrock and Lightning’s
Blade clans. Orgrim Doomhammer, former Warchief of the Horde in Azeroth,
rose to power through the Thunderlord clan. Fenris, captain of the remaining
Wolfriders and Chieftain of the Thunderlords is eager to lead his clan to
glorious battle in the human lands.
Laughing Skull Clan
Leader: Mogor the Ogre
Color: Yellow
The morose Laughing Skull is perhaps the most treacherous of all the
clans. Feeling a kinship to thievery and assassination, the warriors of
the Laughing Skull are distrusted by many of their fellow Orcs. Although
the loyalty of those in the Laughing Skull are questionable, the skill and
audacity of their minions are unequaled.
Bonechewer Clan
Leader: Tagar Spinebreaker
Color: Green
The ravaging, cannibalistic warriors of the Bonechewer clan are well
respected by the rest of the Horde. Ornamenting themselves with the
broken bones and ruined organs of their enemies, the Bonechewers inspire
fear and terror in all who behold them in battle.
90
Page 91

Blizzard Entertainment
91
Page 92

Warcraft II: Battle.net
Edition Credits
Executive Producer
Mike Morhaime
Producer
Bill Roper
Lead Programmer
Brian Fitzgerald
Programming
Dave Lawrence, Tony Tribelli, John Stiles
Battle.net Programming
Pat Wyatt
Artwork
Peter Underwood, Samwise Didier
Audio Production & Sound Design
Tracy Bush, Glenn Stafford
Level Editing
Scott Mercer, Dave Hale
Level Design
Eric Dodds, Joe Frayne, Dave Fried, Carlos
Guerrero, Jason Hutchins, John Lagrave, Matt
Morris, Mike Murphy, Derek Simmons, Ian Welke
PUD Strike Team
Rob Pardo, Scott Mercer, Geoff Fraizer , Dave
Hale, Matt Morris, Derek Simmons, Bill Roper
Cinematic Technical Artist
Joeyray Hall
Manual Update & Layout
Peter Underwood
Quality Assurance Manager
Chris Sigaty
Assistant QA Managers
Ian Welke, John Lagrave
QA Project Lead
Derek Simmons
Assistant Lead/ Macintosh Lead
Joe Frayne
QA Team Leads
Dave Fried (Macintosh), Roger Eberhart
(Campaigns), Matt Morris (Battle.net Edition
.PUDs)
QA Analysts
Brian “Doc” Love, Jason Hutchins, Mike Murphy,
Mark Moser, Justin Parker, Toshiaki Yamazaki,
Carlos Guerrero, Christian Arretche
Additional Testers
Yong Kim, Erik Larsen, Ryan Creasey, Ed Kang,
Stephen Wong, Bo Bell, Les Douglas
Hardware Specialists
Vic Larson, Mike Hale, Brandon Riseling
Additional Testing
Yong Kim, Erik Larsen, Stephen Wong, Ryan
Creasey, Ed Kang, Bo Bell, Les Douglas
Director of Support Services
Robert Bridenbecker
Assistant Technical Support Managers
Twain Martin, John Schwartz
Technical Support
Michael Barken, Thor Biafore, Daniel Choe, John
Hsieh, Kevin Jordan, Jason Schmit
Online Support
Mark Downie, Alen Lapidis, Pat Nagle, David
Nguyen, Collin Smith, Mick Yanko
Director of Operations
Isaac Matarasso
Information Systems
Adrian Luff, Kirk Mahony, Hung Nguyen
Windows 95/98/NT Dunsel Compatibility
Alan Dabiri
Public Relations
Susan Wooley, Tony Gervase
Business Development
Paul W. Sams, Melissa Edwards
Legal Counsel
Paula V. Duffy, Eric Roeder, Kevin Crook, Mark
Reichenthal
Marketing
Steve Huot, Neal Hubbard, Kathy Carter, Jessica
Monson, Steve Parker, Mike Bannon, Jeff
Chenault, Neal Johnson
U.S. Sales
Todd “Little Buddy” Coyle, Danny Kearns
International Sales
Ralph Becker, Christophe Ramboz, Jean-Daniel
Pages
Direct Sales
Rob Beatie, Kim Farrington
Manufacturing
Bob Wharton, Tom Bryan, Jill Rankin
Battle.net Hosting Partners
MindSpring, Exodus, Dacom, Pacific Internet,
Multiplay
92
Page 93

Warcraft II: Beyond the
Dark Portal Credits
Cyberlore Studios
Programming
Ken Grey
Executive Producer
Lester Humphreys
Campaign Design
Jim DuBois, Jesse King, Joe Minton
PUD Design
Jim DuBois, Jesse King, Rob Caswell, Joe Minton
Additional Design
Rob Caswell, Pete Lawson
Art Direction
Seth Spaulding
3D Art
Seth Spaulding, Pete Lawson
2D Art
Rob Caswell, Seth Spaulding, Keith Kellogg, Pete
Lawson
Playtesting
Jesse King, Jim DuBois, Rendall Koski, Pete
Lawson, Dmitri Nishman
Music and SFX
Glenn Stafford
Narration
Bill Roper
Character Voices
Bill Roper, Glenn Stafford, Chris Metzen, Ron
Millar, Kim Farrington, Rachel Hawley, Dawn
Caddel
Manual Design and Layout
Robert Djordjevich
Manual Artwork
Chris Metzen, Samwise Didier, Eric Flannum,
Brian Sousa, Justin Thavirat
Director of Support Services
Shane Dabiri
Lead Tester
Walter Takata
QA Assault Team
David “Deltree” Hale, John Schwartz, Tymothi
Loving, Chris Millar, Russell Miller, Adam
Maxwell, James Phinney
Dunsel
Frank Pearce
Assistant to Mr. Pearce
Alan Dabiri
Blizzard Entertainment
Executive Producer
Bill Roper
Design Consultant
Ron Millar
Storyline Consultant
Chris Metzen, Bill Roper
2D Art Direction
Samwise Didier
Additional 2D Artwork
Samwise Didier, Roman Kenney
3D Art Direction
Duane Stinnett
Additional 3D Artwork
Trevor Jacobs, Matt Samia, Justin Thavirat
93
Page 94

Warcraft II: Tides of
Darkness Credits
Game Design
Blizzard Entertainment
Producers
Michael Morhaime, Samwise Didier, Patrick
Wyatt, Bill Roper
Executive Producers
Allen Adham
Senior Designer
Ron Millar
Story & Design
Chris Metzen
Programming
Michael Morhaime, Patrick Wyatt, Jesse
McReynolds, Frank Pearce, Bob Fitch, Brian
Fitzgerald, David Lawrence, Tony Tribelli, Ron Meyer
Scenario Editor Programming
Tim Thein
Installer Programming
Andy Weir
Autoplay Programming
Mike O’Brien
3D Artwork
Duane Stinnett, Justin Thavirat, Trevor Jacobs,
Joeyray Hall, Matt Samia, Nick Carpenter, Micky
Neilson, Brian Sousa, Dave Berggren, Roman
Kenney
Artwork
Samwise Didier, Dave Berggren, Nick Carpenter,
Roman Kenney, Micky Neilson, Brian Sousa, Chris
Metzen, Ron Millar, Justin Thavirat, Stu Rose
Audio Producer, Music Composition &
Sound Effects Design
Glenn Stafford
Speech
Bill Roper, Glenn Stafford, Chris Metzen, Ron
Millar, Tymothi Loving, Stu Rose
Scenario Design
Ron Millar, Chris Metzen
Scenario Layout
Eric Flannum, Ron Millar
Manual Design and Layout
Robert Djordjevich, Bill Roper, Chris Metzen, Ron
Millar, James Phinney, Jeffrey Vaughn
Manual Artwork
Chris Metzen, Samwise Didier, Eric Flannum,
Roman Kenney, Micky Neilson, Stuart Rose, Ron
Millar, Dave Berggren, Brian Sousa, Duane
Stinnett, Nick Carpenter, Trevor Jacobs, Collin
Murray,
Matt Samia, Justin Thavirat
Director of QA
Shane Dabiri
Lead Testers
Tymothi Loving, Brian “Doc” Love
Testers
Robert “Mephistopheles” Bridenbecker II, Kamran
Fotoohi, David “Big D” Hale, Vic Larson, Brian
“Doc” Love, Adam “Zar” Maxwell, Chris Millar,
Daniel Moore, Jorge Rivero, John Schwartz, James
Shipley, Walter Takata, Greg Autry, Brian Bishop,
Christopher Cross, Mike Givens, David “Deltree” Hale,
Adam Maxwell, Hung Nguyen, Brian Reed, Dean
Shipley, Chris Sigaty, Ian Welke, Jamie Wiggs, Perry
Youngworth
Technical Assistance
Alan Dabiri
Office Manager
Christina Cade
Public Relations
Linda Duttenhaver, Susan Wooley
Marketing
John Patrick, Steve Huot, Kathy Carter, Mark
Polcyn
International Sales
Ralph Becker, Florian Mueller, Chris Yoshimura
U.S. Sales
Todd Coyle
Manufacturing
John Goodman, Tom Bryan
Thanks To
Scoop, Annie Liu, Jeff Kyser, Rhonda Michelle, Ed
Ka-Spel, caffeine (without which…), Sketchead
Sign, Rider, Big Daddy Ogre, Salty Dog and the
Anvil Chorus, Frazetta Woman Dar, Gretchen
Witte, Lisa Pearce, Samantha, Whiskers, Ted
Spellman, Aaron Daluiski, Sting, 1995 UCLA
Hoops, The Dallas Cowboys, Brazil 2001,
Elizabeth Millar, Tim and Prin, Carrie, Rich,
Shannon Reagan, Jabe and friends, The Poxy
Boggards, The King, Team Hamro, the mighty
Thor, Ray the Soda Guy, Brendan Allison,
Michaele S. Bialon, Brita and Ruth, Dunsel
Training Institute, Vladimir Pupfkin, Bunny and
Doug, Paul and Alinda, Paul and Renae, David
Jefferson, The S.F. 49’ers, The Letter M, Nine Inch
Nails, —surfing — James E. Anhalt III (can we
drive the Ferrari now?)
Very Special Thanks To
Bob and Jan Davidson
94
* Macintosh credits are italicized
Page 95

CUSTOMER SERVICES
Technical Support Tel: (0118) 920 9111
Fax: (0118) 987 5603
Lines open 24 hrs, 365 days a year, using our automated technical support attendant. This system includes
answers to all commonly posed questions and problems with our new and major titles. It is set up in a friendly and easy
to use menu system that you navigate through using a touch tone telephone. If the answer to your question is not in our
automated system, then you will be transferred to a technician between the hours of 9am and 5.30pm Monday to
Friday.
Here are some key-presses that will allow you to navigate through our automated attendant. Note that these are the standard
letter assignments that are given to UK telephones so if your phone has letters on the keypad, please use them instead:
2:
A, B, C3:D, E, F4:G, H, I5:J, K, L6:M, N, O7:P, R, S8:T, U, V9:W, X, Y0:Q, Z
Before you call our technical support lines, please check that you have read the Readme file included on the game disk
#1. You may well find a very quick answer to the problem that you are facing as these files contain answers to most
common problems. If the answer is not here, make sure you have precise details of any error message that you receive,
and details regarding the specifications of your computer before you call us, as this will help us in giving you a faster and
more efficient service.
If you would prefer to write to us, please send your mail to the following address:
HAVAS INTERACTIVE UK Ltd.
Customer Services / Mail Order / Tech Support Department
2 Beacontree Plaza
Gillette Way
Reading • Berkshire
RG2 0BS
United Kingdom
Hintline (UK callers only)
09068 660 660
24 hrs. Automated service requires a touch tone phone. Calls cost 50p/min. at all times. Max call length
7.5 minutes. Max call charge at £3.75 at all times.
95
Page 96

WARRANTY
Each company of the HAVAS INTERACTIVE group is named “HAVAS INTERACTIVE” in the paragraphs below:
Havas Interactive warrants for a period of ninety (90) days from the date of purchase that the software title contained in this package shall be free
from defects in material and workmanship. In the event that this software titles proves defective during that time period, Havas Interactive will provide the customer with a functionally equivalent disk upon receipt by Havas Interactive of proof of purchase and the defective product.
REPAIR, REPLACEMENT, OR REFUND AS PROVIDED IN THIS WARRANTY IS THE EXCLUSIVE REMEDY OF THE CONSUMER. CUC SHALL NOT BE LIABLE FOR
ANY INCIDENTAL OR CONSEQUENTIAL DAMAGES FOR BREACH OF ANY EXPRESS OR IMPLIED WARRANTY. EXCEPT TO THE EXTENT PROHIBITED BY APPLICABLE LAW, ANY IMPLIED WARRANTY OF MERCHANTABILITY OR FITNESS FOR A PARTICULAR PURPOSE ON THIS PRODUCT IS LIMITED IN DURATION
TO THE DURATION OF THIS WARRANTY.
Some countries do not allow the exclusion or limitation of incidental or consequential damages, or allow limitations on how long an implied warranty
lasts, so above limitations or exclusion may not apply to you.
COPYRIGHT NOTICE
The software title and the manual are copyrighted. All rights reserved. They may not, in whole or part, be copied, photocopied, reproduced, translated, or reduced to any electronic medium or machine-readable form without prior consent, in wirting, from Havas Interactive. The user of this product shall be entitled to use the product for his or her own use, any commercial use being excluded, but shall not be entitled to sell or transfer the reproductions of the software or manual to other parties in any way, nor to rent or lease the product to others without written permission of Havas Interactive.
96
 Loading...