

Page 1

WarBirds III
Draft
Manual
29th May 2002
Copyright © 2002
i
Entertainment Network
Page 2

Copyright Notice
Copyright © 2002 by iEntertainment Network. All rights reserved.
This manual and the
information. No one may give or sell copies of this manual or other works of
ment Network, to any person or institution, except as provided for by written agreement
with the copyright holder.
Disassembly, reverse compilation, and any other form of reverse engineering of the
WarBirds III
this program, in any media, for any reason, shall be guilty of copyright violation and
criminal liability as provided by law, and shall be subject to civil liability at the discretion
of the copyright holder.
program are unauthorized. Any person/persons reproducing any portion of
WarBirds III
program are copyrighted and contain proprietary
i
Entertain-
Questions or Problems
If you have difficulties with this game and cannot find the solution in this manual, you
can also obtain customer service online. We can be reached as follows:
Web site: http://www.ient.com/warbirds/
Email: wbtech@ient.com or wbaccounts@ient.com
Telephone: 919 678 8834 12 noon to 8pm Eastern Time on Friday or Saturday
i
Entertainment Network and the iEntertainment Network logo are trademarks of
i
Entertainment Network. All other companies or products mentioned herein are the
property of, and may be trademarks of their respective owners.
Page 3

Contents
Download & Installation 9
PC System Requirements . . . . . . . . . . . . . . . . . . . . . . . . . . . . . . . . .9
Macintosh System Requirements. . . . . . . . . . . . . . . . . . . . . . . . . . .10
Downloading & Installing . . . . . . . . . . . . . . . . . . . . . . . . . . . . . . . . .11
DirectX 8.1 . . . . . . . . . . . . . . . . . . . . . . . . . . . . . . . . . . . . . . . . . . . .11
Latest Drivers . . . . . . . . . . . . . . . . . . . . . . . . . . . . . . . . . . . . . . . . . .12
Preflight Selections 13
3D Device Selection . . . . . . . . . . . . . . . . . . . . . . . . . . . . . . . . . . . . .13
Setting Up your Game Controllers . . . . . . . . . . . . . . . . . . . . . . . . . .14
Changing the Game Controllers and Actions. . . . . . . . . . . . . . . .15
Selecting a Controller. . . . . . . . . . . . . . . . . . . . . . . . . . . . . . . . . .15
Centering the Joystick, Rudder and Throttle . . . . . . . . . . . . . . . .16
Calibrating your Game Controllers. . . . . . . . . . . . . . . . . . . . . . . .16
Flight & Offline Setup . . . . . . . . . . . . . . . . . . . . . . . . . . . . . . . . . . . .17
Sound Settings . . . . . . . . . . . . . . . . . . . . . . . . . . . . . . . . . . . . . . . . .20
Color Settings. . . . . . . . . . . . . . . . . . . . . . . . . . . . . . . . . . . . . . . . . .21
Video Settings . . . . . . . . . . . . . . . . . . . . . . . . . . . . . . . . . . . . . . . . .22
Stick Force . . . . . . . . . . . . . . . . . . . . . . . . . . . . . . . . . . . . . . . . . . . .23
Customizing the Input Mapper . . . . . . . . . . . . . . . . . . . . . . . . . . . . .24
Page 4

Contents WarBirds Manual
Flying Basics 25
Selecting an Aircraft or Ground Vehicle. . . . . . . . . . . . . . . . . . . . . .25
Selecting a Country & Field . . . . . . . . . . . . . . . . . . . . . . . . . . . . . . .26
Taking Off. . . . . . . . . . . . . . . . . . . . . . . . . . . . . . . . . . . . . . . . . . . . .27
Autopilot Settings. . . . . . . . . . . . . . . . . . . . . . . . . . . . . . . . . . . . . . .28
Views . . . . . . . . . . . . . . . . . . . . . . . . . . . . . . . . . . . . . . . . . . . . . . . .29
3D Cockpits . . . . . . . . . . . . . . . . . . . . . . . . . . . . . . . . . . . . . . . . .29
Changing Field of View . . . . . . . . . . . . . . . . . . . . . . . . . . . . . . . .29
Numpad Keys . . . . . . . . . . . . . . . . . . . . . . . . . . . . . . . . . . . . . . .29
Joystick Hat . . . . . . . . . . . . . . . . . . . . . . . . . . . . . . . . . . . . . . . . .30
Finding & Attacking Targets. . . . . . . . . . . . . . . . . . . . . . . . . . . . . . .30
Dogfighting. . . . . . . . . . . . . . . . . . . . . . . . . . . . . . . . . . . . . . . . . .30
Identifying Targets & Friendlies . . . . . . . . . . . . . . . . . . . . . . . . . .31
Landing . . . . . . . . . . . . . . . . . . . . . . . . . . . . . . . . . . . . . . . . . . . . . .31
Bailing . . . . . . . . . . . . . . . . . . . . . . . . . . . . . . . . . . . . . . . . . . . . . 32
Offline Missions 33
Offline Practice. . . . . . . . . . . . . . . . . . . . . . . . . . . . . . . . . . . . . . . . .36
Flying Online 39
Creating a WarBirds Account. . . . . . . . . . . . . . . . . . . . . . . . . . . . . .40
Alternative payment methods . . . . . . . . . . . . . . . . . . . . . . . . . . .40
Logging into an Arena . . . . . . . . . . . . . . . . . . . . . . . . . . . . . . . . . . .41
Private Arenas . . . . . . . . . . . . . . . . . . . . . . . . . . . . . . . . . . . . . . . . .42
Viewing the Activity around the Field. . . . . . . . . . . . . . . . . . . . . . . .43
Using the Radio 45
Message Display . . . . . . . . . . . . . . . . . . . . . . . . . . . . . . . . . . . . . . .45
Radio Tuning . . . . . . . . . . . . . . . . . . . . . . . . . . . . . . . . . . . . . . . . . .46
Transmitting a Message. . . . . . . . . . . . . . . . . . . . . . . . . . . . . . . . . .47
Receiving Messages . . . . . . . . . . . . . . . . . . . . . . . . . . . . . . . . . . . .47
Ignoring Other Players. . . . . . . . . . . . . . . . . . . . . . . . . . . . . . . . .47
Game Managers . . . . . . . . . . . . . . . . . . . . . . . . . . . . . . . . . . . . . . .48
Maneuvering 49
Control Surfaces . . . . . . . . . . . . . . . . . . . . . . . . . . . . . . . . . . . . . . .49
Trim . . . . . . . . . . . . . . . . . . . . . . . . . . . . . . . . . . . . . . . . . . . . . . . . . 50
Autotrim . . . . . . . . . . . . . . . . . . . . . . . . . . . . . . . . . . . . . . . . . . . .51
4
Page 5

WarBirds Manual Contents
Maneuvers . . . . . . . . . . . . . . . . . . . . . . . . . . . . . . . . . . . . . . . . . . . .51
Structural Limits . . . . . . . . . . . . . . . . . . . . . . . . . . . . . . . . . . . . . . . .55
Overspeeding. . . . . . . . . . . . . . . . . . . . . . . . . . . . . . . . . . . . . . . .55
Overstressing. . . . . . . . . . . . . . . . . . . . . . . . . . . . . . . . . . . . . . . .56
Spin Recovery . . . . . . . . . . . . . . . . . . . . . . . . . . . . . . . . . . . . . . . . .56
Engine Management . . . . . . . . . . . . . . . . . . . . . . . . . . . . . . . . . . . .57
Bombing & Gunnery 59
Bombing . . . . . . . . . . . . . . . . . . . . . . . . . . . . . . . . . . . . . . . . . . . . . .59
Executing a Bomb Run . . . . . . . . . . . . . . . . . . . . . . . . . . . . . . . .59
Gunnery . . . . . . . . . . . . . . . . . . . . . . . . . . . . . . . . . . . . . . . . . . . . . .61
Signing-On as a Gunner . . . . . . . . . . . . . . . . . . . . . . . . . . . . . . .61
Jumping Gunner Positions. . . . . . . . . . . . . . . . . . . . . . . . . . . . . .62
Artillery Spotting . . . . . . . . . . . . . . . . . . . . . . . . . . . . . . . . . . . . . . . .63
Firing Artillery . . . . . . . . . . . . . . . . . . . . . . . . . . . . . . . . . . . . . . . .63
Degrees of the Compass . . . . . . . . . . . . . . . . . . . . . . . . . . . . . . .63
Capturing Enemy Airfields & Towns . . . . . . . . . . . . . . . . . . . . . . . . .64
Ground Vehicles 67
Selecting a Ground Vehicle . . . . . . . . . . . . . . . . . . . . . . . . . . . . . . .67
Driving a Ground Vehicle . . . . . . . . . . . . . . . . . . . . . . . . . . . . . . . . .68
Manning a Gun. . . . . . . . . . . . . . . . . . . . . . . . . . . . . . . . . . . . . . .69
Destroying Targets with Paratroopers . . . . . . . . . . . . . . . . . . . . .69
Offline Ground Vehicle Practice . . . . . . . . . . . . . . . . . . . . . . . . . . . .70
Carrier Operations 71
Carrier Takeoffs . . . . . . . . . . . . . . . . . . . . . . . . . . . . . . . . . . . . . . . .71
Carrier Landings. . . . . . . . . . . . . . . . . . . . . . . . . . . . . . . . . . . . . . . .72
Manning a Gun. . . . . . . . . . . . . . . . . . . . . . . . . . . . . . . . . . . . . . .73
Torpedo Attacks . . . . . . . . . . . . . . . . . . . . . . . . . . . . . . . . . . . . . . . .74
Community 75
Training. . . . . . . . . . . . . . . . . . . . . . . . . . . . . . . . . . . . . . . . . . . . . . .75
Squadrons . . . . . . . . . . . . . . . . . . . . . . . . . . . . . . . . . . . . . . . . . . . .76
Squad Maintenance Pages . . . . . . . . . . . . . . . . . . . . . . . . . . . . .76
Scoring . . . . . . . . . . . . . . . . . . . . . . . . . . . . . . . . . . . . . . . . . . . . . . .78
Checking your Score . . . . . . . . . . . . . . . . . . . . . . . . . . . . . . . . . .79
Checking the Bomber and Fighter Rankings . . . . . . . . . . . . . . . .79
Checking Squad Scores. . . . . . . . . . . . . . . . . . . . . . . . . . . . . . . .80
Events. . . . . . . . . . . . . . . . . . . . . . . . . . . . . . . . . . . . . . . . . . . . . . . .80
5
Page 6

Contents WarBirds Manual
Customizing WarBirds III 83
Loading Customized Aircraft Skins . . . . . . . . . . . . . . . . . . . . . . . . .83
Customizing Gun Sights & Gauges . . . . . . . . . . . . . . . . . . . . . . . . .85
Customizing Sounds . . . . . . . . . . . . . . . . . . . . . . . . . . . . . . . . . . . .86
General Sounds. . . . . . . . . . . . . . . . . . . . . . . . . . . . . . . . . . . . . .86
Plane Sounds . . . . . . . . . . . . . . . . . . . . . . . . . . . . . . . . . . . . . . .87
Dot “.” Commands 89
Offline AI Dot Commands . . . . . . . . . . . . . . . . . . . . . . . . . . . . . . . .94
Keyboard Commands 95
Apendix A: Cockpit Controls 99
Appendix B: Selection Screens 105
Plane Selection . . . . . . . . . . . . . . . . . . . . . . . . . . . . . . . . . . . . . . .106
Field Selection . . . . . . . . . . . . . . . . . . . . . . . . . . . . . . . . . . . . . . . . 107
Gunner. . . . . . . . . . . . . . . . . . . . . . . . . . . . . . . . . . . . . . . . . . . . . .109
Squad/Score Screen . . . . . . . . . . . . . . . . . . . . . . . . . . . . . . . . . . . 110
Launch Squad Website . . . . . . . . . . . . . . . . . . . . . . . . . . . . . . . 111
Apendix C: Setup Screens 115
Stick Screen. . . . . . . . . . . . . . . . . . . . . . . . . . . . . . . . . . . . . . . . . . 116
Flight Screen . . . . . . . . . . . . . . . . . . . . . . . . . . . . . . . . . . . . . . . . . 118
Sound Screen . . . . . . . . . . . . . . . . . . . . . . . . . . . . . . . . . . . . . . . .120
Colors Screen . . . . . . . . . . . . . . . . . . . . . . . . . . . . . . . . . . . . . . . .121
Video Screen . . . . . . . . . . . . . . . . . . . . . . . . . . . . . . . . . . . . . . . . .122
Stick Force Screen. . . . . . . . . . . . . . . . . . . . . . . . . . . . . . . . . . . . .123
Input Mapper Screen . . . . . . . . . . . . . . . . . . . . . . . . . . . . . . . . . . .124
Trouble Shooting 129
Cleaning up your System. . . . . . . . . . . . . . . . . . . . . . . . . . . . . . . .129
Scanning your Hard Drive . . . . . . . . . . . . . . . . . . . . . . . . . . . . .129
Defragmenting your Hard Drive. . . . . . . . . . . . . . . . . . . . . . . . .129
Modem Setup. . . . . . . . . . . . . . . . . . . . . . . . . . . . . . . . . . . . . . . . .130
Setting up a Windows Dial-Up Connection . . . . . . . . . . . . . . . .130
Optimize your Connection . . . . . . . . . . . . . . . . . . . . . . . . . . . . .133
6
Page 7

WarBirds Manual Contents
Known Problems . . . . . . . . . . . . . . . . . . . . . . . . . . . . . . . . . . . . . .135
Poor Frames per Second (fps). . . . . . . . . . . . . . . . . . . . . . . . . .135
Other Programs Running in the Background . . . . . . . . . . . . . . .135
Stuttering . . . . . . . . . . . . . . . . . . . . . . . . . . . . . . . . . . . . . . . . . .136
Flickering Water and Coastline . . . . . . . . . . . . . . . . . . . . . . . . .137
Overriding Processor Detection to Eliminate Exception Crashes137
Loss of Frame Rate while Flying over Towns. . . . . . . . . . . . . . .138
Textures show up as White on a Macintosh. . . . . . . . . . . . . . . .138
Macintosh Radeon and Geforce 2 Cards. . . . . . . . . . . . . . . . . .139
Cursor Keys don't change Views . . . . . . . . . . . . . . . . . . . . . . . .139
Loss of USB Joystick Functionality . . . . . . . . . . . . . . . . . . . . . .139
The W-Buffer . . . . . . . . . . . . . . . . . . . . . . . . . . . . . . . . . . . . . . .139
Customer Service 141
Online. . . . . . . . . . . . . . . . . . . . . . . . . . . . . . . . . . . . . . . . . . . . .141
Tech Support . . . . . . . . . . . . . . . . . . . . . . . . . . . . . . . . . . . . . . .142
Billing & Account Information . . . . . . . . . . . . . . . . . . . . . . . . . . .142
Credits 143
Index 147
7
Page 8

Contents WarBirds Manual
8
Page 9

Download & Installation
PC System Requirements
• Pentium II, 400 MHz, 600 MHz recommended.
• 128 MB RAM, 384 recommended for best play.
• DirectX 8.0 compatible, or DirectX 8.1 compatible (recommended
for best play) sound and video cards with Windows 98SE, ME,
2000, XP drivers, as applicable to your operating system.
• Joystick, mouse and keyboard. A throttle and rudder pedals are
recommended. Several manufacturers make models of their flight
control systems for the PC.
• 14.4K or faster connection to the Internet. To connect via PPP/
SLIP/LAN, you must have Windows Dial-up Networking and TCP/
IP drivers installed (included with Windows).
• 16 MB 3D card.
• Recommended 3D cards:
– ATI Rage 128
– ATI Rage Mobility128
– ATI Radeon
– Matrox G400
– NVidia GeForce 256
– NVidia GeForce 2MX
– NVidia GeForce 2
– NVidia GeForce 2 Ultra
– NVidia GeForce 3
– NVidia GeForce 4
– NVidia Quadro
– NVidia Quadro 2 Pr0
– Power VR Kyro II
Page 10

Download & Installation WarBirds III Manual
Macintosh System Requirements
• PowerPC-based Macintosh or compatible computer, 400 MHz or
faster.
• MacOS version 8.6 or higher.
• 256 MB RAM required (needs at least 300 MB virtual memory
under 9.x).
• OpenGL version 1.2.1 (included in the download).
• A 14.4 K or faster connection to the Internet for online play.
• Joystick, mouse and keyboard. Throttle and Rudder pedals are
recommended. Several manufacturers make models of their flight
control systems for the Macintosh.
• 3D accelerator card with Direct Support for Apple's OpenGL.
• Supported 3D Cards
– ATI Rage 128 VR
– ATI Nexus
– ATI Radeon
– Nvidia GeForce 2MX
– Nvidia GeForce 3
• Mac compatible joysticks tested and supported:
– Saitek Cyborg 3D
– Saitek Cyborg Gold
– Saitek X series (only supported under OS 9.x)
– MacAlly I-Stick
– Gravis Dual control Xtreme
– CH Pro F16 Fighterstick, Pro Throttle, and Pro Pedals ADB (no
support for ISP callibrator)
– CH F-16 Combat Stick, CH ProThrottle, CH ProPedals USB
Thrustmaster FCS Mk I, Thrustmaster WCS, Thr ustmaster
RCS ADB
10
Page 11

WarBirds III Manual Download & Installation
Downloading & Installing
Before installing
ning. After installation is complete, restart the computer so that all the
new settings can take effect.
If you have trouble downloading, there is a CD with all the
III
files for only $9.95 (at time of writing), which can be ordered from
the Downloads page at http://www.ient.com/warbirds/down-
loads.html.
1. Download
–
WarBirds III
– FurBall at http://www.furball.warbirdsiii.com/
2.
PC Only:
application, and double-click on it. Follow the instructions on the
screen.
3.
Mac Only:
file. It unstuffs into a folder called WarBirds III. Double-click on the
WarBirds III
OpenGL 1.2.1 installer folder. Double-click on the OpenGL 1.2.1
file in this folder.
4. Launch
application, which is located in the WarBirds III folder.
WarBirds III
, close all other applications that are run-
WarBirds
WarBirds III
Web site at http://www.ient.com/warbirds/
Using Windows Explorer locate the downloaded
Using Stuffit Expander, uncompress the downloaded
Installer file inside this folder. There is also an
WarBirds III
from one of the following sites:
by double-clicking on the
WarBirds III
DirectX 8.1
Many games and other Windows programs use DirectX, a standardized set of tools which allow programs to communicate with and control your system’s hardware. DirectX-based programs use DirectX
‘drivers’ to perform many functions, such as painting graphics to the
screen or having your sound card play sound effects.
With new technology constantly being introduced (such as next generation 3D Accelerators), DirectX is updated to support these new
technologies, and the hardware manufacturers release new ‘drivers’
for use with the most recent version of DirectX.
We advise that players download and install DirectX 8.1 from
MicroSoft at http://www.microsoft.com/directx/ hom eus er /do wnl oad s/
11
Page 12

Download & Installation WarBirds III Manual
Latest Drivers
We recommend that you download and install the latest drivers for
your hardware. This includes your Joystick, Sound card and Video
card.
Updated drivers can be obtained from each manufacturer's Web site.
Recommended Video Card Manufacturers
Connect to the Internet, then click on a link below to go to that manufacturer’s Web site.
• NVidia—http://www.nvidia.com/
• Matrox—http://www.matrox.com/
• ATI—http://www.ati.com/
12
Page 13
Preflight Selections
Close all other applications, toolbars, animated cursors and system
tray applets when playing
in the Background” on page 135.
PC Users:
Start
and then
Mac Users:
on the
Launch
, then
Programs
WarBirds III
Launch
WarBirds III
application.
3D Device Selection
WarBirds III
WarBirds III
, then
iEntertainment Network
.
WarBirds III
. See “Other Programs Running
from the Windows desktop. Select
, then
WarBirds III
for the Macintosh by double-clicking
,
Before launching
High Color (16 bit) or higher. When WarBirds III is launched, the 3D
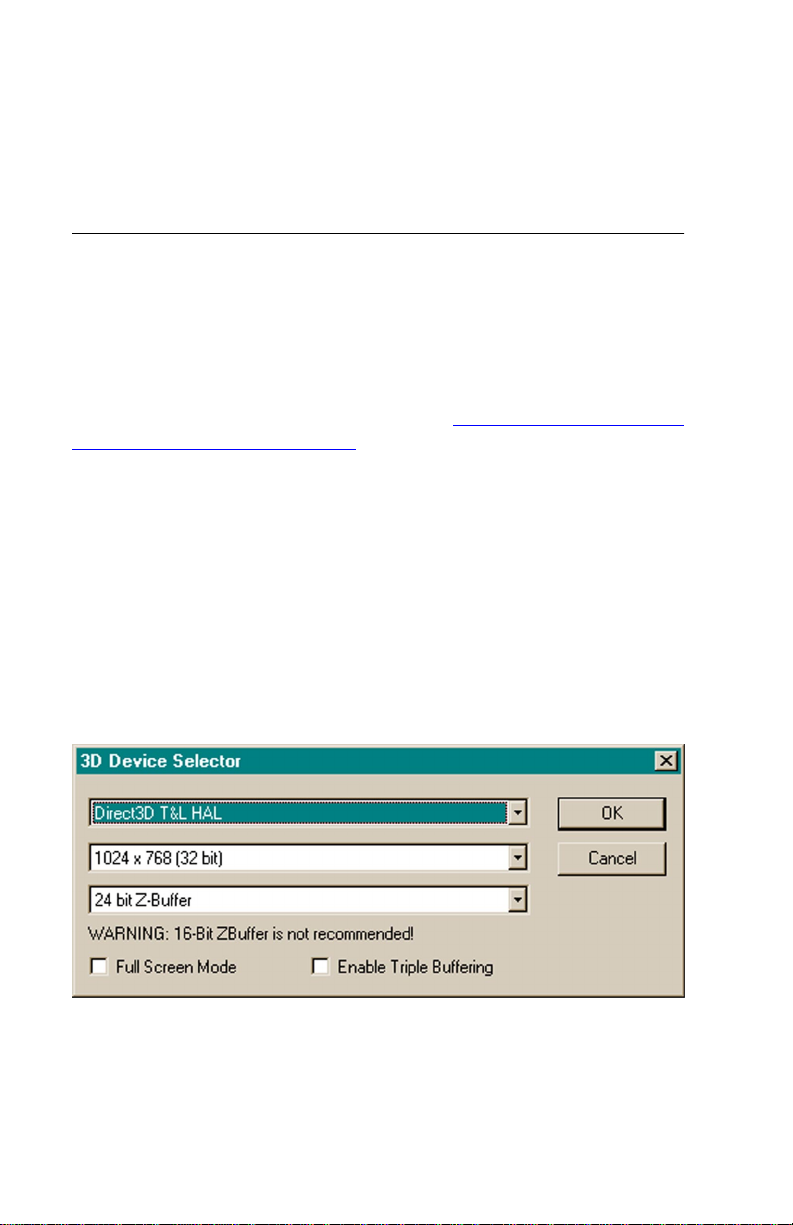
Device Selector window is displayed.
WarBirds III
3D Device Selector Window
set your Windows Display Settings to
Page 14

Preflight Selections WarBirds III Manual
1. Select an option from the drop-down menu. If you see T&L HAL
use it. It means transform and lighting (T&L) calculations are
done by the 3D hardware. This is a
good thing
since it frees up
CPU cycles.
2. Select a resolution, this must be the same or less than your
Windows setting. 32 is recommended, 16 may cause polygon
flashing or tearing.
3. Select one of the Z-Buffer options. Set this to the highest you can,
but be aware that some hardware (NVidia) needs to have this
match the bit depth you select for resolution.
4. Select Full screen mode to have the
WarBirds III
window take up
the whole of the screen.
5. Click the box to enable triple buffering, if required. Triple Buffering
improves the smoothness of the graphics, but it can be system
intensive. You may find your framerate drops when it is selected.
6. Click
Exit the rolling credits screen by pressing
Okay
.
or clicking. The Plane
Esc
Selection screen is displayed with the Main menu on the left.
Setting Up your Game Controllers
WarBirds III
automatically configures your Game Controllers, so most
players do not need to do anything.
Mac Users using a USB Joystick:
Download and install the Mac
Joystick Calibrator.
1. Download the file iSP_Calibrator.sit (1.6KB, 6/22/01) from http://
files.warbirdsiii.com/WarBirds/WBIII/ISp_Calibrator.sit.
2. Double-click to unstuff the downloaded file.
3. Double-click on the unstuffed file, ISp Calibrator.
4. Click on the
5. Follow the instructions on the screen.
Calibrate
button.
The purpose of this utility is to solve Macintosh joystick calibration
issues such as getting only 50% throttle input or pitch input. If you see
the calibration button grayed out, this means that your joystick does
not support calibration via the ISP calibrator. To calibrate your stick
you need to use your joystick manufacture's software. This utility is
NOT meant for use as an input mapper (programming certain buttons
to perform specific functions). To program specific buttons use the
14
Page 15
WarBirds III Manual Preflight Select ion s
Input Mapper within the
the button graphics within the calibrator screen display a red crossed
circle.
WarBirds III
keys.
WarBirds III
does not use Input Sprockets to map functions to
setup dialog. This explains why
Changing the Game Controllers and Actions
To customize your Game Controllers, select
menu. The Setup screens are displayed, with the default Stick menu
at the front.
pedals and a throttle control, with each action on a given controller
controlling a particular movement of the aircraft. (See also
ing the Input Mapper” on page 24
WarBirds III
allows you to use multiple joysticks, rudder
).
Setup
from the Main
“Customiz-
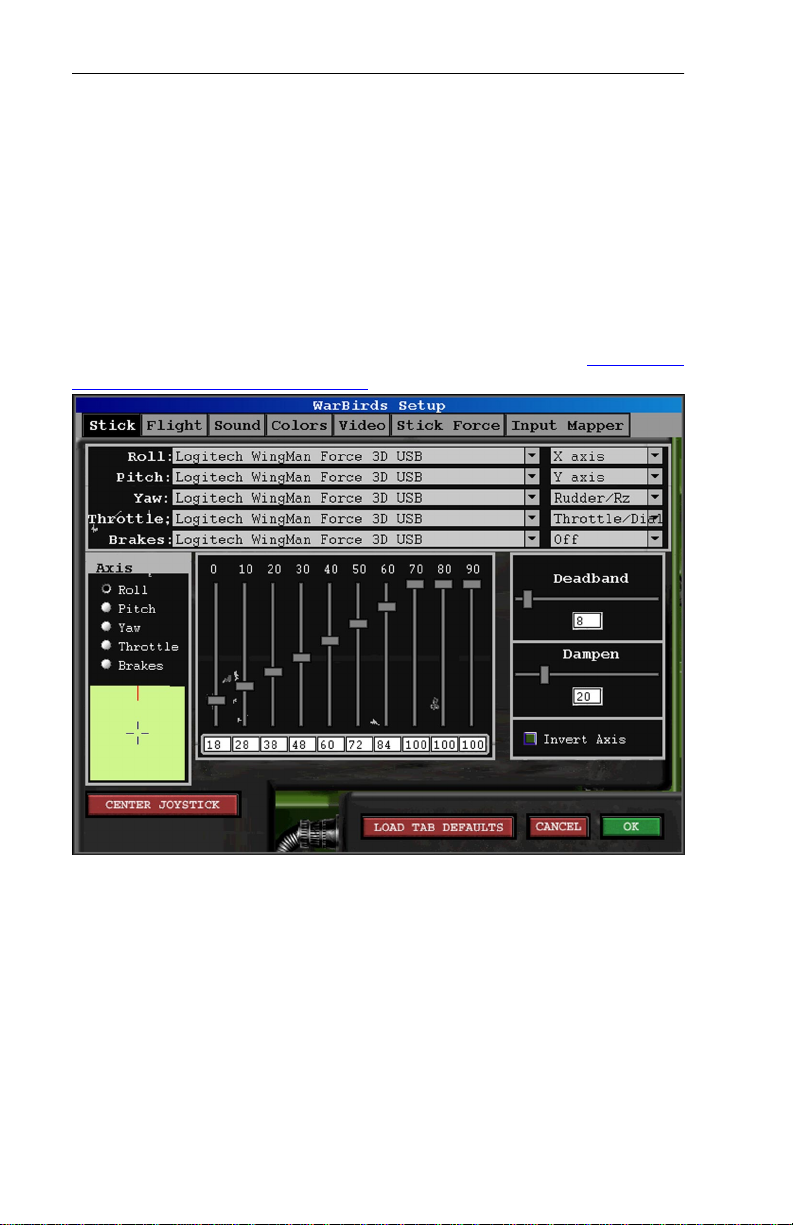
Stick Setup Screen
Selecting a Controller
1. Select a joystick from the drop-down menu alongside
top part of the Stick screen. That joystick will control the Roll
function of the aircraft.
2. Then select the
is the X-axis.
3. Repeat steps 1 and 2 with the
until each function is controlled by the controller in the way that
you prefer.
Axis
that you want to control the Roll. The default
Pitch, Yaw
and
Throttle
Roll
controllers,
in the
15
Page 16

Preflight Selections WarBirds III Manual
Centering the Joystick, Rudder and Throttle
1. The box in the bottom lefthand corner represents the limits of the
joystick’s movements along the vertical and horizantol axes, with
the cross showing the position of the joystick. Move the stick to
the limit of its movement in all directions a couple of times, then
click
Center Joystick
2. The red line at the top of the box shows the position of the rudder.
. Repeat if necessary .
If you have a “twisty” joystick, twist the joystick to its full extent in
each direction a couple of times, then click
3. The bar on the right of the box represents the throttle position
Center Joystick
.
(assuming you have one). Move the throttle control to maximum
and minimum a couple of times, and then select
Center Joystick
.
If you have rudder pedals, move them as far as possible in each
direction, and the click
NOTE: Whenever you fly in
then press
to center the joystick and ensure precise control.
F12
Center Joystick
WarBirds III
.
, release all controls and
Calibrating your Game Controllers
1. Select the action you want to calibrate,
or
Brakes
2. Select
.
Center Joystick
to center the joystick that controls the
action you have selected.
3. Adjust the slider controls, deadband and damper until the cross in
the calibration square moves with the controller as you want it to.
4. Select
OK
to return to the Plane selection screen.
Roll, Pitch, Yaw, Throttle
16
Page 17
WarBirds III Manual Preflight Select ion s
Flight & Offline Setup
To adjust the Flight and Offline Mission options, select
Main menu, and then the
page 33 .
Flight
tab. Also see“
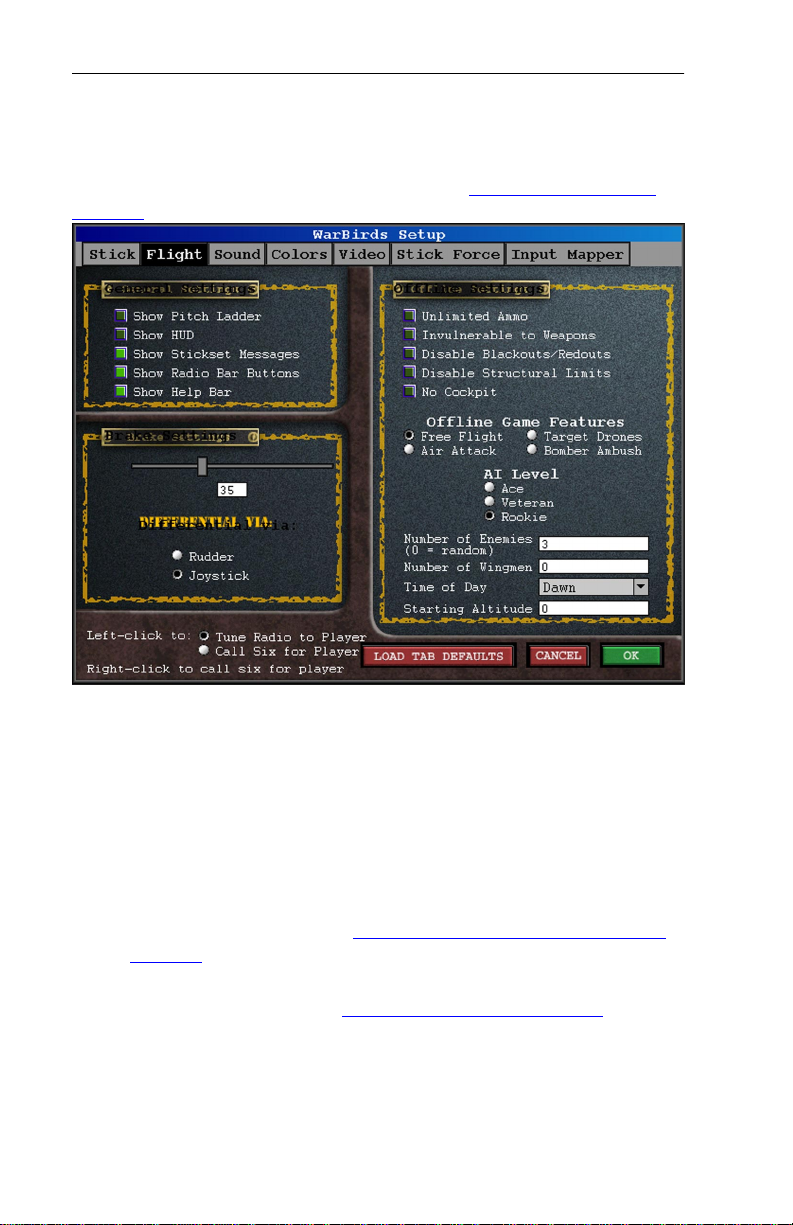
Flight Setup Screen
Offline Missions” on
Setup
from the
1. Click to enable or disable the General Settings. When the button
is lit that setting is enabled.
–
Show Pitch Ladder
in the cockpit.
–
Show HUD
flying.
–
Show Stickset Messages—
swapped stick sets. (see “
page 24 for information regarding Sticksets).
–
rShow Radio Bar Buttons—
tons are displayed (see “
–
Show Help Bar
played.
—Select to have the HUD (red text) displayed when
—Select to have the pitch ladder displayed
Select to be notified that you have
Customizing the Input Mapper” on
When checked, the Radio bar but-
Using the Radio” on page 45).
—When checked the help buttons are dis-
17
Page 18

Preflight Selections WarBirds III Manual
2. Set the percentage of brake power that is used when the brakes
are initially engaged and whether to have the differential brakes
activated from the rudder or the joystick.
3. Select which mouse button you want to:
– Tune Radio to Player
– Send Check Six message to Player
4. Click to enable or disable the Offline Settings. When the button is
lit that setting is enabled.
Unlimited Ammo—
–
–
Invulnerable to Weapons—
damaged when hit by enemy fire.
–
Disable Blackouts/Red outs—
and redouts that occur when pulling so many Gs that the blood
supply to the brain is affected.
–
Disable Structural Limits—
when being pushed beyond its limits (see “
page 55).
–
No Cockpit—
5. Select one of the four offline missions.
–
Free Flight—
takeoff, landing, and maneuvering to become familiar with various aircraft.
–
Target Drones—
enemy field. Use to practice shooting down almost sitting targets.
–
Air Attack—
numerous. This mission gives a close approximation to the
online dogfighting. Try to shoot down the enemy before they
shoot you!
–
Bomber Ambush—
to bomb your airfield. Try to take them out before they arrive.
To practice attacking ground vehicles offline:
a. Select the
b. Open the radio bar and enter
c. To return to flying against aircraft, open the radio bar and
enter
And the enemy just became better—and more
.offbombermodel ground
Select to never run out of ammo.
Select to never have your aircraft
Select to disable the blackouts
Select to stop the plane breaking up
Structural Limits” on
Select to have no cockpit displayed when flying.
An open arena with no enemy pilots. Practice
An open arena with one drone circling each
There is a squadron of Bombers on its way
Bomber Ambush
mission.
.offbombermodel ground
18
Page 19

WarBirds III Manual Preflight Select ion s
6. Select the AI level of your enemies:
–
Ace
–
Veteran
–
Rookie
7. Enter the number of enemies you want flying against you. Zero
gives a random number of enemies. There are always an equal
number of pilots flying your country as there are enemies, plus
yourself and any Wingmen.
8. Enter the number of Wingmen you want flying with you.
9. Select a time of day from the drop-down menu.
–Dawn
– Morning
–Noon
– Afternoon
–Evening
–Dusk
–Night
10. Enter a starting altitude. Zero starts you on the runway.
19
Page 20
Preflight Selections WarBirds III Manual
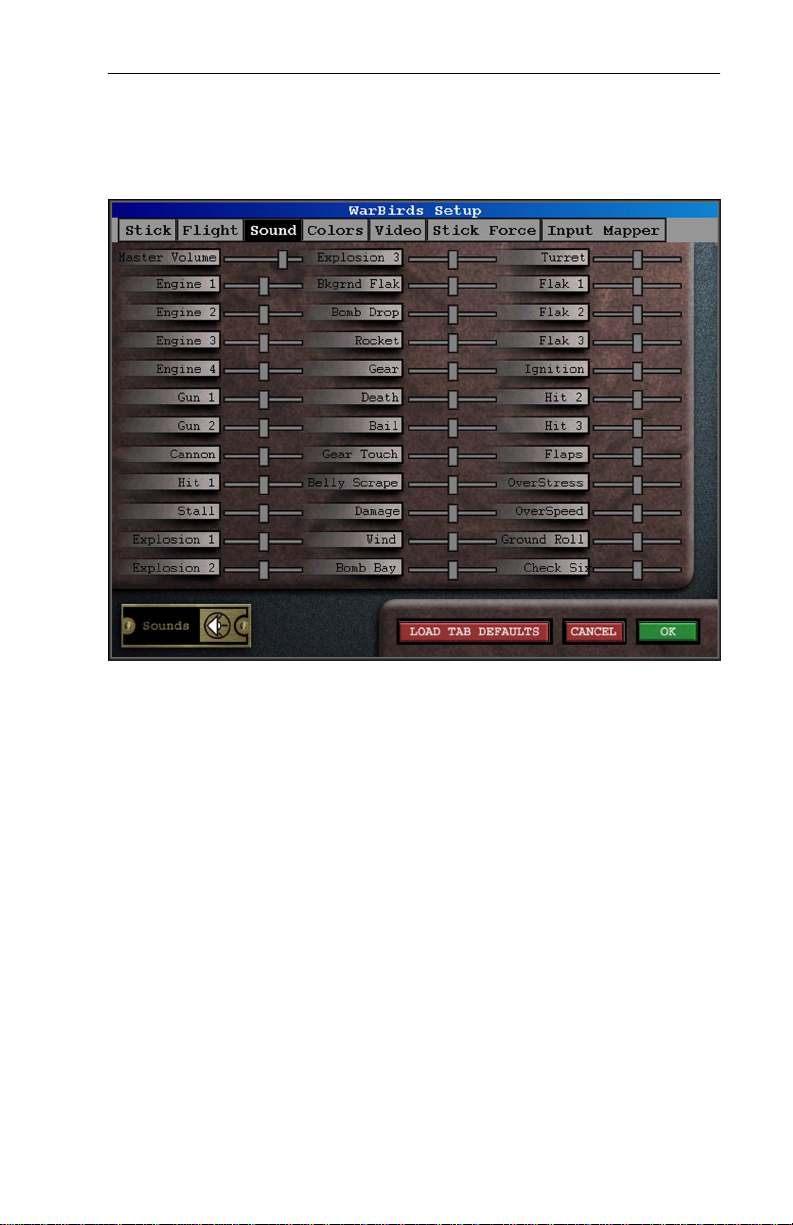
Sound Settings
To adjust the Sound levels, select
then the
Move a slider to the right to increase the volume and to the left to
decrease it.
Sound
tab.
Sound Setup Screen
Setup
from the Main menu, and
20
Page 21

WarBirds III Manual Preflight Select ion s
Color Settings
To adjust the Color levels, select
the
Color
tab.
Use the color sliders to change the shade of the icons displayed while
flying.
The message box transparency can also be changed by moving the
Msg Box Transparency
slider.
Setup
from the Main menu, and then
Color Setup Screen
21
Page 22

Preflight Selections WarBirds III Manual
Video Settings
Generally, the video settings affect how
are flying. Upping a setting improves the look, but it also tends to
decrease the number of frames per second (fps) your computer can
process. For further information about changes you can make to
improve your fps, please see “
To adjust the Video levels, select
Video
then the
tab.
Trouble Shooting” on page 129.
WarBirds III
Setup
from the Main menu, and
looks when yo u
Video Setup Screen
1. Set the Var Level between 250 to 50,000. Higher numbers look
better, but may lower frame rate.
2. Set the Texture size. This allows you to limit how much VRAM is
used by restricting the size of the textures used.
whatever size the original artwork is, the others set the maximum.
3. Select the amount of detail seen on the ground objects. More
slows the system down, but the objects on the ground are more
detailed and prettier.
4. Select
aircraft is active. Higher may lower frame rate.
5. Turning off Environmental maps removes the metalic reflection
22
how far away the highest Level Of Detail (LOD) on the
No Limit
uses
Page 23

WarBirds III Manual Preflight Select ion s
effects on some aircraft (P-51D for example). May improve frame
rate on some systems if turned off.
6. Select the font size of type in the radio bar and GUI.
7. Select the quality of the appearance of the terrain. Higher slows
the sytem down, but is prettier.
8. Select
the maximum distance out to render ground clutter. 0
disables it completely. Ground Vehicles beyond your clutter range
setting are not displayed.
Stick Force
For those with a force feedback joystick, which supports Direct X,
these settings can be customized to your personal preferences.
To adjust the Stick Force levels, select
and then the
Stick Force
tab.
Setup
from the Main menu,
Stick Force Setup Screen
1. Click on the box next to Enable to toggle force feedback on and
off.
2. Change the sliders to reflect how much feedback you want for a
particular effect.
23
Page 24

Preflight Selections WarBirds III Manual
Customizing the Input Mapper
WarBirds III
each key on the keyboard, and button or hat on your joystick.
To customize your Input Mapper, select
and then the
allows you to customize which commands are sent by
Setup
from the Main menu,
Input Mapper
tab.
Input Mapper Setup Screen
1. Select a Stick Set, 1, 2, 3 or 4. Stick Sets are changed ingame by
pressing F5, F6, F7, or F8.
2. Select an action from one of the four drop-down menus, View,
Gunnery & Bombing, Flight, or Misc.
3. Select
sections. Up to four Controls can be set for each action.
4. Press the key or button to perfrom the selected action, or select
Hat
button can be selected to perform more than one action. Setting F
to fire both your primary and secondary weapons, for example.
5. Repeat until you have all the stick sets set up with your preferred
controls for each action.
To check whether a key or action is already in use, click the
Up
button, then press or click the controller button or hat.
24
Press to Change Control
and choose an option from the drop-down menu. A key or
on one of the four Control
Key Look
Page 25
Flying Basics
Selecting an Aircraft or Ground Vehicle
The Plane Selection screen is the default screen when you first enter
the game. If it is not already in view, exit the Setup screens by selecting
OK
or
Cancel
screens.
, or select the
Plane
tab from the top of the Selection
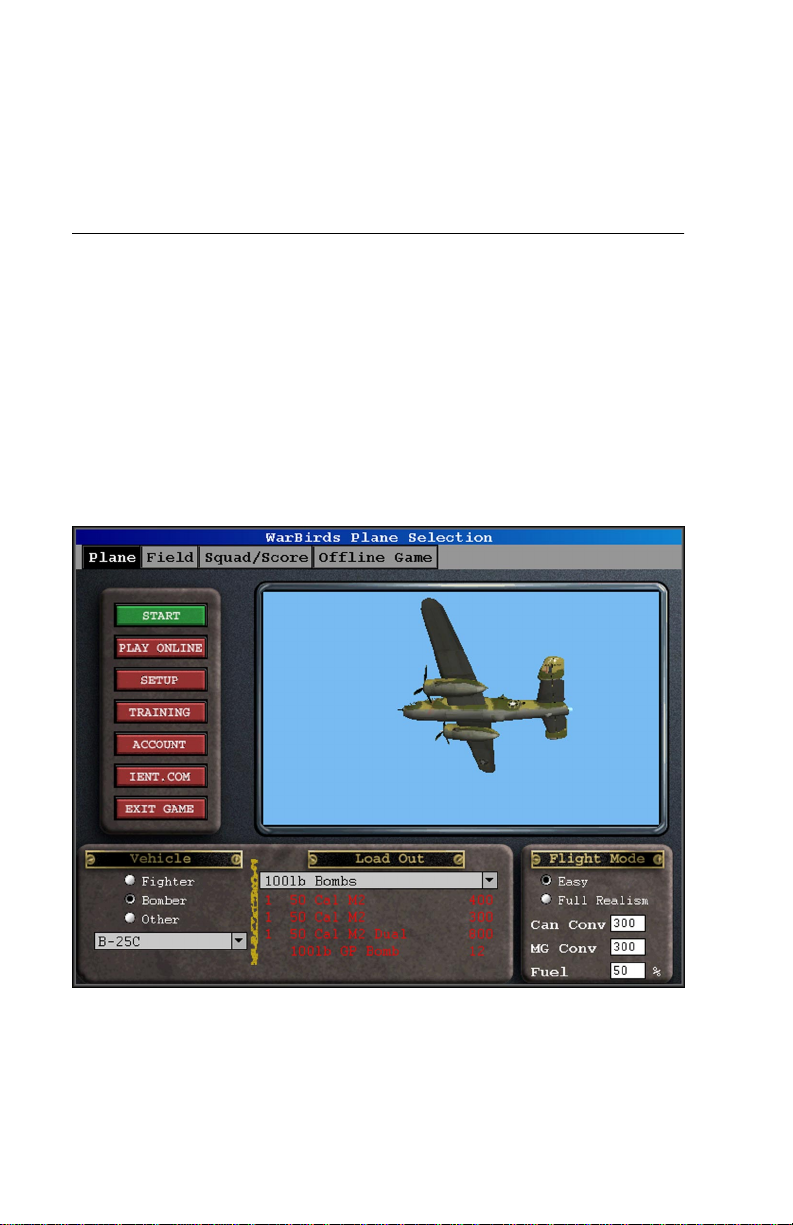
Plane Selection Screen
1. Select
type of aircraft you want to fly, or
Fighter
or
Bomber
in the bottom left, depending on which
Other
to drive a ground vehicle.
Page 26

Flying Basics WarBirds III Manual
2. Then click the drop-down menu to select an aircraft or ground
vehicle from the list.
3. Select a Load Out from the drop-down menu, to change the
gunnery, rockets, bombs, torpedos and paratroopers carried.
4. Select whether to fly with the
select the distance at which you want your canon and machine
guns to converge, and the percentage of fuel with which your
aircraft starts out.
Easy
or
Realistic
flight model. Then
Selecting a Country & Field
Select the
screen is displayed.
1. Select a Terrain from the drop-down menu when flying offline. In
the online arenas the map is set by the arena.
–
–
–
The “b” terrains are 256x256.
Field
Europe
Malta
Tunisia
tab from the top of the Selection screens. The Field
Field Selection Screen
26
Page 27

WarBirds III Manual Flying Basics
2. Select a Country color from the drop-down menu on the bottom
left. Either Red, Green, Gold, or Purple (not all countries are
available when flying in certain online arenas).
3. Select a Field on the map by clicking on it, or by selecting it from
the drop-down menu. When online, right-click (Ctrl + click for
Macs) on Carriers or any drone blips to join as a gunner. Your
location is indicated by parentheses,
for example.
[F5]
•
•
•
•
NOTE: For additional terrains, go to the Downloads page at http://
www.ient.com/warbirds/downloads.html.
Carrier vehicle •
Cv:
Small field •
Fs:
Medium field •
Fm:
Large field
Fl:
Outpost
P:
Town
T:
Village
V:
Map Controls
• Zoom in and out of the map by using the ] and [ keys, pan using
the arrow keys. Or click on the Plus, Minus and arrow buttons on
the screen.
• Toggle the floating map by using F1.
• Toggle the reference grid by clicking the Grid button.
Tak ing Off
These instructions assume that you are flying using the
mode. If you have
some of these steps are not necessary. See Step 4 of
Aircraft or Ground Vehicle
1. Select
2. You are seated in the cockpit on the airfield. Release all controls
and press
3. Ensure that the throttle setting is on zero, and then press
E
4. Use
percent of its full power. Using the rudder make your way to the
end of the runway, if you are not already there, and start rolling
straight down the runway.
Fly
to start your engine(s).
or a throttle control to rev up the engine to about 25
=
Easy
mode selected, takeoff is much easier and
on page 26.
from the Main menu.
to center your joystick (this is very important).
F12
Realistic
flight
Selecting an
Shift
+
27
Page 28

Flying Basics WarBirds III Manual
5. If the aircraft starts yawing (veering to one side or the other),
press A to steer left, or D to steer right (do not hold the keys
down). If you have rudder pedals or a twisty joystick, use them or
that instead.
6. Increase engine power to full by pressing
throttle control as high as it can go. Press X while gaining speed
to trim the aircraft.
7. When the airspeed indicator shows 100 mph or more, ease back
on the joystick to lift off.
8. Once airborne, press
trim the control surfaces.
9. Move the joystick as gently as possible until you have gained
some airspeed and altitude, to avoid paper darting the ground.
10. Center the rudder by pressing
direction and at the preferred altitude press X to engage the
autotrim, which keeps the plane flying straight and level.
to raise the landing gear, and then X to
G
, and when heading in the right
S
or 0, or by moving the
=
Autopilot Settings
Autotrim mode:
straight and level until X is pressed again or until you take over the
controls once more.
Speed mode:
The autopilot attempts to maintain the speed of the plane, by climbing
or descending, as necessary.
Angle mode:
climb or descent angle of the plane at the moment it was engaged. If
necessary, the plane descends to gain the speed to maintain an
angle of ascent. Be careful if your plane is descending when you
engage Angle mode, or you could crash.
28
Press X to engage the autopilot. The plane flies
Press
Press
+ X to put the autopilot in speed mode.
Shift
+ X to instruct the autopilot to maintain the
Ctrl
Page 29

WarBirds III Manual Flying Basics
Views
3D Cockpits
Use the View system to look around and keep your situational awareness (SA) high.
There are three view modes to toggle between in the 3D cockpits:
• Snap
• Pan to Snap
•G-Force
+ O jumps between the different view systems.
Shift
Snap View:
press a key, or move the joystick hat and the view "snaps" to that
position. When you release the key, or joystick hat, the view returns to
the front.
Pan to Snap View:
hat the view pans around and stops at the view position. For example, pressing 2 on the numpad pans the view from the front to the side
and then to the rear.
G-Force View:
which the view changes is limited by the number of Gs being exerted
on the aircraft at the time.
Stickysnap:
snap" is enabled, pressing a key or moving the joystick hat changes
the view to that position, and it stays there until another key is
pressed, or the hat moved.
Type
.stickysnap
return to the default.
The default view is the Snap view. This is when you
Pan to Snap is when pressing a key or joystick
G-Force view is as Pan to Snap, but the speed at
In addition , the views ca n be se t to "s tick ". Wh en "st ick y-
in the radio bar to enable it and
.returnsnap
to
Changing Field of View
To zoom out (make field of view bigger), press V, to zoom in (make
field of view smaller ), press Z.
To return to the default field of view, press
jumps to gunsight view,
F4
jumps to instrument view.
F11
Ctrl
+ V or
Ctrl
+ Z.
Numpad Keys
• Press 4 and 6 on the numpad to look left and right, respectively.
•Press 2 to look behind you.
• Press 5 to look straight up.
• Pressing different combinations of keys, and using 7, 9, 1 and 3
gives the 45 degree views.
29
Page 30

Flying Basics WarBirds III Manual
Joystick Hat
• Move to the right to left to look right or left.
• Move down to look behind you.
• Move up to look straight up.
• Move to the quarter views to look in that direction.
• Hold down 5 on the numpad and move the hat to look up in that
direction.
Finding & Attacking Targets
Dogfighting
The Map is used to find the nearest action in the air. Each sector on
the Map is 20 miles across.
1. Put the aircraft on autopilot by pressing
aircraft flies straight and level until either X is pressed again or
you take over the controls once more.
2. Press
opaque, and again to close the map. Use the zoom keys,
and
[
30
to access the transparent map, F1 again to make it
F1
+ ] to zoom in and out.
Shift
on the keyboard. The
X
Shift
+
Page 31

WarBirds III Manual Flying Basics
3. There is one white arrow showing the direction in which you are
travelling. The colored dots respresent planes in the air, the color
of the dot being the color of the country that plane is flying for.
4. Head for an enemy, and press
necessary).
5. When a target comes into view, an enemy is labeled with the
plane type, friendlies with their callsign (don’t shoot at friendlies!).
The number beneath the label tells you how far away the target is
in hundreds of yards. If your guns are set to converge at 500
yards, that is the range you want to be close to.
6. Press
power to the engine.
7. Lead the target, so that your bullets reach the place where the
target will be. If you fire straight at the target (except at very close
range), your tracers pass harmlessly behind it.
8. When the target is in your sights at 500 yards or less, lead it just
a bit...now hit the trigger button on your joystick and watch your
tracers converge.
to engage WEP (war emergency power), to boost the
F9
again to close the map (twice, if
F1
Identifying Targets & Friendlies
Use the F2 to toggle the icons labeling the other planes:
•
Arena Default
pilot’s callsign if friendly, the plane type if an enemy .
•
Plane Type
•
Range Only
•
Off
Shows no icon at all.
—
NOTE: When online, the arena settings specify which icon labels are
available.
Shows the distance in hundreds of yards, and the
—
Shows the distance and plane type.
—
Shows only the distance.
—
Landing
When you have flown around for a while and are out of bullets or low
on fuel, it is time to head for home. The key to a good landing is setting up a good approach. If you are offline and do not want to practice
landing click the X at the bottom right of the screen.
1. Find your airfield on the Map (
zoom in and out) and line up with the runway while you are still
three to five miles away, at an altitude of between 1000 and 1500
feet.
F1
—use
Shift
+ ] and
Shift
+ [ to
31
Page 32

Flying Basics WarBirds III Manual
2. Throttle back until your airspeed is about 120 mph. More than
that is too fast for a safe landing, any less and you may fall out of
the sky before reaching the runway.
3. Press
4. Press
5. Approach the runway in a shallow descent, using the throttle (
to lower the landing gear.
G
+ Q to lower your flaps fully.
Shift
-
and =) and joystick to control your speed and rate of descent.
Ideally, you should pass over the beginning of the runway at an
altitude of less than 75 feet, and at a speed of just under 100
mph.
6. Just before touchdown, gently pull back on the joystick, raising
the nose just enough for you to see the horizon below your gun
sight.
7. When the tires hit the tarmac, reduce engine power, and press
the
Spacebar
to engage the wheel brakes. The brakes cause the
nose to fall forward. Releasing them or pulling up on the joystick
corrects this.
8. Once the plane has stopped, type
in the radio buffer to
.exit
return to the Control Tower.
Do not be discouraged if you find landing difficult at first, it does
become easier with practice.
Bailing
To jump out of the aircraft before it crashes, press the
times in a row when in flight. The canopy of the cockpit opens and
you are in free fall.
The chute opens automatically at 500 feet, but to open it earlier, press
three times in a row again. The chute falls very slowly and
Enter
there is no way out of it until you land, so opening at high altitudes is
not recommended unless you have a lot of time on your hands and
want to enjoy the view.
32
Enter
key three
Page 33

Offline Missions
Offline Games
There are several preset games available offline in
Select the Offline Game tab to display the Offline Game Selection
screen.
WarBirds III
.
1. Select one of the preset online Missions:
–
1v1 Air Attack
select any plane for this mission, and so can he!
–
2v2 Air Attack
two enemy Aces. Your wingman mimics your flight.
—Take on an Ace pilot one-on-one. You can
—You have one wingman to assist in downing
Page 34

Offline Missions WarBirds III Manual
–
Air Attack
—This is the closest to an online aerial dogfight you
can get without going online. Join in the swirling furball of the
sky. Try to pick an enemy to shoot down, but be constantly
aware of all that is around you.
–
Bomber Ambush
—There is a bomber formation on its way to
bomb your airfield. It is up to you and your two wingmen to stop
them.
–
Carrier Practice
—Your Carrier group is on a mission. Defend
attacks with one of the following aircraft:
F6F-5 F4F-4 RM-2 F4U-1D
A6M2 A6M3 A6M5a Seafire II
F4U-4 F4F-3 SBD-5
–
Free Flight
—An open arena with no enemy pilots. Practice taking off, landing, and maneuvering to become familiar with various aircraft. Further options can be set using the Flight screen
(see page 17
–
Landing Final
).
—Y ou’re on course for the perfect landing at Field
1. Try to keep your cross hairs on the red beacon for the correct angle of descent. See “
Landing” on page 31 for further
information about landing.
–
Malta Assault
in your Panzer and defend against the invaders. See “
—Malta is under attack, and it’s up to you to jump
Ground
Vehicles” on page 67 for more information about driving and fir-
ing from tanks. Alternatively, jump in one of the aircraft available and defend from the sky.
–
Sea Attack
your Ju88A-4 and try to torpedo the fleet. See “
—A Carrier fleet is attacking from the north. Jump in
Torpedo
Attacks” on page 74 for more information on setting up a tor-
pedo attack.
–
Target Drones
—An open arena with enemy aircraft flying
around waiting to be shot at. Use to practice firing your guns at
targets that don’t shoot back!
–
T unisia Assault
—Head for Village 25 with the rest of the tank
platoon. Enemy tanks are on their way to meet you... See
“
Ground Vehicles” on page 67 for more information about driv-
ing and firing from tanks.
–
T unisia Invasion
with your tank from the shore. See “
—A Carrier fleet is on its way , try to bombard it
Ground Vehicles” on
page 67 for more information about driving and firing from
tanks.
34
Page 35

WarBirds III Manual Offline Missions
2. Click to enable or disable the Offline Settings. When the button is
lit that setting is enabled.
–
Unlimited Ammo—
–
Invulnerable to Weapons—
Select to never run out of ammo.
Select to never have your aircraft
damaged when hit by enemy fire.
–
Disable Blackouts/Red outs—
Select to disable the blackouts
and redouts that occur when pulling so many Gs that the blood
supply to the brain is affected.
–
Disable Structural Limits—
when being pushed beyond its limits (see “
Select to stop the plane breaking up
Structural Limits” on
page 55).
–
No Cockpit—
3. Select whether to have your stats displayed while flying.
4. Enter a starting altitude. 0 will start you on the runway.
5. Enter the number of Wingmen you want flying with you.
6. Select a time of day from the drop-down menu.
NOTE: Most of the missions set 4, 5 and 6 for you and will revert to
the mission setting when you click
Select to have no cockpit displayed when flying.
Start
, should you change any.
35
Page 36

Offline Missions WarBirds III Manual
Offline Practice
Options for practicing offline are on the Flight Setup screen.To adjust
the Flight and Offline options, select
then the
Flight
tab.
Setup
from the Main menu, and
Flight Setup Screen
1. Click to enable or disable the Offline Settings. When the button is
lit that setting is enabled.
–
Unlimited Ammo—
–
Invulnerable to Weapons—
damaged when hit by enemy fire.
–
Disable Blackouts/Red outs—
and redouts that occur when pulling so many Gs that the blood
supply to the brain is affected.
–
Disable Structural Limits—
when being pushed beyond its limits (see “
page 55).
–
No Cockpit—
36
Select to never run out of ammo.
Select to never have your aircraft
Select to disable the blackouts
Select to stop the plane breaking up
Structural Limits” on
Select to have no cockpit displayed when flying.
Page 37

WarBirds III Manual Offline Missions
–
Show Help Bar
—
When checked the
help buttons are
displayed.
2. Select one of the four offline missions (see “Offline Missions” on
page 33 for further options).
–
Free Flight—
An open arena with no enemy pilots. Practice
takeoff, landing, and maneuvering to become familiar with various aircraft.
–
Target Drones—
An open arena with one drone circling each
enemy field. Use to practice shooting down almost sitting targets.
–
Air Attack—
And the enemy just became better—and more
numerous. This mission gives a close approximation to the
online dogfighting. Try to shoot down the enemy before they
shoot you!
–
Bomber Ambush—
There is a squadron of Bombers on its way
to bomb your airfield. Try to take them out before they arrive.
To practice attacking ground vehicles offline:
a. Select the
b. Open the radio bar and enter
c. To return to flying against aircraft, open the radio bar and
enter
3. Select the AI level of your enemies:
–
Ace
–
Veteran
–
Rookie
4. Enter the number of enemies you want flying against you.
5. Enter the number of Wingmen you want flying with you.
6. Select a time of day from the drop-down menu.
7. Enter a starting altitude. Zero will start you on the runway.
Bomber Ambush
mission.
.offbombermodel ground
.offbombermodel ground
37
Page 38

Offline Missions WarBirds III Manual
Offline Dot Commands
.offairattack Sets offline game to air attack (AI
planes).
.offfreeflight Sets offline game to free flight
.offbomberambush Sets offline game to bomber mission
Air Attack Mission
.offrps show all Display all the available AI-controlled
aircraft.
.offrps add <model> Adds <model> to the user-selected
list of AI-controlled aircraft. Once the
user has created this list, the AI-con-
trolled aircraft are chosen from it.
.offrps show selected Displays the current user-selected list
of AI-controlled aircraft.
.offrps random Returns to the normal, randomlyse-
lected AI-controlled aircraft.
.offrps nme <x> Sets number of enemy aircraft where
x = 0 to 4. Specifying 0 returns to ran-
dom numbers of friendly and enemy.
Bomber Ambush Mission
.offbombers <x> Sets the number of AI-controlled
bombers, where x = 1 to 8.
.offbombermodel show Displays the available AI-controlled
bomber models.
.offbombermodel <model> Specifies the AI-controlled bomber
model, instead of a random selection.
.offbombermodel random Returns to a random selection of AI-
controlled bomber models.
.offbombermodel ground Toggles the selection of ground vehi-
cles instead of aircraft in the mission.
38
Page 39

Flying Online
When you have shot down lots of drones (offline targets) and become
proficient at taking off and landing, and at flying a variety of aircraft,
you are ready to engage in some real combat.
Points to Ponder while Flying Online
• Learn the View system (see “Views” on page 29). Situation Awareness is the key to life online.
• If you've been practicing in easy mode offline, the aircraft handles
very differently online where easy mode is disabled in most
arenas.
• Redouts and blackouts occur online. If your screen turns red or
black you are pulling either too few or too many Gs.
• Don't fire on your own color (country), you'll only damage yourself
if you hit. Your gun sight indicates your color (country).
• The Ack Weenies are the flak and antiaircraft fire from enemy gun
positions.
• Ask for help. Everyone was a newbie once, and you normally
receive polite answers, particularly from pilots flying the same
color.
• Try to fly in a group. A lone pilot is easily picked on by enemies,
with no one around to give warning.
• Attend Training sessions. The Trainers are volunteer, experienced
flyers who can improve your flying skills.
• Anyone can fly any plane available in the RPS (Rolling Plane Set)
in the Reg-Main and EZ-Main arenas. There are restrictions in the
other arenas.
Page 40

Flying Online WarBirds III Manual
Creating a
To fly online you need an Internet connection, an Internet service provider (ISP) and an account with iEN. You need a credit card to sign up
over the Internet.
•
Premium
can fly an unlimited number of hours in any of the WarBirds arenas for that fee.
Standard
•
you can fly an unlimited number of hours in the ACAs (demo arenas). The first 15 hours of flight in any pay arena is covered by the
monthly fee, and any time spent over the first 15 hours is charged
at $1.99 per hour.
•
Basic
fly an unlimited number of hours in the ACAs (demo arenas). The
first 5 hours of flight in any pay arena is covered by the monthly
fee, and any time spent over the first 5 hours is charged at $1.99
per hour.
—$24.95
—$19.95
—$9.95
WarBirds
is charged to your account each month and you
is charged to your account each month and
is charged to your account each month and you can
Account
To Create an Account:
Go to http://www.ient.com/warbirds/academy_create.html and click
the
Sign Up
icon.
Alternative payment methods
When paying by one of these methods, please include your name,
mailing address, email address and the price plan you want to subscribe to in your correspondence.
Your account will be created as soon as we receive the first payment
and we will email your account Login ID and and password to you.
US & Canadian Citizens:
ments mailed to:
iEN Billing Dept,
124-126 Quade Drive,
Cary, NC 27513
We can also bill you using an automated checkdraft from your checking account. Just send a copy of a voided check to us.
Non-US Citizens:
mailed each month to the address above.
Payment should be received before your billing date each month.
We accept money order payments in US dollars
We accept check or money order pay-
40
Page 41

WarBirds III Manual Flying Online
Logging into an Arena
1. Start
2. Select
WarBirds III
Play Online
.
from the Main menu. The Go Online window is
displayed.
Go Online Window
3. Enter your
Login ID
and
Password
, and then click
Get Arenas.
you have checked Save Password, you do not need to enter the
password each time you login. If you have checked Auto-Login ,
login occurs automatically when you select
Go Online
from the
Main menu.
If
Arena Selection Window
41
Page 42

Flying Online WarBirds III Manual
4. Select an arena from the drop-down menu, and then click
The first time you play online, you are asked to enter a sixcharacter callsign—this is the label by which you are identified
within the game.
5. From the Tower, select a plane, a country and an airfield (see
“
Preflight Selections” on page 13). To view the action around a
particular field or carrier, select it on the Field screen, then move
the selection window to one side by clicking and dragging the top
bar, and then use the joystick to look around.
6. Click
7. Once you are airborne put the plane on autopilot (
Start
. Release all the controls and press
joystick.
to consult the map. Locate the action and set a course for that
F1
general area. As you approach, scan the skies to locate friends
and foes. Friends are the same color as you, enemies are not.
to center the
F12
X
Log In.
) and press
Private Arenas
The Private Arena feature is primarily for Special events, and Private
arenas can only be enabled by Community Managers (CMs). When a
Private Arena has been set up for an event, all those participating are
notified of the password.
To join a Private Arena launch
ing
Play Online
password
For example:
1. Launch
2. Press
3. Type
(passwords are case sensitive).
4. Select
displayed. Enter your Login ID and Password as usual.
5. In the Arena menu select the Private Arena, and then click the
Login
Please note if you exit
To enable the public arenas again, type
, open the radio radio buffer and type
WarBirds III
to open the radio buffer.
/
.privatearena 1a2B3c
Go Online
button.
as usual.
from the Main menu, the Login window is
WarBirds III
WarBirds III
where 1a2B3c is the password
you must return to Step 1.
as usual, and before click-
.privatearena
.privatearena
.
42
Page 43

WarBirds III Manual Flying Online
Viewing the Activity around the Field
To view the activity around a field before deciding to hit the runway,
move the Selection and Setup screen by clicking and holding down
the left mouse button on the top bar of that window, and then move it
out of the way.
Move the joystick around to view the area around the Control Tower.
43
Page 44

Flying Online WarBirds III Manual
44
Page 45

Using the Radio
Chatting using the keyboard is the preferred method of communication in
WarBirds III
guage employed by most pilots, but pilots from many other countries
also fly. Have patience with these players, English is not their first language, and they are probably asking for help. Help them if you can, or
ask others to do so.
If a player you are trying to chat with does not reply immediately,
assume that they are in the middle of combat and too busy to type.
, as everyone has access to it. English is the lan-
Radio 1 Radio 2 Radio 3 Radio 4
Radio Bar
Message Display
The Radios channels provide the means to socialize with other players. There are also messages giving vital tactical information and situation updates.The up and down arrows next to the incoming
messages display area allow you to scroll through recent messages.
Press
played.
Change the width of the radio buffer by typing
where xxx is between 200 and your screen res-32. 440 is the default.
on the keyboard to toggle the number of text lines dis-
Tab
.radiowidth
<xxx>
Page 46

Using the Radio WarBirds III Manual
Radio Tuning
Open the typing buffer by
pressing /,
or
/
+ /, depending on the channel to be opened.
Alt
Tune a radio by clicking in the radio slot, and then typing the number.
There are 106 different channels, any of which can be used. The
channels serve different purposes and reach different ears, so
depending on what you need to say and to whom, use the appropriate channel.
The host command
<x yyy> where x is the radio number and
.radio
yyy is the channel, can also be used to tune the radio.
Channel 100:
This is the common channel—every player can send
and receive messages when tuned to channel 100. If you are in the
Control Tower or a designated Headquarters screen, however, only
players in that room receive your channel 100 transmissions.
To communicate with players in flight, use one of the squadron, country or private channels, as listed.
Who Receives Channel Number Message
Everybody Channel 100 Gray
Red Channel 101 Red
Green Channel 102 Green
Gold Channel 103 Gold
Purple Channel 104 P urple
Members of the same squadron Squad Channel 110 White
Crew members of the same plane Intercom 111 Dark Green
Individual players Player callsign Bright White
Individuals in a country who are tuned in Channels 1-50 Dull Yellow
Any individual who is tuned in Channels 51-99 Dull Yellow
Everyone Messages from host Yellow
Everyone Messages from
Game Managers
Shift
+ /,
Control
Color
Blue
+
NOTE: Only Radio One can be tuned to channels 1-99.
When you first enter the arena, Radio One is tuned to your country
channel and Radio Two is tuned to everyone (100).
46
Page 47

WarBirds III Manual Using the Radio
Once you have tuned your radios, the settings are retained.
Click on an a ircra ft in fl ight t o tun e Radio F our t o that p ilot (t his c an be
changed to right-click using the Flight Setup screen, see page 17
Enter the command
tuned channels.
to display a summary of your currently
.radio
).
Transmitting a Message
To quickly send a message on a particular radio channel, use the
appropriate key to open that channel, then type your message and
press
Radio Key Press Radio Key Press
Enter
.
One
Two
Example:
101, and Radio 2 to 100, in flight press
message to transmit to everyone, and press / to transmit to Red players only.
When in a squadron, tune Radio 3 to 110, and communicate with
other members of the squadron by pressing
message.
Right-click (or
fellow countryman to send a “6” call to that pilot (this can be changed
to left-click using the Flight Setup screen, see page 17
If you are flying for Red and you leave Radio 1 tuned to
Ctrl
/
Shift + /
+ click for one-buttoned mouse Mac users) on a
Three
Four
+ / before typing the
Shift
+ / before typing the
Ctrl
Ctrl + /
Alt + /
).
Receiving Messages
You receive messages from other players if they are sent on a channel you can listen to. These are color coded according to the channel
on which they are sent.
Ignoring Other Players
There is also an ignore command for filtering out those players who
just seem to have a little too much to say. Type
where xxxxxx is the callsign of the player in question, and radio messages from that player cease to be seen by you.
.ignore
<xxxxxx>
47
Page 48

Using the Radio WarBirds III Manual
To reestablish communications with an ignored pilot, press a Radio
key: /,
where xxxxxx is the handle of the pilot. Type
communications with all ignored pilots.
If you leave the game, all ignored players are defaulted to listen mode
again.
Shift
+ /,
Control
+ / or
+ /, and then type
Alt
.listen
.listenall
<xxxxxx>
to reestablish
Game Managers
Game Managers’ names are always in capital letters, and always in
blue. These personnel are on the development team, and are logged
onto the server side of the game. Their presence is for testing and
diagnosing problems within the game environment, and in some
cases sorting out troublesome players.
They have absolute authority.
48
Page 49

Maneuvering
Control Surfaces
There are three dimensions within which the aircraft moves, and
there is a simple control to change the direction of movement in each
of those three dimensions:
• Ailerons control Roll
• Rudder controls Yaw
• Elevators control Pitch
Elevator AileronsFlaps
Rudder
Elevator
Flaps
Ailerons
Control Surfaces
Roll
The ailerons, located on the outer part of the trailing edge of the
wings, control the roll or bank of the airplane. The two ailerons (one
on each wing) work in opposite directions to each other. When the left
one is raised, the right one is lowered. The side to side movement of
the joystick controls the roll or bank of the aircraft.
Page 50

Maneuvering WarBirds III Manual
Pitch
The pitch is the up or down angle of the aircraft, controlled by the elevator. It is located on the trailing edge of the horizontal tail assembly
and is controlled by the forward and backward movement of the joystick. Pulling the joystick back moves the elevator up, causing the
nose of the aircraft to point up. Pushing the joystick forward moves
the elevator down, pitching the nose down.
Yaw
On the trailing edge of the vertical stabilizer on the tail is the rudder.
This controls the yaw, or the left and right turning movement of the
aircraft. On a real aircraft the foot pedals control this. For those who
do not have pedals, the rudder can be manipulated using A (left),
(center), and D (right), or a 3D joystick.
S
Flaps
The flaps are located on the inside of the trailing edge of the wings,
inboard of the ailerons. When this set of control surfaces is lowered
the cross-sectional shape (airfoil) of the wing changes. Lowering the
flaps creates a greater surface area, increasing lift and drag. Flaps
are most commonly used for landing.
Trim
As a plane flies at a particular altitude, weight, and speed, it flies
straight and level with the stick perfectly centered. As speed
increases the nose tends to rise, and the plane tends to yaw and roll
to the right. As speed decreases the nose tends to lower, and the
plane tends to yaw and roll to the left.
To control a plane at a wide range of speeds, there are trim tabs that
are adjusted to allow the plane to fly straight and level for many different sets of conditions. When a plane is “in trim” it is trimmed for
straight and level flight with the joystick centered at that airspeed and
condition. When a plane is “out of trim” its joystick center is far from
the center of its travel, which means that input is needed to make the
plane fly straight and level.
This creates two problems. Firstly, since the joystick center is not the
same as the physical force center it makes flying straight and level
tricky, and making small, gentle adjustments all but impossible. Movements tend to be jerky and really inaccurate, which causes problems
when lining up guns on enemy planes. Gunnery is much easier and
smoother when the plane is in trim.
50
Page 51

WarBirds III Manual Maneuvering
Secondly, if the center of force is too far from the joystick center, you
simply run out of stick. If you have to have the stick 3/4 of the way
back to maintain level flight there is only 1/4 of normal movement
remaining to be used for maneuvering. In this instance, you would
barely be able to maneuver at all.
The solution is to trim the plane for a speed close to that at which you
are fighting. In
Nose down elevator trim. . . . . . . . . . . . . . . . . . . . . . . . . . . . . . . . . . . I
Nose up elevator trim . . . . . . . . . . . . . . . . . . . . . . . . . . . . . . . . . . . . K
Left rudder trim . . . . . . . . . . . . . . . . . . . . . . . . . . . . . . . . . . . . . . . . . .J
Right rudder trim. . . . . . . . . . . . . . . . . . . . . . . . . . . . . . . . . . . . . . . . .L
Left roll trim. . . . . . . . . . . . . . . . . . . . . . . . . . . . . . . . . . . . . . . . . . . . M
Right roll trim . . . . . . . . . . . . . . . . . . . . . . . . . . . . . . . . . . . . . . . . . . . ,
WarBirds III
, the following keys adjust the plane’s trim:
Autotrim
To take the tedium out of making constant adjustments to the trim
manually, there are the autotrim keys (see “
page 28). When autotrim is engaged, it takes a few moments for the
plane to get in trim. The plane can be left flying on autotrim, or you
can take over the controls once again, simply by moving the joystick.
Ideally, the plane should be trimmed for the speed it will be fighting at,
so that the joystick is centered when you really need it to be. Take the
type of plane being flown into consideration when deciding on the
best speed to have the plane in trim.
Autopilot Settings” on
Maneuvers
Aileron Roll
The Aileron Roll is a complete roll, revolving once around the fuselage.
To perform an Aileron Roll, move the joystick to the right or left and
hold it there until the plane is upright once again. Straighten out and
press X to return to straight and level flight.
Break Turn
The Break turn is the standard evasion against attack from astern.
You turn as hard as possible in the direction of the attacker, to
increase deflection quickly, and make your plane harder to hit. It is
best to execute a break turn when level or lower than the attacker.
51
Page 52

Maneuvering WarBirds III Manual
Never break above your opponent, as you lose speed and your size
as a target increases.
To perform a Break turn, move the joystick to the right or left, and then
pull back on the joystick to tighten the turn. Straighten out and press
to return to straight and level flight.
X
Chandelle
The Chandelle, in very simple terms, is a climbing turn. The turn can
range from 90 to 180 degrees. It is a low-G move, and aims to conserve as much energy as possible. The Chandelle allows you to
remain near the fight, and to keep visibility on the fight or target as
you look down and back over the wing, while gaining altitude.
To perform the Chandelle, move the joystick to the right or left, then
pull the stick back gently to climb while you are turning. Once you
have finished the turn, you are at a higher altitude, and on a different
heading. Center the stick and return to straight and level flight by
pressing X.
Immelmann Turn
The Immelmann turn is a simple yet very effective maneuver under
the proper tactical circumstances. The name is derived from its inventor, Max Immelmann, a WWI German Ace who devised the method.
In reality, the version most people are familiar with today from air
shows is not the one that Max Immelmann found so successful.
To perform the air show version, from flying level with good energy,
pull back on the joystick, bringing the aircraft into a steep climb. Maintain the climb until the aircraft passes through the vertical and completes a half loop. At the top of the loop, the plane is inverted. Roll it
back to the upright position. It is now at a higher altitude and is travelling in the opposite direction.
This air show version can be flown in different ways. If your opponent
has enough energy to follow you into the loop, there is a moment of
inertia where your speed is low, and you are a sitting target. The
reversal can be aggressive, limiting the altitude gain in exchange for
maintaining additional speed after completion, or it can be very gradual, with completion at a higher than normal altitude, but with the aircraft at near stall speed.
Max Immelmann's actual combat Immelmann is also known as a version of “Boom and Zoom” (BnZ). He would make a high energy pass
at his opponent, pulling up into an efficient vertical climb until he was
sure he was out of the range of his enemy. Then he would use a rudder reversal to drop back down from a position of advantage and
repeat his attack.
52
Page 53

WarBirds III Manual Maneuvering
Loop
The Loop is a full 360 degree rotation in pitch, in other words a vertical circle.
Perform the Loop by pulling back on the joystick and maintain back
pressure as the aircraft climbs, inverts, dives and then returns to level
flight, with the wings level at all times. At the top of the loop, the
torque effect from the engine begins to corkscrew the aircraft counterclockwise. Add right rudder and roll to counter the torque effects.
When completed, center the joystick and press X to recover straight
and level flight.
Scissors
The Scissors is a series of turns designed to force an attacker on your
six to give up their angle advantage.
This is a very aggressive move. If you try to use it, it is important that
you think aggressively. You are trying to force an overshoot—a total
reversal, putting you on the attacker’s six.
The steps to perform the Scissors are fairly simple, but it takes practice. The following steps assume that the attacker is on your six and
at a range of 6 or 7. It they are further away, use short turns to bring
them in, but do not let them get a good tracking shot at you.
It is important to fly this fight entirely in the rear view, switching from
rear to top/rear, always keeping the attacker in sight, so that you can
react quickly.
1. Begin with a fairly hard turn, held long enough that they have to
roll and turn to keep you in their sights.
2. Once they enter the turn, roll your aircraft in the opposite
direction, and then turn hard that way, keeping the nose low to
conserve energy.
3. When you see their wings start to roll in answer to your turn,
quickly roll back in the opposite direction, and turn that way with
the nose low.
4. The attacker tries to follow, and again when they start to turn, you
turn back the other way.
5. Usually, after two or three turns, they have lost their angle
advantage, and are starting to wonder what has happened. This
is the critical point of the fight.
6. When they are more in the top view than in the rear view, they
have lost their angle, and now is your chance to attack them.
53
Page 54

Maneuvering WarBirds III Manual
• You have got to be aggressive to do this move successfully, and
be fast on the reversals.
• Try to practice this by letting someone get on your six and then
shake them. Do this again and again, until you have a mental
image of where they should be when you reverse. Find the right
moment to make the turns for each plane you fly.
• The first left or right break is held longer than the rest—that is the
one that hooks the attacker. The rest are short and fast, dictated
by how long it takes the opponent to react and reverse.
Skid
The Skid is a lateral slide with a gradual loss of altitude, and is commonly used as a defensive maneuver to throw off an attacker's aim. It
can be performed without incurring a large increase in speed or
change of direction, while trading in only a small amount of altitude.
Perform a Skid by dipping one wing and then applying opposite rudder. The aircraft skids in the direction of the dipped wing.
While in this maneuver, the aircraft sinks and loses altitude. Because
your actual direction of travel is different to the direction that the aircraft is heading, it throws off the attacker’s gunnery. However, it does
not take long for an attacker to adjust their aim, so do not hold the
maneuver for too long.
Split-Ess
The Split-Ess is a half roll, followed by a half loop, to return to straight
and level flight. It is primarily a defensive move, unless you are
attacking with considerable altitude and are meeting the target nose
to nose—you would then let them pass beneath you, and then perform the Split-Ess to arrive at their six.
To perform the Split-Ess, roll the plane until it is inverted and in level
flight, and then pull back on the joystick. Maintain back pressure as
the plane dives and then returns to normal flight.
• Practice the Split-Ess over a ru nway, so that you can check your
heading visually.
• A variation is to perform an additional roll when you pass the 90
degree mark of the half loop. A roll effected while you are pointed
straight down is a very effective escape maneuver.
54
Page 55

WarBirds III Manual Maneuvering
Wing Over
The Wing Over is a common maneuver for altitude and position
recovery after a diving attack—especially after a diving attack on a
ground target.
To perform the Wing Over, pull back on the joystick to enter a climb.
Close to the top of the maneuver, the aircraft should be just above its
stall speed (but not stalling), apply full rudder to yaw the plane over
until the nose is pointing down in the opposite direction of the original
climb. Try to ensure it does not roll over onto its back when in the yaw
motion. Once the nose is pointed down, center the rudder, and enter
back into a dive.
• A tricky maneuver that is handy after a diving attack, setting you
up for a second run.
• A very common maneuver with the “Boom and Zoom” (BnZ) flyers,
especially with the fast planes.
• Performed by an experienced flyer, this maneuver can surprise a
pursuer by quickly reversing on them.
• If you have a distance lead in a chase, use this to convert from a
defensive posture to an offensive one. The trick is not to be shot
up when reversing.
Structural Limits
There are two effects on the structural limits of the airframes, overspeed and structural failure.
Overspeeding
When the plane dives too steeply and travels too quickly, when the
heavy vibration or wind force tears parts off. At these speeds, you
may be experiencing blackouts, compression, or shuddering. In fact,
those effects become a problem before you reach overspeed.
To avoid overspeeding the plane, when you begin to feel the plane
compressing (not responding to the controls due to the force of the
wind limiting movement of the control surfaces), or shuddering violently, ease back your throttle and gently pull out of the dive. Some
planes are able to dive faster than others are. A little practice gives
you a good idea where the limits are.
55
Page 56

Maneuvering WarBirds III Manual
Overstressing
Structural failure occurs when pulling too many Gs overstresses the
aircraft. It is heavily dependent on fuel load, ammo load, the altitude,
and the plane type. There is a warning sound, like metal straining and
bending, which lets you know the airframe is being overstressed.
When you hear this, ease up on your controls and throttle to avoid
losing important parts of your plane, such as the wings.
In the large bombers, overstressing limits are quickly reached, as the
big birds are not built to withstand many Gs. In most of the fighters,
you have to reach blackout, shuddering, and compression effects
long before you start ripping parts off the plane.
A bit of practice lets you know how hard you can push the aircraft.
Each plane also has a gauge indicating how many Gs you are pulling
(or pushing). Blackouts occur at +6 to +7 Gs, redouts occur at -3 to -4
Gs. The planes are generally tougher than you are in this regard. If
you can still see, chances are your airframe is not in danger.
Spin Recovery
Spins occur when one wing stalls and pulls the plane into a spin
towards the stalled wing. Normally, this is because you pulled or
pushed the nose too hard at slow speeds. You feel the plane begin to
“mush” and if you continue pulling or pushing too hard, the plane rolls
and the nose drops. If you ease up or let go of the controls, the plane
recovers very quickly.
If you continue pulling or pushing too hard, a fully fledged spin can
develop. The airspeed drops and stabilizes below stall speed, and the
plane rotates quickly along the yaw axis. Once you reach this point,
you are unable to escape until the speed is above stall speed. Follow
these steps until you see the airspeed begin to climb again, and the
rotation slow down:
1. Full rudder in the direction opposite the spin. (This is confusing if
in an inverted spin, but try to do it correctly.)
2. Push (or pull, if inverted) the nose towards the ground to build
speed.
3. If at full throttle, ease off. If the engine is at idle, ease power on. If
you have lost the engine, skip to step 6.
4. Push (or pull) the stick back and forth to develop a rhythmic swing
of the nose up and down until it is pointed towards the ground,
and you can keep it that way.
56
Page 57

WarBirds III Manual Maneuvering
5. Anything else you can think of.
6. Bail out.
7. Try not to reach step 8 before step 6.
8. When you are too low to bail out successfully, adopt the last ditch
panic procedure of entirely futile yanking of controls and crying.
9. Crash.
As a general rule, spins are a lot more dangerous the lower you are,
since there is not as much time to recover. It is a good idea to fly a little less aggressively at very low altitudes.
Be careful not to go into a secondary spin. This occurs when the
plane recovers from the first spin then enters a second one in the
other direction because of the extreme position of the controls used to
recover fr om t he f ir st . To avoid this, when yo u f e e l t h e p l an e re ac hi ng
the point of recovery, ease up and be ready to neutralize the controls.
You often find that when the plane recovers, it is inverted. Do not
panic, gently fly it out and roll to right it. Yanking the controls just after
recovering from a spin is a certain recipe for a secondary spin.
NOTE: Being inverted or spinning for too long starves the engine of
oil and causes it to seize.
Engine Management
In
WarBirds III
on the engine. Each engine has a dial in the cockpit, with oil pressure
on the left and the coolant temperature on the right. Your engine’s
coolant temperature rises if the oil pressure falls into the red area of
the gauge for too long. Once the coolant temperature needle goes
into the red on the temperature gauge, the engine may seize. Some
planes take longer than others to reach this state.
Your engine’s temperature can also become too high if you use the
WEP (War Emergency Power, F9) for too long. If this happens, the
WEP shuts off and cannot be used until the engine has sufficiently
cooled.
There are two things that can make the oil pressure drop. One is
damage to the oil system caused by enemy fire. The other is flying
inverted for too long. If the oil system is hit, head for the nearest airfield or prepare to ditch. If you have to fly inverted keep an eye on the
oil pressure gauge.
, oil pressure and coolant temperature have an effect
57
Page 58

Maneuvering WarBirds III Manual
58
Page 59

Bombing & Gunnery
Bombing
While solo combat is considered by some to be the most glamorous
form of online flying, a lot of
ing mission.
Choose the bomber you want to fly from the Plane screen (see
page 25
down menu.
. Select your bomb load using the Ordnance-Loadout drop-
Executing a Bomb Run
1. Fly in pilot mode (position1), leaving the gunners to keep enemy
interceptors at bay. Observe the situation around you by using the
numpad keys or the joystick hat. If you are flying an uncrewed
bomber, press
2. Put the plane on autopilot by
pressing X, and open the map
by pressing F1. As soon as
your bomber enters the sector
where your target is located,
make your approach turn—
ideally at a distance of 10 to 15
miles. Press Y to assume the
bombardier’s role.
3. Now press the numpad
look through the bombsight.
You see the aiming cross hairs,
and a bombsight deviation needle in the upper-right portion of the
display. You are on the right course when that needle centers and
the green light is on, but you must hold a straight and level course
for the needle to center. Press [ to increase the magnification of
the bombsight view and ] to decrease it.
Ctrl
WarBirds III
+ E to toggle the external view of the bomber.
to
2
players enjoy flying a bomb-
Bombadier’s View
Page 60

Bombing & Gunnery WarBirds III Manual
Norden Bomb Sight
4. Press
to open the bomb bay doors. When the needle is
O
centered, the green light is on, and the target is squarely in the
cross hairs, press B to release your bombs, one bomb drops for
each key press.
5. Press
to return to the cockpit, if necessary, and return to base.
Y
Setting up a Salvo
Bombs can be dropped individually or in salvos.
1. Type .salvo xx in the Radio bar, where xx is the number of bombs
in each salvo.
2. Then type .delay xxx in the Radio bar, where xxx is 50 to 1000
and is the delay in milliseconds between each bomb release.
3. Press
4. Follow the steps in Executing a Bombing run. When
Ctrl + P
xx number of bombs are dropped, with xxx milliseconds between
each drop.
60
while in flight to turn salvo mode on or off.
is pressed
B
Page 61

WarBirds III Manual Bombing & Gunnery
Gunnery
Newcomers to
WarBirds III
can gain valuable skills in leading targets
and deflection shots when taking up gunner positions, without having
to fly the aircraft. If you want to join as a gunner, it is a good idea to
ask the pilot you want to join over the radio first.
Signing-On as a Gunner
Gunner Screen
Gunner Screen
1. Make sure that you are at the same airfield as the pilot you wish
to join.
2. Select the
3. Select a pilot or an AI General (such as PATTON) from the
Gunner
tab.
Eligible Pilots drop-down menu.
4. Open positions on their aircraft, ground vehicles or ships are
listed. Select a position and then select
5. Wait for confirmation from the pilot.
6. Once you have been accepted in a gunner’s slot, tune one of the
Join
.
radio channels to 111. This plugs you into the intercom system on
that channel.
61
Page 62

Bombing & Gunnery WarBirds III Manual
Joining host drones can also be done using dot commands. Type
.aiattach <ai host> <drone #> <pos #>
Where the ai host is one of the ai Generals, such as PATTON, the
drone number is the number of the drone, and the position number is
the gunner position. If you attach to a vehicle that does not have the
specified position, it defaults to the driver/observer position.
For a list of hosts and drones, type
.aiattach
.
You can also join Carriers or any droness displayed on the Field
Screen, see page 26
by right-clicking (
Ctrl
+
for Macs) on it.
click
When attached to a drone unit, the drone can be steered via:
<heading> <speed> where <heading> is 0 - 360 deg, and
.nav
<speed> is capped to max for vehicle.
returns navigation control to drone logic.
.auto
NOTE: This is a CM configurable command
Jumping Gunner Positions
A gunner can jump from their original slot to an empty one. T o jump to
another gun, use appropriate key.
1 Observer/Cockpit 4 Left 7 Bottom
2Tail 5Right
3Nose 6Top
Controlling the Gun
Some gun positions are electric turrets that rotate using the plane’s
internal power system. Others are attached to flexible mounts, so that
the gunner physically controls the aiming process. The joystick is the
default tool for aiming and firing guns, but if you prefer to use a
mouse, press
Powered Turret Flexible Gun Mount
Any vacant gun positions are controlled by “Otto,” the automatic gunner. Otto is not enabled in all the online arenas.
62
+ M while in position.
Alt
Page 63

WarBirds III Manual Bombing & Gunnery
Artillery Spotting
Towns and villages provide artillery support. The artillery batteries
have a maximum range of 20 miles. It takes about 60 seconds for a
round to land from the time it is fired at maximum range. The town or
village nearest to your position fires the round.
All ground vehicles and aircraft with more than one position (ie gunnery positions) can call for artillery.
Firing Artillery
1. Fly over, or drive to the target.
2. Open the radio bar and fire a spotting round using the
command. This round is aimed at your position plus D2 in the
direction you are heading. You are notified of how long the round
will take to hit.
3. Adjust the firing aim from a spotting round impact with the
.correct xxx yyyy
from the previous impact in degrees from north, (not from your
heading) and
to a maximum of 1000.
4. Continue adjusting
necessary.
5. When the spotting artillery hits the target, call in a barrage with
the
.barrage
For Example:
type
sage appears. The round hits about 900 yards southwest of the target. I then type
southwest, I need it to move to the northeast, which is 45 degrees).
The next round hits the target, so I call in a barrage with
Firing a barrage clears all spotting and adjustment targeting. Firing a
spotting round clears all spotting and adjustments. If you become
confused during adjustment, simply fire another spotting round
and begin adjusting from there.
. The "Artillery spotting round will hit in 35 seconds" mes-
.spot
command, where
is the range from previous impact in yards up
yyyy
.correct xxx yyyy
command.
Flying a B25 over a town, I open the Radio bar and
.correct 45 900
(as the round has hit to the
is the compass bearing
xxx
after each impact, as
.spot
.barrage
.spot
.
Degrees of the Compass
North is 0 degrees, and travelling in a clockwise direction from there,
East is 90 degrees, South 180 degrees and West 270 degrees.
63
Page 64

Bombing & Gunnery WarBirds III Manual
Capturing Enemy Airfields & Towns
Whenever one country loses all of its airfields, the war is over. Victory
goes to the side that controls the most airfields.
There are three phases to a successful capture operation: the attack,
the capture and the defense.
Closure
There are two ways to close a town or airfield. The first is to destroy
all the important enemy ground assets. These include hangars, flak
gun emplacements, and any enemy aircraft caught on the ground.
The second is to drop a pre-determined amount of ordinance (tonnage on target), and is only available when enabled in an arena.
Destroying Assets
Destroying a hangar or other ground structure usually requires a
direct hit with a bomb or a full salvo of rockets. It is possible to do the
job with massed gunfire, but it takes a lot of time and effort and your
chances of success are low. As a rule of thumb, a rocket does about
half the damage of a 100 lb bomb. The amount of ordnance required
to knock out a specific target depends on the weight of the bomb, the
range and angle it is dropped from, and the accuracy of the bombardier. Bombs have a blast radius, so it is not always necessary to
make a direct hit, but closer is always better.
Towns and villages act as launch points for vehicles, and provide artillery support. All objects within a town are bombable including trees
and fences. The buildings within a town tie into strategy (more to follow in upcoming builds).
Antiaircraft emplacements are easy to knock out. A single bomb,
rocket, or a well-aimed machine gun burst usually does the job. However, they are very small targets and unlike hangars, they shoot back.
To capture an enemy field, you need to knock out all the emplacements.
Tonnage on Target
Tonnage on Target is when enough ordnance is deposited on a field
or town to close it, even if there are still key structures standing.
Bombs must be dropped on the target, and hit within the Tonnage on
Target raduis of the field or town.
64
Page 65

WarBirds III Manual Bombing & Gunnery
To view the status of all the fields and towns, type
.fields
in the radio
bar. The last section three columns indicate how many damage
points are currently inflicted, how many damage points are needed to
close the field, and the rebuilding rate.
The points do not equal pounds of ordnance, as a 1000 lb GP would
give a different amount of damage to a 1000 lb AP. 180,000 points is
roughly equal to five B-24s carrying a full load of 1600 pound bombs.
You can inflict more damage than that need for closure, which means
the field then takes longer to rebuild, buying time for the troops to
come in for the capture.
The Capture
Once the flak is suppressed, it is time to bring in the paratroopers to
storm the airfield and capture the base. Use the Ju52 troop transport,
or the M5 half track to deploy paratroopers near or over the airfield to
begin the ground attack.
Troops are deployed like bombs. Open the bomb bay doors and
press B to jettison each paratrooper. The aircraft must be at least 300
feet off the ground for the troops to land successfully. Once on the
ground, the troops storm the control tower. If enough troops make it
into the tower, they destroy it, completing the capture. Provide support for your troops on the ground, as the enemy will be trying to stop
the ground attack.
Capture towns by taking the city hall or church building. This is like
capturing an airfield tower. There is just one problem...your paratroops are not smart and will run straight into buildings, trees, etc. So,
bomb a path for them, since destroyed objects do not affect grunts, or
do some really good airborne drops. If you drop the paratroops inside
the courtyard, their chances of getting in are much better.
Paratroopers must land within 3500 feet of the target, or they will be
removed with the message "Grunt: You dropped me off target, sir".
Paratroopers can be shot, or you can "capture" them by driving a
ground vehicle within 15 feet of them. The Paratroopers surrender
with the message "Grunt: I surrender!" and are removed.
Putting up CAP (Combat Air Patrol)
Taking possession of an enemy base usually causes a reaction on
the part of the opposing country. It is not unlike jabbing a stick into a
hornet’s nest. Planes from any surviving enemy airfields swarm in
your direction and attempt to recapture their lost asset.
65
Page 66

Bombing & Gunnery WarBirds III Manual
Therefore, as soon as you capture a base put up an orbiting umbrella
of friendly aircraft or ground vehicles if in a village. This aerial screen
is your CAP (Combat Air Patrol), and the stronger it is, the better your
chances are of keeping control of the base you have just taken.
66
Page 67

Ground Vehicles
Selecting a Ground Vehicle
The Plane Selection screen is the default screen when you first enter
the game. If it is not already in view, exit the Setup screens by selecting
OK
or
Cancel
screens.
, or select the
Plane
tab from the top of the Selection
Plane Selection Screen
1. Select
2. Then click the drop-down menu and select a ground vehicle from
the list.
Other
in the bottom left.
Page 68

Ground Vehicles WarBirds III Manual
3. Select a country and field, town or village from the Field selection
screen (see page 26
). Tunisia is a good choice, with many fields
close together.
4. Click
Available Ground Vehicles
Start
.
Ground Ve hicle Loadout Ammo
M3 GMC halftrack 1x75mm M1597 59
M4A1 tank 1x30cal M2 1200
M16 halftrack 1x75mm L40
1x30cal M2
M5 halftrack 1x50cal M2
Paratroopers
PzKpfw IV Ausf H tank 1x75mm KwKL40
1x7.9mm MG 34
PzKpfw IV Ausf D tank 1x75mm KwKL24
1x7.9mm MG 34
PzKpfw V Ausf G tank 1x75mm KwKL70
1x7.9mm MG 34
90
1200
2000
4
87
3000
87
3000
82
3000
Driving a Ground Vehicle
1. Press
2. Press the
3. Increase the throttle using
4. Continue changing gear by pressing
change down. Changing down when in 1st gear puts you in
reverse.
5. Use the
driver—some of the tanks have little or no vision from the driving
seat.
6. Use the joystick to move the steering wheel to the right and left.
7. Use the
68
to start the vehicle’s engine.
E
key to change into 1st gear.
;
or a throttle control.
+
to change up,
;
key to toggle through the various views available to the
\
spacebar
to apply the brakes.
Shift + ;
to
Page 69

WarBirds III Manual Ground Vehicles
Manning a Gun
When driving offline, and online when Otto (the automatic gunner) is
enabled, your guns fire at the enemy automatically. However, you
may wish to man the guns yourself.
1. Jump to a gunner position by
pressing 2 or 3—not all vehicles
have a 2nd gunner position (3).
2. Move the gunsight around using the
joystick. On some tanks, the
numpad arrow keys can also be
used to fine-tune your aim. On the
Panzers, use the Q and W keys to
adjust the sight as well.
3. Use the joystick firing button or
F
on
the keyboard to fire the guns.
4. To look around without moving the gunsight, use the normal
numpad view keys, except on those tanks where this fine-tunes
the gunsight, where the up/down left/right arrow keys need to be
used.
When flying online you can man a gun on an AI or player controlled
vehicle (see “
Gunnery” on page 61 for details).
Looking through the
M4A1’s main Gunsight
Steering a Drone
When attached to a drone unit, the drone can be steered via:
<heading> <speed> where <heading> is 0 - 360 deg, and
.nav
<speed> is capped to max for vehicle.
returns navigation control to drone logic.
.auto
This is a CM configurable command
Destroying Targets with Paratroopers
The M5 halftrack carries 4 paratroopers, which can be used to
destroy or capture targets. Drive the M5 to the vicinity of the building
or target to be destroyed or captured, and then press B to send each
paratrooper on their way. See also “
Towns” on page 64.
Capturing Enemy Airfields &
69
Page 70

Ground Vehicles WarBirds III Manual
Offline Ground Vehicle Practice
To practice attacking ground vehicles offline:
1. Select
2. Select the
3. Select the Bomber Ambush mission, and any other selections, as
preferred (see “
4. Open the radio bar and enter
5. To return to flying against aircraft, open the radio bar and enter
.offbombermodel ground
To join in one of the Offline Practice missions that are set up for
Ground Vehicles:
1. Select the Offline Game tab.
2. Select Malta Assault or Tunisia Assault from the drop-down
menu.
3. The mission begins as soon as it has loaded, so click
join in the fun!
NOTE: See “Offline Missions” on page 33 for more information
about the missions available offline.
Setup
from the Main menu.
Flight
tab.
Flight & Offline Setup” on page 17).
.offbombermodel ground
Start
and
70
Page 71

Carrier Operations
The Carrier is a moving air base whose planes can add considerable
punch to any operation. Sinking an enemy ship is a major achievement—if the Carrier is close to your own airfields, it prevents any
attacks coming from it.
NOTE: Carriers are only available online or in the Carrier Practice
Mission (see “
Offline Missions” on page 33.
Takeoff Area
Carrier Vessel
To fly from a Carrier, select one from the Field Selection screen, by
clicking on it. Then, select either
Selection screen, and then choose an aircraft from the drop-down list.
Fighter
Arresting Gear
or
Bomber
from the Plane
Carrier Takeoffs
Carrier takeoffs are similar to takeoffs from land runways, but with
some additional risks. Engine torque can easily pull you over the side
if you lose control. Your plane also needs full climbing power to
become airborne once it clears the deck.
1. Select
Start
from the Main menu.
Page 72

Carrier Operations WarBirds III Manual
2. You are seated in the cockpit on the Carrier. A message is
displayed when your chocks are removed.
3. Release all controls and press
to center your joystick (this is
F12
very important).
4. Ensure that the throttle setting is on zero, and then press
to start your engine(s).
E
5. Use
6. If the aircraft starts yawing (veering to one side or the other),
or a throttle control to rev up the engine to full power.
=
Shift
+
press A to steer left, or D to steer right (do not hold the keys
down). If you have rudder pedals or a twisty joystick, use them or
that instead.
7. Press
8. As you approach the end of the carrier, ease back on the joystick
while gaining speed to trim the aircraft.
X
to lift off.
9. Once airborne, press
to raise the landing gear, and then X to
G
trim the control surfaces.
10. Move the joystick as gently as possible until you have gained
some airspeed and altitude, to avoid having a swim.
11. Center the rudder by pressing
, and when heading in the right
S
direction and at the preferred altitude press X to engage the
autotrim, which keeps the plane flying straight and level.
NOTE: You may wish to fully engage flaps and use WEP to help
with taking off in some aircraft.
Carrier Landings
Carrier landings are sometimes described as controlled crashes,
because they are such delicate maneuvers. Firstly, you need to make
a slow, level, approach, with just enough power to avoid a stall. If you
sense that your approach is not going well, throttle up and climb gently away, circle around and try again.
Carrier aircraft come to a bone-cracking halt by means of the arresting gear. There is a tail hook that extends down from the airplane’s
tail, and if everything goes right, it catches on one of the thick cables
strung across the aft part of a Carrier’s deck.
To execute a successful Carrier landing:
1. Approach the ship at a fairly steep angle, and line up with the
deck.
72
Page 73

WarBirds III Manual Carrier Operations
2. Press
3. Press
4. Use the Cockpit Lean key,
5. Just before the wheels touch down, flare the nose up and chop
to lower the landing gear and deploy the tail hook.
G
+ Q to lower the flaps fully.
Shift
, to change your view.
U
the throttle all the way down.
The ship is moving, so what may initially seem like a good approach
might be too short to compensate for the fact that the landing area is
moving away from you. Short approaches are the most common
cause of crash-landings.
Carrier-based flying is much tougher than ground-based flying. However, most veteran online players eventually strive to master it, just
because it is so exhilarating when you succeed.
Manning a Gun
When Otto (the automatic gunner) is enabled, the Carrier guns fire at
the enemy automatically . However, you may wish to man the guns
yourself.
1. Select a Carrier by right-clicking on one on the Field Selection
screen (see page 26
2. Jump to different gunner positions by pressing the appropriate
key.
1 Observer/Cockpit 4 Left 7 Bottom
).
2Tail 5Right
3Nose 6Top
3. Move the gunsight around using the joystick, or press
Alt
+ M to
enable the mouse.
4. Use the joystick firing button or
on the keyboard to fire the
F
guns.
5. To look around without moving the gunsight, use the normal
numpad view keys
When flying online you can man a gun on an AI or player controlled
vehicle (see “
Gunnery” on page 61 for details).
73
Page 74

Carrier Operations WarBirds III Manual
Torped o Attacks
Bombs can sink ships, but the attempt usually expends a lot of ordnance, since the ships are armored and can throw up a wall of flak.
However, torpedoes strike at the hull below the water line, and a single well-placed “fish” can inflict a mortal wound on a ship.
The German Ju-88 A-4 can carry two torpedos, the Ju-87D one. Just
select
Torpedo
screen (see “
Executing a successful torpedo attack is much trickier than simply
dropping a tight pattern of bombs. In order to hit a ship, the plane executing the drop needs to fly steady, low, and slow—between 25 and
120 feet (8 and 35 meters) and at about 200 mph (320 kpm). This
naturally makes it a vulnerable target, since every gun on the enemy
carrier has a nice steady shot.
When there are enemy CAPs (Combat Air Patrols) on the scene, a
torpedo plane makes an inviting, almost defenseless target, as it is
only able to make the minimum of evasive maneuvers during its
attack run. After you release the torpedos, get out of there as soon as
you can, jinking all the while.
from the
Selecting an Aircraft or Ground Vehicle” on page 25).
Load Out
drop-down menu on the Plane
The angle of attack is crucial. Ideally, a torpedo plane should
approach at a right angle as this gives the biggest target, but then the
ship’s speed becomes an issue. Remember to lead your target—torpedoes run only about twice as fast as the ships, so getting the right
lead is crucial.
A head-on or stern attack renders the torpedo plane slightly less vulnerable, but decreases its chance of scoring a direct hit.
74
Page 75

Community
Training
If you crash and burn frequently, the chances are you could benefit
from some training. The Training pages provide a wealth of hints and
tips, check them out at http://www.furball.warbirdsiii.com/krod/
also contain articles on aircraft and how they fly.
The Training arena is where you can gain invaluable advice on flying
aircraft one-to-one with a trainer. The trainers are volunteers with
years of experience flying in
WarBirds
.
There are several regular training sessions:
Euro Training
Tuesday 20.00 to 22.00
Thursday 20.00 to 22.00
GMT/BST
GMT/BST
US Training
Sunday 22.00 to 0030
Monday 21.00 to 23.30
Tuesday 21.00 to 23.30
Wednesday 20.00 to 22.30
Thursday 23.00 to 01.30
EST/EDT
EST/EDT
EST/EDT
EST/EDT
EST/EDT
Asia/Pacific Training
Monday 10.00 to 12.30
GMT/BST
If you would prefer a training session at a different time, email the
trainers at wbtrainers@ient.com.
. They
Page 76

Community WarBirds III Manual
Squadrons
The pilot who flies alone frequently dies alone, and having squad
mates to keep an eye on your six, is an invaluable help.
There are over 200 squadrons in
torically based squads, to the fly-for-fun brigades.
Flying in a squad, or at least in squad-sized groups gives you a better
chance of surviving wh en flying online. You may be invited to join a
squad, or you can browse through the Squad List, at http://
www.ient.com/warbirds/squadrons.html and click the links there to
visit individual squad Web sites.
WarBirds
Most squads have regular squad nights
where they fly together in one of the arenas. You are bound to make some life
long friends (and enemies!).
To view hcrana’s Squad Night Register,
go to http://www.menacingferrets.com/
squadnight.html .
, ranging from serious his-
Squad Maintenance Pages
Squads are created, joined and maintained through the Squad Maintenance
Pages at http://www.ient.com/warbirds/
squad/. Login using your WarBirds Login
ID and Password. If you close the page,
these will be remembered as cookies. If
you Logout, the cookies are cleared, and
you’ll need to Login again when you next
access the page.
Squad Web Site Menu
76
Creating a Squad
1. Select the Squad/Score Selection
tab.
2. Click
you are connected to the Internet).
3. Click
Squad page menu.
4. Enter a Squad Name, Motto, and
your email address.
5. Click
Launch Web site
Create a Squad
Create
.
(make sure
from the
Page 77

WarBirds III Manual Community
Your squad is created but will not become active until at least one
other person joins it.
Accept any requests to join your squad by clicking
Squad
.
Maintain Your
Joining a Squad
1. Select the Squad/Score Selection tab.
2. Click
Launch Web site
(make sure you are connected to the
Internet).
3. Click
4. Enter the name of the squad. If you do not know the exact name
Join a Squad
from the Squad page menu.
of the squad, fill in the Search for Squad section further down the
page, using either part of the squad name, or a member’s callsign
to search.
5. Type in your email address and any particular reason you wish to
join.
6. Click
Submit Request
.
Maintaining your Squad
1. Select the Squad/Score Selection tab.
2. Click
3. Click
4. Make changes to the Squad details, such as your contact email
5. Highlight a squadron member in the list, and
Launch Web site
(make sure you are connected to the
Internet).
Maintain your Squad
from the Squad page menu.
address, name and motto, as preferred.
Remove
from the Squad, as preferred.
Promote, Demote
or
Emailing your Squad
1. Select the Squad/Score Selection tab.
2. Click
Launch Web site
(make sure you are connected to the
Internet).
3. Click
4. Type text in the box, and then select
Email your Squad
from the Squad page menu.
to all the Squad members.
Find a Squad
1. Select the Squad/Score Selection tab.
2. Click
Launch Web site
Internet).
(make sure you are connected to the
Send
. The email is sent out
77
Page 78

Community WarBirds III Manual
3. Click
4. Select whether to search by Member or Partial Squad Name.
5. Type the player’s callsign, or part of a squad name in the field
Find a Squad
(such as 101), and click
from the Squad page menu.
Find
.
Scoring
Scores are updated daily at 08.00 eastern time, and the Web site lists
the top 100 fighter, bomber and squadron scores for the Main arena.
At the end of a three week Tour of Duty, all the scores are reset.
Each arena keeps track of scores for that arena, with the top 10
fighter, bomber and squad stats available from within the arena.
78
Pilot Statistics Window
Page 79

WarBirds III Manual Community
Checking your Score
In an Arena
1. Select
Password, then click
2. Select an Arena from the menu, and click
3. Select the Squad/Score selection tab.
4. Enter your callsign into the Pilot/Handle field.
5. Select
Information window pops up with your statistics.
Go Online
from the Main menu, enter your Login ID and
Get Arenas
Check pilot scores
.
Log In
.
from the drop-down menu. The
On the Web Site
1. Go to http://www.ient.com/warbirds/squad/.
2. Select Pilot Stats from the side menu.
3. Enter your callsign in the Search for Pilot field and click
To check the score of any other pilot, enter their callsign in the appropriate field.
Find
.
Checking the Bomber and Fighter Rankings
In an Arena
1. Select
Password, then click
2. Select an Arena from the menu, and click
3. Select the Squad/Score selection tab.
4. Select one of the following options from the drop-down menu:
– Show Fighter Rankings—list the top 10 fighter pilots.
– Show Bomber Rankings—list the top 10 bomber pilots
5. The Information window pops up with the statistics.
Play Online
from the Main menu, enter your Login ID and
Get Arenas
.
Log In
.
On the Web Site
1. Go to http://www.ient.com/warbirds/squad/.
2. Select one of the following from the side menu:
–
Top Fighters
–
Top Bombers
–
Top Fighter Squads
–
Top Bomber Squads
3. The top scorers are listed on the Web page.
—list the top 100 fighter piliots
—list the top 100 bomber pilots.
—list the top 100 fighter squads.
—list the top 100 bomber squads.
79
Page 80

Community WarBirds III Manual
Checking Squad Scores
1. Go to http://www.ient.com/warbirds/squad/.
2. Select Squad Stats from the side menu.
3. Enter the name of the squad. If you do not know the exact name
of the squad, fill in the Search for Squad section further down the
page, using either part of the squad name, or a member’s callsign
to search.
Events
Regular scenarios and events are created and run by players, for
players.
The Events page at http://www.ient.com/warbirds/events.html
the events for the current month, with links to the organiser’s Web
site.
European Micro Campaigns (EMC)
Wednesdays 20.00
The EMC ties together a string of loosely scripted scenarios into a
campaign, or miniature war, and is aimed at providing weekly metahistorical missions at Eur o- frie ndl y time s.
The format is sufficiently regulated to ensure enemy contact (read:
fun) and sufficiently loose to allow for surprise and stratagems.
Apart from the reduced icon settings posing a slight challenge, the
EMC format gives rookie pilots a chance to do battle under less chaotic circumstances than in the Main Arena. Because enemy plane
types are usually limited and known in advance, the pilot can fight to
the best of his own aircraft's capability—without having to worry about
all and sundry barrelling in from any direction. However, the likelyhood of intense action and devastating surprise is as high, if not
higher, in the EMC. Also, since sorties are generally made in strength,
pilots seldom have to face the enemy alone. At least until the shooting starts!
The EMC endeavour to emulate air combat history, not necessarily
recreate specific actions. While certain missions might be stipulated
in the writeup, it is up to the participants to immerse themselves in the
mind set of a particular campaign.
For more information visit their Web site at http://ienevents.com/
emchq/.
BST/GMT
lists all
80
Page 81

WarBirds III Manual Community
Scenario Lites (SL)
Sundays 15.00
Wednesdays 21.00
Fridays 22.00
The Scenario Lites are run three times a week for the Real Mode
(RM) and Relaxed Realism (RR) pilots.
Each day is independent of the others and is a two sided historically
based event where players get one life to give for their country.
For more information visit their Web site at http://ienevents.com/sl/
and be sure to read the SL How-to Guide.
EST/EDT
EST/EDT
EST/EDT
(RM)
(RM/RR)
(RM)
Squad Select Series (S3)
EST/EDT
Sundays 19.30
The Squad Select Series is a player organized event that simulates
the large-scale battles fought between opposing Air Forces during
The Second World War. Awards and cumulative scoring allow each
player to track their career and squad exploits over many events.
Events are multi-frame campaigns that promote historical flying and
plane match-ups. Sides are not always even nor have comparible aircraft, it is often luck and determined flying that wins the day.
If you do not belong to a Squad or your own Squad is not registered
to fly in S3s, there are usually plenty of other squads that will adopt
players for an event.
For more information, visit their Web site at http://www.s3events.com/
(when in session)
Target for Tonight
Thursdays 21.00 to midnight
"Target for Tonight" is an ongoing Historical Arena event which simulates a long-term historical battle. It is open to everyone with a WarBirds account. You do not have to register, you do not have to be in a
squad, you do not have to be on time. You can show up when you
want, fly or drive whatever vehicle you want, for whichever side you
want, and perform any mission that appeals to you. The Historical
Arena provides the setting and some goals—the rest is up to you.
Sometime prior to each event, a list of tactical or strategic goals for
the event will be issued by the CM staff of the Historical Arena, consistent with the terrain and timeline then being simulated. For events
which are continued from the previous week, the tactical and strategic
goals will be determined based upon the previous week's results.
For more information visit their Web site at http://www.rhino-
bytes.com/ha/.
EST/EDT
81
Page 82

Community WarBirds III Manual
82
Page 83

Customizing WarBirds III
WarBirds III
and gunsights. The Player Development Corps (PDC) has developed
plane skin packs for online use. They are downloadable from FurBall
at http://www.furball.warbirdsiii.com/downloads/pdc.html
allows players to use customised Aircraft skins, sounds
.
Loading Customized Aircraft Skins
The templates for creating your own aircraft skins are available from
the xaero’s WarBirds site on FurBall at http://furball.warbirdsiii.com/
xaero/
The site also contains many customized skins to view.
You need to have two or three files for each skin:
• wing.tga
• fuse.tga
• extra.tga (when applicable).
1. Create the folder for your customized skin with the following
structure:
WarBirds III\skins\[PLANE ID]\offline\[xxxxxxxx]
The WarBirds III and skins folder are already present.
Create the PLANE ID folder using the list over the page for ref-
erence. For the P51-D, this would be p51, for the Bf109-E4,
this would be bf109e.
Next, create the offline folder, and finally a folder xxxxxxxx with
the name of your choice. There can be multiple folders inside
the offline folder, and you are able to select any of the skins
you have stored them.
Page 84

Customizing WarBirds III WarBirds Manual
2. Copy the wing.tge, fuse.tga and extra.tga (if applicable) files into
the xxxxxxxx folder.
3. Launch WarBirds III. Select the plane that you want to customize.
Open the Radio bar and type .planeskin xxxxxxxx where
xxxxxxxxx is the name of the folder you created.
4. Type .planeskin into the Radio bar to return to the default artwork.
For Example:
1. You have two skins for the Bf109E, and you'd like to have both of
them available when you fly offline. One was created by HotSeat,
the other by YellowHammer .
2. Create
bf109\offline\
folder. Then create new
offline folder. You now have two folders,
III\skins\bf109e\offline\hotseat
IIIskins\bf109e\offline\yellow
3. Copy HotSeat's wing.tga and fuse.tga into the hotseat folder, and
folders inside the
yellow
and
and
hotseat
WarBirds
ready for the artwork.
WarBirds III\skins\
folders inside the
WarBirds
YellowHammer's wing.tga, and fuse.tga into the yellow folder.
4. Launch WarBirds, and select the Bf109-E4.
5. Open the Radio bar and type .planeskin yellow. You now have
YellowHammer's scheme on the Bf109-E. Similarly type
.planeskin hotseat, to have HotSeat's scheme.
6. To return to the default, type .planeskin.
Plane IDs
The Plane IDs are not case specific:
109GR6 A36 B17 B24D B24J B25C BF109E BF109F
BF109G BF109K BF110G DEST1 F4F3 F4F4 F4U1 F4U4
F6F5 FM2 FW1904 FW1908 FW190D HURRI1 HURRI2 JU52
JU87D JU87G JU88A KAGA KI43 KI84 M16 M3
M5 ME262 MKIV MKIVD MKV P38 P38F P38L
P40B P51 P51B SEAF2 SPIT1 SPIT5 SPIT9 XXX
YAK3 YAK9D ZERO ZERO21 ZERO52
84
Page 85

WarBirds Manual Customizing WarBirds III
Customizing Gun Sights & Gauges
Some pilots believe that mastering tricky deflection shots gives them
an edge in combat, and customizing your gun sight can improve
accuracy with this.
It also allows you to add range marks to your sight’s horizontal bars. If
you set those marks for, say, 200 yards, and you close on an enemy
plane until its wingspan fills the distance between those marks on
your sight, you know you are about 200 yards away. This is important
in some special events, where enemy planes are displayed—for maximum realism—with limited range data on the screen. Some players
also use this process to establish torpedo range marks on the outer
edge of their screen, and use them as the default sighting device
whenever they plan to fly a mission against enemy ships.
Y ou can specify a custom sight for each type of aircraft you plan to fly,
or change the default to what you want, otherwise, the game defaults
to the standard cross hair reticule.
The gun sights and gauges in the 3D cockpits may be customized by
placing subsitute texture files into the skins folders as
and/or
For example:
custom gunsite.tga in the
gauges.tga
.
To create a custom gunsite for your P38L, place the
WarBirds III\skins\p38L
directory.
gunsite.tga
The default gun sight and gauges files are located in iEntertainment
Network\WarBirds III\textures. Use these files as templates for your
personalized versions.
• German gauges—GEGS.tga
• Japanese gauges—JAGS.tga
• Russian gauges—RSGS.tga
• USA gauges—USGS.tga
• All gunsites—GUNSITE.tga
Notes:
• gunsite.tga should be saved as uncompressed 32-bit RGB with
the alpha channel containing the blending information for the corresponding colors in the RGB channels.
• gauges.tga file should be saved as uncompressed 24-bit RGB
using the same layout as the country template (German, Japan, or
US/Brita i n).
85
Page 86

Customizing WarBirds III WarBirds Manual
Customizing Sounds
All WarBirds III sounds are in the WarBirds III/Sounds subdirectory as
.DLL files. Each plane has its own .DLL file that contains or points to
the appropriate sounds for that plane's engine and guns. The other
file in the directory is sounds.dll, and it contains the default engine
and gun sounds and all the other sounds.
General Sounds
You can replace any of the default sounds by placing a 22k 8 bit
mono .wav file in the sounds directory. The .wav file must be named
appropriately for it to be read into the game. Here is a list of the
sound names for each sound. They must have the .WAV extension.
EXP1 Explosion 1 EXP2 Explosion 2
EXP3 Explosion 3 BOMB Bomb Release
ROCKET Rocket Firing GEAR Gear Extending/
Retracting
PING Hit Sound PING2 Hit Sound 2
PING3 Hit Sound 3 STALL Stall Horn
DEATH Player plane explodes BAIL Bail out sound
SCREECH Tire Screech SCRAPE Airframe Scraping on
DAMAGE Player plane has a part
damaged
BAYOPEN Bomb Bay doors opening/
closing
FLAK1 Flak explosion FLAK2 Flak explosion 2
FLAK3 Flak explosion 3 START Engine start
FLAPS Flaps extending/retracting GEXCEED Airframe under high G
OVRSPD Airframe buffeting INLINE1 Engine sound
INLINE2 Engine sound INLINE3 Engine sound
RADIAL1 Engine sound RADIAL2 Engine sound
WIND Wind
TURRENT Turret sound for gun-
Ground
ners(programmer spell-
ing)
sound(used in intro
screen only)
load and landing gear
overspeeding
86
Page 87

WarBirds Manual Customizing WarBirds III
RADIAL3 Engine sound JETENG Engine sound
30CAL1 Gun sound 30CAL2 Gun sound
50CAL1 Gun sound 50CAL2 Gun sound
20MM1 Gun sound 20MM2 Gun sound
30MM Gun sound 30MM2 Gun sound
For Examplt: To replace the bomb release sound with a whistling
bomb sound. Create or copy a 22k 8 bit mono .wav and place it in the
WarBirds III\sounds directory and rename it to bomb.wav.
Plane Sounds
To create your own custom sounds for a specific plane, create a subdirectory in your sounds directory with the same name as the plane's
.dll file. In that subdirectory , place your .wav files with the following
names:
ENGINE.WAV Engine sound
GUN.WAV Primary guns
CANNON.WAV Secondary guns
ORD.WAV Heavy cannon(P39 and B25H)
For Example:
To replace the engine sound of the Fw 190A-8. Create a subdirectory in the sounds directy called FW1908 (The appropriate subdirectory name is the .dll name in the sounds directory) and
copy the replacement sound files into that directory.
NOTE: Using large sound files may cause a decrease in your
computer's performance when running WarBirds III.
87
Page 88

Customizing WarBirds III WarBirds Manual
88
Page 89

Dot “.” Commands
All host commands are preceded by a “.” (period). Some host commands can be issued in flight via the radio, others can only be issued
when on the ground, in the Control Tower.
If the radio entry bar is not visible at the bottom of the screen, press /
once to activate it before issuing a host command.
.aiattach <ai host>
<drone #> <pos #>
.ailist Gives list of ai hosts and drones which can
.arnaflags List all the arena flags (settings) for the
.barrage Order the artillery to fire a barrage at the last
.bglodrenderrange
<x>
.bgminrenderrange
<x>
.clear Resets your score.
.conv <xxx> Sets gun convergence distance where xxx is
.correct <xxx> <yyy> Orders the artillery to adjust their spot firing
Attach as a gunner to drone # under the
command of ai host in position number # (1
to 7).
join as a gunner using the .aiattach command.
arena.
spotting round position.
Sets the level of detail.
Sets the minimum range in yards at which
objects are rendered.
1 to 999.
round by xxx degrees from north, and by yyy
yards.
Page 90

Dot “.” Commands WarBirds Manual
.country <x> Tune Radio 1 to country x where x is 1 (red),
2 (green), 3 (gold) or 4 (purple).
.cpu Reports the processor codepath in use.
.date <xx> <yy>
<zzzz>
Set the date to month (xx), day (yy) and year
(zzzz), where xx is 1 to 12, yy is 1 to 31 and
zzzz is 1900 to 2999
.delay <xxx> Sets the delay in milliseconds between each
bomb in the salvo where xxx is 50 to 1000.
.destroyall Destroy all objects (except the tower) to
begin the takeover of a field quickly during
testing.
.detroyob <x> Destroys a single object given the object
number x.
.e Exit plane (must be on ground and stopped
when online).
.ez Enable easy mode.
.field -1 Start flight in the air.
.field <x> Start at field x where x is the field number.
.fields Shows a listing of the available fields, their
current ownership and status.
.flightstart <x> <y>
<alt>
Start flight at designated coordi nate s and
altitude.
.flushplanes Unloads and forces planeskins to reload
(offline, in Tower only).
.fly To the runway.
.framemode <x> Enables the graphical repres enta tio n of the
framerate when x is 2, returns to normal
when x is 1.
.fuel <xxx> Sets fuel level for your plane. Replace xxx
with percentage of load preferred.
.gamma <x.x> Adjust the gamma level, where x.x is 0.0 to
2.0.
.grndlabels Display the ID of ground objects.
90
Page 91

WarBirds Manual Dot “.” Commands
.handle <xxxx> Change your handle to xxxx where xxxx can
be up to 20 characters long.
.hl xxxxxx Player xxxxxx's ic on is colored white. This
can only be done to friendlies.
.hls All members of your squad have their icons
colored white, as long as they are flying for
the same country.
.hurtme <xxx> Destroys the selected part (list below).
.ignore List all ignored players.
.ignore <xxxxxx> Stop receiving messages from player
xxxxxx. Up to 32 players can be ignored this
way.
.invulnerable Make aircraft invulnerable to weapon hits.
.listen all Start receiving messages from all ignored
players.
.listen <xxxxxx> Start receiving messages from ignored
player xxxxxx.
.lodrender Sets the level of detail.
.masterview Slave an observer’s view to your own.
.minrender <x> Sets the level of detail.
.offtime Set the time offline.
.pitchladder <x> Displays the pitchladder when x is 1, doesn't
when x is 0.
.privatearena <pass-
word>
Allows the user to enter a private arena,
when they enter the correct password.
.radio Display currently tuned channels.
.radio <x> <yyy> Tunes Radio x to channel yyy.
radiolines <x> The number of radio buffer lines displayed
where x is 1 to 64.
radiowidth <xxx> Sets the radio width to xxx pixels where x is
220 to screen reso lut ion min us 32 . Def aul t is
440.
91
Page 92

Dot “.” Commands WarBirds Manual
.rank Displays the top 100 pilots.
.ros Shows the roster of players currently online.
.rudderreapeat <x> Toggles rudder keys repeating on being held
down or needing multiple key presses,
where x=1 (repeating) or 0 (single strokes).
.runway <x> Select runway where x is -1 to n. -1 is an air
start when offline, and n depends on the
number of entry points at a given airfield.
.salvo <xx> Sets number of bombs to drop with each key
press when in “pickle” mode.
.score <xxxxxx> Shows a player’s score. Replace xx xxxx with
the player's callsign or leave blank to view
your own.
.setauotlogin <x> Toggles auto login wher e x is 0 or 1.
.setsavepass <x> Toggles saving password where x is 0 or 1.
.shanghai Steal another player and set them as
observer in your co ck pi t.
.slewfeet <x> Sets the number of feet to slew per frame
(for slew mode—modified by throttle).
.slip <x> T oggles the slip indicator above the gun sight
where x is 0 or 1.
.smoke Activate the "airshow" smoke.
.speed <xxx> Sets the autotrim to speed xxx mph
.spot Orders an artillery round to be fired D2
ahead of your position.
.terrain <x> Change the offline terrain to terrain x, where
x is the name of the terrain.
.trimrepeat <x> Toggles trim keys repeating on being held
down or needing multiple key presses,
where x=1 (repeating) or 0 (single strokes).
.unlimitedammo No limit to ammo (works with bombs and
rockets).
92
Page 93

WarBirds Manual Dot “.” Commands
.varlevel <x> Change the number of polygons rendered for
the terrain where x is 250 to 50,000
.wbuffer <x> Toggles the w-buffer where x is 0 or 1.
Damageable Parts List for use with
Eng1 Elev Centfuel Rightgun
Eng2 Hstab Rearfuse Topgun
Eng3 Rudder Centfuse Bottomgun
Eng4 Vstab Pilotarm Leftwing
Hydeng1 Lailaron Pilot Rightwing
Hydeng2 Railaron Tailgun Rightgear
Hydeng3 Leftfuel Nosegun Leftgear
Hydeng4 Rightfuel Leftgun Flaps
.hurtme
93
Page 94

Dot “.” Commands WarBirds Manual
Offline AI Dot Commands
.offairattack Sets offline game to air attack (AI
planes).
.offfreeflight Sets offline game to free flight
.offbomberambush Sets offline game to bomber mission
Air Attack Mission
.offrps show all Display all the available AI-controlled
aircraft.
.offrps add <model> Adds <model> to the user-selected
list of AI-controlled aircraft. Once the
user has created this list, the AI-con-
trolled aircraft are chosen from it.
.offrps show selected Displays the current user-selected list
of AI-controlled aircraft.
.offrps random Returns to the normal, randomlyse-
lected AI-controlled aircraft.
.offrps nme <x> Sets number of enemy aircraft where
x = 0 to 4. Specifying 0 returns to ran-
dom numbers of friendly and enemy.
Bomber Ambush Mission
.offbombers <x> Sets the number of AI-controlled
bombers, where x = 1 to 8.
.offbombermodel show Displays the available AI-controlled
bomber models.
.offbombermodel <model> Specifies the AI-controlled bomber
model, instead of a random selection.
.offbombermodel random Returns to a random selection of AI-
controlled bomber models.
.offbombermodel ground Toggles the selection of ground vehi-
cles instead of aircraft in the mission.
94
Page 95

Keyboard Commands
Keyboard commands and Joystick controls can be customized using
the Input Mapper screen (see page 24
Aircraft Controls
Center Joystick. . . . . . . . . . . . . . . . . . . . . . . . . . . . . . . . . . . . . . . F12
Left Rudder. . . . . . . . . . . . . . . . . . . . . . . . . . . . . . . . . . . . . . . . . . . . A
Right Rudder . . . . . . . . . . . . . . . . . . . . . . . . . . . . . . . . . . . . . . . . . . D
Center Rudder . . . . . . . . . . . . . . . . . . . . . . . . . . . . . . . . . . . . . . . . . S
Gear Up/Down . . . . . . . . . . . . . . . . . . . . . . . . . . . . . . . . . . . . . . . . . G
Wheel Brakes . . . . . . . . . . . . . . . . . . . . . . . . . . . . . . . . . . . . Spacebar
Dive Brakes (if applicable) . . . . . . . . . . . . . . . . . . . . . . . . . . Spacebar
Flaps Down 1 Notch . . . . . . . . . . . . . . . . . . . . . . . . . . . . . . . . . . . . . Q
Flaps Full Down . . . . . . . . . . . . . . . . . . . . . . . . . . . . . . . . . . Shift + Q
Flaps Up 1 Notch . . . . . . . . . . . . . . . . . . . . . . . . . . . . . . . . . . . . . . . W
Flaps Full Up . . . . . . . . . . . . . . . . . . . . . . . . . . . . . . . . . . . . Shift + W
Autotrim Level. . . . . . . . . . . . . . . . . . . . . . . . . . . . . . . . . . . . . . . . . . X
Autotrim Speed. . . . . . . . . . . . . . . . . . . . . . . . . . . . . . . . . . . .Shift + X
Autotrim Angle . . . . . . . . . . . . . . . . . . . . . . . . . . . . . . . . . . . . Ctrl + X
Elevator Trim Up . . . . . . . . . . . . . . . . . . . . . . . . . . . . . . . . . . . . . . . K
Elevator Trim Down . . . . . . . . . . . . . . . . . . . . . . . . . . . . . . . . . . . . . . I
Rudder Trim Left. . . . . . . . . . . . . . . . . . . . . . . . . . . . . . . . . . . . . . . . .J
Rudder Trim Right . . . . . . . . . . . . . . . . . . . . . . . . . . . . . . . . . . . . . . .L
Aileron Trim Right. . . . . . . . . . . . . . . . . . . . . . . . . . . . . . . . . . . . . . . . ,
Aileron Trim Left . . . . . . . . . . . . . . . . . . . . . . . . . . . . . . . . . . . . . . . . M
Clear Trims. . . . . . . . . . . . . . . . . . . . . . . . . . . . . . . . . . . . . . . . . . . . G
).
Page 96

Keyboard Commands WarBirds Manual
Aircraft Controls (continued)
Eject. . . . . . . . . . . . . . . . . . . . . . . . . . . . . .Enter Enter Enter (quickly)
Bail Out . . . . . . . . . . . . . . . . . . . . . . . . . . . . . . . . . . . . . . . . . .Ctrl + B
Open Chute (after bailing) . . . . . . . . . . . . . . . . . . . . . . . . . . . . . Enter
Exit Plane (on runway and online) . . . . . . . . . . . . . . . . . . . . . .Ctrl + B
Toggle Mouse Control . . . . . . . . . . . . . . . . . . . . . . . . . . . . . . . Alt + M
Radio Keys
Radio 1. . . . . . . . . . . . . . . . . . . . . . . . . . . . . . . . . . . . . . . . . . . . . . . . /
Radio 2. . . . . . . . . . . . . . . . . . . . . . . . . . . . . . . . . . . . . . . . . . .Shift + /
Radio 3. . . . . . . . . . . . . . . . . . . . . . . . . . . . . . . . . . . . . . . . . . . Ctrl + /
Radio 4. . . . . . . . . . . . . . . . . . . . . . . . . . . . . . . . . . . . . . . . . . . . Alt + /
Expand/Shrink text window . . . . . . . . . . . . . . . . . . . . . . . . . . . . . . Tab
Send Check 6 call . . . . . . . . . . . . . . . . . . . . . . . . . . . . . . . Right-click
Engine Controls
Start/Kill Engine 1 . . . . . . . . . . . . . . . . . . . . . . . . . . . . . . . . . . . . . . .E
Select & Start all Engines . . . . . . . . . . . . . . . . . . . . . . . . . . . Shift + E
Throttle Up 5 Percent. . . . . . . . . . . . . . . . . . . . . . . . . . . . . . . . . . . . .=
Throttle Down 5 Percent . . . . . . . . . . . . . . . . . . . . . . . . . . . . . . . . . . -
Full Throttle . . . . . . . . . . . . . . . . . . . . . . . . . . . . . . . . . . . . . . .0 (zero)
Engine Idle. . . . . . . . . . . . . . . . . . . . . . . . . . . . . . . . . . . . . . . . . . . . .1
War Emergency Power (WEP). . . . . . . . . . . . . . . . . . . . . . . . . . . . .F9
Next Fuel Tank. . . . . . . . . . . . . . . . . . . . . . . . . . . . . . . . . . . . . . . . . . .
Bombing Keys
Open/Close Bomb Bay . . . . . . . . . . . . . . . . . . . . . . . . . . . . . . . . . . O
Drop Bombs. . . . . . . . . . . . . . . . . . . . . . . . . . . . . . . . . . . . . . . . . . . .B
Salvo Toggle (Pickle mode) . . . . . . . . . . . . . . . . . . . . . . . . . . .Ctrl + P
Jump to Bombardier position . . . . . . . . . . . . . . . . . . . . . . . . . . . . . . .Y
Change to Bombsight when in Bombardier position . . . . . Numpad 2
Bombsight Increase Magnification. . . . . . . . . . . . . . . . . . . . . . . . . . . [
Bombsight Decrease Magnification . . . . . . . . . . . . . . . . . . . . . . . . . . ]
96
Page 97

WarBirds Manual Keyboard Commands
View K eys
Forward . . . . . . . . . . . . . . . . . . . . . . . . . . . . . . . . . . . . . . . Numpad 8
Left . . . . . . . . . . . . . . . . . . . . . . . . . . . . . . . . . . . . . . . . . . . Numpad 4
Right. . . . . . . . . . . . . . . . . . . . . . . . . . . . . . . . . . . . . . . . . . Numpad 6
Back . . . . . . . . . . . . . . . . . . . . . . . . . . . . . . . . . . . . . . . . . . Numpad 2
Up. . . . . . . . . . . . . . . . . . . . . . . . . . . . . . . . . . . . . . . . . . . . Numpad 5
Forward/Right. . . . . . . . . . . . . . . . . . . . . . . . . . . . .Numpad 9 or 8 + 6
Forward/Left . . . . . . . . . . . . . . . . . . . . . . . . . . . . . .Numpad 7 or 8 + 4
Forward/Up. . . . . . . . . . . . . . . . . . . . . . . . . . . . . . . . . . Numpad 8 + 5
Right/Up . . . . . . . . . . . . . . . . . . . . . . . . . . . . . . . . . . . . Numpad 6 + 5
Left/Up . . . . . . . . . . . . . . . . . . . . . . . . . . . . . . . . . . . . . Numpad 4 + 5
Right/Rear . . . . . . . . . . . . . . . . . . . . . . . . . . . . . . .Numpad 3 or 6 + 2
Left/Rear. . . . . . . . . . . . . . . . . . . . . . . . . . . . . . . . .Numpad 1 or 4 + 2
Rear/Up . . . . . . . . . . . . . . . . . . . . . . . . . . . . . . . . . . . . Numpad 5 + 2
Autopan Left . . . . . . . . . . . . . . . . . . . . . . . . . . . . . . . Ctrl + Numpad 4
Autopan Up. . . . . . . . . . . . . . . . . . . . . . . . . . . . . . . . Ctrl + Numpad 5
Autopan Right. . . . . . . . . . . . . . . . . . . . . . . . . . . . . . Ctrl + Numpad 6
Change view type. . . . . . . . . . . . . . . . . . . . . . . . . . . . . . . . . Shift + O
View Badguy toggle . . . . . . . . . . . . . . . . . . . . . . . . . . . . . . . . Shift + 8
Select next Badguy. . . . . . . . . . . . . . . . . . . . . . . . . . . . . . . . . Shift + 9
Overlay Map Toggle . . . . . . . . . . . . . . . . . . . . . . . . . . . . . . . . . . . . F1
Map Zoom In . . . . . . . . . . . . . . . . . . . . . . . . . . . . . . . . . . . . . Shift + [
Map Zoom Out . . . . . . . . . . . . . . . . . . . . . . . . . . . . . . . . . . . . Shift + ]
External View Toggle (when allowed). . . . . . . . . . . . . . . . . . . Ctrl + E
External View Zoom Out. . . . . . . . . . . . . . . . . . . . . . . . . . . . . . . . . . . ]
External View Zoom In . . . . . . . . . . . . . . . . . . . . . . . . . . . . . . . . . . . . [
Move around in external view. . . . . . . . . . . . . . . .Numpad arrow keys
Zoom Out (Field of View bigger). . . . . . . . . . . . . . . . . . . . . . . . . . . . V
Zoom In (Field of View smaller) . . . . . . . . . . . . . . . . . . . . . . . . . . . . Z
Default Field of View. . . . . . . . . . . . . . . . . . . . . . . . . . . . .Ctrl + V or Z
Change Cockpit Head position. . . . . . . . . . . . . . . . . . . . . . . . . . . . . . \
Cockpit lean (for Carrier landings) . . . . . . . . . . . . . . . . . . . . . . . . . . U
Track View (chase cam). . . . . . . . . . . . . . . . . . . . . . . . . . . . . . Alt + V
Snap to Instrument view. . . . . . . . . . . . . . . . . . . . . . . . . . . . . . . . F11
Snap to Gunsight view . . . . . . . . . . . . . . . . . . . . . . . . . . . . . . . . . . F4
Toggle Sticky snap . . . . . . . . . . . . . . . . . . . . . . . . . . . . . . . . .Shift + P
Icon Toggle. . . . . . . . . . . . . . . . . . . . . . . . . . . . . . . . . . . . . . . . . . . F2
97
Page 98

Keyboard Commands WarBirds Manual
Ground Vehicle Keys
Change up a Gear . . . . . . . . . . . . . . . . . . . . . . . . . . . . . . . . . . . . . . . ;
Change down a Gear. . . . . . . . . . . . . . . . . . . . . . . . . . . . . . . Shift + ;
Cycle through different views. . . . . . . . . . . . . . . . . . . . . . . . . . . . . . . \
Adjust MKIV sight by 500 yards. . . . . . . . . . . . . . . . . . . . . . . . Q & W
Jump to Driver position . . . . . . . . . . . . . . . . . . . . . . . . . . . . . . . . . . .1
Jump to Gunner position . . . . . . . . . . . . . . . . . . . . . . . . . . . . . . . . . .2
Finely adjust aim of main turrets . . . . . . . . . . . . . . . . . . 2, 3, 4, 5, & 6
Gunnery Keys
Fire Guns . . . . . . . . . . . . . . . . . . . . . . . . . . . . . . . . . . . . . . . . . . . . . .F
Fire Secondary Gun. . . . . . . . . . . . . . . . . . . . . . . . . . . . . . . . . . . . . .B
Select Secondary weapon . . . . . . . . . . . . . . . . . . . . . . . . . Backspace
Jump to Observer position. . . . . . . . . . . . . . . . . . . . . . . . . . . . .Space
Jump to Pilot position. . . . . . . . . . . . . . . . . . . . . . . . . . . . . . . . . . . . .1
Jump to Tail Gun position. . . . . . . . . . . . . . . . . . . . . . . . . . . . . . . . . . 2
Jump to Nose Gun position . . . . . . . . . . . . . . . . . . . . . . . . . . . . . . . .3
Jump to Left Gun position . . . . . . . . . . . . . . . . . . . . . . . . . . . . . . . . .4
Jump to Right Gun position . . . . . . . . . . . . . . . . . . . . . . . . . . . . . . . .5
Jump to Top Gun position . . . . . . . . . . . . . . . . . . . . . . . . . . . . . . . . .6
Jump to Bottom Gun position. . . . . . . . . . . . . . . . . . . . . . . . . . . . . . .7
Toggle Otto (automatic gunner) . . . . . . . . . . . . . . . . . . . . . . . .Ctrl + T
Toggle Gunner Maintenance screen . . . . . . . . . . . . . . . . . . . .Ctrl + G
Interface K eys
Toggle Clouds . . . . . . . . . . . . . . . . . . . . . . . . . . . . . . . . . . . . . Alt + K
Toggle Horizon Texture . . . . . . . . . . . . . . . . . . . . . . . . . . . . . . Alt + H
Toggle Aircraft Debris. . . . . . . . . . . . . . . . . . . . . . . . . . . . . . . . Alt + N
Toggle Cockpit . . . . . . . . . . . . . . . . . . . . . . . . . . . . . . . . . . . . .Ctrl + C
Toggle HUD (red text) . . . . . . . . . . . . . . . . . . . . . . . . . . . . . . .Ctrl + H
Toggle Ocean. . . . . . . . . . . . . . . . . . . . . . . . . . . . . . . . . . . . . .Ctrl + O
Toggle Slew mode (offline only) . . . . . . . . . . . . . . . . . . . . . . . .Ctrl + S
Toggle Detail . . . . . . . . . . . . . . . . . . . . . . . . . . . . . . . . . . . . . .Ctrl + V
Take Screenshot . . . . . . . . . . . . . . . . . . . . . . . . . . . . . . . . . . . Alt + S
Take Screenshot (Mac only) . . . . . . . . . . . . . . . . . . . Cmd + Shift + 3
Select Stick Set 1. . . . . . . . . . . . . . . . . . . . . . . . . . . . . . . . . . . . . . .F5
Select Stick Set 2. . . . . . . . . . . . . . . . . . . . . . . . . . . . . . . . . . . . . . .F6
Select Stick Set 3. . . . . . . . . . . . . . . . . . . . . . . . . . . . . . . . . . . . . . .F7
Select Stick Set 4. . . . . . . . . . . . . . . . . . . . . . . . . . . . . . . . . . . . . . .F8
98
Page 99

Apendix A: Cockpit Controls
There are several aircraft available in
a unique cockpit layout. The same instruments are present in each
cockpit, with a few exceptions.
Spitfire 3D Cockpit
WarBirds III
, each of which has
When trying out a new aircraft for the first time, try performing various
maneuvers and observe which instrument changes. For example,
you can engage the flaps by pressing Q before you even fire up the
engines. Finding the gear indicator by pressing G while still on the
ground is not to be recommended, however, as it generally damages
the aircraft when it collapses to the runway.
Page 100

Apendix A: Cockpit Controls WarBirds Manual
The units used on the altimeter depend on the aircraft. An aircraft of
German manufacture has metric units whereas one of English manufacture has imperial units.
Gun Sight
The color of the gun sight cross
hairs indicates your country
allegiance.
It is a standard fixed gun sight,
without any computing abilities.
The center of the sight represents
the theoretical line that your gun
rounds pass through when your
aircraft is under a 1 G load at the
convergence range you have
selected.
Fuel Gauge
The fuel gauge indicates the percentage of fuel
remaining, with F being 100 percent and E being 0
percent. When fuel reaches a critically low level, a
red low fuel light illuminates.
The amount of fuel you have at the start of a flight
is selected in the Plane screen, see page 106
.
100
Flaps & Gear Indicator
Flaps:
ably between aircraft. It can be a lever, a dial or a
ladder gauge.
Gear Indicator:
the gear is down. Flying with the gear down
causes a lot of drag and is detrimental to the
maneuverability of the aircraft.
The indicator for the flaps varies consider-
The gear indicator indicates when
Altimeter
The altimeter displays the altitude above mean
sea level (not the height above the ground). The
small hand indicates thousands of units, the long
hand hundreds of units, the red mark tens of thousands of units.
 Loading...