


AUTOMATIC ICE MAKER
INSTALLATION INSTRUCTIONS
An authorized service technician is recommended to install the ice maker kit.

 WARNING
•To avoid electric shock, which can cause death or severe personal injury, disconnect the refrigerator from electrical power before connecting a water supply line to the refrigerator.
•Connect the ice maker to a potable water supply only.
NOTE
Check with your local building authority for recommendations on water lines and associated materials prior to installing your new refrigerator. For household water line hookup from the home water supply system to the unit, Frigidaire recommends for homes with existing valves its Smart Choice® water line kit 5304437642 (with a 6 Stainless Steel Water Line) and for homes without an existing valve, Frigidaire recommends its Smart Choice® water line kit 5304493869 (with a 6 Polyline Waterline). Please refer to www.frigidaire.com for more information.
|
Tools Needed: |
|
• Flat head screw driver |
|
• Phillips or Quadrex driver |
• ¼" Hex driver |
|
• Gloves |
• Drill |
|
• Needle nose pliers |
|
|
|
Ice Maker (IM117000) Kit Components
Parts needed for install inside the unit
5304525288 |
5304520536 |
5304520538/5304520539 |
5304520535 |
5304520537 |
Shoulder Screw |
Ice Maker |
Cover with Door |
Ice Bin |
Bracket (30" only) |
QTY: 5 |
QTY: 1 |
QTY: 1 |
QTY: 1 |
QTY: 1 |
Parts needed for install on back side of the unit
218515401 |
|
|
|
Hose and |
|
5304520540 |
|
Harness Clip |
241500304 |
|
|
(30" only) |
#8 screw |
Water Valve |
Tube |
QTY: 3 |
QTY: 2 |
QTY: 1 |
QTY: 1 |
5304455846 |
5303001193 |
|
Clamp ¼" |
Clamp ½" |
|
QTY: 1 |
QTY: 1 |
P/N: A13109105 |
|
|

Ice Maker Installation Instructions
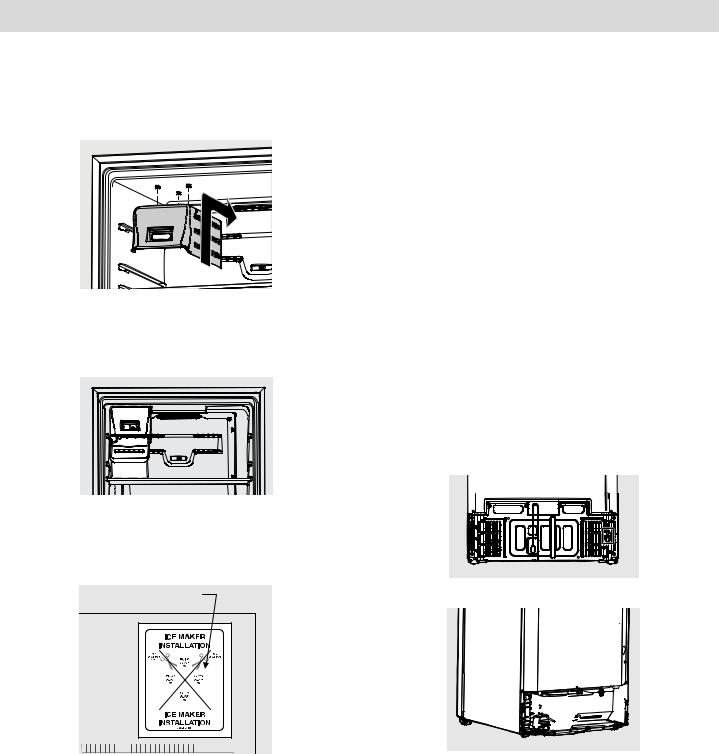
1.Unplug refrigerator from electrical outlet.
2.Lift the freezer shelf up and out. Set aside.
5.For a 30" wide refrigerator install the bracket onto the ice maker. The Ice maker will slide onto the mounting features on the bracket and snap into place. The locking feature is located on the rear of the ice maker.
3.Remove water inlet and electrical cover, located on the inside of the unit, by inserting a flathead screwdriver on left side of opening in the small cover. Push to the right to disengage the snap.
4.Locate dimples in the freezer liner for screw placement (a flashlight may help). Align the shoulder screws with the dimples. Push the screws to penetrate the freezer liner and drive the screws in until they are tight against the liner. Use 2 screws on the left side wall, and 3 on the top of the liner.
To Ceiling
Install 5
Shoulder
Screws
To Wall
2 |
1 |
Locking |
|
Feature |
30" wide refrigerator
Use the bracket with the ice maker
28" wide refrigerator
Use the ice maker only
6.Plug the ice maker in the electrical connector on the back wall.
Align Water
Inlet
Plug


Electrical
 Connec
 to
to

 r
r


Make sure the ice maker water channel is under the water fill tube, and then slide the ice maker onto the 2 side wall shoulder screws. The ice maker will snap into place.
Fill Tube is Above IM Water Channel
2
Ice Maker Installation Instructions
7.Install the plastic shutter into the window in the front of the cover. The shutter snaps into the clips on inside face of the cover, no tools are required. Slide the ice maker cover onto the shoulder screws on top of the unit until it locks into place with a snap.
8.To install the ice bin, the freezer shelf needs to be in the lowest position. Slide the ice bin between the side wall and the right side of the ice maker housing positioned on the shelf.
10. Install the water line by screwing the nut on the end of the tube onto the water inlet. Tighten the nut until snug, and then tighten an additional ¼ turn with needle nose pliers. (See A.)
11.Install the 2 water line clips on the unit evenly spaced inside the depressed area located under the water inlet. Insert the water line tube into the clips. (See B.)
|
A |
|
Water |
|
Inlet |
Water |
B |
Line |
|
|
Clip |
9.Locate the Ice maker installation label on the rear outside right top corner of the refrigerator. Cut the label on the dashed lines, and push flaps inward until they stick to the unit.
Cut on dashed lines and push in on flaps
*If you have a unit with an access cover, continue to page 4 for additional installation instructions. For a unit without an access cover, continue to page 5.
Units with access cover
Units without access cover
3
 Loading...