


FGB557CESE
Frigidaire FGB557CESE, FGB557CESD, FGB557CESC, FGB557CESB, FGB557CESA Owner’s Manual
...
Page
_a_ol....................................................................2
istration..................................................................2
)ortantSafetyInstructions..................................................3-4
GroundingInstructions..............................................................5
OvenIgnition.............................................................................5
LiquefiedPetroleum(Propane)GasConversion(somemodels)5
OvenBaking...............................................................................6
Air CirculationintheOven.........................................................6
OvenCleaning.........................................................................7-8
SettingtheControlsforaCleanCycle........................................8
GeneralCleaning........................................................................9
SingleOvenModels
• BeforeSettingOvenControls...........................................10
• SettingOvenControls......................................................10
• AdjustingOvenTemperature............................................10
• GeneralCleaning.........................................................10-11
• ChangingOvenLight.......................................................11
DoubleOvenModels
• Settingthe Clockand Minute Timer ................................. 12
• BeforeSetting OvenControls ........................................... 13
• SettingOvenControls ...................................................... 14
• GeneralCleaning......................................................... 14-15
• ChangingOvenLight ....................................................... 16
• Adjusting OvenTemperature ............................................ 16
Avoid Service Checklist ....................................................... 17-18
Notes....................................................................................... 19
Warranty.................................................................................. 20
Visit the Frigidaire Web Site at:
http://www.frigidaire.com
READ AND SAVE THESE INSTRUCTIONS 318200953 (0111) Rev. C
Product Registration
Register Your Product
The PRODUCT REGISTRATION CARD
should befilled in completely, signed and
returned to Electrolux Home Products
North America.
This Owner's Guide contains general
operating instructions for your appliance
and feature information for several
models. Your appliance may not have all
the described features.
Thank you for choosing this appliance. The information contained within this
Owner's Guide will instruct you on how to properly operate and care for yourwall
oven. Pleaseread through the information contained in your literature pack to learn
more about your new appliance.
Record Your Model and Serial Numbers
Record inthe space provided belowthe model and serial numbers found on the serial
plate located onthe lower left hand inner trim of the oven or on the side of the lower
oven frame (models with two ovens).
Model Number:
Serial Number:
Date Purchased:
Note: Theinstructions appearing in this Owner's Guide are not meant to cover every
possible condition and situation that may occur. Common senseand caution must
be practiced when installing, operating and maintaining any appliance.
Versibn en espafiol
Sideseaobtener una copia en espahol de
este Manual del Usuario, sfrvaseescribir a
ladirecci6n que se incluye a contin uaci6n.
Solicite la P/N 318204012.
Spanish Owner's Guides
Electrolux Home Products North America
Consumer Relations
P.O. Box 212378
Augusta, Georgia
30917-2378
If the information in this manual is not
followed exactly, a fire or explosion may result causing
property damage, personal injury or death.
FOR YOUR SAFETY:
m Do not store or use gasoline or other flammable vapors
and liquids in the vicinity of this or any other appliance.
WHAT TO DO IF YOU SMELL GAS:
• Do not try to light any appliance.
• Do nottouch any electrical switch; do not use any phone
in your building.
• Immediately call your gas supplier from a neighbor's
phone. Follow the gas supplier's instructions.
• If you cannot reach your gas supplier, call the fire depart-
ment.
Installation and service must be performed by a quali-
fied installer, servicer or the gas supplier.
© 2001 White Consolidated Industries
All rights reserved 2
IMPORTANT SAFETY INSTRUCTIONS
Read all instructions before using this appliance.
Save these instructions for future reference.
This guide contains important safety symbols and instructions. Please pay special attention to these symbols and follow all
instructions given. Here isa brief explanation of these symbols.
This symbol will help alert you to situations that may cause serious bodily harm, death or property damage.
This symbol will help alert you to situations that may cause bodily injury or property damage.
• Remove all tape and packaging wrap before using the
appliance. Destroy the carton and plastic bags after
unpacking the appliance. Neverallowchildren to playwith
packaging material. Do not removethewiring label and other
literature attached to the back of the appliance. Do not
remove model/serial number plate.
• Proper Installation--Be sure your appliance is properly
installed and grounded by a qualified electrician or
installer inaccordance with the National Electrical Code
ANSl/NFPA No. 70 (U.S.A.) or CSA C22.1, PART 1
(Canada)--Iatest editions and local code requirements.
Install only per installation instructions provided in the
literature package for this appliance.
Ask your dealer to recommend aqualified installer, technician
or an authorized repair service. Know how to disconnect the
electrical power to the appliance at the circuit breaker or fuse
box in caseof an emergency.
Electronic controllers can be damaged by
cold temperatures. When you use your appliance for the
first time, or if it has been used for a long period of time,
make sure that it has been exposed to a temperature
above 0°C/32°F for at least 3 hours before con necting itto
the power supply.
• UserServicing--Do not repair or replace any part of the
appliance unless specifically recommended in the
manuals. All other servicing should be done only by a
qualified technician. This may reduce the risk of personal
injury and damage to the appliance.
• Storage in or on Appliance--Flammable materials
should not be stored in an oven, or in the broiler drawer
(if equipped). This includes paper, plastic and cloth items,
such as cookbooks, plasticware and towels, as well as
flammable liquids. Do not store explosives, such as aerosol
cans, in or near the appliance.
Do not use the wall oven for storage.
Do not store items of interest to children in
the cabinets above an appliance. Children climbing on the
appliance to reach items could be seriously injured.
Do not leave children alone--Children should not be
left alone or unattended inthe area where an appliance
isin use. They should never be allowed to sit or stand on any
part of the appliance.
DO NOTTOUCH INTERIOR OVEN BURNEROR INTERIOR
SURFACES OF THE WALL OVEN UNTIL THEY HAVE
COOLED. The oven heating burner may be hot even though
the flames are not visible. Areas nearthe burner may become
hot enough to causeburns. During and after use,do not touch,
or let clothing orother flammable materials touch these areas
until they have had sufficient ti me to cool. Among theseareas
arethe ovenvent openings, the surfaces near these openings,
oven door, window and broiler drawer.
Wear Proper Apparel--Loose-fitting or hanging
garments should never be worn while using the
appliance. Do not let clothing or other flammable materials
contact hot surfaces.
• Never modify or alter the construction of the appliance
by removing panels, wire covers, or any other part of
the product.
• Remove the oven door from any unused wall oven if it
is to be stored or discarded.
Stepping, leaning or sitting on the door(s)
or drawer of this appliance can result in serious injuries
and may also causedamage to the appliance. Do not allow
children to climb or play around the appliance.
Never use your appliance for warming or
heating the room.
• Do Not Use Water or Flouron Grease Fires--Smother the
fire with a pan lid, or use baking soda, a dry chemical
or foam-type extinguisher.
• When heating fat or grease, watch it closely. Fat or
grease may catch fire if allowed to become too hot.
UseOnly Dry Potholders--Moist or damp potholders on
hot surfaces may result in burns from steam. Do not let
the potholderstouch the flame or burners. Do not useatowel
or other bulky cloth instead of a potholder.

IMPORTANT SAFETY INSTRUCTIONS (continued)
• Do Not Heat Unopened Food Containers--Build-up of
pressure may cause the container to burst and result in
injury.
• Removethe oven doors from any unused appliance if it
isto be stored or discarded.
• IMPORTANT--Do not attempt to operate the oven
during a power failure. If the power fails, always turn
the oven off. If the oven is not turned off and the power
resumes, the oven will begin to operate again. Food left
unattended could catch fire or spoil.
IMPORTANT INSTRUCTIONS FOR
USING YOUR OVEN
• Use Care When Opening an Oven DooriStand to the side
of the appliance when opening the door of a hot oven. Let
hot air orsteam escape before you remove or replace food in
the oven.
• Keep Oven Vent Ducts Unobstructed. The wall oven is
vented at the upper control panel trim or grille. Touching the
surfaces in this area when the wall oven is operating may
causesevereburns. Also, do not placeplastic or heat-sensitive
items near the oven vent. These items could melt or ignite.
• Placement of Oven Racks. Always place oven racks in
desired location while oven iscool. Ifthe rack must be moved
while the oven is hot, use extreme caution. Use potholders
and grasp the rack with both hands to reposition. Do not let
potholders contact the oven burner flame or interior of the
oven or broiler drawer. Remove all utensils from the rack
before removing the rack.
• Do not usethe broiler pan without its insert. The broiler
panand gridallow dripping fatto drain and bekept away from
the high heat of the broiler.
• Do not cover the broiler grid or oven bottom with
aluminum foil. Exposed fat and grease could ignite.
• Do not touch a hot oven light bulb with a damp cloth.
Doing so could causethe bulb to break. Disconnect the oven
or shut off the power to the oven before removing and
replacing the bulb.
IMPORTANT INSTRUCTIONS FOR
CLEANING YOUR OVEN
• Clean the wall oven regularly to keep all parts free of
grease that could catch fire. Do not allow grease to
accumulate.
Kitchen Cleaners/AerosolsiAIways follow the
manufacturer's recommended directions for use. Be aware
that excessresidue from cleanersand aerosols may ignite
causingdamage and/or injury.
SELF-CLEANING OVENS
• Clean in the self-cleaning cycle only the parts of the
oven listed inthis owner's guide. Before self-cleaning the
oven, remove the broiler pan and any utensils stored in the
oven.
• Do not clean the oven door gasket. The door gasket is
essential for a good seal. Care should betaken not to rub,
damage or move the gasket.
• Do not use oven cleaners. No oven cleaneror oven liner
protective coatingof any kind should be used inor around any
part of the oven.
The health of some birds is extremely
sensitive to the fumes given off during the self-clea ncycle
of any range. Move birds to another wel ventilated room.
IMPORTANT SAFETY NOTICE
The California Safe Drinking Water and Toxic Enforcement Act requires the Governor of California to publish a list of substances
known to the state to cause cancer, birth defects or other reproductive harm, and requires businessesto warn customers of potential
exposure to such substances.
SAVE THESE INSTRUCTIONS
4
Grounding Instructions (electric ignjtion models only)
IMPORTANT: READ AND SAVETHESEINSTRUCTIONS.
This appliance isequipped with a 3-prong grounding plug for
your protection against shock hazard and should be plugged directly into a
properly grounded receptacle. DO NOTcut or remove the grounding prong from
this plug.
Forpersonal safety, this oven must be properly grounded. For maximum safety,
the power cord must be plugged into a 120Vi60 Hz. outlet that is correctly
polarized and properly grounded.
If a two-prong wall receptacle is the only available outlet, it is the personal
responsibility of the consumer to have it replaced with a properly grounded
three-prong wall receptacle installed by a qualified electrician.
DO NOT UNDER ANY CIRCUMSTANCES CUT OR REMOVE THE THIRD ROUND
GROUNDING PRONG FROM THE POWER CORD PLUG. SEETHE INSTALLATION
INSTRUCTIONS PACKAGED WITH THIS OVEN FOR COMPLETE INSTALLATION
AND GROUNDING INSTRUCTIONS. DO NOT OPERATE THE OVEN USING A
TWO-PRONG ADAPTER OR AN EXTENSION CORD.
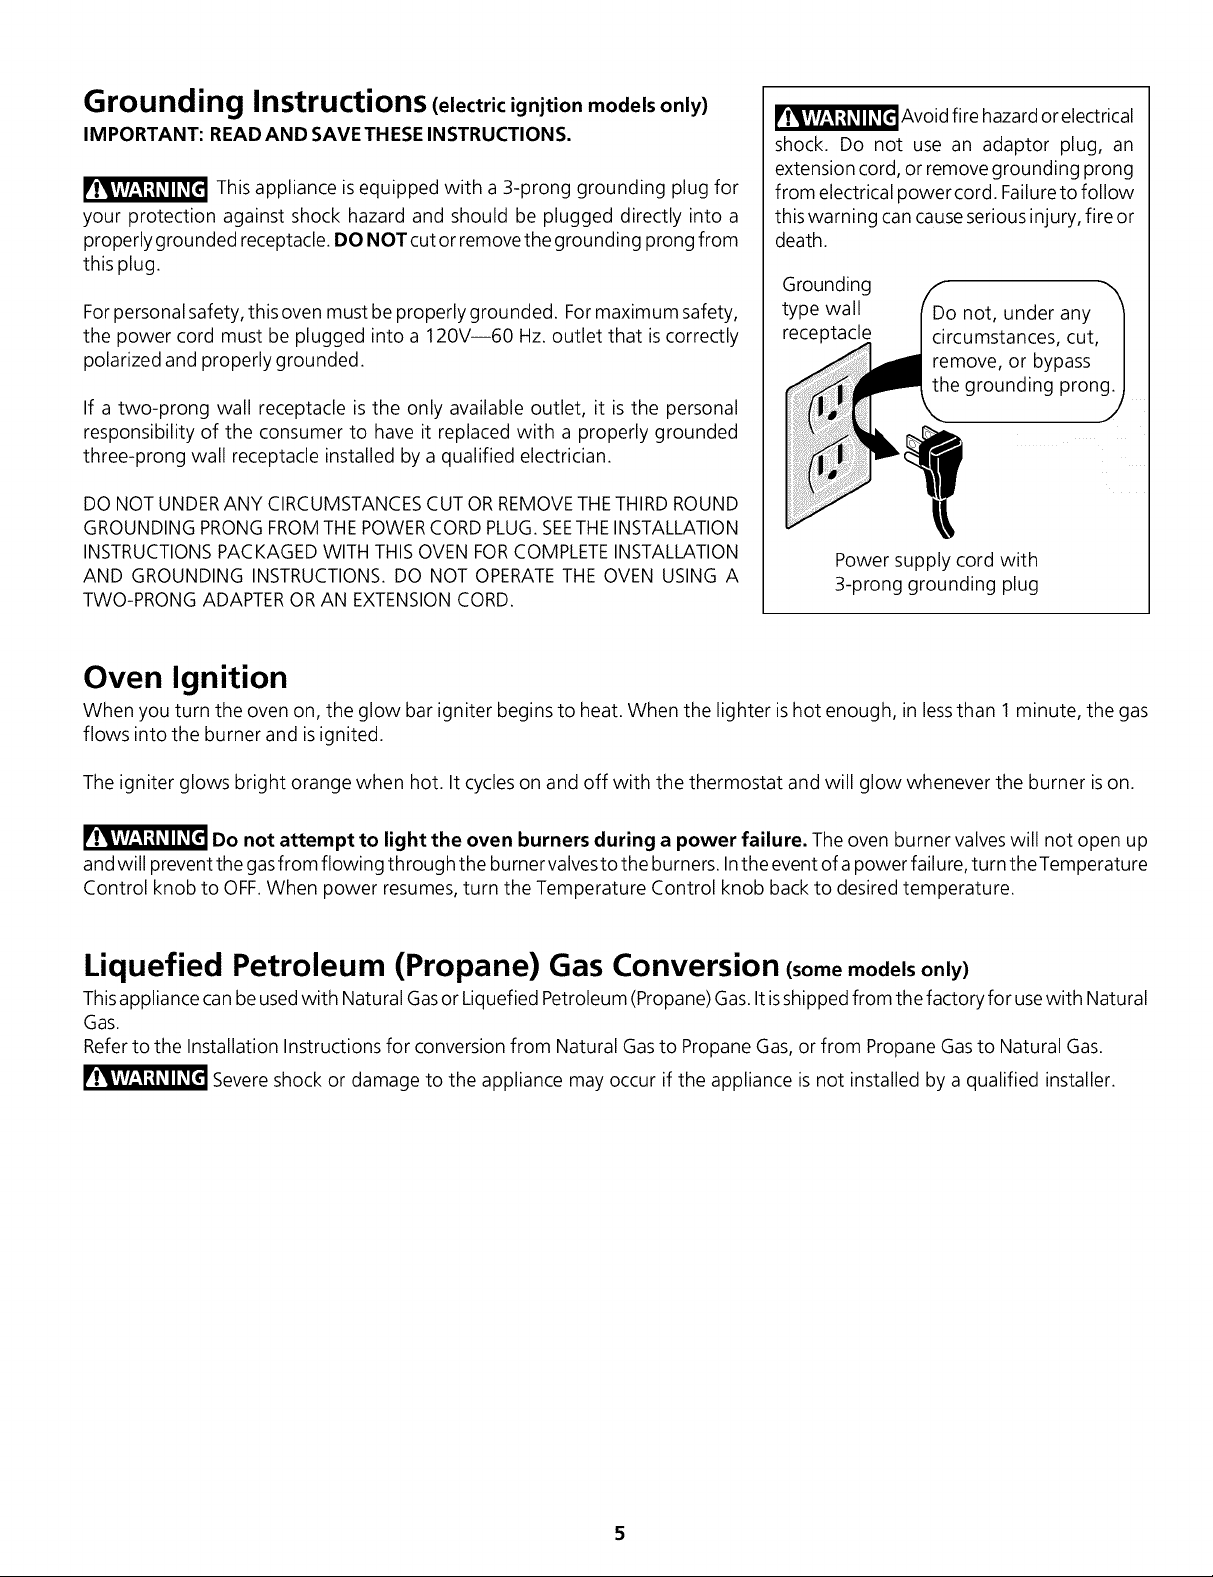
_Avoid fire hazard or electrical
shock. Do not use an adaptor plug, an
extension cord, or remove grounding prong
from electrical power cord. Failureto follow
this warning can causeserious injury, fire or
death.
Grounding
type wall
receptacle
Power supply cord with
3-prong grounding plug
Do not, under any
circumstances, cut,
remove, or bypass
the grounding prong.
Oven Ignition
When you turn the oven on, the glow bar igniter begins to heat. When the lighter ishot enough, in lessthan 1 minute, the gas
flows into the burner and is ignited.
The igniter glows bright orange when hot. It cycles on and off with the thermostat and will glow whenever the burner ison.
Do not attempt to light the oven burners during a power failure. The oven burner valves will not open up
and will prevent the gasfrom flowing through the burner valvesto the burners. Inthe event of a power failure, turn the Temperature
Control knob to OFF.When power resumes, turn the Temperature Control knob back to desired temperature.
"'--'uqueT,eaPetroleum -" rropane/Gas Conversion (somemodelsonly)
Thisappliance can be usedwith Natural Gasor Liquefied Petroleum (Propane) Gas.Itisshipped from the factory for usewith Natural
Gas.
Refer to the Installation Instructions for conversion from Natural Gas to Propane Gas,or from Propane Gasto Natural Gas.
Severe shock or damage to the appliance may occur if the appliance is not installed by a qualified installer.
Oven Baking
"Baking" means to cook foods such ascakesor casserolesby dry heat in a covered or uncovered pan. Roasting, often confused
with baking, means to cook meat in an uncovered pan. To Bake or Roast, follow the instructions inthe Setting Oven Controls
section.
Baking Problems and
Solutions Chart (Below)
Product Expectations
Thecooking times andtemperatures needed to bakea product mayvaryslightly from
your previously owned appliance
Baking Problems Causes Corrections
Cookiesand
biscuits burn on the
bottom.
Cakes too dark on top
or bottom.
Cakes not done in the
center.
Cakes not level.
• Cookies and biscuits put into the
oven before the preheating time (10
minutes approx.) is completed.
• Oven rack overcrowded.
• Dark pan absorbs heat too fast.
• Cakes put into the oven before
preheating time (10 minutes approx.)
is completed.
• Rack position too high or low.
• Oven too hot.
• Oven too hot. •
• Incorrect pan size. •
• Pan not centered in oven. •
• Wall oven not level. •
• Pan too close to oven wall or rack
overcrowded.
• Pan warped. •
• Oven rack not level.
• Allow oven to preheat to the selected temperature before placing
food in oven.
• Choose pan sizes that will permit 2-4" (5-10 cm) of air space on all
sides when placed in the oven.
• Use a medium-weight aluminum baking sheet.
• Allow oven to preheat to the selected temperature before placing
food in the oven.
• Use proper rack position for baking needs.
• Set oven temperature 25°F/12°C lower than recommended.
Set oven temperature 25°F/12°C lower than recommended.
Use pan size suggested in recipe.
Use proper rack position and place pan sothere is 2-4" (5-10 cm)
of space on all sides of pan.
Placea marked glass measuring cup filled with some water on the
center of the oven rack. If the water level is uneven, refer to the
installation instructions for leveling the range.
Besure to allow 2-4" (5-10 cm) of clearance on all sidesof each pan
in the oven.
Do not use pans that are dented or warped.
Check oven rack for flatness and proper positioning.
Foods not done when
cooking time is up.
• Oven too cool.
• Oven overcrowded.
• Oven door opened too frequently.
• Set oven temperature 25°F/12°C higher than suggested and bake
for the recommended time.
• Besureto remove all pansfrom the oven except the ones to be used
for baking.
• Open oven door only after shortest recommended baking time.
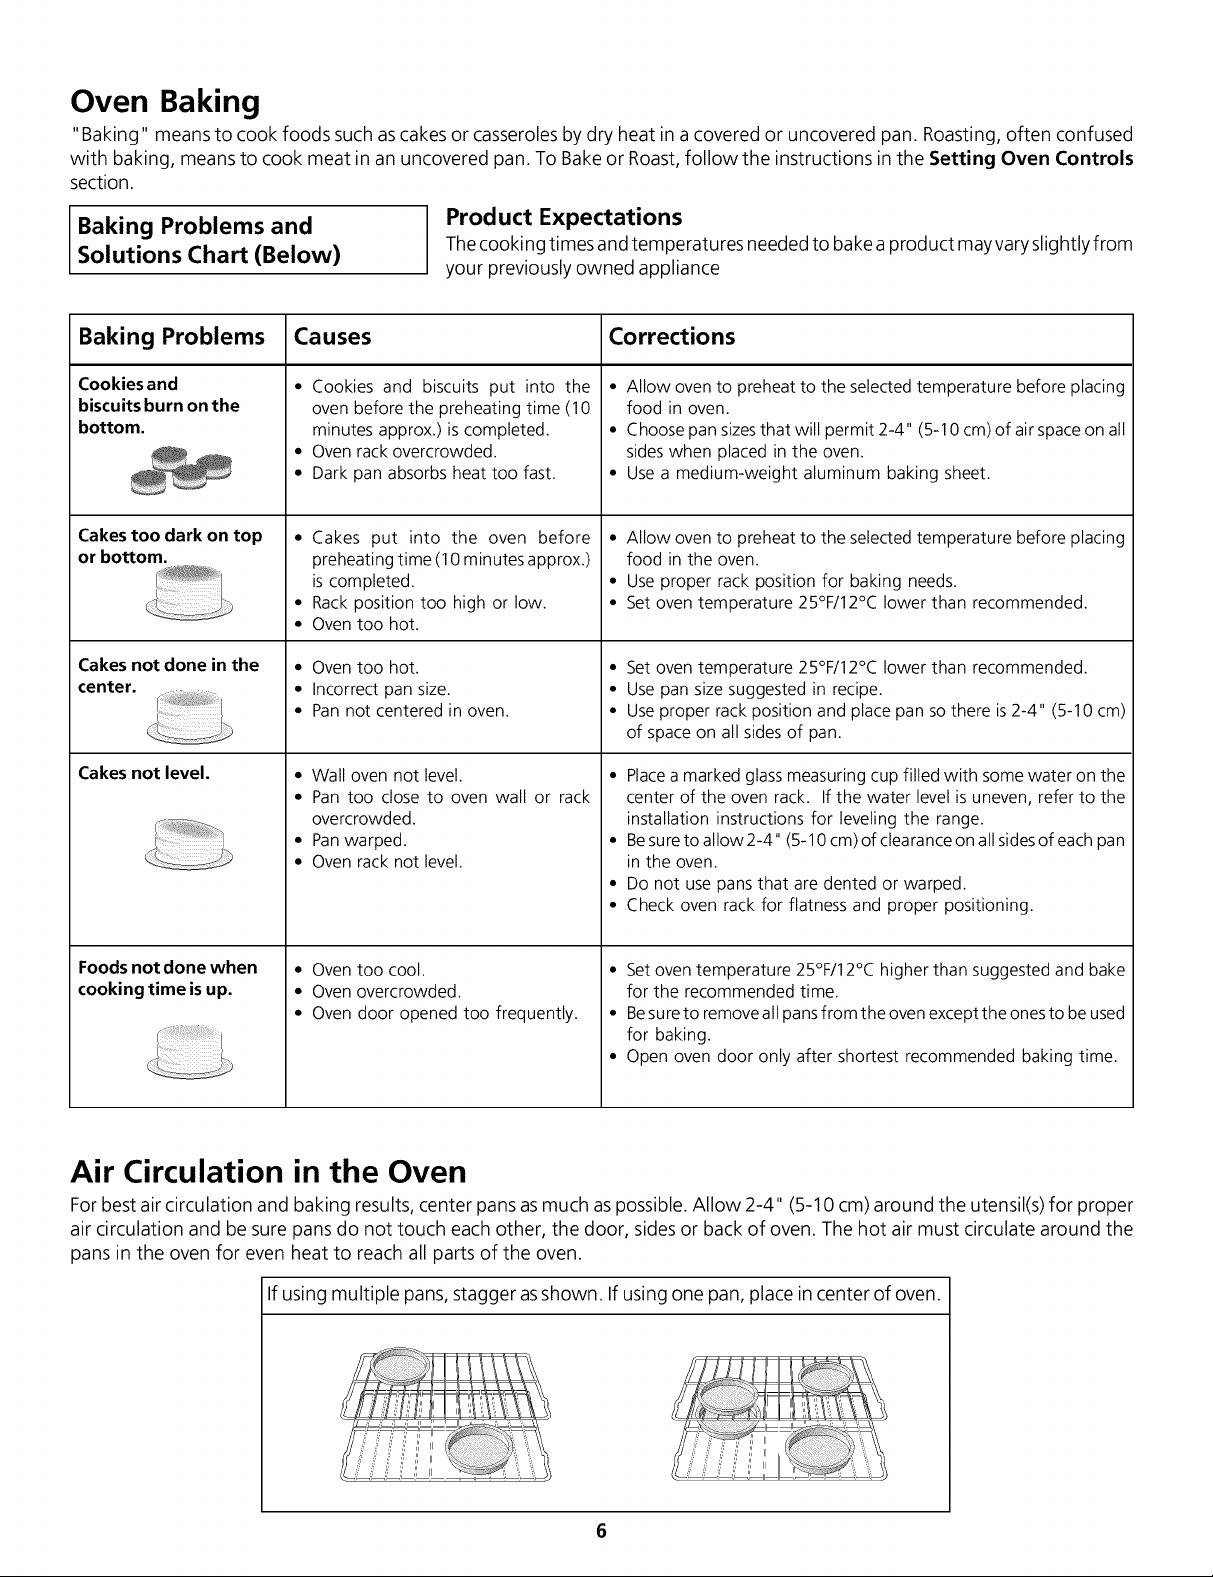
Air Circulation in the Oven
For best air circulation and baking results, center pans as much as possible. Allow 2-4" (5-10 cm) around the utensil(s) for proper
air circulation and be sure pans do not touch each other, the door, sides or back of oven. The hot air must circulate around the
pans in the oven for even heat to reach all parts of the oven.
If using multiple pans,stagger asshown. If using one pan, place in center of oven.
 Loading...