


 Loading...
FORD C-MAX Owner's Manual

The information contained in this publication was correct at the time of going to print. In the interest of continuous development, we reserve the right to change specifications, design or equipment at any time without notice or obligation. No part of this publication may be reproduced, transmitted, stored in a retrieval system or translated into any language in any form by any means without our written permission. Errors and omissions excepted.
© Ford Motor Company 2011
All rights reserved.
Part Number: (CG3567en) 08/2011 20110621083908

Table of Contents
Introduction |
|
About This Manual........................................... |
7 |
Symbols Glossary............................................. |
7 |
Parts and Accessories..................................... |
7 |
Alarm |
|
Principle of Operation.................................. |
48 |
Arming the alarm........................................... |
49 |
Disarming the alarm..................................... |
49 |
At a Glance |
|
At a Glance........................................................ |
10 |
Child Safety |
|
Child Seats......................................................... |
19 |
Booster Seats.................................................. |
20 |
Child Seat Positioning................................... |
21 |
ISOFIX Anchor Points................................... |
24 |
Child Safety Locks.......................................... |
25 |
Occupant protection |
|
Principle of Operation................................... |
27 |
Fastening the seat belts.............................. |
29 |
Seat belt height adjustment...................... |
33 |
Seat belt reminder......................................... |
33 |
Using seat belts during pregnancy.......... |
33 |
Disabling the passenger airbag................ |
34 |
Keys and Remote Controls |
|
General Information on Radio |
|
Frequencies.................................................. |
36 |
Programming the remote control............ |
36 |
Changing the remote control |
|
battery............................................................ |
36 |
Locks |
|
Locking and Unlocking................................. |
39 |
Keyless Entry.................................................... |
43 |
Global Opening and Closing...................... |
45 |
Engine immobiliser |
|
Principle of Operation................................... |
47 |
Coded keys........................................................ |
47 |
Arming the engine immobiliser................. |
47 |
Disarming the engine immobiliser........... |
47 |
Steering Wheel |
|
Adjusting the Steering Wheel................... |
50 |
Audio Control.................................................. |
50 |
Voice Control..................................................... |
51 |
Wipers and Washers |
|
Windscreen Wipers....................................... |
52 |
Autowipers........................................................ |
52 |
Windscreen Washers.................................... |
53 |
Rear Window Wiper and Washers........... |
53 |
Headlamp Washers...................................... |
54 |
Checking the Wiper Blades........................ |
54 |
Changing the Wiper Blades....................... |
54 |
Technical Specifications............................. |
56 |
Lighting |
|
Lighting Control............................................... |
57 |
Autolamps........................................................ |
58 |
Front Fog Lamps............................................ |
58 |
Rear Fog Lamps............................................. |
58 |
Adjusting the Headlamps - Vehicles |
|
With: Adaptive Front Lighting/Xenon |
|
Headlamps................................................... |
59 |
Headlamp Levelling...................................... |
59 |
Hazard Warning Flashers............................ |
59 |
Direction Indicators....................................... |
60 |
Cornering Lamps........................................... |
60 |
Interior Lamps.................................................. |
61 |
Removing a Headlamp................................ |
62 |
Changing a Bulb............................................. |
62 |
Bulb Specification Chart............................. |
69 |
Windows and Mirrors |
|
Power Windows............................................... |
71 |
1

Table of Contents
Exterior Mirrors................................................. |
72 |
Electric exterior mirrors................................ |
73 |
Auto-Dimming Mirror.................................... |
74 |
Blind Spot Monitor......................................... |
74 |
Instrument Cluster |
|
Gauges................................................................ |
77 |
Warning Lamps and Indicators................. |
79 |
Audible Warnings and Indicators.............. |
81 |
Information Displays |
|
General Information...................................... |
83 |
Trip Computer................................................. |
89 |
Personalised Settings.................................. |
89 |
Information Messages................................. |
90 |
Climate Control |
|
Principle of Operation................................ |
100 |
Air Vents.......................................................... |
100 |
Manual Climate Control............................. |
101 |
Automatic Climate Control...................... |
103 |
Heated Windows and Mirrors.................. |
105 |
Auxiliary Heater............................................ |
106 |
Seats |
|
Sitting in the Correct Position................. |
109 |
Manual Seats................................................. |
109 |
Head Restraints............................................. |
110 |
Power Seats...................................................... |
111 |
Rear Seats........................................................ |
112 |
Heated Seats................................................. |
120 |
Convenience features |
|
Sun Shades...................................................... |
121 |
Instrument Lighting Dimmer.................... |
122 |
Clock.................................................................. |
122 |
Cigar Lighter.................................................... |
122 |
Auxiliary Power Points................................ |
123 |
Cup Holders.................................................... |
123 |
Storage compartments.............................. |
124 |
Glasses Holder............................................... |
124 |
Childminder Mirror........................................ |
125 |
Auxiliary input (AUX IN) socket............... |
125 |
USB port........................................................... |
125 |
Satellite Navigation Unit Holder............. |
126 |
Floor Mats........................................................ |
126 |
Starting and Stopping the |
|
Engine |
|
General Information..................................... |
127 |
Ignition Switch................................................ |
127 |
Steering Wheel Lock.................................... |
127 |
Starting a Petrol Engine............................. |
128 |
Starting a Diesel Engine............................. |
128 |
Keyless Starting............................................ |
129 |
Diesel Particulate Filter.............................. |
130 |
Switching Off the Engine............................ |
131 |
Engine Block Heater..................................... |
131 |
Start-Stop |
|
Principle of Operation................................. |
133 |
Using start-stop............................................ |
133 |
Eco Mode |
|
Principle of Operation................................. |
135 |
Using Eco mode............................................ |
135 |
Fuel and Refuelling |
|
Safety Precautions...................................... |
136 |
Fuel Quality - Petrol.................................... |
136 |
Fuel Quality - Diesel.................................... |
136 |
Catalytic Converter...................................... |
136 |
Fuel filler flap.................................................. |
137 |
Refuelling........................................................ |
138 |
Fuel Consumption........................................ |
138 |
Technical Specifications............................ |
139 |
2

Table of Contents
Transmission |
|
Manual Transmission................................... |
141 |
Automatic Transmission............................. |
141 |
Brakes |
|
Principle of Operation................................. |
144 |
Hints on Driving With Anti-Lock |
|
Brakes........................................................... |
144 |
Parking Brake................................................. |
144 |
Stability Control |
|
Principle of Operation................................. |
145 |
Using Stability Control............................... |
145 |
Hill Start Assist |
|
Principle of Operation................................ |
146 |
Using hill start assist................................... |
146 |
Parking Aids |
|
Principle of Operation................................ |
148 |
Using the Parking Aid - Vehicles With: |
|
Rear Parking Aid....................................... |
148 |
Using the Parking Aid - Vehicles With: |
|
Front and Rear Parking Aid................... |
149 |
Active Park Assist |
|
Principle of Operation................................. |
152 |
Using active park assist.............................. |
152 |
Rear view camera |
|
Principle of Operation................................. |
155 |
Using the Rear View Camera................... |
155 |
Cruise Control |
|
Principle of Operation................................. |
158 |
Using Cruise Control.................................... |
158 |
Speed Limiter |
|
Principle of Operation................................ |
160 |
Using the speed limiter.............................. |
160 |
Load Carrying |
|
General Information..................................... |
161 |
Luggage Anchor Points............................... |
161 |
Luggage Covers............................................. |
163 |
Rear Under Floor Storage.......................... |
163 |
Cargo Nets...................................................... |
163 |
Roof Racks and Load Carriers................. |
165 |
Towing |
|
Towing a Trailer............................................. |
168 |
Retractable tow ball................................... |
168 |
Driving Hints |
|
Running-In....................................................... |
172 |
Cold Weather Precautions......................... |
172 |
Driving Through Water................................ |
172 |
Roadside Emergencies |
|
First Aid Kit....................................................... |
173 |
Warning Triangle........................................... |
173 |
Emergency Exit.............................................. |
173 |
Fuses |
|
Fuse Box Locations...................................... |
174 |
Changing a Fuse............................................ |
174 |
Fuse Specification Chart............................ |
175 |
Vehicle recovery |
|
Towing Points................................................ |
183 |
Towing the Vehicle on Four Wheels...... |
183 |
Maintenance |
|
General Information.................................... |
185 |
Opening and Closing the Bonnet........... |
185 |
Under Bonnet Overview - 1.6L |
|
Duratec-16V Ti-VCT (Sigma).............. |
187 |
Under Bonnet Overview - 1.6L |
|
Duratorq-TDCi (DV) Diesel.................. |
188 |
Under Bonnet Overview - 2.0L |
|
Duratorq-TDCi (DW) Diesel................ |
189 |
3

Table of Contents
Engine Oil Dipstick - 1.6L Duratec-16V |
|
Ti-VCT (Sigma)........................................ |
190 |
Engine Oil Dipstick - 1.6L Duratorq-TDCi |
|
(DV) Diesel/2.0L Duratorq-TDCi (DW) |
|
Diesel............................................................ |
190 |
Engine Oil Check.......................................... |
190 |
Engine Coolant Check................................. |
191 |
Brake and Clutch Fluid Check................... |
191 |
Washer Fluid Check..................................... |
192 |
Technical Specifications............................ |
192 |
Vehicle Care |
|
Cleaning the Exterior................................... |
195 |
Cleaning the Interior.................................... |
195 |
Repairing Minor Paint Damage............... |
196 |
Vehicle battery |
|
Jump-Starting the Vehicle........................ |
197 |
Changing the Vehicle Battery.................. |
198 |
Battery connection points........................ |
198 |
Wheels and Tyres |
|
General Information.................................... |
199 |
Changing a Road Wheel............................ |
199 |
Tyre Repair Kit.............................................. |
204 |
Tyre Care......................................................... |
207 |
Using Winter Tyres...................................... |
208 |
Using Snow Chains.................................... |
208 |
Tyre Pressure Monitoring System......... |
208 |
Technical Specifications.......................... |
209 |
Vehicle identification |
|
Vehicle Identification Plate....................... |
214 |
Vehicle Identification Number................. |
215 |
Capacities and Specific- |
|
ations |
|
Technical Specifications............................ |
216 |
Audio introduction |
|
Important audio information................... |
219 |
Audio unit overview |
|
Audio unit overview.................................... |
220 |
Audio system security |
|
Security code................................................. |
226 |
Audio unit operation |
|
On/off control................................................ |
227 |
Sound button................................................. |
227 |
Waveband button........................................ |
227 |
Station tuning control................................ |
227 |
Station preset buttons.............................. |
228 |
Autostore control......................................... |
228 |
Traffic information control....................... |
228 |
Audio unit menus |
|
Automatic volume control....................... |
230 |
Digital signal processing (DSP)............. |
230 |
News broadcasts......................................... |
230 |
Alternative frequencies............................. |
230 |
Regional mode (REG)................................. |
231 |
Compact disc player |
|
Compact disc playback............................. |
232 |
Track selection.............................................. |
232 |
Fast forward/reverse.................................. |
232 |
Shuffle/random............................................ |
232 |
Repeat compact disc tracks.................... |
232 |
Compact disc track scanning.................. |
233 |
MP3 file playback........................................ |
233 |
MP3 display options................................... |
233 |
Ending compact disc playback.............. |
234 |
Auxiliary input (AUX IN) |
|
socket |
|
Auxiliary input (AUX IN) socket.............. |
235 |
4

Table of Contents
Audio troubleshooting |
|
Audio troubleshooting............................... |
236 |
Telephone |
|
General Information.................................... |
237 |
Bluetooth setup............................................ |
237 |
Telephone setup........................................... |
237 |
Telephone controls..................................... |
238 |
Using the telephone................................... |
238 |
Voice control |
|
Principle of Operation................................. |
241 |
Using voice control....................................... |
241 |
Audio unit commands............................... |
242 |
Telephone commands.............................. |
249 |
Climate control commands.................... |
254 |
Connectivity |
|
General Information.................................... |
257 |
Connecting an external device............... |
258 |
Connecting an external device - Vehicles |
|
With: Bluetooth........................................ |
258 |
Using a USB device..................................... |
259 |
Using an iPod................................................ |
260 |
Navigation introduction |
|
General Information................................... |
262 |
Road Safety................................................... |
262 |
Navigation Quick start |
|
Navigation Quick start............................... |
264 |
Navigation unit overview |
|
Navigation unit overview........................... |
267 |
Loading the navigation data..................... |
271 |
System settings |
|
System settings............................................ |
272 |
Navigation system |
|
Route options menu................................... |
275 |
Route displays............................................... |
276 |
Traffic Message Channel |
|
Principle of Operation................................. |
277 |
Using TMC....................................................... |
277 |
Map updates |
|
Map updates.................................................. |
278 |
Appendices |
|
Type approvals............................................. |
279 |
Type approvals............................................. |
279 |
Type approvals............................................. |
279 |
Type approvals............................................. |
280 |
Type approvals............................................. |
280 |
Electromagnetic compatibility................ |
281 |
5

6
Introduction
ABOUT THIS MANUAL
Thank you for choosing Ford. We recommend that you take some time to get to know your vehicle by reading this manual. The more that you know about it, the greater the safety and pleasure you will get from driving it.
WARNING
Always drive with due care and attention when using and operating the controls and features on your
vehicle.
Note: This manual describes product features and options available throughout the range, sometimes even before they are generally available. It may describe options not fitted to your vehicle.
Note: Some of the illustrations in this manual may be used for different models, so may appear different to your vehicle. However, the essential information in the illustrations is always correct.
Note: Always use and operate your vehicle in line with all applicable laws and regulations.
Note: Pass on this manual when selling your vehicle. It is an integral part of the vehicle.
This vehicle has received the endorsement of TÜV, the accredited international testing organisation, for its allergy-friendly properties.
All materials used in the manufacture of the interior of this vehicle meet strict requirements of the TÜV TOXPROOF Criteria Catalogue for Vehicle Interiors by TÜV Produkt and Umwelt GmbH and are designed to minimize the risk of allergic reactions.
Additionally an efficient pollen filter protects the passengers against allergen particles in the outdoor air.
For more information, contact TÜV at www.tuv.com.
SYMBOLS GLOSSARY
Symbols in this handbook
WARNING
You risk death or serious injury to yourself and others if you do not follow the instructions highlighted
by the warning symbol.
CAUTION
You risk damaging your vehicle if you do not follow the instructions highlighted by the caution symbol.
Symbols on your vehicle
When you see these symbols, read and follow the relevant instructions in this handbook before touching or attempting adjustment of any kind.
PARTS AND ACCESSORIES
NowyoucanbesurethatyourFord parts are Ford parts
Your Ford has been built to the highest standards using high quality Ford Original Parts. As a result, you can enjoy driving it for many years.
7
Introduction
Should the unexpected occur and a major part needs replacing, we recommend that you accept nothing less than Ford Original Parts.
The use of Ford Original Parts ensures that your vehicle is repaired to its pre-accident condition and maintains its maximum residual value.
Ford Original Parts match Ford's stringent safety requirements and high standards of fit, finish and reliability. Quite simply, they represent the best overall repair value, including parts and labour costs.
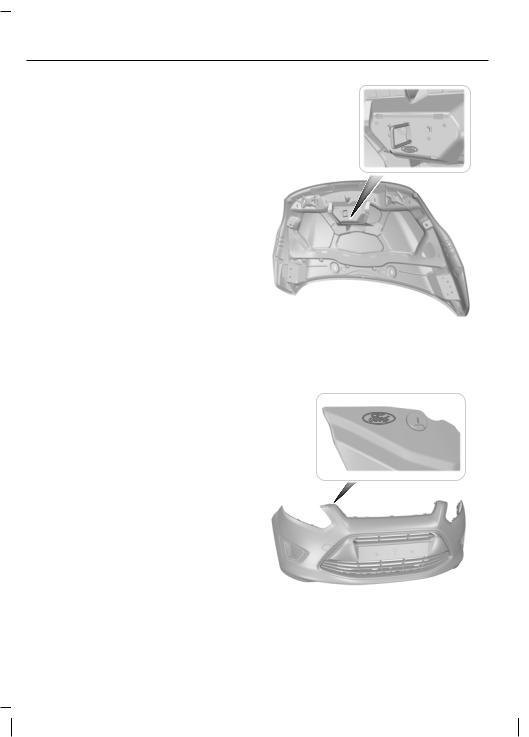
Now it is easier to tell if you have really been given Ford Original Parts. The Ford logo is clearly visible on the following parts if they are Ford Original Parts. If your vehicle has to be repaired, look for the clearly visible Ford branding and make sure that only Ford Original Parts have been used.
Look for the Ford logo on the following parts
Sheet metal
•Bonnet
•Wings
•Doors
•Luggage compartment lid or tailgate
E130165
Bumper and radiator grille
•Radiator grille
•Front and rear bumper
E130166
8
Introduction
Exterior mirror
E130167
Glass |
E130168 |
|||
Lighting |
||||
• |
Rear window |
|||
• |
Rear lamps |
|||
• |
Side glass |
|||
• |
Headlamp |
|||
• |
Windscreen |
|||
|
|
|||
E130169
9

At a Glance
Instrument panel overview
Left-hand drive
A B C D E F G H I
X W V U T S R Q P O N M L K J
10

At a Glance
Right-hand drive
I H G B C D E F
A
J P O N M L K Q R W V U T |
S |
X |
E130099
AAir vents. See Air Vents (page 100).
BDirection indicators. See Direction Indicators (page 60). Main beam. See
Lighting Control (page 57).
CLeft-hand drive vehicles with voice control - Information display control. See
Information Displays (page 83).
CLeft-hand drive vehicles without voice control - Information display control. See Information Displays (page 83).
CRight-hand drive vehicles with voice control - Information and entertainment display control.
CRight-hand drive vehicles without voice control - Information display control. See Information Displays (page 83).
11

At a Glance
DInstrument cluster. See Gauges (page 77). See Warning Lamps and Indicators (page 79).
ELeft-hand drive vehicles with voice control - Information and entertainment display control.
ELeft-hand drive vehicles without voice control - Audio control. See Audio Control (page 50).
ERight-hand drive vehicles with voice control - Information display control. See
Information Displays (page 83).
ERight-hand drive vehicles without voice control - Audio control. See Audio Control (page 50).
F Wiper lever. See Wipers and Washers (page 52).
GInformation and entertainment display.
HAudio unit. See Audio unit overview (page 220).
IDoor lock button. See Locking and Unlocking (page 39).
J Hazard warning flasher switch. See Hazard Warning Flashers (page 59). K Power liftgate switch. See Locking and Unlocking (page 39).
LParking aid switch. See Parking Aids (page 148).
M Active park assist switch. See Active Park Assist (page 152).
NStart-stop switch. See Using start-stop (page 133).
O Heated rear window switch. See Heated Windows and Mirrors (page 105). P Heated windscreen switch. See Heated Windows and Mirrors (page 105). Q Climate controls. See Climate Control (page 100).
R Start button. See Keyless Starting (page 129).
S Ignition switch. See Ignition Switch (page 127).
TAudio control. See AudioControl (page 50). Voice control. See VoiceControl (page 51). Telephone control. See Telephone controls (page 238).
USteering wheel adjustment. See Adjusting the Steering Wheel (page 50).
VHorn.
WCruise control switches. See CruiseControl (page 158). Speed limiter switches. See Speed Limiter (page 160).
XLighting control. See Lighting Control (page 57). Front fog lamps. See Front Fog Lamps (page 58). Rear fog lamp. See Rear Fog Lamps (page 58). Headlamp levelling control. See Headlamp Levelling (page 59). Instrument lighting dimmer. See Instrument Lighting Dimmer (page 122).
12
At a Glance
Power liftgate
WARNINGS
Do not operate the luggage compartment lid unless it is free from obstruction.
Careless opening and closing of the luggage compartment lid can override the protection function and
cause injuries.
The luggage compartment lid can be operated using the remote control, the centre console switch, the luggage compartment lid switch or the luggage compartment lid release handle.
See Locking and Unlocking (page 39).
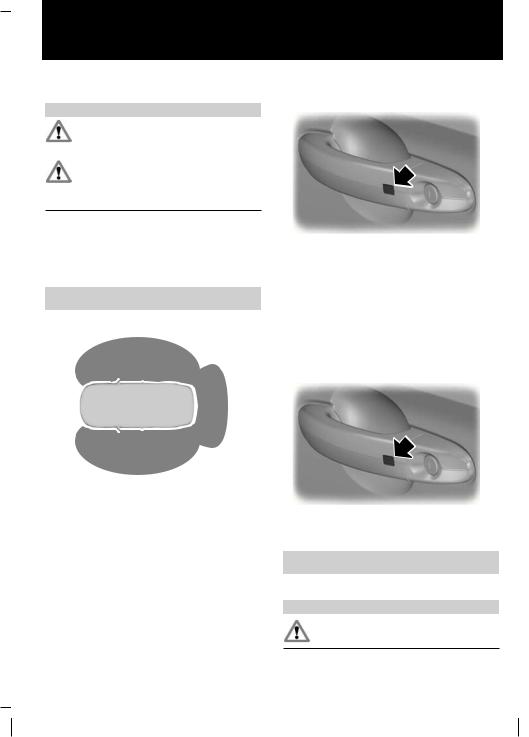
Keyless entry
E78276
Passive locking and unlocking requires a valid passive key to be located within one of the three external detection ranges.
Unlocking the vehicle
E87384
Open any door.
Note: A valid passive key must be located within the detection range of that door.
One long flash of the direction indicators confirms that all the doors and the luggage compartment lid have been unlocked and that the alarm has been disarmed.
Locking the vehicle
E87384
Touch a front door handle lock sensor to lock the vehicle.
See Keyless Entry (page 43).
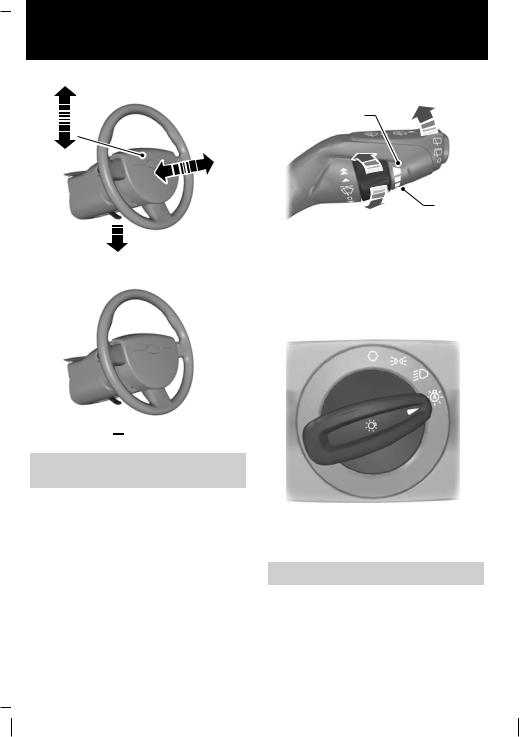
Adjusting the steering wheel
WARNING
Never adjust the steering wheel when the vehicle is moving.
13
At a Glance
Autowipers
2 |
|
A |
B |
|
|
||
|
2 |
|
|
|
|
|
C |
1 |
E128445 |
|
|
E95178 |
A |
High sensitivity |
|
|
|
||
|
B |
On |
|
|
C |
Low sensitivity |
|
Autolamps
 3
3
E95179
See Adjusting the Steering Wheel
(page 50).
E70719
The headlamps will come on and go off automatically depending on the ambient light.
See Autolamps (page 58).
Electric windows
Note: To reduce wind noise or buffeting when just one window is open, open the opposite window slightly.
14
At a Glance
See Power Windows (page 71). |
Manual climate control |
|
Heating the interior quickly |
||
Electric folding mirrors |
||
|
E72623
See Electricexteriormirrors (page 73).
Information displays
E130248
Use the arrow buttons to navigate through the menus and press OK to make a selection.
See General Information (page 83).
E129884
Cooling the interior quickly
E129887
Defrosting and demisting the windscreen
E129888
See ManualClimateControl(page 101).
Automatic climate control
E91391
See Automatic Climate Control (page 103).
15

At a Glance
Keyless starting
E85766
Press the start button.
Stopping the engine when the vehicle is moving
WARNING
Switching off the engine when the vehicle is still moving will result in a loss of brake and steering assistance.
The steering will not be locked, but higher effort will be required. When the ignition is switched off some electrical circuits, warning lamps and indicators may also be OFF.
Press and hold the start button for two seconds, or press three times within three seconds.
Press the start button.
See Keyless Starting (page 129).
Diesel particulate filter (DPF)
WARNING
Do not park or idle your vehicle over dry leaves, dry grass or other combustible materials. The DPF
regeneration process creates very high exhaust gas temperatures and the exhaust will radiate a considerable amount of heat during and after DPF regeneration, and after you have switched the engine off. This is a potential fire hazard.
See DieselParticulateFilter(page 130).
Fuel filler flap
E86613
Press the flap to open it. Open the flap fully until it engages.
A
A
E139202
Insert the fuel nozzle up to and including the first notch on the nozzle A. Keep it resting on the cover of the fuel pipe opening.
16

At a Glance
WARNING
We recommend that you remove the fuel nozzle slowly to allow any residual fuel to drain into the fuel
tank. Alternatively you can wait 10 seconds before removing the fuel nozzle.
E119081
Slightly raise the fuel nozzle to remove it.
See Fuel filler flap (page 137).
Manual transmission
Selecting reverse gear
E99067
On some vehicles it is necessary to raise the collar whilst selecting reverse gear.
See Manual Transmission (page 141).
Automatic transmission
WARNING
Apply the brakes before moving the selector lever and keep them applied until you are ready to move off.
S
E80836
PPark
RReverse
NNeutral
DDrive
SSport mode and manual shifting
See Automatic Transmission (page 141).
Speed limiter
The system allows you to set a speed, to which the vehicle then becomes limited.
See Speed Limiter (page 160).
17

At a Glance
Towing the vehicle on four wheels
CAUTION
For certain engine and transmission combinations, it is recommended not to tow the vehicle with the drive
wheels on the ground.
See Towing the Vehicle on Four Wheels (page 183).
18
Child Safety
CHILD SEATS
E133140
E68916
WARNINGS
Secure children that are less than 150 centimetres (59 inches) tall in a suitable, approved child restraint, in
the rear seat.
Extreme Hazard! Do not use a rearward facing child restraint on a seat protected by an air bag in front
of it!
Read and follow the manufacturer’s instructions when you are fitting a child restraint.
Do not modify child restraints in any way.
Do not hold a child on your lap when the vehicle is moving.
WARNINGS
Do not leave unattended children in your vehicle.
If your vehicle has been involved in an accident, have the child restraints checked by properly trained
technicians.
Note: Mandatory use of child restraints varies from country to country.
Only child restraints certified to ECE-R44.03 (or later) have been tested and approved for use in your vehicle. A choice of these are available from your Dealer.
Child restraints for different mass groups
Use the correct child restraint as follows:
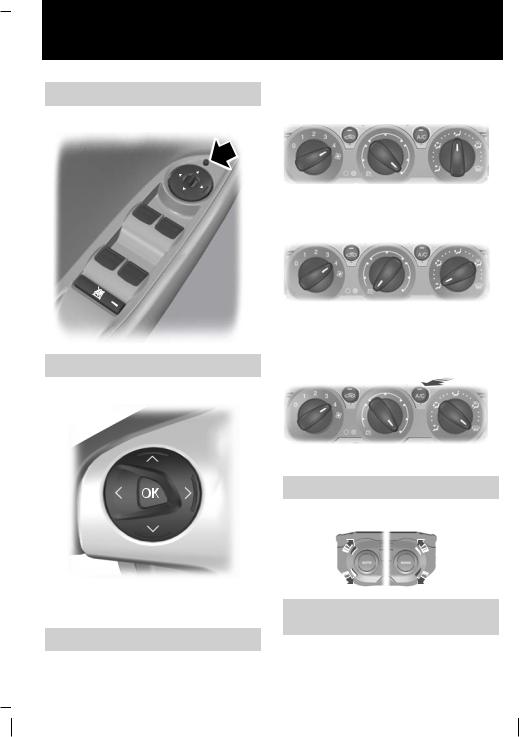
Baby safety seat
E68918
Secure children that weigh less than 13 kilograms (29 pounds) in a rearward facing baby safety seat (Group 0+) in the rear seat.
19
Child Safety
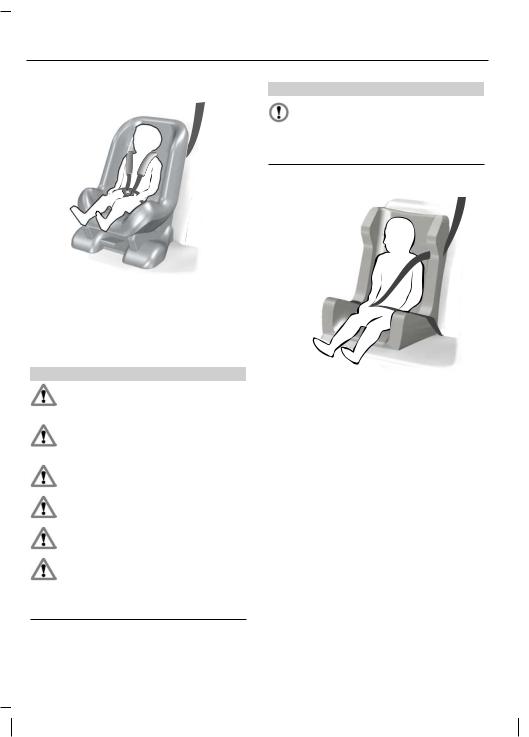
Child safety seat
E68920
Secure children that weigh between 13 and 18 kilograms (29 and 40 pounds) in a child safety seat (Group 1) in the rear seat.
BOOSTER SEATS
WARNINGS
Do not install a booster seat or a booster cushion with only the lap strap of the seat belt.
Do not install a booster seat or a booster cushion with a seat belt that is slack or twisted.
Do not put the seat belt under your child’s arm or behind its back.
Do not use pillows, books or towels to boost your child’s height.
Make sure that your children sit in an upright position.
Secure children that weigh more than 15 kilograms (33 pounds) but are less than 150 centimetres (59
inches) tall in a booster seat or a booster cushion.
CAUTION
When using a child seat on a rear seat, make sure that the child seat rests tightly against the vehicle seat. It may
be necessary to lift or remove the head restraint. See HeadRestraints (page 110).
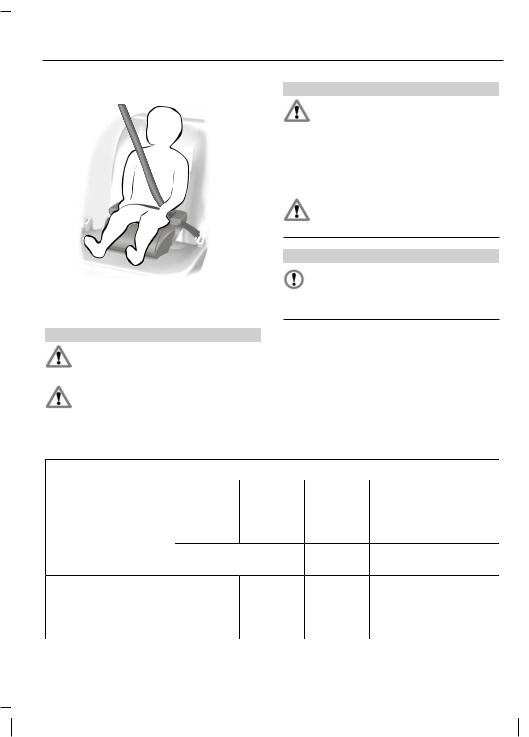
Booster seat (Group 2)
E70710
We recommend that you use a booster seat that combines a cushion with a backrest instead of a booster cushion only. The raised seating position will allow you to position the shoulder strap of the adult seat belt over the centre of your child’s shoulder and the lap strap tightly across its hips.
20
Child Safety
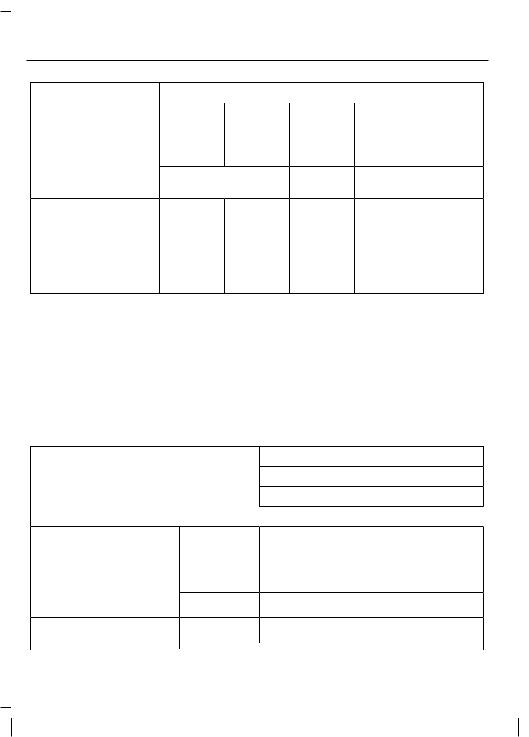
Booster cushion (Group 3) |
WARNINGS |
E68924
CHILD SEAT POSITIONING
WARNINGS
Please consult your Dealer for the latest details relating to Ford recommended child seats.
Extreme Hazard! Do not use a rearward facing child restraint on a seat protected by an air bag in front
of it!
Child seat positions
When you are using a child restraint with a support leg on a second row seat, make sure that you locate the
support leg securely on the under floor storage compartment lid. Make sure that you install the foam spacer correctly inside the storage compartment and that you position the lid correctly.
When using a child seat with a seat belt, make sure that the seat belt is not slack or twisted.
CAUTION
The child seat must rest tightly against the vehicle seat. It may be necessary to lift or remove the head
restraint. See HeadRestraints (page 110).
Note: When using a child seat on a front seat, always adjust the front passenger seat to its fully rearwards position. If it proves difficult to tighten the lap section of the seat belt without slack remaining, adjust the seatback to the fully upright position and raise the height of the seat. See Seats (page 109).
Mass group categories
|
0 |
0+ |
1 |
2 |
3 |
|
Seating positions |
Up to 10 kg |
Up to 13 kg |
9 - 18 kg |
15 - 25 kg |
22 - 36 kg |
|
(20 - 40 |
(33 - 55 |
(49 - 79 |
||||
|
(22 lbs) |
(29 lbs) |
||||
|
lbs) |
lbs) |
lbs) |
|||
|
|
|
||||
|
Baby safety seat |
Child |
Booster seat or cushion |
|||
|
safetyseat |
|||||
Front passenger seat |
X |
X |
UF¹ |
UF¹ |
UF¹ |
|
with airbag ON |
||||||
|
|
|
|
|
||
Front passenger seat |
U¹ |
U¹ |
U¹ |
U¹ |
U¹ |
|
with airbag OFF |
||||||
|
|
|
|
|
||
21
Child Safety
|
|
Mass group categories |
|
|||
|
0 |
0+ |
1 |
2 |
3 |
|
Seating positions |
Up to 10 kg |
Up to 13 kg |
9 - 18 kg |
15 - 25 kg |
22 - 36 kg |
|
(20 - 40 |
(33 - 55 |
(49 - 79 |
||||
|
(22 lbs) |
(29 lbs) |
||||
|
lbs) |
lbs) |
lbs) |
|||
|
|
|
||||
|
Baby safety seat |
Child |
Booster seat or cushion |
|||
|
safetyseat |
|||||
Second row seats - |
U |
U |
U |
U |
U |
|
Grand C-MAX |
||||||
|
|
|
|
|
||
Second row seats - C- |
U |
U |
U |
U |
U |
|
MAX |
||||||
|
|
|
|
|
||
Third row seats - Grand |
U |
U |
U |
U |
U |
|
C-MAX |
||||||
|
|
|
|
|
||
X Not suitable for children in this mass group.
U Suitable for universal category child seats approved for use in this mass group.
U¹ Suitable for universal category child seats approved for use in this mass group. However, we recommend that you secure children in a government approved child seat, in the rear seat.
UF¹ Suitable for universal category forward facing child seats approved for use in this mass group. However, we recommend that you secure children in a government approved child seat, in the rear seat.
ISOFIX child seats
Seating positions
Front seat |
Size class |
|
Seat type |
Second row outboard seat |
Size class |
ISOFIX - Grand C-MAX |
|
|
Seat type |
Second row outboard seat |
Size class |
ISOFIX - C-MAX |
|
Mass group categories
0+ |
1 |
Rear facing |
Forward facing |
 Up to 13 kg (29 lbs)
  9 - 18 kg (20 - 40 lbs)
Vehicle seating position not ISOFIX equipped
C, D, E1 |
A, B, B1, C, D1 |
IL2 |
IL2, IUF3 |
D, E1 |
A, B, B1, D1 |
22
Child Safety
Seating positions
|
Seat type |
Second row centre seat |
Size class |
|
Seat type |
Third row seat ISOFIX - |
Size class |
Grand C-MAX |
Seat type |
|
Mass group categories
0+ |
1 |
Rear facing |
Forward facing |
 Up to 13 kg (29 lbs)
  9 - 18 kg (20 - 40 lbs)
IL2 |
IL2, IUF3 |
Vehicle seating position not ISOFIX equipped
Vehicle seating position not ISOFIX equipped
IL Suitable for particular ISOFIX child restraints systems of the semi-universal category. Please consult child restraints systems suppliers' vehicle recommendation lists.
IUF Suitable for ISOFIX forward facing child restraints systems of universal category approved for use in this mass group and ISOFIX size class.
1The ISOFIX size class for both universal and semi-universal child restraints systems is defined by the capital letters A to G. These identification letters are displayed on ISOFIX child restraints.
2At time of publishing the recommended Group O+ ISOFIX baby safety seat is the Britax Romer Baby Safe. Please consult your Dealer for the latest details relating to Ford recommended child seats.
3At time of publishing the recommended Group 1 ISOFIX child seat is the Britax Romer Duo. Please consult your Dealer for the latest details relating to Ford recommended child seats.
23
Child Safety
ISOFIX ANCHOR POINTS
WARNING
Use an anti-rotation device when using the ISOFIX system. We recommend the use of a top tether
or support leg.
Note: When you are purchasing an ISOFIX restraint, make sure that you know the correct mass group and ISOFIX size class for the intended seating locations. See
Child Seat Positioning (page 21).
Your vehicle is fitted with ISOFIX anchor points that accommodate universally approved ISOFIX child restraints.
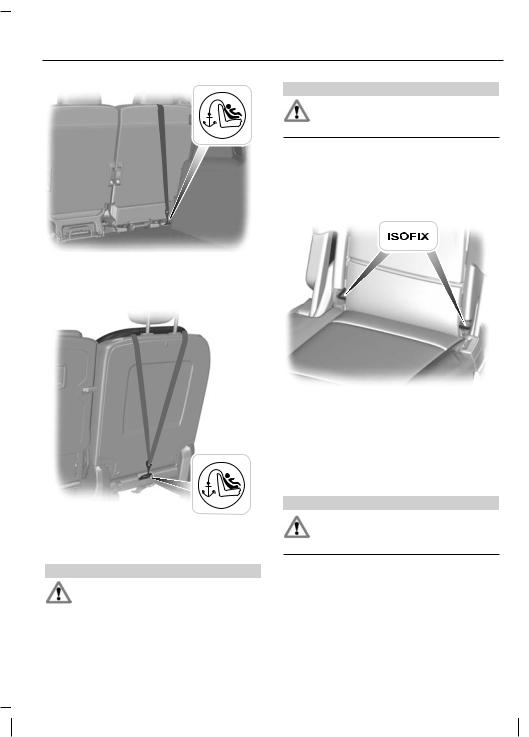
The ISOFIX system comprises two rigid attachment arms on the child restraint that attach to anchor points on the outboard rear seats, where the cushion and backrest meet. Tether anchor points are fitted behind the outboard rear seats for child restraints with a top tether.
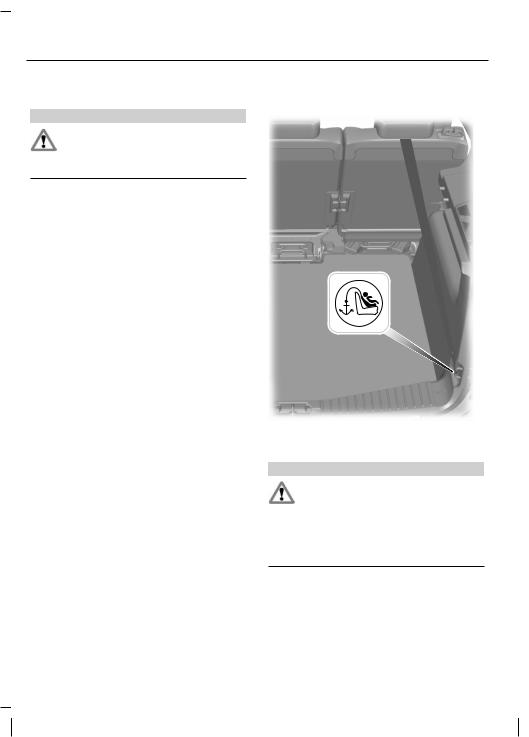
Top tether anchor points - All vehicles
E133892
Top tether anchor points - C-MAX
WARNING
If your vehicle is equipped with the comfort seat system, slide the second row seat forwards to gain
access to the anchor points. After installing the ISOFIX seat, do not move the seat to the comfort position as it could interfere with the tether strap routing.
24
Child Safety
E132100
Top tether anchor points - Grand C-MAX
E130125
Attaching a child seat with top tethers
WARNINGS
Do not attach a tether strap to anything other than the correct tether anchor point.
WARNINGS
Make sure that the top tether strap is not slack or twisted and is properly located on the anchor point.
Note: Where applicable, remove the luggage cover to ease installation. See
Luggage Covers (page 163).
1.Route the tether strap to the anchor point.
E75531
2.Push the child seat back firmly to engage the ISOFIX lower anchor points.
3.Tighten the tether strap in line with the child seat manufacturer's instructions.
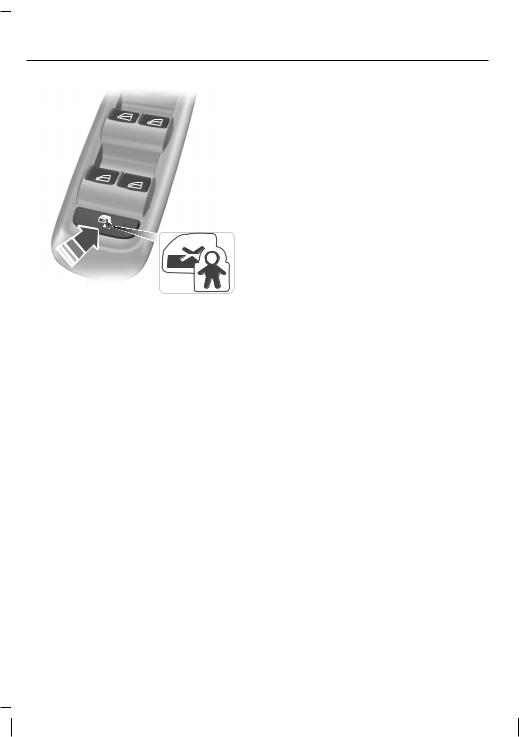
CHILD SAFETY LOCKS
WARNING
You cannot open the doors from inside if you have put the child safety locks on.
Note: Pressing the switch will also disable the rear electric window switches.
25
Child Safety
E124779
26
Occupant protection
PRINCIPLE OF OPERATION
Airbags
WARNINGS
Do not modify the front of your vehicle in any way. This could adversely affect deployment of the
airbags.
Extreme Hazard! Do not use a rearward facing child restraint on a seat protected by an airbag in front
of it!
Wear a seat belt and keep sufficient distance between yourself and the steering wheel. Only when you use
the seat belt properly, can it hold you in a position that allows the airbag to achieve its optimum effect. See Sitting in the Correct Position (page 109).
Have repairs to the steering wheel, steering column, seats, airbags and seat belts carried out by a properly
trained technician.
Keep the areas in front of the airbags free from obstruction. Do not affix anything to or over the airbag covers.
Do not poke sharp objects into areas where airbags are fitted. This could damage and adversely affect
deployment of the airbags.
Use seat covers designed for seats with side airbags. Have these fitted by a properly trained technician.
Note: You will hear a loud bang and see a cloud of harmless powdery residue if an airbag deploys. This is normal.
Note: Only wipe airbag covers with a damp cloth.
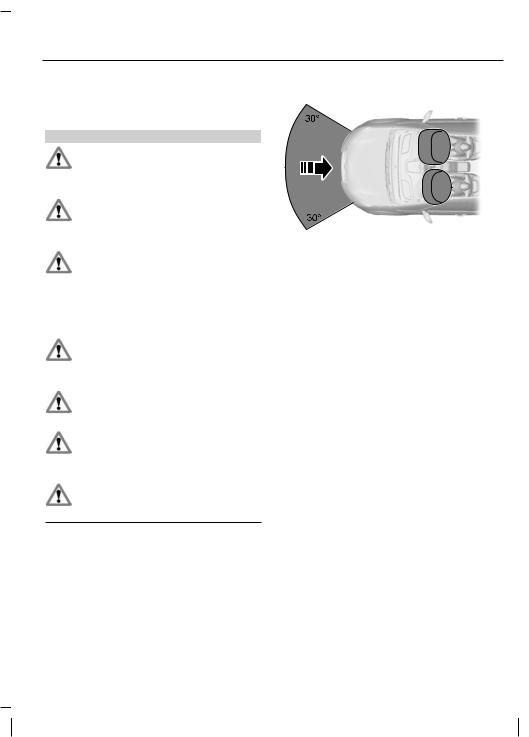
Front airbags
E74302
The driver airbag, front passenger airbag and the seat belt pretensioners will deploy during significant frontal collisions or collisions that are up to 30 degrees from the left or the right. The airbags will inflate within a few thousandths of a second and deflate on contact with the occupants, thus cushioning forward body movement. During minor frontal collisions, overturns, rear collisions and side collisions, the driver and front passenger airbags will not deploy.
Side and curtain airbags
During significant lateral collisions, only the airbags on the side affected by the collision and the seat belt pretensioners will deploy. The airbags will inflate within a few thousandths of a second and deflate on contact with the occupants, thus providing protection for the body. The side and curtain airbags will not deploy during minor lateral collisions, front collisions, rear collisions or overturns.
27
Occupant protection
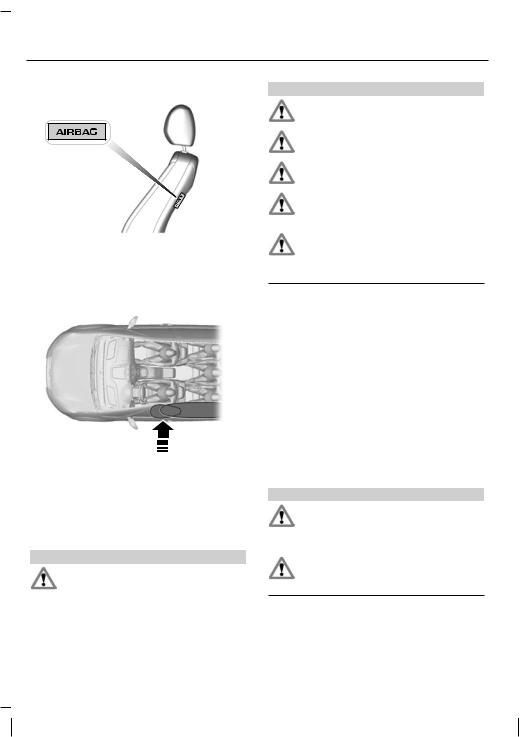
Side airbags
E72658
Side airbags are fitted inside the seatback of the front seats. A label indicates that side airbags are fitted to your vehicle.
Curtain airbags
E75004
Curtain airbags are fitted inside the trim panels over the front and rear side windows. Moulded badges in the B-pillar trim panels indicate that curtain airbags are fitted to your vehicle.
Seat belts
WARNINGS
Wear a seat belt and keep sufficient distance between yourself and the steering wheel. Only when you use
the seat belt properly, can it hold you in a position to achieve its optimum effect. See
Sitting in the Correct Position (page 109).
WARNINGS
Never use a seat belt for more than one person.
Use the correct buckle for each seat belt.
Do not use a seat belt that is slack or twisted.
Do not wear thick clothing. The seat belt must fit tightly around your body to achieve its optimum effect.
Position the shoulder strap of the seat belt over the centre of your shoulder and position the lap strap
tightly across your hips.
Seat belt pretensioners have a lower deployment threshold than the airbags. During minor collisions, it is possible that only the seat belt pretensioners will deploy.
All vehicles
The driver and front passenger seat belt systems are fitted with a seat belt pretensioner.
Grand C-MAX
The second row centre seat belt system is also fitted with a seat belt pretensioner.
Status after a collision
WARNINGS
Seat belts subjected to strain, as a result of an accident, should be renewed and the anchorages
checked by a properly trained technician.
If a seat belt pretensioner has been deployed the seat belt must be renewed.
28
Loading...