


Owner's handbook Audio system
100% Ford. 100% Entertainment.

The information contained in this publication was correct at the time of going to print. In the interest of development the right is reserved to change specifications, design or equipment at any time without notice and without incurring any obligations. This publication, or part thereof, may not be reproduced nor translated without our approval. Errors and omissions excepted.
© Ford Motor Company 2006
All rights reserved.
Order Code: 6S5J-19C104-DA (CG3508en) 01/2006 20060120121755

Table of Contents
Audio introduction |
|
Loudness control ............................ |
|
|
|
........ 3 |
|
||
Important audio information |
|
............ 3 |
|
|
Radio reception................................. |
4 Audio unit menus |
..... |
||
|
|
Automatic volume control |
|
|
Audio unit overview |
...... |
(AVC) 5.............................................. |
|
|
|
|
Audio distortion reduction |
|
|
Audio system |
|
(CLIP) .............................................. |
|
|
|
Digital signal processing (DSP) |
|
||
security ...................... |
|
7 |
21 |
|
Removable front panel |
7 |
Rear seat controls (RICP)............... |
||
Preset scan tuning |
|
|||
Security code |
7 |
|
||
Alternative frequencies |
22 |
|||
Lost security code |
|
|||
|
7 |
|
||
Entering a security code |
|
Music/speech .................................. |
|
|
.................. |
7 |
|
||
|
|
Radio data system (RDS) |
........ |
|
Incorrect security code .................... |
|
Enhanced8other network |
|
|
Vehicle identification (VID) |
................ |
8 |
|
|
|
|
(RDS-EON) ................................... |
|
|
Audio unit clock and |
|
News broadcasts........................... |
23 |
|
|
Priority programme type (PTY) |
|
||
date displays ............ |
|
10 |
|
|
Setting the clock and date on the
audio unit .......................................
Audio unit operation
Cassette tape
10
player.......................
Cassette tape playback ............
... 12
Fast forward .....................................
On/off control................................... |
12 |
Fast rewind |
27 |
|
Volume control |
12 |
|||
Auto reverse |
28 |
|||
Bass/treble control |
12 |
|||
Ending playback |
28 |
|||
Balance/fade control |
12 |
|||
Cassette tape pause |
|
|||
Phone mute control |
|
|
||
|
13 |
|
||
Audio menu control |
|
Cassette tape side selection |
|
|
|
13 |
|
||
|
|
Automatic music search |
|
|
Station preset buttons .................... |
|
(AMS) 15............................................. |
|
|
Audio control.................................... |
15 |
Ejecting a cassette tape |
........... |
|
Waveband button............................ |
16 |
|
|
|
Sound button................................... |
16 |
Compact disc |
|
|
Autostore control............................. |
16 |
player ....................... |
|
|
Stereo indicator control |
.................. |
17 |
|
|
|
|
Loading compact discs |
............. |
|
Traffic information (TA) control....... |
17 |
Loading the compact disc |
|
|
Station tuning control |
|
changer ......................................... |
|
|
|
19 |
|
1

Table of Contents
Track selection ................................. |
|
Audio31 |
Compact disc playback................. |
32 |
troubleshooting ........ |
Compact disc selection................. |
33 |
|
Fast forward/reverse ..................... |
|
34 |
Shuffle/random ............................... |
|
34 |
Compact disc track |
|
|
compression ................................ |
|
35 |
Compact disc track scanning |
|
....... 35 |
Ejecting compact discs |
.................. |
36 |
Unloading the compact disc |
|
|
changer ......................................... |
|
37 |
MP3 file playback ............................ |
|
37 |
MP3 display options ........................ |
|
41 |
Repeat compact disc tracks |
|
......... 42 |
Ending compact disc |
|
|
playback ........................................ |
|
43 |
Ejecting multiple compact discs |
43 |
|
........................................................ |
|
|
Auxiliary input (AUX IN) |
45 |
|
socket ...................... |
|
|
Rear passenger |
|
46 |
controls ................... |
|
|
Rear seat controls.......................... |
46 |
|
Control panel buttons .................... |
|
46 |
Control mode................................... |
47 |
|
One hour mode............................... |
48 |
|
Headphones .................................... |
|
48 |
Headphone sockets....................... |
48 |
|
Rear passenger control display |
|
|
screen ........................................... |
|
49 |
Audio system care |
|
..... 50 |
Audio unit......................................... |
50 |
|
2
Audio introduction
IMPORTANT AUDIO
INFORMATION
WARNINGS
Copyright laws vary from country to country; please
check the laws in your country if you want to record from copyright source material.
Due to technical incompatibility, recordable (CD-R) and
rewritable (CD-RW) discs may not function correctly.
These CD radio units will play compact discs that conform to
the International Red Book standard audio specification. Copy protected CDs from some manufacturers do not conform to this standard and playback cannot be guaranteed.
Dual format, dual sided discs (DVD Plus, CD-DVD format), now being adopted by the music
industry, are thicker than normal CDs and consequently playback cannot be guaranteed in Ford and Sony CD audio units, and jamming could occur.
Warranty claims, where this type of disc is found to be inside an audio unit returned for repair, will not
be accepted.
Apart from the 6000MP3 model, CD units are designed
to play commercially pressed 12 cm audio compact discs only.
The Sony CD unit (but not the 6CD) will play 8 cm discs with a
Sony approved adaptor fitted (CSA-8).
3
Irregular shaped CDs and CDs with a scratch protection film or self adhesive labels attached should
not be used.
The audio unit may be damaged if unsuitable items like credit
cards or coins are pushed inside the CD aperture.
Please contact your Dealer for further information.
Sony CD/6CD
E66256
This label is located on the top of the Sony CD/6CD chassis.
E66257
This label is located on the Sony CD/6CD drive unit's internal chassis.
These units are designed to play discs that conform to the Compact Disc (CD) standard.
Recently, some record companies have marketed various music discs encoded with copyright protection.
Please be aware that among those discs, there are some that do not conform to the CD standard and may not be playable by this product.

Audio introduction
•You cannot play a CD-R/CD-RW that is not finalised. (This process is necessary for a recorded CD-R/CD-RW disc to be played on the audio CD player.)
•With the Sony CD unit, you can play MP3 files recorded on CDROMs, CD-Rs, and CDRWs.
•A CD-R/CD-RW to which a session can be added can be played.
Disc labels
Audio CD
E66254
MP3
E66255
4
RADIO RECEPTION
Advanced digital filter adjustment (ADFA)
Sony CD/6CD
Note: Consult your dealer before switching off the filter.
Under certain exceptional conditions, radio reception may be adversely affected by very strong competing signals. This function allows you to switch off the digital filter to overcome this condition.

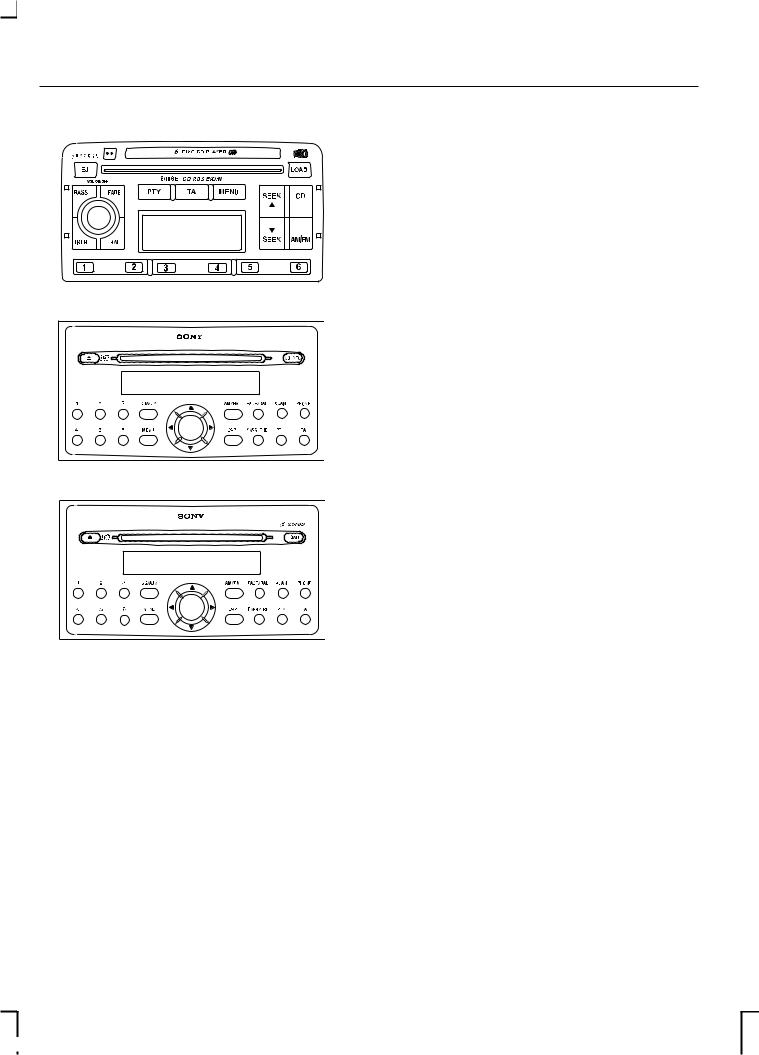
Audio unit overview
2050 |
|
|
|
|
|
|
|
|
|
|
|
|
|
|
|
|
|
|
6000CD Series (with rocker |
||||||||||||||||||
|
|
|
|
|
|
|
|
|
|
|
|
|
|
|
|
|
|
|
|
|
|
|
|
|
|
volume control) |
|||||||||||
|
|
|
|
|
|
|
|
|
|
|
|
|
|
|
|
|
|
|
|
|
|
|
|
||||||||||||||
|
|
|
|
|
|
|
|
|
|
|
|
|
|
|
|
|
|
|
|
|
|
|
|
|
|
|
|
|
|
|
|
|
|
|
|
|
|
|
|
|
|
|
|
|
|
|
|
|
|
|
|
|
|
|
|
|
|
|
|
|
|
|
|
|
|
|
|
|
|
|
|
|
|
|
|
|
|
|
|
|
|
|
|
|
|
|
|
|
|
|
|
|
|
|
|
|
|
|
|
|
|
|
|
|
|
|
|
|
|
|
|
|
|
|
|
|
|
|
|
|
|
|
|
|
|
|
|
|
|
|
|
|
|
|
|
|
|
|
|
|
|
|
|
|
|
|
|
|
|
|
|
|
|
|
|
|
|
|
|
|
|
|
|
|
|
|
|
|
|
|
|
|
|
|
|
|
|
|
|
|
|
|
|
|
|
|
|
|
|
|
|
|
|
|
|
|
|
|
|
|
|
|
|
|
|
|
|
|
|
|
|
|
|
|
|
|
|
|
|
|
|
|
|
|
|
|
|
|
|
|
|
|
|
|
|
|
|
|
|
|
|
|
|
|
|
|
|
|
|
|
|
|
|
|
|
|
|
|
|
|
|
|
|
|
|
|
|
|
|
|
|
|
|
|
|
|
|
|
|
|
|
|
|
|
|
|
|
|
|
|
|
|
|
|
|
|
|
|
|
|
|
|
|
|
|
|
|
|
|
|
|
|
|
|
|
|
|
|
|
|
|
|
|
|
|
|
|
|
|
|
|
|
|
|
|
|
|
|
|
|
|
|
|
|
|
|
|
|
|
|
|
|
|
|
|
|
|
|
|
|
|
|
|
|
|
|
|
|
|
|
|
|
|
|
|
|
|
|
|
|
|
|
|
|
|
|
|
|
|
|
|
|
|
|
|
|
|
|
|
|
|
|
|
|
|
|
|
|
|
|
|
|
|
|
|
|
|
|
|
|
|
|
|
|
|
|
|
|
|
|
|
|
|
|
|
|
|
|
|
|
|
|
|
|
|
|
|
|
|
|
|
|
|
|
|
|
|
|
|
|
|
|
|
|
|
|
|
|
|
|
|
|
|
|
|
|
|
|
|
|
|
|
|
|
|
|
|
|
|
|
|
|
|
|
|
|
|
|
|
|
|
|
|
|
|
|
|
|
|
|
|
|
|
|
|
|
|
|
|
|
|
|
|
|
|
|
|
|
|
|
|
4050 and 5000 |
E66130 |
|
5500
E66138
6000CD (with centrally
6000 CD Series located On/off and volume control)
|
E66131 |
5000C |
6500 |
|
|
|
E66133 |
E66129 |
|
5
Audio unit overview
6006E
E66134
Sony CD
E66135
Sony 6CD
E66137
6

Audio system security
REMOVABLE FRONT |
ENTERING A SECURITY |
PANEL |
CODE |
Note: During removal, avoid touching the contacts on the back of the panel and do not use excessive force to refit it.
•Where available slide the panel release button to the left (on 6006E units press the panel release button) and remove the panel.
•To replace the panel, insert the right-hand edge first, and then push home the left-hand side until the retaining latch is engaged.
SECURITY CODE
Most units incorporate a unique Keycode security number that must be entered before the unit will operate. Normally, the Ford Dealer does this during the predelivery inspection.
If the battery is disconnected for any reason, or the audio unit is removed from the vehicle, the Keycode must be re-entered before the unit will work again.
LOST SECURITY CODE
If you lose the Keycode, contact your dealer and supply details of your audio unit along with some proof of identity. Your Dealer will then obtain the correct code from Ford Motor Company.
7
If ‘ CODE - - - - ’ or ‘ CODE 0000 appears in the display for more than
5 seconds when you switch on the audio unit, you must enter the Keycode.
On all units except 2050
1.Press button 1 repeatedly until the first digit of your Keycode is shown in the display.
2.Press preset buttons 2, 3 and 4 in the same way for remaining three digits.
3.Ensure the complete Keycode is correct before pressing preset button 5 to confirm it.
2050
1.Press button 1, use the arrow left or right arrow buttons until the first digit of your Keycode is shown in the display.
2.Repeat step 1 for the remaining 3 digits.
3.Ensure the complete Keycode is correct before pressing button 1 to confirm.
If the correct code was entered, the radio will beep and then will function normally.

Audio system security
INCORRECT SECURITY CODE
On all units except 2050
Up to TEN Keycode entry attempts are allowed with various consequences if you get it wrong.
The number of attempts is shown in the display.
•You must wait until the display changes to "CODE" this indicates that the waiting period has finished and the correct code can be entered.
•The waiting period doubles each time an incorrect code is entered. (1 minute, 2 minutes, 4 minutes, etc)
• If the display reverts to |
‘ CODEVEHICLE’ |
IDENTIFICATION |
|
|
another entry attempt may be |
(VID) |
|
|
|
made immediately. |
|
|
|
|
• If the display shows |
‘ WAIT 30Note:’ , theFor the location of the vehicle |
|
||
unit will be locked for 30 minutes. |
identification number on your vehicle, |
|
||
Wait until the timer counts down |
please refer to your Owner s |
’ |
||
to zero. When |
‘ CODE ’ is handbook. |
|
|
|
displayed, enter the Keycode again.
• After ten incorrect attempts the unit will be permanently inoperative and ‘ LOCK 10 ‘ LOCKED ’ will be displayed. Contact your local Ford Dealer for help.
2050
‘ COD
If an incorrect code was entered, the radio beeps and "WAIT" appears in the display. This indicates that a waiting period has started.
Note: Do not switch off the radio when the display shows "WAIT". Turning off the radio will cause the waiting period to start all over again.
8
Audio system security
5.Use the left/right arrow buttons to move across the display, and use the volume control or the up/down arrow buttons on Sony CD/6CD, to select or change the individual characters. A total of 15 or 16 characters can be stored.
6.When all the characters have been selected, press MENU to store the number. The unit then returns to normal operation.
On some units, the number appears in the display whenever power is restored. To check the vehicle identification number, repeat steps 1 and 2 then press the MENU button.
9

Audio unit clock and date displays
SETTING THE CLOCK AND DATE ON THE AUDIO UNIT
All units, except the 2050, the 5000C, the 6000CD with centrally located on/off and volume control, and Sony CD/6CD, have a built in facility that will receive RDS data for a current time and date display. When first switched on, a series of bars may be displayed until the signal is received.
In all cases, the time derived from the signal is exact and in most units it cannot be altered. Some units, however, do allow you to set the time manually.
On certain models, where possible, adjustments are made as follows:
•Press and hold the MENU button for approximately two seconds until the display changes.
In this case, either select another radio station which transmits a time signal or set the clock manually.
Note: If any of these features are not available in your unit, the relevant menu options will not be displayed.
2050
The clock is located on the instrument panel please refer to your Owner's handbook for instructions.
5000C and 6000CD with centrally located on/off and volume control
Changing the date and time
•Press the CLOCK button to display the date and time.
Note: If you do not press another button within 30 seconds of pressing the CLOCK button, the display will return to its previous setting.
• Press the MENU button |
|
• |
Use the SEEK buttons to select |
||||
|
|
the date or time value that you |
|||||
repeatedly until a |
|
‘ CLK-MAN |
|||||
|
’ or |
||||||
‘ RDS TIME OFF |
|
’ display appears. wish to change. The selected |
|||||
• Use the SEEK buttons to select |
|
value will flash in the display. |
|||||
• |
Turn the volume control to |
||||||
‘ CLK-AUTO |
’ or |
|
|
||||
‘ RDS TIME ON |
’ . |
||||||
Note: With |
|
|
|
|
|
change the selected date or time |
|
‘ CLK-AUTO |
’ or ‘ RDS value. |
||||||
TIME ON |
’ selected, the time will be |
• |
Use the SEEK buttons to select |
||||
set automatically via the RDS function |
|
additional date or time values that |
|||||
if an RDS signal is available. In this |
|
||||||
|
you wish to change. |
||||||
case you will not find a time display |
|
||||||
• |
Turn the volume control to |
||||||
to set the time manually. |
|
|
|||||
If you observe after setting |
|
|
change the selected date or time |
||||
|
‘ RDS |
||||||
TIME ’ to |
‘ ON ’ , that the clock is not set |
value. |
|||||
Press the CLOCK button to exit |
|||||||
properly, then the radio station |
• |
||||||
selected does not support RDS clock |
and save the new date and time. |
|
|
setting. |
|
10

Audio unit clock and date displays
Note: If you do not press the CLOCK button within 30 seconds of changing a date or time value, the display will exit and save the new values automatically.
Tip: Press and hold the CLOCK button for more than two seconds to automatically select the hour value for winter or summer time adjustment.
12/24 hour format
•Press the MENU button repeatedly until a 12/24 hour clock display appears.
•Use the SEEK button to select the setting required.
•Press the MENU button again to confirm the selection.
Sony CD/6CD
Changing the date
•Press the MENU button and use the up/down arrow buttons until a date setting display appears.
•Use the left/right arrow buttons to select days which flash in the display.
•Use the up/down arrow buttons to make an adjustment, then press the left/right arrow buttons to select months/years and adjust accordingly.
•Press the MENU button to confirm the date.
Changing the time
•Press the MENU button and use the up/down arrow buttons until a clock display appears.
•Use the left/right arrow buttons to select hours which will flash in the display.
•Use the up/down arrows to make an adjustment, then press the left/right arrow buttons to select minutes and adjust accordingly.
•Press the MENU button to confirm the time.
12/24 hour format
•Press the MENU button and use the up/down arrow buttons until a 12/24 hour clock display appears.
•Use the left/right arrow buttons to select the setting required.
•Press the MENU button to confirm your selection.
11

Audio unit operation
ON/OFF CONTROL
•Press the on/off control to turn your unit on or off. This will also operate the unit for up to one hour with the ignition turned off. The radio will switch off automatically after one hour.
2050
Note: CODE will briefly flash in the display when the unit is turned on. This is a normal system function the security code is not required to be entered.
VOLUME CONTROL
Use this control to raise or lower the volume of the current audio source at any time. When you make an adjustment, the display indicates the selected volume level.
On some audio units, the volume control is also used in conjunction with certain menu functions to make other adjustments.
BASS/TREBLE CONTROL
All units, except the 2050, to adjust the amount of bass or treble response from any audio source. On 2050 See Sound button (page 16).
•Where the adjustment is featured on a single button, press the button once for bass or twice for treble.
•Where there are separate buttons, press the required button once.
•Use the volume control or, on Sony CD/6CD, the up/down arrow buttons to make the necessary adjustment.
The display indicates the level selected.
Default audio settings
On 5500/6500 units, press and hold BASS/TREB until the default audio display appears. With the function switched on, all the audio setting return to the manufacturer s original ’ preset levels.
BALANCE/FADE
CONTROL
All units, except the 2050, the BALANCE control is used to adjust the sound coming from the left and right speakers. On 2050 See Sound button (page 16).
All units, except the 2050, the FADE control is used to adjust the sound distribution from front to rear in vehicles equipped with rear speakers. When 6006E is fitted in vehicles without rear speakers,
Rear ’ is displayed if the FADE button is pressed.
12

Audio unit operation
•Where the adjustment is featured on a single button, press the button once for fade or twice for balance.
•Where there are separate buttons, press the required button once.
•Use the volume control to make the necessary adjustment.
•Or, on Sony CD/6CD, use the up/down arrow buttons for fade adjustment, and left/right arrow for balance adjustment.
The display indicates the level selected.
PHONE MUTE CONTROL
•Where available, press the PHONE button to mute your audio unit.
•Press PHONE again to unmute.
AUDIO MENU CONTROL
Where available use the MENU |
|
|
button to access features that |
|
|
cannot be selected directly via one |
|
|
of the button controls. Press the |
|
|
MENU button for |
‘ first level |
’ fe |
or press and hold the MENU button |
|
|
for different |
‘ second level |
’ func |
Features that are not available do not appear in the display.
13
Audio unit operation
Sony CD/6CD
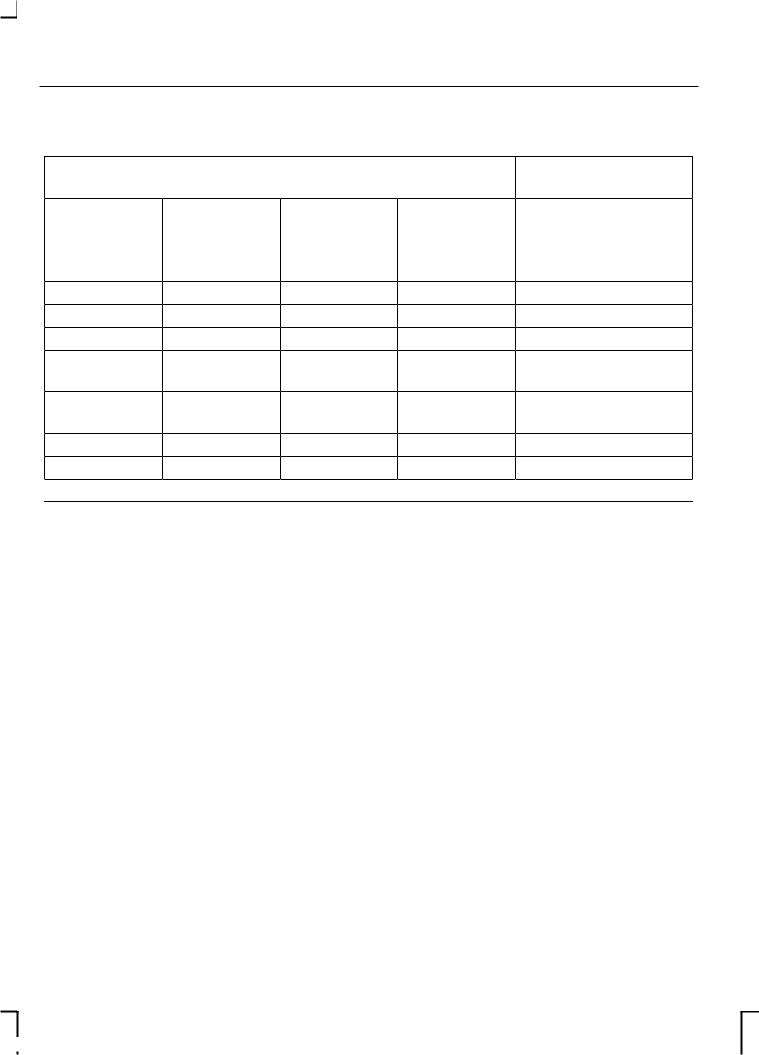
Menu features - First level features |
Second level func- |
||
|
|
|
tions |
During radio During tape |
During CD |
During CD |
During all functions |
reception playback |
playback |
changer |
|
|
|
playback |
|
RSE* |
RSE* |
RSE* |
VID |
Clock |
Clock |
Clock |
CLIP ON/OFF |
Date |
Date |
Date |
Aux ON/OFF |
12/24 hour |
12/24 hour |
12/24 hour |
News ON/OFF |
AVC |
Scroll |
AVC |
Bluetooth enable/ |
|
|
|
disable |
Traffic local or |
AVC |
Repeat |
ADFA ON/OFF |
distant |
|
|
|
AF |
Repeat |
Comp |
|
|
Comp |
Shuffle |
|


 Shuffle

 Note: The sequence in which features appear may vary for different audio units and vehicles.
* Only when fitted.
14
Audio unit operation
5000C/6000CD
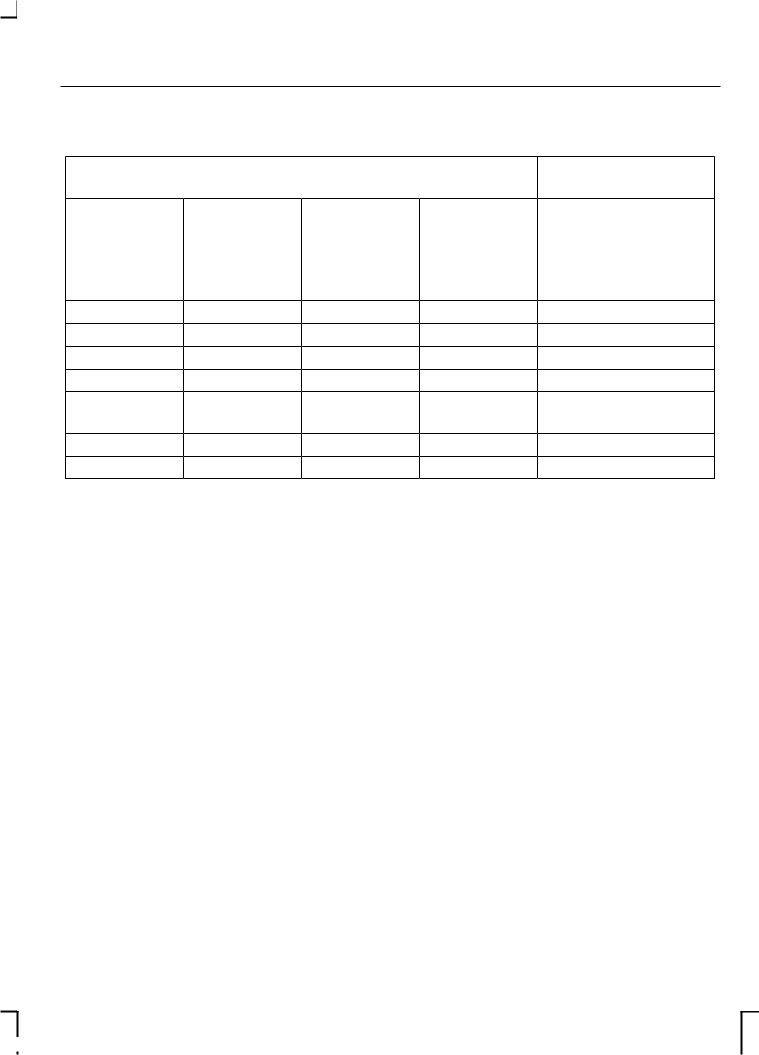
Menu features - First level features |
Second level func- |
|||
|
|
|
|
tions |
During radio During tape |
During CD |
During CD |
During all functions |
|
reception |
playback |
playback |
changer |
|
|
|
|
playback |
|
Manual |
Track |
Scan |
Scan |
Traffic local or distant |
tuning |
number |
|
|
|
Scan tuning |
Clock |
Shuffle |
Shuffle |
AF |
Clock |
Date |
Repeat |
Repeat |
VID |
Date |
12/24 hour |
Comp |
Comp |
CLIP |
12/24 hour |
AVC |
Clock |
Clock |
News |
AVC |
|
Date |
Date |
Bluetooth enable/ |
|
|
|
|
disable |
|
|
12/24 hour |
12/24 hour |
|
|
|
AVC |
AVC |
|
Note: The sequence in which features appear may vary for different audio units and vehicles.
* Only when fitted.
STATION PRESET
BUTTONS
This feature allows you to store your favourite stations so that they can be recalled by selecting the appropriate waveband and pressing one of the preset buttons.
•Select a waveband.
•Tune to the station required.
•Press and hold one of the preset buttons. The audio unit will mute. When sound returns or, on certain units, a bleep sounds, the station has been stored.
This can be repeated on each waveband and for each preset button.
Note: When you drive to another part of the country, FM stations that broadcast on alternate frequencies, and are stored on preset buttons, may be updated with the correct frequency for that area.
AUDIO CONTROL
Where available, this control combines all the sound adjustment
features – bass, treble, balance and fade – in one button.
15

Audio unit operation
•Press AUDIO repeatedly to select the required item.
•Use the volume control to make the necessary adjustment. The display indicates the level selected.
WAVEBAND BUTTON
This control allows you to switch between the LW, MW and AM waveband, where available and the FM waveband.
If you press the button repeatedly during radio reception, you can select from the wavebands available. The display indicates the selection made.
On some units the selector can also be used to return to radio reception when you have been listening to a tape cassette or CD.
SOUND BUTTON
2050 only
Note: The sound button can be identified by the two music note symbols.
Sound style
•Press sound once to reach music settings, to scroll through the settings use the volume up/down buttons.
16
Setting |
Sound style |
FLAT |
Original. |
JAZZ |
Jazz music. |
VOCAL |
Speech. |
POP |
Pop music. |
CLASSIC |
Classical music. |
ROCK |
Rock music. |
Bass/treble/balance and loudness
•Press SOUND twice to select bass adjust the settings with the volume up/down buttons.
•Press SOUND three times to select treble adjust the settings with the volume up/down buttons.
•Press SOUND four times to select balance adjust the settings with the volume up/down buttons.
•Press SOUND five times to select loudness adjust the settings with the volume up/down buttons.
After 5 seconds the display goes back to the last mode of operation.
AUTOSTORE CONTROL
Where available, AutoStore can be used to store the up to six stations on some units, with the strongest signals receivable, either from the FM waveband or from LW, MW, AM and FM (where available).
 Loading...