

FLORABEST FARM 40-Li A1 Operation And Safety Notes Translation Of The Original Instructions
Page 1
CORDLESS LAWNMOWER FARM 40-Li A1
OWIM GmbH & Co. KG
Stiftsbergstraße 1
DE-74167 Neckarsulm
GERMANY
Model No.: HG03586
Version: 02/2018
CORDLESS LAWNMOWER
Operation and Safety Notes
Translation of the original instructions
AKUMULATORSKA KOSILNICA
Navodila za uporabo in varno delo
Prevod izvirnih navodil
AKUMULÁTOROVÁ KOSAČKA NA TRÁVU
Návod na obsluhu a bezpečnostné pokyny
Preklad pôvodného návodu na použitie
IAN 292278IAN 292278
AKKUS FŰNYÍRÓ
Üzemeltetési és biztonsági megjegyzések
Eredeti használati utasítás fordítása
AKU SEKAČKA NA TRÁVU
Obsluha a bezpečnostní pokyny
Překlad původního návodu k používání
AKKU-RASENMÄHER
Bedienungs- und Sicherheitshinweise
Originalbetriebsanleitung
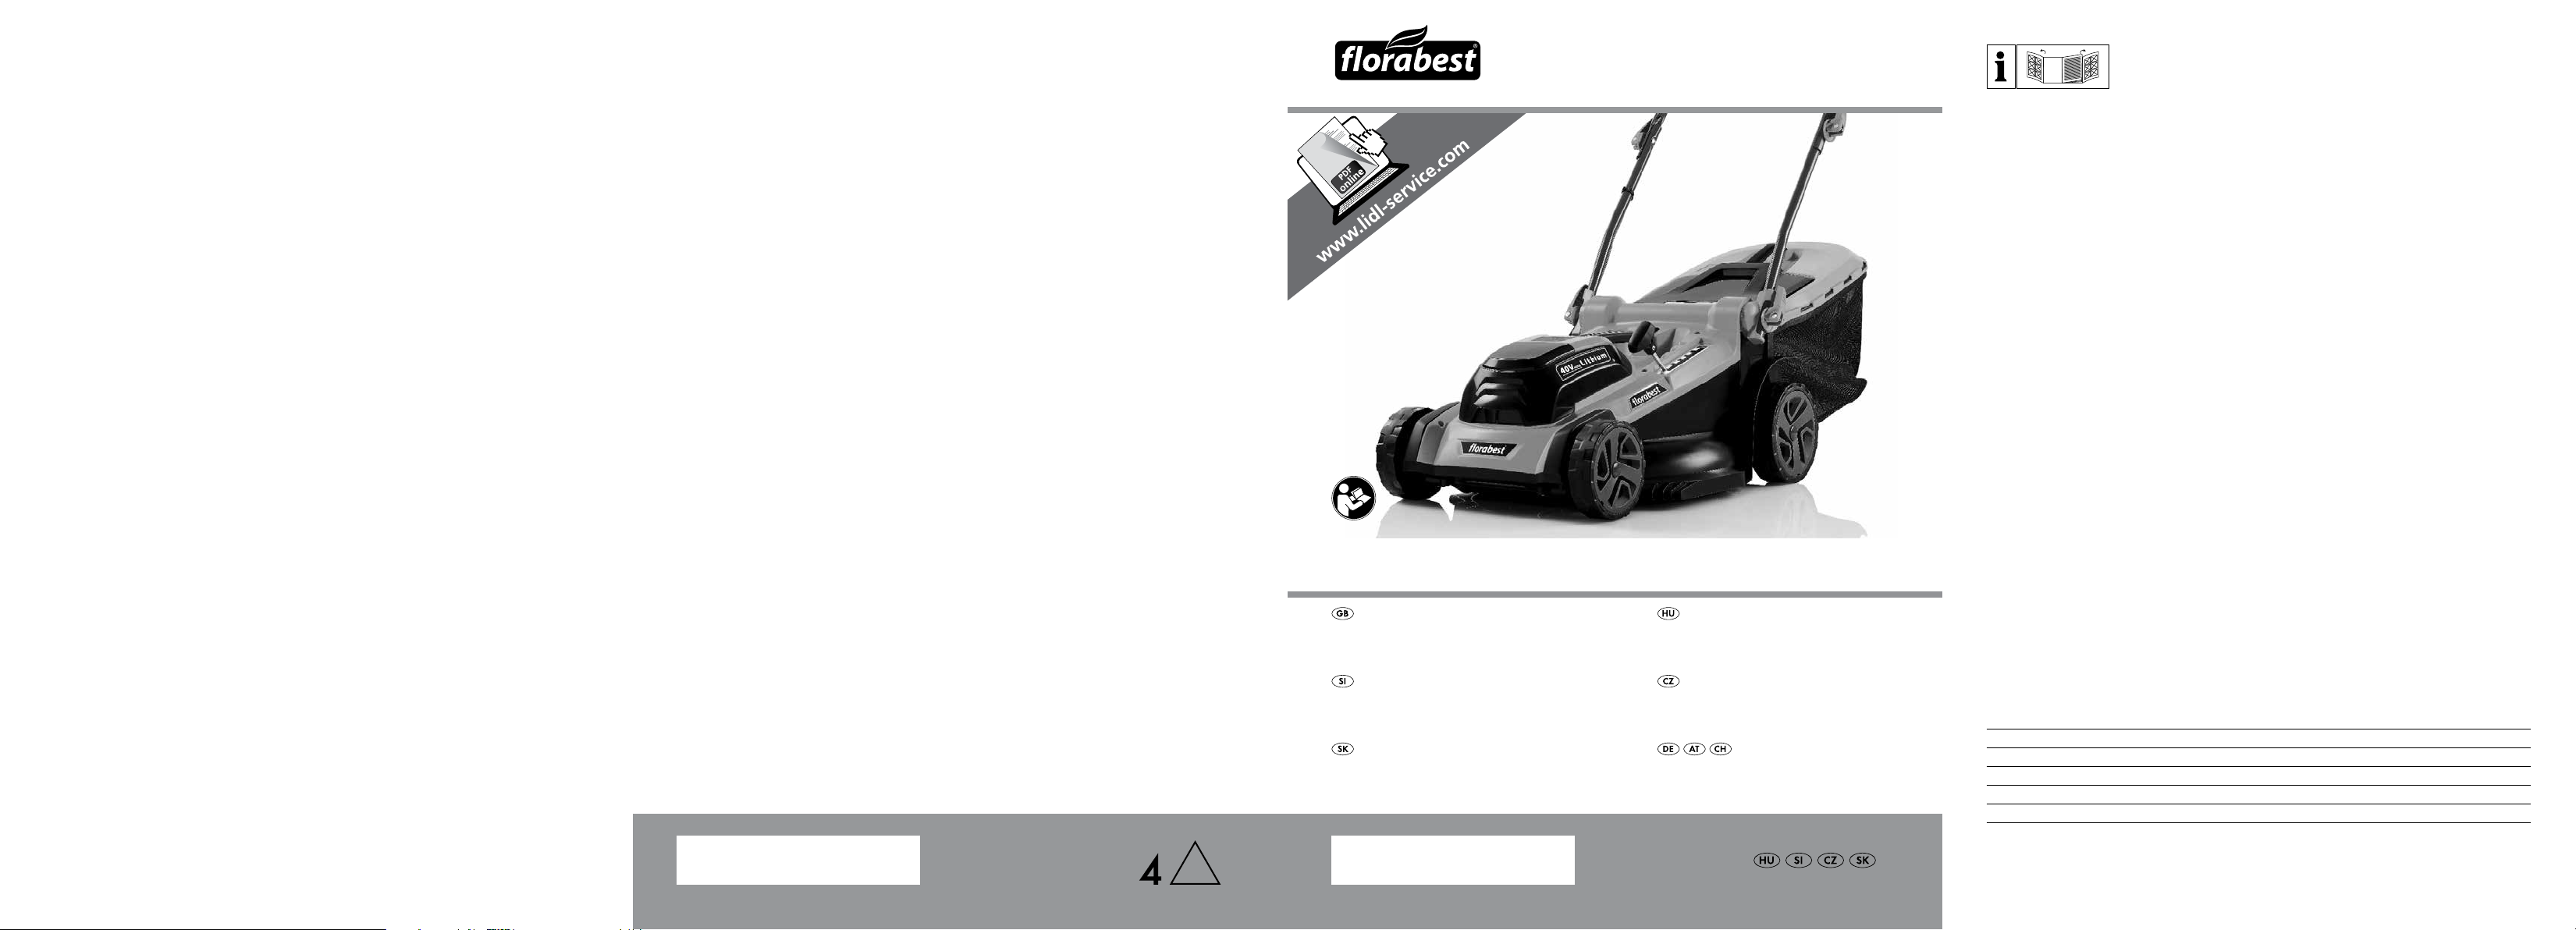
GB Operation and Safety Notes Page 5
HU Üzemeltetési és biztonsági megjegyzések Oldal 22
SI Navodila za uporabo in varno delo Stran 41
CZ Obsluha a bezpečnostní pokyny
SK Návod na obsluhu a bezpečnostné pokyny Strana 74
DE / AT / CH Bedienungs- und Sicherheitshinweise Seite 91
Strana 58
Page 2
A
D
E
3
2
16
15
14
13
11a
12
11
10
1
7c
7b
2
9
7a
3
4
5
6
7
F
H
10a
10b
13a
13b
2x
13c
G
14
3
12
7c
4.
17a7b
I
11a11
11b
3
2x
7
17
4
9
B
19
8
17b
17
17a
17c
C
18d
18
18a
18b
18c
J
K
16
6
15
1
Page 3

Table of contents
List of pictograms used ......................................................................................................... Page 6
Introduction ............................................................................................................................... Page 7
Intended use .................................................................................................................................. Page 7
Parts description ............................................................................................................................. Page 7
Scope of delivery ........................................................................................................................... Page 7
Technical data ................................................................................................................................Page 8
Safety warnings ...................................................................................................................... Page 9
Safe operating practices for electrically powered lawnmowers ..................................................... Page 9
Vibration and noise reduction ........................................................................................................ Page 12
Behaviour in emergency situations ................................................................................................. Page 12
Residual risks .................................................................................................................................. Page 12
Battery charger safety warnings .................................................................................................... Page 12
Initial use ..................................................................................................................................... Page 13
Unpacking ..................................................................................................................................... Page 13
Accessories .................................................................................................................................... Page 14
Assembly ........................................................................................................................................ Page 14
Before use .................................................................................................................................. Page 14
Charging the battery pack ............................................................................................................. Page 14
Checking the battery charging level .............................................................................................. Page 15
Safety key ...................................................................................................................................... Page 15
Attaching / removing the battery pack .......................................................................................... Page 15
Operation ................................................................................................................................... Page 15
Grass collector ............................................................................................................................... Page 15
Mulch plug ..................................................................................................................................... Page 16
Adjusting the cutting height ............................................................................................................ Page 16
Switching on and off ...................................................................................................................... Page 17
Mowing ......................................................................................................................................... Page 17
After use ......................................................................................................................................... Page 17
Cleaning and care ................................................................................................................... Page 17
Cleaning ........................................................................................................................................ Page 18
Maintenance .................................................................................................................................. Page 18
Repair ............................................................................................................................................ Page 18
Storage .......................................................................................................................................... Page 18
Transportation ................................................................................................................................ Page 18
Troubleshooting ....................................................................................................................... Page 18
Disposal ....................................................................................................................................... Page 19
Service ......................................................................................................................................... Page 20
Warranty .................................................................................................................................... Page 20
Translation of original declaration of conformity ..................................................... Page 21
5 GB
Page 4
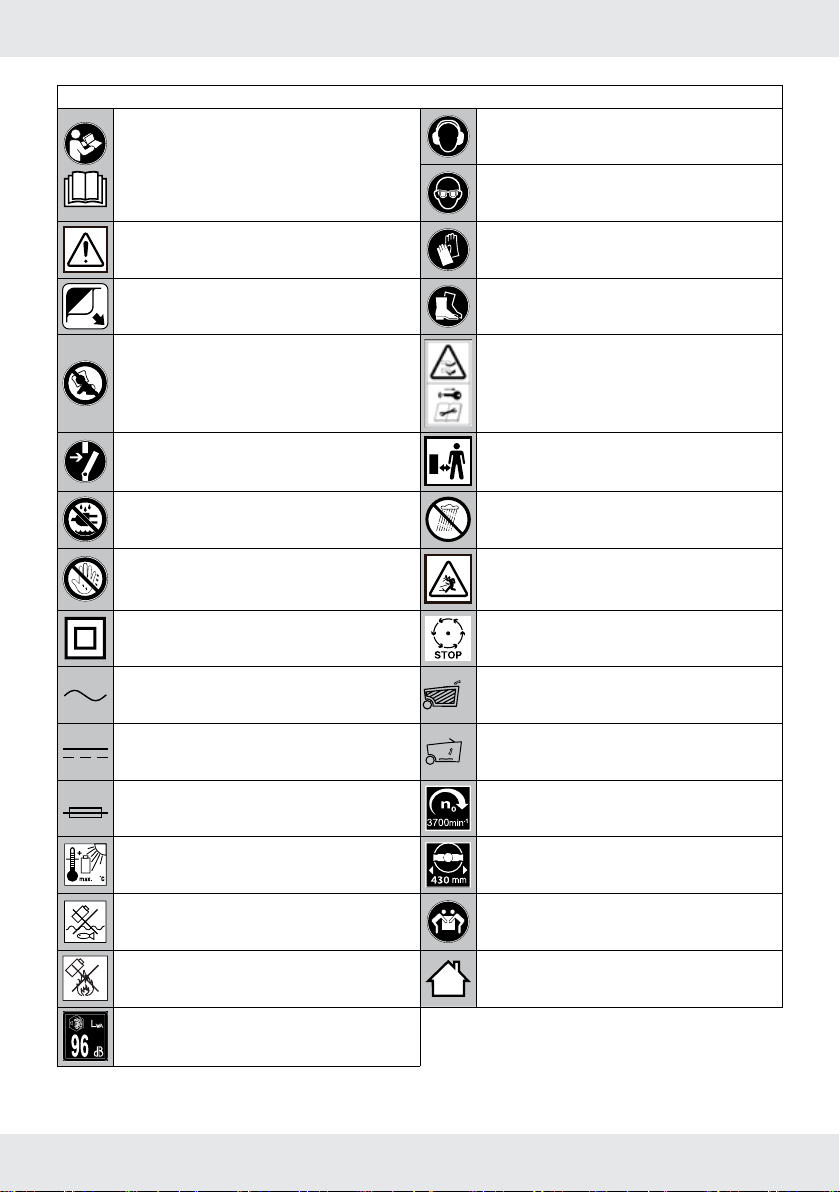
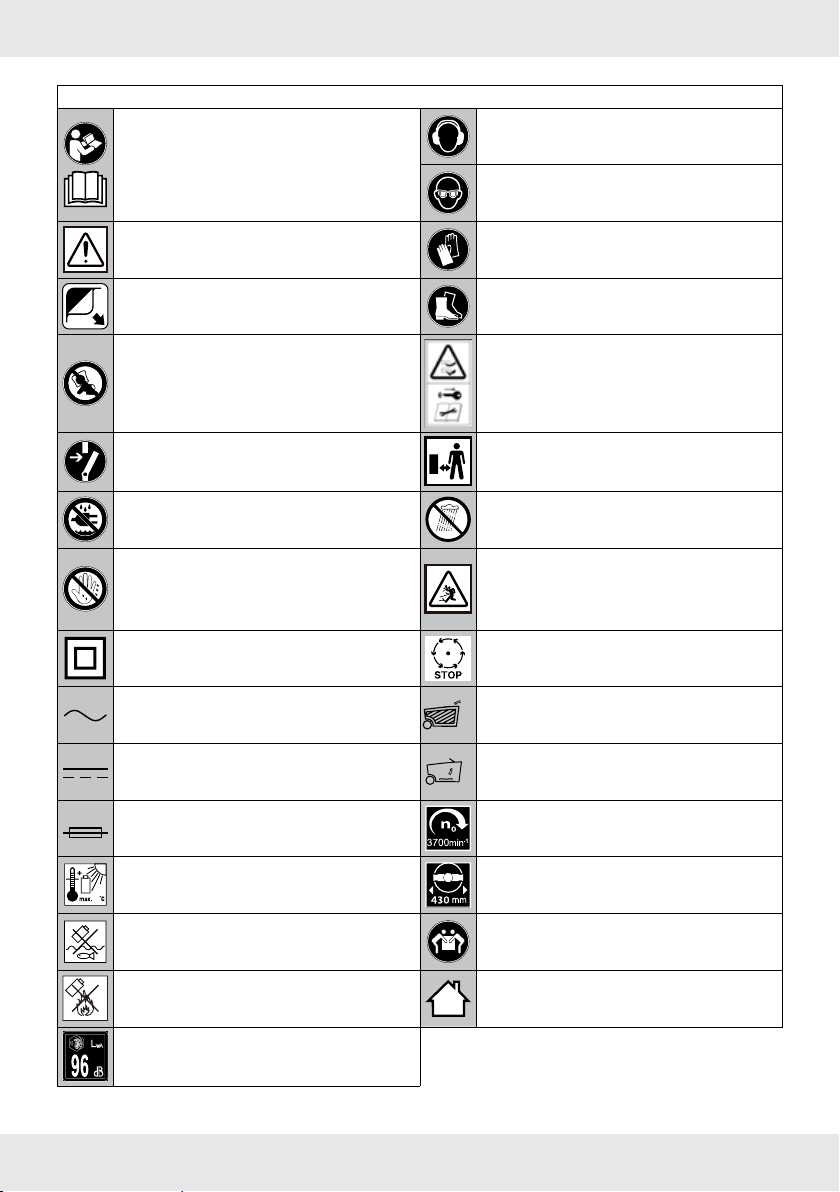
List of pictograms used:
STOP
GO
45
Read the instruction manual. Wear hearing protection!
Wear eye protection!
Caution / Warning Wear protective gloves!
Remove all packaging materials and
Wear non-skit safety shoes!
shipping devices.
Packaging materials are not toys. Beware of sharp blades. Blades continue to
rotate after the motor is switched off
Remove disabling device before
maintenance
Switch the appliance off and remove the
Keep bystanders away!
battery pack.
Protect the electrical parts against moisture. Do not expose the product to rain or wet
conditions.
Do not operate the product with wet hands
Risk of injury from ejected objects.
or while standing on a wet floor. Do not
touch the power plug with wet hands.
Protection class II Blades continue to rotate after the motor is
switched off
Alternating current
Direct current
Fuse No load speed n
T5A
Protect the battery pack against heat and
continuous intense sunlight.
45
Protect the battery pack against water and
Grass collector full
Grass collector ready
0
Cutting width
Lift with two persons.
moisture.
Protect the battery pack from fire. For indoor use only
Guaranteed sound power level in dB
6 GB
Page 5
CORDLESS LAWNMOWER
FARM 40-Li A1
Q Introduction
We congratulate you on the purchase of your
new product. You have chosen a high quality
product. The instructions for use are part of the
product. They contain important information
concerning safety, use and disposal. Before using
the product, please familiarise yourself with all
of the safety information and instructions for use.
Only use the product as described and for the
specified applications. If you pass the product on
to anyone else, please ensure that you also pass
on all the documentation with it.
Q Intended use
This cordless lawnmower (hereinafter “product”
or “power tool”) is designed for mowing
domestic lawns and grass areas.
The product is to be used by adults.
Any other use or modification of the product
are considered improper use and can result in
hazards such as death, life-threatening injuries
and damage. The manufacturer is not liable
for any damages caused by improper use. The
product is not intended for commercial or any
other use.
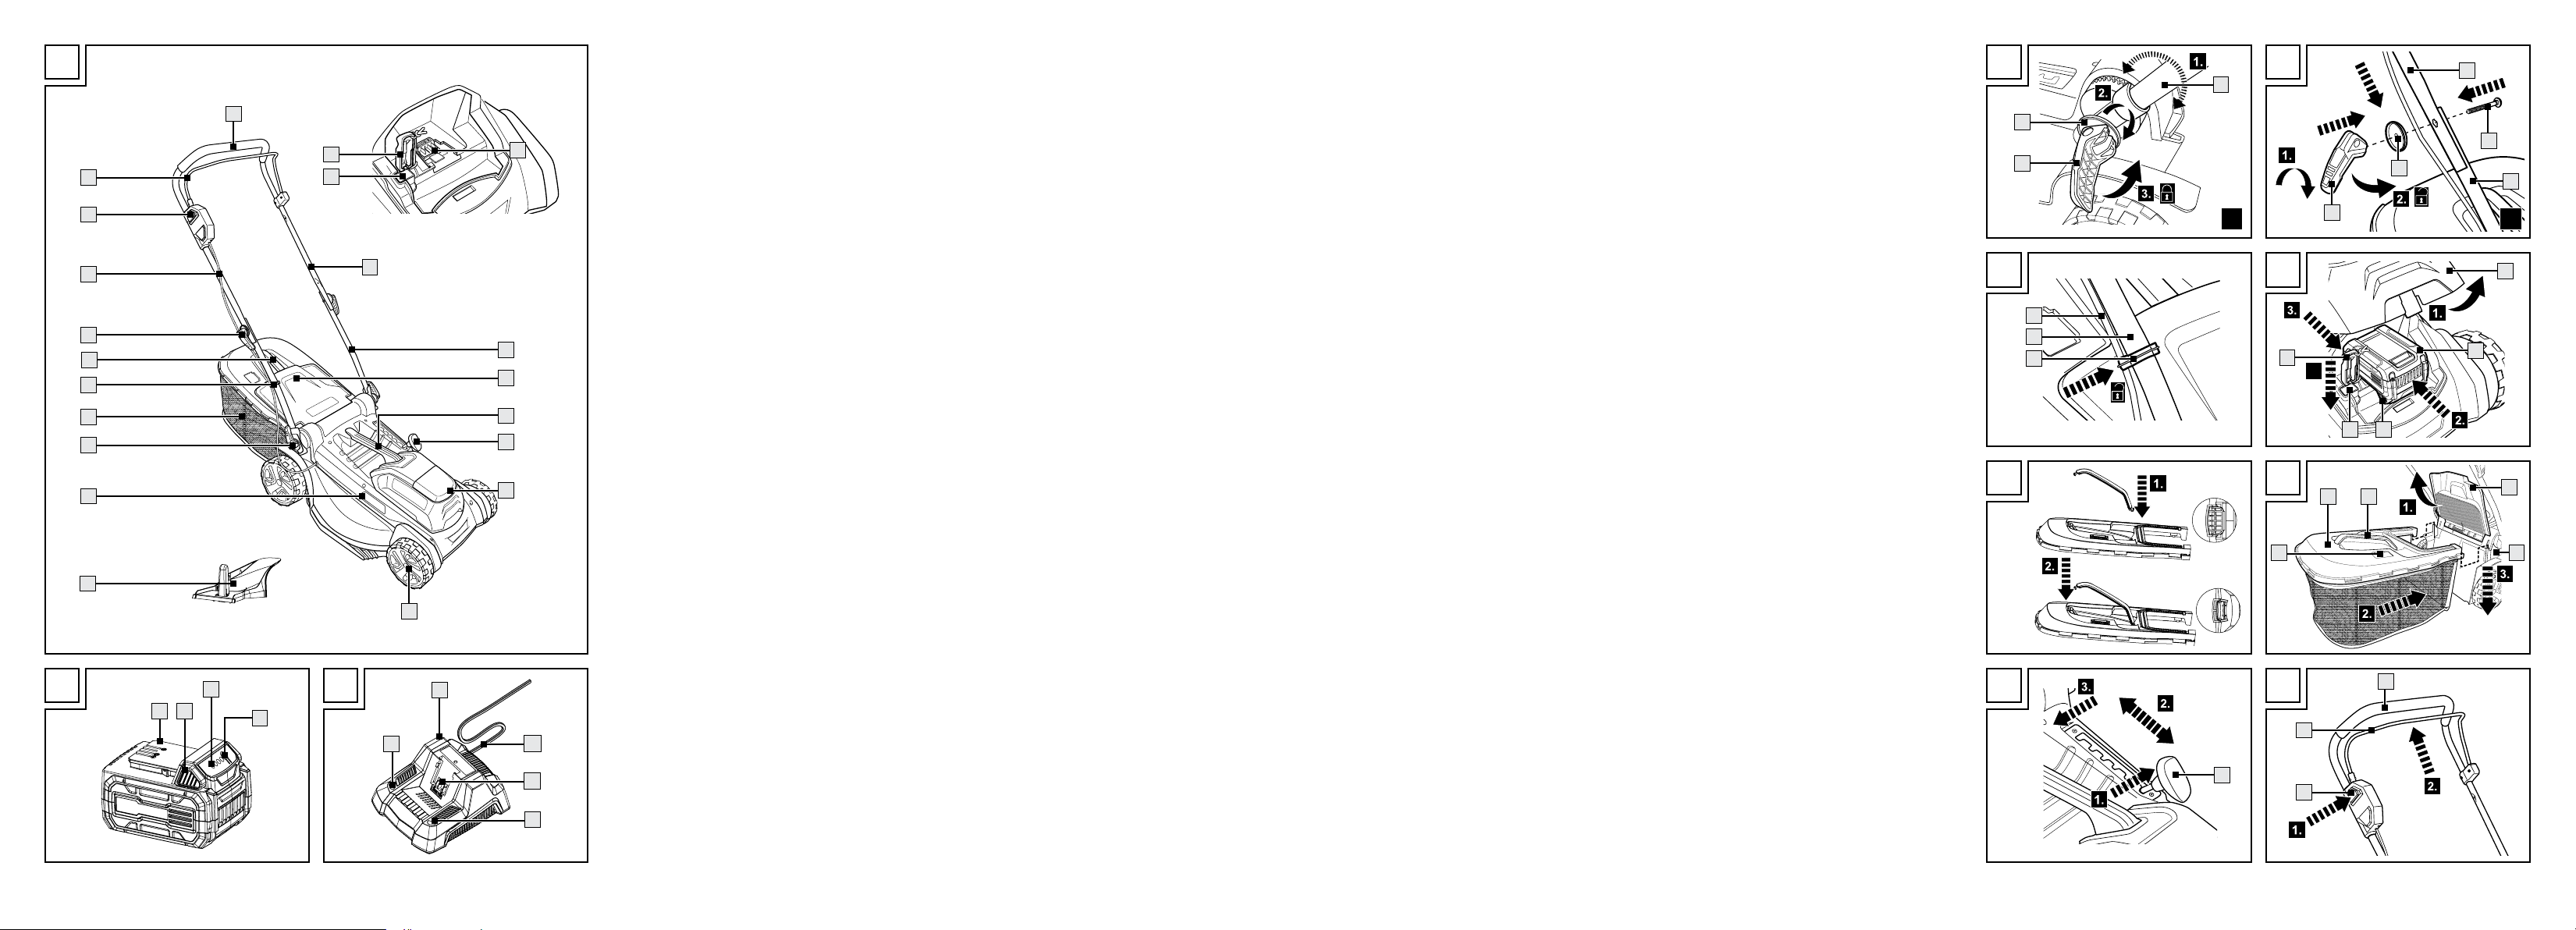
Q Parts description
Figure A/D/E:
1
Handle
2
Upper bar
3
Lower bar (x2)
4
Discharge cover
5
Carrying handle
6
Height adjustment lever
7
Battery compartment cover
7a
Battery pack connector
7b
Safety keyhole
7c
Safety key
8
Wheel (x4)
9
Housing
10
Lower bar mounting set (x2)
10a
Washer
10b
Lever
11
Grass collector
11a
Carrying handle
11b
Fill indicator flap
12
Cable clip
13
Upper bar mounting set (x2)
13a
Bolt
13b
Washer
13c
Lever
14
Control cable
15
Lock-off button
16
On / off switch
i
gure B:
F
17
Battery pack
17a
Release button
17b
Battery level indication lights
17c
Battery level button
Figure C:
18
Rapid battery charger
18a
Power cord with plug
18b
Battery pack connector
18c
Charging status LED – Red
18d
Charging status LED – Green
19
Mulch plug
Q Scope of delivery
1 Cordless lawnmower FARM 40-Li A1
1 Battery pack FAP 40 A1
1 Rapid battery charger FLG 40 A1
1 Grass collector (pre-assembled)
1 Lower bar mounting set (pre-assembled)
1 Upper bar mounting set
1 Carrying handle for grass collector
1 Mulch plug
1 Cable clip
1 Operating instructions
7 GB
Page 6
Q Technical data
Cordless
lawnmower:
Rated voltage: 40 V
No load speed n0: 3700 min
FARM 40-Li A1
-1
Cutting width: 430 mm
Cutting heights: 25/35/45/55/65/75 mm
Grass catcher volume: 40 l
Dimensions (H x W x D): (1010 - 1190) x 475 x
(1140 - 1350) mm
Weight (incl. accessories):15.5 kg
Protection class:
III /
Degree of protection: IPX1
Battery pack: FAP 40 A1
Type: Lithium ion
Rated voltage: 36 V
40 V max.
Capacity: 2.5 Ah (90 Wh)
Number of cells: 10
Rapid battery
charger:
FLG 40 A1
Input
Rated voltage: 200 – 240 V~,
50 / 60 Hz
Power consumption: 160 W
Output
Rated voltage: 36 V
Charging current: 3.6 A
Charging time: approx. 60 min
Protection class:
II /
Noise emission value:
Noise measurement value determined in
accordance with EN 60335. The A-rated noise
level of the power tool is typically as follows:
Sound pressure level L
Uncertainty K
Sound power level L
Uncertainty K
Guaranteed sound power
level L
pA
WA
:
WA
: 81.0 dB(A)
pA
: 3 dB
: 94.3 dB(A)
WA
: 1.81 dB
96 dB(A)
(according to 2000/14/EC amended by
2005/88/EC)
WARNING!
Wear ear protection!
Vibration emission value:
Total vibration values (vector total of three
directions) determined in accordance with
EN 60335:
Hand/arm vibration a
: 2.81 m/s
h
Uncertainty K: 1.5 m/s
2
2
WARNING!
u The vibration level varies in accordance
with the use of the power tool and may
be higher than the value specified in these
instructions in some cases. There is a risk of
underestimation of the vibration load if the
power tool is used regularly in this manner.
Try to keep the vibration loads as low as
possible. Measures to reduce the vibration
load are, e. g. wearing gloves and limiting
the working time. Wherein all states of
operation must be included (e. g. times when
the power tool is switched off and times
where the power tool is switched on but
running without load).
NOTE
u The vibration level specified in these
instructions has been measured in
accordance with a standardised measuring
procedure specified in EN 60335 and can
be used to make equipment comparisons.
The specified vibration emission value can
also be used to make an initial exposure
estimate.
8 GB
Page 7
Safety warnings
WARNING! RISK OF ELECTRIC
SHOCK!
Protect the electrical parts against
moisture. Do not immerse such parts in
water or other liquids to avoid electrical
shock. Never hold the appliance under
running water. Pay attention to the
instructions for cleaning and care.
Do not operate the appliance with wet
hands or while standing on a wet floor.
Do not touch the power plug with wet
hands.
NOTE
Appliances with this symbol are
classified as protection class II. This
means the product is equipped with
enhanced or double insulation between
the mains supply circuit and the output
voltage or the metallic casing.
Appliances with this symbol are
classified as protection class III. This
means the appliance is supplied from
a separated / safety extra-low voltage
(SELV) power source. Under normal
conditions a person can safely come into
contact with it without risk of electrical
shock.
Q Safe operating practices
for electrically powered
lawnmowers
IMPORTANT READ
CAREFULLY BEFORE USE.
KEEP FOR FUTURE
REFERENCE.
1. The product shall not be
used by children.
2. Children should be
supervised to ensure that they
do not play with the product.
3. Cleaning and user
maintenance shall not be
made by children.
4. This product can be used
by persons with reduced
physical, sensory or mental
capabilities or lack of
experience and knowledge
if they have been given
supervision or instruction
concerning use of the product
in a safe way and if they
understand the hazards
involved.
Training
1. Read the instructions
carefully. Be familiar with the
controls and the correct use
of the product.
2. Never allow children or
people unfamiliar with
these instructions to use the
product. Local regulations
can restrict the age of the
operator.
3. Never operate the product
while people, especially
children, or pets are nearby.
9 GB
Page 8

4. Keep in mind that the
operator or user is
responsible for accidents or
hazards occurring to other
people or their property.
Preparation
1. While operating the product
always wear substantial
footwear and long trousers.
Do not operate the product
when barefoot or wearing
open sandals. Avoid
wearing clothing that is
loose fitting or that has
hanging cords or ties.
2. Thoroughly inspect the area
where the product is to be
used and remove all objects
which can be thrown by the
product.
3. Before using, always
visually inspect to see that
the blade, blade bolt and
the blade assembly are
not worn or damaged.
Replace worn or damaged
components in sets to
preserve balance. Replace
damaged or unreadable
labels.
Operation
1. Operate the product only in
daylight or in good artificial
light.
2. Avoid operating the product
in wet grass.
3. Always be sure of your
footing on slopes.
4. Walk, never run.
5. Mow across the face of
slopes, never up and down.
6. Exercise extreme caution
when changing direction on
slopes.
7. Do not mow excessively
steep slopes.
8. Use extreme caution when
reversing or pulling the
product towards you.
9. Stop the blade(s) if the
product has to be tilted
for transportation when
crossing surfaces other
than grass, and when
transporting the product
to and from the area to be
used.
10. Never operate the product
with defective guards or
shields, or without safety
devices, for example
deflectors and/or grass
collector, in place.
10 GB
Page 9

11. Switch on the motor
carefully according to
instructions and with
feet well away from the
blade(s).
12. Do not tilt the product when
switching on the motor,
except if the product has to
be tilted for starting. In this
case, do not tilt it more than
absolutely necessary and lift
only the part, which is away
from the operator.
13. Do not start the product
when standing in front of the
discharge opening.
14. Do not put hands or feet
near or under rotating parts.
Keep clear of the discharge
opening at all times.
15. Do not transport the product
while the power source is
running.
16. Stop the product, and
remove the disabling device.
Make sure that all moving
parts have come to a
complete stop:
¢ whenever you leave the
product,
¢ before clearing blockages
or unclogging chute,
¢ before checking, cleaning or
working on the product,
¢ after striking a foreign
object. Inspect the product
for damage and make
repairs before starting and
operating the product.
If the product starts to
vibrate abnormally (check
immediately):
¢ inspect for damage,
¢ replace or repair any
damaged parts,
¢ check for and tighten any
loose parts.
Maintenance and storage
1. Keep all nuts, bolts and
screws tight to be sure the
product is in safe working
condition.
2. Check the grass collector
frequently for wear or
deterioration.
3. On products with multi
blade, take care as rotating
one blade can cause other
blades to rotate.
4. Be careful during adjustment
of the product to prevent
entrapment of the fingers
between moving blades and
fixed parts of the product.
5. Always allow the product to
cool down before storing
11 GB
Page 10
6. When servicing the blades
45
be aware that, even
though the power source is
switched off, the blades can
still be moved.
7. Replace worn or damaged
parts for safety. Use only
genuine replacement parts
and accessories.
Q Vibration and noise reduction
To reduce the impact of noise and vibration
emission, limit the time of operation, use lowvibration and low-noise operating modes as well
as wear personal protective equipment.
Take the following points into account to minimise
the vibration and noise exposure risks:
¢ Only use the product as intended by its
design and these instructions.
¢ Ensure that the product is in good condition
and well maintained.
¢ Use correct attachments for the product and
ensure they are in good condition.
¢ Keep tight grip on the handles / grip
surfaces.
¢ Maintain this product in accordance with
these instructions and keep it well lubricated
(where appropriate).
¢ Plan your work schedule to spread any high
vibration tool use across a longer period of
time.
Q Behaviour in emergency
situations
Familiarise yourself with the use of this product by
means of this instruction manual. Memorise the
safety warnings and follow them to the letter. This
will help to prevent risks and hazards.
¢ Always be alert when using this product, so
that you can recognise and handle risks early.
Fast intervention can prevent serious injury
and damage to property.
¢ Switch the product off, remove the battery
pack and disengage the safety key if there
are malfunctions. Have the product checked
by a qualified professional and repaired, if
necessary, before you operate it again.
Q Residual risks
Even if you are operating this product in
accordance with all the safety requirements,
potential risks of injury and damage remain. The
following dangers can arise in connection with the
structure and design of this product:
¢ Health defects resulting from vibration
emission if the product is being used over
long periods of time or not adequately
managed and properly maintained.
¢ Injuries and damage to property due to
broken cutting attachments or the sudden
impact of hidden objects during use.
¢ Danger of injury and property damage
caused by flying objects.
WARNING!
u This product produces an electromagnetic
field during operation! This field may under
some circumstances interfere with active or
passive medical implants! To reduce the risk
of serious or fatal injury, we recommend
persons with medical implants to consult their
doctor and the medical implant manufacturer
before operating this product!
Q Battery charger safety
warnings
CAUTION! RISK OF EXPLOSION!
Never charge non-rechargeable
batteries! Protect the battery pack
45
against heat, e. g. against continuous
intense sunlight, fire, water and
moisture. Danger of explosion.
12 GB
Page 11
¢ This appliance can be
used by children aged
from 8 years and above
and persons with reduced
physical, sensory or mental
capabilities or lack of
experience and knowledge
if they have been given
supervision or instruction
concerning use of the
appliance in a safe way
and understand the hazards
involved.
¢ Children shall not play with
the appliance.
¢ Cleaning and user
maintenance shall not be
made by children without
supervision.
¢ Do not charge non-
rechargeable batteries.
Disregarding this instruction is
hazardous.
¢ If the supply cord
is damaged, it must
be replaced by the
manufacturer, its service
agent or similarly qualified
persons in order to avoid a
hazard.
¢ Protect the electrical parts
against moisture. Do not
immerse such parts in water
or other liquids to avoid
electrical shock. Never hold
the appliance under running
water. Pay attention to the
instructions provided for
cleaning, maintenance and
repair.
¢ The appliance is suitable for
indoor use only.
¢ This charger is only designed
for charging the battery pack
type: FAP 40 A1.
Q Initial use
Q Unpacking
CAUTION! RISK OF EXPLOSION
Packaging materials are not toys.
Children should not play with the
packaging materials, as they pose a
risk of swallowing and suffocation!
Remove all packaging materials and
shipping devices.
1. Unpack all parts and lay them on a flat,
stable surface.
2. Remove all packing materials and shipping
devices if applicable.
3. Make sure the delivery contents are complete
and free of any damage. If you find that
parts are missing or show damage do not
use the product but contact your dealer. Do
not use the product unless missing parts have
been delivered in addition or defective parts
have been replaced. Using an incomplete
or damaged product represents a hazard to
people and property.
13 GB
Page 12
4. Ensure that you have all the accessories and
tools needed for assembly and operation.
This also includes suitable personal protective
equipment.
Q Accessories
To operate this product safely and correctly, the
following accessories, i. e. tools and attachments,
are necessary:
o Suitable personal protective equipment
Accessories and tools are available through your
authorised dealer. When buying always consider
the technical requirements of this product (see
“Technical data”).
If you are not certain, ask a qualified specialist and
get advice from your trusted dealer.
NOTE
u This instruction manual contains information
and suggestions for several attachments and
their uses. The attachments mentioned are not
necessarily included in the shipment, but are
meant to indicate additional possibilities for
using this product.
Q Assembly
Attaching the lower bar
1. Fold up the lower bar
3
to a convenient
height and engage the gears in a secure
position (see. Fig. D). Raise both lower
3
bars
to the same height.
2. Turn the lever
clockwise to tighten the
10b
connection, but to not fully tighten it.
3. Tilt down the lever
to secure the
10b
connection. If this requires too much force or
is impossible loosen the lever
10b
a little by
turning it anti-clockwise.
4. Repeat step 1 – 3 on the other side.
Attaching the upper bar
1. Align the open end of the upper bar
the lower bars
3
and slide it down until the
2
with
holes in both parts are congruent with each
other and hold it in place (see Fig. E).
2. Fit the bolt
from the product centre
13a
outward through the holes and hold it in
place.
3. Slide the washer
outwards onto the bolt
washer
should fit the upper bar
13b
4. Screw the lever
5. Turn the lever
with the flat side facing
13b
. The recess of the
13a
13c
onto the bolt
clockwise to tighten the
13c
13a
connection, but to not fully tighten it.
6. Tilt down the lever
to secure the
13c
connection. If this requires too much force or
is impossible loosen the lever
13c
a little by
turning it anti-clockwise.
7. Repeat step 1 – 6 on the other side.
Securing the control cable
1. Use the cable clip
14
cable
through the open end (see Fig. F).
2. Clip the cable clip
14
cable
Q Before use
Q Charging the battery pack
onto the lower bar
12
and insert the control
12
with the control
3
.
NOTE
u The battery pack
Charge the battery pack
comes partly charged.
17
17
prior to first use,
ideally at least 60 minutes.
u Always pull out the power plug
charger
18
from the mains before removing
or connecting the battery pack
18a
17
charger.
u Never charge the battery pack
17
the ambient temperature is below 10 °C or
above 40 °C.
u Rest the charger
18
for at least 15 minutes
between successive charging sessions.
u If no battery pack
charger
18
mains, the charging status LED
17
is inserted into the
and the charger is connected to
18d
green.
1. Align the battery pack
charger
18
and slide it in. Ensure it clicks
17
to the rails of the
noticeably in place.
.
2
.
of the
to the
when
flashes
14 GB
Page 13
2. Connect the power plug
18
charger
status LED
with the mains. The charging
lights up red. The continuously
18c
18a
of the
lit green charging status
LED
indicates that the charging process is
18d
complete.
3. Disconnect the power plug
charger
battery pack
from the mains and remove the
17
from the charger.
18
4. Attach the battery pack
of the
18a
17
back to the
product (see “Attaching / removing the
battery pack”).
Charging status LEDs
Green LED flashes
Charger ready
without battery pack
Green LED lights up
with battery pack
Red LED lights up with
Battery pack fully
charged
Battery pack charging
battery pack
Red and green LEDs
Battery pack defect
flashing
Red and green LEDs
continuously lit
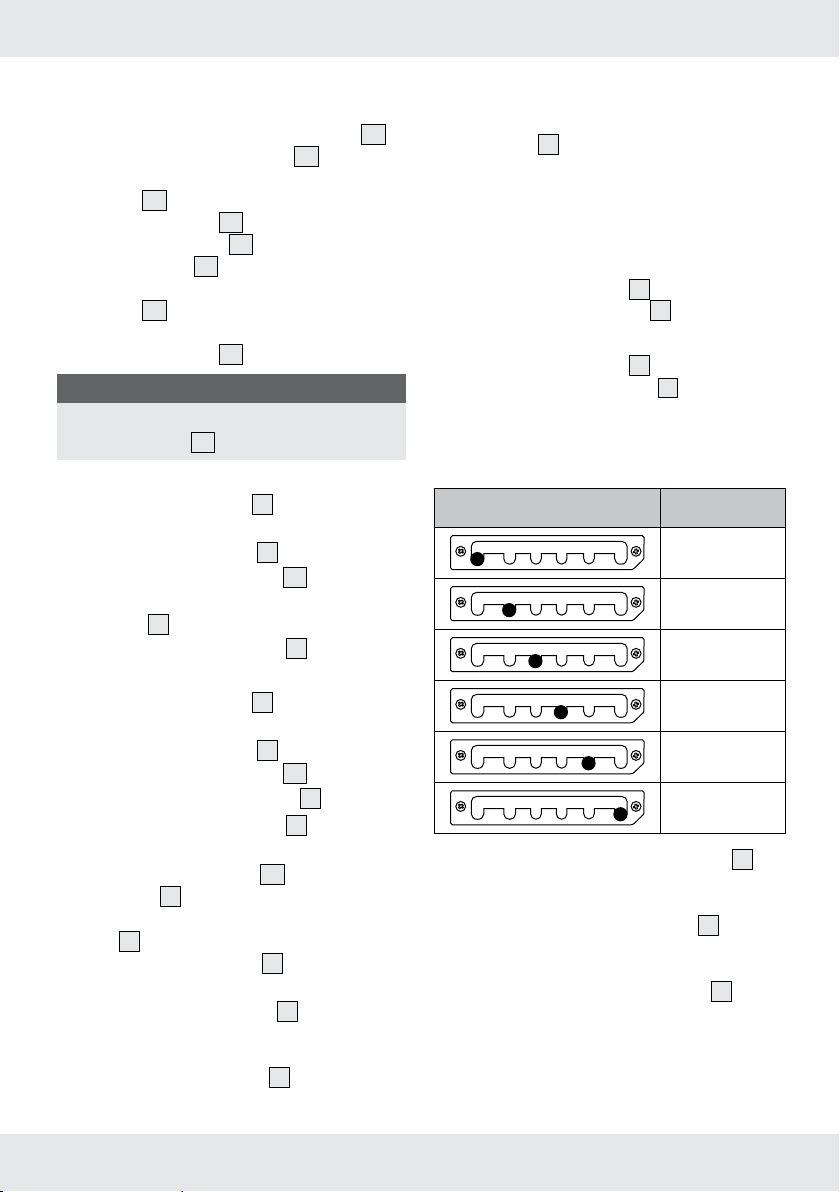
Q Checking the battery charging
Battery pack too cold
or warm
level
o Press the battery level button
charging level of the battery pack
charging level will be shown on the battery
level indication lights
4 Green LEDs
continuously lit
3 Green LEDs
17b
100% battery charging
level
75% battery charging level
continuously lit
2 Green LEDs
50% battery charging level
continuously lit
1 Green LED
25% battery charging level
continuously lit
1 Green LED flashing Low battery charging level
o Charge the battery pack
when it is at 25% or low battery charging
level.
to check the
17c
17
.
17
before operation
. The
Q Safety key
This product is equipped with a safety key
to
7c
prevent unauthorised use. In order to operate the
product the safety key
safety keyhole
7b
must be engaged in the
7c
.
Engaging the safety key
1. Open the battery compartment cover
7
(see Fig. G).
2. Press the button on the safety key
slide it into the safety keyhole
7b
and
7c
. Ensure
it clicks noticeably in place. It shall not be
possible to remove the safety key
7c
without pressing its button.
Disengaging the safety key
1. Press the button on the safety key
pull it out of the safety keyhole
Q Attaching / removing the
7c
and
.
7b
battery pack
Attaching the battery pack:
1. Open the battery compartment cover
(see Fig. G).
2. Align the battery pack
17
to the rails of the
battery pack bay and slide it into it. Ensure it
clicks noticeably in place.
Removing the battery pack:
1. Open the battery compartment cover
(see Fig. G).
2. Press the release button
battery pack
Q Operation
Q Grass collector
17
17a
and slide out the
from the battery pack bay.
This product can be used with a grass collector
that holds the cut grass for easy disposal. If not
used, the cut grass will be ejected through the rear
discharge opening.
To clear the rear discharge opening the mulch
19
plug
must be removed.
1. Lift the discharge cover
and remove the mulch plug
4
with one hand
19
7
7
11
.
15 GB
Page 14
Attaching carrying handle on grass
collector
1. Attach front end of the carrying handle
to the slot of the grass collector
11
11a
(see Fig. H).
2. The hook at the front end of carrying
handle
the grass collector
the carrying handle
grass collector
should snap fit into the cover of
11a
. Attach the rear end to
11
to the end slot of the
11a
.
11
3. Apply small pressure to the carrying
handle
until the hook at the rear end of
11a
the carrying handle snap fit into the cover of
the grass collector
.
11
NOTE
u Fabric handle is available at the back of
grass collector
.
11
Attaching the grass collector
1. Lift the discharge cover
4
with one hand
and hold it in position (see Fig. I).
2. Hold the grass collector
hand by its carrying handle
11
with the other
and
11a
hang it with its supports into the hooks on the
housing
3. Release the discharge cover
9
.
4
.
Removing the grass collector
1. Lift the discharge cover
4
with one hand
and hold it in position (see Fig. I).
2. Hold the grass collector
hand by its carrying handle
from the hooks on the housing
3. Release the discharge cover
11
with the other
11a
and lift it
9
.
.
4
Emptying the grass collector
Observe the fill indicator flap
grass collector
11
during operation. The flap
on top of the
11b
should open up by the air flow through the grass
collector
indicates a full grass collector
with available capacity. A closed flap
11
and it must be
11
emptied before continuing operation.
1. Remove the grass collector
11
(see
“Removing the grass collector”).
2. Dispose of the cut grass through the open
side of the grass collector
11
according to
local regulations.
Q Mulch plug
This product can be used for mulching grass with
the mulch plug
19
. The mulch plug will block the
rear discharge opening. The cut grass is chopped
several times to produce tiny bits of grass. The
cuttings will be left on the lawn where they will
soon rot down and perform fertilizing function.
Attaching the mulch plug
1. Lift the discharge cover
and attach the mulch plug
with one hand
4
19
Removing the mulch plug
1. Lift the discharge cover
and remove the mulch plug
Q Adjusting the cutting height
with one hand
4
19
This product has 6 settings to adjust to one of the
below cutting heights.
Setting
1. Disengage the height adjustment lever
by pushing it sideways out of the notch for the
current setting (see Fig. J).
2. Move the height adjustment lever
forth towards the notch for the desired cutting
height.
3. Engage the height adjustment lever
pushing it sideways into the notch of the
desired cutting height.
.
.
Cutting height
(ca.) in mm
75
65
55
45
35
25
6
6
back or
6
by
16 GB
Page 15
Q Switching on and off
Switching on:
1. Operate the lock-off button
position (see Fig. K).
2. Pull the on / off switch
handle
button
1
to switch on. Release the lock-off
.
15
Switching off:
1. Release the on / off switch
Q Mowing
15
and hold it in
16
towards the
16
to switch off.
WARNING! RISK OF INJURY!
u If the product strikes a foreign object stop
the motor! Switch the product off, remove
the battery pack, disengage the safety key
and let it cool down. Inspect the product
thoroughly for damage! Have any damage
repaired before restarting!
u Extensive vibration of the product during
operation is an indication of damage! Stop
the motor. The product should be promptly
inspected and repaired!
WARNING!
u In some countries regulations define at
what time of the day and on what special
days products are allowed to be used and
what restrictions apply! Ask your community
for detailed information and observe the
regulations in order to preserve a peaceful
neighbourhood and avoid committing
administrative offences!
o Make sure that the lawn is clear of stones,
sticks, wire or other objects that could
damage the product or its motor.
o Do not cut wet grass because it tends to stick
to the underbody of the product, preventing
the proper discharge of grass clippings, and it
could also cause you to slip and fall.
o Never cut off more than one-third of the total
length of the grass for a healthy lawn. In the
autumn, lawns should only be cut as long as
there is growth.
o Slowly push the product forward.
o Mow in slightly overlapping rows. The most
effective pattern for mowing lawns is straight
lines along one of the sides. This will keep the
rows even and ensures that all the lawn is cut
without missing any spots.
o Circle around flower beds. When reaching
a flower bed in the middle of the lawn, cut a
row or two around the circumference of the
bed.
o Pay special attention when changing
direction.
o Empty the grass collector
o Switch the product off immediately if you
11
regularly.
are disturbed while working by other people
entering the working area. Always let the
product come to complete stop before
averting.
o Do not overwork yourself. Take regular breaks
to ensure you can concentrate on the work
and have full control over the product.
Q After use
1. Switch the product off, remove the battery
pack
17
, disengage the safety key
7c
and
let it cool down.
2. Check, clean and store the product (see
“Cleaning and care”).
Q Cleaning and care
WARNING!
Always switch the product off, remove
the battery pack and let the product
cool down before performing inspection,
maintenance and cleaning work!
CAUTION! RISK OF INJURY!
The blade(s) are sharp! Always wear
protective gloves when performing
inspection, maintenance and cleaning
work!
17 GB
Page 16
Q Cleaning
o The product must always be kept clean, dry
and free from oil or grease. Remove debris
from it after each use and before storage.
o Regular and proper cleaning will help ensure
safe use and prolong the life of the product.
o Inspect the product before each use for worn
and damaged parts. Do not operate it if you
find broken and worn parts.
o Never allow fluids to get into the product.
o Clean the product with a dry cloth. Use a
brush for areas that are hard to reach.
NOTE
u Do not use chemical, alkaline, abrasive or
other aggressive detergents or disinfectants to
clean this product as they might be harmful to
its surfaces.
Q Maintenance
Before and after each use, check the product
and accessories (or attachments) for wear and
damage. If required, exchange them for new ones
as described in this instruction manual. Observe
the technical requirements (see “Technical data”).
Q Repair
This product does not contain any parts that can
be repaired by the user. Contact an authorised
service centre or a similarly qualified person to
have it checked and repaired.
Q Storage
o Switch the product off, remove the battery
o Clean the product as described (see
17
pack
and disengage the safety key
.
7c
“Cleaning”).
o Store the product and its accessories in a
dark, dry, frost-free, well-ventilated place.
o Always store the product in a place that is
inaccessible to children. The ideal storage
temperature is between 10 °C and 30 °C.
o We recommend covering the product with a
suitable cloth or enclosure to protect it against
dust.
o Regularly check the charge level of the
battery pack, if it is to be stored for an
extended period. Optimum storage conditions
are cool and dry. Optimal state of charge for
storage is approximately 50%.
Q Transportation
CAUTION! RISK OF INJURY!
Lift with two persons.
o Switch the product off and, remove the
battery pack
key
7c
o Attach shipping devices, if applicable.
o When lifting is unavoidable, lift with two
17
and disengage the safety
.
people. The product should only be lifted by
the carrying handle
and front end of the
5
product. Wear safety gloves when carrying
the product to prevent accidental contact of
the blade.
o Always push the product by its handle.
o Protect the product from any heavy impact
or strong vibrations which may occur during
transportation in vehicles.
o Secure the product to prevent it from slipping
or falling over.
Q Troubleshooting
WARNING!
u Only perform the steps described within
these instructions! All further inspection,
maintenance and repair work must be
performed by an authorised service centre or
a similarly qualified specialist if you cannot
solve the problem yourself!
Suspected malfunctions are often due to causes
that the users can fix themselves. Therefore check
the product using this section. In most cases the
problem can be solved quickly.
18 GB
Page 17
Problem Possible cause Solution
Product
does not
start
Product
does not
reach full
power
Unsatisfactory result
Product
suddenly
stops
Excessive
vibration
or noise
Battery pack not
properly attached
Battery pack
discharged
Battery pack
damaged
Safety key
disengaged
Other electrical
defect to the product
Clogging Stop the product,
Battery pack
capacity too low
Cutting device is
dull / damaged
Cutting material
exceeds capacity
Cutting height is
incorrect
Product overloaded Adjust cutting height
Battery pack
discharged
Battery pack too hot Remove the battery
Cutting device is
dull / damaged
Bolts / nuts are loose Tighten bolts / nuts
Attach properly
Remove and charge
the battery pack
Check by a specialist
electrician
Engage safety key
Check by a specialist
electrician
remove the battery
pack and disengage
the safety key. Check
underneath the
product and clear
out as necessary
(always wear
protective gloves).
Remove and charge
the battery pack
Have it replaced with
a new one by an
authorised service
centre
Only cut materials
according to capacity
of the product
Adjust cutting height
Remove and charge
the battery pack
pack and let it cool
down
Have it replaced with
a new one
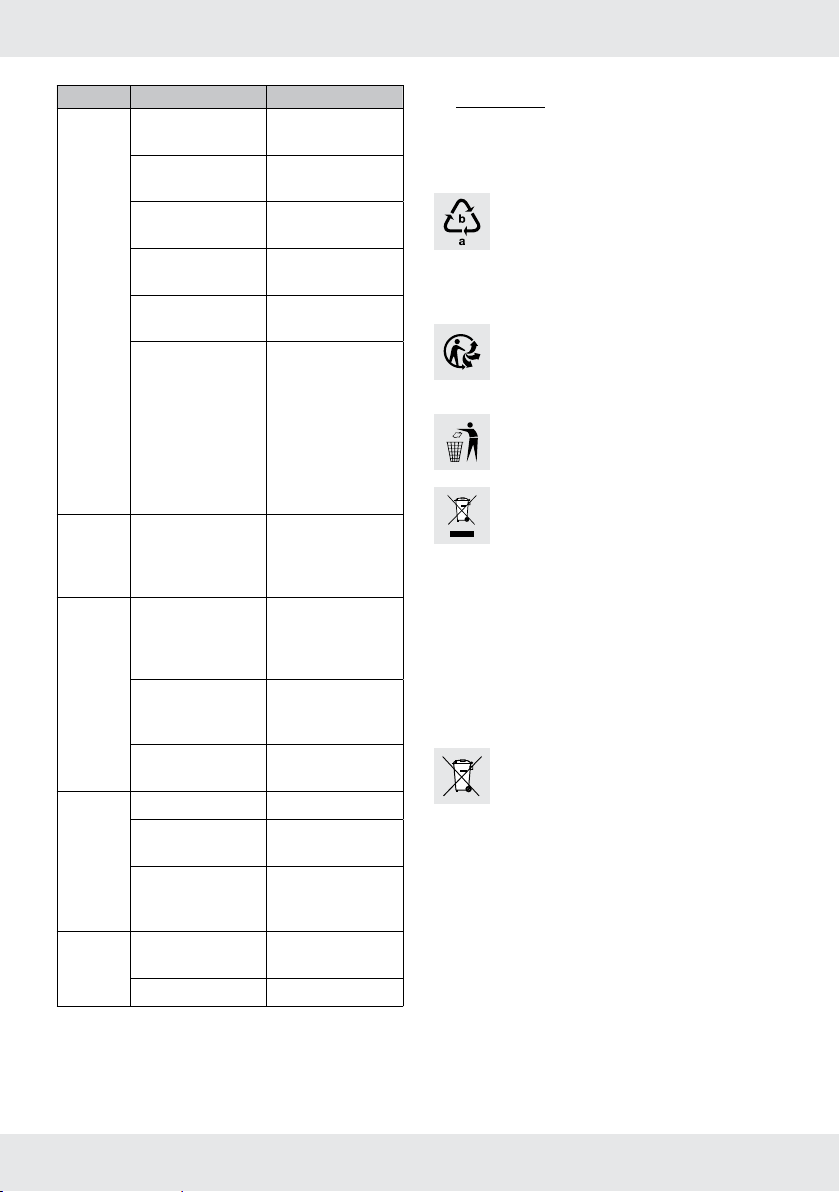
Q Disposal
The packaging is made entirely of recyclable
materials, which you may dispose of at local
recycling facilities.
Observe the marking of the packaging
materials for waste separation, which
are marked with abbreviations (a) and
numbers (b) with following meaning: 1 - 7:
plastics / 20 - 22: paper and fibreboard /
80 - 98: composite materials
The product and packaging materials are
recyclable, dispose of it separately for
better waste treatment.
The Triman logo is valid in France only.
Contact your local refuse disposal
authority for more details of how to
dispose of your worn-out product.
To help protect the environment, please
dispose of the product properly when it
has reached the end of its useful life and
not in the household waste. Information on
collection points and their opening hours
can be obtained from your local authority.
Faulty or used batteries / rechargeable
batteries must be recycled in accordance
with Directive 2006/66/EC and its
amendments. Please return the batteries /
rechargeable batteries and / or the
product to the available collection points.
Environmental damage through
incorrect disposal of the batteries /
rechargeable batteries!
Remove the batteries / battery pack
from the product before disposal.
Batteries /rechargeable batteries may not
be disposed of with the usual domestic
waste. They may contain toxic heavy
metals and are subject to hazardous
waste treatment rules and regulations. The
chemical symbols for heavy metals are as
follows:
Cd = cadmium, Hg = mercury, Pb = lead.
That is why you should dispose of used
batteries / rechargeable batteries at a
local collection point.
19 GB
Page 18
Q Service
WARNING!
u Have your product repaired at the service
centre or an electrician, using only original
manufacturer parts. This will maintain the
safety of this product.
u Always have a plug or power cord of
the charger replaced by the product
manufacturer or its service centre. This will
maintain the safety of this product.
Q Warranty
The product has been manufactured to strict
quality guidelines and meticulously examined
before delivery. In the event of product defects
you have legal rights against the retailer of this
product. Your legal rights are not limited in any
way by our warranty detailed below.
The warranty for this product is 3 years from the
date of purchase. Should this product show any
fault in materials or manufacture within 3 years
from the date of purchase, we will repair or
replace it – at our choice – free of charge to you.
The warranty period begins on the date of
purchase. Please keep the original sales receipt
in a safe location. This document is required as
your proof of purchase. This warranty becomes
void if the product has been damaged, or used or
maintained improperly.
The warranty applies to defects in material
or manufacture. This warranty does not cover
product parts subject to normal wear, thus
possibly considered consumables (e.g. batteries)
or for damage to fragile parts, e.g. switches,
rechargeable batteries or glass parts.
The warranty for this rechargeable battery pack is
1 year from the date of purchase.
Warranty claim procedure
To ensure quick processing of your case, please
observe the following instructions:
Please have the till receipt and the item number
(e.g. IAN 123456) available as proof of
purchase. You will find the item number on the
type plate, an engraving on the front page of the
instructions (bottom left), or as a sticker on the rear
or bottom of the product.
If functional or other defects occur, please contact
the service department listed either by telephone
or by e-mail.
You can return a defective product to us free of
charge to the service address that will be provided
to you. Ensure that you enclose the proof of
purchase (till receipt) and information about what
the defect is and when it occurred.
Service Great Britain
Tel.: 0871 5000 720 (£ 0.10/Min.)
E-Mail: owim@lidl.co.uk
IAN 292278
20 GB
Page 19
Q Translation of original
declaration of conformity
We, OWIM GmbH & Co. KG, Stiftsbergstraße1,
DE-74167 Neckarsulm, GERMANY, hereby
declare under our sole responsibility that the
product: cordless lawnmower FARM 40-Li A1,
model no.: HG03586, version: 02/2018, to
which this declaration refers, complies with the
standards / normative documents of 2006/42/
EC, 2014/35/EU, 2014/30/EU, 2011/65/EU,
2000/14/EC, 2005/88/EC.
Applied harmonised standards:
EN 60335-1: 2012/A11: 2014
EN 60335-2-77: 2010
EN 60335-2-29: 2004+A2: 2010
EN 62233: 2008
EN 55014-1: 2006/A2: 2011
EN 55014-2: 2015
EN 61000-3-2: 2014
EN 61000-3-3: 2013
EN 50581: 2012
We additionally confirm the following in
accordance with the 2000/14/EC emissions
guideline:
Sound power level
guaranteed: 96 dB(A)
measured: 94,3 dB(A)
Compliance evaluation process carried out in
accordance with Annex VI, 2000/14/EC
Tobias König
Division Manager / Responsible for
documentation
OWIM GmbH & Co. KG, Stiftsbergstraße 1,
DE-74167 Neckarsulm, GERMANY
Neckarsulm, 16.01.2018
The declaration of conformity can also be viewed
at: www.owim.com.
The object of the declaration described above
satisfies the provisions of Directive 2011/65/EU
of the European Parliament and the Council of
8 June 2011 on limiting the use of certain harmful
substances in electrical and electronic appliances.
Name of notified body:
TÜV SÜD Industrie Service GmbH (Notified body:
0036)
Address of notified body:
Westendstraße 199, 80686 München, Germany
Serial number: IAN 292278
21 GB
Page 20

Tartalomjegyzék
Az alkalmazott piktogramok magyarázata ........................................................... Oldal 23
Bevezető ................................................................................................................................. Oldal 24
Rendeltetésszerű alkalmazás .................................................................................................... Oldal 24
A készülék részei .......................................................................................................................Oldal 24
Szállítási terjedelem .................................................................................................................. Oldal 24
Műszaki adatok ........................................................................................................................ Oldal 25
Biztonsági figyelmeztetések ......................................................................................... Oldal 26
Adatok az elektromos hajtású fűnyíró biztonságos használatához .......................................... Oldal 26
Vibráció- és zajcsökkentés ........................................................................................................ Oldal 30
Viselkedés vészhelyzetben ........................................................................................................ Oldal 30
Maradék kockázatok ................................................................................................................ Oldal 30
Biztonsági utasítások a töltőkészülékekhez ............................................................................... Oldal 30
Az első használat előtt .................................................................................................... Oldal 32
Kicsomagolás ........................................................................................................................... Oldal 32
Tartozékok ................................................................................................................................. Oldal 32
Összeszerelés ........................................................................................................................... Oldal 32
A használat előtt ................................................................................................................ Oldal 33
Az akkumulátor töltése .............................................................................................................. Oldal 33
Akkumulátor töltési állapot ellenőrzése ..................................................................................... Oldal 33
Biztonsági kulcs ......................................................................................................................... Oldal 34
Az akkumulátor berakása/kivétele ........................................................................................... Oldal 34
Kezelés .................................................................................................................................... Oldal 34
Fűgyűjtő .................................................................................................................................... Oldal 34
Mulcsozó dugó ......................................................................................................................... Oldal 35
A vágási magasság beállítása .................................................................................................. Oldal 35
Be- és kikapcsolás ..................................................................................................................... Oldal 35
Fűnyírás ..................................................................................................................................... Oldal 35
A használat után ....................................................................................................................... Oldal 36
Tisztítás és ápolás .............................................................................................................. Oldal 36
Tisztítás ...................................................................................................................................... Oldal 36
Karbantartás ............................................................................................................................. Oldal 37
Javítás ....................................................................................................................................... Oldal 37
Tárolás ...................................................................................................................................... Oldal 37
Szállítás ..................................................................................................................................... Oldal 37
Üzemzavarok és elhárításuk ........................................................................................ Oldal 37
Ártalmatlanítás .................................................................................................................... Oldal 38
Szerviz ..................................................................................................................................... Oldal 39
Garancia ................................................................................................................................. Oldal 39
Az eredeti megfelelőségi nyilatkozat fordítása .................................................... Oldal 40
22 HU
Page 21
Az alkalmazott piktogramok magyarázata:
STOP
GO
45
Olvassa el a használati útmutatót. Viseljen hallásvédőt!
Viseljen védőszemüveget!
Vigyázat / figyelmeztetés Viseljen védőkesztyűt!
Távolítsa el az összes csomagolóanyagot
Viseljen csúszásmentes biztonsági lábbelit!
és szállítási biztosítást.
A csomagolóanyag nem játékszer. Ügyeljen az éles pengékre. A pengék
még azután is forognak, hogy a motort
kikapcsolták. Karbantartás előtt vegye ki a
bekapcsolás elleni biztosítókat.
Kapcsolja ki a terméket, és vegye ki az
A közelben lévő személyeket tartsa távol!
akkumulátort.
Óvja a villamos alkatrészeket a
Ne tegye ki eső hatásának!
nedvességtől.
Ne használja a készüléket nedves kézzel,
Sérülésveszély az elrepülő tárgyak miatt.
vagy ha nedves padlón áll. A hálózati
csatlakozódugót ne fogja meg nedves
kézzel.
II. védelmi osztály A pengék még azután is forognak, hogy a
motort kikapcsolták.
Váltóáram
Egyenáram
Finombiztosíték Üresjárati fordulatszám n
T5A
Óvja az akkumulátort a hőtől és a tartós,
erős napsugárzástól.
45
Óvja az akkumulátort a víztől és a
Fűgyűjtő tele
Fűgyűjtő kész
0
Vágásszélesség
Az emelést két ember végezze.
nedvességtől.
Óvja az akkumulátort a tűztől. Csak száraz belső helyiségekben
használja.
Garantált hangteljesítményszint dB-ben
23 HU
Page 22
AKKUS FŰNYÍRÓ
FARM 40-Li A1
Q Bevezető
Gratulálunk új termékének vásárlása alkalmából.
Ezzel a döntésével vállalatunk értékes terméke
mellett döntött. A használati utasítás ezen termék
része. A biztonságra, a használatára és a
megsemmisítésre vonatkozó fontos tudnivalókat
tartalmazza. A termék használata előtt ismerje
meg az összes használati és biztonsági
tudnivalót. A terméket csak a leírtak szerint és a
megadott felhasználási területeken alkalmazza.
A termék harmadik személy számára való
továbbadása esetén kézbesítse vele annak a
teljes dokumentációját is.
Q Rendeltetésszerű alkalmazás
Ez a akkus fűnyíró (a továbbiakban „termék”
vagy „elektromos szerszám”) gyepes vagy füves
felületek nyírására szolgál a ház környékén.
A terméket kizárólag felnőtt használhatja.
A termék más jellegű használata vagy
módosítása nem rendeltetésszerűnek minősül és
személyi sérüléssel járó vagy halálos kimenetelű
baleset és anyagi károk kockázatát rejtheti
magában. A nem rendeltetésszerű használatból
származó károkért a gyártó nem vállal
felelősséget. A termék nem ipari használatra
vagy más hasonló alkalmazási területre készült.
Q A készülék részei
A/D/E ábra:
1
Markolat
2
Felső rúd
3
Alsó rúd (x2)
4
Kidobóhely burkolat
5
Hordfogantyú
6
Vágásmagasság beállítókar
7
Akkumulátortartó burkolat
7a
Akkumulátor csatlakozó
7b
Biztonsági kulcslyuk
7c
Biztonsági kulcs
8
Kerék (x4)
9
Ház
10
Rögzítő készlet az alsó rúdhoz (x2)
10a
Alátét
10b
Kar
11
Fűgyűjtő
11a
Hordfogantyú
Töltöttségi szint jelzőjének
11b
csappantyúja
12
Kábelklipsz
13
Rögzítő készlet a felső rúdhoz (x2)
13a
Csap
13b
Alátét
13c
Kar
14
Vezérlőkábel
15
Bekapcsolásgátló
16
Be-/kikapcsoló
a:
B. ábr
17
Az akkumulátor
17a
Kioldó gomb
17b
Töltési állapot kijelző
17c
Töltési állapot gomb
C ábra:
18
Akkumulátor gyorstöltő készülék
18a
Hálózati kábel hálózati dugóval
18b
Akkumulátor csatlakozó
18c
Töltési állapot LED – Piros
18d
Töltési állapot LED – Zöld
19
Mulcsozó dugó
Q Szállítási terjedelem
1 db FARM 40-Li A1 akkus fűnyíró
1 db FAP 40 A1 akkumulátor
1 db FLG 40 A1 akkumulátor gyorstöltő készülék
1 db fűgyűjtő (előszerelt)
1 db rögzítő készlet az alsó rúdhoz (előszerelve)
1 db rögzítő készlet a felső rúdhoz
1 db fűgyűjtő hordfogantyú
1 db mulcsozó dugó
1 db kábelklipsz
1 db üzemeltetési útmutató
24 HU
Page 23
Q Műszaki adatok
Akkus fűnyíró: FARM 40-Li A1
Méretezési feszültség: 40 V
Üresjárati
fordulatszám n
Vágásszélesség: 430 mm
: 3700 min
0
-1
Vágási magasság: 25/35/45/55/65/75 mm
Fűgyűjtő
befogadóképessége: 40 l
Méretek (Ma x Sz x Mé): (1010 - 1190) x 475 x
(1140 - 1350) mm
Tömeg (tartozékokkal
együtt): 15,5 kg
Védettségi osztály:
III /
Védelmi fok: IPX1
Akkumulátor: FAP 40 A1
Típus: Lítium-ion
Méretezési feszültség: 36 V
40 V max.
Kapacitás: 2,5 Ah (90 Wh)
Akkumulátorcellák
száma: 10
Akkumulátor
gyorstöltő készülék :FLG 40 A1
Bemenet
Méretezési feszültség,
méretezési frekvencia:
200 – 240 V~,
50 / 60 Hz
Méretezési
teljesítményfelvétel: 160 W
Kimenet
Méretezési feszültség: 36 V
Töltőáram: 3,6 A
Töltési idő: kb. 60 min
Védettségi osztály:
II /
Zajkibocsátás
A zaj mérési értékének meghatározása az
EN 60335 szabvány szerint történt. A termék „A”jelleggörbével mért zajszintjének tipikus értéke:
Hangnyomásszint L
Bizonytalanság K
Hangteljesítményszint L
Bizonytalanság K
Garantált
hangteljesítményszint L
(a 2000/14/EK szerint, módosította a
: 81,0 dB(A)
pA
: 3 dB
pA
: 94,3 dB(A)
WA
: 1,81 dB
WA
: 96 dB(A)
WA
2005/88/EK)
FIGYELMEZTETÉS!
Viseljen hallásvédőt!
Rezgési értékek:
A három irány vektorának összege, az EN 60335
szabvány szerint került meghatározásra:
Kéz-/kar-vibráció a
: 2,81 m/s
h
Bizonytalanság (K): 1,5 m/s
2
2
FIGYELMEZTETÉS!
u A rezgésszint az elektromos szerszám
használatától függően változik, és bizonyos
esetekben az útmutatóban megadott érték
fölött is lehet. A rezgésterhelést alá lehet
becsülni, ha az elektromos szerszámot
rendszeresen ilyen módon használják.
Törekedjen arra, hogy a rezgés okozta
terhelést a lehető legkisebb szinten tartsa.
A rezgésterhelés csökkentésére vonatkozó
intézkedések lehetnek például a kesztyű
viselete a szerszám használata közben,
valamint a munkavégzés időbeli korlátozása.
Az üzemelési ciklus minden részét figyelembe
kell venni (például azt az időt, amikor az
elektromos szerszám ki van kapcsolva, és
azt is, amikor be van kapcsolva, de terhelés
nélkül fut).
MEGJEGYZÉS
u A jelen útmutatóban megadott rezgésszint
az EN 60335 szabványban rögzített mérési
eljárásnak megfelelően volt mérve, ez
készülékek összehasonlítására használható.
A megadott rezgéskibocsátási érték a
rezgések okozta hatások előzetes becslésére
is használható.
25 HU
Page 24
Biztonsági figyelmeztetések
FIGYELMEZTETÉS!
ÁRAMÜTÉSVESZÉLY!
Óvja a villamos részeket a nedvességtől.
Az áramütés elkerülése érdekében soha
ne merítse vízbe vagy más folyadékba
az elektromos részeket. Soha ne tartsa
a készüléket folyó víz alá. Tartsa be a
tisztítási és ápolási utasításokat.
Ne használja a készüléket nedves
kézzel, vagy ha nedves padlón áll. A
hálózati csatlakozódugót ne fogja meg
nedves kézzel.
MEGJEGYZÉS
Az ezzel a szimbólummal jelölt
készülékek a II. érintésvédelmi
osztálynak felelnek meg. Ez azt jelenti,
hogy a termék megerősített vagy kettős
szigeteléssel rendelkezik a hálózati
áramkör és a kimeneti feszültség illetve a
fémház között.
Az ezzel a szimbólummal jelölt
készülékek a III. érintésvédelmi
osztálynak felelnek meg. Ez azt jelenti,
hogy a termék védő kisfeszültséggel
(SELV) rendelkezik. Normális
körülmények között egy személy
biztonságosan, áramütés veszélye nélkül
érintkezésbe kerülhet vele.
Q Adatok az elektromos
hajtású fűnyíró
biztonságos
használatához
FONTOS!
KÖRÜLTEKINTŐEN
OLVASSA EL A
HASZNÁLATI UTASÍTÁST.
A HASZNÁLATI UTASÍTÁST
ŐRIZZE MÉG, KÉSŐBBI
UTÁNANÉZÉS CÉLJÁRA.
1. Ezt a terméket
gyermekeknek használni
tilos.
2. A gyermekekre oda kell
figyelni, hogy ne játsszanak
a termékkel.
3. Gyermekek nem végezhetik
a készülék tisztítását és
karbantartását.
4. Ezt a terméket használhatják
csökkent fizikai,
érzékszervi, vagy mentális
képességekkel rendelkező,
vagy kellő tudással és
belátással nem rendelkező
személyek is, ha az említett
személyek a biztonságukért
felelős, a készülék
biztonságos használatának
módjával és az esetleges
veszélyekkel tisztában lévő
személy felügyelete alatt
állnak, vagy ilyen személytől
kaptak utasítást a készülék
használatára vonatkozóan.
Gyakorlás
1. Körültekintően olvassa
el a használati utasítást.
Ismerkedjen meg a merev
részekkel és a termék helyes
használatával.
26 HU
Page 25

2. A termék használatát
soha ne engedje meg
gyermekeknek, vagy olyan
személyeknek, akik ezt a
használati utasítást nem
ismerik. Helyi rendelkezések
a használó minimális
életkorát is megszabhatják.
3. Soha ne végezzen fűnyírást,
ha más személyek,
különösen gyermekek, vagy
állatok vannak a közelben.
4. Gondoljon arra, hogy a gép
vezetője vagy a használó a
felelős a más személyekkel
történő vagy azok
tulajdonában bekövetkező
balesetekért.
Előkészítő intézkedések
1. A termék használatakor
mindig szilárd lábbelit
és hosszú nadrágot kell
viselni. Ne használja
a készüléket mezítláb,
vagy könnyű szandálban.
Kerülje laza öltözék vagy
lógó madzagokat, öveket
tartozékként tartalmazó
ruhadarabok viselését.
2. Ellenőrizze a talajt,
amelyiken a terméket
használni fogja, és
távolítson el minden olyan
tárgyat, amit a termék
elkaphat és eldobhat.
3. Használat előtt
mindig ellenőrizze
szemrevételezéssel,
hogy a vágópengék,
a rögzítőcsapok és
az egész vágóegység
nincsenek-e elhasználódva
vagy megsérülve. Az
elhasználódott vagy
sérült vágópengéket
és rögzítőcsapokat a
kiegyensúlyozatlanság
elkerülése érdekében csak
teljes tételben szabad
kicserélni. Az elhasználódott
vagy sérült utasító táblákat
ki kell cserélni.
Kezelés
1. Csak nappali fényben vagy
jó mesterséges megvilágítás
mellett végezzen fűnyírást.
2. Ha lehetséges, kerülje a
nedves fű nyírását.
3. Lejtős terepen mindig
ügyeljen a jó állásra.
27 HU
Page 26

4. A készüléket mindig csak
lépéstempóban vezesse.
5. Lejtős terepen
keresztirányban végezze
a fűnyírást, sohase felfelé
vagy lefelé.
6. Legyen különösen óvatos,
amikor lejtős terepen
megváltoztatja a haladási
irányt.
7. Ne végezzen fűnyírást
különösen meredeken lejtő
terepen.
8. Legyen különösen óvatos,
amikor a terméket megfordítja,
vagy maga felé húzza.
9. Tartsa erősen a
vágópengéket, amikor a
terméket meg kell döntenie
szállítás céljából, vagy ha a
fűről másféle felületre áll át,
valamint akkor, ha amikor a
terméket a nyírandó területre
vagy onnan elviszi.
10. Sohase dolgozzon
a termékkel, ha a
védőberendezések vagy
védőrácsok meg vannak
sérülve vagy nincsenek
felszerelve, pl. az
ütközőlemezek és/vagy
fűgyűjtő berendezések.
11. Az indító kapcsolót
óvatosan kapcsolja be
vagy működtesse, a gyártó
előírásainak megfelelően.
Ügyeljen arra, hogy kielégítő
távolság legyen a lába és a
vágópengék között.
12. A motor indításakor vagy
működtetésekor a terméket
nem szabad megdönteni,
még akkor sem, ha a
terméket előrehaladás
közben meg kell emelni.
Ilyen esetben csak annyira
billentse meg a terméket,
amennyire föltétlenül szükség
van, és csak a használótól
elfordított oldalt emelje fel.
13. Ne indítsa el a motort, ha a
kidobó csatorna előtt áll.
14. Soha ne tegye a kezét vagy
a lábát a forgó részekre
vagy ilyenek alá. Mindig
maradjon távol a kidobó
nyílástól.
15. Soha ne emelje vagy vigye
a terméket járó motorral.
16. Állítsa le a motort, és
húzza ki az indítókulcsot.
Győződjön meg róla, hogy
minden mozgó alkatrész
teljesen leállt:
28 HU
Page 27

¢ mindig, amikor felügyelet
nélkül hagyja a terméket;
¢ mielőtt elhárítja az
eltömődéseket a kidobó
csatornában vagy megoldja
a blokkolásokat;
¢ mielőtt a terméket ellenőrzi,
megtisztítja vagy valamilyen
munkát végez rajta;
¢ amikor idegen tárggyal
találkozott. Mielőtt
újraindítja a gépet, és
dolgozni kezdene a
termékkel, nézze át,
nincsenek-e rajta sérülések,
és végeztesse el a
szükséges javításokat.
Ha a termék szokatlanul erősen
rezegni kezdene, azonnali
ellenőrzést kell végezni:
¢ keresse meg, vannak-e rajta
sérülések;
¢ végezze el a sérült részeken
a szükséges javításokat;
¢ gondoskodjon arról, hogy
az összes anya, csap és
csavar szorosan meg legyen
húzva.
Karbantartás és tárolás
1. Gondoskodjon arról, hogy az
összes anya, csap és csavar
szorosan meg legyen húzva,
és a termék biztonságos
munkaképes állapotban van.
2. Rendszeresen ellenőrizze a
fűfogó berendezés kopását
vagy működésképességét.
3. Ügyeljen arra, hogy a több
vágópengével rendelkező
termékek esetén az egyik
penge mozgása a többi
penge elfordulását idézheti
elő.
4. A termék beállításakor
ügyeljen arra, hogy az ujja
ne szoruljon be a mozgó
vágópengék és a termék
stabilan álló részei közé.
5. Hagyja lehűlni a motort,
mielőtt leállítja a terméket.
6. A vágópengék
karbantartásakor ügyeljen
arra, hogy még abban az
esetben is mozoghatnak
a vágópengék, amikor a
feszültségforrás már le van
kapcsolva.
7. Az elhasználódott vagy sérült
alkatrészeket biztonsági
okokból cserélje ki. Kizárólag
eredeti pótalkatrészeket és
tartozékokat használjon.
29 HU
Page 28

Q Vibráció- és zajcsökkentés
45
A vibrációs- és zajhatások csökkentése érdekében
korlátozza a használati időt, használja a csekély
vibrációjú és csendes üzemmódokat, és viseljen
személyi védőfelszerelést.
A következő intézkedések segítenek a vibráció és
zaj okozta kockázatok csökkentésében:
¢ A terméket csak a rendeltetésének
megfelelően és a jelen utasításoknak
megfelelő módon használja.
¢ Gondoskodjon róla, hogy a termék
kifogástalan állapotban legyen, ill. a
megfelelő karbantartásáról.
¢ Ehhez a termékhez a megfelelő
betétszerszámokat használja, és győződjön
meg róla, hogy ezek kifogástalanok.
¢ Tartsa mindig biztonságosan a terméket a
fogantyúknál/fogófelületeknél fogva.
¢ A termék karbantartását az útmutatónak
megfelelően végezze és gondoskodjon
megfelelő kenésről (ha alkalmazható).
¢ Úgy tervezze meg a munkafolyamatot,
hogy a nagy vibrációs kibocsátási értékkel
rendelkező termékek használatát hosszabb
időre ütemezze.
Q Viselkedés vészhelyzetben
Ismerkedjen meg ennek a használati utasításnak
a segítségével a termék használatával. Jegyezze
meg a biztonsági utasításokat, és feltétlenül
tartsa magát ezekhez. Ez segít abban, hogy a
kockázatokat és veszélyeket el lehessen kerülni.
¢ A termék használata során legyen mindig
figyelmes, hogy a veszélyeket idejekorán fel
tudja ismerni és kezelni tudja őket. A hirtelen
beavatkozások súlyos sérüléseket okozhatnak,
és komoly dologi károkkal járhatnak.
¢ Hibás működés esetén kapcsolja ki a
terméket, és azonnal húzza ki a hálózati
dugót. Ilyenkor a készüléket egy szakképzett
személlyel ellenőriztesse és szükség esetén
végeztessen karbantartást, mielőtt ismét
üzembe veszi.
Q Maradék kockázatok
A személyi sérülések és anyagi károk potenciális
kockázata még akkor is fennáll, ha a termék
kezelése előírás szerint történik. A termék
kialakításával összefüggésben többek között a
következő veszélyek léphetnek fel:
¢ Rezgéskibocsátásból származó
egészségkárosodások, ha a terméket
hosszabb ideig használják, vagy a szerszám
vezetése és karbantartása nem szabályosan
történik.
¢ Személyi sérülések és anyagi károk hibás
vágószerszámok következtében, vagy a
használat közben egy rejtett tárgyba történő
hirtelen behatolás révén.
¢ Sérülési veszély és anyagi károk az elrepülő
tárgyak következtében.
FIGYELMEZTETÉS!
u Ez a termék az üzemelés során
elektromágneses mezőt kelt! Ez a mágneses
mező bizonyos körülmények között
befolyásolhatja az aktív vagy passzív orvosi
implantátumokat! A súlyos vagy halálos
sérülések veszélyének csökkentése érdekében
az orvosi implantátumokkal rendelkezőknek
azt javasoljuk, hogy konzultáljanak az
orvosukkal vagy az orvosi implantátum
gyártójával, mielőtt a terméket kezelik!
Q Biztonsági utasítások a
töltőkészülékekhez
VIGYÁZAT! ROBBANÁSVESZÉLY!
Soha ne töltse a nem újratölthető
elemeket! Védje az akkumulátort
45
hőtől, pl. folyamatos napsugárzástól,
tűztől, víztől és nedvességtől.
Robbanásveszély áll fenn.
30 HU
Page 29

¢ Ezt a készüléket
használhatják 8 éves vagy
annál idősebb gyermekek,
illetve csökkent fizikai,
érzékszervi, vagy mentális
képességekkel rendelkező,
vagy kellő tudással és
belátással nem rendelkező
személyek is, ha az említett
személyek a biztonságukért
felelős, a készülék
biztonságos használatának
módjával és az esetleges
veszélyekkel tisztában lévő
személy felügyelete alatt
állnak, vagy ilyen személytől
kaptak utasítást a berendezés
használatára vonatkozóan.
¢ Gyermekek nem játszhatnak
a készülékkel.
¢ Felügyelet nélkül gyermekek
nem végezhetik a készülék
tisztítását és karbantartását.
¢ Ne használja újra nem
tölthető elemek töltésére.
Ezen utasítás figyelmen kívül
hagyása veszélyhelyzeteket
teremt.
¢ Ha a készülék hálózati
csatlakozókábele megsérül,
a cserét a gyártó által
vagy a vevőszolgálata
által, illetve egy hasonló
képesítésű szakemberrel
kell elvégeztetni a veszélyek
elkerülése érdekében.
¢ Óvja a villamos részeket a
nedvességtől. Az áramütés
elkerülése érdekében soha
ne merítse vízbe vagy más
folyadékba az elektromos
részeket. Soha ne tartsa
a készüléket folyó víz alá.
Tartsa be a tisztításra,
karbantartásra és javításra
vonatkozó utasításokat.
¢ A készülék csak beltérben
történő használatra alkalmas.
¢ Ez a töltőkészülék kizárólag
a következő típusú
akkumulátorok töltésére
alkalmas: FAP 40 A1.
31 HU
Page 30

Q Az első használat előtt
Q Kicsomagolás
VIGYÁZAT! SÉRÜLÉSVESZÉLY!
A csomagolóanyag nem játékszer.
A gyerekek ne játsszanak a
csomagolóanyagokkal, mivel
fennáll a veszélye, hogy lenyelik, és
megfulladnak tőle!
Távolítsa el az összes
csomagolóanyagot és szállítási
biztosítást.
1. Csomagoljon ki minden alkatrészt, és
helyezze őket stabil, sík felületre.
2. Távolítsa el a csomagoló anyagot és a
csomagolási-/ és szállítási biztosításokat (ha
vannak).
3. Győződjön meg róla, hogy a csomagban
minden megvan és semmi sem sérült meg.
Ha azt állapítja meg, hogy valamelyik rész
hiányzik vagy sérült, forduljon ahhoz a
szakkereskedőhöz, akinél Ön ezt a terméket
megvásárolta. Ne használja a terméket,
mielőtt a hiányzó alkatrészeket nem pótolta
vagy a sérült alkatrészeket ki nem cserélte.
A nem teljes vagy sérült termék használata
személyi sérülésekhez és anyagi károkhoz
vezet.
4. Győződjön meg róla, hogy az üzembe
helyezéshez és a használathoz megvan
minden szükséges tartozék és szerszám.
Ebbe beletartozik a megfelelő egyéni
védőfelszerelés is.
Q Tartozékok
A termék biztonságos és szabályos használatához
többek között a következő tartozékokra, mint pl.
szerszámokra és betétszerszámokra van szükség:
o A megfelelő egyéni védőfelszerelést
Tartozékokat és szerszámokat szakkereskedésben
tudja beszerezni. Vásárlásakor vegye mindig
figyelembe a termék műszaki követelményeit (lásd:
„Műszaki adatok”).
Ha bizonytalan valamiben, forduljon
szakemberhez, vagy kérje ki szakkereskedője
tanácsát.
MEGJEGYZÉS
u Jelen használati útmutatóban információkat
és tudnivalókat talál a különböző
betétszerszámokhoz és azok alkalmazási
területeihez. Az említett betétszerszámok nem
részei a szállítási terjedelemnek, hanem a
termék alkalmazási lehetőségeit mutatják.
Q Összeszerelés
Az alsó rúd felszerelése
1. Hajtsa felfelé az alsó rudat
3
egy kényelmes
helyzetbe, és hagyja biztonságosan
egymásba akadni a fogaskoszorúkat (lásd
a D ábrát). Emelje fel mindkét alsó rudat
ugyanabba a magasságba.
2. Forgassa el a kart
az óramutató
10b
járásának irányába, ezáltal a kapcsolódás
szorosan meghúzódik, de még ne húzza meg
teljesen.
3. Hajtsa le a rudat
10b
, hogy rögzítse a
kapcsolódást. Ha mindez túl nagy erőt
igényelne vagy lehetetlen lenne, lazítsa meg
a kart
egy kicsit, ehhez fordítsa el az
10b
óramutató járásával ellentétesen.
4. Ismételje meg az 1-3 lépéseket a másik
oldalon.
A felső rúd felszerelése
1. Irányítsa a felső rúd nyitott végét
alsó rudakhoz
és csúsztassa ezt lefelé,
3
2
az
míg mindkét részben a furatok fedésbe nem
kerülnek,, ekkor tartsa ott ebben a helyzetben
(lásd az E ábrát).
2. Dugja át a csapot
a termék közepétől
13a
kezdve a furatokon keresztül, és tartsa meg
ebben a helyzetben.
3. Csúsztassa rá az alátétet
felével kifelé a csapra
mélyedésének
rúdra
13b
2
.
4. Csavarja rá a kart
13b
a lapos
13a
. Az alátét
rá kell illeszkednie a felső
13c
a csapra
13a
.
3
32 HU
Page 31

5. Forgassa el a kart
13c
az óramutató
járásának irányába, ezáltal a kapcsolódás
szorosan meghúzódik, de még ne húzza meg
teljesen.
6. Hajtsa le a rudat
, hogy rögzítse a
13c
kapcsolódást. Ha mindez túl nagy erőt
igényelne vagy lehetetlen lenne, lazítsa meg
a kart
egy kicsit, ehhez fordítsa el az
13c
óramutató járásával ellentétesen.
7. Ismételje meg az 1-6 lépéseket a másik
oldalon.
A vezérlőkábel rögzítése
1. Használja a kábelklipet
vezérlőkábelt
14
és tegye át a
12
a nyitott oldalon (lásd az F
ábrát).
2. Akassza be a kábelklipet
vezérlőkábellel együtt
Q A használat előtt
Q Az akkumulátor töltése
12
a
az alsó rúdba
14
MEGJEGYZÉS
u Az akkumulátor
kissé feltöltött állapotban
17
kerül kiszállításra. Használat előtt töltse fel az
akkumulátort
, ideális esetben 60 percen
17
keresztül.
u Mindig húzza ki a töltőkészülék
18a
dugóját
akkumulátort
a hálózatból, mielőtt az
17
kiveszi a töltőkészülékből,
18
vagy beteszi a töltőkészülékbe.
u Soha ne töltse az akkumulátort
17
, ha a
környezeti hőmérséklet 10 °C alatt vagy
40 °C fölött van.
u Pihentesse a töltőkészüléket
az egymást
18
követő töltési folyamatok között legalább
15 percig.
u Ha nincs akkumulátor
töltőkészülékben
a
17
, és a töltőkészülék az
18
áramhoz van csatlakoztatva, akkor a töltési
állapotot jelző LED
zölden villog.
18d
1. Állítsa az akkumulátort
vezetőihez
18
meg arról, hogy az a helyére kattant.
2. Csatlakoztassa a hálózati dugót
töltőkészülékről
A töltési állapot LED
A folyamatosan világító zöld töltési állapot
LED
azt jelzi, hogy a töltési folyamat
18d
befejeződött.
3. Húzza ki a töltőkészülék
hálózatból, és vegye ki az akkumulátort
töltőkészülékből.
4. Tegye be az akkumulátort
(lásd „Akkumulátor berakása/kivétele“).
Töltési állapot LED-ek
3
A zöld LED világít
.
akkumulátor nélkül
A zöld LED világít
akkumulátorral
A piros LED világít
akkumulátorral
A piros és a zöld LED-ek
villognak
A piros és a zöld LED-ek
folyamatosan világítanak
Q Akkumulátor töltési állapot
ellenőrzése
o Az akkumulátor töltési állapotának
ellenőrzéséhez nyomja meg az akkumulátor
töltési állapot gombot
akkumulátor
állapot kijelzője
A 4 zöld LED
folyamatosan világít
A 3 zöld LED
folyamatosan világít
A 2 zöld LED
folyamatosan világít
A 1 zöld LED
folyamatosan világít
1 zöld LED villog Alacsony töltési állapot
o Használat előtt töltse fel az akkumulátort
ha 25% vagy alacsony töltési állapotban van.
17
a töltőkészülék
17
és csúsztassa be. Győződjön
a
18
az áramellátási helyhez.
18c
18a
pirosan világít.
dugóját
18
17
18a
a termékbe
a
17
Töltőkészülék kész
Az akkumulátor
teljesen fel van töltve
Az akkumulátor tölt
Akkumulátor hiba
Az akkumulátor túl
hideg vagy meleg
. Az
17c
töltési állapotát a töltési
17b
mutatja.
100% töltési állapot
75% töltési állapot
50% töltési állapot
25% töltési állapot
17
a
,
33 HU
Page 32

Q Biztonsági kulcs
Ez a termék biztonsági kulccsal 7c van
felszerelve, hogy megelőzze a nem megengedett
alkalmazást. A termék kezeléséhez a biztonsági
kulcsnak
a biztonsági kulcs lyukba 7b dugva
7c
kell lenni.
A biztonsági kulcs bedugása
1. Nyissa ki az akkumulátortartó burkolatát
7
(lásd a G ábrát).
2. Nyomja meg a gombot a biztonsági
kulcson
biztonsági kulcs lyukba
és tegye be a kulcsot a
7c
. Győződjön
7b
meg arról, hogy az a helyére kattant. Nem
lehet kihúzni a biztonsági kulcsot
ennek a
7c
gombnak a használata nélkül.
A biztonsági kulcs kihúzása
1. Nyomja meg a gombot a biztonsági
kulcson
kulcs lyukból
Q Az akkumulátor berakása/
és húzza ki a kulcsot a biztonsági
7c
.
7b
kivétele
Az akkumulátor berakása:
1. Nyissa ki az akkumulátortartó burkolatát
(lásd a G ábrát).
2. Állítsa az akkumulátort
17
az akkumulátor
megfogó vezetőihez és csúsztassa be.
Győződjön meg arról, hogy az a helyére
kattant.
Az akkumulátor kivétele:
1. Nyissa ki az akkumulátortartó burkolatát
(lásd a G ábrát).
2. Nyomja meg a kioldó gombot
ki az akkumulátort
az akkumulátor
17
17a
megfogójából.
7
7
és vegye
Q Kezelés
Q Fűgyűjtő
Ezt a terméket egy fűgyűjtővel
11
együtt lehet
használni, ami felfogja a lenyírt füvet egy egyszerű
ártalmatlanítás céljából. Ha nem használja, akkor a
lenyírt fű a hátsó kidobó nyíláson át lesz eltávolítva.
A hátsó kidobó nyílás kinyitásához el kell távolítani
a mulcsozó dugót
19
.
1. Emelje fel a kidobó burkolatát
kezével, és vegye ki a mulcsozó dugót
A hordfogantyú felszerelése a
fűgyűjtőre
1. Tegye rá a hordfogantyú elülső végét
fűgyűjtő résére
(lásd a H ábrát).
11
2. A hordfogantyú elülső végén lévő
kampót
burkolatába
hátulsó végét
résére
be kell akasztani a fűgyűjtő
11a
11
. Tegye rá a hordfogantyú
11a
a fűgyűjtő hátulsó
11
.
3. Gyakoroljon egy kis nyomást a
hordfogantyúra
, míg a hordfogantyú
11a
hátulsó végén lévő kampó be nem akad a
11
.
fel van szerelve egy
fűgyűjtő burkolatába
MEGJEGYZÉS
u A fűgyűjtőre
11
fogantyú.
A fűgyűjtő felszerelése
1. Emelje fel és tartsa az egyik kezével a kidobó
burkolatát
2. Tartsa a fűgyűjtőt
fogantyújánál
4
(lásd az I ábrát).
11
a fűgyűjtő
11a
fogva, és akassza rá a
felfogójával a burkolaton lévő kampóra
3. Eressze le a kidobó burkolatát
A fűgyűjtő levétele
1. Emelje fel és tartsa az egyik kezével a kidobó
burkolatát
2. Tartsa a fűgyűjtőt
fogantyújánál
burkolaton lévő kampóról
(lásd az I ábrát).
4
11
a fűgyűjtő
11a
fogva, és emelje le a
9
3. Eressze le a kidobó burkolatát
4
4
.
4
az egyik
19
11a
9
.
.
.
a
.
34 HU
Page 33

A fűgyűjtő ürítése
Figyeljen a töltési szintet mutató kijelző
csappantyúját
fűgyűjtőn
a munka közben a
11b
. A csappantyút a fűgyűjtő
11
11
levegőárama nyitja ki, ha van befogadási
lehetőség. A lezárt csappantyú azt mutatja, hogy
tele van a fűgyűjtő
, ezt a munka folytatása
11
előtt ki kell üríteni.
1. Vegye ki a fűgyűjtőt
levétele“).
2. Ártalmatlanítsa a lenyírt füvet a fűgyűjtő
11
(lásd „A fűgyűjtő
11
nyitott oldalán lévő nyíláson keresztül kivéve,
a helyi rendelkezéseknek megfelelően.
Q Mulcsozó dugó
A terméket a mulcsozó dugóval
19
a fű mulccsá
alakítására is lehet használni. A mulcsozó dugó
eltömíti a hátulsó kidobó nyílást. A lenyírt füvet
többször is kisebb darabokra kell vágni. A
darabkákat vissza kell engedni a gyepre, ahol az
majd hamarosan el fog rothadni, és trágyázási
szerepet fog betölteni.
A mulcsozó dugó felszerelése
1. Emelje fel a kidobó burkolatát
be a mulcsozó dugót
19
4
.
, és tegye
A mulcsozó dugó leszerelése
1. Emelje fel a kidobó burkolatát
ki a mulcsozó dugót
Q A vágási magasság beállítása
19
4
, és vegye
.
Ez a termék 6 beállítási lehetőséggel rendelkezik,
amelyekkel az alább megadott vágási
magasságok valamelyikét lehet beállítani.
Beállítás
Vágási
magasság (kb.)
mm-ben
75
65
55
45
Beállítás
Vágási
magasság (kb.)
mm-ben
1. Reteszelje ki a kart a vágási magasság
beállításához
a jelenlegi beállítás rovátkájából (lásd a J
ábrát).
6
, ehhez mozdítsa el oldalra
2. Mozdítsa el a kart a vágási magasság
beállításához
visszafelé vagy előrefelé,
6
a kívánt vágási magasság rovátkájának
irányába.
3. Reteszelje be a vágási magasság beállítására
szolgáló kart
, ehhez mozdítsa el oldalra
6
a kívánt beállítás rovátkájába mozdítva.
Q Be- és kikapcsolás
Bekapcsolás:
1. Hozza működésbe és tartsa a
bekapcsolásgátlót
(lásd a K ábrát).
15
2. Nyomja el a be- / kikapcsolót
fogantyú
Oldja ki a bekapcsolásgátlót
1
irányába a bekapcsoláshoz.
15
Kikapcsolás:
1. A kikapcsoláshoz oldja ki a be- /
kikapcsolót
Q Fűnyírás
16
.
FIGYELMEZTETÉS! SÉRÜLÉSVESZÉLY!
u Ha a termék egy idegen tárgyba ütközik,
állítsa le a motort! Kapcsolja ki a terméket,
vegye ki az akkumulátort, húzza ki a
biztonsági kulcsot és hagyja, hogy lehűlni.
Gondosan vizsgálja meg a terméket, hogy
nem sérült-e meg. Minden kárt javíttasson
meg, mielőtt tovább folytatná a munkát!
u A termék túlzott mérvű rezgése a munka
közben sérülésre utal! Kapcsolja ki a motort.
A terméket mielőbb meg kell vizsgálni és
meg kell javítani!
35
25
a
16
.
35 HU
Page 34

FIGYELMEZTETÉS!
u Egyes országokban olyan rendelkezések
vannak érvényben, amelyek megszabják,
hogy milyen napszakokban és különösen
mely napokon szabad a terméket használni,
és milyen korlátozások léteznek! Kérdezze
ezeket részletesen meg a helyi hatóságoknál,
és tartsa be ezeket a rendelkezéseket, hogy a
szomszédok nyugalmát biztosítsa, és elkerülje
a rendbontást.
o Győződjön meg arról, hogy a gyep mentes
kövektől, gallyaktól, drótoktól és más
tárgyaktól, amelyek a terméket vagy a termék
motorját károsítani képesek.
o Ne nyírjon nedves füvet, mivel ez hajlamos
a termék alsó részére való felragadásra,
ami gátolja a levágott fű rendeltetésszerű
kidobását, emellett meg is csúszhat és el is
eshet rajta.
o Egy egészséges gyephez soha ne nyírjon le a
fű teljes magasságának egyharmad részénél
többet. Ősszel csak addig kell a füvet nyírni,
amíg növekedésben van.
o Lassan tolja előre a terméket.
o Végezze a nyírást úgy, hogy egy kevéssé
lapolják át egymást a nyírási sávok. A
leghatékonyabb fűnyírási mintázat az, amikor
egy oldal mentén egyenes sávokban nyír. Ez
egyenletes sávokat eredményez, és biztosítja
a fű lenyírását anélkül, hogy kihagyna egy
darabot.
o A virágágyások körül járjon körbe. Ha a
gyepen belül ér egy virágágyáshoz, nyírjon
egy vagy két sávot az ágyás kerülete mentén.
o Legyen különösen óvatos, amikor irányt
változtat.
o Ürítse ki a fűgyűjtőt
o Azonnal kapcsolja ki a terméket, ha a munka
11
rendszeresen.
során a munkaterületre belépő más személyek
megzavarják. Mindig várja meg, míg a
termék teljesen megáll, mielőtt otthagyná.
o Ne dolgozza agyon magát. Tartson
rendszeresen szüneteket, ezzel biztosítja,
hogy a munkára tud majd koncentrálni, és a
terméket is tökéletesen uralja.
Q A használat után
1. Kapcsolja ki a terméket, vegye ki az
akkumulátort
kulcsot
, húzza ki a biztonsági
17
és hagyja, hogy szükség esetén
7c
lehűljön.
2. Végezze el a termék ellenőrzését, tisztítását
és tárolását (lásd „Tisztítás és ápolás“).
Q Tisztítás és ápolás
FIGYELMEZTETÉS!
Kapcsolja ki a terméket, és vegye ki
az akkumulátort, húzza ki a biztonsági
kulcsot és hagyja lehűlni a terméket,
mielőtt felülvizsgálati, karbantartási vagy
tisztítási munkát végez!
VIGYÁZAT! SÉRÜLÉSVESZÉLY!
A vágópenge (vágópengék) éles(ek)!
Mindig viseljen védőkesztyűt, ha
felülvizsgálati, karbantartási vagy
tisztítási munkát végez!
Q Tisztítás
o A terméket mindig tartsa tisztán, szárazon,
olajtól vagy kenőzsíroktól mentesen. Minden
használat után és elrakás előtt távolítsa el a
port.
o A rendszeres és szakszerű tisztítás segít a
biztonságos használat fenntartásában, és
meghosszabbítja a termék élettartamát.
o Ellenőrizze a terméket minden használat előtt,
nincsenek-e elhasználódott vagy hibás részek.
Ne használja a terméket, ha hibás vagy
elhasználódott részeket talált rajta.
o Ügyeljen arra, hogy ne kerüljön semmilyen
nedvesség a termék belsejébe.
o Száraz ruhával tisztítsa meg a terméket.
Használjon kefét a nehezen hozzáférhető
helyeken.
MEGJEGYZÉS
u Ne használjon vegyi, lúgos, csiszoló
hatású vagy másféle agresszív tisztító- vagy
fertőtlenítőszereket a termék megtisztítására,
mivel ezek károsíthatják a termék felületét.
36 HU
Page 35

Q Karbantartás
Ellenőrizze a terméket és tartozékait (pl. a
betétszerszámokat) minden használat előtt és
után, nincsenek-e elhasználódott vagy hibás
részek. Ezeket adott esetben az ezen használati
utasításban leírt módon cserélje ki újakra.
Ennek során vegye figyelembe a műszaki
követelményeket (lásd „Műszaki adatok”).
Q Javítás
A készülék belsejében nem található olyan
alkatrész, amit a felhasználó javítani tudna. A
termék ellenőrzése és karbantartása céljából
forduljon szakemberhez.
Q Tárolás
o Kapcsolja ki a terméket, és vegye ki az
akkumulátort
kulcsot
o A leírtaknak megfelelően tisztítsa meg a
, húzza ki a biztonsági
17
.
7c
terméket (lásd „Tisztítás“).
o A terméket és annak tartozékait sötét, száraz,
fagyvédett és jól szellőző helyen tárolja.
o A terméket mindig gyerekek számára hozzá
nem férhető helyen tárolja. Az optimális
tárolási hőmérséklet 10 °C és 30 °C között
van.
o Javasoljuk, hogy a terméket a tároláskor
megfelelő ruhával takarja le, hogy megvédje
a portól.
o Ellenőrizze rendszeresen az akkumulátor
töltési állapotát, ha huzamosabb időn
keresztül történik a tárolás. Az optimális
tárolási klíma hűvös és száraz. Tároláskor az
optimális töltésszint kb. 50%.
Q Szállítás
VIGYÁZAT! SÉRÜLÉSVESZÉLY!
Az emelést két ember végezze.
o Kapcsolja ki a terméket, és vegye ki az
akkumulátort
kulcsot
o Amennyiben van, szerelje fel a szállítási
, húzza ki a biztonsági
17
7c
.
biztosításokat.
o Ha az emelés elkerülhetetlen, akkor
ketten emeljék a terméket. A terméket
csak a hordfogantyúnál
5
fogva, és az
elülső végénél lehet megemelni. A termék
hordásánál védőkesztyűt kell viselni, hogy
a pengékkel való véletlen érintkezést meg
lehessen előzni.
o Mindig a fogantyúknál fogva tolja a terméket.
o Óvja a terméket az ütődésektől és erős
rázkódástól, amelyek szállítás közben
különösen gépjárművekben lépnek fel.
o Rögzítse a terméket billenés és elcsúszás
ellen.
Q Üzemzavarok és elhárításuk
FIGYELMEZTETÉS!
u Csak azokat a munkákat végezze el,
amelyek a jelen használati útmutatóban
vannak leírva!
Minden további felülvizsgálatot,
karbantartási és javítási munkát arra jogosult
ügyfélszolgálat vagy hasonlóan képzett
szakembernek kell végeznie!
A készülék hibás működése, az üzemzavarok
vagy a sérülések gyakran olyan okokra vezethetők
vissza, melyeket a felhasználó saját maga is el tud
hárítani vagy ki tud küszöbölni. Ezért ellenőrizze
a terméket, mielőtt szakemberhez fordulna, ehhez
nyújt segítséget az alábbi táblázat. A legtöbb
esetben a zavarokat így gyorsan el lehet hárítani.
37 HU
Page 36

Probléma
A termék
nem indul
A termék
nem éri
el a teljes
teljesítményét
Nem
megfelelő
eredmény
A termék
hirtelen
leáll
Túlzott
rezgés és
zaj
Lehetséges ok Megoldási ja-
Az akkumulátor
nincs szabályosan
berakva
Az akkumulátor
nincs feltöltve
Az akkumulátor
megsérült
A biztonsági kulcs
ki van húzva
Más jellegű
villamos hiba a
terméken
Eltömődés Kapcsolja ki a
Az akkumulátor
kapacitása túl kicsi
A vágószerszám
elhasználódott /
megsérült
A vágandó anyag
meghaladja a
teljesítményt
A vágási magasság
hibás
A termék túl van
terhelve
Az akkumulátor
nincs feltöltve
Az akkumulátor túl
forró
A vágószerszám
tompa vagy megsérült
A csavarok / anyák
meglazultak
vaslat
Helyezze be szabályosan
Vegye ki az akkumulátort és töltse fel
Szakemberrel
ellenőriztesse
A biztonsági kulcs
bedugása
Szakemberrel
ellenőriztesse
terméket, vegye ki
az akkumulátort és
húzza ki a biztonsági kulcsot. A termék
alatt ellenőrizze az
eltömődést és szükség esetén tisztítsa
ki (mindig viseljen
védőkesztyűt).
Vegye ki az akkumulátort és töltse fel
Kizárólag a kijelölt
szervizzel cseréltesse ki újra
Csak olyan anyagokat vágjon, amelyek összhangban
vannak a termék
teljesítményével
A vágási magasság
beállítása
A vágási magasság
beállítása
Vegye ki az akkumulátort és töltse fel
Vegye ki az akkumulátort és hagyja
lehűlni
Cseréltesse ki újra
Húzza utána a csavarokat / anyákat
Q Ártalmatlanítás
A csomagolás környezetbarát anyagokból készült,
amelyeket a helyi újrahasznosító helyeken ad- hat le
ártalmatlanítás céljából.
A hulladék elkülönítéséhez vegye
figyelembe a csomagolóanyagon található
jelzéseket. Ezek rövidíté- seket (a) és
számokat (b) tartal- maznak a következő
jelentéssel: 1–7: műanyagok / 20–22:
papír és karton / 80–98: kötőanyagok.
A termék és a csomagolóanyagok
újrahasznosíthatóak, semmisítse meg
ezeket elkülönítve a jobb hulladékkezelés
érdekében. A Triman-logó csak
Franciaországra vonatkozik.
A kiszolgált termék megsemmisítési
lehetőségeiről lakóhelye illetékes
önkormányzatánál tájékozódhat.
A környezete érdekében, ne dobja
a kiszolgált terméket a háztartási
szemétbe, hanem adja le szak- szerű
ártalmatlanításra. A gyűjtő- helyekről és
azok nyitvatartási idejéről az illetékes
önkormányzat- nál tájékozódhat.
A hibás vagy elhasznált elemeket a
2006/66/EK irányelv és módosításai
értel- mében újra kell hasznosítani.
Szolgáltassa vissza az elemeket és / vagy
a terméket az ajánlott gyűjtőállomásokon
keresztül.
Az elemek helytelen megsemmisítése miatt előálló
környezeti károsodások!
Ártalmatlanítás előtt vegye ki az
akkumulátort / akkumulátor egységet a
termékből.
Az elemeket nem szabad a háztartási
szemétbe helyezni. Azok mérgező
hatású nehézfémeket tartalmazhatnak és
különleges kezelést ígénylő hulladékoknak
számítanak. A ne- hézfémek vegyi
szimbólumai a következők: Cd = kádmium,
Hg = higany, Pb = ólom.
Ezért juttassa el az elhasznált elemeket
egy községi gyűjtőhelyre.
38 HU
Page 37

Q Szerviz
FIGYELMEZTETÉS!
u A termék javítását bízza a szervire vagy
villamos szakemberre, kizárólag eredeti
pótalkatrészek felhasználása mellett.
Ez fogja garantálni a termék biztonságát.
u A hálózati dugó vagy a hálózati kábel
cseréjét a termék gyártójával vagy
annak szervizével végeztesse el. Ez fogja
garantálni a termék biztonságát.
Q Garancia
A terméket szigorú minőségi előírások
betartásával gondosan gyártottuk, és szállítás
előtt lelkiismeretesen ellenőriztük. Ha a terméken
hiányosságot tapasztal, akkor a termék eladójával
szemben törvényes jogok illetik meg Önt. Ezeket
a törvényes jogokat a következőkben ismertetett
garancia vállalásunk nem korlátozza.
A termékre 3 év garanciát adunk a vásárlás
dátumától számítva. A garanciális idő a vásárlás
dátumával kezdődik. Kérjük, jól őrizze meg a
pénztári blokkot. Ez a bizonylat szükséges a
vásárlás tényének az igazolásához.
Ha a termék vásárlásától számított 3 éven belül
anyag- vagy gyártási hiba merül fel, akkor a
választásunk szerint a terméket ingyen megjavítjuk
vagy kicseréljük. A garancia megszűnik, ha a
terméket megrongálták, nem szakszerűen kezelték
vagy tartották karban.
A garancia az anyag- vagy gyártáshibákra
vonatkozik. A garancia nem terjed ki azokra a
termékrészekre, melyek normál kopásnak vannak
kitéve és ezért fogyóeszköznek tekinthetők
(pl. elemek), vagy a törékeny részekre sérülésére,
pl. kapcsolók, akkuk, vagy üvegből készült részek.
A cserélhető akkumulátor egységre 1 év a
garancia a vásárlás dátumától kezdődően.
Garanciális ügyek lebonyolítása
Ügyének gyors elintézhetősége céljából, kérjük
kövesse az alábbi útmutatást:
Kérjük, kérdések esetére készítse elő a
pénztárblokkot és a cikkszámot (pl. IAN 123456)
a vásárlás tényének az igazolására.
Kéjük, hogy a cikkszámot olvassa le a
típustábláról, a gravírozásból, az Útmutató
címoldaláról (balra lent), illetve a hátoldalon, vagy
a termék alján található matricáról.
Amennyiben működési hibák, vagy egyéb
hiányosság lépne fel, előszöris vegye fel a
kapcsolatot a következőkben megnevezett
szervizek egyikével telefonon, vagy e-mailen.
A hibásnak ítélt terméket ezután a vásárlást
igazoló blokk, valamint a hiba leírásának és
keletkezési idejének mellékelésével díjmentesen
postázhatja az Önnel közölt szervizcímre.
Szerviz Magyarország
Tel.: 06 800 21225
E-mail: owim@lidl.hu
IAN 292278
39 HU
Page 38

Q Az eredeti megfelelőségi
nyilatkozat fordítása
Mi, az OWIM GmbH & Co. KG cég,
Stiftsbergstraße 1, DE-74167 Neckarsulm,
NÉMETORSZÁG, ezennel felelősségünk teljes
tudatában kijelentjük, hogy az alábbi termék:
Akkus fűnyíró FARM 40-Li A1,
típusszám: HG03586, verzió: 02/2018,
amelyekre a jelen nyilatkozat vonatkozik, eleget
tesz az alábbi szabványoknak / normatív
dokumentumoknak: 2006/42/EK,
2014/35/EU, 2014/30/EU, 2011/65/EU,
2000/14/EK, 2005/88/EK.
Alkalmazott harmonizált szabványok:
EN 60335-1: 2012/A11: 2014
EN 60335-2-77: 2010
EN 60335-2-29: 2004+A2: 2010
EN 62233: 2008
EN 55014-1: 2006/A2: 2011
EN 55014-2: 2015
EN 61000-3-2: 2014
EN 61000-3-3: 2013
EN 50581: 2012
Ezen túlmenően igazoljuk, hogy a termék megfelel
a 2000/14/EK zajemissziós irányelvben
foglaltaknak:
Hangteljesítményszint
garantált: 96 dB(A)
mért: 94,3 dB(A)
Alkalmazott megfelelőségi értékelési eljárások a
2000/14/EK, VI függelék szerint
Tobias König
területi vezető / dokumentációs felelős
OWIM GmbH & Co. KG, DE- 74167 Neckarsulm,
Stiftsbergstraße 1, NÉMETORSZÁG
Neckarsulm, 2018.01.16.
A megfelelőségi nyilatkozat itt található:
www.owim.com.
A nyilatkozat fent leírt tárgya megfelel az
Európai Parlament és az Európai Tanács
2011. június 8-i, egyes veszélyes anyagok
elektromos és elektronikus berendezésekben
való alkalmazásának korlátozására vonatkozó
2011/65/EU irányelvének.
A tanúsító szervezet neve:
TÜV SÜD Industrie Service GmbH (Notified body:
0036)
A tanúsító szervezet címe: 80686 München,
Westendstraße 199, Németország
Sorozatszám: IAN 292278
40 HU
Page 39

Vsebina
Legenda uporabljenih piktogramov ............................................................................. Stran 42
Uvod ............................................................................................................................................ Stran 43
Pravilna namenska uporaba ........................................................................................................Stran 43
Opis delov ................................................................................................................................... Stran 43
Obseg dobave .............................................................................................................................Stran 43
Tehnični podatki ........................................................................................................................... Stran 44
Varnostna opozorila ............................................................................................................. Stran 45
Navedbe za varno uporabo električno gnanih kosilnic ...............................................................Stran 45
Zmanjševanje vibracij in hrupa ....................................................................................................Stran 48
Ravnanje v sili .............................................................................................................................. Stran 48
Preostala tveganja ....................................................................................................................... Stran 48
Varnostna opozorila za uporabo polnilnika ...............................................................................Stran 49
Pred prvo uporabo ...............................................................................................................Stran 49
Jemanje iz embalaže .................................................................................................................... Stran 49
Dodatna oprema ......................................................................................................................... Stran 50
Montaža ...................................................................................................................................... Stran 50
Pred uporabo ..........................................................................................................................Stran 50
Polnjenje akumulatorja ................................................................................................................. Stran 50
Preverjanje stanja napolnjenosti akumulatorja ............................................................................Stran 51
Varnostni ključ .............................................................................................................................. Stran 51
Vstavljanje / odstranjevanje akumulatorja ...................................................................................Stran 51
Upravljanje .............................................................................................................................. Stran 51
Košara za travo ............................................................................................................................ Stran 51
Vtikač za zastiranje ......................................................................................................................Stran 52
Nastavitev višine reza ..................................................................................................................Stran 52
Vklop in izklop
Košnja .......................................................................................................................................... Stran 53
Po uporabi ...................................................................................................................................Stran 53
Čiščenje in nega ..................................................................................................................... Stran 53
Čiščenje ....................................................................................................................................... Stran 53
Vzdrževanje ................................................................................................................................. Stran 54
Popravilo ...................................................................................................................................... Stran 54
Skladiščenje ................................................................................................................................. Stran 54
Transport ...................................................................................................................................... Stran 54
Motnje in odpravljanje ....................................................................................................... Stran 54
Odstranjevanje ....................................................................................................................... Stran 55
Servis ........................................................................................................................................... Stran 55
Garancijski list ......................................................................................................................... Stran 56
Originalna izjava o skladnosti ......................................................................................... Stran 57
............................................................................................................................. Stran 53
41 SI
Page 40

Legenda uporabljenih piktogramov:
STOP
GO
45
Preberite navodila za uporabo. Uporabljajte zaščito sluha!
Uporabljajte zaščitna očala!
Previdnosti / Opozorilo Uporabljajte zaščitne rokavice!
Odstranite ves embalažni material in
Nosite nedrseče zaščitne čevlje!
transportna varovala.
Embalažni material ni igrača. Bodite pozorni na ostra rezila. Rezila se
vrtijo še nekaj časa po tem, ko ste izklopili
motor. Pred vzdrževanjem zaščitite napravo
pred nenamernim ponovnim zagonom.
Izklopite napravo in odstranite akumulator. Preprečite dostop drugim osebam!
Zaščitite električne dele pred vlago. Ne izpostavljajte dežju!
Naprave ne vključujte z vlažnimi rokami
ali če stojite na vlažnih tleh. Vtikača ne
Nevarnost poškodb oseb, povzročena z
odletavajočimi predmeti.
prijemajte z vlažnimi ali mokrimi rokami.
Zaščitni razred II Rezila se vrtijo še nekaj časa po tem, ko ste
izklopili motor.
Izmenični tok
Istosmerni tok
Fine varovalke
T5A
Zaščitite akumulator pred vročino in trajnimi
močnimi sončnimi žarki.
45
Košara za travo je polna
Košara za travo je pripravljena
Vrtljaji v prostem teku n
0
Širina reza
Zaščitite akumulator pred vodo in vlago. Za dvigovanje naprave sta potrebni dve
osebi.
Zaščitite akumulator pred ognjem. Uporabljajte samo v suhih notranjih
prostorih.
Zagotovljen nivo zvočne moči v dB.
42 SI
Page 41

AKUMULATORSKA KOSILNICA
FARM 40-Li A1
Q Uvod
Iskrene čestitke ob nakupu vašega novega
izdelka. Odločili ste se za zelo kakovosten
izdelek. To navodilo za uporabo je sestavni del
tega izdelka. Vsebuje pomembna navodila za
varnost, uporabo in odstranitev. Preden začnete
izdelek uporabljati, se seznanite z vsemi navodili
za uporabo in varnostnimi napotki. Izdelek
uporabljajte samo tako, kot je opisano, in samo
za navedena področja uporabe.
Če izdelek odstopite novemu lastniku, mu zraven
izročite tudi vse dokumente.
Q Pravilna namenska uporaba
Akumulatorska kosilnica (v nadaljevanju
imenovana „naprava“ ali „električno orodje”) je
namenjena za košnjo trave in travnatih površin v
domačem območju.
Napravo sme uporabljati samo odrasla oseba.
Drugačna uporaba ali spremembe na napravi
se smatrajo za nepravilno uporabo in lahko
povzročijo tveganja, kot so življenjska nevarnost,
telesne poškodbe in materialna škoda.
Proizvajalec ne prevzema odgovornosti za
škodo ali nesreče, ki bi nastale zaradi nepravilne
uporabe izdelka. Naprava ni namenjena za
industrijsko uporabo ali za druge namene
uporabe.
Q Opis delov
slika A/D/E:
1
Ročaj
2
Zgornji steber
3
Spodnji steber (x2)
4
Izmetalni pokrov
5
Nosilni ročaj
6
Ročica za nastavitev višine reza
7
Pokrovček predala za baterije
7a
Vmesnik za akumulator
7b
Odprtina za varnostni ključ
7c
Varnostni ključ
8
Kolo (x4)
9
Ohišje
10
Pritrdilni komplet za spodnji steber (x2)
10a
Podložka
10b
Ročica
11
Košara za travo
11a
Nosilni ročaj
11b
Loputa prikaza nivoja napolnjenosti
12
Sponka za kabel
13
Pritrdilni komplet za zgornji steber (x2)
13a
Sornik
13b
Podložka
13c
Ročica
14
Kabel za krmiljenje
15
Vklopna zapora
16
Stikalo za vklop/izklop
a B
:
slik
17
Akumulator
17a
Tipka za sprostitev
17b
Prikaz stanja napolnjenosti
17c
Tipka za stanje napolnjenosti
slika C:
18
Hitri polnilnik za akumulator
18a
Omrežni kabel z vtikačem
18b
Vmesnik za akumulator
18c
Stanje napolnjenosti rdeča LED
18d
Stanje napolnjenosti zelena LED
19
Vtikač za zastiranje
Q Obseg dobave
1 akumulatorska kosilnica FARM 40-Li A1
1 akumulator FAP 40 A1
1 polnilnik za hitro polnjenje akumulatorja FLG 40 A1
1 košara za travo (že nameščena)
1 pritrdilni komplet za spodnji steber (že nameščen)
1 pritrdilni komplet za zgornji steber
1 nosilni ročaj košare za travo
1 vtikač za zastiranje
1 kabelska sponka
1 navodila za uporabo
43 SI
Page 42

Q Tehnični podatki
Akumulatorska
kosilnica:
Določena napetost: 40 V
Vrtljaji v prostem teku n0: 3700 min
FARM 40-Li A1
-1
Širina reza: 430 mm
Višina reza: 25/35/45/55/65/75 mm
Prostornina košare za
travo:
40 l
Dimenzije (V x Š x G): (1010 - 1190) x 475 x
(1140 - 1350) mm
Masa (vklj. z opremo): 15,5 kg
Zaščitni razred:
III /
Stopnja zaščite: IPX1
Akumulator: FAP 40 A1
Tip: Litijev-ionski
Določena napetost: 36 V
40 V maks.
Kapaciteta: 2,5 Ah (90 Wh)
Število baterijskih celic: 10
Hitri polnilnik za
akumulator:
FLG 40 A1
Vhod
Določena napetost,
frekvenca:
200 – 240 V~,
50 / 60 Hz
Določen odvzem: 160 W
Izhod
Določena napetost: 36 V
Polnilni tok: 3,6 A
Čas polnjenja: pribl. 60 Min.
Zaščitni razred:
II /
Emisija hrupa:
Merilna vrednost za hrup, izmerjena ustrezno z
EN 60335. A-ocenjeni nivo hrupa za napravo
znaša na tipični način:
Nivo zvočnega tlaka L
Negotovost K
: 3 dB
pA
Raven zvočnega hrupa
:
L
WA
Negotovost K
WA
: 81,0 dB(A)
pA
94,3 dB(A)
: 1,81 dB
Zagotovljena raven
zvočnega hrupal L
: 96 dB(A)
WA
(po 2000/14/ES spremenjeno od 2005/88/ES)
OPOZORILO!
Uporabljajte zaščito sluha!
Vrednost vibracij :
(vektorski seštevek treh smeri), določen ustrezno z
EN 60335:
Vibracije na dlaneh /
:
rokah a
h
Negotovost K: 1,5 m/s
2,81 m/s
2
2
OPOZORILO!
u Raven vibracij se spreminja odvisno od načina
uporabe električnega orodja in lahko v mnogo
primerih tudi preseže vrednost, ki je navedena
v teh navodilih. Redna uporaba električnega
orodja na tak način lahko povzroči podcenitev
obremenitve z vibracijami. Skušajte poskrbeti,
da bo obremenitev z vibracijami čim manjša.
Možna ukrepa za zmanjšanje obremenitve
z vibracijami sta tudi uporaba rokavic med
delom z orodjem in skrajšanje časa uporabe
orodja. Pri tem je treba upoštevati vse dele
delovnega cikla (npr. čas, ko je električno
orodje izključeno, in čas, ko je orodje sicer
vključeno, vendar ni obremenjeno).
NAPOTEK
u V teh navodilih navedeni nivo vibracij je bil
določen po normiranem merilnem postopku v
skladu s standardoma EN 60335 ter se lahko
uporabi za primerjavo orodij. Navedeno
vrednost emisije vibracij je mogoče uporabiti
tudi za uvodno oceno izpostavljenosti.
44 SI
Page 43

Varnostna opozorila
OPOZORILO! NEVARNOST
ELEKTRIČNEGA UDARA
Zaščitite električne dele pred vlago.
Ne potapljajte naprave v vodo ali
druge tekočine, da preprečite nevarnost
električnega udara. Naprave ne držite
pod tekočo vodo. Upoštevajte navodila
za čiščenje in nego.
Naprave ne vključujte z vlažnimi rokami
ali če stojite na vlažnih tleh. Vtikača ne
prijemajte z vlažnimi ali mokrimi rokami.
NAPOTEK
Naprave s tem simbolom sodijo v
zaščitni razred II. To pomeni, da je
naprava izdelana z močnejšo ali dvojno
izolacijo med omrežnim tokokrogom
in izhodno napetostjo, oziroma do
kovinskega ohišja.
Naprave s tem simbolom sodijo v
zaščitni razred III. To pomeni, da
je naprava oskrbovana z zaščitno
manjšo napetostjo (SELV). Pri običajnih
pogojih lahko oseba pride v stik s to
napetostjo, ne da bi prišlo do nevarnosti
električnega udara.
Q Navedbe za varno
uporabo električno
gnanih kosilnic
POMEMBNO! SKRBNO
PREBERITE NAVODILA ZA
UPORABO
NAVODILA ZA UPORABO
SHRANITE ZA KASNEJŠO
UPORABO.
1. Otroci ne smejo uporabljati
te naprave.
2. Še posebej bodite pozorni na
otroke, da se ne bodo igrali z
napravo.
3. Otroci ne smejo čistiti in
nastavljati naprave.
4. Osebe ki na podlagi svojih
fizičnih, senzoričnih ali
duševnih sposobnostih
ali zaradi neizkušenosti
ali neznanja niso v stanju
pravilno uporabljati napravo,
te naprave ne smejo
uporabljati brez nadzorstva
odgovorne odrasle osebe.
Usposabljanje
1. Skrbno preberite navodila
za uporabo. Seznanite se
z nastavitvami in pravilno
uporabo naprave.
2. Otroci in osebe, ki niso
seznanjene z navodili
za uporabo, ne smejo
uporabljati naprave. Lokalni
zakoni lahko omejujejo
najmanjšo starost uporabnika
naprave.
3. Ne uporabljajte naprave, če
so v neposredni bližini druge
osebe, še posebej to velja za
otroke ali živali.
45 SI
Page 44

4. Upravljavec naprave je
odgovoren za nesreče z
drugimi osebami ali za
povzročeno škodo.
Pripravljalni ukrepi
1. Pri uporabi naprave nosite
dolge hlače in delovne
čevlje. Ne uporabljajte
naprave, kadar ste bosi ali
obuti v lahke sandale. Ne
nosite ohlapnih oblačil ali
oblačil z visečimi trakovi ali
naramnicami.
2. Preglejte področje, kjer
boste uporabljali napravo.
Odstranite vse predmete,
ki bi jih naprava lahko
zagrabila in izmetala daleč
proč.
3. Pred uporabo naprave
vedno izvedite vizualni
pregled naprave. Preverite,
da niso obrabljeni ali
poškodovani: rezila,
pritrdlilni sorniki in celotna
rezalna enota. Da
preprečite neravnotežje
je potrebno izrabljene
ali poškodovane dele
in pritrdilne sornike
zamenjavati vedno v paru.
Potrebno je zamenjati tudi
poškodovane ali obrabljene
opozorilne tablice.
46 SI
Uporaba
1. Napravo uporabljajte samo
pri dnevni svetlobi ali dobri
umetni svetlobi.
2. Če je le mogoče, ne
uporabljajte naprave za
košenje vlažne trave.
3. Pri košnji na pobočjih bodite
vedno pozorni na dobro
stojišče.
4. Napravo vodite le s hitrostjo
koraka.
5. Kosite prečno na pobočje,
nikoli navzgor ali navzdol.
6. Bodite še posebej pozorni,
kadar obračate stroj na
pobočju.
7. Ne kosite na prestrmih
pobočjih.
8. Bodite še posebej previdni,
kadar obračate napravo ali
jo vlečete za seboj.
9. Zaustavite napravo in
počakajte da se rezila
zaustavijo, če boste napravo
prenašali, transportirali prek
drugih travnatih površin ali
prenesli na drugo površino.
10. Ne uporabljajte naprave s
poškodovanimi zaščitnimi
napravami ali zaščitnimi
mrežami ali brez vgrajenih
zaščitnih naprav npr.
udarna pločevina in/ali
košara za travo.
Page 45

11. Previdno vklapljajte
napravo, pri tem
upoštevajte vsa navodila
od proizvajalca naprave.
Bodite pozorni na zadostno
razdaljo vaših nog do rezil
naprave.
12. Pri vklopu ali zagonu
motorja ne smete nagibati
naprave, tudi v primeru če
treba napravo dvigniti na
pobočje. V tem primeru
nagnite samo toliko, kot
je nujno potrebno in
dvignite samo tisto stran,
ki je obrnjena stran od
uporabnika.
13. Ne zaganjajte motorja,
če stojite pred izmetalnim
kanalom.
14. Nikoli ne segajte z rokami
ali nogami pod vrteče dele
naprave! Ne približujte se
izmetalni odprtini naprave.
15. Ne dvigujte in ne prenašajte
naprave, kadar deluje
motor.
16. Zaustavite motor in izvlecite
varnostni ključ. Preverite, če
so se zaustavili vsi vrteči deli
naprave:
¢ ko zapuščate napravo;
¢ preden odpravljate blokade
ali zamašitve v izmetalnem
kanalu;
¢ pred preverjanjem,
čiščenjem ali delom na
napravi;
¢ če z napravo udarite v tujek.
Preglejte napravo glede
poškodb in izvedite ustrezna
popravila; šele potem
ponovno zaženite napravo
ter uporabite.
Če naprava pričenja
neobičajno močno vibrirati,
potem zaustavite motor
naprave in počakajte, da se
zaustavi:
¢ preglejte glede poškodb;
¢ izvedite ustrezna popravila
poškodovanih delov;
¢ poskrbite, da so vse matice,
sorniki in vijaki trdno priviti.
Vzdrževanje in
skladiščenje
1. Poskrbite, da so vse matice,
sorniki in vijaki trdno privit
in da je naprava v dobrem
delovnem stanju.
2. Redno preverjajte košaro
za travo glede obrabe ali
izgube funkcionalnosti.
3. Bodite pozorni na to, da
pri napravah z več rezili,
povzroča premikanje enega
rezila posledično tudi
premikanje drugih rezil.
47 SI
Page 46

4. Pri nastavljanju naprave
bodite pozorni, da ne
poškodujete prstov z
zagozdenjem med gibljivimi
rezili in fiksno nameščenimi
deli naprave.
5. Počakajte, da se motor
ohladi, šele nato shranite
napravo.
6. Pri vzdrževanju rezil bodite
pozorni, da se rezila
lahko zavrtijo tudi, ko
je izklopljeno električno
napajanje.
7. Iz varnostnih razlogov
zamenjajte obrabljene
ali poškodovane dele.
Uporabljajte izključno
originalne nadomestne dele
in opremo.
Q Ravnanje v sili
Seznanite se z navodili za uporabo izdelka.
Zapomnite si ta varnostna opozorila in jih obvezno
upoštevajte. Tako se boste izognili tveganjem in
nevarnostim.
¢ Pri uporabi izdelka bodite vedno pozorni, da
boste pravočasno prepoznali nevarnosti in jih
obvladali. Naglo ukrepanje lahko povzroči
težke poškodbe in materialno škodo.
¢ Izdelek v primeru nepravilnega delovanja
takoj izključite ter odstranite akumulatorsko
baterijo. Izdelek naj pregleda kvalificiran
strokovnjak in ga pred ponovno uporabo po
potrebi popravi.
Q Preostala tveganja
Tudi pri uporabi izdelka v skladu s predpisi
obstaja potencialno tveganje telesnih poškodb in
materialne škode. Med drugim lahko v povezavi
s konstrukcijo in izvedbo tega izdelka nastopijo
naslednje nevarnosti:
¢ škoda na zdravju zaradi emisije vibracij v
primeru dolgotrajne ali nenamenske uporabe
in neustreznega vzdrževanja.
¢ Telesne poškodbe in materialna škoda zaradi
pokvarjenih rezalnih orodij ali nenadnega
udarca v skrit predmet med uporabo.
¢ Nevarnost poškodb in materialne škode
zaradi letečih predmetov.
Q Zmanjševanje vibracij in hrupa
Omejite čas uporabe, uporabljajte načine
delovanja, pri katerih nastaja manj vibracij in
hrupa, ter uporabljajte osebno zaščitno opremo,
da zmanjšate vpliv vibracij in hrupa.
Z naslednjimi ukrepi lahko zmanjšate tveganja,
povezana z vibracijami in hrupom:
¢ Izdelek uporabljajte samo namensko in tako,
kot je opisano v teh navodilih.
¢ Poskrbite, da bo izdelek brezhiben in dobro
vzdrževan.
¢ Uporabljajte prave delovne nastavke za
izdelek in poskrbite, da bodo brezhibni.
¢ Izdelek trdno držite za ročaje/prijemalne
površine.
¢ Izdelek vzdržujte skladno z navodili ter
poskrbite za ustrezno mazanje (če pride v
poštev).
¢ Delo načrtujte tako, da bo uporaba izdelkov
z močnimi vibracijami porazdeljena v daljšem
časovnem obdobju.
48 SI
OPOZORILO!
u Ta izdelek med delovanjem ustvarja
elektromagnetno polje! To polje lahko v
določenih okoliščinah vpliva na delovanje
aktivnih ali pasivnih medicinskih vsadkov.
Da bi zmanjšali tveganje resnih ali smrtnih
poškodb, osebam z medicinskimi vložki
priporočamo, da se pred uporabo izdelka
posvetujejo s svojim zdravnikom in s
proizvajalcem medicinskega vsadka.
Page 47

Q Varnostna opozorila za
45
uporabo polnilnika
POZOR! NEVARNOST EKSPLOZIJE!
Ne polnite baterij, ki niso namenjene
za ponovno polnjenje! Zaščitite
45
akumulator pred vročino npr. tudi pred
dolgotrajnimi sončnimi žarki, ognjem,
vodo in vlago. Obstaja nevarnost
eksplozije!
¢ Napravo lahko otroci
od 8. leta starosti in
osebe z omejenimi
fizičnimi, senzoričnimi in
umskimi sposobnostmi ter
pomanjkanjem znanja in
izkušenj uporabljajo samo
pod nadzorom ali če so bili
poučeni o varni uporabi
naprave in razumejo
morebitne nevarnosti.
¢ Otroci se z napravo ne smejo
igrati.
¢ Naprave ne smejo čistiti
in vzdrževati otroci brez
nadzora.
¢ Ne skušajte polniti baterij, ki
niso predvidene za polnjenje.
Kršitev tega navodila povzroči
nevarnost.
¢ Če se poškoduje priključni
kabel orodja, ga mora v
izogib nevarnosti zamenjati
proizvajalec, njegova servisna
služba ali druga podobno
kvalificirana oseba.
¢ Zaščitite električne dele pred
vlago. Električnih delov ne
potapljajte v vodo ali v drugo
tekočino, da se izognete
nevarnosti električnega udara.
Izdelka nikoli ne držite pod
tekočo vodo. Upoštevajte
navodila za čiščenje,
vzdrževanje in popravila.
¢ Naprava je namenjena
samo za uporabo v zaprtih
prostorih.
¢ Polnilnik je primeren samo
za polnjenje akumulatorskih
baterij naslednjega tipa:
FAP 40 A1.
Q Pred prvo uporabo
Q Jemanje iz embalaže
POZOR! NEVARNOST POŠKODBE!
Embalažni material ni igrača. Otroci
se ne smejo igrati z embalažnim
materialom; obstaja nevarnost zaužitja
in s tem nevarnost zadušitve!
Odstranite ves embalažni material in
transportna varovala.
1. Vzemite vse dele iz embalaže ter jih odložite
na ravno, stabilno površino.
2. Odstranite embalažni material ter varovala
v embalaži/transportna varovala (če
obstajajo).
3. Preverite, ali so dobavljeni vsi deli in ali
niso morda poškodovani. Če ugotovite,
da manjkajo deli ali da niso brezhibni, se
obrnite na trgovca, pri katerem ste kupili ta
izdelek. Ne uporabljajte izdelka, dokler ne
prejmete manjkajočih delov oz. do zamenjave
pokvarjenih delov. Uporaba nepopolnega ali
poškodovanega izdelka privede do telesnih
poškodb in materialne škode.
49 SI
Page 48

4. Poskrbite, da boste imeli na razpolago
potreben pribor in orodje za zagon in
uporabo. Sem spada tudi primerna osebna
zaščitna oprema.
Q Dodatna oprema
Za varno in pravilno uporabo te naprave je
potrebno med drugimi uporabljati tudi sledečo
opremo, kot npr. orodje in vstavljivo orodje:
o Ustrezno osebno zaščitno opremo
Dodatno opremo in orodje lahko nabavite v
strokovni prodajalni. Pri nabavi vedno upoštevajte
tehnične zahteve za uporabo na tej napravi (glej
„Tehnični podatki“).
Če niste prepričani, se posvetujte s kvalificiranim
osebjem v vaši strokovni prodajalni.
NAPOTEK
u V teh navodilih za uporabo so informacije
in napotki za različna vstavljiva orodja in
področja uporabe. Predstavljena vstavljiva
orodja niso vsa prisotna v obsegu pošiljke,
ampak samo prikazujejo možnosti uporabe
te naprave.
Q Montaža
Namestitev spodnjega stebra
1. Razklopite spodnji steber
3
navzgor v
udobni položaj in omogočite, da zobniška
krona ustrezno medsebojno zaskoči (glej sliko
D). Dvignite oba spodnja stebra
3
na enako
višino.
2. Potem zasukajte ročico
v smeri urinega
10b
kazalca, da vzpostavite povezavo, vendar
ročice ne privijte do konca.
3. Zasukajte ročico
navzdol, da zavarujete
10b
povezavo. Če je treba uporabiti preveč sile ali
ni možno priviti, malce sprostite ročico
10b
,
tako da jo zasukate v nasprotni smeri urinega
kazalca.
4. Ponovite korake 1 – 3 na nasprotni strani.
Namestitev zgornjega stebra
1. Izravnajte odprti konec zgornjega stebra
k spodnjemu stebru
3
in ga enakomerno
2
potisnite navzdol v odprtine na obeh delih in
pridržite v tem položaju (glej sliko E).
2. Vstavite sornik
s sredinske strani naprave
13a
navzven skozi odprtino in pridržite v tem
položaju.
3. Namestite podložko
navzven na sornik
z ravno stranjo
13b
. Utor podložke
13a
naj bi prilegal zgornjemu stebru
4. Privijte ročico
5. Potem zasukajte ročico
13c
na sornik
13c
kazalca, da vzpostavite povezavo, vendar
ročice ne privijte do konca.
6. Zasukajte ročico
navzdol, da zavarujete
13c
povezavo. Če je treba uporabiti preveč sile ali
ni možno priviti, malce sprostite ročico
tako da jo zasukate v nasprotni smeri urinega
kazalca.
7. Ponovite korake 1 – 6 na nasprotni strani.
Zavarovanje kabla krmilnika
1. Uporabite kabelsko sponko
kabel krmilnika
14
skozi odprto stran (glej
sliko F).
2. Spnite kabelsko sponko
krmilnika
Q Pred uporabo
Q Polnjenje akumulatorja
14
na spodnji steber
12
NAPOTEK
u Akumulator
je dobavljen delno napolnjen.
17
Pred uporabo polnite akumulator
60 minut.
u Izvlecite vtikač
polnilnika
18a
preden odstranite ali vstavite akumulator
v polnilnik.
u Ne polnite akumulatorje
17
temperatura pod 10 °C ali nad 40 °C.
u Ohlajajte polnilnik
18
med zaporednim
polnjenjem za vsaj 15 minut.
u Če akumulatorja
polnilnik povezan z električnim tokom, potem
ni v polnilniku
17
utripa zelena LED za stanje napolnjenosti
13b
2
.
.
13a
v smeri urinega
13c
12
in položite
s kablom
3
.
najbolje
17
18
iz omrežja
17
, če je okoliška
18
in je
18d
se
,
.
50 SI
Page 49

1. Naravnajte akumulator
polnilnika
18
in ga potisnite. Prepričajte se,
17
z vodili
da je slišno zaskočil.
2. Vstavite omrežni vtikač
polnilnika
18a
18
v električno vtičnico. Stanje napolnjenostiLED
sveti rdeče. Zelena - LED za stanje
18c
napolnjenosti stalno sveti
18d
in s tem
sporoča, da je končan postopek polnjenja
akumulatorja.
3. Izvlecite vtikač
polnilnika
18a
vtičnice in odstranite akumulator
18
iz električne
17
iz
polnilnika.
4. Vstavite akumulator
17
v napravo (glej
“Vstavljanje/odstranjevanje akumulatorja“).
LED za stanje napolnjenosti
Utripa zelena LED brez
Polnilnik je pripravljen
akumulatorja
Sveti zelena LED z
akumulatorjem
Sveti rdeča LED z
Akumulator je v celoti
napolnjen
Akumulator se polni
akumulatorjem
Utripata rdeča in
Akumulator je okvarjen
zelena LED.
Trajno svetita rdeča in
zelena LED.
Q Preverjanje stanja napolnjenosti
Akumulator je
prehladen ali prevroč
akumulatorja
o Za preizkus stanja napolnjenosti akumulatorja
pritisnite tipko za stanje napolnjenosti
Stanje napolnjenosti akumulatorja
pojavi na prikazu za stanje
napolnjenosti
Trajno svetita 4 zeleni
.
17b
100% stanje napolnjenosti
LED
Trajno svetita 3 zeleni
75% stanje napolnjenosti
LED
Trajno svetita 2 zeleni
50% stanje napolnjenosti
LED
Trajno svetita 1 zeleni
25% stanje napolnjenosti
LED
Utripa 1 zelena LED Nizko stanje napolnjenosti
o Napolnite akumulator
17
pred uporabo, če
je ta na 25% ali nizkem stanju napolnjenosti.
.
17c
17
se
Q Varnostni ključ
Naprava je opremljena z varnostnim ključem
,
7c
ki preprečuje nedovoljeno uporabo. Da bi lahko
uporabljali napravo, morate vstaviti varnostni
ključ
v odprtino za varnostni ključ
7c
.
7b
Vstavljanje varnostnega ključa
1. Odprite pokrov za akumulator
2. Pritisnite tipko ob varnostnem ključu
ga vstavite v odprtino za varnostni ključ
7
(glej sliko G).
in
7c
7b
.
Prepričajte se, da je slišno zaskočil. Za izvlek
varnostnega ključa
je treba prej pritisniti na
7c
tipko.
Izvlek varnostnega ključa
1. Pritisnite tipko ob varnostnem ključu
7c
in
izvlecite varnostni ključ in odprtine za varnostni
ključ
Q Vstavljanje / odstranjevanje
7b
.
akumulatorja
Vstavljanje akumulatorja:
1. Odprite pokrov za akumulator
2. Naravnajte akumulator
ohišja za akumulator in ga potisnite. Prepričajte
se, da je slišno zaskočil.
Odstranitev akumulatorja:
1. Odprite pokrov za akumulator
2. Pritisnite sprostitveno tipko
akumulator
Q Upravljanje
Q Košara za travo
17
iz ohišja za akumulator.
Naprava se lahko uporablja s košaro za travo
ki pobira pokošeno travo, ter omogoča enostavno
odstranitev trave. Če na napravi ni nameščene
košare za travo, se pokošena trava odstranjuje prek
izmetalne odprtine.
Za odpiranje zadnje izmetalne odprtine, je treba
odstraniti vtikač za zastiranje
1. Z eno roko dvignite izmetalni pokrov
odstranite vtikač za zastiranje
7
17
19
(glej sliko G).
z vodili polnilnika
7
(glej sliko G).
17a
in odstranite
.
19
.
11
4
in
,
51 SI
Page 50

Namestitev nosilnega ročaja na košaro
za travo
1. Namestite sprednji konec nosilnega
ročaja
na utor košare za travo
11a
(glej
11
sliko H).
2. Kavlji na sprednjem koncu nosilnega
ročaja
za travo
nosilnega ročaja
travo
3. Rahlo pritisnite na nosilni ročaj
se zaskočijo na pokrovu košare
11a
. Namestite zadnji konec
11
na zadnji utor košare za
11a
.
11
11a
, da
zaskočijo kavlji na zadnjem koncu nosilnega
ročaja v pokrov košare za travo
.
11
NAPOTEK
u Ročaj je nameščen na košari za travo
.
11
Namestitev košare za travo
1. Z eno roko dvignite in pridržite izmetalni
pokrov
2. Pridržite košaro za travo
obesite košaro s kavlji na ohišje
3. Spustite izmetalni pokrov
(glej sliko I).
11
z ročajem
4
.
9
naprave.
11a
in
4
Odstranitev košare za travo
1. Z eno roko dvignite in pridržite izmetalni
pokrov
2. Pridržite košaro za travo
in dvignite košaro iz kavljev na ohišju
(glej sliko I).
11
z ročajem
11a
9
4
naprave.
3. Spustite izmetalni pokrov
4
.
Izpraznitev košare za travo
Med košnjo opazujte loputo prikazovalnika
napolnjenosti
11b
odpreti s pretokom zraka košare za travo
košare
11
. Loputa se mora
11
,
kadar je zagotovljena zmožnost sprejemanja trave.
Zaprta loputa opozarja na polno košaro za
11
travo
, ki jo je treba izprazniti pred
nadaljevanjem dela.
1. Odstranite košaro za travo
11
(glej
„Odstranitev košare za travo“).
2. Odstranite pokošeno travo skozi odprtino
na košari za travo
11
, pri tem upoštevajte
lokalna določila.
Q Vtikač za zastiranje
Naprava se lahko z vtikačem za zastiranje
19
uporablja kot zastirka za trate. Vtikač za zastiranje
blokira zadnjo izmetalno odprtino. Pokošena trave
se večkratno razseka na manjše dele. Razsekana
trava ostane na trati, kjer kmalu razpade in
prevzame funkcijo gnojenja trate.
Namestitev vtikača za zastiranje
1. Z eno roko dvignite izmetalni pokrov
vstavite vtikač za zastiranje
19
in
4
.
Odstranitev vtikača za zastiranje
1. Z eno roko dvignite izmetalni pokrov
odstranite vtikač za zastiranje
Q Nastavitev višine reza
in
4
19
.
Naprava omogoča 6 različnih nastavitev, s katerimi
pridobimo spodaj navedene višine reza.
nastavitev
Višina reza
(pribl.) v mm
75
65
55
45
35
25
1. Sprostite vzvod za nastavitev višine reza
,
6
tako da ga povlečete iz utora trenutne
nastavitve (glej sliko J).
2. Premaknite vzvod za nastavitev višine reza
6
naprej ali nazaj v smeri utorov in izvedite
želeno nastavitev višine reza.
3. Zapahnite vzvod za nastavitev višine reza
6
s tem da ga stransko potisnete v utor za želeno
višino reza.
,
52 SI
Page 51

Q Vklop in izklop
Vklop:
1. Vklopite in pridržite vklopno zaporo
sliko K).
2. Pritisnite stikalo za vklop/izklop
1
ročaja
, za vklop naprave. Sprostite
vklopno zaporo
.
15
16
v smeri
15
(glej
Izklop:
1. Za izklop naprave, spustite stikalo za vklop/
izklop
Q Košnja
.
16
OPOZORILO! NEVARNOST
POŠKODBE!
u Če naprava udari ob tujek, takoj zaustavite
motor! Izklopite napravo in odstranite
akumulator, izvlecite varnostni ključ, ter
počakajte da se naprava ohladi. Temeljito
preglejte napravo glede poškodb. Popravite
kakršnokoli poškodbo, preden nadaljujete z
delom!
u Prekomerne vibracije naprave pri delu
nakazujejo na poškodbo naprave! Izklopite
motor. Napravo je treba takoj pregledati in
popraviti!
o Kosite v malce prekrivanih sledeh. Efektiven
vzorec košenja ustreza ravni sledi vzdolž
ene strani. To omogoča enakomerne sledi
in zagotavlja, da bo trata pokošena brez
preostankov.
o Kroženje okrog debla. Če se na trati nahajajo
drevesa ali grmičevje, izvedite enega ali dva
sloja košenja okrog debla te rastline.
o Bodite še posebej pozorni, kadar spreminjate
smer.
o Redno praznite košaro za travo
o Takoj izklopite napravo, če se vam bliža druga
11
.
oseba, ki posega v vaše delovno območje.
Preden zapustite napravo, počakajte da se po
izklopu popolnoma zaustavi.
o Ne pretiravajte z delom. Delajte redne pavze,
da se boste lahko osredotočili na delo in
obdržali popoln nadzor nad napravo.
Q Po uporabi
1. Izklopite napravo in odstranite
akumulator
ter počakajte da se naprava ohladi.
17
, izvlecite varnostni ključ
2. Preverite, očistite in shranite napravo (glej
„Čiščenje in nega“).
Q Čiščenje in nega
7c
,
OPOZORILO!
u V mnogih državah obstajajo določila, v
katerem času dneva in v katerih dnevih se
sme uporabljati napravo! Povprašajte pri vaši
lokalni upravi o podrobnejših informacijah
in upoštevajte lokalna določila, da boste
obdržali dobre odnose s sosedi in da ne
boste v prekršku.
o Pred začetkom dela preglejte trato, odstranite
kamenje, veje, žico ali druge predmete, ki bi
lahko poškodovali napravo ali motor naprave.
o Ne kosite vlažne trave, ker se lepi na
spodnji del naprave in preprečuje pravilno
izmetavanje trave, prav tako pa obstaja
nevarnost zdrsa ali padca.
o Nikoli ne kosite več kot eno tretjino višine
trave, da s tem ohranite zdravo trato. V
jeseni kosite trato samo toliko časa, dokler še
pričakujete rast trave.
o Potisnite napravo počasi naprej.
OPOZORILO!
Izklopite napravo in odstranite
akumulator, izvlecite varnostni ključ, ter
počakajte da se naprava ohladi, šele
nato izvajajte pregled, vzdrževanje in
čiščenje!
PREVIDNOST! NEVARNOST
POŠKODB!
Rezila so zelo ostra! Pri pregledovanju,
vzdrževanju, čiščenju vedno
uporabljajte zaščitne rokavice!
Q Čiščenje
o Poskrbite, da bo izdelek vedno čist, suh ter
očiščen olja in masti. Po vsaki uporabi in pred
uskladiščenjem odstranite prah z izdelka.
o Redno čiščenje pomaga pri varni uporabi in
podaljša življenjsko dobo izdelka.
53 SI
Page 52

o Pred vsako uporabo preverite obrabo in
poškodbe izdelka. Če najdete poškodovane
ali obrabljene dele, izdelka ne uporabljajte.
o Pazite, da v notranjost izdelka ne vdrejo
tekočine.
o Izdelek čistite s suho krpo. Za težko dostopna
mesta uporabite krtačo.
NAPOTEK
u Za čiščenje izdelka ne uporabljajte nobenih
kemikalij, alkalnih, abrazivnih ali drugih
agresivnih čistilnih oz. dezinfekcijskih sredstev,
ki bi lahko poškodovala površine.
Q Vzdrževanje
Izdelek in dele pribora (npr. delovna orodja)
preglejte glede obrabe in poškodb pred in po
vsaki uporabi. Dele po potrebi zamenjajte z
novimi, kot je opisano v teh navodilih za uporabo.
Pri tem upoštevajte tehnične zahteve (glejte
„Tehnični podatki“).
Q Popravilo
V notranjosti tega izdelka ni delov, ki bi jih
uporabnik lahko sam popravil. Za pregled in
popravilo izdelka se obrnite na kvalificiranega
strokovnjaka.
Q Skladiščenje
o Izklopite napravo in odstranite
akumulator
o Očistite napravo, kot je opisano (glej
17
, izvlecite varnostni ključ
7c
„Čiščenje“).
o Shranite napravo in opremo v temnem, suhem
in dobro prezračevanem mestu, zaščiteno
pred zmrzovanjem.
o Shranite napravo nedostopno za otroke.
Optimalna temperatura shranjevanja je med
10 ˚C in 30 ˚C.
o Priporočamo, da napravo pri skladiščenju
pokrijete z ustrezno krpo, da jo zaščitite pred
prahom.
o Če boste napravo shranili za dalj časa,
redno pregledujte stanje napolnjenosti
akumulatorja. Optimalno je shranjevanje
v hladnem in suhem prostoru. Optimalno
stanje napolnjenosti akumulatorja med
skladiščenjem je 50%.
Q Transport
POZOR! NEVARNOST POŠKODBE!
Za dvigovanje naprave sta potrebni
dve osebi.
o Izklopite napravo in odstranite
akumulator
o Namestite transportna varovala, če obstajajo.
o Če je treba napravo dvigovati, naj to storita
dve osebi. Pri dviganju naprave primite samo
za nosilni ročaj
17
, izvlecite varnostni ključ
5
in na sprednjem koncu
naprave. Pri prenašanju naprave vedno
uporabljajte zaščitne rokavice, da preprečite
stik z rezili.
o Napravo potiskajte tako, da jo primete za
ročaj.
o Zaščitite napravo pred udarci in močnimi
vibracijami, še posebej pri transportu v vozilu.
o Zavarujte napravo pred prevračanjem ali
padcem.
Q Motnje in odpravljanje
OPOZORILO!
u Izvajajte samo dela, ki so opisana v teh
navodilih za uporabo! Vse ostale preglede,
vzdrževalna dela in popravila morajo
opraviti strokovnjaki na pooblaščenem servisu
.
ali drugi ustrezno kvalificirani strokovnjaki!
Domnevne napake v delovanju, motnje in škoda so
pogosto posledica vzrokov, ki jih lahko uporabnik
odpravi sam. Preden se obrnete na strokovnjaka,
zato preglejte izdelek po spodnji preglednici. V
večini primerov boste tako lahko hitro odpravili
motnje.
Težava Možni vzrok Rešitev
Naprava
se ne
vklopi
Akumulator
ni pravilno
nameščen
Akumulator je
izpraznjen
Poškodovan
akumulator
Izvlečen je
Pravilno namestite
Odstranite akumulator
in napolnite
Naj preverijo v
pooblaščenem servisu
Vstavite varnostni ključ
varnostni ključ
Druge električne
napake na
Naj preverijo v
pooblaščenem servisu
napravi
.
7c
54 SI
Page 53

Težava Možni vzrok Rešitev
Naprava se
ne vklopi
Naprava
ne dosega
polne moči
Nezadovoljivi
rezultati
Naprava se
v trenutku
zaustavi
Prekomerne
vibracije in
hrup
Q Odstranjevanje
Zamašitev Izklopite napravo,
Kapaciteta
akumulatorja je
prenizka
Rezila so
obrabljena /
poškodovana
Rezani material
presega
zmogljivost
naprave
Višina reza je
nastavljena
napačno
Naprava je
preobremenjena
Akumulator je
izpraznjen
Akumulator je
prevroč
Rezalno orodje
je topo ali
poškodovano
Vijaki/matice so
ohlapni
odstranite akumulator
in izvlecite varnostni
ključ. Preglejte
spodnjo stran naprave
glede zamašitve in če
je potrebno očistite
(vedno uporabljajte
zaščitne rokavice).
Odstranite akumulator
in napolnite
Rezila naj zamenjajo
v pooblaščenem
servisnem centru.
Kosite samo material,
ki ustreza zmogljivosti
naprave
Nastavite višino reza
Nastavite višino reza
Odstranite in napolnite
akumulator
Odstranite akumulator
in počakajte, da se
ohladi
Zamenjajte z novim
Privijte vijake/matice
Embalaža je narejena iz okolju primernih materialov,
ki jih lahko oddate za recikliranje na lokalnih
zbirališčih odpadkov.
Upoštevajte oznake embalažnih materialov
za ločevanje odpadkov, ki so označene s
kraticami (a) in številkami (b) z naslednjim
pomenom: 1–7: umetne mas / 20–22:
papir in karton / 80–98: vezni materiali.
Izdelek in materiale embalaže je mogoče
reciklirati; za lažjo obdelavo odpadkov jih
odstranite ločeno.
Logotip Triman velja samo za Francijo.
O možnostih odstranjevanja odsluženega
izdelka se lahko pozanimate pri svoji
občinski ali mestni upravi.
Ko je vaš izdelek dotrajan, ga zaradi
varovanja okolja ne odvrzite med
gospodinjske odpadke, temveč ga oddajte
na ustreznem zbirališču tovrstnih odpadkov.
O zbirnih mestih in njihovih delovnih časih
se lahko pozanimate pri svoji pristojni
občinski upravi.
Pokvarjene ali iztrošene baterije /
akumulatorje je treba reciklirati v skladu
z Direktivo 2006/66/ES in njenimi
spremembami. Baterije / akumulatorje in /
ali izdelek vrnite na ponujenih zbirnih
mestih.
Škoda na okolju zaradi
napačnega odstranjevanja
baterij / akumulatorjev!
Pred odstranjevanjem odstranite baterije/
akumulatorske baterije iz izdelka.
Baterij / akumulatorjev ni dovoljeno
odstraniti skupaj z gospodinjskimi odpadki.
Vsebujejo lahko strupene težke kovine in
so podvržene določbam za ravnanje z
nevarnimi odpadki. Kemični simboli težkih
kovin so naslednji:
Cd = kadmij, Hg = živo srebro, Pb = svinec.
Zato iztrošene baterije / akumulatorje
oddajte na komunalnem zbirnem mestu.
Q Servis
OPOZORILO!
u Izdelek naj popravlja servis ali strokovnjak
električar, in sicer izključno z originalnimi
nadomestnimi deli. Le tako bo ohranjena
varnost izdelka.
u Vtič ali električni kabel naj zamenja
proizvajalec izdelka ali njegova servisna
služba. Le tako bo ohranjena varnost izdelka.
55 SI
Page 54

Pooblaščeni serviser:
OWIM GmbH & Co. KG
Stiftsbergstraβe 1
DE-74167 Neckarsulm
NEMČIJA
Servisna telefonska številka: 00386 (0) 80 28 60
Garancijski list
1.
S tem garancijskim listom OWIM GmbH &
Co. KG, Stiftsbergstraβe 1, DE-74167 Neckarsulm
NEMČIJA jamčimo, da bo izdelek v garancijskem
roku ob normalni in pravilni uporabi brezhibno
deloval in se zavezujemo, da bomo ob izpolnjenih spodaj navedenih pogojih odpravili morebitne pomanjkljivosti in okvare zaradi napak v
materialu ali izdelavi oziroma po svoji presoji
izdelek zamenjali ali vrnili kupnino.
2. Garancija je veljavna na ozemlju Republike
Slovenije.
3. Garancijski rok za proizvod je 3 leta od datuma izročitve blaga. Datum izročitve blaga je
razviden iz računa.
4. Kupec je dolžan okvaro javiti pooblaščenemu
servisu oziroma se informirati o nadaljnjih postopkih na zgoraj navedeni telefonski številki.
Svetujemo vam, da pred tem natančno preberete navodila o sestavi in uporabi izdelka.
5. Kupec je dolžan pooblaščenemu servisu predložiti garancijski list in račun, kot potrdilo in dokazilo o nakupu ter dn
Na akumulator dajemo 1 leto garancije od datuma nakupa.
evu izročitve blaga.
6.
,
7. Vzroki za okvaro oziroma nedelovanje
8. Jamčimo servisiranje in rezervne dele za mini-
9. Obrabni deli oz. potrošni material so izvzeti iz
10. Vsi potrebni podatki za uveljavljanje garancije se
11. Ta garancija proizvajalca ne izključuje
V primeru, da proizvod popravlja nepooblaščen
servis ali oseba, kupec ne more uveljavljati zahtevkov iz te garancije.
izdelka morajo biti lastnosti stvari same in ne
vzroki, ki so zunaj proizvajalčeve oziroma prodajalčeve sfere. Kupec ne more uveljavljati
zahtevkov iz te garancije, če se ni držal priloženih navodil za sestavo in uporabo izdelka
ali če je izdelek kakorkoli spremenjen ali nepravilno vzdrževan.
malno dobo, ki je zahtevana s strani zakonodaje.
garancije.
nahajajo na dveh ločenih dokumentih
(garancijski list, račun).
pravic potrošnika, ki izhajajo iz odgovornosti prodajalca za napak
e na blagu.
i
Prodajalec:
Lidl Slovenija d.o.o. k.d., Pod lipami 1, SI-1218 Komenda
56 SI
Page 55

Postopek pri uveljavljanju garancije
Za zagotovitev hitre obdelave vašega primera vas
prosimo, da sledite naslednjim napotkom:
Prosimo, da za vsa vprašanja pripravite račun in
številko izdelka (npr. IAN 123456) kot dokazilo
o nakupu.
Številko izdelka najdete na identifikacijski ploščici,
gravuri, naslovni strani v navodilih (spodaj levo) ali
na nalepki na hrbtni ali spodnji strani.
Če pride do napačnega delovanja ali drugih
pomanjkljivosti, se obrnite najprej na v
nadaljevanju navedeni servisni oddelek po
telefonu ali prek e-pošte.
Izdelek, označen kot okvarjen, lahko nato brez
poštnine pošljete na navedeni naslov servisa,
zraven pa priložite potrdilo o nakupu (blagajniški
račun) in navedite, za kakšno pomanjkljivost gre in
kdaj je nastala.
Servis Slovenija
Tel.: 080 080 917
E-Mail: owim@lidl.si
IAN 292278
Dodatno je potrjeno ustrezno s smernicami za
emisije hrupa 2000/14/ES:
Nivo zvočne moči
Zagotovljen: 96 dB(A)
Izmerjen: 94,3 dB(A)
Uporabljeni postopke Izjave o skladnosti ustreza
prilogi VI, 2000/14/ES
Ime imenovanega mesta:
TÜV SÜD Industrie Service GmbH (Benannte
Stelle: 0036)
Naslov imenovanega mesta:
Westendstraße 199, 80686 München, Germany
Serijska številka: IAN 292278
Tobias König
Vodja oddelka / Odgovorni za dokumentacijo
OWIM GmbH & Co. KG, Stiftsbergstraße 1,
DE-74167 Neckarsulm, GERMANY
Q Originalna izjava o skladnosti
Mi, OWIM GmbH & Co. KG, Stiftsbergstraße 1,
DE-74167 Neckarsulm, DEUTSCHLAND,
pojasnjujemo v celotni odgovornosti, da izdelek:
Akumulatorska kosilnica FARM 40-Li A1, model št.:
HG03586, različica: 02/2018, ustreza pogojem
te pojasnitve, s standardi / standardnimi dokumenti
2006/42/ES, 2014/35/EU, 2014/30/EU,
2011/65/EU, 2000/14/ES, 2005/88/ES.
Uporabni harmonizirani standardi:
EN 60335-1: 2012/A11: 2014
EN 60335-2-77: 2010
EN 60335-2-29: 2004+A2: 2010
EN 62233: 2008
EN 55014-1: 2006/A2: 2011
EN 55014-2: 2015
EN 61000-3-2: 2014
EN 61000-3-3: 2013
EN 50581: 2012
Neckarsulm, 16.01.2018
Izjava o skladnosti je na voljo tudi na:
www.owim.com.
Zgoraj opisani predmet pojasnitev izpolnjuje
predpise smernic 2011/65/EU Evropskega
parlamenta in Sveta z dne 8. junija 2011 o
omejevanju uporabe nekaterih nevarnih snovi v
električni in elektronski opremi.
57 SI
Page 56

Obsah
Legenda používaných piktogramů ............................................................................. Strana 59
Úvod ......................................................................................................................................... Strana 60
Stanovený účel .......................................................................................................................... Strana 60
Seznam dílů .............................................................................................................................. Strana 60
Obsah dodávky ........................................................................................................................ Strana 60
Technické údaje ........................................................................................................................ Strana 61
Bezpečnostní pokyny ....................................................................................................... Strana 62
Pokyny pro bezpečné použití elektricky poháněné sekačky na trávu ....................................... Strana 62
Redukce vibrací a hluku ............................................................................................................. Strana 65
Postup v případě nouze ............................................................................................................ Strana 65
Zbytková rizika ........................................................................................................................... Strana 65
Bezpečnostní pokyny pro nabíječky ......................................................................................... Strana 65
Před prvním použitím ........................................................................................................ Strana 66
Rozbalení ................................................................................................................................... Strana 66
Příslušenství ................................................................................................................................ Strana 66
Montáž ...................................................................................................................................... Strana 67
Před použitím ....................................................................................................................... Strana 67
Nabíjení akumulátoru ............................................................................................................... Strana 67
Kontrola nabití akumulátoru ...................................................................................................... Strana 68
Bezpečnostní klíč ....................................................................................................................... Strana 68
Vložení / vyjmutí akumulátoru .................................................................................................. Strana 68
Používání ............................................................................................................................... Strana 68
Záchytná nádoba na trávu ....................................................................................................... Strana 68
Mulčovací nástavec .................................................................................................................. Strana 69
Nastavení výšky sečení ............................................................................................................. Strana 69
Zapnutí a vypnutí ...................................................................................................................... Strana 69
Sečení ........................................................................................................................................ Strana 70
Po použití .................................................................................................................................. Strana 70
Čistění a péče ....................................................................................................................... Strana 70
Čištění ........................................................................................................................................ Strana 70
Údržba....................................................................................................................................... Strana 71
Oprava ..................................................................................................................................... Strana 71
Uskladnění ................................................................................................................................. Strana 71
Přeprava ....................................................................................................................................Strana 71
Poruchy a náprava ............................................................................................................ Strana 71
Zlikvidování .......................................................................................................................... Strana 72
Servis ........................................................................................................................................ Strana 72
Záruka ..................................................................................................................................... Strana 72
Původní prohlášení o shodě ........................................................................................... Strana 73
58 CZ
Page 57

Legenda použitých piktogramů:
STOP
GO
45
Přečtěte si příručku. Noste ochranu sluchu!
Noste ochranné brýle!
Pozor/výstraha Noste ochranné rukavice!
Odstraňte všechny obalové materiály a
Vždy protiskluzovou obuv!
přepravní pojistky.
Obalový materiál není hračka pro děti. Dávejte pozor na ostré nože. Nože se po
vypnutí otáčejí ještě dále. Před údržbou
vyjměte pojistky proti zapnutí.
Vypněte výrobek a vyjměte akumulátor. Kolem stojící osoby držte mimo dosah!
Chraňte elektrické části před vlhkostí. Nevystavujte dešti!
Nářadí se nikdy nedotýkejte vlhkýma
Nebezpečí zranění vymrštěnými předměty.
rukama, nebo když stojíte na mokrém
povrchu. Nikdy se nedotýkejte zástrčky
vlhkýma nebo mokrýma rukama.
Třída ochrany II Nože se po vypnutí otáčejí ještě dále.
Střídavý proud
Stejnosměrný proud
Trubičková pojistka Otáčky naprázdno n
T5A
Chraňte akumulátor před horkem a
trvalým, silným slunečním zářením.
45
Záchytná nádoba na trávu plná
Záchytná nádoba na trávu připravena
0
Šířka sečení
Chraňte akumulátor před vodou a vlhkostí. Zvedejte ve dvou osobách.
Chraňte akumulátor před ohněm. Používejte jen v suchých místnostech.
Zaručená hladina akustického výkonu v dB.
59 CZ
Page 58

AKU SEKAČKA NA TRÁVU
FARM 40-Li A1
Q Úvod
Blahopřejeme Vám ke koupi nového výrobku.
Rozhodli jste se pro kvalitní produkt. Návod k
obsluze je součástí tohoto výrobku. Obsahuje
důležité pokyny pro bezpečnost, použití a
likvidaci. Před použitím výrobku se seznamte
se všemi pokyny k obsluze a bezpečnostními
pokyny. Používejte výrobek jen popsaným
způsobem a na uvedených místech. Při předání
výrobku třetí osobě předejte i všechny podklady.
Q Stanovený účel
Tato Aku sekačka na trávu (dále jako „výrobek“
nebo „elektrické nářadí”) je vhodný k sečení
trávníku v domácnosti.
Výrobek je určen jen k použití dospělými
osobami. Jiné použití nebo úpravy výrobku jsou
v rozporu se stanoveným účelem a mohou vést k
nebezpečí ohrožení života, zranění nebo škod.
Za škody vzniklé v důsledku nevhodného použití
nenese výrobce žádnou odpovědnost. Výrobek
není určen pro komerční použití ani k jiným
účelům.
Q Seznam dílů
Zobrazení A/D/E:
1
Držadlo
2
Horní držadlo
3
Spodní držadlo (x2)
4
Kryt vyhazovacího otvoru
5
Držadlo
6
Páčka pro nastavení výšky sečení
7
Kryt prostoru pro baterii
7a
Rozhraní akumulátoru
7b
Otvor pro bezpečnostní klíč
7c
Bezpečnostní klíč
8
Kolečko (x4)
9
Tělo výrobku
10
Upevňovací sada pro spodní držadlo (x2)
10a
Podložka
10b
Páčka
11
Záchytná nádoba na trávu
11a
Držadlo
11b
Klapka ukazatele stavu naplnění
12
kabelové svorky
13
Upevňovací sada pro horní držadlo (x2)
13a
Čep
13b
Podložka
13c
Páčka
14
Řídicí kabely
15
Aretace zapnutí
16
Vypínač
obr
azení B:
Z
17
Akumulátor
17a
Uvolňovací tlačítko
17b
Kontrolky stavu nabití
17c
Tlačítko stavu nabití
Zobrazení C:
18
Rychlonabíječka akumulátoru
18a
Přívodní kabel se zástrčkou
18b
Rozhraní akumulátoru
18c
LED stavu nabíjení – červená
18d
LED stavu nabíjení – zelená
19
Mulčovací nástavec
Q Obsah dodávky
1 aku sekačka na trávu FARM 40-Li A1
1 akumulátor FAP 40 A1
1 rychlonabíječka akumulátoru FLG 40 A1
1 záchytná nádoba na trávu (předmontované)
1 upevňovací sada pro spodní držadlo
(předmontované)
1 upevňovací sada pro horní držadlo
1 držadlo pro záchytnou nádobu na trávu
1 mulčovací nástavec
1 kabelová svorka
1 návod k použití
60 CZ
Page 59

Q Technické údaje
Aku sekačka na
trávu:
Jmenovité napětí: 40 V
Otáčky naprázd n0: 3700 min
FARM 40-Li A1
-1
Šířka sečení: 430 mm
Výška sečení: 25/35/45/55/65/75 mm
Objem záchytné
40 l
nádoby na trávu:
Rozměry (v x š x h): (1010 - 1190) x 475 x
(1140 - 1350) mm
Hmotnost (včetně
15,5 kg
příslušenství):
Třída ochrany:
III /
Krytí: IPX1
Akumulátor: FAP 40 A1
Typ: lithium-iontový
Jmenovité napětí: 36 V
40 V max.
Kapacita: 2,5 Ah (90 Wh)
Počet článků baterií: 10
Rychlonabíječka
akumulátoru:
FLG 40 A1
Vstup
Jmenovité napětí,
frekvence:
200 – 240 V~,
50 / 60 Hz
Jmenovitý příkon: 160 W
Výstup
Jmenovité napětí: 36 V
Nabíjecí proud: 3,6 A
Doba nabíjení: cca 60 min
Třída ochrany:
II /
Emise hluku:
Naměřené hodnoty hluku byly zjištěny podle
EN 60335. A-vážená hodnota hladiny hluku
výrobku je typicky následující:
Hladina akustického
tlaku L
: 81,0 dB(A)
pA
Nepřesnost K
Hladina akustického
výkonu L
Nepřesnost K
Zaručená úroveň akustického
výkonu L
: 3 dB
pA
: 94,3 dB(A)
WA
: 1,81 dB
WA
:
WA
96 dB(A)
(podle 2000/14/ES, změněno 2005/88/ES)
VAROVÁNÍ!
Noste ochranu sluchu!
Hodnoty vibrací:
Triaxiální vektorový součet, zjištěn podle
EN 60335:
Vibrace ruka/paže a
: 2,81 m/s
h
Nepřesnost K: 1,5 m/s
2
2
VAROVÁNÍ!
u Hladina vibrací se bude měnit podle použití
elektrického nářadí a v některých případech
může být vyšší než hodnota uvedená v
tomto návodu. Pokud se elektrické nářadí
používá takým způsobem pravidelně, může
být vibrační zatížení podceněno. Zkuste
minimalizovat dopad vibrací co nejvíce.
Příklady opatření ke snížení expozice
vibracemi zahrnují nošení rukavic při
používání nástroje a omezení pracovní
doby. V takovém případě je třeba vzít v
úvahu všechny části provozního cyklu (např.
časy, kdy je elektrické nářadí vypnuté a ty,
ve kterých je sice zapnuté, ale pracuje bez
zatížení).
UPOZORNĚNÍ
u Hladina vibrací uvedená v tomto návodu
byla měřená podle standardizované metody
měření podle EN 60335 a může být použitá
pro porovnání zařízení. Stanovená hodnota
emisí vibrací může být použita také pro
počáteční posouzení expozice.
61 CZ
Page 60

Bezpečnostní pokyny
VAROVÁNÍ! NEBEZPEČÍ ÚRAZU
ELEKTRICKÝM PROUDEM!
Chraňte elektrické části před vlhkostí.
Neponořujte tyto části do vody
ani jiných kapalin, abyste zamezili
nebezpečí úrazu elektrickým proudem.
Výrobek nikdy nedržte pod tekoucí
vodou. Dbejte na pokyny ohledně
čištění a údržby.
Nářadí se nikdy nedotýkejte vlhkýma
rukama, nebo když stojíte na mokrém
povrchu. Nikdy se nedotýkejte zástrčky
vlhkýma nebo mokrýma rukama.
UPOZORNĚNÍ
Výrobky s tímto symbolem odpovídají
třídě ochrany II. To znamená, že výrobek
je vybaven zesílenou nebo dvojitou
izolací mezi proudovými obvody a
výstupním napětím, resp. kovovým
krytem.
Výrobky s tímto symbolem odpovídají
třídě ochrany III. Znamená to, že
výrobek je napájen bezpečným malým
napětím (SELV). Za normálních okolností
s nimi může přijít osoba bezpečně
do kontaktu, bez nebezpečí úrazu
elektrickým proudem.
Q Pokyny pro bezpečné
použití elektricky
poháněné sekačky na
trávu
DŮLEŽITÉ! Přečtěte si
pečlivě návod k použití.
Návod k použití uložte
pro pozdější použití.
1. Tento výrobek by neměli
používat děti.
2. Děti musí být pod dohledem,
aby si s výrobkem nehrály.
3. Děti nesmějí provádět čištění
a údržbu.
4. Tento výrobek mohou
používat osoby s omezenými
fyzickými, smyslovými nebo
mentálními schopnostmi
nebo nedostatkem zkušeností
a vědomostí, pokud jsou
pod dohledem nebo dostali
pokyny, jak se má přístroj
používat a porozuměli
možnému nebezpečí.
Úvod
1. Přečtěte si pečlivě návod
k použití. Seznamte se s
nastavováním stroje a jeho
správným používáním.
2. Nikdy nedovolte dětem ani
jiným osobám, které nejsou
obeznámeny s návodem
k použití, aby používaly
výrobek. Místní předpisy
mohou stanovovat minimální
věk uživatelů.
3. Nikdy nesečte, jsou-li v
blízkosti osoby, zejména děti
nebo zvířata.
62 CZ
Page 61

4. Myslete na to, že obsluha
nebo uživatel je odpovědný
za nehody nebo poškození
jejich majetku.
Přípravná opatření
1. Při provozu je nutno vždy
nosit pevnou obuv a
dlouhé kalhoty. Výrobek
nepoužívejte naboso nebo
jen v lehkých sandálech.
Vyhýbejte se nošení volných
oděvů nebo oděvů s visícími
šňůrkami nebo opasky.
2. Zkontrolujte terén, na
kterém budete používat
výrobek a odstraňte všechny
předměty, které by mohly
být zachyceny a vymrštěny.
3. Před použitím vždy
proveďte vizuální
kontrolu na opotřebování
a poškození nožů,
upevňovacích šroubů a
celé sekací jednotky. Aby
se předešlo nevyvážení a
házení, smějí se opotřebené
nebo poškozené nože
a upevňovací šrouby
vyměňovat pouze v celých
sadách. Opotřebené nebo
poškozené výstražné štítky
je třeba vyměnit.
Zacházení
1. Sečte jen za denního světla
nebo při dobrém umělém
osvětlení.
2. Pokud je to možné, zamezte
použití výrobku na mokrém
trávníku.
3. Na svazích vždy dbejte na
udržení stabilního postoje.
4. Veďte výrobek jen krokem.
5. Sečte vždy po vrstevnici,
nikdy do kopce ani z kopce.
6. Při změně směru jízdy na
svahu buďte vždy zvláště
opatrní.
7. Nesečte na příliš strmých
svazích.
8. Při otáčení sekačky nebo
tahání vašim směrem buďte
mimořádně opatrní.
9. Při pohybu výrobku přes jiné
povrchy, jako je trávník a při
pohybu na sečenou plochu
a z ní zastavte nůž (nože).
10. Nepoužívejte nikdy
výrobek s poškozenými
ochrannými zařízeními
nebo ochrannými mřížemi
nebo bez nasazených
ochranných zařízení, jako
např. nárazových plechů a/
nebo záchytných zařízení
na trávu.
63 CZ
Page 62

11. Startujte nebo stiskněte
vypínač opatrně, podle
pokynů výrobce. Dbejte na
dostatečnou vzdálenost noh
k noži (nožům).
12. Při startování motoru se
nesmí výrobek naklánět,
pouze pokud je třeba
výrobek během tohoto
postupu nadzvednout.
V takovém případě jej
nakloňte jen tak, jako je to
bezpodmínečně potřebné
a nadzvedněte jej jen
na straně odvrácené od
uživatele.
13. Motor nestartujte, pokud
stojíte před vyhazovacím
kanálem.
14. Nikdy nevsunujte ruce ani
nohy pod otáčející se části.
Držte se stále mimo dosah
vyhazovacího otvoru.
15. Stroj s běžícím motorem
nikdy nezvedejte ani
nepřenášejte.
16. Motor odstavte a vytáhněte
startovací klíč. Dbejte na
to, aby všechny otáčející se
části byly zcela zastaveny:
¢ vždy, když opustíte výrobek;
¢ před uvolňováním
zablokování nebo
odstraňováním ucpání ve
vyhazovacím kanálu;
¢ před kontrolou nebo
čištěním výrobku nebo
prováděním prací na něm;
¢ pokus byl zasažen cizí
předmět. Před opětovným
nastartováním výrobku
a prací s výrobkem jej
zkontrolujte na poškození a
proveďte potřebné opravy.
Pokud začne výrobek nezvykle
silně vibrovat, je potřebná
okamžitá kontrola:
¢ zkontrolujte výrobek na
poškození;
¢ proveďte potřebné opravy
poškozených dílů;
¢ zajistěte řádné dotažení
všech matic, čepů a šroubů.
Údržba a uskladnění
1. Zajistěte řádné dotažení
všech matic, čepů a šroubů
a bezpečný provozní stav
výrobku.
2. Záchytné zařízení na trávu
pravidelně kontrolujte na
opotřebení nebo ztrátu
funkčnosti.
3. Dbejte na to, že u výrobků s
více noži může pohyb nože
vést k otáčení zbylých nožů.
4. Při nastavování výrobku
dbejte na to, aby nedošlo
k přivření prstů mezi
pohybujícími se noži a
fixními částmi výrobku.
64 CZ
Page 63

5. Před odstavením výrobku
45
nechte vychladnout motor.
6. Při údržbě nožů dbejte
na to, že nože se mohou
pohybovat dokonce i v
případě, pokud je vypnutý
zdroj napětí.
7. Z bezpečnostních důvodů
vyměňujte opotřebené nebo
poškozené díly. Používejte
výhradně originální
náhradní díly a příslušenství.
Q Redukce vibrací a hluku
Omezte čas použití, používejte režimy s nízkými
vibracemi a nízkým hlukem a používejte osobní
ochranné pomůcky ke snížení vibrací a hluku.
Následující opatření pomáhají zmírnit rizika vibrací
a hluku:
¢ Výrobek používejte pouze v souladu s účelem
použití, a jak je popsáno v tomto návodu.
¢ Ujistěte se, že je výrobek správně a dobře
udržován.
¢ Používejte správné aplikační nástroje
pro tento výrobek a ujistěte se, že jsou
bezchybné.
¢ Výrobek držte pevně a bezpečně za
rukojeti / úchyty.
¢ Udržujte výrobek podle pokynů a zajistěte
odpovídající mazání (je-li třeba).
¢ Naplánujte si pracovní postup tak, aby bylo
používání výrobků s vysokými vibracemi
rozšířeno na delší časové období. .
Q Postup v případě nouze
Seznamte se s používáním tohoto výrobku podle
těchto pokynů. Zapamatujte si bezpečnostní
pokyny a bezpodmínečně se jich držte. To
pomáhá předcházet rizikům a nebezpečím.
¢ Vždy buďte opatrní při používání tohoto
výrobku, abyste mohli včasně identifikovat
a reagovat na nebezpečí. Rychlé zásahy
mohou zabránit vážnému zranění a
poškození majetku.
¢ V případě poruchy okamžitě vypněte výrobek
a vyjměte akumulátor. Dejte jej zkontrolovat
kvalifikovanému technikovi a v případě
potřeby jej dejte opravit předtím, než jej
znovu uvedete do provozu.
Q Zbytková rizika
I když používáte tento výrobek podle předpisů,
existuje potenciální riziko pro osoby a poškození
majetku. V souvislosti s konstrukcí a provedením
tohoto výrobku se mohou vyskytnout mimo jiné,
následující rizika:
¢ Škody na zdraví vyplývající z emisí vibrací,
pokud je výrobek používán po dlouhou dobu,
není řádně spravován ani udržován.
¢ Zranění osob a škody na majetku způsobené
vadnými řeznými nástroji nebo náhlým
nárazem skrytého předmětu během
používání.
¢ Riziko zranění a majetkové škody způsobené
létajícími předměty.
VAROVÁNÍ!
u Tento výrobek generuje elektromagnetické
pole během provozu! Za určitých okolností
může toto pole ovlivnit aktivní nebo
pasivní lékařské implantáty! Abyste snížili
riziko vážného nebo smrtelného zranění,
doporučujeme, aby se osoby s lékařskými
implantáty poradili s lékařem a výrobcem
lékařského implantátu před obsluhou
výrobku!
Q Bezpečnostní pokyny
pro nabíječky
POZOR! NEBEZPEČÍ VÝBUCHU!
Nikdy nenabíjejte nenabíjecí baterie!
Chraňte akumulátor před teplem, jako
45
např. před nepřetržitým slunečním
zářením a ohněm, vodou a vlhkostí.
Hrozí nebezpečí výbuchu.
65 CZ
Page 64

¢ Tento přístroj mohou používat
děti ve věku 8 let a výše
a osoby se sníženými
fyzickými, smyslovými nebo
duševními schopnostmi, nebo
s nedostatkem zkušeností
a znalostí, pokud jsou pod
dozorem nebo byly poučeny
o bezpečném používání
zařízení a porozuměly z toho
plynoucím rizikům.
¢ Děti si nesmí hrát s přístrojem.
¢ Čištění a údržbu uživatele
nesmí provádět děti bez
dozoru.
¢ Nenabíjejte nenabíjecí
se baterie. Porušení
tohoto upozornění vede k
nebezpečím.
¢ Pokud je napájecí kabel
tohoto zařízení poškozen,
musí jej vyměnit výrobce,
jeho servisní zástupce nebo
podobně kvalifikovaná
osoba, aby se zabránilo
nebezpečí.
¢ Chraňte elektrické části proti
vlhkosti. Nikdy je neponořujte
do vody nebo jiných
kapalin, aby nedošlo k úrazu
elektrickým proudem. Nikdy
nedržte přístroj pod tekoucí
vodou. Postupujte podle
pokynů pro čištění, údržbu a
opravy.
¢ Přístroj je vhodný pouze pro
vnitřní použití.
¢ Tato nabíječka je vhodná
pouze pro nabíjení
následujících typů
akumulátorů: FAP 40 A1.
Q Před prvním použitím
Q Rozbalení
POZOR! NEBEZPEČÍ ZRANĚNÍ!
Obalový materiál není hračka pro děti.
Děti by se neměly hrát s obalovým
materiálem, protože jinak hrozí
nebezpečí jeho spolknutí nebo udušení!
Odstraňte všechny obalové materiály a
přepravní pojistky.
1. Rozbalte všechny součásti a položte je na
rovný a stabilní povrch.
2. Odstraňte obalový materiál a obalová /
přepravní zabezpečení (pokud jsou k
dispozici).
3. Ujistěte se, že je dodávka kompletní a bez
možného poškození. Pokud zjistíte, že některé
součásti chybí nebo jsou vadné, obraťte
se na prodejce, u něhož jste tento výrobek
zakoupili. Nepoužívejte výrobek dříve, než
budou dodány chybějící díly nebo než budou
nahrazeny vadné součásti. Použití neúplného
nebo poškozeného výrobku bude mít za
následek zranění osob a poškození majetku.
4. Ujistěte se, že máte potřebné příslušenství a
nástroje pro uvedení výrobku do provozu a
použití. To zahrnuje vhodné osobní ochranné
prostředky.
Q Příslušenství
Pro bezpečné a správné použití výrobku je
potřebné následující příslušenství, jako např.
nástroje a nástavce:
o Vhodná ochranná zařízení, příslušenství a
nástroje dostanete u odborného prodejce.
Při koupi vždy zohledněte technické požadavky
tohoto výrobku (viz „Technické údaje“).
66 CZ
Page 65

Pokud si nejste jisti, obraťte se na kvalifikovaného
odborníka nebo se poraďte se svým
specializovaným prodejcem.
UPOZORNĚNÍ
u Tento návod k použití obsahuje informace
a pokyny ohledně různých nástrojů a jejich
použití. Uvedené nástroje nemusejí být
nevyhnutně součástí dodávky, ale mají
poukázat na další možnosti použití tohoto
výrobku.
Q Montáž
Montáž spodního držadla
1. Spodní držadlo
3
vyklopte nahoru
do pohodlné polohy a ozubené věnce
nechte zapadnout do sebe (viz obr. D).
Nadzvedněte spodní držadlo
3
do stejné
výšky.
2. Pro dotažení spojení otáčejte páčku
10b
ve
směru hodinových ručiček, nedotáhněte ji
však úplně.
3. Pro zajištění spojení páčku
10b
zaklapněte.
Pokud by to vyžadovalo příliš mnoho síly
nebo by to nebylo možné, páčku
10b
mírně
povolte tak, že ji pootočíte proti směru
hodinových ručiček.
4. Kroky 1-3 opakujte na druhé straně.
Montáž horního držadla
1. Otevřený konec horního držadla
k spodnímu držadlu
3
nasuňte jej dolů,
2
přiložte
dokud nebudou zarovnány otvory v obou
částech a podržte jej v této poloze (viz obr.
E).
2. Nasuňte čep
13a
zevnitř výrobku přes otvory
směrem ven a podržte jej v této poloze.
3. Podložku
na čep
měla přizpůsobit hornímu držadlu
4. Páčku
5. Pro dotažení spojení otáčejte páčku
13b
nasuňte plochou stranou zvenčí
13a
. Prohlubeň podložky
13c
našroubujte na čep
13a
13b
.
by se
2
.
13c
ve
směru hodinových ručiček, nedotáhněte ji
však úplně.
6. Pro zajištění spojení páčku
13c
zaklapněte.
Pokud by to vyžadovalo příliš mnoho síly
nebo by to nebylo možné, páčku
13c
povolte tak, že ji pootočíte proti směru
hodinových ručiček.
7. Kroky 1-6 opakujte na druhé straně.
Zajištění řídicího kabelu
1. Použijte kabelovou svorku
14
kabel
přes otevřenou stranu (viz obr. F).
2. Kabelovou svorku
zaklapněte k spodnímu držadlu
Q Před použitím
Q Nabíjení akumulátoru
12
a vložte řídicí
12
s řídicím kabelem 14
3
UPOZORNĚNÍ
u Akumulátor
Před prvním použitím akumulátor
17
je dodán částečně nabitý.
17
ideálně po dobu 60 minut.
u Před vyjmutím nebo vložením akumulátoru
17
do nabíječky vždy vytáhněte zástrčku
nabíječky
u Akumulátor
z elektrické sítě.
18
nikdy nenabíjejte při teplotě
17
okolí pod 10 °C nebo nad 40 °C.
u Mezi dvěma nabíjeními nechte nabíječku
klidu alespoň po dobu 15 minut.
u Pokud není do nabíječky
akumulátor
17
a nabíječka je zapojena do
elektrické sítě, LED stavu nabíjení
18
vložen žádný
18d
zeleně.
1. Zarovnejte akumulátor
nabíječky
18
a nasuňte jej dovnitř. Dbejte na
17
s kolejničkami
to, aby slyšitelně zaklapl.
2. Připojte síťovou zástrčku
k napájení. LED stavu nabíjení
18a
nabíječky 18
18c
zasvítí
červeně. Po ukončení nabíjení zasvítí zelená
LED stavu nabíjení
18d
a indikuje, že je
nabíjení ukončeno.
3. Odpojte síťovou zástrčku
18a
nabíječky 18
od napájení a vyjměte akumulátor
nabíječky.
mírně
.
nabijte,
zasvítí
17
z
18a
18
v
67 CZ
Page 66

4. Vložte akumulátor 17 zpátky do výrobku
(viz „Vložení / vyjmutí akumulátoru“).
LED stavu nabíjení
Zelená LED bliká bez
akumulátoru
Zelená LED svítí s
akumulátorem
Červená LED svítí s
Nabíječka je
připravena
Akumulátor je plně
nabitý
Akumulátor se nabíjí
akumulátorem
Červená a zelená LED
Vadný akumulátor
blikají
Červená a zelená LED
svítí
Q Kontrola nabití akumulátoru
o Stiskněte tlačítko stavu nabití baterie
Akumulátor je příliš
studený nebo teplý
17c
pro
zkontrolování stavu nabití akumulátoru.
Na zobrazení stavu nabití akumulátoru
17b
se zobrazí stav nabití / zbylý výkon
akumulátoru
17
.
4 zelené LED svítí 100% stav nabití
3 zelené LED svítí 75% stav nabití
2 zelené LED svítí 50% stav nabití
1 zelené LED svítí 25% stav nabití
1 zelená LED bliká Nízký stav nabití
o Pokud je stav nabití na 25 % nebo nízký,
akumulátor
Q Bezpečnostní klíč
před použitím nabijte.
17
Tento výrobek je vybaven bezpečnostním klíčem 7c ,
který má zamezit nepovolanému použití. Abyste
mohli výrobek používat, je třeba zasunout
bezpečnostní klíč
7c
do klíčové dírky 7b .
Zasunutí bezpečnostního klíče
1. Otevřete kryt prostoru pro baterii
7
(viz obr. G).
2. Stiskněte tlačítko na bezpečnostním klíči
tento zasuňte do klíčové dírky
7b
to, aby slyšitelně zaklapl. Bezpečnostní klíč
7c
. Dbejte na
a
7c
by nemělo být možné vytáhnout bez stisknutí
jeho tlačítka.
Vytažení bezpečnostního klíče
1. Stiskněte tlačítko na bezpečnostním klíči
tento vytáhněte z klíčové dírky
Q Vložení / vyjmutí akumulátoru
7b
.
Vložení akumulátoru:
1. Otevřete kryt prostoru pro baterii
7
(viz obr. G).
2. Zarovnejte akumulátor
17
s kolejničkami
uchycení akumulátoru a nasuňte jej dovnitř.
Dbejte na to, aby slyšitelně zaklapl.
Vyjmutí akumulátoru:
1. Otevřete kryt prostoru pro baterii
7
(viz obr. G).
2. Stiskněte uvolňovací tlačítko
akumulátoru vyjměte akumulátor
Q Používání
Q Záchytná nádoba na trávu
17a
a z uchycení
17
.
Tento výrobek lze používat se záchytnou nádobou
na trávu
11
, která zachycuje posečenou trávu pro
snazší odstranění. Pokud se nepoužívá, posečená
tráva je vyhazována přes zadní vyhazovací otvor.
Pro otevření zadního vyhazovacího otvoru je třeba
odstranit mulčovací nástavec
19
.
1. Jednou rukou nadzvedněte kryt vyhazovacího
4
otvoru
a odejměte mulčovací nástavec
Montáž držadla na záchytnou nádobu
na trávu
1. Přední konec držadla
záchytné nádoby na trávu
2. Hák na předním konci držadla
11a
nasaďte do drážky
11
(viz obr. H).
11a
by měl
zaklapnout do krytu záchytné nádoby na
trávu
11
. Zadní konec držadla
11a
nasaďte do zadní drážky záchytné nádoby
na trávu
3. Na držadlo mírně zatlačte
11
.
11a
, dokud
nezaklapne hák na zadním konci držadla do
záchytné nádoby na trávu
11
.
UPOZORNĚNÍ
u Na záchytné nádobě na trávu
11
je
umístěno polstrované držadlo.
7c
a
19
.
68 CZ
Page 67

Montáž záchytné nádoby na trávu
1. Jednou rukou nadzvedněte a podržte kryt
vyhazovacího otvoru
2. Záchytnou nádobu na trávu
za držadlo
11a
uchycení na háky na těle výrobku
3. Kryt vyhazovacího otvoru
4
(viz obr. I).
11
podržte
a zavěste jí pomocí jejich
9
.
4
pusťte.
Demontáž záchytné nádoby na trávu
1. Jednou rukou nadzvedněte a podržte kryt
vyhazovacího otvoru
2. Záchytnou nádobu na trávu
za držadlo
výrobku
11a
9
.
3. Kryt vyhazovacího otvoru
4
(viz obr. I).
11
podržte
a zvedněte jí z háků na těle
pusťte.
4
Vyprázdnění záchytné nádoby na trávu
11b
11
.
Během provozu na záchytné nádobě na trávu
sledujte klapku ukazatele stavu naplnění
Pokud je funkční zachycování, klapka by se
měla otvírat proudem vzduchu záchytné nádoby
na trávu
záchytnou nádobu na trávu
11
. Uzavřená kapka znamená plnou
11
a před dalším
pokračováním ji je třeba vyprázdnit.
1. Záchytnou nádobu na trávu
11
odejměte
(viz „Demontáž záchytné nádoby na trávu“).
2. Posečenou trávu vyprázdněte otevřenou
stranou záchytné nádoby na trávu
11
podle
platných předpisů.
Q Mulčovací nástavec
Tento výrobek lze používat s mulčovacím
nástavcem
19
k mulčování trávy. Mulčovací
nástavec blokuje zadní vyhazovací otvor.
Posečená tráva se vícenásobně nařeže na menší
kousky. Takto posečená tráva zůstává ležet na
trávníku, kde se brzo rozloží a působí tak jako
hnojivo.
Montáž mulčovacího nástavce
1. Nadzvedněte kryt vyhazovacího otvoru
nasaďte mulčovací nástavec
19
.
4
Demontáž mulčovacího nástavce
1. Nadzvedněte kryt vyhazovacího otvoru
odejměte mulčovací nástavec
19
4
.
Q Nastavení výšky sečení
Tento výrobek disponuje 6 níže uvedenými
možnostmi nastavení výšky sečení.
Nastavení
1. Uvolněte páčku pro nastavení výšky sečení
tak, že ji vysunete bočně ze zářezu
aktuálního nastavení (viz obr. J).
2. Páčku pro nastavení výšky sečení
zpátky nebo dopředu směrem k zářezu
požadované výšky sečení.
3. Páčku pro nastavení výšky sečení
tak, že jí dáte bočně do zářezu požadované
výšky sečení.
Q Zapnutí a vypnutí
Zapnutí:
1. Stiskněte aretaci zapnutí
15
obr. K).
2. Pro zapnutí stiskněte vypínač
držadla
. Aretaci zapnutí
1
Vypnutí:
1. Pro vypnutí výrobku pusťte vypínač
a
a
Výška sečení
(cca) in mm
75
65
55
45
35
25
6
posuňte
6
zajistěte
a podržte ji (viz
16
ve směru
uvolněte.
15
16
.
6
69 CZ
Page 68

Q Sečení
VAROVÁNÍ! NEBEZPEČÍ ZRANĚNÍ!
u Pokud výrobek narazí na cizí těleso, vypněte
motor! Výrobek vypněte, vyjměte akumulátor,
vytáhněte bezpečnostní klíč a nechte jej
vychladnout. Výrobek pečlivě zkontrolujte na
poškození. Před dalším pokračováním nechte
opravit jakéhokoliv poškození!
u Nadměrné vibrace výrobku během provozu
poukazují na poškození! Vypněte motor.
Výrobek nechte co nejdříve zkontrolovat a
opravit!
VAROVÁNÍ!
u V některých zemích existují předpisy, které
určují, ve kterou denní dobu a ve kterých
dnech lze výrobky používat a jaké jsou
omezení! Ohledně detailních informací
se obraťte na místní úřad a dbejte na tyto
předpisy, abyste zajistili klid v sousedství a
předešli porušování předpisů.
o Zajistěte, aby byl trávník bez kamenů, větev,
drátů nebo jiných předmětů, které by mohly
poškodit výrobek nebo jeho motor.
o Nesečte mokrou trávu, protože to vede k
jejímu ulpívání na podvozku výrobku, což
zabraňuje řádnému vyhazování posečené
trávy a také zvyšuje nebezpečí uklouznutí a
pádů.
o Pro zdravý trávník nesečte nikdy výše než v
jedné třetině celkové výšky trávy. Na podzim
sečte jen pokud ještě trávník roste.
o Výrobkem pohybujte pomalu dopředu.
o Sečte v mírně překrývajících se dráhách.
Nejúčinnější vzor sečení odpovídá přímým
dráhám podél jedné ze stran. Vede to k
rovnoměrným dráhám a zajišťuje sečení
trávníku bez vynechaných míst.
o Kolem květinových záhonů kružte. Pokud
během sečení trávníku dosáhnete květinový
záhon, sečte jednu nebo dvě dráhy podél
obvodu záhonu.
o Při změně směru buďte vždy zvláště opatrní.
o Záchytnou nádobu na trávu
11
pravidelně
vyprazdňujte.
o Pokud Vás během sečení vyruší jiné osoby,
které vstoupí na trávník, výrobek ihned
vypněte. Dříve, než se od výrobku odvrátíte,
nechte jej zcela zastavit.
o Nepřetěžujte se. Dělejte pravidelné přestávky,
abyste se mohli lépe koncentrovat na práci a
udrželi úplnou kontrolu nad výrobkem.
Q Po použití
1. Výrobek vypněte, vyjměte akumulátor
vytáhněte bezpečnostní klíč
7c
17
,
a nechte jej
případně vychladnout.
2. Výrobek zkontrolujte, vyčistěte a uložte (viz
„Čištění a péče“).
Q Čistění a péče
VAROVÁNÍ!
Před kontrolou, údržbou a čištěním
výrobek vypněte, vyjměte akumulátor,
vytáhněte bezpečnostní klíč a výrobek
nechte vychladnout!
POZOR! NEBEZPEČÍ ZRANĚNÍ!
Nůž / nože jsou velmi ostré! Při
provádění kontroly, údržby a čištění
noste vždy ochranné rukavice!
Q Čištění
o Vždy udržujte výrobek čistý, suchý a bez oleje
nebo mastnoty. Po každém použití a před
uskladněním odstraňte prach.
o Pravidelné a řádné čištění pomáhá zajistit
bezpečné používání a prodlužuje životnost
výrobku.
o Před každým použitím zkontrolujte u
výrobku opotřebované a poškozené části.
Nepoužívejte jej, pokud najdete vadné nebo
opotřebované součásti.
o Dbejte na to, aby se dovnitř výrobku
nedostala kapalina.
o Očistěte výrobek suchým hadříkem. Použijte
kartáč na těžko přístupná místa.
UPOZORNĚNÍ
u Nepoužívejte k čištění výrobku chemické,
alkalické, abrazivní nebo jiné agresivní čistící
nebo dezinfekční prostředky, protože by
mohly poškodit povrchy.
70 CZ
Page 69

Q Údržba
Před a po každém použití zkontrolujte, zda je
výrobek a příslušenství (např. aplikační nářadí)
opotřebované a poškozené. Je-li to nutné, vyměňte
je za nové, jak je popsáno v této příručce.
Dodržujte přitom technické požadavky (viz.
“Technické údaje”).
o Výrobkem posunujte vždy za držadlo.
o Při přepravě ve vozidlech chraňte výrobek
před nárazy nebo silnými vibracemi.
o Zajistěte výrobek před vyklouznutím nebo
převrácením.
Q Poruchy a náprava
Q Oprava
Uvnitř tohoto výrobku nejsou žádné součásti,
které by uživatel mohl opravit. Obraťte se na
kvalifikovaného technika, aby se výrobek dal
zkontrolovat a opravit.
Q Uskladnění
o Výrobek vypněte, vyjměte akumulátor
vytáhněte bezpečnostní klíč
o Výrobek vyčistěte uvedeným způsobem
7c
17
.
(viz „Čištění“).
o Uložte výrobek a jeho příslušenství na
tmavém, suchém, nezamrzajícím a dobře
větraném místě.
o Výrobek uchovávejte vždy na místě mimo
dosah dětí. Optimální teplota skladování je
mezi 10 °C a 30 °C.
o Doporučujeme výrobek přikrýt vhodným
hadříkem, abyste jej ochránili před prachem.
o Pravidelně kontrolujte stav nabití akumulátoru,
pokud jej skladujete po delší dobu.
Optimální podmínky skladování jsou chlad a
sucho. Optimální stav nabití pro uskladnění je
cca 50 %.
Q Přeprava
POZOR! NEBEZPEČÍ ZRANĚNÍ!
Zvedejte ve dvou osobách.
o Výrobek vypněte, vyjměte akumulátor
vytáhněte bezpečnostní klíč
o Pokud jsou k dispozici, nasaďte přepravní
7c
17
.
pojistky.
o Pokud je zvedání výrobku nezbytné, zvedejte
výrobek ve dvou osobách. Výrobek zvedejte
jen za držadlo
5
a přední konec. Při
přenášení výrobku noste ochranné rukavice,
abyste zamezili neúmyslnému kontaktu s noži.
VAROVÁNÍ!
u Provádějte pouze takové práce, které jsou
vysvětlené v tomto návodu k obsluze!
Všechny další inspekční, údržbářské
a opravárenské práce musí provádět
autorizované servisní středisko nebo
a
obdobně kvalifikovaný odborník!
Zdánlivé chyby funkcí, poruchy nebo poškození
jsou často způsobeny příčinami, které mohou být
uživatelem opraveny. Zkontrolujte proto výrobek
pomocí následující tabulky dříve, než kontaktujete
kvalifikovanou osobu. Ve většině případů mohou
být takto chyby vyřešeny rychle.
Problém Možná příčina Řešení
Výrobek se
nezapne
Akumulátor není
řádně upevněn
Akumulátor je vybitý Akumulátor vyjměte
Akumulátor je
poškozen
Vytažený
bezpečnostní klíč
Jiná elektrická
závada výrobku
Ucpání Výrobek vypněte,
a
Výrobek
nedosahuje plného
výkonu
Příliš nízká kapacita
akumulátoru
Řádně jej upevněte
a nabijte
Nechte zkontrolovat
odborníkem
Bezpečnostní klíč
zasuňte
Nechte zkontrolovat
odborníkem
vyjměte akumulátor
a vytáhněte
bezpečnostní klíč.
Zkontrolujte ucpání
pod výrobkem a
příp. jej vyčistěte
(vždy noste
ochranné rukavice).
Akumulátor vyjměte
a nabijte
71 CZ
Page 70

Problém Možná příčina Řešení
Neuspokojivý
výsledek
Výrobek
se náhle
zastavil
Nadměrné
vibrace
nebo hluk
Q Zlikvidování
Řezný nástroj je
opotřebovaný /
poškozený
Sečený materiál
překračuje výkon
Nesprávná výška
sečení
Výrobek je přetížen Nastavte výšku
Akumulátor je vybitý Akumulátor vyjměte
Akumulátor je příliš
horký
Řezný nástroj je tupý
nebo poškozený
Šrouby/matice jsou
uvolněny
Nechte
vyměnit pouze
autorizovaným
servisem za nový
Sečte jen materiály v
souladem s výkonem
výrobku
Nastavte výšku
sečení
sečení
a nabijte
Akumulátor vyjměte
a nechte jej
vychladnout
Vyměňte
Šrouby/matice
dotáhněte
Obal se skládá z ekologických materiálů, které
můžete zlikvidovat prostřednictvím místních sběren
recyklovatelných materiálů.
Při třídění odpadu se řiďte podle označení
obalových materiálů zkratkami (a) a čísly
(b), s následujícím významem: 1–7: umělé
hmoty / 20–22: papír a lepenka / 80–98:
složené látky.
Výrobek a obalové materiály jsou
recyklovatelné, zlikvidujte je odděleně pro
lepší odstranění odpadu.
Logo Triman platí jen pro Francii.
O možnostech likvidace vysloužilých
zařízení se informujte u správy vaší obce
nebo města.
V zájmu ochrany životního prostředí
vysloužilý výrobek nevyhazujte do
domovního odpadu, ale předejte k
odborné likvidaci. O sběrnách a jejich
otevíracích hodinách se můžete informovat
u příslušné správy města nebo obce.
Vadné nebo vybité baterie resp.
akumulátory se musí, podle směrnice
2006/66/ES a jejích příslušných změn,
recyklovat. Baterie, akumulátory i výrobek
odevzdejte zpět do nabízených sběren.
Ekologické škody v důsledku
chybné likvidace baterií /
akumulátorů!
Před odstraněním výrobku do odpadu z
něho vyjměte baterie resp. akumulátorový
balíček.
Baterie / akumulátory se nesmí zlikvidovat
v domácím odpadu. Mohou obsahovat
jedovaté těžké kovy a musí se zpracovávat
jako zvláštní odpad. Chemické symboly
těžkých kovů:
Cd = kadmium, Hg = rtuť, Pb = olovo.
Proto odevzdejte opotřebované baterie /
akumulátory u komunální sběrny.
Q Servis
VAROVÁNÍ!
u Dejte výrobek opravit servisnímu středisku
nebo kvalifikovanému elektrikáři a pouze
s originálními náhradními díly. To zajišťuje
zachování bezpečnosti výrobku.
u Výměnu zástrčky nebo napájecího kabelu
dejte vždy provést výrobci výrobku nebo jeho
poprodejnímu servisu. To zajišťuje zachování
bezpečnosti výrobku.
Q Záruka
Výrobek byl vyroben s nejvyšší pečlivostí podle
přísných kvalitativních směrnic a před odesláním
prošel výstupní kontrolou. V případě závad máte
možnost uplatnění zákonných práv vůči prodejci.
Vaše práva ze zákona nejsou omezena naší níže
uvedenou zárukou.
Na tento artikl platí 3 záruka od data zakoupení.
Záruční lhůta začíná od data zakoupení. Uschovejte
si dobře originál pokladní stvrzenky. Tuto stvrzenku
budete potřebovat jako doklad o zakoupení.
Pokud se do 3 let od data zakoupení tohoto
výrobku vyskytne vada materiálu nebo výrobní
vada, výrobek Vám – dle našeho rozhodnutí –
bezplatně opravíme nebo vyměníme. Tato záruka
zaniká, jestliže se výrobek poškodí, neodborně
použil nebo neobdržel pravidelnou údržbu.
72 CZ
Page 71

Záruka platí na vady materiálu a výrobní vady.
Tato záruka se nevztahuje na díly výrobku
podléhající opotřebení (např. na baterie), dále
na poškození křehkých, choulostivých dílů, např.
vypínačů, akumulátorů nebo dílů zhotovených ze
skla.
Záruka na tento akumulátor je 1 rok od data
koupě.
Postup v případě uplatňování záruky
Pro zajištění rychlého zpracování Vašeho případu
se řiďte následujícími pokyny:
Pro všechny požadavky si připravte pokladní
stvrzenku a číslo artiklu (např. IAN 123456) jako
doklad o zakoupení.
Číslo artiklu najdete na typovém štítku, gravuře,
titulní stránce návodu (vlevo dole) nebo na
nálepce na zadní nebo spodní straně.
V případě poruch funkce nebo jiných závad
nejdříve kontaktujte, telefonicky nebo e-mailem, v
následujícím textu uvedené servisní oddělení.
Výrobek registrovaný jako vadný potom můžete
s přiloženým dokladem o zakoupení (pokladní
stvrzenkou) a údaji k závadě a kdy k ní došlo,
bezplatně zaslat na adresu servisu, která Vám byla
sdělena.
Servis Česká republika
Tel.: 800 143 873
E-Mail: owim@lidl.cz
Aplikované harmonizované normy:
EN 60335-1: 2012/A11: 2014
EN 60335-2-77: 2010
EN 60335-2-29: 2004+A2: 2010
EN 62233: 2008
EN 55014-1: 2006/A2: 2011
EN 55014-2: 2015
EN 61000-3-2: 2014
EN 61000-3-3: 2013
EN 50581: 2012
Dodatečně se ve smyslu Směrnice na emisi hluku
2000/14/ES potvrzuje:
Hladina akustického výkonu
zaručená: 96 dB(A)
naměřená: 94,3 dB(A)
Použitý postup posuzování shody podle přílohy VI,
2000/14/ES
Název oznámeného subjektu:
TÜV SÜD Industrie Service GmbH (NB: 0036)
Adresa oznámeného subjektu:
Westendstraße 199, D-80686 Mnichov, Německo
Sériové číslo: IAN 292278
IAN 292278
Q Původní prohlášení o shodě
My, OWIM GmbH & Co. KG, Stiftsbergstraße 1,
DE-74167 Neckarsulm, NĚMECKO, tímto
prohlašujeme na svou vlastní odpovědnost, že
výrobek: Aku sekačka na trávu FARM 40-Li A1,
č. modelu: HG03586, verze: 02/2018, na
který se toto prohlášení o shodě vztahuje, splňuje
požadavky níže uvedených norem / směrnic
2006/42/ES, 2014/35/EU, 2014/30/EU,
2011/65/EU, 2000/14/ES, 2005/88/ES.
Tobias König
Ředitel divize / odpovědný za dokumentaci
OWIM GmbH & Co. KG, Stiftsbergstraße 1,
DE-74167 Neckarsulm, GERMANY
Neckarsulm, 16.01.2018
Prohlášení o shodě najdete také na:
www.owim.com.
Předmět prohlášení o shodě uvedený výše
odpovídá ustanovením Směrnice 2011/65/EU
Evropského parlamentu a Řady z 8. června 2011
ohledně limitovaného použití určitých škodlivých
látek použitých v elektrických a elektronických
zařízeních.
73 CZ
Page 72

Obsah
Legenda používaných piktogramov ............................................................................Strana 75
Úvod ...........................................................................................................................................Strana 76
Účel použitia ................................................................................................................................Strana 76
Popis častí ...................................................................................................................................Strana 76
Obsah dodávky ...........................................................................................................................Strana 76
Technické údaje ...........................................................................................................................Strana 77
Bezpečnostné pokyny .........................................................................................................Strana 78
Návod pre bezpečné použitie elektrickej kosačky na trávu.........................................................Strana 78
Zníženie vibrácií a hluku .............................................................................................................Strana 81
Správanie v núdzovom prípade .................................................................................................. Strana 81
Zvyškové riziko ............................................................................................................................ Strana 81
Bezpečnostné pokyny pre nabíjačky ..........................................................................................Strana 82
Pred prvým použitím ...........................................................................................................Strana 82
Vybalenie .....................................................................................................................................Strana 82
Príslušenstvo .................................................................................................................................Strana 83
Montáž .......................................................................................................................................Strana 83
Pred použitím ..........................................................................................................................Strana 84
Nabíjanie akumulátora ................................................................................................................Strana 84
Kontrola stavu nabitia akumulátora .............................................................................................Strana 84
Bezpečnostný kľúč .......................................................................................................................Strana 84
Vloženie / vybratie akumulátoru .................................................................................................Strana 85
Obsluha .....................................................................................................................................Strana 85
Zberač trávy ...............................................................................................................................Strana 85
Mulčovacia zástrčka .................................................................................................................... Strana 85
Nastavenie výšky kosenia ............................................................................................................Strana 86
Zapnutie a vypnutie .....................................................................................................................Strana 86
Kosenie ........................................................................................................................................Strana 86
Po použití .....................................................................................................................................Strana 87
Čistenie a starostlivosť ........................................................................................................Strana 87
Čistenie ........................................................................................................................................Strana 87
Údržba.........................................................................................................................................Strana 87
Opravy ........................................................................................................................................Strana 87
Skladovanie .................................................................................................................................Strana 87
Transport .....................................................................................................................................Strana 87
Odstraňovanie porúch ........................................................................................................Strana 88
Odstránenie .............................................................................................................................Strana 88
Opravy ......................................................................................................................................Strana 89
Záruka .......................................................................................................................................Strana 89
Originálne vyhlásenie o zhode ....................................................................................... Strana 90
74 SK
Page 73

Legenda používaných piktogramov:
STOP
GO
45
Prečítajte si návod na obsluhu. Používajte ochranu sluchu!
Noste ochranné okuliare!
Pozor / Varovanie Používajte ochranné rukavice!
Odstráňte všetky obalové materiály a
prepravné zaistenia.
Používajte protišmykovú bezpečnostnú
obuv!
Obalový materiál nie je hračka. Dajte si pozor na ostré nože. Nože sa
naďalej otáčajú po vypnutí motora. Pred
údržbou odpojte poistky
Vypnite výrobok a vyberte akumulátor. Okolostojace osoby udržujte mimo dosah
pracoviska!
Chráňte elektrické časti pred vlhkosťou Nevystavujte dažďu!
Zariadenie nepoužívajte mokrými rukami
alebo na mokrom povrchu. Nikdy sa
Nebezpečenstvo poranenia v dôsledku
odhodených predmetov
nedotýkajte sieťovej zástrčky mokrými
alebo vlhkými rukami
Trieda ochrany II Nože sa naďalej otáčajú po vypnutí
motora.
Striedavý prúd
Jednosmerný prúd
Jemná poistka Voľnobežné otáčky n
T5A
Chráňte akumulátor pred teplom a dlho
trvajúcim, silným slnečným žiarením.
45
Chráňte akumulátor pred vodou a
Zberač trávy je plný
Zberač trávy je pripravený
0
Rezná šírka
Musia dvíhať dve osoby.
vlhkosťou.
Chráňte akumulátor pred ohňom. Používajte iba v suchých vnútorných
priestoroch.
Zaručená hladina akustického výkonu v dB
75 SK
Page 74

AKUMULÁTOROVÁ KOSAČKA NA
TRÁVU FARM 40-Li A1
Q Úvod
Blahoželáme Vám ku kúpe Vášho nového výrobku.
Rozhodli ste sa pre veľmi kvalitný výrobok. Návod
na obsluhu je súčasťou tohto výrobku. Obsahuje
dôležité upozornenia týkajúce sa bezpečnosti,
používania a likvidácie. Skôr ako začnete výrobok
používať, oboznámte sa so všetkými pokynmi k
obsluhe a bezpečnosti. Výrobok používajte iba
v súlade s popisom a v uvedených oblastiach
používania. V prípade postúpenia výrobku ďalším
osobám odovzdajte aj všetky dokumenty patriace
k výrobku.
Q Účel použitia
Táto akumulátorová kosačka na trávu (ďalej len
“výrobok” alebo “elektrické náradie”) je vhodná
na kosenie trávnikov a trávy v domácnosti.
Výrobok by mali používať iba dospelé osoby.
Iné použitia alebo úpravy výrobku sa považujú
za nevhodné a môžu viesť k rizikám, ako sú
usmrtenie, zranenie a poškodenie. Výrobca
nenesie žiadnu zodpovednosť za škody
spôsobené nesprávnym použitím. Výrobok nie je
určený pre komerčné alebo iné oblasti využitia.
Q Popis častí
Obrázok A/D/E:
1
Držadlo
2
Horné držadlo
3
Spodné držadlo (x2)
4
Výsuvný kryt
5
Rukoväť
6
Páčka pre nastavenie výšky kosenia
7
Kryt priestoru na batérie
7a
Rozhranie akumulátora
7b
Otvor pre bezpečnostný kľúč
Bezpečnostný kľúč
7c
8
Koliesko (x4)
9
Teleso
10
Sada upevnenia pre spodné držadlo (x2)
10a
Podložka
10b
Páčka
11
Zberač trávy
11a
Rukoväť
11b
Klapka indikátora stavu naplnenia
12
Káblová svorka
13
Sada upevnenia pre horné držadlo (x2)
13a
Skrutka
13b
Podložka
13c
Páčka
14
Riadiaci kábel
15
Zámka vypínača
16
Vypínač
áz
ok B:
Obr
17
Akumulátor
17a
Uvoľňovacie tlačidlo
17b
Zobrazenie stavu nabíjania
17c
Tlačidlo stavu nabíjania
Obrázok C:
18
Akumulátorová rýchla nabíjačka
18a
Sieťový kábel so – zástrčkou
18b
Akumulátorové rozhranie
18c
Stav nabitia - LED – červená
18d
Stav nabitia - LED – zelená
19
Mulčovacia zástrčka
Q Obsah dodávky
1 akumulátorová kosačka na trávu FARM 40-Li A1
1 akumulátor FAP 40 A1
1 akumulátorová rýchla nabíjačka FLG 40 A1
1 zberač trávy (vopred namontovaný)
1 sada upevnenia pre dolné držadlo
(vopred namontovaná)
1 sada upevnenia pre horné držadlo
1 rukoväť pre zberač trávy
1 mulčovacia zástrčka
1 Káblová svorka
1 návod na použitie
76 SK
Page 75

Q Technické údaje
Akumulátorová
kosačka na trávu: FARM 40-Li A1
Menovité napätie: 40 V
Rýchlosť voľnobehu n0: 3700 min
-1
Šírka kosenia: 430 mm
Výška kosenia: 25/35/45/55/65/75 mm
Objem zberača trávy: 40 l
Rozmery (V x Š x H): (1010 - 1190) x 475 x
(1140 - 1350) mm
Hmotnosť (vrátane
príslušenstva): 15,5 kg
Trieda ochrany:
III /
Stupeň ochrany: IPX1
Akumulátor: FAP 40 A1
Typ: Lítium - iónová
Menovité napätie: 36 V
40 V max.
Kapacita: 2,5 Ah (90 Wh)
Počet batériových
článkov: 10
Akumulátorová
rýchla nabíjačka:
FLG 40 A1
Vstup
Menovité napätie,
-frekvencia:
200 – 240 V~,
50 / 60 Hz
Menovitý príkon: 160 W
Výstup
Menovité napätie: 36 V
Prúd nabíjania: 3,6 A
Doba nabíjania: cca. 60 min
Trieda ochrany:
II /
Emisie hluku:
Hluk je meraný podľa EN 60335. A - vážená
hladina hluku výrobku je typická:
Hladina akustického
: 81,0 dB(A)
tlaku L
pA
Neistota K
Úroveň akustického
výkonu L
Neistota K
Zaručená úroveň
akustického výkonu L
: 3 dB
pA
: 94,3 dB(A)
WA
: 1,81 dB
WA
WA
:
96 dB(A)
(podľa 2000/14/ES zmenená z 2005/88/ES)
VAROVANIE!
Noste ochranu sluchu!
Hodnoty vibrácií:
Vektorový súčet troch smerov stanovený podľa
EN 60335:
Vibrácie ruky a paže a
: 2,81 m/s
h
Neistota K: 1,5 m/s
2
2
VAROVANIE!
u Hodnota emisie vibrácií sa mení v závislosti
od použitia elektrického náradia a môže byť
v niektorých prípadoch vyššia ako hodnota
uvedená v tomto návode. Pri pravidelnom
používaní elektrického náradia týmto
spôsobom hrozí nebezpečenstvo podcenenia
zaťaženia vibráciami. Pokúste sa udržiavať
úroveň vibrácii čo najnižšie. Opatrenia za
účelom zníženia zaťaženia vibráciami sú
napr. nosenie rukavíc pri používaní náradia
a obmedzenie doby používania. Pritom je
treba zohľadniť všetky doby prevádzky (napr.
doby, počas ktorých je elektrické náradie
vypnuté a doby, keď náradie síce beží, ale v
skutočnosti je bez zaťaženia).
POKYN
u V tomto návode uvedená hodnota
emisie vibrácií bola zistená v súlade so
štandardizovaným testom uvedeným v
európskej smernici EN 60335 a je ju možné
použiť na porovnanie s iným náradím.
Udávanú hodnotu vibrácií je možné tiež
používať na predbežný odhad zaťaženia.
77 SK
Page 76

Bezpečnostné pokyny
VAROVANIE! NEBEZPEČENSTVO
ÚRAZU ELEKTRICKÝM PRÚDOM!
Chráňte elektrické časti pred vlhkosťou.
Nikdy ich neponárajte do vody alebo
iných kvapalín, aby ste predišli úrazu
elektrickým prúdom. Nikdy nedržte
zariadenie pod tečúcu vodou. Postupujte
podľa pokynov na čistenie a údržbu.
Nepoužívajte zariadenie s mokrými
rukami alebo na mokrej zemi. Nikdy sa
nedotýkajte sieťovej zástrčky mokrými
alebo vlhkými rukami.
POKYN
Zariadenia označené týmto symbolom
vyhovujú triede ochrany II. To znamená,
že výrobok je vybavený zosilnenou
alebo dvojitou izoláciou medzi sieťovým
obvodom a výstupným napätím alebo
kovovým telesom.
Zariadenia s týmto symbolom vyhovujú
triede ochrany III. To znamená, že
výrobok je dodávaný s ochranným veľmi
nízkym napätím (SELV). Za normálnych
okolností môže osoba prísť bezpečne
do kontaktu s ním bez rizika úrazu
elektrickým prúdom.
Q Návod pre bezpečné
použitie elektrickej
kosačky na trávu
DÔLEŽITÉ POZORNE SI
PREČÍTAJTE NÁVOD NA
POUŽITIE.
ULOŽTE NÁVOD
NA POUŽITIE
PRE DODATOČNÉ
NAHLIADNUTIE.
78 SK
1. Deti nesmú tento výrobok
používať.
2. Deti by mali byť pod
dohľadom, aby sa s týmto
výrobkom nehrali.
3. Čistenie a údržbu deti
nesmú vykonávať .
4. Tento výrobok môžu
používať osoby so
zníženými fyzickými,
zmyslovými alebo
duševnými schopnosťami
alebo nedostatkom
skúseností a vedomostí, ak
boli pod dozorom alebo
boli poučení o bezpečnom
používaní výrobku
a porozumeli z toho
vyplývajúcim rizikám.
Zácvik
1. Pozorne si prečítajte pokyny.
Oboznámte sa s ovládacími
prvkami a správnym
používaním výrobku.
2. Nikdy nedovoľte deťom
alebo iným osobám, ktoré
nepoznajú návod na
použitie, aby používali
výrobok. Miestne predpisy
môžu stanoviť minimálny
vek používateľa.
3. Nikdy koste, pokiaľ sú ľudia,
najmä deti alebo zvieratá v
blízkosti.
Page 77

4. Pamätajte si, že
prevádzkovateľ alebo užívateľ
zodpovedá za nehody s inými
osobami alebo poškodenia
ich majetku.
Prípravné opatrenia
1. Pri manipulácii s výrobkom
vždy noste pevnú obuv a
dlhé nohavice. Nepoužívajte
produkt naboso alebo
v ľahkých sandáloch.
Nepoužívajte voľné
oblečenie alebo oblečenie
s visiacimi šnúrkami alebo
pásmi.
2. Skontrolujte oblasť, kde sa
výrobok používa, a odstráňte
všetky predmety, ktoré môžu
byť zachytené výrobkom a
vystrelené.
3. Pred použitím vždy
vizuálne skontrolujte, či sú
nože, montážne skrutky
a celá rezná jednotka
opotrebované alebo
poškodené. Opotrebované
alebo poškodené rezné
nože a upevňovacie skrutky
môžu byť vymenené len v
súpravách, aby nedošlo k
nerovnováhe. Opotrebované
alebo poškodené informačné
tabuľky musia byť vymenené.
Manipulácia
1. Koste len za denného svetla
alebo pri dobrom umelom
osvetlení.
2. Ak je to možné, vyhnite sa
použitiu výrobku na mokrej
tráve.
3. Vždy dávajte pozor na
dobrý postoj na svahoch.
4. Výrobok tlačte iba krokom.
5. Koste krížom cez svah, nikdy
nie hore alebo dolu.
6. Buďte zvlášť opatrní pri
zmene smeru jazdy na svahu.
7. Nekoste nadmerne strmé
svahy.
8. Buďte obzvlášť opatrní
pri otáčaní alebo ťahaní
výrobku smerom k sebe.
9. Zastavte rezný nôž (-e), keď
sa výrobok bude musieť
naklápať na prepravu cez
iné plochy ako je tráva a pri
presúvaní výrobku z a na
povrch kosenej plochy.
10. Nikdy nepoužívajte
výrobok s poškodenými
ochrannými krytmi alebo
ochrannými mriežkami
alebo bez zabudovaných
bezpečnostných zariadení,
napr. usmerňovače a /
alebo zariadenia na
zachytávanie trávy.
79 SK
Page 78

11. Spúšťajte alebo používajte
štartovací spínač opatrne
podľa pokynov výrobcu.
Uistite sa, že nohy sú v
dostatočnej vzdialenosti od
rezného noža (nožov).
12. Pri štartovaní alebo
spúšťaní motora výrobok
nenakláňajte, iba ak
výrobok musí byť v priebehu
procesu zdvíhaný. V takom
prípade ho nakloňte len tak,
ako je to bezpodmienečne
nevyhnutné, a zdvihnite
len stranu odvrátenú od
užívateľa.
13. Motor neštartujte, keď stojíte
pred výtokovým kanálom.
14. Nikdy nedávajte ruky ani
nohy na rotujúce časti alebo
pod nich. Vždy sa držte
ďalej od vypúšťacieho
otvoru.
15. Výrobok nikdy nezdvíhajte
ani neprepravujte s
bežiacim motorom.
16. Zastavte motor a vytiahnite
štartovací kľúč. Uistite sa,
že sa všetky pohyblivé časti
úplne zastavia:
¢ kedykoľvek zanecháte
výrobok;
¢ pred uvoľnením blokovaní
alebo odstránením prekážok
vo výtokovom kanáli;
¢ pred kontrolou, čistením
alebo prácou na výrobku;
¢ ak bol zasiahnutý cudzí
predmet. Pred opätovným
spustením a prácou s
výrobkom skontrolujte
poškodenie výrobku a
vykonajte potrebné opravy.
Ak výrobok začne neobvykle
silno vibrovať, vyžaduje sa
okamžitá kontrola:
¢ skontrolujte poškodenia;
¢ vykonajte potrebné opravy
poškodených častí;
¢ uistite sa, že sú všetky
matice, kolíky a skrutky
utiahnuté.
Údržba a skladovanie
1. Uistite sa, že sú všetky
matice, kolíky a skrutky
utiahnuté a výrobok je v
bezpečnom prevádzkovom
stave.
2. Pravidelne kontrolujte
zachytávač trávy kvôli
opotrebovaniu alebo strate
funkčnosti.
3. Všimnite si, že pri výrobkoch
s viacerými nožmi môže
pohyb jedného noža
spôsobiť otáčanie ostatných
nožov.
80 SK
Page 79

4. Pri nastavovaní výrobku
dávajte pozor na to, aby
sa vám prsty nezovreli
medzi pohyblivými nožmi
a stacionárnymi časťami
výrobku.
5. Pred odložením výrobku
motor nechajte vychladnúť.
6. Pri údržbe nožov dávajte
pozor na to, že aj keď je
zdroj napätia vypnutý,
môžu sa nože pohybovať.
7. Z bezpečnostných dôvodov
nahraďte opotrebované
alebo poškodené časti.
Používajte iba originálne
náhradné diely a
príslušenstvo.
Q Zníženie vibrácií a hluku
Na zníženie vibrácií a hluku obmedzte dobu
používania, používajte režimy prevádzky s menšou
intenzitou hluku a vibrácií a tiež noste osobné
ochranné prostriedky.
Na zníženie nebezpečenstva v súvislosti s
vibráciami a hlukom pomáhajú nasledovné
opatrenia:
¢ Používajte náradie iba podľa jeho účelu
použitia a príslušných pokynov.
¢ Dbajte na to, aby bolo náradie vždy v
bezchybnom stave a dobre udržiavané.
¢ Používajte správne nástroje určené pre
toto náradie a dbajte na to, aby boli v
bezchybnom stave.
¢ Výrobok držte pevne za držadlá.
¢ Starajte sa o výrobok podľa pokynov a
zabezpečte dostatočné namazanie (ak je to
potrebné).
¢ Naplánujte si prácu s náradím s vysokými
vibráciami tak, aby bola rozdelená na dlhšiu
dobu.
Q Správanie v núdzovom
prípade
Na základe tohto návodu na obsluhu sa
oboznámte s používaním tohto výrobku.
Dobre si zapamätajte bezpečnostné pokyny a
bezpodmienečne ich dodržiavajte. Pomôže to
predchádzať možným rizikám a nebezpečenstvu.
¢ Buďte pri používaní tohto náradia vždy
pozorný, aby ste nebezpečenstvo včas
spozorovali a dokázali mu čeliť. Rýchlym
konaním môžete predísť ťažkým zraneniam a
škodám.
¢ V prípade poruchy výrobok ihneď vypnite
a vytiahnite akumulátor. Pred opätovným
používaním ho nechajte skontrolovať a
prípade opraviť kvalifikovaným odborníkom.
Q Zvyškové riziko
Aj v prípade správneho používania tohto výrobku
hrozí možné nebezpečenstvo zranení a vecných
škôd. Vzhľadom na konštrukciu a prevedenie tohto
náradia môžu vzniknúť okrem iného nasledovné
nebezpečenstvá:
¢ V prípade používania výrobku dlhšiu dobu,
nesprávneho vedenia a údržby poškodenie
zdravia, ktoré vyplýva z emisie vibrácií.
¢ Zranenia a vecné škody kvôli chybným
rezným nástrojom alebo náhlemu odhodeniu
skrytých telies počas používania.
¢ Nebezpečenstvo zranenia a vecných škôd
spôsobených odletujúcimi telesami.
VAROVANIE!
u Toto náradie vytvára počas prevádzky
elektromagnetické pole! Toto pole môže za
určitých okolností ovplyvňovať aktívne alebo
pasívne lekárske implantáty! Aby ste znížili
nebezpečenstvo vážnych alebo smrteľných
zranení, odporúčame osobám s lekárskymi
implantátmi, aby sa pred používaním
náradia obrátili na svojho lekára a výrobcu
lekárskeho implantátu!
81 SK
Page 80

Q Bezpečnostné pokyny
45
pre nabíjačky
POZOR! NEBEZPEČENSTVO
VÝBUCHU!
Nikdy nenabíjajte nenabíjateľné
batérie! Chráňte akumulátor pred
45
teplom, napr. tiež pred trvalým
slnečným žiarením, ohňom, vodou a
vlhkosťou. Existuje nebezpečenstvo
výbuchu.
¢ Tento výrobok smú používať
deti od 8 rokov alebo
osoby s obmedzenými
fyzickými, zmyslovými alebo
duševnými schopnosťami
alebo s nedostatkom
skúseností alebo vedomostí
s používaním výrobku, iba
ak by boli pod dohľadom
alebo dostali pokyny, ako
výrobok bezpečne používať
a porozumeli z toho plynúcim
nebezpečenstvám.
¢ Deti sa nesmú s náradím hrať.
¢ Čistenie a užívateľskú údržbu
nesmú vykonávať deti bez
dohľadu.
¢ Nenabíjajte nenabíjateľné
batérie. Nedodržiavanie
tohto pokynu môže viesť k
nebezpečenstvu.
¢ Ak je poškodený prívodný
kábel, musí ho vymeniť
výrobca alebo podobne
kvalifikovaná osoba, aby sa
predišlo nebezpečenstvu!
¢ Chráňte elektrické časti pred
vlhkosťou. Neponárajte ich
nikdy do vody alebo iných
tekutín, aby ste predišli
nebezpečenstvu úrazu
elektrickým prúdom. Výrobok
nikdy nedržte pod tečúcou
vodou. Dbajte na pokyny
ohľadom čistenia, údržby a
opravy.
¢ Výrobok je určený iba na
použitie v interiéri.
¢ Táto nabíjačka je určená
iba na nabíjanie akumulátora
nasledujúceho typu:
FAP 40 A1.
Q Pred prvým použitím
Q Vybalenie
POZOR! NEBEZPEČENSTVO ÚRAZU!
Obalový materiál nie je hračka. Deti by
sa nemali hrať s obalovým materiálom,
inak riskujú prehltnutie alebo udusenie!
Odstráňte všetky obalové materiály a
prepravné zaistenia.
1. Vybaľte všetky diely a položte ich na plochý,
stabilný povrch.
2. Odstráňte obalový materiál, ako aj obalové a
prepravné poistky (ak sú k dispozícii).
82 SK
Page 81

3. Skontrolujte, či je rozsah dodávky úplný a
bez akéhokoľvek poškodenia. Pri chýbajúcich
alebo poškodených dieloch výrobok
nepoužívajte a obráťte sa na predajcu,
u ktorého ste zakúpili tento výrobok.
Nepoužívajte výrobok až do momentu,
kým nebudú dodatočne dodané chýbajúce
diely alebo nebudú vymenené chybné diely.
Používanie neúplného alebo poškodeného
náradia môže viesť k zraneniam a škodám.
4. Uistite sa, že je k dispozícii všetko
príslušenstvo a nástroje potrebné na uvedenie
do prevádzky a používanie. Zahŕňa to
vhodné osobné ochranné prostriedky.
Q Príslušenstvo
Pre bezpečné a správne používanie tohto výrobku
je potrebné okrem iného nasledujúce príslušenstvo,
ako napríklad: nástroje a aplikačné nástroje:
o Vhodné osobné ochranné prostriedky,
príslušenstvo a náradie sú k dispozícii u
odborných predajcov.
Pri nákupe vždy dodržiavajte technické
požiadavky tohto výrobku (viď. “Technické
údaje”).
V prípade neistoty sa obráťte na kvalifikovaného
odborníka a poraďte sa so svojím odborným
predajcom.
POKYN
u V tomto návode na obsluhu nájdete
informácie a upozornenia o rôznych
aplikačných nástrojoch a oblastiach ich
použitia. Uvedené aplikačné nástroje nie sú
nevyhnutne zahrnuté do rozsahu dodávky,
ale skôr poukazujú na možné použitie tohto
výrobku.
Q Montáž
Pripevnenie spodného držadla
1. Vyklopte spodné držadlo
3
nahor do
pohodlnej polohy a nechajte ozubené vence
bezpečne zapadnúť do seba (viď. obrázok
D). Zdvihnite obe spodné držadlá
3
do
rovnakej výšky.
2. Otočte páčku
10b
v smere hodinových
ručičiek, aby ste pripojenie utiahli, ale úplne
nezatiahli.
3. Sklopte páčku
10b
nadol, aby ste zaistili
spojenie. Ak to vyžaduje príliš veľkú silu
alebo to nie je možné, uvoľnite trochu
10b
páčku
jej otočením proti smeru
hodinových ručičiek.
4. Zopakujte kroky 1 - 3 na druhej strane.
Pripevnenie horného držadla
1. Zarovnajte otvorený koniec horného
držadla
2
k spodnému držadlu
3
a
zasuňte ho dole tak, aby boli otvory zhodné v
oboch častiach a držte ho v tejto polohe (viď.
obr. E).
2. Vystrčte skrutku
13a
zo stredu výrobku cez
otvory von a držte ju v tejto polohe.
3. Zasuňte podložku
na skrutku
zodpovedať hornému držadlu
4. Zaskrutkujte páčku
5. Otočte páčku
13b
plochou stranou von
13a
. Žľab podložky
13c
13c
v smere hodinových
13b
2
na skrutku
by mal
.
13a
ručičiek, aby ste utiahli spojenie, ale
nedotiahnite ju úplne.
6. Sklopte dole páčku
13c
na zaistenie spojenia.
Ak to vyžaduje príliš veľkú silu alebo to
nie je možné, uvoľnite trochu páčku
13c
otočením proti smeru hodinových ručičiek.
7. Zopakujte kroky 1 - 6 na druhej strane.
Zabezpečenie riadiaceho kábla
1. Použite káblovú svorku
14
kábel
cez otvorenú stranu dovnútra (viď.
12
a vložte riadiaci
obr. F).
2. Zaklapnite káblovú svorku
14
káblom
na spodnom držadle
12
s ovládacím
3
.
jej
.
83 SK
Page 82

Q Pred použitím
Q Nabíjanie akumulátora
POKYN
u Akumulátor
nabitím. Dobite akumulátor
17
je dodávaný s nepatrným
17
pred použitím
v ideálnom prípade po dobu 60 minút.
u Pred vybratím alebo zasunutím
akumulátora
zástrčku
u Nikdy nenabíjajte akumulátor
17
do nabíjačky vždy vytiahnite
18a
nabíjačky 18 zo siete.
17
, ak je
okolitá teplota nižšia ako 10 ° C alebo vyššia
ako 40 °C.
u Ušetrite nabíjačku
18
najmenej po dobu
15 minút medzi vzájomne nasledujúcimi
nabíjaniami.
u Ak nie je v nabíjačke
akumulátor
17
napájania, indikátor stavu nabitia
18
a tá je pripojená k zdroju
vložený žiadny
18d
na zeleno.
1. Zarovnajte akumulátor
nabíjačky
18
a zatlačte ho dovnútra. Uistite
17
s lištami
sa, že zapadne na miesto.
2. Pripojte sieťovú zástrčku
18a
nabíjačky
zdroju napájania. Kontrolka stavu
18c
nabitia
svieti na červeno. Nepretržite
svietiaci zelený indikátor nabíjania
signalizuje dokončenie nabíjania.
3. Odpojte zástrčku
18a
nabíjačky
18
zdroja napájania a vyberte akumulátor
nabíjačky.
4. Vložte akumulátor
17
do výrobku (viď
“Vloženie / vybratie akumulátora”).
LED stav nabíjania
Zelená LED dióda
bliká bez akumulátora
Zelená LED dióda
svieti s akumulátorom
Červená LED dióda
Nabíjačka je
pripravená
Akumulátor je úplne
nabitý
Akumulátor sa nabíja
svieti s akumulátorom
18d
od
bliká
18
17
Červená a zelená LED
diódy blikajú
Červená a zelená LED
diódy svietia nepretržite
Q Kontrola stavu nabitia
akumulátora
o Pre kontrolu úrovne nabitia akumulátor stlačte
tlačidlo Stav nabíjania
akumulátora
nabíjania
4 zelené LED diódy
svietia nepretržite
3 zelené LED diódy
svietia nepretržite
2 zelené LED diódy
svietia nepretržite
1 zelená LED dióda svieti
nepretržite
1 zelená LED dióda bliká Nízka úroveň nabitia
o Pred použitím nabite akumulátor
úroveň nabitia 25% alebo nízku.
Q Bezpečnostný kľúč
Tento výrobok je vybavený bezpečnostným
kľúčom
k
použitiu. Na ovládanie výrobku musí byť
, ktorý zabraňuje jeho neoprávnenému
7c
bezpečnostný kľúč
bezpečnostný kľúč
Vloženie bezpečnostného kľúča
1. Otvorte kryt priestoru pre batérie
z
(viď. obr. G).
2. Stlačte tlačidlo na bezpečnostnom kľúči
a vložte ho do otvoru pre bezpečnostný
7b
kľúč
miesto. Nemalo by byť možné odstrániť
bezpečnostný kľúč
tlačidla.
Vytiahnutie bezpečnostného kľúča
1. Stlačte tlačidlo bezpečnostného kľúča
a vytiahnite ho z otvoru pre bezpečnostný
7b
kľúč
17
sa zobrazí na displeji stavu
.
17b
7c
vložený do otvoru pre
.
7b
. Uistite sa, že zapadne na
7c
.
Akumulátor je chybný
Akumulátor je príliš
chladný alebo teplý
17c
. Stav nabíjania
100% úroveň nabitia
75% úroveň nabitia
50% úroveň nabitia
25% úroveň nabitia
17
, ak má
7
bez stlačenia jeho
7c
7c
84 SK
Page 83

Q Vloženie / vybratie
akumulátoru
Vloženie akumulátoru:
1. Otvorte kryt priestoru na batérie
(viď. obr. G).
2. Zarovnajte akumulátor
17
akumulátora a zasuňte ho. Uistite sa, že
zapadne na miesto.
Vybratie akumulátoru:
1. Otvorte kryt priestoru pre batérie
(viď. obr. G).
2. Stlačte uvoľňovacie tlačidlo
vyberte z držiaka akumulátora.
Q Obsluha
Q Zberač trávy
Tento výrobok je možné používať so zberačom
11
trávy
, ktorý zbiera pokosenú trávu, aby
sa ľahko likvidovala. Ak sa zberač nepoužije,
pokosená tráva sa vysunie cez zadný vypúšťací
otvor.
Ak chcete otvoriť zadný vypúšťací otvor, musíte
odstrániť mulčovaciu zástrčku
19
1. Jednou rukou vytiahnite vysúvací kryt
vyberte mulčovaciu zástrčku
Pripevnenie držadla k zberaču trávy
1. Pripevnite predný koniec držadla
drážke zberača trávy
11
(viď. obr. H).
2. Hák na prednom konci rukoväte
mal zasunúť do krytu zberača trávy
Pripevnite zadný koniec rukoväte
zadnému otvoru zberača trávy
3. Na rukoväť
11a
mierne zatlačte, až kým hák
na zadnom konci rukoväte nezapadne na kryt
zberača trávy
11
.
POKYN
u Na zberač trávy
11
je pripevnená tkanina.
7
s lištami držiaka
7
17a
a batériu
.
19
4
.
11a
k
11a
by sa
11
.
k
11a
.
11
a
Pripojenie zberača trávy
1. Jednou rukou zdvihnite a podržte vysúvací
4
kryt
(viď. obr. I).
2. Držte zberač trávy
11
pomocou rukoväte
a zaveste ho s jeho držiakmi na háčiky na
9
telese
3. Spustite vysúvací kryt
.
4
.
Odobratie zberača trávy
1. Jednou rukou zdvihnite a podržte vysúvací
4
kryt
2. Uchopte zberač trávy
17
vytiahnite ho z háčikov na telese
3. Spustite vysúvací kryt
(viď. obr. I).
11
za rukoväť
4
.
Vyprázdňovanie zberača trávy
Pri prevádzke sledujte klapku indikátora úrovne
naplnenia
11b
na zberači trávy
11
mala byť otvorená prietokom vzduchu zberača
trávy
, ak je zaručená kapacita. Uzavretá
11
klapka označuje plný zberač trávy
pokračovaním v práci musí byť vyprázdnený.
1. Odstráňte zberač trávy
(viď “Odobratie
11
zberača trávy”).
2. Pokosenú trávu zlikvidujte otvorenou stranou
zberača trávy
Q Mulčovacia zástrčka
podľa miestnych predpisov.
11
Tento výrobok je možné použiť s mulčovacou
zástrčkou
19
na mulčovanie trávy. Mulčovacia
zástrčka blokuje zadný vypúšťací otvor. Pokosená
tráva sa niekoľkokrát rozseká na malé časti.
Nasekaná tráva sa ponechá na trávniku, kde
čoskoro zhnije a zaujme funkciu hnojiva.
Pripojenie mulčovacej zástrčky
1. Zdvihnite vysúvací kryt
mulčovaciu zástrčku
19
4
a vložte
.
Odstránenie mulčovacej zástrčky
1. Zdvihnite vysúvací kryt
mulčovaciu zástrčku
4
.
19
a vyberte
9
.
. Klapka by
a pred
11
11a
a
11a
85 SK
Page 84

Q Nastavenie výšky kosenia
Tento výrobok má 6 možností nastavenia jednej z
nižšie uvedených výšok kosenia.
Nastavenie
Výška kosenia
(cca) v mm
75
65
55
45
Q Kosenie
VAROVANIE! NEBEZPEČENSTVO
ÚRAZU! !
u Ak výrobok zasiahne cudzí predmet,
vypnite motor! Vypnite zariadenie, vyberte
akumulátor, vyberte bezpečnostný kľúč a
nechajte ho vychladnúť. Výrobok dôkladne
preverte, či nie je poškodený. Predtým,
než budete pokračovať, nechajte opraviť
akékoľvek poškodenie!
u Nadmerné vibrácie výrobku počas
prevádzky naznačujú poškodenie! Vypnite
motor. Výrobok by mal byť okamžite
preskúšaný a opravený!
35
25
1. Uvoľnite páčku nastavenia výšky kosenia
tak, že ju vysuniete bokom von zo zárezu
aktuálneho nastavenia (viď. obr. J).
2. Páčku nastavenia výšky kosenia
posuňte
6
smerom dozadu alebo dopredu smerom k
zárezu pre nastavenie požadovanej výšky
kosenia.
3. Uzamknite páčku nastavenia výšky
kosenia
6
tak, že ju zasuniete bokom do
zárezu pre požadované nastavenie výšky
kosenia.
Q Zapnutie a vypnutie
Zapnutie:
1. Stlačte a podržte zámku vypínača
(viď. obr. K).
2. Pre zapnutie stlačte vypínač
rukoväti
Vypnutie:
1. Uvoľnite vypínač
1
. Uvoľnite zámku vypínača
16
pre vypnutie.
16
smerom k
15
VAROVANIE!
u V niektorých krajinách existujú ustanovenia,
v ktoré denné časy a špeciálne dni môže byť
výrobok použitý a aké existujú obmedzenia!
6
Požiadajte o podrobné informácie vo svojej
obci a postupujte podľa týchto pokynov,
aby ste udržali pokoj v susedstve a zabránili
spáchaniu priestupku!
o Uistite sa, že trávnik neobsahuje kamene,
vetvy, drôty alebo iné predmety, ktoré by
mohli poškodiť výrobok alebo jeho motor.
o Nekoste mokrú trávu, pretože sa naklonená
prilepí k podvozku výrobku, čo môže brániť
správnemu koseniu trávy a môže tiež spôsobiť
pošmyknutie a pád.
o Nikdy nekoste viac ako tretinu celkovej výšky
trávy pre jeden zdravý trávnik. Na jeseň by
trávniky mali byť kosené len tak dlho, ako tam
existuje rast.
o Pomaly posúvajte výrobok dopredu.
o Koste v mierne sa prekrývajúcich pásoch.
15
.
Najefektívnejší režim kosenia zodpovedá
priamemu smeru pozdĺž jednej strany.
To má za následok rovnomerné pruhy a
zabezpečuje, že trávnik je kosený bez
preskakovania miesta.
o Krúžte okolo kvetinového záhonu. Keď sa
dostanete do kvetinového záhonu v trávniku,
koste jeden alebo dva chodníky po obvode
záhonu.
o Pri zmene smeru buďte obzvlášť opatrní.
o Vyprázdnite zberač trávy
pravidelne.
11
86 SK
Page 85

o Výrobok ihneď vypnite, ak vás vyrušia iní
ľudia, ktorí vstúpia do pracovného priestoru
počas práce. Pred obrátením zariadenia vždy
nechajte výrobok úplne zastaviť.
o Neprepracujte sa. Robte pravidelné
prestávky, aby ste sa ubezpečili, že sa môžete
sústrediť na prácu a mať úplnú kontrolu nad
výrobkom.
Q Po použití
1. Vypnite zariadenie, vyberte batériu
odstráňte bezpečnostný kľúč
17
7c
a nechajte
,
ho prípadne vychladnúť.
2. Výrobok skontrolujte, vyčistite a uložte (viď.
“Čistenie a údržba”).
Q Čistenie a starostlivosť
VAROVANIE!
Pred vykonaním kontroly, údržby alebo
čistenia vypnite zariadenie, vyberte
batériu, odstráňte bezpečnostný kľúč a
nechajte produkt vychladnúť!
POZOR! NEBEZPEČENSTVO ÚRAZU!
Rezný nôž je ostrý! Pri vykonávaní
inšpekčných, údržbárskych alebo
čistiacich prác noste vždy ochranné
rukavice!
Q Čistenie
o Výrobok musí byť stále čistý, suchý a
bez mastnoty. Po každom použití a pred
uskladnením z neho odstráňte znečistenie.
o Pravidelné a správne čistenie pomôže
zabezpečiť bezpečné používanie a predĺži
životnosť náradia.
o Pred každým použitím skontrolujte výrobok na
opotrebené a poškodené diely. Nepoužívajte
ho, ak zistíte prasknuté alebo opotrebované
diely.
o Zabráňte, aby sa do výrobku dostala tekutina.
o Náradie čistite suchou utierkou. Na ťažko
dostupné miesta použite kefku.
POKYN
u Na čistenie tohto náradia nepoužívajte
chemické, alkalické, drsné alebo iné agresívne
čistiace alebo dezinfekčné prostriedky,
pretože by mohli poškodiť povrch.
Q Údržba
Pred a po každom použití skontrolujte výrobok a
príslušenstvo (alebo nadstavce) na opotrebenie
a poškodenie. V prípade potreby ich vymeňte za
nové, ako je uvedené v tomto návode na obsluhu.
Dodržiavajte technické požiadavky (pozri časť
„Technické údaje“).
Q Opravy
Tento výrobok neobsahuje žiadne diely, ktoré by
boli opraviteľné používateľom. Obráťte sa za
účelom kontroly a opravy na autorizovaný servis
alebo podobne kvalifikovaného odborníka.
Q Skladovanie
o Vypnite výrobok a vyberte akumulátor
odstráňte bezpečnostný kľúč
o Očistite výrobok podľa popisu (viď.
7c
17
.
,
“Čistenie”).
o Výrobok a jeho príslušenstvo skladujte na
tmavom, suchom, nemrazivom a dobre
vetranom mieste.
o Výrobok vždy uložte na miesto, ktoré nie je
pre deti prístupné. Optimálna skladovacia
teplota je medzi 10 ° C a 30 ˚C.
o Odporúčame výrobok pri skladovaní zakryť
vhodnou handričkou proti prachu.
o Pravidelne kontrolujte stav nabitia akumulátora,
ak sa má skladovať dlhšie. Optimálne
skladovacie prostredie je chladné a suché.
Optimálna úroveň nabitia je približne 50%.
Q Transport
POZOR! NEBEZPEČENSTVO ÚRAZU!
Musí sa dvíhať dvoma osobami.
o Vypnite výrobok a vyberte akumulátor
odstráňte bezpečnostný kľúč
o Pripevnite prepravné ochranné prostriedky, ak
7c
17
.
,
sú k dispozícii.
o Ak je zdvíhanie nevyhnutné, noste výrobok
v pároch. Výrobok by sa mal zdvihnúť iba
pomocou držadla
a predného konca. Pri
5
nosení výrobku používajte ochranné rukavice,
aby sa zabránilo neúmyselnému kontaktu s
nožom.
87 SK
Page 86

o Výrobok vždy posúvajte za rukoväť.
o Výrobok chráňte pred otrasmi a silnými
vibráciami, ku ktorým dochádza najmä pri
preprave vo vozidlách.
o Zaistite výrobok proti skĺznutiu a preklopeniu.
Q Odstraňovanie porúch
VAROVANIE!
u Vykonávajte iba také práce, ktoré sú uvedené
v tomto návode na obsluhu! Každá ďalšia
kontrola, údržba alebo oprava musí byť
vykonaná autorizovaným zákazníckym
servisom alebo podobne kvalifikovaným
odborníkom!
Zdanlivé chyby, poruchy alebo poškodenia majú
často príčinu, ktorú môže odstrániť sám používateľ.
Skontrolujte preto náradie pred kontaktovaním
odborníka na základe nižšie uvedenej tabuľky.
Vo väčšine prípadov je možné poruchu rýchlo
odstrániť.
Problém Možná príčina Riešenie
Výrobok
nenaštartuje
Výrobok
nedosahuje plný
výkon
Akumulátor nie je nainštalovaný správne
Vybitý akumulátor Vyberte akumulátor
Akumulátor je
poškodený
Bezpečnostný kľúč je
vytiahnutý
Iné elektrická chyba
na výrobku
Upchatie Vypnite zariadenie,
Kapacita batérie je
príliš nízka
Správna inštalácia
a nabite ho
Dajte ho skontrolovať
odborníkovi
Zastrčte bezpečnost-
ný kľúč
Dajte ho skontrolovať
odborníkovi
vyberte batériu a vyberte bezpečnostný
kľúč. Pod výrobkom
skontrolujte či je
upchatý a ak je to
potrebné, vyčistite
ho (vždy používajte
ochranné rukavice).
Odstráňte a nabite
akumulátor
Problém Možná príčina Riešenie
Neuspokojivé
výsledky
Výrobok
náhle
zastaví
Nadmerné
vibrácie a
hluk
Q Odstránenie
Rezný nástroj je
opotrebovaný/
poškodený
Rezný materiál
prekračuje výkon
Výška kosenia je
nesprávna
Preťaženie výrobku Nastavte výšku
Vybitý akumulátor Vyberte akumulátor
Akku-Pack zu heiß Vyberte akumulátor
Rezný nástroj je tupý
alebo poškodený
Skrutky / matice
uvoľnené
Dajte ho vymeniť
za nový len v
autorizovaných
servisných
strediskách
Koste len materiály
podľa výkonu
výrobku
Nastavte výšku
kosenia
kosenia
a nabite ho
a nechajte ho
vychladnúť
Dajte vymeniť za
nový
Zatiahnite skrutky /
matice
Obal pozostáva z ekologických materiálov, ktoré
môžete odovzdať na miestnych recyklačných zberných miestach.
Všímajte si prosím označenie obalových materiálov pre triedenie od- padu,
sú označené skratkami (a) a číslami (b) s
nasledujúcim význa- mom: 1–7: Plasty /
20–22: Papier a kartón / 80–98:
Spojené látky.
Výrobok a obalové materiály sú
recyklovateľné, zlikvidujte ich od- delene
pre lepšie spracovanie od- padu. TrimanLogo platí iba pre Francúzsko.
O možnostiach likvidácie opotrebovaného výrobku sa môžete in- formovať
na Vašej obecnej alebo mestskej správe.
Ak výrobok doslúžil, v záujme ochrany
životného prostredia ho neodhoďte do
domového odpadu, ale odovzdajte na
odbornú likvi-dáciu. Informácie o zberných
miestach a ich otváracích hodinách získate
na Vašej príslušnej správe.
88 SK
Page 87

Defektné alebo použité batérie musia byť
odovzdané na recykláciu podľa smernice
2006/66/ES a jej zmien. Batérie a/
alebo výrobok odovzdajte prostredníctvom
dostup- ných zberných stredísk.
Škody na životnom prostredí v
dôsledku nesprávnej lik- vidácie
batérií!
Pred odstránením vyberte z výrobku
batérie/akumulátor.
Batérie sa nesmú likvidovať spolu s
domovým odpadom. Môžu obsahovať
jedovaté ťažké kovy a podliehajú
manipulácii ako nebez- pečný odpad.
Chemické značky ťažkých kovov sú
nasledovné:
Cd = kadmium, Hg = ortuť, Pb = olovo.
Spotrebované batérie preto odovzdajte v
komunálnej zberni.
Q Opravy
VAROVANIE!
u Nechajte výrobok opraviť servisom alebo
kvalifikovaným odborníkom a iba za použitia
originálnych náhradných dielov. Zabezpečíte
tak bezpečnosť výrobku.
u Výmenu zástrčky alebo prívodného kábla
nechajte vykonať vždy výrobcom alebo jeho
zákazníckym servisom. Zabezpečíte tak
bezpečnosť výrobku.
Q Záruka
Tento výrobok bol dôkladne vyrobený podľa
prísnych akostných smerníc a pred dodaním
svedomito testovaný. V prípade nedostatkov tohto
výrobku Vám prináležia zákonné práva voči
predajcovi produktu. Tieto zákonné práva nie sú
našou nižšie uvedenou zárukou obmedzené.
Na tento produkt poskytujeme 3-ročnú záruku
od dátumu nákupu. Záručná doba začína plynúť
dátumom kúpy. Starostlivo si prosím uschovajte
originálny pokladničný lístok. Tento doklad je
potrebný ako dôkaz o kúpe.
Ak sa v rámci 3 rokov od dátumu nákupu tohto
výrobku vyskytne chyba materiálu alebo výrobná
chyba, výrobok Vám bezplatne opravíme alebo
vymeníme – podľa nášho výberu. Táto záruka
zaniká, ak bol produkt poškodený, neodborne
používaný alebo neodborne udržiavaný.
Poskytnutie záruky sa vzťahuje na chyby materiálu
a výrobné chyby. Táto záruka sa nevzťahuje na
časti produktu, ktoré sú vystavené normálnemu
opotrebovaniu, a preto ich je možné považovať
za opotrebovateľné diely (napr. batérie) alebo
na poškodenia na rozbitných dieloch, napr.
na spínači, akumulátorových batériach alebo
častiach, ktoré sú zhotovené zo skla.
Záruka na tento akumulátor je 1 rok od dátumu
kúpy.
Postup v prípade poškodenia v záruke
Pre zaručenie rýchleho spracovania Vašej
požiadavky dodržte prosím nasledujúce pokyny:
Pre všetky otázky majte pripravený pokladničný
doklad a číslo výrobku (napr. IAN 123456) ako
dôkaz o kúpe.
Číslo výrobku nájdete na typovom štítku, gravúre,
na prednej strane Vášho návodu (dole vľavo)
alebo ako nálepku na zadnej alebo spodnej
strane.
Ak sa vyskytnú funkčné poruchy alebo iné
nedostatky, najskôr telefonicky alebo e-mailom
kontaktujte následne uvedené servisné oddelenie.
Produkt označený ako defektný potom môžete s
priloženým dokladom o kúpe (pokladničný lístok)
a uvedením, v čom spočíva nedostatok a kedy sa
vyskytol, bezplatne odoslať na Vám oznámenú
adresu servisného pracoviska.
Servis Slovensko
Tel.: 0850 232001
E-pošta: owim@lidl.sk
IAN 292278
89 SK
Page 88

Q Originálne vyhlásenie o zhode
Spoločnosť OWIM GmbH & Co. KG,
Stiftsbergstrasse 1, DE-74167 Neckarsulm,
NEMECKO, na vlastnú zodpovednosť prehlasuje,
že výrobok: Akumulátorová kosačka na trávu
FARM 40-Li A1, model-č.: HG03586, verzia:
02/2018, na ktorú sa vzťahuje toto vyhlásenie,
zodpovedá normám / normatívnym dokumentom
2006/42 / ES, 2014/35/ EÚ, 2014/30/ EÚ,
2011/65/ EÚ, 2000/14 / ES, 2005/88 / ES.
Aplikované harmonizované normy:
EN 60335-1: 2012/A11: 2014
EN 60335-2-77: 2010
EN 60335-2-29: 2004+A2: 2010
EN 62233: 2008
EN 55014-1: 2006/A2: 2011
EN 55014-2: 2015
EN 61000-3-2: 2014
EN 61000-3-3: 2013
EN 50581: 2012
Zusätzlich wird entsprechend der
Geräuschemissionsrichtlinie 2000/14/ES
bestätigt:
Schallleistungspegel
garantiert: 96 dB(A)
gemessen: 94,3 dB(A)
Angewendetes Konformitätsbewertungsverfahren
entsprechend Anhang VI, 2000/14/ES
Riaditeľ divízie / zodpovedný za dokumentáciu
OWIM GmbH & Co. KG, Stiftsbergstraße 1,
DE-74167 Neckarsulm, Nemecko
Neckarsulm, 16.01.2018
Vyhlásenie o zhode nájdete tiež na:
www.owim.com.
Predmet vyhlásenia o zhode uvedený
vyššie zodpovedá ustanoveniam Smernice
2011/65/EÚ Európskeho parlamentu a
Rady z 8. júna 2011 ohľadom limitovaného
používania určitých škodlivých látok použitých v
elektrických a elektronických zariadeniach.
Názov notifikovaného orgánu:
TÜV SÜD Industrie Service GmbH (Notified body:
0036)
Adresa notifikovaného orgánu:
Westendstraße 199, 80686 München, Nemecko
Sériové číslo: IAN 292278
Tobias König
90 SK
Page 89

Inhaltsverzeichnis
Legende der verwendeten Piktogramme .................................................................... Seite 92
Einleitung .................................................................................................................................... Seite 93
Bestimmungsgemäße Verwendung ................................................................................................ Seite 93
Teilebeschreibung .......................................................................................................................... Seite 93
Lieferumfang .................................................................................................................................. Seite 93
Technische Daten ........................................................................................................................... Seite 94
Sicherheitshinweise ................................................................................................................ Seite 95
Angaben zum sicheren Gebrauch für elektrisch betriebene Rasenmäher ...................................... Seite 95
Vibrations- und Geräuschminderung .............................................................................................. Seite 99
Verhalten im Notfall ....................................................................................................................... Seite 99
Restrisiken .......................................................................................................................................Seite 99
Sicherheitshinweise für Ladegeräte ................................................................................................ Seite 99
Vor dem ersten Gebrauch ................................................................................................... Seite 100
Auspacken ..................................................................................................................................... Seite 100
Zubehör ......................................................................................................................................... Seite 101
Montage ........................................................................................................................................ Seite 101
Vor dem Gebrauch ................................................................................................................. Seite 102
Akku-Pack laden ............................................................................................................................. Seite 102
Akku-Ladezustand prüfen ............................................................................................................... Seite 102
Sicherheitsschlüssel ........................................................................................................................ Seite 102
Akku-Pack einsetzen / entnehmen..................................................................................................Seite 103
Bedienung .................................................................................................................................. Seite 103
Grassammler .................................................................................................................................. Seite 103
Mulchstecker .................................................................................................................................. Seite 104
Einstellen der Schnitthöhe .............................................................................................................. Seite 104
Ein- und Ausschalten ...................................................................................................................... Seite 104
Mähen ........................................................................................................................................... Seite 104
Nach dem Gebrauch ..................................................................................................................... Seite 105
Reinigung und Pflege............................................................................................................. Seite 105
Reinigung ....................................................................................................................................... Seite 105
Wartung ......................................................................................................................................... Seite 106
Reparatur ....................................................................................................................................... Seite 106
Lagerung ........................................................................................................................................ Seite 106
Transport ........................................................................................................................................ Seite 106
Störung und Behebung ......................................................................................................... Seite 106
Entsorgung ................................................................................................................................. Seite 107
Service ......................................................................................................................................... Seite 108
Garantie ...................................................................................................................................... Seite 108
Original-Konformitätserklärung....................................................................................... Seite 109
91 DE / AT / CH
Page 90

Legende der verwendeten Piktogramme:
STOP
GO
45
Lesen Sie die Bedienungsanleitung. Tragen Sie Gehörschutz!
Tragen Sie eine Schutzbrille!
Vorsicht / Warnung Tragen Sie Schutzhandschuhe!
Entfernen Sie alle Verpackungsmaterialien
Tragen Sie rutschfeste Sicherheitsschuhe!
und Transportsicherungen.
Verpackungsmaterial ist kein Spielzeug. Nehmen Sie sich vor scharfen Messern in
Acht. Messer drehen sich weiter nachdem
der Motor ausgeschaltet wird. Entnehmen
Sie Einschaltsicherungen vor der Wartung.
Schalten Sie das Produkt aus und
Umstehende Personen fernhalten!
entnehmen Sie den Akku-Pack.
Schützen Sie elektrische Teile vor
Nicht dem Regen aussetzen!
Feuchtigkeit.
Nehmen Sie das Gerät nicht mit feuchten
Händen, oder auf nassem Untergrund
Verletzungsgefahr durch weggeschleuderte
Objekte.
stehend in Betrieb. Fassen Sie den
Netzstecker nie mit nassen oder feuchten
Händen an.
Schutzklasse II Messer drehen sich weiter nachdem der
Motor ausgeschaltet wird.
Wechselstrom
Gleichstrom
Feinsicherung Leerlaufdrehzahl n
T5A
Grassammler voll
Grassammler bereit
0
92 DE / AT / CH
Schützen Sie den Akku-Pack vor Hitze und
dauerhafter, starker Sonneneinstrahlung.
45
Schützen Sie den Akku-Pack vor Wasser
Schnittbreite
Mit zwei Personen heben.
und Feuchtigkeit.
Schützen Sie den Akku-Pack vor Feuer. Nur in trockenen Innenräumen verwenden.
Garantierter Schallleistungspegel in dB
Page 91

AKKU-RASENMÄHER
FARM 40-Li A1
Q Einleitung
Wir beglückwünschen Sie zum Kauf Ihres neuen
Produkts. Sie haben sich damit für ein hochwertiges
Produkt entschieden. Die Bedienungsanleitung ist
Teil dieses Produkts. Sie enthält wichtige Hinweise
für Sicherheit, Gebrauch und Entsorgung. Machen
Sie sich vor der Benutzung des Produkts mit
allen Bedien- und Sicherheitshinweisen vertraut.
Benutzen Sie das Produkt nur wie beschrieben und
für die angegebenen Einsatzbereiche. Händigen
Sie alle Unterlagen bei Weitergabe des Produkts
an Dritte mit aus.
Q Bestimmungsgemäße
Verwendung
Dieser Akku-Rasenmäher (nachfolgend „Produkt“
oder „Elektrowerkzeug” genannt) ist zum Mähen
von Rasen- und Grasflächen im Heimbereich
geeignet.
Das Produkt ist nur von Erwachsenen zu benutzen.
Andere Verwendungen oder Veränderungen
des Produkts gelten als nicht bestimmungsgemäß
und können zu Risiken wie Lebensgefahr,
Verletzungen und Beschädigungen führen. Für aus
bestimmungswidriger Verwendung entstandene
Schäden übernimmt der Hersteller keine Haftung.
Das Produkt ist nicht für den gewerblichen Einsatz
oder für andere Einsatzbereiche bestimmt.
Q Teilebeschreibung
Abbildung A/D/E:
1
Griff
2
Oberer Holm
3
Unterer Holm (x2)
4
Auswurfabdeckung
5
Tragegriff
6
Hebel zur Schnitthöheneinstellung
7
Batteriefachabdeckung
7a
Akku-Pack-Schnittstelle
7b
Sicherheitsschlüsselloch
7c
Sicherheitsschlüssel
8
Rad (x4)
9
Gehäuse
10
Befestigungssatz für unteren Holm (x2)
10a
Unterlegscheibe
10b
Hebel
11
Grassammler
11a
Tragegriff
11b
Klappe der Füllstandsanzeige
12
Kabelclip
13
Befestigungssatz für oberen Holm (x2)
13a
Bolzen
13b
Unterlegscheibe
13c
Hebel
14
Steuerkabel
15
Einschaltsperre
16
Ein- / Ausschalter
bbildun
A
17
g B:
Akku-Pack
17a
Entriegelungstaste
17b
Anzeigen Ladezustand
17c
Taste Ladezustand
Abbildung C:
18
Akku-Schnellladegerät
18a
Netzkabel mit –stecker
18b
Akku-Pack-Schnittstelle
18c
Ladezustands-LED – Rot
18d
Ladezustands-LED – Grün
19
Mulchstecker
Q Lieferumfang
1 Akku-Rasenmäher FARM 40-Li A1
1 Akku-Pack FAP 40 A1
1 Akku-Schnellladegerät FLG 40 A1
1 Grassammler (vormontiert)
1 Befestigungssatz für unteren Holm (vormontiert)
1 Befestigungssatz für oberen Holm
1 Tragegriff für Grassammler
1 Mulchstecker
1 Kabelclip
1 Betriebsanleitung
93 DE / AT / CH
Page 92

Q Technische Daten
AkkuRasenmäher:
Bemessungsspannung: 40 V
Leerlaufdrehzahl n0: 3700 min
FARM 40-Li A1
-1
Schnittbreite: 430 mm
Schnitthöhe: 25/35/45/55/65/75 mm
Grassammlervolumen: 40 l
Abmessungen (H x B x T): (1010 - 1190) x 475 x
(1140 - 1350) mm
Gewicht (inkl. Zubehör): 15,5 kg
Schutzklasse:
III /
Schutzgrad: IPX1
Akku-Pack: FAP 40 A1
Typ: Lithium-Ionen
Bemessungsspannung: 36 V
40 V max.
Kapazität: 2,5 Ah (90 Wh)
Anzahl der Batteriezellen: 10
AkkuSchnellladegerät
FLG 40 A1
Eingang
Bemessungsspannung,
-frequenz:
200 – 240 V~,
50 / 60 Hz
Bemessungsaufnahme: 160 W
Ausgang
Bemessungsspannung: 36 V
Ladestrom: 3,6 A
Ladedauer: ca. 60 min
Schutzklasse:
II /
WARNUNG!
Tragen Sie Gehörschutz!
Schwingungswerte
Vektorsumme dreier Richtungen, ermittelt
entsprechend EN 60335:
Hand- / Armvibration a
Unsicherheit K: 1,5 m/s
: 2,81 m/s
h
2
WARNUNG!
u Der Schwingungspegel wird sich
entsprechend dem Einsatz des
Elektrowerkzeugs verändern und kann
in manchen Fällen über dem in diesen
Anweisungen angegebenen Wert liegen. Die
Schwingungsbelastung könnte unterschätzt
werden, wenn das Elektrowerkzeug
regelmäßig in solcher Weise verwendet
wird. Versuchen Sie, die Belastung durch
Vibrationen so gering wie möglich zu
halten. Beispielhafte Maßnahmen zur
Verringerung der Vibrationsbelastung
sind das Tragen von Handschuhen beim
Gebrauch des Werkzeugs und die
Begrenzung der Arbeitszeit. Dabei sind alle
Anteile des Betriebszyklus zu berücksichtigen
(beispielweise Zeiten, in denen das
Elektrowerkzeug abgeschaltet ist, und solche,
in denen es zwar eingeschaltet ist, aber ohne
Belastung läuft).
2
Geräuschemission
Messwert für Geräusch ermittelt entsprechend
EN 60335. Der A-bewertete Geräuschpegel des
Produkts beträgt typischerweise:
Schalldruckpegel L
Unsicherheit K
Schallleistungspegel L
Unsicherheit K
Garantierter
Schallleistungspegel L
: 81,0 dB(A)
pA
: 3 dB
pA
WA
: 94,3 dB(A)
WA
: 1,81 dB
:
96 dB(A)
WA
(nach 2000/14/EG geändert von 2005/88/EG)
94 DE / AT / CH
HINWEIS
u Der in diesen Anweisungen angegebene
Schwingungspegel ist entsprechend einem
in EN 60335 genormten Messverfahren
gemessen worden und kann für den
Gerätevergleich verwendet werden. Der
angegebene Schwingungsemissionswert
kann auch zu einer einleitenden Einschätzung
der Aussetzung verwendet werden.
Page 93

Sicherheitshinweise
WARNUNG!
STROMSCHLAGGEFAHR!
Schützen Sie elektrische Teile gegen
Feuchtigkeit. Tauchen Sie diese nie in
Wasser oder andere Flüssigkeiten, um
einen elektrischen Schlag zu vermeiden.
Halten Sie das Gerät nie unter
fließendes Wasser. Beachten Sie die
Anweisungen für Reinigung und Pflege.
Nehmen Sie das Gerät nicht mit
feuchten Händen oder auf nassem
Untergrund stehend in Betrieb. Fassen
Sie den Netzstecker nie mit nassen oder
feuchten Händen an.
HINWEIS
Geräte mit diesem Symbol entsprechen
der Schutzklasse II. Dies bedeutet,
dass das Produkt mit einer verstärkten
oder doppelten Isolierung zwischen
Netzstromkreis und Ausgangsspannung
beziehungsweise Metallgehäuse
ausgestattet ist.
Geräte mit diesem Symbol
entsprechen der Schutzklasse III. Dies
bedeutet, das Produkt wird mit einer
Schutzkleinspannung (SELV) versorgt.
Unter normalen Umständen kann eine
Person sicher damit in Kontakt kommen,
ohne die Gefahr eines Stromschlages.
Q Angaben zum sicheren
Gebrauch für elektrisch
betriebene Rasenmäher
WICHTIG LESEN SIE DIE
GEBRAUCHSANWEISUNG
SORGFÄLTIG.
GEBRAUCHSANWEISUNG
ZUM NACHLESEN
AUFBEWAHREN.
1. Dieses Produkt darf nicht von
Kindern benutzt werden.
2. Kinder sollten beaufsichtigt
werden, damit sie nicht mit
dem Produkt spielen.
3. Reinigung und Wartung
darf nicht von Kindern
durchgeführt werden.
4. Dieses Produkt kann von
Personen mit verringerten
physischen, sensorischen
oder mentalen Fähigkeiten
oder Mangel an Erfahrung
und Wissen benutzt werden,
wenn sie beaufsichtigt oder
bezüglich des sicheren
Gebrauchs des Produkts
unterwiesen wurden und
die daraus resultierenden
Gefahren verstehen.
Training
1. Lesen Sie die
Gebrauchsanweisung
sorgfältig. Machen Sie sich
mit den Steilteilen und dem
richtigen Gebrauch des
Produkts vertraut.
2. Erlauben Sie niemals Kindern
oder anderen Personen, die
die Gebrauchsanweisung
nicht kennen, das Produkt
zu benutzen. Örtliche
Bestimmungen können das
Mindestalter des Benutzers
festlegen.
95 DE / AT / CH
Page 94

3. Mähen Sie niemals,
während Personen,
besonders Kinder, oder
Tiere in der Nähe sind.
4. Denken Sie daran, dass
der Maschinenführer oder
der Benutzer für Unfälle
mit anderen Personen
oder deren Eigentum
verantwortlich ist.
Vorbereitende
Maßnahmen
1. Beim Betrieb des Produkts
sind immer festes Schuhwerk
und lange Hosen zu
tragen. Betreiben Sie das
Produkt nicht barfüßig
oder in leichten Sandalen.
Vermeiden Sie das Tragen
loser Kleidung oder
Kleidung mit hängenden
Schnüren oder Gürteln.
2. Überprüfen Sie das
Gelände, auf dem das
Produkt eingesetzt wird,
und entfernen Sie alle
Gegenstände, die von
dem Produkt erfasst und
weggeschleudert werden
können.
3. Vor dem Gebrauch
ist immer durch
Sichtkontrolle zu prüfen,
ob die Schneidmesser,
Befestigungsbolzen und
die gesamte Schneideinheit
abgenutzt oder beschädigt
sind. Abgenutzte oder
beschädigte Schneidmesser
und Befestigungsbolzen
dürfen zur Vermeidung
einer Unwucht nur
satzweise ausgetauscht
werden. Abgenutzte oder
beschädigte Hinweisschilder
müssen ersetzt werden.
Handhabung
1. Mähen Sie nur bei
Tageslicht oder bei guter
künstlicher Beleuchtung.
2. Wenn möglich, ist der
Einsatz des Produkts bei
nassem Gras zu vermeiden.
3. Achten Sie immer auf eine
guten Stand an Hängen.
4. Führen Sie das Produkt nur
im Schritttempo.
5. Mähen Sie quer zum Hang,
niemals auf- oder abwärts.
6. Seien Sie besonders
vorsichtig, wenn Sie die
Fahrtrichtung am Hang
ändern.
96 DE / AT / CH
Page 95

7. Mähen Sie nicht an
übermäßig steilen Hängen.
8. Seien Sie besonders
vorsichtig, wenn Sie das
Produkt umkehren oder ihn
zu sich heranziehen.
9. Halten Sie das (die)
Schneidmesser an, wenn
das Produkt angekippt
werden muss zum Transport
über andere Flächen
als Gras und wenn das
Produkt von und zu der zu
mähenden Fläche bewegt
wird.
10. Benutzen Sie niemals das
Produkt mit beschädigten
Schutzeinrichtungen
oder Schutzgittern
oder ohne angebaute
Schutzeinrichtungen,
z. B. Prallbleche und / oder
Grasfangeinrichtungen.
11. Starten oder betätigen
Sie den Anlassschalter mit
Vorsicht, entsprechend den
Herstelleranweisungen.
Achten Sie auf
ausreichenden Abstand
der Füße zu dem (den)
Schneidmesser(n).
12. Beim Starten oder Anlassen
des Motors darf das Produkt
nicht gekippt werden, es sei
denn, das Produkt muss bei
dem Vorgang angehoben
werden. In diesem Fall
kippen Sie es nur so
weit, wie es unbedingt
erforderlich ist, und heben
Sie nur die vom Benutzer
abgewandte Seite hoch.
13. Starten Sie den Motor
nicht, wenn Sie vor dem
Auswurfkanal stehen.
14. Führen Sie niemals Hände
oder Füße an oder unter
sich drehende Teile. Halten
Sie sich immer entfernt von
der Auswurföffnung.
15. Heben Sie oder tragen Sie
niemals das Produkt mit
laufendem Motor.
16. Stellen Sie den Motor
ab und ziehen Sie
den Startschlüssel ab.
Vergewissern Sie sich, dass
alle sich bewegenden Teile
zum vollständigen Stillstand
gekommen sind:
¢ wann immer Sie das Produkt
verlassen;
¢ bevor Sie Blockierungen
lösen oder Verstopfungen im
Auswurfkanal beseitigen;
97 DE / AT / CH
Page 96

¢ bevor Sie das Produkt
überprüfen, reinigen oder
Arbeiten an ihm durchführen;
¢ wenn ein Fremdkörper
getroffen wurde. Suchen Sie
nach Beschädigungen am
Produkt und führen Sie die
erforderlichen Reparaturen
durch, bevor Sie erneut
starten und mit dem Produkt
arbeiten.
Falls das Produkt anfängt,
ungewöhnlich stark zu vibrieren,
ist eine sofortige Überprüfung
erforderlich:
¢ suchen Sie nach
Beschädigungen;
¢ führen Sie die erforderlichen
Reparaturen beschädigter
Teile durch;
¢ sorgen Sie dafür, dass
alle Muttern, Bolzen und
Schrauben fest angezogen
sind.
Wartung und Lagerung
1. Sorgen Sie dafür, dass
alle Muttern, Bolzen und
Schrauben fest angezogen
sind und das Produkt in einem
sicheren Arbeitszustand ist.
2. Prüfen Sie regelmäßig die
Grasfangeinrichtung auf
Verschleiß oder Verlust der
Funktionsfähigkeit.
3. Achten Sie darauf,
dass bei Produkten mit
mehreren Schneidmessern
die Bewegung eines
Schneidmessers zu
Drehungen der übrigen
Schneidmesser führen kann.
4. Achten Sie beim Einstellen
des Produkts darauf, dass
keine Finger zwischen
bewegenden Schneidmessern
und feststehenden Teilen
des Produkts eingeklemmt
werden.
5. Lassen Sie den Motor
abkühlen, bevor Sie das
Produkt abstellen.
6. Achten Sie beim Warten
der Schneidmesser darauf,
dass selbst dann, wenn
die Spannungsquelle
abgeschaltete ist, die
Schneidmesser bewegt
werden können.
7. Ersetzen Sie aus
Sicherheitsgründen
abgenutzte oder beschädigte
Teile. Verwenden Sie
ausschließlich OriginalErsatzteile und -Zubehör.
98 DE / AT / CH
Page 97

Q Vibrations- und
45
Geräuschminderung
Begrenzen Sie die Benutzungszeit, verwenden
Sie vibrations- und geräuscharme Betriebsarten
und tragen Sie persönliche Schutzausrüstung,
um Vibrations- und Geräuschauswirkungen zu
reduzieren.
Die folgenden Maßnahmen helfen, vibrations- und
geräuschbedingte Risiken zu mindern:
¢ Verwenden Sie das Produkt nur gemäß
seinem bestimmungsgemäßen Gebrauch und
wie in diesen Anweisungen beschrieben.
¢ Stellen Sie sicher, dass das Produkt
einwandfrei und gut gewartet ist.
¢ Verwenden Sie die richtigen
Einsatzwerkzeuge für dieses Produkt und
stellen Sie sicher, dass diese einwandfrei sind.
¢ Halten Sie das Produkt sicher an den
Handgriffen / Griffflächen fest.
¢ Warten Sie das Produkt entsprechend
den Anweisungen und sorgen Sie
für ausreichende Schmierung (wenn
anwendbar).
¢ Planen Sie Ihren Arbeitsablauf so, dass
die Verwendung von Produkten mit hohem
Vibrationswert auf einen längeren Zeitraum
verteilt ist.
Q Verhalten im Notfall
Machen Sie sich anhand dieser
Bedienungsanleitung mit der Benutzung
dieses Produkts vertraut. Prägen Sie sich die
Sicherheitshinweise ein und halten Sie sich
unbedingt daran. Dies hilft, Risiken und Gefahren
zu vermeiden.
¢ Seien Sie bei der Nutzung dieses Produkts
immer aufmerksam, damit Sie Gefahren
frühzeitig erkennen und handeln können.
Rasches Einschreiten kann schwere
Verletzungen und Sachschäden vermeiden.
¢ Schalten Sie das Produkt bei Fehlfunktionen
umgehend aus, entnehmen Sie den Akku-Pack
und ziehen Sie den Sicherheitsschlüssel ab.
Lassen Sie dieses von einer qualifizierten
Fachkraft überprüfen und gegebenenfalls
instand setzen, bevor Sie es wieder in Betrieb
nehmen.
Q Restrisiken
Auch wenn Sie dieses Produkt vorschriftsmäßig
bedienen, bleibt ein potentielles Risiko für
Personen- und Sachschäden bestehen. Folgende
Gefahren können im Zusammenhang mit der
Bauweise und Ausführung dieses Produkts unter
anderem auftreten:
¢ Gesundheitsschäden, die aus
Vibrationsemissionen resultieren, falls das
Produkt über einen längeren Zeitraum
benutzt, nicht ordnungsgemäß geführt und
gewartet wird.
¢ Personen- und Sachschäden hervorgerufen
durch defekte Schneidwerkzeuge oder
plötzlichen Einschlag eines verdeckten
Objekts während des Gebrauchs.
¢ Verletzungsgefahr und Sachschäden
verursacht durch fliegende Objekte.
WARNUNG!
u Dieses Produkt erzeugt während des Betriebs
ein elektromagnetisches Feld! Dieses Feld
kann unter bestimmten Umständen aktive
oder passive medizinische Implantate
beeinträchtigen! Um die Gefahr von
ernsthaften oder tödlichen Verletzungen
zu verringern, empfehlen wir Personen mit
medizinischen Implantaten ihren Arzt und den
Hersteller vom medizinischen Implantat zu
konsultieren, bevor das Produkt bedient wird!
Q Sicherheitshinweise für
Ladegeräte
VORSICHT! EXPLOSIONSGEFAHR!
Laden Sie nicht aufladbare Batterien
niemals auf! Schützen Sie den
45
Akku-Pack vor Hitze, z. B. auch vor
dauernder Sonneneinstrahlung, Feuer,
Wasser und Feuchtigkeit. Es besteht
Explosionsgefahr.
99 DE / AT / CH
Page 98

¢ Dieses Gerät kann von
Kindern ab 8 Jahren und
darüber sowie von Personen
mit verringerten physischen,
sensorischen oder mentalen
Fähigkeiten oder Mangel
an Erfahrung und Wissen
benutzt werden, wenn sie
beaufsichtigt oder bezüglich
des sicheren Gebrauchs des
Gerätes unterwiesen wurden
und die daraus resultierenden
Gefahren verstehen.
¢ Kinder dürfen nicht mit dem
Gerät spielen.
¢ Reinigung und Benutzer-
Wartung dürfen nicht
von Kindern ohne
Beaufsichtigung durchgeführt
werden.
¢ Laden Sie keine nicht wieder
aufladbaren Batterien auf.
Verstoß gegen diesen Hinweis
führt zu Gefährdungen.
¢ Wenn die
Netzanschlussleitung dieses
Gerätes beschädigt wird,
muss sie durch den Hersteller
oder seinen Kundendienst
oder eine ähnlich qualifizierte
Person ersetzt werden, um
Gefährdungen zu vermeiden.
¢ Schützen Sie elektrische Teile
gegen Feuchtigkeit. Tauchen
Sie diese nie in Wasser oder
andere Flüssigkeiten, um
einen elektrischen Schlag zu
vermeiden. Halten Sie das
Gerät nie unter fließendes
Wasser. Beachten Sie die
Anweisungen für Reinigung,
Wartung und Reparatur.
¢ Das Gerät ist nur für den
Gebrauch in Innenräumen
geeignet.
¢ Dieses Ladegerät ist
ausschließlich zum Aufladen
von Akku-Packs des
folgenden Typs geeignet:
FAP 40 A1.
Q Vor dem ersten Gebrauch
Q Auspacken
VORSICHT! VERLETZUNGSGEFAHR!
Verpackungsmaterial ist kein
Spielzeug. Kinder sollten nicht mit
Verpackungsmaterial spielen, da
ansonsten die Gefahr besteht, dass sie
dieses verschlucken oder daran ersticken!
Entfernen Sie alle
Verpackungsmaterialien und
Transportsicherungen.
1. Packen Sie alle Teile aus und legen Sie diese
auf eine flache, stabile Oberfläche.
2. Entfernen Sie das Verpackungsmaterial und
Verpackungs- / und Transportsicherungen
(falls vorhanden).
100 DE / AT / CH
Page 99

3. Stellen Sie sicher, dass der Lieferumfang
vollständig und frei von möglichen Schäden
ist. Wenden Sie sich an den Händler, bei
dem Sie dieses Produkt gekauft haben, wenn
Sie feststellen sollten, dass Teile fehlen oder
fehlerhaft sind. Verwenden Sie das Produkt
nicht, bevor fehlende Teile nachgeliefert oder
defekte Teile ersetzt wurden. Die Verwendung
eines unvollständigen oder beschädigten
Produkts führt zu Personen- und Sachschäden.
4. Versichern Sie sich, dass Sie über
nötiges Zubehör und Werkzeuge für die
Inbetriebnahme und Benutzung verfügen.
Dies schließt eine geeignete persönliche
Schutzausrüstung ein.
Q Zubehör
Für den sicheren und ordnungsgemäßen Gebrauch
dieses Produkts werden unter anderem die
folgenden Zubehörteile wie z. B. Werkzeuge und
Einsatzwerkzeuge benötigt:
o Geeignete persönliche Schutzausrüstung
Zubehör und Werkzeuge erhalten Sie im
Fachhandel. Beachten Sie beim Erwerb immer die
technischen Anforderungen dieses Produkts (siehe
„Technische Daten“).
Fragen Sie bei Unsicherheit eine qualifizierte
Fachkraft und lassen Sie sich von Ihrem
Fachhändler beraten.
HINWEIS
u In dieser Bedienungsanleitung finden
Sie Informationen und Hinweise zu
verschiedenen Einsatzwerkzeugen und
deren Einsatzbereichen. Die erwähnten
Einsatzwerkzeuge sind nicht zwingend im
Lieferumfang enthalten, sondern zeigen die
Einsatzmöglichkeiten dieses Produkts auf.
Q Montage
Anbringen des unteren Holms
1. Klappen Sie den unteren Holm
3
nach
oben in eine komfortable Lage und lassen
Sie die Zahnkränze sicher ineinander greifen
(siehe Abb. D). Heben Sie beide unteren
3
Holme
2. Drehen Sie den Hebel
auf die gleiche Höhe.
10b
im Uhrzeigersinn
um die Verbindung festzuziehen, jedoch nicht
vollständig anziehen.
3. Klappen Sie den Hebel
nach unten, um
10b
die Verbindung zu sichern. Sollte dies zu viel
Kraft erfordern oder unmöglich sein, lösen Sie
den Hebel
10b
ein wenig, indem Sie ihn gegen
den Uhrzeigersinn drehen.
4. Wiederholen Sie die Schritte 1 – 3 auf der
anderen Seite.
Anbringen des oberen Holms
1. Richten Sie das offene Ende des oberen
Holms
2
zu den unteren Holmen
3
aus
und schieben Sie diesen nach unten, bis die
Bohrungen in beiden Teilen deckungsgleich
sind und halten ihn an dieser Position
(siehe Abb. E).
2. Stecken Sie den Bolzen
13a
von der
Produktmitte aus nach außen durch die
Bohrungen und halten Sie diesen an dieser
Position.
3. Schieben Sie die Unterlegscheibe
flachen Seite nach außen auf den Bolzen
Die Mulde der Unterlegscheibe
an den oberen Holm
anpassen.
2
4. Schrauben Sie den Hebel
13a
Bolzen
5. Drehen Sie den Hebel
.
13c
13b
mit der
13b
sollte sich
auf den
13c
im Uhrzeigersinn
um die Verbindung festzuziehen, jedoch nicht
vollständig anziehen.
6. Klappen Sie den Hebel
13c
nach unten, um
die Verbindung zu sichern. Sollte dies zu viel
Kraft erfordern oder unmöglich sein, lösen Sie
den Hebel
13c
ein wenig, indem Sie ihn gegen
den Uhrzeigersinn drehen.
7. Wiederholen Sie die Schritte 1 – 6 auf der
anderen Seite.
Sichern des Steuerkabels
1. Verwenden Sie den Kabelclip
Sie das Steuerkabel
14
hinein (siehe Abb. F).
2. Rasten Sie den Kabelclip
Steuerkabel
14
am unteren Holm
12
und legen
durch die offene Seite
12
mit dem
3
ein.
13a
.
101 DE / AT / CH
Page 100

Q Vor dem Gebrauch
Q Akku-Pack laden
HINWEIS
u Der Akku-Pack
17
wird mit geringer Ladung
ausgeliefert. Laden Sie den Akku-Pack
Gebrauch idealerweise 60 Minuten.
u Ziehen Sie stets den Stecker
Ladegeräts
Akku-Pack
18
vom Netz, bevor Sie den
aus dem Ladegerät entnehmen
17
oder einsetzen.
u Laden Sie den Akku-Pack
18a
des
17
nie, wenn die
Umgebungstemperatur unterhalb 10 °C oder
oberhalb 40 °C liegt.
u Schonen Sie das Ladegerät
18
zwischen
aufeinanderfolgenden Ladevorgängen für
mindestens 15 Minuten.
u Wenn kein Akku-Pack
Ladegerät
18
eingesetzt ist und dieses mit
17
in das
der Stromversorgung verbunden ist, blinkt die
Ladezustands-LED
1. Richten Sie den Akku-Pack
Schienen des Ladegeräts
18d
grün.
17
mit den
aus schieben Sie
18
diesen hinein. Stellen Sie sicher, dass dieser
spürbar einrastet.
2. Verbinden Sie den Netzstecker
Ladegeräts
Die Ladezustands-LED
18
mit der Stromversorgung.
18c
18a
leuchtet rot. Die
durchgängig leuchtende grüne LadezustandsLED
signalisiert, dass der Ladevorgang
18d
abgeschlossen ist.
3. Trennen Sie den Netzstecker
Ladegeräts
18
von der Stromversorgung
und entnehmen Sie den Akku-Pack
18a
des
dem Ladegerät.
4. Setzen Sie den Akku-Pack
17
in das
Produkt ein (siehe „Akku-Pack einsetzen /
entnehmen“).
Ladezustand-LEDs
Grüne LED blinkt ohne
Ladegerät bereit
Akku-Pack
Grüne LED leuchtet mit
Akku-Pack voll geladen
Akku-Pack
des
17
17
vor
aus
Rote LED leuchtet mit
Akku-Pack lädt
Akku-Pack
Rote und grüne LEDs
Akku-Pack defekt
blinken
Rote und grüne LEDs
leuchten durchgehend
Q Akku-Ladezustand prüfen
o Drücken Sie zum Prüfen des Akkuladezustands
die Taste Akkuladezustand
Ladezustand des Akku-Packs
Anzeigen Akkuladezustand
4 grüne LEDs leuchten
Akku-Pack zu kalt oder
warm
17c
. Der
wird auf den
17
angezeigt.
17b
100% Ladezustand
durchgehend
3 grüne LEDs leuchten
75% Ladezustand
durchgehend
2 grüne LEDs leuchten
50% Ladezustand
durchgehend
1 grüne LEDs leuchten
25% Ladezustand
durchgehend
1 grüne LED blinkt Niedriger Ladezustand
o Laden Sie den Akku-Pack
17
vor dem
Gebrauch, falls dieser auf 25% oder
niedrigem Ladezustand ist.
Q Sicherheitsschlüssel
Dieses Produkt ist mit einem Sicherheitsschlüssel
7c
ausgestattet, um unerlaubte Verwendung zu
verhindern. Um das Produkt zu bedienen, muss der
Sicherheitsschlüssel
7b
eingesteckt sein.
im Sicherheitsschlüsselloch
7c
Sicherheitsschlüssel einstecken
1. Öffnen Sie die Batteriefachabdeckung
7
(siehe Abb. G).
2. Betätigen Sie die Taste am
Sicherheitsschlüssel
in das Sicherheitsschlüsselloch
7c
und stecken Sie diesen
7b
. Stellen Sie
sicher, dass dieser spürbar einrastet. Es sollte
nicht möglich sein den Sicherheitsschlüssel
7c
abzuziehen, ohne dass dessen Taste betätigt
wird.
Sicherheitsschlüssel abziehen
1. Betätigen Sie die Taste am
Sicherheitsschlüssel
aus dem Sicherheitsschlüsselloch
und ziehen Sie diesen
7c
.
7b
102 DE / AT / CH
 Loading...