


 Loading...
Flir N437BEW, N237VE, N237BE, N233ZD, N233ZC User Manual
...Instruction Manual
FLIR IP Series
Firmware v2.210

Instruction Manual
FLIR IP Series
#LX400038; r. 1.0/18537/18537; en-US |
iii |

Table of contents
1 |
Overview ............................................................................................ |
1 |
|
2 |
Web Configuration Setup ..................................................................... |
2 |
|
|
2.1 |
Supported Browsers.................................................................... |
2 |
|
2.2 |
Internet Explorer Setup ................................................................ |
2 |
|
2.3 |
Safari Setup............................................................................... |
2 |
|
2.4 |
Firefox Setup ............................................................................. |
3 |
|
2.5 |
Google Chrome Setup ................................................................. |
3 |
3 |
Live View ............................................................................................ |
|
5 |
|
|
3.1 |
PTZ Control Panel (PTZ Cameras Only) |
...........................................7 |
|
|
|
3.1.1 |
PTZ Controls................................................................... |
8 |
|
|
3.1.2 |
Scan ............................................................................. |
8 |
|
|
3.1.3 |
Preset............................................................................ |
8 |
|
|
3.1.4 |
Pattern........................................................................... |
9 |
|
|
3.1.5 |
Goto.............................................................................. |
9 |
|
|
3.1.6 |
Pan ............................................................................... |
9 |
|
|
3.1.7 |
Tour ............................................................................ |
10 |
4 |
Playback (Cameras with microSD only)................................................ |
11 |
||
|
4.1 |
Playback Controls ..................................................................... |
12 |
|
|
4.2 |
Backing up Video Files ............................................................... |
13 |
|
5 |
Setup |
............................................................................................... Camera |
|
14 |
|
5.1 .................................................................................. |
Settings |
14 |
|
|
....................................................................... |
5.1.1 |
14 |
|
|
........................................................ |
5.1.2 |
Profile Management |
17 |
|
................. |
5.1.3 |
Zoom and Focus (Motorized Lens Cameras Only) |
18 |
|
........................................................................... |
5.1.4 |
Video |
19 |
|
...................................................................... |
5.1.5 |
Snapshot |
20 |
|
........................................................................ |
5.1.6 |
Overlay |
21 |
|
............................................................. |
5.1.7 |
Privacy Masking |
22 |
|
............................................................................ |
5.1.8 |
Path |
22 |
|
5.2 ........................................................................... |
5.1.9 |
Audio |
23 |
|
Network |
23 |
||
|
......................................................................... |
5.2.1 |
TCP-IP |
23 |
|
................................................................... |
5.2.2 |
Connection |
24 |
|
..................................................... |
5.2.3 |
PPPoE (Unsupported) |
25 |
|
.......................................................................... |
5.2.4 |
DDNS |
25 |
|
........................................................................ |
5.2.5 |
IP Filter |
25 |
|
................................................................ |
5.2.6 |
SMTP (Email) |
26 |
|
........................................................................... |
5.2.7 |
UPnP |
26 |
|
........................................................................ |
5.2.8 |
Bonjour |
27 |
|
...................................................... |
5.2.9 |
SNMP (Unsupported) |
28 |
|
.................................................. |
5.2.10 |
Multicast (Unsupported) |
28 |
|
..................................................... |
5.2.11 |
802.1x (Unsupported) |
28 |
|
........................................................ |
5.2.12 |
QoS (Unsupported) |
28 |
|
5.3 ............................................ |
5.2.13 |
RTSP Streaming (Advanced) |
28 |
|
PTZ |
Preset |
29 |
|
|
.......................................................................... |
5.3.1 |
29 |
|
|
............................................................................ |
5.3.2 |
Tour |
30 |
|
........................................................................... |
5.3.3 |
Scan |
31 |
|
......................................................................... |
5.3.4 |
Pattern |
31 |
|
............................................................................. |
5.3.5 |
Pan |
32 |
#LX400038; r. 1.0/18537/18537; en-US |
v |

Table of contents
|
|
5.3.6 |
Privacy Mask................................................................. |
32 |
|
|
5.3.7 |
PTZ Speed ................................................................... |
33 |
|
|
5.3.8 |
Idle Motion.................................................................... |
33 |
|
|
5.3.9 |
Power Up ..................................................................... |
33 |
|
|
5.3.10 |
PTZ Restart .................................................................. |
34 |
|
5.4 |
5.3.11 |
Default......................................................................... |
34 |
|
Event ..................................................................................... |
Motion Detect |
35 |
|
|
|
5.4.1 |
35 |
|
|
|
5.4.2 |
Video Masking (Unsupported)........................................... |
38 |
|
|
5.4.3 |
Relay Activation (Cameras with Alarm I/O Only) .................... |
38 |
|
|
5.4.4 |
No SD Card .................................................................. |
38 |
|
|
5.4.5 |
Capacity Warning........................................................... |
39 |
|
|
5.4.6 |
SD Card Error................................................................ |
39 |
|
|
5.4.7 |
Disconnection ............................................................... |
40 |
|
|
5.4.8 |
IP Conflict..................................................................... |
41 |
|
5.5 |
5.4.9 |
Network ....................................................................... |
41 |
|
Storage |
Record..................................................................................Schedule |
42 |
|
|
|
5.5.1 |
42 |
|
|
|
5.5.2 |
Snapshot Schedule ........................................................ |
43 |
|
|
5.5.3 |
Holiday Schedule ........................................................... |
44 |
|
|
5.5.4 |
Path ............................................................................ |
44 |
|
|
5.5.5 |
Local ........................................................................... |
45 |
|
|
5.5.6 |
FTP............................................................................. |
45 |
|
5.6 |
5.5.7 |
Record Control .............................................................. |
46 |
|
System ................................................................................... |
General |
46 |
|
|
|
5.6.1 |
46 |
|
|
|
5.6.2 |
Date & Time.................................................................. |
47 |
|
|
5.6.3 |
Account ....................................................................... |
48 |
|
|
5.6.4 |
PTZ Settings ................................................................. |
50 |
|
|
5.6.5 |
Default......................................................................... |
51 |
|
|
5.6.6 |
Import / Export............................................................... |
52 |
|
|
5.6.7 |
Auto Maintain ................................................................ |
52 |
|
5.7 |
5.6.8 |
Upgrade....................................................................... |
53 |
|
Information .............................................................................. |
53 |
||
|
|
5.7.1 |
Version ........................................................................ |
53 |
|
|
5.7.2 |
Log ............................................................................. |
53 |
6 |
Firmware Upgrade Tool ...................................................................... |
55 |
||
|
6.1 |
Installing a Firmware Upgrade Over the LAN................................... |
55 |
|
|
6.2 |
Installing a Firmware Upgrade Over the Internet............................... |
56 |
|
7 |
Connecting to Cameras with FLIR Cloud™ CMS.................................... |
58 |
||
|
7.1 |
System Requirements................................................................ |
58 |
|
|
7.2 |
Installing FLIR Cloud™ Client ...................................................... |
58 |
|
|
7.3 |
Adding a Camera over the Local Network (LAN) .............................. |
59 |
|
|
7.4 |
Adding a Camera over the Internet using a DDNS Address ................ |
60 |
|
8 |
Using FLIR Cloud™ Client for PC or Mac .............................................. |
63 |
||
|
8.1 |
Home Page ............................................................................. |
63 |
|
|
8.2 |
Live View ................................................................................ |
63 |
|
|
|
8.2.1 |
Live View Controls.......................................................... |
64 |
|
8.3 |
8.2.2 |
Opening Live View in Multiple Monitors ............................... |
65 |
|
Controlling PTZ Cameras ........................................................... |
66 |
||
#LX400038; r. 1.0/18537/18537; en-US |
vi |

Table of contents
|
|
8.3.1 |
PTZ Presets.................................................................. |
67 |
|
|
8.3.2 |
PTZ Tours..................................................................... |
68 |
|
|
8.3.3 |
PTZ Pattern .................................................................. |
69 |
|
|
8.3.4 |
PTZ Scan ..................................................................... |
70 |
|
8.4 |
8.3.5 |
PTZ Pan....................................................................... |
70 |
|
Playback................................................................................. |
70 |
||
|
8.5 |
Playback Controls ..................................................................... |
72 |
|
|
8.6 |
Downloading Video to your Computer Hard Drive............................. |
73 |
|
|
8.7 |
Alarm ..................................................................................... |
|
74 |
|
8.8 |
Log........................................................................................ |
|
74 |
|
8.9 |
E-map .................................................................................... |
|
75 |
|
8.10 |
Devices |
.................................................................................. |
77 |
|
8.11 |
Device Config .......................................................................... |
78 |
|
|
8.12 |
Alarm CFG .............................................................................. |
79 |
|
|
8.13 |
Tour & Task ............................................................................. |
82 |
|
|
8.14 |
Account .................................................................................. |
83 |
|
|
|
8.14.1 |
Managing User Accounts ................................................. |
83 |
|
8.15 |
8.14.2 |
Managing Roles............................................................. |
85 |
|
General |
Basic.................................................................................. |
86 |
|
|
|
8.15.1 |
86 |
|
|
|
8.15.2 |
File ............................................................................. |
86 |
|
|
8.15.3 |
Alarm Prompt ................................................................ |
87 |
|
|
8.15.4 |
Version ........................................................................ |
88 |
9 |
Smartphone and Tablet Apps .............................................................. |
89 |
||
|
9.1 |
iPhone.................................................................................... |
Prerequisites |
89 |
|
|
9.1.1 |
89 |
|
|
|
9.1.2 |
Connecting to your IP camera on an iPhone ......................... |
89 |
|
|
9.1.3 |
Live View Interface ......................................................... |
90 |
|
|
9.1.4 |
Controlling PTZ Cameras................................................. |
91 |
|
|
9.1.5 |
Viewing Snapshots and Videos with Local Files .................... |
92 |
|
|
9.1.6 |
Using Playback Mode on iPhone ....................................... |
93 |
|
|
9.1.7 |
Enabling Push Notifications .............................................. |
94 |
|
|
9.1.8 |
Using the Event List ........................................................ |
96 |
|
|
9.1.9 |
Using Favorites.............................................................. |
97 |
|
|
9.1.10 |
Using the E-Map ............................................................ |
98 |
|
9.2 |
9.1.11 |
Device Manager........................................................... |
100 |
|
iPad ..................................................................................... |
Prerequisites |
101 |
|
|
|
9.2.1 |
101 |
|
|
|
9.2.2 |
Connecting to your IP Camera on an iPad.......................... |
101 |
|
|
9.2.3 |
Live View Interface ....................................................... |
102 |
|
|
9.2.4 |
Controlling PTZ Cameras............................................... |
103 |
|
|
9.2.5 |
Using Playback Mode on iPad......................................... |
104 |
|
|
9.2.6 |
Using Local File to View Manual Recordings ...................... |
106 |
|
|
9.2.7 |
Enabling Push Notifications ............................................ |
107 |
|
|
9.2.8 |
Using the Event List ...................................................... |
109 |
|
|
9.2.9 |
Using Favorites............................................................ |
110 |
|
|
9.2.10 |
Using the E-Map .......................................................... |
111 |
|
9.3 |
9.2.11 |
Using the Device Manager ............................................. |
113 |
|
Android |
Prerequisites................................................................................ |
113 |
|
|
|
9.3.1 |
113 |
|
|
|
9.3.2 |
Connecting to your IP camera on Android .......................... |
114 |
#LX400038; r. 1.0/18537/18537; en-US |
vii |

Table of contents
|
|
9.3.3 |
Live View Interface ....................................................... |
114 |
|
|
9.3.4 |
Controlling PTZ Cameras............................................... |
115 |
|
|
9.3.5 |
Viewing Snapshots and Videos with Local Files .................. |
116 |
|
|
9.3.6 |
Using Playback Mode on iPhone ..................................... |
117 |
|
|
9.3.7 |
Enabling Push Notifications ............................................ |
118 |
|
|
9.3.8 |
Using the Event List ...................................................... |
120 |
|
|
9.3.9 |
Using Favorites............................................................ |
121 |
|
|
9.3.10 |
Using the E-Map .......................................................... |
122 |
|
|
9.3.11 |
Device Manager........................................................... |
124 |
10 |
Appendix A — Camera Conditions (Select models only) ...................... |
126 |
||
|
10.1 |
Image Sensor Setting .............................................................. |
126 |
|
|
10.2 |
White Balance Setting.............................................................. |
126 |
|
|
10.3 |
Exposure Setting .................................................................... |
127 |
|
|
10.4 |
Noise Reduction Setting........................................................... |
129 |
|
|
10.5 |
Day / Night Setting .................................................................. |
130 |
|
|
10.6 |
Focus Setting......................................................................... |
131 |
|
|
10.7 |
Zoom Setting ......................................................................... |
132 |
|
|
10.8 |
Sharpness Setting .................................................................. |
133 |
|
|
10.9 |
Picture Setting........................................................................ |
133 |
|
|
10.10 |
Restore Default Settings........................................................... |
134 |
|
#LX400038; r. 1.0/18537/18537; en-US |
viii |

1 |
Overview |
This manual covers the following topics related to your FLIR IP Series camera:
• |
Web browser configuration interface: See 2 Web Configuration Setup, page 2. |
|
• |
Firmware upgrade tool: See 6 Firmware Upgrade Tool page 55. |
, |
•Central Management Software for PC / Mac: See 7 Connecting to Cameras with FLIR Cloud™ CMS, page 58.
•Smartphone / tablet apps: See 9 Smartphone and Tablet Apps page 89.
 Note
Note
•For physical installation instructions, please refer to the Quick Connection Guide for your camera model.
•Some settings described in this manual may not be available depending on the features supported by your camera model.
•The following models have a different web interface and supporting software: DND13TL2, DNB14L2, DNB13TL2, DNV14TL2, DNE14TL2, DNV14UX2, DNB14UX2. For instructions, please refer to the respective manual for these cameras.
#LX400038; r. 1.0/18537/18537; en-US |
1 |
2 |
Web Configuration Setup |
The camera includes a built-in web interface that can be accessed using a web browser.
2.1 Supported Browsers
•Google Chrome™, Mozilla Firefox®, and Apple Safari® (via Webplugin)
•Microsoft Internet Explorer® 8.0 or later, 32-bit version (via ActiveX®)
2.2 Internet Explorer Setup
1. Open Internet Explorer® and enter the camera’s IP address in the address bar in the following format: http://IP address:HTTP Port .
• For example: http://192.168.0.100:80
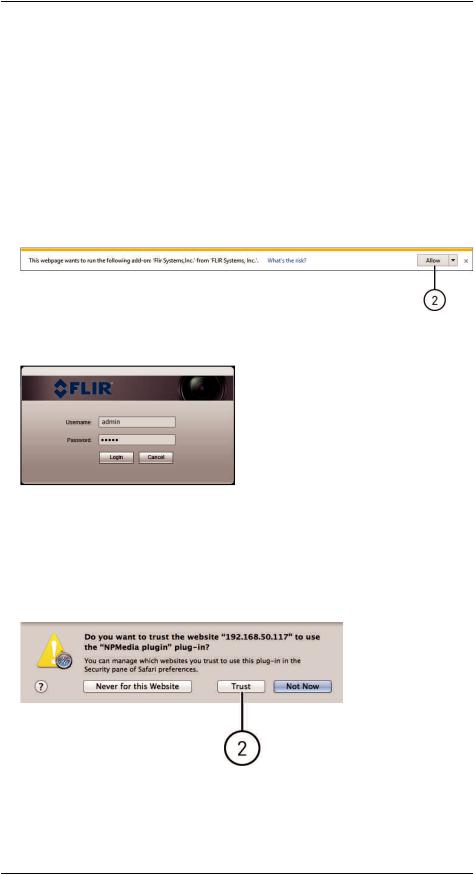
2.A notification bar appears asking if you would like to install ActiveX® plugins. Click Install or Allow to install the plugins.
3. Enter the camera user name (default: admin and password (default: admin and click
Login .
2.3 Safari Setup
1. Open Safari® and enter the camera’s IP address in the address bar in the following format: http://IP address:HTTP Port .
• For example: http://192.168.0.100:80
2.A notification appears asking if you want to use the NPMedia plug-in. Click Trust to use the plug-in.
#LX400038; r. 1.0/18537/18537; en-US |
2 |
2 |
Web Configuration Setup |
3. Enter the camera user name (default: admin and password (default: admin and click
Login |
. |
 Note
Note
If video from the camera does not appear after installation, quit Safari® by right-clicking on the Safari® icon in the dock and then selecting Quit Then restart Safari® and log.back into your camera.
2.4 Firefox Setup
1. Open Firefox® and enter the camera’s IP address in the address bar in the following format: http://IP address:HTTP Port .
• For example: http://192.168.0.100:80
2.A notification appears asking if you want to use the MMX plug-in. Click Allow... to use the plug-in.
3.Enter the camera user name (default: admin and password (default: admin and click
Login |
. |
 Note
Note
If video from the camera does not appear after installation, quit Firefox® by closing the browser window. Then restart Firefox® and log back into your camera.
2.5 Google Chrome Setup
1. Open Chrome™ and enter the camera’s IP address in the address bar in the following
format: http://IP address:HTTP Port |
. |
• For example: http://192.168.0.100:80 |
|
#LX400038; r. 1.0/18537/18537; en-US |
3 |
2 |
Web Configuration Setup |
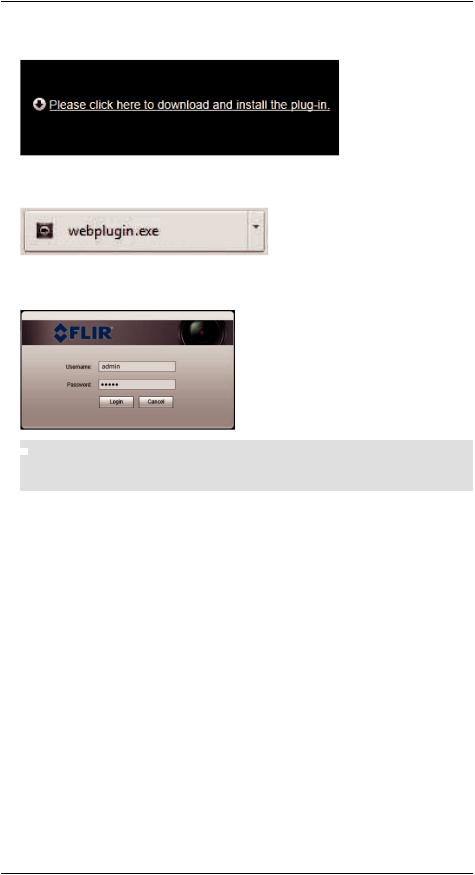
2. Click Please click here to download and install the plug-in
3.The plug-in downloads automatically. When finished, double-click the plug-in in the downloads bar at the bottom of the browser window.
4.Enter the camera user name (default: admin and password (default: admin and click
Login |
. |
 Note
Note
If video from the camera does not appear after installation, quit Chrome™ by closing the browser window. Then restart Chrome™ and log back into your camera.
#LX400038; r. 1.0/18537/18537; en-US |
4 |
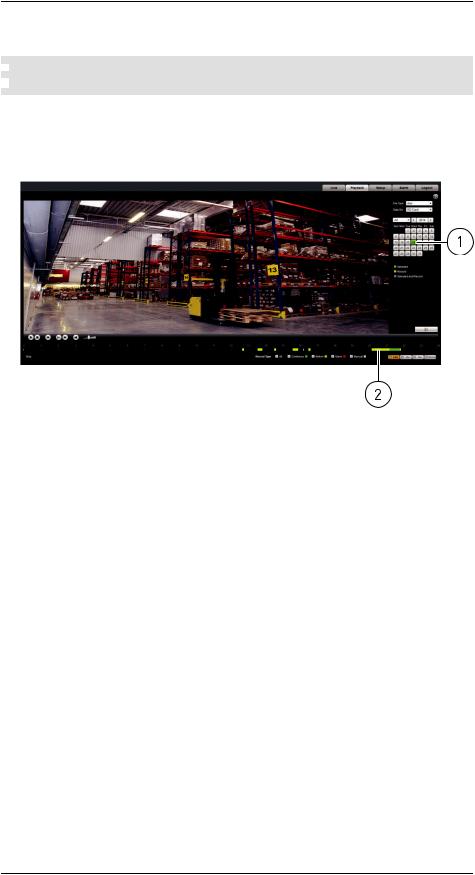
3 |
Live View |
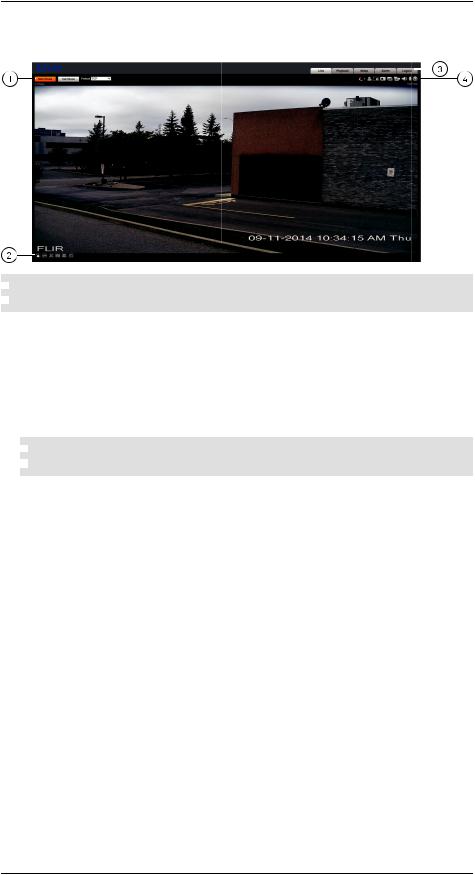
Upon login, the web interface opens to the Live View.
 Note
Note
 Some functions are not available on all IP camera models, based on the features available.
1.Stream/Protocol Select: Allows you to select the video stream and protocol used in Live View.
•Main Stream: Click to view the Main Stream. The Main Stream provides better picture quality and resolution, but requires higher bandwidth.
•Sub Stream: Click to view the Sub Stream. The Sub Stream is recommended for better performance when viewing the camera over the Internet.
•Protocol: Select the protocol that will be used to stream video: TCP or UDP.
 Note
Note
 Multicast is not supported.
#LX400038; r. 1.0/18537/18537; en-US |
5 |

3 |
Live View |
2.Video Display Controls ( )
)
•  Color Settings: Click to open color settings.
1. Brightness; 2. Contrast; 3. Hue; 4. Saturation
• Original Size: Click to view the video in its original size. This depends on the resolution and if you are viewing the Main Stream or Sub Stream.
• Full Screen: Click to view the video in full screen. Double-click or press ESC to exit full screen mode.
• Width / Height Ratio: Click select Original to use the original proportions of the image or Adaptive to adapt the image proportions to the size of the screen.
•  Realtime / Fluency: Click to select Realtime Normal or Fluency.
• PTZ Controls (PTZ cameras only): Click to hide/show PTZ camera controls. For details, see 3.1 PTZ Control Panel (PTZ Cameras Only) page 7.
3.Menu Tabs
•Live: Click to access Live View.
•PTZ: On micro PT cameras, the PTZ Control Panel is opened using the PTZ tab, which replaces the button on the Video Display Controls panel.
•Playback: Click to playback video from the camera’s microSD card (cameras that support microSD only).
•Setup: Click to setup camera functions.
•Alarm: Click to configure alarms.
•Logout: Log out of the camera.
#LX400038; r. 1.0/18537/18537; en-US |
6 |

3 |
Live View |
4.Live View Functions ( )
)
• Pen: Click the pen icon to activate the pen. Then, click-and-drag to draw lines
overtop of the video display. Click the arrow beside the pen icon to select the pen color ( ).
).
• Alarm Output: Click to activate an alarm output device connected to the camera (cameras with alarm I/O only).
• Digital Zoom: Click to activate digital zoom mode. Then, click-and-drag in the video area to select an area to zoom in.
• Snapshot: Click to save a snapshot from the camera to your computer hard drive. To configure the folder where snapshots are saved, see 5.1.8 Path page 22.
 Note
Note
Depending on your computer’s security settings, you may need to run your browser as administrator to save snapshots or manual recordings.
• |
Triple Snapshot: Save the next three frames from the camera as snapshots. |
|
• |
Manual Record Click to start manually recording live video to your computer : |
|
|
hard drive. Click again to stop recording. To configure the folder where manual re- |
|
|
cordings are saved, see 5.1.8 Path page 22. |
, |
• Manual Focus (motorized lens cameras only): Click to display the AF Peak and AF Max parameters for auto focus. The closer AF Peak and AF Max are, the
better the focus effect is. To configure auto focus, see 5.1.3 Zoom and Focus (Motorized Lens Cameras Only) page 18. ,
• Audio Output: Click to mute / un-mute audio coming from the camera (audioenabled cameras only; must have self-powered microphone connected to the camera).
• Intercom: Click to activate the intercom to the camera (audio-enabled cameras only; must have amplifier or speakers connected to the camera.
• Help: Click to access the built-in help file.
3.1PTZ Control Panel (PTZ Cameras Only)
From Live View, click  to open the PTZ control panel.
 Note
Note
The PTZ control panel only allows you to call pre-configured actions. To configure PTZ actions such as preset locations and tours, see 5.3 PTZ page 29. ,
#LX400038; r. 1.0/18537/18537; en-US |
7 |
3 |
Live View |
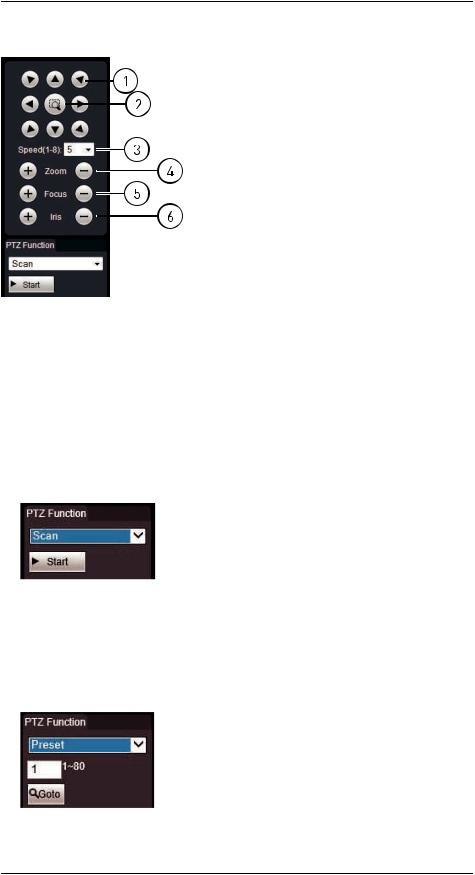
3.1.1 PTZ Controls
1.Click the arrows to move the camera
2.Click middle button and then click and drag on the video to move the camera
3.Adjust the camera speed
4.Adjust the zoom
5.Adjust the focus
6.Adjust the iris
3.1.2 Scan
You can use the Scan function to have the camera move automatically between two points.
To configure scan function:
1. Select Scan from the dropdown menu under PTZ Function
2. Click Start to begin the scan.
3.1.3 Preset
You can save preset positions in the camera to recall them later.
To go to a preset location:
1. Select Preset from the dropdown menu under PTZ Function
2. Enter the number of the preset you would like to move the camera to.
#LX400038; r. 1.0/18537/18537; en-US |
8 |

3 |
Live View |
3. Click Goto to move the camera to the preset location.
3.1.4 Pattern
You can use the pattern function to record a series of camera movements to recall later.
To run a pattern:
1. Select Pattern from the dropdown menu under PTZ Function
2.Enter the number of the pattern you would like to move the camera to between 1~5.
3.Click Start to run the pattern.
3.1.5 Goto
The Goto function allows you to move the camera to a position with specified parameters.
To move the camera to a specified position:
1. Select Goto from the dropdown menu under PTZ Function
2.Enter the Horizontal Angle you would like to move the camera to between 0~3600.
3.Enter the Vertical Angle you would like to move the camera to between 0~900.
4.Enter the Zoom level between 1~128.
5.Click Goto to go to the specified position.
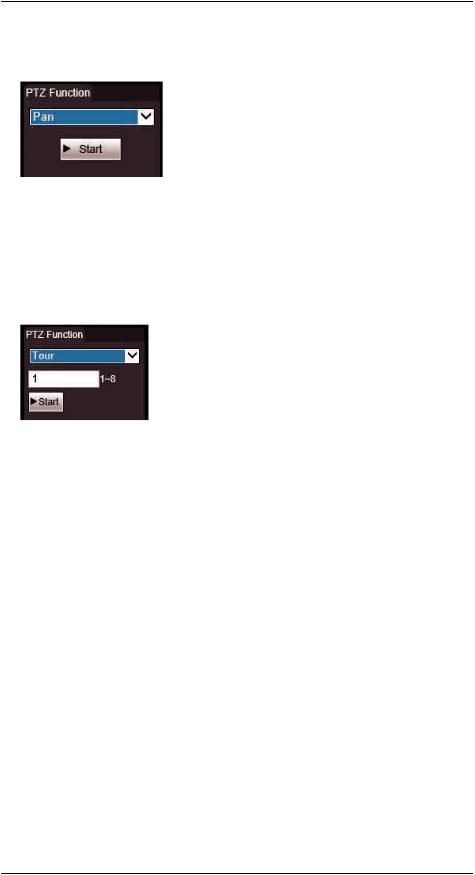
3.1.6 Pan
You can use pan to have the camera move horizontally between two positions.
#LX400038; r. 1.0/18537/18537; en-US |
9 |
3 |
Live View |
To start a pan:
1. Select Pan from the dropdown menu under PTZ Function
2. Click Start to begin panning.
3.1.7 Tour
Use tours to have the PTZ camera move automatically to several preset locations in a cycle.
To start a tour:
1. Select Tour from the dropdown menu under PTZ Function
2.Enter the number of the tour you would like to move the camera to between 1~8.
3.Click Start to begin the tour.
#LX400038; r. 1.0/18537/18537; en-US |
10 |
4 |
Playback (Cameras with microSD |
|
only) |
Playback mode allows you to playback video from the camera’s SD / microSD card.
 Note
Note
 Playback is only available if your camera supports on-board recording using an SD / microSD card.
To playback video from the microSD card:
1.Use the calendar to select a day to search for video. The bar on the bottom populates with video recorded on that day.
2.Click in the time bar to start playback.
OR
1.Click in the calendar to select a day to search for video.
2.Click  . A list appears with video files from the selected day.
#LX400038; r. 1.0/18537/18537; en-US |
11 |

4 |
Playback (Cameras with microSD only) |
3. Click a time to select it.
4. Click  then
then  to start playback.
4.1 Playback Controls
1. Play
2. Stop
3. Next frame
4. Slow
5. Fast
6. Mute
7. Volume
8. Select playback time
9. Show / hide recording type in time bar
10. Zoom into time bar
#LX400038; r. 1.0/18537/18537; en-US |
12 |
4 |
Playback (Cameras with microSD only) |
4.2 Backing up Video Files
You can download video files to your computer hard drive. Video files are saved in (.dav) format. You can use the video player available from www.flirsecurity.com/pro to play backup video files.
To backup video files:
1.Click in the calendar to select a day to search for video.
2.Click  . A list appears with video files from the selected day.
3.Click  next to the video file you would like to download to your computer’s hard drive.
#LX400038; r. 1.0/18537/18537; en-US |
13 |
5 |
Setup |
The Setup menus allow you to configure camera settings.
5.1 Camera
The Camera tab allows you to set the camera’s video and image settings.
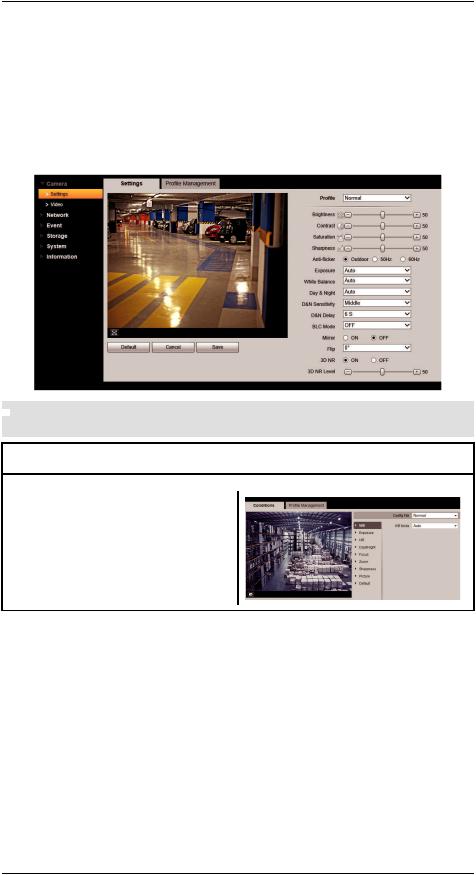
5.1.1 Settings
The Settings menu allows you to configure the image sensor settings for the camera. As you make adjustments, the effects will be shown in the video display.
 Note
Note
CAUTION
Some camera models use a different interface to configure the image sensor settings (shown on the right). If the image sensor setting menu on your camera appears this way, see 10 Appendix A — Camera Conditions (Select models only) page 126 for instructions on using this interface.
To configure the image sensor settings:
1.Under Profile select Day, Night or Normal You can configure the image, sensor, settings differently for each profile, allowing you to quickly apply different settings if required.
#LX400038; r. 1.0/18537/18537; en-US |
14 |

5 |
Setup |
2.Configure the following:
•Brightness: Adjust the brightness of the image between 0 and 100
•Contrast: Adjust the contrast of the image between 0 and 100
•Saturation: Adjust the color saturation of the image between 0 and 100
•Sharpness: Adjust the sharpness of the image between 0 and 100 Higher sharpness will make edges in the image clearer, but may increase noise in the picture.
•Gamma: Adjust the gamma level of the image between 0 and 100 The gamma level controls the balance between dark and bright parts of the camera image. It is recommended to keep this value near the mid-point as a low gamma level can produce a washed-out image, and high gamma can create a dark, oversaturated image.
•Anti-flicker: Select the anti-flicker mode depending on the environment:
•Outdoor: The system will use the exposure mode to adjust for lighting.
•50Hz: The system will compensate for lighting using 50Hz AC power (i.e. for Europe).
•60Hz: The system will compensate for lighting using 60Hz AC power (i.e. for North America).
•Exposure: Select the exposure mode.
•Auto: The system will automatically adjust the brightness and exposure based on the environment.
•Low Noise: The system will automatically adjust the gain to reduce the amount of noise in the image. Set the minimum and maximum Gain Scope Increasing the max gain will increase the noise reduction.
•Low Motion Blur: The system will automatically adjust the shutter to reduce motion trails in the image. Set the minimum and maximum Shutter Scope
•Manual: Configure manual exposure settings. Configure the Shutter Regulate and Gain Scope.
•White Balance: Select the white balance mode.
•Auto: Automatic white balance.
•Sunny: White balance mode for daylight.
•Night: White balance mode for night time.
•Customized: Manual white balance. Use the sliders to configure the Red Con-
trol and Blue Control |
. |
•Auto Iris (auto iris cameras only): Select ON to enable auto iris or OFF to disable auto iris. If your camera supports the auto iris feature and is installed outdoors, it is recommended to select OUTDOOR
•Day & Night: Select one of the following day / night modes.
•Auto: Camera will automatically change between day and night mode based on the lighting (recommended).
•Color: Camera will be in day mode at all times.
•B/W: Camera will be in black and white at all times.
•BLC Mode: Select one of the following modes.
•BLC (Backlight Compensation): camera automatically adjusts the exposure for a clearer image in the darkest areas of the video. Click Default to use default settings or Customized to adjust the BLC area. The darker the area you select, the brighter the image will be.
#LX400038; r. 1.0/18537/18537; en-US |
15 |

5 |
Setup |
Example image for BLC setting
•WDR (Wide Dynamic Range): camera compensates for changes in brightness across the image to enhance the picture quality of both light and dark areas.
Adjust the WDR level between 1 and 100 |
. |
Example image for WDR setting
•HLC (Highlight Compensation): camera dims the brightest areas of the image to make them clearer. Adjust the HLC level between 1 and 100
Example image for HLC setting
• Off: Disable this function.
•Mirror: Select ON to flip the camera left and right.
•Flip: Select one of the options to flip the image or 0° to disable. Note that 90° rotations are not supported if the Main Stream is set above 720p resolution.
#LX400038; r. 1.0/18537/18537; en-US |
16 |
5 |
Setup |
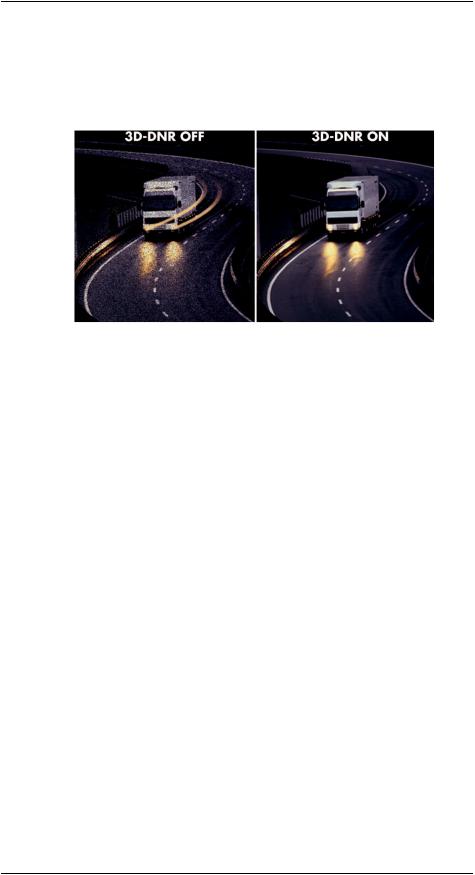
•3D NR: Select ON to enable 3D spatial noise reduction. Under 3D NR Level click + / - or use the slider to set the noise reduction value. The higher the value, the greater the noise reduction. 3D noise reduction accomplishes the same process for moving objects as well, providing clearer images in low light conditions. Removing noise from the camera image reduces your recording file size and makes videos clearer and more detailed.
Example image for 3D NR setting
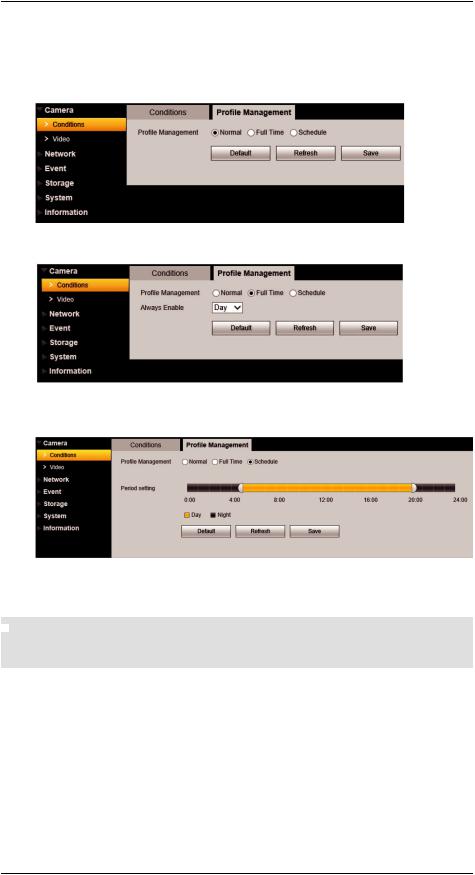
5.1.2 Profile Management
The Profile Management tab allows you to set which Profile to use at what times. Choose to use a single profile at all times, or set a schedule for the camera to switch back and forth between Day and Night profiles. In order to get the full benefit of this feature, ensure you have configured the Normal, Day and Night profiles in the Settings submenu. See 5.1.1 Settings page 14 for details. ,
#LX400038; r. 1.0/18537/18537; en-US |
17 |
5 |
Setup |
To configure the condition profile:
1.Select one of the following options:
• Normal: Camera will use the Normal profile at all times.
• Full Time: Select the profile the camera will use at all times.
•Schedule: Configure a schedule that the camera will use for Day (yellow) and Night (black) profiles. Click and drag in the time bar to set the schedule.
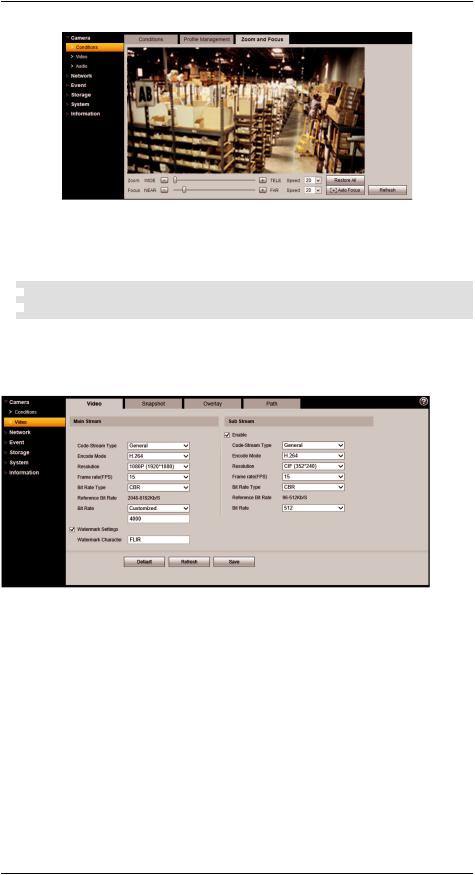
5.1.3 Zoom and Focus (Motorized Lens Cameras Only)
For motorized lens cameras, you can use the Zoom and Focus tab to adjust the lens.
 Note
Note
This setting is only available on cameras with a motorized lens. Check the technical specifications for your camera.
#LX400038; r. 1.0/18537/18537; en-US |
18 |
5 |
Setup |
•Zoom: Click + / - or use the slider to adjust the zoom level.
•Focus: Click + / - or use the slider to adjust the focus.
•Auto Focus: Click to have the camera automatically adjust the focus to the currently selected zoom level.
 Note
Note
 Adjustments in this menu are automatically saved.
5.1.4 Video
The Video tab allows you to configure the encoding settings for the camera. Video settings are divided into Main Stream and Sub Stream.
To configure video quality settings:
1. Check Enable under Sub Stream to enable the sub stream or uncheck to disable.
#LX400038; r. 1.0/18537/18537; en-US |
19 |
5 |
Setup |
2.For the Main Stream and Sub Stream, configure the following:
•Code Stream Type: For the Main Stream, select General to configure settings when motion is not detected or Motion to configure settings when motion is detected.
•Encode Mode: Select the encoding type: H.264 (Main H.264 profile), H.264H (High Profile H.264), H.264B (Baseline H.264 profile), MJPEG
 Note
Note
A much higher bitrate and faster connection is required to maintain image quality using MJPEG.
It is recommended to use H.264 unless you have special requirements.
•Resolution: Select the desired resolution for the video stream. There is a different recommended bit rate depending on the resolution selected.
 Note
Note
 You may not set the resolution above 720p if the Flip function is activated.
•Frame Rate (FPS): Select the desired frame rate for the video stream between 1 and 30 FPS.
•Bit Rate Type: Select CBR (Constant Bit Rate) or VBR (Variable Bit Rate). If you select VBR, you can select the Video Quality between 1 (lowest) and 6 (best).
•Reference Bit Rate: Recommended bit rate range based on the resolution and frame rate settings you have selected.
•Bit Rate: Select the desired bit rate for each video stream or select Customized and enter the bit rate in Kbps.
•I Frame: Select the interval for I frames. It is recommended to select 2 unless you have special requirements.
3.Under Watermark Settings check to enable watermark to protect against video tampering.
4.Under Watermark Character, enter the desired watermark text.
5.Click Save to save changes.
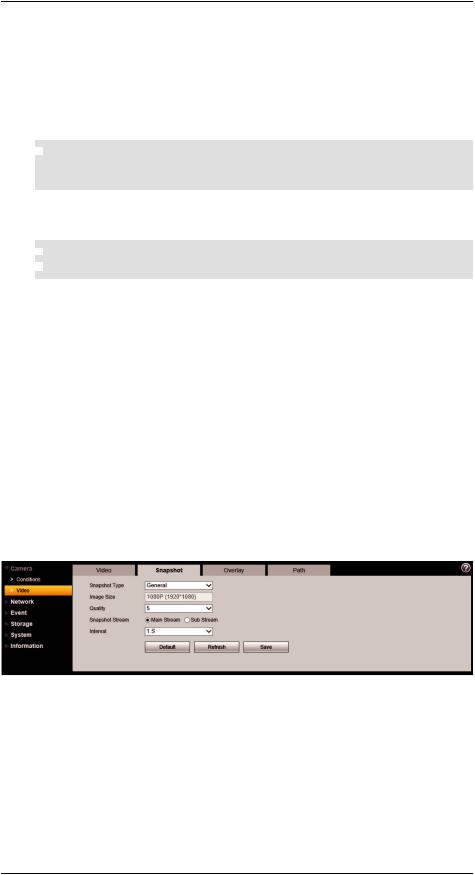
5.1.5 Snapshot
The Snapshot menu allows you to configure images quality settings for snapshots.
#LX400038; r. 1.0/18537/18537; en-US |
20 |
5 |
Setup |
To configure snapshots:
1.Configure the following:
•Snapshot Type: Select General to configure snapshots taken using scheduled recording. Select Event to configure snapshots activated by alarms.
•Image Size: The image size of snapshots is the same as the resolution for the stream selected.
•Quality: Select the image quality for snapshots between 1 (lowest) and 6 (highest).
•Snapshot Stream: Select Main Stream to take snapshots from the Main Stream or Sub Stream to take snapshots from the Sub Stream.
•Interval: Select the interval between snapshots between 1 and 7 seconds.
2.Click Save to save changes.
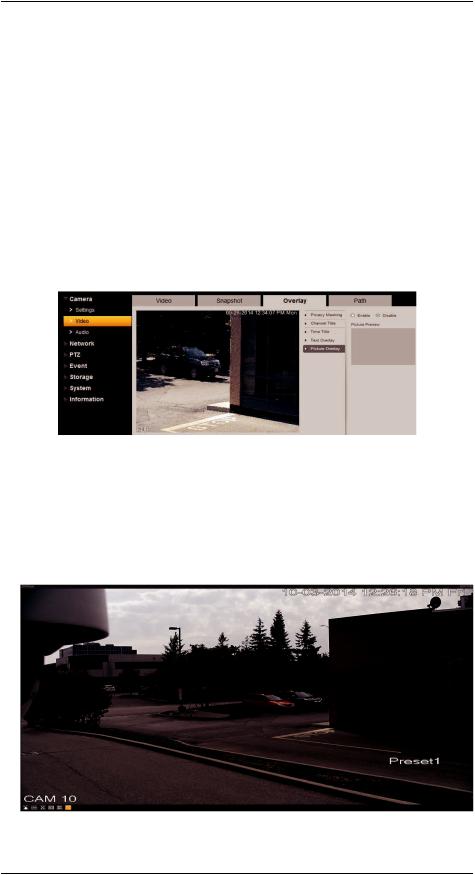
5.1.6 Overlay
The Overlay tab allows you to configure the text and information that appears overtop of the camera image, such as time and date display.
To configure video overlay:
1.Under Channel Title, click Enable to show the name of the channel on screen. Under Input channel title enter a personalized channel name,.
2.Under Time Title check to show the time. Check Week, Display to show the day of the week.
3.Under Text Overlay, click Enable beside the PTZ functions (for example, tours and preset locations) you want to display on screen (PTZ cameras only). Under Input location enter a custom message up to 5,lines.
Example image of Preset text overlay
#LX400038; r. 1.0/18537/18537; en-US |
21 |
5 |
Setup |
4. Click Save to save changes.
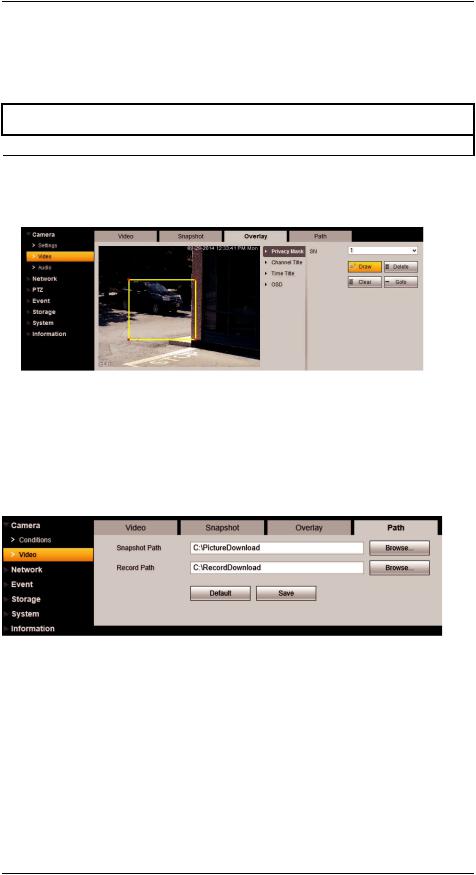
5.1.7 Privacy Masking
Configure privacy masks to hide certain parts of the camera image in video recordings.
CAUTION
 Privacy masks block out parts of the camera image entirely and appear as black boxes in recordings.
To configure video overlay:
1.Under Privacy Masking select a number from the SN dropdown. Click Draw to create a new privacy mask. You can create up to 24 privacy masks.
•Click the corners of a privacy area to adjust the size of the privacy area.
•Right-click to delete the currently selected privacy area.
•Click-and-drag outside of the privacy areas to create a new privacy area.
•Click Save to save changes.
5.1.8 Path
The Path tab allows you to configure the folder where snapshots and manual recordings are saved to.
To configure the recording and snapshot folder:
1.Configure the following:
•Snapshot Path: The folder on your hard drive where snapshots are stored. Click Browse to select a different folder.
•Record Path: The folder on your hard drive where manual recordings are stored. Click Browse to select a different folder.
2.Click Save to save changes.
#LX400038; r. 1.0/18537/18537; en-US |
22 |
Loading...