


 Loading...
User’s manual FLIR MR77
Pinless moisture psychrometer with infrared thermometer and Bluetooth METERLiNK®

User’s manual FLIR MR77
#T559822; r. AC/ 9132/9132; en-US

Table of contents
1 |
Disclaimers.............................................................. |
1 |
|
|
1.1 |
Copyright....................................................... |
1 |
|
1.2 |
Quality assurance ............................................. |
1 |
|
1.3 |
Documentation updates ....................................... |
1 |
|
1.4 |
Disposal of electronic waste................................... |
1 |
2 |
Safety information ...................................................... |
2 |
|
|
2.1 |
FCC Complicance ............................................. |
2 |
|
2.2 |
Industry Canada compliance.................................. |
3 |
3 |
Introduction ............................................................. |
4 |
|
|
3.1 |
Key features.................................................... |
4 |
4 |
Description .............................................................. |
5 |
|
|
4.1 |
Meter description .............................................. |
5 |
|
4.2 |
Function buttons ............................................... |
7 |
|
4.3 |
Display description ............................................ |
8 |
|
4.4 |
Status icons and indicators.................................... |
8 |
5 |
Operation ............................................................... |
11 |
|
|
5.1 |
Powering the meter ........................................... |
11 |
|
5.2 |
Moisture measurements...................................... |
11 |
|
5.3 |
Hygrometric measurements.................................. |
13 |
|
5.4 |
IR temperature measurements............................... |
14 |
|
5.5 |
Condensation measurements................................ |
15 |
|
5.6 |
Vapor pressure measurements .............................. |
16 |
|
5.7 |
Selecting measurement units ................................ |
17 |
|
5.8 |
Storing and recalling measurements......................... |
17 |
|
5.9 |
Alarm settings. ................................................ |
18 |
|
5.10 |
Locked mode ................................................. |
19 |
|
5.11 |
Streaming measurement data using Bluetooth .............. |
20 |
6 |
Maintenance. ........................................................... |
21 |
|
|
6.1 |
Cleaning and storage......................................... |
21 |
|
6.2 |
Battery replacement .......................................... |
21 |
7 |
Material groups ........................................................ |
22 |
|
8 |
Technical specifications .............................................. |
40 |
|
|
8.1 |
General specifications........................................ |
40 |
|
8.2 |
Humidity meter specifications ................................ |
41 |
#T559822; r. AC/ 9132/9132; en-US |
v |

Table of contents
|
8.3 |
Moisture specifications ....................................... |
41 |
|
8.4 |
Thermal measurement range specifications................. |
42 |
|
8.5 |
Vapor pressure specifications................................ |
42 |
|
8.6 |
Dew Point Temperature specifications ....................... |
42 |
|
8.7 |
Mixing Ratio specifications ................................... |
42 |
9 |
Technical support ..................................................... |
43 |
|
10 |
Warranties .............................................................. |
44 |
|
|
10.1 |
FLIR Global Limited Lifetime Warranty ...................... |
44 |
10.2FLIR Test and Measurement Limited 2 Year
Warranty...................................................... |
45 |
#T559822; r. AC/ 9132/9132; en-US |
vi |

1 Disclaimers
1.1 Copyright
© 2013, FLIR Systems, Inc. All rights reserved worldwide. No parts of the software including source code may be reproduced, transmitted, transcribed or translated into any language or computer language in any form or by any means, electronic, magnetic, optical, manual or otherwise, without the prior written permission of FLIR Systems.
The documentation must not, in whole or part, be copied, photocopied, reproduced, translated or transmitted to any electronic medium or machine readable form without prior consent, in writing, from FLIR Systems.
Names and marks appearing on the products herein are either registered trademarks or trademarks of FLIR Systems and/or its subsidiaries. All other trademarks, trade names or company names referenced herein are used for identification only and are the property of their respective owners.
1.2 Quality assurance
The Quality Management System under which these products are developed and manufactured has been certified in accordance with the ISO 9001 standard.
FLIR Systems is committed to a policy of continuous development; therefore we reserve the right to make changes and improvements on any of the products without prior notice.
1.3 Documentation updates
Our manuals are updated several times per year, and we also issue product-critical notifications of changes on a regular basis.
To access the latest manuals and notifications, go to the Download tab at:
http://support.flir.com
It only takes a few minutes to register online. In the download area you will also find the latest releases of manuals for our other products, as well as manuals for our historical and obsolete products.
1.4 Disposal of electronic waste
As with most electronic products, this equipment must be disposed of in an environmentally friendly way, and in accordance with existing regulations for electronic waste.
Please contact your FLIR Systems representative for more details.
#T559822; r. AC/ 9132/9132; en-US |
1 |
2 Safety information
 Note
Note
Before operating the device, you must read, understand, and follow all instructions, dangers, warnings, cautions, and notes.
 Note
Note
FLIR Systems reserves the right to discontinue models, parts or accessories, and other items, or to change specifications at any time without prior notice.
WARNING
Do not look directly into the laser beam. The laser beam can cause eye irritation.
WARNING
Do not use the laser pointer near explosive gases or in other possible explosive areas. Injury to persons can occur.
This symbol, adjacent to another symbol or terminal, indicates that the user must refer to the manual for further information.
This symbol, adjacent to a terminal, indicates that, under normal use, hazardous voltages may be present.
Double insulation.
2.1 FCC Complicance
This device complies with part 15 of the FCC Rules. Operation is subject to the following two conditions:
1.This device may not cause harmful interference.
2.This device must accept any interference received, including interference that may cause undesired operation.
This equipment has been tested and found to comply with the limits for a Class B digital device, pursuant to part 15 of the FCC Rules. These limits are designed to
#T559822; r. AC/ 9132/9132; en-US |
2 |

2 Safety information
provide reasonable protection against harmful interference in a residential installation. This equipment generates, uses, and can radiate radio frequency energy and, if not installed and used in accordance with the instructions, may cause harmful interference to radio communications. However, there is no guarantee that interference will not occur in a particular installation. If this equipment does cause harmful interference to radio or television reception, which can be determined by turning the equipment off and on, the user is encouraged to try to correct the interference by one or more of the following measures:
•Reorient or relocate the receiving antenna.
•Increase the separation between the equipment and receiver.
•Connect the equipment into an outlet on a circuit different from that to which the receiver is connected.
•Consult the dealer or an experienced radio/TV technician for help.
WARNING
Changes or modifications not expressly approved by the party responsible for compliance could void the user's authority to operate the equipment.
2.2 Industry Canada compliance
This device complies with Industry Canada licence-exempt RSS standard(s). Operation is subjectto the following two conditions: (1) this device may not cause interference, and (2) this devicemust accept any interference, including interference that may cause undesired operation of thedevice.
#T559822; r. AC/ 9132/9132; en-US |
3 |

3 Introduction
Congratulations on your purchase of the FLIR MR77 with METERLiNK® Bluetooth capabilities for use with FLIR infrared (IR) cameras.
This pinless moisture meter incorporates a patented built-in IR thermometer and 20-point memory. You can monitor moisture in wood and other building materials with no surface damage with the pinless moisture sensor (pin-type moisture probe included), and measure humidity and air temperature with the built-in probe, plus non-contact IR temperature using its patented IR design. Advanced functions provide moisture content, dew point, and vapor pressure calculations.
This meter is shipped fully tested and calibrated and, with proper use, will provide years of reliable service.
3.1 Key features
•Quickly indicates the moisture content of materials with pinless technology without damaging the surface.
•Optional remote pin-type probe (MR77-P) allows for moisture readings at different penetration levels (0.9 m (3′) cable length).
•Easy to read, large dual display with backlight feature.
•Simultaneously displays the percentage moisture content of wood or material being tested and the air temperature, IR temperature, or humidity.
•Uses a patented IR design to measure non-contact surface temperature, with an 8:1 distance-to-spot ratio and 0.95 fixed emissivity.
•Built-in humidity/temperature probe measures relative humidity and air temperature plus the mixing ratio and the dew point.
•Measures ambient and surface vapor pressure.
•Automatically calculates the differential temperature.
•Minimum/maximum and data hold modes.
•20-point internal memory.
•Auto power off and low battery indication.
#T559822; r. AC/ 9132/9132; en-US |
4 |

4 Description
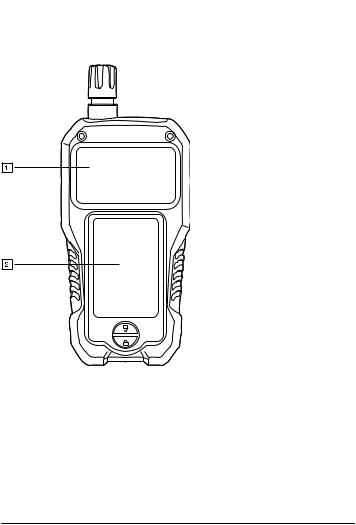
4.1 Meter description
Figure 4.1 Front view
1.IR sensor.
2.Laser pointer diode.
3.Humidity sensor and thermometer.
 Note
Note
 Protect the sensor with the protective cap when not in use.
#T559822; r. AC/ 9132/9132; en-US |
5 |
4 Description
4.LCD display.
5.Function buttons, see section 4.2 Function buttons page 7.
6.External pin probe connection jack (RJ45).
Figure 4.2 Rear view
1.Internal moisture sensor.
2.Battery compartment.
#T559822; r. AC/ 9132/9132; en-US |
6 |
4 Description
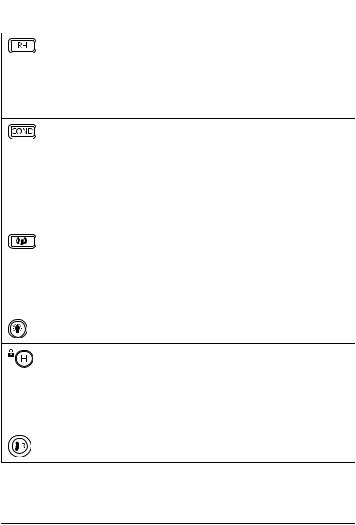
4.2 Function buttons
• Press the button to enter Hygrometer mode, see section 5.3
Hygrometric measurements page 13.
•Press the button repeatedly to cycle through the display of relative humidity, dew point temperature, and mix ratio.
•Press and hold the button for 2 seconds to enter Humidity alarm set mode, see section 5.9 Alarm settings page 18.
• Press the button to enter Condensation mode, see section
5.5 Condensation measurements page 15.
•Press the button repeatedly to toggle between Condensation mode and Vapor pressure mode, see section 5.6 Vapor pressure measurements, page 16.
•When in Moisture mode, press and hold the button for 2 seconds to toggle between the relative and absolute readings, see section 5.2 Moisture measurements page 11.
• Press the button to enter Moisture mode, see section 5.2
Moisture measurements page 11.
•Press the button repeatedly to toggle between the internal sensor and external pin probe measurements.
•Press and hold the button for 2 seconds to enter Moisture alarm set mode, see section 5.9 Alarm settings page 18.
Press the button to enable/disable the display backlight.
• Press the button to toggle between Normal and Hold mode. In Hold mode, the display freezes the last reading and continues to display this value.
•Press and hold the button for 5 seconds to toggle between Normal and Locked mode, see section 5.10 Locked mode page 19.
Press and hold the button to enable IR temperature measurements, see section 5.4 IR temperature measurements page 14.
#T559822; r. AC/ 9132/9132; en-US |
7 |
4 Description
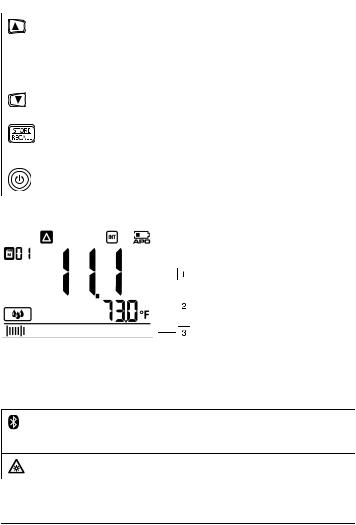
• Press and hold the button for 2 seconds to change the unit setting. For more information, see section 5.7 Selecting measurement units page 17. ,
•When in View data mode, press the button to step through the datalogger memory locations.
When in View data mode, press the button to step through the datalogger memory locations.
Press the button to capture and store the current readings. For more information, see section 5.8 Storing and recalling measurements page 17. ,
Press the button to switch the meter on/off.
4.3 Display description
1.Main display.
2.Secondary display.
3.Bar graph (matches the reading on the main display).
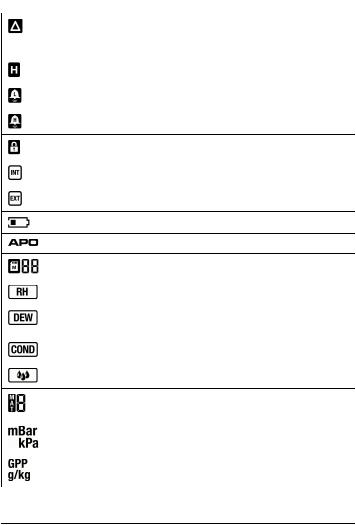
4.4 Status icons and indicators
Indicates that METERLiNK® (Bluetooth) communication is active, see section 5.11 Streaming measurement data using Bluetooth page 20. ,
Indicates that the IR sensor and the laser pointer diode are active.
#T559822; r. AC/ 9132/9132; en-US |
8 |
4 Description
Indicates that the meter is displaying relative moisture measurements (solid indicator) or absolute moisture measurements (flashing indicator).
Indicates that the meter is in Hold mode.
Indicates that the reading is lower than the Low alarm threshold.
Indicates that the reading is higher than the High alarm threshold.
Indicates that the meter is in Locked mode.
Indicates that the internal moisture sensor is active.
Indicates that the external pin probe is active.
Indicates the battery voltage status.
Indicates that the auto power off function is enabled.
Indicates the active datalogger memory location (1–20).
Indicates that the meter is in Hygrometer mode.
Indicates that the meter is displaying dew point temperature readings on the main display.
Indicates that the meter is in Condensation mode.
Indicates that the meter is in Moisture mode.
Indicates the number that represents the material group under test, see section 7 Material groups page 22.
Indicates that the meter is displaying vapor pressure in millibar (mBar) or in kilopascal (kPa) units.
Indicates that the meter is displaying the mixing ratio in grains per pound (GPP) or in grams per kilogram (g/kg) units.
#T559822; r. AC/ 9132/9132; en-US |
9 |
4 Description
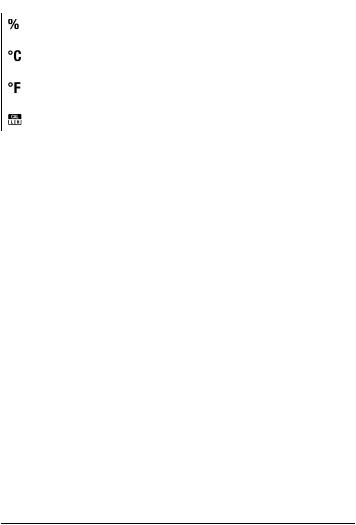
Indicates that the meter is displaying relative humidity in percent
(%) units.
Indicates that the meter is displaying temperature in degrees Celsius ( units. )
Indicates that the meter is displaying temperature in degrees Fahrenheit ( units. )
High/low calibration point.
#T559822; r. AC/ 9132/9132; en-US |
10 |

5 Operation
5.1 Powering the meter
1.Remove the protective cap from the humidity sensor/thermometer assembly.
2.Press the  button to switch on the meter.
3.If the battery indicator  shows that the battery voltage is low or if the me-
ter does not power on, replace the battery. See section 6.2 Battery replacement page 21. ,
4.Press the  button to switch off the meter.
5.1.1 Auto power off
The meter enters sleep mode after 30 minutes of inactivity. The meter beeps three times 20 seconds before powering off. Press any function button to prevent the meter from powering off. The auto power off time-out is then reset.
5.1.1.1 Disable auto power off
1.To disable the auto power off function, start with the meter switched off.
2.Simultaneously press and hold the  and
and  buttons until the
  indicator disappears, indicating that the function is disabled.
5.2 Moisture measurements
With the meter in Moisture mode, moisture measurements can be performed using either the internal moisture sensor or by connecting the external pin probe.
The internal moisture sensor can detect moisture to a depth of 19 mm (0.75″). The internal moisture reading can be relative or absolute.
The three-digit main display shows the moisture reading, and the four-digit secondary display shows the ambient air temperature. The bar graph matches the reading on the main display.
While in Moisture mode, IR measurements may also be performed, see section 5.4 IR temperature measurements, page 14.
#T559822; r. AC/ 9132/9132; en-US |
11 |
Loading...