


 Loading...
User’s manual FLIR Cx series

User’s manual FLIR Cx series
#T559918; r. AA/20829/20829; en-US |
iii |

Table of contents
1 |
Disclaimers ........................................................................................ |
1 |
|
|
1.1 |
Legal disclaimer ......................................................................... |
1 |
|
1.2 |
Usage statistics .......................................................................... |
1 |
|
1.3 |
Changes to registry ..................................................................... |
1 |
|
1.4 |
U.S. Government Regulations........................................................ |
1 |
|
1.5 |
Copyright .................................................................................. |
1 |
|
1.6 |
Quality assurance ....................................................................... |
1 |
|
1.7 |
Patents ..................................................................................... |
1 |
|
1.8 |
EULA Terms .............................................................................. |
1 |
|
1.9 |
EULA Terms .............................................................................. |
2 |
2 |
Safety information ............................................................................... |
3 |
|
3 |
Notice to user ..................................................................................... |
6 |
|
|
3.1 |
User-to-user forums .................................................................... |
6 |
|
3.2 |
Calibration................................................................................. |
6 |
|
3.3 |
Accuracy .................................................................................. |
6 |
|
3.4 |
Disposal of electronic waste .......................................................... |
6 |
|
3.5 |
Training .................................................................................... |
6 |
|
3.6 |
Documentation updates ............................................................... |
6 |
|
3.7 |
Important note about this manual.................................................... |
6 |
4 |
Customer help .................................................................................... |
7 |
|
|
4.1 |
General .................................................................................... |
7 |
|
4.2 |
Submitting a question .................................................................. |
7 |
|
4.3 |
Downloads ................................................................................ |
7 |
5 |
Quick Start Guide ................................................................................ |
9 |
||
|
5.1 |
Procedure ................................................................................. |
9 |
|
6 |
Description....................................................................................... |
|
10 |
|
|
6.1 |
View from the front .................................................................... |
10 |
|
|
6.2 |
View from the rear..................................................................... |
10 |
|
|
6.3 |
Connector ............................................................................... |
11 |
|
|
6.4 |
Screen elements ...................................................................... |
11 |
|
|
6.5 |
Auto-orientation........................................................................ |
11 |
|
|
6.6 |
Navigating the menu system ....................................................... |
12 |
|
7 |
Operation ......................................................................................... |
|
13 |
|
|
7.1 |
Charging the battery .................................................................. |
13 |
|
|
7.2 |
Turning on and turning off the camera............................................ |
13 |
|
|
7.3 |
Saving an image....................................................................... |
13 |
|
|
|
7.3.1 |
General........................................................................ |
13 |
|
|
7.3.2 |
Image capacity .............................................................. |
13 |
|
|
7.3.3 |
Naming convention......................................................... |
13 |
|
7.4 |
7.3.4 |
Procedure .................................................................... |
13 |
|
Recalling an image.................................................................... |
13 |
||
|
|
7.4.1 |
General........................................................................ |
13 |
|
7.5 |
7.4.2 |
Procedure .................................................................... |
13 |
|
Deleting an image ..................................................................... |
14 |
||
|
|
7.5.1 |
General........................................................................ |
14 |
|
7.6 |
7.5.2 |
Procedure .................................................................... |
14 |
|
Deleting all images.................................................................... |
14 |
||
|
|
7.6.1 |
General........................................................................ |
14 |
|
7.7 |
7.6.2 |
Procedure .................................................................... |
14 |
|
Measuring a temperature using a spotmeter ................................... |
15 |
||
#T559918; r. AA/20829/20829; en-US |
v |

Table of contents
|
7.8 |
7.7.1 |
General ........................................................................ |
15 |
|
Hiding measurement tools .......................................................... |
15 |
||
|
7.9 |
7.8.1 |
Procedure .................................................................... |
15 |
|
Changing the color palette .......................................................... |
15 |
||
|
|
7.9.1 |
General ........................................................................ |
15 |
|
7.10 |
7.9.2 |
Procedure .................................................................... |
15 |
|
Changing the image mode .......................................................... |
15 |
||
|
|
7.10.1 |
General ........................................................................ |
15 |
|
7.11 |
7.10.2 |
Procedure .................................................................... |
16 |
|
Changing the temperature scale mode .......................................... |
17 |
||
|
|
7.11.1 |
General ........................................................................ |
17 |
|
|
7.11.2 |
When to use Lock mode .................................................. |
17 |
|
7.12 |
7.11.3 |
Procedure .................................................................... |
17 |
|
Setting the emissivity ................................................................. |
17 |
||
|
|
7.12.1 |
General ........................................................................ |
17 |
|
7.13 |
7.12.2 |
Procedure .................................................................... |
18 |
|
Changing the reflected apparent temperature ................................. |
18 |
||
|
|
7.13.1 |
General ........................................................................ |
18 |
|
7.14 |
7.13.2 |
Procedure .................................................................... |
18 |
|
Performing a non-uniformity correction .......................................... |
18 |
||
|
|
7.14.1 |
What is a non - uniformity correction? ................................... |
18 |
|
|
7.14.2 |
When to perform a non - uniformity correction ........................ |
18 |
|
7.15 |
7.14.3 |
Procedure .................................................................... |
19 |
|
Using the camera lamp .............................................................. |
19 |
||
|
|
7.15.1 |
General ........................................................................ |
19 |
|
7.16 |
7.15.2 |
Procedure .................................................................... |
19 |
|
Changing the settings ................................................................ |
19 |
||
|
|
7.16.1 |
General ........................................................................ |
19 |
|
7.17 |
7.16.2 |
Procedure .................................................................... |
20 |
|
Updating the camera ................................................................. |
20 |
||
|
|
7.17.1 |
General ........................................................................ |
20 |
|
|
7.17.2 |
Procedure .................................................................... |
20 |
8 |
Technical data |
................................................................................... |
21 |
|
|
8.1 |
Online field ......................................................-of-view calculator |
21 |
|
|
8.2 |
Note about ...........................................................technical data |
21 |
|
|
8.3 |
FLIR C2 .................................................................................. |
22 |
|
9 |
Mechanical drawings ......................................................................... |
25 |
||
10 |
Cleaning the camera .......................................................................... |
26 |
||
|
10.1 |
Camera .......................................housing, cables, and other items |
26 |
|
|
|
10.1.1 ......................................................................... |
Liquids |
26 |
|
|
10.1.2 .................................................................... |
Equipment |
26 |
|
10.2 |
10.1.3 .................................................................... |
Procedure |
26 |
|
Infrared ............................................................................lens |
26 |
||
|
|
10.2.1 ......................................................................... |
Liquids |
26 |
|
|
10.2.2 .................................................................... |
Equipment |
26 |
|
|
10.2.3 .................................................................... |
Procedure |
26 |
11 |
Application examples......................................................................... |
27 |
||
|
11.1 |
Moisture ...........................................................& water damage |
27 |
|
|
|
11.1.1 ........................................................................ |
General |
27 |
|
|
11.1.2 .......................................................................... |
Figure |
27 |
#T559918; r. AA/20829/20829; en-US |
vi |

Table of contents
|
11.2 |
Faulty contact in socket .............................................................. |
27 |
|
|
|
11.2.1 |
General........................................................................ |
27 |
|
11.3 |
11.2.2 |
Figure.......................................................................... |
28 |
|
Oxidized socket........................................................................ |
28 |
||
|
|
11.3.1 |
General........................................................................ |
28 |
|
11.4 |
11.3.2 |
Figure.......................................................................... |
28 |
|
Insulation deficiencies................................................................ |
29 |
||
|
|
11.4.1 |
General........................................................................ |
29 |
|
11.5 |
11.4.2 |
Figure.......................................................................... |
29 |
|
Draft ...................................................................................... |
General |
30 |
|
|
|
11.5.1 |
30 |
|
|
|
11.5.2 |
Figure.......................................................................... |
30 |
12 |
About FLIR Systems .......................................................................... |
32 |
||
|
12.1 |
More than just an infrared camera ................................................ |
33 |
|
|
12.2 |
Sharing our knowledge .............................................................. |
33 |
|
|
12.3 |
Supporting our customers........................................................... |
34 |
|
|
12.4 |
A few images from our facilities .................................................... |
34 |
|
13 |
Glossary .......................................................................................... |
|
35 |
|
14 |
Thermographic measurement techniques ............................................ |
38 |
||
|
14.1 |
Introduction ............................................................................ |
38 |
|
|
14.2 |
Emissivity................................................................................ |
38 |
|
|
14.3 |
14.2.1 Finding the emissivity of a sample ...................................... |
38 |
|
|
Reflected apparent temperature................................................... |
41 |
||
|
14.4 |
Distance ................................................................................. |
42 |
|
|
14.5 |
Relative humidity ...................................................................... |
42 |
|
|
14.6 |
Other parameters...................................................................... |
42 |
|
15 |
History of infrared technology............................................................. |
43 |
||
16 |
Theory of thermography..................................................................... |
46 |
||
|
16.1 |
Introduction ............................................................................. |
46 |
|
|
16.2 |
The electromagnetic spectrum..................................................... |
46 |
|
|
16.3 |
Blackbody radiation................................................................... |
46 |
|
|
|
16.3.1 |
Planck’s law .................................................................. |
47 |
|
|
16.3.2 |
Wien’s displacement law.................................................. |
48 |
|
|
16.3.3 |
Stefan-Boltzmann's law ................................................... |
50 |
|
16.4 |
16.3.4 |
Non-blackbody emitters................................................... |
50 |
|
Infrared semi-transparent materials............................................... |
52 |
||
17 |
The measurement formula.................................................................. |
54 |
||
18 |
Emissivity tables ............................................................................... |
58 |
||
|
18.1 |
References.............................................................................. |
58 |
|
|
18.2 |
Tables .................................................................................... |
|
58 |
#T559918; r. AA/20829/20829; en-US |
vii |

1 |
Disclaimers |
1.1 Legal disclaimer
All products manufactured by FLIR Systems are warranted against defective materials and workmanship for a period of one (1) year from the delivery date of the original purchase, provided such products have been under normal storage, use and service, and in accordance with FLIR Systems instruction.
Uncooled handheld infrared cameras manufactured by FLIR Systems are warranted against defective materials and workmanship for a period of two (2) years from the delivery date of the original purchase, provided such products have been under normal storage, use and service, and in accordance with FLIR Systems instruction, and provided that the camera has been registered within 60 days of original purchase.
Detectors for uncooled handheld infrared cameras manufactured by FLIR Systems are warranted against defective materials and workmanship for a period of ten (10) years from the delivery date of the original purchase, provided such products have been under normal storage, use and service, and in accordance with FLIR Systems instruction, and provided that the camera has been registered within 60 days of original purchase.
Products which are not manufactured by FLIR Systems but included in systems delivered by FLIR Systems to the original purchaser, carry the warranty, if any, of the particular supplier only. FLIR Systems has no responsibility whatsoever for such products.
The warranty extends only to the original purchaser and is not transferable. It is not applicable to any product which has been subjected to misuse, neglect, accident or abnormal conditions of operation. Expendable parts are excluded from the warranty.
In the case of a defect in a product covered by this warranty the product must not be further used in order to prevent additional damage. The purchaser shall promptly report any defect to FLIR Systems or this warranty will not apply.
FLIR Systems will, at its option, repair or replace any such defective product free of charge if, upon inspection, it proves to be defective in material or workmanship and provided that it is returned to FLIR Systems within the said oneyear period.
FLIR Systems has no other obligation or liability for defects than those set forth above.
No other warranty is expressed or implied. FLIR Systems specifically disclaims the implied warranties of merchantability and fitness for a particular purpose.
FLIR Systems shall not be liable for any direct, indirect, special, incidental or consequential loss or damage, whether based on contract, tort or any other legal theory.
This warranty shall be governed by Swedish law.
Any dispute, controversy or claim arising out of or in connection with this warranty, shall be finally settled by arbitration in accordance with the Rules of the Arbitration Institute of the Stockholm Chamber of Commerce. The place of arbitration shall be Stockholm. The language to be used in the arbitral proceedings shall be English.
1.2 Usage statistics
FLIR Systems reserves the right to gather anonymous usage statistics to help maintain and improve the quality of our software and services.
1.3 Changes to registry
The registry entry HKEY_LOCAL_MACHINE\SYSTEM\CurrentControlSet \Control\Lsa\LmCompatibilityLevel will be automatically changed to level 2 if the FLIR Camera Monitor service detects a FLIR camera connected to the computer with a USB cable. The modification will only be executed if the camera device implements a remote network service that supports network logons.
1.4 U.S. Government Regulations
This product may be subject to U.S. Export Regulations. Please send any inquiries to exportquestions@flir.com.
1.5 Copyright
© 2014, FLIR Systems, Inc. All rights reserved worldwide. No parts of the software including source code may be reproduced, transmitted, transcribed or translated into any language or computer language in any form or by any means, electronic, magnetic, optical, manual or otherwise, without the prior written permission of FLIR Systems.
The documentation must not, in whole or part, be copied, photocopied, reproduced, translated or transmitted to any electronic medium or machine readable form without prior consent, in writing, from FLIR Systems.
Names and marks appearing on the products herein are either registered trademarks or trademarks of FLIR Systems and/or its subsidiaries. All other trademarks, trade names or company names referenced herein are used for identification only and are the property of their respective owners.
1.6 Quality assurance
The Quality Management System under which these products are developed and manufactured has been certified in accordance with the ISO 9001 standard.
FLIR Systems is committed to a policy of continuous development; therefore we reserve the right to make changes and improvements on any of the products without prior notice.
1.7Patents
One or several of the following patents and/or design patents may apply to the products and/or features. Additional pending patents and/or pending design patents may also apply.
000279476-0001; 000439161; 000499579-0001; 000653423; 000726344; 000859020; 001106306-0001; 001707738; 001707746; 001707787; 001776519; 001954074; 002021543; 002058180; 002249953; 002531178; 0600574-8; 1144833; 1182246; 1182620; 1285345; 1299699; 1325808; 1336775; 1391114; 1402918; 1404291; 1411581; 1415075; 1421497; 1458284; 1678485; 1732314; 2106017; 2107799; 2381417; 3006596; 3006597; 466540; 483782; 484155; 4889913; 5177595; 60122153.2; 602004011681.5-08; 6707044; 68657; 7034300; 7110035; 7154093; 7157705; 7237946; 7312822; 7332716; 7336823; 7544944; 7667198; 7809258 B2; 7826736; 8,153,971; 8018649 B2; 8212210 B2; 8289372; 8354639 B2; 8384783; 8520970; 8565547; 8595689; 8599262; 8654239; 8680468; 8803093; D540838; D549758; D579475; D584755; D599,392; D615,113; D664,580; D664,581; D665,004; D665,440; D677298; D710,424 S; DI6702302-9; DI6903617-9; DI7002221-6; DI7002891-5; DI7002892-3; DI7005799-0; DM/057692; DM/061609; EP 2115696 B1; EP2315433; SE 0700240-5; US 8340414 B2; ZL 201330267619.5; ZL01823221.3; ZL01823226.4; ZL02331553.9; ZL02331554.7; ZL200480034894.0; ZL200530120994.2; ZL200610088759.5; ZL200630130114.4; ZL200730151141.4; ZL200730339504.7; ZL200820105768.8; ZL200830128581.2; ZL200880105236.4; ZL200880105769.2; ZL200930190061.9; ZL201030176127.1; ZL201030176130.3; ZL201030176157.2; ZL201030595931.3; ZL201130442354.9; ZL201230471744.3; ZL201230620731.8.
1.8EULA Terms
•You have acquired a device (“INFRARED CAMERA”) that includes software licensed by FLIR Systems AB from Microsoft Licensing, GP or its affiliates (“MS”). Those installed software products of MS origin, as well as associated media, printed materials, and “online” or electronic documentation (“SOFTWARE”) are protected by international intellectual property laws and treaties. The SOFTWARE is licensed, not sold. All rights reserved.
•IF YOU DO NOT AGREE TO THIS END USER LICENSE AGREEMENT (“EULA”), DO NOT USE THE DEVICE OR COPY THE SOFTWARE. INSTEAD, PROMPTLY CONTACT FLIR Systems AB FOR INSTRUCTIONS ON RETURN OF THE UNUSED DEVICE(S) FOR A REFUND. ANY USE
OF THE SOFTWARE, INCLUDING BUT NOT LIMITED TO USE ON THE DEVICE, WILL CONSTITUTE YOUR AGREEMENT TO THIS EULA (OR RATIFICATION OF ANY PREVIOUS CONSENT).
•GRANT OF SOFTWARE LICENSE. This EULA grants you the following license:
•You may use the SOFTWARE only on the DEVICE.
•NOT FAULT TOLERANT. THE SOFTWARE IS NOT FAULT TOLERANT. FLIR Systems AB HAS INDEPENDENTLY DETERMINED HOW TO USE THE SOFTWARE IN THE DEVICE, AND MS HAS RELIED UPON FLIR Systems AB TO CONDUCT SUFFICIENT TESTING TO DETERMINE THAT THE SOFTWARE IS SUITABLE FOR SUCH USE.
•NO WARRANTIES FOR THE SOFTWARE. THE SOFTWARE is provided “AS IS” and with all faults. THE ENTIRE RISK AS TO SATISFACTORY QUALITY, PERFORMANCE, ACCURACY, AND EFFORT (INCLUDING LACK OF NEGLIGENCE) IS WITH YOU. ALSO, THERE IS NO WARRANTY AGAINST INTERFERENCE WITH YOUR ENJOYMENT OF THE SOFTWARE OR AGAINST INFRINGEMENT. IF YOU HAVE RECEIVED ANY WARRANTIES RE-
GARDING THE DEVICE OR THE SOFTWARE, THOSE WARRANTIES DO NOT ORIGINATE FROM, AND ARE NOT BINDING ON, MS.
•No Liability for Certain Damages. EXCEPT AS PROHIBITED BY
LAW, MS SHALL HAVE NO LIABILITY FOR ANY INDIRECT, SPECIAL, CONSEQUENTIAL OR INCIDENTAL DAMAGES ARISING FROM OR IN CONNECTION WITH THE USE OR PERFORMANCE OF THE SOFTWARE. THIS LIMITATION SHALL APPLY EVEN IF ANY REMEDY FAILS OF ITS ESSENTIAL PURPOSE. IN NO EVENT SHALL MS BE LIABLE FOR ANY AMOUNT IN EXCESS OF U.S. TWO HUNDRED FIFTY DOLLARS (U.S.$250.00).
•Limitations on Reverse Engineering, Decompilation, and Disassembly. You may not reverse engineer, decompile, or disassemble the SOFTWARE, except and only to the extent that such activity is expressly permitted by applicable law notwithstanding this limitation.
•SOFTWARE TRANSFER ALLOWED BUT WITH RESTRICTIONS.
You may permanently transfer rights under this EULA only as part of a permanent sale or transfer of the Device, and only if the recipient agrees to this EULA. If the SOFTWARE is an upgrade, any transfer must also include all prior versions of the SOFTWARE.
•EXPORT RESTRICTIONS. You acknowledge that SOFTWARE is subject to U.S. export jurisdiction. You agree to comply with all applicable international and national laws that apply to the SOFTWARE, including the U.S. Export Administration Regulations, as well as end-user, end-use and destination restrictions issued by U.S. and other governments. For additional information see http://www.microsoft.com/exporting/.
#T559918; r. AA/20829/20829; en-US |
1 |

1 |
Disclaimers |
1.9 EULA Terms
Qt4 Core and Qt4 GUI, Copyright ©2013 Nokia Corporation and FLIR Systems AB. This Qt library is a free software; you can redistribute it and/or modify it under the terms of the GNU Lesser General Public License as published by the Free Software Foundation; either version 2.1 of the License, or (at your option) any later version. This library is distributed in the hope that it will be
useful, but WITHOUT ANY WARRANTY; without even the implied warranty of MERCHANTABILITY or FITNESS FOR A PARTICULAR PURPOSE. See the GNU Lesser General Public License, http://www.gnu.org/licenses/lgpl-2.1.html. The source code for the libraries Qt4 Core and Qt4 GUI may be requested from FLIR Systems AB.
#T559918; r. AA/20829/20829; en-US |
2 |

2 |
Safety information |
WARNING
Applicability Cameras with one or more batteries. |
: |
Do not disassemble or do a modification to the battery. The battery contains safety and protection devices which, if damage occurs, can cause the battery to become hot, or cause an explosion or an ignition.
WARNING
Applicability Cameras with one or more batteries. |
: |
If there is a leak from the battery and you get the fluid in your eyes, do not rub your eyes. Flush well with water and immediately get medical care. The battery fluid can cause injury to your eyes if you do not do this.
WARNING
Applicability Cameras with one or more batteries. |
: |
Do not continue to charge the battery if it does not become charged in the specified charging time. If you continue to charge the battery, it can become hot and cause an explosion or ignition. Injury to persons can occur.
WARNING
Applicability Cameras with one or more batteries. |
: |
Only use the correct equipment to remove the electrical power from the battery. If you do not use the correct equipment, you can decrease the performance or the life cycle of the battery. If you do not use the correct equipment, an incorrect flow of current to the battery can occur. This can cause the battery to become hot, or cause an explosion. Injury to persons can occur.
WARNING
Make sure that you read all applicable MSDS (Material Safety Data Sheets) and warning labels on containers before you use a liquid. The liquids can be dangerous. Injury to persons can occur.
CAUTION
Do not point the infrared camera (with or without the lens cover) at strong energy sources, for example, devices that cause laser radiation, or the sun. This can have an unwanted effect on the accuracy of the camera. It can also cause damage to the detector in the camera.
CAUTION
Do not use the camera in temperatures more than +50°C (+122°F), unless other information is specified in the user documentation or technical data. High temperatures can cause damage to the camera.
CAUTION
Applicability Cameras with one or more batteries. |
: |
Do not attach the batteries directly to a car’s cigarette lighter socket, unless FLIR Systems supplies a specific adapter to connect the batteries to a cigarette lighter socket. Damage to the batteries can occur.
CAUTION
Applicability Cameras with one or more batteries. |
: |
Do not connect the positive terminal and the negative terminal of the battery to each other with a metal object (such as wire). Damage to the batteries can occur.
#T559918; r. AA/20829/20829; en-US |
3 |

2 |
Safety information |
CAUTION
Applicability Cameras with one or more batteries. |
: |
Do not get water or salt water on the battery, or permit the battery to become wet. Damage to the batteries can occur.
CAUTION
Applicability Cameras with one or more batteries. |
: |
Do not make holes in the battery with objects. Damage to the battery can occur.
CAUTION
Applicability Cameras with one or more batteries. |
: |
Do not hit the battery with a hammer. Damage to the battery can occur.
CAUTION
Applicability Cameras with one or more batteries. |
: |
Do not put your foot on the battery, hit it or cause shocks to it. Damage to the battery can occur.
CAUTION
Applicability Cameras with one or more batteries. |
: |
Do not put the batteries in or near a fire, or into direct sunlight. When the battery becomes hot, the built-in safety equipment becomes energized and can stop the battery charging procedure. If the battery becomes hot, damage can occur to the safety equipment and this can cause more heat, damage or ignition of the battery.
CAUTION
Applicability Cameras with one or more batteries. |
: |
Do not put the battery on a fire or increase the temperature of the battery with heat. Damage to the battery and injury to persons can occur.
CAUTION
Applicability Cameras with one or more batteries. |
: |
Do not put the battery on or near fires, stoves, or other high-temperature locations. Damage to the battery and injury to persons can occur.
CAUTION
Applicability Cameras with one or more batteries. |
: |
Do not solder directly onto the battery. Damage to the battery can occur.
CAUTION
Applicability Cameras with one or more batteries. |
: |
Do not use the battery if, when you use, charge, or put the battery in storage, there is an unusual smell from the battery, the battery feels hot, changes color, changes shape, or is in an unusual condition. Speak with your sales office if one or more of these problems occurs. Damage to the battery and injury to persons can occur.
#T559918; r. AA/20829/20829; en-US |
4 |

2 |
Safety information |
CAUTION
Applicability Cameras with one or more batteries. |
: |
Only use a specified battery charger when you charge the battery. Damage to the battery can occur if you do not do this.
CAUTION
Applicability Cameras with one or more batteries. |
: |
The temperature range through which you can charge the battery is ±0°C to +45°C (+32°F to +113°F), unless other information is specified in the user documentation or technical data. If you charge the battery at temperatures out of this range, it can cause the battery to become hot or to break. It can also decrease the performance or the life cycle of the battery.
CAUTION
Applicability Cameras with one or more batteries. |
: |
The temperature range through which you can remove the electrical power from the battery is -15°C to +50°C (+5°F to +122°F), unless other information is specified in the user documentation or technical data. If you operate the battery out of this temperature range, it can decrease the performance or the life cycle of the battery.
CAUTION
Applicability Cameras with one or more batteries. |
: |
When the battery is worn, apply insulation to the terminals with adhesive tape or equivalent materials before you discard it. Damage to the battery and injury to persons can occur if you do not do this.
CAUTION
Applicability Cameras with one or more batteries. |
: |
Remove any water or moisture on the battery before you install it. Damage to the battery can occur if you do not do this.
CAUTION
Do not apply solvents or equivalent liquids to the camera, the cables, or other items. Damage to the battery and injury to persons can occur.
CAUTION
Be careful when you clean the infrared lens. The lens has an anti-reflective coating which is easily damaged. Damage to the infrared lens can occur.
CAUTION
Do not use too much force to clean the infrared lens. This can cause damage to the anti-reflective coating.
 Note
Note
The encapsulation rating is only applicable when all the openings on the camera are sealed with their correct covers, hatches, or caps. This includes the compartments for data storage, batteries, and connectors.
#T559918; r. AA/20829/20829; en-US |
5 |

3 |
Notice to user |
3.1 User-to-user forums
Exchange ideas, problems, and infrared solutions with fellow thermographers around the world in our user-to-user forums. To go to the forums, visit:
http://www.infraredtraining.com/community/boards/
3.2 Calibration
We recommend that you send in the camera for calibration once a year. Contact your local sales office for instructions on where to send the camera.
3.3 Accuracy
For very accurate results, we recommend that you wait 5 minutes after you have started the camera before measuring a temperature.
3.4 Disposal of electronic waste
As with most electronic products, this equipment must be disposed of in an environmentally friendly way, and in accordance with existing regulations for electronic waste.
Please contact your FLIR Systems representative for more details.
3.5 Training
To read about infrared training, visit:
•http://www.infraredtraining.com
•http://www.irtraining.com
•http://www.irtraining.eu
3.6 Documentation updates
Our manuals are updated several times per year, and we also issue product-critical notifications of changes on a regular basis.
To access the latest manuals and notifications, go to the Download tab at:
http://support.flir.com
It only takes a few minutes to register online. In the download area you will also find the latest releases of manuals for our other products, as well as manuals for our historical and obsolete products.
3.7 Important note about this manual
FLIR Systems issues generic manuals that cover several cameras within a model line.
This means that this manual may contain descriptions and explanations that do not apply to your particular camera model.
#T559918; r. AA/20829/20829; en-US |
6 |

4 |
Customer help |
4.1 General
For customer help, visit:
http://support.flir.com
4.2 Submitting a question
To submit a question to the customer help team, you must be a registered user. It only takes a few minutes to register online. If you only want to search the knowledgebase for existing questions and answers, you do not need to be a registered user.
When you want to submit a question, make sure that you have the following information to hand:
•The camera model
•The camera serial number
•The communication protocol, or method, between the camera and your device (for example, HDMI, Ethernet, USB, or FireWire)
•Device type (PC/Mac/iPhone/iPad/Android device, etc.)
•Version of any programs from FLIR Systems
•Full name, publication number, and revision number of the manual
4.3 Downloads
On the customer help site you can also download the following:
•Firmware updates for your infrared camera.
•Program updates for your PC/Mac software.
•Freeware and evaluation versions of PC/Mac software.
•User documentation for current, obsolete, and historical products.
•Mechanical drawings (in *.dxf and *.pdf format).
•Cad data models (in *.stp format).
•Application stories.
#T559918; r. AA/20829/20829; en-US |
7 |

4 |
Customer help |
• Technical datasheets.
• Product catalogs.
#T559918; r. AA/20829/20829; en-US |
8 |

5 |
Quick Start Guide |
5.1 Procedure
Follow this procedure:
1.Charge the battery for approximately 1.5 hours, using the FLIR power supply.
2.Push the On/off button  to turn on the camera.
3.Aim the camera toward your target of interest.
4.Push the Save button to save an image.
(Optional steps)
5.Install FLIR Tools on your computer.
6.Start FLIR Tools.
7.Connect the camera to your computer, using the USB cable.
8.Import the images into FLIR Tools.
9.Create a PDF report in FLIR Tools.
#T559918; r. AA/20829/20829; en-US |
9 |
6 |
Description |
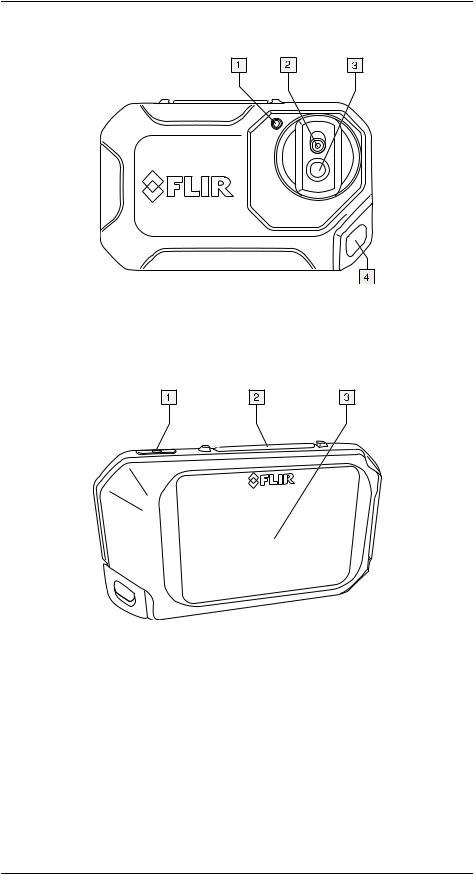
6.1 View from the front
1. Camera lamp.
2. Digital camera lens.
3. Infrared lens.
4. Attachment point.
6.2 View from the rear
1. On/off button.
2. Save button.
3. Camera screen.
#T559918; r. AA/20829/20829; en-US |
10 |
6 |
Description |
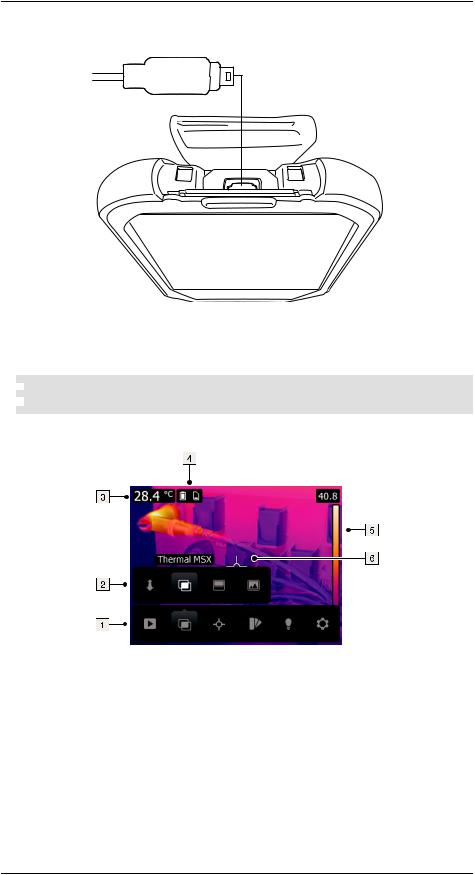
6.3 Connector
The purpose of this USB Micro-B connector is the following:
•Charging the battery using the FLIR power supply.
•Moving images from the camera to a computer for further analysis in FLIR Tools.
 Note
Note
 Install FLIR Tools on your computer before you move the images.
6.4 Screen elements
1.Main menu toolbar.
2.Submenu toolbar.
3.Result table.
4.Status icons.
5.Temperature scale.
6.Spotmeter.
6.5 Auto-orientation
The camera has an auto-orientation feature, which means that the camera automatically adjusts the measurement information on the display to the vertical or horizontal position of the camera.
#T559918; r. AA/20829/20829; en-US |
11 |
6 |
Description |
 Note
Note
The auto-orientation feature is enabled by a setting. Select Settings > Device settings > Auto orientation > On .
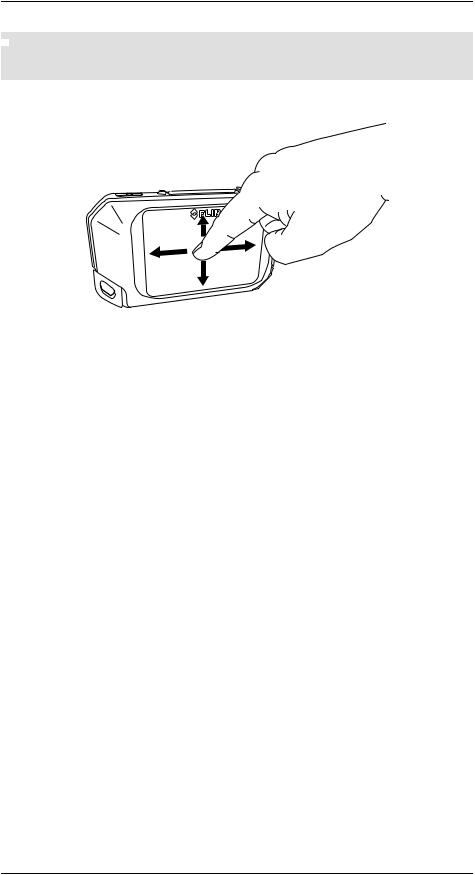
6.6 Navigating the menu system
The camera has a touch screen. You can use your index finger or a stylus pen specially designed for capacitive touch usage to navigate the menu system.
Tap the camera screen to bring up the menu system.
#T559918; r. AA/20829/20829; en-US |
12 |
7 |
Operation |
7.1 Charging the battery
Follow this procedure:
1.Connect the FLIR power supply to a wall outlet.
2.Connect the power supply cable to the USB connector on the camera.
7.2 Turning on and turning off the camera
•Push the On/off button  to turn on the camera.
•Push and hold the On/off button  for less than 5 seconds to put the camera in standby mode. The camera then automatically turns off after 48 hours.
•Push and hold the On/off button  for more than 10 seconds to turn off the camera.
7.3 Saving an image
7.3.1 General
You can save images to the internal camera memory.
The camera saves both a thermal image and a visual image at the same time.
7.3.2 Image capacity
Approximately 500 images can be saved to the internal camera memory.
7.3.3 Naming convention
The naming convention for images is FLIRxxxx.jpg where xxxx is a unique counter.
7.3.4 Procedure
Follow this procedure:
1. To save an image, push the Save button.
7.4 Recalling an image
7.4.1 General
When you save an image, it is stored in the internal camera memory. To display the image again, you can recall it from the internal camera memory.
7.4.2 Procedure
Follow this procedure:
1.Tap the camera screen. This displays the main menu toolbar.
2.Select Images  . This displays an image in the image archive.
3.To view the previous or next image, do one of the following:
•Swipe left or right.
•Tap the left arrow  or the right arrow
  .
.
4.To switch between a thermal image and a visual image, swipe up or down.
#T559918; r. AA/20829/20829; en-US |
13 |

7 |
Operation |
5.Tap the camera screen. This displays a toolbar.
•Select Full screen  or Exit full screen
  to switch between the full screen and normal views.
•Select Thumbnails  to display the thumbnail overview. To scroll between the thumbnails, swipe up/down. To display an image, tap its thumbnail.
•Select Delete  to delete the image.
•Select Information  to display information about the image.
•Select Camera  to return to live mode.
7.5 Deleting an image
7.5.1 General
You can delete an image from the internal camera memory.
7.5.2 Procedure
Follow this procedure:
1.Tap the camera screen. This displays the main menu toolbar.
2.Select Images  . This displays an image in the image archive.
3.To display the previous or next image, do one of the following:
•Swipe left or right.
•Tap the left arrow  or the right arrow
  .
.
4.When the image you want to delete is displayed, tap the camera screen. This displays a toolbar.
5.On the toolbar, select Delete  . This displays a dialog box.
6. |
In the dialog box, select Delete |
. |
7. |
To return to live mode, tap the camera screen and select Camera |
. |
7.6 Deleting all images
7.6.1 General
You can delete all images from the internal camera memory.
7.6.2 Procedure
Follow this procedure:
1.Tap the camera screen. This displays the main menu toolbar.
2.Select Settings  . This displays a dialog box.
3.In the dialog box, select Device settings This displays a dialog box.
4.In the dialog box, select Reset options. This displays a dialog box.
5.In the dialog box, select Delete all saved images This displays a dialog box.
6. |
In the dialog box, select Delete |
. |
7. |
To return to live mode, tap the upper left arrow |
repeatedly. |
#T559918; r. AA/20829/20829; en-US |
14 |

7 |
Operation |
7.7 Measuring a temperature using a spotmeter
7.7.1 General
You can measure a temperature using a spotmeter. This will display the temperature at the position of the spotmeter on the screen.
7.7.1.1 Procedure
Follow this procedure:
1.Tap the camera screen. This displays the main menu toolbar.
2.Select Measurement  . This displays a submenu toolbar.
3.On the submenu toolbar, select Center spot  .
.
The temperature at the position of the spotmeter will now be displayed in the top left corner of the screen.
7.8 Hiding measurement tools
7.8.1 Procedure
Follow this procedure:
1.Tap the camera screen. This displays the main menu toolbar.
2.Select Measurement  . This displays a submenu toolbar.
3.On the submenu toolbar, select No measurements  .
.
7.9 Changing the color palette
7.9.1 General
You can change the color palette that the camera uses to display different temperatures. A different palette can make it easier to analyze an image.
7.9.2 Procedure
Follow this procedure:
1.Tap the camera screen. This displays the main menu toolbar.
2.Select Color  . This displays a submenu toolbar.
3.On the submenu toolbar, select the type of color palette:
• Iron |
. |
•Rainbow.
•Rainbow HC.
•Gray.
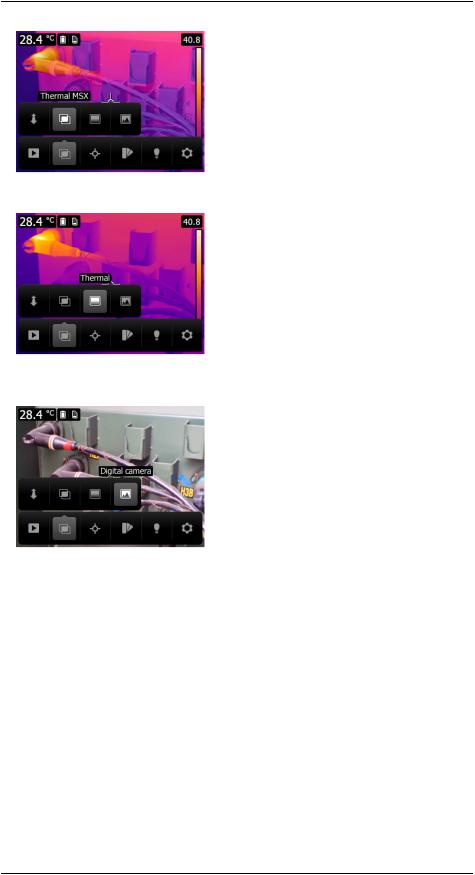
7.10 Changing the image mode
7.10.1General
The camera captures both thermal and visual images at the same time. By your choice of image mode, you select which type of image to display on the screen.
The camera supports the following image modes:
•Thermal MSX (Multi Spectral Dynamic Imaging): The camera displays an infrared image where the edges of the objects are enhanced with visual image details.
#T559918; r. AA/20829/20829; en-US |
15 |
7 |
Operation |
• Thermal The camera displays a fully infrared image. |
: |
•Digital camera The camera displays only the visual image captured by the digital: camera.
To display a good fusion image ( ThermalMSX mode), the camera must make adjustments to compensate for the small difference in position between the digital camera lens and the infrared lens. To adjust the image accurately, the camera requires the alignment distance (i.e., the distance to the object).
7.10.2Procedure
Follow this procedure:
1.Tap the camera screen. This displays the main menu toolbar.
2.Select Image mode  . This displays a submenu toolbar.
3.On the submenu toolbar, select one of the following:
•Thermal MSX  .
.
•Thermal  .
.
•Digital camera  .
.
#T559918; r. AA/20829/20829; en-US |
16 |
Loading...