


USER MANUAL
FLIR MODEL MR176
IMAGING MOISTURE METER PLUS with IGMTM

Table of Contents
1. DISCLAIMERS |
4 |
|
1.1 |
Copyright |
4 |
1.2 |
Quality Assurance |
4 |
1.3 Documentation |
4 |
|
1.4 Disposal of Electronic Waste |
4 |
|
2. |
SAFETY |
|
|
5 |
|
|
2.1 |
Safety Notes |
|
|
5 |
|
2.2 |
Laser Safety |
|
|
5 |
3. |
INTRODUCTION |
|
|
6 |
|
|
3.1 Key Features |
|
|
6 |
|
4. METER AND MENU ICON DESCRIPTIONS |
|
7 |
|||
|
4.1 Meter Parts |
|
|
7 |
|
|
4.2 |
Control Buttons |
|
|
8 |
|
4.3 Menu Map and Overview |
|
|
9 |
|
5. |
OPERATION |
|
|
10 |
|
|
5.1 Powering the Meter |
|
|
10 |
|
|
5.1.1 Auto Power OFF (APO) |
|
|
10 |
|
|
5.2 Moisture Measurements |
|
|
10 |
|
|
|
5.2.1 Moisture Measurement Overview |
|
10 |
|
|
|
5.2.2 Moisture Displays Overview |
|
|
11 |
|
|
5.2.3 IMAGE Modes |
|
|
12 |
|
|
5.2.4 MOISTURE Modes |
|
|
13 |
|
|
5.2.5 Internal Moisture Sensor Measurements (Pinless) |
14 |
||
|
|
5.2.6 External Pin Probe Moisture Measurements |
14 |
||
|
|
5.2.7 Reference Mode Moisture Measurements |
15 |
||
|
5.3 |
Thermal Imager (IR) |
|
|
15 |
|
5.4 Lock/Unlock Palette Auto Scale Mode |
|
17 |
||
|
5.5 Screen Capture and Hold |
|
|
18 |
|
|
5.6 |
Progressive Environmental Stability Indicator |
|
18 |
|
|
5.7 |
‘Combination’ Feature: Save Thermal Image with Pinless Moisture Reading |
19 |
||
FLIR MR176 USER GUIDE |
2 |
Document Identifier: MR176 en US_AA |
|||
|
5.8 High Moisture Alarm |
20 |
|
5.9 SETTINGS Menu |
20 |
6. |
MAINTENANCE |
22 |
|
6.1 Cleaning |
22 |
|
6.2 Battery Charging |
22 |
|
6.2.1 Disposal of Electronic Waste |
22 |
|
6.3 Updating the MR176 firmware |
23 |
7. |
SPECIFICATIONS |
24 |
8. |
TECHNICAL SUPPORT |
26 |
9. |
MATERIAL GROUPS |
27 |
|
9.1 Common Names of Timbers (BS888/589:1973) with MR176 Group Nos. |
27 |
|
9.2 Botanical names of timbers with MR176 program group numbers |
29 |
|
9.3 %WME Table (% Wood Moisture Equivalent) |
31 |
10. |
WARRANTY |
32 |
|
10.1 FLIR Test & Measurement 2 year/10 year Limited Warranty |
32 |
FLIR MR176 USER GUIDE |
3 |
Document Identifier: MR176 en US_AA |

1. Disclaimers
1.1 Copyright
© 2015, FLIR Systems, Inc. All rights reserved worldwide. No parts of the software including source code may be reproduced, transmitted, transcribed or translated into any language or computer language in any form or by any means, electronic, magnetic, optical, manual or otherwise, without the prior written permission of FLIR Systems.
The documentation must not, in whole or part, be copied, photocopied, reproduced, translated or transmitted to any electronic medium or machine readable form without prior consent, in writing, from FLIR Systems.
Names and marks appearing on the products herein are either registered trademarks or trademarks of FLIR Systems and/or its subsidiaries. All other trademarks, trade names or company names referenced herein are used for identification only and are the property of their respective owners.
1.2 Quality Assurance
The Quality Management System under which these products are developed and manufactured has been certified in accordance with the ISO 9001 standard.
FLIR Systems is committed to a policy of continuous development; therefore we reserve the right to make changes and improvements on any of the products without prior notice.
1.3 Documentation
To access the user manuals, extended warranty registration, firmware updates, and notifications go to the Download tab at: http://support.flir.com. In the download area you will also find the latest releases of manuals for our other products, as well as manuals for our historical and obsolete products. The extended warranty page can also be found at www.Flir.com/testwarranty.
1.4 Disposal of Electronic Waste
As with most electronic products, this equipment must be disposed of in an environmentally friendly way, and in accordance with existing regulations for electronic waste.
Please contact your FLIR Systems representative for more details.
FLIR MR176 USER GUIDE |
4 |
Document Identifier: MR176 en US_AA |

2. Safety
2.1 Safety Notes
Before operating the device, you must read, understand, and follow all instructions, dangers, warnings, cautions, and notes.
FLIR Systems reserves the right to discontinue models, parts or accessories, and other items, or to change specifications at any time without prior notice.
2.2 Laser Safety
 Warning Statement
Do not look directly into the laser beam. The laser beam can cause eye irritation.
FLIR MR176 USER GUIDE |
|
|
|
|
|
Document Identifier: MR176 en US_AA |
|
|
|
|
|
||
|
|
|
|
|
||
|
|
|
|
|
||
|
|
|
|
|
||
|
|
|
|
|
||
|
|
|
|
|
||
|
|
|
|
|
||
|
|
|
|
|
||
5 |
||||||

3. Introduction
Thank you for selecting the FLIR MR176 Imaging Moisture Meter. The MR176 integrates high quality thermal imaging technology with the best in class moisture detection and measurement. The MR176 includes an integrated non invasive pinless moisture sensor, an external pin moisture probe (MR02), and a replaceable temperature and relative humidity sensor (MR01) that provides dew point, vapor pressure, and mixing ratio readings in addition to air temperature and relative humidity.
Featuring Infrared Guided Measurement (IGMTM) technology, the MR176 helps to quickly scan and target moisture issues; visually guiding the user to the spot where measurements can be confidently made and where readings can be easily analyzed. The MR176 can save measurements and images for later transfer to a PC; reports can be generated with FLIR Tools PC software. Please see www.flir.com/test for additional accessories available for this device. This device is shipped fully tested and calibrated and, with proper use, will provide years of reliable service.
Please register the FLIR MR176 within 60 days of purchase for extended warranty at the following location: www.flir.com/testwarranty
3.1 Key Features
FLIR Lepton® microbolometer Focal Plane Array (FPA) with integrated shutter delivers best in class thermal imaging
Quickly scan for moisture using the integrated non invasive pinless moisture sensor
External pin probe (included) for resistive moisture content measurements
Ambient air temperature and relative humidity readings from field replaceable sensor
IGM Custom mode allows user to select a which measurements (Moisture and Psychrometrics) are displayed with the IR thermal image
IGM Moisture mode displays both the thermal image and moisture readings on one screen
Psychrometrics mode shows ambient air temperature, relative humidity (RH%), dew point, mixing ratio, and vapor pressure all on one screen
Moisture mode shows Pin or Pinless moisture readings with large digits and color bargraph
Scale Lock adds precision to thermal image scanning
Capture, view, & delete thermal images and measurements
Nine (9) material group selections for pin based readings
Programmable high moisture alarm with audible and color visual alerts
Laser pointer and display crosshairs for targeting of anomalies found on thermal image
Easy to read, color display with intuitive graphical interface and tool tips in local languages
File management, image review, & report generation with free FLIR Tools PC software via USB
Internal rechargeable battery with USB based international charger
Register for Extended Warranty: www.Flir.com/testwarranty
FLIR MR176 USER GUIDE |
6 |
Document Identifier: MR176 en US_AA |

4. Meter and Menu Icon Descriptions
1
4.1 Meter Parts
1.Temperature and Relative Humidity Sensor (MR01)
2. Color Graphical Display |
2 |
|
3.Screen Capture button
4.Four (4) Navigation buttons (ring)
5. |
Select button (center) |
3 |
|
6. |
Back button |
||
4 |
|||
7. |
Laser Pointer / Crosshairs button |
5 |
|
8. |
Power button |
||
|
9.USB, External Probe jack, and charge LED
10.Laser pointer lens (back)
11. |
Thermal imaging lens (back) |
|
12. |
Internal Pinless Moisture sensor (back) |
|
13. |
Micro USB Port (bottom) |
10 |
14. |
External Probe Jack (bottom) |
|
15. |
Battery Charging LED status lamp (bottom) |
11 |
Fig. 4 1 Meter Description
13 


 15 14
15 14 


6
7
8
9
12
FLIR MR176 USER GUIDE |
7 |
Document Identifier: MR176 en US_AA |
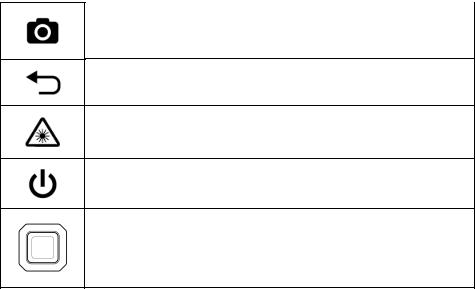
4.2 Control Buttons
Image Capture button: Press to save a ‘screen shot’. Refer to section 5.5 Screen Capture and Hold for full details.
Back button. Press to back up or return from a menu screen.
Press to activate laser pointer/crosshairs in thermal imaging modes.
Press to power the meter ON. Press and hold to power the meter OFF.
Press the Select button (center) to access the Main Menu. Use this button to select items from within the menu structure.
Use the four outer navigation (rim) buttons to move up down left right.
FLIR MR176 USER GUIDE |
8 |
Document Identifier: MR176 en US_AA |

4.3 Menu Map and Overview
The Menu structure is outlined below and covered thoroughly in subsequent sections of this User Guide. The center Select button and the four (4) Navigation buttons are used to access and program the modes of operation available from the menus. Refer to Fig. 4 2.
Icons 1 through 5 in Fig. 4 2 make up the Main Menu. Press the Select button to open the Main Menu:
1.Image Review: view and delete IR Thermal Images
2.Image modes (items 10~14): IR, IGM Custom, IGM Moisture, Psychrometrics, Moisture
3.Moisture modes: Material Groups, Pin Mode, Pinless Mode, Set Reference
4.Lock/Unlock Palette Auto Scale: Select Lock to adjust the color palette range to suit a given application (see Section 5.4 Lock/Unlock Palette Auto Scale Mode for more detail). Unlock for normal auto scaling operation.
5.Settings utility: Language, Configure IGM Custom, Palette, High Alarm, Auto Power OFF, Temperature units, Date & Time, Help contact screen, and Meter Information screen.
Icons 6 through 9 in Fig. 4 2 are available in the Moisture Mode Menu. Press icon 3 to view these Moisture modes. A blue dot is shown to the left of the pin icon (7) or the pinless icon (8), depending on which is selected.
6.Material Group: Select the material under test (Groups 1~9); For Pin Mode only. See Section 9 for Wood and Material Group listings.
7.Pin mode: Select this mode when using external pin moisture probe.
8.Pinless mode: Select this mode when using the internal (rear) moisture sensor.
9.Set Reference: Select this mode to store the current reading as a reference value. For pinless mode only.
Icons 10 through 14 in Fig. 4 2 are available in the Image Mode Menu. Press icon 2 to view the Image Mode menu.
10.IR (View Thermal Image only)
11.IGM Custom (View Thermal Image + selected Psychrometrics)
12.IGM Moisture (View Thermal Image + Moisture readings)
13.Moisture + Psychrometrics (Air Temperature, RH%, Dew point, Mixing ratio, Vapor pressure views)
14.Moisture (Digital + Bargraph reading with Alarm, Material Group, & Relative values)
Fig. 4 2 Menu Icons
10 11 12 13 14
6 7 8 9
1 2 3 4 5
FLIR MR176 USER GUIDE |
9 |
Document Identifier: MR176 en US_AA |

5. Operation
Important Note: Please charge the meter’s battery before first use. Instructions for battery charging are provided in Section 6.2.
5.1Powering the Meter
1.Press the Power button momentarily to switch the meter ON.
2.Press and hold the Power button for > 1 second to switch the meter OFF.
3.If the battery status indicator shows that the battery voltage is low, or if the meter does not power on, charge the battery. See section 6.2 Battery Charging. The battery status indicator is visible in the Main Menu (press the center Select button to access the Main Menu).
4.Please fully charge the battery before use.
5.1.1Auto Power OFF (APO)
The meter switches OFF automatically after a programmed period of inactivity. Press any button to reset the APO timer. To disable APO, or to change the APO time out value, use the
Settings mode, accessible from the Main Menu. The default time out is 20 minutes.
5.2Moisture Measurements
5.2.1Moisture Measurement Overview
Moisture measurements can be performed using either the internal pinless moisture sensor (rear) or by connecting an external probe. A standard external pin probe is included which connects to the MR176 via the jack at the bottom of the meter. Other external probes are available; please visit www.flir.com/test for details.
NOTE: Objects in close proximity to the internal pinless moisture sensor (located on the rear of the unit) will affect the reading on the display; Keep hands and fingers clear of the sensor when taking measurements.
The internal moisture sensor detects moisture to a depth of approximately 19mm (0.75”). The actual depth will vary depending upon the amount of moisture, the material under test, surface roughness, and other factors.
Moisture readings are shown on the display (digitally and with bar graph) in the Moisture only mode or in small digits (upper left hand corner) in the IGM Custom and IGM Moisture modes. See Fig. 5 1. Pinless measurement readings are ‘relative’ scaled (0~100). Pin based readings are represented in terms of %MC (moisture content) for wood and %WME (wood moisture equivalent) for non wood materials; additional information is provided in Section 5.2.6 External Pin Probe Moisture Measurements and in the specifications.
Moisture measurements are covered in detail in the following sections. Be sure to select Pin Mode or Pinless Mode in the Moisture Menu to match the measurement type.
FLIR MR176 USER GUIDE |
10 |
Document Identifier: MR176 en US_AA |
5.2.2 Moisture Displays Overview
There are three modes where moisture readings are displayed; refer to Figs. 5 1 (a) through (c) for a description of each. To access the modes shown below, press the Select button after
navigating to the Image Mode icon |
in the Main Menu. Then use the navigation buttons |
to scroll to the desired mode; press Select again to confirm.
Fig. 5 1(a) IGM Moisture Image Mode 
1.Relative icon and reference value
2.Alarm icon and Alarm Threshold value
3.Mode icon (pinless mode selected)
4.Moisture reading
5.Laser pointer icon
6.Cross hairs
7.Thermal image
3 |
4 |
5 |
6 |
7 |
2
1
Fig. 5 1(b) IGM Custom Image Mode 
1.Thermal image
2.Mixing ratio
3.Dew point temperature
4.Relative Humidity (solid green dot & green reading when stabilized)
5.Air Temperature reading
6.Mode icon (pinless mode selected)
7.Moisture reading
8.Alarm icon
9.Relative mode icon
7 8 9
6
5 4
32
1
FLIR MR176 USER GUIDE |
11 |
Document Identifier: MR176 en US_AA |
 Loading...