


Tel.:1 (800) 361-4639

REV. 04/06

"# ! 4
/ 2
,
K
L /
,
D
,
9 !
= ;2
# 2 ;.
1 ;2 ; 2
K 1 #
B-; /-
@ 2 ; 2
>
-2 ; B
= / ;2 2
C
6
< E F -
< 2 < 2
< <
# F 2 E . <
< E @ < < < .
F 2 -
< < 2 <
@- < E F <
< 2 < <
F F

"# +
@ M&
3
L 5
( !
( + M / &
3
5
6 ! ( " !M 4!%N$
+ &
3
+ 5
: !
M (
, M ( &
N 3
D M M 4 N &!
=(' "= 2$ &
I =(' &&M&%
1 &3
O- &5
: M %!
9 , %
1 %& N " $%3
= %5
O 3!
1 3
- -3
1 33
1 , 35 1 4!
L 4 @ 4&
' 43
45
2 5!
+ 5 D P 5&
Q 53 I 55
1 7!
@ , 7
+ , 7&
D 73
+ 75

:
' B ;2 M%
4
/-7
( ;2
( @ < M / B %
D / < 4
: 7
( ( B / " !M4!%N$
> %
> ; / 4
B 7
1
( ; M ( ;2
( / M ( % : / 3
I C B / M / M 5
( ? &
LCD (pantalla digital) ..........&
Instrucciones generales de la pantalla digital&&M&%
( B / &4
O- &7
( M @ C %
@ , %
( %% (B / " /$ %4
:-2 / %7
( B 3 ( < 3
( O-3%
> B 34 @ / 37
( < B 4
O- 4
@ A 4% O 44
( /47
B 5
/ 5
( B P 5% @54
@ 57 @ B7
( 7
B 7%
D B ;274
6 B C B 77

99
@ G M%
4
D 7
: F
( E
= F . M / %
D 4
7
D
D E "1 G !M4!%N$
> < % > 2 4
+ 7
<
D G M @
E M ( %
> E R 3
+ 7
1< & ACL (affichage à cristaux liquides)&
Instructions générales au sujet de l'ACL&&M&%
( B / &4 (- -&7
9 %
@ , %4 @ %%
( G M G F %4
>2 G %7
@ E F G 3
( 3 @- -3%
1< 34 @ E 37
( 4
4
@ 4%
44
@ 47
2 < 5
( F . 5
D F P 5% ( 54
= S 57
@ 7
@ , 7
@ < 7% > 74
( < H . G !!

"# 1 1
|
+ |
! 1 |
|
@ |
=(' "= 2$ |
|
+ , |
|
& |
+ |
' |
% |
@ |
& 9 |
3 |
* |
% |
4 |
1 . |
|
5 |
: |
|
7 |
1 |
|
;
<
=
>
?
@
@)1N
;
<

$1 B 9C7
+ B
@
@
& (
% @ < 3 ( /
4 D-/
5 >/ 7 '
! '- -
=('(pantalla digital)
@
@ / B & @ / % > ;
A 1 1 9 )
<
<
& (
% @
3 @ 2 F
4 + R
5 : < 7 :
! :
ACL (affichage à cristaux liquides)
= G
& = G F < % > 2
"# 1 1
5 N
7 : ! 1
N
@
@
& D , % : 3 ) 4 @
5 : /
> ? @
@
;
 <
<  =
=
 >
>
&

$1 B 9C7
5 D /
7 ' ! @
#
' ?
6 <
& > . B % I C
3 I C 4 @-
5 / /
A 1 1 9 )
5 @ < 7 :
! :
#
1<
6 & @
% I
3 I <
4 =
5 : E<2 G
%
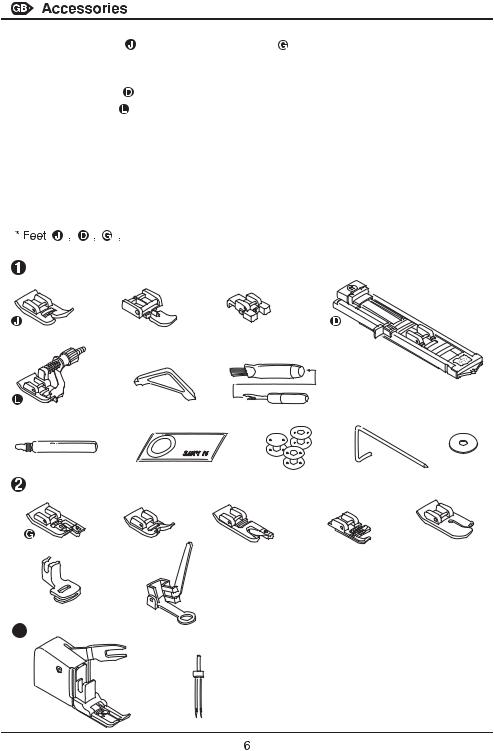
Standard Accessories (1) |
Bonus Feet (2) |
||
1. |
All purpose foot |
13. |
Overlock foot |
2. |
Zipper foot |
14. |
Satin stitch foot |
3. |
Button sewing foot |
15. |
Darning/Embroidery foot |
4. |
Buttonhole foot |
16. |
Cording foot |
5. |
Blind hem foot |
17. |
Quilting foot |
6. |
L-screwdriver |
18. |
Gathering foot |
7. |
Seam ripper / brush |
19. |
Roll hemming foot |
8.Oil bottle
9.Pack of needles (3x)
10.Bobbin (3x)
11.Seam guide
12.Spool pin felt (2x)
Optional Accessories (3) These accessories are not supplied with this sewing machine;they are however available as special accessories by calling our customer service at
1 (800) 361-4639.
20.Walking foot
21.Twin needle
 These letters appear on the electronic display.
1 |
2 |
3 |
4 |
5 |
6 |
7 |
|
|
|
|
|
||
|
9 |
10 |
11 |
12 |
8 |
|
|||
|
|
|
|
13 |
14 |
15 |
16 |
17 |
|
||||
|
|
|
|
|
18 |
|
19 |
|
|
3
20 |
21 |
|

Accesorios standard (1) |
Pies Suplementarios (2) |
||
1. |
Pie universal |
13. |
Pie overlock |
2. |
Pie para cremallera |
14. |
Pie para bordar |
3. |
Pie para coser botones |
15. |
Pie para ruedos |
4. |
Pie para ojales |
16. |
Pie para hilo de cordon |
5. |
Pie para puntada ciega |
17. |
Pie para acolchar |
6. |
Destornillador grande |
18. |
Pie fruncidor |
7. |
Pincel/Corta-ojales |
19. |
Pie para zurcido |
8.Aceitera
9.Agujas (3x)
10.Bobinas (3x)
11.Regla de borde
12.Sujetador de la bobina confieltro (2x)
Accessoires Standard (1) |
Pieds-de Biches |
||
1. |
Pied universel |
Supplementaires (2) |
|
2. |
Pied pour fermetures à |
13. |
Pied à overlock |
|
glissière |
14. |
Pied à broder |
3. |
Pied pour poser des |
15. |
Pied ourleur |
|
boutons |
16. Pied pour cordonnet |
|
4. |
Pied à boutonnière |
17. |
Pied pour ouatinage |
5. |
Pied pour ourlet |
18. |
Pied fronceur |
|
invisible |
19. |
Pied à repriser |
6.Tournevis
7.Pinceau/Découseur
8.Huilier
9.Aiguilles (3x)
10.Canettes (3x)
11.Guide pour piquage
12.Feutre pour broche porte-bobines (2x)
Accesorios Opcional (3) Estos pies no son suministrados con las máquinas sino que ellos están disponibles en llamer al servicios al cliente al 1 (800) 361-4639.
20.Pie regular
21.Aguja doble
Accessoires Optionnels (3) Ces accessoires ne sont pas inclus avec cette machine à coudre,cependant, ils sont disponibles en appelant notre service à la clientele au 1 (800) 361-4639.
20.Pied de transport supérieur
21.Aiguille double
"# 4 ) 1( G 4-
|
N - |
|
"$ |
||
|
|
+ - |
|
. |
|
+ "$ |
5

/ 9 1 H-
D - B - A/ B
"$
> /
= /
1-( 4
@ G / 2 EF 2 E E "$
1 E
=E < < @
G "$
7

"# ! 4 9 ) 1 G
|
|
|
|
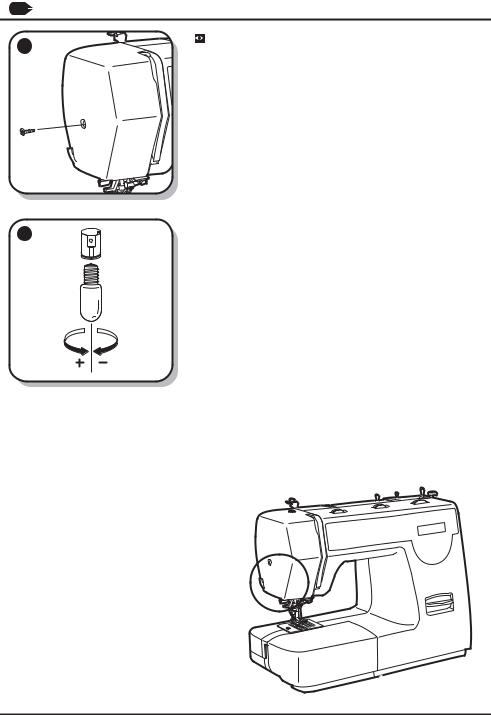
Always make sure that the machine is unplugged from power source |
|
|
|
and the main switch is on "O". when the machine is not in use and |
|
|
before inserting or removing parts. |
|
|
+ 2 - |
|
|
|
|
|
( " M$ |
|
|
+ . K |
|
8 6 8 "$ |
|
|
|
|
|
|
1 8 6 8 |
|
|
+ "&$ + |
|
. |
|
|
|
|
|
|
# |
|
|
|
|
|
Consult a qualified electrician if in doubt as to connect machine to |
|
|
power source. Unplug power cord when machine is not in use. |
|
|
The appliance must be used with the foot controller 4C-337B (110- |
|
|
120V area) / 4C-337G (220-240V area) manufactured by |
|
|
MATSUSHITA ELECTRIC (TAIWAN) CO., LTD. |
|
|
! |
|
|
L - " $ |
|
+ , , |
|
|
|
- 6 |
|
|
6 2 |
|
|
' "$ |
- |
|
@- |
|
( |
;
!

! B 9C7
( ;2 < A L M > ; -
2

Desenchufe la máquina del toma corriente cuando no la use.
> "&$

Ante cualquier duda antes de conectar la máquina a la red, consulte a un electricista. Desenchufe la máquina del toma corriente cuando no la use.
El pedal debe ser usado con el dispositivo de enchufe 4C-337B (110-120V área) / 4C-337G (220240V área) manufacturado por MATSUSHITA ELECTRIC (TAIWAN) CO., LTD.
9 B-/
( 8 6 8
>-
'
# ) 9 9 ) I

La machine doit toujours être débranchée et l'interrupteur principal à "O" lorsque la machine n'est pas utilisée, pour changer des pièces et/ ou accessoires.
( F E < H < 2
<
: E " M$ > "$"$ =E / < = G E< 2 < 2 E F 8 6 8 @ < "&$ = < < <

Consulter un électricien qualifié en cas de doute pour brancher la machine. Débrancher la machine quand celle-ci c'est pas en service. Le pied de contrôle doit être obligatoirement utilisé avec les apareils 4C-337B (110-120V area) / 4C-337G (220-240V area) fabriqués par MATSUSHITA ELECTRIC (TAIWAN) CO., LTD.
&
( < " 2 E$ @ < 2
< 2 S H < E S
< 1
< <
* 2 2 S 2 "$
L <
( F
"# !) 4 4 )- -
|
|
|
|
Make sure to disconnect the electrical supply plug |
|
|
|
|
|
|
from wall outlet before changing light bulb. |
|
# |
! " ! |
|
|
|
|
|
!#$% " ! &!#$ |
|
|
= "$"$ |
|
|
":$ |
|
|
) "($"$ |
|
|
|
!

! 9-91 6
' ;2 <
- < ! " ! !# ;$ % " ! &! ;$
' "$ 1 ":$
1 "($"$ D
> <-
!) 4 9 91

Assurez-vous que la machine est débranchée de la prise murale avant de changer la lampe.
E H ! " ! !# $ %
" ! &!$
' "$ 2 U < " <$ "$ > ":$ '< E "($"$
"# G ( 1 1 + 3
,
, "$
/ 4 ) 1 + 1
+
2 /
" $
N /
/
L
,
,
&

1 3 1 6 1 6 1
@ . /
/- B "$
/ 1 B 1 6 1
= V ;2 2
/ / "$
1 / B /
B @ / B
B ;
3 1 ( (-) I J 1
@ E G <
E 2 F
E
/ 9 1 1 ( (-)
= < < < / < F
" <$
( / E G < - E /
E G
@ G <
E <
E
%
"# ) 4 ) 1 + )


- 


- 
 +
+
;
4

Turn power switch to "O" before carrying out any of the operations below.
"$
"$"$
) 4 ) 1 + ,
= "$ "$
"$"$
= "$ "$
9 3 4 ) 1 + ,
"$
, "$
) 4 ) 9 4 ,
"$ /
2 "&$
3

/ 1 1 6 1
= "$ "$B "$
/ 1
: / "$2 "$< "$ "$
> / "$ : / "$
"$2 ;
$9 / 1
= "$
"$2 ;
/ 4-
D "$
"&$

Toda esta operación debe hacerse con el interruptor principal en "O".
4 11 1 ( (-)

Placer l'interrupteur principal à "O" avant de procéder.
"$ F E G
6 2 E 2 < < "$
1 1 ( (-)
"$ / 2 EF 2 "$
< "$ @ < G "$ E
"$ "$E 1 < "$
1 ( (-)
F E G F
@ < G "$ E G F <
1 < "$
1 4 1 7 4
6 < "$ F E G < F < < = E 2 1 < "&$
4

"# % 4 )- --


|
@ |
|
|
|
+ , |
|
|
|
"$ |
|
|
|
|
|
, @ |
|
|
|
"$ |
@ + @
8 8

When the bobbin winder spindle is in "bobbin winding" position, the machine will not sew and the hand wheel will not turn. To start sewing, push the bobbin winder spindle to the left (sewing position).
1
5

#-) +
@ C / "$
+ C "$
> / / @
( < ; (
"$
1 /
91
@ "$
F
"$
@ E < F
2 2 "$
& @ "$
% @ E H = E
2 "$
3 E . < < G
2 2 H G
4 'G 2
2
5
L
7

"# 4- --
|
|
|
Turn power switch to "O" before inserting or removing the |
||
|
||
|
bobbin. |
|
|
|
|
|
|
|
|
9 "$ |
|
|
N 6 |
|
|
, "$"$ |
|
@ |
||
|
||
|
" $ |
|
|
"$ |
|
|
N "&$ |
|
|
6 |
|
|
D , |
|
|
"%$ |
;
<
!

! B- -
= / 2
"$
1 / / @ 2
/ / "$"$
@ / "$ 6 / C
-/ W C "&M%$

El interruptor principal tiene que estar a ("O").
1

Assurez-vous de placer l'interrupteur principal en position "O" avant d'insérer ou de retirer la canette.
= F 2 E F
9 F G "$
+ R F E 6 S F 2 E
E " G$"$
> / 2 EF 2
E "$= < % "38$ D 2 R F E .
I R F G 2
R E G G G

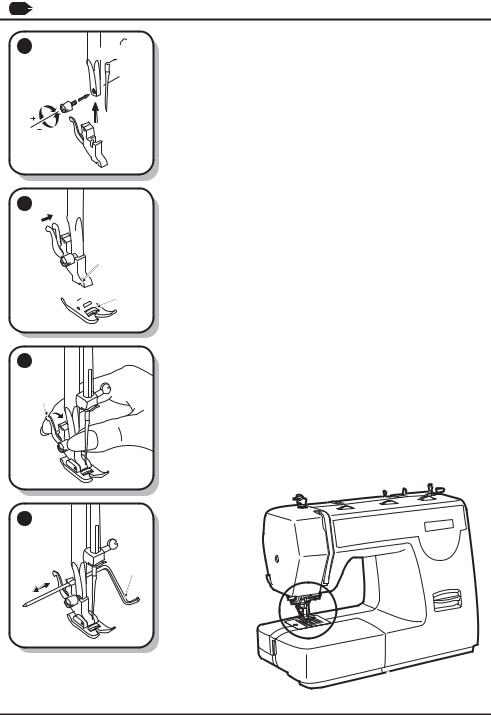
"# !) 4 4 ) D 0 9 @K @<'E
|
|
$ |
|
|
|
|
|
|
|
|
Turn power switch to "O" before |
||||||||
|
|
|
|||||||
|
|
|
inserting or removing the needle. |
|
|||||
|
|
|
|
||||||
|
|
|
, , |
||||||
|
|
# |
1 |
|
|
|
|
- |
|
|
|
+ |
|||||||
|
|
|
|||||||
|
|
|
|
||||||
|
! |
|
|
|
|
|
|||
|
|
= "$ |
|||||||
|
|
|
|||||||
|
|
|
|
||||||
|
|
|
"$ |
|
|
|
|
||
|
|
|
+ |
||||||
|
|
|
":$ |
||||||
# |
|
! |
@ |
|
|
|
"($ |
|
|
"'$ |
|||||||||
+
+
"$ "$
":$"($

! B 4 / D 9 @K @<'E
( / -
D / A B
/ / < /
"$
: > 2 ; (M' 6 /

El interruptor principal debe estar en "O".
= / 2 "$ N ;
= / ; : = / ;
( = /
1 4 D 0 A9 @K @<'E

Assurez-vous de placer l'interrupteur principal en position "O" avant de changer l'aiguille.
E G 2 E
E
E F
1< < F
+ / 2 EF 2 E F
' "$E . "$
D "($ 2 U <
E E G F "$
& 6 E "($ / 2 EF < 1
"$
=E / H < G
E "$< < ":$"($"$
 Loading...