


TRAVELER III
The Go Anywhere, Hear Everything AM/FM/LW
and Shortwave Radio
OWNER’S MANUAL

TRAVELER III OWNER’S MANUAL
MEET THE TRAVELER III
Thank you for purchasing the Etón Traveler III. We want you to thoroughly enjoy the use of this product. To take advantage of its many excellent and unique features, we urge you to carefully read the user’s manual.
FRONT
2
3
4
5
1 |
6 |
7 |
8 |
9 |
10 |
11 |
BACK
12
13
14
2
TRAVELER III OWNER’S MANUAL
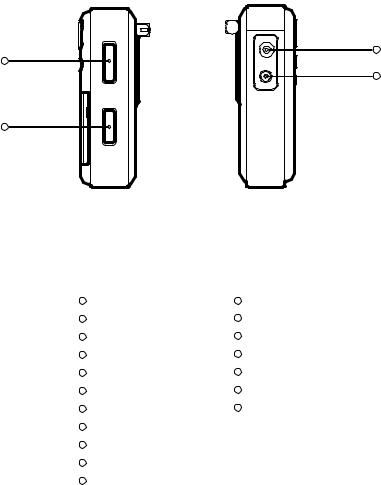
RIGHT SIDE |
LEFT SIDE |
17
15
18
16
Features:
1 |
Speaker grill |
12 |
Whip Antenna |
2 |
LCD panel |
13 |
Back Stand |
3 |
Power/sleep button |
14 |
Battery compartment |
4 |
DISPLAY Mode/Lock button |
15 |
Tuning dial |
5 |
G.M.T. cover |
16 |
Volume knob |
6 |
Up button |
17 |
Earphone jack |
7 |
Down button |
18 |
DC jack |
8AM/LW button
9FM/RDS button
10Snooze/Light button
11Step button
3

TRAVELER III OWNER’S MANUAL
POWER/SLEEP BUTTON
1. Short press to turn on radio and press again to turn off
2. Long press this button, the  icon flashes in the LCD. Rotate “Tuning” knob to select the desired auto shut-down time with 1~120 minutes.
3. Select “ON” indicates the radio will be on all the time.
Note: If the alarm is ringing,quick press this button to shut down alarm function.
DISPLAY MODE/LOCK BUTTON
Quick press to display Alarm, temperature,local/world time,signal strength,S/N ratio
Long press: lock/unlock buttons and tuning knob
VF/VM FREQUENCY/ADDRESS,TUNING STEP BUTTON
With the radio on:
Quick press:Switch between frequency or address. When Switching to Frequency, the “tuning” will flash; When switching to address, the “Preset” will flash.
Long press to change tuning step fast or slow, uicon indicates slow step, uuicon indicates fast step.
|
u |
|
uu |
|
|
Slow Step |
|
Fast Step |
|
|
|
|
|
|
Band |
Slow tuning knob |
Fast tuning knob |
Slow tuning knob |
Fast tuning knob |
|
|
|
|
|
FM |
0.01MHZ |
0.1MHZ |
0.1MHZ |
1MHZ |
|
|
|
|
|
LW |
1KHZ |
3KHZ |
3KHZ |
100KHZ |
|
|
|
|
|
MW |
1KHZ |
9/10KHZ |
9/10KHZ |
100KHZ |
|
|
|
|
|
SW |
1KHZ |
5KHZ |
5KHZ |
100KHZ |
4
TRAVELER III OWNER’S MANUAL
HOME BUTTON
Rotate “time zone indicator knob” to your city.
Long press “HOME” button,the hour will flash, rotate tuning knob to change hour.
Short press Home button,the minute will flash,rotate tuning knob to change minute. Quick press again to confirm local time.
ALARM - SETTING UP ALARM TIMER
The setting method is the same as local time setting,only the difference is that the user needs to re-press ALARM button after reset alarm,then tune up TUNING knob to set up auto-power off timer with the range of 1~90 minutes.
•Alarm method selection 
 , Quick press ALARM button without alarm timer setting. If
  icon flashes to activate alarm to radio feature.
•With the radio on, firstly search your desired station which is used for your favorite station for alarm,also set up the suitable volume.
•Long press ALARM button,when the user heard a “Beep” sound,also icon flashes,the user can set up alarm by this station. If the alarm is up,the unit will power on automatically and receive preset station,then it will shut down automatically when it reaches the desired time. During the listening, if the alarm is on,the unit will switch to preset station automatically. If icon flahes indicates alarm by buzzer, the following feature is new:
•If the user is not familiar with local station frequency and play time, suggest to use alarm by buzzer. If the alarm is up, the unit will have “Beep-Beep” sound and it will shut down with the preset time automatically.
5
TRAVELER III OWNER’S MANUAL
•If the above icons don’t be displayed,which indicates the alarm is off.
Note: Alarm timer matches the time of the indicator of time zone. If the user sets up the alarm is on at 7:00 a.m.,and the time of time zone indicator will be New York time, the unit will be alarmed at 7:00 a.m. of New York time.
LIGHT/SNOOZE BUTTON
Quick press [Light/Snooze]button to select brightness level (OFF- LOW-High)
If no operation, the brightness of backlight will light up your selected level or turn off backlight in 10 minutes. If the backlight is off, when the user operate any button,quick press to light up the backlight in the first time, quick press again means button operation.
SNOOZE FUNCTION:
The alarm is on, quick press Light/snooze button to shut down alarm temporarily, the alarm will ring after 10 minutes. So the snooze function can repeat 3 times. For alarm ringing in the 4th time, press Light/Snooze button again to shut down alarm.
SHORTWAVE BAND/ AUTO DISPLAY BUTTON
With the radio on:
•Quick press [p]or [q] button to select SW band
•Continuously quick press [p]or [q] button to select SW meter band
•In Frequency auto-search status: long press[p]or [q] button to auto-display station
6
TRAVELER III OWNER’S MANUAL
•In address search status, long press [p]or [q] button to autodisplay preset stations
AM/LW BAND/ATS BUTTON
With the radio on:
•Quick press[AM/LW]button select AM(MW) or LW band
•Long press [AM/LW] button to auto tuning stoarge AM(MW) or LW band
FM RDS /ATS BUTTON
With the radio on:
•Quick press FM/RDS button to select FM band
•Long press FM RDS button to proceed with ATS function
RDS INFORMATION DISPLAY
In FM band, quick press FM RDS button to display different RDS information in cycle.
If any RDS information in the LCD, icon will be displayed.
Quick press FM RDS button to display :PS/PTY/RT/DATA
PS : program name if no station, just display NO PS PTY: Program type if no program,just display NO PTY RT: Program text if no text, just display NO RT
DATA: Time/Date/Weekly program callsign information, if no any information,just display NO DATA
7
TRAVELER III OWNER’S MANUAL
If any information available, just display format is:
NORTH AMERICA:
Station Callsign |
Weekday |
Mon-Day-Year |
Hour:Minute |
|
(MON, TUE, WED, THU, FRI, SAT, SUN) |
|
|
|
|
|
|
WGSS |
TUE |
03-25-2014 |
02 :15 |
|
|
|
|
INTL:
Station Callsign |
Weekday |
Mon,Day,Year |
Hour:Minute |
|
(MON, TUE, WED, THU, FRI, SAT, SUN) |
|
|
|
|
|
|
WGSS |
TUE |
Mar,25,2014 |
02 :15 |
|
|
|
|
Note: If no station callsign, then display PI CODE of current station.
MEMORY BUTTON
With the radio on:
When pick up the station,quick press Memory button,then 


 will flash.
Rotate TUNING knob to find the preset address and quick press Memory button again to confirm preset.
QUICK PRESS [p] OR [▼]BUTTON AND MEMORY
PRESET BUTTON
Use ATS function to fast preset stations
1. When auto scan frequency, long press [p] or [q] button to auto scan station.
8
TRAVELER III OWNER’S MANUAL
2. When pick up your favorite station,just quick press MEMORY button once to save this station,and then auto scan other stations.
DELETE BUTTON
Delete one station
With the radio on:
1. In address scan status,long press [delete] button, 


 icon will flash, also ”PXX DEL “ will flash in the LCD (XX indicates preset address);
2. Release this button,rotate Tuning button to find your desired deleted address and frequency.
3. Quick press [DELETE] button to confirm delete.
Delete all stations
With the radio off:
Long press [delete] button for 2 seconds until the LCD displays “ALL
DEL” flashing, release this button and quick press this button again to delete all preset stations.
With the radio on:
In address search status,long press [delete] for 2 seconds until LCD displays “ALL DEL” flashing,release this button then quick press
[delete]button to delete all stations.
Quick press [p] or [q] button and DELETE button:
1. In address search status,long press [p] or [q] button to enter into auto presets station;
9
TRAVELER III OWNER’S MANUAL
2. When the user finds unfavorite stations,just quick press DELETE button to delete it then check the next one.
RESET BUTTON
Use a toothstick or other sharp stick to press RESET button to reset the unit completely when the unit malfunction or down.
DST
If the user wants to use summer time, then the time will be 1 hour in advance. i.e.“DST” =daytime summer time
TIME INDICATOR KNOB
After set up local time,rotate Time Indicator Knob, if the indicator is at your desired time zone,the LCD will display the time of Time Zone.
- TUNING + KNOB
Rotate this knob to adjust time,frequency and preset address When set up time, the user can use HOME or ALARM button to set up clock
Rotate this knob to change frequency when tuning
Rotate this knob to select the preset address in preset address mode.
- VOLUME + KNOB
Rotate this knob to change volume up or down.
Earphone Jack: 3.5mm
DC Jack
10
TRAVELER III OWNER’S MANUAL
System setting
1. Set up MW step
With the radio off, long press [9/10k] button, the LCD will display
AM-10K,which means MW step -10K; AM-9K means MW step-9K.
Note: When MW step is 10K, temperature display format is Fahrenheit, when MW step is 9k,temperature display format is Celsius
2. Set up FM frequency range
With the radio off, long press FM SET and then release it, quick press to select FM frequency range as under:
87,5-108MHz
87.0-108MHz 64.0~108MHZ 76.0~108MHZ
3. Turn on or off LW band
With the radio off,long press AM/LW button ,the LCD displays “LW ON”,which means LW is on.VS LOW OFF
4. Turn on or off buzzer
With the radio off,long press SNOOZE/LIGHT button, the LCD displays Beep on,means beep is activated,VS Beep off
11
TRAVELER III OWNER’S MANUAL
SPECIFICATIONS
1. Supported Frequencies:
|
|
US/CAN/MEX |
INTL |
FM : |
|
87 - 108 MHz |
64 - 108 MHz |
AM(MW) : |
520 - 1710 kHz |
522 - 1620 kHz |
|
LW: |
|
153 - 513 kHz |
153 - 513 kHz |
SW1: |
2.3 - 26.1 MHz |
2.3 - 26.1 MHz |
|
DAB: |
|
174.928 - 239.200 MHz |
|
2. Noise Limited Sensitivity: |
|
||
FM |
≤ 3μv |
|
|
MW ≤ 1mv/m |
|
||
SW |
≤ 10mv/m |
|
|
LW |
≤ 18μv |
|
|
3. Speaker: 50mm 8ohm 0.5W 4. Earphone: D 3.5mm
5. Power Supply:
Batteries: 4 x AA size (4x1.5V) DC: 6V
6. Dimension: 135(L)x87(H)x27(D)mm
7. Weight: approx 213g (excluding batteries)
NEED HELP? CONTACT US.
Etón Corporation
1015 Corporation Way, Palo Alto, CA 94303, USA 1-800-872-2228 (U.S.)
1-800-637-1648 (Canada)
650-903-3866 (worldwide)
12

TRAVELER III OWNER’S MANUAL
M-F, 8:00AM-4:30PM, Pacific Standard Time
www.etoncorp.com.
WARNING
•Do not expose this appliance to rain or moisture.
•Do not submerge or expose for extended period to water.
•Protect from high humidity and rain.
•Only operate within specified temperature range (0 °C to 40 °C).
•Unplug or remove batteries immediately if liquid has been spilled or any object has fallen into the apparatus.
•Clean only with a dry cloth. Do not use detergents or chemical solvents as this might damage the finish.
•Do not remove cover [or back].
•Refer servicing to qualified service personnel.
ENVIRONMENT
Disposal
According to the European Directive 2002/96/EC all electrical and electronic products must be collected separately by a local collection system.
Please act according to your local rules and do not dispose of your old products with your normal household waste.
Please dispose of all types of batteries per your Government, State or Local rules and/or regulations. If you are unsure, please call the
13
TRAVELER III OWNER’S MANUAL
appropriate local authority to find out how to dispose of them safely and help protect the environment.
WARRANTY REGISTRATION
To ensure full warranty coverage or product updates, registration of your product should be completed as soon as possible after purchase or receipt.
Please go to
http://www.etoncorp.com/productregistration to register your product.
LIMITED WARRANTY
Retain your proof of purchase or the receipt. Limited Warranty information can be viewed at www.etoncorp.com in the Support section.
SERVICE FOR YOUR PRODUCT
To obtain service for your product, we recommend first contacting an Etón service representative at 800-872-2228 US, 800-637- 1648 Canada or (650) 903-3866 for problem determination and trouble-shooting. If further service is required, the technical staff
14
TRAVELER III OWNER’S MANUAL
will instruct how to proceed based on whether the radio is still under warranty or needs non-warranty service.
WARRANTY
If your product is still in warranty and the Etón service representative determines that warranty service is needed, a return authorization will be issued and instructions for shipment to an authorized warranty repair facility. Do not ship your radio back without obtaining the return authorization number.
NON-WARRANTY
If your product is no longer under warranty and requires service our technical staff will refer you to the nearest repair facility that will be able to best handle the repair.
For service outside of North America, please refer to the distributor information included at time of purchase/receipt.
15

TRAVELER III MANUEL DU PROPRIÉTAIRE
FAITES CONNAISSANCE AVEC LA TRAVELER III
Merci d’avoir acheté la Traveler III Nous voulons que vous appréciez complètement l’utilisation de ce produit. Pour prendre avantage de ses nombreuses excellentes et uniques fonctionnalités, nous vous prions instamment de lire soigneusement ce manuel d’utilisateur.
AVANT
2
3
4
5
1 |
6 |
7 |
8 |
9 |
10 |
11 |
ARRIÈRE
12
13
14
16

TRAVELER III MANUEL DU PROPRIÉTAIRE
CÔTÉ DROIT |
CÔTÉ GAUCHE |
17
15
18
16
Caractéristiques :
1 |
Grille de haut-parleur |
9 |
Bouton FM/RDS [MF/RDS] |
2 |
Panneau LCD |
10 |
Bouton Snooze/Light [Répétition |
3 |
Bouton Power/sleep (Mise en |
|
de réveil/Éclairage] |
|
marche/Sommeil] |
11 |
Bouton Sleep [Sommeil] |
4 |
Bouton DISPALY Mode/ |
12 |
Antenne fouet |
|
Lock [Mode d’AFFICHAGE/ |
13 |
Support arrière |
|
Verrouiller] |
14 |
Compartiment de piles |
5 |
Couvercle G.M.T. |
15 |
Cadran d’accord |
6 |
Bouton Up [Vers le haut] |
16 |
Bouton de volume |
7 |
Bouton Down [Vers le bas] |
17 |
Prise d’écouteur |
8 |
Bouton AM/LW [MA/OL] |
18 |
Prise de CC. |
17
TRAVELER III MANUEL DU PROPRIÉTAIRE
BOUTON POWER/SLEEP (MISE EN MARCHE/SOMMEIL]
1. Appuyez brièvement pour mettre la radio en marche et appuyez de nouveau pour éteindre
2. Appuyez longtemps sur ce bouton,  l’icône sur le panneau LCD clignote Tournez le bouton d’accord [Tuning] pour choisir le délai voulu avant l’extinction automatique avec 1~120 minutes.
3. Choisir “ON” gardera la radio allumée tout le temps.
Remarque : Si le réveil sonne, appuyez brièvement ce bouton pour arrêter la fonction de réveil.
BOUTON DISPALY MODE/LOCK [MODE D’AFFICHAGE/ VERROUILLER]
Appuyez brièvement pour afficher Alarm, Temperature, Local/World
Time, Signal strength, S/N ratio [Réveil, Température, Heure Locale/ Monde, Force du signal, Rapport signal/bruit]
Appuyez longtemps sur : les boutons Lock/Unlock [Verrouiller/ Déverrouiller] et sur le bouton Tuning [Accord]
BOUTON VF/VM FREQUENCY/ADDRESS,TUNING STEP [FRÉQUENCE/ADRESSE FV/MV, PAS D’ACCORD]
Avec la radio allumée :
appuyez brièvement sur : Swith between frequency or address [Changer entre fréquence et adresse] En passant à fréquence,
“tuning” va clignoter; en passant à adresse, “Preset” va clignoter.
Appuyez longtemps pour changer entre pas d’accord long ou court, l’icône indique un pas court, l’icône indique un pas long.
18

TRAVELER III MANUEL DU PROPRIÉTAIRE
|
u |
|
uu |
|
|
|
Pas long |
|
Pas court |
|
|
|
|
|
|
|
|
Bande |
Bouton d’accord |
Bouton d’accord |
Bouton d’accord |
Bouton d’accord |
|
long |
rapide |
long |
rapide |
||
|
|||||
|
|
|
|
|
|
FM |
0.01MHZ |
0.1MHZ |
0.1MHZ |
1MHZ |
|
|
|
|
|
|
|
LW |
1KHZ |
3KHZ |
3KHZ |
100KHZ |
|
|
|
|
|
|
|
MW |
1KHZ |
9/10KHZ |
9/10KHZ |
100KHZ |
|
|
|
|
|
|
|
SW |
1KHZ |
5KHZ |
5KHZ |
100KHZ |
BOUTON HOME [ACCUEIL]
Faites tourner le “bouton de fuseau horaire” sur votre ville. Appuyez longtemps sur le bouton “HOME”, les heures vont clignoter, faites tourner le bouton d’accord pour modifier l’heure.
Appuyez brièvement sur le bouton “HOME”, les minutes vont clignoter, faites tourner le bouton d’accord pour modifier les minutes. Appuyez de nouveau brièvement pour confirmer l’heure locale.
RÉVEIL - RÉGLAGE DU RÉVEIL
La méthode de réglage est la même que pour le réglage de l’heure locale, la seule différence est que l’utilisateur doit ré appuyer
sur le bouton ALARM [RÉVEIL] après avoir réglé le réveil, puis faites tourner le bouton TUNING [Accord] pour régler le délai pour l’extinction automatique dans la plage de 1~90 minutes.
•Sélection de la méthode de réveil 

 , Appuyez brièvement sur le bouton ALARM [RÉVEIL] sans régler l’heure de réveil. Si
 l’icône clignote pour activer la fonction réveil radio.
•Avec la radio en marche, recherchez d’abord votre station voulue utilisée comme votre station favorite pour le réveil et réglez aussi le volume à votre convenance.
19
TRAVELER III MANUEL DU PROPRIÉTAIRE
•Appuyez longtemps sur le bouton ALARM [Réveil], après que entendiez un “bip” l’icône clignote, vous pouvez entendre cette station à l’heure du réveil. Si le réveil est enclenché, l’unité va s’allumer automatiquement et commencera à recevoir la station puis elle s’éteindra automatiquement au moment choisi. Durant l’écoute, si le réveil sonne, l’unité va passer automatiquement à la station préréglée. Si l’icône clignotant indique réveil par sonnerie, la fonctionnalité suivante est nouvelle :
•Si l’utilisateur ne connait pas la fréquence de la station locale et ses heures de transmission, il est recommandé d’utiliser le réveil par sonnerie. Si le réveil est enclenché, l’unité émettra un son “bip-bip” et elle s’éteindra automatiquement après le délai préréglé.
•Si les icônes ci-dessus ne sont pas affichées, cela indique que le réveil n’est pas enclenché.
Remarque : Le réveil est réglé selon le fuseau horaire choisi. Si l’utilisateur règle le réveil pour 7 heures du matin, et que l’indicateur de fuseau horaire est sur heure de New York, l’unité sonnera le réveil à 7 heure du matin, heure de New York.
BOUTON LIGHT/SNOOZE [ÉCLAIRAGE/RÉPÉTITION]
Appuyez brièvement sur le bouton Light/Snooze [Éclairage/ Répétition] pour choisir le niveau de brillance 0FF-LOW-HIGH [ÉTEINT-BAS-ÉLEVÉ]
En absence d’utilisation, le rétroéclairage restera allumé au niveau de brillance choisi pendant 10 minutes. Si le rétroéclairage est éteint, quand l’utilisateur appuie rapidement sur un bouton quelconque
la première fois, le rétroéclairage s’allume, un second appui sur le bouton activera la fonctionnalité du bouton.
20
TRAVELER III MANUEL DU PROPRIÉTAIRE
FONCTION SNOOZE [RÉPÉTITION]
Avec le réveil déclenché, appuyez rapidement sur le bouton Light/ Snooze [Éclairage/Répétition] pour arrêter temporairement le réveil, le réveil sonnera de nouveau après 10 minutes. La fonction répétition peut être répétée 3 fois. Quand le réveil sonne une 4e fois, appuyez de nouveau sur le bouton Light/Snooze [Éclairage/ Répétition] pour arrêter le réveil.
BOUTON BANDE ONDES COURTES / AFFICHAGE AUTO
Avec la radio allumée :
•Appuyez rapidement sur le bouton [p] or [q] pour choisir la bande SW [OC]
•Appuyez rapidement sur le bouton [p] or [q] pour choisir la bande SW [OC]
•Sur l’indicateur d’état de la recherche automatique de fréquences : appuyez longtemps sur le bouton [p] ou [q] pour afficher automatiquement la station
•Sur l’indicateur d’état de la recherche d’adresse : appuyez longtemps sur le bouton [p] ou [q] pour afficher automatiquement les stations préréglées
BOUTON AM/LW BAND/ATS [BANDES MA/OL/ATS]
Avec la radio allumée :
• Appuyez rapidement sur le bouton AM/LW [MA/OL], choisissez la bande AM(MW) [MA(OM] ou LW [OL]
21
TRAVELER III MANUEL DU PROPRIÉTAIRE
• Appuyez longtemps sur le bouton AM/LW [MA/OL], pour la recherche et le préréglage automatique des stations de la bande AM(MW) [MA(OM] ou LW [OL]
BOUTON FM RDS / ATS
Avec la radio allumée :
•Appuyez rapidement sur le bouton FM/RDS pour choisir la bande FM [MF]
•Appuyez longtemps sur le bouton FM RDS pour continuer avec la fonction ATS
AFFICHAGE DES INFORMATIONS RDS
Dans la bande FM [MF] appuyez rapidement sur le bouton FM RDS pour afficher de façon cyclique les différentes informations RDS.
Si des informations RDS existent une icône sera affichée sur le panneau LCD.
Appuyez rapidement sur le bouton FM RDS pour afficher PS/PTY/RT/
DATA
PS : Nom du programme, en absence de station, affiche NO PS PTY : Type de programme, en absence de programme affiche
NO PTY
RT : Texte de programme, en absence de texte, affiche NO RT
22
TRAVELER III MANUEL DU PROPRIÉTAIRE
DATA [DONNÉES] : Informations Heure/Date/Hebdomadaire/
Indicatif, en absence d’informations, affiche NO DATA
Si des informations existent, le format d’affichage est le suivant :
Amérique du Nord:
Indicatif de |
Jour de semaine |
Mois-Jour-An |
Heure:Minute |
station |
(MON, TUE, WED, THU, FRI, SAT, SUN) |
|
|
|
|
|
|
WGSS |
TUE |
03-25-2014 |
02 :15 |
|
|
|
|
International:
Indicatif de |
Jour de semaine |
Mois,Jour,An |
Heure:Minute |
station |
(MON, TUE, WED, THU, FRI, SAT, SUN) |
|
|
|
|
|
|
WGSS |
TUE |
Mar,25,2014 |
02 :15 |
|
|
|
|
Remarque : En absence d’indicatif de station, le PI CODE de la station actuelle sera affiché.
BOUTON MÉMOIRE
Avec la radio allumée :
Après avoir choisi une station appuyez rapidement sur le bouton Mémoire, 


 va clignoter.
Faites tourner le bouton TUNING [Accord] pour trouver l’adresse préréglée et appuyea rapidement sur le bouton Mémoire pour confirmer le préréglage.
APPUYEZ RAPIDEMENT SUR LE BOUTON [p] OU [q]
ET SUR LE BOUTON MÉMOIRE POUR PRÉRÉGLER
Utilisez lafonction ATS pour prérégler rapidement les stations.
23
TRAVELER III MANUEL DU PROPRIÉTAIRE
1. Pour un balayage automatique des fréquences : appuyez longtemps sur le bouton [p] ou [q] pour balayer automatiquement les stations.
2. Pour choisir votre station favorite, appuyez rapidement une fois sur le bouton MÉMOIRE pour mémoriser cette station et balayer ensuite les autres stations.
BOUTON DELETE [SUPPRIMER]
Supprimer une station
Avec la radio allumée :
1. Dans l’affichage d’état du balayage d’adresses, appuyez longtemps sur le bouton DELETE [SUPPRIMER], 


 l’icône clignotera et PXX DEL clignotera sur l’écran LCD (XX indique l’adresse de la station préréglée]
2. Relâchez ce bouton, faites tourner le bouton TUNING [ACCORD] pour trouver l’adresse et la fréquence à supprimer.
3. Appuyez rapidement sur le bouton DELETE pour confirmer la suppression.
Supprimer toutes les stations
Avec la radio éteinte :
Appuyez pendant 2 secondes sur le bouton DELETE [SUPPRIMER] jusqu’à ce que l’affichage LCD affiche ALL DEL [SUPP TOUTES] qui clignote, relâchez ce bouton et appuyez de nouveau rapidement sur ce bouton pour supprimer toutes les stations préréglées.
24
 Loading...