


FRX5-BT
The Rugged, All-Purpose, Multi-Power, Smartphone Charging Weather Alert Radio with S.A.M.E. Technology and Bluetooth®
Owner’s Manual
1
FRX5-BT OWNER’S MANUAL
MEET THE FRX5-BT
Thank you for purchasing the Etón FRX5-BT. We want you to thoroughly enjoy the use of this
product. To take advantage of its many excellent and unique features, we urge you to carefully read the user’s manual.
NOTE:
Radio performance may be degraded while using the USB input or output charging feature. The audio from weak radio stations may no longer come in clearly.
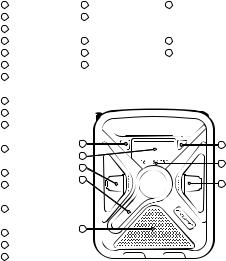
Features
1 |
Power Button |
18 |
Strap Hole |
23 |
USB Out Phone |
2 |
Display |
19 |
LED Flashlight and |
|
Charging |
3 |
Volume Knob |
|
Emergency Beacon |
|
|
4 |
Hand Crank |
20 |
Micro-USB Charging Port |
24 |
Reset Button |
5 |
Speaker |
21 |
Headphone Jack |
25 |
Solar Panel |
6 |
Play/Pause Button |
22 |
AUX Port |
|
|
7 |
SAME Alert Status |
|
|
|
|
|
Level Lights |
Front |
|
|
|
8 |
Tuning Knob |
|
|
|
|
9 |
Alarm On/Off |
|
|
|
|
10 |
AM/FM & Back/ |
|
|
|
Previous & Bluetooth |
1 |
|
11 |
Weather Band & |
||
|
|||
|
Enter/Confirm Button |
2 |
|
|
3 |
||
12 |
WB Alert Button |
||
4 |
|||
13 |
Menu & Scan |
||
|
|||
|
Downward Button |
|
|
14 |
Cell Phone Charger & |
|
|
|
Scan Upward Button |
|
|
15 |
Light Button |
5 |
|
|
|||
16 |
Ambient Light |
|
|
17 |
Antenna |
|
6
7
8
2
FRX5-BT OWNER’S MANUAL
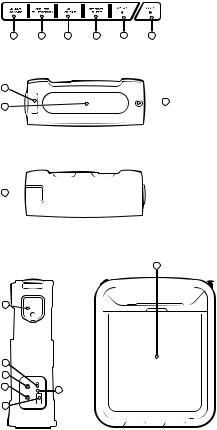
Top Buttons
9 |
10 |
11 |
12 |
13 |
14 |
Top Side
15
 17
17
16 
Bottom Side
18 
Right Side |
Back Side |
25
19

20
21
22
23
<![endif]> Reset
Reset
25
3
FRX5-BT OWNER’S MANUAL
KEY OPERATIONS
POWER
Press to turn on/off
Selecting Radio Band
With radio on: Press AM/FM/Bluetooth to switch between AM/FM/Bluetooth or press WB button to listen to WB. Scroll tuning knob to find WB station for your area.
Note:
MENU button has secondary function. When listening to either FM/AM, press and hold MENU to tune into the previous available station, press and hold CELL to tune into the next available station, press MENU to store the current frequency into memory. 8 memory locations are available for each band; FM/AM. Rotate TUNING knob to select the location(from 1 ~ 8) and press MENU to save to that location.
After storing stations into memory, each time you press the MEMORY/TUNE button, you will go to your stored stations. To go to the next stored station, press MEMORY/TUNE again. For example, when the FM you are listening to is memory location 5, with pressing of MEMORY/TUNE button, the radio will go to memory location 6.
Bluetooth
Press AM/FM/Bluetooth to turn on the Bluetooth. Turn on Bluetooth on your device and connect to FRX5-BT. Play your music through the FRX5-BT.
PLAY/PAUSE Streaming Music
Press the Play/Pause button on the front of the FRX5BT to control your streaming music.
Light Operation
Press the Light button to turn on the ambient light or the flashlight(alternate), press it again to turn off. When the ambient light or the flashlight is on, press
4
FRX5-BT OWNER’S MANUAL
and hold the Light button to adjust the brightness. Press the Light button twice quickly to turn on the red emergency light, press it twice again to turn off.
Tablet or Cell Phone Charging
Plug your device’s USB charging cable into the USB out port on the FRX5-BT and plug the other end into your device. Press the CELL phone charger button to start charging,”CELL” flashes in the display in the display. Press it again to stop charging and the symbol will disappear.
FRX5-BT POWER OPTIONS
Charge via USB
Insert provided micro USB cable into Micro USB Charging Port and other end into standard USB charging block and plug into wall outlet. The battery charging icon will indicate that the unit is charging.
NOTE: The USB power source should be able to withstand a minimum constant 500 mA power output for an extended period of time to fully charge the FRX5BT’s 2000mAh battery.
Solar Charging
When placed in sunlight, it will automatically start charging the lithium battery. Battery charging icon will show unit is charging. Fully charges the battery in 5-6 hours.
Crank Charging
Crank for 4 minutes to get 1 minute of talk time on most smart phones, 10-15 minutes of radio time.
Setting Weatherband Alert
1. With RADIO on, press WB button
2. Rotate tuning knob to tune to WB for your location. 3. Press the WB ALERT button, WB will be displayed in
the display.
5
FRX5-BT OWNER’S MANUAL
Note: Audio will shut off in WB ALERT mode.
4. Press WB or AM/FM button to exit the WB Alert mode.
All feature settings below require the radio to be in the “OFF” mode.
Set Time
1. Press MENU.
2. SET TIME will be displayed. 3. Press WB.
4. The HOURS digits on the clock will flash.
5. Rotate the TUNING dial up or down to the appropriate digit, note that AM or PM will change as you pass the number 12.
6. Press WB to enter.
7. The MINUTES digits on the clock will flash.
8. Press WB to enter.
9. If no buttons are pressed for 20 seconds, the unit will go back to normal position.
Set Alarm
1. Press MENU.
2. Rotate TUNING dial up one step. 3. SET ALARM will be displayed. 4. Press WB.
5. The HOURS digits on the clock will flash.
6. Rotate the TUNING dial up or down to the appropriate digit, note that AM or PM will change as you pass the number 12.
7. Press WB to enter.
8. The MINUTES digits on the clock will flash.
9. Press WB to enter.
10. If no buttons are pressed for 20 seconds, the unit will go back to normal position.
11. Press Alarm ON/OFF button to turn on the alarm. A bell icon will appear on the display. Press button again to turn off alarm.
6
FRX5-BT OWNER’S MANUAL
SET S.A.M.E. ALERT MODE
Set S.A.M.E location using preloaded locations
1. Press MENU.
2. Rotate TUNING dial up three steps.
3. COUNTY – MUL, COUNTY –SIN or COUNTY –ALL will be displayed.
4. Press WB.
5. The word MULTIPLE, SINGLE or ALL will flash on the display.
6. Rotate the TUNING dial up or down to the desired choice.
7. Press WB to enter
MULTIPLE or SINGLE OPERATION:
8. The memory slot number, 01 – 25 will display on the left side of the display.
9. Rotate the tuning dial up or down to select the desired channel to set .
10. Press WB to enter.
11. Use TUNING dial to select USA or CANADA or USER SET for your location.
12. Press WB to enter.
USA OR CANADA OPERATION:
13. Use TUNING dial to select STATE if in USA, Province if in CANADA.
14. Press WB to enter.
15. Use TUNING dial to select COUNTY if in USA or AREA if in CANADA.
16. Press WB to enter, entered location will scroll across the screen for this location. Rotate TUNING dial to select a new location or press MENU to EXIT.
17. If no buttons are pressed for 20 seconds, the unit will go back to normal position.
7
FRX5-BT OWNER’S MANUAL
Voice or Siren
1. Press MENU.
2. Rotate TUNING dial up four steps.
3. ALERT – VOI or ALERT - SIR will be displayed. 4. Press WB.
5. SIREN will flash on the screen.
6. Rotate the TUNING dial up or down to indicate either SIREN or VOICE.
7. Press MENU to enter setting.
8. If no buttons are pressed for 20 seconds, the unit will go back to normal position.
Set S.A.M.E. location directly entering COUNTY/ PROVINCE code
1. The memory slot number, 01 – 25 will display on the left side of the display.
2. Rotate the tuning dial up or down to select the desired channel to set.
3. Press WB to enter
4. Use TUNING dial to select first digit for your location.
5. Press WB to enter.
6. Use TUNING dial to select second digit for your location.
7. Repeat until all 6 digits are correct. 8. Press MENU to enter.
9. ALL locations OPERATION: 10. Press MENU.
11. Rotate TUNING dial up three steps.
12. COUNTY – MUL, COUNTY –SIN or COUNTY –ALL will be displayed.
13. Press WB.
14. Rotate TUNING knob until ALL flashes on the screen.
15. Press MENU to select.
16. COUNTY-ALL will be displayed .
17. If no buttons are pressed for 20 seconds, the unit will go back to normal position.
8
FRX5-BT OWNER’S MANUAL
Enable or Disable S.A.M.E. ALERT
1. Press MENU
2. Rotate TUNING dial five steps
3. ALERT ON or ALERT OFF will be displayed 4. Press WB button
5. The ALERT icon will flash at the top of the screen
6. Rotate the TUNING dial to select either ALERT ON or ALERT OFF
7. Press MENU to enter and exit
NOTE: ALERT OFF - When a alert is issued, the text alert will scroll across the screen without audio.
ALERT Lights
Alert lights are classified according to the event’s degree of urgency and severity.
WARNING (Red Light)
A WARNING is issued when a hazardous weather or hydrologic event is occurring, imminent or likely. A WARNING means weather conditions pose a threat to life or property. People in the path of the storm need to take protective action.
WATCH (Orange Light)
A WATCH is used when the risk of a hazardous weather or hydrologic event has increased significantly, but its occurrence, location or timing is still uncertain. It is
intended to provide enough lead time so those who need to set their plans in motion can do so. A WATCH means that hazardous weather is possible. People should have a plan of action in case a storm threatens and they should listen for later information and possible warnings especially when planning travel or outdoor activities.
9
FRX5-BT OWNER’S MANUAL
ADVISORY (Yellow Light)
An ADVISORY is issued when a hazardous weather or hydrologic event is occurring, imminent or likely. ADVISORIES are for less serious conditions than
WARNINGS, that cause significant inconvenience and if caution is not exercised, could lead to situations that may threaten life or property.
When a S.A.M.E. alert is issued for your area the text alert will scroll across the screen, a loud siren will sound and one of the S.A.M.E. alert status level lights will illuminate.
Set DEFEAT mode
To disable any S.A.M.E. notifications you do not want to be alerted to you can use the DEFEAT feature.
1. Press MENU
2. Rotate TUNING dial four steps 3. DEFEAT – SIR will be displayed 4. Press WB
5. The S.A.M.E. notifications will begin to scroll across the display
6. Rotate the TUNING dial to the desired notification to
ENABLE or DISABLE 7. Press WB
8. DISABLE or ENABLE will be shown below the notification
9. Rotate TUNING dial to next desired notification to
ENABLE or DIABLE
10. Press MENU to enter and exit.
Setting Weatherband Alert
Tune to WB for your location and press the <WB ALERT> button. ‘Alert’ will appear in the display and the audio will turn off. The radio will continue to monitor your WB station and will activate the audio if an alert is issued. Press any button to turn off the Alert.
10
FRX5-BT OWNER’S MANUAL
Note: NOAA does a test alert every Wednesday between 10 am and noon, regardless of your location. For more information please go to: http://www.nws. noaa.gov/nwr/nwrtest.htm
Set Backlight LED sleep mode
Normal operation for the radio’s backlight is to dim after 30 seconds of inactivity. If you desire to have the backlight always illuminated you can choose ON MODE for the backlight LED, this will keep the backlight always illuminated for the display. Note that this will shorten battery life.
1. Press MENU
2. Rotate TUNING dial six steps 3. SET BKLED will be displayed 4. Press WB
5. NORMAL or ON will flash on the display
6. Rotate TUNING knob to select 7. Press MENU to exit
TROUBLE-SHOOTING
If the unit becomes unresponsive, press the RESET button with a paper clip to reset. If you are having further problems please contact us.
NEED HELP? CONTACT US.
Etón Corporation
1015 Corporation Way, Palo Alto, CA 94303, USA 1-800- 872-2228 (U.S.)
1-800-637-1648 (Canada)
650-903-3866 (Worldwide)
M-F, 8:00AM-4:30PM, Pacific Standard Time www.etoncorp.com.
WARNING
•Do not expose this appliance to rain or moisture.
11

FRX5-BT OWNER’S MANUAL
•Do not submerge or expose for extended period to water.
•Protect from high humidity and rain.
•Only operate within specified temperature range
•(0 °C to 40 °C).
•Unplug immediately if liquid has been spilled or any object has fallen into the apparatus.
•Clean only with a dry cloth. Do not use detergents or
•chemical solvents as this might damage the finish.
•Unplug and disconnect external antennas during
•lightning storms.
•Do not remove cover [or back].
•Refer servicing to qualified service personnel.
ENVIRONMENT
Disposal
According to the European Directive 2002/96/EC all electrical and electronic products must be collected separately by a local collection system.
Please act according to your local rules and do not dispose of your old products with your normal household waste.
Please dispose of all types of batteries per your Government, State or Local rules and/or regulations. If you are unsure, please call the appropriate local
12
FRX5-BT OWNER’S MANUAL
authority to find out how to dispose of them safely and help protect the environment.
WARRANTY REGISTRATION
To ensure full warranty coverage or product updates, registration of your product should be completed as soon as possible after purchase or receipt.
Please go to http://www.etoncorp.com/productregistration to register your product.
LIMITED WARRANTY
Retain your proof of purchase or the receipt. Limited Warranty information can be viewed at www.etoncorp. com in the Support section.
SERVICE FOR YOUR PRODUCT
To obtain service for your product, we recommend first contacting an Etón service representative at 800-872-2228 US, 800-637-1648 Canada or (650) 903-3866 for problem determination and trouble-shooting. If further service is required, the technical staff will instruct how to proceed based on whether the radio is still under warranty or needs non-warranty service.
WARRANTY
If your product is still in warranty and the Etón service representative determines that warranty
13
FRX5-BT OWNER’S MANUAL
service is needed, a return authorization will be issued and instructions for shipment to an authorized warranty repair facility. Do not ship your radio back without obtaining the return authorization number.
NON-WARRANTY
If your product is no longer under warranty and requires service our technical staff will refer you to the nearest repair facility that will be able to best handle the repair.
For service outside of North America, please refer to the distributor information included at time of purchase/receipt.the radio is still under warranty or needs non-warranty service.
14
 Loading...