

Page 1
Userguide
No 037 | September 2011 - revised August 2012
Piezo-actuated Mouse ICSI (intracytoplasmic
sperm injection) using the Eppendorf PiezoXpert®
Hadi Hajarian, Laboratory of In Vitro Fertilization, Agro-Biotechnology Institute (ABI), Malaysia
Ko Kwan Mor, Eppendorf Asia Pacific Headquarters, Malaysia
Abstract
ICSI (intracytoplasmic sperm injection) is an important and commonly used assisted reproductive technology in
both, humans and animals. The Mouse is one of the most common model organisms of choice to study mammalian
fertilization. However, the ability to fertilize mouse eggs successfully by sperm injection has been hard to achieve due
to the fact that the metaphase II mouse oocytes are extremely sensitive and convential ICSI gives low survival rates
[1]. This problem can be solved with piezo-actuated micromanipulation where the capillary advances a very short
distance at a very high speed. This enables the capillary to penetrate the cell membrane with minimum distortion of
the cell and yields to high survival rates. The microinjection workstation required for this technique is very similar to
standard ICSI, but with the addition of a piezo-assisted unit attached to the capillary holder. In this Userguide, the
®
use of the Eppendorf PiezoXpert in combination with the Eppendorf TransferMan
parameter settings as well as optimization of the piezo-actuated microinjection procedure itself are discussed.
NK 2 workstation is shown and
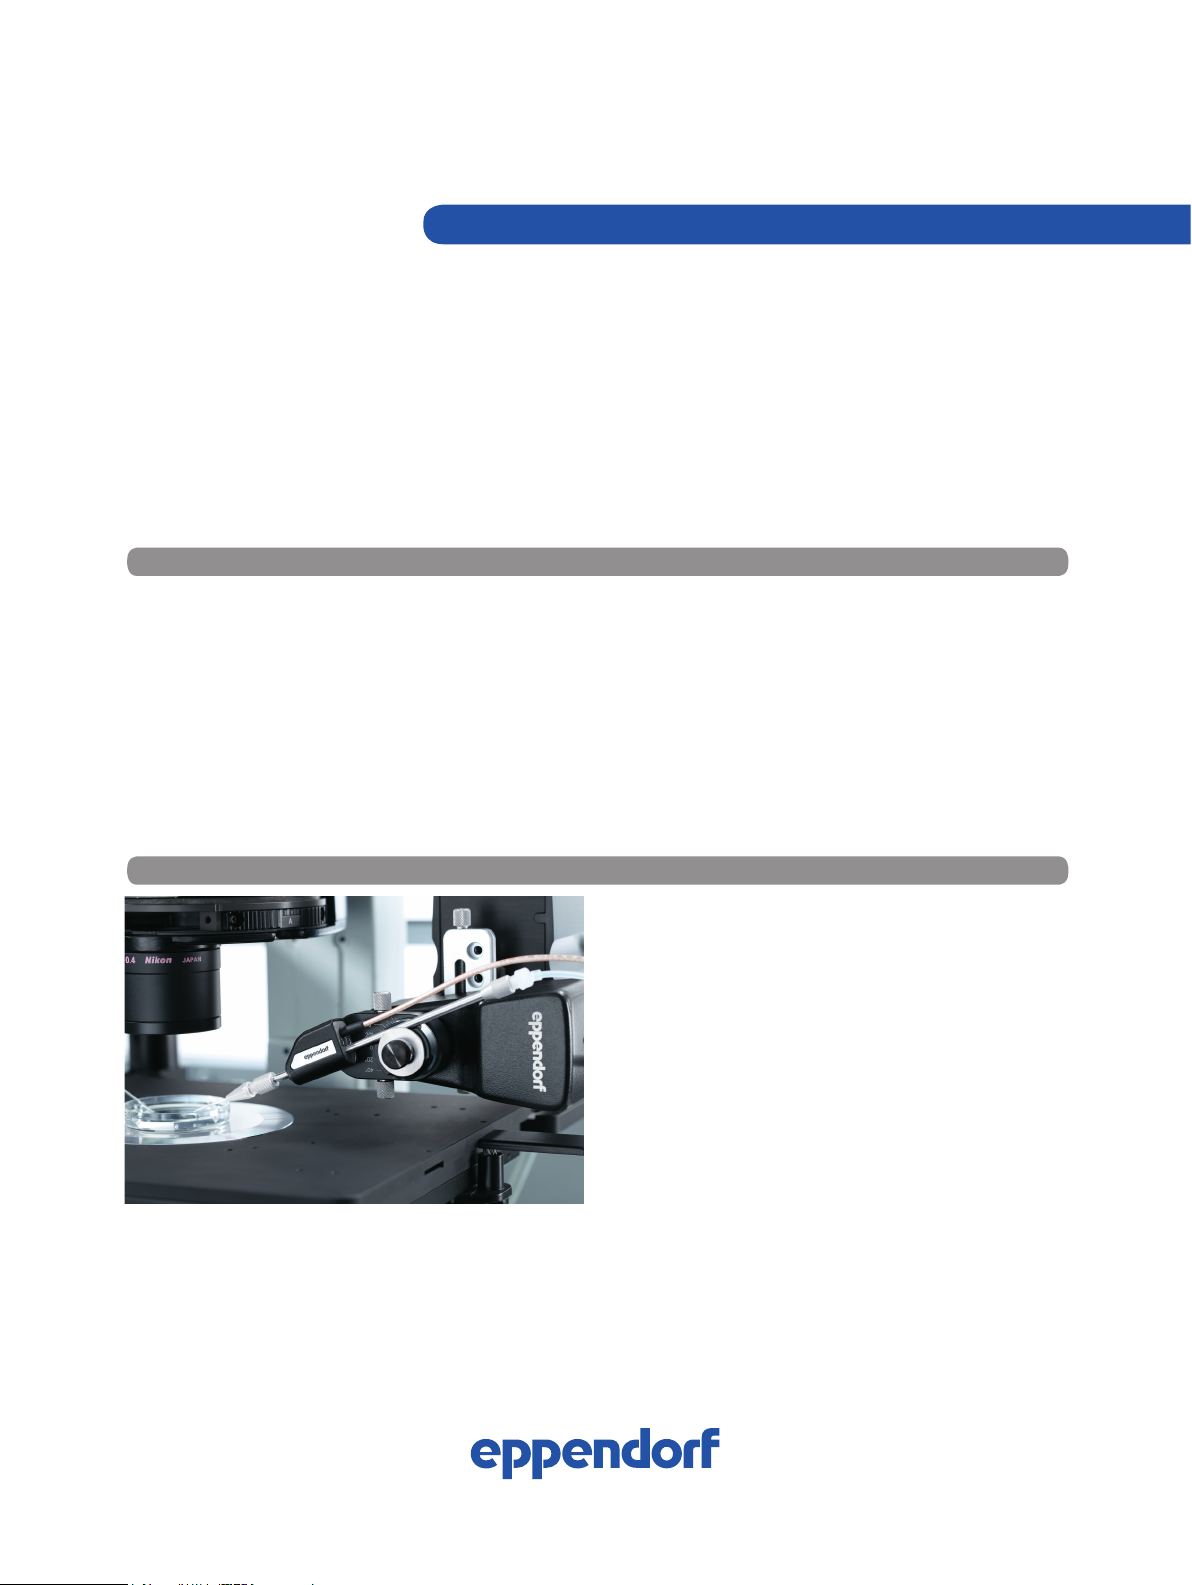
Introduction
Fig. 1: Actuator of PiezoXpert mounted onto the right arm of
the manipulator (Eppendorf TransferMan NK 2).
Intracytoplasmic sperm injection (ICSI) is a technique that
involves the direct transfer of a single sperm into the oocyte
cytoplam via a glass capillary with a spike.
While this conventional ICSI technique has been very successful in humans, it has proven unsuccessful in mice [2].
This is due to a lower viscosity of the ooplasm. Thus wound
healing capacity of mouse oocytes is inferior to that of human oocytes. Furthermore, the oolemma of mouse oocytes
is much more elastic than that of human oocytes. Successful ICSI in mice was first demonstrated by Kimura and
Yanagimachi [3] using piezo-actuated micromanipulation,
which is far less traumatic than the conventional method.
This method proved to increase survival as well as fertilization rates of oocytes after sperm injection [3].
Eppendorf has a long tradition in the area of conventional
ICSI. In particular, the Eppendorf TransferMan NK 2 system
is an electronic micromanipulation system that offers a number of useful features for ICSI. In combination with the piezo
impact unit PiezoXpert, Eppendorf is offering a complete
system for both, conventional ICSI and piezo-actuated ICSI
(Figure 1, 2).
Page 2
Userguide No 037 | Page 2
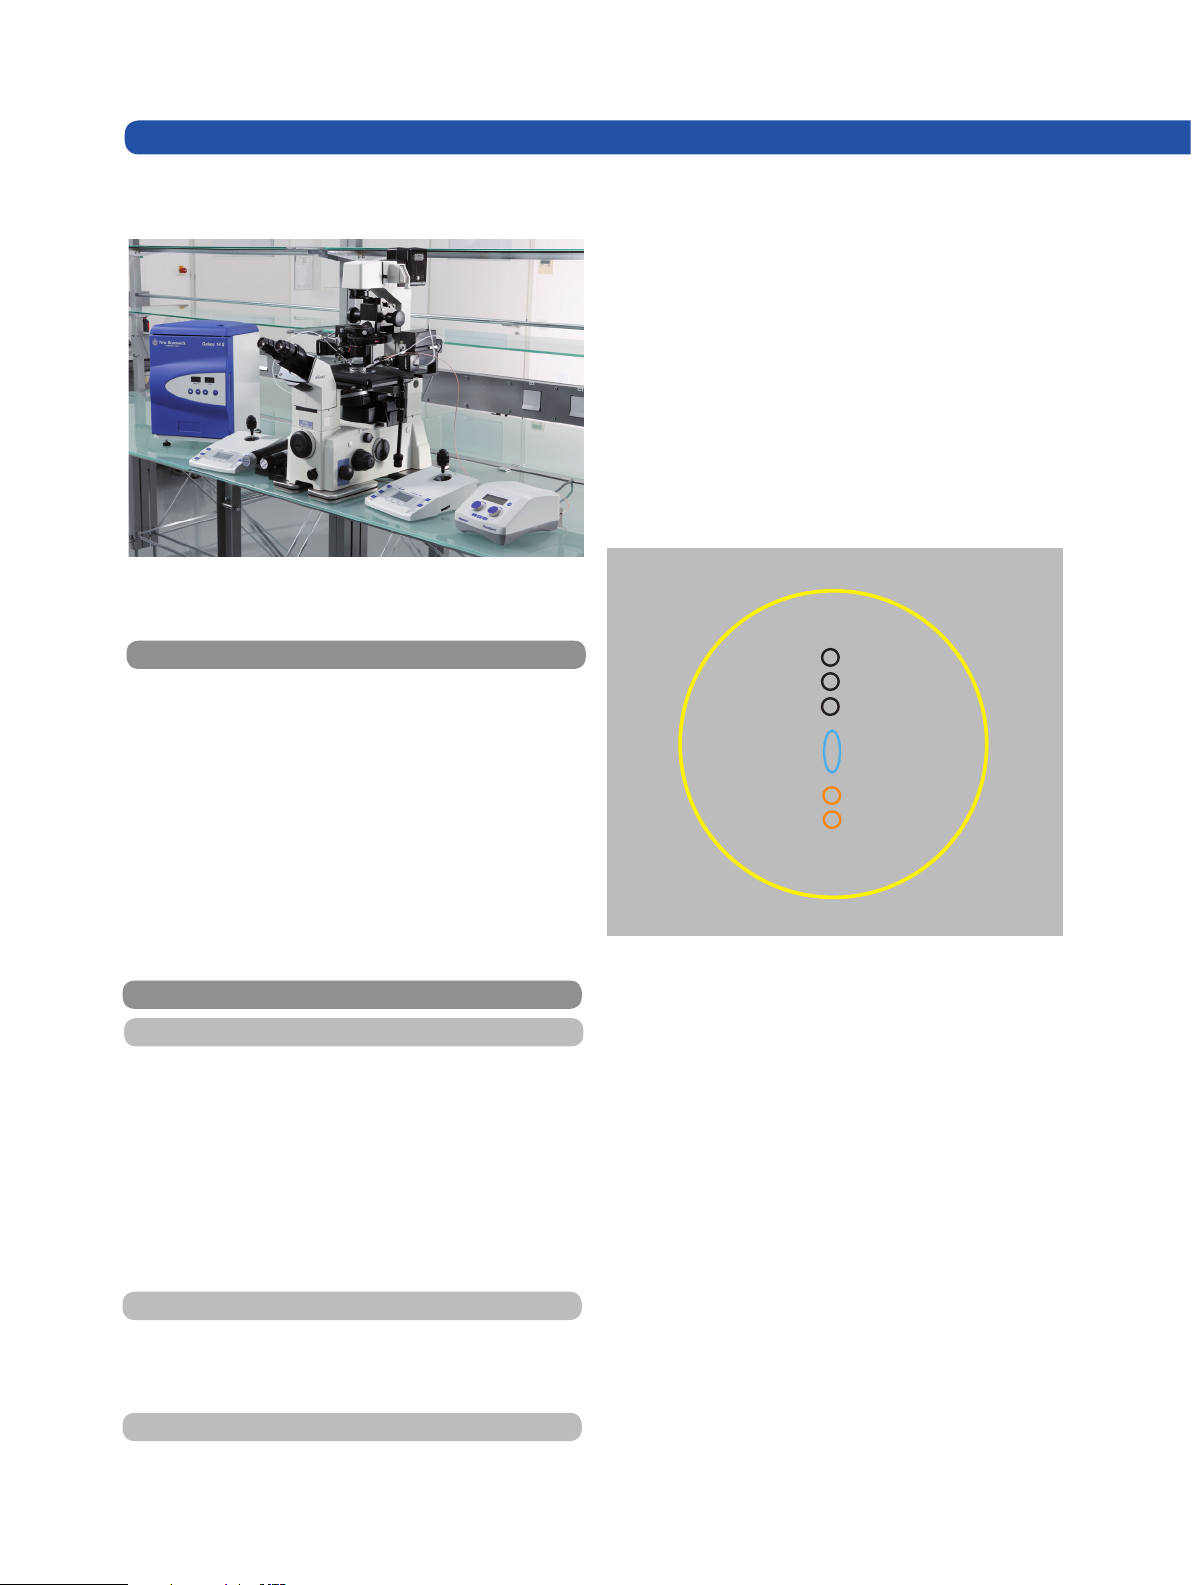
Fig. 2: Eppendorf piezo-actuated mouse ICSI system. Worksta-
tion with 2 TransferMan NK 2, PiezoXpert, mounted onto a Nikon Eclipse TE 2000 microscope and incubator GALAXY 14 S.
head separation methods (sonication method and piezoassisted method) are shown as below.
ICSI dish with sonicated sperm
An example with sperm heads that are separated using
sonication is shown in Figure 3 [4]. Here, a 5 μL flat drop of
sperm suspension is positioned in the center of a flat Petri
dish. 3 x 5 μL drops of CZB-HEPES with 12 % PVP are
positioned at one end of the dish along the midline. In addition, 2 x 5 μL injection drops of CZB-HEPES are placed at
the other end of the dish along the midline. Add approx. five
eggs in one of the injection droplets. Cover with mineral oil.
Materials and Equipment
Animals, media, consumables and devices were used as
described previously [4] with the following modifications:
Media:
CZB-HEPES (CZB-H)
CZB
CZB-HEPES with 12 % polyvinylpyrrolidone (PVP)
Density gradient (e.g. Percoll)
Fluorinert C-77 (FC-77), Fluorinert C-770 (FC-770)
Consumables:
100 μL pipette tips
Piezo impact unit:
Eppendorf PiezoXpert
Methods
1 Preparation of spermatozoa
Mouse sperms (fresh or frozen-thawed) are prepared based
on the method of sperm head isolation.
If the sonication method is used, sperms are prepared by
centrifugation and subsequent sonication to isolate sperm
heads by diluting a small sample of sperms with buffer
followed by repeated sonication (e.g. 4 x 15 seconds) [5].
If the piezo assisted method is used, described at 5.2.1,
sperms are prepared using mini swim-up [6] or density
gradient centrifugation.
2 Preparation of oocytes
The metaphase II oocytes are collected from superovulated
females and further treated as described previously [4]. The
cumulus-free oocytes are transferred to a culture dish [4].
3 Preparation of the microinjection dish
The arrangement of the drops in the microinjection dish depends on personal preferences. Examples for different sperm
Sperm
droplets
Sperm
suspension
Injection
droplets
Fig. 3: ICSI dish with sonicated sperm. Image adapted from [4].
ICSI dish for sperm head isolation using piezo-assisted
method
2 dishes (A; B) are prepared as shown in Figure 4. In dish
A 2 x 5 μL flat droplets of CZB-HEPES with 12 % PVP are
placed in the center of the dish. One droplet for the sperm
suspension and the other one for the isolated sperm heads
collection. In dish B, a 5 μL droplet of CZB-HEPES with
12 % PVP is placed at the center of the dish and 6 x 5 μL
injection drops of CZB-HEPES are positioned adjacent to
the center. Add approx. five eggs; one in each of the injection droplets. (One drop is left without cells for cleaning the
capillary.)
First of all sperms are cut in the ‘sperm suspension droplet‘
(dish A). Then the sperm heads are transferred to the
‘sperm heads collection droplet’. Collect as many sperm
heads as possible before transferring them to dish B, where
the injection takes place.
The advantage of this preparation is to minimize the exposure time of oocytes out of the CO
incubator and thus
2
improve the survival rate of oocytes.
Page 3
Userguide No 037 | Page 3
Injection droplets
Sperm
droplet
Sperm head
droplet
A
Fig. 4:
ICSI dishes for sperm head isolation (A) and injection (B) using piezo-assisted method
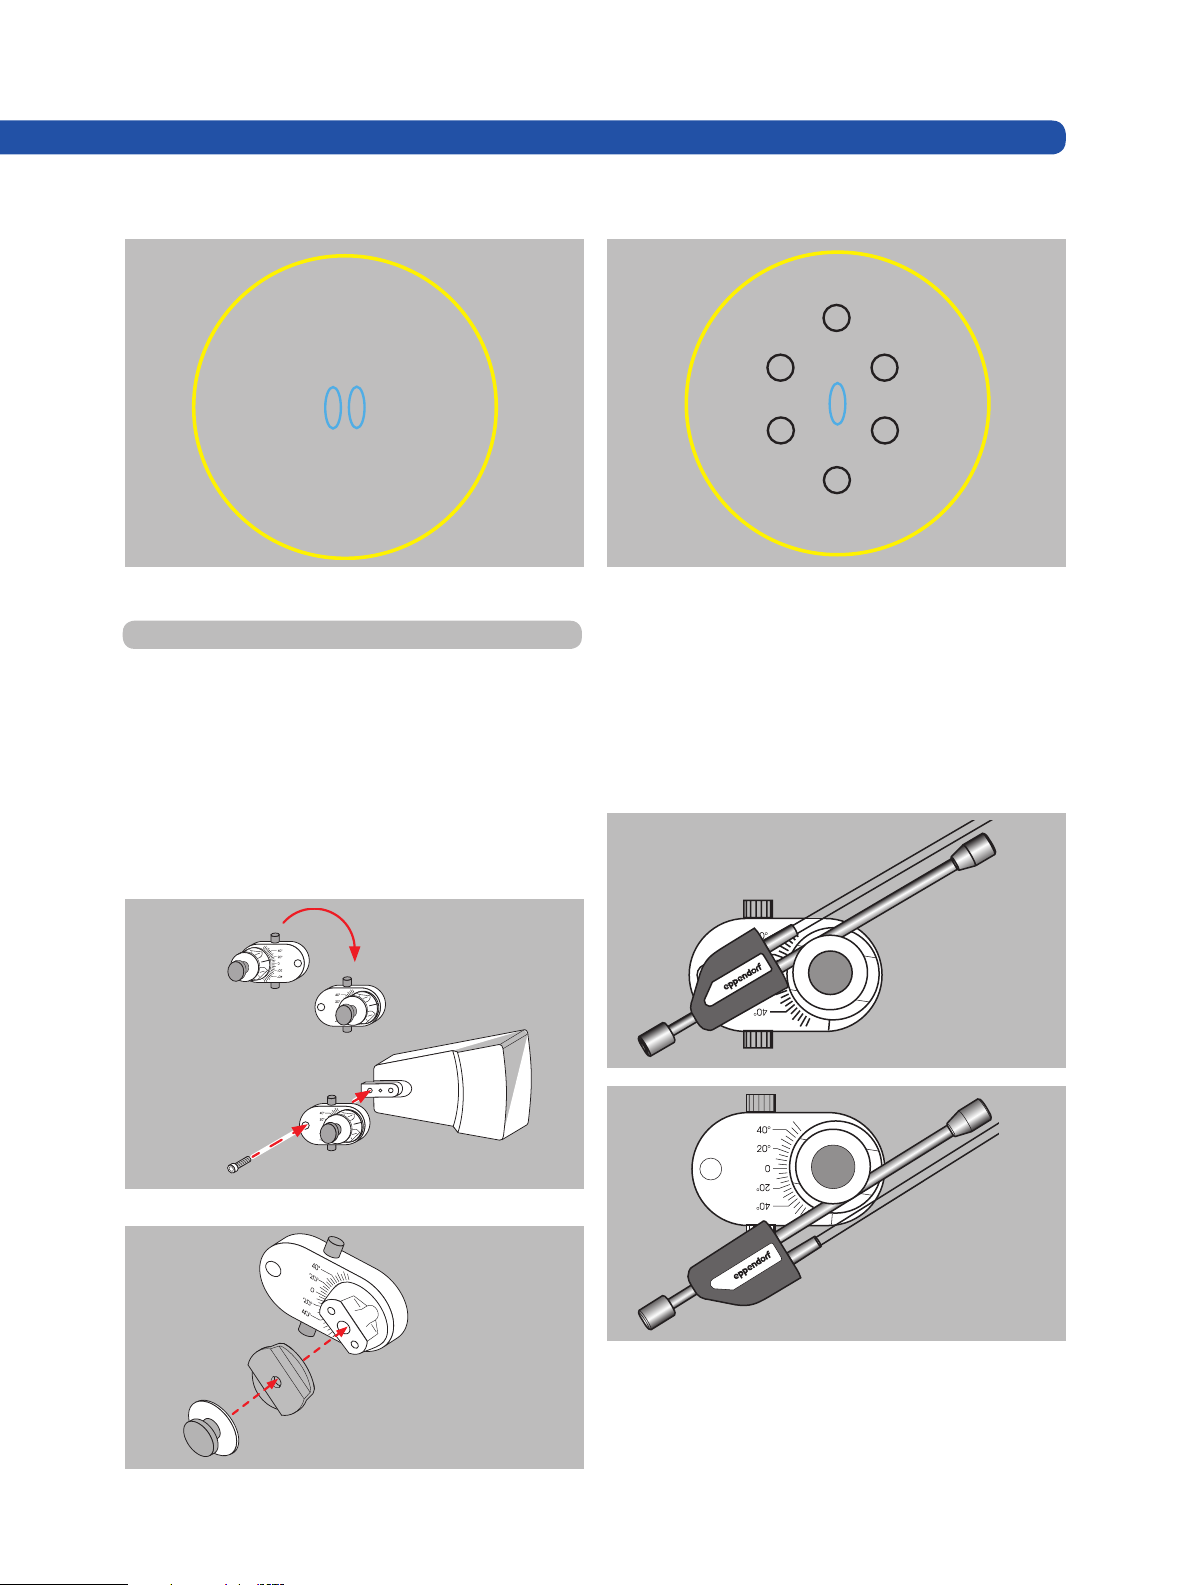
4. Equipment setup
4. 1 Installation of PiezoXpert onto TransferMan NK 2
Loosen the M3x12 cheese head screw and remove the X
head (Figure 5A). Rotate the X head 180°.
Tighten the X head again using the M3x12 cheese head
screw.
Loosen the knurled screw (Figure 5B). Remove the knurled
Place the actuator in the upper (see Figure 6A) or lower (see
Figure 6B) groove of the distance plate. Tighten the knurled
screw to secure the actuator between the distance plate
and pressure plate.
The flatter the angle of the capillary, the more direct the effect of the piezo impulses. Most people use straight or low
angled capillaries for piezo-actuated injection.
screw and the pressure plate from the X head.
Place the provided spacer plate on the bore of the X head.
Secure the spacer plate using the knurled screw and pressure plate.
Sperm head droplet
Injection droplets
B
Fig. 5: Installation of spacer plate onto TransferMan NK 2
A
Fig. 6: Installation of piezo actuator onto TransferMan NK 2
Connect the tubing from CellTram vario to the rear end of
the capillary holder of the actuator.
B
Dispense the oil by rotating the CellTram vario knob to the
right until it is dripping from the opening of the grip head.
A
B
Page 4

Userguide No 037 | Page 4
4. 2 Preparation of microinjection capillary
If Fluorinert FC-77 or FC-770 is used, back-fill the capillary
using a Microloader. Approx. 1/3 of the capillary is filled with
Fluorinert.
If mercury is used, back-fill the capillary with approx. 2 μL of
mercury (i.e. 4 mm column) using a Hamilton syringe under
a fume hood.
Mount the capillary in the actuator grip head.
Make sure that the capillary goes deep enough and touches
the stopper of the capillary holder.
Absorb a small amount of medium via the front capillary
opening, so that the samples will not get in contact with
Fluorinert or mercury (depending on substance in use),
but the heavy liquid is still as close as possible to the front
opening. This is important to ensure an optimal performance for the drilling.
Focus on the periphery of the PVP drop, bring the capillaries
into the same focus so that the periphery of the drop and
capillaries are both in focus. Set Position 1 for both capillar-
ies. Optionally, the Z-Limit (special function of the Transfer-
Man NK 2) can be set using the periphery as a guideline to
prevent capillary breakage.
Raise both capillaries, so that they are just above the me-
dium droplet. The capillaries should remain in the mineral oil
to prevent evaporation and capillary blockage. Then Position
2 is set.
The parameters (intensity, speed and number of pulses) of
the PiezoXpert can be preinstalled. Up to 3 sets of optimized
A B C
Figure 7: Preparation of microinjection capillary. Loosely screw the grip head into the front knurled screw of the actuator (A). Care-
fully push the capillary into the grip head until it touches the stopper (B). Tighten the grip head (C) and rotate the front knurled screw
to align the angled capillary.
5 Piezo-assisted intracytoplasmic sperm injection (ICSI)
5. 1 System optimization prior to ICSI
The TransferMan NK 2 can store up to 3 positions. When a
position is stored, the capillary can be recalled to the position automatically simply by pressing the position button
or a double-click on the joystick button. Preinstallation of
positions can significantly speed up the injection process
and reduce the time of cells out of the CO
incubator and
2
eventually improve the survival rate of oocytes.
For mouse ICSI, usually two position storages are used:
Position 1 - Position to perform injection or sperm head
separation
Position 2 – Parking position above the droplets for moving the plate from sperm droplet to oocytes droplets or vice
versa
Figure 8 : Setting of parameter sets A and B
Page 5

Userguide No 037 | Page 5
programs can be stored. Each program consists of parameter set A and B. Usually, parameter set A is used for the
penetration of the zona pellucida and set B is used
for the penetration of the oolemma. Both sets A and B can
be triggered via either the button on the control unit or the
foot control.
Optimization of parameters:
1. Set the parameters for the speed and number of pulses to 1.
2. Gradually increase the value for intensity (starting from 1)
until the piezo impulses are strong enough to penetrate the
membranes.
3. Fine tune the speed and pulse parameters.
4. Use the lowest parameter settings that work.
Position the sperm so that its neck is at the opening of the
capillary (Figure 9A).
Then apply a few pulses to separate the head from the tail.
Aspirate the head into the injection capillary (Figure 9B). Repeat
the procedure with the next sperm. Separate as many sperm
heads as possible
Transfer the separated sperm heads into the ICSI dish before
injection (see Figure 4B).
5.2.2 Microinjection of sperm heads into oocytes:
Aspirate up to five sperm heads into the capillary. This way is
more efficient and less time consuming than treating one sperm
at a time. Make sure the sperm heads are not directly lined up
adjacent to each other within the capillary to avoid accidentally
injecting more than one sperm head at a time into an oocyte.
Usually, the parameter settings for Fluorinert are slightly higher
than for mercury.
A
Parameter set A
(zona penetration)
Intensity
Speed
Pulse
Table 1: Parameter settings for mouse ICSI using mercury (A) and Fluorinert (B).
10 1
1 1
∞ 1
Parameter set B
(oolemma penetration)
B
Intensity
Speed
Pulse
Parameter set A
(zona penetration)
20 5
1 1
∞ 1
Parameter set B
(oolemma penetration)
NOTE: Users should optimize the parameters for their own
experiments as the settings always depend on individual laboratory protocols. As a guideline, if no cryopreserved oocytes
are used, we recommend the parameters for both mercury and
Fluorinert respectively, shown in Table 1.
For sperm head separation using the PiezoXpert, parameters
with higher intensity and speed can be used. These parameters
can be saved e.g. in program 2.
5.2 During ICSI
5.2.1 Isolation of sperm head:
When using the sonication method, refer to 1.
For applying the piezo-assisted method: First aspirate a single,
motile sperm (head first) into the injection capillary (using the
ICSI dish for sperm head isolation (Figure 4A).
A
B
Fig. 9: Immobilization of a sperm using PiezoXpert (A, B)
Page 6

Userguide No 037 | Page 6
A B
D E F
Fig. 10: Mouse ICSI
G
Move the stage to the injection droplet. Place the holding
capillary using the previous stored positions. The oolemma
of the oocyte should be sharply focused at 20x or 40x.
Aspirate and hold the oocyte using the holding capillary
and place the polar body at the 6 or 12 o’clock position.
Use Position 1 to recall the injection capillary and bring the
injection capillary to the zona pellucida (Figure 10 A);
(Y-OFF function can be activated on TransferMan NK 2
control board to reduce the lateral movement of the capillary while penetrating the cell which may cause cell lysis).
Advance the injection capillary while applying piezo impulse
parameter set A via the foot control to penetrate the zona
(Figure 10 B). Try to expel the zona plug into the perivitelline
space (Figure 10 C). Subsequently, push the oolemma till a
funnel shape is seen. Move one sperm head forward using
C
the dispensing function of the CellTram vario until it is close
to the tip of the capillary and advance the capillary until it
almost reaches the opposite side (Figure 10 D). Then trigger
piezo drilling parameter set B via the foot control until the
relaxation of the oolemma is observed (Figure 10 E). The
sperm head is then injected with a minimum of medium
(Figure 10 F). Withdraw the capillary gently (Figure 10 G).
Release the injected oocyte. Repeat the procedure for all
other oocytes.
5.3 Post-ICSI
After injection, transfer the oocytes in KSOM under mineral
oil in a humidified 5 % CO
treat as described elsewhere [4].
incubator at 37 °C and further
2
Page 7

Userguide No 037 | Page 7
References
[1] Yoshida N and Perry ACF. Piezo-actuated Mouse Intracytoplasmic Sperm Injection (ICSI).
Nature Protocols 2007; Vol. 2, No. 2:296-304.
[2] Collas P and Barnes FL. Nuclear Transplantation by Microinjection of Inner Cell Mass and Granulosa-Cell Nuclei.
Mol Reprod Develop 1994; 38:264-167.
[3] Kimura Y and Yanagimachi R. Intracytoplasmic Sperm Injection in the Mouse. Biol Reprod 1995; 52:709-720.
[4] Stein P and Schneider I. Piezo-actuated Mouse ICSI. Eppendorf Userguide 032. www.eppendorf.com.
[5] Nagy A, Gerstenstein M, Vintersten K, Behringer, B. Manipulating the Mouse Embryo: A Laboratory Manual
(Third Edition). Cold Spring Harbor Laboratory Press; 2003.
[6] Deng M, Kishikawa H, Yanagimachi R, Kopf GS, Schultz RM, Williams CJ. Chromatin-mediated cortical granule
redistribution is responsible for the formation of the cortical granule-free domain in mouse eggs.
Dev Biol 2003; 257(1):166-76.
Page 8

Userguide No
037
Ordering information
Product Description Order no.
International
Eppendorf PiezoXpert
®
Basic device incl. Actuator, Foot control and spacer plate* 5194 000.016 5194000024
Order no.
North America
TransferMan® NK 2 ** Proportional micromanipulator for suspension cells 5188 000.012 920000011
CellTram® Air **
CellTram® Oil **
Manual pressure device for the reliable holding of suspended
cells
Manual pressure device for the reliable holding of suspended
cells
5176 000.017 920002021
5176 000.025 920002030
CellTram® vario ** Manual hydraulic microinjector, with gears 1:1 and 1:10 5176 000.033 920002111
VacuTip™ ** and ***
PiezoDrill
Tip Mouse ICSI
™
PiezoDrill
™
Tip ES
Microloader
™
Microscope Adapter
25 glass capillaries for holding large cells (e.g. eggs), sterilized,
tip angle 35°
25 glass capillaries for the transfer of mouse sperms, angle 25° 5175 220.005 930001091
25 glass capillaries for the transfer of embryonal stem cells,
angle 25°
Capillary tips for filling microinjection capillaries, set of 2x 96
pcs.
Adapter for micromanipulators available for different inverse
microscopes
5175 108.000 930001015
5175 250.001 930001104
5242 956.003 930001007
Available on
request
Available on
request
GALAXY® 14 S (230 V) **** Incubator CO14S-230-0000
GALAXY® 14 S (230 V) **** Incubator with 1-19 % O
control CO14S-2300200
2
GALAXY® 14 S (120 V) **** Incubator CO14S-120-0000
GALAXY® 14 S (120 V) **** Incubator with 1-19 % O
control CO14S-120-0200
2
* For mounting the PiezoXpert onto TransferMan NK 2 or PatchMan NP 2
** This product is registered in Europe as a medical device (according to Medical Device Directive MDD/93/42/EDD). This
product is not registered in the U.S. as a medical device and does not have a 510(k) registration. For resarch use only.
Not for use in human medical applications.
*** Proven non cytotoxicity by the mouse embryo development test.
**** New Brunswick CO
Incubators have been designed for research use only. New Brunswick CO2 Incubators in general
2
are not certified for any human IVF/medical application
are trademarks of Eppendorf AG
™
and VacuTip
™
PatchMan
™,
, Microloader
™
, Piezo Drill Tip ES
™
Eppendorf AG · 22331 Hamburg · Germany · Tel: +49 40 53801-0 · Fax: +49 40 538 01-556 · E-mail: eppendorf@eppendorf.com
Your local distributor: www.eppendorf.com/worldwide
Eppendorf North America, Inc. · 102 Motor Parkway · Hauppauge, N.Y. 11788-5178 · USA
Tel: +1 516 334 7500 · Toll free phone: +1 800-645-3050 · Fax: +1 516 334 7506 · E-mail: info@eppendorf.com
Application Support Europe, International: Tel: +49 1803 666 789 (Preis je nach Tarif im Ausland;
9 ct/min aus dem dt. Festnetz; Mobilfunkhöchstpreis 42 ct/min) · E-mail: support@eppendorf.com
North America: Tel: +1 800 645 3050 · E-mail: techserv@eppendorf.com
Asia Pacific: Tel: +60 3 8023 6869 · E-mail: support_asiapacific@eppendorf.com
is a Trademark from 3M Company United States of America , Maplewood, Minnesota
™
are registered trademarks of Eppendorf AG • Piezo DrillTip Mouse ICSI
®
and CellTram
®
, TransferMan
®
, Eppendorf PiezoXpert
®
is a registered trademark of New Brunswick, Eppendorf AG • Fluorinert
®
eppendorf
Galaxy
Order-No. AU0 37WW 020/GB2/0T/0812/CREA • All rights reserved, including graphics and images • Copyright © 2011 - 2012 by Eppendorf AG
 Loading...