

Einhell BT-BO 16 A,BT-BO 25 A User guide

Art.-Nr.: 20.303.35 I.-Nr.: 01019
Art.-Nr.: 20.303.45 I.-Nr.: 01019
Originalbetriebsanleitung
Starthilfekabel
Original operating instructions
Jumper Cables
Manual de instruções original
cabo auxiliar de arranque
BT-BO 16 A
BT-BO 25 A
Anleitung_BT_BO_16A_25A_SPK7:Anleitung LE-CU III 16 mm2 14.05.2009 14:25 Uhr Seite 1
2
1
Anleitung_BT_BO_16A_25A_SPK7:Anleitung LE-CU III 16 mm2 14.05.2009 14:25 Uhr Seite 2

Achten Sie darauf,
쎲 dass die Kapazität der stromgebenden Batterie
(z.B. 45 Ah) nicht wesentlich unter der der
entladenen liegt
쎲 dass nur Batterien gleicher Nennspannung (z.B.
12 V) verbunden werden dürfen
쎲 dass zwischen den Fahrzeugen kein
Karosseriekontakt hergestellt werden darf
(Kurzschlussgefahr)
쎲 dass Zündquellen (z.B. offenes Licht, brennende
Zigaretten oder elektrische Funken) von den
Batterien fernzuhalten sind (Verpuffungsgefahr)
und dass wegen der Verätzungsgefahr man sich
nicht über die Batterien beugt
쎲 dass das Elektrolyt der entladenen Batterie auch
bei niedriger Temperatur flüssig ist
쎲 dass die entladene Batterie nicht von dem
dazugehörigen Bordnetz getrennt wird und die
Zündungen der Fahrzeuge vor dem Anklemmen
der Starthilfekabel ausgeschaltet sind: bei
Schaltgetrieben der Schalthebel in LeerlaufStellung; bei Automatikgetrieben der Wählhebel
in Stellung «P» steht und die Feststellbremse
angezogen ist
쎲 dass die Leitungen des Starthilfekabels nicht von
den sich drehenden Teilen im Motorraum erfasst
werden können
쎲 wie und in welcher Reihenfolge Starthilfekabel
an- und abzuklemmen sind
쎲 dass beim Entfernen der Leitungen des Start-
hilfekabels, diese nicht in Kontakt mit sich
drehenden Teilen des Motors kommen.
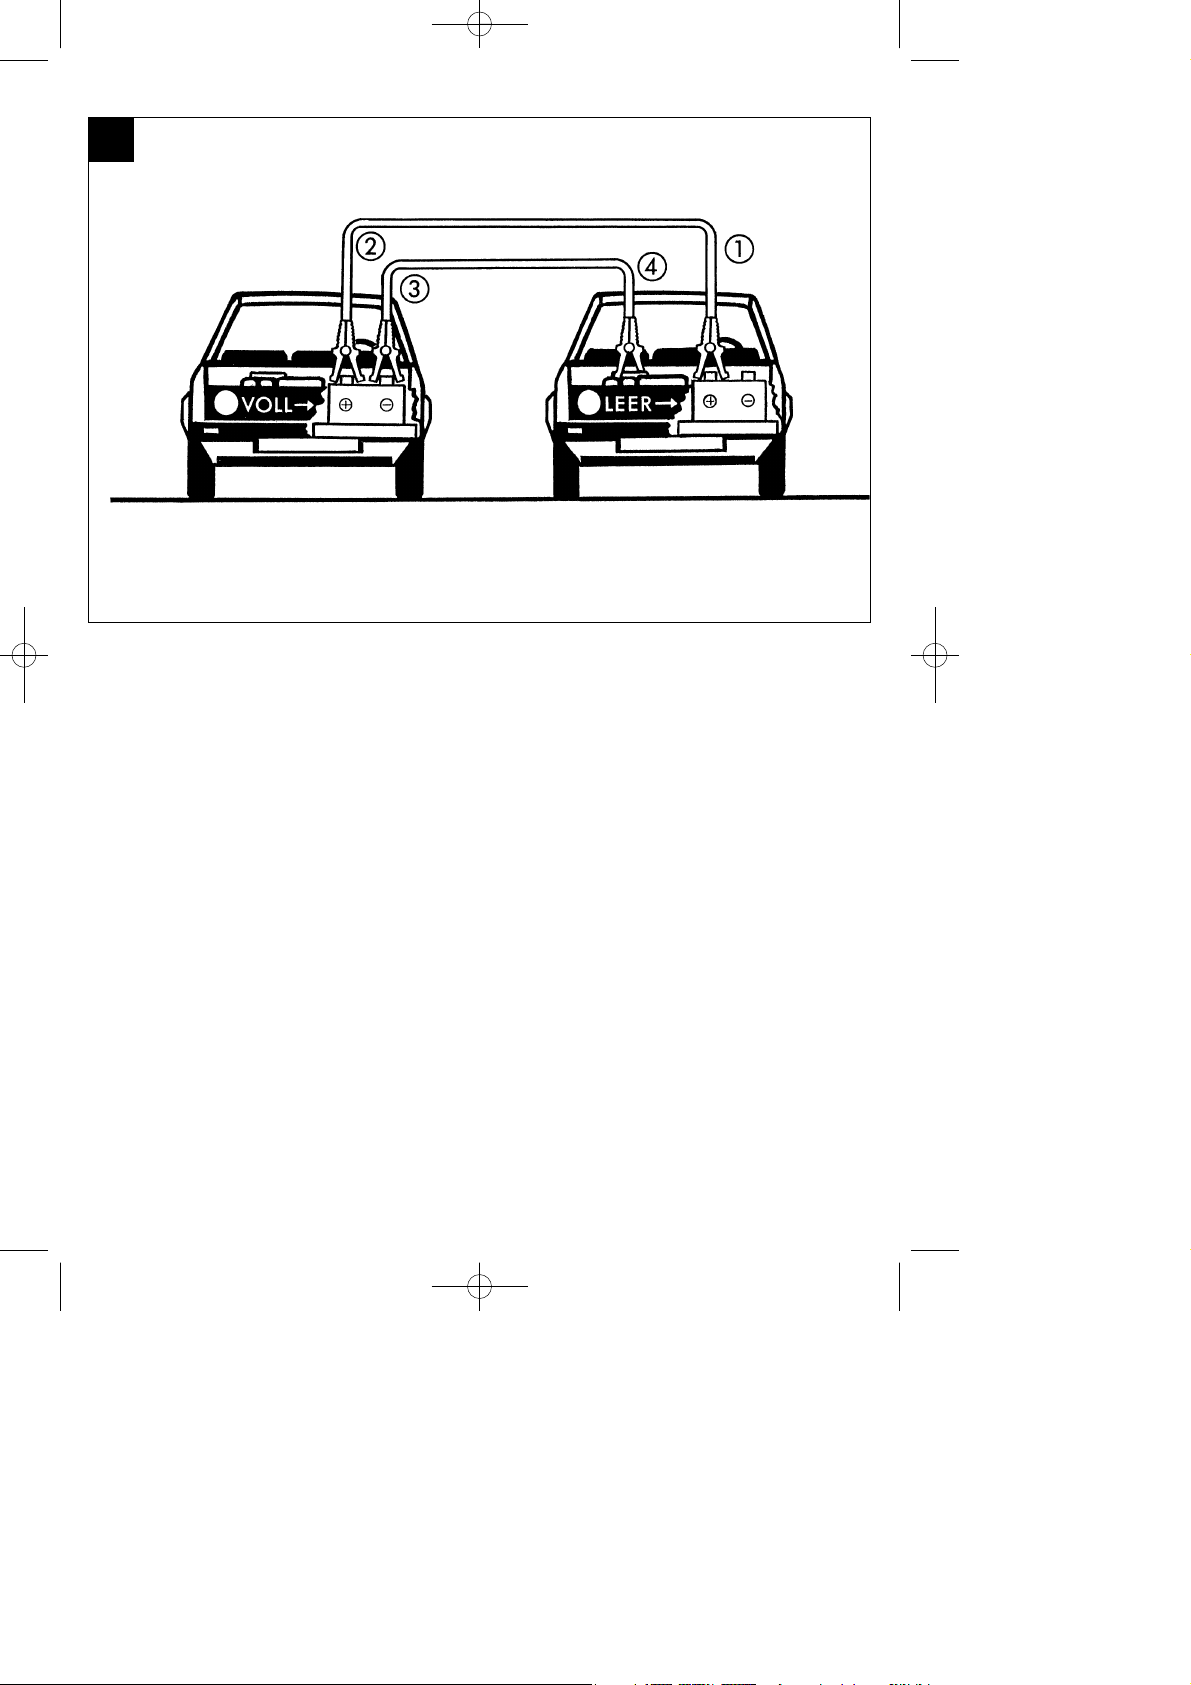
Anklemmen:
Leitung mit den roten Polzangen zuerst am Pluspol
der entladenen Batterie (siehe Bild/Position 1) und
dann am Pluspol der Spenderbatterie (siehe
Bild/Position 2) anklemmen. Anschliessend die
Leitung mit den schwarzen Polzangen am Minuspol
der Spenderbatterie (siehe Bild/Position 3) und
danach an die Fahrzeugmasse des
liegengebliebenen Fahrzeuges, z.B. am Masseband
oder einer anderen blanken Stelle am Motorblock
(siehe Bild/Position 4), soweit wie möglich von der
Batterie entfernt anklemmen, um das Zünden von
möglicherweise entwickeltem Knallgas zu
verhindern.
Starten:
Danach Motor des Spenderfahrzeugs starten und auf
mittlere Drehzahl bringen. Anschliessend Motor des
liegengebliebenen Fahrzeugs starten. Nach einem
Startvorgang, der nicht länger als 15 Sekunden
dauern soll, ist eine Wartezeit von 1 Minute
einzulegen.
Abklemmen:
Wenn der Motor rund läuft (nach 2 bis 3 Minuten)
Starthilfekabel in umgekehrter Reihenfolge
abklemmen: Zuerst schwarze Polzange vom
Masseband oder Motorblock des liegengebliebenen
Fahrzeuges abnehmen (siehe Bild/Position 4). Dann
die andere schwarze Polzange vom Minuspol der
Spenderbatterie (siehe Bild/Position 3) und
anschliessend die beiden roten Polzangen in
beliebiger Reihenfolge abnehmen.
Technische Daten:
BT-BO 16 A
Querschnitt 25 mm
2
Länge 3 m
geeignet für Ottomotoren mit max. 2500 ccm (12 V
oder 24 V Batterie
BT-BO 25 A
Querschnitt 40 mm
2
Länge 3,5 m
geeignet für Ottomotoren mit max. 5500 ccm und
Dieselmotoren mit max. 3000 ccm (12 V oder 24 V
Batterie
Hinweise:
Starten von Katalysator-Autos
Bei nicht startfähiger Batterie den Motor nur mit
Starthilfekabel und Spenderbatterie starten. Durch
Anschieben oder Abschleppen kann Benzin in den
Auspuff gelangen und den Katalysator beschädigen.
Vor dem Abklemmen einen großen Stromverbaucher
einschalten, um Spannungsspitzen in der Bordelektronik zu vermeiden. Bedienungsanleitung des
Autos bzw. der Zusatzgeräte (wie z.B. Autotelefon,
Bordcomputer usw.) auf eventuelle Hinweise zur
Ladung der Batterie und zur Starthilfe beachten.
D
3
Anleitung_BT_BO_16A_25A_SPK7:Anleitung LE-CU III 16 mm2 14.05.2009 14:25 Uhr Seite 3

It is vital to make sure that
쎲 the capacitance of the battery supplying the
power (e.g. 45 Ah) does not lie substantially
below that of the discharged battery;
쎲 only batteries of identical nominal voltage (e.g.
12 V) are connected together;
쎲 there is no contact between the body work of the
vehicles involved (risk of short-circuiting);
쎲 sources of ignition (e.g. naked lights, burning
cigarettes or electric sparks) are kept away from
the batteries (risk of detonation) and that you
avoid bending over the batteries due to risk of
caustic burns;
쎲 the electrolyte of the discharged battery is still
fluid at low temperature;
쎲 the discharged battery is not disconnected from
its vehicleʼs electric system and that the ignition
of both vehicles is switched off before connecting
up the jumper cables: vehicles with manual
transmissions - place the shift lever in neutral;
vehicles with automatic transmissions - place the
selector lever in position „P“ and pull the hand
brake;
쎲 the leads of the jumper cable cannot get caught
up in any moving parts inside the engine
compartment;
쎲 you know how and in which order you have to
connect and disconnect the jumper cables.
쎲 when you remove the leads of the jumper cable
they do not come into contact with any moving
parts of the engine.
Connecting the jumper leads:
Connect the lead with the red pole clamps first to the
positive pole of the discharged battery (see
Figure/Item 1) and then to the positive pole of the
supplier battery (see Figure/Item 2). Now connect the
lead with the black pole clamps to the negative pole
of the supplier battery (see Figure/Item 3) and then
to ground on the receiver vehicle, e.g. the ground
strap or some other bare point on the engine block
(see Figure/Item 4). Choose a point as far away as
possible from the battery in order to avoid the ignition
of any electrolytic gas which may develop.
Starting:
Start the engine of the supplier vehicle and rev up to
the medium speed range. Then start the engine of
the receiver vehicle. Try for no longer than 15
seconds to start the vehicle, then wait for 1 minute
before trying again.
Disconnecting the jumper leads:
When the engine is running smoothly (after 2 to 3
minutes), disconnect the jumper cables in reverse
order: First disconnect the black pole clamp from the
ground strap or the engine block of the receiver
vehicle (see Figure/Position 4). Then disconnect the
other black pole clamp from the negative pole of the
supplier battery (see Figure/Item 3). Finally, remove
the two red pole clamps in any order.
Technical data:
BT-BO 16 A
Cross cut 25 mm
2
Length 3 m
Suitable for petrol engines with max 2500 cc (12 V or
24 V battery)
BT-BO 25 A
Cross cut 40 mm
2
Length 3.5 m
Suitable for petrol engines with max 5500 cc and
diesel engines with max. 3000 cc (12 V or 24 V
battery)
Notes:
Starting cars with catalytic converters
If the battery is not able to start the engine, only jump
start it with the jump cables and auxiliary battery. If
you attempt to push off the car or tow it, petrol may
get into the exhaust and damage the catalytic
converter. Switch on a large power consumer before
disconnecting so as to prevent voltage surges in the
electrical system. Refer to the ownerʼs manual for the
car or additional equipment (such as car phone, onboard computer, etc.) for instructions on charging the
battery and jump starting.
GB
4
Anleitung_BT_BO_16A_25A_SPK7:Anleitung LE-CU III 16 mm2 14.05.2009 14:25 Uhr Seite 4
 Loading...